1
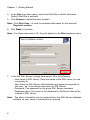
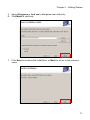
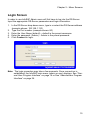
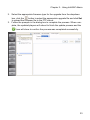
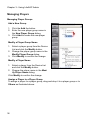
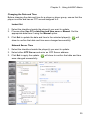
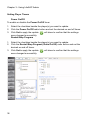
InfoSAP Admin
Software User’s Manual
Version 1.0
Preface
Copyright
This publication, including all photographs, illustrations and software, is protected under international copyright laws, with all rights reserved. Neither this
manual, nor any of the material contained herein, may be reproduced without
the express written consent of the manufacturer.
Version 1.0, January, 2010
Disclaimer
The information in this document is subject to change without notice. The manufacturer makes no representations or warranties with respect to the contents
hereof and specifically disclaims any implied warranties of merchantability or fitness for any particular purpose. Furthermore, the manufacturer reserves the
right to revise this publication and to make changes from time to time in the
content hereof without obligation of the manufacturer to notify any person of
such revision or changes.
i
Preface
ii
Table of Contents
Chapter 1
Getting Started ........................................................... 1
Introduction .......................................................................................... 2
Requirements ...................................................................................... 3
System Requirements ......................................................................... 3
Support Software ................................................................................ 3
Installing Support Software ................................................................. 3
Installing InfoSAP Admin ................................................................. 4
DS-Server Software ............................................................................ 4
InfoSAP Admin Software .................................................................... 9
Chapter 2
Menu Screens .......................................................... 13
User Groups ...................................................................................... 14
Players and Player Groups ........................................................... 14
Login Screen ...................................................................................... 15
General User Program Interface .................................................. 16
Menu Descriptions ............................................................................ 16
Main Screen ...................................................................................... 17
Content Publish ................................................................................. 18
Player Management .......................................................................... 19
Instant Message ................................................................................ 20
FTP Setting ....................................................................................... 21
Log .................................................................................................... 22
System Setting .................................................................................. 23
About ................................................................................................. 23
Logout ............................................................................................... 23
Exit .................................................................................................... 23
Administrator Program Interface .................................................. 24
Menu Descriptions ............................................................................ 24
iii
Table of Contents
Main Screen ...................................................................................... 25
Player Management .......................................................................... 26
Login Setting ..................................................................................... 27
About ................................................................................................. 27
Logout ............................................................................................... 27
Exit .................................................................................................... 27
Chapter 3
Using InfoSAP Admin ...............................................29
General User Functions ................................................................. 30
Changing the Operating Language ................................................... 30
Linking an FTP Server to a Player or Player Group .......................... 30
Updating Players ............................................................................... 31
Manual Update ............................................................................. 31
Daily Auto Update ........................................................................ 32
Firmware Upgrade ....................................................................... 32
Managing Players ............................................................................. 34
Managing Player Groups ............................................................. 34
Add a New Group ........................................................................ 34
Modify a Player Group Name ....................................................... 34
Modify a Player Name .................................................................. 34
Assign a Player to a Player Group ............................................... 34
Changing the Date and Time ....................................................... 35
Setting Player Timers ................................................................... 36
Reboot / Reset to Factory Default ................................................ 37
Player Status ................................................................................ 38
Instant Messages .............................................................................. 39
FTP Settings ..................................................................................... 40
Adding an FTP Server ................................................................. 40
Device Logs ...................................................................................... 41
Viewing a Player Log ................................................................... 41
System Settings ................................................................................ 42
Assigning Players ........................................................................ 42
Changing Passwords ................................................................... 43
Administrator Functions .................................................................. 44
Player Management .......................................................................... 44
Add a User ................................................................................... 44
Modify a User Password .............................................................. 44
iv
Table of Contents
Delete a User ............................................................................... 44
Assign a Player ............................................................................ 44
Change Admin Password ................................................................. 46
Chapter 4
Frequently Asked Questions .................................... 47
v
Table of Contents
vi
Chapter 1
Getting Started
This chapter describes the steps necessary to install InfoSAP Admin.
1
Chapter 1 - Getting Started
Introduction
InfoSAP Admin is purpose-built to control a number of Optoma SignShow
D5000 advanced digital signage systems over a Wide Area Network (WAN).
InfoSAP Admin controls your digital signage network from a single location,
whether your signage system covers a single location or stretches across the
globe.
InfoSAP Admin utilizes a server called DS-Server v.2 to give the user access to
any D5000 no matter where the player is in the world. InfoSAP Admin comes in
two parts, the Client Application and the Database (DS-Server), the client is
installed on any PC/Laptop with Internet access, and DS-Server is installed on
Microsoft Widows Server with SQL Server.
The InfoSAP Admin interface is exceptionally intuitive and time-efficient. This
allows for the creation of Creator content can be published at the click of a button to a single SignShow player or any combination of grouped players across
your network.
2
Chapter 1 - Getting Started
Requirements
Before beginning InfoSAP Admin installation procedure, ensure that the following system requirements are met.
System Requirements
•
•
•
•
•
•
•
•
•
Pentium 4 2.0GHz or above
512 MB RAM or above
Windows Server 2003 SP1 or above
IIS 5.1 or above
.NET framework 3.5
DirectX 9.0C or above
MS SQL Server 2005 SP2 (or express edition) or above
SQL Server Management Studio 2005 Express or above
30 MB available hard disk space
Support Software
The following software packages are required before installing The InfoSAP
Admin software package:
•
•
•
SQL Server 2005 Express Edition or above with Management Studio
MSXML6 or above
IIS 5.1 or above
Installing Support Software
Before installing DS-Server, the PC/Server must have IIS, MSXML and SQL
Server installed.
When installing SQL Server, ensure that Mixed Mode is selected as the
authentication mode to ensure your database security settings can be managed appropriately.
3
Chapter 1 - Getting Started
Installing InfoSAP Admin
To install the InfoSAP Admin software, double-click setup.exe.
DS-Server Software
The application is a two stage process. DS-Server must be installed first to provide the database foundation for the InfoSAP application.
1. Click Install DS-Server to begin the application process. The DSServer4.0
Setup Wizard will open.
4
Chapter 1 - Getting Started
2. Click Next to continue the setup.
3. After reading the license agreement, check the radio button next to “I
Agree” and click Next to continue. The Select Installation Location screen
appears.
5
Chapter 1 - Getting Started
4. In the Site drop-down menu, select the Web Site to install, otherwise
Default Web Site is selected.
5. Click Browse to select the drive location.
Note: Click Disk Cost... to view the available disk space for the selected
Physical Location.
6. Click Next to continue.
Note: If multiple sites exist in IIS, they will display in the Site dropdown menu.
7. In the Set SQL Server Linkage Parameters, fill in the following:
- Host name of SQL Server: Enter the name of the SQL server you are
connecting to.
- User Name of SQL Server: Administrative privileges are required for
this user. “sa” is the default username for SQL Server.
- Password: The password for the given SQL Server username.
- Database name: The name of the database for DS-Server that will be
created in SQL Server.
Note: The above information can be retrieved from the SQL Server database
software on your server if confirmation is required.
6
Chapter 1 - Getting Started
8. Click Close to exit the DS-Server install dialog.
7
Chapter 1 - Getting Started
Note: To test that DS-Server was installed correctly, navigate to “http://<DSServer Address>/DSServer/Version.htm” on another workstation. If successful, the version of DS-Server you installed will show on the web
page.
IMPORTANT: Use Windows Update to download any updates for the .NET
Framework as they may be critical for DS-Server.
8
Chapter 1 - Getting Started
InfoSAP Admin Software
Once you complete the DS-Server setup you will be returned to the software
setup window. Click Install InfoSAP Admin.
Note: If you do not yet have Microsoft .NET Framework 3.5 installed on your
system it will be installed at this point. Follow the on-screen instructions
to install the software. When complete the installer will return to the
InfoSAP Admin setup wizard.
1. Click Next to continue past the Welcome screen.
2. Enter your name and product serial number. Click Next to continue.
9
Chapter 1 - Getting Started
3. After reading the license agreement, check the radio button next to “I
Agree” and click Next.
4. Click Browse to select the drive location.
Note: Click Disk Cost... to view the available disk space for the selected
Physical Location.
10
Chapter 1 - Getting Started
5. Select Everyone or Just me to designate user authority.
6. Click Next to continue.
7. Click Next to continue the installation, or Back to return to the previous
menu.
11
Chapter 1 - Getting Started
8. When installation is complete, click Close to end the installation process.
InfoSAP Admin software is now installed.
12
Chapter 2
Menu Screens
InfoSAP Admin and DS-Server work together to connect FTP based content to
your D5000 Players across a WAN. This section will guide you through the various components of InfoSAP Admin and their functions.
InfoSAP Admin has two main login categories: General users and Administrator. Administrators can create, modify and delete users from the system and
assign players to different users. General users can manage all other player
functions.
To run InfoSAP Admin click the
icon on the desktop or start menu.
13
Chapter 2 - Menu Screens
User Groups
InfoSAP Admin has two main login categories: General users and Administrator. Administrators can create, modify and delete users from the system and
assign players to different users. See “Administrator Program Interface” on
page 24. General users can update content to players, manage some player
settings, send instant messages, manage FTP settings and work with player
logs. See “General User Program Interface” on page 16.
Players and Player Groups
InfoSAP Admin allows you to manage players individually and in groups.
Grouping players will allow software functions to be applied to multiple players
simultaneously, See “Player Management” on page 19.
14
Chapter 2 - Menu Screens
Login Screen
In order to use InfoSAP Admin users will first have to log into the DS-Server.
Input the appropriate DS-Server parameters and login information.
1. In the DS-Server drop-down menu, type in or select the DS-Server address
(example shown: 192.168.1.110)
2. Type the Port number (example shown: 80)
3. Enter the User Name (default) – default is the preset username.
4. Enter the password: (Admin) – Admin is the preset password.
5. Click Connect to login.
Note: The login procedure may take a few moments. Once connection is
established, the InfoSAP main menu (admin or user) displays. See “General User Program Interface” on page 16 or See “Administrator Program
Interface” on page 24.
15
Chapter 2 - Menu Screens
General User Program Interface
The program interface for InfoSAP Admin consists of a button bar along the left
side of the window and various tools and working areas depending on which
menu is active.
Menu Descriptions
Select Interface Language.
Update content to players or player groups.
Manage players and player groups.
Send instant messages to players or player groups.
Manage FTP servers.
View history and configuration information for players.
Assign players to different users and update login settings.
View version and build information.
Log out of the software without exiting.
Log out and exit the software.
16
Chapter 2 - Menu Screens
Main Screen
The Main menu allows users to change the operating language of the software.
Click the dropdown menu to change the language. See “Changing the Operating Language” on page 30.
17
Chapter 2 - Menu Screens
Content Publish
Content Publish allows you to publish defined content to players or groups.
Before publishing can take place, you must associate an FTP server to a player
or group.
Device List
The Device List displays all players and player groups that are connected to the
DS-Server. See “Manual Update” on page 31.
FTP List
The FTP List displays all FTP servers that are linked to the DS-Server. See
“Daily Auto Update” on page 32.
Working Area
The working Area is divided into 3 frames:
Manual Update - Allows users to manually update content to selected
players.
Daily Auto Update - Allows users to schedule when auto content updates
take place.
18
Chapter 2 - Menu Screens
Firmware Upgrade - When firmware upgrades are available from Optoma
they can be applied to players through this interface.
See “Firmware Upgrade” on page 32.
Player Management
Player Management allows you to organize players and player groups and
modify global settings such as date and time.
Button Bar
The Button Bar allows users to Add, Modify, or Delete players or player
groups from the Device List. See “Managing Player Groups” on page 34.
Device List
The Device List displays all players and player groups that are connected to the
DS-Server. See “Managing Player Groups” on page 34.
FTP List
The FTP List displays all FTP servers that are linked to the DS-Server. See
“Managing Player Groups” on page 34.
19
Chapter 2 - Menu Screens
Working Area
The working Area is divided into 4 frames:
Date/Time - Allows users to modify the date and time for selected players.
See “Changing the Date and Time” on page 35.
Timer - Allows users to schedule auto power on/off and start/stop for
selected players. See “Setting Player Timers” on page 36.
Reboot - Allows users to reboot selected players or reset to factory
defaults. See “Reboot / Reset to Factory Default” on page 37.
Status List - Displays a status report for selected players. See “Player Status” on page 38.
Instant Message
Instant Message allows you to send a text message to a player or group of
players across your network.
Button Bar
The Button Bar allows users to Select All, or Unselect All from the list of players or player shown in the Device List. See “Instant Messages” on page 39.
20
Chapter 2 - Menu Screens
Device List
The Device List displays all players and player groups that are connected to the
DS-Server. See “Instant Messages” on page 39.
Working Area
Allows users to enter and send an instant message to all selected players. See
“Instant Messages” on page 39.
FTP Setting
FTP Setting allows you to add, modify or delete FTP servers from your system.
FTP List
The FTP List displays all FTP servers that are linked to the DS-Server. See
“FTP Settings” on page 40.
Working Area
Allows users to add, modify or delete FTP servers. See “FTP Settings” on
page 40.
21
Chapter 2 - Menu Screens
Log
Log allows you to view system logs from selected players.
Device List
The Device List displays all players and player groups that are connected to the
DS-Server. See “Device Logs” on page 41
Player Information
Displays information on the selected player. See “Device Logs” on page 41
Working Area
Allows the user to display the log for any online player. See “Device Logs” on
page 41
22
Chapter 2 - Menu Screens
System Setting
System Setting allows Admin users to assign players to different users and
allows regular users to modify their login settings.
Player Assignment
Allows the Admin user to assign players to different users. See “Assigning Players” on page 42.
Login Setting
Allows users to change their passwords. See “Changing Passwords” on
page 43.
About
The About window displays build, copyright and version information.
Logout
Click Logout to logout of InfoSAP Admin without exiting.
Exit
Click to logout of the current user profile and exit the system.
23
Chapter 2 - Menu Screens
Administrator Program Interface
Menu Descriptions
Select Interface Language.
Manage players and player groups.
Assign players to different users and update login settings.
Logout of the software without exiting.
Logout and exit the software.
24
Chapter 2 - Menu Screens
Main Screen
The Main menu allows users to change the operating language of the software.
Click the down arrow on the language dropdown menu to change the language.
See “Changing the Operating Language” on page 30.
25
Chapter 2 - Menu Screens
Player Management
Player Management allows players to be assigned to different users.
User List
The User List displays the various users in the DS-Server and the players
assigned to each user. See “Player Management” on page 44.
Unassigned Player List
The Unassigned Player List displays all players and player groups that are
connected to the DS-Server but not assigned to a particular user. See “Player
Management” on page 44.
26
Chapter 2 - Menu Screens
Login Setting
Login Setting allows users to modify their login and password settings.
Login Setting
Allows users to change their passwords. See “Change Admin Password” on
page 46.
About
The About window displays build, copyright and version information.
Logout
Click Logout to logout of InfoSAP Admin without exiting.
Exit
Click to logout of the current user profile and exit the system.
27
Chapter 2 - Menu Screens
28
Chapter 3
Using InfoSAP Admin
This chapter describes how to use the various functions in InfoSAP Admin.
29
Chapter 3 - Using InfoSAP Admin
General User Functions
Changing the Operating Language
To change the Operating Language, select your desired language in the dropdown menu in the Main window.
Linking an FTP Server to a Player or Player Group
To assign an FTP Server to a player or player
group navigate to the Content Publish window
and drag the desired FTP server from the FTP
List onto the desired target player or player group
in the Device List as illustrated.
Confirmation that the link was successful is evidenced when the FTP Server is shown in square
brackets beside the player name:
e.g.: Player One [FTP Data Server One]
30
Chapter 3 - Using InfoSAP Admin
Updating Players
Manual Update
Before updating content to a player or player group, ensure that the player is
online and has an FTP served assigned to it.
1. Click the Add button in the Manual Update tab and select the desired
player or player group you would like to update. Multiple players or player
groups can be updated by clicking Add again. To remove items after adding them, select the player or player group and click Delete.
2. Beside each item to be updated, click the
button to select the appropriate schedule file. Repeat for all players or player groups to be updated.
3. When all schedule files have been assigned, click the Upload button to
update the players. Clicking the Cancel button during the upload process
will stop the upload.
Once the schedule file(s) have been uploaded, InfoSAP Admin will automatically download content files to the FTP server, and
upon completion.
will show in the log list
31
Chapter 3 - Using InfoSAP Admin
Daily Auto Update
Before setting up Daily Auto Update to a player or player group, ensure that
the player is online and has an FTP served assigned to it, and that the FTP
server contains one schedule file and the relevant content files.
Note: Daily Auto Update will download all files in the assigned FTP server,
therefore the FTP server must contain only one schedule file.
1. Select the check box beside the players or groups you with to update.
2. Set the appropriate time for the system to update the selected players and
click Set.
will show when updates are complete.
Firmware Upgrade
When firmware upgrades have been received from Optoma, they can be
applied using the Firmware Upgrade tool.
1. Click the checkboxes beside the players or player groups that are to be
updated.
32
Chapter 3 - Using InfoSAP Admin
2. Select the appropriate firmware type for the upgrade from the dropdown
box, click the
button to select the appropriate upgrade file and click Set
to upload the firmware file to the FTP server.
3. Follow the prompts in the dialog box to complete the process. When complete, the updated players will reboot to finish the update process and the
icon will show to confirm the process was completed successfully.
33
Chapter 3 - Using InfoSAP Admin
Managing Players
Managing Player Groups
Add a New Group
1. Click the Add the button.
2. Enter the new player group name in
the New Player Group dialog.
3. Click Add to create the new player
group.
Modify a Player Group Name
1. Select a player group from the Device
List and click the Modify button.
2. Change the player group name in the
Modify Player Group dialog.
3. Click Modify to confirm the change.
Modify a Player Name
1. Select a player from the Device List
and click the Modify button.
2. Change the player name in the Modify Player Name dialog.
Click Modify to confirm the change.
Assign a Player to a Player Group
To assign a player to a player group, drag and drop it to a player group or to
Others as illustrated above.
34
Chapter 3 - Using InfoSAP Admin
Changing the Date and Time
Before changing the date and time for a player or player group, ensure that the
player is online and has an FTP served assigned to it.
Instant Set
1. Select the checkbox beside the player(s) you want to update.
2. Choose either Use PC’s date/time and time zone or Manual. Set the
appropriate date/time if using the Manual option.
3. Click Set to update the date and time to the selected player(s).
show to confirm that date and time were changed successfully.
will
Network Server Time
1. Select the checkbox beside the player(s) you want to update.
2. Select either NTP Server and enter an NTP Server address.
3. Click Set to apply the update.
were changed successfully.
will show to confirm that date and time
35
Chapter 3 - Using InfoSAP Admin
Setting Player Timers
Power On/Off
To enable or disable the Power On/Off timer:
1. Select the checkbox beside the player(s) you want to update.
2. Click the Power On/Off radio button and set the desired on and off times.
3. Click Set to apply the update.
were changed successfully.
Restart/Stop Program
will show to confirm that the settings
1. Select the checkbox beside the player(s) you want to update.
2. Click the Restart/Stop Program (Video On/Off) radio button and set the
desired on and off times.
3. Click Set to apply the update.
were changed successfully.
36
will show to confirm that the settings
Chapter 3 - Using InfoSAP Admin
Reboot / Reset to Factory Default
Reboot Players
1. Select the checkbox beside the player(s) you want to reboot.
2. Click the Reboot button and click Y to confirm.
that the players were reset successfully.
will show to confirm
Reset to Factory Default
1. Select the checkbox beside the player(s) you want to reset.
2. Click the Reboot with Factory Default button and click Y to confirm.
will show to confirm that the players were reset successfully.
37
Chapter 3 - Using InfoSAP Admin
Player Status
To view a status report of the players connected to your database:
1. Click the Open button under the Status List tab.
2. The system will provide a popup status window listing system and configuration information for each online player.
To export a spreadsheet of the status report:
1. Click the Export button under the Status List tab.
2. Input an appropriate file name and folder in the Save As dialog.
38
Chapter 3 - Using InfoSAP Admin
Instant Messages
1. Select the checkbox beside the player(s) you want to send an instant message to.
2. Click the Message radio button under the Instant Message tab and enter
the message you wish to send in the text box. If you wish to send a message that has been sent previously, select the message using the dropdown menu.
3. Click the Set button to send your message.
the instant message was sent successfully.
will show to confirm that
39
Chapter 3 - Using InfoSAP Admin
FTP Settings
Adding an FTP Server
1.
2.
3.
4.
5.
Enter a descriptive name for the FTP server you want to add.
Input the address and port number of the FTP server.
Input the user name and password of the FTP server.
Input the path for your player content files.
Click the Add button to add the FTP server to the FTP List.
Modify an FTP Server
1. Select an FTP Server from the FTP List.
2. Modify the appropriate fields in the working area.
3. Click Modify to apply the changes.
Delete an FTP Server
1. Select an FTP server from the FTP List.
2. Click the Delete button. The FTP server will be removed from the FTP List.
40
Chapter 3 - Using InfoSAP Admin
Device Logs
Viewing a Player Log
1. Select the player in the Device List.
2. Click the Get button in the Log frame. Information on the player’s configuration and location will be displayed in the Player Information frame.
3. To export a log, click the Export to Excel File button and enter an appropriate file name and location in the Enter a descriptive name for the FTP
server you want to add.
4. Input the address and port number of the FTP server.
5. Input the user name and pass Save As dialog box.
41
Chapter 3 - Using InfoSAP Admin
System Settings
Assigning Players
Assigning players requires the Administration Access. Please refer to page
46 for instruction.
42
Chapter 3 - Using InfoSAP Admin
Changing Passwords
1. Enter a new user name if you wish to change it, or leave this field blank if
the user name is to remain the same.
2. Input the password to be changed, and the new password.
3. Click Modify to change the settings.
4. Click Y on the pop-up confirmation box to confirm the changes.
43
Chapter 3 - Using InfoSAP Admin
Administrator Functions
Player Management
Add a User
1. Click the
button.
2. Input a new user name and password in the Add User pop-up window.
3. Click the Add button to add the new user to the User List.
Modify a User Password
1. Select a user from the User List whose password you would like to modify.
2. Click the
button.
3. Input a new password in the Modify User pop-up window.
4. Click the Modify button to confirm the change.
Delete a User
1. Select a user from the User List that you would like to delete.
2. Click the
button.
3. Click Y to confirm your choice in the pop-up confirmation window.
Assign a Player
To assign a player to a different user, drag the player from User List or Unassigned Player List and drop it in it’s new location.
Note: The first time a player is connected to the DS-Server, it is assigned to the
Default user profile. If the Default user profile is deleted, the player is
assigned to the Unassigned Player List. In that case a player must be
assigned to a profile by the Administrator before it can be made available.
44
Chapter 3 - Using InfoSAP Admin
45
Chapter 3 - Using InfoSAP Admin
Change Admin Password
To change the Administrator password:
1. Input the original password, and the new password.
2. Click the Set button.
3. Click Y in the pop-up confirmation box to confirm the change.
46
Chapter 4
Frequently Asked Questions
Q
My language is not available. Can I add it to the software?
A
Additional languages will become available with future editions of the
software.
Q
Why are there no players or FTP servers available when I login to
InfoSAP Admin?
A Check that you are logging in to the correct DS-Server when starting the
software.
Q
Why is one of my players not visible in the player list?
A
Ensure that all connections to the player are made properly and that an
SD card is inserted.
Q
Why is the Export to Excel file button in Status List and Log greyed
out?
A
This button is greyed out when Microsoft Excel is not installed on your
system.
Q
How often are player logs updated?
A
Player logs are updated to the DS-Server every 10 minutes.
47
Chapter 4 - Frequently Asked Questions
Q After logging into InfoSAP Admin, why does the application window not
appear?
A
Check to see that your firewall settings allow InfoSAP Admin access to
your network.
Q
A
Why is one of my FTP servers not visible in the FTP List?
Ensure that the computer hosting the FTP server is turned on and configured properly, then check your FTP settings in InfoSAP Admin to ensure
they match the settings on the host server. If you are still having problems,
check with your system administrator.
48