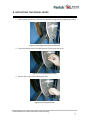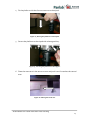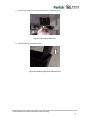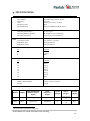
1
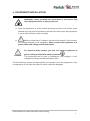
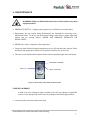
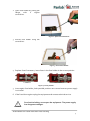
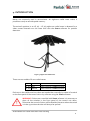
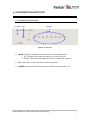
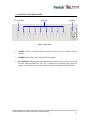
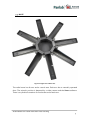
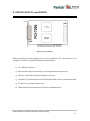
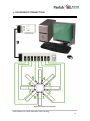
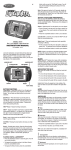
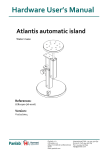
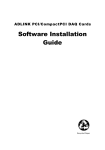
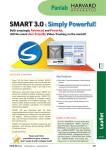
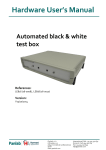
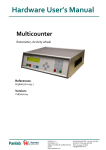
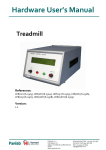
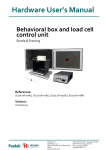
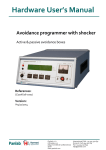
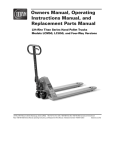
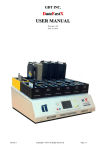
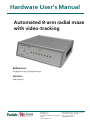
Hardware User’s Manual Automated 8-arm radial maze with video-tracking References: LE767(76-0229), LE769(76-0230) Version: V06/11/2014 Panlab, s.l.u C/Energía, 112 08940 Cornellà de Ll.(Barcelona) Spain www.panlab.com International Calls: +34 934 750 697 Domestic Call: 934 190 709 Fax: +34 934 750 699 [email protected] Limitation of Liability PANLAB does not accept responsibility, under any circumstances, for any harm or damage caused directly or indirectly by the incorrect interpretation of what is expressed in the pages of this manual. Some symbols may have more than one interpretation by professionals unaccustomed to their usage. PANLAB reserves the right to modify, in part or in total, the contents of this document without notice. 1. EQUIPMENT INSTALLATION WARNING: Failure to follow the instructions in this section may cause equipment faults or injury to the user. A. Place the equipment on a flat surface and leave at least 10 cm of free space between the rear panel of the device and the wall. Never place the equipment in zones with vibration or direct sunlight. B. Make sure that the AC voltage in the electrical network is the same as the voltage selected in the equipment. Never connect the equipment to a power outlet with voltage outside these limits. For electrical safety reasons you only can connect equipment to WARNING power outlets provided with earth connections . This equipment can be used in installations with category II overvoltage according to the General Safety Rules. The manufacturer accepts no responsibility for improper use of the equipment or the consequences of use other than that for which it has been designed. Automated 8-arm radial maze with video-tracking 2 2. MAINTENANCE WARNING: Failure to follow the instructions in this section may cause equipment fault. PRESS KEYS SOFTLY – Lightly pressing the keys is sufficient to activate them. Equipments do not require being disinfected, but cleaned for removing urine, faeces and odour. To do so, we recommend using a wet cloth or paper with soap (which has no strong odour). NEVER USE ABRASIVE PRODUCTS OR DISSOLVENTS. NEVER pour water or liquids on the equipment. Once you have finished using the equipment turn it off with the main switch. Clean and check the equipment so that it is in optimal condition for its next use. The user is only authorised to replace fuses with the specified type when necessary. OPENING FLANGE SWITCH FUSE-HOLDER Figure 1. Power inlet, main switch and fuse holder. FUSE REPLACEMENT In case of an over-voltage or other incident in the AC net making it impossible to turn on the equipment, check fuses according to the following procedure. 1 Remove power cord from the power inlet Automated 8-arm radial maze with video-tracking 3 2 Open fuse-holder by pulling the flange with a regular screwdriver Figure 2. Open fuse-holder door. 3 Extract fuse holder using the screwdriver. Figure 3. Extract fuse-holder. 4 Replace fuses if necessary. Insert fuses in the fuse-holder in the correct position. CORRECT INCORRECT Figure 4. Fuses position. 5 Insert again fuse-holder, both possible positions are correct because power supply is universal. 6 If the fuses blow again unplug the equipment and contact technical service. For electrical safety, never open the equipment. The power supply has dangerous voltages. WARNING Automated 8-arm radial maze with video-tracking 4 3. TABLE OF CONTENTS 1. EQUIPMENT INSTALLATION 2 2. MAINTENANCE 3 3. TABLE OF CONTENTS 5 4. INTRODUCTION 6 5. EQUIPMENT DESCRIPTION 7 5.1. CONTROL UNIT FRONT PANEL 7 5.2. CONTROL UNIT REAR PANEL 8 5.3. MAZE 9 6. INSTALLING PCI 7200 BOARD 10 7. EQUIPMENT CONNECTION 11 8. MOUNTING THE RADIAL MAZE 13 9. SPECIFICATIONS 16 Automated 8-arm radial maze with video-tracking 5 4. INTRODUCTION Mazes are commonly used in neuroscience. An eight-arm radial maze makes it possible to study an animal spatial memory. The animal’s position in an LE 767 – LE 769 eight-arm radial maze is detected by a video camera located over the maze that uses the Smart software for position detection. Figure 5. Eight-arm radial maze. There are two models of 8-arm radial mazes: CODE ANIMAL POSITION DETECTION LE 767 Rat Video Camera + Smart software LE 769 Mouse Video Camera + Smart software Each arm in the radial maze has a door activated either manually by means of a switch on the front panel of the control unit or by software using the Smart software. WARNING: If doors are controlled with Smart software it is necessary to place all the switches in the front panel of the control unit down. Otherwise the control of doors will be disabled, because when the switch is in the up position the door will always be opened. Automated 8-arm radial maze with video-tracking 6 5. EQUIPMENT DESCRIPTION 5.1. Control Unit Front Panel POWER ALL DOORS Figure 6. Front panel. DOOR: There are 8 switches, one for each arm of the radial maze. o UP: The door opens when the switch is in the up position. o DOWN: The door closes when the switch is in the down position. ALL: This switch controls all 8 doors at the same time. POWER: Red coloured LED that comes on while the control unit is on. Automated 8-arm radial maze with video-tracking 7 5.2. CONTROL UNIT REAR PANEL PC CONTROL DOORS POWER Figure 7. Rear Panel. DOORS: There is a DB9 female connector for each arm. It is used to control the door. POWER: Power inlet, main switch and fuse holder. PC CONTROL: DB37 female connector used to connect the control unit to the PCI7200 board installed on your PC. Through this connector the signals to open or close the doors with the software are transmitted to the radial maze. Automated 8-arm radial maze with video-tracking 8 5.3. MAZE Figure 8. Eight-arm radial maze. The radial maze has 8 arms and a central area. Each arm has a manually operated door. The animal’s position is detected by a video camera and the Smart software. There is a cylindrical container for food at the end of each arm. Automated 8-arm radial maze with video-tracking 9 6. INSTALLING PCI 7200 BOARD Figure 9. PCI 7200 Board. Before working with the equipment you must install the PCI 7200 board in your computer. In order to install the board proceed as follows. 1) Turn off the computer. 2) Remove the computer box lid by unscrewing the necessary screws. 3) Remove 1 lid of the PCI slots and keep the screws 4) Plug the PCI 7200 board to a free PCI slot and check that it is correctly located. 5) Fix the PCI 7200 board with screws 6) Place again the computer box lid and fix it with the screws Automated 8-arm radial maze with video-tracking 10 7. EQUIPMENT CONNECTION Figure 10. Equipment connection. Automated 8-arm radial maze with video-tracking 11 The necessary cables and connections are listed in the following table: 1 2 3 4 5 6 7 8 9 FROM LE 767 Door 1 LE 767 Door 2 LE 767 Door 3 LE 767 Door 4 LE 767 Door 5 LE 767 Door 6 LE 767 Door 7 LE 767 Door 8 Le 767 PC CONTROL TO Arm 1 Arm 2 Arm 3 Arm 4 Arm 5 Arm 6 Arm 7 Arm 8 PCI 7200 board CABLE Cable DB9 to LUCAS 3 Cable DB9 to LUCAS 3 Cable DB9 to LUCAS 3 Cable DB9 to LUCAS 3 Cable DB9 to LUCAS 3 Cable DB9 to LUCAS 3 Cable DB9 to LUCAS 3 Cable DB9 to LUCAS 3 DB37 cable Automated 8-arm radial maze with video-tracking 12 8. MOUNTING THE RADIAL MAZE 1. Insert the structure arm into the circular base using the corresponding orifices. Figure 11. Inserting the arm in the circular base. 2. Screw the Allen screws into the base to fix the structure arms. Figure 12. Screwing the Allen screws. 3. Secure the screws with a hexagonal key. Figure 13. Securing the screws. Automated 8-arm radial maze with video-tracking 13 4. Fit the platform with the 8 structure arms to the tripod. Figure 14. Placing the platform on the tripod. 5. Secure the platform to the tripod with a hexagonal key. Figure 15. Securing the platform to the support. 6. Place the maze arm in the structure arm and push it until it reaches the central area. Figure 16. Placing the maze arm. Automated 8-arm radial maze with video-tracking 14 7. Secure the maze arm to the structure arm with the screw. Figure 17. Securing the maze arm. 8. Affix the motor mechanism lid. Figure 18. Introducing the motor mechanism lid Automated 8-arm radial maze with video-tracking 15 9. SPECIFICATIONS POWER SUPPLY Input voltage: Frequency: Fuse: Maximum Power: Conducted Noise: Universal input 90 Vac to 264 Vac 50 /60 Hz 2 fuses 5mm*20mm 2A 250V 18 W EN55022 /CISPR22/CISPR16 class B ENVIRONMENTAL CONDITIONS Operating Temperature: Operating Relative Humidity: Storage Temperature: 10° C to +45°C 0% to 85% RH, non-condensing 0°C to +50°C, non-condensing DOOR Time open-closed: Regulation open: Regulation closed: 0.6s (mouse) , 0.75s (rat) Potentiometer P2 Potentiometer P1 CONNECTOR DOOR (DB9 female) Pin 1 5 6 Function Door + 5V DC GND CONNECTOR PC CONTROL (DB37 female) Pin 20 21 22 23 24 25 26 27 36 Function Door 1 Door 2 Door 3 Door 4 Door 5 Door 6 Door 7 Door 8 GND DIMENSIONS(CONTROL UNIT) Width x Height x Depth: Weight: 340mm x 110mm x 340mm 5.44 kg 1 DIMENSIONS (CAGE) : MODEL ANIMAL ARM DIMENSIONS [Width x Height x Depth] BASE [Diameter x Height] DOOR [Height] LE767 Rat 144x345x715 Ø 1249x114.5 90 LE769 Mice 357x201x102 Ø 616x116 50 1 WALLS [Height] From 294 to 41 From 150 to 26 TRIPOD [Height] 850 850 Dimensions are expressed in millimetres Automated 8-arm radial maze with video-tracking 16 DECLARACIÓN DE CONFORMIDAD DECLARATION OF CONFORMITY DECLARATION DE CONFORMITÉ Nombre del fabricante: Manufacturer’s name: Nom du fabricant: Panlab s.l.u. www.panlab.com [email protected] Dirección del fabricante: Manufacturer’s address: Adresse du fabricant: Energía, 112 08940 Cornellà de Llobregat Barcelona SPAIN Declara bajo su responsabilidad que el producto: Declares under his responsibility that the product: Déclare sous sa responsabilité que le produit: RADIAL MAZE Marca / Brand / Marque: PANLAB Modelo / Model / Modèle: LE 767 – LE 769 Cumple los requisitos esenciales establecidos por la Unión Europea en las directivas siguientes: Fulfils the essential requirements established by The European Union in the following directives: Remplit les exigences essentielles établies pour l’Union Européenne selon les directives suivantes: D.C.73/23/CEE D.C.89/336/CEE D.C.93/68/CEE D.C.2002//96/CE Directiva de baja tensión / Low Voltage / Basse tension Directiva de compatibilidad electromagnética y su modificación D.C.92/31/CEE. EMC Modificaciones y marcado CE Residuos de aparatos eléctricos y electrónicos Para su evaluación se han aplicado las normas armonizadas siguientes: For its evaluation, the following harmonized standards were applied: Pour son évaluation, nous avons appliqué les normes harmonisées suivantes: Seguridad / Safety / Sécurité EN 61010-1:2001 EMC: EN 61326:1997/A1:1998 EN 61000-3-2, EN 61000-3-3 EN 61000-4-2, EN 61000-4-3, EN 61000-4-4, EN 61000-4-5, EN 61000-4-6, EN 61000-4-8, EN 61000-4-11 EN 55022/ CISPR22 Clase B / Class B / Classe B En consecuencia, este producto puede incorporar el marcado CE: Consequently, this product can incorporate the CE marking: En conséquence, ce produit peut incorporer le marquage CE: En representación del fabricante: Manufacturer’s representative: En représentation du fabricant: Patricia Carranza Responsable de Calidad / Quality Responsible / Responsable de Qualité Cornellà de Llobregat, 9/01/2007 Automated 8-arm radial maze with video-tracking 17