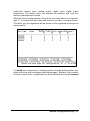
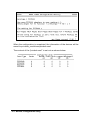
1
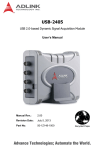
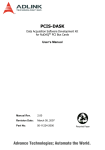
ADLINK PCI/CompactPCI DAQ Cards Software Installation Guide Recycled Paper Copyright 1999~2002 ADLINK Technology Inc. All Rights Reserved. Manual Rev. 4.20: December 12, 2002 Part No: 50-10005-105 The information in this document is subject to change without prior notice in order to improve reliability, design and function and does not represent a commitment on the part of the manufacturer. In no event will the manufacturer be liable for direct, indirect, special, incidental, or consequential damages arising out of the use or inability to use the product or documentation, even if advised of the possibility of such damages. This document contains proprietary information protected by copyright. All rights are reserved. No part of this manual may be reproduced by any mechanical, electronic, or other means in any form without prior written permission of the manufacturer. Trademarks NuDAQ, NuIPC, PCIS-DASK, DAQBench, and PCI series product names are registered trademarks of ADLINK Technology Inc. Other product names mentioned herein are used for identification purposes only and may be trademarks and/or registered trademarks of their respective companies. Getting service from ADLINK • Customer Satisfaction is the most important priority for ADLINK Tech Inc. If you need any help or service, please contact us. ADLINK Technology Inc. Web Site http://www.adlinktech.com Sales & Service Technical Support [email protected] NuDAQ + USBDAQ + PXI [email protected] Automation [email protected] NuIPC [email protected] NuPRO / EBC [email protected] TEL +886-2-82265877 FAX Address 9F, No. 166, Jian Yi Road, Chungho City, Taipei, 235 Taiwan. • +886-2-82265717 Please email or FAX us of your detailed information for a prompt, satisfactory and constant service. Detailed Company Information Company/Organization Contact Person E-mail Address Address Country TEL FAX Web Site Questions Product Model Environment to Use Detail Description Suggestions to ADLINK OS: Computer Brand: M/B: CPU: Chipset: BIOS: Video Card: Network Interface Card: Other: Table of Contents Chapter 1 DOS ........................................................................ 1 1.1 DOS Borland C and Microsoft C Library and Utility............ 1 Chapter 2 Windows 95.......................................................... 4 2.1 2.2 Device Installation ........................................................... 4 Software Driver Installation .............................................. 7 2.2.1 2.2.2 2.2.3 DLL Drivers................................................................................7 LabVIEW Driver - PCIS-LVIEW/95........................................8 VEE Drivers - PCIS-VEE/95...................................................9 Chapter 3 Windows 98/NT/2000/XP.................................10 3.1 Device Installation ......................................................... 10 3.1.1 3.1.2 3.2 Windows 98.............................................................................10 Windows 2000/XP..................................................................11 Software Drivers Installation .......................................... 13 3.2.1 3.2.2 3.2.3 3.2.4 System Requirements...........................................................13 DLL - PCIS-DASK/D2K-DASK.............................................13 LabVIEW Driver - PCIS-LVIEW/D2K-LVIEW.....................17 VEE Drivers - PCIS-VEE/D2K-VEE....................................20 Chapter 4 Linux ....................................................................22 4.1 Software Drivers Installation .......................................... 22 4.1.1 4.1.2 System Requirements...........................................................22 Install PCIS-DASK/X..............................................................22 Chapter 5 NuDAQ Configuration Utility .........................26 5.1 5.2 5.3 Windows NT 4.0 ........................................................... 26 Windows 98/2000/XP .................................................... 28 Linux ............................................................................ 30 Chapter 6 Software Un-Installation .................................33 6.1 6.2 Windows 95/98/NT/2000/XP .......................................... 33 Linux ............................................................................ 33 Chapter 7 Trouble Shooting..............................................34 7.1 7.2 PCI_SCAN Utility .......................................................... 35 Windows 95/98/NT/2000/XP Trouble Shooting................ 36 Warranty Policy ....................................................................40 Table of Contents • i 1 DOS 1.1 DOS Borland C and Microsoft C Library and Utility In the following sections, the PCI-7230/cPCI-7230 is used as an example to illustrate how to install the software utilities and drivers. Installation procedures for other PCI cards are the same as the PCI-7230. Note: The DAQ-2000 series does not have a DOS library. 1. Place the ADLINK All-In-One CD into an appropriate CD-ROM drive. 2. If you’re using a NuDAQ PCI card, type the following commands at the DOS prompt. (X indicates the CD-ROM drive): X:\> CD \NuDAQPCI X:\NuDAQPCI> DOSSETUP If you’re using a Compact PCI DAQ card, then type the following commands at the DOS prompt: X:\> CD \NuIPC X:\NuIPC> DOSSETUP DOS • 1 The following user interface will be loaded to the screen: ADLINK NuDAQ PCI Installation Rev. 3.00 (DOS Version) (C)CopyRight ADLINK Technology Inc. 2000.3.1 PCI6208 PCI6308 PCI7200 PCI7230 PCI7233 PCI7234 PCI7248 PCI7250 PCI7296 PCI7300 PCI7396 PCI7432 PCI7433 Press UP or DOWN key to select a card, or ESC to exit ADLINK PCI6208 DAQ Card ADLINK PCI6308 DAQ Card ADLINK PCI7200 DAQ Card ADLINK PCI7230 DAQ Card ADLINK PCI7233 DAQ Card ADLINK PCI7234 DAQ Card ADLINK PCI7248 DAQ Card ADLINK PCI7250 DAQ Card ADLINK PCI7296 DAQ Card ADLINK PCI7300 DAQ Card ADLINK PCI7396 DAQ Card ADLINK PCI7432 DAQ Card ADLINK PCI7433 DAQ Card Install directory: C:\ADLINK 3. Press Up or Down key to select the card model, then press Enter to continue. Then type the path name where you want the program files to be installed to. ADLINK NuDAQ PCI Installation Rev. 3.00 (DOS Version) (C)CopyRight ADLINK Technology Inc. 2000.3.1 Setup will install PCI6208 in the following directory. To change to another directory, please input the directory that you want to ins tall. C:\ADLINK Press Enter to install, or ESC to back. Install directory: C:\ADLINK 2 • DOS 4. Use Up or Down key to select what kind of the library you want to install. ADLINK NuDAQ PCI Installation Rev. 3.00 (DOS Version) (C)CopyRight ADLINK Technology Inc. 2000.3.1 Press UP or DOWN key to select, or ESC to go back Borland C Library, Samples and Utility Microsoft C Library, Samples and Utility Install directory: C:\ADLINK The installation process is then completed, you can now press the Esc key to exit. After the installation, all the files of the card that you selected will be stored in the installation directory. DOS • 3 2 Windows 95 2.1 Device Installation Windows 95 and the NuDAQ/NuIPC data acquisition cards work very well together because of Windows 95 includes Plug and Play capabilities. Note: The DAQ-2000 series does not have a Windows 95 library. Once Windows 95 has started, the Plug and Play functions of Windows 95 will find and locate the new NuDAQ/NuIPC cards. If this is the first time Windows 95 has operated with the installed NuDAQ/NuIPC cards, Windows 95 will prompt for the device information source. 4 • Windows 95 Click the Next button to continue with the driver installation for the device. The system will initially search the device driver information on FDD A:. After it fails to load the device information from drive A:, the following window is displayed. This window allows you to specify the location of the device information. Place the ADLINK All-In-One CD into the CD-ROM drive then click the Other Locations… button. The following window then is prompted for you to specify the location of the device information. Click the Browse… button to invoke the Browsers’ Folder window, then select the appropriate location of the NuDAQ/NuIPC card’s device information. Windows 95 • 5 The device information files (.INF) are located in X:\Inf\Win95Inf\ <model_number>. (x indicates the CD-ROM drive) For example, the device information for the PCI-7432 is located in X:\Inf\Win95Inf\7432. To determine if the hardware device installation was successful, you can open the Device Manager in Start>>Settings>>Control Panel>>System, and then select the Device Manager tab. Under Device Manager, you should find the device under DAQ. You can double-click the device, select the Resources tab and check if the I/O port and IRQ resources for the device are allocated successfully. 6 • Windows 95 2.2 Software Driver Installation 2.2.1 DLL Drivers step 1. Under Windows 95, place the ADLINK All-In-One CD into the appropriate CD-ROM drive. step 2. If the Autorun setup program is not invoked automatically, manually execute X:\Setup.exe. (X indicates the CD-ROM drive). step 3. Select Driver InstallationàNuDAQ PCIàPCI-7230àWin95 to setup the PCI-7230 DLL for Windows 95. Setup first displays a Welcome dialog box. Click the Next button to continue with the installation. Setup then displays the following dialog box for you to specify the destination directory. The default path is C:\ADLink\7230\w95. If you want to install the PCI-7230 DLL for Windows 95 in another directory, select the Browse… button to change the destination directory. Then click the Next button to begin installing the PCI-7230 DLL for Windows 95. Windows 95 • 7 2.2.2 LabVIEW Driver - PCIS-LVIEW/95 step 1. Place the ADLINK All-In-One CD into the appropriate CD-ROM drive. step 2. If the Autorun setup program is not invoked automatically, manually execute X:\Setup.exe. (X indicates the CD-ROM drive). step 3. Select Software PackageàNuDAQ PCI LVIEWàWin95 to setup the PCI-LVIEW/95. SoftwareàPCIS- Setup will automatically detect the LabVIEW directory and copy the necessary files to the LabVIEW directory. If you don’t have LabVIEW installed on your system or your LabVIEW is of an older version (earlier then version 5.0), Setup will display a dialog box for you to specify the LabVIEW directory. Specify your LabVIEW directory, and then click the OK button. When the installation process is completed, the PCIS-LVIEW/95 directory should contain the following files and sub-directories: Sub-directory Manual <DIR> Help <DIR> Lib <DIR> 6208 <DIR> 7200 <DIR> 7230 <DIR> … 8 • Windows 95 Description PDF manual files, including User Guide and Function Reference. On-line help file A copy of all library files (.llb). These files are also copied to <LabVIEW Dir>\User.lib directory. Example programs for each card. All the PCIS-LVIEW library files should be copied to <LabVIEW Dir>\User.lib. They include 6208.llb, 7200.llb, and 7230.llb, If you don’t find these files in the <LabVIEW Dir>\User.lib directory, please copy them from the <PCIS-LVIEW Dir>\Lib directory. 2.2.3 VEE Drivers - PCIS-VEE/95 step 1. Place the ADLINK All-In-One CD into the appropriate CD-ROM drive. step 2. If the Autorun setup program is not invoked automatically, manually execute X:\Setup.exe. (X indicates the CD-ROM drive). step 3. Select Software PackageàNuDAQ VEEàWin95 to setup PCI-VEE/95. PCI SoftwareàPCIS- When the installation process is completed, the PCIS-VEE/95 directory should contain the following files and sub-directories: File/Sub-directory Manual <DIR> Help <DIR> 7230 <DIR> 7248 <DIR> 7250 <DIR> … Description PDF manual files On-line help file User objects and sample programs for each card Windows 95 • 9 3 Windows 98/NT/2000/XP 3.1 Device Installation Windows 98/2000/XP and the PCI/CompactPCI data acquisition cards work well together because of Windows 98/2000/XP’s Plug and Play capabilities. Once Windows 98/2000/XP has started, the Plug and Play function will find and locate the new PCI/CompactPCI cards. If this is the first time your Windows system is operating with the installed ADLINK DAQ cards, and you haven’t installed the ADLINK Windows 98/2000/XP software drivers (PCIS-DASK, PCIS-LVIEW, D2K-DASK, etc.), you will be informed to install the device drivers. Windows NT is not a Plug and Play system. If you are using Windows NT, please skip this section and go to section 3.2 Software Drivers Installation. 3.1.1 Windows 98 Windows 98 prompts the following window to inform you to install the device driver. Click the Next button to continue with installing the device. The device information files are located in the “Inf\DASK98Inf” directory of the ADLINK All-In-One CD. 10 • Windows 98/NT/2000/XP After installing the ADLINK Windows 98 software driver, the INF files and driver files are copied into its appropriate directories. With the installed Device Information Files (.INF) and Device Driver Files (.SYS), Windows 98 will be able to identify and initiate any data acquisition card automatically at system startup time. After installing ADLINK‘s Windows 98 software driver and re-booting the system, to check if the installation process was a success, you can open the Device Manager in Start>>Settings>>Control Panel>>System, and select the Device Manager tab. In the Device Manager, you should find the device under NuDAQ. Double-click on the device, select the Resources tab to check if the I/O port and IRQ resources for the device are allocated successfully. 3.1.2 Windows 2000/XP Windows 2000/XP prompts the following window to inform you to install the device drivers. Click the Next button to continue with installing the device. The device information files are located in the “Inf\DASK2000Inf” directory of the ADLINK All-In-One CD. Windows 98/NT/2000/XP • 11 After installing ADLINK’s Windows 2000/XP software driver, the INF files and driver files are copied into its appropriate directories. With the installed Device Information Files (.INF) and Device Driver Files (.SYS), Windows 2000/XP will be able to identify and initiate any data acquisition card automatically at system startup time. After installing ADLINK’s Windows 2000/XP software driver and re-booting the system, to check if the installation process was a success, you can open the Device Manager Start>>Settings>>Control Panel>>System, and then select the Hardware tab. In the Device Manager, you should find the device under NuDAQ Boards. Double-click on the device, and select the Resources tab to check if the I/O port and IRQ resources for the device are allocated successfully. 12 • Windows 98/NT/2000/XP 3.2 Software Drivers Installation 3.2.1 • • • • System Requirements An IBM PC/AT or compatibles, running Windows 98/NT/2000/XP A hard disk with enough disk space to install the software driver A CD-ROM drive or 1.44-MB, 3.5-inch floppy disk drive Application development system PCIS-DASK, D2K-DASK: any Windows programming language that allows calls to a DLL, such as Microsoft Visual C/C++, Microsoft Visual Basic, etc. PCIS-LVIEW, D2K-LVIEW : Need National Instruments LabVIEW version 4.0 or later. PCIS-VEE, D2K-VEE: Need VEE version 4.0 or later. • 3.2.2 PCI/cPCI series or DAQ-2000 series data acquisition cards that the software driver supports DLL - PCIS-DASK/D2K-DASK With PCI-xxxx or cPCI-xxxx cards, please use the PCIS-DASK. With the DAQ-2000 series cards, please use D2K-DASK. In the following, we will be using the PCI-7230/cPCI-7230 and DAQ-2010 as example unless otherwise specified to illustrate how to install the Windows 98/NT/2000/XP DLL drivers. The installation procedures for the other PCI cards are the same. step 1. Place the ADLINK Al-In-One CD into the appropriate CD-ROM drive. step 2. If the Autorun setup program is not invoked automatically, manually execute X:\Setup.exe. (X indicates the CD-ROM drive). step 3. PCI-7230/cPCI-7230: Select Driver InstallationàNuDAQ PCIàPCI-7230àWin98/NT/2000/XP to setup the NuDAQ PCI DLL driver (PCIS-DASK). DAQ-2010: Select Driver InstallationàDAQ-2000 seriesàDAQ2010àWin98/NT/2000/XP to setup the DAQ-2000 series DLL driver (D2K-DASK). Windows 98/NT/2000/XP • 13 You can install the PCIS-DASK/D2K-DASK with any one of the following options: • • • Typical: Install all files to the hard disk, including INF files (Win98/2000/XP only), DLL files, driver files, and all sample programs. Compact: Installs a minimum set of files to your hard disk. Only INF files (Win98/2000/XP only), DLL files, and driver files are installed. Custom : The Custom Installation dialog box is displayed for you to select the sample programs of the cards you want to install. The Custom Installation dialog box is shown below. 14 • Windows 98/NT/2000/XP The selective components include Libraries & all sample programs. However, for trouble free operation of the PCIS-DASK or D2K-DASK, Library components are required. Hence Library components MUST be selected. When the software component installation process has completed, Setup will launch the DAQ Configuration Utility, PciUtil or D2kUtil. This utility is provided for configuring the card. Refer to the DAQ Configuration Utility section to learn how use this utility. If you choose the “Typical” option in the “Select Components” window, when the installation process is completed, the installation directory should contain the following files and sub-directories: File/Sub-directory LIB <DIR> INCLUDE <DIR> HELP <DIR> MANUAL<DIR> UTIL<DIR> SAMPLES <DIR> Description Import library and DLL. Pci-Dask.lib or D2K-Dask.lib for Visual C/C++. Pdask_bc.lib or D2kDask_bc.lib for Borland C++. Include files for application programming. DASK.BAS or D2KDASK.BAS for Visual Basic Programming. DASK.H or D2KDASK.H for C/C++ programming. DASK.PAS or D2KDASK.PAS for Delphi programming. On-line help file. PDF manual files, including User Guide and Function Reference. Driver Registry/Config utility. Sample programs browser, Examples.exe, and various sub-directories with sample programs of the cards Note: ADLINK will periodically upgrade the PCIS-DASK and D2K-DASK to add support for new data acquisition cards. Please refer to the Read Me file in the PCIS-DASK/D2K-DASK folder for the current card types that the PCIS-DASK/D2K-DASK actually supports. [Windows 98/2000/XP] After installing the PCIS-DASK/D2K-DASK, the INF files and driver files are copied to its appropriate directories. With the installed Device Information Files (.INF) and Device Driver Files (.SYS), Windows 98/2000/XP will be able to identify and initiate any data acquisition card automatically at system startup time. Windows 98/NT/2000/XP • 15 [Windows NT 4.0] After loading Windows NT and all the devices you wish to operate have been plugged into your computer, make sure the PCIS-DASK/D2K-DASK device drivers corresponding to the cards are started. For the PCISDASK/D2K-DASK to be able to communicate with the DAQ cards, the card’s own device driver (e.g. PCI6208, PCI7200, DAQ2010, etc.) must be started. You can check by opening the “Control Panel”, double-click “Devices”, and a Devices window will be load as shown below. If the device status is none, you have to select the device and then press the Start button. 16 • Windows 98/NT/2000/XP 3.2.3 LabVIEW Driver - PCIS-LVIEW/D2K-LVIEW With the PCI/cPCI series cards, please use PCIS-LVIEW and with the DAQ2000 series cards, please use the D2K-LVIEW. step 1. Place ADLINK Al-In-One CD into the appropriate CD-ROM drive. step 2. If the Autorun setup program is not invoked automatically, manually execute X:\Setup.exe.(X indicates the CD-ROM drive). step 3. PCI/cPCI series: Select Software PackageàNuDAQ PCI SoftwareàPCIS-LVIEWàWin98/NT/2000/XP to install PCISLVIEW. DAQ-2000 series: Select Software PackageàDAQ-2000 Series SoftwareàD2K-LVIEWàWin98/NT/2000/XP to install D2K-LVIEW. Note: D2K-LVIEW needs the D2K-DASK software driver. You must install the D2K-DASK software driver before you’re able to use the D2K-LVIEW VIs. Setup will automatically detect the LabVIEW directory and copy the necessary files to the LabVIEW directory. If you don’t have LabVIEW installed on your system or your LabVIEW is of an older version (earlier then version 5.0), Setup will display a dialog box for you to specify the LabVIEW directory. Specify your LabVIEW directory, and then click the OK button. Windows 98/NT/2000/XP • 17 When the software component installation process has completed, Setup will launch the DAQ Configuration Utility, PciUtil or D2kUtil. This utility is provided for configuring the card. Refer to the DAQ Configuration Utility section to learn how use this utility. When the installation process is completed, the PCIS-LVIEW directory should contain the following files and sub-directories: File / Sub-directory Plv.llb or D2kLv.llb Util <DIR> Manual <DIR> Help <DIR> Menus <DIR> 6208 Samples <DIR> 7200 Samples <DIR> 7230 Samples <DIR> Description A copy of VI library. It is also copied to <LabVIEW Dir>\User.lib directory. DAQ Configuration utility PDF manual files, including User Guide and Function Reference. On-line help file. (PCIS-LVIEW only) .mnu files. They are also copied to <LabVIEW Dir>\Menus directory. Sample programs for each kind of card. … Please check if the following files are copied to your LabVIEW directory. 1. If the Plv.llb/D2kLv.llb file doesn’t exist in the <LabVIEW Dir>\User.lib directory, please copy it from the <Installation Dir>. 2. If the <LabVIEW Dir>\Menus does not have the ADLINK or Daq_2000 sub-directory, or there is no file in these sub-directory, please copy all files in the <Installation Dir>\Menus to <LabVIEW Dir>\Menus\adlink or <LabVIEW Dir>\Menus\Daq_2000 directory. [Windows 98/2000/XP] After installing PCIS-LVIEW/D2K-LVIEW, the INF files and Driver files are copied into appropriate directories. With the well installed Device Information Files (.INF) and Device Driver Files (.SYS), Windows 98/2000/XP system will identify and install any new plugged data acquisition card automatically. 18 • Windows 98/NT/2000/XP [Windows NT 4.0] After loading Windows NT and all the devices you wish to operate have been plugged into your computer, make sure the PCIS-DASK/D2K-DASK device drivers corresponding to the cards are started. For the PCISDASK/D2K-DASK to be able to communicate with the DAQ cards, the card’s own device driver (e.g. PCI6208, PCI7200, DAQ2010, etc.) must be started. You can check by opening the “Control Panel”, double-click “Devices”, and a Devices window will be load as shown below If the device status is none, you have to select the device and then press the Start button. Windows 98/NT/2000/XP • 19 3.2.4 VEE Drivers - PCIS-VEE/D2K-VEE step 1. Place ADLINK All-In-One CD into the appropriate CD-ROM drive. step 2. If the Autorun setup program is not invoked automatically, manually execute X:\Setup.exe. (X indicates the CD-ROM drive). step 3. PCI/cPCI series: Select Software PackageàNuDAQ PCI SoftwareàPCIS-VEEàWin98/NT/2000/XP to install PCIS-VEE. DAQ-2000 series: Select Software PackageàDAQ-2000 Series SoftwareàD2K-VEEàWin98/NT/2000/XP to install D2KVEE. Note: D2K-VEE needs the D2K-DASK software driver. You must install the D2K-DASK software driver before you’re able to use the D2KVEE user objects. When the software component installation process has completed, Setup will launch the NuDAQ PCI Configuration Utility, PciUtil. This utility is provided for configuring the card. Refer to the NuDAQ PCI Configuration Utility section to learn how use this utility When the installation process is completed, the PCIS-VEE directory should contain the following files and sub-directories: File/Sub-directory UserObj Samples <DIR> Util <DIR> Manual <DIR> Help <DIR> Description User objects Sample programs DAQ Configuration utility PDF manual files On-line help file (PCIS-VEE only) [Windows 98/2000/XP] After installing the PCIS-VEE/D2K-VEE, the INF files and driver files are copied to its appropriate directories. With the installed Device Information Files (.INF) and Device Driver Files (.SYS), Windows 98/2000/XP will be able to identify and initiate any data acquisition card automatically at system startup time 20 • Windows 98/NT/2000/XP [Windows NT 4.0] After loading Windows NT and all the devices you wish to operate have been plugged into your computer, make sure the PCIS-DASK/D2K-DASK device drivers corresponding to the cards are started. For the PCISDASK/D2K-DASK to be able to communicate with the DAQ cards, the card’s own device driver (e.g. PCI6208, PCI7200, DAQ2010, etc.) must be started. You can check by opening the “Control Panel”, double-click “Devices”, and a Devices window will be load as shown below If the device status is none, you have to select the device and then press the Start button. Windows 98/NT/2000/XP • 21 4 Linux 4.1 Software Drivers Installation 4.1.1 • • • • System Requirements An IBM PC/AT or compatibles, running Linux Kernel 2.2.12 or later A hard disk with enough disk space to install PCIS-DASK A CD-ROM drive or 1.44-MB, 3.5-inch floppy disk drive Application development system PCIS-DASK: Using the appropriated C/C++ compiler (gcc or cc) to compile the program. • NuDAQ PCI-bus or NuIPC CompactPCI data acquisition cards with PCIS-DASK support. 4.1.2 Install PCIS-DASK/X Step 1. UNPACK Place ADLINK All-In-One CD into the appropriate CD-ROM drive. Decompress the file (TGZ file) in the /Software/PCIS-DASK/Linux directory according to your Linux version of your system. Refer to the file /Software/Pcis-dask/Linux/Readme.txt to identify which version of Linux the file supports. ex. 22 • Linux tar xvzf pci-dask_320.2.2.18.tgz This will extract the pci-dask_xxx ( where ‘xxx’ in pci-dask_xxx is the version number ) directory with the following subdirectories: \ File/Sub-directory lib <DIR> Include <DIR> drivers <DIR> docs<DIR> samples<DIR> util<DIR> Description PCIS-DASK shared library . libpci-dask.so for linux. Include files for application programming. dask.h for C/C++ programming. Kernel modules for NuDAQ PCI-cards. High_Memory Management Module Installation Script. PDF manual files, including User Guide and Function Reference. Some sample programs for NuDAQ device. Driver Configuration utility. Step 2. RESERVE MEMORY. Note: If you DO NOT perform any continuous operation, you can skip this step and jump to step3. For contiguous memory allocation, we reserve memory in the upper memory space. Users need to pass a command line argument to the kernel. There are two ways to do this. (suppose you have 64MB RAM and want to reserve 4MB memory for devices) 1. Insert “mem ” keyword to boot loader configuration file. a) If you use LILO as boot loader, you can add "append=" statement to the file “/etc/lilo.conf”. In file “lilo.conf”: boot=/dev/hda prompt image=/boot/vmlinuz-2.2.12-20 label=linux initrd=/boot/initrd-2.2.12-20.img read-only root=/dev/hda9 append="mem=60M" Linux • 23 b) If you use GRUB as boot loader, add “mem=” statement to the file “/etc/grub.conf” default=0 timeout=10 splashimage=(hd0,1)/boot/grub/splash.xpm.gz title Red Hat Linux (2.4.18-3) root (hd0,1) kernel /boot/vmlinuz-2.4.18-3 ro root=/dev/hda1 mem=60M Note: You have to manually execute the /sbin/lilo to make the setting active. Linux does not reserve memory for you automatically. 2. You can specify this command line arguments to the interactive prompt at boot time. a) LILO LILO: linux mem=60M b) GRUB i. Press ‘a’ to modify the kernel arguments. ii. ro root=/dev/hda1 mem=60M Step 3. DEVICE INSTALLATION Because of the architecture of the PCI bus, the NuDAQ PCI devices can be detected automatically. All the user has to do is insert the modules and make nodes for th e devices. You can do this manually, or use the applets we provide. • pci-dask_xxx/util/dask_conf for driver configuration • pci-dask_xxx/drivers/dask_inst.pl for driver installation The dask_conf can configure the device drivers, and save the devices information into pcidask.conf. (Please refer to section 5.3). From the configuration file, pcidask.conf, the installation script inserts the device modules configured before and the memory management module if required. Then the script makes the device nodes according to the number of cards. To start installation, execute the script as follows: <InstallDir>/pci-dask_xxx/drivers/dask_inst.pl 24 • Linux Step 4. INSTALL LIBRARY The library is provided as a shared library for Linux. To install the library, type the following command: cp libpci_dask.so /usr/lib In addition, dask_inst.pl also involves the installation for the library. Linux • 25 5 NuDAQ Configuration Utility The DAQ Configuration Utility, PciUtil or D2kUtil, is used to set/modify the allocated buffer sizes for continuous AI, AO, DI and DO operations. 5.1 Windows NT 4.0 The main window of the DAQ Configuration utility is shown below. With Windows NT systems, if any PCI card drivers have been registered, it will show in the Registered Drivers list. 26 • NuDAQ Configuration Utility To register a PCI card driver, click the New… button, and a Driver Configuration window will appear. In this window, users can select the driver they want to register and input the parameters in the box corresponding to the AI, AO, DI, or DO for the requirement of your application. The “Buffer Allocated” for AI, AO, DI, DO represents the size of the contiguous Initially Allocated memory for continuous analog input, analog output, digital input, digital output respectively. Its unit is Kbytes, i.e. 1024 bytes. The Device driver will try to allocate the memory size at system startup time. If the system is not able to provide the memory size specified, the device driver will allocate the largest possible size it can. You can use AI/DI/DO_InitialMemoryAllocated function to retrieve the memory size allocated. Only the fields that are available to the card are enabled, the others are grayed out. The size of the initially allocated memory is the maximum memory size the DMA or Interrupt transfer can perform. Unexpected errors will result if the DMA or Interrupt transfer exceeds the initially allocated size. After the device configurations of the driver you have selected are completed, click the OK button to register the driver and return to the main window. The driver you just regis tered will be shown in the registered drivers list as shown in the figure to the right. You can now exit the registration utility using the EXIT command in NuDAQ Configuration Utility • 27 the menu bar or click the Done button. To activate the registered drivers you need to restart your Windows NT system. 5.2 Windows 98/2000/XP The main window of the DAQ Configuration utility, PciUtil or D2kUtil, is shown below. In this window, users can select the driver they want to register and input the parameters in the box corresponding to the AI, AO, DI, or DO for the requirement of your application. The “Buffer Allocated” for AI, AO, DI, DO represents the size of the contiguous Initially Allocated memory for continuous analog input, analog output, digital input, digital output respectively. Its unit is Kbytes, i.e. 1024 bytes. The Device driver will try to allocate the memory size at system startup time. If the system is not able to provide the memory size specified, the device driver will allocate the largest possible size it can. You can use AI/DI/DO_InitialMemoryAllocated function to retrieve the memory size allocated. Only the fields that are available to the card are enabled, the others are grayed out. The size of the initially allocated memory is the maximum memory size the DMA or Interrupt transfer can perform. Unexpected errors will result if the DMA or Interrupt transfer exceeds the initially allocated size 28 • NuDAQ Configuration Utility After the device configurations of the driver you have selected are completed, click the OK button to register the driver and return to the main window. The driver you just registered will be shown in the registered drivers list. You can now exit the registration utility using the EXIT command in the menu bar or click the Done button. To activate the registered drivers you need to restart your Windows 98/2000/XP system NuDAQ Configuration Utility • 29 5.3 Linux dask_conf is used for users to configure the PCIS-DASK drivers, removing the configured drivers, and setting/modifying the allocated buffer sizes for the AI, AO, DI and DO. The default location of this utility is pci-dask_xxx/util directory. The dask_util main screen is shown below. If any PCIS-DASK card driver(s) have been registered, it will show in the Registered Drivers list To configure one of the PCIS-DASK drivers, type the number corresponding to the Card Type and a Driver Configuration screen appears. In this screen, users can input the number of cards and the buffer size for continuous operation. The buffer size is set on the memory-page. The PAGE_SIZE is four kilo-byte per page. The “Memory Pages” for the AI, AO, DI, DO represent the page sizes of contiguous Initially Allocated memory for 30 • NuDAQ Configuration Utility continuous analog input, analog output, digital input, digital output respectively. The device driver will allocate the memory size from the memory management module. After the device configurations of the driver you have select is completed, type “Y” to confirm the input data and return to the dask_conf main screen. The driver you just registered will be shown in the registered drivers list as shown below: To modify the configuration, including number of cards and the buffer size, select the driver and re-configure the settings again. Similarly, if the number of cards is set to zero, configuration for the selected driver will be removed. NuDAQ Configuration Utility • 31 When the configuration is completed, the information of the devices will be saved to pci-dask_xxx/drivers/pcidask.conf. The content of the "pcidask.conf" is set out as shown below: 32 • NuDAQ Configuration Utility 6 Software Un-Installation 6.1 Windows 95/98/NT/2000/XP All ADLINK Windows 95/98/NT/2000/XP software can be easily be uninstalled. To un-install a software, open the Control Panel, double-click Add/Remove Programs, select the software you want to un-install. 6.2 Linux To remove PCIS-DASK for Linux, execute the Un-installation script, dask_remove.pl, in the pci-dask/util directory. Then the script will remove the device nodes made in /dev and the library copied into /usr/lib. Software Un-Installation • 33 7 Trouble Shooting A PCI card installation problem may occur under any of the following situations: 1. BIOS Setting. 2. BIOS Compatibility. 3. Operating System Device Driver Installation. 4. Operating System Compatibility. 5. Software Library Installation. 6. Hardware failure. 34 • Trouble Shooting 7.1 PCI_SCAN Utility A software utility "PCI_SCAN.EXE" is included in the ADLINK All-In-One CD to help you with diagnosing any PCI card installation problems. It is located in the \Utility\PCI_SCAN\DOS directory. You can also download it from our web site, http://www.adlink.com.tw. This utility runs under a DOS system. It is used for diagnosing BIOS compatibility and DOS installation problems. For the operating system device driver installation and operating system compatibility problem within the Windows system, refer to section 7.2. (a) What problem can be diagnosed using "PCI_SCAN.EXE"? PCI_SCAN utility is used primarily to list the BIOS setting. It does not solve installation problem, but can be use to list the systems PCI resources, check if the BIOS has assigned the correct resources to your PCI I/O cards, and check if the BIOS assignments conflict with other resources of different I/O devices. (b) How to use this utility? Whenever your install card does not function probably, please run this utility at first. 1. When the system is powered on, the BIOS assign resources to the PCI add-on card. 2. This utility must run under a pure DOS environment. It calls the BIOS to list all the PCI resources in your computer, and displays the information to the screen. 3. It logs the BIOS setting to the file "PCI_SCAN.LOG". 4. Some operating systems (like Windows 98) may change the BIOS default setting, the I/O card resources under Windows 98 or NT may differ from that under a pure DOS environment. Therefore, we recommend you run this utility under a pure DOS environment. (c) What is the log file used for? If there is an installation problem, please send us the log file. We can help with diagnostics if its is related to a BIOS compatibility problem. Trouble Shooting • 35 7.2 Windows 95/98/NT/2000/XP Trouble Shooting Situation1: After installation and restarting Windows NT, the device doesn’t work. Actions: 1. Does the driver appear in the registry list or not? If not, use the DAQ configuration utility, PciUtil or D2kUtil to add the device to the registry. Please refer to the DAQ Configuration Utility chapter for operation details. 2. If the driver is listed in the registry, check the device status in Devices window (Control Panel>>Devices). If the device status is none, activate it using the following steps: (1) Select the device and then press the Start button. (2) If the device does not started after pressing the Start button, record the error message shown. (3) Run the Ntfdpci utility. This utility is located under the \Utility\PCI_SCAN\NT directory of the ADLINK All-In-One CD. Install the utility, RE-START the system and run Ntfdpci.exe in the installed directory. (4) A log file NtPci.dat is generated after running the Ntfdpci.exe program. Send us this log file and the error message obtained from step (2). This will help us diagnose the problem with your card. Situation2: After installation and restarting Windows 98/2000/XP, the device doesn’t work. Actions: 1. Is the device installed or not? If the device was installed correctly using the correct INF file, you should be able to find this device under NuDAQ class (win98) or NuDAQ Boards class (Win2000/XP) in the Device Manager. If not, Windows might have classified the NuDAQ PCI or NuIPC CompactPCI DAQ device as a generic device and installed it in the Device Manager under Other Devices. ADLINK Windows 98/2000/XP software drivers do not recognize the device as a valid DAQ device. 36 • Trouble Shooting 2. Follow these steps to correct the problem: (1) Open the Windows Device Manager. a. From the Start menu, select Settings>>Control Panel. b. From the Control Panel, double-click on System. c. In the System Properties dialog box, select the Device Manager tab. (2) Under Other Devices, remove the entries that correspond to your DAQ devices. (3) Restart your system. Windows will try to re-identify all of your PCI or CompactPCI DAQ devices. Then follow the installation procedures for the device driver according to the Device Installation section of Windows 98/NT/2000/XP of chapter 3. (4) If the problem still persists, please run the PCI_SCAN utility under a pure DOS environment, and send us the log file and any information from the Device Manager. Situation3: After installation and restarting Windows 95, the device doesn’t work. Actions: 1. Is the device installed or Not? If the device was installed correctly by using the correct INF file, you should be able to find this device under DAQ class in the Device Manager. If not, Windows 95 may have classified the NuDAQ PCI or NuIPC CompactPCI DAQ device as a generic device and installed it in the Device Manager under Other Devices. Windows 95 DLL for this device will not recognize the device as a valid DAQ device. 2. Follow these steps to correct the problem: (1) Open the Windows 95 Device Manager. a. From the Start menu, select Settings>>Control Panel. b. From the Control Panel, double-click on System. c. In the System Properties dialog box, select the Device Manager tab. (2) Under Other Devices, remove the entries that correspond to your DAQ devices. Trouble Shooting • 37 (3) Restart your system. Windows 95 will try to re-identify all of your PCI or CompactPCI DAQ devices. Then follow the installation procedures for the device driver according to the Device Installation section of Windows 95 of chapter 3 (4) If the problem still persists, please run the PCI_SCAN utility under a pure DOS environment, and send us the log file and any information from the Device Manager. Situation 4: If you want to use ADLINK Windows 98 software drivers (PCIS-DASK, PCIS-VIEW, DAQBench, etc.), but the devices have been installed with Windows 95 software library? Actions: 1. Open the Windows 98 Device Manager. a. From the Start menu, select Settings>>Control Panel. b. From the Control Panel, double-click on System. c. In the System Properties dialog box, select the Device Manager tab. 2. Under DAQ, remove the entries that correspond to your DAQ devices. 3. Restart your system. Windows 98 will re-identify all of your PCI or CompactPCI DAQ devices. Then please install the device driver according to the procedures described in Device Installation in Windows 98 chapter. Situation 5: Performing continuous operations failed (Windows 98/NT/2000/XP) Actions: 1. The memory size of the initially allocated memory for the AI/DI/DO for your device is not assigned or not large enough. Use the DAQ configuration utility PciUtil or D2kUtil to set or modify the memory size. Please refer to DAQ Configuration Utility chapter for operation procedures for this utility. 2. The buffer size your program asks for currently exceeds the memory size for the initially allocated memory. Use the related memory allocation size report function (e.g. AI_InitialMemoryAllocated) to check the size value. 38 • Trouble Shooting Situation 6: Inserting a new cards before installing ADLINK software drivers, and Windows 98/2000/XP informs you of an unsuccessful device installation. Actions: 1. Because the System Driver Files (.SYS) are un-searchable, the devices will not operate properly. To solve this problem, install the PCIS-DASK/D2K-DASK software driver. After installing all appropriate ADLINK software (PCIS-DASK, PCIS-L VIEW, DAQBench, etc.), all necessary device information files (.INF) and system driver files (.SYS) will be copied to their proper directories. All devices installed should now all operate properly. Trouble Shooting • 39 Warranty Policy Thank you for choosing ADLINK. To unders tand your rights and enjoy all the after-sales services we offer, please read the fo llowing carefully. 1. Before using ADLINK’s products, please read the user manual and follow the instructions exactly. When sending in damaged products for repair, please attach an RMA application form. 2. All ADLINK products come with a two-year guarantee, free of repair charge. • The warranty period starts from the product’s shipment date from ADLINK’s factory • Peripherals and third-party products not manufactured by ADLINK will be covered by the original manufacturers’ warranty • End users requiring maintenance services should contact their local dealers. Local warranty conditions will depend on the local dealers 3. Our repair service does not cover the two-year warranty, if damages are cause by the following events: a. Damage caused by not following instructions in the user’s manual. b. Damage caused by carelessness on the users’ part during product transportation. c. Damage caused by fire, earthquakes, floods, lightening, pollution and incorrect usage of voltage transformers. d. Damage caused by unsuitable storage environments with high temperatures, high humidity or volatile chemicals. e. Damage caused by leakage of battery fluid when changing batteries. f. Damages from improper repair by unauthorized technicians. g. Products with altered and damaged serial numbers are not entitled to our service. h. Other categories not protected under our guarantees. 40 • Warranty Policy 4. Customers are responsible for the fees regarding transportation of damaged products to our company or to the sales office. 5. To ensure the speed and quality of product repair, please download an RMA application form from our company website www.adlinktech.com . Damaged products with RMA forms attached receive priority. For further questions, please contact our FAE staff. ADLINK: [email protected] Test & Measurement Product Segment: [email protected] Automation Product Segment: [email protected] Computer & Communication Product Segment: [email protected] ; [email protected]. Warranty Policy • 41