1
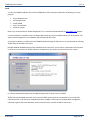
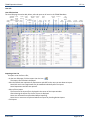
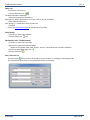
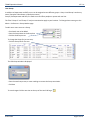
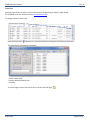
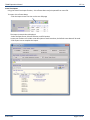
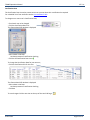
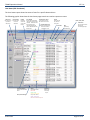
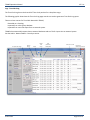
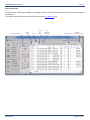
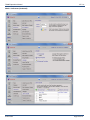
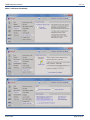
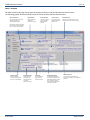
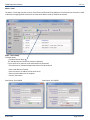
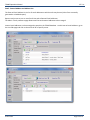
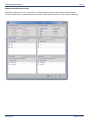
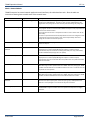
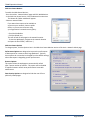
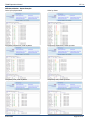
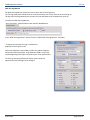
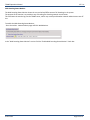
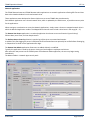
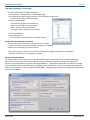
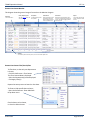
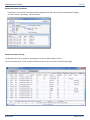
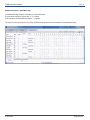
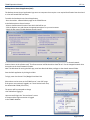
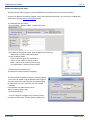
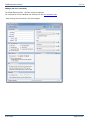
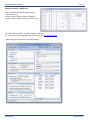
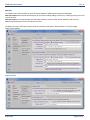
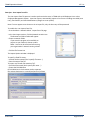
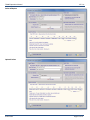
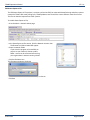
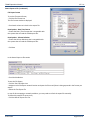
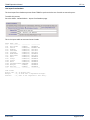
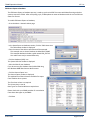
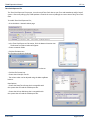
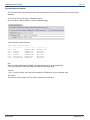
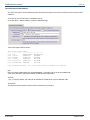
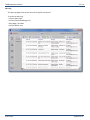
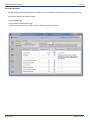
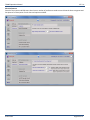
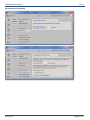
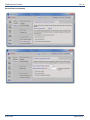
TEAM5 Operation Manual Contents System Overview Version Feature Comparison Chart Install Recommendations User Edit Importing a User List Add a User Delete User(s) Edit Multiple Users ( Global Controls ) Sort / Filter User List Email User List Print User List User List Preferences Required Test Retest Frequency User Department User Shift User Groups Department Manager Leave Time Leave Time Import Certification Date Certification Dates Import Periodic Test PIN Reset User Status (ESD Test Status) Logs - ESD Test Log Logs -Attendance Log Logs - Time Clock Log Test Machine Access Control Enable Time Clock Enable Network ID Communication Port PIN Checking Door Relay Display Language WEB SmartLog Status Monitor Network Status Monitor Admin - Preferences Admin Password / PINs Auto Start Daily Shutdown / Restart Group Headers Language Leave Type Edit Not Clocked In Status Program License Support / Vendor Information Admin - Database Automated Backup Manual Backup Restore Database 4-Nov-2012 V5.7.xx Admin Email Email Server Setup Email - External Address List Admin - Scheduled Reports Send to Dept Manager(s) Scheduled Email Recipients Scheduled Report Filter Additional Scheduled Report Filters Admin - Network Admin Web Monitors Web User Status Monitor Web Status Monitor - Report Examples Web Test Log Monitor Web Smartlog Status Monitor Network Applications Remote User Status Monitor Server Setup Remote User Status Monitor Client Setup Remote User Status Monitor Remote User Status Filter/Search/Sort Remote User Status Test History Remote User Status Test Log Remote User Status Leave Time Edit Desktop Access Control Application Remote User Admin Server Setup Remote User Admin Client Setup Remote User Admin Program Remote User Admin -Adding a New User Remote User Admin - Modify User Data Sync - Import from Database User Import from Database Time clock import from Database Data Sync - Import from File User Import from File User Import File Format Leave Time Import from File Data Sync - Export to Database ESD Status Export to Database Time Clock Export to Database DESCO Legacy Export to Database Data Sync - Export to File ESD Status Export to File Time Clock Export to File Alert Log Alert Email Recipients Moving TEAM5 Software / Restoring to a new computer Tables Repairing a TEAM5 Database Repairing a TEAM Basic Database Page 1 of 74 TEAM5 Operation Manual V5.7.xx System Overview This diagram shows the major components of the TEAM System Enterprise Features Remote User Administration ESD Test Time Clock Remote User Status Access Control LAN (Ethernet / RS232) RS485 (Daisy Chain) USB (Desktop) Desktop Access Control TEAM Server Software - Administration - Data Collection / Storage / Distribution - Compliance and Auditing Reports Email Scheduled Reports Local Area Network ESD Status Export SQL Database and TEXT File WEB Status Monitor (HTML) Employee List Import Automate (Enterprise) and Manual WEB Test Log (HTML) Leave Time Import Automated (Enterprise) and Manual 4-Nov-2012 Page 2 of 74 TEAM5 Operation Manual V5.7.xx Version Feature Comparison Chart Feature Description Admin Password Program Access Control Automated Data Collection Auto Start on Windows Startup Auto Shutdown/ Restart for Daily Server Maintenance Set password protection to access TEAM TEAM5 Enterprise Automatically poll data from the SmartLog TEAM will automatically upon Windows startup Schedule TEAM shutdown and restart times to avoid conflict with scheduled server maintenance (i.e. anti-virus scans, server backup, etc.) Schedule TEAM system backups. Up to 10 backups can be scheduled per day. TEAM will import a user list via a text file Sort and Filter the user list in TEAM by Department for reports or viewing purposes. Web Page Showing the network status of all Data Loggers Schedule e-mailed ESD Status reports. An unlimited number reports can be scheduled per week. Sort and Filter the user list in TEAM by Shift for reports or viewing purposes. Sort and Filter the user list in TEAM by a field of your choice for reports or viewing purposes. Users who are checked off with “Leave” time can and will be excluded from automated reports. Restrict test authorization and access control to users who have expired certification dates Users who are checked off with “Periodic” testing can and will be excluded from automated reports. 4-digit PIN required with scanning a user badge for security purposes. Satisfies FDA regulations. Generate employee attendance reports Web Pages Showing the current ESD Test Status of all employees Allows users who’ve tested and passed there required test to access selected areas without being required to test again for a selected period of time. Manage employee time and attendance Scheduled Backup User Import via file (Manual) User Group by Department System Status Web Page Scheduled Reporting Via Email User Group by Shift User Group by Custom Defined Groups Report Exclusion by Leave time Test / Access control Restriction by Certification Date Report Exclusion by Periodic User PIN + Badge Scan Option Attendance Report ESD Test Status Web Page Access Control by ESD Status, or user Group Time Clock Network User Administration Network ESD Status /Reporting Program ESD Status Export to File ESD Status Export to SQL Database User List and Leave Time Import via file (Automated) 4-Nov-2012 Multi-User Windows Client used to manage ESD Employee List. Multi-User Windows Client used to report current and historical ESD status. Automated flat file export of ESD status by employee for third party systems Automated SQL export of ESD status by employee for third party systems TEAM automatically syncs user lists and leave time data via a simple text file TEAM5 Page 3 of 74 TEAM5 Operation Manual V5.7.xx Install 1. Insert the TEAM5 Installation CD into the CD-ROM drive of the computer and follow the following on-screen prompts: System Requirements License Agreement Install TEAM5 View / Print Manual Check for Update Note: If you cannot locate the TEAM5 Installation CD, it is available for download off the DescoEMIT.com website. 2. Once installation is complete, insert the Green USB License Key into an available USB Port of the computer. The system should recognize the new hardware and will automatically install. 3. Once the hardware is installed, start the TEAM5 by double clicking the shortcut icon on your desktop or selecting TEAM5 from the windows start menu. DO NOT REMOVE OR MISPLACE the Green USB Flash Drive License Key. It must remain connected to the computer in order to run and access the TEAM5 software. If misplaced or lost, please contact the factory for a quote. It’s recommended a Desktop Shortcut be added during install for quick access to TEAM5. TEAM5 has been designed exclusively for use with the EMIT SmartLog. Please contact EMIT or your local sales representative for a current list of compatible hardware. TEAM5 is comprised of a windows data management collection program, MS Access database, and an email client (for use with an SMTP email server). 4-Nov-2012 Page 4 of 74 TEAM5 Operation Manual V5.7.xx System Requirements The Remote Admin and Remote Status programs require the .net 3.5 Framework Recommendations Windows ID Full Windows Adminstrator ID Priviledges Recommended. TEAM5 should always be run under the same Windows Id, as some Windows ID schemes create seperate file areas for each ID. The ID must be able to create/read/modify/delete registry settings. The ID must be able to create/read/modify/delete files in the ( C:\Program Files\TEAM5 ) folder and all sub folders. Virus and other Scanning and Update programs. If a Virus, Update or other scanning program needs to lock files in the C:\Program Files\TEAM5, TEAM5 should be shut down prior to the scan or update program. An automated daily shutdown/restart service is provided within TEAM to insure that TEAM is not running when Virus, Update or Backup programs which lock files are running. This service should be used in conjunction with the scheduler built into most Virus, Update and Backup programs to prevent file locking problems that may cause the TEAM database and or shared network resources to be unavailable. Firewalls If you use the TEAM5 Network Status Monitor feature or the Scheduled Backup feature firewalls should be configured to allow TEAM5 to create/read/modify/delete files in the chosen network folders. If you use Virtual Com Ports to communicate with SmartLog Testers over a local area network, firewalls should not prevent TEAM5 or the virtual com port software from sending and receiving data over the network. Email ID If your organization uses an integrated Windows/Network/Email login, we recomend a specific ESD Email ID be created for email sent from TEAM5. To use the TEAM5 scheduled email features, your email server must be able to accept incomming SMTP email messages from TEAM5. Backups Backups should always be made to a network or removable storage device. This is to ensure the TEAM5 system may be restored on a new computer in the event of catastrophic failure of the primary TEAM5 Server. Moving TEAM5 Software Please review the section titled ‘Moving TEAM5 Software’ and make this document available to your system administrators so they are prepared restore TEAM5 Software and Data in case your server fails or needs to be ugraded. 4-Nov-2012 Page 5 of 74 TEAM5 Operation Manual V5.7.xx User Edit User Edit Overview The User Edit page is used to add, delete, edit and report on all users in the TEAM5 Database. Show/Hide Green Import Multi User Arrows User List Update Apply Toggle Controls Multi User Select Polling Update User(s) Import Operation Remove Search Leave Manual Users Users Time Import Add Undo Sort Certification User Changes List Dates Save List to File Filter List Print List Email List Save Changes User Change History Display Preferences Current Change Date/Time Date/Time Importing a User List To import a user list from a file; - On the User Edit page, Click the Import User List icon The Import Users window is displayed. - Select the default test requirements, department and shift for the users you are about to import. Note: Each user's test requirement may be modified individually after the import. Note: Department and shift are optional. - Select a file to import. The format for the import file is displayed in the center of the import window. After selecting the import file, the list of users is displayed. Note: User information may be edited before importing. Note: One or more users may be excluded from import by checking Do Not Import. - Click Import. 4-Nov-2012 Page 6 of 74 TEAM5 Operation Manual V5.7.xx Add A User To add users one at a time; - Click the Add Users icon The New ID window is displayed. - Enter the required user information Required Test, Retest, Department, User Type, User ID, Test ID, and Name - Enter optional information Shift, Group 1 / 2, Certification Date, Periodic Test - Click Save Please See User Attribute Table for a definition of user data. Delete User(s) - Check one or more users to delete - Click the Delete User icon Edit Multiple Users ( Global Controls ) - Check one or more users to change - Adjust one or more of the user attributes ( Required Test, Retest, Dept, Shift, Group 1, Group 2, Certification Date, Periodic, PIN Reset) - Click the corresponding Apply icon - Click the Save Icon Sort / Filter User List The sort control allows the list to be sorted by up to 4 columns in ascending or descending order. This example will resort the user list by Department then by Last Name. 4-Nov-2012 Page 7 of 74 TEAM5 Operation Manual V5.7.xx Sort / Filter ( continued ) The Filter control allows the list to be limited by one or more column values. This example will filter the user list to show only people in Department 100. Email User List To email a list of users; - Select one or more users - Click the email icon The Select Report Columns window will appear - Uncheck any columns you do not want to appear on the report - Click Continue The Select Email Recipients Window will appear - Select one or more email recipients - If you want to include an additional message with the emailed report, type text into the message box - Choose the email body and attachment format - Click Email to send 4-Nov-2012 Page 8 of 74 TEAM5 Operation Manual V5.7.xx Print User List To print a list of users; - Select one or more users - Click the print icon The Printer - Include / Exclude Data window will appear - Select a Printer - Uncheck any columns you do not want to appear on the report - Click Print User List Preferences To change user list appearance preferences; - Click the Preference icon The Preferences Window is displayed. Any of the data columns may be hidden by un-checking the box next to the column name. This is often used to hide columns like Group 1/ 2 if they are not used. Additionally the screen may be split to lock columns at the left and allow non visible columns to be viewed on the right. To split the screen; -Check the Split Screen box - Close the preferences window To display test IDs with leading zeros; - Check the leading zeros box To gain more display area for data, you may hide the global controls to the left of the user list by un-checking the Global Controls box, then closing the preferences window. 4-Nov-2012 Page 9 of 74 TEAM5 Operation Manual V5.7.xx Required Test The Required Test determines the type of test that a user must perform at a SmartLog configured for ESD testing. This table describes each of the test requirements. ESD Test Requirements Table Test Name Wrist Only Description One wrist strap must be tested SmartLog V3 Yes SmartLog V4-V5 Yes Foot Only Two Heel Straps must be tested Yes Yes Foot And Wrist One wrist strap AND Two Heel Straps must be tested Yes Yes Foot OR Wrist One wrist strap OR Two Heel Straps must be tested Yes Yes Foot with Wrist Optional If a Wrist Strap is plugged in to the tester, Both Heel and Wrist will be tested. If no wrist strap is plugged in, only heel strap will be tested No Yes User Choice After scanning badge, user may choose Wrist Only, Foot Only or Both No Yes No Test Required User is not required to perform ESD test No Yes To change the test requirement for more than one user; - Check each user to be changed - Click the Required Test link Required Test Link The Required Test window is displayed - Select a test requirement and click Save To change the test requirement for just one user; - Click the test requirement for the user The Required Test window is displayed. - Select a test requirement and click Save Required Test Link To save changes click the save icon at the top of the User Edit Page 4-Nov-2012 Page 10 of 74 TEAM5 Operation Manual V5.7.xx Retest Frequency Retest Frequency is the length of time that a Passed ESD test is valid. If a person passes a test at 9:00 AM and their Retest Frequency is set 4Hours they will be required to re-test at 1PM to avoid be reported at "Not Tested". The Retest Frequency period may also effect other systems such as Access Control devices that require a Passed ESD test for entry or for Manufacturing Systems requiring a Passed ESD test to perform a manufacturing process. To change more than one user's Retest Frequency; - Check each user to be changed - Adjust the Retest Control - Click the apply icon To change Retest for just one user; - Click the Retest setting for the user The Retest Frequency window is displayed. Click to change Retest Frequency - Adjust Retest Frequency and click Save To save changes click the save icon at the top of the User Edit Page 4-Nov-2012 Page 11 of 74 TEAM5 Operation Manual V5.7.xx User Department The User Department is used to sort and filter people on reports and user lists. For a detailed list of user attributes see the User Attribute Table. To change one or more user's Department; - Check each user to be changed - Click the Department link The Select Department window is displayed - Select a Department and click Save If the department is not listed, you can create a new department by entering text into the New Department box. To change the Department for just one user; - Click the Department link for the user. The Select Department window is displayed. - Select the Department and click Save. Department Link To save changes click the save icon at the top of the User Edit Page 4-Nov-2012 Page 12 of 74 TEAM5 Operation Manual V5.7.xx User Shift The User Shift is used to sort and filter people on reports and user lists. For a detailed list of user attributes see the User Attribute Table To change one or more user's Shift; - Check each user to be changed - Click the Shift link The Select Shift window is displayed - Select a Shift and click Save If the Shift is not listed, you can create a new shift by entering text into the New shift box. To change the Shift for just one user; - Click the Shift link for the user. The Select Shift window is displayed. - Select the Shift and click Save To save changes click the save icon at the top of the User Edit Page 4-Nov-2012 Page 13 of 74 TEAM5 Operation Manual V5.7.xx User Groups In addition to Department and Shift, users can be assigned to two different groups. Group 1 and Group 2 can be any name ( Examples: Clean Room or Quality Assurance) Groups, like Department and Shift, are used to sort and filter people on reports and user lists. The Titles "Group 1" and "Group 2" may be customized to apply to your business. To Change these names go to the Admin - Preferences - Group Headers page. To add one or more users to a Group; - Check each user to be added - Enter the Group Name in the Group box - Click the Set Group Arrow To change the Group for just one user; - Click the Group link for the user The Edit Group window is displayed. - Enter the new Group name, or enter nothing to remove the Group association. - Click Save To save changes click the save icon at the top of the User Edit Page 4-Nov-2012 Page 14 of 74 TEAM5 Operation Manual V5.7.xx Department Manager When a person is assigned as a Department Manager, an email address is also required. This email address is used by the Scheduled Email Service. By checking a Department ID on a scheduled report, TEAM will filter the report to include only people in the selected department. The report is then automatically emailed to Department Managers For a detailed list of user attributes see the User Attribute Table To change Department Manager Assignment; - Click the Mgr (Manager) link To save changes click the save icon at the top of the User Edit Page 4-Nov-2012 Page 15 of 74 TEAM5 Operation Manual V5.7.xx Leave Time Assigning Leave Time to a person, prevents the person from appearing on reports as Not Tested. For a detailed list of user attributes see the User Attribute Table To change a person's Leave Time; - Click the Leave Time link Note: Red Leave Icons indicate one or more future dates are assigned to this person as leave time. The Leave Date(s) edit window is displayed. - Choose the Leave Type to be assigned - Choose a date range - Click the Add Leave Date(s) icon - Click Save To save changes click the save icon at the top of the User Edit Page 4-Nov-2012 Page 16 of 74 TEAM5 Operation Manual V5.7.xx Leave Time Import Using the Leave Time Import function, a list of leave dates may be imported from a text file. To import a list of Leave dates; - Click the Import Leave Time icon on the user Edit page The Import Leave window is displayed. - Select the Date format, Column Delimiter, and file location In case your file does not include a text description of each leave date, the Default Leave date will be used. - Click Import icon to complete the import. 4-Nov-2012 Page 17 of 74 TEAM5 Operation Manual V5.7.xx Certification Date The Certification Date is used to prevent access to a person when their certification has expired. For a detailed list of user attributes see the User Attribute Table To change one or more user's Certification Date; - Check each user to be changed - Click the Certification Date Link The Choose Date Shift window is displayed - Select a date or No Date No Date prevents all certification checking. - Click the Set Certification Date icon To change the Certification Date for just one user; - Click the Certification link for the user. The Choose Date Shift window is displayed - Select a date or No Date No Date prevents all certification checking. - Click Save To save changes click the save icon at the top of the User Edit Page 4-Nov-2012 Page 18 of 74 TEAM5 Operation Manual V5.7.xx Certification Dates Import The Certification Dates Import process allows a list of certification dates to be imported into the TEAM database. To import a list of certification dates. - Click the Import Certification Icon The Import Leave window is displayed. - Select the Date format, Column Delimiter, and file location - Select the delimiter - Select the import file - Click Import icon to complete the import. 4-Nov-2012 Page 19 of 74 TEAM5 Operation Manual V5.7.xx Periodic Test People with the Periodic attribute, do not perform ESD tests on a daily basis. The Periodic Test attribute is used to prevent these people from appearing on reports as "Not Tested". For a detailed list of user attributes see the User Attribute Table To change a person's Periodic Test setting; - Click the Periodic link for the user. A "Y" will appear in the periodic cell when the person is designated as testing only periodically. To save changes click the save icon at the top of the User Edit Page PIN Reset The PIN (Personal Identification Number) is a four digit number that is used to confirm the identification of a person after they have scanned their badge. The PIN is optional. Users are only prompted to enter a PIN if the feature is enabled on the Test Machine Page. PINs are set by the user the first time they log in, or after an administrator has reset the PIN on the User Edit page. To reset the PIN for one or more people; - Check each user to be changed - Click the PIN Reset Icon To save changes click the save icon at the top of the User Edit Page 4-Nov-2012 Page 20 of 74 TEAM5 Operation Manual V5.7.xx User Status (ESD Test Status) The User Status report shows the status of users for a specific date and time. The following graphic shows how the User Status page controls are used to report user status. Status Time Set report time to previous date/ time Current Status Set report time to current date/time Refresh Manually refresh all report data Report Auto Refresh Report will automatically refresh each minute when checked. Note: Real time data collection and reporting performance will be reduced with Auto Refresh ON Leave Time History Click to view leave time dates. Pass / Fail Percentages 4-Nov-2012 Exclude Never Tested Click remove all users who have never tested Exclude Unknown ID Uncheck to show test ID that have not been assigned to a user Status Color coded status Red = FAIL Green = Pass Yellow = Not Tested Grey = Not Tested Violet = Leave Time Maroon Certification Expired Search Search by User ID, Test ID or User name Sort Order Email / Print / Save Filter (Selectively exclude data) Preferences: Show / Hide Columns Split Screen Test ID Display Style Test History Click to view test history report. Page 21 of 74 TEAM5 Operation Manual V5.7.xx Logs - ESD Test Log The ESD Test Log report shows a sequential log of all tests performed during a specific date/time range. The following graphic shows how the ESD Test Log page controls are used to report the ESD Test Log. Log date Range Set report time to previous date/ time Current Day Set report time to current date/time Refresh Manually refresh all report data Search Search by User ID, Test ID or User name Sort Order Filter (Selectively exclude data) Preferences: Show / Hide Columns Split Screen Test ID Display Style Email / Print / Save Reset Date Range Changes the report start time to midnight today and end time to the current date/time 4-Nov-2012 Page 22 of 74 TEAM5 Operation Manual V5.7.xx Logs -Attendance Log The Attendance Log shows a one month view of users and indicates if a person performed an ESD test, did not perform an ESD test, or was on Leave Time. The following graphic shows how the Attendance Log Page controls are used to generate an attendance log report. Select Month/Year and Click Retrieve Log Show or Hide Test Statistics 4-Nov-2012 Search / Sort / Filter Legend (T) Tested (L) Leave Time (.) No Tests Email / Print / Save Preferences: Show / Hide Columns Split Screen Test ID Display Style ESD Statistics Page 23 of 74 TEAM5 Operation Manual V5.7.xx Certification - Log The Certification Log shows all users how have been assigned a Certification Date. Users who have not been assigned a Certification Date do not appear on the list. Certification Dates are used to prevent users from Access and Testing when the Certification Date is expired. To enabled this feature, see the Test Machine section. Refresh Report 4-Nov-2012 Search Change Sort Order Filter (Selectively exclude data) Email / Print / Save Preferences: Show / Hide Columns Page 24 of 74 TEAM5 Operation Manual V5.7.xx Leave Time - Log The Leave Time log shows all users who have been assigned one more dates as Leave Time. Leave Time dates are used to prevent users from appearing on status reports as "Failed or Not Tested" Set report date range 4-Nov-2012 Refresh Report Search Change Sort Order Filter (Selectively exclude data) Email / Print / Save Preferences: Show / Hide Columns Page 25 of 74 TEAM5 Operation Manual V5.7.xx Logs - Time Clock Log The Time Clock Log shows the IN and OUT Time clock punches for a date/time range. The following graphic shows how the Time clock Log page controls are used to generate a Time Clock Log report. There are three sources for Time Clock data within TEAM5, Recorded on a Smartlog Imported from a third party database Imported from a text file export from an external system. TEAM5 also automatically exports data to external databases and to a file for import into an external system. See the Admin - Network Admin - Data Sync section. Set report date range 4-Nov-2012 Refresh Report Search Change Sort Order Filter (Selectively exclude data) Email / Print / Save Preferences: Show / Hide Columns Page 26 of 74 TEAM5 Operation Manual V5.7.xx Access Control Log The Access Control Log shows all badge scans through an Access Control Point and indicates if the person was allowed or denied access. To Configure a Smartlog as an Access Control Point, see the Test Machine page. Set report date range 4-Nov-2012 Refresh Report Search Change Sort Order Filter (Selectively exclude data) Email / Print / Save Preferences: Show / Hide Columns Page 27 of 74 TEAM5 Operation Manual V5.7.xx Test Machine The Test Machine page shows the current status of all test machines and allows individual settings for each test machine to be modified. This graphic shows how Test Machine page controls are used to view and manage test machine data. ESD Test Override When enabled, the person's individual ESD test requirement is ignored, and the person is prompted to perform the Override Test. Restrict by Department When enabled, only people from selected departments are allowed access. PIN Checking When PIN Checking is enabled, users must enter PIN number in addition to scanning badge before ESD Testing, gaining Access Control or Entering Time Clock Punch Relay Time The door relay will activate for the number of seconds listed after a passed ESD test or Access Control Log In. Access Control When enabled, SmartLog is capable of controlling access to specific areas of a facility via a door relay actuator. Time Clock When enabled, SmartLog is capable of collecting Time Clock Data and ESD test Data Network ID Each SmartLog is assigned a unique two digit ID (00 to 64) Firmware Version The version lasted reported by the Smartlog. Calibration Sets the Smartlog Calibration date Location Name The location name is a descriptive name appearing on reports indicating where a transaction occurred. Communication Port Ports may be virtual links to Ethernet adapters or real com ports. More than one device may share a port when daisy chained. Operational Status When disabled, no data sent to or received from device SmartLog List This list shows the settings for each individual SmartLog Scan Ports Clicking this starts a scan of all com ports for any available SmartLogs Common Settings These settings apply to ALL SmartLogs Display Language This control allows the display language to be changed on all SmartLogs 4-Nov-2012 Network Status This window shows the current status of all SmartLogs Machine Type Displays the type of SmartLog as read from the device Last Poll Time The last time TEAM was able to communicate with a SmartLog Last Transaction Time The last time a transaction was recorded on the SmartLog ID Count The Number of IDs currently loaded on the SmartLog Transactions Today The number of transactions recorded since midnight Location The Name of the physical location of the SmartLog Transaction Count The total number of transactions recorded since the last Smartlog Master Reset Page 28 of 74 TEAM5 Operation Manual V5.7.xx Admin - Preferences The Admin Preferences page controls general program preferences. The following graphics show each preference and a description explaining how each preference functions. 4-Nov-2012 Page 29 of 74 TEAM5 Operation Manual V5.7.xx Admin - Preferences (Continued) 4-Nov-2012 Page 30 of 74 TEAM5 Operation Manual V5.7.xx Admin - Preferences (Continued) 4-Nov-2012 Page 31 of 74 TEAM5 Operation Manual V5.7.xx Admin - Database The Admin Preferences page controls general program preferences and periodic Administrative functions. The following graphic describes how the control is used to perform Administrative functions. Import Transactions This control imports a file which was exported from the Smartlog Setup Program. Manual Backup Makes a backup of all data and preference settings. Restore Database This control restores data from Manual and Automated Backups Test Data Purge This control archives old data and reduces database size. Recalc ESD Status This control synchronizes the Current ESD status for all users with the test log. Exported files contain transactions that were stored on the Smartlog but could not be read by TEAM Database Update This controls allows customer specific updates to be run on the database. 4-Nov-2012 Automated Backup Schedule of times when TEAM will automatically back up all data preference settings Auto Delete Set the number of days redundant backups are saved Database Maintenance The database maintenance control reduces database size. Database Maintenance should be run monthly to prevent performance problems and to insure data is archived. Database Size Alert This controls directs the Admin to go to the Alerts pages to set up database size alerts Page 32 of 74 TEAM5 Operation Manual V5.7.xx Admin - Email The Admin - Email page has two controls, Email Server and External Email Addresses. The Email Server controls are used to identify an outgoing SMTP email server and the email address used by TEAM to send emails. Email - Server Setup To Enable Email; - Click Email Server Setup The Test Mail Server Connection window is displayed If your email server requires an ID and Password to send email, - Check the box ID / Password Required and enter ID and Password - Enter email address of sender - Enter the name or IP address of the email server - Enter the email address of the recipient - Click the Test button Email Server Test PASSED 4-Nov-2012 Email Server Test FAILED Page 33 of 74 TEAM5 Operation Manual V5.7.xx Email - External Address and Address Lists The External Email Address List is a list of email addresses to which emails may be sent (either from a manually generated or scheduled report). Reports may be sent to one or more Email Lists and to External Email addresses. The Admin - Email preference page allows email lists and external addresses to be managed. Internal email addresses are those assigned to people in the TEAM5 database. to edit internal email addresses, go to the User Edit page and click on the email cell for a specific person. 4-Nov-2012 Page 34 of 74 TEAM5 Operation Manual V5.7.xx Admin - Scheduled Reports The Admin - Scheduled Reports page allows an unlimited number of scheduled reports to be sent at a specific time of day and day of week. Reports may be sent to a one or more email addresses, email lists, and directly to the department manager(s) of each department. Reports may be filtered to show only people who have for example, tested and failed, and no retest was performed before the scheduled report is generated. This report can be sent directly to the email address of the individual who failed the test. Any report may also be archived to a file. Typically reports are archived to a shared network location to insure auditable reports are available even if the computer running TEAM5 is down. The reprot list may be sorted and filtered to make reprot schedule management easier. If a report schedule is missed due to an email server or network problem, any report may be re-sent within 24 hours by clicking the "Re Send" icon. By clicking on any report, or clicking 4-Nov-2012 "Add a new report" the "Scheduled Report Settings" window will be displayed. Page 35 of 74 TEAM5 Operation Manual V5.7.xx All attributes of a scheduled report may be edited from the "Scheduled Reports Settings" window. Send to Dept Manager(s) - When the "Send To Department Manager(s)" box is checked each report is split into several reports so that a department manager will only see the people in their department. This feature creates a report with a smaller number of people so that managers do not need to scroll through hundreds or thousands of names. Scheduled Email Recipients In addition to Department Mangers, reports may also be directed to any number of external email addresses. Scheduled Report Filter The reports may also be customized by applying a report filter. - Click the filter icon The Report Filter window is displayed - Check or Un-check Values and columns to add or remove from report. - Click save Save Settings After adjusting report settings, click the save icon to the right of the Day of week selector. 4-Nov-2012 Page 36 of 74 TEAM5 Operation Manual V5.7.xx Additional Scheduled Report Filters By clicking the Report Filter Icon on the Admin - Scheduled Reports page the filter window will be displayed. The filter window allows scheduled reports to be filtered by ESD Status, Department, Shift, Group1 and Group2. 4-Nov-2012 Page 37 of 74 TEAM5 Operation Manual V5.7.xx Admin - Network Admin TEAM5 Enterprise has several network applications and interfaces, this table describes each. After the table are instructions showing how to enable each of the network items. Name Web User Status Monitor Type HTML (WEB Page) output Description TEAM publishes a set of web pages showing the current ESD testing Status of all people in the TEAM Database. The status is near real time, TEAM refreshes the pages after each polling cycle if a test has been performed during the polling cycle. Remote User Status Program Network Application The Remote User Status Monitor is another way to view ESD status data. This program resides on a shared network folder and may be run by anyone who has access to the network location. The program shows all users in the system and their current as well as their 31 day test history. Controls are provided to filter data by Department and other user categories so that a manager can view only the people in their area of responsibility rather than listings of hundreds to thousands of people. Remote User Admin Network Application The Remote User Admin program is used to Add/Delete and modify users from a network computer. Auto User Import from File or Database Network Interface The Auto User Import process is used to synchronize the user in TEAM with an HR Employee List or other Employee Management System. Auto User Import, automatically imports a list of users including User Adds (new user), User Deletes, and User Modifications (changes to a user profile). Auto Leave Time Import Network Interface The Auto Leave Time Import process is used to leave time in TEAM with an HR Employee List or other Employee Management System. Auto User Import, automatically imports a list of leave dates and updates each user profile associated with the leave date. Status Export to File Network Interface The Status Export to File process, is used to synchronize ESD Test status with Manufacturing and other systems external to TEAM. After each polling cycle, TEAM updates a text file with the current ESD test status for all users. This file can then be imported into other systems. Status Export to Database Network Interface The Status Export to Database process, is used to synchronize ESD Test status with Manufacturing and other systems external to TEAM. After each polling cycle, TEAM updates an external database with the current ESD test status for all users. Time Clock Export to File or Database Network Interface The Time Clock Export process, is used to send Time Clock data to your Time and Attendance and/or Payroll system. After each polling cycle, TEAM updates a file with the current (midnight to current time of day) Time clock data. DESCO Legacy Export Network Interface This process exports all ESD test transactions to an Access Database named TESTER.MDB to support customers who have systems that depend on the legacy database. 4-Nov-2012 Page 38 of 74 TEAM5 Operation Manual V5.7.xx Web Monitors There are three "Web Monitors" in the TEAM5 system. There are three "Web Monitors" in the TEAM5 System The Web Monitors are a set of static web pages updated by the TEAM server as often as every polling cycle. The Web Pages can be set to update less frequently to improve performance with large databases (1000 + users) The User Status Monitor, Test Log Monitor and Smartlog Status Monitors are controlled from the Admin - Network Admin - Web Monitors page. When an HTTP client (Web browser) requests a URL that points to a directory structure instead of an actual Web page within the directory, the browser attempt to load "index" page. TEAM uses the file name "index.htm" 4-Nov-2012 Page 39 of 74 TEAM5 Operation Manual V5.7.xx Web User Status Monitor To enable the Web Status Monitor; - Go to the Admin - Network Admin page and Click Web Monitors - In the Web User Status Section, Click the Network Location Icon The Browse for Folder window will appear. - Choose a network folder. If you want these reports to be available to anyone on your network, choose a public folder, or you can restrict access using your organization's network security policy. - Check the Enable Box. - Click the Reload icon. This will refresh all web pages in the network location. - To view the Web pages, navigate to the network location and open the file named ( index.htm ) Web User Status Options To change options, click the Options icon in the Web User Status Monitor section of the Amin - Network Admin page Performance Options are designed to improve the performance of data exports for customers with large databases. Typically these options do not need to be changed from the default settings unless data export is degrading system performance. Browser Options This option allows the web pages to automatically refresh after a preset number of minutes. This option can be disabled if frequent browser refresh cause performance issues with web browser. Data Security Options are designed to hide the user ID from publically viewed pages. 4-Nov-2012 Page 40 of 74 TEAM5 Operation Manual V5.7.xx WEB Status Monitor - Report Examples Order by Employee Name Order by Status Grouped by Department, order by Name Grouped by Department, Order by Status Grouped by Shift, order by Name Grouped by Shift, Order by Status 4-Nov-2012 Page 41 of 74 TEAM5 Operation Manual V5.7.xx Web Test Log Monitor The Web Test Log Monitor shows from one to seven days of test log history. The Test log shows each individual test and may be sorted by time of day, name of person testing etc. The logs may also be grouped by test Location and User Attributes such as Department, Shift etc. To enable the Web Test Log Monitor; - Go to the Admin - Network Admin page and Click Web Monitors In the "Web Test Log Monitor" section Click the "Enable Web Test Log Monitor" check box. - To adjust how the Web Test Log is updated and displayed Click the Options icon Performance Options are provided to reduce the update frequency and amount of data displayed. Large databases (1000 + users) may required adjusting these options to prevent poor server performance. The Sorting / Grouping and Data to Display options allow the appearance of the web pages to be changed. 4-Nov-2012 Page 42 of 74 TEAM5 Operation Manual V5.7.xx Web Smartlog Status Monitor The Web Smartlog Status Monitor shows the current Online/Offline status of all Smartlogs in the system. The purpose of the monitor is to provide a way of checking the Smartlog network via a browser. This eliminates the need to log into the TEAM5 server, which may not be possible when network administrators are off site. To enable the Web Smartlog Status Monitor; - Go to the Admin - Network Admin page and Click Web Monitors In the "Web Smartlog Status Monitor" section Click the "Enable Web Smartlog Status Monitor" check box. 4-Nov-2012 Page 43 of 74 TEAM5 Operation Manual V5.7.xx Network Applications The TEAM5 Remote Status and TEAM5 Remote Admin applications are network applications allowing ESD Test and User data to be viewed and edited via a shared network drive. These applications were developed to allow multiple users to access TEAM5 data simultaneously. Each Network Application uses a shared network drive, which is updated by the TEAM server, to provide an access point for the applications. When setting up a workstation to access the Network Applications, simply create a shortcut a mapped network drive in which the Network Application resides. The Mapped Drive shortcut must include a drive letter in the range (D: ...Z:) The Remote User Status application is a read only application that shows current and historical (up to 31 days) ESD test data, Leave Time, and User Requirements. The Desktop Access Control application is used to log In/Out times at a network workstation. In addition to In/Out logging the person's ESD Status and Certification Date can optionally be verified before allowing log in. Elapsed time is shown on the application after login. The Remote User Admin application allows users to added, deleted, or modified. Typically this application is used by the person issuing new test badges to employees and visitors. After enter the new person into the TEAM System via the Remote Admin application, the user may begin testing immediately. The Network Admin - Network Apps control panel... 4-Nov-2012 Page 44 of 74 TEAM5 Operation Manual V5.7.xx User Status Application - Server Setup To enable the Remote User Status Application; - Go to the Admin - Network Admin - Network Apps page - In the Remote User Status Program section, Click the Network Location Icon The Browse for Folder window will appear. - Choose a network folder. If you want this program to be available to anyone on your network, choose a public folder. Access can be restricted using your organization's network security policies. - Check the Enable Box. - Click the Reload icon. This will refresh all data linked to the network location. Remote User Status Monitor Client Setup To access this program from other computers on your network; - Create a shortcut on the remote computer that points to a mapped network drive containing this network location To insure the shortcut continues to work after the manager has logged out/and back in to Windows; - Verify the drive pointed to is permanently mapped Remote User Status Options To change options, click the Options icon in the Web Remote Status section of the Amin - Network Admin page There are two option types, Performance and Data Security Performance options are designed to improve the performance of data exports for customers with large databases. Typically these options do not need to be changed from the default settings unless data export is degrading system performance. Data Security options are designed to hide the User ID and or Test ID from publically viewed pages. Language Options change the language the Remote Status Program is displayed in. 4-Nov-2012 Page 45 of 74 TEAM5 Operation Manual V5.7.xx Remote User Status Monitor This diagram show the general usage of controls on the Monitor Program. ESD Status Color coded status History Reporting Date Last Update See next History section for The Date/Time data was more details last updated. Auto Refresh When checked the screen automatically refreshes when new data received from the TEAM5 Server Preferences Allows the Passed and Other Status lists to be customized by filtering and sorting. Also allows toggling of Data Columns On/Off. Report Current data view may be printed, emailed or saved to a file. Summary This summary shows counts by status, user counts and last update time Remote User Status Filter/Search/Sort To filter data, so that only one Department is shown; - Click the Preferences - Filter button The Filter Data window is displayed. - Select the Department(s) to be displayed - Click Apply Filter(s) Repeat the same process to Search or Sort data. To Show or Hide specific data columns; - Open the Preferences -Show Hide Data Drop down menu. Check columns to be shown, un-check to hide columns. 4-Nov-2012 Page 46 of 74 TEAM5 Operation Manual V5.7.xx Remote User Status Test History Clicking on a User's record in the Remote Status application will open the User Detail window which displays the User's profile, Test History, and Leave Dates Remote User Status Test Log The Remote Status Test Log shows a chronologic list of all tests performed by all users. This list can be searched, sorted, and filtered using the same controls as those on the ESD Status page. 4-Nov-2012 Page 47 of 74 TEAM5 Operation Manual V5.7.xx Remote User Status - Attendance Log The Attendance log shows list of all days in a selected month. If a person has tested on a given day, a "T" is shown If no tests were performed on the date a "." is shown. The report has the same Search, Sort, Filter and Reporting options that are available on the ESD Status page. 4-Nov-2012 Page 48 of 74 TEAM5 Operation Manual V5.7.xx Remote User Status - Leave Time Edit The Leave Time edit feature of the Remote Status Program allows department manager to edit leave time employees while viewing current status data, To enable Leave Time Edit on the Remote Status Program. - Define one or more Department managers on the User Edit page of the TEAM5 server or via the Remote Admin Application. - On the TEAM5 Server, Go to the Admin - Network Admin page - Select Network Apps page - In the Remote Status Section, Click the Options icon - In the "Leave Time Edit section, check the box named "Allow Dept Managers to edit Leave Time - Verify Polling is ON to ensure this new setting to sent to the Remote Status Application To Edit Leave Time in the Remote Status Application - Start the Remote Status Application With the ESD Status tab selected, - Click on a user name to display the details about the user. - Click the Leave time tab At the bottom of the page, - Click "Login to Edit Leave Time" - Enter the Department Managers Test/Badge ID and PIN. Not the Department manager's User ID. Manager's PIN number can be reset on the TEAM5 server "User Edit" page. If the manager has not previously logged in or if their PIN has been reset the default PIN is 0000 (Four Zeros) The manager will be prompted to change their PIN before proceeding to edit leave dates. Only one login is required each time the Remote Status application is started. 4-Nov-2012 Page 49 of 74 TEAM5 Operation Manual V5.7.xx Desktop Access Control Application (DAC) The Desktop Access Control application logs access to computers that require a non-expired Certification Date check and or a Current Passed ESD Test Status. To enable the Desktop Access Control Application - Go to the Admin - Network Admin page on the TEAM5 Server In the Desktop Access Control section - Select a shared network location from which DAC will be run. - Click the Options icon and choose the appropriate options for your environment. - Check the box named "Enable Desktop Access Control" On workstations that require this application create a desktop shortcut to DAC application in the shared network location chosen in the previous step. The Shortcut must include the a drive letter D: to Z: for the mapped network drive that points to the shared network location. Note: The Windows ID running the DAC app, must have Read and Write privileges to the shared network folder. Start the DAC application by clicking the ICON. To login, enter the Person's Test/Badge ID and their PIN. PIN numbers can be reset on the TEAM5 server "User Edit" page. If the person not previously logged in or if their PIN has been reset, the default PIN is 0000 (Four Zeros) The person will be prompted to change their PIN before logging in. Upon successful login the "Current Status" screen is shown and the login transaction is logged in the TEAM5 database. 4-Nov-2012 Page 50 of 74 TEAM5 Operation Manual V5.7.xx Remote User Admin Server Setup The Remote User Admin program is used to Add/Delete and modify users from a network computer. Access to the Remote User Admin program is User ID and Password protected. For instructions to add Remote Administrators see the Admin Preferences section To enable Remote User Admin; - Go to the Admin - Network Admin - Network Apps page - In the Remote User Admin section, Click the Network Location Icon The Browse for Folder window will appear. - Choose a network folder. If you want this program to be available to anyone on your network, choose a public folder. Access can be restricted access using your organization's network security policies. - Click the New User Defaults icon The New User Defaults window is displayed. This Required Test and Retest Frequency setting is applied to any new user added using the Remote Admin Program. These are just default values and may be changed during the Add process or at any time after the user is added. - Click Save In the Remote User Admin section of the Admin - Network Admin page - Check the Enable Box. - To run the program, navigate to the network location and open the file named ( TEAM5_Remote_Admin.exe ) 4-Nov-2012 Page 51 of 74 TEAM5 Operation Manual V5.7.xx Remote User Admin Client Setup To access this program from other computers on your network; - Create a shortcut on the remote computer that points to a mapped network drive containing this network location To insure the shortcut continues to work after the manager has logged out/and back in to Windows; - Verify the drive pointed to is permanently mapped Remote User Admin Program To run the Remote User Admin Program; - Follow instructions in the previous section Remote User Admin Client Setup - Start the Remote Admin program from the shortcut created in the previous section. - Enter a User ID and Password If you have not set up any remote Administrators, follow instructions in the Admin - Preferences section. If this is the first time the ID has logged in, the password will be ( password ). The change password window is displayed.. - Enter a new password After logging in the TEAM5 Remote Admin main menu is displayed. Note: the Name of the Administrator currently logged in is displayed in the lower left of the menu. Remote User Admin -Adding a New User To add a new user; - Click the Add User Icon The New User window is displayed. - Enter the User ID and Test ID - Click Continue 4-Nov-2012 Page 52 of 74 TEAM5 Operation Manual V5.7.xx Adding a new User ( continued ) The TEAM5 Remote Admin - User Edit window is displayed. For a description of each individual user attribute, see the User Attribute Table - After entering user information, Click Save Changes. 4-Nov-2012 Page 53 of 74 TEAM5 Operation Manual V5.7.xx Remote User Admin - Modify User From the TEAM5 Remote Admin Main Menu, - Click Modify User The User Search / Select window is displayed. - Select a user by double clicking on the user name. The TEAM5 Remote Admin - User Edit window is displayed. For a description of each individual user attribute, see the User Attribute Table - After editing user information, Click Save Changes. 4-Nov-2012 Page 54 of 74 TEAM5 Operation Manual V5.7.xx Data Sync The TEAM5 system has the ability to synchronize data between TEAM and other personnel databases. Data Sync Import allows the automated import of User data including Adding of new users, modifying existing users and removal of users. Data Sync Export is an automated process that exports ESD test results to External SQL databases and Text Files. Additionally TEAM exports Time Clock data to Text Files. The Data Sync Import and Export Control panels are located on the Admin - Network Admin - Data Sync pages. Import from Database Import from File 4-Nov-2012 Page 55 of 74 TEAM5 Operation Manual V5.7.xx Data Sync - User Import from File The User Import from file process is used to synchronize the users in TEAM with an HR Employee List or other Employee Management System. Auto User Import, automatically imports a list of users including User Adds (new user), User Deletes, and User Modifications (changes to a user profile). Note: If a user appears more than once in an import file, only the last entry will be processed. To enable the User Import from File; - Go to the Admin - Network Admin - Import from File page - In the User Import section, Click the Network Location Icon The Browse for Folder window will appear. - Choose a network folder. If you want this program to be available to anyone on your network, choose a public folder. Access can be restricted access using your organization's network security policies. - Click the File Format icon The Import Options window is displayed. To specify a fixed file name; - Uncheck the box named ( Don't specify file name ...) - Enter the name of the file To import any file with file extension TXT; - Check the box named ( Don't specify file name ...) - Choose the Field Delimiter (A field delimiter is the character used to separate the various data items in a record (row/one line) of data. 4-Nov-2012 Page 56 of 74 TEAM5 Operation Manual V5.7.xx Delete All Option Optional Delete 4-Nov-2012 Page 57 of 74 TEAM5 Operation Manual V5.7.xx Data Sync - Leave Time Import from File The Auto Leave Time Import process is used to synchronize user leave time date in TEAM with other Employee Management Systems. To enable the Leave Time Import from File; - Go to the Admin - Network Admin - Data Sync Import page - In the Leave Time Import section, Click the Options Icon The Import Leave Date List Options window will be displayed. This options window allows the file format to be customized. The File name, Default Leave type and Date Formats are shown in the first three sections. The Import File Format is shown in the last section. After adjusting the import file format, Click the Save icon to save changes and exit the window. 4-Nov-2012 Page 58 of 74 TEAM5 Operation Manual V5.7.xx ESD Status Export to File The ESD Status Export to File process, is used to synchronize ESD Test status with Manufacturing and other systems external to TEAM. After each polling cycle, TEAM updates a text file with the current ESD test status for all users. This file can then be imported into other systems. To enable Status Export to File; - Go to the Admin - Network Admin page - In the Status Export to File section, Click the Network Location Icon The Browse for Folder window will appear. - Choose a network folder. If you want this program to be available to anyone on your network, choose a public folder. Access can be restricted access using your organization's network security policies. - Click the File Name icon The File Name window is displayed. - Enter the name of the file that TEAM will export data to. - Click Save 4-Nov-2012 Page 59 of 74 TEAM5 Operation Manual V5.7.xx Status Export to File ( continued ) File Export Format To set the file export format; - Click the File Format icon The File Format window is displayed - Check each column to include in the export file Data Options - Date Time Format - Choose the Date / Time format that is compatible with the system that will read the TEAM export file. Data Options - Column Delimiter - Choose the Column Delimiter that is compatible with the system that will read the TEAM export file. - Click Save In the Status Export to file section - Check the Enable box. To test the File Export; - Click the Test File Export icon - Navigate to the File Export network location and open the file to verify data is being exported in the format you expect. - Delete the Test Export file In case of drive mapping or network problems, you may need to refresh the export file manually. To Refresh the export file at any time; - Click the Refresh Export File icon. 4-Nov-2012 Page 60 of 74 TEAM5 Operation Manual V5.7.xx User Import from Database The User Import from database process allows TEAM5 to synchronize the user list with an external system. To enable this process, Go to the Admin - Network Admin - Import from Database page. This is the import table structure and control codes. Table ---Col1 Col2 Col3 Col4 Col5 Col6 col7 col8 Col9 Col10 Col11 Col12 Col13 Col14 ---- Name: User ------------ActionCode UserID BadgeID FirstName LastName MiddleName Department Shift Group1 Group2 Email CertExpireDate Manager Periodic ------------- ---------VCHAR(1) VCHAR(255) VCHAR(255) VCHAR(255) VCHAR(255) VCHAR(255) VCHAR(255) VCHAR(255) VCHAR(255) VCHAR(255) VCHAR(255) DATETIME VCHAR(1) VCHAR(1) ---------- ----------NULLABLE PRIMARY KEY NOT NULL NOT NULL NOT NULL NULLABLE NOT NULL NULLABLE NULLABLE NULLABLE NULLABLE NULLABLE NULLABLE NULLABLE ----------- Code Values Action Code = D, To delete user. Manager = Y, To make user a department manager. Periodic = Y, User is not required to test daily. 4-Nov-2012 Page 61 of 74 TEAM5 Operation Manual V5.7.xx ESD Status Export to Database The ESD Status Export to Database process, is used to synchronize ESD Test status with Manufacturing and other systems external to TEAM. After each polling cycle, TEAM updates an external database with the current ESD test status for all users. To enable ESD Status Export to Database; - Go to the Admin - Network Admin page - In the Status Export to Database section, Click the Table Name Icon The Table Name window is displayed. - Enter the name of the table to which data will be exported. This example uses an Access Database included with TEAM5 This example database includes a table named ESD_STATUS. Your table name may be named differently. - Click the Database (DSN) icon The System DSN List window is displayed. - Select the DSN of your database. If you do not see your database listed, add a DSN using the Windows ODBC Data Source Administrator. - Click the Data to Export icon. The Data to Export window is displayed. This window lists all data elements available for export from TEAM to other systems. The first three colums are required. The Primary Key is User ID Data Types are listed as MS Access equivelents. Please check with your DDMS provider for a translation from these data types to you DBMS - Click Save 4-Nov-2012 Page 62 of 74 TEAM5 Operation Manual V5.7.xx Time Clock Export to File The Time Clock Export to File process, is used to send Time Clock data to your Time and Attendance and/or Payroll system. After each polling cycle, TEAM updates a file with the current (midnight to current time of day) Time clock data. To enable Time Clock Export to File; - Go to the Admin - Network Admin page - In the Time Clock Export to File section, Click the Network Location icon The Browse for Folder window will appear. - Choose a network folder. - Click the File Name icon The File Name window is displayed. - Enter the name of the file that TEAM will export data to. - Click the File Format icon. - Choose User ID and/or Test ID - The column order can be adjusted using the Move up/down buttons. Data Options - Choose the Date/Time format that is compatible with the system that will read the TEAM export file. - Choose the Column Delimiter that is compatible with the system that will read the TEAM export file. 4-Nov-2012 Page 63 of 74 TEAM5 Operation Manual V5.7.xx Time Clock Export to Database The Time Clock Export to Database process automatically exports time clock transactions to an external SQL database. To access the Time Clock Export to Database control, Go to the Admin - Network Admin - Export to Database page. Time Clock Export Table structure Table ---Col1 Col2 Col3 Col4 Col5 Col6 Name: TimeClockHist ----------- -----------IDX NUMERIC(INT) UserID VCHAR(255) BadgeID VCHAR(255) TCCode VCHAR(255) TCLocation VCHAR(255) TCTimeStamp DATETIME ----------PRIMARY KEY NOT NULL NOT NULL NOT NULL NOT NULL NOT NULL IDX: IDX is a counter maintained by TEAM5, it should not be set up as an automated field. Team uses this field to sync data between TEAM5 and the Export table. TCCode: I (In) , O (Out) by default, this code can be modified in TEAM5 to be any one character code. TCLocation: The physical location where the Time Clock transaction was recorded. 4-Nov-2012 Page 64 of 74 TEAM5 Operation Manual V5.7.xx Time Clock Import from Database The Time Clock Import from Database process automatically imports time clock transactions from an external SQL database. To access the Time Clock Export to Database control, Go to the Admin - Network Admin - Export to Database page. Time Clock Import Table structure Table ---Col1 Col2 Col3 Col4 Col5 Col6 Name: TimeClockHist ----------- -----------IDX NUMERIC(INT) UserID VCHAR(255) BadgeID VCHAR(255) TCCode VCHAR(255) TCLocation VCHAR(255) TCTimeStamp DATETIME ----------PRIMARY KEY NULLABLE NULLABLE NOT NULL NULLABLE NOT NULL Note: Although Nullable, one of the values UserID or BadgeID are required IDX: IDX is a counter maintained by the external database. It should be set up as an automated field. Team uses this field to sync data between TEAM5 and the Import table. TCCode: I (In) , O (Out) by default, this code can be modified in TEAM5 to be any one character code. TCLocation: The physical location where the Time Clock transaction was recorded. 4-Nov-2012 Page 65 of 74 TEAM5 Operation Manual V5.7.xx Alert Log The Alert Log page shows system alerts for a specific time period. To access the Alert Log; - Click the Alerts page - Click the Choose Date Range icon - Select Begin / End date - Click the Refresh Icon 4-Nov-2012 Page 66 of 74 TEAM5 Operation Manual V5.7.xx Alert Email Recipients The Alert Email Recipients page allows email address lists and individual email addresses to be assigned to Alerts. To access the Alert Email Recipients Page; - Click the Alerts Page - Click the Alert Email Recipients Page - To Edit the recipient list for any Alert, click the edit ion and select recipients. 4-Nov-2012 Page 67 of 74 TEAM5 Operation Manual V5.7.xx Alert Preferences Several of the system and ESD status alerts have a number of preferences used to control how the alerts are generated. See pictures for description of each alert and options available. 4-Nov-2012 Page 68 of 74 TEAM5 Operation Manual V5.7.xx Alert Preferences (continued) 4-Nov-2012 Page 69 of 74 TEAM5 Operation Manual V5.7.xx Alert Preferences (continued) 4-Nov-2012 Page 70 of 74 TEAM5 Operation Manual V5.7.xx Moving TEAM5 Software / Restoring to a new computer This procedure details how to move the TEAM5 software and database from one computer to another. Procedure 1 ( Use this procedure if the old system is NOT operational) - Locate last backup from old system - Install Software on new system - Restore data. Procedure 2 ( Use this procedure if the old system is operational) - Backup Data ***IMPORTANT - DO NOT SKIP THIS STEP*** - Install Most Recent Updates to Old System http://cscsoftware.net/TEAM5_UPDATE - Backup Data a second time - Install software on new system http://cscsoftware.net/TEAM5_INSTALL - Restore data from old system Backup Old System If your old system is non-functional then locate the most recent automated backup. The Backup is comprised of two files: yyyy-mm-dd__hh.mm.ss ap_team5.database.bak yyyy-mm-dd__hh.mm.ss ap_team5.registry.bak Where yyyy-mm-dd__hh.mm.ss ap = the date and time the backup was performed. Open the registry backup file using Windows Notepad and read the version number of the program. Example: app_version|5.04.01 If this version does not match the current version, please call DESCO to get the install program that matches your older version. If your old system is functional Perform a manual backup. - Select the Admin - Database page, Click Backup Now - Update TEAM with the latest version http://cscsoftware.net/downloads - Do a second backup Install Software on New System 1) Move License Dongle Remove the license dongle from the old computer and install it on the new system. Here is a link to the USB License Drivers for XP and Vista http://cscsoftware.net/usb.exe 2) Re-Install TEAM Install TEAM on the new system. IMPORTANT: If your old system is not working, use the old install program. Restore Database and Preferences on New System Go to the Admin tab and click the "Restore" icon. A window will be displayed that will allow you to choose the location of each of the backup files. After selecting both backup files, click "Restore" Apply Updates If you have an older version of TEAM5, Download and run the latest version of TEAM5 Update from the http://cscsoftware.net/downloads page. END 4-Nov-2012 Page 71 of 74 TEAM5 Operation Manual V5.7.xx Tables User Attribute Table Attribute Name Data Type (Length) Alpha-Num (4 to 255) Required Description Yes A permanent ID assigned to a person. This ID should not change after a person is assed to the database. Typically this ID Is an Employee number or other unique identifier. Test ID Alpha-Num (4 to 255) Yes The ID that is contained on the personal identification badge. If ID badges are not used, the SmartLog will accept manually entered Test IDs from 4 to 16 digits in length. PIN Numeric (4) No The PIN (Personal Identification Number) is a four digit number that is used to confirm the identification of a person after they have scanned their badge. The PIN is optional. Users are only prompted to enter a PIN if the feature is enabled on the Test Machine Page. User ID PINs are set by the user the first time they log in, or after an administrator has reset the PIN on the User Edit page. Name (First / Last) Alpha-Num (1 to 255) Alpha-Num (1 to 255) Alpha-Num (1 to 255) Yes The First and Last Name of the person. No The middle name or initial of a person. Yes Each person must be assigned to a Department or Dept.. Dept. is an attribute used to sort and filter people on reports. Shift / Group 1 /Group 2 Certification Date Alpha-Num (1 to 255) Date No These attributes are optional user categories used to sort and filter reports No The certification date is used to prevent access to a person after a specific data. If a certification date is assigned, a person will be denied access if the date expires. Certification dates are updated on the User Edit page. Periodic Test Yes / No No People with the Periodic attribute, do not perform ESD tests on a daily basis. The Periodic Test attribute is used to prevent these people from appearing on reports as "Not Tested". Department Manager Yes / No No When a person is assigned as a Department Manager (on the User Edit page) an email address is also required. This email address is used by the Scheduled Email Service. Name Middle Department When a Department ID is checked on a scheduled report, TEAM will filter the people included on the report by department, the report is then automatically emailed to "Department Managers" Leave Time 4-Nov-2012 Date No Leave time is a list of dates associated with one user. When a report is generated and a person has a leave data = report date, TEAM lists their status as "Leave" rather than "Not Tested" Page 72 of 74 TEAM5 Operation Manual V5.7.xx Repairing a TEAM5 Database If a TEAM5 database becomes corrupt, it may be possible to repair the database using the Microsoft JETCOMP.EXE program. This program and the database file are located in the folder: C:\Program Files\TEAM5\DB To Repair a database; - Using Windows Explorer, open the TEAM5 Database folder C:\Program Files\TEAM5\DB - Rename the TEAM5 database file from TEAM5.mdb to TEAM5_bak.mdb - Open the JETCOM.EXE program - Select the file you just renamed as the (Source) - Enter the following as the (Destination) C:\Program Files\TEAM5\DB\TEAM5.mdb - Click the 'Compact' button - The Status Bar at the bottom of the window will show the progress of database repair process. - When the Status Bar shows "Ready", the repair process is complete - Click Exit - Restart TEAM 4-Nov-2012 Page 73 of 74 TEAM5 Operation Manual V5.7.xx Repairing a TEAM Basic Database If the Team Basic database becomes corrupt, it may be possible to repair the database using the Microsoft JETCOMP.EXE program. This program and the database file are located in the folder: C:\Program Files\TEAM Basic\DB To Repair a database; - Using Windows Explorer, open the TEAM Basic Database folder C:\Program Files\TEAM Basic\DB - Rename the database file from team_basic.mdb to team_basic_bak.mdb - Open the JETCOM.EXE program - Select the file you just renamed as the (Source) - Enter the following as the (Destination) C:\Program Files\TEAM Basic\DB\team_basic.mdb - Click the 'Compact' button - The Status Bar at the bottom of the window will show the progress of database repair process. - When the Status Bar shows "Ready", the repair process is complete - Click Exit - Restart Team Basic 4-Nov-2012 Page 74 of 74