1
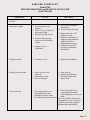
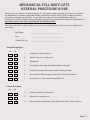
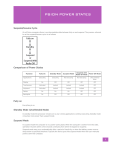
Bariatric Patient Lift
CQ-9750
USER MANUAL
PAGE 1
INDEX
PAGE 2
OPERATION AND LOCATION REFERENCE
PAGE 3
REFERENCE PICTURE OF MECHANICAL OPERATION
PAGE 4
SELECTING THE STYLE OF SLING TO BE USED
LIFTING FROM CHAIR TO BED
PAGE 5
LIFTING FROM BED TO CHAIR
LIFTING FROM THE FLOOR
PAGE 6
LIFTING WITH RECUMBENT BARS
PAGE 7
WEIGHING WITH ELECTRONIC SCALE
CHARGING PROCEDURE
PAGE 8
SERIES 9750 SPEC SHEET
PAGE 9
TROUBLE SHOOTING GUIDE
PAGE 10
TROUBLE SHOOTING GUIDE (CONT.)
PAGE 11
ROUTINE MAINTENANCE
PAGE 12
WARRANTY
PAGE 13-15
GENERAL PROCEDURE GUIDE
Page 1
MECHANICAL OPERATION LOCATION
SERIES 9000
(CQ-9750 Operation Corresponds with the View on Page 3)
1. This lift is powered by a 24VDC removable battery pack located at the back of the lift. The
battery fits either way in the lift and charger receptacle to make it easy to remove and replace the
battery.
2. The lift has a built-in battery indicator which illuminates when the battery is about 60% used
up. This would be the best time to replace with the battery that is full in the charger.
3. Once the battery is inserted into the charging receptacle, the charge light on the charging unit
comes on. Make sure this yellow light comes on to assure your battery is charging. Once the
battery is fully charged, the light will turn green. The charger is fully automatic and will quit
charging when the battery reaches a full charge. You will not damage the battery or charger if left
plugged in all the time.
4. The lift is operated by switches located at the tips of the handles. This allows proper
ergonomics by keeping the hands on the handles while operating the lift and maneuvering it at the
same time.
5. The optional hand control gives a second source to operate the lift. This allows the operator to
be next to the person being transferred and operate the lift at the same time. It also aids as a backup source to operate the lift.
6. If for any reason the lift would stop in mid-travel, the first thing to check is the circuit breaker
located on the battery receptacle. If the breaker has popped out, simply press it back in and try
lifting. If the problem is not the breaker, and you cannot lower the patient/resident by the switch
on the handle or the remote control, you must use the safety override manually.
7. To operate the lift manually, insert the manual override speed wrench that is located at the back
of the lift. Insert the speed wrench through the access hole at the back of the lift indicated by the
sticker stating “Manual Override”. Turn the wrench in the direction of the arrow on the sticker to
lower the lift manually. Depending on the distance needed to travel, this could take several
minutes to lower. A faster option would be to use a 1/4” socket driver and an electric drill inserted
in the same location as the manual override speed wrench supplied.
8. The leg adjuster opens and closes the legs of the lift. By pushing forward on the handle,
maneuver the handle around the stopper plate until the handle snaps into the fully extended
position. This enables the lift to be narrowed to go through doorways and widened to go around a
wheelchair or lounge chair.
9. The brakes are located on the rear wheels. Press the tab with your foot to lock the wheel and
the pivot. Press the tab upward to release the brakes.
Page 2
MECHANICAL OPERATION
Informative Graphic Forthcoming.
Page 3
SELECTING THE STYLE OF SLING TO BE USED
The first step is to select the Style of sling to be used. The most common sling is the divided
leg sling. The person must have two full legs in order for you to use the divided leg sling on them.
This sling is designed to be removed from the Person after they have been transferred into their
wheelchair. This way, they do not have to sit on the sling throughout the time they are sitting in
their chair. If you find it difficult to remove a divided leg sling from behind a person while they are
seated in a wheelchair, you may choose to leave it behind them. Be sure to observe the correct
position of the sling before you lift that person. The sling may have moved. If a person has
discomforts while you use the divided leg sling on them, an option would be the hammock sling. If
you are lifting a single or bilateral amputee, you must always use a hammock sling. The hammock
sling comes with or without the commode hole.
The second step is to determine the proper Size. It’s simple. Lay a sling across the persons
chest. If it’s the proper size sling, you will note 7-8 inches of extra material extended past the side
of each arm. If you observe little or no fabric extended past the arms, you must upgrade to a larger
sling. If you observe more than 8 inches of fabric past each arm, downgrade to a smaller sling. All
styles have a color coded border to easily indicate the size of sling: (purple for Small, raspberry for
Medium, teal for Large, and black for X-Large). The loops on the straps are color coded for
positioning the sling to the desired location. Changing the orientation of these loops will change
the angle of the Person being transferred. This comes in handy for charting the colors that would
work best for each individual. All sling styles come with built-in positioning handles on the back of
the sling. These always face out and are used to position a Person back in a chair.
LIFTING FROM CHAIR TO BED
To apply the divided leg sling on someone sitting in a wheelchair, first lean the person
slightly forward to get clearance between the back of the person and the back of the wheelchair.
Keeping the sling from twisting, work the sling along the crevice between the legs and the chair.
Make sure the sling is all the way down and that there is no gap behind the person. If the sling is
not all the way down, it will not come under the leg very easily. Work the sling along side the legs,
getting as much material going toward the front of the chair as possible. Raise the leg and pull the
material through, trying to prevent any wrinkles. Crisscross the inside flaps with the main loops,
then tread the strap with the color-coded loops through the main loop down to the stopper and do
the same thing on the other side. Crisscrossing the inside flaps will keep the legs tight together for
a more comfortable and dignified transfer. If during the transfer it is required for the person’s legs
to relax open, you can hook it up without crisscrossing the inside flaps. This will allow the legs to
relax open. Now that the sling is positioned, bring the lift towards the person, open the legs of the
lift to the wide position, lower the hanger until the desired colored loops can be hooked on the
hanger. It doesn’t matter if the front or back is hooked up first.
Now, push the up button on the handle or use the remote control to raise the person high
enough to clear the bed. Position the lift so that the person will be lowered to the proper position in
the bed. Once there is plenty of slack in the straps, remove the loops from the hanger and pull the
lift out of the way. Un-thread the straps from the main loops. Roll the person on their side and fold
the sling, then roll to the other side and remove the sling.
Page 4
LIFTING FROM BED TO CHAIR
When transferring from bed to chair, just reverse the steps we just did. Roll the person to
their side and fold the sling. Align the bottom of the back of the sling by the tailbone. Roll the
person to their side and pull the rest of the sling through, straightening any wrinkles. Bring
material under the legs the same way as if they were in the chair. Crisscross the inside flaps and
thread the straps through the main loops. Bring the lift in adjusting the base to the desired
position and lower hanger near the center of the person being transferred. It is recommended to
keep the lift in the widest position at all times when transferring a person that is uncooperative or
combative. Bend the knees and hook up the color-coded loops that were previously used to bring
them to a sitting position. Press the button to raise the lift and make sure the material under the
leg stays straight towards the knee, keeping out as many wrinkles as possible. Note: If the base
is in the narrow position, adjust it to the widest position once you are clear from the bed
and always before turning. Once we are over the chair, lower and guide the person by the builtin handles on the sling to bring them back far into the chair. To remove the sling, reverse the
step. Unthread the straps from the main loops, raise the legs, and pull the material aside. Now,
lean the person forward and pull sling clear.
LIFTING FROM THE FLOOR
To transfer from the floor, apply the sling with the same procedure as if they were in bed.
If the person is on the floor as a result of a fall, no transfer should be attempted until it is
determined that there are no injuries. Once the sling is positioned under the person as if they
were lying in a bed, bring the lift up to the person being transferred from either the head or legs.
If the lift is brought in by the head, apply a pillow between the head and the base of the lift.
Lower the lift to the lowest position and hook up the front two straps to the hanger. Push the lift
up as far as possible, then lock the brakes. Now, hook up the back two straps by bending the
knees and applying the loops to the hanger. All the models of slings come with straps long
enough to transfer from the floor. Note that we are using the sling with a built-in head support.
If you are using a sling without a head support, you will need to support the head with your
hands. When bringing the lift in by the legs, lift the legs onto the base again, cushioning with
some pillows.
Page 5
RECUMBENT BAR INSTRUCTIONS
The R-bars were developed in response to several requests from customers to develop a system that
will transport hip patients. The system will equally lift patients whose bodies are rigid. Previous to
the R-bar system, nurses had no choice but to lift their patients manually, thereby placing
themselves and patients at risk. Caution: Be sure to consult with the patient’s health care
provider for proper patient positioning and transport. The R-bar system is designed to be
used on CQ-9750 Lift only!
Instructions:
1. Assess the Patient: Consult with the patient’s nurse.
2. Prepare the Model CQ-9750 Lift: Remove the R-bars from the bag. Attach the R-bars to the Jhooks on the lift. Double check the connections. Observe the black nylon loops. If
frayed, cease activity and order new loops. Be sure to hang the R-bars directly under each moving
hanger bar from the lift. You want the R-bars to mirror image the movement of the existing hanger
bars. Do not attach the R-bars perpendicular.
3. Safety: Observe the R-bar sling you will be using. Check the fabric for tears, holes, and frays.
If damaged, replace with a new sling.
4. Place the Abductor Pillow: Place the pillow between the groin and the knees. Note a white
label that says “ConvaQuip”. You should be able to read that label as it is placed properly between
the legs.
5. Place the Sling: Rest the sling beside the patient. Log roll the patient to one side. Carefully
slide the sling underneath the patient. Be sure the bottom of the sling will rest at knee level. Roll
the patient back and pull the remaining material out until you see that the patient will be directly in
the middle of the sling.
6. Lift the Patient: Open the legs of the lift. Place the R-bars directly over the
patient. Use the patient’s belly button as a centering point. Lower the lift low enough to provide
ease of sling hook-up. Double check your connections. Adjust the head support. Tell the patient
you are about to lift them, then lift. Lift the patient high enough to clear the bed and transport to
the nearest recliner. Center the patient over the recliner and lower the patient. DO NOT
MANIPULATE THE LIFT BY PULLING ON THE PATIENT! Remove the abductor pillow and
leave the sling behind the patient. Before you lift the patient from the recliner to transport back to
bed, check to see that the sling is in the correct lifting position. If not, reposition the sling. Open
the legs on the lift. Apply the abductor pillow. Lift, Transport, and Lower the patient
into bed. Unhook the sling and move the lift aside. Remove the sling from under the patient.
Observe the sling for contaminants. If soiled, launder per ConvaQuip instructions located on the
sling.
Page 6
WEIGHING WITH ELECTRONIC SCALE
The electronic digital scale allows the person to be weighed during a transfer. Press the
“ON/ZERO” button to turn on the scale. Make sure that “LOW BAT” did not appear on the screen,
if so, replace the four “AA” batteries located on the side of the scale. The scale will take about 5
seconds to zero itself. Place the desired sling onto the hanger, making sure it is not touching the
ground, and press the “ON/ZERO” button. This will place the weight of the sling into memory and
will automatically minus out the weight of the sling from the reading. This reading will always stay
in memory, even if the scale is shut off, until you run this procedure again. Now with the scale still
on, remove the sling and place it beneath the person being weighed. Select pounds or kilograms by
pressing and holding the units button to toggle back and forth. Lift the person clear of the chair or
bed. Once the reading is steady, the scale will lock on the reading to make it easier to read if the
person will not remain steady. The scale runs on four “AA” batteries. The scale has a built-in
battery indicator that will warn you when the batteries are getting low. The scale will automatically
shut off by itself if left untouched over 2 minutes. To manually shut off the scale, simply press and
hold the “OFF” button until the screen goes blank.
The optional Litter Attachment or Recumbent Bars can be used to weigh someone who is
bedridden and must be lifted in a horizontal position. The scale will zero out the weight of the litter
or recumbent bars to resemble the most accurate weight.
CHARGING PROCEDURE
1.
The lift has a battery indicator light located on the receptacle that will flash when the battery
is low. This is the best time to exchange the battery with one that is fully charged at the charger.
2.
Keep the charging receptacle on a counter or flat surface near an outlet where the suction
cups will have good contact.
3.
With the charger plugged into the outlet, the battery can be inserted either way into the
charging receptacle. Insert the battery from the top, making sure the yellow light comes on to
indicate contact.
4.
When the green light on the charger has lit, the batter is fully charged and will shut off
automatically. It will not overcharge the battery.
*The charger will not be damaged if lift in the wall at all times
*The charger will get warm during its charge cycle
Page 7
CQ-9750 Bariatric
Patient Lift
Spec Sheet
Informative Graphic Forthcoming
Item No.Part No.
1
2
3
4
5
6
7
8
9
10
11
12
13
14
15
36 Base Assembly Complete
Front Leg Assembly
Pin
Front Leg Assembly (Left)
Pin Washer
Top Cap Assy
Mast Spacer Cap
1000 lb - L mast
1000 lb - R mast
Base Cover Ver III- 1
Base Cover Ver III- 2
1000 lb Lifting Assembly
1000 lb Power Box Assembly
5 in Revvo
5 in Revvo
Qty.
1
1
2
1
2
2
1
1
1
1
1
1
1
4
2
Item No.Part No.
16
17
18
19
20
21
22
23
24
25
26
27
28
29
Front Mast Cover
Rear Mast Cover
Side Mast Bracket Assy R
Side Mast Bracket Assy L
Handle Bar Assy
HDK Beam Hander Mount Shaft
HDK Hander Complete
HDK Adj Handle Assembly
Adjuster Mount Assembly
HDK Leg Adjuster Rod Assy R
HDK Leg Adjuster Rod Assy L
HDK 24V Battery
HDK Leg Cover
10047-2 Square Remote Assy
Qty.
1
1
1
1
1
1
1
1
1
1
1
1
2
1
Page 8
BARIATRIC PATIENT LIFT
Model CQ-9750
TROUBLESHOOTING and MAINTENANCE GUIDE
CAUSE
PROBLEM
SOLUTION
I. LIFT
1. Lift won’t go up
1.
2.
3.
4.
Bad lift control switch
Dead battery
Hand control is broken
Actuator not working
6. Circuit Breaker popped
1. Remove and replace
2. Switch batteries
3. Send in hand control for
repair or order new parts
4. Replace motor
5. Make sure battery pack
is making contact with
terminals in the receiver box
6. Push in Circuit Breaker
1. Not enough grease on
actuator
2. Loud ticking noise when
lift goes up and down
1. Put white lithium grease on
the upper and lower part of
the actuator
2. Replace actuator nut
3. Faulty or worn out actuator
3. Replace actuator
1. Batteries are worn out or
circuit board is bad
2. Batteries are not being
charged when the RED
charge battery light comes
On
1. Order new batteries or
order new circuit board
2. Order new batteries; also
make sure that you charge
the batteries when the
RED light comes on
1. Fuse is blown in the
transformer
2. Electrical outlet may not be
Operational
1. Order a new transformer
5. Battery is not making
connection
II. ACTUATOR
1. Actuator makes noise
III. BATTERY PACK
1. Charge battery light stays on
constantly
2. Batteries wearing out too
Quickly
IV. BATTERY CHARGER
1. Battery charger lights do not
come on when plugged in
2. Use different outlet
Page 9
BARIATRIC PATIENT LIFT
Model 9750
TROUBLESHOOTING and MAINTENANCE GUIDE
(CONTINUED)
PROBLEM
CAUSE
SOLUTION
I. SCALE
1. Inaccurate weights
1. Not zeroing out scale
properly
2. “Lbs” to “Kg” switch is in
the wrong setting
3. Batteries in scale are low
4. Person in lift is moving
excessively while taking
weight
5. System is out of
Calibration
1. Zero scale according to
instructions
2. Switch to desired setting
3. Replace the four “AA”
batteries in scale
4. Make sure the patient is
hanging evenly under the
hanger and there is
minimumal movement
5. Calibrate the scale following the calibration
Instructions
2. Display is erratic
1. Lift battery is low
1. Replace the lift battery
3. Display screen is blank
1. Power to scale is not
turned on
2. Lift battery is dead
3. Scale is damaged
1. Turn scale on
2. Replace the lift battery
3. Call tech suppport for
Instructions
4. Scale reads 9.0L
1. The wiring harness connecting the load cell to
the display box has either
been damaged or disconnected
1. Check entire black wire
connecting the load cell
to the display box for a cut or
break
Note: If you find a break in the
wiring harness, you will need to
solder the wires back together
and tape them individually.
Page 10
ROUTINE MAINTENANCE
Every Day
Periodically
* After each person you lift,
you should check the sling,
and wash if needed; refer
to the ConvaQuip laundering
Instructions located on the sling
label.
* Grease actuator every six
months.
* Check the movement of
the lift; remove hair from
the casters if needed.
* Check leg covers; if
cracked, replace with new.
* Check all vinyl covers; if
worn, replace with new.
* Check all external fittings;
tighten where needed.
* Check the condition of all
slings; if you are in doubt
of its operational ability to
safely lift a person, then
discard the sling and order
a new sling.
* Check the lift; if the “RED”
light is on, then charge
the batteries.
Periodic Testing
* General Lift Condition:
A general visual inspection
of the external parts and
all functions should be
carried out to ensure no
adverse damage has occurred. If any doubt,
withdraw the equipment
from use and call the
ConvaQuip Service Dept
at (800) 637-8436.
* Keep your ConvaQuip lift
clean by wiping it down
with a damp cloth; use a
mild detergent if needed.
NOTE: Do not use a
petroleum based solvent on
paint, stickers, or plastic.
Page 11
WARRANTY
1 YEAR LIMITED WARRANTY ON ALL PARTS
ONLY UNDER CONDITIONS OF NORMAL
AND INTENDED USE. 10 YEAR WARRANTY
ON THE MAIN STRUCTURE OF THE LIFT.
MISUSE, DAMAGE OR ALTERATION OF
BODY LIFT OR ANY OF ITS PARTS, VOIDS
THE WARRANTY. NO OTHER WARRANTIES
WRITTEN, VERBAL, IMPLIED OR OTHER
THAN LISTED HERE WILL BE HONORED.
Page 12
MECHANICAL FULL BODY LIFTS
GENERAL PROCEDURE GUIDE
Thank you for selecting the ConvaQuip Patient Lift. The purpose of these operating instructions is to introduce
the authorized user/operator in using and working with this device safely, and to conduct routine preventative
maintenance procedures on the device. For this goal to be achieved, it is essential that the authorized
user/operator carefully read this manual, understand, and practice the precautionary measures recommended in it.
Please have anyone who will be operating this lift read this manual.
This form is intended as a guide to help you develop a procedure sheet that will fit your specific application in
your facility.
Staff Name:
____________________________________
Date:
____________________________________
Checked Off By:
____________________________________
General Preparation:
Yes
No
1.
Identify the resident or patient.
2.
Explain what you are going to do.
3.
Wash hands.
4.
Get supplies ready: sling, wheelchair, blanket or lap robe.
5.
Get help from experienced team member for this procedure.
6.
Have assistant stand on opposite side of bed to assist with transfer.
7.
Provide privacy. Pull curtain all around the bed.
1.
Position wheelchair at foot of bed.
2.
Adjust bed to working level.
3.
Make sure battery indicator does not indicate low battery. (If so, replace.)
General Procedure:
No
Yes
Page 13
MECHANICAL FULL BODY LIFTS
GENERAL PROCEDURE GUIDE
Yes
(Continued)
No
4.
a.) Examine lift sling for any damage: tears, frays, or weak areas.
b.) Make sure the correct size sling is to be applied.
c.) If weighing resident or patient, hang the sling on the hanger hooks,
press the ON button.
5.
Lower side rails.
6.
Roll resident or patient to one side and place sling, folded halfway under
resident or patient. Top of sling should be approximately at shoulder
blade area. Bottom of sling should be approximately near the tail bone.
7.
Roll resident or patient to other side and pull rolled half of sling
through. Smooth sling and check correct placement.
8.
Roll resident or patient onto center of sling. Pull padded legs on sling
along each side and wrap inside thigh areas close to groin area.
Crisscross straps through the holes before hooking to the lift.
9.
Raise head of bed slightly.
10.
Position lift over bed and instruct assistant to help guide lift into proper
position.
11.
Check that base legs of lift are in wide position where applicable. If
base position must remain in narrow position, make sure the lift area
between bed and chair are clear of any obstacles. Widen once clear
from bed.
12.
Attach straps on sling to lift. Remember that the straps at the thigh area
must be crisscrossed at the hanger before lifting.
13.
Tell assistant to guide resident as you begin to lift them from the bed
using “up” button on hand control or “up” button at handle grips. Once
there is slight tension on the straps, check to make sure all four loops are
still on the hooks before lifting.
14.
Lift resident or patient until buttocks have cleared the bed. Give
reassurance to allay fears. If weighing, steady resident or patient and
look at the reading on the scale.
15.
Tell assistant to steady the resident or patient in lift and guide to position
over wheelchair, trolley, tub lift, etc. CAUTION: Push and turn the lift
from the handles only. Pushing on the top of the beam or on the
resident or patient could jeopardize the lift’s stability.
16.
Lock wheelchair brakes.
17.
Instruct assistant to stand behind wheelchair and place hands in
positioning straps on both sides of sling. While the resident or patient is
coming down, pull the handles back to position the resident or patient in
an upright position.
Page 14
MECHANICAL FULL BODY LIFTS
GENERAL PROCEDURE GUIDE
Yes
(Continued)
No
18.
Disconnect all straps from the hanger and remove sling by raising legs and
pulling along sides. Ask resident or patient to lean forward to remove for
back and hip area.
19.
Move lift away and adjust for comfort. Apply safety belt if ordered. Position
feet on foot pedals.
20.
Cover lap with blanket and leave call light within reach.
21.
Wash hands. Report reaction and overall tolerance to team leader.
Page 15