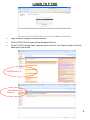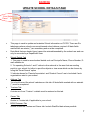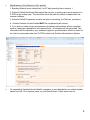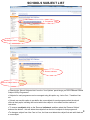
1
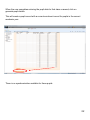
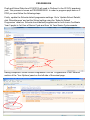
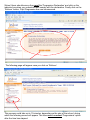
USER MANUAL Post- Primary Online Database P-POD Last Update 16 September 2014 Table of Contents Introduction Initial Setup Requirements – ‘Must Do’ Login School * Update School Details * School Subject Lists * School Report Options Pupil * Add New Entrant * Pupil Search * Pupil Batch Update * Inter-school Transfer * PLC Data Entry Rollover * Progressions October Returns * Rules Report * Submit Returns To DES Settings * Synchronization Reports Produced By P-POD Contact Details 2 Introduction • The objective of the Post-Primary Online Database (P-POD) project is to provide an efficient and effective IT solution that enables sharing of data on schools and pupils which are common to the data needs of post-primary schools, the Department, State Examination Commission and other agencies within the education sector. • The IT solution will also accommodate any future development to meet the full implementation of the Department’s Data Strategy to link information on the characteristics and needs of individual learners from pre-primary to higher and further education. • P-POD is a central database for all post-primary schools accessed through the esinet portal. Initially this database will be pre-populated with the data of students which schools returned to the Department in October 2013. • From 2014/15 onwards, schools will use P-POD to submit their October Returns to the Department. Thus eliminating the need for schools to generate their October Returns files from their local student administration system and submitting them to the Department via esinet. • Schools must continue to submit the mandatory paperwork i.e. OL1/ Certificate of Management Authority to the Department so that the returns can be processed. • This User Manual document is a work in progress and will be revised on regular basis, as PPOD is updated. Please revisit this document as often as possible to insure you are always operating with the latest database functionalities. 3 Initial Setup Requirements Pupil Data from 2013/2014 October Returns process will be migrated to P-POD. P-POD will allow schools to carry out a number of functions as briefly outlined below; Step 1. Update School Details – See also Page 6 This ‘Update School Details’ page, consisting of six separate tabs can be used to update or amend basic school information held on P-POD as it relates to the school. It is important to thoroughly check all the information recorded in these tabs before continuing to enter pupil data. All data fields marked with an asterix (*) are mandatory and must be completed. Data fields that are ‘greyed out’ cannot be entered or amended by the school user and will be entered or amended by a Department User. If a change is required to data in a "greyed out" field the school should forward details of the change via e-mail to [email protected] outlining the amendment required.. Miscellaneous Tab Section 2 – Default Progression and Enrolment Date Schools should default the natural progression path for all Junior Certificate year 3 pupils to the first year to the senior cycle as offered by the school (Transition Year, Leaving Certificate etc) as applicable. Schools can also default the progression path of their transition year pupils to whichever Leaving certificate course is offered by the school. School can also set default enrolment date for all incoming new entrants to the school in the following academic year. Section 3 – October Returns Contact Details These are mandatory fields and basically the school should record the contact details for the staff member who is responsible for the school’s October Returns Section 4 – Data Synchronisation Credentials Data Synchronisation routine provided by your software supplier requires a separate Username and Password to operate. Schools can generate their own Username and password for Synchronisation by entering a password of their choosing and clicking the “CREATE” button – This information should be kept safely as it will be required for future data synchronisation. Step 2 School Subject Lists – See also Page 11 ‘Maintain School Subject List By Programme’ is used to pre-define core and other subjects for the various programmes (Junior Cert, Leaving Cert etc.) offered by your school. It is imperative that schools pre-define subject lists for each programme being offered in the school before they commence entering pupil data as this will make the entering of new pupils a lot easier to complete at data entry stage. This must be completed before proceeding to key up New Entrants. Once the above steps have been taken, schools should start to enter new entrant pupil data on to PPOD.as outlined follows. 4 Add New Entrants School users should use the ‘Add New Entrant’ page to enter a new pupils personal details onto the P-POD system. Once Personal data has been entered for a pupil, the system will assign a Pupil Id (DPIN) for the pupil and it will bring you to the ‘Maintain New Entrant‘ page, where enrolment records, subjects, exemptions can be recorded. Family and Medical details can also be recorded if this option is “Turned On” under the Settings/Synchronization Option. Only those with an “Approver” role in the school can turn on/off this option.. Pupil Search This page will allow users to search for an existing pupil or groups of pupils on P-POD by using the various search parameter options. The results will allow you to select a pupil by clicking on the Pupil ID which brings the user to the ‘Maintain Pupil’ page, which is similar to the ‘Maintain New Entrant‘ page, where enrolment records, subjects, exemptions, Family and Medical details can be recorded or amended as required. Pupil Batch Update This page is used to update and amend groups of pupils with the same data e.g. Year 1 Junior Cert optional subject choices. This facility can be used to update Enrolment Records, Subject Records or both en mass. 5 LOGIN TO P POD Login to esinet’ using the normal procedure. Click on ‘PPOD Post Primary Online Database’ Service. On the P POD ‘Landing Page’ select an option from the ‘Your Options’ panel on the left hand side of the screen. PPOD Service ‘Your Options’ Panel 6 SCHOOL UPDATE SCHOOL DETAILS PAGE ‘Your Options’ Panel This page is used to update and maintain School information on P-POD. There are Six tabs/pages where schools can record/amend school data as required. All data fields marked with an asterix (*) are mandatory and must be completed. Data fields that are shaded (grey) cannot be entered/amended by the school user and can only be recorded by a Department User. School Details Tab 1. This page is used to record school details such as Principal’s Name, Phone Number, Email address etc 2. ‘Co-operating Schools 1 and 2’ refers to other schools in the area that are sending pupils to your school for tuition in specific subjects or visa versa which can be chosen by using the ‘Smart Search’ option 3. Indicator boxes for ‘Parents Association’ and ‘Student Council’ are to be ticked if such organisations exist in your school. Address Tab You should record the school’s address on this tab. All data fields marked with an asterisk (*) must be completed. Trustees Tab A minimum of one ‘Trustee’ ‘s details must be entered on this tab. Owner Tab Similar to ‘Trustee tab, if applicable to your school. BOM Chairman Tab Similar to both the Trustee and Owner tab. Include Start/End date where possible. 7 Miscellaneous Tab (Attention to ALL points!) 1. Boarding Schools must submit their 5 or 6/7 day boarding fees in section 1. 2. School’s Default Enrolment Date should be set prior to entering any new entrants on to P-POD for the school year. This should be set to the date the school re-opens after the summer holidays. 3. School's Default Progression must be set prior to executing the ‘Rollover’ procedure. 4. October Returns Contact Details MUST be completed by all schools. 5. If you wish to create a login and password for data synchronization, please complete section 4 and type a password in the relevant field – A username will be generated. This information will be required by your software supplier’s synchronisation routine in order for the User to synchronise data from P-POD to their local Student Administration System. On completing ‘Update Schools Details’ remember to save data before you select another option from the ‘Your Options’ panel e.g. Add New Entrant, Pupils search etc etc. 8 SCHOOLS SUBJECT LIST ‘Programme’ Tabs ‘Add Subject’ button Remove Indicator ‘Remove Subject’ button Selecting the ‘School Subjects Lists’ from the ‘Your Options’ panel brings you to the ‘Maintain School Subject List By Programme’. Subjects for each programme can be managed using this option e.g. Junior Cert , Transition Year etc. Schools can use this option to pre-define the core subjects for each programme that the school offers to their pupils, including the level at which the subject is to be taken and the medium of instruction. To remove a subject/s click on the ‘Remove Indicator/s’ and then select the ‘Remove Subject’ button at the bottom – this will delete the subject/s from the list of subjects for that programme. To change a subject from Non Core to Core, the User must delete the subject first and add it back as a core subject. 9 School Report Options Latest Progressions This will produce a report on a pupil by pupil basis including subject details following the completion of a “Rollover” process – where pupil data from one academic year is brought forward to a subsequent academic year EG 2012/13 to 2013/14 N.B. – Subjects listed on this report are the previous year's subjects and are not current. CMA/OL20 Schools can produce their Certificate of Management Authority and their OL20 Report associated with their October Returns, which has to be sent to the Department in order to have the Returns processed Schools in the ETB Sector will need to forward the CMA/OL20 to their Head Office for counter signature by the Chief Executive before sending it on to the Department in order to have the school’s October Returns processed. 10 PUPIL ADD NEW ENTRANT PAGE ‘Next’ Button School Users should use this page to enter a New Pupils personal details onto the P-POD system for your school. Data fields marked with an asterix (*) are mandatory. When all the Pupil’s data has been entered, you should click the ‘Next’ button. At this point, the pupil will be assigned a Pupil Id number and the other data tabs e.g. Enrolment record etc will become active for the school user to enter all other data relevant to that pupil record on P-POD via the ‘Maintain New Entrant’ screen. The School User can now 1. Save Personal details 2. Cancel any further transactions 3. Or Delete the personal record 11 Maintain New Entrant ‘Maintain New Entrant’ Tabs ‘Save’ button The ‘Maintain New Entrant’ page is for recording additional student information such as Enrolment record, Subjects, Exemptions etc. School Users should record appropriate data on each of the tabs on the ‘Maintain New Entrant’ screen. Please note that the default value for ‘Programme’ is Junior Certificate and ‘Programme Year’ is Year 1. Care should be taken when entering new entrants for any other Programme/Programme Years other than Junior Certificate, Year 1 pupils (i.e. 1st Year Pupils) ‘Subjects’ are selected with ‘Add All Core Subjects’ and ‘Add Subject’ buttons as required. Both Irish Exemptions and Repeat of a Year Exemptions can be recorded for a pupil where necessary via this Exemptions Tab. Also existing exemptions can be viewed and incorrect exemptions can be deleted. The Family Details tab and Medical tab are for school use only. While the data entered on these tabs will be stored on the central database, the data itself will only be visible to the school user if this option has been “Turned On” on the Settings/Synchronisation Option Schools are reminded to save details on a regular basis to avoid losing data. If you have exited the screen you can retrieve new entrants from Pupil Search/Academic Year/ New Entrant. N.B. To add a late entry, the User must ensure that the academic year is correct. 12 PUPIL SEARCH By selecting ‘Pupil Search’ from the ‘Your Options’ panel it takes the user to the ‘Pupil Search’ Page. Enter details into the data boxes from the dropdown lists. A search will be progress once data has been entered into any data box. The search parameters are as follows Search for Pupils by ‘Academic Year’. Search for Pupils by ‘PPSN’. Search for Pupils by ‘Programme’. Search for Pupils by ‘Forename’ or ‘Surname’ or both. Search for Pupils by ‘New Entrant’ indicator. Search for Pupils by ‘Roll Class’ PUPIL ID if available Search for Pupils by ‘Programme’ or ‘Prog Year’ or both. To narrow the search results use as many data parameters as possible. All combination of data parameters will produce results. Click the ‘Search’ button to start the search. The ‘Pupil Search Results’ page will appear. If the search results return exactly one pupil match, that pupil’s record will be displayed. 13 PUPIL SEARCH (Continued) Selecting the ‘Return To Search’ button (And this should be a single click), will bring you back to the ‘Pupil Search’ Page. To select from the pupils listed by the search, double click on ‘Pupil ID’’ for the pupil required and it will take you to the ‘Maintain Pupil’ screen on P-POD. This ‘Maintain Pupil’ screen is very similar to the ‘Maintain New Entrant’ screen all but for one additional tab – ‘Enrolment History’ tab. This ‘Enrolment History’ tab will allow the school user to view a pupils previous enrolment details as recorded on P-POD. 14 Pupil Batch Update Batch Update Criteria The ‘Pupil Batch Update’ facility is used to amend/update groups of pupils who have the same update requirement, e.g. optional subject choice, programme changes, roll class and enrolment date By selecting ‘Pupil Batch Update’ from the ‘Your Options’ panel It takes the User to the ‘Pupil Batch Search’ Page (1st Slide). Define the pupils that are to have their records updated through the search criteria and click the ‘Search’ button. The ‘Pupil Batch Search Results’ page (2nd Slide) is returned. This facility can be used to either update pupil Enrolment Records, subject records or both. The User will select pupils to update by tick box beside pupil ID, and click the ‘Select Pupils’ button. Choose the amendment’s that are to be made either on enrolment, subject or both. On enrolment tab click update batch to amend enrolment criteria and on subject tab click add/delete/edit to amend subject details. Click the ‘Select Pupils’ button. Selecting the ‘Return To Search’ button will bring you back to the ‘Pupil Batch Search’ Page. 15 Deleting a Pupil / Enrolment Record It is important to note the difference between ‘Deleting a Pupil Record’ and ‘Deleting an Enrolment Record’. Deleting a Pupil Record 1. Deleting a Pupil Record only applies to a ‘New Entrant’ pupil who does not have a previous Enrolment Record EG Where a new entrant pupil enrols with the school but doesn’t ever attend. 2. To delete the record you select ‘Pupil Search’ from the ‘Your Options’ menu. Enter the search criteria as required. Select the required pupil by ‘clicking’ on the Pupil ID 16 Select ‘Delete Pupil’ button on the ‘Personal Tab’ and click ‘OK’ on the message box that appears. The Pupil record has been deleted. Deleting an Enrolment Record An enrolment record on the other hand will need to be deleted when a pupil who has been enrolled in the school the previous year and has been rolled over, but who doesn’t attend will need to have their enrolment record deleted. 1. To delete an ‘Enrolment record’ go to the ‘Maintain Pupil’ page and select the Enrolment Tab. 2. Complete the ‘Pupil Leaving Details’ of this section. All sections must be completed; a. Click on the Indicator Box. b. Enter the ‘Early Leaving Date’ and an ‘Early Leaving Reason’ c. Select ‘Delete Pupil Enrolment’ and click ‘OK’ on the message box. 17 Inter-school Transfer This facility will allow Schools to transfer a pupils records on P-POD from their previous School. The previous School must mark the pupil as an “Early Leaver” in the ‘Maintain Pupil Page’ on the ‘Enrolment Tab’ with the roll number of the destination School. If this information is not available to ‘Receiving’ School should make contact with the previous school (Principal) and request them to mark the pupil as an “Early Leaver” with the new School roll number. 1 2 It is very important to ensure that you have not already manually added the pupil as a ‘New Entrant’. If you have, you must delete the pupil’s record on P-POD first and then transfer the pupil using the interschool transfer facility. This facility will transfer historical records and exemptions where applicable. As the ‘Receiving School’ you click on the ‘Inter-school Transfer’ button in the ‘Your Options’ menu on the left hand side of the PPOD page and you will get a list of pupils who have 18 indicated your School roll number as their destination School. The following list will appear. 1 2 Select the pupil by clicking on the ‘Tag Box’ beside the ‘Pupils id’ and then click on the ‘Transfer’ button located beneath the list. Once transferred, a new enrolment record will be created for the pupil in the current academic year. a. The school must amend the programme and programme year to the correct pupil data and insert the roll class for the pupil. b. The default enrolment date is the date of transfer, which can be amended if necessary. (Pupils should only be transferred within the current academic year i.e. pupil starting from 01/09/2014 should only be transferred where current year is 2014/15). The screen below will appear on completion of the data transaction. 19 PLC Data Entry This “rapid data entry” page allows PLC pupils to be entered onto P-POD, with a reduced set of pupil data fields. This routine will facilitate large PLC providers to enter necessary pupil data quickly. The data entered, will generate a partial record sufficient for October Returns. This data will NOT synchronize with your local database. If you require the pupil data to synchronize you must add the data through the ‘Add New Entrant’ key. There are two important points to be noted before you start this procedure. Firstly, check the ‘School Subject List’ to ensure the PLC Tab has been pre-populated with details of the courses that have been approved by SOLAS for your School. And secondly, you must have completed your P-POD Progression so that the current Academic Year is 2014/15. As a P-POD Data Entry Users you can click into the PLC data entry screen by selecting ‘PLC Data Entry’ for the ‘Your Options’ menu on the left hand side of the PPOD page and complete the following actions: 1. Select the required course from the dropdown list. 2. Select the desired Year and Roll Class, and click on SET Course Button. Once you have entered this data, the Pupil PPSN data box will open and no longer be ‘greyed out’. 1 2 20 When you type in the PPSN and use the TAB button, the pupil details field will populate if the pupil already exists on the Database. You may have to include the attainment or Location. Indicate if Dispersed VTOS by clicking the checkbox. If no pupil details are returned, then pupil does not exist on the database and all details will have to be input. A user can save the pupils and exit and return to this list at any time. 21 When the user completes entering the pupil data for that class or award, click on generate pupil details. This will create a pupil record with a current enrolment record for pupils in the current academic year There is no synchronization available for these pupils. 22 Rollover PROGRESSION • In order for a school to roll over pupil data from one academic year to the next in P-POD, a process known as ‘Progression’ has been developed. This process takes the current pupil data and moves it forward to the next academic year e.g. Junior Cert Year 1 to Junior Cert Year 2, Junior Cert Year 2 to Junior Cert Year 3 etc • Progression will move students’ data along the academic paths that the majority of students are following. The Progression routine must be completed before the 30th September of each academic year. • The natural progression of pupil data is straight forward and will not require any default progressions to be set by the school. Pupils in the final year of the Junior Cycle programme (e.g. Junior Cert Year 3 and in Transition Year 1) will need to be progressed to a new programme. School Users should set school default progressions for both pupils in Junior Cert/JCSP Year 3 and Transition Year if provided by the school before initiating the progression routine. • After Progression routine is complete, A school user can use the Batch update facility or single student update facility to make necessary changes where a minority group of pupils or a single pupil are not following the majority progression, e.g. a small group of pupils progressing to Leaving Cert Applied after Junior Cert year 3 rather than Transition Year, or if an individual is following a separate unique progression path or specific subject choices. • Where the core subjects have been pre-defined in the School Subjects List, pupils will automatically have these subjects assigned to their records when progression takes place. • Pupils who leave school during the academic year (Early School Leavers-ESL’s) must have their data updated prior to running the progression routine. Their departure from your school must be recorded on P-POD before progression to ensure that ESL data will not rollover into the next academic year. • More Detailed instruction as how to how to carryout a Progression is outlined below PROGRESSION Pupil and School Data from 2012/2013 will need to ‘Rollover’ to the 2013/14 academic year. This process is known as PROGRESSION . In order to progress pupil data on P POD you must follow the following steps. Firstly, update the Schools default progression settings. Go to ‘Update School Details’, click ‘Miscellaneous’ and set the School setting using the ‘School’s Default Progression’ data box. Schools should default progressions for both Junior Certificate Year 3 pupils to 1st Year of Senior Cycle and from 1st Year Senior Cycle onwards. Having completed ‘School Default Progression’ click on ‘Progressions’ in the ‘Rollover’ section of the ‘Your Options’ panel on the left side of the esinet page. School Users should ensure they read the ‘Progression Declaration’ and click on the indicator box when you understand and comply with the declaration. Finally click on the ‘Rollover’ button. Pupil Progression has now commenced. The following page will appear once you click on ‘Rollover’ This process could take up to 10 minutes, depending on the size of the school, during which the following screen will appear. The User must re-select ‘Progressions’ option after the time has elapsed On completion of the Progression process, the ‘Progression Summary’ will be displayed for the user. A Progression Report may be printed by clicking ‘School Progression Report’ in the ‘Progression’ data box from the ‘Your Options’ panel. Print the report! October Returns Rules Report The Rules report is a summary of all warnings and errors pertaining to both School and Pupil data as stored on PPOD. Schools should normally run a progression process at some stage prior to the commencement of a new academic year. The next step will be for schools to finalise their pupil data for October Returns purposes. The ‘Rules Report’ in the ‘October Returns’ Section of ‘Your Options’ menu will allow schools to generate a report of errors and warnings for their pupil cohort and allow the User correct these errors and warnings prior to submitting the school’s October Returns. This will bring you to the ‘Rules Report Page’. The errors and warnings are listed under three (3) Tabs – Pupil, School and Rules. The Schools tab is for information only and will display any errors or warnings as it relates to the ‘School’ data only. To correct the ‘School’ errors please contact the PPOD helpdesk. The Pupil tab will enable the user to correct errors and warnings on an individual pupil basis, click on the ‘Pupil’ Tab. A list of pupils will appear with the relevant error recorded beside the individual pupil. Selecting the ‘Pupil will bring you to the ‘Maintain Pupil’ page where the necessary correction/amendment to the pupil’s record can be made. 28 The ‘Rules’ Tabs will group errors and warnings by Rule that is being broken. By clicking on the ‘Count of Broken Rules’ (highlighted in blue), Pupils who break this rule in common will be displayed in the ‘Batch Update’ facility, which will enable the user to make the same correction/amendment for a number of pupils at the same time. It is important to note that Pupils must be in the same ‘Programme’ and ‘Year’ to apply the correction /amendment to that group of pupils only. Return to the ‘Rules Report’ page and select the ‘Regenerate Rules Report’ Button. Continue to correct all errors and warning in the manner. When all errors and warning have been cleared, the following page will appear. It may not be possible to clear all errors/warnings but it’s in the best interest of the school that any errors that can be corrected are, and an brief written explanation is provided to the Department when the school is submitting their October returns paperwork for the outstanding errors 29 Submit Returns to DES In order to generate October Returns it is necessary to click on the ‘Submit Returns to DES’ button in the ‘October Returns’ Section of the ‘Your Options panel. The ‘Declaration box’ followed by the ‘Next’ button must be ticked to proceed with generation of the October Returns Files. The process will continue to a new screen to let the user know that the files are being generated. This process may take 15 minutes. Once the process has completed an e-mail will be sent to the e-mail address of the ‘October Returns Contact Details’ supplied in the ‘School Details’ Page (Miscellaneous Tab). On receipt of the e-mail one may click on the ‘Refresh’ button for confirmation the files have been sent and are awaiting confirmation. 30 If the figures in the Summary of October Returns on screen 3 are correct, User should click on the checkbox to agree to the declaration and click the Submit button. Once the files are transferred to DES, School User can print the combined OL20 Report and CMA by clicking on OL20 Report. The paperwork forms part of the October Returns Process and should be signed by the relevant bodies (Principal/CE of ETB’s) and returned immediately to the PLDS Section. 31 The combined Certificate of Management / OL20 will need to be printed off and signed by the School Principal prior to sending it in to the Department to have their school’s October Returns processed. Schools in the ETB sector will need to forward a signed Certificate of Management / OL20 to their Head Office for counter signature by the Chief Executive and onward transmission to the Department to have the school’s October Returns processed. 32 Settings Synchronization • The ‘Family Details’ tab and ‘Medical’ tab are for school use only. While the data entered on these tabs is stored on the central database, the data itself will only be visible and accessible to the school user. • For synchronisation, a school user may opt out of the ‘Synchronisation Routine’ for these two sections. If a school decides to take this option, the school user will be obliged to key all the relevant Family and Medical data for their students onto their local school administration system. • This option is selected by accessing P-POD through ‘esinet’. In the ‘Your Options’ column on the left side of the screen, under the ‘Settings’ section, the synchronisation routine options are available to the school user. As a school user the following pages will appear depending on whether the ‘School Approver’ has selected to ‘Turn On Synchronisation’ or ‘Turn Off Synchronisation’. It should be noted that where a school has not updated Family Contacts/Medical Details on P-POD but have such information stored on their local Student Administration System, Data Synchronisation will overwrite student records on the local system. 33 This option to ‘Opt In’ or ‘Opt Out’ of the synchronization of Family and Medical Details can only be set by the ‘School Approver’. Once the ‘School Approver’ has logged in and selected the Synchronization option in Settings the following page appears. 34 To ‘Turn On’ Synchronization: 1. Select the indicator box on the right side of the synchronization declaration 2. Click the ‘Turn On’ button. The following page will appear: 35 Reports Produced by P-POD The ‘Print Menu’ button allows schools to print a variety of pupil reports. When a school selects this option, it will bring them to the ‘Pupils Reports Options’. Select whichever report is required from those listed. Personal Details – prints the personal data recorded on P-POD for the pupil. Programme Details – prints off the pupil’s enrolment record Subjects Details – prints off the list of subjects the pupils has been entered for on P-POD Enrolment History – prints a summary of the pupil’s enrolments over the years that the pupils has been in Post Primary school. Current Exemptions – prints a summary of the pupil’s exemptions as entered on P-POD. Pupil Family Details Report – prints a summary of the pupil’s family details recorded on PPOD. Medical Details – prints a summary of the pupil’s medical details recorded on P-POD Print All – Prints all pupil details as recorded on P-POD Print Privacy Statement – Prints the student enrolment Data Protection Statement 36 Print Data Protection Statement – Prints the student Personal Data Protection Statement P-POD CONTACT DETAILS Helpdesk 090 648 3990 090 648 3906 090 648 4022 Fax 090 648 3914 Address P-POD Helpdesk (PLDS), Dept. Education and Skills, Cornamaddy, Athlone, Co. Westmeath. E-mail address [email protected] 37