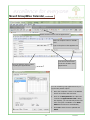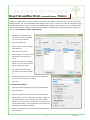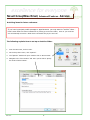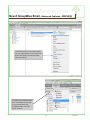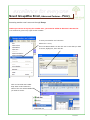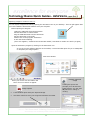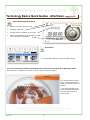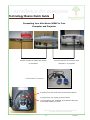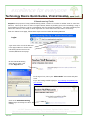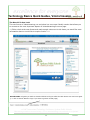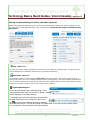
1
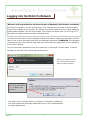
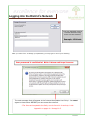
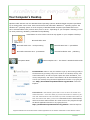
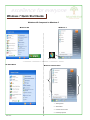
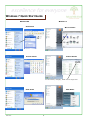
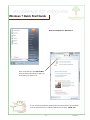
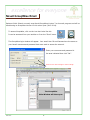
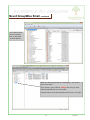
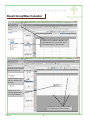
Welcome to Spokane Public Schools Employee’s Guide to Technology in Our Schools An ITSC Publication Fall 2014 excellence for everyone Important Contact List and Information ITSC Help Desk @ 354-7600 For login problems Novell login and GroupWise help Web Accounts: A "web account" is used on most Spokane Public Schools web sites that ask for a username and password https://www2.spokaneschools.org/Account/default.aspx Computer problems or questions Network problems Network printing help Technology help Instructional Media Library http://intranet.spokaneschools.org/MediaLibrary/ First contact for Password Assistance New Teacher Resources ITSC Hardware Repair @ 354-7600 Hardware repair and parts http://www.spokaneschools.org/site/Default.aspx? PageID=1978 Audio / Visual Needs Microsoft IT Academy Online Training Call Tech Services @ 354-7203 http://www.spokaneschools.org/page/2326 New Network (Novell) accounts Phone and voicemail set-up Settings with your phone Spokane Virtual Learning http://www2.spokaneschools.org/onlinelearning/index.php Cell phone set-up and help Passwords for Access: IFAS Web Accounts PowerSchool WebSMARTT Software Assistance Nutritional Services @ 354-7270 PowerTeacher Grade Book (Secondary Only) Support @ 354-7600 Guides and Videos (in blackboard course) http://bb.spokaneschools.org/webapps/portal/frameset.jsp Elementary Electronic Record Book Support @ 354- 7308 Guides and Videos Blackboard/SVL/ICAN Support @ 354-7545 Data Dashboard @ 354-5968 My computerx:drive, teacher tools, elementary record book Educational Technology Professional Development Technology Resources, Quick Guides, and Free downloads Express Program Software EZCare2 Terry Watanabe @ 354-7332 http://www.spokaneschools.org/edtech Professional Development classes http://www2.spokaneschools.org/prolearn/ Schooldude for Custodians Facility/Maintenance – 354-7172 Discovery Education Streaming Video (Staff Tab Academic Resources) http://www2.spokaneschools.org/video/ Fall 2014 2 excellence for everyone Welcome To Our District WELCOME TO THE INSTRUCTIONAL TECHNOLOGY SUPPORT CENTER (ITSC) Spokane Public Schools Technology Plan Vision Statement It is the vision of Spokane Public Schools that technology will be utilized appropriately and effectively in classrooms, offices and support functions. Spokane Public Schools will implement and maintain a comprehensive technology plan that: Provides equitable access to technology and technology resources. Integrates technology throughout the curriculum and subject area content. Provides students with the skills to be successful in the K-12 education, higher education, or world of work. Improves administrative and management services, including the classroom. Provides ongoing training and professional development opportunities for teachers and staff. Spokane Public Schools believes that: Basic computer skills are best learned in a contextual setting, being infused into a variety of classroom based activities and providing the student learner the opportunity to apply the skill in a meaningful way. Our schools must prepare students for today’s workplace and the workplace of the future. Skillful use of technology supports the development of process skills such as flexibility, adaptability, critical thinking, problem solving and collaboration are essential to success in our rapidly changing information age. When technology is used for learning, a disengaged learner can change from a passive student to an active participant. Technology allows us to better respond to the diverse learning styles of our students and educates them for a wider range of intelligence. Technology maximizes productivity and efficiency and enables schools to better prepare our students for future learning. Equitable access is a community investment and we’ll continue to encourage active partnerships between the schools, businesses, families and the community. Technology is a resource to be employed on behalf of, not the driver behind, the learning process. The technology plan and vision will support each site’s School Improvement Plan, not supplant it. Over time technology will become an almost invisible and reliable part of the learning process. A networked technology system permits efficient and effective communications within and outside of the district. Internet and intranet based applications will continue to expand and dominate computing for the foreseeable future requiring a resilient, reliable and secure high-speed/ high capacity network. 3 Fall 2014 excellence for everyone TABLE OF CONTENTS TECHNOLOGY IN OUR SCHOOLS: THE BASICS Contact List and Information ........................................................................................... 2 Logging into the District’s Network .............................................................................. 5 - 7 Your Computer’s Desktop................................................................................................ 9 Windows 7 Basics ................................................................................................. 11 - 15 Novell GroupWise ................................................................................................ 19 - 27 GroupWise Email ............................................................................ 19 - 23 GroupWise Calendar ....................................................................... 24 - 25 GroupWise WebAccess .................................................................... 26 - 27 Telephone Basics .................................................................................................. 29 - 31 Printing and Mail Services ............................................................................................. 32 TECHNOLOGY IN OUR SCHOOLS: ADVANCED TOPICS ...............................................32 GroupWise Advanced Features ................................................................................ 33 - 39 Technology Basics Quick Guides ............................................................................. 41 - 53 Creating a Technology Requisition ........................................................................... 54 - 57 Appendix Spokane Public School’s Internet Acceptable Use Policy ............................................ A-1 - A-5 Fall 2014 4 excellence for everyone Logging Into Spokane Public Schools Network 5 Fall 2014 excellence for everyone Logging into the District’s Network Welcome and congratulations on becoming part of Spokane Public Schools community. Our district is a leader in its use of technology in the classroom and is proud of the accomplishments of its students as well as staff. Our district uses Novell Netware as the network operating system and GroupWise 7 as the email system. This section will explain how you can “log on” to the system to access network functions, including email. To access the network you will be assigned a Novell user name (usually your first name and first letter or two of your last name) and given the temporary password of NEWUSER. This password will expire with your first network login when you will be given an opportunity to set a password of your own choosing. You will receive this information from your supervisor or office staff. In some cases, it may be necessary to call 354-7203, where they can assist you. When your computer “boots up” the Novell Login screen will be the first to appear. This screen will appear and you will then select “yes” to change your password. You will be given five grace logins (or chances) to change your password. You must change this temporary password to one of your choosing before the grace logins expire. Fall 2014 6 excellence for everyone Logging into the District’s Network Your new password must be a least 6 characters long and is not case sensitive. Example: 12Grizzle After you select “Yes” to change your password, you may type in one of your choosing. Your password is confidential. Write it down and keep it secure. The next message that will appear is the Internet Acceptable Use Policy*. You must agree to these terms BEFORE you can access the network. *The Internet Acceptable Use Policy can be found in its entirety in the Appendix on pages A-1 through A-5. 7 Fall 2014 excellence for everyone Your Computer’s Desktop Fall 2014 8 excellence for everyone Your Computer’s Desktop Spokane Public Schools uses two Windows based operating systems. Windows based computers purchased by our district after June of 2011 have been delivered with Microsoft’s Windows 7© operating system. The Windows XP© operating system is on the majority of Windows based computers purchased before June 2011. Microsoft Office Suite (versions 2003, 2007 or 2010— depending on your computer’s licensing) is used for word processing, database, presentation and publishing. Listed below are a few of the icons that may appear on your computer’s desktop. Microsoft Office 2013 Microsoft Word 2013 - word processing Microsoft Excel 2013 - spreadsheet Microsoft PowerPoint 2013 - presentation Microsoft Publisher 2013 - publishing GroupWise Email Internet Explorer 8.0 - The district’s standard web browser PowerTeacher makes it easy for teachers to get up and running quickly in the classroom by providing easy-to-use tools to view student, faculty, and school information, as well as to print reports and enter attendance, comments, assignments, and scores. PowerTeacher will be automatically delivered to your desktop using the Novell Application launcher or by typing the link: http://PowerSchool.spokaneschools.org/teachers in Internet Explorer. PowerSchool is web-based system that is used to store all student and staff information. It has the ability to provide information to teachers, parents and administrators and to be able to provide mandated information to both the Federal and State government. PowerSchool will be automatically delivered to those staff members who need access to the program through the Novell Application launcher or by typing the link: http://PowerSchool.spokaneschools.org/admin in Internet Explorer. Support materials can be found for both of these applications in the Teacher Tools folder on the district’s X drive. 9 Fall 2014 excellence for everyone Notes: Fall 2014 10 excellence for everyone Windows 7 Quick Start Guide 11 Fall 2014 excellence for everyone Windows 7 Quick Start Guide Windows XP Compared to Windows 7 Windows XP Windows 7 Start Button XP Start Menu Start Button Windows 7 Start Menu 4 3 1 2 Fall 2014 12 1 All Programs 2 Search Box 3 Custom menu items 4 Recently opened excellence for everyone Windows 7 Quick Start Guide Windows 7 Windows XP Your Personal Folder manages your files. In this version of Windows, you can also use libraries to organize and access files regardless of where they’re stored. Open up your Personal Folder and look to the left side of the window to view folders and libraries. You can navigate to any of your files, pictures, music or videos from there. Buck In WindowsXP you are accustom to opening My Documents from the Desktop to access your files, folders, My Pictures, My Music, and My Videos. (Some of you created folders to store your files directly on your Desktop as an alternative). Computer folder, opens access to locations such as hard disks, CD or DVD drives, and removable media. You can also access other devices that might be connected to your computer, such as external hard drives and USB flash drives. With Windows 7 you open the Personal Folder from the Desktop. After you open the Personal Folder look to the left of the window and you will see a Navigation Pane. The new way to find files anywhere on the computer. Buck Choosing a Background in XP Personalize a Background in Win 7 1 Click Start Button 2 Click Control Panels 3 Click Desktop Background choose from dropdown or browse to your own picture 4 Save Changes 13 Fall 2014 excellence for everyone Windows 7 Quick Start Guide Windows XP Windows 7 XP Printers Win 7 Printers Control Panels Control Panels You can View by: Category, Small icons or Large icons. Shut Down Fall 2014 Shut Down 14 excellence for everyone Windows 7 Quick Start Guide Help and Support for Windows 7 Enter a few words in the Search Box and get Pictures and Steps to help you do anything you want to do. If you are having problems locating various features that may have been moved, please feel free to call the Help Desk at 8-7600. Thank you 15 Fall 2014 excellence for everyone Notes: Fall 2014 16 excellence for everyone Using GroupWise Email 17 Fall 2014 excellence for everyone Novell GroupWise Email Spokane Public Schools currently uses Novell GroupWise Version 7 as its email program and will be transitioning to GroupWise Version 12 this school year (2013-2014). To access GroupWise, click on the icon that looks like this. It can be accessed from your task bar or from the “Start” menu. Version 7 Version 12 The GroupWise login window will appear. Your email User ID and Password are the same as your Novell username and password that were used to access the network. Enter your username and password in the area indicated then click “OK”. Please do not make changes to these settings! The GroupWise Main Window will then open. Fall 2014 18 excellence for everyone Novell GroupWise Email, continued Nav Bar Tool Bar Panels Folder List Nav Bar Provides quick access to your most commonly used folders. By default, the Home, Mailbox, Calendar, Sent Items, and Contacts are on the Nav Bar. You can also customize the Nav Bar. Tool Bar Lets you quickly accomplish common GroupWise tasks, such as Opening the Address Book, sending mail messages, and filtering items. Panels Displays your frequently used information in a quick glimpse. You can add additional panels from a list of preconfigured panels or you can create your own. Folder List Allows you organize your GroupWise items. You can create new folders as needed for storage of GroupWise items. 19 Fall 2014 excellence for everyone Novell GroupWise Email, continued To create a new email message, click on the New Mail icon on the main tool bar. Opened email will be automatically deleted after 100 days! Archiving your email messages will ensure they are not deleted. *See GroupWise Advanced Features To send an email to someone, type their email address in the “To:” area or choose their name from the Address Book. Click here to access the GroupWise address book. You can change your message’s font and color from this window. You can also create bulleted and numbered lists. Sending files to other users can be done by clicking on the Paperclip, browsing for the file then “attaching” the file to your message. You can attach files to your email. Click the “Send” button to send your email. Fall 2014 20 excellence for everyone Novell GroupWise Email, continued Your address book can be sorted by first or last name, or email address. When you are through with your message(s), you can put them in the trash. They remain in your trash for 7 days, then they are automatically deleted and are irretrievable. Calendar items will be automatically deleted every 120 days. 21 Fall 2014 excellence for everyone Novell GroupWise Calendar To display the GroupWise Calendar, click on the Calendar icon in the folder list or on the calendar tab on the Nav Bar Navigate to the desired date from this box. Click on a date to display the calendar for that day. Double-click on an existing appointment to view the details. Double click in any area to create a new Appointment, Task or Note. Fall 2014 22 excellence for everyone Novell GroupWise Calendar, continued Double click this icon to set an appointment. Enter the recipient name in the To: field. Type in the place of the appointment You can use these icons to set the duration of the appointment. Enter the Subject and any notes regarding the appointment. You can schedule group appointments by using the Busy Search option. 1. Enter the recipients’ names in the To field and fill in the start date and time. 2. Click on the Busy Search icon. When the “Choose the Appointment Time” dialog box displays, you can manually find a time when everyone is available or use AutoSelect to find the time automatically. 3. Click OK to have the time updated and Send. 23 Fall 2014 excellence for everyone Novell GroupWise WebAccess You can access your GroupWise email and calendar from home or another location via the Internet. From Spokane Public School’s Home Page click on the Staff Tab On the page that opens, select GroupWise Remote Email. From the WebAccess login page, enter your username and password just as you would for the Windows version of GroupWise. The main window will display a folder list as well as a list of icons. Starting GroupWise Access On the GroupWise WebAccess login page, enter your username and password. Click either “This is a public or shared computer” or “This is a private computer”. The option you choose affects the timeout interval that is used. To help keep your information secure, a shorter timeout interval is used if you are using WebAccess from a public or shared computer. (Conditional) If you’re using a mobile device such as a mobile phone, click Options, then select the Use the basic interface. The basic interface has limited functionality and graphics. It is designed to perform the most basic tasks in GroupWise WebAccess. Click Login Fall 2014 24 excellence for everyone Novell GroupWise WebAccess, continued Nav Bar The Nav Bar is located at the top of the WebAccess page. It is designed to quick access to the folders you use the most. By default the Nav Bar contain the Mailbox, Calendar, Contacts and Documents folders. The Main toolbar contains most of your commonly used functions, such as New Appointment and New Mail. The Main toolbar is located at the top of the main page. The Item Context toolbar contains context-sensitive buttons that relate to the item that is displayed. 25 Fall 2014 excellence for everyone Notes: Fall 2014 26 excellence for everyone Telephone Basics 27 Fall 2014 excellence for everyone Telephone Basics Avaya Phone System Quick Tips Checking Messages from your Desk Press the Voice mail access button Enter your password (if this is the first time using the new system, type in the default password which is the last three digits of your extension. The system will make you change your password to a four digit code). Checking Messages from out of the Office: Dial the Voicemail access number—354-5999. When the system answers press # Enter your extension number (also referred to your mailbox number) Enter your password Menu Items: Press 1 To Review Messages Press 2 To send a message Press 4 for personal configuration Record a Greeting Press 4 for Personal configurations then 1, 1 to record your Person Greeting 1, 2 to record your Extended Absence greeting Reviewing Messages: Press 1, 1 from the Main Menu to listen to new messages Press 1,2 from the Main Menu to listen to saved messages Fall 2014 28 excellence for everyone Telephone Basics, Additional Options While listening options are: 1 Rewind 1, 1 Rewind to the beginning of message 2 Pause/Resume 3 Forward 3, 3 Fast Forward to end of message 4 Slow down message 5 Envelope information 6 Faster 7 Quieter 8 Reset Volume 9 Louder 0 Reset Speed # Skip * Cancel After Listening, options are: 4 Replay 5 Envelope 5, 5 List all recipients 6, 1 Forward message with no comment 6, 2 Forward message with a comment 7 Erase message 8 Reply 1 to reply to sender 2 to reply to all 3 to reply to sender with original message 4 to reply to all with original message 8 Call the sender 9 Save the message 29 Fall 2014 excellence for everyone PRINTING & MAIL SERVICES ~ Phone: 354-7228 · Fax: 354-7380 · Hours: 7:30 a.m. to 4:30 p.m. ~ Printing & Mail Services provides district-wide full service printing and graphics, supporting graphic design, computer page layout, bindery facilities and digital and offset printing. The Printing & Mail Services can also provide support for most specialty order items. Other responsibilities include the district interschool mail services. INTERDISTRICT MAIL SERVICE The district interschool mail service goes from the central office each morning at 7:30 am to each site in the district to pick up and deliver mail. The mail is then delivered back to the central office around 10:30 am and separated back into each location and sent out again the next morning. Your site will have pick up/delivery each morning between 8am to 9:30am. GRAPHICS DESIGN SERVICES The graphics design services for our district is free of charge. We do layout for brochures, books, posters, cards, specialty items and more. We can also layout forms for online use. Some forms are even made to be interactive. We can make your requested item into a PDF or even burn it on to a CD. Be sure and contact us before starting any design projects and we can help you get the correct information to us for a quick turn around time of a quality end product. PRINTING SERVICES The district print shop is capable of producing just about anything. If it cannot be done in house we can vend it out for final completion of a project. We can print up to 11x17 in size in house and can vend larger items. We use both digital high volume copiers as well as offset printing presses. We can offset print 2 to 3 spot color printing and have the capability to print full color on our digital color copier. We can print for just your classroom or site or can do a full district distribution of your project. Turn around time is anywhere from 1 day to 2 weeks depending on the complexity of your job. Call ahead for any rush job or price estimates or just call for help when getting started on any project. We will be happy to answer any questions you have. Your office manager can help you place an online print request and get you the proper budget authority and account number. She can also help you get the small jobs done using your on site copier. You may need an access code or you may have someone on site that takes care of the copying for you. Fall 2014 30 excellence for everyone Technology in Our Schools: Advanced Procedures 31 Fall 2014 excellence for everyone TECHNOLOGY IN OUR SCHOOLS: ADVANCED TOPICS GroupWise Advanced Features ................................................................................ 33 - 39 Personal Settings .............................................................................................. 34 Panels ............................................................................................................. 35 Archiving .................................................................................................. 36 - 37 Proxy ....................................................................................................... 38 - 39 Technology Basics: Quick Guides for the Classroom ...................................................41 – 57 Connecting to a Networked Printer – Windows 7 ............................................. 42 - 43 AVerVision: Recording Images ..................................................................... 44 - 46 Connecting Your AVerVision ................................................................................ 47 Videostreaming........................................................................................... 48- 52 Capturing Video ................................................................................................ 53 Creating a Technology Requisition ........................................................................... 54 - 57 Appendix Spokane Public School’s Internet Acceptable Use Policy ........................................... A-1 - A-5 Fall 2014 32 excellence for everyone GroupWise: Advanced Features 33 Fall 2014 excellence for everyone Novell GroupWise Email, Advanced Features - SETTINGS You can customize GroupWise for your personal preferences, like setting your message to be checked for spelling errors before sending. You can add your “signature” at the end of your email message by choosing the “Signature” tab and filling in your information in this box. Fall 2014 34 excellence for everyone Novell GroupWise Email, Advanced Features - PANELS A panel is a customized view of information in GroupWise. By default in the Home view, you see an Unread Messages panel. The unread Messages panel displays a list of items you have not read. The Checklist panel is another default panel on the Home view. The Checklist panel displays items that are in your checklist folder. A panel can be created to display a multitude of information. A predefined list of panels has been created, but you can also create your own custom panels. Right-click on the folder that you want to modify the panels for; then click Properties. Click the Display tab. Select Panels from the View By drop-down list. Click Customize Panels. Select whether you want to view the panels in one or two columns. Select from the list of available panels or create your own panels by clicking New Panel. Click Add next to the column you want the column to display in. (Optional) Click Move Up or Move Down to position the column where you want it to display Click OK. To Create a New Panel: Click the panel drop-down arrow, then click Add Panel. Click New Panel. Type the panel name in the Name the new panel field. Select whether you want the panel to display a folder or the Address Book. If you select a folder, click Change Folder to select the folder to display the content or If you select Address Book, use the drop-down list to select the address book you want to display. Select a display setting from the Choose display settings drop-down list. 35 Fall 2014 excellence for everyone Novell GroupWise Email, Advanced Features - ARCHIVE Archiving items for future reference: If you have important emails message or appointments you may want to “archive” them that is save them for future reference. By setting up an Archive folder, items in your mail box are automatically moved to a folder that is accessible only by the end user. The following explains how to set up an Archive folder: 1. From the Menu Bar, click on Tools. 2. On the drop down menu, click “Options”. 3. The “Options” window will open. Double-click on Environment. 4. Navigate to the “File Location” tab. Here you be able to specify the Archive folder location. Fall 2014 36 excellence for everyone Novell GroupWise Email, Advanced Features - ARCHIVE To move an item to the Archive folder, use your right button on your mouse to access the “Action” menu and select “Move to Archive”. To access your Archived items, click on the down arrow next to your name above the GroupWise folder list, then select “Archive”. 37 Fall 2014 excellence for everyone Novell GroupWise Email, Advanced Features - PROXY The Proxy feature allows you to access another user’s GroupWise account or enables others to access your GroupWise account. How to give others access to your mailbox: 1. Select Tools > Options from the Menu Bar. 2. Double-click the Security icon. 3. Select the Proxy Access tab. 4. Use the address book icon to select the user(s) you wish to give access to your mailbox. 5. Use the Access rights section to assign rights to the user. 6. You can remove the user by selecting the name and clicking on “remove user”. Select the name from the address book to select the name of the user (s) you wish to give access to your mailbox. Fall 2014 38 excellence for everyone Novell GroupWise Email, Advanced Features - PROXY Accessing another user’s account through Proxy: Before you can act as a proxy for another user, you must be added to that user’s Access List. You will then be given Proxy rights to their mailbox. To Proxy into another user’s account: Select File > Proxy. From the Address Book icon find the user’s name that you want to access, highlight it, then click OK. Click on the Folder List header drop down list and select the name of the user whose Mailbox you want to access. 39 Fall 2014 excellence for everyone Notes: Fall 2014 40 excellence for everyone Technology in the Classroom : Quick Guides 41 Fall 2014 excellence for everyone Installing a Printer in Windows 7 Adding a Printer to a Windows 7 Workstation Open Internet Explorer and navigate to the iPrint web page for your location. (See links below) Elementary Sites: http://elem-a/ipp Middle Schools: http://midd-a/ipp High Schools: http://high-a/ipp) Administration & Miscellaneous Sites: http://itsc-a/ipp (Administration Building, Bryant, KSPS, Libby & Plant Department) Find the printer to be installed in the alphabetical list and double click on the name. Click “Yes” to install the printer. Fall 2014 42 excellence for everyone Installing a Printer in Windows 7, continued You will see this progress bar as the printer is installing. Your printer is successfully installed when you see this message. You will be able to choose your printers from the Device window. 43 Fall 2014 excellence for everyone Technology Basics Quick Guides - AVERVISION, page 1 of 3 Quick Guide: AverVision Recording Images and Video with the AVerVision Version 2 Software Directions: Capturing images of student work is an excellent way to document growth in learning. Where you want to capture these images, though, is determined by the use of your USB cable. When the USB cable connects your AVerVision to your computer, your computer controls the AVerVision’s recording features, and you need to capture images on the computer itself. No downloading is required since the image is recorded on the computer. With the USB cable unplugged or the computer is off, however, the AVerVision may store the images. To download the images, please follow the instructions below. Capturing Images on Your AVerVision To capture images on your AVerVision, your USB plug should be unplugged or your computer turned off. 1. Turn on your document camera. 2. Capture images you desire by pressing the Capture button on the remote control or the CAP/DEL button on the AVerVision itself. Viewing Images Click the “Playback” button on your AVerVision or your remote control. Navigate to your desired image using your arrow keys. To view them full screen, click on the “Playback” button again. Deleting Individual Images Click on the “Trash” button on your remote control or the “CAP/DEL” button on your AVerVision, hit the down arrow to navigate to “Yes,” then hit the right arrow key to delete (Note: The right arrow is also your “Enter” key). Deleting ALL Images Click on the “Camera” button on the AVerVision or your remote control. Press the menu button on the camera or remote. Arrow down to Advance. Hit right arrow to select Advance. Press the down arrow to IMG Format. Hit the right arrow to select. Navigate down to yes. Press the right arrow to select. To transfer images, your computer must be on but your USB cord must be unplugged before you begin this process. 1. To download images from your AVerVision to your computer, click “Menu.” 2. Use the down arrow to navigate to the “Advance” bar at the bottom. 3. Click the right arrow (“Enter”). 4. Drop down to “USB Select” at the bottom. Click right arrow (“Enter”). 5. Go to “IMG Download.” Click right arrow (“Enter”). 6. When the message “Download” appears in the right hand corner of your monitor, plug in your USB cable. 7. A “Removable Disk (E:)” window will appear. Your AVerVision is now behaving like a flash drive. 8. Click on “Open folder to view files…” Click OK. 9. Open the JPEG folder. Identify the images you desire to download by clicking on them and viewing them. After viewing an image, close the file. 10. Now, drag or copy the photo files (JPGs) to your desired folder. 11. These images are now on your computer, and you may open them by double clicking. Fall 2014 44 excellence for everyone Technology Basics Quick Guides - AVERVISION, PAGE 2 OF 3 Capturing Images or Video on Your P.C You can capture images and video by opening the AVerVision icon on your desktop. This icon will appear after you have loaded the AVerVision software onto your computer. Before Opening the Program Unplug the USB cable from the AVerVision. Put the AVerVision in camera mode. Plug the USB cable back into the AVerVision. Put the AVerVision in PC mode. Double click on the program: AVerVision. It will now show initializing. (If an error appears, “Create Device Enumerator Failed,” start back at number one and try it again.) Open the AVerVision program by clicking on the AVerVision icon. As you click on the different buttons on the toolbar, a control window opens for you to manipulate or complete your image capture. Main View Window DocCam Settings Playback Captured Image Hover your mouse over the bottom left corner for more controls to appear. A dialog box opens and prompts you to browse and locate pictures. You can open all pictures for editing or viewing. Image Capture A new window opens with your captured image. Use these controls to save your image and annotate as needed. JH & JM © 2006 Instructional Technology Facilitators, Spokane Public Schools Screen shot(s) from AverMedia products used for educational purposes. 45 Fall 2014 excellence for everyone Technology Basics Quick Guides - AVerVision, page 3 of 3 Video Recording and Playback Return to DocCam preview mode Playback video files Set the timing or duration of the video. Attach a microphone to you computer to add voice narration or annotation. Annotation Immediately add text to pictures before saving. Your user manual and software guide that came in the box should include an Anti-Glare Sheet. Use this sheet for magazines, pictures, or an item that is projecting a glare. You will also want to tape a piece of white construction paper on the table under the camera. * This will designate where items should be placed and help the camera to focus more quickly. JH & JM © 2007 Instructional Technology Facilitators, Spokane Public Schools Screen shot(s) from AverMedia products used for educational purposes. Fall 2014 46 excellence for everyone Technology Basics Quick Guide Connecting Your AVerVision 300AF to Your Computer and Projector Connect VGA Out on laptop with VGA In Connect VGA Out on AverVision with on AverVision Computer 1 on projector Use VGA cable for connections To project from your AVerVision, press Camera button. To project from your laptop, press PC button. ***If needed on your keyboard, press FN and LCD twice to see laptop display on screen. JM & JH © 2007 Instructional Technology Team, Copyright Spokane Public Schools 47 Fall 2014 excellence for everyone Technology Basics Quick Guides, VIDEOSTREAMING, PAGE 1 OF 5 Videostreaming Guide Purpose: The purpose of using Videostreaming within a lesson is to utilize an added visual to reach ALL learners. This may be done in order to support lesson themes by building upon prior knowledge, using it as an added unit resource, and as a presentation tool (for student and teacher). The most wonderful part about this resource is the ability to show segments of a video rather than the video in its entirety. From our district home page, follow these steps to access United Streaming Material: Login: Type video at the end of the district’s home page address or choose Videostreaming Resources from the Teacher/Staff Resources page. On the United Streaming Video Sign In page, click on the “Sign In” link. In the sign in box, enter your “Share Point” user name and password. If you are having trouble signing in, try resetting the password on your account . Click on the United Streaming link to begin accessing the video catalog. JM©2007 Instructional Technology Facilitators, Spokane Public Schools DEstreaming screenshots accessed at http://www.unitedstreaming.com/index.cfm on 12 Jan 2007 Fall 2014 48 excellence for everyone Technology Basics Quick Guides, VIDEOSTREAMING, PAGE 2 OF 5 The New All in One Look The new format of videostreaming you see below is a more user friendly version that allows you to connect to the most important aspects of Unitedstreaming from one page. ***Take a look at the new format and make margin notes next to the items you would like more information about or would like to explore further.*** Breadcrumbs will guide you back to sections without having to select the back button over and over again. (i.e. click on Search Results: frogs if you want to go back to that page.) JM©2007 Instructional Technology Facilitators, Spokane Public Schools DEstreaming screenshots accessed at http://www.unitedstreaming.com/index.cfm on 12 Jan 2007 49 Fall 2014 excellence for everyone Technology Basics Quick Guides, VIDEOSTREAMING, PAGE 3 OF 5 Search by Keyword (Based on your purpose, you will find this to be the most efficient way to search.) To Perform a Search by Keyword: Step 1: The Keyword option appears at the top of your screen. Enter your keyword and change the WITHIN section as needed. Click “GO” and the search will begin. Step 2: Your results will display the video titles available in alphabetical order. Step 3: Decide if you want to refine your search. If so, use the Narrow My Results pane located on the left hand side. JM©2007 Instructional Technology Facilitators, Spokane Public Schools DEstreaming screenshots accessed at http://www.unitedstreaming.com/index.cfm on 12 Jan 2007 Fall 2014 50 excellence for everyone Technology Basics Quick Guides, VIDEOSTREAMING, PAGE 4 OF 5 Playing and Downloading Full Videos and Video Segments Videos are divided into segments so you can show the part that best relates your teaching objective or lesson. Click on the Video Segments tab to view a complete list. Notice that the length is identified within parenthesis. Play a Video icon You can view a video segment directly from the internet by clicking on the Play button. The quality of the clip will depend on the reliability and speed of your Internet connection. Download a Video icon To download a video or video segment, right-click on the download icon and choose "Save Target As..." Save a copy of the file on your computer to ensure best viewing quality. It is best to delete the video after use. The videos will take up a great deal of space over time. (Please add the video to your playlist (content collection) for future reference. Do not save videos to the network.) Closed Captioning icon Many videos are available with closed captioning. To activate closed captioning, check the box next to "Enable Closed Captioning" in the Media Settings. To download videos with closed captioning, first download the video following the above instructions. Next click on the next to the play and download icons to download the closed captioning file. This file must reside in the same folder as the video and the filename (before the .smi extension) must be identical to the video filename. JM©2007 Instructional Technology Facilitators, Spokane Public Schools DEstreaming screenshots accessed at http://www.unitedstreaming.com/index.cfm on 12 Jan 2007 51 Fall 2014 excellence for everyone Technology Basics Quick Guides, VIDEOSTREAMING, PAGE 5 OF 5 My Content This new feature (which is the same as the former add to playlist) allows you to collect, organize, share and retrieve your favorite resources. You will notice that you have the opportunity to add videostreaming content to folders you create in My Content by using the “Add to” drop down menu on any media resource page or by selecting individual video segments and selecting ADD. By bookmarking resources, you will avoid searching for it again. Remember that adding resources to My Content does not initiate a playing or downloading procedure. All files and projects are stored on the district’s videostreaming servers. Add a Media Resource to My Content 1. Locate a resource that you wish to add to My Content. 2. Select “My Content” from the “Add to” drop down menu and click “ADD.” 3. A pop-up window will open. You may add the resource to the “My Content” default folder, select a folder or add it to a new folder. 4. If you select “Add to New Folder,” follow the prompts and enter a folder name and folder location. My Content allows you to create folders within folders. 5. Click on “Add” and the window will display a confirmation message, telling you that your content has been added. 6. To access your content, click on the “My Content” link on the navigation bar at the top of the screen. Put the flexibility of My Content to work for you. Once you have added media resources to My Content, you can use the pull down menu to copy, move, share and delete them at any time. For more information, please refer to the help page. JM©2007 Instructional Technology Facilitators, Spokane Public Schools DEstreaming screenshots accessed at http://www.unitedstreaming.com/index.cfm on 12 Jan 2007 Fall 2014 52 excellence for everyone Technology Basics Quick Guide, Capturing Video Capturing Video from Cameras Shoot Practice Footage Record footage on your digital video camera. Prepare material for Downloading Always plug your camera into a power outlet before attaching it to a computer. Before connecting the camera to an outlet, make sure the camera is OFF. If you do not, you may short circuit or fry the motor. Opening Movie Maker Go to start. Scroll up to “All Programs”. Locate and click on Windows Movie Maker. Connecting the Camera Locate the Firewire port on the digital camera. It may be labeled “DV” or “IEEE1394”. Plug in the four pin (small side) to the camera and the other four pin to the computer. Turn the camera to Play/VCR mode. Downloading to Movie Maker After importing and capturing, all the footage and stills will be located in your collections pane. Capture Video Make sure that the “Tasks” pane (Movie Tasks) is open on the left side of the program screen. If it is not, click on the “Tasks” button on the tool bar. Your computer is now controlling your camera. Rewind your tape to the point you want to start. Now follow the steps on the screen. Step one: Click “Start Capture.” Final step: Click finish. JM©2007 Instructional Technology Facilitators, Spokane Public Schools Screen shot(s) reprinted by permission from Microsoft Corporation. 53 Fall 2014 excellence for everyone Creating a Technology Requisition The ITSC Web site lists technology equipment that is most commonly used as well as supported in our district. Equipment can be ordered using the following steps: From the ITSC Home Page select Technology Requisitions/ Orders Next, sign in using your Novell login username and password. Once you have signed into the site, you will be able to view equipment that is supported both fully and limited by the ITSC. These items can be purchased through this site by using the following procedure: Click on the item you want to view/purchase. Fall 2014 54 excellence for everyone Creating a Technology Requisition, continued From this window, you can add or change the configuration of the equipment. Once you have the equipment configured to your satisfaction, click on Update Price and “Add to Cart”. Click on “Preview” to view your requisition in Draft mode. You can also save your requisition for later if you want to add items at a later date. 55 If you are finished with the order, click on “Checkout”. Fall 2014 excellence for everyone Creating a Technology Requisition, continued In the Checkout window you can either create a new requisition or add to an existing one. You must fill in your contact information completely. Fill in the budget number and detailed instructions for delivery and set up. Fall 2014 56 excellence for everyone Creating a Technology Requisition, continued Next, you can print a draft of your requisition. If you are satisfied with the information, go on to the final step. If you need to modify the information, click on the “Back” arrow and make the needed changes. The final step is to PRINT your requisition (NOT in draft mode) and have it signed by your site’s budgetary authority. Then, send it to the ITSC for processing. If you need assistance, call the Help Desk at 8-7600. 57 Fall 2014 excellence for everyone Notes: Fall 2014 58 excellence for everyone Spokane Public School’s Internet Acceptable Use Policy 59 Fall 2014 excellence for everyone Internet Acceptable Use Policy Acceptable Use Policy Advances in telecommunication technologies continue to change the way we communicate. From offices, schools, and homes we are able to travel electronically all over the world to gather information. As more people travel this electronic highway and use the ever growing variety of technologies and services becoming available, maps to find information and rules to keep users safe and accountable become vital to successfully completing the journey. These informational networks and technologies represent a powerful educational resource. We are able to connect to businesses, major universities, national libraries, and other schools around the world. Just as we learn social codes and behaviors which are acceptable in everyday life, we need to learn the correct procedures and rules for using these networks of information services and technologies in the public school system. The purpose of this Acceptable Use Policy is to provide guidelines, rules, procedures and code of conduct for the use of technology and the information network in Spokane Public Schools. I. Telecommunications and Network Resources For the purpose of this Acceptable Use Policy, telecommunications is defined as the sending and receiving of electronic, analog or digital information using any school district equipment, systems or networks; including, but not limited to, computers, telephones (wired, cellular, wifi), fax machines, local/wide/metropolitan-area networks, the district intranet, e-mail, voice-mail and the public internet. Employees using their personal computers, PDA's or other electronic device(s) for any district-related purpose and/or using district programs, internet access, files, e-mail, or documents shall also be subject to all requirements of this policy. II. Spokane Public Schools Educational Network and the Public Internet The internet is a global network made up of many contributing networks that support the open exchange of information among many different kinds of institutions all over the world. The purpose of the Spokane Public Schools' Educational Network and all of its technologies is to support the curricular needs and teaching and learning requirements of the district's educational program and to support the business and administrative needs of the school district's operations. Use of the Spokane Public Schools' Education Network and all of its technologies is a necessary element of the district's educational mission and business and administrative needs, and is furnished to staff and students as a privilege, not a right or entitlement. The district seeks to protect legitimate users of such technology by establishing guidelines for such use and imposing discipline on those who abuse the privilege. III. Computer, Technology and Network Monitoring The district has the right, but not the duty, to monitor any and all aspects of its computer systems and networks, including, but not limited to monitoring web sites visited by staff and students, monitoring chat groups and newsgroups, reviewing material downloaded from or uploaded to the internet by users, reviewing e-mail and instant messages sent and received by users, monitoring the content and use of blogs and wikis, and reviewing any files or information stored on district computers or network servers or storage devices. Staff and students should not have an expectation of privacy in anything they create, store, send or receive on district computers or networks. The district will make every reasonable attempt to limit access to inappropriate material by using an internet filtering system, providing teacher training, and encouraging personal responsibility and accountability. Neither the district's attempts to limit access to inappropriate materials nor the guidelines set forth in this policy attempt to articulate all required or proscribed behavior by network users. The user is ultimately responsible for his/her actions in accessing and using network services. Successful operation of the Spokane Public Schools Educational Network and all of its technologies requires that all users conduct themselves in a responsible, decent, ethical and polite manner while using the network. Fall 2014 A-2 excellence for everyone Internet Acceptable Use Policy, continued IV. Appropriate Use of Computers, Technology and Network Resource Student and staff use of district technology, computing and network resources must be in accordance with the educational and operational needs and objectives of Spokane Public Schools. This includes, but is not limited to, the following; V. a. Student use of e-mail shall be permitted provided it is supervised and monitored by an appropriate staff member and is in conjunction with the curricular and educational needs of the student. Unsupervised use of e-mail by students shall not be permitted. b. Incidental and infrequent personal use of the internet, e-mail and telecommunications services shall permitted for staff provided it does not interfere with professional responsibilities or the educational process, mission or operation of the school district and does not violate any other district policy or procedure. c. Chat areas, instant messaging services, news groups, blogs, podcasts, RSS feeds, wikis, or other communication methods that are explicitly allowed by the internet filtering system shall be permitted when used in conjunction with the curricular, educational or operational needs of staff and students. d. Staff or student storage of school-related, educational or business related data and information shall be permitted provided it is reasonable and necessary. e. Staff shall use due care and caution to protect and preserve the confidentiality of all data accessed, viewed, copied, printed, or transmitted in accordance with state and federal laws, rules and regulations. f. Staff shall make each electronic communication truthful and accurate. Care is to be used in drafting email and other electronic documentation. E-mail messages shall be treated as formal business documents and must follow any and all record retention rules and practices. Inappropriate Use of Computers, Technology and Network Resource Unethical and unacceptable behaviors, inappropriate use of district computers, systems, networks and technology resources, and any violation of this Acceptable Use Policy shall be cause for taking disciplinary measures against staff in accordance with district policy, collective bargaining provisions on progressive discipline, and against students consistent with Policy 3200, Student Rights and Responsibilities. Unethical and unacceptable behaviors and inappropriate use of district computers, systems, networks and technology resources includes, but is not limited to: a. Transmitting or receiving any material in violation of any federal or state regulation, including, but not limited to: i. Material protected by copyright or trade secret. ii. Threatening or obscene material as defined by law and/or Spokane Public Schools' policies. b. Accessing any information that does not have educational or training value or interferes with professional responsibilities or the educational process. c. Using district resources for illegal, inappropriate, or obscene or sexual purposes or in support of such activities. i. Illegal activities will be defined as a violation of local, state, and/or federal laws. ii. Inappropriate use will be defined as a violation of the intended use of the district's technology, systems and networks and/or their purposes and goals, including violation of any or all rule included in this policy. A-3 Fall 2014 excellence for everyone Internet Acceptable Use Policy, continued iii. Obscene or sexual activities will be defined as a violation of generally accepted social standards, including, but not limited to material that is harassing, embarrassing, sexually explicit or profane, and sexual misconduct as defined in WAC 181-88-060. d. Using district technology resources to bully, intimidate or harass others or discriminate against others in violation of Spokane Public Schools policies. e. Intentionally disrupting network traffic, crashing the network or systems, or degrading or disrupting equipment or system performance. f. Using Spokane Public Schools computing and network resources for commercial or financial gain or fraud. g. Using Spokane Public Schools computing and network resources to transmit or receive material for commercial or personal activities, including but not limited to, solicitation or promotion of: i. Commercial activities or product advertisements for personal gain. ii. Political lobbying inconsistent with, or in violation of, Policy 6120, Lobbying by District Employees. h. Stealing or attempting to steal data, equipment, network resources, intellectual property or any other technology related resources. i. Using district technology resources, personal technology resources or the internet to cheat or attempt to cheat, or to plagiarize or attempt to plagiarize. j. Using any personal technology, including but not limited to, PCs, laptops, cell phones, music/video/game players or other electronic devices, in conjunction with district technology, network or resources that might be considered a violation of these rules. k. Forging e-mail messages, altering the attribution-of-origin information of e-mail messages, using an e-mail account assigned to another user, posting unauthorized, anonymous or inappropriate messages on chat rooms, news-groups, blogs or wikis or sending unsolicited e-mail (SPAM) or initiating the mass e-mailing of all employees without proper authorization. l. Gaining or seeking to gain unauthorized access of district files or data or other's files or data, or vandalizing or altering the files or data of another user. m. Gaining or seeking to gain unauthorized access to resources, services, systems or entities. The use of keylogger technologies is prohibited. n. Sharing their own account or password information with another user or allowing another to use their account to access a district system, application, network, computer or data for which that individual does not have appropriate authorization or a legal need to know. o. Using the account of another user to access a district system, application, network, computer or data for which that individual does not have appropriate authorization or a legal need to know. p. Attaining unauthorized access to information or possessing or disclosing information in violation of federal or state regulation, including, but not limited to the: i. Family Educational Rights and Privacy Act FERPA). ii. Children's Internet Protection Act (CIPA). iii.Health Insurance Portability and Accountability Act (HIPAA). Fall 2014 A-4 excellence for everyone Internet Acceptable Use Policy, continued q. Possessing any data in paper, electronic or any other form in violation of these rules. r. Committing software piracy, including but not limited to the downloading or installation or use of software applications, games, video, audio, graphical or textual contend to which the district does not have a valid license or authorization. Downloading or uploading personal software or games shall not be permitted. s. Hacking, cracking, vandalizing, purposefully degrading, destroying or tampering with any district hardware, software, application, system network or any other technology. t. Committing computer vandalism through any malicious attempt to harm or destroy data of another user, uploading or creation of computer viruses, spreading of computer worms, phishing exploits or any other physical or virtual destruction or disruption of district technology resources. i. Acts considered to be vandalism will include, but are not limited to, the modification of the system set-up and/or the system performance that would intentionally impair any system services or functions, attaining unauthorized access to or modification of system settings. u. Attempting to defeat or bypass the district's internet filter by using or trying to use proxies, https, special ports, modification to district browser settings or any other techniques designed to avoid being blocked from inappropriate content or to conceal internet activity v. Attempting to defeat, disable or bypass any security protocols, authentication services, firewalls, content filters, PC or server system security settings or parameters, network intrusion detections services or any other technology that manages and secures the network. w. Initiating or attempting to initiate downloads from or uploads to any "darknet", P2P or any other unauthorized file sharing sites or services, including but not limited to gaming, music, video, software or other sites. VI. Disclaimer Spokane Public Schools makes no warranties of any kind, whether express or implied, for the computing and network services it provides and is not responsible for material viewed or downloaded from the internet by users. Use of any information obtained via the internet is at the user's own risk. Users must be aware that there are many services available via the internet that might be offensive to certain groups of users. Spokane Public Schools has filters and security in place to block staff and student access to inappropriate and/or offensive material available via the internet but these filters are not a guarantee that all inappropriate material is blocked. Spokane Public Schools cannot eliminate access to all such services, nor could the district begin to identify all of them. Individual users are responsible for their own actions in navigating the internet using Spokane Public Schools' technology resources. Spokane Public Schools reserves the right to change or modify its "TECHNOLOGY, TELECOMMUNICATIONS and INTERNET ACCEPTABLE USE POLICY" at any time. VII. Consent and Waiver a. Parents or guardians will have the opportunity to elect to prevent their children from having access to the internet. b. b. Employees are required to complete and sign an Acceptable Use Consent and Waiver form before they access the district's network services. Spokane Public Schools © 2008, all rights reserved 200 N. Bernard Street Spokane, WA 99201 (509) 354-5900 A-5 Fall 2014