1
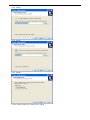
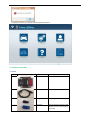
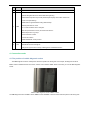
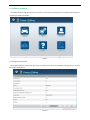
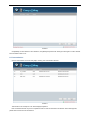
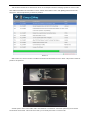
EasyCoding User Manual Table of contests 1. Software operating system ........................................................................................................................................................................... 2 2. Software download and installation .................................................................................................................................................................. 2 2.1 Software download.................................................................................................................................................................................... 2 2.2 Software installation .................................................................................................................................................................................. 2 3. Product instruction .......................................................................................................................................................................................... 5 3.1 Parts ......................................................................................................................................................................................................... 5 3.2 EasyCoding Function ................................................................................................................................................................................ 6 4. Connection mode ............................................................................................................................................................................................ 8 4.1 The position of vehicle diagnosis socket ..................................................................................................................................................... 8 4.2 Connection mode of ENET ........................................................................................................................................................................ 9 5. Software operation manual ............................................................................................................................................................................ 10 5.1 Software operating environment ............................................................................................................................................................... 10 5.2 Vehicle condition .................................................................................................................................................................................... 10 5.3 Internet condition .................................................................................................................................................................................... 10 6. Operating software........................................................................................................................................................................................ 11 6.1 Diagnostic function ................................................................................................................................................................................. 11 6.2 DTC ....................................................................................................................................................................................................... 12 6.3 Customization ......................................................................................................................................................................................... 13 6.3.1 Common mode ................................................................................................................................................................................. 14 6.3.2 Expert Mode ..................................................................................................................................................................................... 16 7. Options ........................................................................................................................................................................................................ 18 8. Registration .................................................................................................................................................................................................. 18 9. Upgrading..................................................................................................................................................................................................... 18 10. Help ........................................................................................................................................................................................................... 18 11. Service ....................................................................................................................................................................................................... 18 11.1 Guarantee clause ................................................................................................................................................................................... 18 1. Software operating system Requirements for hardware: laptop, PC, PAD. Space of system disk is no less than 5G, and RAM is no less than 2G. Operating system: Supporting WINDOWS XP SP3, WIONDOWS 7 and WIONDOWS 8, but not WINDOWS RT. Requirements for internet: The software needs to be upgraded online, please make sure your internet is connected. 2. Software download and installation 2.1 Software download Log in http://www.ucandas.com and download EasyCoding_setup_V1.0 installation package. 2.2 Software installation Decompress EasyCoding_setup_V1.0 package and release the folder setup.exe or you can find setup.exe from manufacturer’s Sandisk. The following is an example: Press 【Next】 Press 【Next】 Press 【Next】 Choose “Create a desktop icon” and then press 【Next】 Press 【Install】 Press 【Finish】to operate “EasyCoding” If Superdog is not inserted, the following information will pop up. If Superdog is inserted, you will enter software application interface. 3. Product instruction 3.1 Parts Number 1 Picture Name ENET Contactor Function Connect OBD diagnosis socket 2 Cable Connect PC and ENET Contact 3 USB Flash disk EasyCoding installation software 4 Superdog Superdog must be inserted in USB interface of your PC when applying EasyCoding 3.2 EasyCoding Function EasyCoding is a newly developed device for reading BMW and Rolls-Royce fault codes and making vehicle personalized settings. Below is a list of car models and model years that it supports: Dev. Platform Car models F01 BMW 7 Series Sedan F02 BMW 7 Series Limo BMW 7 Series High F03 Security F04 BMW 7 Series Hybrid F06 F07 F10 F11 F12 F13 F15 F16 F18 F20 F21 F22 F23 F25 F26 F30 BMW 6 Series Gran Coupe BMW 5 Series Gran Turismo BMW 5 Series Sedan BMW 5 Series Wagon BMW 6 Series Convertible BMW 6 Series Coupe BMW X5 M Sport BMW X6 Sports Activity Croup BMW 5 Series Sedan (China Limo) BMW 1 Series Luxury Sedan BMW 1 Series Sedan BMW 1 Series Sedan BMW 1 Series Convertible X3 SUV X4 SUV BMW 3 Series Gran Coupe Year of made Oct. 2010 upwards Apr. 2009 upwards Dev. Platform Car models F31 BMW 3 Series Wagon F32 BMW 3 Series Coupe Nov. 2011 upwards Apr. 2012 upwards F33 F34 Jan. 2013 upwards F35 Dec. 2012 upwards Jun. 2009 upwards Apr. 2011 upwards May 2012 upwards F36 F55 F56 F80 Mar. 2012 upwards May 2014 upwards F82 F83 Mar. 2014 upwards F85 Oct. 2010 upwards F86 Jan. 2013 upwards Oct. 2012 upwards Jan. 2014 upwards Apr. 2014 upwards Jan. 2011 upwards Jan. 2014 upwards Sep. 2011 upwards RR1 RR2 RR3 RR4 RR5 RR6 BMW 3 Series Convertible BMW 3 Series Gran Turismo BMW 3 Series Gran Coupe (China Limo) BMW 4 Series Coupe Year of made Oct. 2012 upwards Dec. 2012 upwards May 2013 upwards Mar. 2013 upwards Aug. 2012 upwards MINI Cooper MINI Cooper M3 4-Door Sedan Sep. 2013 upwards Feb. 2014 upwards Jan. 2014 upwards Apr. 2014 upwards M3 2-Door Coupe M3 Convertible May 2014 upwards Apr. 2014 upwards BMW X5 M SUV BMW X6 M SUV Rolls-Royce luxury sedan series II Rolls-Royce Corniche Convertible II Rolls-Royce luxury sport cars series II Rolls-Royce luxury sedan Rolls-Royce Ghost Rolls-Royce Convertible Mar. 2014 upwards Feb. 2014 upwards Nov. 2002 upwards Jun. 2006 upwards Aug. 2011 upwards May 2015 upwards Feb. 2014 upwards Feb. 2014 upwards Table 1. EasyCoding car model and model year list Personalization functions please see Table 2. Personalization function list. Note: To check out if some functions are available on specific cars, please look up that car’s settings according to the table below. These functions vary from vehicle to vehicle. Because of different hardware configuration, some functions may not available on certain cars. # System Function Add Select Sound Effects Of Lock/Unlock In I-drive Operate Navigation Menu And Watch DVD During Driving Enable Efficient Dynamics Sport CID (Added Sport Displays The Vehicle Info Screen (Power & Torque Meters)). Disable iDrive Legal Disclaimer During iDrive Startup Select Sports Mode In I-drive 1 HU Turn On Gasoline Station Alert In Navigator Allow PDC(Park Distance Control) To Indicate Park Distance Disable Daytime Running Lamps Convert kilometers To Miles Increase The FM band Disable Handbrake To Play Videos Disable Reversing Camera Warning Window # System Function Video Playing With USB Are Available In 2013 NTB 2 ACSM Set Seat Belt Alarm To Last 10 Seconds Allow Car Windows To Roll Up Without Being Disturbed By Door Openings 3 BDC Activate/Deactivate Headlight Washer Set Car's Auto Start/Stop To Start In The Last Used Setting (e.g. Off) When The Engine Is Started Central Control Unlock Automatically When Engine Is Off 4 CAS Shorten Time To Roll Up Or Down Car Windows Shorten The Time To Fold Down Rearview Mirrors Voice Recognition Play Videos 5 Combox Add CIC stored addresses/messages from 25 to 50 Microphone Settings Change and Synchronize Incoming Call Ringtones On Bluetooth Device 6 DWA8 Set Lock Alarm Sound To The Maximum Allow Car Windows To Roll Up Without Being Disturbed By Door Openings 7 FEM Activate/Deactivate Headlight Washer Set Car's Auto Start/Stop To Start In The Last Used Setting (e.g. Off) When The Engine Is Started 8 FKA AC Records Last Engine-off Statues Allow Car Windows To Roll Up Without Being Disturbed By Door Openings 9 FRM Auto Control Of High Beams Extend Foot To Open Rear Cover 10 FZD 11 IHKA 12 TCU Set Lock Alarm Sound To The Maximum AC Records Last Engine-off Statues AC Air Circulation Records its Engine-off Statues Microphone Settings Allow Car Windows To Roll Up Without Being Disturbed By Door Openings Activate/Deactivate Headlight Washer 13 JBBFE Wiper Resets Automatically Disable Front Camera At Maximum Distance Disable Back Camera At Maximum Distance 14 KOMBI Display Digital Vehicle Speed Disable Front Camera At Maximum Distance 15 PMA Disable Back Camera At Maximum Distance Disable Front Camera At Maximum Speed Disable Back Camera At Maximum Speed Add Select Sound Effects Of Lock/Unlock In I-drive 16 RADIO Operate Navigation Menu And Watch DVD During Driving Disable Daytime Running Lamps # System Function Increase The FM band Add Select Sound Effects Of Lock/Unlock In I-drive Operate Navigation Menu And Watch DVD During Driving Enable Efficient Dynamics Sport CID (Added Sport Displays The Vehicle Info Screen (Power & Torque Meters)). Disable iDrive Legal Disclaimer During iDrive Startup 17 RSE Select Sports Mode In I-drive Turn On Gasoline Station Alert In Navigator Allow PDC(Park Distance Control) To Indicate Park Distance Disable Daytime Running Lamps Convert kilometers To Miles Increase The FM band Disable Handbrake To Play Videos Voice Recognition 2 18 ULF Select Bluetooth Phone Ringtone Change and Synchronize Incoming Call Ringtones On Bluetooth Device Table 2. Personalization function list 4. Connection mode 4.1 The position of vehicle diagnosis socket The OBD diagnosis socket is usually below instrument panel in the driving side. For example, the diagnosis socket of BMW 1 series is situated at driver door frame, and the cover is marked “OBD”. When uncovered, you can see OBD diagnosis socket. Picture1. OBD diagnosis socket of BMW 1 series The OBD diagnosis socket of BMW 3 series, BMW 5 series and BMW 7 series is below instrument panel in the driving side. Picture2. OBD diagnosis socket of BMW 3 series Picture3. OBD diagnosis socket of BMW 5 series Picture4. OBD diagnosis socket of BMW 7 series 4.2 Connection mode of ENET Plug ENET connecter into the OBD diagnostic port of the car. The indicating light on the connector will turn on, indicating that the OBD port is providing a stable power supply, as shown in Picture 5. If the light is not on, please check if there is a bad ENET connection. Then connect the networking cable to the ENET connector. Once the connection is built, the EasyCoding software is ready to use. Picture5. Connection mode of ENET 5. Software operation manual 5.1 Software operating environment System requirement: WINDOWS operating system, Windows XP SP3,Windows 7,Windows 8. 5.2 Vehicle condition Make sure the vehicle battery is in good condition. The voltage is above 12V, and there is electricity loss. Turn on ignition switch but do not start the vehicle and turn off other electric appliances on the car. 5.3 Internet condition Please check the Cable Network Setting in your computer and configure your computer to obtain an IP address automatically instead of using an assigned IP address. Picture6 6. Operating software Insert Superdog to the USB interface of your computer. It’s unnecessary to install any drive. Double click EasyCoding icon on desktop to operate the software. Picture7 6.1 Diagnostic function When network status icon on the lower right corner of computer stops circling an exclamation mark appears, you can click the software diagnostic icon. Picture 8 The software reads vehicle VIN code automatically and displays vehicle information. If the vehicle information is not shown, you need to contact the supplier for the latest vehicle data. Press [Page Down] to display full vehicle information; Press [Back] can return to previous menu; Press [OK] to entering into Sub-menu. Picture9 Two major diagnostic functions: “DTC” and “Customization”。 6.2 DTC The function of diagnosing DTC can scan all DTCs existing in electric system. Please confirm there is no DTC stored before customization. Historical DTCs and sporadic DTCs can be cleared by clearing function, but permanent DTCs indicate DTCs exist in vehicle and can’t be cleared. Please confirm whether further maintenance is needed. After customization, you can check whether there is DTC information stored in the car. If there is new DTC information, then the customization is not suitable this vehicle. Please restore the modified customization. Click DTC menu as follows: Picture10 Click [Delete] can clear all DTCs. After clearance, click [Back] and operate DTC clearing function again to confirm whether DTC information exists or not. 6.3 Customization Choose customization menu and click [OK] to entering into customization interface. Picture11 This interface is an example of a car which displays all systems. Note: sometimes the lists may not be complete because of radio communication mechanism. When this happened, please return and reenter into the interface. Choose a system. Take HU as an example. Click [OK] to get into mode selection menu. Picture12 6.3.1 Common mode Click “Common Mode” and the functions that can be modified in the system are shown. You can refer to chart 2: customization chart to select common functions for relevant system according to function lists. Different vehicle models may correspond to different systems. Picture13 Take “Select sound effects of Lock/Unlock in I-drive” as an example to introduce modifying operation in common mode. Click “Select sound effects of Lock/Unlock in I-drive”, and the current state is “close”. Click [Modify] and this function will show“open”. Then click [Code FDL], as shown in picture 14. Picture 14 When code is set, common function is modified successful. But it still needs to be set in “idrive”. The process is shown as picture 15 and picture 16. Picture 15 Picture 16 Another option in “Door Lock”is added, that is “Sound Effects of Lock/Unlock”. Check this option and you can test the sound effects of lock/unlock. If the sound is too small, you can modify the volume in common mode. 6.3.2 Expert Mode Some functions may require system parameters to be modified or sometimes you may not find the functions you want, in “Common Mode”, then you will need “Expert Mode”. There are posts of opening expert functions in BMW forums. You can modify parameters referring to those posts and modify the functions you want in “Expert Mode”. System name, parameter and reflash hidden code table are the same, but we haven't tested yet. Click “Expert Mode” to entering into parameter searching interface. The process is shown as picture 17. Picture 17 Please input the desired parameter in input box. Picture 18 Find the desired parameter, and click the parameter line with left mouse button. As shown in picture 19, there are 3 options, choose the desired state or input customized value. Picture 19 Picture 20 After change setting, click “Code FDL” Note: "Custom" default uses the hexadecimal format, for example, decimal 1 equals to hexadecimal 0 x01, you can enter 0 x01 or 01; decimal 10 equals to hexadecimal 0x0A, you can enter 0x0A or 0A. Expert Mode also provides "Recovery" function. If any fault code is generated when modifying certain system parameter and the code cannot be erased, that indicates this function is not available for your car. By this time you need to use recover function, it can restore your vehicle the raw data. Generally, choose the earliest system parameter to recover, see Picture 21. Picture 21 7. Options This function is used to display software version and to select languages. 8. Registration Registration is not needed for this version. 9. Upgrading Online upgrading is not supported at present. Please pay attention to upgrading information on www.ucandas.com. There are at least 3 upgrades each year, including vehicle model database, code setting database, new com mon function settings and software optimizing. 10. Help Click “Help” to entering into help interface and to guiding you operate the software correctly. 11. Service 11.1 Guarantee clause One-year free replacement for the hardware of EasyCoding and two-year free upgrade for EasyCoding.