1
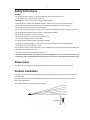
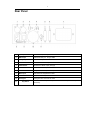
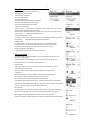
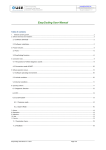
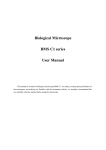
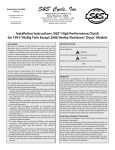
1
DASDI Laser
USER MANUAL
For safety, please read this user manual carefully before initial use.
Event Lighting reserves the right to revise the manual at any time. Information and specifications within this
manual are subject to change without notice. Event Lighting assumes no liability or responsibility for any
errors or omissions. Please consult Event Lighting for any clarification or information regarding this item.
www.event-lighting.com.au
V1.0
2
CONTENTS
Safety Instructions
Product Installation
Rear Panel
Control Board Operation
-
Display panel
Main screen
Play Mode
Files operating
Pictures setting
Setting the sensitivity of sound active
Setting the Rotation
DMX instructions
DMX Values
Warranty
Laser Emission Data
Specifications
3
Safety Instructions
WARNING
• Do not open this device, there is no user-serviceable parts inside. Risk of electric shock.
• Do not look at the light source when the device is on.
• CAUTION: This unit's housing may be hot during and after operation.
• Install this device in a location with adequate ventilation, at least 20 inch (50 cm) from adjacent surfaces.
• Do not leave any flammable material within 50 cm of this unit while operating or connected to power.
• Use a safety chain when mounting this device overhead.
• Do not operate this device outdoors or in any location where dust, excessive heat, water, or humidity may affect it.
• Do not operate this device if the housing, lenses, or cables appear damaged.
• Do not connect this device to a dimmer or rheostat.
• ONLY connect this device to a grounded and protected circuit.
• ONLY use the hanging bracket to carry this device.
• In case of a serious operating problem, stop using immediately.
• The maximum ambient temperature is 104° F (40° C). Do not operate this device at higher temperatures.
• Do not point this laser toward people or crowds.
• Do not point this laser toward any area where you or the operator do not know where the beams are being directed.
• Use aperture cover whenever not in use.
• Use the key to lock the laser to avoid unauthorised use.
• Avoid direct eye contact with laser light. Never intentionally expose your eyes or others to direct laser light.
• This laser product can potentially cause instant eye injury or blindness if laser light directly strikes the eyes.
Power Input
This device has an auto-switching power supply work with input voltage range of 100~240 VAC, 50/60 Hz.
Product Installation
This device can be mounted in many orientations provided each individual device is secured by the use of correct
mounting bracket.
This device should be directed above the heads of people and do not direct it toward the line of sight of people
Refer to the diagram below
Use a safety chain when mounting this device overhead.
4
Rear Panel
1
DMX input
3PIN Male XLR port, using for DMX
2
DMX output
3PIN Female XLR port,using for DMX
3
Safety Loop
Attach the safety cable
4
SIZE
The Size of X and Y axis adjustment
5
ILDA OUTPUT
Standard ILDA DB25 Output (throught)
6
ILDA INPUT
Standard ILDA DB25 Input
7
LCD control Panel
Intelligent LCD control panel of the system
8
Mains input
With socket and integrated fuse holder
9
Switch
Switch on and off the power
10
Cooling fan
Cooling and never cover this fan outlet
11
Key Switch
To turn the laser effect (laser diode) ON/OFF. Be sure that only authorized operator
hold the key
5
CONTROL BOARD OPERATION
Display Panel Instructions
Picture1
1.Display Window
2.UP 3.DOWN
4.SDCARD
5.MIC
6.ENTER
7.MENU/EXIT
Function Description of Main Display Screen
Picture2
1 .Present Play Mode
2. Opening Folder (A:\ shows that it under the SD card root directory)
3. Icons of The folders' types
Folder
Picture file .ida format
Programs List files .ist format
4. Operating Prompts, add the current file to play list (only the ida format is effective)
5. Sign of opening sound-active function, only if you turn to Sound-active mode)
6. Current working speed (Only under SD browse mode with Built-in effect mode is effective)
7. choosing the file or file' s name
8. Total number of files and which file is chosen currently.
6
Play Mode
1 .Seven combined play modes of this machine:
-The mode of SD card file browsing
-The mode of SD card play list
-The mode of Built-in effect
-The mode of DMX control
Picture3
-The mode of SD card file browsing and sound-active
Picture4
-The mode of SD card play list and sound-active
-The mode of Built-in effect and sound-active
2. The choices of Play Mode
-Press the
"menu" under main screen, it will show the menu of Picture 3,then press "up" and "
down" to choose mode Return white says selected
-Press the "enter" it will show the Picture 4, "up" and "down" to choose what you want, and next
press the "enter",“√”presents your current play mode.
Picture5
3. Sound-active combination mode
-As picture 4, choose "sound control" and press" enter". then it will show sound-active mode with
your last step.(“√”presents that the sound-active mode is effective.)
4. Setting to Host
-As picture 4,choose "Setting to Host" and press "enter",then the machine is set be
as the Host machine. you can connect other machine which is not host machine with
ILDA interface,(when the machine has been set be as host machine, it cannot
Picture6
be receive the signal of ILDA interface.)
5. Setting finished, press the "exit" and return the main screen.
File’s operating
1.At the main screen of "SD card browsing mode "and" SD card play list mode", press "up"
and "down" to choose the file.
2.when you choose a file, please press the "enter" then you can open this file, look the
Picture7
picture 6,after opening the ILD Folder, you will see the picture 7.
3.CDUP, two way
-press "Menu" at the main screen, it will show the menu, then press "down"
to choose
"upper directory". then Press "enter".
-At the main screen, press the "down" to last file, look picture8, then press "enter".
4. Edit play list
-After choosing the ida file, then press "enter", it will show" setting the playing time"
Picture8
as in the picture 9, press "up" will add the time and "down" will reduce
the time" (Playing time is the times of the program has been played)
-After setting the playing time, press the "enter",it will show "add successful" presents that it
has been added to the profile list" Profile list. 1st" (Note: The machine will create a new profile list
automatic under every directory, and the file name is “default .ist")
5.PIay and Stop
Picture9
This function only under the play list mode will be effective. After choosing one file of the playing
list, press "enter”,it will open. The machine will play as the edited programs, press "enter',it
will stop playing. The picture will stopped, Picture 10 shows the "stop" and "play".
Picture 11 shows that it is playing. When press "up" and "down",it will stop and show next program.
Picture10
Picture11
7
Pictures' Setting
At the main screen press "menu" it will show a item of "Pictures" Setting", then press
"enter" , you will see many orders, do as below (picture 12):
1.Setting Image Reverse, under "Pictures' Setting",choose "X mirror image" or
"Y mirror image",and press "enter',the picture will be reversed in X or Y
direction , then press the "exit",it will Automatic keep your Setting.
2.Setting the Scanning speed, under "Pictures” ”Setting",Choose "Scanning speed",
press "enter",you will see the screen As picture 13 Press "up" and "down" to change
the Scanning speed. After finished the setting, Press "exit",it will automatic keep your
setting.(Note: Under The play list Mode, it is no effective.)
3.Setting the Playing speed(The speed of pictures moving), under "Pictures Setting",
choose "Playing Speed" ,like the picture 14, Press "up" and "down" to change the
playing speed.(The larger of the number, the slower of the speed). After finished the
setting, Press "exit",it will automatic keep your setting.(Note: Under The play list
Mode and Built-in effect mode, it is no
effective.)
Picture12
Picture13
Pictures' Setting
This Machine has some effects for user's option (Default is two),operation as below:
1.At the main Screen which Under Auto mode, Press "enter"
2.Press "down",choose "effect select"
3.Press "enter" ,it will show the menu of effects .(See picture 15)
4.Press "Up" or "Down" to choose the effect and press the "enter" it will show the
effect which has “√”,if several items has”√”,the programs will be played by turns.
Picture14
Setting the Sensitivity of Sound-Active
At the Main Screen, Press the "menu",and choose "Sensitivity of Sound-Active",
and then "enter", it will show the items of Sensitivity, Press "up" and "down"
to change the Sensitivity, The number 87 is the most sensitivity, and number 0
represents that it cannot accept sounds.
Picture15
Setting the Rotating
Note: must under hardware Configuration Rotating is the rotating of stepping motor (the
machine has rotating gratings will be effective), at the main screen, press "menu",
and choose "Setting the Rotating", Press the "enter". Ir will show the order of Setting
the rotating, as picture 16:
1.Setting the Rotating speed, press "up", it will add the speed to 255,it stop rotating,
it is 0,turn "down" ,you can see it.
2.Setting the direction of Rotating, Press "enter', it will make the stepping motor wrap
around. After finished, Press ”exit” ,return to main Screen, keep the setting automatically.
Picture16
DMX instruction
1.Setting the DMX address: at main Screen of DMX mode,press "up" or "Down" to
choose the DMX address. the system will keep your address automatically.
See picture17.
Picture17
8
DMX CHANNELS DESCRIPTION:
Operating Mode Selection
CH1
CH2
Sound Sensitivity Control
0
Blackout
1-40
SD Browse Mode
41 - 80
SD List Mode
81-100
SD Browse Mode + Voice
101-120
SD Browse Mode + Voice
121-160
Built in Effects
161-200
Built in Effect + Voice
201 -240
DMX Programming Mode
241-255
DMX Programming Mode + Voice
0-255
0
1-50
CH3/14
Off Light
out of bounds through the mode; When the channel
value is less than 5, the pattern size will be reduced.
Pattern Mode Selection 1st/2nd
out of bounds for the exhumation mode, when
50-100
channel values less than 55, the size of the pattern
will be reduced
CH4/15
Pattern Selection 1st / 2nd
0-255
2 for a number of built-in effects mode pattern
3-channel SD card mode, a logarithmic
transformation to a folder,
0: Select the root recorded on day
0-63
static size adjustment
dynamic size effect, every 32 values for some, each
CH5/16
Pattern Scaling
64-255
piece is different from the size of the effect, in the
same paragraph, the greater the value, the faster the
action
0-63
static rotation adjustment
the dynamic effect of the rotation every 32 values
CH6/17
Y-axis rotation
64-255
for some, each for different rotation effects, in the
same paragraph, the greater the value,the faster the
action
CH7 / 18
Horizontal movement of the pattern
0-63
static level shift adjustment
9
the dynamic horizontal movement effect, every 32
64-255
values for some, each for different horizontal
movement effects, within the same segment, the
larger the value, the faster the action
0-63
static vertical movement adjustment
the dynamic vertical movement effect, every 32
CH8 / 19
The vertical movement of the pattern
64-255
values for some, each for different vertical
movement effect, within the same segment, the
larger the value, the faster the action
0-63
static horizontal scaling adjustment
dynamic horizontal scaling effect, every 32 values
CH9 / 20
horizontal roll
64-255
for some, each for different levels of zoom effect,
in the same paragraph, the greater the value, the
faster the action
0-63
static vertical scaling adjustment
dynamic vertical zoom effect, every 32 values for
CH10 / 21
vertical roll
64-255
some, each for different vertical zoom effect, in the
same paragraph, the greater the value, the faster the
action
0-63
CH11 / 22
Gradually painting
64-255
static gradually drawn regulation
dynamic gradually painting effect, the greater the
value, the faster the action
CH12 / 23
Node
CH13 / 24
Colour Selection
0-255
0-63
static color choices, every the eight value of a color
scheme
64-127
five-colour flow
128-255
Automatic colour
10
WARRANTY
Please refer to your local dealer or please contact Event Lighting.
LASER EMISSION DATA
* As measured under IEC measurement conditions for classification.
Laser Classification: Class 3B
Green Laser Medium DPSS: Nd:YVO4+KTP,532nm
Red Laser Medium LD: GaAIAs 650nm,typical
Blue Laser Medium LD: InGaN 450nm, typical
Beam Diameter:r <5mm at aperture
Divergence(each beam): <12 mrad
Divergence(total light) :<90 degrees
Laser Power:300mW 650nm Red CW, 100mW 532nm Green CW, 600mW 450nm Blue CW
Transverse Beam Mode: TEM00
Scanning: ILDA 20 Kpps
SPECIFICTAIONS
Mains Input:AC100~240V, 50/60Hz
Fuse:250V /1.6A Slow Blow (20mm Glass)
Total Power:25W
X/Y Axis Beam Angle:±20°
Laser Safety Standard:EN60825-1 2007
Condition Temperature:10~40℃
DMX Connections:3 pins XLR Male/Female
Net Weight:3.25Kg
Measurement: