1
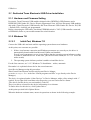
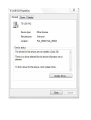
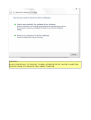
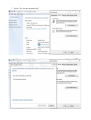
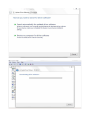
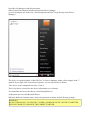
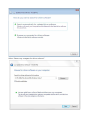
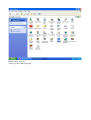
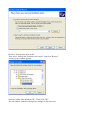
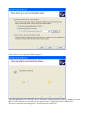
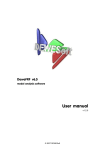
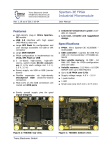
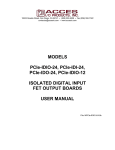
USB Drivers Installation
User Manual
General Index
1 Introduction ................................................................................................................................... 1
2 Device Drivers ............................................................................................................................... 1
2.1 Dedicated Trenz Electronic USB Driver Installation ............................................................ 2
2.1.1 Hardware and Firmware Setting .................................................................................... 2
2.1.2 Windows 7/8 .................................................................................................................. 2
2.1.2.1 Initial Part, Windows 7/8 ....................................................................................... 2
2.1.2.2 Windows 7/8 Installation – offline, local ............................................................... 6
2.1.2.3 Windows 7/8 Installation – online, automatic ........................................................ 8
2.1.2.3.1 Configuration Problems ................................................................................. 8
2.1.2.3.2 Force the online search ................................................................................ 10
2.1.2.4 End of installation under Windows 7/8 (Final Part) ............................................ 12
2.1.2.5 A pop-up window that shall never appear in driver installation under Windows 7/8
............................................................................................................................................ 13
2.1.3 Windows Vista ............................................................................................................. 14
2.1.4 Windows XP ................................................................................................................ 20
2.1.4.1 If you want to reinstall DEWESoft driver ............................................................ 30
2.2 Generic Cypress Driver Installation .................................................................................... 32
3 Document Change History .......................................................................................................... 32
1 Introduction
This manual describes the driver installation process of a generic Cypress USB driver and a
dedicated Trenz Electronic USB driver on a Microsoft Windows XP, Vista, 7 and 8 operating
systems.
Trenz Electronic USB drivers for Windows 7 are installed as certified drivers on Windows 8 too;
the installation of Windows 7 drivers on Windows 8 follow the same procedure.
For the other two operating systems (XP and Vista), there are some differences, but the skeleton of
the procedures is the same as Windows 7/8.
The further possibility that exists in Windows 7 and Windows 8 is the automatic update from
Internet (Windows repository of certified drivers, Windows Update).
2 Device Drivers
To provide a convenient interface between host computer and Trenz Electronic USB modules,
suitable drivers shall be installed on the operating system. There are two drivers that work with
Trenz Electronic USB modules:
1. a generic Cypress USB driver, which works with default USB controller configuration;
2. a dedicated Trenz Electronic USB driver, which works with custom USB controller
firmware.
The generic Cypress USB driver is used only for initial USB microcontroller programming and it is
not needed for a normal work flow. Most users need to install only the dedicated Trenz Electronic
USB driver.
2.1 Dedicated Trenz Electronic USB Driver Installation
2.1.1 Hardware and Firmware Setting
Previously, Trenz Electronic USB modules shipped with a DEWESoft USB firmware and a
DEWESoft USB Vendor ID / Device ID pair programmed. Now, all Trenz Electronic USB modules
ship with a Trenz Electronic USB firmware and Trenz Electronic USB Vendor ID / Device ID (VID
= 0x0bd0, PID = 0x0300) pair programmed.
Before connecting the USB cable, check that EEPROM switch is "ON" (USB controller connected
to EEPROM). Refer to your module manual for switch location.
2.1.2 Windows 7/8
2.1.2.1
Initial Part, Windows 7/8
Connect the USB cable and wait until the operating system detects new hardware.
At this point, two outcomes are possible.
1. If there is an Internet connection and Windows parameters are correctly set, the driver is
automatically downloaded from Microsoft Update and installed.
Even if correct parameters are set, it may happen that the operating system informs you that
is unable to install the device. In this case, you can force this search (see 2.1.2.3.2 Force the
online search)
2. The operating system informs you that is unable to install the device.
For the first outcome, see 2.1.2.3 Windows 7/8 Installation – online, automatic.
Hereunder it is explained what to do for the second outcome.
Open Device Manager using this procedure:
Start\Control Panel\System and Security\System\Device Manger
(or write devmgmt.msc in the line “Search programs and files” to go directly to the Device
Manager).
The device is registered under “Other Devices” in Device Manager with a yellow triangle with “!”
symbol. If you right click it and then select Properties, you can read as Device Status:
“The drivers for this device are not installed. (Code 28)
There is no driver selected for the device information set or element.
To find a driver for this device, click Update Driver”
At this point you shall click Update Driver.
When the hardware assistant starts, answer its questions as shown in the following example.
WARNING:
DO NOT UNINSTALL “TE USB FX2” UNDER “OTHER DEVICES” OR THE COMPUTER
WILL BE UNABLE TO SEARCH THE CORRECT DRIVER.
2.1.2.2
Windows 7/8 Installation – offline, local
Select “Browse my computer for driver software” instead of “Search automatically for updated
driver software”.
Under Windows 7, the installation process does not ask the user whether he/she wants to trust the
driver creator, because the Trenz Electronic device driver it is not only digitally signed with a
signature entrusted by a Certification Authority but also certified by the Microsoft Windows Logo
Program. The digital signer of the driver is Microsoft Windows Hardware Compatibility. Trenz
Electronic device driver has been signed by Microsoft through Winqual site (now Winqual website
is under https//sysdev.microsoft.com). To obtain this signature, Trenz Electronic device driver had
to pass some quality tests arranged by Microsoft.
During the driver installation under Windows 7/8, the following pop-up window shall never appear.
The following pop-up window shall appear instead.
2.1.2.3
Windows 7/8 Installation – online, automatic
WARNING
THE FIRST ONLINE INSTALLATION MAY START AFTER 30-60 SECONDS OF APPARENT
IDLENESS. AFTER THIS TIME, AN AUTOMATIC INSTALLATION SHALL START.
IF THE AUTOMATIC INSTALLATION DOES NOT START (EVEN WITH PARAMETERS
CORRECTLY SET), FORCE THE INSTALLATION with the following procedure:
1. right click on device TE USB FX2;
2. select “Update driver”
3. select “Search automatically for updated driver software”
Under Windows 7, the installation process does not ask the user whether he/she wants to trust the
driver creator, because the Trenz Electronic device driver it is not only digitally signed with a
signature entrusted by a Certification Authority but also certified by the Microsoft Windows Logo
Program. The digital signer of the driver is Microsoft Windows Hardware Compatibility. Trenz
Electronic device driver has been signed by Microsoft through Winqual site (now Winqual website
is under https//sysdev.microsoft.com). To obtain this signature, Trenz Electronic device driver had
to pass some quality tests arranged by Microsoft.
The certification granted by Microsoft Windows Logo Program gives another advantage: if the host
computer has a connection to the Internet, you can leave the search of a correct driver to Windows 7
itself.
2.1.2.3.1 Configuration Problems
There is a possibility that Windows does not allow you to automatically search the driver online,
because of some parameters in Device Installation Settings.
To change Device Installation Settings, do the following steps:
1. Click Start
2. Click Control Panel
3. Click System and Security
4. Click System
5. Click Advanced System Settings
6. Click Hardware Tab
7. Click Device Installation Settings
8. Select “Yes,do this automatically”
Another procedure is the following (in particular if the operating system is Windows 8)
1. Click Computer
2. If OS is Windows 8, you must also click Computer on the top
3. Click System Properties
4. Click Advanced System Settings
5. Click Hardware Tab
6. Click Device Installation Settings
7. Select “Yes, do this automatically”
After this change your operating system shall be able to search online the driver for Windows 7 and
Windows 8.
2.1.2.3.2 Force the online search
IF THE AUTOMATIC INSTALLATION DOES NOT START (EVEN WITH PARAMETERS
CORRECTLY SET), FORCE THE INSTALLATION with the following procedure:
1. right click on device TE USB FX2;
2. select “Update driver”
3. select “Search automatically for updated driver software” instead of “Browse my computer
for driver software”.
2.1.2.4
End of installation under Windows 7/8 (Final Part)
At the end of the procedure, check that in the “Device Manager” under “Trenz Electronic USB
Devices” device class, the “Trenz Electronic USB FX2” device has been added; the USB device is
not added under “Universal Serial Bus controllers” category.
2.1.2.5
A pop-up window that shall never appear in driver
installation under Windows 7/8
During the installation of driver under Windows 7/8, you shall never see the following pop-up
window:
If you see this pop-up window, chances are that you are about to install the old DEWESoft driver.
Another pop-up window that shall never appear during driver installation under Windows 7/8 is the
following.
If you see this pop-up window, chances are that you are about to install the Windows XP driver
under Windows 7/8.
2.1.3 Windows Vista
Connect the USB cable and wait until the operating system detects new hardware.
Click “Cancel”.
Open Device Manager using this procedure:
Start\Control Panel\System and Security\System\Device Manger
(or write devmgmt.msc in the line “Search programs and files” to go directly to the Device
Manager)
The device is registered under “Other Devices” in Device Manager with a yellow triangle with “!”
symbol. If you right click it and select Properties, you can read as Device Status:
“The device is not configured correctly. (Code 1).
There is no driver selected for the device information set or element.
To reinstall the drivers for this device, click Reinstall Driver”
At this point you can click Reinstall Driver.
When the hardware assistant starts, answer its questions as shown in the following example.
WARNING.
DO NOT UNINSTALL “TE USB FX2” UNDER “OTHER DEVICES” OR THE COMPUTER
WILL BE UNABLE TO SEARCH THE CORRECT DRIVER.
After clicking “Reinstall Driver”, another pop up window appears.
Select “Browse my computer for driver software”.
Select the folder MS-Windows-Vista-7.
After the driver selection, this pop-up window appears.
Select “Install this driver software anyway”.
A new pop up window appears. Wait until the end of installation.
At the end of installation, this pop-up window shall appear.
2.1.4 Windows XP
Connect the USB cable and wait until the operating system detects new hardware.
If a pop-up appears, click “Cancel”.
Open the Control Panel. Use the procedure described in the following images.
Click “Start”, then “Control Panel”.
Select “Switch to Classic View”.
Double-click “System”.
A new pop-up window appears.
Select the tag “Hardware”.
Then click “Device Manager”.
A new pop-up window appears. In this window, a TE USB FX2 device shall appear.
The device is registered under “Other Devices” in Device Manager with a yellow circle with “!”
symbol. If you right click it and then select Properties, you can read as Device Status:
“The device is not configured correctly. (Code 1).
There is no driver selected for the device information set or element.
To reinstall the drivers for this device, click “Reinstall Driver”
At this point you can click Reinstall Driver.
A new pop up window appears.
When the hardware assistant starts, answer its questions as shown in the following example.
WARNING.
DO NOT UNINSTALL “TE USB FX2” UNDER “OTHER DEVICES” OR THE COMPUTER
WILL BE UNABLE TO SEARCH THE CORRECT DRIVER.
Select “No,not this time”. Then click “Next”. A new pop-up window appears.
Select “Install from a list or specific location (Advanced)”. Then click “Next”.
A new pop up window appears.
Deselect “Search removable media”.
Then select “Include this location in the search:” and click “Browse”.
A new pop-up window appears.
Select the folder “MS-Windows-XP”. Then click “OK”.
The old window shall have changed accordingly to this selection.
Click “Next”. A new pop-up window appears.
After the installation, TE USB FX2 device shall have changed position in Device Manger. It is not
under “USB controllers” but under its own specific class “Trenz Electronic USB devices”.
The device name has also changed to “Trenz Electronic USB FX2”.
Select “Finish”.
After installation, you can control the status of installation using “Properties” (right click).
Because the Windows XP installation is not clean ( all driver installations under Windows XP are
not clean). If you uninstall the “Trenz Electronic USB FX2” device and you reattach the TE USB
FX2 device, you see a window different from the previous one (first installation).
2.1.4.1
If you want to reinstall DEWESoft driver
After the installation of the new driver, you may be unable to reinstall the DEWESoft driver.
If this happens and you want to reinstall the old driver, you shall follow this procedure:
1. Right-click the TE USB FX2 device under Device Manager window.
2. Select “Update Driver”.
3. Follow the normal procedure until you arrive to this window.
Select “Don't search. I will choose the driver to install”.
The DEWESoft driver is “Trenz Electronic TE03xx USB”.
The Trenz Electronic driver is “Trenz Electronic USB FX2”.
2.1.4.2
Advanced Operations
If the user wishes to go back to a former device driver, it is recommended to uninstall the current
device driver and then reinstall the old device driver.
As Microsoft Windows XP dos not offer the "Delete the driver software for this device." uninstall
option, it might be useful to:
•
delete TE03xx-USB*.sys and TE_USB_FX2*.sys files in the
C:\WINDOWS\system32\drivers\ folder after uninstalling the current device driver and
before installing the new device driver;
•
delete oem*.inf files (along with their companion oem*.pnf files) in the C:\WINDOWS\inf\
folder corresponding to the relevant VID/PID after uninstalling the current device driver and
before installing the new device driver.
2.2 Generic Cypress Driver Installation
Most users don't need this driver, this driver is used only for initial USB microcontroller
programming, which was already done for all supplied TE modules.
If the USB microcontroller (Cypress EZ-ESB FX2) driver is not installed on the
host computer, then the easiest way to do it, is the following:
•
disconnect the module if it connected or leave the module unconnected;
•
configure the module such that the USB microcontroller will provide its default vendor ID
and device ID to the USB host. To do it, set “EEPROM” switch to “OFF” state (EEPROM
disconnected from USB microcontroller). Refer to your module manual for switch location;
•
connect the module to the host computer through the USB interface;
•
wait until the operating system detects new hardware and starts the hardware assistant;
•
set “EEPROM” switch to "ON" state (EEPROM connected to USB microcontroller);
• answer the hardware assistant questions as shown in the following example
Check that, in the “Device Manager” under “USB-Controller”, the “Cypress Generic USB Device”
has been added.
After that, the I2C EEPROM should be programmed with the right Vendor ID / Device ID pair; see
firmware recovery chapter in UM-Firmware.pdf.
3 Document Change History
Version
Date
Author
1.00
2012-06-11 SP, FDR Initial release.
1.10
2012-07-02 Sp, FDR Added XP, Vista.
Improved 7 and 8
Description