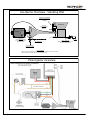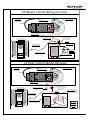
1
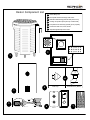
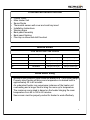
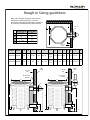
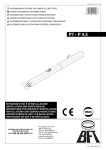
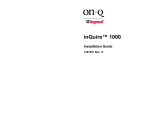
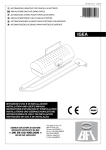
Heater Model __________ Serial # __________ Installation Guide ULTRA-SAUNA HEATER Proudly made in USA since 1964 Gas Heaters - 40,000-80,000 BTU Installation Instructions & User Manual PO Box 636 Eagle Idaho USA. 83616 T: 877.467.2862 F: 208.286.0290 [email protected] www.scandiamfg.com 1 BEFORE YOU START PLEASE READ CAREFULLY Heater and controls must be installed by a licensed professional Heater controls must never be installed inside the sauna room Heater controls should never be placed near water Heater must be installed according to local codes. Ensure all factory connections are tight. Wires may have come loose in shipping. Heater should not be operated without recommended amount of rocks Sauna door must always open outward. Sauna door can never include a lock. Sauna should be constructed of soft wood (i.e. clear western red cedar) Sauna room should never have tile walls or benches Do not treat or varnish sauna wood Use only Scandia high density sauna rocks Check and clean rocks and rock tray twice a year or as needed The warning signs and sauna usage plaque must be displayed Sauna room sizing is based on standard 7 foot ceiling Only use aroma-stone when using fragrances to protect heater Do not touch the heater while in operation Do not cover the heater Never hose down the sauna Never leave children unattended Sauna bathing is not suitable for those with health problems Sauna room must be vented according to manufacturers specifications or Scandia installation instructions Heater guard must be installed 2 Scandia Ultra Sauna Gas Heater Component List Heater Component List 1 Heater Body Unit 2 Back panel w/external through-wall covers 3 Stainless steel flashing (internal back panel cover) 4 Venting component option (flue cap or draft hood) 5 Complete burner assembly (natural gas or propane) 6 Control box with cover, wires, knobs 7 Imported high-density sauna rocks 2 1 0.24014340310667" x 0.24014340310667" 0.48028680621333" x 0.48028680621333" Flue Cap 4 3 J 0.20564516129032" x 0.20564516129032" 0.41129032258065" x 0.41129032258065" or Draft Hood w/Elbow Ultra Sauna Scandia/Vico Gas Burner Overview and installation instructions Pilot Generator Assembly Includes: Thermopile and pilot light Thermopile wires to gas valve at base of burner assembly 5 Gas Burner 0 15 45 Gas Valve 30 Gas Orifice Must be factory prepared according to gas type and altitude of location Pilot Light pre-plumbed to gas valve Gas Air Adjuster (for Propane Only) Burner Lip Step # 1 Slides under the burner bracket on the floor of the heater chamber Burner Bolt Step #2 Locks burner in place Burner Installation 1. Burner lip must be inserted into the burner bracket on the inside base of the heater chamber. 2. Bolt the burner to the intake vent floor - use the pre-drilled hole. 6 Model F 7 3 YOUR HEATER SHOULD INCLUDE Control Panel Main Heater Unit Sauna Rocks Thermostat sensor wall cover and rock tray insert Installation Instructions Warning Signs Back panel assembly Back panel flashing Flue cap or elbow and draft hood set HEATER SIZING Ultra Sauna Gas Fired Heaters Model BTU Output Minimum Room Size Maximum Room Size 240 40,000 BTU 60 sq ft (5.57 sq m) 88 sq ft (8.15 sq m) 245 40,000 BTU 60 sq ft (5.57 sq m) 88 sq ft (8.15 sq m) 280 80,000 BTU 80 sq ft (7.43 sq m) 240 sq ft (22.30 sq m) 285 80,000 BTU 80 sq ft (7.43 sq m) 240 sq ft (22.30 sq m) Sauna Heater Sizing Minimum and maximum room sizes are based on a 7 foot ceiling height Properly sized heater will bring room temperature to desired level in approximately 30 to 60 minutes An undersized heater may experience instances of the heater unit overheating and a longer time to bring the room up to temperature The maximum room sized is based on the heater bringing the room temperature from 60 to 180 in 60 minutes Sauna room must be properly vented for heater to work effectively 4 Rough-in Sizing guidelines Note: Your Scandia Ultra gas sauna heater should be installed only by a licensed electrician and HVAC professional. Improper or unofficial installation will void warranty. C Gas Line A B C D 40,000 BTU 80,000 BTU 18.5" 29" 8" 12" 7" 11" 2 1/2" 4" 0.515625" x 0.515625" A 0.20564516129032" x 0.20564516129032" 0.41129032258065" x 0.41129032258065" B D Cedar wall lining Models Heater A B C D E 240 & 245 40,000 28" 4" 18 1/2" 2 1/2" 20 x 32 280 & 285 80,000 40" 6" 29" 4" 33" x 45" G H J K L N 8 1/4" x 3 1/2" 24 1/2" 14" 13 1/4" 7" 4" 10 1/4" 8" 8 1/4" x 5 1/2" 16 1/4" I 12" 6" 12 1/4" 14" 32" Wall to outside Cedar wall lining D F 20" Wall to inside Cedar wall lining D (back panel assembly) K (back panel assembly) B C C 0.515625" x 0.515625" K E 0.20564516129032" x 0.20564516129032" 0.41129032258065" x 0.41129032258065" E J I 0.20564516129032" x 0.20564516129032" 0.41129032258065" x 0.41129032258065" N 0.515625" x 0.515625" K A A H H F F B L G B L G 5 Rough-in control box and interior back panel 40,000 BTU Heater (240/245) Installing the back panel Back panel should be installed when sauna room is framed in prior to the finishing steps of the sauna room Back panel is mounted directly to the face of the studs Insulate area between back panel and exterior wall in accordance with local codes Centerline of the flue opening must be a minimum of 17 1/2” from the side wall. Metal tabs at the bottom of the back panel must rest on the finished floor. If the interior wall material is more than 3/4” thick spacers should be placed between the stud and the back panel Adjust intake box and flue collar to wall thickness. Walls thicker than 5 1/2” will require extensions Installing the control box Control box should be installed when sauna room is framed in prior to the finishing steps of the sauna room Control box is mounted to the studs facing outside the room at the farthest point away from the heater Control box should be 48” from the floor on center Place a nail 10” below the interior ceiling on the stud facing the sauna room. String a pull wire from the nail to the control box. 25 ft of low voltage two lead wire is supplied in the control box. Run this wire from the control box to the heater intake box and through the opening in the side of the box 80,000 BTU Heater (280/285) Installing the back panel Back panel should be installed when sauna room is framed in prior to the finishing steps of the sauna room Back panel is mounted directly to the face of the studs Insulate area between back panel and exterior wall in accordance with local code Centerline of the flue opening must be a minimum of 26 1/2” from the side wall. Metal tabs at the bottom of the back panel must rest on the finished floor. If the interior wall material is more than 3/4” thick spacers should be placed between the stud and the back panel Adjust intake box and flue collar to wall thickness. Walls thicker than 5 1/2” will require extensions Installing the control box Control box should be installed when sauna room is framed in prior to the finishing steps of the sauna room Control box is mounted to the studs facing outside the room at the farthest point away from the heater Control box should be 48” from the floor on center Place a nail 10” below the interior ceiling on the stud facing the sauna room. String a pull wire from the nail to the control box. 25 ft of low voltage two lead wire is supplied in the control box. Run this wire from the control box to the heater intake box and through the opening in the side of the box 6 Exterior Back Panel Rough-in 20 1/4” 40,000 BTU Heater (240/245) Back Panel 6 1/4” Through-wall rough-in. 5 1/2” A) Exhaust vent (W 9 1/2 in x H 9 1/2 in) B) Intake vent (W 13 3/4 in x H 6 in) 32 1/4” A 5 1/2” Exhaust Vent 9 1/2” x 9 1/2” After intake and exhaust openings are roughed in and interior back panel is installed place flue collar in the exhaust vent opening adjusting to the wall thickness Repeat with intake box cover Walls thicker than 5 1/2” will require extensions 20” 8 1/4” 1 1/2” B Air Intake Vent W 13 3/4 x H 6” 3” 5 1/4” 3 1/2” floor 31 1/2” 80,000 BTU Heater (280/285) Back Panel 6 1/4” Through-wall rough-in. A) Exhaust vent (W 12 1/2 in x H 12 1/2 in) B) Intake vent (W 16 1/4 in x H 8 1/4 in) C) *Please allow 1/4” tolerance in these dimensions After intake and exhaust openings are roughed in and interior back panel is installed place flue collar in the exhaust vent opening adjusting to the wall thickness Repeat with intake box cover Walls thicker than 5 1/2” will require extensions 9-3/4” 44 “ A Exhaust Vent 9-3/4” W 12 1/2 x H 12 1/2 11-3/4” 7” B Air Intake Vent W 16 1/2 x H 8 1/2 4-1/4 ” 20-3/4” 8-1/2” 5” floor 7 Finishing the sauna room Finish 1. 2. 3. 4. Insulate the space between the backpanel and the exterior wall per local codes Ensure wall material rests behind the lip on the back panel Place 1” fiberglass insulation against the interior side of the back panel Remove paper from stainless flashing and start screws to galvanized (do not tighten) 5. Remove butterfly nut from bottom of intake box and slide burner assembly out of the unit. 6. Slide heater into place, guide insulated high-limit wires through the hole on the intake bracket. Secure heater to stainless steel flashing with two screws. 7. Tighten screws on the corners of the flashing. 8. Slip burner inside heater through the intake box allowing the burner lip to fit under the burner bracket. Replace the butterfly nut and screw to secure the burner. 9. Place caution sign on flashing above heater. 10. Carefully uncoil the thermostat probe and using the pull wire previously placed gently pull the probe into the sauna room. 11. attach the thermostat probe ten inches below ceiling as far away from heater as possible. The probe must be placed horizontally in the provided thermostat probe cover. 12. Install heater guard rail. Chassis A B 240/245 280/285 Width Of Heater Shell 18 1/2” 29” Wall to Face of Heater 21” 33” Side of Heater to Wall (Min.) 8” 12’ Height of Heater Shell 28” 40” Wall to Inside of Guard (Min.) 29” 41” Floor to Bottom of shell 4” 6” 8 7 ft 0 in Scandia Ultra-Sauna Heater Guard Rail SAUNA heater Upper bench 0.20564516129032" x 0.20564516129032" 0.41129032258065" x 0.41129032258065" Back Wall D Cedar wall lining C TOP VIEW 0.515625" x 0.515625" Gas Line Lower bench B Heater vent A HEATER Rails are spaced 3-3/4 ” apart Back SIDEVIEW FRONT VIEW Components for 3-sided heater guard: 2x 2x2 corner posts / legs 3x 1x4 rails long piece rails for front 6x 1x4 short piece rails for each side 2x Wall brackets Misc. screws ** 2-sided heater guard will have 1 post and one side only.** Heater guard rail installation: All components come ready to be assembled Observe distances around heater for guard rail, walls, benches and other obstructions Follow the heater manufacturer’s clearances recommendations. 9 Do not cut down heater guard to fit! wall Scandia/Vico Gas Burner Overview and installation instructions Gas Burner Overview - Standing Pilot Pilot Generator Assembly Includes: Thermopile and pilot light Gas Burner Thermopile wires to gas valve at base of burner assembly Gas Valve Pilot Light pre-plumbed to gas valve Gas Orifice Must be factory prepared according to gas type and altitude of location Gas Air Adjuster (for Propane Only) Burner Lip Step # 1 Slides under the burner bracket on the floor of the heater chamber Burner Bolt Step #2 Locks burner in place Burner Installation 1. Burner lip must be inserted into the burner bracket on the inside base of the heater chamber. 2. Bolt the burner to the intake vent floor - use the pre-drilled hole. Piezo Ignitor Overview 10 60 Minute Control Wiring Overview Pilot Gas Line: Gas line that feeds to pilot light assembly Pilot Generator Wire: Two wires from gas valve to pilot assembly (one red, one white) Thermostat to Gas Valve Use red wire from control lead wire. ON Pilot White wire to pilot gen te xt text OFF text te xt Gas Valve at base of heater Red wire to pilot gen Pilot Control Knob: Turns pilot on/off. Used to light pilot Gas Valve at Base of Heater Use the supplied 25ft “control lead” wiring to connect controls to pilot and high limit (brown sheathing) High-limit toTimer connection. Connect white wires. Gas Sauna Heater Rear view of sauna heater Do not use green wires Timer to High-Limit Use white wire from control lead wire. High Limit Wire: Metal cased wire line from heater. 1 2 NO POWER CONNECTION REQUIRED Thermostat to Gas Valve Use red wire from control lead wire. Timer to Thermostat prewired from factory Controls (60 minute timer version) 24 Hour Control Wiring Overview Pilot Gas Line: Gas line that feeds to pilot light assembly Pilot Generator Wire: Two wires from gas valve to pilot assembly (one red, one white) White wire to pilot gen te xt text OFF Pilot O N Thermostat to Gas Valve Use red wire from control lead wire. text te xt Gas Valve at base of heater Red wire to pilot gen Pilot Control Knob: Turns pilot on/off. Used to light pilot Gas Valve at Base of Heater Gas Sauna Heater Rear view of sauna heater Use the supplied 25ft “control lead” wiring to connect controls to pilot and high limit (brown sheathing) High-limit to Thermostat connection. Connect white wires. Do not use green wires High Limit Wire: Metal cased wire line from heater. Timer to Gas Valve Use millivolt wiring - red wire from gas valve to terminal #2 on 24 hour control L1 T1 . Thermostat to High Limit Use white wire from control lead wire. (millivolt wire) Controls (24 Hour timer version) Ground Wire To ground terminal Neutral Wire To terminal #6 Hot Wire To terminal #5 11