1
Mamiya ZD
Setup Guide
English Instructions
j
Installing the software_ _ _~
If there are any software applications running in the background,
including1virus softwate, please shut them down.
Using Windows
Operating environment of the computer having this program installed.
The following operating environment is recommend·ed for the computer having this
software tnstal led.
OS
Windows 2000/Windows XP
CPU
Pentium 4 or
Memory
1 GB or more
Display
1024 .x 768 pixels or more, capable of 24-bit full color
Hard Disk
256 MB or more available disk space
higher~
2.4 GHz or taster
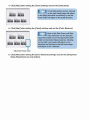
1. Start the computer and insert the included
CD-ROM into the CD-ROM drive of the
computer. Double click the [MAMIYA_DP]
JI. tUVNA_fll> (il;J
f(j.j...
(ffil-
icon and then open [SETUP.EXE].
SEllt EXE
A screen fo r sel.e cting the language type of t he
installed software wiH be displaye.d .
ll!t!<'l,,:l .o M'•. ,l+\<i:Y.i:<>
I
"f .,J
:>,I
'1 .
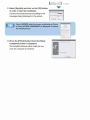
2. Select (English) and cli.c k on the [OK] button
in order to start the installation.
Continue the install process aooording to the
messages being displayed on the screen.
1~
Select [AGREE) when the screen confirming on Terms
of Use [LICENSE AGREEMENn is displayed. Continue
the install process.
:::J
•-
._.,.·-·vna--
,_
--·-..-.i.-.
............
..,._... .-1..
-·...,.......-
__-·,.-
--......---...-"·-··
_,........,
.....
--..-__.... .__..,.....
.......
..... ,._.....,_ -.:-..•~
C-.t"_,,_,, ,.,._,~-··
..........
..
~-~------------------------t :~_....,
..... 1111111.
--~ .·
·~
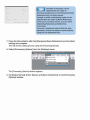
3. Press the [Finish] button when the [Setup
Compl!eted] screen is displayed.
The installed software will be ready for use
once the computer is restarted.
-
Operating environment of the computer having thi:s program installed!.
The following operating envfronment is recommended for the computer havi,ng this
software installed.
OS
Mac OS X v10.2 and after
CPU
Power PC G4 350 MHz or faster
Memocy
1GBormora
Display
Displaying over 16,700,000colors / 1024x768 and above
Hard Disk
256 MB or more available disk space
1. Start the computer- and insert the included CD-ROM into the CD-ROM drive of
the computer.
2 . .Doubl:e click the [Mamiya Digital
.P hotoStudio] icon.
..
~-
·A"Of....W••
r'J.__
3. The [lnstam Mamiya Digital PhotoStudio) screen wUI be drsplayed. Click the
(Continue] button.
Continue the install process according to the messages being d isplayed on the
screen ..
Select [Agree} when the screen confi rming Terms of Use is di splayed.
Continue the install process.
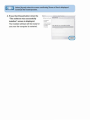
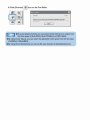
4. Press the [Close] button when the
" The software was successfully
installed" screen is disp~ayed.
The installed software will be ready for
use once the computer is restarted.
lftY.311 ..,.,,,VI Dgn'S V~tud10
l~ IAll 'Sof'INll~
,. Uc:W1-11•
,. '"""'1109
'fh softwano
w;u
su«GSsfully lnst•Uod
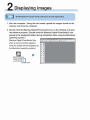
2 Displaying images~---The Windows XP screen will be referred to for this. explanation.
1. Start the computer. Using the card reader; upload the images stored on the
memory card onto the computer.
2. Double· click the [Mamiya Digital Photostudio.J icon on the desktop and open
the software program. (Double click the [Mamiya Digi.ta~ PhotoStudio) icon
placed in the designated folder during installation when using the Macintosh
operating system.)
[Mamiya Digital PhotoStudio] (the
e~~- ~-~ ~Q~~~~Q ~ -~ a•t
start-up screen) window appears.
o.I 9 ~
(Only the toolbar wil.I be displayed on ~ .~
~_sj
the Macintosh operating system..)
_gj ii
.!] ~
....-i~~~......,.v~........,.,.'""""1K·
~~·,
~~
Mamiya Digital
PhotoStudio
Doubeclick
~o
.£1
'lj
~
..
-
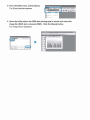
3. From the [File] menu, select [Open].
The [Open] w indow appears.
•
••• ,~
•
'.:-3 ,I)
!II
5= "'=" f..& (S;
lttl"
<,I
_:• L ~I': S
4. Open the folder where the RAW data photograph is stored and select the
image file (RAW data: extension MEF). Click the [Open] button.
The image will be displayed.
==::::;-1.. 1 - 1 I
-~
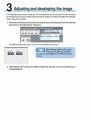
3 Adjusting and developing the image
The deve~opment process using the "Processing Wizard (Processing Preview Assistant
forthe Macintoshiversion)"will be explained below. Refertothe Mamiya DLgitaJ PhotoStudio
User's Manual for detail's.
1. From the [Tool] menu, select (Processing:Wizard (Developing Parameter Setting
Assistant on the Macintosh version)].
JJ
J
I I
,-ncn ::;cttrc:; 1[)
E!i i _ _ _ __
The [White Balance] screen of the [Processing Wizard] screen.
=---~
[Shot Setting], [WB mode], [Color
Temperature], [Mired], and [File]
can be set accordingly on the [White Balance]
screen.
[
·-
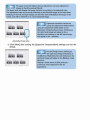
2. Click [Next] after setting t he [White Balance] settings and set the [Exposure
Com:p€msation.).
The upper level will display the pr~adjustment and post-adjustment
images in the {Processing Wi zard).
The lower lev.el will display the image variat ion according to the adjusted rat es.
The adjustment rate can be set by selecting on the desired image in the lower level
Clicking on the leh and right images on the lower level will display the image in the
center. and will be referred to as a post-adjusted image.
Exposure correction can be set
usi ng the adjustment width setting
usi ng the adjustment width slider on t he
[Exposure Compensation] screen. Clicking on
the r ight hand image will adjust in the+
direction and clicking on the left hand image
will adjust in the - directio.n.
Adjustable Range slider
3. Cl ick (Next] after setting the [Exposure Compensation] settings a111d set the
[Tone).
On the [Tone] screen, clicki ng on
the right hand image will adjust in
the [Medium High] direction and clicking on the
left hand image will adjust in the [Medium Low]
direction.
Placing a check mark on [File] will use .a
previously saved adjustment file for
adjustment.
4. Click [Next] after setting the [Tone] settings and set the [Saturation].
On the [Saturation] screen, clicking
011 the right hand image wi.11 adjust
in the f High] direction and clicking on the left
hand image w ill adjust in the [Low] direction.
c=:"1 - -
-
5. Click [Next] after setting the [Color] set.tings and set the [Color Balance] .
Each of the Red, Green, and Blue
Color balance.scan be using the
adjustment wi dth set on the adj ustment width
s lider on the {Color Balance] screen. Clicking
011 the right hand image will adj ust in the +
direction and clicking on the left hand image
will adj1ust in the - direction.
Adjustable Range slide:r
6. Click [Next] aft.e r setting the [Colar Bafance.J settings and set the (Sharpness/
Noise Reduction/Lens Correction].
Strength of sharpness can be
adjusted with the slider of
[Sharpness] appearing on the [Sharpness/ Noise
Reduction/Lens Corretion] screen.
Strength or width of eliminating noise can be
adj usted with the slider of [Noise Reduction).
In the [Lens Corretion) screen, you can setect
[Vignetting Reduction] and [Distortion
Correction].
If you put a checkmark next to [File) for each
parameter, various corrections can be made by
using t he set adjustment files.
7. Press the [Save] button after the [Sharpness! Noise Reduction/Lens Corretion]
settings are complete.
Tlhis will end the setting process using the IProcessing Wizard].
8. Select [Processing1 OpUons] from the (Settings] menu.
~ s hattrnt re~(0
~
T lhe [Processing Options] window appears.
9. Set [Output format.], [Color Space], and [Save Destination] on the [Processing
Options] window.
10. Click [Proc·ess]
~ icon o n t he Tool Pallet.
~
Processing____
All Files:
( 1/ 1 )
C:¥Marn iya Dig itaIPf".JtoStu dio¥1 00MOP DS¥MMFC0026. MEF
• By using [Output format), you can select the file format to be output from
the three types of [Exjf-JPEG]. [Exif-TIFF(Bbit)], or [TIFf(16bit)).
• By using [Co1or Space). you can sel ect the applicable color space from "the two types
of (sRBG] or [AdobeRBG].
• By using [Save Destination], yow can set the save location of developed pictures.
Software, Functions
This software has the following five functions. Refer to the User's
Manual for details.
(1) Brow·s ing
This is a function that allows the user to display raw images
taken and developed image data on a computer. Thumbnail
display and Preview display are· possible.
Thumbna:il
This is a function that allows the users to list tak.e n images and
developed image data at a reduced si!Ze.
Preview
This is a function that displays a preview of the output image
of takern images and developed image data.
Displaying Image Information
This is a function that allows the user to view the file name, file
siz,e , and various other settings of the image taken.
(2) Retouching (ediiUng) function
Overall adjustments and individual adjustments can be carried
out through t he Wizard iF ormat (consists of answering the
questions posed by the system allowing easy overall
adjustment).
(3) Developing
This is a function that aJlows the user to modify i.mag,e white
balance, color balance and expos1ure correction to develop the
I
image.
(4) Out put
I
This is a function that alllows the user to output deve·loped
images from a printer or image setter.
(5) Capture Function
This is a function that alllows the user to take images by
controlling the aperture and shutter speed of a camera from a
computer when the camera is connected to a computer which
has the software installed.
1 What's in t he box?- - - - Talke the camera and accessories ol!Jt of the box and check that all items are included.
The memory card {SD memory card or compact flash card) t hat allows ·the
stora.ge of phot.,ographed .i mages is sold separately.
1
·• Eye cup AE301
• Correcting lens standard DE301
• Finder screen type A SA301
·• IH Cut filterYB301
...
·• Body frornt cap KV401·
• Battery charger DiE-975A User's IM:anuaJ
• Lithium ion battery BA7'01 User's Manual
• IA Cut filter/Low Pass fi lter User's Manual
Mamiya ZD Camera
• Neck sbrap CN301
• IEEIE1394 cable BL301
Battery charger OE-975A
Power cord
Lithium i.on battery BA701
IA Cut filter case
Filter replacement guide
Mam iya Digital PhotoStudioBS301
(RAW Data development software)
c
I'
Mamiya ZD
Setup Guide (this document)
Mamiya Digital PhotoSt udio
User's Manual
Mamiya ZD
User's Manual
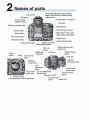
2 Names of parts-----~
Strobe light adjustment a nd correction
button I Cancel button I Se If timer timing
setting button
LCD monitor
ISO button
AiE lock button I OK button
/_
Screen quality
selection button
F
.
Rea:rdial
Monitor button
Zoom button
Card access lamp
Information !button --~=
Shutter release mode
switch lever
M irror up
button
Digital d ia:I
lock button
Miirror
Shutter ni:lease
button
Hot shoe
Lelils rermova.I
button
i
Exposure
Metering
mode button ----..!!.!l.L:.~
correction button
View
adjustment
~~~
Fo?us mode
switch lever
P reViiew button
Lens attachment I removal guideline
knob
Eye cup attac ment I
.
1
rem oval lever
Eye piece shutter
Auto b racket
mode button
Exposure mode
button
LCD back light
button
Upper LCD
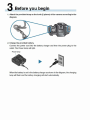
3 Before you begin ----~
1. Attach the provided strap on the· hoo~k (2. places) of the camera according to the
diagram.
2. Charge the provided battery.
Connect the power oord into the battery charger and then the power plug to the
outlet. The Power lamp will light.
Power lamp
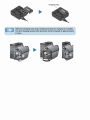
When the battery ls set in the battery charger as shown in the diagram , the charging:
lamp will flash and the battery charging willl start automatically.
Chargrng lamp
~
When the oharging lamp stops flashing and stays lit, charging is compmete.
The first chargi111g session after purchase will be complete in approximately
2 hours.
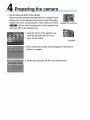
4 Preparing the camera---~
1. Set th e d ate and time· of t fle camera.
Place the shutter release mode switch lever to S {Single-Frame
Mode) and. move the selection key lock lever to the ON position.
Display the menu by pressing the menu button and select
[~](Set up menu) using the [.... ] of the selection key
and press [ t] on the selection key.
Selectiom Ikey lock lever
1 Using the[_.. --1of the selection key,
select the [9] "Set DatefTlme" and
press the OK button.
OK button
.2 The current time andl date wil'I be displayed. Press the OK
button to complete.
-·
_
oa_
<.,_
T· ~
• ----
D • I•
1•
"e.e r
14
W lnwil•
-18
O•
3 Set the year using· the[.... ] of the selection key.
4 Once the year Is set, use the [ f ] of the selection .k ey in order
to set tine month. Set the day/hour/minute accordingliy. Press
the OK button to ·c onflrm the settings.
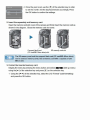
2 .. Insert the· separately sold memory card.
Open tihe memory card slot oover of the camera and firmly insert.the memory card as
shown in the d iagram. C lose
~he
memory card slot cover.
Compact flash card
SO memory card slot
(CF card/MD: Micro drive) slot.
The SD memory card and t he compact flash card {CF card/MD: Micro drive)
can be used as memory cards. Use a memory card with a capacity of 256
MB or over.
3 .. Format the i nserted mem ory card.
I' ]
Display the menu by press.ing the menu button and select[~]. (Set up menu}
iusing Um[... ] of the selection key and press
on the selection k·ey.
1 Using the[........] of the selection ;key, select the [11 ] "Formaf' {card formatting)
and press the OK button.
2 Using the [ • t ] of the selection key, se'lect the slot with the memory card
inserted (SD card or CF card) and press the OK button.
3 A message confirming formatting will be displayed. Press the OK button. Press
the cancel button in order to cancel formatting. Pressing the cancel button will
direct tlhe screen to step 2.
All images w ithin the memory card will be deleted when formatted.
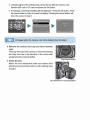
4. Remove the camera front cap and lens fronUrear
caps.
Tlhe body front cap of the camera is removed by turning
the body front cap in the direction of tlhe anow while
pressing the I.ens removal button.
5. Attach the lens.
Match the lens attachment index and camera lens
attachmenVremovail index and turn until a clicking noise
is heard.
Lens attachment I removal guide line
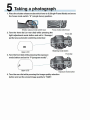
5 Taking a photograph- - 1.. Place the shutter release mode switch lever t o S (Single-Frame Mode) and move
the focus mode switch us" (s·i ngle focus) position.
Shutter release mode switch :1ever
2. Turn th e front dia:I (or rear dial) while pressi ng the
light adjustment mode button and s~t to uAverage I
partia~ area automat ic switch in g metering" ..
Front diall
1
Upper LCD
Meteri ng mode button
Front dial
3. Tur n the front dial while pressing the exposure
mode button and set to '~ P (pro gram mode)".
p
Upper LCD
Exposure mode button
4. Tur n the liear dial whUe pliessing the Image qua'lity selection
button and set 1he stored image qual ity to f' RAW".
Screen quality selection button
Rear dial
1~
Digital LCD panel
5. Turn the rear d ial {or front d ial} wlhile pressing
the· ISO butto111 and set ISO reception to "50".
ISO
ISO button
Rear dial
5"
. u
Digital LCD palilel
6. Turn the front dia1 while pressing the white balance
button and set to nAWB " (auto white balance).
F ront.dial
AWB
Digital LCD panel
White balance button
7. Hold the camera so that the subject is within the focus frame and press the
shutter release button haltway. Once the focus match mark !i s nt, fu Uy press
the shutter release button and take the photograph.
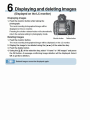
6 Displaying and deleting images
(Disp layed 0111 the LC monito'r)
1
Displ'aying images
1. Push the monitor button after taking the
photograph.
The most recently photog.raphed image will be
disp:layed on the LC monitor.
Pressing the shutter re-lease, button wm automatically
ret um the camera semng to photography mode.
Deleting im:ages
Monito:r button
Delete bultton
1. Push the monitor button.
The most recently photographed imag0 will. be displayed on the LC monrtor.
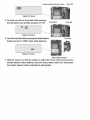
2. Display the image to be de:l eted using' tlile [,.. .. ] of the selection key.
3. Push the delete button.
4. Using the [A' ] of the selection key, select !! 1~ ·f rame" or '' AU images" and press
the· OK button. A message confirming image deletion will be displayed. Select
OK to perform deletion.
Deleted images cannot be displayed again.