1
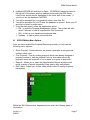
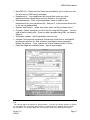
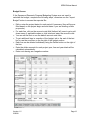
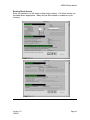
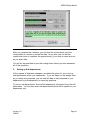
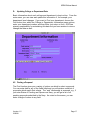
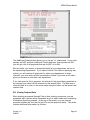
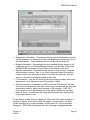
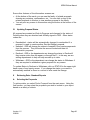
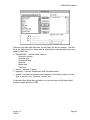
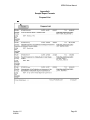
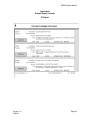
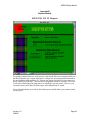
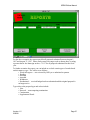
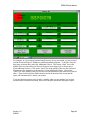
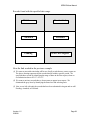
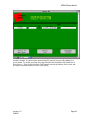
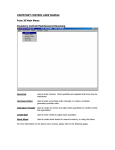
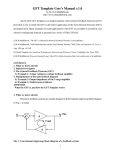
Office of Sponsored
Research
Sponsored Projects Exchange
- Proposal Monitoring
(SPEX-PM)
User Manual
February 1998
SPEX-PM User Manual
Version 1.5
2/26/98
Page 2
SPEX-PM User Manual
Table of Contents
I
Getting Started
A. Setting the Memory Allocation
B. Setting FileMaker Pro Preferences
C. Setting up your Employee Table
II
Logging into SPEX
III
SPEX-PM Main Menu Options
IV Exiting SPEX
V
SPEX Conventions
A. Moving Around the System
B. Using Pull-down Menus
VI Entering a Proposal
A. Selecting the Proposal Type
B. Data elements to Enter a Proposal
C. Setting up Sub-departments
D. Updating College or Department Data
VII Finding a Proposal
VIII Viewing Proposal Data
IX Updating Proposal Status
X
Retrieving Data - Standard Reports
A. Selecting the Proposals
B. Sorting the Proposals
C. Printing a Report
Appendix A - Sample Report Formats
Version 1.5
2/26/98
Page 3
SPEX-PM User Manual
I
Getting Started (one time actions)
A.
Setting the Memory Allocation
To use SPEX, you need to have FileMaker Pro 3.0 installed on your computer.
Once installed, we recommend that you allocate a minimum of 5 MB in memory
to FileMaker Pro using the following procedure:
1.
2.
3.
4.
Go to your FileMaker Pro application.
Click on the icon once to select the application.
From the File menu, select Get Info
In the FileMaker Pro Info window, in the lower right hand box labeled
Memory Requirements, set the Preferred Size to 5000 K by typing in 5000.
5. Close the FileMaker Pro Info box.
The system will respond better with more memory. If possible, set the
preferred memory size to a higher number based on your CPUÕs memory. If
you need help figuring out how much memory you can allocate to FileMaker
Pro, contact Joseph Sullivan in OSR (x8-1161).
B.
Setting FileMaker Pro Preferences
Set the following preferences within FileMaker Pro using the following
procedure:
1. Open the FileMaker Pro application
2. Go to Preferences under the Edit Menu
3. Look at the User Name section. If your name does not appear in the
system option, please enter your name in the custom option.
4. Look at the Network Protocol box. If it is not set to tcp/ip, please reset
selection to tcp/ip.
5. Quit the application
6. Restart Filemaker Pro when you are ready to work in the system
C.
Setting up a Department Specific PI/Employee Table
Each user needs to copy a separate department file (emptable_.fp3) from the
Sponsored Research Server to customize who will be included in the PI pulldown menu on the initial proposal screen and in the employee pull-down
menu on the Effort screen. Using a customized table improves performance by
making the table smaller and prevents you from needing to scroll through a
long list to find the PIs and employees in your department.
The emptable file resides permanently on the userÕs machine and is set-up
specifically for a user and by the user. The user selects which employees they
would like to add from the university employee list. Each user should select the
Version 1.5
2/26/98
Page 4
SPEX-PM User Manual
people who are most commonly the PIs or senior personnel on their
proposals. You are not limited to selecting employees in your department.
If more than one person in your department uses SPEX-PM, one of you can
create this file and can share it with the other users.
The following steps are required to install and set-up the employee table:
1. Log into the Sponsored-Research server. If you do not have the server set
up as an icon, you can connect to the server through the AS AppleTalk zone;
the server is named Sponsored-Research. Log in as a Registered User
with the name research and the password sponsor.
2. Open the Research folder; open the SPEX/Updates folder. Copy the file
Ôemptable_.fp3Õ to your FileMaker Pro folder.
3. When you log into SPEX-PM using the normal login procedures, you can
begin to populate the table by using the Edit button on the main menu. If the
system says you do not have an emptable file, click continue and you will be
prompted to locate the file for FileMaker Pro.
4. Once in the entry function, you will see a list of all employees on the right
1
hand side of the screen. Scroll through the list and click on each employee
who you want to include on your personal list. Once you are finished, you
can sort your personal list for ease of use (so that it will be displayed in
alphabetical order in the pull-down menu). You can also print the list.
5. If at any time when entering a proposal, you find that a given PI is not
included in your list, use the Add PI button to add new PIs to your personal
employee table (emptable).
II
Logging into SPEX
Each user will be given their own user ID and password when they attend a
SPEX training session. This ID and password gives the user access to the
appropriate proposals based on their department or college affiliation. If a new
user in your office needs to start accessing SPEX, contact Joseph Sullivan in
OSR so that they can be assigned their own ID and password. IDs and
passwords should not be shared under any circumstances. You have the
option to change your ID when you first log in. If you want to change it at
another time, please contact Joseph Sullivan.
1. Open the FileMaker Pro application.
2. Click on the circle next to the text ÒOpen an existing fileÓ and then click on
OK on the right hand side of the screen.
3. Select the 'Hosts' option on the right hand side of the window.
1
This table includes all faculty and select job class codes. If you have a PI who is not
included in this list, contact Joseph Sullivan in OSR (x8-1161) to have them added to the
table and you can add them to your department employee table.
Version 1.5
2/26/98
Page 5
SPEX-PM User Manual
4. Highlight SPEXDB.fp3 and click on Open. SPEXDB.fp3 should be listed in
the top half of the screen which is labeled Hosts under the OSR Server.
Local Hosts should also be highlighted in the lower half of the screen. If
you do not see the database, call OSR.
5. You will be prompted for your password; enter it and click OK.
6. You will be prompted for your ID after the database is opened. Enter your ID
and click on enter or press return.
7. From the main menu, select the appropriate option:
• PM - to enter the Proposal Management system. The system will take
about 5 minutes to load all required files from the server.
• Edit - to set-up your department employee table.
• Updates - to view system announcements
III.
SPEX-PM Main Menu Options
Once you have entered the Proposal Monitoring module, you will see the
following menu options:
•
•
•
•
Enter Proposal - Enters data into the system; generates a new proposal
number when used
Find Proposal - Find an existing proposal which was already assigned a
proposal number to edit the proposal, look up information about the
proposal, revise the proposal or run a report on a group of proposals.
Reports - Allows you to enter the Administrative Reports module which
prints a variety of reports (Appendix B has step by step instructions).
Edit Tables - Allows you to enter tables which control a variety of system
parameters.
Within the Edit Table section, departments can enter the following types of
information:
Version 1.5
2/26/98
Page 6
SPEX-PM User Manual
•
•
•
Employee - Used to update the employee table maintained by each user;
user selects employees from a campus-wide database.
Department - Used to update basic data about departments; data
maintained primarily by OSR but menu item accessible to all users
Sub-department - Establishes sub-departments if the department is
interested in sorting their proposals beyond the department level;
maintained by departments but accessible to all users
Within the Edit Table section, OSR enters the following types of information:
• Sponsor - Maintains the sponsor table; used exclusively by OSR
• Division - Maintains the division data for each sponsor; used exclusively by
OSR
• College - Updates basic data about colleges; data maintained primarily by
OSR but menu item accessible to all users
Version 1.5
2/26/98
Page 7
SPEX-PM User Manual
IV
Exiting SPEX
If you will not be working on the system for some time but want to keep it open,
you can hide FileMaker Pro. This will eliminate the initial wait to open all the
files when you need to use the system again.
You can exit the system from any screen by choosing Quit from the pull-down
menu under File from the menu bar. This closes all associated tables and
exits you from FileMaker Pro.
V
SPEX Conventions
A
Moving Around the System
You can move around SPEX by selecting a field with the mouse (point and
click) or by tabbing through the fields.
B.
Using Pull-down Menus
There are pull-down menus for key elements such as sponsor, PI, account
codes and department. If you click on a field once, you can then scroll and
make a selection from the menu. You can also begin typing to move quickly to
a certain section of the list which is alphabetical.
If you double click on a field, you can just enter the data. For example, if you
know the account code you wish to enter, double click on the account code field
and type in the 4 digit code. The associated text title will appear automatically.
Version 1.5
2/26/98
Page 8
SPEX-PM User Manual
VI
Entering a Proposal
A.
Selecting the Proposal Type
To enter a proposal, choose Enter a Proposal from the main menu. You will be
prompted through a series of questions to enter the appropriate proposal type.
The proposal types and their characteristics are outlined below.
Proposal
Type
New
Duplicate
Revised
Budget
Renewal
Supplemental
Continuation
Version 1.5
2/26/98
Definition
Starting Point
Not related to any other
proposal
Not related to any other
proposal but use one as a
starting point to avoid
rekeying; most commonly
used when submitting the
same proposal to multiple
agencies
Overrides original proposal agency will not approve both;
revision changes the status
of original proposal to
resubmitted
Request for subsequent
years of funding for a
previously awarded
proposal; non-competing;
minimal chance that funds
will not be awarded;
augmentation of a budget
(Primarily for NIH, DOE)
Request for supplemental
funding for the same
research project; typically
does not extend project
term; competing request
Request for additional funds
to be spent over a new
project term but to continue
similar research direction;
treated by sponsor as a new
proposal in terms of critical
review; competing request
All fields are
blank
Many fields
copied; can edit
as appropriate;
choice to copy
budget
Relationship to
other proposals
none
none
Many fields
copied; can edit
as appropriate;
choice to copy
budget
Many fields
copied; can edit
as appropriate;
choice to copy
budget
related to
proposal used
as the source
through Find
Many fields
copied; can edit
as appropriate;
choice to copy
budget
Many fields
copied; can edit
as appropriate;
choice to copy
budget
related to
proposal used
as the source
through Find
related to
proposal used
as the source
through Find
related to
proposal used
as the source
through Find
Page 9
SPEX-PM User Manual
If you are entering a proposal that is not ÒNewÓ, you will be prompted to use the
Find function to locate the source proposal. If the original or source proposal is
not entered into the system due to it being submitted prior to July 1995, you
have two options. You can either enter it to have a complete record of the
proposal history or you can enter the proposal as a New proposal and change
the Proposal Type as appropriate. If you choose the later option, you will not
see the complete ÒfamilyÓ on-line.
All newly entered proposals will have a status of Work-In-Progress. Once the
proposal is checked by OSR and OSR enters a date under Date Checked, the
status is changed to Pending.
Once you have selected Enter a Proposal from the main menu, a proposal
number is automatically generated. If you realize you do not want to enter a
proposal or use that number, you will need to delete it using the button at the
bottom of the initial edit screen.
B.
Data elements to Enter a Proposal
Proposal Number Screen (copy on next page)
• Proposal Number - assigned by the system as the next available number;
also generates date of creation; shows in upper left on the screen
• Old Pr # - This will be filled in for proposals entered from OSR files
indicating the number given to the proposal under the old numbering
system (prior to FY97). Do not fill in this field for any proposals submitted
after July 1, 1996.
• Center - Enter the applicable center if one has already been set-up; applies
to renewals, supplements and continuations.
• Contract Number - Can be entered as reference for renewal, continuation or
supplemental fund proposal types
• Proposal Title - free form text
• Begin and End dates - delineate with Ò/Ó or Ò-Ó
• Submitting Organization - will be pre-filled to CMU; change to MPC for
Mellon-Pitt Corporation.
• PI - Click on the boxed field on the left to view the pull-down menu
containing your department employee table. Begin typing a name or use
the scroll bar to move to the relevant part of the list. When you locate the PI,
click on his or her name and wait until the system inserts their data into the
2
field. The PI number is the HRIS system ID which assures the integrity of
this data.
2
If you do not see the name of the PI you wish to add, use the Employee List button to add
the employee to your department employee file. If they are not on the master university list,
contact Joseph Sullivan in OSR. Until they are added, we recommend you select one of
the first two entries in the department employee table, 99998 - Non-CMU employee for a
faculty member who has not arrived yet on campus or 99999-Not in table for a non-faculty
Version 1.5
2/26/98
Page 10
SPEX-PM User Manual
•
•
•
•
•
•
•
•
Non-CMU PIs - These free form fields are provided for you to track up to two
PIs who are not CMU faculty members.
Department(s) - Your department will be pre-filled; enter any other
departments who should have security access to this proposal.
Sub-departments - Click on the department name to select a subdepartment from your pre-defined list. See part C of this section about how
to set up sub-departments.
3
Sponsor and Division - select from those listed on the pull-down menu.
Program - Select a program or add to the list using the Edit option. You can
type in the list at any point. Once you add a program using Edit, you need to
select it.
Solicitation number - add if applicable; free form text
Indicate if the proposal represents flow-through funds from a non-federal
government sponsor but with a federal government prime agreement
behind the sponsor. If yes, indicate the original federal source of funds.
Enter the fringe and overhead rates - type as percentages.
PI and also list them as a non-CMU PI (as a reminder) by typing their name in this free form
field.
3
You can not add to the sponsor or division tables. If you do not find the sponsor or division
you are looking for, contact any staff member in OSR so that the sponsor and/or division
can be added. The sponsor table ties to the sponsor table in the Effort Email system.
Version 1.5
2/26/98
Page 11
SPEX-PM User Manual
Budget Screen
If the Sponsored Research Proposal Budgeting System was not used to
calculate the budget, complete the following steps, otherwise use the ÒImport
BudgetÓ button to access the exported file.
•
•
•
•
•
•
•
Edit or enter the project dates for each period if necessary (they will be prefilled based on the project begin and end dates if you are entering a New
proposals).
For each line, click on the account code field (farthest left) once to get a pulldown menu of applicable codes or click twice and enter the account code.
You can edit the text or use the default account code titles.
To get additional lines in a section of the budget, tab to the end of the last
line or use the scroll bar on the far right of the budget section.
Each line can be deleted individually using the Delete button on the right of
the line.
Enter the dollar amounts for each project year; line and year totals will be
calculated automatically.
Enter cost sharing as a negative number.
Version 1.5
2/26/98
Page 12
SPEX-PM User Manual
Effort Screen
This screen is optional. If you wish to enter effort data for your proposals, you
will be able to generate pending reports automatically. If this would be useful
to you, please complete this screen by selecting the Effort Percentage button at
the bottom of the Budget screen. Entering the Effort screen opens some new
tables so you will not move to it as quickly as you do to the other proposals
screens.
• Use the button at the bottom of the screen to automatically pre-fill the PIs
entered on the first screen if appropriate.
• Select AY/SU/CY as applies for each PI
• Enter the % effort (must be equal to or less than 1) and edit the # of months
if required
• The program will calculate the person-months.
• You can add other senior personnel from the pull-down menu which
4
contains your department employee table.
4
If you do not see the name of the employee you wish to add, use the Employee List button
to add the employee to your department employee table. If they are not on the master
university list, contact Joseph Sullivan in OSR.
Version 1.5
2/26/98
Page 13
SPEX-PM User Manual
Routing Sheet Screens
Enter the questions on the three routing sheet screens. Pull down menus are
provided where appropriate. Many are pre-filled based on answers in prior
screens.
Version 1.5
2/26/98
Page 14
SPEX-PM User Manual
After you complete the 3 screens, you can view the routing sheet, print the
routing sheet or continue to review the data. At any time, you can exit the
system and return to complete the proposal entry; your work is saved as soon
as you enter data.
You will not be permitted to print the routing sheet unless you have answered
all of the questions.
C.
Setting up Sub-departments
At the request of business managers, we added the option for you to set up
sub-departments within your department. If you set these up and assign them
as you enter new proposals, you can use this data to sort proposals in your
department by sub-department for reporting purposes.
To set up sub-departments, choose Sub-department Information from the edit
table menu. You can then enter sub-departments which will be specific to your
department only.
Version 1.5
2/26/98
Page 15
SPEX-PM User Manual
When you are entering proposal data, your department will be pre-filled. To
select a sub-department, click on the department name and you will get a pulldown menu of the sub-departments that you entered. Select the appropriate
one.
Version 1.5
2/26/98
Page 16
SPEX-PM User Manual
D.
Updating College or Department Data
Basic information about each college and department is kept on-line. From the
main menu, you can view and update this information if, for example, your
department head changes. If you want to Find your department, choose the
Find button from within the College or Department Information menu options,
enter your department number and then Enter (not return or find). OSR has
primary responsibility for maintaining this data but you have access to view or
change the data as well.
VII
Finding a Proposal
The Find function gives you a variety of options on which to select a proposal.
You can enter data in any of the fields listed and you will retrieve a sub-set of
proposals which match that criteria. The ÒandÓ relationship is assumed, e.g., if
you enter Status of Pending and Sponsor as Navy, you will get a list of all
pending proposals submitted to the Navy. As noted on the screen, you can
enter a range of values in any field.
Version 1.5
2/26/98
Page 17
SPEX-PM User Manual
The Additional Criteria button allows you to use an ÒorÓ relationship. If you enter
sponsor as NSF and then Additional Criteria and then enter sponsor as NIH,
you will get a list of all proposals that are for NSF or for NIH.
Security limits your access to proposals which list your department as one of
the sponsoring departments. If you select Perform Find without specifying any
criteria, you will retrieve all proposals for which your department is listed.
However, you must enter at least one selection criteria if you have an ID which
gives you access to more than one department.
If you can cancel a find in progress, the criteria for the record being searched at
the moment you cancel will be entered into the search fields. The best way to
clear this data is to return to the main menu using the button on the screen and
reselect find.
VIII Viewing Proposal Data
After selecting a proposal through Find or after entering a proposal, you are
presented with a screen which resembles a set of index cards each containing
information about the proposal. At the top of the screen, you can see the
proposal number, the title, the first two PIs and the proposal status. The cards
contain additional information as follows:
Version 1.5
2/26/98
Page 18
SPEX-PM User Manual
•
•
•
•
•
•
Department Information - Summarizes the impacted departments includes
the administrator for reference and any sub-department assigned by any of
the departments. These departments can all access the proposal.
Budget Information - Summarizes the more detailed budget screen in the
categories used in the Detailed Budget System; you can look at the more
detailed SPEX information using a button at the bottom of the card.
Sponsor Information - Summarizes the sponsor name, division, program
and solicitation number. Also, if you have information about the sponsor
contacts which you would like to keep on-line with the proposal, you can
enter it in the free form fields provided on this card.
PI Information - Lists the PIs working on the proposal including their home
department, room, phone and email if provided in HRIS.
Status Information - Completed by OSR to track the OSR contact, the date
the proposal was checked, the date a hard copy was received and filed and
subsequent status or action items relating to the proposal. OSR, the
Provost office or the departments can enter status updates on this card.
Rates & Totals - Summarizes the fringe and overhead rates and the total
project and sponsor cost.
On the Status screen, there is a button for Reps and Certs which contains a
number of agency forms which OSR will prepare as appropriate. An Early
Center Request form is also available on that screen for use by business
managers. SPEX-PM will generate the form including all appropriate data.
Version 1.5
2/26/98
Page 19
SPEX-PM User Manual
Some other features of the information screens are:
• At the bottom of the cards, you can see the family of related proposals
showing any revisions, continuations, etc. You can click on any of the
related proposals in this box to view another proposal in the family.
• You can print any screen in this section using the button at the bottom of the
screen.
IX
Updating Proposal Status
All proposal are created as Work-In-Progress and changed to the status of
Pending when they are checked and officially signed in OSR. Other status
codes are:
•
•
•
•
Resubmitted - status will be automatically changed to resubmitted if a
proposal is used to create another Revised Budget proposal.
Awarded - OSR will change the status to Awarded if they receive paperwork
from the sponsor. They will enter the amount funded and date for
information purposes.
Declined - OSR or the departments can change the status to Declined if
they receive notice from the agency or through the PI. In this way, we are
asking departments to help us keep records up to date.
Withdrawn - OSR or the department can change the status to Withdrawn if
they are required to withdrawn a given proposal for any reason.
To update Status to Declined or Withdrawn, click on STATUS in the upper right
hand corner of any Inquiry screen. If you change the status, your name is
automatically entered so there is a record of who made the change.
X
Retrieving Data - Standard Reports
A.
Selecting the Proposals
To retrieve data, you select Find a Proposal from the main menu. Using the
find function, you can select the proposals you wish to include in your report
based on a variety of criteria.
Version 1.5
2/26/98
Page 20
SPEX-PM User Manual
B.
Sorting the Proposals
Once the data is selected, use the Sort button to sort the data as desired for
your report. When you click on Sort, you will see a standard FileMaker Pro
dialog box for sorting. The default sort is proposal number. You can remove
this by highlighting it in the right hand box and selecting the Clear button in the
center. You can select any field for sorting by highlighting it on the left and
selecting Move to move it to the right as a sort criteria. You can use the buttons
at the bottom of the box to indicate whether this field should be sorted in
ascending or descending order. Once your criteria is set, click on Sort and the
records will be sorted. You can add an unlimited number of fields which will
act as nested sorts.
Version 1.5
2/26/98
Page 21
SPEX-PM User Manual
There are four files with fields that you will likely use as sort options. The first
file is the default and the others can be selected by using the pull-down menu
under Current File:
• RsrchMN.fp3 - includes fields such as
Proposal number
Proposal type
Proposal status
Sponsor
Begin date
Total cost
• piprop - includes PI name
• deptprop - includes Department and Sub-department
• spontbl - includes the sponsor and category; for example, used to sort by
type of sponsor, e.g., Industrial, Federal, etc.
If there are other fields that you wish to sort on and can not find them listed,
contact Joseph Sullivan in OSR.
Version 1.5
2/26/98
Page 22
SPEX-PM User Manual
C.
Printing a Report
Once the records are selected and sorted, use the Print option to print the
format you see on the screen or use the Reports button to select the Listing or
PI format (samples included in Appendix A)
Version 1.5
2/26/98
Page 23
SPEX-PM User Manual
Appendix A
Sample Report Formats
Proposal List
Version 1.5
2/26/98
Page 24
SPEX-PM User Manual
Appendix A
Sample Report Formats
PI Report
Version 1.5
2/26/98
Page 25
SPEX-PM User Manual
Appendix B
Reports Module
SPEX-PM: BY PI Reports
To provide a summarized view of all activity related to the PIs in your employee table, use
the BY PI button to get a report which shows a single line for each proposal submitted in
the specified date range sorted by PI. There is also a new field which we have started to
track, Award Received Date. This field will be populated whenever an award is received.
It will aid in identifying what proposals were awarded in a given period. However, you
can only run one set of dates for each report, either Submission or Award.
If you select this button, you will see the foaling screen which allows you to enter criteria
for the report.
Version 1.5
2/26/98
Page 26
SPEX-PM User Manual
For the above example, the request specifies all proposals submitted between August 1,
1997 and August 31, 1997. Dates can be entered as ranges such as shown above or using
a greater than or less than sign such as >7/1/97 for all proposals submitted for this fiscal
year.
To further customize the report, you can include or exclude certain types of awards based
on their status or type. The values are as follows:
• Work-in-Progress - not reviewed by OSR yet or submitted to sponsor
• Pending
• Declined
• Awarded
• Withdrawn
• Resubmitted - a revised budget has been submitted and this original proposal is
no longer active
Type refers to the proposal type and values include:
• New
• Renewal - non-competing continuation
• Continuation
• Supplemental Funds
Version 1.5
2/26/98
Page 27
SPEX-PM User Manual
For example, in a given report summarizing PI activity for a given month, you may want to
exclude Work-in-Progress, Withdrawn, and Resubmitted proposals. To do this, enter the
date range as shown above and click Additional Criteria. Click on the “Omit” box in the
middle of the new line and select Work-in-Progress in the Status box as shown above.
Click Additional Criteria. Click on the “Omit” box in the middle of the new line and select
Withdrawn in the Status box as shown above. Click Additional Criteria. Click on the
“Omit” box in the middle of the new line and select Resubmitted in the Status box as shown
above. Then click the Perform Find button located at the bottom of the screen and the
report will automatically be sent to your printer.
If you get into this screen in error or make a mistake when you are entering your criteria,
use the Return to Main Menu button, then reselect Reports and initiate the request again.
Version 1.5
2/26/98
Page 28
SPEX-PM User Manual
Records found with the specified date range.
Withdrawn
Resubmitted
Awarded
Declined
Pending
Work-In-Progress
How the find worked in the previous example:
(1) We want to start with criteria that will be true for all records that we want to report on.
The above drawing represents all the records that fall within a specific period. We
specified these records by identifying the range of dates in the first request, when we
set Submission date to 8/1/97...8/31/97
(2) We want to omit any records that we do not want to appear in our report. We
eliminated the gray areas by identifying the Status box and selecting omit.
(3) Now we are left with only the records that have been submitted in August and are still
Pending, Awarded, or Declined.
Version 1.5
2/26/98
Page 29
SPEX-PM User Manual
Another example, in a given report summarizing PI proposal activity still pending for a
given month. To do this, enter the date range and also enter Pending in the Status box as
shown above. Then click the Perform Find button located at the bottom of the screen and
the report will automatically be sent to your printer.
Version 1.5
2/26/98
Page 30