1
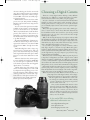
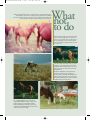
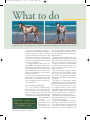
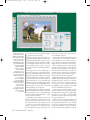
132-43-PixelPerfect0305B
132
◆
9/19/05
PAINT HORSE JOURNAL
◆
11:25 AM
MARCH 2003
Page 132
132-43-PixelPerfect0305B
9/19/05
11:25 AM
Page 133
Taking good digital photos for
on-line horse registration can be
a snap—with a little time,
effort and understanding
of the technology.
By LAURA JESBERG
PAINT HORSE JOURNAL
◆
MARCH 2003
◆
133
132-43-PixelPerfect0305B
9/19/05
Before unleashing
your credit card,
identify your
photographic
needs, find models
in your price range,
understand their
features and
determine the best
place from which to
purchase. Shown
here: an easy-to-use
Kodak EasyShare
DX6490; the Nikon
Coolpix 5400, a
popular choice for
the “prosumer”
market; and the
Nikon D1X, a favorite
of professional
photographers.
134
◆
11:25 AM
Page 134
n the 40 years APHA has registered
horses, four clear,
detailed photographs
have always been crucial
to the process. A horse
owner may think these
photos necessary only for
proving birthright and obtaining a registration certificate, but to the Association
they have added importance. As part of the
recorded anthology of every
American Paint Horse, registration photos chronicle the historical development of the breed.
Regardless of how successful or
well known a horse becomes, its
registration photos are APHA’s
only official visual records. Accordingly, every Paint owner should
provide images that show the individual character and beauty of his or
her horse.
“Members get frustrated at times
with our requests for additional photos because they don’t understand why
we need the best photos possible,” explains APHA Registration Department Head
Allyson Pennington. “We need their assistance
in providing important photographic data for
building our records for the future.”
For members who prefer walk-in registration or registration by mail, APHA requires
actual printed photographs of the horse. Photos printed on most home printers have neither the quality needed to show the details of
the horse nor the durability necessary for
archiving.
With the advent of APHA’s on-line registration system, which debuted last year, horse
owners can now submit digital registration
photos if they choose to register a horse using
PAINT HORSE JOURNAL
◆
MARCH 2005
APHA began printing photos directly onto
the registration certificate in 2000 (above,
top). The documents are printed on a special
blue-rimmed paper that contains an artificial
watermark and special fibers. The scanned
photo makes it virtually impossible for
someone to switch images on certificates.
From www.aphaonline.org (above, bottom),
members can access the On-line Foal
Registration section by logging in with their
member number and password, and
selecting “My APHA.”
132-43-PixelPerfect0305B
9/19/05
11:25 AM
Page 135
the new technology. In the first six months
since this program’s inception, approximately
5,000 horses—10 percent of the total registered in 2004—have been successfully registered via the Internet.
APHA members love the ease of the on-line
process. Last year, Patty Bouma of Billings,
Montana, registered 26 horses using the new
technology.
“As soon as I saw that registration would be
available on-line, I knew it would make the
process so much easier for us,” says Bouma.
“Before, my husband, Neil, would take all the
pictures, then we’d have to drive an hour to
Great Falls to get them processed. Going digital eliminated the need to make that trip just
to get film developed.”
Al and Lynne Tamburrino of Mount Carroll, Illinois, with the help of their son Jason,
registered six older horses—five born in 2002
and one born in 2001—through the on-line
system.
“We didn’t really plan to wait so long to register the horses,” explains Jason. “We took
photos of the horses when they were yearlings
with a regular film camera. The photos didn’t
turn out too well, and we didn’t want to send
them.
“When we found out that on-line registration was available, I browsed the APHA Web
site, noted the photo requirements, and we
took a bunch of pictures with our 4-megapixel
digital camera,” he continues.
“I didn’t change any of the settings on the
camera, and the resulting photos were 1,280
by 960 pixels. The uploading process took a
long time using the satellite Internet connection my parents have on their farm. I uploaded the rest of the photos back at my
place in the city, using a DSL connection,
and the process was much quicker.
Choosing a Digital Camera
There are so many digital cameras offering so many different
features that it is difficult to compare them unless you understand the features and how they affect your photography.
Are you a casual user or a serious amateur? This will determine
whether you want a camera that is totally automatic—that you
literally point and shoot to take photos—or a model that allows
you to manually adjust controls such as shutter speed and aperture settings.
Will you be photographing static scenes such as family portraits, or action shots at horse shows? This will determine the
best viewfinder and lens. For action shots, you need a powerful
enough zoom to put you close to the action and a fast enough
shutter speed to capture it.
Will you be shooting the majority of your photos indoors? This
will determine the quality of the flash needed. Some digital models with built-in flash units can only light a subject that is less
than 10 feet away. If you want a flash with more range, a camera
with a detachable flash might be a better choice.
Do you wish to photograph in a variety of formats, such as
wide angle, telephoto or extreme close-up? While many pointand-shoot digital models have limited capability in these areas, a
camera system with interchangeable lenses allows you to select
just the right lens for your project. Expect to pay more for a digital model with such flexibility.
What will you do with the images? Will you print the photos
as snapshots or enlargements, use them to register a horse, embed
them in a document, publish them on a Web page, e-mail them
to others, or include them in a presentation? This will determine
the resolution the camera must have. For film-quality prints and
enlargements, choose a camera with a minimum of 3 megapixels.
How mobile should your camera be? Do you want a model that
can fit in your pocket or one that requires you carry a camera bag?
This will determine the size and design of the camera. In general,
models with greater zoom capability are boxier in design.
What are your battery needs? Batteries and battery life are of
prime importance with digital cameras. Are rechargeable batteries essential, or do you prefer a camera that
will take regular AA or AAA batteries? Some cameras recharge via a docking station, which is handy
to have at home but is an extra piece of gear that
must be taken on the road.
Once you have determined the answers to these
questions, there are several Web sites devoted to
the comparison and review of digital cameras that
will enable you to narrow your choices. If you
prefer the hands-on approach, visit your favorite
camera store, talk to a trained sales representative
and try out a few models.
A few useful Web sites offering
additional information are:
www.digitalcamera-hq.com
www.dpreview.com
www.imaging-resource.com
PAINT HORSE JOURNAL
◆
MARCH 2005
◆
135
132-43-PixelPerfect0305B
9/19/05
Pixelation means the
individual pixels in a
photo are apparent
to the viewer,
resulting in jagged
outlines or bad color
gradations. This
generally occurs
when a digital file is
enlarged beyond
its limits.
136
◆
11:25 AM
Page 136
“APHA’s Web site explained everything very
well, and it seemed to me like an effort was
made to make the process very easy.”
If one of your New Year’s resolutions is to
try out the on-line registration process, you’ll
need to have sharp, high-quality digital photos of your horses.
“Ninety-five percent of all the on-line registrations that are marked ‘incomplete’ are
held up because of problems with the photos,” explains Pennington. “We have to request new photos for a variety of reasons—
the images are the wrong size, lack enough
PAINT HORSE JOURNAL
◆
MARCH 2005
clarity to clearly see the markings or have
been cropped, the horse is photographed
from too far away, or close-ups are needed to
determine registry eligibility.”
The proper tools and a little understanding
of the process will ensure that all aspects of
your on-line registration go smoothly and accurately.
The Gear
First, you need the necessary equipment.
There are three ways to create a digital image:
by taking a photo with a digital camera, by
using a scanner to make a digital copy of a
standard film camera photo or by having digital copies of your film camera photos put on
a photo CD when they are processed.
If you have neither a digital camera nor a
scanner and must choose between the two,
elect to put your money into a digital camera;
you will find many more uses for a camera
than you will for a scanner.
According to a study by the research group
InfoTrends, worldwide digital camera sales
reached nearly 53 million units in 2004. It is
no longer a question of whether digital cameras will take over their film-based counterparts, but when.
The digital camera market is divided
roughly into three tiers, with image resolution,
features, and, of course, price separating the
tiers.
Camera descriptions always include the
term “megapixel,” which refers to millions of
tiny squares called picture elements or “pixels.” Like the impressionists who painted intricate scenes with small dabs of paint, your
computer and printer can use these tiny pixels to display or print photographs. A 1megapixel camera is capable of taking photos
containing 1 million pixels, a 2-megapixel
camera can create images containing 2 million
pixels and so on.
At the low end are the fully-automatic
point-and-shoot cameras with resolutions
anywhere from 1 to 4 megapixels and prices
generally below $500. These cameras can feature zoom lenses and built-in flash units.
“Prosumer” cameras occupy the next tier.
These cameras have 4 to 5 megapixels in their
image sensors. Costing less than $1,000, this
fast-growing category also features manual
settings, which allow the user more creative
control.
The top echelon cameras, which appeal to
both serious amateurs and professional photographers, start at $1,000. Frequently based on 35
millimeter camera designs, these models have
132-43-PixelPerfect0305B
9/19/05
11:25 AM
Page 137
W
hat
not
Below: In this blurry image, it is impossible to accurately determine
the markings on the horse. Trying to photograph a horse milling
about in a pasture does not produce good results. Instead, halter the
horse and have a helper hold it during the photo session.
to do
Below: It takes a high-end camera and an
experienced photographer to freeze the
motion of a running horse. In this photo,
the leg markings are lost in the blurred
motion and harsh shadows hide much of
the coat color.
Left: This image was taken from too great
a distance to accurately depict the foal’s
markings. While it appears there are some
belly spots, the size and shape cannot be
distinguished.
Below: The markings on this foal’s head
cannot be clearly seen. Shooting from
another angle to eliminate the background
clutter, as well as moving closer to the foal
and patiently waiting for it to put its head up,
would have improved the photo.
Above: In this example, the lighting is wrong;
the sunlight striking the rear of the horse
creates dark shadows, and the outline of its
head and chest are lost against the dark
background. Better positioning of the horse
so that the sunlight illuminates its side would
create a much clearer image.
132-43-PixelPerfect0305B
9/19/05
11:25 AM
Page 138
What to do
These images are perfect examples of good registration photos. Not everyone has access to a beautiful beach, but they
can take the time to make sure their horse is cleaned up and their photographs are well-composed, taken from the
resolutions of 6 to 12 megapixels and even accept lenses from their film-based counterparts.
When purchasing any kind of technical
product, consumers are always advised to “buy
as much as you can afford,” to get features that
will last a few years and be worth the investment before the technology moves on. Digital
cameras are no different.
A 1-megapixel camera, which typically costs
around $100, will photograph images, but the
quality will not have sufficient detail to produce anything larger than a four-by-six-inch
print. Cameras like these are useful for creating lower-resolution images to be e-mailed or
displayed on a Web site.
To enjoy the same quality and the variety of
enlargements you enjoyed with your 35 millimeter camera, you should start with no less
than a 2-megapixel camera, and even better, a
3-megapixel model.
Understanding the Technology
So, you’ve purchased a digital camera.
How, exactly, does it take a picture and what
do you do with the shots you’ve taken? Creating good digital images, whether for foal
registration or for your family Christmas
card, requires some additional understanding
of how digital imaging works.
A good rule of thumb is to
A digital camera
performs
many of the
always shoot at the highest
same functions as a
35 millimeter camresolution setting.
era, but offers much
138
◆
PAINT HORSE JOURNAL
◆
MARCH 2005
more versatility than your old film model. Although many digital cameras may have the
look of a traditional camera, they are fundamentally different.
Digital photography captures and stores an
image electronically, using an electronic image
sensor and microprocessor for image capture.
This data is transferred to a file that is then
recorded on the camera’s own internal memory, which holds relatively few images, or on a
larger, interchangeable PC storage device
called a “flash card.”
The larger the storage capacity of the flash
card, the more photos you can fill it with before you have to unload them onto a computer or CD. Some digital cameras include a
flash card, but with others you must purchase
it separately.
The quality of a digital image, whether
printed or displayed on a computer screen, depends in part on the number of pixels used to
create the image, and is referred to as “resolution.” Digital cameras have several “quality”
settings that determine resolution. A good rule
of thumb is to always shoot at the highest setting. This results in the greatest number of
pixels per image and the sharpest photo.
Remember, you can always make a high-resolution image smaller, but you cannot make a
low-resolution image bigger.
If you enlarge any digital image enough, the
pixels begin to show an effect called “pixelation.” This is the blocky, fuzzy appearance that
occurs when an image is magnified to the
point that the curves and overall picture of an
9/19/05
11:26 AM
Page 139
PHOTOS COURTESY OF VALAREE HUITT, WINDRUSH RANCH
132-43-PixelPerfect0305B
correct distance and against an uncluttered background. Notice that all the photos were taken using the “landscape”
mode and none were cropped.
image begins to give way and the individual
pixels become apparent. The fewer pixels an
image has to begin with, the less it can be enlarged before pixelation occurs.
This is why an image from a Web site that
might be perfectly sharp at a small size when
viewed on-line cannot be used for registration. Pixelation will occur when the image
is enlarged to APHA size specifications, and
the detail on the horse becomes impossible
to see clearly.
Taking the Pictures
If you photograph a dark horse against a
dark barn in the late afternoon on a cloudy
day, the results will be poor regardless of what
kind of camera you use. There are four areas
that must be addressed correctly to shoot a
The position of the photographer in relation to the horse is critical. Envision a 30-foot to 40-foot box centered on the
horse and take a photo from each corner of the box. Make sure each view is taken in “landscape” mode.
PAINT HORSE JOURNAL
◆
MARCH 2005
◆
139
132-43-PixelPerfect0305B
9/19/05
In this example, the
original picture has a
width of 2,576 pixels
and a height of 1,932
pixels. To reduce the
dimensions to the
800-by-600-pixel size
specified by APHA,
change the width
setting to 800. If
you put a check in
the “Constrain
Proportions” box,
the width and height
measurements are
linked so that when
one is changed,
the other adjusts
automatically to
maintain the original
picture ratio. Once
the resizing is
complete, don’t
forget to save the
new image using the
“Save As” menu
command.
140
◆
11:26 AM
Page 140
good registration photo: background, lighting, appearance and positioning.
Take photographs of light-colored horses
against darker backgrounds and of dark horses
against lighter backgrounds so their coat color
doesn’t blend into objects behind them. Make
sure the background isn’t cluttered or junky.
If your weanling is inside a pen, try to position it as far away from the background fence
as possible.
Photograph in the best available light. A
bright, but overcast day is optimal because the
light is more diffused and harsh shadows that
might hide important markings are lessened.
Sunny days work well if you can plan your shoot
for early morning or late afternoon, when the
light is gentler. Photos shot in the midday sun
can result in overexposed-looking images. A fillflash can be utilized, even during daylight hours,
to fill in shadows cast by the sun or to provide
additional lighting on a cloudy day.
Your horse’s appearance is important. Braided
manes and polished hooves aren’t necessary, but
a clean and tidy coat gives a professional image
and ensures that those important Paint coat patterns are accurately recorded.
Positioning is critical. The horse needs to be
haltered and held by a handler with a lead
rope, if possible. Take the photo from 15 to 20
feet away from the horse, situating your body
to achieve the correct distance rather than utilizing your camera’s zoom. Make sure the
horse’s body fills the screen, but “frame” him
PAINT HORSE JOURNAL
◆
MARCH 2005
with some extra space all the way around, as
you would frame a picture.
If your camera has interchangeable lenses or
a zoom feature, the focal length used should
be 50 millimeters, the normal setting, or
greater. Any lower setting is considered wideangle and will cause distortion of the image.
Shoot all registration photos with your camera turned so that the image is wider than it is
tall. This is called “landscape” mode. Use this
format for the front and rear shots, as well as the
side shots and any optional shots. Avoid shooting down or up at the horse from an angle, because this distorts the horse’s appearance.
APHA Web Application Developer Tracy
Madison evaluates problem registration photos
and offers this advice: “If a photo of the front
of a horse is taken from too high an angle, the
horse appears to have a huge head and tiny
body. Taking your photograph at eye level with
the horse will eliminate the distortion.”
Consult the user manual to make sure your
camera is adjusted to the setting that produces
the highest quality image. The setting suitable
for photos to be e-mailed or used on a Web
site will not produce a detailed enough image
for registration purposes.
Avoid trying to take registration photos of a
horse loose in a pasture or pen. These images are
inevitably blurry because the horse is running
past the photographer instead of standing still,
some part of the horse is cut off in the photo
because it ran closer than anticipated, or the de-
132-43-PixelPerfect0305B
9/19/05
11:26 AM
Page 141
tail is not sharp enough because the camera was
too far away from the animal.
If your horse is minimally marked, take additional photos to prove your case for including it in the regular registry. The on-line registration process allows you to submit up to
15 additional images.
Additional tips on taking photographs of
minimal qualifying areas can be found in the
APHA Registration Guide Book. Members can
request the book by calling the Association at
(817) 834-2742, or by downloading it from
APHA’s Web site (www.apha.com) under
“Forms and Downloads.”
Camera to Computer
Your camera’s memory card is now filled to
the brim with great-looking registration photos. How do you get them to your computer
and where do you put them?
Every digital camera system is equipped with
some way to interface with your computer.
Some models, such as the Kodak EasyShare series, have a docking station that stays permanently attached to your computer by a cable.
The camera is placed on the dock and the image
transfer begins with the push of a button.
Other systems require that you remove the
storage card from the camera and place it in an
adapter that connects to your computer. A few
cameras simply have a cable that connects directly to the computer.
APHA staffers Susan Naughton, Staci Cunningham and Shari Barnhouse provide technical assistance to members who need help with
the on-line registration process. They all agree
that two of the most frequent problems members have with their digital photos are that they
cannot find them on their computer or they
can’t remember what the images are named.
As your computer’s hard drive starts filling up
with photos from your digital camera, it is essential to have some sort of system for organizing them. Regardless of the type of computer
system you have, digital cameras automatically
look for a specific folder in which to place images. On PCs, it is called “My Pictures,” on
Macintosh computers it is called “Pictures.”
Typically, the camera’s software creates a
folder named with the date of the image transfer and then deposits all the camera’s images
into that folder. Each image has a unique
name, usually containing some sort of sequential numbering.
It is a good idea to immediately review all of
your photos after transferring them to your
computer. Delete the poor shots and rename the
remaining images in a way that makes them easy
to distinguish within the folder when you are
ready to start the on-line registration process.
You may have taken 30 shots of your weanling, only four or five of which will actually be
uploaded to the Association. APHA suggests
this naming scheme: the birth year plus the
dam’s name plus the view taken. Thus, the
head shot of a filly born in 2005 and out of a
mare called Sheza Mother would be renamed
“05shezamotherhead.jpg.”
Renaming a file is a simple process. On a PC,
locate the file, point the mouse cursor at it,
right-click the mouse button and choose “Rename.” On a Mac, locate the file in the Finder,
click once to select the file and then single-click
again. The file name will shift into the editing
mode, allowing you to type in the new name.
When renaming the file, make sure you
don’t delete the JPG file extension. This tells
your computer that the file is an image, rather
than a document or spreadsheet.
Zooming, Resizing and Cropping
There are three other aspects of digital imaging that you need at least a nodding acquain-
Cropping is a great
tool for manipulating
digital images.
However, do not
crop registration
photos. In this
example, the
photo on top is an
acceptable right side
view of a horse; in
the photo on the
bottom, cropping
has cut off part of
the horse’s legs. A
photo with this type
of cropping will have
to be re-submitted in
the proper format.
PAINT HORSE JOURNAL
◆
MARCH 2005
◆
141
132-43-PixelPerfect0305B
9/19/05
11:27 AM
Page 142
If you must use a
scanner…
If you already own a scanner and are not quite ready to join the
digital camera revolution, you can create a digital image from a photographic print.
A flatbed scanner is like a copy machine, to the extent that it has
a glass plate under a lid and a moving light that scans across the
plate. Instead of creating another piece of paper as a copy machine
does, however, a scanner captures a digital image.
However, creating an image suitable for registration purposes requires a bit more work than simply placing a photo on the glass
surface of the scanner and hitting the “Scan” button.
The first step in proper scanning technique is to preview the scan,
providing your scanner has that feature. When you select the “Preview” button, a quick, low-resolution overview scan of the entire
scanner bed is produced and appears in the Preview window.
Once the image has been previewed, use the scanner’s selection
tools to select the portion of the previewed image to be scanned,
such as a single photograph. The portion of the image to be scanned
will be surrounded by a dashed rectangle, called a marquee box.
The final scan will include only the area within the marquee box.
Make sure the resolution on your scanner is set to scan the image
at a minimum of
200 dpi (dots per
inch). Once the
final scan is performed, the scanning software normally stores the
resulting image in
your
Pictures
folder.
If your scanner
does not have preview capability,
the
resulting
image will look
like a large white
rectangle
(the
scanner bed) with
a smaller photo
positioned inside
it. Image editing
software must be
employed to remove the surplus white space. Use the cropping tool to draw a rectangle around the photo, isolating the image. Remember to resave
and rename the image.
Renaming the scans using the “birthyear/mare’s name/photographic view” naming convention will make the images easy to find
during the on-line registration process. When renaming the file,
make note of the scan’s format. Many scanners produce JPG images,
while others create TIFF files. Any TIFF file must be converted to
JPG before it can be submitted on-line. Consult your scanner or
image editor manual for instructions.
tance with to successfully produce good registration photos.
The first is the zoom feature of a digital lens.
Did you know that there are actually two
types of zoom? Optical zoom is the zoom that
is the most familiar to consumers. It uses the
optics, or the lens, of the camera to bring the
subject closer. On an automatic camera, you
can see and hear the lens telescoping out toward the subject.
A digital zoom is not really a zoom in the
strictest definition of the term. A digital zoom
merely enlarges a portion of the image, thus
simulating an optical zoom. In other words, the
camera crops a portion of the image and then
enlarges it back to size. In doing so, however,
image quality is lost and, more importantly,
when photographing horses it creates distortion.
Instead, move your shooting position to
within 15 to 20 feet of the horse. If your camera has only a digital zoom, don’t use it. If you
have an optical zoom on a point-and-shoot
digital, turn on the camera and shoot from the
default lens setting, which should be the normal focal length. If you have a more complex
model with an interchangeable lens, set the
lens as close to 50 millimeters as possible.
The two most common ways to manipulate
a digital image—once it has been recorded
and transferred to a computer—are resizing
and cropping. When resizing an image, you
take an existing picture as a whole and make
the entire thing smaller. A snapshot, taken at
the highest quality setting of a 4-megapixel
point-and-shoot camera, can have the dimensions of 1,536 pixels by 2,304 pixels and a file
size of 1.7 megabytes.
These dimensions are great for creating
large, 8-by-10-inch prints, but are overkill for
registration purposes. APHA requires a minimum of 800 pixels by 600 pixels for registration photos. Resizing a large raw image to this
resolution results in a smaller file with a faster
download time, and still maintains the overall
quality and crispness of the photo.
Image editing software is included with
most digital cameras and all work in a similar
fashion. To resize an image, open it with the
software, find the “Image Size” command—
usually under the “Modify” or “Format”
menu—and change either the length or width
dimensions (the other will adjust automatically). If you have difficulty with this step,
consult your software manual, press the F1
button on your PC keyboard or select the
Help menu to access the on-screen help files.
Always use the “Save As” option after manipulating an image. This preserves the origi-
132-43-PixelPerfect0305B
9/19/05
11:27 AM
Page 143
nal photo in case you
want to create a
larger print later. If
you plan to resize all
your
registration
photos, create a new
folder called “For
APHA” and store the
resized versions there.
The process of
“cropping” allows a
selected portion of a
photo to be trimmed
out. For example, a
full-height figure of a
horse can be cropped
to a tight head shot.
Or, you might wish
to get rid of that little
tree leaf that snuck
into the corner of an
otherwise perfectly
composed picture of
your yearling.
APHA requests, however, that you do not
crop registration photos. When printed on the
registration certificate, the photos must have a
specific ratio of length and width; cropping
can alter this ratio, making the image unacceptable for printing.
Good To Go
Armed with three name selections, sharp
digital photos and the necessary documentation, you are ready to begin the on-line registration process in the comfort and privacy of
your own home.
The on-line registration procedure even has
a built-in stopping point.
Tracy Madison explains, “A member can go
in and, through a series of screens, fill out all the
information about the horse, including foaling
date, parentage, sex, coat and mane color,
method of breeding and coat pattern type.
“All that is left at this stage is to input the
name choices and upload the photos. If you
have your photos ready, you can move on to
the ‘Naming and Photo Uploads’ section. If
Completing the entire
process for each horse in
one session minimizes the
possibility of errors.
you have not yet taken your photos, you can
opt to ‘Finish Later.’
“This saves all the information to APHA’s
database, leaves the registration with an open
and incomplete status and takes the member
back to the beginning screen to register another horse.”
Cindy Grier, APHA manager of registration, offers these words of advice: “If you have
several horses to register, APHA recommends
that you initiate the on-line process only when
you have the registration photos and all other
required information on hand.
“Completing the entire process for each
horse in one session minimizes the possibility
of errors. We also encourage members to register as early as possible. Waiting until the day
before a deadline can lead to unnecessary
stress if problems occur.”
Patty Bouma is completely sold on the online process.
“I recommend that all the mare owners who
breed to our stud register the resulting foal online,” she says. “I even put it in our catalog.
“The thing that is so cool is the speed of the
process. Within 24 hours, I received an e-mail
for each registration, listing the name of the
horse and the registration number. Within a
week, I had the registration certificates.
“It was especially beneficial to us because I
got it all done in time for our September sale,”
she continues. “I could give every person who
bought one of our babies the actual registration certificate.” f
On-line registrations
are expected to
increase in 2005
as more horse
owners like Patty
Bouma discover the
ease and efficiency
of APHA’s Internet
technology.
PAINT HORSE JOURNAL
◆
MARCH 2005
◆
143