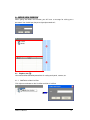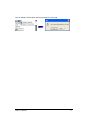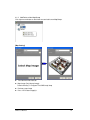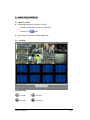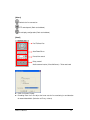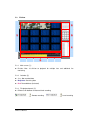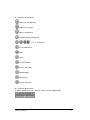
1
Table of Contents
User Manual
Table of Contents
1.
2.
Introduction ...................................................................................................................... 4
1.1.
CMS (Central Management Software) ................................................................ 4
1.2.
Main Features ................................................................................................... 4
1.3.
CMS Specification ............................................................................................. 6
1.4.
Supplement ....................................................................................................... 7
1.5.
Installation ......................................................................................................... 7
1.6.
Uninstallation ................................................................................................... 10
LOG IN & LOG OUT....................................................................................................... 13
2.1.
Log in .............................................................................................................. 13
2.2.
Log out ............................................................................................................ 14
2.3.
Default Display mode (Initial Display) ............................................................... 14
3.
TOOL BAR ..................................................................................................................... 15
4.
MODE VIEW WINDOW .................................................................................................. 16
4.1.
5.
Explorer tree (①) ............................................................................................. 16
4.1.1.
Add/Delete a New LiveView ...................................................................... 16
4.1.2.
Add/Delete a New Map/Group .................................................................. 18
4.1.3.
Add a New Camera or Sensor .................................................................. 20
4.1.4.
Live images on the map............................................................................ 22
4.1.5.
Pop-up Menu ........................................................................................... 23
4.2.
Property window (②) ....................................................................................... 25
4.3.
Icon Collections ............................................................................................... 26
MAIN VIEW WINDOW.................................................................................................... 28
5.1.
Basic Function ................................................................................................. 28
5.2.
LiveView .......................................................................................................... 28
5.3.
FileView .......................................................................................................... 30
5.4.
5.3.1.
Main screen (①)....................................................................................... 30
5.3.2.
Calendar (②) ........................................................................................... 30
5.3.3.
File playback panel (③) ............................................................................ 30
5.3.4.
File list (④: 1 way to playback) ................................................................ 32
5.3.5.
Intelligent Time Map (⑤: 2
st
nd
way to playback) ........................................... 32
Map ................................................................................................................. 33
5.4.1.
CMS User Manual
Basic functions ......................................................................................... 33
2
6.
7.
Camera/Sensor information ...................................................................... 34
5.4.3.
Camera/Sensor Pop-up menu .................................................................. 34
HISTORY VIEW WINDOW ............................................................................................. 35
6.1.
Event history (Live) .......................................................................................... 35
6.2.
Application history (Live) .................................................................................. 36
6.3.
Event history (Search) ..................................................................................... 37
6.4.
Application history (Search) ............................................................................. 38
6.5.
Pop-up menu for Event history (Live & Search) ................................................ 38
RECORDING SETUP..................................................................................................... 39
7.1.
7.2.
7.3.
8.
5.4.2.
General setting ................................................................................................ 39
7.1.1.
Recording drive setup (①) ........................................................................ 39
7.1.2.
Event setup (②) ....................................................................................... 40
7.1.3.
Password setup (③) ................................................................................. 40
Schedule setting .............................................................................................. 41
7.2.1.
Connection information (①) ...................................................................... 41
7.2.2.
Recording schedule (②) ........................................................................... 42
7.2.3.
Template setup (③) .................................................................................. 42
7.2.4.
Advanced setup (④) ................................................................................. 43
Alias setting ..................................................................................................... 44
CMS Client..................................................................................................................... 46
8.1.
8.2.
Environment Setup (CMS) ............................................................................... 46
8.1.1.
Client list (①) ........................................................................................... 47
8.1.2.
Server list (②) .......................................................................................... 48
CMS client software ......................................................................................... 49
8.2.1.
Connection information (①) ...................................................................... 50
8.2.2.
Display control (②) ................................................................................... 51
8.2.3.
Playback control (③) ................................................................................ 52
8.2.4.
File list (1 way to playback) ..................................................................... 52
8.2.5.
Intelligent Time Map (2
8.2.6.
Display window(④)................................................................................... 54
CMS User Manual
st
nd
way to playback) ................................................ 53
3
1. Introduction
1.1. CMS (Central Management Software)
CMS is a total management software based on network which is compatible with all
BNT products. It consists of mode view window, main view window and history view
window. CMS doesn’t have Graphic User Interface in each panel. Therefore CMS
including each panel is too flexible to adjust the size and display structure of them.
CMS has the following features for the efficient central management.
1.2. Main Features
Flexibility in UI
CMS doesn’t have GUI so each panel can be adjusted in its size and display view.
And docking and undocking each panel is so easy to make a various display
configuration.
Multi-Monitoring and Screen
Multi-monitors are supported up to the limit of CMS server can support.
Therefore user can configure Tree, Live, Map, File, Event panels in various display
modes as they want.
Simultaneous multi-live monitoring
Liveview has 16 & 64 monitoring view in each model. The number of channel for
this CMS is maximum 64. The normal recommendation is P4 3.0GHz (CPU), 2GB
(RAM) basically.
Simultaneous local & remote file search and playback for multiple sites
CMS can record the live images on local storage in server PC and also can access
to video server’s storage remotely. This feature is run on the same fileview panel.
CMS User Manual
4
Event Capture
Event data are shown you in text or thumbnail mode. When you do double click
text data or thumbnail image, it starts to be played back automatically from the
time of event occurring in fileview panel.
Multi Map/Group configuration
CMS supports multi Map/Group with main and sub configuration which is easy to
look around all configuration in tree structure at one view.
Event log information
It shows event/application history information in history view window and also the
information is stored as a file which will be needed as supplement.
Easy Remote PTZ control
Remote PTZ control panel is movable and easy to use.
Pop-up menu using mouse right button
Main menu is supplied as pop-up by mouse right click.
CMS Client
CMS Client users can access to CMS server and get live and recorded image data.
CMS User Manual
5
1.3. CMS Specification
Contents
Server
PC
Detail Information
CPU
Pentium 4 3.0GHz or higher
Memory
2GB or higher
No. of LiveView
4
OS
Windows 2000 or higher
ATI Radeon 7000 Series (PCI Type)
Video Card
128M or higher, Direct-X included
- 2 Min. from the time of event
Post time
In the event recording
Recording mode
- 2 Min. is extened from the time of event in case of
consistent events
Motion / Sensor / Continuous
- Weekly, daily schedule in each channel
Recording schedule
CMS
- Overwriting function as to adjustable recording
rate and disk space
- Alias search
Max. Live channel
16 channel (Simultaneous)
Max. VOD channel
16 channel (Simultaneous)
Max. recording rate
CIF 5 Frame per channel (5 * 64 CH / sec)
- 4 MRX connection (64 CH)
CMS setup
- Decoding: 4 frame (Recording & Restreaming)
- Minimum size is 200GB
- Only OS and CMS should be installed in the system
st
HDD
System HDD (1 HDD)
- No divided partition (Only one physical partition)
- Enough free size is necessary to have virtual memory
Notification
allocation for system/event log and jpg saving
Initial system loading
CPU & Main board
CMS User Manual
CPU: about 40%, Memory: about 1.07GB
Dual CPU / Dual core CPU / Hyperthread is no
available
6
1.4. Supplement
Including CMS Installer, User Manual, USB Lock-key driver
USB Lock-key
1.5. Installation
You should follow the below procedures for CMS system installation.
Double click CMS Installer
Click “Next” button.
CMS User Manual
7
Click “Next” button.
Click “Next” button.
CMS User Manual
8
Installing CMS
Click “Finish” button.
CMS User Manual
9
1.6. Uninstallation
To uninstall CMS, you have to follow the below procedures by the way of CMS installer
or Add or Remove Programs in Windows control panel.
[CMS installer]
Double click CMS Installer
Mark on “Remove CMS” and clock “Finish” button.
CMS User Manual
10
CMS is removing
Click “Close” button after finishing CMS uninstallation.
CMS User Manual
11
[Add or Remove Programs in Windows]
Go into “Add or Remove Prgrams” in control panel of Widnows.
Select CMS program and click “Remove” button.
Click “Yes” button for the confirmation.
Removing CMS is done after this step.
CMS User Manual
12
2. LOG IN & LOG OUT
2.1. Log in
It displays CMS logo when it start to run.
The initial password is made by user and they have to keep it for the future use.
If user doesn’t want to put password, just click “Cancel” button.
The password should consist of at least 4 characters and at most 16 characters.
If user has the above message box, they have to input a proper password.
CMS User Manual
13
2.2. Log out
After you click the close button of the software, you need to put the pre-assigned
password for the log out.
2.3. Default Display mode (Initial Display)
①
③
②
④
Tool bar can be useful for basic functions and entering into setup mode.
(Same as Windows interface)
Mode view window has tree structurized display and pop-up menu for setup.
So it can show user friendly interface at one sight.
Main view window: LiveView, FileView and Map/Group panel are displayed in this
area.
History view window: It consists of event & application history in each live and
search mode.
CMS User Manual
14
3. TOOL BAR
When you point each button with mouse cursor, you can have tool tip message.
CMS logo: If you do double click, the program will be closed.
From the left, Minimize, Restore down, Close button same as Windows.
Previous/Next button to the displayed panel same as Windows.
This is a combo box which has the same concept as URL on web.
If you input a panel title and press “Enter” button or click “GO” button, you can move to
it directly.
Display mode: Left one (Mode view window hidden),
Right one (History view window hidden)
Environment Setup: General, recording schedule, alias setting
Edit mode to edit the mode view window.
To change into lock or unlock, you have to input the pre-assigned password.
The showing images is to be changed.
CMS User Manual
15
4. MODE VIEW WINDOW
When going into Mode view window, you will have a message for asking you a
password. You should input the pre-assigned password on it.
①
②
4.1. Explorer tree (①
①)
You need to follow the below procedures for setting each panel, camera, etc.
4.1.1. Add/Delete a New LiveView
Click right mouse button on the LiveView and title a LiveView.
CMS User Manual
16
You can delete LiveView after confirming through this message.
CMS User Manual
17
4.1.2. Add/Delete a New Map/Group
Click right mouse button on the blank area and add a new Map/Group.
[Map Setting]
Title: Maximum 20 character
Map Image (Only bitmap image)
Default directory: C:\Program Files\CMS\map\*.bmp
Preview a map image
Press “OK” button to apply it.
CMS User Manual
18
You can delete a map and sub items after confirming through this message.
(Refer to 4.1.5)
When you want to add sub-Map/Group to the main Map/Group, you can do the right
mouse click on the Map/Group icon and select “Add a New Map/Group”.
[Group Setting]
Title: Maximum 20 characters
Select a type of devices such as IP Camera, video server and DVR.
Press “OK” button to apply it.
You can delete a Map/Group and sub items after confirming through this message.
(Refer to 4.1.5)
CMS User Manual
19
4.1.3. Add a New Camera or Sensor
You should add a new camera or sensor after making a liveview panel.
Click right mouse button on the Map/Group.
[Camera Setting]
Title: Maximum 20 characters
Server IP/ID: IP address or ID of network video server
Channel: Channel of network video server
User ID & Password: ID & Password for access to network video server
LiveView: You can select a LiveView title.
LiveView Position: One liveview has 16 channel. You can select one of them.
DDNS Address: When you use dynamic IP and domain name, you need to input IP
address of DDNS.
Camera type selection: There are four kinds of camera such as Fixed, Mini dome,
Mini PTZ and Speed dome camera.
CMS User Manual
20
[Sensor Setting]
Title: Maximum 20 characters
Server IP/ID: IP address or ID of network video server connected with sensor
Channel: Channel of network video server
User ID & Password: ID & Password for access to network video server
LiveView: You can select LiveView title.
LiveView Position: One liveview has 16 channel. You can select one of them.
DDNS Address: When you use dynamic IP and domain name, you need to input IP
address of DDNS.
CMS User Manual
21
4.1.4. Live images on the map
You need to click, drag and drop the camera or sensor icon on the map.
You can have a live window by doing double click the camera or sensor icon.
When CMS get the event from video server, it shows blinking on the image bar.
CMS User Manual
22
4.1.5. Pop-up Menu
You can have a pop-up menu by clicking right mouse button.
<Map>
<Group>
Map Setting: You can modify the pre-setting such as map title, map image.
Group Setting: You can change group title.
Add a New Map: Refer to the above 4.1.2 [Map Setting]
Add a New Group: Refer to the above 4.1.2 [Group Setting]
Add a New Camera: Refer to the above 4.1.3 [Camera Setting]
Add a New Sensor: Refer to the above 4.1.3 [Sensor Setting]
Change to Map/Group: You can convert map/group into group/map.
Delete This Map/Group: Refer to the above 4.1.2 [Map/Group Setting]
<Camera >
Camera Setting: You can change camera title.
Delete This Camera: You can delete this selected camera.
Go To Map/Group: You can go to Map/Group panel directly.
Go To LiveView: You can go to LiveView panel directly.
Go To FileView: You can go to FileView panel directly.
Go To Schedule: You can go to Schedule setup page directly.
CMS User Manual
23
<Sensor >
Sensor Setting: You can change sensor title.
Delete This Sensor: You can delete this selected sensor.
Go To Map/Group: You can go to Map/Group panel directly.
Go To LiveView: You can go to LiveView panel directly.
Go To FileView: You can go to FileView panel directly.
Go To Schedule: You can go to Schedule setup page directly.
CMS User Manual
24
4.2. Property window (②
②)
This shows the status of Map/Group, camera or sensor.
[Map]
[Group]
Type: Kinds of the selected item
Title: Name of the selected item
Map Image: Location of loaded map images
Camera: The number of connected camera
[Camera]
[Sensor]
Type: Kinds of the selected item
Title: Name of the selected item
IP/ID: IP address or ID of connected video server
Channel: Channel number of video server
User ID: ID for access to video server
LiveView: Connected Liveview panel
Position: Displayed channel number
Status is informed as below.
- Normal, Live connecting, Live/Motion/Sensor/Continuous remote recording, Live
local recording, Reconnecting, Net fail, No signal
CMS User Manual
25
4.3. Icon Collections
<LiveView>
LiveView
Added LiveView panel
<FileView>
<Map>
<Group>
<Video transmitting devices>
<Camera>
<Sensor>
CMS User Manual
26
<Live connection>
<Local recording on CMS Server>
<Remote recording on Video transmitter>
<Channel selection >
CMS User Manual
27
5. MAIN VIEW WINDOW
5.1. Basic Function
Undocking/Docking of LiveView & FileView
-
Undocking: Right mouse click on the tab label
-
Docking: Click
button
Type of panel: LiveView, FileView, Map/Group
5.2. LiveView
[Display mode]
1 Division
4 Division
8 Division
16 Division
CMS User Manual
28
[Others]
Refresh the live connection
PTZ control panel (Refer to the below)
Live display configuration (Refer to the below)
[Detail]
Pan/Tilt/Auto Pan
Auto Zoom/Focus
Preset/Aux control
Relay control/
Audio communication (Client Server) : To be continued
OSD: On Screen Display
Decoding Rate: User can adjust the frame rate for live monitoring in consideration
of network bandwidth. (Selection as Every **frame)
CMS User Manual
29
5.3. FileView
②
①
③
④
⑤
5.3.1. Main screen (①)
Division: Max. 16 division to playback for multiple sites and additional live
monitoring
5.3.2. Calendar (②)
Grey: Not recorded date
Deep blue: Searching date
Red: Recorded date (Activated)
5.3.3. File playback panel (③)
Different icon between remote and local recording
: Remote recording
CMS User Manual
: Local recording
30
Playback control buttons
Search for recorded data
Capture a still image
Open a recorded file
Playback display configuration
1 / 4 / 8 / 16 Division
2 Frame backward
Stop
Pause
2 Frame forward
2 times slower play
Backward play
Normal play
2 times faster play
Playback speed control
Playback speed varies from -32 to 32 in each channel independently.
CMS User Manual
31
5.3.4. File list (④: 1st way to playback)
- One hour based file
- Remote recording mode:
Live
Network Fail
Motion
- Local recording mode:
Continuous
Sensor
No signal
Continuous
Motion
Sensor
- List and channel can be sorted out by clicking the title on the top.
5.3.5. Intelligent Time Map (⑤: 2nd way to playback)
- It shows different color in each recording mode.
- By selecting one of recording modes, you can have the chosen bar.
- When you click the time you want to see and do right mouse button, you can have
one hour base time map for the time.
- You can move the time scroll freely and the playback is linked with the movement of
time scroll.
- When you click the channel number which is positioned on the left, the playback of
selected channel will be unactivated.
CMS User Manual
32
5.4. Map
5.4.1. Basic functions
Camera blinking: When a event happen, the square line and tool bar of live window
are blinking.
Open live window: Double clicking the camera
Close live window: Click the close button on the screen
Movement of camera: Camera icon can be moved by mouse drag and drop.
Flexible size in live window: Adjustable by the mouse drag
Map configuration: Map can consist of sub-maps.
CMS User Manual
33
5.4.2. Camera/Sensor information
When you point the camera/sensor icon with mouse, you can have the basic
information through pop-up message.
5.4.3. Camera/Sensor Pop-up menu
Right mouse button shows you a pop-up menu as Camera/Sensor Setting and PTZ
Control.
[Camera Setting]
[Sensor Setting]
Title, Server IP/ID, Channel can be reset (Activated)
User ID, Password, LiveView title, Position, DDNS address are fixed (Inactivated)
Camera/Sensor direction: It can be edited by marking one of directions.
[PTZ Control] Refer to 5.2 LiveView
CMS User Manual
34
6. HISTORY VIEW WINDOW
Undocking/Docikng of history/mode/main view window
-
Undocking: Left mouse click & drag each tool bar or Double click
-
Docking: Click minimize button
History type: Event history, Application History
Display mode: Text, Thumbnail
6.1. Event history (Live)
[Text]
Display information: No. of event, time(yy/mm/dd, h/m/s), event type (recording
mode), server IP/ID, server channel
CMS User Manual
35
[Thumbnail]
Display information: Server IP/ID, server channel, time(yy/mm/dd, h/m/s)
6.2. Application history (Live)
Display information: No. of events, time(yy/mm/dd, h/m/s), system log
CMS User Manual
36
6.3. Event history (Search)
[Text]
[Thumbnail]
Search condition: Duration time, server IP/ID, channel, event type
Result shows the total pages for the searched data.
CMS User Manual
37
6.4. Application history (Search)
Search condition: Duration time, event type
Result shows the total pages for the searched data.
The log data is stored in the local PC. (C:\Program Files\CMS\Data\*.sys)
※ Note: Event image files are deleted when the synchronized recording data start to
be deleted. Therefore, in consideration extra size of system drive, we recommend you
to use as No Event Capture as a default. (Refer to the following 7.1.2)
6.5. Pop-up menu for Event history (Live & Search)
Thumbnail/Text: It converts text into thumbnail and vice versa.
Play live view
If you click “Play live view” after selecting event item (text or image), the related
Map/Group panel is activated automatically. To apply this feature, Map/Group panel
should be displayed in the main view window.
(In Live mode, double clicking on the item gives you the same operation)
Play file view
If you click “Local/Remote Search” after selecting event item (text or image), the
related file is played back from the event occurring on the FileView automatically.
To apply this feature, fileview panel should be displayed in the main view window.
(In Search mode, double clicking on the item gives you the same operation)
CMS User Manual
38
7. RECORDING SETUP
7.1. General setting
①
②
③
7.1.1. Recording drive setup (①)
Recording drive: This is drive setting for operating the recording, left section is for
recording drive and right one is for system drive. You can edit this drive setting by
using
buttons.
(Note: Drive which Windows OS is installed should not be used as a recording drive for
the stable system operation and it will not be displayed on Drive On System section)
CMS User Manual
39
It shows you used and free size information graphically.
Spare space per drive: We recommend you to leave at least 5GB in each drive for
the stable system operation.
7.1.2. Event setup (②)
Event Sound: If you set event sound on, alarm sounds when events happen in
order to inform system manager.
Event Capture On makes event data with snapshot images in event history.
Event Capture Off makes only event date with blank images.
Main Window Blink: If you set it on, you can have blinking of CMS tab when events
happen. This is to notify event situation to system manager in a simple way.
After finishing all settings, apply the changes to press ‘OK” or “Apply” button.
[Comparison between event capture on and off]
7.1.3. Password setup (③)
You need to know the pre-assigned password to change it.
After changing it, you should click “Change” button to apply it.
CMS User Manual
40
7.2. Schedule setting
④
①
②
③
7.2.1. Connection information (①)
LiveView: You can select one of LiveView titles.
Display channel
-
It shows you the connected channel. You can apply the recording schedule to
each channel.
-
When you click the channel, the channel information (IP address, Name,
channel no.) is displayed on the right box.
All: If you want to apply a recording schedule to All channels, you should select ‘All”
to do a simple and quick setup.
CMS User Manual
41
7.2.2. Recording schedule (②)
Recording mode: Continuous, Motion, Sensor
Recording rate: You can set recording frame rate as to live transmitted frame rate.
Daily & Weekly schedule in 24 hours
Add/Delete recording schedule
-
Check required recording mode
-
Click and drag left/right mouse button to add/delete the recording mode
(In case of deletion, eraser mark is shown)
All: You can apply the chosen recording modes to all date and time with one
mouse click.
7.2.3. Template setup (③)
For the future modification or additional setting, you can make some templates.
Finish recording schedule setting in the above table
Click
Input template name on the below blank.
When needed, you can load a pre-defined template and click
CMS User Manual
.
42
7.2.4. Advanced setup (④)
Tree structurized channel display
-
Each channel can be marked separately and upper level LiveView can cover
lower level one with one mouse click.
-
In case of different channels required the same schedule, you can mark and
apply the same setting to them with one mouse click.
Recording schedule: Refer to 7.2.2
Related channel: This is for event cooperation with a specified channel
If you mark some related channels after you select a channel in the tree structure
and then when events happen on the specified channel, other related channels are
operating the same event and signal.
CMS User Manual
43
7.3. Alias setting
Alias function is to give a specific nickname to an IP address in order for system
manager to distinguish from each cameras.
Double click “Item” to edit alias.
Input Alias on the message box. (Check if IP address of server is matched)
CMS User Manual
44
You can have the alias list in the window.
◈ Alias effect
When you give an alias, it is shown as its alias in every panel.
[For example]
Server search in FileView
Event list in history window
CMS User Manual
45
8. CMS Client
8.1. Environment Setup (CMS)
①
CMS User Manual
②
46
8.1.1. Client list (①)
You can add client IDs to this list. This is the ID for access to CMS server.
After clicking “Add” button, you can input new ID & Password as to the above
pictures.
CMS User Manual
47
8.1.2. Server list (②)
Accessible Server List: User can access to these video servers by using the
specific ID.
Inaccessible Server List: User can’t access to these servers for these video servers.
<< / >> : Move into each box in each video server IP.
<<< / >>> : Move into each box all video server IPs.
After all settings is done, you have to click “OK” button to save the setting value.
CMS User Manual
48
8.2. CMS client software
①
④
②
③
③
CMS User Manual
49
8.2.1. Connection information (①)
Combo box: Input the IP addresses of CMS PC. They are saved automatically and
selected in the combo box.
ID & Password: These are made in CMS environment setup and CMS client user
has to memorize them for login.
After inputting CMS IP address, ID & Password of CMS client completely, click
“Connect” button. When the connection is done successfully, the color connection
icon is changed.
“C” means CLEAR, so that when you want to delete all of the saved CMS IP
addresses, you can click “C” button.
CMS User Manual
50
8.2.2. Display control (②)
Calendar
-
Grey: Not recorded date
-
Deep blue: Searching date
-
Red: Recorded date (Activated)
Combo box: It shows you the accessible IP address of video server automatically
after login connection.
Live Connect: It is connected to the video server of the selected IP address.
Icon display
Search for recorded data of the selected IP address
Capture a still image
Open a recorded file to play back
Playback display configuration
1 / 4 / 8 / 16 Division
CMS User Manual
51
8.2.3. Playback control (③)
Icon display
2 Frame backward
Backward play
Stop
Pause
2 Frame forward
2 times slower play
Normal play
2 times faster play
Playback speed control
Playback speed varies from -32 to 32 in each channel independently.
8.2.4. File list (1st way to playback)
- One hour based file
- Recording mode :
Sensor
Motion
Continuous
- List and channel can be sorted out by clicking the title on the top.
CMS User Manual
52
8.2.5. Intelligent Time Map (2nd way to playback)
- It shows different color in each recording mode.
- When you click the time you want to see and do right mouse button, you can have
one hour base time map for the time.
- You can move the time scroll freely and the playback is linked with the movement of
time scroll.
- When you click the channel number which is positioned on the left, the playback of
selected channel will be unactivated.
CMS User Manual
53
8.2.6. Display window(④)
It shows you 1/4/8/16 division display mode.
Status button gives you all information regarding to the video display operation.
CMS User Manual
54