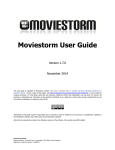
1
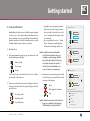
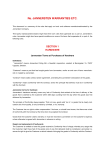
hC
HurryCover 2.0
A Book Cover Manager
for InDesign CS4 / CS5 / CS6 / CC
U s e r
M a n ua l
hC
Overview
1 . Description
HurryCover allows you to create perfectly sized book covers or
dust jackets which you can easily re-adjust the dimensions, the
spine, the back and/or front flaps whenever you want. If your
document needs to be updated according to new measurements,
HurryCover automatically moves the layout components the
required distance and ensures that guides and fold marks always
fit the correct dimensions.
MAIN DIMENSIONS
PASTEBOARD
BLEED AND SLUG
34p0
1p3
48p0
2p6
1p3
12p0
50p0
4p6
FLAPS
METADATA
Title:
MARKS AND GUIDES
22p0
Spine/flap marks
Description:
Crop marks
NOTE
22p0
HurryCover supports usual InDesign measurement units: agates,
ciceros, centimeters, inches, millimeters, picas. You can instantly
switch from one to another. See Advanced tips and features, §2.
In addition, HurryCover lets you edit a set of metadata (title,
author, description, keywords) and add page details in the slug
area—such as finished width, spine thickness or contact name.
This way you can be sure that your client and/or the printer have
all reliable information directly shown in the final export.
AG
hC
CM
IN MM PC PT
Update
Create
NOTE
[email protected]
Close
HurryCover PRO 2.017
Licensed to: [email protected]
You can download a free tryout version of HurryCover at:
http://ww.indiscripts.com/blog/public/scripts/HurryCoverTry.zip.
It offers most of the features of the PRO release, but it makes
impossible to update a document (the Update button remains
grayed out).
• Mac OS X 10.6 or later,
H u r r y C o v e r 2 . 0 M a n ua l
CI
Contact:
On master page
3 . TRY vs. PRO version
2 . System requirements
or Windows XP / Vista / 7 / 8 (x86 or x64 editions).
• 800×600 pixel screen-resolution or greater.
• Adobe InDesign CS4, CS5, CS5.5, CS6 or CC.
Keywords:
Guides
Page details
1p0
My New Jacket
Author:
We strongly encourage you to install and test the TRY version
before you purchase the PRO license of the product. Always
make sure that your system meets the requirements.
The main dialog of
HurryCover has a
very similar lookand-feel in both
Mac OS and Windows
environments. The
following languages are
available (depending on
your InDesign locale):
• English (default)
• French
• German
• Spanish
1
hC
Getting started
1 . Before you install
2 ) You see there two main folders: Application and User. Rightclick the User folder and pick “Reveal in Finder.”
HurryCover entirely resides in a single file: HurryCoverPro.jsx.
When you download the file from your private link, however,
it is originally zipped.
3 ) You should now see a Scripts Panel folder. Drag HurryCoverPro.jsx
into there. Congratulations, HurryCover is now installed!
The first step is to unzip the .zip file so you can place
HurryCoverPro.jsx at the desired location (see below).
3 . Installing in Windows
As a precaution before you go on, save your working files and
restart InDesign in a clean session.
2 . Installing in Mac OS X
1 ) In InDesign, open the Scripts panel as follows:
• CS4: Window > Automation > Scripts.
• CS5, CS5.5, CS6 or CC: Window > Utilities > Scripts.
1 ) In InDesign, open the Scripts panel as follows:
• CS4: Window > Automation > Scripts.
• CS5, CS5.5, CS6 or CC: Window > Utilities > Scripts.
2 ) You see there two main folders: Application and User. Rightclick the User folder and pick “Reveal in Explorer.”
3 ) You should now see a Scripts Panel folder. Drag HurryCoverPro.jsx
into there. Congratulations, HurryCover is now installed!
WINDOWS
MAC OS X
DRAG INTO
DRAG INTO
RIGHT-CLICK
RIGHT-CLICK
CLICK
H u r r y C o v e r 2 . 0 M a n ua l
CLICK
2
MAIN DIMENSIONS
34p0
1p3
2p6
1p3
50p0
4p6
MAIN DIMENSIONS
4 . Installing
an update
FLAPS
BLEED AND SLUG
48p0
12p0
METADATA
PASTEBOARD
6 . Running HurryCover
from the Indiscripts menu
MARKS AND GUIDES
34p0an update of the product is available, 1p3
If you are notified that
simply download the new package from your private link,
then marks
Spine/flap
22p0
2p6
1p3
unzip and install the file HurryCoverPro.jsx over the previous
Crop one,
marks
i.e. at the same location.
22p0
50p0
Guides
4p6
Page details
The new version is instantly
functional, and your global settings
1p0
On master page
are all preserved.
FLAPS
MARKS AND GUIDES
AG
CI
CM
IN MM PC PT
22p0
Title:
hC
16p0
Keywords:
You can now run HurryCover
going into:
METADATA
Contact:
Indiscripts > HurryCover PRO [email protected]
Title:
Spine/flap marks Update
Once the installation
done,
switch back to InDesign.Page
You details
can
Licensedisto:
[email protected]
1p0
run HurryCover from the Scripts panel as follows: On master page
HurryCover PRO 2.016
hC
Licensed to: [email protected]
in the User folder,
2 ) Look for HurryCoverPro.jsx
then double-click on it.
H u r r y C o v e r 2 . 0 M a n ua l
Author:
Create
Description:
Close
Keywords:
Guides
1 ) In InDesign,
display the Scripts panel via:
AG CI CM IN MM PC PT
• Window > Automation > Scripts (CS4), or
• Window > Utilities > Scripts (CS5, CS5.5, CS6 or CC).
My New Jacket
To have HurryCover available in48p0
the InDesign’s menu bar,
Author:
simply click the Indiscripts-menu button as shown in the below
12p0
Description:
screenshot, then close
the dialog box.
5 . Running HurryCover from the Scripts panelCrop marks
HurryCover PRO 2.017
hC
Getting started
PASTEBOARD
BLEED AND SLUG
Contact:
[email protected]
INDISCRIPTS MENU
TURNED OFF
CLICK
Update
Tired of continually
digging into the
Scripts panel?
Make HurryCover
available in a
dedicated menu!
Create
Close
INDISCRIPTS MENU
TURNED ON
3
hC
Getting started
7 . Create your first cover!
• Typically, if you are preparing a standard
dust jacket, the jacket is wrapped around
the case bound book and the turn-in thickness is correlated with the thickness of the
cover material.
• By cons, gatefold soft covers (i. e. “French
flaps”) only require a small adjustment
thickness between the flap and the cover.
Basically, HurryCover allows you to build the complete template
of a book cover, or a dust jacket, with perfectly measured areas
for front and back cover, spine, optional flaps, bleed and slug. In
addition, HurryCover creates all convenient guides, crop and
fold marks which you want to have in your layout.
1 ) Run HurryCover.
NOTE
2 ) In the main dimensions panel, type in the dimensions of the
finished width, spine and height:
Finished width.
Cover’s spine.
Height.
Finished width refers to the width of the front cover—which is
also the width of the back cover.
3 ) If necessary, activate the flaps panel by clicking its check box,
then type in the width of the front (resp. back) flap as well as the
turn-in thickness:
MAIN DIMENSIONS
4 ) In the bleed and slug panel, type
34p0in the width
of the bleed area, the crop marks offset, and the
total room of the slug area: 2p6
Offset FLAPS
applied to the marks.
Slug.
Turn-in thickness.
2p6
50p0
FLAPS
MARKS AND GU
Spine/flap
22p0
Crop mark
22p0
Guides
Page deta
1p0
AG
CI
CM
On master
IN MM PC PT
BLEED AND SLUG
hC
HurryCover PRO 2.017
NOTE
22p0
By default, the marks offset is linked to the bleed.
Again, you can unlink these values1p0
by turning
off the link button (to the right of the field).
hC
CI
CM
IN MM PC PT
HurryCover PRO 2.017
Licensed to: [email protected]
PASTEBOARD
Licensed to: [email protected]
1p3
1p3
4p6
METADATA
Title:
MARKS AND GUIDES
Author:
Spine/flap marks
Description:
Crop marks
AG
H u r r y C o v e r 2 . 0 M a n ua l
22p0
BLEED AND S
34p0
50p0
Bleed.
Front flap’s width.
Back flap’s width.
By default, the front and back flap widths
are linked. However, HurryCover allows you
to unlink these values by turning off the link
button (to the right of the field). This way you
can treat flaps separately. Also, any field of
the FLAPS panel can be individually set to 0
in order to remove the corresponding area.
MAIN DIMENSIONS
Keywords:
Guides
Page details
Contact:
On master page
Update
Create
4
2p6
1p3
50p0
4p6
FLAPS
MARKS AND GUIDES
Spine/flap marks
22p0
12p0
Getting started
Title:
Description:
Keywords:
Guides
Page details
1p0
CM
Update
IN MM PC PT
A new InDesign document is then created having the following
areas, guides and elements:
HurryCover PRO 2.017
hC
BACK COVER
Close
FOLD MARKS (SPINE AND FLAPS)
SPINE
BACK FLAP
Create
HurryCover’s guides
and marks are placed
on a reserved layer,
HC_GuidesAndMarks,
to let you safely work
on your own layer(s).
CLICK
Licensed to: [email protected]
SLUG AREA
BLEED AREA
TURN-IN
CUSTOM CROP MARKS
[email protected]
FRONT COVER
TURN-IN
CI
Contact:
On master page
5 ) Finally, click Create to generate the cover template.
AG
My New Jacket
Author:
Crop marks
22p0
hC
METADATA
FRONT FLAP
FOLD GUIDES
PAGE DETAILS
H u r r y C o v e r 2 . 0 M a n ua l
5
hC
Managing your cover
1 . Adjusting size(s)
MAIN DIMENSIONS
34p0
1p3
48p0
2p6
1p3
12p0
1 ) Open an InDesign document that was created with HurryCover.
NOTE
HurryCover 2.x cannot manage documents built
with
50p0
HurryCover 1.x (2007). To make a document compliant with
the current product, see AdvancedFLAPS
tips and features, §7.
4p6
Spine/flap marks
panel, the flaps panel,
3 ) Change any size in the main dimensions1p0
and/or the bleed and slug panel.
Page details
16p0
NOTE
AG
CI
Title:
Author:
Description:
Crop marks
Keywords:
Guides
Contact:
[email protected]
On master page
IN MM PC PT
Update
HurryCover PRO 2.016
CLICK
CM
hCin theLicensed
The Update button is only enabled
PRO version.
to: [email protected]
H u r r y C o v e r 2 . 0 M a n ua l
METADATA
MARKS AND GUIDES
2 ) Run HurryCover. Note that the dialog 22p0
box then displays the
current dimensions of your document.
4 ) Click Update.
UPDATE
PASTEBOARD
BLEED AND SLUG
SPINE
Proceed as follows:
SPINE
What makes HurryCover really powerful is that you can edit the
specific size of any area of your document after it was created
and laid out. For example, if you need to increase the spine width
of a book jacket due to a “last minute technical adjustment,”
HurryCover will save you from recalculating all the related
measurements. Even better, HurryCover will automatically and
accordingly reposition the elements of your layout to make free
room for the new spine width.
A typical use of
HurryCover is changing
the spine width
of the final jacket
with no effort and
perfect accuracy.
You could resize as
well the finished
width, flaps, etc.
Create
Close
6
hC
Managing your cover
2 . Adding / removing spine
MAIN DIMENSIONS
HurryCover supports templates with zero-width spine, which
simply means “no spine.” Therefore, you can very easily add or
remove this area by editing the spine field.
2 ) Click the 1p3
48p0
34p0
2p6
1p3
12p0
0
3 ) Enter the new width of the spine.
CI
CM
Keywords:
Create
AG CI
CI
CM
AG
hC
CI
CM
IN MM PC PT
HurryCover PRO 2.013
Licensed to: [email protected]
METADATA
Title:
Ja
REMOVING THE
Contact:
BACK FLAP
Update
m
Create
MARKS AN
Spin
22p0
Crop
0
Guid
[email protected]
1p0
Create
AG CI
hC
Bo
2p6
FLAPS
Keywords:
Guides
REMOVINGPage
THEdetails
On master page
FRONT FLAP
Author:
50p0
Description:
Crop marks
16p0
Th
Author:
Spine/flap marks
0
Title:
Contact:
Update
4p6
FLAPS
3 ) Choose one or more of the following actions:
H u r r y C o v e r 2 . 0 M a n ua l
12p0
IN MM PC PT
PRO 2.017
hC HurryCover
Licensed
to: [email protected]
MARKS AND
GUIDES
1p0
the front flap, then enter the new width (‘0’ is allowed).
Page details
FRONT
FLAP 48p0
WIDTH 34p0
On master page
1p3
AG
On master
METADATA
ty
Keywords: BLEED
PASTEBOARD
MAIN DIMENSIONS
Guides
1p3
1p0
2p6
2 ) If necessary, unlink the flaps by clicking the link button to the
right of the back flap field.
icon (or manually select the field) to edit
Spine/flap marks
BLEED AND SLUG
16p0
34p0 FLAP WIDTH
BACK
12p0
Page detai
HurryCover PRO 2.017
hC
Description:
Licensed to: [email protected]
Crop marks
22p0
Licensed to: [email protected]
MAIN DIMENSIONS
IN Close
MM PC PT
CM
MARKS AND GUIDES
50p0
1 ) With your document active in InDesign, run HurryCover.
1p3 [email protected]
1p0
4p6
Update
HurryCover PRO 2.017
By the same logic the flaps (front and/or back flap) can be separately added or removed by editing their respective width.
16p0
Contact:
FLAPS
3 . Adding / removing flap(s)
Crop mark
48p0
Guides
1p3
On master page
50p0
IN MM PC PT
MARKS AND GUI
PASTEBOARD
Spine/flap
22p0
Description:
0
Page details
AG
My New Jacket
Author:AND SLUG
BLEED
Crop marks
34p0
Guides
1p0
hC
• Click the Title:
FLAPS
MARKS AND GUIDES
22p0
50p0
REMOVING SPINEMETADATA
MAIN DIMENSIONS
Spine/flap marks
22p0
4 ) Click Update.
4p6
ADDING SPINE
FLAPS
icon (or manually select the spine field).
BLEED AND S
34p0
50p0
1 ) With your document active in InDesign, run HurryCover.
PASTEBOARD
MAIN DIMENSIONS
BLEED AND SLUG
CM
ClosePC PT
IN MM
HurryCover PRO 2.013
Licensed to: [email protected]
7
Page
On m
hC
Managing your cover
• Click the or anything else), the object keeps its place in the flap—as illusPASTEBOARD
trated
by the orange rectangle in the figure below.
icon (or manually select the field) to edit
MAIN DIMENSIONS
BLEED AND SLUG
the back flap, then
enter the new width (‘0’ is allowed).
34p0
1p3
48p0
2p6
1p3
12p0
50p0
4p6
• Click the check box of the flaps panel to globally enable or
disable the flaps, as shown below:
FLAPS
TURNED OFF
FLAPS
METADATA
Title:
MARKS AND GUIDES
22p0
Author:
Spine/flap marks
Description:
Crop marks
16p0
Keywords:
Guides
Page details
1p0
AG
hC
CI
CM
When the width of
any area is modified,
HurryCover repositions
the objects in order
to maintain the
distance to their
“reference edge.”
Contact:
[email protected]
UPDATE
On master page
IN MM PC PT
Update
Create
Close
HurryCover PRO 2.013
Licensed to: [email protected]
4 ) Finally, click Update.
4 . Automatic repositioning
The underlying rule is that HurryCover attempts to preserve the
distance to the most inner edge of the area the object belongs to.
If the object overlaps multiple areas—as illustrated by the gray
rectangle which meets both the front cover and the front flap—
then again the reference edge is assumed the most inner one.
HurryCover has been designed to update your layout the most
accurate way, considering the relationship between the cover
template and the graphic elements of the document.
Suppose you have a rectangle within the bounds of the front flap.
HurryCover will regard that rectangle as owned by the flap and
will try to maintain its position relative to the fold. Thus, if you
resize any area of your template (spine width, front cover, and/
H u r r y C o v e r 2 . 0 M a n ua l
NOTE
The above rule only applies to left-sided or right-sided objects. If
an element is located within the book spine area and/or overlaps
the central axis of the cover, then it will remain in place.
8
hC
Managing your cover
5 . Smart resize
In addition to automatic repositioning, HurryCover can readjust
the width of every individual element (rectangle, oval, triangle,
polygon, text frame…) whose visible bounds fit two vertical edges
of the cover areas.
NOTE
My Title
Smart resize mechanism is enabled by default. You
can disable this feature from the ADVANCED SETTINGS
panel. See Advanced tips and features, §4.
UPDATE
The figure below shows how some simple objects are processed
when their bounds match various reference edges.
In order to prevent unwanted modifications, the Smart resize
feature is restrictive. The following conditions are all required:
• The frame of the object must be very close to each reference
edge, according to a “snap zone” internally set to 0.5 pt.
• The object must be an individual page item (i.e. groups are
ignored).
• The object must belong to a non-locked layer.
NOTE
Automatic repositioning and Smart resize mechanisms also apply to:
• hidden objects,
• objects that belong to an hidden layer,
• individually locked objects.
So only locked layers are globally ignored.
My Title
MAIN DIMENSIONS
34p0
1p3
2p6
1p3
50p0
4p6
The marks and guides panel provides a set
FLAPS
of check boxes that let
you turn on/off custom
printer’s marks, guides and page details:
22p0
• Spine/flap marks (also referred
22p0 to as “fold
marks”) are custom solid lines added for
1p0
the flaps and spine. They help
the printer
determine where to fold the paper.
hC
CI
CM
IN MM PC PT
HurryCover PRO 2.017
Licensed to: [email protected]
PASTEBOARD
BLEED AND SLUG
6 . Using marks and guides
AG
H u r r y C o v e r 2 . 0 M a n ua l
When Smart resize is in
action, every individual
element that fits two
vertical edges of the
cover is automatically
resized on Update.
METADATA
Title:
MARKS AND GUIDES
Author:
Spine/flap marks
Description:
Crop marks
Keywords:
Guides
Page details
Contact:
On master page
Update
Create
9
hC
Managing your cover
• Crop marks are basically similar to the InDesign’s built-in
NOTE
crop marks. (They help the printer determine where to trim
the paper.) The benefit of using HurryCover’s crop marks is
that they have the same offset, weight and length as spine/
flap marks. (If you prefer to use InDesign’s crop marks in
the print out, turn off Crop marks in HurryCover and click
Update.)
NOTE
NOTE
Fold and crop marks always go outside the page boundary.
The applied offset is specified in the
field,
which by default is linked to the bleed offset
 .
Unlink those fields to specify a different offset. (However, keep in
mind it is not recommended to have marks offset less than bleed.)
Marks’ weight and length can be globally set from the ADVANCED
SETTINGS panel. See Advanced tips and features, §4.
• Guides are InDesign’s guides for spine and flaps.
Depending on your settings, HurryCover automatically
creates guides to delineate each separate area of your cover,
including the “turn-in” between the front (resp. back) cover
and the front (resp. back) flap.
• Page details refers to an information block placed at the
bottom of the page over the bleed area. It brings together all
size details (Flat size, Finished width, Spine, Flaps, Turn-in)
as well as the Contact field (see below Adding/updating metadata) and the last-modified date of the document.
H u r r y C o v e r 2 . 0 M a n ua l
Both printer’s marks and page details use the [Registration]
swatch. Also, outlines are used for page details so that
no additional font is added in the document.
• On master page (not available in InDesign CS4) tells
HurryCover to place any marks, guides and extras on a
master. This way you can manage multiple variants of your
cover from a single document—since updating the master
will instantly update every child page.
NOTE
On master page is disabled in CS4 due to an InDesign
issue related to rotated spread views.
All marks, guides and extras managed by HurryCover are placed
on a separate layer, HC_GuidesAndMarks, which is locked.
Although you can rename this layer to your liking, be
careful not to remove it.
7 . Adding / updating metadata
Metadata is a set of background information about a document,
such as title, description, author name, or keywords applied to it.
This dataset is stored using the XMP standard, which facilitates
the exchange of metadata between applications.
Using well worded metadata helps you streamline your workflow
and organize your documents. When you export your artwork
out of InDesign (PDF, IDML…) the metadata travels with the file.
10
hC
Managing your cover
This makes it easier for your document to be found and properly
identified. For example, it may be important for your studio—
and/or for your clients—to make visible which designer worked
on a certain document.
4 ) In the Description field, enter a short description or subject. This
will match “Description” in InDesign’s File Information, and
“Subject” in Acrobat’s Document Properties.
NOTE
Use the Metadata panel to add (or edit) such background
information:
1 ) If necessary, activate the panel by clicking its check box.
2 ) In the Title field, fill in a title for the document. This will match
“Document Title” in InDesign’s File Information, and “Title” in
Acrobat’s Document Properties.
PASTEBOARD
BLEED AND SLUG
3 ) In the Author field, enter the author’s name, if relevant. This
will1p3match “Author” in both InDesign’s
File Information and
48p0
Acrobat’s Document Properties.
1p3
12p0
METADATA
TURNED ON
4p6
MARKS AND GUIDES
Spine/flap marks
Crop marks
Guides
Page details
METADATA
Title:
The New Typography
Author:
Jan Tschichold
Description:
Book jacket (v. 1.2)
Keywords:
typography, jacket
Contact:
[email protected]
HurryCover does not support multi-line descriptions.
5 ) In the Keywords field, enter a comma-separated list of keywords.
This will match “Keywords” in both InDesign’s File Information
and Acrobat’s Document Properties.
6 ) HurryCover provides an extra field, Contact, which is not an
actual XMP structure and therefore is not stored in metadata.
Use it to make a name, e-mail address, phone number, or any
additional data, visible in the page details block at the bottom
of the page.
8 . Restoring the previous state of the document
If anything goes wrong once you click Update, you can globally undo all modifications processed by HurryCover. Just press
Cmd Z, or go into Edit > Undo HurryCover. The document is
then restored to its previous size and state.
On master page
Update
Create
Close
2.016
scripts.com
H u r r y C o v e r 2 . 0 M a n ua l
11
hC
Advanced tips and features
1 . How do I change the size of the pasteboard?
You can also temporarily override the current unit as you enter a
value. For example, even if the unit block is set to PT (points), you
can type a new value like “4mm” to specify millimeters. In such
case, the field is changed into “11.34pt” as soon as you validate.
To specify how far the pasteboard extends out from the slug
area, simply enter values for Horizontal pasteboard margins and
Vertical pasteboard margins:
Horizontal pasteboard margins. (Disabled in
InDesign CS4.)
Vertical pasteboard margins.
2 . How do I specify units of measure?
Most of the fields in HurryCover require a unit of measure.
By default, all values fit the current horizontal ruler unit set
in InDesign. You can change this at any time in HurryCover
through the “unit block”:
AG
CI
CM
NOTE
HurryCover supports most of the notations available in InDesign,
e.g.:
• “1.23i”, “1.23in”, “1.23inches”,
• “123mm”, “12.3cm”, “.123m”,
• “1p6”, “1.5pc”, “1.5pica”, “18pt”, “18points”
• “c6”, “.5ci”, “0.5cicero”
• “12ag”, “12agates”
When a notation cannot be properly parsed, or would result in a
wrong value, a short alert message popups while you are typing:
MAIN DIMENSIONS
IN MM PC PT
Each button switches to a different unit:
• AG to specify Agates
• CI to specify Ciceros
• CM to specify Centimeters
• IN to specify Inches
• MM to specify Millimeters
• PC to specify Picas
• PT to specify Points
When you click a button, HurryCover instantly converts and
displays all values into the selected unit.
H u r r y C o v e r 2 . 0 M a n ua l
PASTEBOARD
BLEED AND SLUG
123m
1p3
48p0
2p6
between 1 pt and 3685 pt.
1p3
12p0
50p0
4p6
The value must be
FLAPS
METADATA
MARKS AND GUIDES
Spine/flap marks
3 . How do I save
my global preferences?
22p0
Crop marks
16p0
Guides HurryCover
Similarly to how
InDesign manages preferences,
makes a distinction between application-levelPage
anddetails
document-level
1p0
On
master
pagecreated
settings. When you are updating a document that was
with HurryCover, settings visible in the main dialog match that
AG
hC
CI
CM
IN MM PC PT
HurryCover PRO 2.016
Licensed to: [email protected]
Update
Title:
The New Typog
Author:
Jan Tschichold
Description:
Book jacket (v.
Keywords:
typography, jac
Contact:
me@indiscripts
Create
Close
12
MAIN DIMENSIONS
PASTEBOARD
BLEED AND SLUG
34p0
1p3
48p0
2p6
1p3
12p0
specific document and 50p0
take priority over HurryCover’s default
4p6
settings. In this scenario:
button applies settings to the active
cover.
• The Update
FLAPS
MARKS
AND GUIDES
• The Create button applies settings to the newly created
Spine/flap marks
22p0
cover (the active cover
remains unchanged).
Crop marks
ignores changes and lets the active
• The Close button simply
16p0
Guides
cover unchanged.
4 . How do I access advanced settings?
METADATA
HurryCover
features a few
preferences, referred to as
Theadditional
New Typography
Title:
“advanced Author:
settings”, which
responsible for the overall funcJan are
Tschichold
tioning of the
program. Book jacket (v. 1.2)
Description:
Keywords:
On master page
By contrast, if no document is available (or if the active document
is not a valid
the main
AG cover),
CI CMthen
IN MM
PC PTdialog matches the default
settings—i.e. preferences—of HurryCover. In this scenario:
is disabled.
• The Update button
HurryCover
PRO 2.016
hC
Licensed
to: [email protected]
applies
settings to the newly created doc• The Create button
ument (the default settings remain unchanged).
• The Close button saves changes as new default settings.
Therefore the easiest way to set your usual preferences is to
proceed as follows:
1 ) In InDesign, close any document window.
2 ) Run HurryCover.
3 ) Enter your preferred settings for future book covers (size, flaps,
options, metadata, etc.).
4 ) Click Close.
H u r r y C o v e r 2 . 0 M a n ua l
typography, jacket
To access advanced settings in HurryCover, click the gear icon
[email protected]
Contact:
at the right side of the Close button:
Page details
1p0
hC
Advanced tips and features
Update
Create
GO TO ADVANCED
SETTINGS
Close
The advanced settings panel then shows up. From there you
can both:
• Change the weight and/or the length used for all crop and
fold marks (see Managing your cover, §6);
• Turn on/off Smart resize (see Managing your cover, §5).
ADVANCED SETTINGS
Marks weight:
0.25pt
Marks length:
18pt
ADVANCED
SETTINGS window.
• Click Reset to restore
the defaults.
• Click OK to validate
your choices.
Smart resize
Reset
OK
13
hC
Advanced tips and features
5 . How do I deal with recurring works?
When you prepare book covers or jackets for a series, it may be
convenient to establish a template for this series, then to reuse
it as a starting point for each specific document. This way you
don’t have to constantly re-create standard artworks, layout and
contents—e.g. flap structure, backgrounds, shared logos, frames,
barcode area, and so on.
As HurryCover manages InDesign templates as well as regular
documents, it’s easy to streamline such workflow:
1 ) Run HurryCover.
2 ) Enter your preferred settings for the series (size, flaps, options,
metadata, etc.).
3 ) Click Create to generate a fresh preformatted template.
Once you have a prepared template, you can start a new cover
from that template whenever you want:
1 ) In InDesign, go into File > Open.
2 ) Locate and select your template.
3 ) Select Open Normal (Mac OS) or Normal (Windows), then click
Open.
4 ) Run HurryCover, adjust the cover to your needs, then click
Update.
5 ) Save the document with its own name.
6 . Can I add extra guides in my jacket?
You may want to manage additional ruler guides for margins,
hinges, gutters, safety zones, etc. As HurryCover has been
designed to offer a simple and intuitive user interface, we did not
integrate all technical parameters that could be required in your
workflow. However, there is usually no issue in using custom
guides in your document or template. Such guides will just be
repositioned as well as other layout components.
4 ) Feed the template so that it contains the layout of a typical
issue—including layers, grids, guides, placeholder frames, styles,
swatches, graphics, texts, etc.
5 ) Save your document as an InDesign template:
• Go into File > Save As, and specify a location and filename.
• Choose “InDesign CSX Template” for Format (Mac OS) or
Save As Type (Windows), and then click Save.
H u r r y C o v e r 2 . 0 M a n ua l
NOTE
As a general rule, do not place your own guides
on the layer dedicated to HurryCover.
14
hC
Advanced tips and features
7 . How do I make existing documents compliant
with HurryCover?
Since documents which was not originally created from
HurryCover are not supported by the program, you may have
to manually convert old book covers into the new format. Here
are the basic steps involved in this task:
1 ) Open the existing document in InDesign.
7 ) Open the Layers panel. From the flyout menu, select Paste
Remembers Layers.
8 ) Go into Edit > Select All, and copy the selection (Cmd C).
9 ) Activate the destination document.
10 ) Go into Edit > Paste in Place.
2 ) Write down the inner dimensions of the book cover:
• finished width and spine width,
• height,
• bleed and slug,
• flaps and turn-in thickness, if relevant.
3 ) Run HurryCover, then enter all the needed dimensions in the
corresponding fields.
4 ) Click Create.
5 ) In InDesign, go into Window > Arrange > Tile. (So you get both
the source and the destination document visible.)
6 ) Activate the source document. If needed, hide/lock the layers
you don’t want to copy. Also, make sure that all the required
objects are visible and not locked.
H u r r y C o v e r 2 . 0 M a n ua l
15
hC
HurryCover
2.0
www.indiscripts.com
A plug-in for Adobe® InDesign® based on Adobe® ExtendScript and ScriptUI. Created
and developed by Marc Autret. Designed by Dominique Chiron and Marc Autret.
User Interface available in English, French, German, Spanish. German localization
provided by Robert Kaltenbrunn. Spanish localization provided by Camilo Umaña.
My very special thanks to Dominique Chiron (doopix.com), Jean-Christophe Courte (urbanbike.com),
Robert Kaltenbrunn (absatzsetzer.de), and Camilo Umaña. I also wish to thank the many people who
have helped improve this product, in particular : Loïc Aigon, Laurent Tournier, Nicolas Pichou, Jean-Marc
Bonnard, Eduardo Antunes, Norbert Congard, Philippe Theophanidis, Laurent Grolleau, Colin Flashman,
Ulrich Döllken, Ian Mac Pherson.
Main Product Page: http://www.indiscripts.com/category/projects/HurryCover
Tryout version: http://ww.indiscripts.com/blog/public/scripts/HurryCoverTry.zip
Technical Support: [email protected]
Purchasing HurryCover:http://www.indiscripts.com/store/HRCV
End User License Agreement: http://www.indiscripts.com/pages/eula
Terms and Conditions of Sale: http://www.indiscripts.com/pages/cgv
Copyright Notice: http://www.indiscripts.com/pages/copyright
This manual, as
with the terms
to ensure that
any errors that
well as the software documented in it, is released under license and may be used or copied only in accordance
of that license. The content of this document is subject to change without notice. Every effort has been made
the information in this document is accurate. However, Indiscripts assumes no responsibility or liability for
may appear in this document. InDesign, the InDesign logos, are trademarks of Adobe Systems Incorporated.
© Marc Autret, indiscripts.com, 2007-2013. All rights reserved. Made in France.