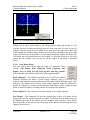
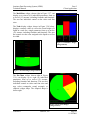
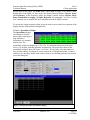
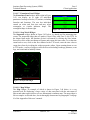
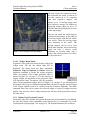
1
Technical Manual
Lumistar Data Processing System (LDPS)
Part-2
The LDPS Client Application
(Preliminary)
Document:
Editor:
Date:
Release:
U0990102
D. Spielman
11/20/2006
Initial
Lumistar, Inc.
2701 Loker Ave. West, Suite 230
Carlsbad, CA 92010
(760) 431-2181
www.lumi-star.com
This document is the intellectual property of Lumistar, Inc. The document contains proprietary and
confidential information. Reproduction, disclosure, or distribution of this document is prohibited without
the explicit written consent of Lumistar, Inc.
This document is provided as is, with no warranties of any kind. Lumistar, Inc. disclaims and excludes all
other warranties and product liability, expressed or implied, including but not limited to any implied
warranties of merchantability or fitness for a particular purpose or use, liability for negligence in
manufacture or shipment of product, liability for injury to persons or property, or for any incidental,
consequential, punitive or exemplary damages. In no event, will Lumistar, Inc., be liable for any lost
revenue or profits, or other indirect, incidental and consequential damages even if Lumistar, Inc. has been
advised of such possibilities, as a result of this document or the usage of items described within. The entire
liability of Lumistar, Inc. shall be limited to the amount paid for this document and its contents.
RESTRICTED RIGHTS LEGEND
Use, duplication, or disclosure by the Government is subject to restrictions set forth in subparagraph
(c)(1)(ii) of the rights in Technical Data and Computer Software clause in DFARS 252.227-7013. Lumistar,
Inc. and its logo are trademarks of Lumistar, Inc. All other brand names and product names contained in
this document are trademarks, registered trademarks, or trade names of their respective holders.
© 2006 Lumistar, Inc. All rights reserved.
Lumistar, Inc.
2701 Loker Avenue West
Suite 230
Carlsbad, CA 92010
(760) 431-2181
(760) 431-2665 Fax
www.lumi-star.com
Lumistar Data Processing System (LDPS)
Technical Manual
Part-2
Client Application
TABLE OF CONTENTS
1
INTRODUCTION..................................................................................................... 8
1.1
1.2
1.1
2
GENERAL ............................................................................................................. 8
MANUAL FORMAT AND CONVENTIONS .............................................................. 10
PROFICIENCY ..................................................................................................... 10
THE LDPS CLIENT PROGRAM ........................................................................ 11
2.1
THEORY OF OPERATION ..................................................................................... 11
2.1.1
Data Collection......................................................................................... 11
2.1.2
Embedded Managers ................................................................................ 11
2.1.3
Data Processing Manager ........................................................................ 11
2.1.4
Function & Derived Parameter Managers............................................... 12
2.1.5
Display Manager ...................................................................................... 12
3
THE CLIENT PROGRAM’S GRAPHICAL USER INTERFACE (GUI) ....... 13
3.1
SYSTEM MENU ................................................................................................... 14
3.2
PROJECT MENU .................................................................................................. 14
3.3
DISPLAY MENU .................................................................................................. 14
3.4
VIEW MENU ....................................................................................................... 15
3.5
EDIT MENU ........................................................................................................ 20
3.5.1
Display List Editor Window...................................................................... 20
3.5.2
Derived List Editor Window ..................................................................... 21
3.5.3
Function List Editor Window.................................................................... 22
3.6
TOOLS MENU ..................................................................................................... 22
3.7
SERVER INFORMATION SECTION ........................................................................ 22
3.8
CLIENT OPTIONS ................................................................................................ 24
3.8.1
A Helpful Hint for Network Users ............................................................ 24
3.8.2
Directory Tab............................................................................................ 25
3.8.3
Operations Tab ......................................................................................... 26
3.8.3.1 Startup Section ...................................................................................... 28
3.8.4
Utility Tab ................................................................................................. 29
3.9
DISPLAY PAGE ................................................................................................... 30
3.9.1
Display Page Main Menu ......................................................................... 30
3.9.2
Quick Menu/Top Controls Area................................................................ 31
3.9.3
Page Options............................................................................................. 33
3.9.4
Display Page Mouse Controls and Menus................................................ 35
3.9.4.1 Page Mouse Menu................................................................................. 36
3.9.4.1.1 Text Type Widgets.......................................................................... 37
3.9.4.1.2 Instrument Widgets......................................................................... 39
3.9.4.1.3 History Plot Widgets....................................................................... 42
3.9.4.1.4 Gauge & Chart Widgets.................................................................. 44
3.9.4.1.5 Special Device Widgets .................................................................. 46
3.9.4.1.6 Spreadsheet Widget ........................................................................ 47
3.9.4.1.7 Enunciator Panel Widget ................................................................ 48
3.9.4.1.8 Stop Watch Widget ......................................................................... 48
U0990102
Lumistar, Inc.
Page iii
11/20/2006
Lumistar Data Processing System (LDPS)
Technical Manual
Part-2
Client Application
3.9.4.1.9 Map Widget .................................................................................... 48
3.9.4.2 Widget Mouse Menu –.......................................................................... 49
3.9.5
Display Page Keyboard Controls ............................................................. 49
3.10 DISPLAY LISTS ................................................................................................... 50
4
WIDGET PROPERTIES ....................................................................................... 51
4.1
INITIAL SETUP.................................................................................................... 51
4.2
WIDGET TRIGGERS ............................................................................................ 54
4.3
DISPLAY FORMULA MATH ................................................................................. 56
4.3.1
Formula Rules........................................................................................... 56
4.3.2
Multi-stream Users ................................................................................... 58
4.3.3
Formula Errors......................................................................................... 58
4.3.4
Formula Operators & Functions .............................................................. 58
4.3.5
SOME SUPPLIED CONSTANTS ............................................................. 60
4.3.6
Display Formula Math Editor .................................................................. 60
4.3.7
Display Function Math Editor .................................................................. 61
4.3.8
Client Processing ...................................................................................... 63
4.3.8.1 Notes & Clarifications .......................................................................... 66
4.3.9
Double Precision Tags.............................................................................. 68
4.4
DISPLAY WIDGET DLL RULES .......................................................................... 70
4.4.1
API Calls................................................................................................... 71
4.4.2
STRUCTURE mathdllpassinfotype ........................................................... 72
4.4.3
DLL Call Process...................................................................................... 75
4.5
HARDCOPY ........................................................................................................ 75
5
GETTING STARTED ............................................................................................ 76
5.1
5.2
6
QUICK REVIEW .................................................................................................. 76
BEGIN THE PROCESS OF USING THE LDPS CLIENT ........................................... 77
APPENDIX.............................................................................................................. 79
6.1
THE MEASUREMENT CALCULATOR.................................................................... 79
6.2
THE LINK BUDGET CALCULATOR ...................................................................... 81
6.3
THE NETWORK WIZARD .................................................................................... 81
6.4
THE MEASUREMENT CONVERTER ...................................................................... 83
6.5
THE LDPS ARCHIVE STRIPPER UTILITY ............................................................ 84
6.6
LDPS IMPORT DATABASE ................................................................................. 85
6.7
CHAPTER 8 BUS MONITOR ................................................................................. 85
6.7.1
Chapter 8 Bus Monitor Debug Options .................................................... 88
6.7.1.1 Stream Control ...................................................................................... 89
6.7.1.2 Decoder Options ................................................................................... 89
6.7.1.3 Debug Logging Options........................................................................ 89
6.7.1.4 Debug Logging Isolation ...................................................................... 89
6.7.2
Notes about Chapter 8 Bus Monitor Usage.............................................. 90
6.8
THE MAP WIDGET ............................................................................................. 91
6.8.1
Capabilities ............................................................................................... 91
6.8.2
Images ....................................................................................................... 92
6.8.2.1 Map Images........................................................................................... 92
U0990102
Lumistar, Inc.
Page iv
11/20/2006
Lumistar Data Processing System (LDPS)
Technical Manual
Part-2
Client Application
6.8.2.2 Waypoint Images .................................................................................. 93
6.8.2.3 Moving Target Images.......................................................................... 93
6.8.3
Map Functions .......................................................................................... 94
6.8.4
Earth Model .............................................................................................. 95
6.8.5
Map Widget Properties ............................................................................. 96
6.8.5.1 World View Tab ................................................................................... 96
6.8.5.2 Map Tab ................................................................................................ 97
6.8.5.3 Caption Tab........................................................................................... 98
6.8.5.4 Data Panel Tab...................................................................................... 99
6.8.5.5 Waypoints Tab .................................................................................... 100
6.8.5.6 Moving Targets Tab............................................................................ 102
6.8.6
Map Widget Glossary ............................................................................. 104
U0990102
Lumistar, Inc.
Page v
11/20/2006
Lumistar Data Processing System (LDPS)
Technical Manual
Part-2
Client Application
List of Tables
Table 3-1 Keyboard Shortcuts .......................................................................................... 50
Table 4-1Arithmetic Operators & Functions .................................................................... 58
Table 4-2 Exponent & Log Functions .............................................................................. 59
Table 4-3 Trig Functions .................................................................................................. 59
Table 4-4 Arithmetical Operations ................................................................................... 59
Table 4-5 Bitwise Operators & Functions ........................................................................ 59
Table 4-6 Angle Functions................................................................................................ 60
Table 4-7 Special Solve Flag - Byte Order Change.......................................................... 65
Table 6-1 Map Widget Distance Functions ...................................................................... 94
Table 6-2 Map Widget Angular Functions ....................................................................... 95
List of Figures
Figure 1-1 Examples of Client Display Widgets ................................................................ 9
Figure 1-2 More Display Widget Examples ....................................................................... 9
Figure 2-1 LDPS Client/Server Architecture.................................................................... 12
Figure 3-1 The LDPS Client Window (Idle State, No Projects Loaded).......................... 13
Figure 3-2 Display Page & List File Dialog Windows..................................................... 15
Figure 3-3 Parameter Database List.................................................................................. 16
Figure 3-4 Derived Parameter List ................................................................................... 17
Figure 3-5 Function Parameter List .................................................................................. 17
Figure 3-6 Client Server -Control Pop-Up Windows ....................................................... 17
Figure 3-7 Serial Card Data Display................................................................................. 18
Figure 3-8 Card Status Display (LS-50) ........................................................................... 18
Figure 3-9 Stream Manager Window ............................................................................... 19
Figure 3-10 Embedded Audio/Video Manager................................................................. 19
Figure 3-11 LDPS Error Log Display Window................................................................ 19
Figure 3-12 Display List Editor Window ......................................................................... 20
Figure 3-13 Derived Parameter List ................................................................................. 22
Figure 3-14 Function Parameter List ................................................................................ 22
Figure 3-15 Client Options Window - Directory Tab....................................................... 25
Figure 3-16 Client Options - Operations Tab ................................................................... 27
Figure 3-17 Client Options - Utility Tab .......................................................................... 29
Figure 3-18 An Example of a Client Display Page........................................................... 30
Figure 3-19 An Example of a Client Display List ............................................................ 31
Figure 3-20 Display Page "Quick Menu" ......................................................................... 31
Figure 3-21 An Example Display Widget With Pop-up Menu......................................... 36
Figure 3-22 Alpha Numeric List - Text Widget ............................................................... 38
Figure 3-23 Time Display - Text Widget ......................................................................... 38
Figure 3-24 Scrolling Stack - Text Widget....................................................................... 38
Figure 3-25 7-Segment Display - Text Widget................................................................. 39
Figure 3-26 ASCII Text Widget (with embedded 7-segment) ........................................ 39
U0990102
Lumistar, Inc.
Page vi
11/20/2006
Lumistar Data Processing System (LDPS)
Technical Manual
Part-2
Client Application
Figure 3-27 Altimeter Widget (Instruments) .................................................................... 40
Figure 3-28 HSI Display Widget & Editor (Instruments) ................................................ 40
Figure 3-29 Artificial Horizon Widget (Instruments)....................................................... 41
Figure 3-30 Rate of Climb Widget (Instruments)............................................................. 41
Figure 3-31 Odometer Widget (Instruments) ................................................................... 42
Figure 3-32 XY Plot Widget (History Plots) .................................................................... 42
Figure 3-33 FTT Plot Widget (History Plots)................................................................... 43
Figure 3-34 Strip Chart Widget (History Plots)................................................................ 43
Figure 3-35 Angle Gauge Widget (Gauges/Charts).......................................................... 44
Figure 3-36 Linear Gauge Widget (Gauges/Charts)......................................................... 44
Figure 3-37 Multi-Bars Widget (Gauges/Charts) ............................................................ 45
Figure 3-38 Tank Widget (Gauges/Charts)....................................................................... 45
Figure 3-39 Pie Chart Widget (Gauges/Charts)............................................................... 45
Figure 3-40 LS-22 Widget (Special Device) .................................................................... 46
Figure 3-41 Properties Editor (Spreadsheet Widget)........................................................ 47
Figure 3-42 Enunciator Panel Widget............................................................................... 48
Figure 3-43 Stopwatch Widget ......................................................................................... 48
Figure 3-44 An Example of the Map Widget ................................................................... 49
Figure 4-1 Widget Editor (Artificial Horizon).................................................................. 51
Figure 4-2 Widget Appearance Editor (Artificial Horizon) ............................................ 53
Figure 4-3 Widget Trigger Editor (Artificial Horizon)..................................................... 55
Figure 4-4 Display Formula Editor Window .................................................................... 61
Figure 4-5 Display Function Editor Window ................................................................... 63
Figure 6-1 The RF Tab ..................................................................................................... 79
Figure 6-2 The Numbers Tab............................................................................................ 79
Figure 6-3 The Math/Trig Tab.......................................................................................... 80
Figure 6-4 The Time/Date Tab ......................................................................................... 80
Figure 6-5 The WG 48 Tab............................................................................................... 80
Figure 6-6 The Misc Tab .................................................................................................. 81
Figure 6-7 The PCM Data Tab ......................................................................................... 81
Figure 6-8 Tools → Link Budget Calculator.................................................................... 81
Figure 6-9 Network Wizards' Help Screen ....................................................................... 82
Figure 6-10 Tools → Measurement Converter................................................................. 83
Figure 6-11 Tools → LDPS Archive Stripper .................................................................. 84
Figure 6-12 Chapter 8 Bus Monitor Window ................................................................... 87
Figure 6-13 Chapter 8 Software Decommutator Logging Options Window................... 89
Figure 6-14 Map Widget Properties – World View Tab .................................................. 97
Figure 6-15 Map Widget Properties - Map Tab................................................................ 98
Figure 6-16 Map Widget Properties - Caption Tab .......................................................... 99
Figure 6-17 Map Widget Properties - Data Panel Tab ................................................... 100
Figure 6-18 Map Widget Properties - Waypoints Tab.................................................... 101
Figure 6-19 Map Widget Properties - Moving Targets Tab ........................................... 102
U0990102
Lumistar, Inc.
Page vii
11/20/2006
Lumistar Data Processing System (LDPS)
Technical Manual
1
Part-2
Client Application
Introduction
1.1 General
The Lumistar Data Processing System (LDPS) was developed out of a need to replace
outdated and obsolete data collection software based on the DOS operating systems. The
technology behind data acquisition is continually changing and evolving, but the
techniques employed in displaying the data has not. Most users do not change the way
they look at their data as often as they change the hardware that acquires it. For this
reason, the LDPS application is broken up into two programs, the Lumistar Server and
the Lumistar Client. The server program collects data from various sources, archives it,
arranges the data into a normalized format, and then passes the data on to the client. As
new technologies are developed for collecting data, only the server program need be
modified. The client application, which is the primary focus of this document, is
essentially a data presentation program, with software hooks to allow new display and
processing routines to be added by the user.
LDPS can acquire and process information from up to twelve data streams. Processing
can aggregate data from any combination of individual streams. Each hardware device
will have one or more streams associated with it. The streams include both data and status
information for the device. The user may monitor device specific parameters such as
hardware status, hardware mode, signal strength, etc. For example, a stream collecting
PCM data from a decommutator will receive data from a bit synchronizer, which in turn
U0990102
Lumistar, Inc.
Page 8
11/20/2006
Lumistar Data Processing System (LDPS)
Technical Manual
Part-2
Client Application
gets data from a receiver, that in turn receives a signal from a diversity combiner, etc.
These hardware devices all belong to the same data stream and the status of this hardware
can be monitored as part of the stream.
The LDPS client application provides the user with a wide variety of graphical display
elements called “widgets.” A few examples of these display widgets are shown in
Figure 1-1 below. Using these widgets, the user may build up more complex data
visualization displays called, “pages.”
Figure 1-1 Examples of Client Display Widgets
It is not possible for Lumistar to fully anticipate all user requirements, thus the LDPS
application is designed to allow users to implement their own display and analysis
routines. If for example, a new display widget is required and not in the widget gallery,
the user may write their own custom display widget, or wrap a third party widget into the
program. If the user has a different way of collecting data, or an unconventional source of
data, Lumistar can investigate, upon request1, the possibility of adding a new data
collection routine to the server program, without affecting the client program. The user
can also add new data collection routines.
Figure 1-2 More Display Widget Examples
LDPS is designed to be extremely easy to use for anyone familiar with any type of
display system. This manual is mainly intended for users new to the data collection and
display community, and for those who wish to write their own data processing and/or
display widget routines.
1
Contact the factory with your specific requirements.
U0990102
Lumistar, Inc.
Page 9
11/20/2006
Lumistar Data Processing System (LDPS)
Technical Manual
1.2
Part-2
Client Application
Manual Format and Conventions
This manual contains the following sections:
Chapter 1 Introduction
Chapter 2 The LDPS Client Program
Chapter 3 The Client Program’s GUI
Chapter 4 Widget Properties
Chapter 5 Getting Started
Chapter 6 Appendix
Throughout this document, several document flags will be utilized to emphasis warnings
or other important data. These flags come in three different formats: Warnings, Cautions,
and Information. Examples of these flags appear below.
1.1 Proficiency
The best way to really get comfortable with the LDPS system is to use it. Experiment,
create several projects, large and small, slow and fast. Create several displays. Test the
system with the various projects provided with the installation to see where any
limitations are. It is recommended that the user read the entire manual, at least once,
cover to cover, to get a thorough understanding of the system. There is no real order it
must be read either, each of the chapters and major sections are fairly self-contained.
U0990102
Lumistar, Inc.
Page 10
11/20/2006
Lumistar Data Processing System (LDPS)
Technical Manual
2
Part-2
Client Application
The LDPS Client Program
2.1 Theory of Operation
The primary functions of the client include collecting raw data from the server, and
manipulating and displaying the data via display pages (collections of individual display
widgets). As a part of this process, the client checks & performs trigger functions on the
processed and displayed data. The client also archives any processed data selected by the
user, as well as displaying the data on one or more display pages.
2.1.1 Data Collection
The server application collects data from external sources such as receivers and
decommutators, and feeds this raw data on to one or more clients via a shared memory or
network. The client picks up the raw data and begins processing. There can be a
maximum of twelve streams of each type of data (Serial and Status) that can come from
the server for processing by the client.
Within the client, the received data is distributed to a respective functional manager for
further processing. These managers provide support for specific data types such as
embedded video, embedded audio, embedded time, hardware device status, as well as
serial processes. The data is also stored in its raw form in a CVT (current value table),
and can be displayed in a variety of formats, depending on the type of data.
2.1.2 Embedded Managers
The embedded managers (Video, Audio, Time) collect the raw data, extract what is
needed from the respective serial stream, and then process the data. The processing might
include playing the audio or video, and storing the embedded time for further use on a
display widget.
2.1.3 Data Processing Manager
The data processing manager performs the bulk of the computational tasks in the client
by receiving selected data from the data collection manager. Only selected parameters
from the serial database of parameters are processed. All of the Function and Derived list
parameters are processed, and no processing is required on status parameters, as they are
already in their processed form received from the Server.
On the client, the processing of data occurs as fast as the computer can handle. In this
context, it should be stated that processing the data is not the same as displaying the data.
Data received from the server often arrives in more than a single frame buffer. Therefore,
each parameter to be processed gets dealt with and the result is fed into a FIFO2 buffer.
Afterwards, the display manager pulls the appropriate sample out of the FIFO for display.
This method allows processing of supercommutated data to occur in live mode (real time,
relatively speaking).
2
FIFO – First In, First Out.
U0990102
Lumistar, Inc.
Page 11
11/20/2006
Lumistar Data Processing System (LDPS)
Technical Manual
Part-2
Client Application
Prior to processing, fetching the data from the correct location is done in two ways, both
of which being closely coupled to the parameter database. For normal PCM streams, the
data is collected from the CVT buffer that came from the server. For other type streams,
the CVT buffer is sent to a user selected software decommutator, where the raw word
value for each of the processed parameters is provided.
The data processing manager works closely with the display manager to administer the
list of parameters to be processed. This includes how to process and display the
parameter, as well as how the processing is triggered. Once the parameter is processed for
each minor frame in the buffer, it is sent to the archive manager for each respective
display page.
2.1.4 Function & Derived Parameter Managers
The parameter database for serial data streams handles ninety percent of the processing
setup for user parameters. The other ten percent are special processing requests such as
performing mathematical operations on parameters from different streams, converting
radians to degrees, performing large concatenations, solving complex equations, etc.
When the client loads the derived and function parameter lists, all of the parameters in the
list are processed. The rate at which the parameters are processed is adjustable.
2.1.5 Display Manager
The display manager handles all of the display functions. A display page is made up of a
group of widgets, with each widget containing one or more parameters. Thus, the list of
processed parameters is made up only of the parameters identified in the widgets.
The widget properties for the parameter(s) in the widget are edited for presentation as
well as checking and trigger functions. The parameters used by the widget are tied to the
database that is loaded; depending on the stream they came from. If the parameter is from
a serial stream, then the project must be loaded, or the parameter is set invalid. If the
parameter is from a status stream, then the parameter is assumed valid.
Data Collection
Devices
Server Program
Network or Shared Memory
Client Program
Output Devices
Disk
Figure 2-1 LDPS Client/Server Architecture
U0990102
Lumistar, Inc.
Page 12
11/20/2006
Lumistar Data Processing System (LDPS)
Technical Manual
3
Part-2
Client Application
The Client Program’s Graphical User Interface (GUI)
The client program collects data from the server and processes data of interest for display
to the user. On a powerful processor, the client also has enough power to allow output of
data to external hardware devices if required. The client application is designed to be
expanded easily by the user and to be intuitive to the user.
The displays on the client only process data sent from the server, and the server only
sends serial data when a project is loaded. Therefore, if the project is unloaded on the
server, and there are client displays open, then the user will be prompted to save any open
pages and will be alerted that the server is unloading. Once the prompt is acknowledged,
all client displays will be closed. Non-serial data can be processed without a project being
loaded.
To invoke the LDPS client, the user may click on the, “Start Client” command in the
main server menu (red oval below), or, the user may start the client by double clicking on
the client’s icon from the Windows program manager. Either way, the main client
window shown in Figure 3-1 will be displayed.
The LDPS client GUI is composed of four sections as described in the following
paragraphs.
The Caption section at the top of the window displays the name of the program and the
current version. The caption section also contains the standard window controls to
minimize, maximize, and close the window / program.
Figure 3-1 The LDPS Client Window (Idle State, No Projects Loaded)
U0990102
Lumistar, Inc.
Page 13
11/20/2006
Lumistar Data Processing System (LDPS)
Technical Manual
Part-2
Client Application
The Menu section, below the caption, has seven commands that will be described in
detail in the numbered paragraphs that follow. Below the menu section is the Server
Information area that will be described in detail beginning in paragraph 3.7 on page 22.
3.1 System Menu
The system menu shown right has three commands
including: Options, When to Process Derived
Functions, and Do Supercom Processing. The
options command (only available if a project is not
loaded) enables the user to set up the client application
as described in paragraph 3.8 on page 24. The When to Process Derived Functions
command overrides the settings in the client options and lets the user determine when to
process data for derived and function parameters. This command has two options, as
shown below that include: On First Valid Stream, and Use Throttle.
The On First Valid Stream command only applies to multiple stream projects where there
are formulas or functions that use data from multiple streams. In this scenario, the issue
of when to start process a formula or function arises, especially if the streams are at
different rates. When this command is invoked, the formulas and functions are processed
when the first stream gets new data. The Use Throttle command allows the user to
manually set the rate to process at (up to 500
Hertz). Note: it is suggested that stream 1 be
the fastest stream. If stream 1 is invalid, then
it will process data on the interrupt from the
first valid stream.
If the processor of the machine that the client application is running on has sufficient
horsepower, the user may enable supercom processing of live data by clicking the Do
Supercom Processing command.
3.2 Project Menu
The project menu has two commands: Load, and Close. Depending on when the client
program was started and the state of the loaded project on the server, the user may have
to manually connect to the server, or load the project. The user may not want to be
connected to the server, so one disconnects by clicking the close command.
3.3 Display Menu
The display menu shown right has three commands:
Page, List, and New Page. The Page command allows
the user to select the file name of an individual client
display page as shown left in Figure 3-2 below. Recall
that a client page is a collection of one or more display
widgets. The List command allows the user to select the file name of a list of client pages
as shown right in Figure 3-2 below. The list of pages is a graphical object with multiple
U0990102
Lumistar, Inc.
Page 14
11/20/2006
Lumistar Data Processing System (LDPS)
Technical Manual
Part-2
Client Application
tabs corresponding with individual client pages. The New Page command allows the user
to create a new empty display page.
Figure 3-2 Display Page & List File Dialog Windows
3.4 View Menu
The view menu shown right has five sub-menu
groups that allow the user to view other windows
of data that are not normally displayed. The first
sub-menu group includes the Serial DBase List,
the Derived DBase List, and the Function DBase
List.
The Serial DBase List, shown in Figure 3-3 on
page 16, allows the user to view a list of all serial
stream parameters from all the streams loaded in
the project. There is a Find button for those with large databases. This allows one to
search for a specific parameter name. Note: the spelling must be correct. If the parameter
name is found, the first row of the list will start with the selected parameter name.
The Derived DBase List, shown right in Figure 3-4 on page 17, allows the user to view a
list of all derived (formula) parameters from all the streams loaded in the project. If a
project is not loaded, then an empty derived parameter list, as shown left in Figure 3-4,
will be displayed. Right click the mouse to invoke the menu shown.
The Function DBase List, shown right in Figure 3-5 on page17, allows the user to view a
list of all function parameters from all the streams loaded in the project. If a project is not
loaded, then an empty derived parameter list, as shown left in Figure 3-5, will be
displayed. Right click the mouse to invoke the menu shown.
The second sub-menu group includes the Card Serial Data, and Card Status Data
commands. Invoking the Card Serial Data command will produce a list of serial device
types installed in the system (LS-50, 1553, etc.). For each device type, the user may then
select a specific card number. The resulting window, an example of which is shown in
Figure 3-7 on page 18, provides a real-time updating view of the raw data coming from
U0990102
Lumistar, Inc.
Page 15
11/20/2006
Lumistar Data Processing System (LDPS)
Technical Manual
Part-2
Client Application
the selected serial device. There will be one such display for each stream. This command
functions in both live and playback modes, and allows hardcopy and ASCII snap shots of
the frame data. Individual words may be selected for display in the Quick List (shown
below left) by double clicking the desired word from the Frame List display (shown
below right). The selective word display, and the Frame List display, may individually be
paused by clicking the Pause button. Click Pause again to resume the real-time update of
the display. The Frame List, and Quick List commands allow the user to specify the
number type for the display. The available number types include: decimal, HEX, Binary,
Invoking the Card Status Data command will
produce a list of status device types installed
in the system (basically all cards supplied by
Lumistar). For each device type, the user may
then select a specific card number. The
resulting window, an example of which is
shown in Figure 3-8 on page 18, provides a
real-time updating view of the status data
coming from the selected device. There will
be one such display for each card in the
system. The status data show in this display is
the same data available to the clients for
display as well.
The third sub-menu group includes the
Stream Manager, and the Emb Audio/Video
Manager commands. Invoking the Stream
Manager command will produce a list of all
devices installed in the system, and what
streams are associated with them. The
resulting window, an example of which is
shown right in Figure 3-9 on page 19,
provides a list of the twelve streams, and what
serial and no-serial devices are assigned to
them. By invoking the Emb Audio/Video
Figure 3-3 Parameter Database List
Manager, shown in Figure 3-10 on page19,
the user can configure and control the extraction of embedded audio and/or video within
a stream. Note: changes that override the project settings may be made using this
command.
The forth and fifth sub-menu group includes the Server Controls, and the Error Logs
commands. The Server Control pop-up windows shown in Figure 3-6 on page 17 allow
the user to control the mode functions of the server application from the client
application.
U0990102
Lumistar, Inc.
Page 16
11/20/2006
Lumistar Data Processing System (LDPS)
Technical Manual
Part-2
Client Application
Figure 3-4 Derived Parameter List
If the server is in Live mode, then the remote client controls for the server will appear as
shown left in Figure 3-6 on page 17. This control allows the user to start and stop the
archive recording, and to bump the run number (depending on the archive mode options
selected). If the server is in Playback mode, then the remote client controls for the server
will appear as shown right in Figure 3-6. This control allows the user to start and stop the
playback function on the server.
Figure 3-5 Function Parameter List
Figure 3-6 Client Server -Control Pop-Up Windows
U0990102
Lumistar, Inc.
Page 17
11/20/2006
Lumistar Data Processing System (LDPS)
Technical Manual
Part-2
Client Application
Invoking the Error Logs command allows the user to view all of the error logs generated
by the various programs and device DLLs. The resulting display, an example of which is
shown in Figure 3-11 on page 19, is not exclusively error logs, but contain status and
other information as well.
Figure 3-7 Serial Card Data Display
Figure 3-8 Card Status Display (LS-50)
U0990102
Lumistar, Inc.
Page 18
11/20/2006
Lumistar Data Processing System (LDPS)
Technical Manual
Figure 3-9 Stream Manager Window
Part-2
Client Application
Figure 3-10 Embedded Audio/Video Manager
Figure 3-11 LDPS Error Log Display Window
U0990102
Lumistar, Inc.
Page 19
11/20/2006
Lumistar Data Processing System (LDPS)
Technical Manual
Part-2
Client Application
3.5 Edit Menu
The edit menu shown right has three commands:
Display List, Derived List, and Function List. The
Display List editor shown in Figure 3-12 below allows
the user to view and edit a list of display pages that are
included in a display set. Recall that a client display
page is a collection of one or more display widgets. The display set is a graphical object
with multiple tabs corresponding with individual client pages.
3.5.1 Display List Editor Window
The display list editor window shown in Figure 3-12 below allows the user to view a list
of all display pages that make up a display set, and to set the functional options for each
display pages on an individual basis. To view the pages that make up a display set, click
the Recall button and enter the name of the display set from the file browser. After all
changes have been made, save the changes by clicking the Save, or SaveAs button. The
functional options that may be configured for each page are described as follows.
Enable Classification Bars – Some displays will require the classification level of the
data to be displayed. If this check box is enabled, a bar will be displayed at the top and
bottom of the display page depicting the classification level set by the user (or
automatically set by the data dictionary and the highest level of classification of the
parameters processed on the display page).
Enable Event/Printer Log – This
option enables the event log and
printer log. Triggers events may be
output to this log. If this option is
not set, then no events will be
recorded, and no trigger events will
be output to a printer.
Enable Triggered Hardcopy –
This option enables or disables the
Auto Hardcopy event action defined
for the parameter (if one was
defined). Select this option if
hardcopies are not required.
Selecting this does not change the
parameter event defined in the
widget.
Figure 3-12 Display List Editor Window
U0990102
Lumistar, Inc.
Page 20
11/20/2006
Lumistar Data Processing System (LDPS)
Technical Manual
Part-2
Client Application
Enable Triggered Audio – This option enables or disables the Audio event action
defined for the parameters (if one is defined). Sometimes one may not wish to have the
audio alarm go off. This option allows the user to control the audio while at the same
time leaving unchanged the parameter event defined in the widget(s).
Enable Triggered Archive Control – This option enables or disables the Control
Archive Output Flag. If not enabled, then archiving is controlled via the normal archive
button. If this option is enabled, and the archive button is on, then archiving to the file
will only occur if a (any or all) parameter is triggered and the trigger action selection
includes the Control Archive Output option. Note; there can be multiple parameters that
have this trigger action. If any are triggered, then output to the archive file will occur,
otherwise IT WILL NOT.
Auto Hide Top Controls – If the Auto Hide option is enabled, the top controls bar will
be invisible until the mouse cursor is at the top of the screen. When the mouse cursor
leaves the control area, the control area will become invisible again. If this option is not
enabled, the top control bar will always be visible.
Auto Hide Event Log – The display page may maintain an event log. Entries are made
in the log by triggering parameters (when the event log option is enabled for the
parameter). The user may also enter additional information in the log when the event is
triggered. This option enables the display of the event log (or hides it). If enabled, the
event log is displayed at the bottom of the display page. There are controls on the event
log to allow one to clear the event log and to save the event log to a file. If the event log
is activated, and the auto hide option is enabled, then the event log will be invisible until
the mouse cursor is located at the bottom of the screen. When the mouse cursor leaves the
event log area, the event log area will again become invisible.
Set Classification - This option enables the user to set the classification of the display. If
Auto is selected from the list box, then the program sets the classification to the highest
level defined by all of the parameters on the page. Otherwise, the user may select any of
the other classification levels to override the classification set by any of the parameters.
Display Update Rate – This list box allows the user to change the update rate of the
display. The default is 10 Hertz (adequate for most displays). The update rate is
adjustable from 1 to 30 Hertz. Display graphics are CPU expensive. If the CPU load
exceeds 75% (40% on dual virtual processors), one should decrease the display update
rate to avoid loosing any of the processed parameters.
3.5.2 Derived List Editor Window
The Derived List editor shown left in Figure 3-13 on page 22 allows the user to view a
list of all derived (formula) parameters from all the streams loaded in the project. If a
project is not loaded, then an empty derived parameter list, as shown left in Figure 3-4 on
page 17 will be displayed. Right click the mouse to invoke the menu shown.
U0990102
Lumistar, Inc.
Page 21
11/20/2006
Lumistar Data Processing System (LDPS)
Technical Manual
Part-2
Client Application
3.5.3 Function List Editor Window
The Function List editor shown right in Figure 3-14 below allows the user to view a list
of all function parameters from all the streams loaded in the project. If a project is not
loaded, then an empty derived parameter list, as shown left in Figure 3-5 on page17, will
be displayed. Right click the mouse to invoke the menu shown.
Figure 3-13 Derived Parameter List
Figure 3-14 Function Parameter List
3.6 Tools Menu
The Tools menu, shown right, offers a variety
of handy utilities that are easily accessed via
this menu. These tools include: a Link Budget
calculator, Measurement Calculators,
Measurement Converter, the Network
Wizard, LDPS Archive Stripper, LDPS
Parameter Database Import Utility, and an
IRIG-106 Chapter 8 Bus Monitor. Note for Link Budget and Measurement Calculators,
the user may add other tools simply by placing an exe file into the User Tools sub
directory. For more information on the individual tools, please refer to the Appendix of
this document beginning on page 79.
3.7 Server Information Section
Below the menu section of the client window is the information section (shown below –
red rectangle). The information section presents a variety of statistics about the server and
client programs. The server information section has several subsections including; Project
State, Server Information, and Stream Information. The particulars are described as
follows:
Project State
Project Name – The name of the project loaded on the client is displayed. If no project is
loaded, then “NOT LOADED: is displayed.
U0990102
Lumistar, Inc.
Page 22
11/20/2006
Lumistar Data Processing System (LDPS)
Technical Manual
Part-2
Client Application
Project Mode – The project mode information comes from the server application (while
running). Either LIVE or PLAYBACK mode will be displayed. The client application has
no control over the mode.
Server Info
System Time - The numeric time value the system is using is displayed. The client
application has no control over the time displayed. If the server application is not
running, then the system time comes from the CPU clock (and is so stated next to the
time).
Server Mode – The server application has several states of operation, including: loading,
unloading, running normal (project loaded), idle (nothing going on), shutting down, and
off.
Packet Count – The packet count display is a simple sanity check for the client/server
communication path. If the count number does not increment, then there is no
communication with the server.
Overflow Count – This display counts the number of maintenance packets that were lost
from the server. If the counter continually increments, then there is most likely a problem
with the network (under light traffic loads). If graphics intensive displays are in use, this
may also cause the count to increment. If data from the maintenance thread is being lost,
then the system time and the status of the various streams are most likely to be affected.
Stream Information
Master Shutdown – This button is only available if the client is on the same machine as
the server. If this button is clicked, it will shut down the client AND the server. Use this
button with caution, especially if on a network. The master shutdown will not close the
backup server as well as the primary server. Only the server with the client that pressed
this button will shut down.
The Project Loaded section is only visible if a project is loaded on the client. This section
gives more information that is only valid if a project is loaded and allows some additional
control over the processing.
U0990102
Lumistar, Inc.
Page 23
11/20/2006
Lumistar Data Processing System (LDPS)
Technical Manual
Part-2
Client Application
Stream Time – For each stream processed by the client, a stream time stamp is extracted
and displayed. If a stream time is being used for system time, then this will be indicated
via an arrow pointing to the stream time.
Data Overflow – For each stream on the client, if the client could not get all of the data
processed before the next buffer arrived from the server, then the overflow counter will
increment. If the overflow counter is continually incrementing, then action is needed to
relieve the stress on the server.
Data Rate – For each stream on the client, the frame rate of data being received from the
server is displayed.
When to Process Data – As discussed in paragraph 3.1 on page 14, the decision of when
to process data for multiple streams can vary, depending on the project. The client
options discussed in paragraph 3.8.3 on page 26, allows the user to choose when to
process. The user may override the option setting by clicking the desired button here. If
the user selected the Use Throttle command from the When to Process Derived Functions
menu (System→ When to Process Derived Functions→ Use Throttle), then the throttle
slider control will become visible for adjustment.
Client Data Overflow – Not to be confused with the Data Overflow counter
(maintenance packets) described previously, the Client Data Overflow counter tallies the
number of times the client could not finish processing the data before new data arrived
from the server. If this counter continues to increment, action is needed to relieve the
stress on the client machine. The easiest and quickest way to remedy this condition is to
slow down the display update rate of the displays.
3.8 Client Options
There are numerous options the user can configure for the client. To get to the options
menu (System → Options), a project must NOT be loaded. The client options window
currently has three tabs to configure including: Directory, Operations and Utility.
Some options are also used by the server (like color selections, and directories), and the
server options file is shared by the device applications. The client(s) will share data if, the
client options are set to look at a specific server. Note. Although listed as
“Server8xOptions.opt” for the file name, there is only one options file for the server,
client, and hardware applications.
3.8.1 A Helpful Hint for Network Users
For network users, filling in the options for each machine can be inconvenient. If the user
configures the options for one machine, then the “Server8xOptions.opt” file may be
copied from the LDPS\SYSTEM\OPTIONS directory to the same directory on all the
other client machines. The user may then go through and modify only the client machines
that need to be different.
U0990102
Lumistar, Inc.
Page 24
11/20/2006
Lumistar Data Processing System (LDPS)
Technical Manual
Part-2
Client Application
3.8.2 Directory Tab
For non-network users, the directory tab shown in Figure 3-15 below is handy to have for
administration purposes. The directory tab is most important for network users. Here, the
user tells the client application where to get the files it needs to run projects. For network
users, one must use the file browser and go through the Network Neighborhood to point
to the network machine and directory to use. For non-network users, one may also go
through the Network Neighborhood if the files are on a remote computer.
Figure 3-15 Client Options Window - Directory Tab
Server – This path/name points to where the server program is located. The user may
switch servers on the network, but in doing so; the options file for that specific server will
be used. Without pointing at a valid LDPS server, the client will not get data.
The rest of the directories described in the following paragraphs are of administrative
concern and can be mixed and matched to be different or the same on each client,
depending on user requirements.
Enumeration Sets – Enumerations for widgets are stored and recalled from this location.
Event Logs – Client event logs from display pages are stored and recalled from this
location. It is suggested that these event logs be keep on the local machine.
U0990102
Lumistar, Inc.
Page 25
11/20/2006
Lumistar Data Processing System (LDPS)
Technical Manual
Part-2
Client Application
Display Archive – If processed data is archived, it is stored and recalled from this
location. It is suggested that the archived data be keep on the local machine.
Functions – Any user written functions for display page widgets are stored and recalled
from this location. It is suggested that these functions be keep on the local machine.
Screen Captures/Hardcopy – Any hardcopies produced are stored and recalled from
this location. Hardcopies are not really “hard copies” anymore. Instead they are either
BMP or JPG image files. It would be unwise to tie up the computer to actually make a
hardcopy printout while running a test because one might have to wait a minute or more
before getting control back from the printer. If real hardcopy printouts are needed, either
make them post test, or, copy the images to another machine and make the hardcopies
from that machine. It is suggested that these image files be keep on the local machine.
Client Displays – The actual display files are stored and recalled from this location. The
suggest location for these files is highly dependant on the situation for the system and for
the individual clients. It may be advantageous for some clients to get their displays from
the same location, while other clients get their displays from a different place.
Display Backgrounds – The display backgrounds are BMP image files that are stored
and recalled from this location.
Map Displays – Display information for maps widgets are stored and recalled from this
location. It is suggested that these map displays be keep on a remote shared drive.
WAV Files – Windows WAV audio files for widgets to play are stored and recalled from
this location. It is suggested that these audio files be keep on a remote shared drive.
Formula Lists – The derived formula and function DLL lists are stored and recalled
from this location. It is suggested that these formula list files be keep on a remote shared
drive.
3.8.3 Operations Tab
The operations tab shown in Figure 3-16 on page 27 allows the user to configure many
specific functional behaviors related to the operation of the client application. These tasks
include processing, archiving, and alarm functions and are described in detail in the
following paragraphs.
Process Derived On First Valid Stream - This applies only to multiple stream projects
where there are formulas or functions that use data from multiple streams. In this
scenario, the issue of when to start process a formula or function arises, especially if the
streams are at different rates. When this option is checked, the formulas and functions are
processed when the first stream gets new data. The Use Throttle command (see paragraph
3.1 on page 14) allows the user to manually set the rate to process at (up to 500 Hertz).
U0990102
Lumistar, Inc.
Page 26
11/20/2006
Lumistar Data Processing System (LDPS)
Technical Manual
Part-2
Client Application
Note: it is suggested that stream 1 be the fastest stream. If stream 1 is invalid, then it will
process data on the interrupt from the first valid stream.
Write Tag Timestamps in Archive File – When archiving data from a display page,
normally one only gets the system time stamp once for each parameter in the display. If
this check box is selected, then the location of the parameter timestamp will be next to
the data value in the archived file. This option is quite useful for playback, especially
with supercom data. For formulas and functions, the timestamp used is the system time.
Figure 3-16 Client Options - Operations Tab
Allow Server Shutdown – This can be a dangerous option. If this option is selected,
AND the corresponding server option is also enabled, then a Master Shutdown button
(see below) will appear on the main client GUI. Pressing this button will shut down both
the client and server. Use caution with this feature if running on a network.
Perform Stale Data Checks – The parameter database has the capability of checking for
stale data on a parameter basis. We define stale data where the parameter is supposed to
update at a specific rate, but instead is updating at a slower rate. When stale data occurs,
an asterisk is displayed next to the parameter value on the display pages. The stale data
checking is intended mostly for Chapter 8 users, but it can apply to other formats as well.
U0990102
Lumistar, Inc.
Page 27
11/20/2006
Lumistar Data Processing System (LDPS)
Technical Manual
Part-2
Client Application
This option will globally allow the user to turn the stale data checking on or off,
regardless of how the database is configured.
Always Load Project Automatically – When this option is selected, the client, upon
startup, will always load the same project that the server has already loaded. Thereafter,
the user has to manually load and unload the project on the Client. Also, if this option is
selected, the application will continually check and load the project if it is not already
loaded. The check is performed at five-second intervals. This gives enough time to get
into options and reset this in case this feature is not wanted.
Disallow Archives and Hardcopies – If this option is checked, the user will not be
allowed to archive data or make hardcopies.
Alert On Server Project Close – If this option is selected, and a project is loaded and
the server shuts down the project, then the user is alerted with a prompt to save any edited
display pages before the client unloads the same project. This option is normally enabled
on network systems and disabled on stand alone systems.
Embedded Audio Default is Playing – Select this option to automatically start playing
embedded audio. The default is not to automatically select Play.
Embedded Video Windows On Top – Select this option to always have the embedded
video displays appear on top of other displays.
Soft Decom break out audio – Select this option if the user’s software decommutator is
to extract audio data instead of having the program extract them. An example of this use
would be for chapter 8 streams, where the upper 8 bits are decoded bits, and the lower 16
bits are the audio bytes.
Soft Decom break out video – Select this option if the user’s software decommutator is
to extract video data instead of having the program extract them.
3.8.3.1 Startup Section
Load Last Display List – If this option is selected, then when the client program is
started up again, the last valid display list shown will automatically be displayed again.
Load Last Display Page – If this option is selected, then when the client program is
started up again, the last valid display page shown will automatically be displayed again.
Remember Page Size Position – Normally, pages are displayed in 80% of the total
screen real estate when they are called up. If this option is selected, then the size and
position of the page when it was previously saved will be restored when the page is again
recalled.
Disable Network – If this option is selected, then the network will not be used for
communications with the server, even though there may be a network interface card in
U0990102
Lumistar, Inc.
Page 28
11/20/2006
Lumistar Data Processing System (LDPS)
Technical Manual
Part-2
Client Application
the computer the server is running on. Recall that client/server communication may take
place via shared memory, or network. The client program must be restarted in order for
the change to take affect.
Set Windows Application Thread Priority High – Normally, the default for this option
is not checked. In the scenario where the client and server applications are both running
on the same machine, with the machine not being particularly fast, one may notice that
the client is losing data on fast streams. If this occurs, then select the option. This will set
the Windows thread priority for the client application to run in High (the same as the
server). This may resolve some of the data loss issues at the client. The Windows thread
priorities for the applications can be set with the Windows Task Manager, but this option
allows one to change the priority such that the client program will always start up with
the same priority.
Force Single Processor – This option forces the client application to use a single
processor in a multi-processor environment. This can also be accomplished with the task
manager, but this option sets the program to work this same way at each start up (because
processor thread associations no not persist between program restarts).
3.8.4 Utility Tab
The utility tab, shown in Figure 3-17 below, allows the user to assign the keyboard
function keys (F1-F10), and to define the text associated with data classification levels.
The client display function key assignments allow the user to assign function keys (F1 –
F10) to act as shortcuts for the client displays. These F Keys are in addition to the hard
coded keys available via the program. Available functions include:
•
•
•
•
•
•
•
•
•
•
Display Archive
Hardcopy
Unlatch
Freeze/Release
Quick Menu Hide/View
Event Log Hide/View
Ack Audio
Server Archive On/Off
Server Bump Run
Server Playback On/Of
To assign a function key, place
the mouse cursor within the key
functions area and right click. Figure 3-17 Client Options - Utility Tab
Select the desired function from
the list menu and then press the function key that will be associated with the selected
function.
U0990102
Lumistar, Inc.
Page 29
11/20/2006
Lumistar Data Processing System (LDPS)
Technical Manual
Part-2
Client Application
The User Classification Text area allows the user to define/redefine the text associated
with the various data classification levels. To change the text for any of the classification
levels, place the mouse cursor within the text area and right click. Select the desired
classification level from the list menu and then change the text in the resulting dialog
box.
3.9 Display Page
The display page is the primary feature of the client application. The display page
presents data to the user in a wide variety of forms, including both tabular and graphical
modalities. The parameters on the display page are the only parameters that get processed
by the client. The widget’s configuration parameters control both appearance and
processing. The user may create and/or edit the widgets on the display page while data is
running.
3.9.1 Display Page Main Menu
Each display page or display list, like the example shown in Figure 3-18 below, has its
own main menu and controls that are independent of other display pages that may be
active. The user may have up to sixteen (16) display pages visible at a time.
Figure 3-18 An Example of a Client Display Page
U0990102
Lumistar, Inc.
Page 30
11/20/2006
Lumistar Data Processing System (LDPS)
Technical Manual
Part-2
Client Application
In the caption area at the top of the display page are the customary Windows controls
(minimize, maximize, close). In addition, on the left side the System Time is displayed
(updated at a 10 hertz rate independent of the display update rate slider). Also shown is
the name of current Display Page. Next to the caption are status messages for the display
that may be of interest, i.e. Freeze (the display page is frozen). If the display page has
been edited without saving, then the display page name will be prefixed with an asterisk.
For display lists, like the example shown in Figure 3-19 below, the caption area is the
same as a display page caption described. The name of the list is displayed and the name
of the current page is also displayed on the list.
Figure 3-19 An Example of a Client Display List
3.9.2 Quick Menu/Top Controls Area
Under the caption (or at the top of the window if the page belongs to a Display List) is a
bar for the Quick Menu. As shown in Figure 3-20 below, the quick menu allows one to
quickly access some of the controls for the page. The controls on the quick menu are
described in detail in the following paragraphs.
Figure 3-20 Display Page "Quick Menu"
U0990102
Lumistar, Inc.
Page 31
11/20/2006
Lumistar Data Processing System (LDPS)
Technical Manual
Part-2
Client Application
Display Update Rate – This is a slider bar on the left side of the quick menu that
changes the update rate of the display. The default is 10 Hertz (adequate for most
displays). The update rare is adjustable from 1 to 30 Hertz. Note that display graphics are
CPU expensive. If the CPU load exceeds 75% (40% on dual virtual processors), then
decrease the display update rate such that there is no loss of parameter processing.
Open ARC – A button that toggles display page archiving on and off (assuming the
display page archive has been opened).
Hardcopy – A button that makes a hardcopy of the display page. Hardcopies are not
really “hard copies” anymore. Instead they are either BMP or JPG image files. It would
be unwise to tie up the computer to actually make a hardcopy printout while running a
test because one might have to wait a minute or more before getting control back from
the printer.
Unlatch – A button that when pressed, unlatches all parameters that may be latched on
the display due to a triggered event.
Ack Audio – If any parameter triggers an audible alarm sound, then the alarm sound may
be terminated immediately by clicking this button. Quitting the display also ends the
alarm.
Freeze – This button toggles the page between freeze and running. When frozen,
processing will still take place on the parameters, but the displayed values will not
update.
Save and Save As – These buttons allows the display page to be saved.
Translucence – This slider control lets the display page be ‘seen through’ such that one
can see other pages or data behind the display page.
U0990102
Lumistar, Inc.
Page 32
11/20/2006
Lumistar Data Processing System (LDPS)
Technical Manual
Part-2
Client Application
Page Options – There are many more options for the
display page that may not need to be accessed so
quickly. To access these options, either press the
button, or right click in the quick menu area to invoke
the page options popup window shown right. The
same menu can be invoked by right clicking in the
display itself (not a widget).
3.9.3 Page Options
There are fifteen (15) options in the page options menu
shown right that are described in detail in the
following paragraphs.
Enable Classification Bars – For security reasons,
some displays will require the classification level of
the data to be displayed. If this option is enabled, a bar
will be displayed at the top and bottom of the display
page depicting the classification level set by the user (or set automatically by the data
dictionary and the highest level of classification of the parameters processed on the
display page).
Enable Event/Printer Log – This option enables the event log and printer log. Triggers
events may be output to this log. If this option is not set, then no events will be recorded,
and no trigger events will be output to a printer.
Enable Triggered Hardcopy - This option enables or disables the Auto Hardcopy event
action defined for the parameter (if one was defined). Select this option if hardcopies are
not required. Selecting this does not change the parameter event defined in the widget.
Enable Triggered Audio - This option enables or disables the Audio event action
defined for the parameters (if one is defined). Sometimes one may not wish to have the
audio alarm go off. This option allows the user to control the audio while at the same
time leaving unchanged the parameter event defined in the widget(s).
Enable Triggered Archive Control – This option enables or disables the Control
Archive Output Flag. If not enabled, then archiving is controlled via the normal archive
button. If this option is enabled, and the archive button is on, then archiving to the file
will only occur if a (any or all) parameter is triggered and the trigger action selection
includes the Control Archive Output option. Note; there can be multiple parameters that
have this trigger action. If any are triggered, then output to the archive file will occur,
otherwise IT WILL NOT.
Auto Hide Top Controls – If the Auto Hide option is enabled, the top controls bar will
be invisible until the mouse cursor is at the top of the screen. When the mouse cursor
U0990102
Lumistar, Inc.
Page 33
11/20/2006
Lumistar Data Processing System (LDPS)
Technical Manual
Part-2
Client Application
leaves the control area, the control area will become invisible again. If this option is not
enabled, the top control bar will always be visible.
Auto Hide Event Log – The display page may maintain an event log. Entries are made
in the log by triggering parameters (when the event log option is enabled for the
parameter). The user may also enter additional information in the log when the event is
triggered. This option enables the display of the event log (or hides it). If enabled, the
event log is displayed at the bottom of the display page. There are controls on the event
log to allow one to clear the event log and to save the event log
to a file. If the event log is activated, and the auto hide option
is enabled, then the event log will be invisible until the mouse
cursor is located at the bottom of the screen. When the mouse
cursor leaves the event log area, the event log area will again
become invisible.
Page Color – Selecting this option invokes the color picker
window shown right. This option allows the user to set the
background color for each display page.
Set Classification - This option enables the user to
set the classification of the display. If Auto is selected
from the list box, then the program sets the
classification to the highest level defined by all of the
parameters on the page. Otherwise, the user may
select any of the other classification levels to override
the classification set by any of the parameters.
Background Picture – This option allows the user to
select an actual photograph or drawing as a
background image for the display page. This could be
a picture of an aircraft, a drawing, or any other
Windows BMP file. Widgets on the display page are
drawn on top of this picture.
Clear Background Picture – This option removes any background picture that had been
previously selected.
Background Picture Transparent – Using this option, the user can experiment with the
background color and the background picture. When selected, the background color will
show through in certain colors of the background image.
U0990102
Lumistar, Inc.
Page 34
11/20/2006
Lumistar Data Processing System (LDPS)
Technical Manual
Part-2
Client Application
Set All Widgets To Use Stream x – This option
invokes the pop-up window shown right. This feature
allows one to create a single display page for use on a
particular stream. Assume a scenario with two identical
streams and the requirement to show the same data for
both streams. Rather than copying the page to a different
page, and manually editing each parameter in the new
page, this tool can be used to change the stream number
on a global basis. This includes derived parameters (formulas) and functions. Note for
formulas. The user must force parameter names using the full syntax, i.e
N1:PARAMNAME, where N is normal solving and 1 indicates for stream 1. Otherwise,
the formulas will not change with this tool.
Set All Widgets To Use Font x – This option allows the
user to change the font name and font size of all the
widgets on the display page to the selected font name
and size. Note. Some widgets have a fixed font size and
thus will not change.
Clear All Archive Control Triggers – This option will scan all widgets on a page and
clear any parameter trigger actions that are set to Control Archive Output. Use this option
if one can’t remember what widgets have a parameter set with this action.
3.9.4 Display Page Mouse Controls and Menus
The editing of all display widgets begins with the mouse cursor. The
RIGHT mouse button will produce a particular menu, based upon where
one clicks on the page. If one points the mouse at a widget and right
clicks, a menu like the one shown in Figure 3-21 below will appear. If
one is not pointing at a widget, but rather pointing on the display area of
the page, then a menu like the one shown right will appear that pertains to
the display page.
U0990102
Lumistar, Inc.
Page 35
11/20/2006
Lumistar Data Processing System (LDPS)
Technical Manual
Part-2
Client Application
Figure 3-21 An Example Display Widget With Pop-up Menu
Widgets can be move around either by left clicking on the widget and moving it, or by
selecting a group of widgets and moving them all at the same time. To move a group of
widgets, select the group by left clicking on the page above the upper left widget, and
while holding the left button down, drag the mouse to below and right of the lower right
widget, and release the mouse button. A red rectangle around the widgets will result. Left
click inside the red rectangle and move the widgets. To abort the group move, left click
outside the red rectangle. One can also size all the widgets in the group as described
below.
3.9.4.1 Page Mouse Menu
The page mouse menu shown right has eight (8) commands. These
include: Add Widget, Paste Clipboard, Erase Clipboard, Save
Display, Save As, Snap To Grid, Close Archive, and Page Options.
Each command is described in detail in the following paragraphs.
Paste Clipboard - The clipboard mentioned here is NOT the standard
Windows clipboard, but rather a special widget clipboard. Using it, one may copy
widgets to the clipboard and then paste them on the same or different display page. Up to
thirty-two (32) widgets may be stored in the widget clipboard. When the clipboard is
pasted, all widgets are copied from the clipboard with offsets of their original position
based on where the mouse is pointing and the first widget in the clipboard.
Erase Clipboard - This command erases the contents of the widget clipboard.
Save Display - This command will save the display page. If there is no name for the
display page, the user will be prompted for a name. The asterisk (if any) displayed next to
the display page name in the caption area will disappear after the page is saved. Recall
that the presents of the asterisk next to the page name indicates that the page has been
changed, but not saved.
U0990102
Lumistar, Inc.
Page 36
11/20/2006
Lumistar Data Processing System (LDPS)
Technical Manual
Part-2
Client Application
Save As - This command will prompt the user to save the display page with a particular
name. If one is running a display list and cycles through the display pages, the original
display page will be recalled unless the user change the page name in the display list.
Snap To Grid – This command allows all the widgets on the
page to line up on a grid. This applies to both horizontal and
vertical positions of the widgets. The user may select the grid
size to be 2, 5, 10, 20, or 100 pixel squares as shown right.
Size Widget Group – If one has a group of widgets selected
(using the bounding rectangle), then this command will size all
the widgets in the group to be the same size, based on Widest,
Narrowest, Tallest, or Shortest widget.
Close Archive - This command is only available if a display archive is open. The
command allows one to close the display archive so a different file can be opened with
the archive button.
Page Options – This command allows the user to change other page options, as
discussed in paragraph 3.9.3 on page 33. This command was included here in case the
user deactivated the Top Controls and needed to regain them.
Add Widget – This command invokes the widget gallery
shown right. After the specific widget has been selected, it
will appear on the page at the location pointed to by the
mouse. There are ten (10) widget types to choose from and
include: Text, Instrument, History Plots, Gauges &
Charts, Special Devices, Spreadsheets, the Enunciator
Panel, the Stop Watch, the Map Widget, and a User Drawn
Widget.
3.9.4.1.1 Text Type Widgets
The following paragraphs briefly describe the
Text Type display widgets. The text widgets
include: Alpha Numeric, Time, Scrolling Stack,
7-Segment Display, and ASCII Text displays.
Detailed instructions on how to set up each of
these text widgets are not included in this
document, as the setup is simple and selfexplanatory. Very detailed information on
widget properties in general are discussed in paragraph 4 starting on page 51 of this
manual
The Alpha Numeric text widget, shown in Figure 3-22 below, can display up to sixteen
(16) individual parameters from up to twelve (12) streams, including formulas and
U0990102
Lumistar, Inc.
Page 37
11/20/2006
Lumistar Data Processing System (LDPS)
Technical Manual
Part-2
Client Application
functions. The parameter name, current value, and label displayed in a three-column
table.
Figure 3-22 Alpha Numeric List - Text Widget
The Time widget, shown in Figure 3-23 below, can display the stream time for up to
twelve (12) streams as well as system time, and the time from a time card. The stream
number and current time are displayed in a two-column table.
Figure 3-23 Time Display - Text Widget
The Scrolling Stack widget, shown in Figure 3-24 below, can display up to eight (8)
individual parameters from up to twelve (12) streams, including formulas and functions.
The parameter name (up to 8) and the time stamp are displayed in a multi-column table.
Each new value for the parameter appears below the previous, with the most recent value
appearing at the bottom of the display.
Figure 3-24 Scrolling Stack - Text Widget
U0990102
Lumistar, Inc.
Page 38
11/20/2006
Lumistar Data Processing System (LDPS)
Technical Manual
Part-2
Client Application
The 7-Segment display widget, shown in Figure 3-25 below, displays the numeric
decimal value for a single parameter from up to twelve (12) streams, including formulas
and functions. Up to eight (8) digits may be displayed, with two digits to the right of the
decimal point.
Figure 3-25 7-Segment Display - Text Widget
The ASCII Text widget, an example of which is shown in Figure 3-26 below, allows the
user to enter any ASCII text, up to sixteen (16) characters in length. The text appears in
the upper left corner of the widget and may have either vertical or horizontal orientation.
The area within this widget may be re-sized as desired, and other widgets may be placed
within, as shown in the figure below.
Figure 3-26 ASCII Text Widget
(with embedded 7-segment)
3.9.4.1.2 Instrument Widgets
The following paragraphs briefly describe the
Instrument display widgets. The instrument
widgets include: Altimeter, HSI, Artificial
Horizon, Climb, and Odometer displays. Detailed
instructions on how to set up each of these
instrument widgets are not included in this
document, as the setup is simple and selfexplanatory. Very detailed information on widget
properties in general are discussed in paragraph 4 starting on page 51 of this manual
U0990102
Lumistar, Inc.
Page 39
11/20/2006
Lumistar Data Processing System (LDPS)
Technical Manual
Part-2
Client Application
The Altimeter display widget, shown in Figure
3-27 below, displays the numeric value for
altitude and barometric pressure. The altimeter
widget uses two parameters from up to twelve
(12) streams, including formulas and functions.
The altimeter widget also has a warning light in
the lower left of the display. The altitude
warning light color is set by the first value
color. The warning light can change colors
based on the event colors set in the first
parameter in the widget.
Figure 3-27 Altimeter Widget
(Instruments)
The HSI display widget, shown in Figure 3-28 below, requires up to eight (8) parameters
from up to twelve (12) streams, including formulas and functions to become fully
functional. The parameters include: Course Display, Nav Source, Distance Display, Nav
Pointer, Time Display, Speed Display, Bug, and Compass.
Figure 3-28 HSI Display Widget & Editor (Instruments)
The Artificial Horizon display widget, shown in Figure 3-29 below, requires up to six
(6) parameters from up to twelve (12) streams, including formulas and functions to
become fully functional. The parameters include: Bug Heading, Cue Pitch, Cue Roll,
Heading, Pitch, and Roll.
U0990102
Lumistar, Inc.
Page 40
11/20/2006
Lumistar Data Processing System (LDPS)
Technical Manual
Part-2
Client Application
Figure 3-29 Artificial Horizon Widget (Instruments)
The Climb display widget, shown in Figure 3-30 below, displays the value for the rate of
climb. The Climb widget uses a single parameter from up to twelve (12) streams,
including formulas and functions.
Figure 3-30 Rate of Climb Widget (Instruments)
The Odometer display widget, shown in Figure 3-31 below, displays the numeric
decimal value for a single parameter from up to twelve (12) streams, including formulas
and functions. Eight (8) digits are displayed, with two digits to the right of the decimal
point. The odometer widget also has an optional reset button, shown in red at the left of
the figure below. Pressing the reset button will reset the display value to zero. The reset
button may be turned on and off from the widget properties editor.
U0990102
Lumistar, Inc.
Page 41
11/20/2006
Lumistar Data Processing System (LDPS)
Technical Manual
Part-2
Client Application
Figure 3-31 Odometer Widget (Instruments)
3.9.4.1.3 History Plot Widgets
The following paragraphs briefly describe the
History Plot display widgets. The History Plot
widgets include: XY Plot, FTT Plot, and Strip Chart
displays. Detailed instructions on how to set up each
of these instrument widgets are not included in this
document, as the setup is simple and selfexplanatory. Very detailed information on widget
properties in general are discussed in paragraph 4
starting on page 51 of this manual
The XY Plot display widget, shown in Figure 3-32 below, can display one or two X/Y
data pairs (four individual parameters from up to twelve (12) streams, including formulas
and functions). The display supports both linear and logarithmic displays.
Figure 3-32 XY Plot Widget (History Plots)
The FTT Plot widget, shown in Figure 3-33 below, displays the
frequency spectrum calculated via an FTP algorithm applied to a single
parameter from up to twelve (12) streams, including formulas and
functions. To access the controls for the spectrum display, place the
mouse cursor within the plot grid and right click to invoke the controls
menu shown right. The FTP algorithm applied to a single parameter can
U0990102
Lumistar, Inc.
Page 42
11/20/2006
Lumistar Data Processing System (LDPS)
Technical Manual
Part-2
Client Application
have up to 1,024 points, selected from the widget properties appearance dialog box.
Figure 3-33 FTT Plot Widget (History Plots)
The Strip Chart widget, shown in Figure 3-34 below, can display up to four (4)
individual parameters from up to twelve (12) streams, including formulas and functions.
Figure 3-34 Strip Chart Widget (History Plots)
U0990102
Lumistar, Inc.
Page 43
11/20/2006
Lumistar Data Processing System (LDPS)
Technical Manual
Part-2
Client Application
3.9.4.1.4 Gauge & Chart Widgets
The following paragraphs briefly describe the
Gauges & Charts display widgets. The
Gauges/Charts widgets include: Angular Gauge,
Liner Gauge, Multi-Bar Chart, Tank, and Pie
Chart displays. Detailed instructions on how to
set up each of these instrument widgets are not
included in this document, as the setup is simple
and self-explanatory. Very detailed information
on widget properties in general are discussed in paragraph 4 starting on page 51 of this
manual
The Angle Gauge widget, shown right in
Figure 3-35, can display up to eight (8)
individual parameters from up to twelve
(12) streams, including formulas and
functions. The user has individual control
on arrow length and width, as well as the
number of scales and min/max values.
The Linear Gauge widget, shown in
Figure 3-36 below, can display up to eight
(8) individual parameters from up to
twelve (12) streams, including formulas
and functions. The Linear Gauge can have
one or two separate scales as well as
individual control on arrow length and
width, as well as min/max values.
Figure 3-35 Angle Gauge Widget (Gauges/Charts)
Figure 3-36 Linear Gauge Widget (Gauges/Charts)
U0990102
Lumistar, Inc.
Page 44
11/20/2006
Lumistar Data Processing System (LDPS)
Technical Manual
Part-2
Client Application
The Multi-Bars widget, shown right in Figure 3-37, can
display up to sixteen (16) individual parameters from up
to twelve (12) streams, including formulas and functions.
The user has individual control on bar colors and font
sizes.
The Tank display widget, shown in Figure 3-38 below,
displays a numeric value as well as the visual height of a
liquid in a tank for a single parameter from up to twelve
(12) streams, including formulas and functions. The user
has control over the color assigned to the liquid as well as
its width.
Figure 3-37 Multi-Bars Widget
(Gauges/Charts)
Figure 3-38 Tank Widget (Gauges/Charts)
The Pie-Chart widget, shown right in Figure
3-39, can display up to eight (8) individual
parameters from up to twelve (12) streams,
including formulas and functions. The user has
individual control on colors and font sizes and
may select rectangular, round rectangle, or
elliptical widget shape. The elliptical shape is
shown right.
Figure 3-39 Pie Chart Widget
(Gauges/Charts)
U0990102
Lumistar, Inc.
Page 45
11/20/2006
Lumistar Data Processing System (LDPS)
Technical Manual
Part-2
Client Application
3.9.4.1.5 Special Device Widgets
The following paragraphs briefly describe the
Special Device display widgets. The Special
Device widgets include: MF Decom Status, and
LS-22 Scope displays. Detailed instructions on
how to set up each of these instrument widgets
are not included in this document, as the setup is
simple and self-explanatory. Very detailed
information on widget properties in general are
discussed in paragraph 4 starting on page 51 of this manual.
The MF Decom Status widget, shown right, is a simple
status display for the LS-50 multifunction telemetry card.
The display simulates four LED indicators that show the
MajFL, MinFL, BS, IRIG
status of the; Major Frame Lock, Minor Frame Lock, Bit
Synchronizer signal lock, and IRIG time-code status. The display may be connected to
any of the twelve (12) streams supported by the client.
The other special device is the LS-22 Scope widget, shown in Figure 3-40 below. This
special device widget may be configured to display either spectral or time-domain data
from the Lumistar LS-22-SE Spectral & Oscilloscope Display PCI Card. The display
may be connected to any of the twelve (12) streams supported by the client. For more
information on the LS-22-SE, see the hardware user’s manual, Lumistar document
number: U0220201. The setup and configuration of the LS-22-SE is also discussed at
some length in paragraph 3.6 of Part-1 of this user’s manual (server manual).
Figure 3-40 LS-22 Widget (Special Device)
The LS-22 Scope widget is somewhat different from other client widgets in that placing
and right clicking the mouse cursor in the display portion of the widget does not invoke
the widget properties editor as with other widgets. Rather, the display controls are
invoked and are different according to the mode the display is in. There are two display
modes supported. The Frequency display mode, shown left in Figure 3-40, shows a
U0990102
Lumistar, Inc.
Page 46
11/20/2006
Lumistar Data Processing System (LDPS)
Technical Manual
Part-2
Client Application
spectral plot of the signal. The Time mode, shown right in Figure 3-40, shows a timedomain plot of the signal. In Time mode, the display controls include: Cursors, Pause,
and Persistence. In the Frequency mode, the display controls include: Marker Mode,
Pause, Bandwidth Averaging, and Spike Rejection. See paragraph 3.6 of Part-1 of this
user’s manual (server manual) for more information on these display controls.
To invoke the widget properties editor, place the mouse cursor in the lower portion of the
display near the slider controls and right click.
3.9.4.1.6 Spreadsheet Widget
The Spreadsheet widget,
an example of which is
shown right, can display a
large amount of
information in a compact,
tabular form. The
spreadsheet widget can display up to 256 (16 x 16) individual parameters from up to
twelve (12) streams, including formulas and functions. The properties editor for the
spreadsheet widget is shown in Figure 3-41 below. The user may select the number of
rows and the number of columns as well as control the cell height and width. To enter a
column or row heading, double click on the column or row heading and enter the desired
text in the dialog box.
Figure 3-41 Properties Editor (Spreadsheet Widget)
U0990102
Lumistar, Inc.
Page 47
11/20/2006
Lumistar Data Processing System (LDPS)
Technical Manual
3.9.4.1.7 Enunciator Panel Widget
The Enunciator Panel widget, shown right in Figure
3-42, can display up to eight (8) individual
parameters from up to twelve (12) streams, including
formulas and functions. The user has individual
control on colors and font sizes and may select
rectangular, or circular indicator shape. The
rectangular shape is shown right.
Part-2
Client Application
Figure 3-42 Enunciator Panel Widget
3.9.4.1.8 Stop Watch Widget
The Stopwatch widget, shown in Figure 3-43 below, is a handy tool for measuring time
events. The stopwatch widget has two modes, Elapsed Time, and Time To Go (TTG). In
the elapsed time mode, the duration of time is measured by clicking the Start button.
Successive clicks of the start button will pause and resume the time count. To set the time
count back to zero, click on the Reset button. In the TTG mode, enter the time value to
count down from by invoking the widget properties editor. Upon counting down to zero
in TTG mode, a variety of trigger events can be used including: hardcopy printouts, event
logs, and visual and/or auditory alarms.
Figure 3-43 Stopwatch Widget
3.9.4.1.9 Map Widget
The Map Widget, an example of which is shown in Figure 3-44 below, is a very
powerful tool for displaying a large variety of data associated with the movement of
objects and other targets relative to a two dimensional coordinate map. The map widget is
far too complex to describe here, but is thoroughly documented in paragraph 6.8 on page
91 of the Appendix of this user’s manual.
U0990102
Lumistar, Inc.
Page 48
11/20/2006
Lumistar Data Processing System (LDPS)
Technical Manual
Part-2
Client Application
The map widget can contain one image
that represents the world of interest. It
can also contain up to 32 waypoints
(and their respective images), and
display up to 12 moving targets (and
their respective images). In addition to
displaying images, there are up to 12
functions that can be displayed at a time
on the map widget.
Figure 3-44 An Example of the Map Widget
The user can couple the world image to
a selected moving target, or the center of
all moving targets, such that the worldview moves, while the moving target
stays stationary in the center. The
moving target(s) can be set to coast
during data dropouts, and each moving
target can have a velocity vector
predicting its location along with a
history trail, allowing one to see where
the object has been.
3.9.4.2 Widget Mouse Menu –
In general, if one right clicks on any display widget, the
widget menu, like the one shown right will be
displayed. The mouse menu has three commands:
Properties, Copy to Clipboard, and Delete. Select the
properties command to invoke the widget properties
editor. An example of the widget properties editor is
shown in Figure 4-1 on page 51. For the majority of
display widgets, the appearance of the properties editor
will remain the same. Exceptions, like the properties
editor for the spreadsheet widget shown in Figure 3-41 on page 47, are documented in
this manual. The Copy to Clipboard command allows the user to copy the selected widget
to the widget clipboard (not to be confused with the Windows clipboard). The delete
command allows the user to remove the selected widget, or group of widgets from the
display. One may also select a widget and press the Del key on the keyboard to achieve
the same effect.
3.9.5 Display Page Keyboard Controls
The display page has a number of keyboard shortcuts that are described here. In addition,
the user may assign certain commands to the function keys (F1 through F10) via the
Client Options (see paragraph 3.8.4 on page 29). The keyboard shortcuts are as follows:
U0990102
Lumistar, Inc.
Page 49
11/20/2006
Lumistar Data Processing System (LDPS)
Technical Manual
Part-2
Client Application
Table 3-1 Keyboard Shortcuts
Key
Ctrl A
Ctrl H
Ctrl S
Ctrl U
Up Arrow
Down Arrow
Up Arrow
Down Arrow
Left Arrow
Right Arrow
Function
Toggle display page archiving.
Generates a hardcopy of the screen.
Resumes the display if it was frozen or freezes the display if not frozen.
Unlatches any parameters that were latched.
Increases the display update rate (no widget with focus).
Decreases the display update rate (no widget with focus).
Move focused widget up 1 pixel. (press key twice)
Move focused widget down 1 pixel. (press key twice)
Move focused widget left 1 pixel. (press key twice)
Move focused widget right 1 pixel. (press key twice)
3.10 Display Lists
Display lists, like the one shown in Figure 3-19 on page 31, are simply a collection of
display pages. When viewing a display list, only one display page is visible at any one
time. There may be up to eight (8) display pages on the display list. The display list
allows one to monitor multiple pages of widgets and to switch quickly between the pages
in the list. Processing of the data only occurs on the active display page. The individual
display pages in the list do not have a caption area, but rather the information is kept in
the caption area of the display list.
Directly below the caption area are the individual tabs that correspond to the display
pages of the display list. To switch pages, simply click on any one of the tabs. One may
also use the PgUp and PgDn keys on the keyboard. This will cycle to the next or previous
display page in the list. The user may also use the number keys to switch directly to the
desired page. The number keys start with 1, then go through 8, corresponding to the first
tab on the left.
U0990102
Lumistar, Inc.
Page 50
11/20/2006
Lumistar Data Processing System (LDPS)
Technical Manual
4
Part-2
Client Application
Widget Properties
Each display widget in LDPS is setup and configured via the widget properties editor. In
general, the look and feel of the properties editor is the same for all widgets, although
there are a few exceptions. As an example, the properties editor for the Artificial Horizon
widget is shown in Figure 4-1 below. A detailed explanation of the various portions of
the properties editor is presented in the following numbered paragraphs.
The quickest and easiest way to use the properties editor is to ensure that the database
and/or project are loaded first. Live data does not have to be running, although it can. In
fact, widgets can even be edited while conducting a test.
The majority of widgets can
support up to eight (8)
parameters. Some widgets can
only display one or two
parameters, while others like the
Multi-Bars (see page 45) can
support sixteen (16) parameters.
The spreadsheet widget (see
paragraph 3.9.4.1.6 on page 47)
can display up to 256
parameters. All widgets support
parameters from up to twelve
(12) streams, including formulas
and functions.
As changes are made to the
properties, the widget reflects the
change immediately. Canceling
from a property editor results in Figure 4-1 Widget Editor (Artificial Horizon)
the original properties being
restored. The properties are different for each widget. There are at least two property
setup windows for each widget. The first property setup window is fairly generic for all
widgets, and is typified by the window shown in Figure 4-1 above. The first property
setup window is where one enters the parameter information, as well as enumeration and
basic display characteristics (like number of decimal points). The second property setup
window is typically very different for each type of widget. Here, one sets up the
appearance of the widget and configures items such as the background color, captions,
needles, etc.
4.1 Initial Setup.
The first property setup window is where the initial configuration of each parameter in
the widget is made. As shown in Figure 4-1, there are seven basic sections in the first
property setup window. Each section is described in the following paragraphs.
U0990102
Lumistar, Inc.
Page 51
11/20/2006
Lumistar Data Processing System (LDPS)
Technical Manual
Part-2
Client Application
The Caption Area displays the name of the widget, and indicates if any changes have
been made to the widget by showing an asterisk preceding the name of the widget. Below
the caption area are one or more tabs where one selects the Parameter Number (or
name) to be edited in the widget. Some widgets have the name of the parameter (like
Latitude, Longitude, HSI Bug, etc) while others have the number the parameter.
The Parameter Information area, shown right, is
below the parameter number tabs in the left corner of
the window. This area contains the information
required for the parameter to update. The user can
either manually enter the information, or drag a
parameter from any of the available lists onto the appropriate fields, which will
automatically enter the required information. There are four fields required. If the Enable
Parameter check box in not selected, then the parameter will not be processed. Next to
this checkbox are three ellipses (…). Each ellipse represents a valid list a parameter may
be chosen from. Clicking on the ellipse invokes the respective list. The lists include (from
left to right): The Parameter Database, the Derived Parameter list, and the Function
Parameter list. Invoke the appropriate list, select a parameter, and then drag the
parameter into the Parameter Name. All of the appropriate information will automatically
be entered. If manually entering the parameter information, select the Stream Source
from the dropdown list. Here one may choose from a derived formula, a function, or one
of the streams. If the stream is from a derived formula or from a function, then one will
have to drag the parameter from the appropriate list onto the parameter name. One cannot
manually enter the parameter name in this scenario. Switching from a stream to a derived
or function stream causes the parameter name to be cleared.
The Parameter Name is how the client application finds the needed information from
the database. The Data Solve Algorithm method indicates how the data is to be solved
by the client. If the stream source is from a derived formula, then the algorithm method
will be Derived. If the stream source is from a function, then the algorithm method will
be Function. Otherwise, the algorithm method will be Mx+B or Raw. (See paragraph
4.3.8 on Client Processing for more details). For derived and function parameters, the
algorithm method will be filled in automatically. For normal stream parameters, the only
choices are Mx+B and RAW. For the Spreadsheet widget, there is an additional
algorithm method - Text Label, which allows one to have text in a cell (no processing of
data). The text displayed is the text contained in the Parameter Label.
Under the parameter information area is Label and
Appearance section (shown right). There are two
fields required. The event triggers and widget
appearance are also invoked from this section.
The Parameter Label field defines what to display on the widget for the parameter’s
label. The parameter label does not have to be the same as the parameter name. Unlike
the parameter name, it can also contain spaces and be a mixture of upper and lower case.
U0990102
Lumistar, Inc.
Page 52
11/20/2006
Lumistar Data Processing System (LDPS)
Technical Manual
Part-2
Client Application
Use the Unit of Measure Label to define what to displayed for the unit of measure
associated with the parameter label. For example, the parameter label might be,
“Velocity,” with the corresponding unit of measure label of, “MPH.” Some widgets do
not display a unit of measure label, while others do.
The ellipse (…) next to Edit Triggers invokes the
widget trigger editor shown in Figure 4-3 on page
55. The ellipse (…) next to Edit Appearance
invokes the widget appearance editor shown in
Figure 4-2 shown right. This appearance property
applies to the widget as a whole, not necessarily to a
particular parameter in the widget.
Under the label and appearance section is the Value
Presentation section shown below. There are six
fields required.
Figure 4-2 Widget Appearance Editor
(Artificial Horizon)
If the Global Presentation check box is selected, then all of the parameters in the widget
will have the same information defined in this section applied to them. This includes the
Data Color, which defines the color of the text for the data when it is valid and not
triggered, and the color of pens, needles, bars, text, etc. It also includes the Label Color,
which defined the color for parameter labels and unit of measure labels for the selected
parameter.
Choose the Display Radix to define the number base for the widget. If one chooses
anything except base 10, the data displayed will be raw/unprocessed data. There are four
special radix types in addition to the standard number radix types. These include:
1. ASCII, which displays the ASCII character for the processed value if the value is
between 32 and 127. Any other value displays “???”
2. DMS, which displays a degree type value in degrees:minutes:seconds in the form:
ddd mm ss.sss. One can elect to remove the partial seconds (.sss) by setting the
number of decimal places (see below) to 0, 1 or 2. All other ‘number of decimal
places’ will result in 3 decimal places to the right.
3. HMS, which displays a time type value (in seconds) to hours:minutes:seconds in
the form: hh:mm:ss.ssssss. The seconds will either have 0 decimal places, 3
decimal places, or 6 decimal places, depending on the setting of the number of
decimal places. Invalid time will be displayed as XX:XX:XX.XXXXXX.
U0990102
Lumistar, Inc.
Page 53
11/20/2006
Lumistar Data Processing System (LDPS)
Technical Manual
Part-2
Client Application
4. DHMS, which displays a time type value (in seconds) to
days:hours:minutes:seconds in the form: ddd:hh:mm:ss.ssssss. The seconds will
either have 0 decimal places, 3 decimal places, or 6 decimal places, depending on
the setting of the number of decimal places. Invalid time will be displayed as
XXX:XX:XX:XX.XXXXXX.
The Value Width field defines the number of total characters to display for the parameter
value, including the decimal point and sign. The Decimal Places field defines the number
of decimal places to the right of the decimal point for the parameter value. If the display
radix is other than base 10, then 0 decimal places to the right of the decimal point will be
displayed.
The Enumeration section allows the user to define text to
be displayed for a parameter instead of a specific value.
There may be up to 512 values for each parameter. For
example, display the word “ON” when the value for the
parameter is a 1, and display the word “OFF” when the
value is a 0. In general, if the parameter value equals one of
the values entered, then instead of displaying the value, the text next to the value will be
displayed. One may elect to have the enumeration apply to the display, to the event log,
neither, or both. The user can also save the enumeration list and recall it later for a
different parameter or widget by using the Load, Save, and Clear buttons.
4.2 Widget Triggers
The trigger editor allows the user to setup and
configure trigger events for the widget. As shown
right, the ellipse (…) next to Edit Triggers invokes
the widget trigger editor shown in Figure 4-3 on page
55. The trigger editor has four regions or sections
that are described in the following paragraphs.
The Trigger Enable section has five (5) settings. The priority of checking parameters
follows the order established in this section (Equals, Greater Than, Less Than, etc.). If the
parameter value Equals the entered value, a trigger will occur. Likewise, if the parameter
value is Greater Than, or Less Than, the entered value, a trigger will occur. A
parameter is In Range, if the parameter value is greater than or equal to the low value
box AND the parameter value is less than or equal to the high value box. When the
parameter is in range, a trigger will occur. Correspondingly, a parameter is Out Of
Range if the parameter value is less than the low value box OR the parameter value is
greater than the high value box. When the parameter is out range, a trigger will occur.
The Trigger Colors section allows the user to select the text color for the parameter value
if the selected trigger is met. This overrides the Data Color selected on the Value
Presentation section described on page 53. Each of the seven (7) trigger condition can
have a separate color.
U0990102
Lumistar, Inc.
Page 54
11/20/2006
Lumistar Data Processing System (LDPS)
Technical Manual
Part-2
Client Application
The Trigger Events Control
section allows the user to
select an action, or group of
actions that take place if a
trigger condition is satisfied.
The user may select any or all
of the eleven actions. The
individual
actions
are
described as follows:
The
Hardcopy
action
produces a hardcopy (screen
capture) of the screen. The
Latch action freezes the
updating of the displayed
value. The value will not be
updated again until the page is
unlatched via the Page
Controls. With the Event Log
Entry action, the time stamp,
parameter name, parameter
Figure 4-3 Widget Trigger Editor (Artificial Horizon)
label, unit of measure label,
and the parameter value are all entered into the event log. Correspondingly, the Line
Printer Entry action sends to the printer the time stamp, parameter name, parameter
label, unit of measure label, and the parameter value. The Play Audio File action plays a
WAV file selected by the user. Select the sound file by clicking on the panel next to the
check box. With the Run Exe File action, the selected executable program will be run.
Select the desired exe file by clicking on the panel next to the check box.
When the Control Archive Output action is selected, archiving is enabled and data is
written to the disk. Multiple parameters on the display page may have this action set, and
any parameter that is triggered will cause data to be written to the disk. The display page
option, “Enable Triggered Archive Control” must be enabled for this trigger action to
work. If it is not enabled, then this action has no meaning. If multiple display pages are
open, and a parameter on one of the page is triggered with the Bring Page To Front
action set, then the display page with the triggered parameter will become the top most
displayed page. This action is useful if one is monitoring parameters that are of little
interest, unless they change in value. The Flash Page Color action will cause the
background color of the display page to flash at a 3-Hertz rate while the trigger condition
is satisfied. In the same way, the Change Page Color action will cause the background
color of the display page to change color (and remain) until the trigger condition is no
longer satisfied. Finally, the X Out action will cause a large “X” to be displayed across
the display page while the trigger condition is met.
U0990102
Lumistar, Inc.
Page 55
11/20/2006
Lumistar Data Processing System (LDPS)
Technical Manual
Part-2
Client Application
In the Trigger Action Control section, the user can control how trigger notifications are
handled. Trigger events often occur during a test, and the user may only want a single
notification to be given when the trigger is first satisfied. At other times, one may require
notification anytime the trigger is satisfied. The controls in this section allow the user to
specify when the trigger notifications take place. Two options are supported. With the On
Value Change option, a trigger event is sent only if the value changes from one process
iteration to the next. If the value satisfies a trigger, and remains at the same value, only a
single event action will occur. This option is useful for times when the trigger condition
remains true for some extended time, but only one hardcopy notification is required. With
the While Value Meets Trigger option, a trigger action will continually be generated as
long as the trigger condition is satisfied.
4.3 Display Formula Math
When assigning a solve method to a parameter in a display widget on the client, one has
the option to select Formula as the algorithm method to use. If the display needs
something more complex than a parameter solved with a linear (Mx + B) formula, and
can be solved with a simple mathematical expressions, then the Formula solve method
should be used. If the mathematics are too complex, then one must use a Function solve
method, which involves the user writing a DLL.
The Formula solve method is a very powerful technique. For instance, one can perform a
trig function on a parameter, or compare a parameter from stream 1 with a parameter
from stream 2. One may also have conditional statements in the formula (If, then, else).
Scaled or raw parameters can be used in the formula. Other formula results may be used
in the equation, as well as function results. The limitation is that the formula cannot
exceed 1,024 characters.
4.3.1 Formula Rules
The math engine is parameter name based. Enter the formula just like one would for a
high school math problem (NON RPN3). All the rules of precedence apply. There is even
a method to do conditional expressions. Derived variables can also be inside a derived
formula.
EXAMPLE – non-conditional
INPLAT * 48.7 + INPLON - 2.0 + SIN(45.0)
EXAMPLE – conditional
IF INPLAT > 35.0 THEN RESULT:=1.0 ELSE IF INPLON < -117.0 THEN
RESULT:=2.0 ELSE RESULT:=INPLAT/INPLON
3
RPN – Reverse Polish Notation.
U0990102
Lumistar, Inc.
Page 56
11/20/2006
Lumistar Data Processing System (LDPS)
Technical Manual
Part-2
Client Application
The parser is based on a 3rd party tool and is quite fast (as fast as compiled code). The
parser allows “Pascal-like” constructs, including math operators and if-then-else with
blocks and nesting. In general, the formulas must conform to the following rules:
•
Each statement must end with a semicolon (;)
•
The following statements may be used:
o if .. then ... else ...;
o for ..:=... to (downto) ... do begin end;
o repeat ... until ...;
o while ... do begin end;
o break, assignments (:=);
o Statement(s) in the above declarations states that one can specify either a
single statement or a block of statements. The block of statements must be
enclosed in begin ... end keywords.
o Cycle statements can use break keyword to break the cycle (break must
also end with a semicolon).
•
Each function has a reserved local variable RESULT, which is used to assign the
result the function returns. For instance:
IF (PARAM_1 * 3.0) > 50 THEN RESULT := 2.1 ELSE RESULT := 1.3;
If one use a valid identifier name in the left part of the assignment statement, or as
a variable in a for cycle, which is not a variable within the scope of the formula, a
local variable is created automatically and initialized with zero (0), which is valid
only within the body of the formula. Thus, if one use somewhere in a script, i.e.
a:=a+2; and 'a' is not declared as a variable, then the first thing that occurs is the
creation of a local variable 'a', initialized with zero, and then the evaluation is
performed.
•
If no block type statements are used, then no RESULT or the semicolon is
required. For instance:
PARAM_1 * PARAM_2
•
Expressions may contain the following constant and variable types:
o integer numbers
o floating point numbers
o scientific numbers
•
No limit (except memory) on the number of derived parameters. Each derived
parameter can have several variables inside it.
•
Hex numbers are allowed in a formula, but the parser replaces them because it
requires base-10. The parser looks for 0xy or 0Xy, followed by a space. This
number is converted from hex and replaced with a base-10 number. If one has
parameters that start with 0X, one may wish to change the name.
U0990102
Lumistar, Inc.
Page 57
11/20/2006
Lumistar Data Processing System (LDPS)
Technical Manual
Part-2
Client Application
4.3.2 Multi-stream Users
Variable names are very often common (i.e., the same) across multiple data streams. One
may wish to perform mathematical operations on these variables from multiple data
streams. To accomplish this, a method had to be devised such that the math engine could
identify which stream the parameter belonged to. The resulting method prefixes the
variable name with either “N” or “R” (N=Normal, R=Raw), followed by the stream
number it belongs to, followed by a double underscore and then the variable name. For
example:
N2__INPLAT + R1__INPLAT - N1__INPLAT * R2__INPLAT
In the example, this translates to, “take the scaled value of INPLAT from stream 2, and
add the raw value of INPLAT from stream1, etc “
4.3.3 Formula Errors
If the formula has an error in it, the corresponding error message is made available, and
the resulting value for the formula is set to 0.
4.3.4 Formula Operators & Functions
The formula math engine supports the following operators and functions.
Table 4-1Arithmetic Operators & Functions
Function
ABS(X)
SQR(X)
SQRT(X)
SIGN(X)
ZERO(X)
TRUNC(X)
FRAC(X)
ROUND(X)
CEIL(X)
FLOOR(X)
DEC(X)
INC(X)
ARG(X,Y)
RADIUS(X,Y)
POWER(X,Y)
IPOWER(X,Y)
X^Y
U0990102
Description
absolute value
square = X^2 = X*X
square root
sign of X; =1 for X>0, =0 for X=0, =-1 for X<0
=0 for X=0, =1 for X<>0
=INT(X)integer part
fractional part
rounds X to the nearest integer value
always returns "ceil" integer value
always returns "floor" integer value
decrements a value X by 1 and returns a new value
increments a value X by 1 and returns a new value
argument(phase) of X and Y
= sqrt(sqr(X)+sqr(Y))
raises X to a power of Y (Y is a floating point value)
raises X to a power of Y (Y is a integer value)
raises X to a power of Y (same as above two functions)
Lumistar, Inc.
Page 58
11/20/2006
Lumistar Data Processing System (LDPS)
Technical Manual
Part-2
Client Application
Table 4-2 Exponent & Log Functions
Function
EXP(X)
LN(X)
LG(X)
LOG(X)
ANTILOG(X)
Description
exponent
natural logarithm
decimal logarithm
base 2 logarithm
e ^2.718281828459045235360287 raised to power
Table 4-3 Trig Functions
Function
SIN(X)
COS(X)
TAN(X)
COTAN(X)
ASIN(X)
ACOS(X)
ATAN(X)
SINH(X)
COSH(X)
TANH(X)
Table 4-4 Arithmetical Operations
Description
sine
cosine
tangent
cotangent
arcsine
arccosine
arctangent
hyperbolic sine
hyperbolic cosine
hyperbolic tangent
Operation
+
*
/
DIV
MOD
^
NEG
<
<=
>=
>
<>
=
AND, OR, XOR,
NOT
Description
Addition
Subtraction
Multiplication
Division
integer division
modulo
power of
negate;
Less than
Less than or equal to
Greater than or equal
to
Greater than
Not equal to
Equals
Logical AND, OR,
Exclusive OR, and
NOT
Table 4-5 Bitwise Operators & Functions
Function
~
AND, OR, XOR
SHL
SHR
ROR(value,numbits)
ROL(value,numbits)
SWPBTS(value,numbits)
BYTESWAP(value)
WORDSWAP(value)
HIBYTE(value)
LOBYTE(value)
UINT(value)
INV(value)
U0990102
Description
negate;
AND, OR, and Exclusive OR
shift left
shift right
rotate a 32 bit number right num bits
rotate a 32 bit number left num bits
swap bits in value numbits from msb to lsb the rightmost
numbits only.. ie 5 = A
swap hi and lo bytes in rightmost 16 bits of value
swap hi and lo words in rightmost 32 bits of value
returns hibyte of least 16 bits in number
returns lobyte of least 16 bits in number
returns value as 32 bit unsigned integer
invert the bits = value ^ -1
Lumistar, Inc.
Page 59
11/20/2006
Lumistar Data Processing System (LDPS)
Technical Manual
Part-2
Client Application
Table 4-6 Angle Functions
Function
RAD(value), D2R(value)
DEG(value), R2D(value)
BAMD(value)
SEMIR(value)
SEMID(value)
Description
degrees to radians
radians to degrees
bams to degrees
semicircles to radians
semicircles to degrees
Miscellaneous functions include:
• ACCRATIME(doy,hoit,loit,ust) - Accra encoder embedded time
• BITSET(value,bitnum)
4.3.5 SOME SUPPLIED CONSTANTS
The function math engine has the following supplied constants:
•
•
•
•
•
•
•
PI = 3.14159(carried to 16 places)= // the value of pi
E = 2.71828182846 = //E = exp(1)
FPM = 1.0/FEETPERMETER = //3.2808 meters per foot
FPNMI = NMI = //6076.115489
FPSMI = FEETPER_SMILE = //5280.0
K = K = //180/pi
FPG = ACCEL_ONE_G = //32.17349
4.3.6 Display Formula Math Editor
Functions and formulas are global to all client displays and are created in a central
location. Once created, these parameters can be used in any of the displays.
To create these new parameters, perform the
following steps. From the main client menu, click
View, and then select either Function List or
Derived List as
shown right. A
small window will
appear, like the one
shown left. Use this
to create or edit the
formula/functions
required. Right click on this window to Add New, Edit,
Delete, Save To File, Recall From File, and Append From
File.
U0990102
Lumistar, Inc.
Page 60
11/20/2006
Lumistar Data Processing System (LDPS)
Technical Manual
Part-2
Client Application
To add a new parameter, right click and select Add New. Enter the parameter name when
prompted. The name must be unique in the list. Once entered, the parameter becomes part
of the list and the editor will appear. For formula parameters, the editor window shown in
Figure 4-4 below will appear. To edit a parameter already in the list, right click on the
parameter in the list and select Edit from the menu. Again, the editor for the parameter
will appear. The name of a parameter already in the list may not be changed.
To delete a parameter, right
click on the parameter in the
list and select Delete from the
menu. To add derived
parameters to the current list
from another list, right click
on Append From File in the
menu. When prompted, enter
the file to append to the
current list.
It is advisable to save the
parameter list once created.
To save the list of derived
parameters to a file, right
click on Save to File in the
menu. When prompted, enter
the file to save the list to.
Then place the list file in the
project so that it will
automatically be loaded when
the project is loaded.
Figure 4-4 Display Formula Editor Window
To use the display formula editor, simply type in the formula in the input box at the
bottom of the window. Check the formula for errors by clicking the Syntax Check button.
“No Errors” will be displayed next to the button if the formula checks out. If there are
problems with the formula, “Syntax Error In Expression:” will be displayed in red text,
followed by the portion of the formula that is in error. To save the formula, simply click
the Accept button at the bottom of the window.
4.3.7 Display Function Math Editor
Functions are a powerful way for the user to implement their own special processing
routines into the LDPS client. The function can be written with any compiler that
supports Windows DLLs. Just follow the API described in paragraph 4.4.1 on page 71
when developing the function DLL.
U0990102
Lumistar, Inc.
Page 61
11/20/2006
Lumistar Data Processing System (LDPS)
Technical Manual
Part-2
Client Application
With functions, up to 128 parameters can be used by the function DLL to calculate the
result. Each parameter passes both scaled and raw data. There are also constants that are
passed into the function DLL to allow the function to operate in different modes.
Client functions are solved at the processing rate defined in the options (the default is
when stream 1 receives new data). The user may wish to have some interface between
LDPS and another program or to some external device (like a network, serial port, etc).
Client functions allow one to connect to basically any hardware and/or software and to
pass any data needed. An example of this scenario could include driving an antenna to
point to a specific spot in the sky based on the latitude, longitude, and altitude of data
collected from the telemetry stream.
With normal parameters, the text is limited in how it is displayed. This involves either
picking the number of decimal places or by using enumeration. This usually suffices
except if one wishes to display an angle with degrees, minutes, seconds, or time with
hours, minutes, seconds. With a function, the resulting value displayed may be a string
created by the function and may take on any format desired.
In LDPS, client functions operate in one of two modes. As a “normal” function, the DLL
solves for the data and returns the value to be displayed in a widget. The “alternate”
mode does the same thing, except it also allows the function DLL to draw on the screen.
This allows developers to hook their own widget into the display. To do this, add a User
Draw widget to the display page. This automatically forces the solve method for the data
to be a function.
The function editor shown in Figure 4-5 on page 63 has five sections.
At the top of the editor is the Help Section for the selected function (assuming if there is
help). When one writes a function, one should also write an ASCII help file. Use the
same name as the function DLL, but with a “.txt” file extension. The help file should
instruct the user on how to fill in the required data.
Under the help section is the Function Section, where the function to be use is selected.
Click the blank button next to Function Name and enter the file name when prompted.
The button name will change from blank to the name of the function. Under the button is
the Use Text Out check box. If selected, the widget display will show the string returned
from the function. If not selected, the display will format the result as defined in the
widget for the number of decimal places. Below this check box is the Apply Pdbase Mx
+ B on return check box. If selected, when the function returns a value, the scale factor
and offset defined in the parameter database for the first parameter fed to the function
will be applied before it is displayed. Note that data passed into the function already has
the scale factor and offset applied. Therefore, if the scale factor and offset are not 1.0 and
0.0 respectively, then the results may not be correct. This option should never be used
and is intended for very special cases. Normally, this option is used for functions that
intentionally ingest raw data values for calculations and also return raw values. Thus the
U0990102
Lumistar, Inc.
Page 62
11/20/2006
Lumistar Data Processing System (LDPS)
Technical Manual
Part-2
Client Application
client application applies the scale factor and offset from the first parameter passed into
the function.
Figure 4-5 Display Function Editor Window
The Function Mode section varies, depending on how the function was written. It will
have check boxes to select, as required by the function.
The Function Constants section also varies, depending on how the function was written.
The function may require the user to enter in certain values to enable the function to
operate differently. Either type in the value for the required field or double click and enter
the value when prompted. The latter allows one to enter the value in scientific notation if
required.
The Parameter Data Feed section varies, depending on how the function was written.
Enter the parameters that the function requires for the calculation, in the order that the
function expects to receive them (if any order is expected). The parameters feed to the
function can come from a stream, from a formula, or from the result of another function.
A good number of functions have been written by Lumistar and are shipped with LDPS.
If a specific function is not included and the user lacks the capability to write DLLs, then
contact Lumistar customer support to discuss the requirements.
4.3.8 Client Processing
The client processing engine has a great many tasks to perform when new data is
received from the server. Each stream in the project has its own processing thread that is
activated when new data for the stream is received from the server. In addition to solving
U0990102
Lumistar, Inc.
Page 63
11/20/2006
Lumistar Data Processing System (LDPS)
Technical Manual
Part-2
Client Application
data for a single stream, there is another processing thread for solving derived (formula)
and function data, which may contain data from multiple streams. The user has the option
to specify when to process data (on stream 1 with new data, or via a user controlled
throttle). Normally, the fastest stream should be assigned to stream 1
Note that the processing of data is not to be confused with the display of data. They
involve two entirely different processor threads and are performed at different rates. The
processing of data is event driven and is performed on new data arriving from the server.
The display update rate is normally set by a timer to update the display at a user-defined
rate (30 Hertz or less). The human eye cannot usually perceive changes in data accruing
at this rage.
The events that occur during a processing cycle are as follows:
•
•
•
New data arrives from the server. The raw data, the timestamp, and the data status
are placed into the raw data CVT.
Cycle through all parameters of interest and solve the data for each.
If the parameter is from stream 1, and the user option to trigger solving data on
stream 1, then solve the formulas and functions. If stream 1 is invalid, then solve
when the first valid stream interrupt occurs.
The actual solving of the parameter data involves the following steps:
1. Solve the support tags for the parameter. Support tags are parameters that have a
second parameter (a concatenation), a time parameter, and/or a mode parameter
associated with it. [See paragraph 4.3.9 on page 68 on Double Precision Tags for
exceptions]
2. Solve the preprocessed data for the parameter. Preprocessing is performed on the
word for the parameter (and all other parameters associated with the root word).
The preprocessing (if selected) takes the root word and applies the user-defined
formula on the word. When the parameter is solved, it uses the preprocessed
result as the value for the root word. If no preprocessing is selected, the value
used to solve the parameter is the raw value received from the server. [See
paragraph 4.3.9 on page 68 on Double Precision Tags for exceptions]
3. If used, the mode mask and operator are checked. If the mode mask and operator
do not match, the rest of the solve steps are omitted and the result value remains
unchanged from the previous processing cycle.
4. If the parameter uses a second parameter (concatenation), then the second
parameter is solved. [See paragraph 4.3.9 on page 68 on Double Precision Tags
for exceptions]
5. Depending on how the database defined the solve type for the parameter, (the type
of number the parameter is), the bits are extracted from the raw value and the
appropriate routine is applied to convert the raw value into the appropriate format
(two’s complement, binary, IEE754, etc), or preprocessed value, or
wordswap/byteswap, or concatenated value, as the case may be. [See paragraph
4.3.9 on page 68 on Double Precision Tags for exceptions]
U0990102
Lumistar, Inc.
Page 64
11/20/2006
Lumistar Data Processing System (LDPS)
Technical Manual
Part-2
Client Application
6. The converted number is multiplied by the scale factor (EUC) and the linear
offset is added (Mx + B).
7. The resulting scaled value, raw value, and its timestamp are stored in a different
CVT for access by the rest of the processing section and display engine.
Note if a parameter is defined as contiguous, and the parameter has more bits in it than
the word contains, then the concatenated bits are stored in the CVT (up to 32 bits). This
eliminates the need for using the 2nd parameter name, as long as the bits are contiguous.
In this scenario, one will not be able to get the raw word value of the single words that
make up the multiword parameter unless one makes another parameter that defines just
those few bits. The CVT stores all the bits that make up the parameter.
Special note for parameters identified in the parameter database with the special solve
flag set to other than zero (None). Currently, the special solve flag is for byte order
changing. The following table describes what occurs to the raw concatenated data, just
prior to applying the scale factor and offset. This will take care of Endean issues.
Table 4-7 Special Solve Flag - Byte Order Change
Enum
Code
0
1
2
3
4
5
Definition
No swapping
Byte swapped only
Word swapped only
Byte & word swapped
Word reversed
Word reversed byte-swap
Byte Reordering Result
16-bit 32-bit
64-bit
12
1234 12345678
21
2143 21436587
n/a
3412 34127856
n/a
4321 43218765
n/a
3412 78563412
n/a
4321 87654321
The rest of the processing cycle is as follows (using the CVT identified in step 7 above).
The processing occurs either on new data from stream 1 or on the timer throttle,
depending on the option set by the user:
1. Solve the formula and function parameters.
2. Loop through all pages displayed and all widgets on each display page and all
parameters enabled on each widget.
• If the parameter value is latched, then perform no further processing.
• Check if processing of the parameter is allowed. If not, then perform no
further processing (see the LDPS administrator for permission code, normally
one is allowed to process).
• If a widget requires a history buffer, then store the new value and time into the
history buffer (Y/Y plots, Strip charts, maps).
• Check if a trigger has occurred (trigger set in the widget editor).
• If a trigger occurred, then act on the trigger (i.e., change the color of the value,
make a hardcopy, play a sound, etc).
• For the Map widget with the Output Track Data option checked, pass the
track data out to the shared memory.
3. If display archiving is on, then archive the data for the display page. Note that
U0990102
Lumistar, Inc.
Page 65
11/20/2006
Lumistar Data Processing System (LDPS)
Technical Manual
Part-2
Client Application
archiving will not take place if the option, “Enable Triggered Archive Control” is
not selected for the page and no parameter triggers have occurred with the trigger
action “Control Archive Output.”
As described in the later portion of the process cycle, the display engine can get
interrupted from its timer by a trigger, if the trigger action deals with the display of data
on the screen. Also note that the archiving of display page data occurs at the processing
rate, not the display rate. This allows the archiving of scaled data in ASCII format in real
time. For slower streams (a 300 Hertz minor frame rate for example), 100 % of the
selected data can be archived in real time. In playback mode, 100% of the selected data is
always archived.
One exception to note - The Stop Watch widget does not express any interest in any
widget, therefore it is not part of the processing engine. It is only part of the display
engine. The time (elapsed or to go) is processed at the display rate. If one is archiving on
the client, then the time in the archive file will only be updated at the display rate.
4.3.8.1 Notes & Clarifications
• The processing section on the client now supports supercom data as well as
subcommutated data. The user has an option on the client to disable processing at the
supercom level. In playback mode, the default for this option is ON. In live mode, the
default is OFF. Supercom processing can eat up a lot of CPU horsepower; therefore
the user will have to experiment to determine how much the CPU can handle. If the
supercom processing is off, then the supercommutated words will apply the
SuperCom method selected in the parameter database (first value, last value, etc). For
software decommutators, the user will have to maintain a structure of data to solve for
results and pass back the supercom result as it applies to a minor frame. If the logging
of supercom data is required (by the client), then the user will have to write a logging
function inside the software decommutator.
•
The client maintains an overall interest list, based on the widget interest list. In
addition to the overall interest list, a minor frame process list is made. For each minor
frame, each word is checked to see if it needs to be processed. If so, then the raw data
is collected from the stream buffer and placed into the tag data and the “numtags” are
processed for the minor frame. If the parameter is concatenated, either by contiguous
or 2nd parameter, then the raw data contains the concatenated data at this point.
•
When getting 2nd tag concatenated data, no support for the 2nd tag is gathered, just
the raw data from the minor frame with the bits broken out. No LUTs or linear EUC
(mx+b) or preprocessing takes place.
•
For Chapter 8 streams, when getting mode tag data, no LUTs or linear EUC (mx+b)
or preprocessing is checked for the mode comparison. Only raw data with the bits
broken out are involved (and concatenated and/or byteswapped/wordswapped if
needed).
U0990102
Lumistar, Inc.
Page 66
11/20/2006
Lumistar Data Processing System (LDPS)
Technical Manual
Part-2
Client Application
•
If a tag uses a mode parameter, and the mode operation indicates that the value is not
supposed to be updated, then the current raw value resorts to the last raw value. For
PCM type streams, the scaled data is used.
•
When getting time parameter associated data, the value is fully solved (LUT and
mx+b), less preprocessing (which shouldn't be used anyway). The stale flag is set
only if:
o The Pdbase update rate for the parameter is greater than 0.0.
o The dt of the timestamp parameter scaled value, minus the TOY4 of the current
value is less than (dt * 1.10), as defined in the Pdbase (allow some slop in
timehacks). The TOY for the working parameter is set to the scaled value of the
time associated parameter.
•
If a software decommutator is used, the minor frame of data is sent to the soft decom
where it is processed. Next the software decommutator is called on to retrieve the
interest list of raw values. The interest list is passed to the soft decom (local process
list) and contains a variable called “ProcessedThisTag”, which is initially set to false
when the list is passed. It is the software decommutator’s responsibility to solve the
list, and set the flag accordingly. Upon return from the call, the “processedtag” array
is filled in and further processing proceeds in the same manner as with non-software
decommutated data.
•
NOTE. The double (IEEE754 DOUBLE types) precision numbers can be broken out
of the Pdbase ONLY by having two, 32-bit parameters and using the 2nd parameter
concatenate function. This is because the internal structure only uses 32-bit integers
and the double requires 64 bits.
•
Once the processed interest list is filled in for the minor frame (with concatenation if
called for), then the following processing actions occur for each tag in the processed
interest list:
1. Get the raw support values (time, mode).
2. Check to see if the data is valid (as set by the device for stream or softdecom).
3. Solve the scaled value for the tag via the following method:
a. Read & adjust the raw data based on users preprocess formula (if used).
WARNING - The preprocess formulas only work on 16 bit words. If the raw
data value is not 16 bits, DO NOT USE THIS FUNCTION else the data will
not be correct.
b. Break out the bits used for the tag raw data value. Note, if concatenating the
data, then the raw data then becomes the concatenated data, not the original
single word data. If one concatenates and uses raw data for calculations, then
expect the total raw data to be used.
4. Check if an update is allowed by using the mode tag and mask equation.
5. Check if the data is stale by looking at the time tag (if used).
4
TOY – Time Of Year.
U0990102
Lumistar, Inc.
Page 67
11/20/2006
Lumistar Data Processing System (LDPS)
Technical Manual
Part-2
Client Application
6. Save the last scaled value and timestamp.
7. Perform the mx+b for scaled data and store into scaled value for the tag.
•
If the client option is set to solve derived and function parameters on stream 1, then
after the processing described above is performed, the derived and function
parameters are solved when stream 1 gets new data. This only applies if a project is
loaded. There is a 20-Hertz thread that checks if a project is loaded. If a project is
loaded, then all loaded streams are checked for valid data. The first serial stream
found with valid data becomes the stream that solves the derived and function
parameters. This will normally be the first stream (the fastest). If a project is not
loaded, or the solve option is not checked, then derived and function parameters are
solved at a 20-Hertz rate.
•
After the interest list is processed for a minor frame, the list is passed on to the
display manager where each display page scans the interest list, and further processes
tags of interest in the following way:
1. Check for triggers and trigger actions.
2. Checks if processing of the tag is allowed, and if allowed then formats the
data into strings, fonts, font colors, etc.
3. Passes the formatted data to the archive manager for the display page. The
actual archive only occurs on the correct stream as defined above for formulas
and derived parameter solves.
4. Passes the solved data for the widget parameter to the widget FIFO manager
for display at non-bursting rates.
4.3.9 Double Precision Tags
The processing engine for the client stores raw data in 32-bit words, and stores scaled
data as double precision numbers. If the user has parameters that are transmitted as
IEEE754 double precision numbers, then not all of the bits will fit into a 32-bit word,
because this type of number requires 64 bits. As an example, a IEEE754 double precision
number will look like the following when it comes from a raw stream (assume 16-bit
words):
•
•
•
•
•
Word 1 = 0x40B3
Word 2 = 0x24F3
Word 3 = 0x404E
Word 4 = 0xA4A9,
Result value is 4900.9502
LDPS can solve double precision type numbers in a variety of ways. There are four
different methods to solve the data, depending on how the data was transmitted. Each
method has a set of special rules. Documented below are the four methods, listed in the
order of normal usage (as well as complexity).
U0990102
Lumistar, Inc.
Page 68
11/20/2006
Lumistar Data Processing System (LDPS)
Technical Manual
Part-2
Client Application
1. Define the data type as DOUBLE in the parameter database for the tag. Rules for
this method include:
a. All 64 bits must be contiguous in the stream.
b. No 2nd parameter can be assigned.
c. All the words that make up the bits must be the same word length.
d. Up to eight (8) words are concatenated to achieve the 64 bits.
e. No Endean work is performed. They must be in Little Endean form
(IEEE754).
f. No preprocessing of the words is performed. Simply use raw data from the
stream.
g. Software decommutators cannot be used. Soft decoms only return 32 bit
words to the application for further processing.
h. If a raw value is used for anything, then only the most significant 32 bits
of the raw value are used.
i. The number of bits listed for the parameter will be the word number of
bits, not 64.
j. No EUC or Mx+B is applied.
k. Mode and Time tag processing is applied.
l. Chapter 8 and 1553 type databases cannot use this method (can’t get 64
contiguous bits with those type streams).
2. Define the data type as MW_DOUBLE for the first of two parameters. The
second parameter will be defined as type BINARY.
a. Must use two parameters (the second parameter must also be defined).
b. The first parameter is defined as MW_DOUBLE and contains 32 bits (the
32 bits must be contiguous).
c. The second parameter listed in the first parameter is defined as BINARY
and contain 32 bits (the 32 bits must be contiguous).
d. The word lengths that make up the two 32 bit words do not have to be the
same length.
e. The two 32 bit words do not have to be contiguous with each other, but the
individual 32 bit words must be contiguous bits.
f. Software decommutators can solve this type data.
g. Endean checking can be performed.
h. If a raw value of the first parameter is used for anything, then only the
most significant 32 bits of the raw value are used.
i. No preprocessing of the words is performed. Simply use raw data from the
stream.
j. The number of bits listed for each parameter will be 32.
k. EUC and Mx+B are applied as normal (concatenate to double, then times
EUC of first parameter, then + B of the first parameter).
l. Mode and Time Tag processing is applied as normal.
m. Chapter 8 and 1553 type databases cannot use this method (can’t get 32
contiguous bits with those type streams).
U0990102
Lumistar, Inc.
Page 69
11/20/2006
Lumistar Data Processing System (LDPS)
Technical Manual
Part-2
Client Application
3. Define the data type as BINARY. Identify as many parameters as necessary to
add up to 64 bits. Set the scale factor to1.0 and offset to 0.0. Then create a display
function list parameter using the “Iee754NumberConvert” function, passing into
the function all the defined parameters. Preprocessing of the words is performed
as dictated.
4. Define the data type as needed. Identify as many parameters as necessary to add
up to 64 bits. Create a display derived list parameter and molest the bits as
necessary to create a double (very messy). Preprocessing of the words is
performed as dictated.
Most will use method 1 above. For those that don’t follow IRIG standards, or who use a
software decommutator, use method 2 above. Method 3 works well and may have to be
used if there are variable length words in the stream. Also use Method 3 if a soft decom is
in play, or if there is Endean processing is needed, or preprocessing of the words is
required. Method 4 is for those users who have way too much time on their hands, or who
prefer to do things the hard way.
4.4 Display Widget DLL Rules
This paragraph is intended only for those programmers familiar with writing Windows
DLLs. For those not writing a widget DLL, skip this section
For widgets that use Function as the solve type for a parameter, a DLL is called by the
client application. These DLLs must follow the rules used by the client program. When
LDPS was installed, there was a directory created called “\UserTools\MathFunction” that
contain the files needed to compile and create a function. To write a function DLL from
scratch, the two files described below will be required.
•
•
MathFunctionDefinesUnit.h – This file contains the variable types and defines
used to pass information to and from the DLL.
MathFunctionApiUnit.h – This file contains the function prototypes for the
DLL. Use this file or create another. If this file is used, the DLL source code must
contain the “#define FORDLLMATH_IMPORT” statement.
Also in the directory mentioned above is the file set, “MathFunctionUtilsUnit” Use the
files as an example for utilities. This file set contains a utility function one should use (or
something similar) when calls are made to the function DLL. The file set provides a data
and function sanity checker to verify that processing DLL calls can continue.
Under the Documentation\ICD Related\WidgetMathFunction directory is an example
project for the Template.DLL. This is a Borland Builder C++ project, which may aid in
understanding the API. The DLL itself and its help file are stored in the correct directory
of User\ClientFiles\FunctionDlls. The Template DLL does nothing useful. It is intended
to show how to implement functions that are too complex for the normal math engine or
U0990102
Lumistar, Inc.
Page 70
11/20/2006
Lumistar Data Processing System (LDPS)
Technical Manual
Part-2
Client Application
to draw a widget on the screen. Extensive notes are contained in the source file on how to
use the DLL calls.
There are two basic types of display widgets for the client. The first are widgets using the
program interface (a predefined set), and the second are widgets using the DLL function
interface (user written).
For normal, predefined widgets, each widget can contain up to eight (16 or 256)
parameters per widget. Any or all of the parameters can have the solve type set to
function. When the parameters are set to function, the MathFunctionApiUnit is called to
solve the data. For user-defined widgets, the MathFunctionApiUnit is called as before,
but there can only be one enabled parameter on the widget (the first parameter). In this
case, the MathFunctionApiUnit calls will make a couple of extra calls to the DLL to
allow the user to draw to the screen, inside a rectangle defined by the user in the program.
The DLL interface is the same for both DLL widgets, and for widgets that use function as
the solve method for its parameters. The only difference is that there are no draw
functions called if it is not a DLL widget.
When one writes a DLL, a help text file should also be written. The help file should
contain notes on what the DLL does and how to pass data to it and interpret the data
returned from it. This might include the parameter order to pass in, the parameter names
to use, constants to determine the mode the DLL is in, etc. The extension for the help file
is “.TXT” and the name is the same as the DLL name and must be an ASCII file. When
the user is assigning a function to a parameter, this help file will be displayed in the
function editor.
The compiled function DLL and its associated help file needs to be stored in the
subdirectory: \User\ClientFiles\FunctionDlls under the LDPS program directory.
4.4.1 API Calls
There are seven (7) function calls used for the function DLL interface. The calls all return
an integer to the client. In actuality, it doesn't matter what value is returned because the
client treats it as a returning void.
•
int DllMathInit (mathdllpassinfotype
&therecord,mathdlltoprogramcbfunctiontype progcallback);
This routine is called at the instantiation of the math routine, when a parameter is created.
Allocate any memory needed at this point and initialize the variables to a default state.
This function is called when the parameter is created. Make sure to set the string labels
for the constants passed in to the DLL. Set the string labels to "" (null) if they are not
needed. Set the string labels that are needed to something meaningful to the user. Instead
of Constant Double 1, one should use "Num Bits Per Word".
• int DllMathProcess(mathdllpassinfotype &therecord);
This routine is called in the process loop of the client program. Depending on the update
rate of the stream, this could be fast or slow or something in between. Use this routine to
U0990102
Lumistar, Inc.
Page 71
11/20/2006
Lumistar Data Processing System (LDPS)
Technical Manual
Part-2
Client Application
perform calculations. Do not draw to a form at this point or solve for string outputs, just
process the new data.
• int DllMathUpdateOutput(mathdllpassinfotype &therecord);
This routine is called in the display loop of the client program. The default rate is 10
Hertz, but could be set to something different. This routine is used to update the result
passed to the client program when the client needs a string representation of the result (a
number is not represented). If the type display object is not a drawing kind, then this
routine is called directly from the client program, otherwise it is called by “dlldraw.” The
user cannot draw to form with this function because the form is null here.
• int DllMathDraw(mathdllpassinfotype &therecord);
This routine is called in the display loop of the client program. The default rate is 10
Hertz, but could be set to something different. If the type display object is a drawing
kind, then this routine is called directly from the client program instead of calling
“dllupdateoutput.” The user can call “dllupdateoutput” for the conversion to string form,
or to maintain a result. It can be used as both drawing kind and non-drawing kind. The
user can draw to the form here.
•
int DllMathDrawMouseEvent(mathdllpassinfotype &therecord,int x, int y, bool
mousemove, bool buttondown)
This routine is called from a graphics type DLL only. It is called when a mouse event
occurs within a window. The routine returns the mouse x and y position (top left of
window is 0,0). The routine indicates if the event is due to a mouse movement (true) or
button change (false). The routine also returns the state of any of the buttons (the user
can’t pick which button). The states are buttondown (true) or buttonup (false). The
variable InstanceId in “therecord” will indicate which window the event came from.
• int DllMathDrawKbdEvent(mathdllpassinfotype &therecord, int key, bool keydown);
This routine is called from a graphics type DLL only. It is called when a keyboard event
occurs within a window. The routine returns the key and indicates if the event was
keydown(true) or keyup(false). The variable InstanceId in “therecord” will indicate
which window the event came from.
• int DllMathKill(mathdllpassinfotype &therecord);
This routine is called when the client program will no longer call this DLL instance. Use
this routine to clean up any memory allocations and events and threads. If this is the last
instance of the DLL, then clean up all of the global stuff also.
4.4.2 STRUCTURE mathdllpassinfotype
As seen in paragraph 4.4.1 on page 71 (API calls), all DLL calls pass a structure of type
“mathdllpassinfotype.” This structure is defined in “MathFunctionDefinesUnit.h.” This
structure contains a great deal of information. A detailed explanation of the structure is as
follows:
U0990102
Lumistar, Inc.
Page 72
11/20/2006
Lumistar Data Processing System (LDPS)
Technical Manual
Part-2
Client Application
•
bool AllParamsValidFrameSync; - All parameters passed into the DLL have been
checked for valid data. This variable is set to true if all parameters have valid data,
and false if one or more parameters have invalid data. Valid is determined by using
frame sync lock for the stream it belongs to.
•
bool AllParamsValidLocation; - All parameters passed into the DLL have been
verified to exist in the parameter database of the project loaded. If one or more of the
parameters passed to the DLL do not exist in the project database, then this variable is
set false. This indicates if a project is loaded or if the user made a typographical error
entering a parameter name.
•
bool AnyParamsStale; - All parameters passed into the DLL have been checked for
stale data, as defined in the parameter database. If one or more of the parameters
passed to the DLL contain stale data, then this flag is set to true.
•
int InstanceId; - The same DLL can be used for multiple parameters in multiple
widgets. An InstanceId is also passed in the structure. This instance id is guaranteed
to be a unique number for each parameter using the DLL. The instance id is really an
index used for sharing a data segment and for comparing the data from one index
against another. This number is assigned and given to the user just prior to the call of
DllInit(). The instance id can be used for DLLs that share a data segment, but must
have some unique data structures for multiple instances of the loaded DLL (i.e. for
computing averages over time). When the DLL is first called by the client application
(DllEntryPoint), the user should reset all numbers. The instance id can also be a
handy number if a single copy of the DLL is run during the applications life. NOTE.
The instance id is not guaranteed to start with 0 or be sequential. If the user edits a
widget that used this DLL, all parameters using this DLL will be killed first. The user
edits the desired parameter(s) and then new indexes are created (starting with the
highest one used so far). The index (InstanceID) is assigned based on the order the
function is added to the function list. For example, one could have an index id of 7
and an index id of 22, if the order of the particular function is added to the function
list as described. The highest index value will be MAXFUNCTIONTYPEPARAMS 1 (currently 8192 - 1). It is implemented this way because it's easier to increment a
global index in the client program (in case other widgets are not being edited using
the same DLL), than it is to close all parameters in all widgets using this DLL and
then starting over. The user may want a translation routine to index objects (if they
are used). The instance id is normally not going to be used by non-complex DLLs
because the value is updated, an then pass into “therecord.” This keeps the data
straight for the user (on non complex, meaning one molests the data for index X
based on the data from index Y using the same DLL).
•
HWND WindowHandle; - This is the handle to the screen for the widget. If the
widget is a user graphics type, then the handle will not be null. For all other widget
types, this handle is null. This may be needed for some Windows API calls.
U0990102
Lumistar, Inc.
Page 73
11/20/2006
Lumistar Data Processing System (LDPS)
Technical Manual
Part-2
Client Application
•
HDC *TheDc; - This is the handle to the device context for the screen. If the widget
is a user graphics type, then the dc will not be null. For all other widget types, this
handle is null. This may be needed for some Windows API calls to the de.
•
TRect DrawRect; - This is the definition of the screen rectangle for the widget
coordinates, in pixels, where 0,0 is top left. This is only needed for graphics type
widgets.
•
mathdllconstantinfo ConstAry[MAXCONSTANTSPASSEDTODLL]; - The user
edits the constants when editing a parameter for the function. The constants were
designed to allow the same DLL to have multiple functions, or multiple methods of
solving the same function, based on the values passed in. This is a good reason one
should have a help file with the DLL. The user fills in the Boolean and double
constants as required. Also fill in the name to display for the constant as required.
•
int NumVarsPassed; - The function can pass in up to 128 parameters. This variable
indicates how many values were passed in. Use this to determine if there are enough
parameters passed in so that the data may be processed.
•
mathdllparamininfo InAry[MAXPARAMSPASSEDTODLL]; - This contains
floating point data for each parameter passed from the client program and whether the
value is valid or not (coming from the program source and the parameter stream
source). It also contains the raw, unscaled value for the parameter, in case one needs
to manipulate the raw data first (like for the concatenate DLL function provided).
•
double SysTime; - This is the system time, in seconds of year when the call is made
to the DLL.
•
double LastSysTime; - This is the system time, in seconds of year, when the last call
was made to the DLL.
•
Int NumVarsPassedOut; - This is the number of variables passed back to the client
program. Currently, only 1 is used by the client program.
•
mathdllparamoutinfo OutAry[MAXVALUESOUTOFDLL]; - This is the value
used by the client program and is the result of the user’s process. If other widgets or
math processes calculate their data based on this data, then this is the value that is
used. The output value is displayed in the appropriate place on the widget using the
format defined by the user. Currently, only the first value (raw and scaled) is used, so
one can use the other outvalues as a scratchpad.
•
mathdllscratchinfo UserScratchInfoAry[MAXDLLSCRATCHELEMENTS];
This is the scratch pad information one may use if desired. The client program does
not use it.
U0990102
Lumistar, Inc.
Page 74
11/20/2006
Lumistar Data Processing System (LDPS)
Technical Manual
Part-2
Client Application
•
char OutString[STRINGOUTCHARS]; - The user has the option to display a
string from the DLL, instead of using numbers. This allows complex enumerations
based on the data.
•
int RetCode; - This is the return code of the function call. Set the RetCode to
“DLL_ERPROCNOTUSED” if it is a blank procedure (does nothing). Set it to
“DLL_ERNOERROR” if there were not errors during the call. Set it to a number
greater than zero if the output of the function is not a valid answer, but was processed.
4.4.3 DLL Call Process
The process that occurs is as follow:
DllMathInit()
loop
DllMathProcess()
//solve the data
DllMathUpdateOutput()
or DllDraw()
DllMathDrawMouseEvent (for graphics types only)
DllMathDrawKbdEvent
(for graphics types only)
end loop
DllMathKill() -> clean up as last step in the process.
4.5 Hardcopy
The Hardcopy function for the client display does not output the image to a printer.
Instead, the picture is saved to a file (either a BMP or a JPG file, as set by the user
options). It is implemented this way because making hardcopy output to a printer can eat
up CPU cycles over a long time period. This scenario may not be acceptable during a live
test.
When a hardcopy is generated, the name of the file is created in part by counting the
number of hardcopies made since the program was loaded. The name of the file is
“LdHdCpy” plus the number for the count of hardcopies, plus the extension for the
correct type of file (Bmp or Jpg). For example, LdHdCpy1.Jpg, LdHdCpy2.Jpg, etc.
A way to implement a very simple print server is as follows: 1) Auto increment filenames
and place the resulting files in the directory of choice. 2) Have a dedicated computer
connected to the printer. This computer must see all the client machines on the network.
3) Write a simple program on the print server computer to scan all clients for hardcopies.
When a hardcopy is found. Copy the hardcopies from the remote to local drive queue
directory, possibly renaming the files to reflect the client the file came from. Then delete
the hardcopies from the remote drive. Scan the local queue directory for hardcopies. If a
hardcopy is found, Print the hardcopy and move the hardcopy file to permanent storage
directory. 4) Run the print server program when running any client programs.
U0990102
Lumistar, Inc.
Page 75
11/20/2006
Lumistar Data Processing System (LDPS)
Technical Manual
5
Part-2
Client Application
Getting Started
Learning to use a new item of high technology for the first time is never an easy
endeavor, and no two people will approach it in the same way. This chapter is intended as
a place to start the process of learning how to use the LDPS Client application.
5.1 Quick Review
By way of quick review, the following summarizes some of the more salient concepts
that effect how LDPS operates.
•
•
•
•
•
•
•
•
•
•
•
•
In LDPS, there are two major architectural entities: the server, and the client(s).
Each is a powerful application in their own right and they work together to
acquired, archive, process, and present a wide variety of telemetry data.
The servers’ job is to collect data from the hardware, do some manipulation of the
data, and distribute the data to the clients and/or the hard disk drive.
The purpose of the client is to collect data from the server and process and display
it.
LDPS is a project-oriented application. In order for data to be distributed, a
project must be loaded. A project contains information about the streams of data
and the hardware that collects the data.
Each project can contain up to twelve (12) streams of serial data and twelve
streams of non-serial data. Each stream consists of a hardware device, data
produced by the device, and possibly a serial database associated with the device.
The processing of data is based on the parameter name. The user only has to know
the parameters’ name in order to have processing occur on that parameter.
Each stream must have at least one device associated with it. Many devices can be
in a single machine. Each device must be associated with a stream.
Each stream contains a current value table (CVT) for the device and a parameter
list. Serial devices also have a serial CVT and a parameter list. The device
parameter list is fixed and is created by the system (cannot be edited by the user).
The user creates the serial parameter list.
The processing of parameters can take many forms, including the use of a Lookup Table.
A hardware device can be set up and raw data can be monitored without a project
being loaded on the server. In this scenario, none of the clients will receive the
data.
The server only responds to clients identified in the system. The server can always
have a client on the same machine. Remote clients require a network. Client
displays are CPU intensive.
Processing of data is a selection process. Only tags with expressed interest are
transmitted from the server and processed by the client. The only way interest can
be expressed is via a widget of some sort on a display page.
U0990102
Lumistar, Inc.
Page 76
11/20/2006
Lumistar Data Processing System (LDPS)
Technical Manual
Part-2
Client Application
5.2 Begin The Process of Using The LDPS Client
To get started with the LDPS client application, follow the steps below in the order listed.
First of all, read carefully paragraph 6.2, “Begin The Process of Using LDPS” in the
getting started section of the LDPS Server Manual (Part-1), Lumistar document number
U0990101.
Next consider what data needs to be processed and displayed. Ponder the following
questions:
• Will all the parameters fit on one display page, or will multiple display pages be
required?
• Does the test have different parts, or phases, where only certain parameters are of
interest during a specific phase? (i.e., display lists will be needed)
• Are there different projects that require different sets of display pages?
• Is there any special processing required that is not available with the widgets
supplied in the gallery?
If there are special processing and/or displays that need to be developed, these will
require the user to write one or more DLLs (see paragraph 4.4, “Display Widget DLL
Rules” on page 70).
Start the client program. If the server has a project loaded, then the project will
automatically load on the client if the Always Load Project Automatically option is set in
the client options (see paragraph 3.8.3 on page 26). If not, it is recommended that one
load the project on the server to take advantage of the parameter popup lists.
On the client window, click on Display, then New Page (Display → New Page). A blank
display page will appear. Begin adding the required widgets. After all widgets have been
added, save the page. Repeat this for each display page created for the test.
On the client window, click on Display, then Edit Display List (Display → Edit Display
List). This will invoke the Display List Editor window shown in Figure 3-12 on page 20.
Add the display pages previously created that are to be grouped together in the list. Up to
16 pages can be grouped together. This is not required if only one display page will be
displayed at a time.
To display a single page, on the client window, click on Display, then Page
(Display → Page). When prompted, select a previously defined display page from the
file menu. Data will begin processing on all parameters on the display page. Repeat this
for each display page to be viewed at the same time.
To display a group of display pages, on the client window, click on Display, then List
(Display → List). When prompted, select a previously defined display list from the file
menu. The resulting group of pages will be displayed (see Figure 3-19 on page 31 for an
U0990102
Lumistar, Inc.
Page 77
11/20/2006
Lumistar Data Processing System (LDPS)
Technical Manual
Part-2
Client Application
example), with the first page in the group being displayed. All of all the parameters on
that page will have the processing engine working for them). To change the page that is
displayed in the group (and therefore expressing interest), either click on the page tab, or
press the number on the keyboard that corresponds to the page number in the list, or press
the PgUp / PgDn keys.
The user may edit the display pages while the project is loaded and data is running. This
feature is seldom seen on other display systems from third party vendors.
The only way to get really comfortable with the LDPS system is to experiment with it.
This is especially true of the client application. The client displays have a lot of power,
and also a great many options. The user is encouraged to create multiple displays and to
test the system with various projects loaded to determine where any limitations are.
And as always, do not hesitate to contact Lumistar customer support if any issues or
problems arise.
U0990102
Lumistar, Inc.
Page 78
11/20/2006
Lumistar Data Processing System (LDPS)
Technical Manual
6
Part-2
Client Application
Appendix
6.1 The Measurement Calculator
The Measurement Calculator (found in the tools menu of either the server or client) is a
virtual “Swiss Army Knife” of measurement calculations and offers a smorgasbord of
handy numerical routines for a variety of different applications. Each application area has
a tab containing many different parameters and functions. The user selects a particular
parameter or function by right clicking and selecting the item. The specific menus for
each of the tabs are shown in the figures that follow.
Figure 6-1 The RF Tab
Figure 6-2 The Numbers Tab
The measurement calculator has seven tabs across the top of the window that includes:
RF, Number, Math/Trig, Date/Time, WG 84, Misc, and PCM Data. The use of each tab is
fairly self-exclamatory and is not described in detail here.
U0990102
Lumistar, Inc.
Page 79
11/20/2006
Lumistar Data Processing System (LDPS)
Technical Manual
Figure 6-3 The Math/Trig Tab
Part-2
Client Application
Figure 6-4 The Time/Date Tab
Figure 6-5 The WG 48 Tab
U0990102
Lumistar, Inc.
Page 80
11/20/2006
Lumistar Data Processing System (LDPS)
Technical Manual
Figure 6-6 The Misc Tab
Part-2
Client Application
Figure 6-7 The PCM Data Tab
6.2 The Link Budget Calculator
The Link Budget Calculator (found in the tools menu of either the server or client) is a
useful tool for performing a link margin analysis for terrestrial or satellite radio links used
in telemetry applications. The user enters the fundamental parameters that describe the
link, including range, frequency, transmitter power, bit rate, etc., and the budget for the
link is calculated as shown below right in Figure 6-8. The link budget is a simple
accounting of the gains and losses that the signal experiences during its travel from the
source to the destination.
Figure 6-8 Tools → Link Budget Calculator
6.3 The Network Wizard
Network management is very important in LDPS and is necessary for the server-to-client
communication mechanism. The client programs must know who to request data from,
U0990102
Lumistar, Inc.
Page 81
11/20/2006
Lumistar Data Processing System (LDPS)
Technical Manual
Part-2
Client Application
and also be able to read project files. During operation, the server broadcasts data out to
the world on the net, or on the user defined subnet mask, if it was optionally set. The
client programs pick up the data from the network and uses it as needed. The clients’
configuration options define the network address of the server it accepts data from, as
well as the address of the Backup Server, if one has been assigned.
For the mechanisms described above to function correctly, the network environment must
be setup and configured correctly. The Network Wizard is a helpful took that aids the
user in the network setup process, and walks the user through the steps necessary. The
first window that the Network Wizard displays is shown in Figure 6-9 below.
Figure 6-9 Network Wizards' Help Screen
The complete text of the help window is shown below:
Before this wizard will work, you must have all the PCs you wish to be part of
the LDPS network configured and turned on.
This wizard needs to be run only on the LDPS Server.
The following must be configured on all machines:
1. All must have the same subnet mask for the first 3 bytes, i.e. 162.33.21.y,
where y is the last byte of the IP address of each of the PCs.
On DHCP type servers, this will more than likely be done for you.
2. All must have the LDPS_8X directory SHARED, with the shared name of
"Lumistar", with both read and write permissions.
[the directory where Ldps8xServer.exe is located]
This includes this machine (the Server)
Ensure you uncheck 'Read Only'
Ensure you check 'Share this computer on the Network'
Ensure you check 'Allow network users to change files'
3.
LDPS must be installed on all PCs.
4.
All PCs must have the same log on user name and password.
5. All firewalls turned off (i.e. McAffey, Symantic, Windows, etc)
If you know what you are doing, you can set the firewalls up to work if you wish.
U0990102
Lumistar, Inc.
Page 82
11/20/2006
Lumistar Data Processing System (LDPS)
Technical Manual
Part-2
Client Application
When all of the above are met, press 'Continue' to begin, or 'Close' to end the
wizard.
Clicking the Continue button in Figure 6-9 invokes the Windows Login Information
dialog box shown below. Enter the log on name and password, and make any changes to
the subnet mask required (contact your network administrator for assistance).
6.4 The Measurement Converter
The Measurement Converter (found in the tools menu of either the server or client) is
another virtual “Swiss Army Knife” of conversion functions for a large variety of
physical parameters. Each physical parameter has a tab containing many different units of
measure that the user converts to and from. The user selects a particular input and output
parameter, and the units of measure for each and then enters the numeric value for the
input. The output is automatically calculated as the input value is entered. The specific
menus for each of the tabs are shown in the figures that follow.
Figure 6-10 Tools → Measurement Converter
U0990102
Lumistar, Inc.
Page 83
11/20/2006
Lumistar Data Processing System (LDPS)
Technical Manual
Part-2
Client Application
6.5 The LDPS Archive Stripper Utility
If the user wishes to employ their own tools for data reduction, it will be necessary to
extract data from the LDPS archive files to facilitate this processing. The archive stripper
utility shown in Figure 6-11 below should prove useful in this endeavor. The archive file
format has four main sections. These include:
•
•
•
•
File Header – Contains information about how to read the file.
Block Header – Contains block time stamp, run number, time source, and a
spare byte.
Frame Header – The decommutator prefixes PCM data with the frame
timestamp.
Device Tags – Data from the devices (device status tags) are written after the
PCM data.
The user may elect to remove any or all of the main sections described above. The
archive file may also optionally be converted into a TM15 archive format.
Figure 6-11 Tools → LDPS Archive Stripper
To operate the program, start by clicking on the Archive File To Convert bar. Select the
archive file to convert. Note: the file must be in the LDPS 8x archive format. Select the
5
(Tables Manager 1) A multidimensional analysis program for DOS and Windows from Applix, Inc.,
Westborough, MA (www.applix.com).
U0990102
Lumistar, Inc.
Page 84
11/20/2006
Lumistar Data Processing System (LDPS)
Technical Manual
Part-2
Client Application
strip options check boxes for those elements that are to be removed from the archive file.
Finish by clicking the Convert button. The process may be aborted by pressing the
Cancel button. When the conversion is finished, a trill sound will emit from the PC
speaker and the Convert button will no longer appear depressed. The converted file is
saved in the directory the stripper utility resides in. The converted file will have the same
name as the original file with a “BIN” extension. If one elects to keep the file header
information in the converted file, then the file header information will be followed by a
NULL character before the PCM data begins. (Look for a <CR>, Line Feed, NULL
sequence).
6.6 LDPS Import Database
The LDPS parameter database import program is described in detail in paragraph 1.3.8
on page 21 of the LDPS Server Manual (Part-1). To invoke it, from the server, select
Tools, and then LdpsImportPdbase (Tools → LdpsImportPdbase). This tool can also be
invoked in a stand-alone fashion from the ../User Tools/ subdirectory. This program will
not import every type of format likely to be encountered, but it will handle most of them.
If it will not support a particular master the user can always write their own custom
application, using the supplied LdpsPdbaseConvert.dll.
6.7 Chapter 8 Bus Monitor
The Chapter 8 Bus Monitor is invoked from the tools menu on
the LDPS server as shown right. The Chapter 8 Bus Monitor
program is an application that monitors IRIG-106, Chapter 86
data, and a few statistics. The actual raw PCM data is
decommutated by the server program (see paragraph 3.2 on
page 79 of the LDPS Server Manual (Part-1). The embedded
Chapter 8 data is then further processed by the Chapter 8
software decommutator DLL running on the Client. The resulting Chapter 8 data is
placed in shared memory, where the bus monitor application can access it. Note: the bus
monitor application is useless without the LDPS client running a Chapter 8
decommutator as one of the streams.
To invoke the Chapter 8 Bus Monitor display, click on the Tools menu in the server and
select the Ch8BusMonitor command (Tools → Ch8BusMonitor). The resulting window
is shown in Figure 6-12 on page 87. There are five main sections of the GUI. At the top
left are two commands: Debug, and About. Clicking the Debug command invokes the
Chapter 8 Software Decommutator Logging Options Window shown in Figure 6-13 on
page 89. The About command allows the user to view the software version number and
the error log for this Chapter 8 Bus Monitor.
Below the two commands, in the upper left corner of the window is the Chapter 8
software decommutator information. This indicates if the soft decom is alive or not, and
which streams are available for monitoring. If there is more than one Chapter 8 stream
loaded on the server, the user may select which stream to monitor via the click wheel.
6
Defines MIL-STD-1553 data that has been embedded within a standard PCM telemetry stream defined by
Chapter 4 of the IRIG-106 document.
U0990102
Lumistar, Inc.
Page 85
11/20/2006
Lumistar Data Processing System (LDPS)
Technical Manual
Part-2
Client Application
At the top center of the window is a box displaying the PCM Frame Time (the time
stamp of the frame of data from the decommutator) and the embedded Chapter 8 Frame
Time (i.e. Chapter 8 words 2, 3, and 4).
At the top right of the window are three controls: Pause, Hard Copy, and Reconnect.
Clicking the Pause button halts the updating (at a 10 Hertz rate) of numerical data on the
display. Clicking the Hard Copy button takes a snapshot of the application window and
saves the image (Windows BMP format) in the root directory where the bus monitor
application is located. If the Chapter 8 bus monitor is started before the server and
primary decommutator (LS-50), there is a chance that the shared memory connection will
not be active. In this scenario, click the Reconnect button to establish the link between
the software decommutator and the Chapter 8 bus monitor.
The bus status information occupies the upper half of the display below the controls
mentioned previously. This area contains statistical counters for each bus, as follows:
•
•
•
•
•
•
•
•
Bus A Count – For type words 4 thru 15 from the command word, counts the
number of words stored since the reset of the decoder on bus A.
Bus B Count – – For type words 4 thru 15 from the command word, counts the
number of words stored since the reset of the decoder on bus B.
Msg Count – Counts the number of times a new command word was stored.
Error Count – Counts the number of times a type word 8 and 12 from the
command word were stored (error bus A and error bus B).
Parity Error Count – If the software decommutator parity checking mode is not
set to DON’T CARE, then parity errors are counted. The default parity checking
mode is set to HOPE, meaning just count the errors, but don’t do anything about
them.
Overflow Count – Counts the number of times a type word 0 from the command
word was received.
Total Word Count – Counts all type words except type 1 from the command word
(fill data). This is used for the calculation of bus loading.
Bus Loading – The percentage of the maximum theoretical usage of the bus.
Individual statistics for each bus may be independently reset by clicking the Reset button
above the respective column (0 through 7). Click the Reset All button to reset all
statistics to zero.
U0990102
Lumistar, Inc.
Page 86
11/20/2006
Lumistar Data Processing System (LDPS)
Technical Manual
Part-2
Client Application
Figure 6-12 Chapter 8 Bus Monitor Window
The bus information section occupies the lower portion the Chapter 8 bus monitor
window shown in the figure above. The bus info area displays the data values for the
selected bus, R/T number, message number, and T/R bit position. There are four main
areas of the bus info section that include:
•
Word Selection – It is impossible to display all 600,000+ words on a single
display. Using four click-wheels to select the desired Bus, R/T number, Message
number, and Transmit bit position, the user may select the area of interest in the
stream. The other sections will display data specific to these selections.
U0990102
Lumistar, Inc.
Page 87
11/20/2006
Lumistar Data Processing System (LDPS)
Technical Manual
•
•
•
Part-2
Client Application
Message Time Delta – To the right of the word selector is displayed the time
difference between the embedded Chapter 8 frame time and the time the last
message was updated. The time delta can indicate if the data is stale.
Special Words – There are forty-one (41) words in each array of Chapter 8 data.
The array consisting of ([bus][T/R bit][msg][RT num][word]), with lengths of
[8][2][32][32][41]. Of those forty-one words, thirty-two (32) are data words. The
other words are defined as special words as follows:
1. Command Word
2. Status Word
3. Message Time Hi
4. Message Time Lo
5. Message Time Micro
6. User Def 1
7. User Def 2
8. Mode Code
9. Response Time
These values are displayed in hex. For convenience, the three message time words
(3,4, & 5) are put together to display the time of day format.
Data Words – There are thirty-two (32) data words in the Chapter 8 array
selected. The values are displayed in hex.
6.7.1 Chapter 8 Bus Monitor Debug Options
As an aid to analysis and troubleshooting, the Chapter 8 Bus Monitor includes a
debugging feature. With it, the user may log information in an error log (located at
System\ErLogs\Ch8Dll.log). The debug command features should only be used in
playback mode due to certain peculiarities in logging ASCII data and the high stream
data rates involved. Click the Debug command in the main menu to invoke the software
decommutator logging options window shown in Figure 6-13 below right.
U0990102
Lumistar, Inc.
Page 88
11/20/2006
Lumistar Data Processing System (LDPS)
Technical Manual
Part-2
Client Application
The soft decom logging options window has four
main sections including: Stream Control,
Decoder Options, Debug Logging Options, and
Debug Logging Isolation. Each section is
discussed in more detail in the numbered
paragraphs that follow.
6.7.1.1 Stream Control
This section shows the status of the Chapter 8
DLL (NONE, or ACTIVE), and indicates is
Chapter 8 streams are available (NONE, or
ACTIVE). If multiple streams are available, the
user may select the desired stream via the click
wheel.
6.7.1.2 Decoder Options
It has been noticed that some streams have a
problem in that the number of data words Figure 6-13 Chapter 8 Software
following a command word are not correct. In the Decommutator Logging Options Window
strictest sense, this is an error and the error would
be counted in the decoder. However, if the Data Word Count Filter is not selected, then
the data words are added to the array anyway and the error is not counted. If the filter is
selected, then the data words are not added to the array and the error counter is
incremented.
6.7.1.3 Debug Logging Options
In this section, the user may indicate with more specificity, the type of data that is to be
recorded in the log. By checking Log Includes Fill Words, even fill words will be
logged with the data, provided the Log All Types of Words check box is also selected. If
the Log All Cmd Data Info check box is selected, then each 24-bit value will be logged
as it arrives and is decoded. The information recorded includes: Cmd Word (upper 8
bits), Value (lower 16 bits), Bus ID (extracted from the Cmd Word), and Typw Word
(extracted from the Cmd Word). If the Log On Cmd Word check box is selected, then
the command word will be broken out and logged. The information recorded includes:
Bus, RT, Msg, T/R bit, Cmd, Last5, Words To Follow, and Mode Code. By selecting
Log All Types of Words, any type word that comes along will be logged. The
information recorded includes: Bus, RT, Msg, T/R bit, Word Type (including Overflow),
Value of the word, Data Words to Follow, and Data Word Count (number of words
counted so far for this cmd word).
6.7.1.4 Debug Logging Isolation
This section acts as a filter for the logging options described in the previous paragraph.
To limit the logging to the selected Bus, RT, Msg, and T/R bit, right click the mouse
cursor and select/configure the desired element. To log all traffic for a given element,
enter a value of “-1” for that element. A “-1” for the T/R Bit will record both bits.
U0990102
Lumistar, Inc.
Page 89
11/20/2006
Lumistar Data Processing System (LDPS)
Technical Manual
Part-2
Client Application
6.7.2 Notes about Chapter 8 Bus Monitor Usage
The statistical counters can get quite large. To clear them and start again, on the client
click Reset in the soft decom area. The user will be prompted to enter a value to fill the
data with. The data will be filled with this value and the statistical counters will reset to
zero. The default value to start the Chapter 8 arrays with is zero. To see which data words
are being used, fill their value with some other number, and then look at the words for the
desired address. If the value remains at the initial value, then it is not being updated in the
stream. This is an easy way to determine the number of data words being used for a
particular command word.
The User Def words are really not part of the 1553 data per say, but the IRIG
specification dictates a bus ID be used when transmitting them. These words are counted
as bus traffic by the software decommutator, and therefore the bus loading calculation
will not be accurate for the bus defined in the user def words. For example, in the F18
program, the User Def 2 word is used for embedded audio, with a bus ID of 7. If this
scenario becomes an issue, the software decommutator can be modified not to count the
user def words as part of the bus loading calculation.
The bus loading percentage is calculated at a 1 hertz rate. The calculation is thus:
• totalbits = AryTotalWordCount[busnum] * 20.0;
• maxbits = dtime * 1,024,000.0; //max theoretical bits per second
• loading = totalbits/maxbits;
There seems to be no consensus on what to do when a parity error is detected. In LDPS,
the default mode is to just count the errors and do nothing else about them (proceed as if
nothing was wrong). Parity checking looks for odd parity.
U0990102
Lumistar, Inc.
Page 90
11/20/2006
Lumistar Data Processing System (LDPS)
Technical Manual
Part-2
Client Application
6.8 The Map Widget
The map widget shown right needs a
separate section in this user’s manual
because it has far too many configurations
and is not obvious on how to set up. The
map widget is capable of giving the user a
good representation of the world and the
items of interest in the world. It is not,
however, a full-fledged range control
widget. Those capabilities will evolve over
time as users requirements mature. Up to
four map widgets may be on a display
page at the same time. Depending on the
map mode, a fairly fast processor and
graphics card will be needed in order to
keep the CPU usage down to a reasonable
level.
CAUTION - It is not recommended that
this widget be used on the same machine that the server application is running on,
especially if the map image is coupled to a moving target with fast data rates and
archiving. The map widget can use up a lot of CPU cycles, which in turn can cause data
dropouts from the server.
The map widget is divided into three sections: The worldview, a caption bar just below
the worldview (optional), and a data panel for display of selected calculations. The data
panel is not used to display normal telemetry data. Use normal widgets to display this
type of information. The data panel is strictly intended for calculations involving moving
targets, waypoints, and the origin.
6.8.1 Capabilities
The map widget is just like any another widget on the client display page(s). It can be
moved and sized just like a normal widget. It can even be copied and pasted like a normal
widget.
The properties editor for the map widget is somewhat different in operation. Normal
widgets allow one to escape from any changes made, and don’t take affect until the user
accepts the changes. However, changes in the map widget properties take affect
immediately and cannot be undone.
The map widget can contain one map image, representing the world of interest. The map
image is a .BMP graphics file that could result from an actual scan of a real map. The
map widget can also contain up to 32 waypoints (and their respective images). These
waypoint images are also .BMP graphic files. Finally, the map widget can contain up to
U0990102
Lumistar, Inc.
Page 91
11/20/2006
Lumistar Data Processing System (LDPS)
Technical Manual
Part-2
Client Application
twelve (12) moving targets (and their respective images). The moving target images are
also .BMP graphics files. As well as displaying images, the map widget can have up to
twelve (12) functions that can be displayed at a time, with the user selecting the functions
from a list.
The world image can be coupled to a selected moving target, or it can be the center of all
moving targets, such that the world moves and the moving target is stationary in the
center of the worldview. Each moving target can have a velocity vector predicting its
location as well as a history trail, letting one know where the object has been.
The user may also set the moving target(s) to coast on telemetry data dropout.
6.8.2 Images
There are three types of images used by the map widget. The hardest part of using the
map widget is getting the images correct and accurate. There is no image editor supplied
with the map widget. It is up to the user to make images. Each image must be saved as a
Windows BMP file and placed in the maps directory under LDPS\User\ClientFiles\Maps.
Images can be scanned in with a scanner, and/or drawn with an image editing program
such as Windows Paintbrush. The demo map included with LDPS was scanned in and
adjusted with IrfanView, a cheap and free image viewer/editor. The moving target images
were drawn with Paintbrush.
The user will have to experiment with the images and the modes of display to get the
colors to present correctly on the screen. If one chooses not to display a map image, the
job of using the map widget will be much easier.
The top of the screen in the map widget is north. Make note of this when making a map
image. For moving target and waypoint images, one can display text as well as an image,
or may display text instead of an image. If text is displayed, the upper left corner of the
first character in the text is the point of reference.
The map and waypoint images will shrink and grow with zooming., while the moving
target images remain fixed in size.
6.8.2.1 Map Images
Creating the map image is the hardest to get correct, and will usually take several
iterations to get right. Having a map image is not mandatory. In fact, in some cases, the
map image clutters the screen and detracts from the items of interest. The trick in creating
the map image is in getting the map lined up in the scanner correctly such that one can
determine the upper & lower left corner coordinates of the map. The placement of the
moving targets on the map is only as accurate as the scanned map. The sample map
distributed with LDPS is a 1:500,000 scale map of the China Lake area. If the map is to
be coupled with a moving target, it is strongly recommended that one keep the size of the
scanned image (the BMP file) small. Limiting the number of colors in the map is also
advisable. Two colors would be ideal. The supplied China Lake map is a 16-color BMP
file, and on most machines tested, can only handle a 2- or 3-Hertz update rate on the
U0990102
Lumistar, Inc.
Page 92
11/20/2006
Lumistar Data Processing System (LDPS)
Technical Manual
Part-2
Client Application
display before saturating the CPU. A 2-color (monochrome) China Lake image worked
well at 10 hertz. A 256-color China Lake image was ludicrous.
6.8.2.2 Waypoint Images
The waypoint image(s) does not require such accuracy. These images are intended to
depict items such as trucks, buildings, etc. When entering the coordinates for a waypoint,
only the upper left coordinate is important for mathematical purposes, as it is the point
used for calculations. The lower right coordinate is used just to size the image. Most
users don’t use an image with the waypoints, instead preferring to display the label for
the waypoint.
6.8.2.3 Moving Target Images
The moving target images can be simple or complex. The smaller in size the BMP file is,
the less the processor load. Each point in the image takes at least 21 calculations to
manipulate. For a 32x32 pixel icon of a moving target, at least 21,504 calculations are
performed each time the target position is updated. Multiply this by the number of
moving targets, and one can see how the processor load can escalate. Making the image
larger only exacerbates this issue. Finding the right target image size is something that
the user will have to experiment with. The user can also elect not to have an image and
instead only display the text associated with the target. Selecting the background color for
the moving target image is important, especially if using a map image. As shown below,
black works best. This is due to the way the target is displayed. If one wants to see just
the moving target portion of the image and not the entire rectangle that makes up the
BMP file, one would choose to display the image in Opaque mode, which erases the
black part of the image to reveal the map below.
The point of reference for the moving target object is the center of the BMP file.
Rotations of the image depend on this. Keep this in mind when creating the image, as
calculations and displays are based on this point. One might consider placing a black dot
on the center of the image as a reminder of the point of reference. When making the
image, leave enough black space on the left and right portion of the target. Now imagine
that the image is rotated 90 degrees. If the picture displayed still falls within the square,
the picture is ready to go. Also note, the picture of the moving target must be pointing to
the top of the screen. This is north and the rotation of the moving target is based on this.
U0990102
Lumistar, Inc.
Page 93
11/20/2006
Lumistar Data Processing System (LDPS)
Technical Manual
Part-2
Client Application
6.8.3 Map Functions
The map widget performs a large number of mathematical calculations to display the
images. Some of these calculations are useful to be displayed. Up to 12 of these functions
can be displayed on each map widget.
There are four basic types of map functions. These include: Mouse, Time, Distance, and
Angular. The user may mix and match these functions as required. For example, they
can be moving target from origin, moving target from waypoint, moving target from
moving target, etc.
Mouse Functions
The mouse functions allow the user to move the mouse around the map and retrieve
distance and angular results as if the mouse were a moving target. The accuracy of the
mouse function results depends on the zoom factor of the worldview and how big the
map widget is (number of pixels for the world display). The reference point is the view
origin coordinate (which is at the center of the world view)
Time Function
There is only one time function that displays the system time selected on the server.
Distance Functions
These functions involve distances from any object to any other object. The object can be
the view origin, a moving target or a waypoint. The user can select the displayed unit of
measure for each. The distance functions are summarized in the table below.
Table 6-1 Map Widget Distance Functions
Units of Measure
Feet
Nmi (nautical miles)
Smi (statute miles)
Yds (yards)
Meters
Km (kilometers)
Per Second (for rate type functions)
Per Minute (for rate type functions)
Per Hour (for rate type functions)
U0990102
Measurements
MSL (mean sea level)
Rsi (slant range)
Rg (ground range)
Dx (distance east)
Dy (distance north)
Dz (distance up)
Vx (velocity east)
Vy (velocity north)
Vz (velocity up)
Vh (horizontal velocity)
Vt (total velocity)
Rsi Rate (slant range rate)
Rg Rate (ground range rate)
Lumistar, Inc.
Page 94
11/20/2006
Lumistar Data Processing System (LDPS)
Technical Manual
Part-2
Client Application
Angular Functions
Angular functions can be angles from any object to any other object. The object can be
the view origin, a moving target or a waypoint. The user can select the displayed unit of
measure for each. The angle functions are summarized in the table below.
Table 6-2 Map Widget Angular Functions
Units of Measure
Degrees
Radians
DMS (displays in degrees minutes
seconds format)
Per Second (for rate type
functions)
Per Minute (for rate type
functions)
Per Hour (for rate type functions)
Measurements
Latitude
Longitude
Azimuth
Elevation
THdg (true heading)
Pitch
Roll
THdg Rate (true heading rate)
Pitch Rate
Roll Rate
6.8.4 Earth Model
The calculations used for the LDPS map widget use the WGS-847 earth model. The
World Geodetic System (WGS) defines a fixed global reference frame for the Earth, for
use in geodesy and navigation. The latest revision is WGS-84 dating from 1984 (last
revised in 2004), which will be valid up to about 2010.
In the early 1980s the need for a new world geodetic system was generally recognized by
the geodetic community as well as within the Department of Defense. WGS-72 no longer
provided sufficient data, information, geographic coverage, or product accuracy for all
then current and anticipated applications. The means for producing a new WGS were
available in the form of improved data, increased data coverage, new data types and
improved techniques. GRS-80 parameters together with available Doppler, satellite laser
ranging and VLBI observations constituted significant new information. Also, an
outstanding new source of data had become available from satellite radar altimetry. Also
available was an advanced least squares method called collocation which allowed for a
consistent combination solution from different types of measurements all relative to the
Earth's gravity field, i.e. geoid, gravity anomalies, deflections, dynamic Doppler, etc.
The new World Geodetic System was called WGS-84. It is currently the reference system
being used by the Global Positioning System. It is geocentric and globally consistent
within ±1 m. Current geodetic realizations of the geocentric reference system family
7
Department of Defense World Geodetic System 1984, Its Definition and Relationships With Local
Geodetic Systems, Third Edition, National Geospatial-Intelligence Agency. (http://earthinfo.nga.mil/GandG/publications/tr8350.2/tr8350_2.html)
U0990102
Lumistar, Inc.
Page 95
11/20/2006
Lumistar Data Processing System (LDPS)
Technical Manual
Part-2
Client Application
ITRS (International Terrestrial Reference System) maintained by the IERS are
geocentric, and internally consistent, at the few-cm level, while still being meter-level
consistent with WGS-84.
The WGS-84 originally used the GRS-80 reference ellipsoid, but has undergone some
minor refinements in later editions since its initial publication. Most of these refinements
are important for high-precision orbital calculations for satellites, but have little practical
effect on typical topographical uses.
Some pertinent WSG-84 parameters include:
•
•
•
•
•
•
•
•
Equatorial radius - 6.378137e+6 meters.
Polar radius - 6.3567523142e+6 meters.
Eccentricity - 0.0818191908426.
Valid latitudes are between S 70.0 degrees and N 70.0 degrees.
Valid altitudes (MSL) are between –200.0 feet and +5000.0 Nmi.
All longitudes can be used.
Maximum world view radius is 13000.0 Nmi.
Minimum world view radius is 0.1 Nmi.
6.8.5 Map Widget Properties
There are a great many settings required to setup up a map widget to provide total
functionality. There are six categories (tabs) of setup for the map widget. Each will be
described in detail in the following numbered paragraphs.
6.8.5.1 World View Tab
This tab, shown in Figure 6-14 on page 97, allows the user to adjust the picture one
would see if viewed somewhere above the earth looking straight down. The user can
adjust where the viewers’ eye is centered by setting the origin, as well as adjust how high
the viewers eye is by adjusting the radius. These eye adjustments can be made in two
ways.
First, one can type in the coordinates by clicking on one of the View Origin coordinate
labels. When prompted, enter the latitude, longitude, and Mean Sea Level (MSL) for the
center. Or, adjust the coordinates by moving the slider bars for the latitude and longitude.
The height of the eye is adjusted by clicking on the View Radius label or by moving the
slider for the view radius.
The View Orientation Coupling allows the user to couple the worldview to a moving
target, or to the center of all moving targets. Coupling the worldview to a moving target
eats a great deal of CPU time, so be mindful of this if a map image is loaded. The user
may select from one of twelve (12) moving targets. When the view is coupled to a
moving target, the selected moving target image is stationary in the center of the view,
pointing north, and the rest of the images are positioned relative to the selected moving
target.
U0990102
Lumistar, Inc.
Page 96
11/20/2006
Lumistar Data Processing System (LDPS)
Technical Manual
Part-2
Client Application
Figure 6-14 Map Widget Properties – World View Tab
If the view is coupled to a moving target, one will also have the option to couple the eye
to the altitude of the moving target. When the altitude is coupled, the eye is adjusted to
provide a 30-degree view of the world, looking straight down, with the view changing as
the altitude of the moving target changes.
If there are multiple moving targets, the user may elect to see all the moving targets all
the time (always visible on the world view). The option to couple the view to the center
of all moving targets is also available, and if selected, the view radius will automatically
change so all moving targets are visible and the center of the view will be the center of
the group of moving targets.
The user may also choose the background color for the world. Depending on the size of
the map image (if one is loaded), the worldview should be some color not covered by the
map image. Selecting black works well.
6.8.5.2 Map Tab
The map tab, shown in Figure 6-15 on page 98, is where one loads an image of a map, if
one is to be displayed. This tab is also where one unloads the image as well. Configuring
the map tab is the hardest part to get accurate. Success depends on how accurate the
original scan of the map was.
U0990102
Lumistar, Inc.
Page 97
11/20/2006
Lumistar Data Processing System (LDPS)
Technical Manual
Part-2
Client Application
Figure 6-15 Map Widget Properties - Map Tab
To load a map image, click the Load Map Image button, and when prompted, select the
BMP file to display. Don’t be alarmed if the image is not seen at first. Initially, the upper
left and lower right coordinates default to the same value, so the image is basically nonexistent. Once the image is loaded, enter the upper left and lower right coordinates of the
map. Click on one of the coordinate labels and when prompted, enter the latitude,
longitude, and MSL of the corner selected. The prompt requires all three variables to be
entered for each corner.
Use the slider bars to make slight alterations to the corners. To test out the accuracy, the
user can either use one of the mouse functions to point to different locations on the map
to verify a coordinate match, or can drive a moving target to a known coordinate on the
map and check if the moving target image position information matches the coordinates
displayed on the map.
6.8.5.3 Caption Tab
The caption tab, shown in Figure 6-16 on page 99 is optional. Use this tab to choose the
text displayed in the caption area of the map widget, as well as the color of the area, and
the size (height). Note, size is determined by the font size selected for the text.
U0990102
Lumistar, Inc.
Page 98
11/20/2006
Lumistar Data Processing System (LDPS)
Technical Manual
Part-2
Client Application
Figure 6-16 Map Widget Properties - Caption Tab
6.8.5.4 Data Panel Tab
The data panel tab, shown in Figure 6-17 on page 100, allows the user to control the data
panel on the map widget. The data panel is the area below the caption (if there is one) or
just below the worldview. The data panel is where various results of calculations are
displayed. The background color of this panel can be changed as well as the font color of
the data.
The data panel can display up to twelve (12) functions. The panel is divided such that
there are six rows and six columns, with each row displaying two functions. Each row is
made up of a label, data, unit-of-measure label, and then another label, data, unit-ofmeasure label. When a function to display is selected, one is prompted for the unit of
measure to display and the function. The labels are fixed. The user cannot adjust what
they display other than by selecting a function and the unit of measure.
U0990102
Lumistar, Inc.
Page 99
11/20/2006
Lumistar Data Processing System (LDPS)
Technical Manual
Part-2
Client Application
To edit the function to be displayed, select the cell and
then right click on the cell. The menu shown in Figure
6-17 will appear. Select the type of function to display
(mouse, time, distance, angular, described in paragraph
6.8.3 on page 94). When the type of function is select, a
window similar to the one shown right will appear
allowing one to select the unit-of-measure to display
for the function and the references for the function. The
references are for measurements from one object to
another object, with the user selecting the objects.
These from and to objects can be the origin, a moving
target, or a waypoint. If a moving target or waypoint
reference is selected, one must enter the index for the object (i.e., which moving target, or
waypoint). The from and to objects can have different indexes.
Figure 6-17 Map Widget Properties - Data Panel Tab
6.8.5.5 Waypoints Tab
Waypoints are simply points on the earth. Using the waypoints tab, shown in Figure 6-18
on page 101, the user can select images to be displayed at these points. Up to thirty-two
(32) waypoints may be displayed on the worldview.
U0990102
Lumistar, Inc.
Page 100
11/20/2006
Lumistar Data Processing System (LDPS)
Technical Manual
Part-2
Client Application
Figure 6-18 Map Widget Properties - Waypoints Tab
The first thing is to define how many waypoints there are on the map. Then each
waypoint must be defined (edited). Rather than having a large, complex editor window to
display all the viewpoint information, there is an index to select (Waypoint ID) that
defines which waypoint to edit.
Waypoints can have text displayed at the location of the waypoint. Select the Waypoint
ID and enter the text to be displayed and the color of the text. Waypoints can also have an
image displayed at the location of the waypoint. Select the Waypoint ID and click on the
Load Waypoint Image button to load the image to be displayed. Likewise, click on the
Unload Image button to remove the image. One can select to have the image drawn
transparent. This means that the waypoint bitmap image is XOR’d with the map image to
produce a transparent effect (i.e., one can see through the waypoint to the map below).
After the waypoint image is loaded (if any), the location of the waypoint needs to be
entered. Again, as with the map image, enter the upper left and lower right coordinates of
the waypoint image. One can also elect to draw lines between waypoints (a route). Each
waypoint can be connected to one other waypoint with a solid line, a dashed line, or a
dotted line. If the waypoint number to connect to is the same as the waypoint being
edited, no line is drawn. The color and the width of the line can be selected by the user. If
U0990102
Lumistar, Inc.
Page 101
11/20/2006
Lumistar Data Processing System (LDPS)
Technical Manual
Part-2
Client Application
the width of the line is greater than 1, then the dashed and dotted type lines show up as a
solid line.
6.8.5.6 Moving Targets Tab
Moving targets are what the map widget is all about. Using the moving targets tab, shown
in Figure 6-19 below, enables the map to have up to twelve (12) moving targets.
Figure 6-19 Map Widget Properties - Moving Targets Tab
Just as with waypoints, the first thing is to define how many moving targets there are on
the map. Then each moving target must be defined (edited).
The map widget supports a feature to forward the track data for moving targets to a user
written application. This feature involves shared memory. To enable this feature, check
the box labeled “Output Track Data” on the moving targets tab. The user should only
select this option for a single map widget, not multiple map widgets. If the map widget is
displayed and this option is selected, then data will go out to shared memory. If multiple
maps are displayed, then the data from subsequent maps will overwrite the data from the
first map, which will probably give the user written application erroneous results. To be
able to switch origins, make a list of map widgets, each with the different origins and
then select the page with the desired origin. This method will keep from overwriting data.
One can also opt not to check this option on other displays.
U0990102
Lumistar, Inc.
Page 102
11/20/2006
Lumistar Data Processing System (LDPS)
Technical Manual
Part-2
Client Application
Just as with waypoints, the user can opt to draw the moving targets as transparent. This is
the default for moving targets. (The user is encouraged to experiment with this feature to
get a better feel for how it works). Text can be displayed where the moving target is
positioned, and one my select the color of the text. This color is also the color used for
the velocity vector and the history trail.
Load the image to be displayed that represents the selected moving target. One can adjust
the image size slightly with the slider bars. When the map widget is first displayed, the
location of the moving target(s) is placed at the view origin.
One can select to have a velocity vector for the target displayed along with the length of
the vector. The velocity vector is the predicted point where the moving target will be in X
seconds, if it has kept the same velocities in each axis (x, y, and z). The prediction can be
from 0 to 30 seconds. The color of the velocity vector is the same color selected for the
text (if telemetry data feeding the moving target is valid). If the telemetry data is invalid,
then the color is gray.
The user can also select to have a history trail displayed. The history trail is where the
moving target has been in the last X seconds, and the length can be selected from 0 to
120 seconds. A dot is painted where the moving target has been, with the color of the text
being selected by the user (if telemetry data feeding the moving target is valid). If the
telemetry data is invalid, then the history trail color is gray.
One can choose to have the moving target coast if the telemetry data steam becomes
invalid. Coasting means that the moving target continues moving with the last valid
velocity in all 3 axis.
The actual mechanics of how the moving target is positioned takes place in one of two
ways; coasting or the data fed from a telemetry stream. For coasting, one can adjust the
input data using the arrow buttons on the left side of the property page. For data coming
from a telemetry stream, the user must select the specific stream. To specify a particular
stream (and parameter), select the Edit Moving Target Parameters button.
There are up to nine (9) parameters that can feed the moving object. These include: Lat,
Long, MSL, THdg, Pitch, Roll, Vx, Vy, and Vz). At a minimum, one needs to supply the
latitude and longitude. For any of the other seven parameters that are not defined, they
are calculated based on the latitude, longitude, and time delta from the last sample.
(Currently, there is no filtering going on and some of the calculations may appear a little
jumpy at times depending on the sanity of the latitude and longitude inputs.) The more
information feed from the telemetry stream, the more accurate the data will be
representing the moving target data.
Data feed to the moving target must be in a known unit of measure. As there is no
agreement on which units of measure to use, the following has been established for the
map widget. Angular measurements must be in radians. Distance measurements must be
U0990102
Lumistar, Inc.
Page 103
11/20/2006
Lumistar Data Processing System (LDPS)
Technical Manual
Part-2
Client Application
in Nmi (nautical miles). Time measurements must be in seconds. For many users, this
implies that data coming from a stream will have to be adjusted. Make the adjustment by
selecting the solve type for the parameter to be a formula or a function. Editing the
parameter in this way is the same as for a normal widget. The formula and function editor
for the map widget is the same as for normal widgets. When one selects the tab for the
particular telemetry parameter, notice that the unit of measure label changes to the input
unit of measure required. The user cannot change this.
For some telemetry streams, the latitude and longitude are not part of the stream. Instead
the stream may have the distance traveled from a launch point. Here is where a function
would come in handy. One would feed the function the parameters for the distance
traveled, and the launch point coordinates. The function would then calculate the position
of the desired moving target. Another use for a function could involve the position of a
moving target. The function would then calculate the range, azimuth, and elevation from
a location point and feed the data to an antenna-pointing device.
As mentioned previously, the user cannot undo any edit changes made to the properties
for the map widget. The one exception to this are the telemetry data parameters. They can
be undone, just like a normal widget parameter.
6.8.6 Map Widget Glossary
This glossary of terms also gives the constants used in the mathematical calculations
performed with the map widget.
Image – A Windows bit map picture (BMP) file.
Waypoint – A point in the world with latitude, longitude, and MSL coordinates.
MSL – Mean Sea Level. The altitude above the ocean. This is not the same as above the
earth’s crust or above the ground.
AGL – Above ground level.
Rsi – Slant range. The line of sight range.
Rg – Ground range. The range with the altitude component of Rsi removed.
Vx – Velocity east.
Vy – Velocity north.
Vz – Velocity up.
Vt – Total velocity vector. Sqrt(Vx2 + Vy2 + Vz2)
Vh – Horizontal velocity. The vertical component from Vt is removed.
Dx – Distance east.
Dy – Distance north.
Dz – Distance up.
THdg – True heading.
Moving Target – An aircraft, missile, ship, or other object that has telemetry data
feeding the positional data.
Nmi – Nautical miles. There are 6076.115489 feet per nautical mile.
Smi – Statute miles. There are 5,280.0 feet per statute mile.
Yds – Yards. There are 3 feet per yard.
Azimuth – The side angle, relative to true north, of one object from another.
U0990102
Lumistar, Inc.
Page 104
11/20/2006
Lumistar Data Processing System (LDPS)
Technical Manual
Part-2
Client Application
Elevation – The up/down angle, relative to a line parallel to the earth, of one object from
another.
Meters – There are 3.2808 feet per meter.
Km – Kilometer. There are 1,000 meters per kilometer.
DMS – Degrees Minutes Seconds
Origin Coordinates – The latitude, longitude, and MSL coordinates for the center of the
display and the reference for calculations.
WGS-84 – The standard used for the earth model.
EER – Earth equatorial radius of 6.378137e+6 meters.
EPR – Earth polar radius of 6.3567523142e+6 meters.
ECC – Earth eccentricity of 0.0818191908426
K – A constant for the number of degrees per radian of 57.295779513082320876798155
(degrees per radian)
PI/2 – The value of π divided by 2 = 1.570796326794896619231322
All forms of π are based on that number, i.e. π = PI/2 * 2
G - Acceleration of mass (gravity) normal at feet/sec2 = 32.17349
TM – Telemetry.
U0990102
Lumistar, Inc.
Page 105
11/20/2006