1
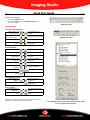
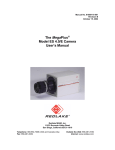
Ver. 1. 2
Quick Start Guide
This quick start guide provides instructions for setting up a basic
system with Imaging Studio. For additional information, download
the user’s manual from the Redlake FTP site at
ftp://ftp.redlake.com/motion/ .
Equipment Required for Setup
•
•
•
•
•
PC running Windows 2000 or XP with Service Pack 1 or higher.
PCMCIA card with power supply (see user’s manual for
additional power options and information)
One of the following camera(s): MotionXtra HG-SE,
MotionScope M3 or registered MotionScope M1/M2
CD with application software
6-pin Firewire 1394 Interface cable
System Requirements
•
•
•
•
•
•
•
Pentium III 1.8 GHz with MMX
DRAM 512 MB or higher
Graphic memory 64 MB or higher
Display 1280 x 768 pixel resolution or higher
HDD capacity 40 GB or higher
CD or DVD-ROM
6-pin IEEE 1394a interface, PCMCIA with power supply or PCI
type with Texas Instruments chip set.
Note: Administrator Privileges on the PC are required
before installing the software!
Page 1
Set up the Camera
1.
2.
3.
4.
5.
6.
7.
From the main toolbar, select the Camera Setup icon, or
double click on the camera name in the right-hand toolbar
window.
Select the Vertical Resolution using the Lines drop down
menu and the Horizontal Resolution using the Pixel/Line
drop down menu. Select the Speed using the Frames/sec.
drop down menu. Select the Exposure using the Shutter
Time text box.
Select the Pre-trigger time by typing the desired percentage
into the Pre-Trig % of Buffer text box from the Camera Setup
window. The Pre-Trig Time [s.] text box displays the resulting
pre-trigger time.
The default setting for the Sequence Length is the total
available recording time in seconds. To change the sequence
length, type the desired number of seconds into the
Sequence Length[s.]text box.
If using an external trigger, the default setting is a falling edge
or switch closure. If a rising edge or open switch is desired,
check the Trigger box on the Camera Setup window.
The default setting for the data transfer speed from the camera
to the computer is approximately 250 to 300 Mbit/s. To
increase the data transfer speed to the full 400 Mbit/s, check
the High Transfer Speed box on the Camera Setup window.
Click on the Options button to access additional power,
battery and trigger options.
View a Live Image
Install the Software
Install the software before connecting the camera to the PC. If you
are installing software to control multiple cameras and/or
previously installed cameras, please refer to the user’s manual.
1. Insert the CD into CD-ROM drive of the computer.
2. Select the CD drive and double click on the Redlake Imaging
Studio Installer.msi file. The program will start automatically
and guide you through the installation.
3. If required, register the camera by double clicking on the
Redlake Imaging Studio Register Key.exe on the CD and install
it to the PC.
Set up the Hardware
Make sure the software is installed on the PC before connecting the
camera to the computer.
1. Switch the camera power to the ON position.
2. When the Power and Ready/Data LEDs light up, connect the
Firewire cable to the Firewire port on the camera. Connect the
other end of the Firewire cable to the PC.
3. The Windows Found New Hardware Wizard will display after
the camera is connected to the PC. Select the option to Install
the software automatically and click on the Next button.
4. From the Windows Hardware Installation screen, select the
Continue Anyway button and follow the on-screen
instructions to complete the installation.
1.
2.
Click on the Preview Normal button or click on the Preview
Correct Exposure button.
Adjust the exposure while in Preview mode by using the
Exposure slider at the top of the toolbar.
To Record Images Without Pre-trigger Frames
1.
2.
Click on the green Set Ready for Record button. The
Ready/Data LED on the camera will light up green.
Click on the red Trigger button or press the manual control
trigger button. The red Ready/Data LED will blink red while
recording images. It will light up solid red when the buffer is
full.
To Record Images with Pre-trigger Frames
1.
2.
3.
Click on the green Set Ready for Record button. The
Ready/Data LED on the camera will light up green.
Click on the white Set for Pre-trigger Mode button. The
Ready/Data LED will blink red and green.
Click on the red Trigger button. The red Ready/Data LED will
blink red while recording images. It will light up solid red when
the buffer is full.
Note: The camera will not display a live image while it is in
record mode.
Quick Start Guide
Ver. 1. 2
Page 2
View Recorded Images
1.
2.
Click on the Playback button.
Click on the Stop button and the Play Forward button to
replay the sequence.
Shutter time slider
Quick Reference
Camera Set up and Operation
Open camera and
change settings
Preview normal with
the correct exposure
Enable camera record
Trigger
Save settings to the
camera
Preview in low light mode
Playback speed slider
Arm for pre-trigger mode
Sleep mode
View and Playback
Go to last frame
Step forward one frame
Play forward
Go to beginning of the
sequence
Stop
Adjust camera color and
contrast
Flip
Go to first frame
Step back one frame
Playback
Go to the end of the
sequence
Go to frame 0
Change output size
Rotate
Zoom
Cut and Modify a Sequence
Select 1st frame of
sequence
Select last frame of
sequence
Mark frame 0
Store a Sequence
Save stored frames in
RAW format
Download as a movie
file
Auto-download in RAW
format
Download as a single
image
For additional information, download the user’s manual from the
Redlake FTP site at ftp://ftp.redlake.com/motion/ .
The right-hand window provides camera and movie lists as well
as access to advanced function tabs.