1
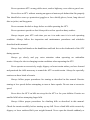
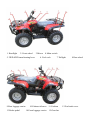
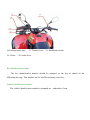
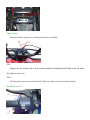
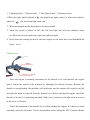
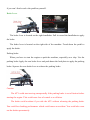
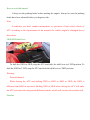
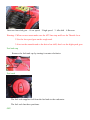
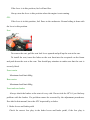
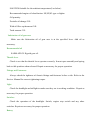
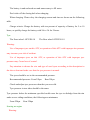
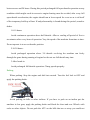
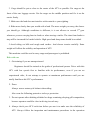
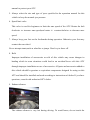
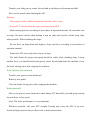
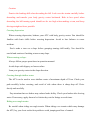
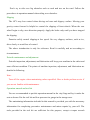
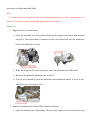
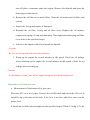
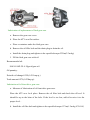
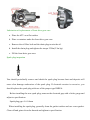
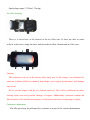
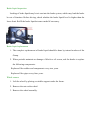
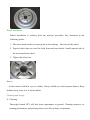
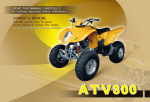
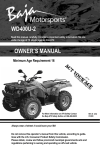
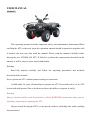
USER MANUAL
XT400ATV
This operating manual includes important safety and maintenance information.When
reselling the ATV to the next buyer,the operation manual should be passed on together with
it because the next user also need the manual .Please read the manual carefully before
driving the new JUNMA 300 ATV. If failed to conform the requirements described in the
manual, it will be easy to cause inuries and deaths
Warning
Read this manual carefully and follow the operating procedures and methods
described in this manual
Never operate an ATV without proper training or instruction
A child under 16 years old should never operate an ATV. Never allow drive of an ATV
by and individal person if he or she does not have the abilites to operate it safely.
Warning:
Injury or death could be result from failare to follow WARNING instructions when you are
operating, inspecting or repairing the ATV.
Always avoid driving and ATV on any paved surfaces, including side walks, parking
lots and streets.
Never operate an ATV on any public street, road or highway, even a dirt or gravel one.
Never drive an ATV without wearing an approved motorcycle helmet that fits properly.
You should also wear eye protection (goggles or face shield).gloves, boots, long-sleeved
shirt or jacket, and long pants.
Never consume alcohol or drugs before or while operating the ATV.
Never operate at speeds too fast Always drive at low speed on dusty surface.
Always inspect your ATV each time you use it to make sure it is in safe operating
condition. Always follow the inspection and maintenance procedures and schedules
described in this manual.
Always keep both hands on the handlebars and both feet on the footboards of the ATV
during operate.
Always go slowly and pay extra attention when operating on unfamiliar
terrain .Always be alert to changing terrain conditions when operating the ATV.
Never operate on excessively rough, slippery or loose terrain unless you have learned
and practiced the skills necessary to control the ATV on such terrain. Always be especially
cautious on these kinds of terrain.
Always follow proper procedures for turning as described in this manual. Practice
turning at low speeds before attempting to turn at faster speeds. Do not turn at excessive
speed.
Never drive the ATV on hills too steep for the ATV or for your abilities. Practice on
smaller hills before attempting larger hills.
Always follow proper procedures for climbing hills as described in this manual.
Check the terrain carefully before starting up any hill. Never climb hills with excessively
slippery or loose surfaces.Shift your weight forward. Never open the throttle suddenly or
make sudden gear changes. Never go over the top of a hill at high speed.
Always follow proper procedures for going down hills and for braking on hills as
described in this manual. Check the terrain carefully before starting down any hill. Shift
your weight backward. Never go down a hill at high speed. Avoid going down a hill at an
angle that would cause the vehicle to lean sharply to one side. Go straight down the hill
where possible.
Always follow proper procedures for crossing the side of a hill as described in this
manual. Avoid hills with excessively slippery or loose surfaces. Shift your weight to the
uphill side of the ATV. Never attempt to turn the ATV around on any hill until you have
mastered the turning technique described in this manual on level ground. Avoid crossing
the side of a steep hill if possible.
Avoid crossing the steep hills.
Always use proper procedures if you stall or roll backwards when climbing a hill. To
avoid stalling, se proper gear and maintain a steady speed when climbing a hill. If you stall
or roll backwards,follow the special procedure for braking described in this manual.
Always check for obstacles before operating in a new area.Never attempt to operate
over large obstacles, such as large rocks or fallen trees. Always follow proper procedures
when operating over obstacles as described in this manual.
Always be careful when skidding or sliding. Learn to safely control skidding or
sliding by practicing at low speeds and on level, smooth terrain. On extremely slippery
surfaces, such as ice, go slowly and be very cautious in order to reduce the chance of
skidding or sliding out of control.
Never operate an ATV in fast flowing water or in water deeper than that recommended
in this manual. Remember that wet brakes may have reduced stopping ability. Test your
brakes after wiping water away. If necessary, apply them several times to let friction dry
out the linings.
Always be sure there are no obstacles or people behind you when operating in reverse.
When it is safe to proceed in reverse, go slowly. Always use the size and type tires
specified in this manual. Always maintain proper tire pressure as described in this manual.
Never modify and ATV through improper installation or use of accessories.
Never exceed the stated load capacity for an ATV. Cargo should be properly
distributed and securely attached.
Reduce speed and follow instrucrions in this manual for carrying cargo or pulling a
trailer. Allow greater distance for braking.
Improper handling of gasoline can cause fire and can cause jnjruies and deaths and
other serious accident. So ,do not refuel right after the engine has been running and is still
every hot. Never refuel while smoking, or while in the vicinity of sparks, open flames, or
other sources of ignition. When transporting the machine in another vehicle, be sure it is
kept upright and that the fuel cock is in the OFF position. Otherwise, fuel many leak out of
the carburetor of fuel tank.
Never start or run the engine in a dosed area will cause the breakdown. And exhaust
fumes are poisonousus and may cause loss of person’s consciousness and death within a
short time. Always operate your machine in an area with adequate ventilation.
1. Headlight
2. Front wheel
5. 2WD/4WD transforming lever
9.Rear luggage carrier
13.Brake pedal
3.Mirror 4.Main switch
6. Fuel cock
7.Taillight
10.Exhaust silencer 11.Cushion
14.Front luggage carrier. 15.Gear bar
8.Rear wheel
12.Fuel tank cover
16.Parking brake shoe
19. Choke
17. Throttle lever
18. Handlebar switch
20. brake lever
Key identification number
The key identification number should be stamped on the key as shown in the
following drawing. This number can be used for ordering a new key.
Vehicle identification number
The vehicle identification number is stamped on underside of seat.
Main Switch
Function of the respective switch positions are as follow:
ON:
Engine can be started only at this position and the headlight and taillight come on when
the light switch is on.
OFF:
All electrical circuits are switched off. The key can be removed in this positio
Handlebar switch
1. Lighting switch
2.Horn switch
1.When the light switch placed at
placed at
3.Turn light switch 4.Starting switch
,the high beam light comes on, when the switch is
the low beam light comes on.
2. When pressing down the horn button, the horn sounds.
3. when the switch is placed at left, the left turn light and left turn indicator come
on .When the switch is placed at right, the right turn light.
4. Press down the starting switch to start the engine, at the same time need handhold the
break level .
Throttle lever
Once the engine is running, movement of the throttle lever will increase the engine
speed. Adjust the speed of the machine by changing the throttle position. Because the
throttle is spring-loaded, the machine will decelerate, and the engine will return to an idle
and time the hand is removed from the throttle lever. Before starting the engine, check the
throttle to be sure it is operating smoothly. Make sure it returns to the idle position as soon
as the lever is released.
Check the operation of the throttle lever before starting the engine. IF it does not work
smoothly, check for the cause. Correct the problem before riding the ATV. Consult a dealer
if you can’t find or solve the problem yourself.
Brake Lever
The brake lever is located on the right handlebar. Pull it toward the handlebar to apply
the brake.
The brake lever is located on the right side of the machine .Tread down the pedal to
apply the brake.
Parking brake
When you have to start the engine or park the machine, especially on a slop. Use the
parking brake Apply the rear brake lever and push down the lock plate to apply the parking
brake. Squeeze the rear brake lever to release the parking brake.
Caution:
The ATV could start moving unexpectedly if the parking brake is out of fuction before
starting the engine. This could cause loss of control or a collision.
The brake could overheat if you ride the ATV without releasing the parking brake.
You could lose braking performance which could cause an accident. You could also wear
out the brakes prematurely.
How to avoid the hazard
Always set the parking brake before starting the engine. Always be sure the parking
brake have been released before you begin to ride.
Note:
It indicates you don’t conduct maintenance or operation of four wheel vehicle of
ATV according to the requirements in the manual, the vehicle might be damaged due to
this reason.
2WD/4WD shift lever
To shift the 2WD to 4WD, stop the ATV and shift, the shift lever to 4 WD position. To
shift the 4WD to 2 WD, stop the ATV and shift the shift lever to 2WD position.
Warning:
Potential hazard:
When driving the ATV and shifting 2WD to 4WD or 4WD to 2WD, the 2WD is
different from 4WD in operation. Shifting 2WD to 4WD when driving the ATV will make
the ATV encounter the unexpected different controls, which will increase the accident risk.
Gear bar
There are four shift gear : 1.Low speed
2.high speed
3. idle shift 4.Reverse
Warning: 1.When reverse must make sure the ATV has stop and Low the Throttle lever
2.Use the low speed gear on the rough road.
3.if not on the smooth road or the driver has skill, don’t use the high speed gear.
Fuel tank cap
Remove the fuel tank cap by turning it counter-clockwise.
Fuel cock
The fuel cock supplies fuel from the fuel tank to the carburetor.
The fuel cock has three positions.
OFF:
If the lever is in this position, fuel will not flow.
Always turn the lever to this position when the engine is not running.
ON:
If the lever is in this position, fuel flows to the carburetor. Normal riding is done with
the lever in this position.
Seat
To remove the seat, pull the seat lock lever upward and pull up the seat at the rear.
To install the seat, insert the lobes on the seat front into the receptacle on the frame
and push down the seat at the rear. You should pay attention to make sure that the seat is
securely fitted.
Front carrier
Maximum load limit:40kg.
Rear carrier
Maximum load limit:80kg.
Front and rear brakes
Always check the brakes at the start of every side. Do not ride the ATV if you find any
problem with the brakes. If a problem cannot be corrected by the adjustment procedures.
Provided in this manual, have the ATV inspected by a dealer.
1. Brake levers and brake pedal
Check for correct free play in the brake levers and brake pedal, if the free play is
incorrect adjust it see pages.
2. Brake operation
Test the brakes at slow speed after starting out to make sure they are working properly.
If the brakes do not provide proper braking performance, inspect the brakes for wear. See
page.
Fuel
Make sure there is sufficient gasoline in the tank.
Recommended fuel:unleaded fuel
Fuel tank capacity: Total:7.5L
level
Reserve:1.5L
Unleaded fuel
1.Filler tube
2.Fuel
will give a longer spark plug life and reduce maintenance cost. If unleaded gasoline
is not available, then leaded regular gasoline can be used.
Caution:
Fuel can spill, causing a fire and severe injury.
Fuel will expand when it heats up if the fuel tank is overfilled, fuel could spill out due
to heat from the engine or the sun. So, do not overfill the fuel tank. Be careful, not to spill
fuel, especially on the engine or exhaust pipe. Wipe up any spilled fuel immediately. Be
sure the fuel tank cap is closed securely. Do not refuel right after the engine has been
running and is still very hot.
Engine oil
Make sure the engine oil is at the specified lever. Add oil as necessary.
Recommended oil
SAE20W40: Suitable for the ambient temperature(5-40)
SAE10W30:Suitable for the ambient temperature(-10_35)
SAE5W30:Suitable for the ambient temperature(0 or below)
Recommended engine oil classfication: SE,SF,SG type or higher.
Oil quantity:
Periodic oil change:2.9L
With oil filter replacement:3.0L
Total amount:3.5L
Lubrication oil of gear case
Make sure the lubrication oil of gear case is at the specified lever. Add oil as
necessary.
Recommended oil
SAE80 API GL Hypoid gear oil.
Throttle lever
Check to see that the throttle lever operates correctly. It must open smoothly and spring
back to idle position when released. Repair as necessary for proper operation.
Fittings and Fastenerns
Always check the tightness of chassis fittings and fasteners before a ride. Refer to the
Service. Manual for correct tightening torque.
Light
Check the headlight and taillight to make sure they are in working condition . Repair as
necessary for proper operation.
Switches
Check the operation of the headlight. Switch, engine stop switch and any other
switches. Repair as necessary for proper operation.
Battery
The battery is and enclosed one and unnecessary to fill water.
Don’t take off the closing bolt when charging.
When charging. Please obey the charging current and time as shown on the following
table.
Charge criteria: Charge the battery with ten percent of capacity of battery for 5 to 10
hours, or quickly charge the battery with 2A to 3A for 2 hours.
Tyre
The Front wheel :AT25X8-10
The Rear wheel:AT25X10-10
Warning:
Use of improper tyres on this ATV, or operation of this ATV with improper tire pressure
may increase your risk of accident.
Use of improper tyres on this ATV, or operation of this ATV with improper tyre
pressure may. Cause loss of control.
Pay attention to choose the size and type of used tyres according to the description in
the above chart and make sure that the tyre pressure is normal.
The tyres should be set to the recommended pressure.
Recommended pressure: Front 25kpa
Rear 25kpa
Check and adjust tyre pressure when the tyres are cold.
Tyre pressure in two sides should be the same.
Tyre pressure below the minimum specified could cause the tyre to dislodge from the rim
under severe riding conditions, the following are minimums:
Front 22kpa
Starting an engine
Warning:
Rear 22kpa
Never ride the ATV in cold weather, always make sure all control cables work
smoothly before you begin ridding.
Starting a cold engine:
1. set the parking brake
2. Turn the fuel lock to ON
3. Turn the main switch key to position.
4. Shift the transmission into neutral.
Warning:
The engine can be started in any gear if the rear brake lever is applier. However, it is
recommended to shift into neutral before starting the engine.
5. use the starter (choke) in reference to the figure.
Note:
If the engine fails to start, release the start switch, then push the start switch again,
pause a several secords before the next attempt. Each cranking should be as short as
possible to preserve battery energy. Do not crank the engine more than 10 seconds for each
starting.
If the battery is discharged. Pull the recoil starter to start the engine.
Starting a warm engine
The throttle should be opened slightly when starting a warm engine.
Prewarming
To get maximum engine service life, prewarm the engine before starting off. Never
accelerate forcefully with a cold engine.
Engine break-in
There is never a more important period in the left of your machine than the period
between zero and 20 hours. During this period prolonged full open throttle operation or any
condition which might result in excessive engine heating must be avoided, after every full
open throttle acceleration, the engine should run at lower speed for a rest so as to rid itself
of the temporary build up of heat. If andy abnormality is found during this period ,consult a
dealer.
1.0-10 hours:
Avoid continuous operation above half throttle. Allow a cooling off period of five to
ten minutes after every hour of operation. Vary the speed of the machine from time to time.
Do not operate it at one set throttle position.
2.10-20 hours:
Avoid prolonged operation above 3/4 throttle revolving the machine can freely
through the gears during running of engine but do not use full throttle any time.
3 After break-in
Avoid prolonged full throttle operation. Chang speeds properly.
Parking
When parking. Stop the engine and shift into neutral. Turn the fuel lock to OFF and
apply the parking brake.
Avoid parking on hills or other inclines. If you have to park on an incline put the
machine in low gear, apply the parking brake and block the front and rear. Wheels with
rocks or other objects. Do not park the ATV on the hills that are so steep you could not
walk up them easily.
1. Appling the brakes in low gear to stop the machine.
2. stop the engine.
Pay attention to the following points. Choose only accessories designed for your ATV
dealer has a variety of genuine accessories. Choose a genuine accessory.
Warning:
Accessories should be rigidly and securely installed.
Do not install an accessory where it could interfere with your ability to control the ATV.
Examples include a heavy or bulky object attached to the handlebars which could make
steering difficult, an accessory that limits your ability to move around on the seat, or one
that limits your view. Use extra caution when riding an ATV with accessories.
Loading
Never exceed the weight limits shown an overloaded ATV can be unstable.
You must use common sense and good judgement when carring cargo or towing a trailor.
Keep the following points in mind:
Maximum loading limit
Vehicle loading limit(total weight of cargo,rider and accessories):210kg
Front luggage carrier:40kg
Rear luggage carrier:80kg
Tool kit:2kg
Pulling load(total weight of trailer and cargo):410kg
Vertical weight on trailer hook:15kg
1. Do not exceed the maximum pulling weight.
2. Adjust the load in the trailer.
3. Cargo should be put as close to the center of the ATV as possible. Put cargo at the
front of the rear luggage carrier. Put the cargo on the middle position and fix it on the
carrier firmly.
3. Make sure the load does not interfere with controls or your sighting.
4 .Ride more slowly than you would with a load. The more weight you carry, the slower
you should go. Although conditions is different, it is not allower to exceed 2nd gear
whenever you are carrying heavier loads or when towing a trailer. The time from brake to
stop will be increased for loaded vehicle. High speed and sharp turns should be avoided.
5.Avoid riding on hills and rough road surface. And choose terrain carefully. Extra
weight will affects the stability and operation of ATV.
This machine could be used to carry cargo and passengers is prohibited.
Ride with care
1. Get training if you are unexperienced.
Beginners should be trained at the guide of professional person. Drive with this
ATV with low speeds first to familiar with its performance, even if you are an
experienced rider, fo not attemp to operate at maximum performance until you are
totally familiar with ATV’s performance.
2. Dress
Always wear a motorcycle helmet when riding.
Also wear the following protective tools eye protection
3. Do not operate after drinking alchohol or drugs containing sleeping pill composition,
because operator would be slow in driving in such way.
4. Always check your ATV each time before you use it to make sure the reliabitity of
ATV. Always follow the inspection and maintenance procedures in the operation
manual to protect your ATV.
5. Always select the size and type of tyres specified in the operation manual for this
vehicle to keep the normal tyre pressure.
6. Speed limit valve
This valve is used for beginners to limit the max speed of the ATV. Rotate the bolt
clockwise to increase max.speed,and rotate it
countercloclwise to decrease max
speed.
7. Always keep your feet on the footboards during operation. Otherwise your feet may
contact the rear wheel.
Never attempt stunts,such as wheelies or jumps. Don’t try to show off.
8. Refit
Improper installation of accessories or refit of this vehicle may cause changes in
harding which in some situations could load to an accident.Never refit this ATV
through improper installation or use of accessories. All parts and accessories added to
this vehicle should be genuine or equivalent components designed for using on this
ATV and should be installed and used according to instructions of dealer. If you have
questions, cousult with authorized ATV dealer.
9. Exhaust silencer
The exhaust silencer is very hot during driving. To avoid burns, do not touch the
exhaust cylinder. Park the machine where pedestrians or children can not touch it.
10. Where to drive
This vehicle is designed for wild terrain. So driving on the tarmacadam shall give
rise to out of control
Don’t operate the ATV on the tarmacadam, including the pavement public road,
parking ground and walking street.
Don’t operate the ATV on any public road street or highway
Know the terrain where you ride
Ride carefully in complicated terrain. Stay alert for holes, rocks or roots in the terrain
otherwise may cause the machine to tip over.
When riding in an area where you might not easy to be seen, such as dune and hilly
land, must mount a caution flag on the machine to remind other vehicles.
Do not ride in areas of forbidding pass.Do not ride on private property.
Operation course
Caution:
Do not shift gears without releasing the throttle. Otherwise may cause damage to the
engine or drive gear.
When slowing down or stopping, release the throttle and brake gradually. As you
brake, shift to lower gear. Ensure that the engine has sufficiently slowed improper use of
brakes or shifting can cause the tyres slidding to lose the control.
Must make the engine to slow down fully before engaging a lower gear.
Turn
Must make the turning practice in low speed before making a turn.
Turn your ATV according to procedures in operation manual. Practice should be done
before turning in high speed.
The turning speed should not be too high.
As you approach a curve, slow down and begin to turn the direction rod. Then put your
gravity center on the footboard to the outside of the curve and lean your body inside. Make
the engine to maintain an even speed when passing the curve. This maneuver will let the
tyre on the inside of the curve slip slightly.
The turning practice should be in flat area without any obstacles. Improper operation
may make your ATV to go straight. If the ATV doesn’t turn, stop it and practice again. If
the riding surface is loose and slippery, move your weight forward.
Once you have learn this technique you can turn your ATV at higher speed.
The sudden acceleration, brake , incorrect body position and too high speed will cause
the ATV to slip. If the ATV slips while passing a curve and the ATV machine leans inward,
you should release the throttle and move your body gravity center to outside of the carve to
avoid tipping over.
Remember: ride at higher speed only after you are thoroughly familiar with the
operation of your ATV.
Climbing slope
Don’t ride on slope before you are very familiar with ATV operation skill. Otherwise it
will cause accidents.
Necessary practice is required. When climbing the hill, move your body gravity center
forward and operate according to procedures in operation manual.
Climb the hill according to the method in manual.
Check carefully before climbing.
Do not drive on slippery and loose slope.
Transfer your body gravity center forward and avoid abrupt acceleration and shift.
Drive in low speed when climbing the hill.
Warning:
There may be other vehicles and persons on other side of slop.
If your ATV can not climb the slope, turn round your ATV.
Make turning practice according to procedures in operation manual. Do not make turn
on slope. Be more careful when making a turn on slope and avoid to climb steep slope
when possible. When climbing the slope:
Do not drive on depression and slippery slope and drive according to procedures in
operation manual.
Ensure the ATV not to slip when stop it on slope.
The shift should be proper and speed should be stable when climbing slope. Losing
traction force, you should transfer the gravity center forward and brake the machine. Close
the brake closing piece after stopping the machine.
If the machine slips backward
Transfer your gravity center backward
Brake by foot pedal
Close the brake closing piece after stopping the machine.
Riding downhill
Move your gravity center backward, when riding ATV downhill, your and grisp steering
bar, and drive at low speed.
Note: The brake performance is very important.
Whenever possible, ride your ATV straight, Turning may cause the ATV to tip over.
Avoid too high speed so that you have time to deal with accident.
Caution:
Practice the braking skill when decending the hill. Look over the terrain carefully before
decending and transfer your body gravity center backward. Ride in low speed when
decending the hill turning speed should not be too high when making a turn, and keep
driving straight as far as possible.
Crossing depression
When crossing depression, balance your ATV with body gravity center. You should be
familiar with basic skills before crossing depression. Avoid to lose balance to cause
accident.
Don’t make a turn on a slope before grasping turning skill totally. You should be
careful and cautious if making a turn on any slope.
When crossing a slope:
Always follow proper prouclures in operation manual.
Avoid slope with slippery or loose surface.
Lean your gravity center in the slope direction.
Crossing through shallow water
The ATV can be used to cross shallow water of maximum depth of 35cm. Check your
path carefully before crossing, and avoid of ride where there is sharp drop off. Drive
slowly and carefully.
Pay attention that wet brakes may reduce brake ability. Check your brakes after leaving
water. If necessary, apply them to let friction dry out the linings several times.
Riding over rough terrain
Be careful when riding on rough terrain. When riding over terrain which may damage
the ATV, lay your feets on the foot pedals to avoid jumping and loss of control.
Don’t try to ride over big obstacles such as rock and tree on the road. Follow the
proceduces in operation manual when riding over obstacles.
Slipping
The ATV may lose control when driving on loose and slippery surface. Moving your
gravity center forward is helpful to control the slipping of front wheels. When the rear
wheel begin to slip, steer direction properly. Apply the brake only until you have stopped
the slipping.
Paractise safely control slipping at low speed. On very slippery surfaces, such as ice,
drive slowly to avoid loss of control.
The above introduction is only for reference. Read it carefully and act according to
circumstances.
Periodic maintenance and adjustment
Periodic inspection, adjustment, and lubrication will keep your machine in the safest and
most efficient condition. The points of machine inpeciton, adjustment, and lubrication are
detailed in following.
Note:
Turn off the engine when maintaining unless specified .Have a dealer perform sevice if
you are not familiar with maintenance.
Operation manual and tool kit
You are recommended to put this operation manual in the vinyl bag and lay it under the
seat as shown. Put the tool kit and low-pressure tire gauge in the storage case.
The maintaining information included in this manual is provided you with the necessary
information for completing preventive maintenance and minor repairs by your self. The
tools provided in the tool kit are sufficient for this purpose, except a torque wrench
necessary to tighten nuts and bolts.
Note:
If you do not have a required torque wrench during maintenance, take your machine to a
dealer to check the torque settings and adjust them as necessary.
Engine oil
1. Engine oil level measurement
a. place the machine on a flat surface Warm up the engine for several minutes and
turn off it. Wait more than 10 minutes for the oil to drain back into the crankcase
before checking the oil level.
b. Wipe the dipstick off with a clean rag. Insert the dipstick in the filler hole.
c. Remove the dipstick and inspect the oil level.
d. The oil level should be between maximum and minimum marks. if level is low,
add oil to raise it to proper level.
2. Engine oil replacement and oil filter element cleaning.
a. place the machine on a flat surface. Warm up the engine for several minutes and
turn off place a container under the engine. Remove the dipstick and open the
drain plug to drain the oil.
b. Remove the oil filter cover and oil filter. Clean the oil strainer and oil filter with
solvent.
c. Inspect the O-ring and replace if damaged.
d. Reinstall the oil filter, O-ring and oil filter cover. Replace the oil strainer,
compression spring, O-ring and drain plug. Then tighten the drain plug and filter
cover bolts to the specified torque.
e. Add oil to the engine with oil and install the dipstick.
Caution:
Be sure no foreign material enters the carnkcase.
f. Warm up the engine for several minutes at idle speed. Check for oil leakage
when warming up the engine for several minutes at idle speed. Check for oil
leakage when warming up.
Caution:
If oil leakage is found , turn off the engine promptly and check for the cause.
Lubrication oil of final gear case
a. Measurement of lubrication oil of gear case.
Place the ATV on a level place. Remove the oil filler bolt and check the oil level. It
should be up to the brim of the hole. If the level is too low ,add oil to raise it to the
proper level.
b. Install the oil filler bolt and tighten to the specified torque:23Nm (2.3m.kg, 17ft. lb)
Lubrication oil replacement of final gear case
a. Remove the gear case cover.
b. Place the ATV on a flat surface.
c. Place a container under the final gear case.
d. Remove the oil filler bolt and the drain plug to drain the oil.
e. Install the drain plug and tighten to the specified torque:23Nm(2.3m.kg)
f. Fill the final gear case with oil.
Recommended oil:
SAE 80 API GL-4 Hypoid gear oil.
Oil quantity:
Periodic oil change:0.25L(0.21 Imp qt,)
Total amount:0.27L(0.23Imp qt)
Lubrication oil of front drive gear case
a. Measure of lubrication oil of front drive gear case.
Place the ATV on a level place. Remove the oil filter bolt and check the oil level. It
should be up to the brim of the hole. If the level is too low, add oil to raise it to the
proper level..
b. Install the oil filter bolt and tighten to the specified torque 12Vm(1.2m.kg.8.7ft.16f)
Lubrication oil replacement of front drive gear case
a. Place the ATV on a flat surface
b. Place a container under the front drive gear case.
c. Remove the oil filter bolt and the drain plug to rain the oil.
d. Install the drain plug and tighten the torque 23Nm(2.3m.kg)
e. Fill the front drive gear case.
Spark plug inspection
You should periodically remove and check the spark plug because heat and deposits will
cause slow damage oaderosion of the spark plug. If electrode erosion is excessive, you
should replace the spark plug with one of the proper type D8REA.
Before installing the new spark plug, measure the electrode gap with a feeler gauge and
adjust to specification.
Spark plug gap: 0.6-0.8mm
When installing the spark plug, generally clean the gasket surface and use a new gasket.
Clean off and grime from the threads and tighten to specification.
Spark plug torque:17.5Nm(1.75m.kg)
Air filter cleaning
There is a check hose at the bottom of the air filter case. If there are dust or water
collects in this hose, empty the hose and clean the air filter element and air filter case.
Caution:
The carburetor was set at the factory after many test. If the setting s are disturbed by
someone without sufficient technical knowledge, poor engine performance and damage
may result.
Never run the engine with the air element removed. This will let unfiltered air enter,
causing rapid wear and possible damage of engine. Additionally, operation without the
filter element will weak the performance of carburetor and cause overheating of engine.
Carburetor adjustment
The idle speed may be performed by customer as a part of the routine maintenance.
Brake liquid inspection
Lacking of brake liquid may let air run into the brake system, which may lead the brake
be out of function. Before driving, check whether the brake liquid level is higher than the
lower limit. Refill the brake liquid at same model if necessary.
Brake liquid replacement
1. The complete replacement of brake liquid should be done by trained workers of the
Group.
2. When periodic maintain or damage of block or oil occurs, ask the dealer to replace
the following components:
Replace all the rubber seal components every two years.
Replace all the pipes every four years.
Wheel remove
1. Left the wheel by placing a suitable support under the frame.
2. Remove the nut on the wheel.
3. Remove the wheel assembly.
Wheel installation
Wheel installation is contrary from the removal procedure .Pay attaention to the
following points:
1. The arrow mark on the tyre must point to the rotating direction of the wheel.
2. Tapered wheel nuts are used for both front and rear wheels. Install tapered side of
the nut towards the wheel.
3. Tighten the wheel nut.
Battery
Avoid contact with skin, eyes or clothes. Always shield eyes when operate battery. Keep
children away from it to avoid accidents.
Cleaning and storage
A. Cleaning
Thorough cleaned ATV will has better appearance in general. Cleaning improves its
running performance and prolongs the service life of many components.
1. Before cleaning the ATV:
a. Plug up the exhaust pipe with plastic bag or strong rubber band to prevent water
in.
b. The spark plug and oil filler caps must be strictly installed.
2. If the engine case is excessively dirt, wash it with degreaser. Don’t use degreaser for
wheel.
3. Rinse the dirt and remove oil dirt on soft hose.
Caution:
Excessive water pressure may cause water seepage and deterioration of wheel
bearings, brakes , transmission seals and electrical equipment.
4. When rinsing dirty material for may times, use warm water and mild detergent-type
soap. Use old tooth brush a bottle brush to wash hard-to-get-at-places.
5. After cleaning ATV with clean water, immediately dry the surface with a chamois,
clean towel or soft absorbent cloth.
6. Clean the seat with a vinylupholstery cleaner to keep the cover pliable and glossy.
7. Apply automotive type wax to all chrome plated surfaces. Avoid using combination
cleaner-waxes. After using abrasives to protect scratched surface, let the engine idle
for several minutes.
After washing the brakes, let engine brake several times at slow speed to dry the
linings.
B. Storage
Long term storage (60 days or more) of your ATV will require some protective
procedures to prevent ATV from damage. After thoroughly cleaning the ATV, adopt the
following protective measures:
1. Add fresh fuel into fuel tank.
2. Add one tablespoon of SAE 10W30 or 20W40 motor oil in the spark plug hole and
reinstall the spark plug. Ground the spark plug wire and run the engine over several
times too coat the cylinder body with oil.
3. Lubricate all control cables.
4. Elevate the engine body to raise all wheels off the ground.
5. Seal the exhaust pipe outlet with plastic bag to prevent water in.
6. If store ATV in a humid or salt-air atmosphere, cover all exposed metal surfaces
with a light plastic film of oil. Do not apply oil to any plastic parts or the cushion.
7. Take out the battery and store if in a dry place. The battery should be stored in the
place where the ambient temperature should be 30 temperature maximum and 0
temperature minimum.
Item
Specification
Dimension:Overll
Item
Specification
Gear ratio:
length
2150mm
Low speed
2.188
Overall width
1130mm
High speed
1.069
Overall height
1200mm
Reveerse
-1.5
Seat height
860mm
Whell base
1400mm
Minimum ground clearance 210mm
Frame
minmum turning radius
Frane type
stell tube
Basic weight
Caster angell
4
With oil and full tank
Trail
28mm
Engine:
3200mm
1-stroke
4-stroke/water
cooling
Tire
Dispiacement
264ml
Type
Vacuum
Cylinder diameter
72mm
Size:Front
AT25*8-12
Compresssion ratio
10.5:1
Size:Rear
T25*10-10
Starting system
Electric
Lubricaton system
presssure splash
Engine oil:
Brake:
Periodic oil change
2.8L
Front brake type
pan hydraulic brake
With oil filter repiacment
3.0L
Operation
left hand operation
Total amount
3.5L
Rear brake type
pan hydraulic brake
Total amount of gear oil
0.23L
Main fuel tank capacity
11L
Reserve fuel tank capacity
2.4L
Operation
Caburetor:
left hand or right foot brake
Suspension
Equal
Type
vacuum
type
Front
Rock arm
Center damper
Spark plug type
D8rea
Rear
Spark plug gap
0.6-0.7mm
Shock absorber:
Clutch type
shoe
automatic Front/rear
Spring/hydraulic damper
centrifuga 、 wet
several type
Transmission:
Whell travel:
Front whell
150mm
150mm
Primary reduction system
Apur gear
Rear whell
Primary reduction ratio
2.444
Electrical:
Secondary reduction ststem
Shaft drive
lgnition system
C.D.I
Secondary reduction ratio
2.61
Generrator system
A.C Magneto
Comstan
Transmission type
mesh,2-speed type/voltage,capacity
front ,1-speed
12V9A
Head light
12V,35W/35W*2
right hand
Tailight/brake light
12V,5W/21W*1
operation
Turn indicator
12V,10W*4
reverse
Operation
Battery
ITEM
INITIAL
ROUTINE
1 mouth
Valve
Check value clearance.Adjust if necassary
Spark plug
Check
comdition.
Adjust
gap
△
and
clean.Replace if necessary.
Air filter
Clean.Replace if necessary.
Carburetor
Check idle speed/starder operation.Adjust
△
head
breather Check
breather
hose
for
system
damage.Replace if necessary
Exhaust system
Check
for
△
△
carcks
or
leakage.Retighten
if
necessary.Repleace gasket if necessary
Spark Arrester
Clean
Fuel line
Check
fuel
hose
6 mouth
6 mouth
△
△
△
△
1 year
Every 20-40 hours(more often in wet or dusty areas)
if necessary
Cylinder
3 mouth
EVERY
for
crcks
or
damage.Replace if necessary.
△
△
△
△
△
△
△
△
△
△
△
Engine oil
Repleace(warm engine before draining)
△
△
Engine oil filter
Clean
△
△
△
Engine oil straniner
Clean
△
△
△
Final gear oil
Check oil level/oil leakage.Replace
△
Brake
Check operation.Adjust if necessary
△
Clutch
Check operation.Adjust if necessary
Wheels
Check balance/damage/run out.Replace if
necessary
Wheels bearings
Check balance/damage/run out.Replace if
necessary
△
△
△
△
△
△
△
△
△
△
△
△
△
Front and rear suppension Check operation.Conrect if necessary
Steering system
Check
△
operation.Conrect
if
necessary.Check toein.Adjust if necessary
Steering shaft
Lubricate every 6 months.(use Li grease)
Fitting and Fasteners
Check
all
chassis
fittings
fasteners.Correct if necessary.
and
△
△
△
△
△
△
△
△
△
△
△
B: blue
G: green
Y: yellow
BL: black
W: white
P: purple
U: umber
GR: gray
O: orange
A: azury
Rear right
turn light
Rear left
turn light
Light assy rear
combination
reply
meter
main switch
Gear indicator
and gear switch
Over currecntStart
switch
asssy
Water temperature
transmission
Speed
transmission
Brake switch
Cool fan
Oil temperature
Brake switch
switch
Currecnt switch
Emergency switchHom button
limited
speed
Head light
Front right
turn light
Left
hand
switch
Brake switch
Cool fan Singal
controller
Reserve sound
Rear left
indicator
limited speed Left Head lamp turn light
Four ways fuse
Cool fan fuse
Main switch
fuse
Ignition coils
light fuse
fuse
Magnetor