1
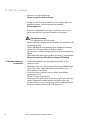
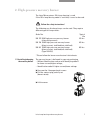
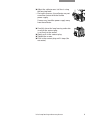
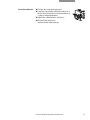
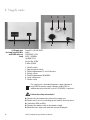
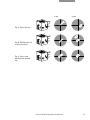
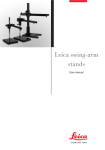
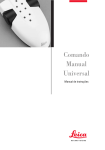
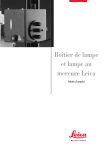
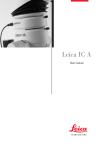
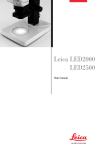
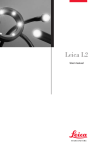
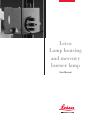
Leica
Lamp housing
and mercury
burner lamp
User Manual
Table of contents
Page
1. Safety concept . . . . . . . . . . . . . . . . . . . . . . . . . . . . . . . . . . . . . . . . 3
1.1 Description . . . . . . . . . . . . . . . . . . . . . . . . . . . . . . . . . . . . . . . 3
1.2 Safety precautions . . . . . . . . . . . . . . . . . . . . . . . . . . . . . . . . . 3
1.3 Safety instructions . . . . . . . . . . . . . . . . . . . . . . . . . . . . . . . . . 4
1.4 Recommendations, instructions . . . . . . . . . . . . . . . . . . . . . 6
2. High-pressure mercury burner . . . . . . . . . . . . . . . . . . . . . . . . . 7
2.1 Installing/changing the mercury burner . . . . . . . . . . . . . . 7
3. Assembling the 106 z lamp housing . . . . . . . . . . . . . . . . . . . . . 10
3.1 Installing the stray-light protection . . . . . . . . . . . . . . . . . . 10
3.2 Replacing the collector and heat-absorbing filter . . . . . 10
4. Supply units . . . . . . . . . . . . . . . . . . . . . . . . . . . . . . . . . . . . . . . . . 12
4.1 Supply unit for 50W mercury burners . . . . . . . . . . . . . . . . 12
4.2 ebq 100 supply unit for 100W mercury burners . . . . . . . . 13
5. Adjusting the high-pressure mercury burner . . . . . . . . . . . . 14
2
Leica lamp housing and mercury burner
1. Safety concept
1.1 Description
The Leica 106 z lamp housing is the light source for the
fluorescence stereomicroscope Leica MZ16 FA as well as the
fluorescence module for Leica stereomicroscopes. The
Leica lamp housing is used with 100W or 50W mercury burners,
their corresponding supply units and stray-light protection.
In particular, please note
• the safety instructions in this user manual
• the safety instructions for handling electrical devices
in the user manual M2-105-0 (M series) and M2-116-5
(Leica MZ16 FA)
• the user manual and safety instructions for the
ebq 100 supply unit
• the user manual and safety instructions provided by the
lamp manufacturer, and, in particular, the section on how to
proceed if a lamp breaks and releases mercury.
1.2 Safety precautions
For the Leica MZ16 FA
• The stray-light protection on the lamp housing prevents
irradiation of the hands.
• UV protection screen in front of the object level prevents the
user from looking directly into the UV rays.
• UV filters in the observation beam path protect the eyes.
• Automatic shutter locking during rotation of the filter changer, observation without fluorescence and removal of the filter
holders prevents UV radiation from reaching the eyes.
• Filter holders without transponders in the free positions of
the rapid filter changer prevent direct UV radiation from
reaching the eyes.
Leica lamp housing and mercury burner
3
1. Safety concept
1.3 Safety instructions
Lamp housing
The Leica MZ16 FA fluorescence stereomicroscope and the
fluorescence module for Leica stereomicroscopes may only be
used in combination with the Leica lamp housing for 100W or
50W mercury burners, their corresponding supply units and
stray-light protection.
Leica Microsystems accepts no liability for damages
resulting from the use of lamp housings from other
manufacturers.
High-pressure mercury burner
• To minimize the risk of explosion, replace a discolored highpressure mercury burner promptly when it has reached the
end of its rated life. Follow the manufacturer’s specifications
and the minute meter on the supply unit!
• Allow the high-pressure mercury burner to cool off before
replacing it to prevent the possibility of severe burns:
Burn hazard
• Dispose of used mercury burners as hazardous waste.
• Follow the user manual and safety instructions provided by
the lamp manufacturer, and, in particular, the section on how
to proceed if a lamp breaks and releases mercury.
• Do not remove the mercury burner’s dust cover until after you
have installed the lamp. Be very careful to avoid getting
fingerprints on the lamp.
• After installing the mercury burner, adjust it exactly as
described. Never let the bright tips of the electric arcs, the
focal spots, cross when projected:
Hazard of explosion from overheating
• When transporting the equipment, remove the high-pressure
mercury burner, transport it in its original packaging and protect moving parts in the lamp housing using the transport anchors (which should be stored in a safe place for future use).
Leica Microsystems assumes no liability for incorrectly
installed or improperly used high-pressure mercury
burners.
4
Leica lamp housing and mercury burner
Supply units
The 100W mercury burners are powered by the ebq 100 supply
unit.
Read the separate instruction manual provided with this
supply unit.
The supply unit for 50W mercury burners
is described in this manual.
For the ebq supply unit: only fuses of the specified type
with the listed rated current may be used. Using other
fuses or bridging the fuse holder is not permitted. Danger
of fire!
Always unplug the power plug of the supply unit from the power
supply:
– when installing and disassembling the lamp housing
– before opening the lamp housing
– when replacing the high-pressure mercury burner and
other parts, such as the heat-absorbing filter or the
collector
– during maintenance work on the supply unit.
After switching on the supply unit, new mercury burners
must be adjusted immediately.
There is a danger of overheating for mercury burners that
are not adjusted.
Danger of explosion.
Notice of dangers
• Never open the lamp housing when the lamp is switched on.
Eye hazard.
• Never open the lamp housing when it is energized.
Disconnect the power supply.
• Disconnect the lamp housing from the power supply when
assembling it. Disconnect the power plug and power supply.
Danger of explosion, UV radiation, danger of blinding.
• Before opening the lamp housing, allow it to cool off for at
least 15 min.
Danger of explosion, danger of burns.
• Never cover the air duct on the lamp housing.
Danger of fire!
Leica lamp housing and mercury burner
5
1. Safety concept
• Use the stray-light protection.
Danger to eyes from UV radiation.
• During assembly work on xenon burners, always wear the
protective gloves and face protection provided.
Risk of explosion
• Electrical components must be assembled at least 10 cm
away from the wall and from flammable substances.
•
•
•
•
•
1.4 Recommendations,
instructions
6
UV radiationwarning
UV radiation can harm the eyes.
Never look into the light spot on the object level without a UV
protection screen.
Never look directly into the beam path (danger of blinding).
Always fill all filter positions with filter holders.
Do not select a white, strongly reflective background for the
object.
Never open the lamp housing when the lamp is switched on.
Danger of explosion, UV radiation, danger of blinding!
• Avoid switching the lamp on and off frequently, as this
reduces its life.
• Hot mercury burners light only after they have cooled down.
• If possible, allow a new mercury burner to burn-in for 1–2
hours without interruption.
• Install the mercury burner very carefully, and without
applying pressure.
Burners can burst very easily.
• Never touch the glass parts of the mercury burner with your
hands. Fingerprints are burned on and reduce the light
quality. If necessary, carefully wipe off dust and fingerprints
using an alcohol-soaked cloth, then wipe dry.
Leica lamp housing and mercury burner
2. High-pressure mercury burner
The Leica Microsystems 106 z lamp housing is used.
If the 105 z lamp housing model is available, it can also be used.
Follow the safety instructions!
The following gas discharge lamps can be used. They require
different types of lamp mounts.
Order No.
500 137 50W high-pressure mercury burner
(alternating current)
500 138 100W high-pressure mercury burner
(direct current, stabilized/not stabilized)
500 321 100W high-pressure mercury burner
(direct current, stabilized/not stabilized)
(Type 103 W/2)
Typical
Life
100 hrs.
200 hrs.
300 hrs.
* Please follow the burner manufacturer’s datasheets.
2.1 Installing/changing
the mercury burner
The mercury burner is delivered in separate packaging.
– Without identification code or with identifying code L1
for lower current/higher voltage,
– Identification code L2 higher current/lower voltage.
Unscrew the 2 hexagon-head screws.
Pull the contact plug partially out
(do not rotate).
Lift the cover.
Leica lamp housing and mercury burner
7
Unscrew the 2 hexagon-head screws.
Carefully pull out the base with lamp mount
and connecting cable.
Unscrew the top Phillips screw.
Pull up the cooling element and pull it
to the side.
Unscrew the bottom clamping system.
Remove the transport anchor and store
it for later transport.
When replacing burners, remove the
used mercury burner and dispose of it
as hazardous waste.
• When inserting the new mercury burner, the mark on the
metal mount must be upright.
Carefully insert the mercury burner into the bottom mount.
Rotate the mercury burners with seal point so that it is
located to the side of the beam path.
Carefully set the flexible power supply on the top metal
mount of the mercury burner.
Very carefully tighten the top and bottom
screws.
Guide the lamp mount with the mercury
burner into the rail of the lamp housing.
Tighten the screw.
8
Leica lamp housing and mercury burner
Adjust the collector on a trial basis using
the focusing knob.
• During this process, the collector may not
come into contact with the flexible
power supply.
If necessary, bend the power supply away
from the collector.
Carefully close the lamp housing and make
sure that the contact plug
is set firmly in the socket.
Gently push in the contact plug.
Tighten the screws.
Push in the contact plug until it stops (do
not rotate).
Leica lamp housing and mercury burner
9
3. Assembling the lamp housing
Unscrew the hexagon-head screw on the
adapter part using an Allen key.
Insert the lamp housing into the adapter
part and tighten the hexagon-head screw.
3.1 Stray-light
protection
Between the lamp housing and the lamp base, there are gaps
through which UV light escapes, and which can temporarily
irradiate the hands of the user when handling objects under
the lamp housing. The stray-light protection on the bottom of
the lamp housing is designed to catch this stray light.
Fasten the stray-light protection using 2
screws.
3.2 Replacing the
collector and
heat-absorbing filter
For cleaning, or in case of malfunction, the collector
and heat-absorbing filter can be removed.
Open the lamp housing and remove the
lamp base.
Move the reflector towards the right until
it stops.
Hold the collector in place and pull out
the focusing knob.
Remove the collector.
Unscrew the 2 screws and remove the
heat-absorbing filter on the collector.
Screw a new heat-absorbing filter into
place.
10
Leica lamp housing and mercury burner
Insert the collector
Pull the focusing knob outward.
Carefully replace the collector and push it
to the left until the focusing knob comes to
a stop in the guide groove.
Adjust the collector on a trial basis.
Reinstall the lamp base
and close the lamp housing.
Leica lamp housing and mercury burner
11
4. Supply units
3
2
4.1 Supply unit
for lamp housing 106 z
with 50W mercury
lamp
1
6
4
5
7
Type 301-185.003/10372
Input:
220V/240V ±10%
220V ~ 50/60Hz
Hg 50W L1/L2
Osram No. 0-958
P. Max. 320VA
1. On/off switch
2. Operating time meter
3. Switching between L1 and L2 burners
4. Safety starter
5. Switching between 50Hz/60Hz
6. Lamp connection
7. Power cable
The supply unit is intended for power supply voltages of
over 220V. For power supply voltages under 220V, an
additional pre-transformer, such as 110V/230V, is required.
Follow the safety instructions!
Connect the lamp housing cable to the supply unit.
Switch on ‹L1› or ‹L2› according to the label on the lamp base.
Switch on 50Hz or 60Hz.
Connect the power cable to the power supply.
Read the hour meter and note the number displayed.
12
Leica lamp housing and mercury burner
To minimize the risk of explosion, replace a discolored
high-pressure mercury burner promptly when it has
reached the end of its rated life.
Follow the manufacturer’s specifications and the minute meter
on the supply unit!
Switch on the supply unit.
The safety starter ignites the burner. If the burner does not
ignite after several attempts, the burner could still be too hot
or may be burned out, and the safety starter then switches
off. Wait until the burner has cooled off or replace it with a
new one. New start:
Press the red button on the safety starter.
• The safety starter becomes operational once again.
After switching on the supply unit, new mercury burners
must be adjusted immediately.
There is a danger of overheating for mercury burners
that are not adjusted.
Danger of explosion.
Replacing the safety starter
Turn the safety starter counterclockwise and remove it.
You can also use Osram safety starters for HBO 75W.
4.2 ebq 100 supply unit
for 100W mercury
burners
100W mercury burners must be powered by the ebq 100
supply unit.
Read the separate instruction manual and safety
instructions provided with this supply unit.
Leica lamp housing and mercury burner
13
5. Adjusting the mercury burner
After installing the mercury burner, adjust it exactly as described. Never let the bright tips of the electric arcs, the focal
spots, cross when projected.
Danger of explosion from overheating
Adjustment is also important to obtain a homogenous light
surface and good fluorescence.
When adjusting the mirror image of the arc, never
project it onto the electrodes for a longer period.
Danger of explosion from overheating!
Both electrodes can be faintly seen in the extension of the
symmetrical level of the arc.
Switch on the supply unit. Wait for 2–3 minutes.
• For the supply unit for 100W, you will hear a whistling sound.
Swing away the UV protection screen.
• You can work temporarily without the UV protection screen
only when making adjustments!
For the Leica MZ16 FA: Rotate the filter set into the beam
path using the F button on the
manual operation unit.
Draw crosshairs on a piece of paper and place it in the
middle of the illuminated circular area.
Select the lowest magnification.
• The arc is visible in the illuminated circular area.
It is positioned approximately 45° diagonally to the drawn
crosshairs (Fig. a).
Look into the oculars and focus the crosshairs.
With the naked eye, observe the arc on the paper and focus
it using the focusing knob (3) (Fig. a).
Move the arc using the positioning buttons (1 and 2) (Fig. b).
Focus the second arc (mirror image) using the button (6) and
position it symmetrically to the direct image using the knobs
(4 and 5) (Fig. c).
• For the 50W mercury burner, the arcs should contact each
other.
• For the 100W mercury burner, the arcs should cross.
Readjust the lamp field using the focusing knob (3).
• The light field should now be as large, round and uniformly
illuminated as possible.
Reposition the UV protection to protect the observer.
14
Leica lamp housing and mercury burner
Hg 50W
Fig. a: Focus the arc.
Hg 100W
3
1
Fig. b: Position the arc
at the crosshairs.
Fig. c: Focus and
position the second
arc.
2
4
5
6
Leica lamp housing and mercury burner
15
Leica Microsystems – the brand
for outstanding products
Leica, the leading brand for microscopes and scientific instruments, has developed
from five brand names, all with a long tradition: Wild, Leitz, Reichert, Jung and
Cambridge Instruments. Leica symbolizes not only tradition, but also innovation.
Leica Microsystems – an international company
with a strong network of customer services
Australia:
Austria:
Canada:
China:
Denmark:
France:
Gladesville, NSW
Vienna
Richmond Hill/Ontario
Hong Kong
Herlev
Rueil-Malmaison
Cédex
Bensheim
Milan
Tokyo
Seoul
Rijswijk
Lisbon
Germany:
Italy:
Japan:
Korea:
Netherlands:
Portugal:
Singapore:
Spain:
Barcelona
Sweden:
Sollentuna
Switzerland:
Glattbrugg
United Kingdom: Milton Keynes
USA:
Bannockburn/Illinois
Tel.
Tel.
Tel.
Tel.
Tel.
+1 800 625 286
+43 1 486 80 50 0
+1 905 762 20 00
+8522 564 6699
+45 44 5401 01
Fax
Fax
Fax
Fax
Fax
+61 2 9817 8358
+43 1 486 80 50 30
+1 905 762 89 37
+8522 564 4163
+45 44 5401 11
Tel.
Tel.
Tel.
Tel.
Tel.
Tel.
Tel.
Tel.
Tel.
Tel.
Tel.
Tel.
Tel.
+33 1 4732 8585
+49 6251 1360
+39 02 57 486 1
+81 3 543 596 09
+82 2 514 6543
+31 70 41 32 130
+35 1 213 889 112
+65 6 77 97 823
+34 93 494 9530
+46 8 625 45 45
+41 1 809 34 34
+44 1908 666 663
+1 800 248 0123
Fax
Fax
Fax
Fax
Fax
Fax
Fax
Fax
Fax
Fax
Fax
Fax
Fax
+33 1 4732 8586
+49 6251 136 155
+39 02 5740 3273
+81 3 543 596 15
+82 2 514 6548
+31 70 41 32 109
+35 1 213 854 668
+65 6 77 30 628
+34 93 494 9532
+46 8 625 45 10
+41 1 809 34 44
+44 1908 609 992
+1 847 405 0164
and representatives of Leica Microsystems
in more than 100 countries.
T
In accordance with the ISO 9001 certificate, Leica Microsystems (Switzerland) Ltd.,
Business Unit Stereomicroscopy has at its disposal a management system that
meets the requirements of the international standard for quality management.
Leica Microsystems (Switzerland) Ltd
Business Unit SM
CH-9435 Heerbrugg
Telephone +41 71 726 33 33
Fax +41 71 726 33 99
www.leica-microsystems.com
www.stereomicroscopy.com
The companies of the Leica Microsystems
Group operate internationally in five business
segments, where we rank with the market
leaders.
Microscopy
Our expertise in microscopy is the basis for all
our solutions for visualization, measurement
and analysis of microstructures in life sciences
and industry.
Specimen Preparation
We specialize in supplying complete solutions
for histology and cytopathology.
Imaging Systems
With confocal laser technology and image
analysis systems, we provide three-dimensional
viewing facilities and offer new solutions for
cytogenetics, pathology and material sciences.
Medical Equipment
Innovative technologies in our surgical microscopes offer new therapeutic approaches in
microsurgery. With automated instruments for
ophthalmology, we enable new diagnostic
methods to be applied.
Semiconductor Equipment
Our automated, leading-edge measurement
and inspection systems and our E-beam
lithography systems make us the first choice
supplier for semiconductor manufacturers all
over the world.
Illustrations, descriptions and technical data are not binding and may be changed without notice.
Leica Microsystems’ Mission is to be the world’s first-choice provider of innovative
solutions to our customers’ needs for vision, measurement, lithography and analysis
of microstructures.