1
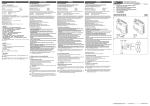
Thank you for your purchasing this product. Before attempting to connect or operate this product, please
read these instructions carefully and save this manual for future use.
彩 色 高 清 摄 像 机
CAUTION
使 用 说 明 书
!
RISK OF ELECTRIC
SHOCK DO NOT OPEN
CAUTION: TO REDUCE THE RISK OF ELECTRIC
SHOCK, DO NOT REMOVE COVER
(OR BACK).
NO USER-SERVICEABLE PARTS INSIDE. REFER
SERVICING TO QUALIFIED SERVICE PERSONNEL
DESCRIPTION
YR-680U employs 1/3" High Sensitivity CCD概
and述
HAWK DSP image processing technology, 3-DNR,
whose operating speed is 100 times higher than the traditional one's. Its resolution is as high as 600TVL.
When light change reaches a certain value, sense up switches on automatically, which greatly increases
image sensitivity and makes it get perfect pictures under any light and truly reaches the starlight level
sensitivity. It supports BLC, White Balance, AGC, Flicker Prevention, Motion Detection, Privacy and
other functions. The advanced digital noise reduction eliminates the noises effectively, making the
picture clearer and brighter.
High Resolution Color Camera
User Manual
Advanced image processing technology, realizes 600TVL, high definition and bright images
YR-680U
600 TV Line
420 TV Line
PRECAUTIONS
1. Use the appropriate power
The input power for YR-680U is DC12V/AC24 . Be sure to connect it to the appropriate power. Wrong
connection may cause malfunction and/or damage to the camera.
2. Do not attempt to disassemble the camera.
To avoid electric shock, do not remove screws or camera housing. There are no user serviceable parts inside.
Ask a qualified service person for servicing.
3. Handle the camera with care.
Do not abuse the camera. Avoid striking, shaking, etc. The camera could be damaged by improper
handling or storage.
4. Do not expose the camera to rain or moisture, or try to operate it in wet areas.
Do not place the camera in the following locations:
①Locations where temperature is lower than -10C or higher than 50C;
②Locations where humidity is higher than 95%;
③Locations where there are large amounts of water vapor and steam.
5. Do note use strong or abrasive detergents when cleaning the camera body.
Use a dry cloth to clean the camera when dirty. In case the dirt is hard to remove. Use a mild detergent
and wipe gently.
6. Clean the CCD faceplate with care.
When cleaning the CCD panel, do not use strong or abrasive detergents. Use a piece of lens tissue or
cotton tipped applicator and ethanol.
7. Do not attempt to aim the camera at the sun
Do not attempt to aim the camera at the sun or other extremely bright objects that cause smear to
appear irrespective of whether the camera is operating or not. This can damage the CCD (Charge
Coupled Device).
8. Do not put the camera in a place with interference.
When this camera is installed near the equipment like wireless communication device which emits
strong electromagnetic field, some irregularity such as noise on monitor screen may happen.
FEATURES
产品特征
Digital
WDR
数 字 宽动态
DC12V/AC24 Duplicate Supply Design
Advanced digital WDR technology greatly improves the effect to gain bright images in dark.
Compatible with DC12V and AC24V. It can switch over to the suitable mode according to the
input power supply.
High
高 清Resolution
晰度
Horizontal 600 TVL High Resolution
OSD Menu
HS-BLC
强光抑制
Powerful menu operation function, which can set all functions of the camera.
Automatically distinguish strong light piont, shield the strong light on the image to improve the
definition of the image for better surveillance.
Day & Night
Adopt the color mode in day, when the light is enough; at night when the illumination is lower,
higher sensitivity and image quality are needed, so it changes to W/B mode automatically.
3-DNR (Digital Noise Reduction)
adopt special caculation rules,reduce the noise of video and color, improve the definition of the
image, create clear and scrip images.
SPECIFICATION
基本参数
PARTS INSTRUCTION
Function Instruction
Model
2
1
Sensor
3
4
6
5
1、CS-Mount Lens Adapter 2、 Back Focal Length Fixing Screws 3、Auto Iris Lens Interface
7
8
1.Control –
1
3
2
4
2.Control +
3.Drive +
4.Drive -
Right
Up
Menu
Left
Down
≥50dB(AGC Off)
4×.8×.16×. 32×.64×.128×.256×.Off
Low、Middle、High、Off
On;Off;High light Suppression
Electronical Iris/Auto Iris (DC Driver)
Motion Detection
Privacy
Adjustment
Title
OSD Function Setting:
3-DNR
Digital WDR
Sync Mode
Menu: OSD Menu,choose OSD menu or quit.
Up/down:Up and Down button moves vertically
Left/right:Left and Right moves horizontally or modify paramete,rs,, with “ ”
means with
inferior menu setting, press“Left/Right”for setting,“back ” for superior menu setting.
Voltage
Power
Current
Lense
Dimension
外观尺寸
126. 5
Operating Temperature
Storage Temperature
Dimension(mm)
56
Weight
.Specifications subject to change without notice.
6 9. 9
135 .8
PAL/NTSC
600TVL
0.01Lux
Sense Up
Electronic Shutter
Mode
White Balance
Range
OSD Menu
Mirror
Day&Night
Auto Iris Interface Definition
YR-680U
1/3" High Sensitivity CCD
S/N Ratio
AGC
BLC
Iris Control
4、OSD menu
5、Bracket Screw Fixing Hole 6、video out 7、PWR: Power Indicator LED 8、Power in
NO. DC Drive
Sensor
Video Format
Resolution
Mini Illumination
1/60(1/50)-1/100000 Second
Manual, Auto Tracing, Automatical
(Automatical) 2200~10000°K
Horizontal, Vertical, Rotation
Auto、Color、Monochrome
On/Off
On/Off
Brightness, Sharpness
On/Off(Max15Characters)
On/Off
Off; Indoor; Outdoor
Internal
DC12V/AC24V
<100mA
CS Mount
-10 ℃~50 ℃
-20 ℃~50 ℃
136(L) * 56(H) * 70(W)
450g
CAMERA 摄
MENU
OPERATION
像 机FUNCTION
菜 单 功 能
操 作
主 菜单:
Main Menu :
LENS :
SETUP
LENS
EXPOSURE
WHITE BAL
DAY/NIGHT
3DNR
SPECIAL
ADJUST
RESET
EXIT
3DNR
DC
SPECIAL:
AWB
COLOR
ON
LEVEL
RETURN
50
1、Click the MENU
button to show the main menu, and move cursor to SPECIAL by up and down
特殊 功 能 :
buttons. Click the MENU button to enter setting.
SPECIAL
1、Click the MENU button to show the main menu, and move the cursor to EXPOSURE. Use left
When set
as DC driver, brightness range can be set between 1~100.
镜头:
and right buttons to set "LENS". MANUAL: manual Iris lens; DC: DC driver Iris lens.
CAM TITLE
OFF
D-EFFECT
MOTION
OFF
PRIVACY
OFF
SYNC
INT
RETURN
LENS
BRIGHTNESS
50
ETURN
2、Move the cursor to CAM TITLE, and set CAM TITLE by left and right buttons: OFF/ON.
It can edit 15 Cam Title at most.
EXPOSURE :
调 整 : the MENU button to show the main menu, and move the cursor to
1、Click
EXPOSURE by up and down buttons. Click MENU button to enter setting.
CAM TITLE
0
A
L
X
EXPOSURE
SHUTTER
1/50
BRIGHTNESS
50
MIDDLE
AGC
SENSE-UP
AUTO
BLC
OFF
D-WDR
OFF
CLR POS END
2、Move the cursor to SHUTTER, and set SHUTTER by left and right buttons: 1/50,FLC,1/250,
1/500, 1/2000, 1/5000, 1/10000, 1/100000.
3、Move the cursor to BRIGHTNESS, and set BRIGHTNESS by left and right buttons between
0-1009 (only available when the lens is in manual mode and shutter in auto mode.)
4、Move the cursor to AGC, and set AGC by right and left buttons:
LOW; MID; HIGH; OFF.
5、Move the cursor to SENSE UP, and set SENSE UP by left and right buttons:
×4: 4 times; ×8: 8times ; ×16: 16times; ×32: 32times; ×64: 64times; ×128: 128 times;
×256: 256times; OFF (only available when the lens is in manual mode and shutter in auto
mode; when the lens is set as DC and shutter set as fixed 1/50)
D-EFFECT
OFF
OFF
D-ZOOM
OFF
GAMMA
0.45
D-ZOOM
D-ZOOM
PAN
×32
X 32
4
5
TITLT
RETURN
6、Move the cursor to BLC, and set BLC by left and right buttons: OFF; BLC; HSBLC
BLC
MIDDLE
4、Move the cursor to MOTION, and set MOTION by right and left buttons: OFF/ON.
When MOTION is set as ON, it can set:
Motion Area: motion area is divided into 4 areas; AREA DISPLAY: OFF/ON.
Area Position: LEFT/RIGHT; TOP/BOTTOM;
Area Size: WIDTH; HEIGHT; SENSITIVITY: 0~40 level
MOTION
2
LEFT/RIGHT
WIDTH
TOP/BOTTOM
4
3
HEIGHT
3
RETURN
HSBLC
LEVEL
DEFAUALT
5
LEFT/RIGHT
WIDTH
2
AREA SELECT
AREA1
AREA DISPLAY
ON
LEFT/RIGHT
8
WIDTH
32
TOP/BOTTOM
4
HEIGHT
24
TOP/BOTTOM
4
3
HEIGHT
3
7、Move the cursor to D-WDR ,and set D-WDR by right and left buttons: Off; Indoor; Outdoor.
5、Move the cursor to PRIVACY, and set PRIVACY by left and right buttons: OFF/ON.
When PRIVACY is on, it can set:
Privacy Area: privacy area can be divided into 8 areas; AREA DISPLAY: OFF/ON;
Area Position : LEFT/RIGHT; TOP/BOTTOM;
Area Size: WIDTH: HEIGHT; Color: 0~15 level
PRIVACY
and down buttons. Click the MENU button to enter setting.
2、Move the cursor to WHITE BAL, and set WHITE BAL by left and right buttons:
MANUAL: Manual White Bal; ATW: Auto Tracing White Bal; AWB: Automatical White Bal;
When set as MANUAL, its color temperature can be set: RED: 0~100; BLUE: 0~100
1、Click the MENU button to show the main menu, and move the cursor to DAY/NIGHT by up
and down buttons. Click the MENU button to enter setting.
2、Move the cursor to DAY/NIGHT, and set DAY/NIGHT by left and right buttons:
AUTO: atuo color to black; COLOR; B/W: black and white.
AREA SELECT
AREA1
AREA DISPLAY
ON
LEFT/RIGHT
WHITE BAL MANUAL
40
21
OFF
RETURN
WHITE
白
平衡 BAL:
:
1、Click the MENU
button to show the main menu, and move the cursor to WHITE BAL by up
BLUE
RED
RETURN
40
SENSITIVITY
MOTION VIEW
RETURN
日DAY/NIGHT:
夜切换
:
FREEZE
MIRROR
RETURN
SENSE-UP
GAIN
DEFAUALT
.
3、Move the curosr to D-EFFECT, and set D-EFFECT by left and right buttons: FREEZE: OFF/ON;
MIRROR: OFF; MIRROR: horizontal mirror; V-FLIP: vertical mirror; ROTATE; D-ZOO: OFF/ON.
It can make a 32 times digital magnification to the picture and set Gamma between 0.05~1.
RETURN
SENSE-UP
RETURN
1 2 3 4 5 6 7 8 9
BC DE FGHIJK
MNOPQRSTUV
( )
YZ
& : ~,
WIDTH
8
16
TOP/BOTTOM
8
HEIGHT
16
COLOR
0
RETURN
ADJUST:
调节
1、Click the MENU button to show the main menu, and move the cursor to ADJUST by up and down
buttons. Click MENU button to enter setting.
2、Move the cursor to SHARPNESS, and use left and right buttons to set:
SHARPNESS value: 0~31; BLUE: 0~100; RED: 0~100
ADJUST
DAY/NIGHT AUTO
SHARPNESS
25
DELAY
5
BLUE
97
S-LEVEL
55
RED
89
E-LEVEL
RETURN
65
RETURN
RESET:
复位
Recover as factory default.
DAY/NIGHT B/W
3DNR :
3D降噪
BURST
RETURN
RESET
ON/OFF
1、Click the MENU button to show the main menu, and move the cursor to 3DNR by up and down
buttons. Click the MENU button to enter setting.
2、Move the cursor to 3DNR, and set 3DNR by left and right buttons:
OFF; ON: range 0~100;
FACTORY
RETURN
EXIT :
退出
Exit menu after setting is finished.
RESET