1
Appendix A
APPENDIX A. SUPERDOS UTILITIES USED
MOST OFTEN
142
Dim3D (Rev. 10.0)
Appendix A
APPENDIX A. SuperDOS Utilities Used Most
Often
¾
¾
¾
¾
¾
¾
¾
¾
¾
¾
¾
¾
¾
¾
¾
¾
¾
¾
¾
¾
¾
¾
¾
¾
Dim3D (Rev. 10.0)
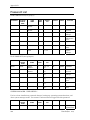
BYE
COPY
CRUNCH
DEL
DIR
DISKINIT
DKTEST
DV
EDIT
EXEC
FIL
FREE
MMI
OFILES
PCDEL
PCDIR
PCFORMAT
PCXFER
REBOOT
REN
REV
STAPE
TYPE
DS09003
143
Appendix A
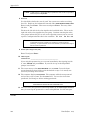
BYE
PURPOSE:
The purpose of this command is to terminate a session under any password.
This is also called signing off or BYEing off the system. Executing BYE from
the SuperDOS prompt will acquire the password screen again.
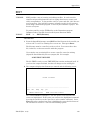
PROCEDURE:
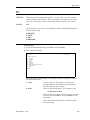
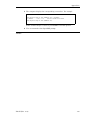
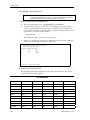
1 End out of all menus and obtain the SuperDOS prompt (>).
2 Enter BYE and press Enter. The computer displays the password screen:
SuperDOS
Password
......
NOTES:
144
Dim3D (Rev. 10.0)
Appendix A
COPY
PURPOSE:
This utility is used to create a copy of an existing file or files on another part
of the hard disk or to/from a floppy disk. The source file, or file used as the
origin, remains unchanged even though it has been copied.
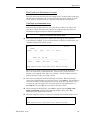
FORMAT:
COPY (switches) (destination filespec) (source filespec)
) NOTE:
In the SuperDOS COPY command, the “source” and “destination” are just opposite
of the DOS copy command.
Switches
These switches are optional commands, which can further define and control
the copy process. Switches can be combined. You can use both the /D and the
/P switches in the same copy command. For example:
COPY/D/P=1 5:31 5:1:VM*
There are no spaces between switches, however they are separated by a slash
(/).
/D
Deletes a pre-existing file by the same name. The file is then
recreated to the size and characteristics of the source file.
/F
(SuperDOS 5.0.0 or higher) Performs the fast copy operation. It uses
all of the task’s available memory for buffers to speed up the copy
therefore may slow down the performance of other tasks, especially if
the copy is to or from a diskette. Of course, if no other users are
running, no loss of performance will be detected.
/P
Directs output to the system printer. Enter it in the format COPY/P
for most Dimensions systems. If you have more than 1 system printer
and you wish to print it, enter the format COPY/P=# where “#” is the
number of the desired system printer (1-9). The output information
indicates whether or not the copy completed successfully.
Destination Filespec
The destination filespec contains up to 3 parts - the drive, the user group, and
the filename. See below for explanations and examples of each part.
Destination Drive:User Group
This is where the copied file(s) will be stored when the copy is finished. The
drive can be either 1 for the floppy drive or 5 for the hard drive (5 or 6 for
dual drive systems). The user group can be any valid user group on the
selected drive (0-63) or an asterisk wildcard (*) indicating whatever the
source user group is. The * wildcard cannot be used for the drive. For
example:
COPY 5:31 5:1:filename
COPY 1:* 5:1:filename
Dim3D (Rev. 10.0)
145
Appendix A
If you use the switch /D, (i.e., COPY/D 5:31 5:1:filename), any file in 5:31
which already exists will be deleted from 5:31 before the computer copies the
new one over.
In entering the copy command, there is always a space after the switches (if
any) and before the destination drive:user group. Separate the drive:user
group with a colon (:).
Destination Filename
If the filename is to remain unchanged from the source filename, it is not
necessary to enter a destination filename. For example:
COPY 5:31: 5:1:TEST
(makes a copy of 5:1:TEST in 5:31 named TEST)
If it is to be changed, enter the filename of the new file following the
drive:user group and a colon. For example:
COPY 5:1:TEST.OLD 5:1:TEST
(makes a copy of 5:1:TEST named TEST.OLD in 5:1)
Source Filespec
The source filespec contains 3 parts - the drive, the user group, and the
filename. See below for explanations and examples of each part.
Source Drive:User Group
If the filename is to remain unchanged from the source filename, it is not
necessary to enter a destination filename. For example:
COPY 5:31 5:1:VM*
COPY 5:* 1:*:*
When you enter the copy command, always include a space before the source
drive:user group. Also, always separate the drive:user group by a colon (:).
Source Filename
The source file can be one file or a group of files listed separately or grouped
with a wildcard. A colon precedes the filename. For example:
COPY 5:31 5:1:CM1.D
(copies CM1.D from 5:1 to 5:31)
COPY 5:31 5:1:CM3* 5:1:CM4* 5:1:CM5*
(copies all files beginning with CM3, CM4, and CM5 from
5:1 to 5:31)
COPY 5:31 5:1:CM*
(copies all files beginning with CM from 5:1: to 5:31)
COPY 5:31 5:1:*.XYZ
(copies all files ending with .XYZ from 5:1 to 5:31)
The source filename is the last part of the copy command you need to enter.
146
Dim3D (Rev. 10.0)
Appendix A
PROCEDURE:
1 From the SuperDOS prompt (>), enter COPY, any desired switch, and the
desired destination and source filespecs. Then press Enter to begin the copy
process.
2 COPY verifies that the source file exists and then performs the transfer as
specified n the switches. For every file successfully copied, the program
prints the source filename and the filespec of the destination file to which it
was copied. It is printed on the screen unless the switch was entered to print
it on the system printer.
3 After completing the copy as instructed, the computer displays: END OF
PROGRAM. You are returned to the SuperDOS prompt.
NOTES:
Dim3D (Rev. 10.0)
147
Appendix A
CRUNCH
PURPOSE:
The purpose of CRUNCH is to eliminate fragmentation of free space. It is
used when your free space listing indicates that you have a large total space
free compared with your largest free block.
FORMAT:
CRUNCH (switches) (drive number)
Switches
These are optional commands, which can further define the CRUNCH
command:
/P
Directs auxiliary information to a system printer. The format is
shown below:
CRUNCH/P
/L
Lists information required for recovery. This switch is the default
switch.
/T
Displays the time it took to compress the drive.
PROCEDURE:
1 Make sure everyone is off the system before beginning this procedure.
2 Use the DV utility shown below to make sure that the directory information
matches the information in the file header sector. At the SuperDOS prompt
enter DV and press Enter. Enter the following responses:
Y
To use the printer
1
For system printer 1
5
For drive 5
Y
To OK directory
When DV is finished, the cursor will be back at the SuperDOS prompt. If any
errors are printed out, call Dimensions support before proceeding any
further.
3 Use the DKTEST utility shown below to test for any bad sectors. At the
SuperDOS prompt enter DKTEST and press Enter. Enter the following
responses:
Esc
To take you to the action line
Enter
To start test
When DKTEST is finished, the cursor will be at the SuperDOS prompt and
any bad sectors will be listed on the screen. If any bad sectors are listed, call
Dimensions support before proceeding any further.
4 Run FREE/S 5 to find the total sectors free and record the number.
148
Dim3D (Rev. 10.0)
Appendix A
5 Make a tape backup of your entire system. Your filespec will read 5:*:*. You
must be sure you have a current backup of 5:0 (operating system), 5:51
(Dimensions programs), 5:1 (your live data), and any other user group you
need to restore if CRUNCH is unsuccessful.
6 Make sure that all terminals are not in use and back to the password screen.
7 At the SuperDOS prompt under your level 7 password, enter CRUNCH, any
desired switches, the drive number, and press Enter. For example:
>CRUNCH/P/T 5
(this example shows drive 5)
Enter Y to start the program. Let the program run. The size of the disk
drive will determine the time it takes to run. Plan on a couple of hours. If
you need to terminate the program, press Ctrl C one time. The program will
finish working with the current file before terminating the utility. If you
press Ctrl C twice, the program will halt immediately. There is a possibility
that some data may be lost or corrupted.
8 When CRUNCH is finished, the total number of files and sectors moved will
be displayed and the cursor will be at the SuperDOS prompt. Run FREE/S 5
again to get the total sectors free and compare against the earlier listing that
you recorded. If an error message is displayed on the screen from running
CURNCH or your total sectors free after the CRUNCH is incorrect, call
Dimensions support.
NOTES:
Dim3D (Rev. 10.0)
149
Appendix A
DEL
PURPOSE:
The purpose of the DEL command is to delete files from a disk directory.
FORMAT:
DEL (switches) (filespec)
Switches
These are optional commands, which can further control the delete process.
There is no space following DEL and the switches however they are separated
by a slash (/). For example:
DEL/V 5:*:filename
/B
Batch file. See SuperDOS Utilities Guide.
/V
Stops for user verification before deletion. The following is displayed
for each file in the filespec:
filespec OK TO DELETE? (Y/N):
/X
Exclude. See SuperDOS Utilities Guide.
Filespec
The filespec contains up to 3 parts – the drive, the user group, and the
filename. See below for explanations and examples of each part.
Drive:User Group
This is where the file or files you wish to delete are located on the disk. The
drive must be specifies (1 for the floppy drive or 5 for the hard drive). A colon
must precede the user group. The wildcard characters * and ? can be used
for the user group but not for the drive. It is recommended that the /V switch
be used in conjunction with wildcard characters to avoid the inadvertent
deletion of files. User groups 01 through 09 can be entered as a single digits
(1 vs. 01). Examples:
DEL 5:31:filename
Deletes filename from 5:31.
DEL/V 5:*:*.OLD
Deletes with verification all files ending with .OLD from all
user groups.
DEL/V 5:0?:TEST
Deletes with verification all files names TEST in user
groups 01 through 09.
If you do not specify a drive:user group, the delete command assumes the
default drive:user group assigned to that password. If the filename exists in
other searchlist drive:user groups, it is not deleted. For example:
150
Dim3D (Rev. 10.0)
Appendix A
DEL TEST.D
If the default drive:user group is 5:1, deletes TEST.D from 5:1 but does not
delete TEST.D if it is found in another drive:user group.
Filename
The filename can be one file or a group of files listed separately or grouped
with a wildcard. A colon precedes the filename. For example:
DEL 5:31:CM3.OLD
Deletes CM3.OLD from 5:31.
DEL 5:31:CM3* 5:31:CM4*
Deletes all files beginning with CM3 and CM4 from 5:31.
DEL 5:31:CM*
Deletes all files beginning with CM from 5:31.
DEL 5:*:.OLD
Deletes all files ending with .OLD from all user groups.
The filename is the last part of the delete command you need to enter.
PROCEDURE:
1 From the SuperDOS prompt enter DEL, any desired switches, and the
desired filespec. Then press Enter to begin the delete process.
) NOTE:
If the file is open, it cannot be deleted. The computer displays:
CAN’T BECAUSE: File opened while trying to delete.
If the file cannot be found, the computer will display the filespec and “File Not
Found.” You may have typed in the filespec incorrectly.
If the drive:user group are invalid (not assigned in the searchlist for the password),
no files are deleted and you are returned to the SuperDOS prompt.
2 DEL determines if any of the files are opened. If all conditions allow, the
computer deletes the specified file(s) and displays the filespec and
“DELETED”. You are returned to the SuperDOS prompt.
NOTES:
1. Use the DIR utility to verify the files you wish to delete. Then change the command to
delete the files. For example:
DIR 5:1:*.SV
DEL 5:1:*.SV
2. The safest method is to use the /V switch to verify each file you wish to delete.
Dim3D (Rev. 10.0)
151
Appendix A
DIR
PURPOSE:
The purpose of the DIR command is to list files from a disk directory or to
create batch files for use with other SuperDOS utilities.
FORMAT:
DIR (switches) (filespec)
Switches
These are optional commands, which can further define the directory listing.
Switches can be combined. For example, you can use both the /L and the /M
together:
DIR/L/M 5:1:*
/B
Lists files to a batch file. Enter this switch in the format shown below
where filespec is the filespec of the file to which the directory is to be
output and filespec-1 through filespec-n are the filespecs to be listed:
DIR/B=filespec filespec-1 . . . filespec-n
/E
Displays individual extents under their respective files. This switch
displays the extent number and the sector number of the extent’s file
header sector. NOTE: The /E switch must be used in conjunction
with the /L switch.
/L
Lists long version of the directory showing the filename, file types,
beginning sector number, number of sectors, extent size, number of
extents, date last used, and date created.
/M
Lists directory on CRT, one screenful at a time, asking for MORE? At
the bottom of the screen. Entering Y will continue listing the
directory, N will terminate and return you to the SuperDOS prompt.
/N
Used in conjunction with the /B switch to eliminate the drive and user
group from filespecs contained in a batch file.
/O
Lists directory to a disk test file. The value of this switch is a filespec.
In the example shown below TEST.T is the filespec of the file in
which the listing is to be stored and filespec-1 through filespec-n are
the filespecs to be listed:
DIR/=TEST.T filespec-1 . . . filespec-n
/P
Directs output to a system printer. Nothing will be printed on the
screen. Enter it using the format below:
DIR/P (filespec)
If you wish to print to another system printer, use the format
DIR/P=# where “#” indicates the system printer number (1-9).
/R
152
Displays a long listing with revision numbers for all applicable
programs.
Dim3D (Rev. 10.0)
Appendix A
/S
Sorts directory before printing. It can be sorted in one of the
following formats:
/S=A
/S=C
/S=L
/S=N
/S=S
/S=U
by last access date
by creation date
by file length based on the number of sectors in ascending
order
by filename alphabetically (default)
by sector
by user group
/T=X
Displays by file type where X=D(ata), I(ndex duplicate keys not
allowed), T(ext), R(elocatable), J (index duplicate keys allowed).
/V
Sort in reverse order. This function must be used in conjunction with
the /S switch which defines the type of sort to be used.
/X
Excludes files from a group specified by a wildcard filespec. For
example, the filespec 5:*:* might be entered to list all files on drive 5.
In the example shown below, TEST.T will not be included in the
listing:
DIR/X=TEST.T 5:*:*
Filespec
The filespec contains up to 3 parts – the drive, the user group, and the
filename. See below for explanations and examples of each part.
Drive:User Group
This is where the file or files you wish to delete are located on the disk. The
drive must be specifies (1 for the floppy drive or 5 for the hard drive). A colon
must precede the user group. The wildcard characters * and ? can be used
for the user group but not for the drive. User groups 01 through 09 can be
entered as a single digits (1 vs. 01). Examples:
DIR 5:*:filename
Lists all files named filename in all user groups.
DIR 5:1:*
Lists all files in user group 1.
DIR 5:0?:TEST
Lists all files name TEST in user groups 1 through 9.
DIR/L/S=U/P 5:*:*
Lists all files for all user group sin the long version, sorted
by user group, and printed to the system printer.
If all files in the default drive and user group are to be listed, a filespec of *
can be used.
DIR *
Lists all files on the default drive:user group.
If files exist in other searchlist drive:user groups, they are not listed.
Dim3D (Rev. 10.0)
153
Appendix A
Filename
The filename can be one file or a group of files listed separately or grouped
with a wildcard. A colon precedes the filename. For example:
DIR/L 5:*:*.OLD
Lists all files ending in .OLD in all user groups.
DIR/L 5:31:C* 5:31:V*
Lists all files in 5:31 beginning with C and V.
The filename is the last part of the DIR command you need to enter.
PROCEDURE:
1 From the SuperDOS prompt, enter DIR, any desired switches, and the
desired filespec. Then press Enter to begin the listing process.
2 DIR displays the files specified in the format requested. You are returned to
the SuperDOS prompt.
NOTES:
154
Dim3D (Rev. 10.0)
Appendix A
DISKINIT
PURPOSE:
This utility initializes diskettes used in SuperDOS.
) NOTE:
FORMAT:
Diskettes must first be formatted under DOS before they can be initialized using
DISKINT.
DISKINIT (switch)
Switch
This is an optional command which can further the control of DISKINIT.
/P
This switch performs a partial initialization, reinitializing sector 0
(which contains the Drive Information Table), but not the Bit Map or
the Directory.
PROCEDURE:
1 Insert the diskette to be initialized in the floppy drive.
2 From the SuperDOS prompt, enter DISKINIT and press Enter.
3 Enter drive # to be initialized (1-9):
Enter 1 for the floppy drive.
4 The computer displays a DISKINIT menu. Select the appropriate disk type.
The most common disk type for Dimensions users is PS/2 Floppy 1.44 MD
(25).
5 Volume ID # (0-65535)
Enter a unique identifier for the disk. This is optional.
6 Enter maximum # of file names in directory:
Enter the maximum number of files you may put on this disk. The greater
the number entered, the larger the directory will be created on the disk,
taking up more space on the disk.
7 There are nn sectors required for the directory.
This will provide space for nnnn entries.
Is this okay? (Y/N):
Enter Y if this is OK or N if the number of sectors is too large.
8 If the diskette was previously initialized, the program displays:
This disk has been previously DISKINITed.
Would you to like to re-initialize the disk (Y/N):
Enter Y to continue, N to terminate the DISKINIT command.
Dim3D (Rev. 10.0)
155
Appendix A
9 If you pressed Y to continue, DISKINIT reinitializes the diskette. When the
process is complete, the computer asks:
Initialized Another (Y/N) ?
If desired, enter Y to initialize another. Or enter N to end this procedure.
10 If you entered Y above to initialize another, the computer asks:
Use the same parameters?
(Y/N)
Enter Y to use the same parameters from the previous disk. Or enter N to
enter the parameter again.
NOTES:
See SuperDOS Utilities Guide for more specific information.
156
Dim3D (Rev. 10.0)
Appendix A
DKTEST
PURPOSE:
The purpose of this command is to test for bad sectors on the hard drive.
FORMAT:
DKTEST
PROCEDURE:
) NOTE:
ALL USERS MUST BE SIGNED OFF THE SYSTEM BEFORE BEGINNING THIS
PROCEDURE.
1 From the SuperDOS prompt, enter DKTEST and press Enter.
2 The computer displays the DKTEST menu. Enter the following parameters:
Drive # :
Test which sectors :
Type of test :
Log to :
Enter the drive number to be tested (usually 5 for
Dimensions users).
All:
File:
Dir:
Test the entire disk.
Test specific sectors occupied by a file.
Test the directory portion of the disk.
Read: Reads the data stored in the specified sectors
to check for bad sectors but does not modify data on
the disk. This is the only option you should run.
Indicates where the DKTEST should send the
results of the test:
C = CRT (screen)
P = Printer
F = File
Number of passes :
Map bad sectors :
Enter the number of times DKTEST is to run the
test.
Enter Y to map out any bad sectors that are found
(made unavailable for further use). Or enter N to
not have bad sectors mapped out.
3 After you enter all parameters, press Esc. The cursor moves to the Action
line.
4 Select the desired action:
Start test
Begins DKTEST.
Change
Allows you to change the parameters.
Quit
Terminates the procedure.
NOTES:
See SuperDOS Utilities Guide for more specific information.
Dim3D (Rev. 10.0)
157
Appendix A
DV
PURPOSE:
The purpose of this command is to verify that the information in the directory
matches the information in the file header sector for each file. It also verifies
that no files overlap and that all bits in the bit map are ON for each file.
Run this utility before using the CRUNCH command.
PROCEDURE:
) NOTE:
ALL USERS MUST BE SIGNED OFF THE SYSTEM BEFORE BEGINNING THIS
PROCEDURE.
1 From the SuperDOS prompt, enter DV and press Enter.
2 Use the Printer (Y/N):
Enter Y if the output is to go to the printer. Or enter N to display on the
terminal only.
3 If you entered Y to use the printer, the computer also asks:
Enter system printer (1-9) or E to END
Enter the system printer number to use, usually 1.
4 Enter the Drive # to Verify (1-9):
Enter the drive number to verify, usually drive 5.
4 Directory is in Sectors 1-99 OK? (Y/N)
Enter Y. Contact a Dimensions support analyst before entering any other
value.
6 DV then verifies all appropriate information, displays how many files it has
looked at and what percentage of the directory it has currently tested. After
the first pass, the program makes a second pass and normally there are no
errors found. If there are errors, the computer prints or displays them as the
program runs. Contact a Dimensions support analyst if errors are found.
NOTES:
See SuperDOS Utilities Guide for more specific information.
158
Dim3D (Rev. 10.0)
Appendix A
EDIT
PURPOSE:
EDIT provides a way of creating and editing text files. It can be used for
simple word processing functions such as typing short letters, memos, and
other correspondence. It also provides a way to create and edit “jobs” that are
used in projects. Jobs hold the responses normally typed in by the operator
when using a Dimensions program. A series of jobs constitute a project. See
Section 4, Projects.
To print a text file, use the TYPE utility or the Dimensions program
DS08538, Print a Text File, found on the System Functions Menu.
FORMAT:
EDIT
or
EDIT (filename)
PROCEDURE:
1 From the SuperDOS prompt, enter EDIT and the filename of the text file you
wish to edit. It can be an existing file or a new one. Then press Enter.
The filename must be a text file in order to edit it. You cannot edit a data
file, index file, or other non-text file with this program.
If you wish to use an existing file to create a new file, enter the existing
(input) file first followed by the new (output) file. For example:
>EDIT TEST TEST.NEW
The file TEST is used to create TEST.NEW but remains unchanged itself. If
you leave the output file blank, it makes all changes to the existing file.
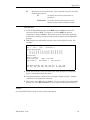
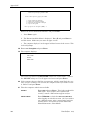
2 The computer displays the filename you entered and the following screen:
EDIT
Screen Editor
6.1.0
Filename: 6:51:DJ03908
-------------------------------------------------------------------------------Action:
Edit
Change
Help
ARROWS or SPACE to Select
Quit
RETURN or First Letter to Execute
The command Edit is highlighted. Also the options at the bottom of the
screen are highlighted. At this point you can move the highlighted command
by using the arrow keys or the space bar to select another command,. Press
Enter when the command you want is highlighted or enter the first letter of
the command to execute it. You have the following options:
Dim3D (Rev. 10.0)
159
Appendix A
Edit
Change
Help
Quit
Go to Step 3 to edit the selected file.
Change the filename to be edited. This command is
used in case a mistake was made in entering the
filename.
Show the Help menu screen, which provides
information and instructions on the editing
functions.
Return to the SuperDOS prompt without performing
any edit functions.
3 Once in the edit function, the computer displays the first 22 lines of the text
file. If it is new file, the lines are blank. The screen also contains a status
line, a ruler, and a function key line. For example:
OVERWRITE
HELP-ShiftF1 6:51:DJ03908
1:1
L------+-------+-------+-------+-------+-------+-------+-------+-------+------:CALCULATE AVE COST TYPE 2
DS03908
<13>
<13>
E
Status Line
This is the very top line of the screen. It contains
information on the current editing sessions:
- Mode—overwrite or insert
- How to obtain the help menu
- Filename being edited
- Cursor position (line:column)
It also serves as the COMMAND LINE where you
enter commands. Activate the command line by
pressing F1 or Ctrl A. Notice the screen displays
the Command: prompt at the left side of the status
line. See Step 4 for more information on commands.
Ruler
Function Key Line
160
The ruler is immediately under the Status Line (line
2). It displays the current margins (L & R) and the
tab setting (+). For simple editing you will probably
not need to change the ruler.
This is the last line displayed on the screen. It
shows an abbreviated list of what the first 8 function
keys do, both unshifted and shifted. Press Shift to
display the shifted function keys. On the main
monitor, this line displays the first 10 unshifted
function keys.
Dim3D (Rev. 10.0)
Appendix A
4 With the cursor positioned on the first line of text or the first line of a new
file, you can type your letter or whatever you are doing. EDIT defaults to the
overwrite mode so whatever you type writes over what was there before. You
can do any of the following:
Use arrow keys
Display Help Menu
Perform commands
Use function keys
Del key
Delete a line
The arrow keys move the cursor around on the
screen without affecting the displayed text.
Press Shift F1 at any time to display the Help
Menu. The screen is redisplayed showing the
available help options. Pressing Q to Quit Help,
when available, brings you back where you left. The
Help Menu is described in detail in the SuperDOS
Utilities Guide.
Commands can be used anytime by pressing F1 or
Ctrl A. See Table A for the commands used most
frequently.
Function keys are used as short cuts to commands.
They are listed at the bottom of the screen. See
Table B for the function keys used most frequently
in simple word processing.
The Delete key deletes one character to the left of
the cursor.
To delete a line, position the cursor anywhere on the
line to be deleted and press Shift LineDEL (on
numeric keypad). The UnDo command is not able to
undo this kind of deletion.
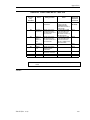
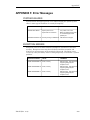
TABLE A. COMMANDS
Enter these commands at the Command: prompt. Press F1 to get this
prompt.
END or E
Ends and saves the current editing session.
HELP or H
Acquires the Help Menu and screens.
QUIT
Dim3D (Rev. 10.0)
Ends but does not save the current editing session
161
Appendix A
TABLE B1. FUNCTIONS KEYS - UNSHIFTED
If the function keys have been programmed for other uses on your terminal
(as on a Wyse 50 or 60), they may not work properly in EDIT. Use the
equivalent keyboard command instead.
Function
Key
Unshifted
Editing Function
F1
Command
Acquires Command:
prompt.
F2
PageUp
Displays previous
screen of text.
F3
PageDown
Displays next screen of
text.
F4
Insert/
Overwrite
Toggles between insert
and overwrite modes
F5
LastWord
F6
NextWord
F7
UnDo
Moves cursor to first
character of the
previous word on the
current line. It does
not go to the previous
line.
Moves cursor to first
character of next word
on the current line. It
does not go to the next
line.
Undoes certain
changes to the current
line. It will not restore
editing changes that
involve more than 1
line.
F8
GoTo
) NOTE:
162
Name
*
Notes
Equivalent
Keyboard
Command
If no command is to be
entered at Command:,
press Enter to return to
editing.
If there is only one
screen of text, this
function doesn’t do
anything.
If there is only one
screen of text, this
function doesn’t do
anything.
When you enter EDIT,
the overwrite mode is
used by default.
This makes it quicker
to move the cursor
backwards, word by
word rather than
character by character.
Ctrl A
This makes it quicker
to move the cursor,
word by word rather
than character by
character.
Move the cursor to the
previous editing
change location then
press F7. You can
undo changes and
deletions as long as it
only involves one line.
Once the cursor is
moved to another line,
UnDo can no longer
undo changes to it.
*
Ctrl W
Ctrl P
Ctrl N
Ctrl O
Ctrl Q
Ctrl U
*
* For the function keys listed here but not explained, refer to the SuperDOS Utilities
Guide.
Dim3D (Rev. 10.0)
Appendix A
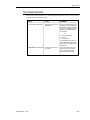
TABLE B2. FUNCTIONS KEYS - SHIFTED
Function
Key
Unshifted
Name
Editing Function
F1
Help
Accesses help screen
and menus.
F2
TopText or
Top of File
Moves cursor to the
first line of the file in
the same column as in
the current line
F3
Bottom of
Text or
Bottom of
File
Moves cursor to the
last line of the file in
the same column as in
the current line.
F4
ChangeSid
e
Start of
Line
*
F5
F6
End of Line
F7
F8
Join
Select
) NOTE:
Moves cursor to the
beginning of the
current line.
Moves cursor to the
end of the current line.
*
*
Notes
Equivalent
Keyboard
Command
HELP can be accessed
anytime if the file
SUPERDOS.SWP
exists and if the task is
large enough.
For large files, it takes
a few seconds for the
cursor to move from
the middle or bottom of
the file to the top.
For large files, it takes
a few seconds for the
cursor to move from
the top or middle of the
file to the bottom
*
Command:
(F1 HELP)
*
Ctrl S
Ctrl T
Ctrl B
None
Ctrl E
*
*
None
None
* For the function keys listed here but not explained, refer to the SuperDOS Utilities
Guide.
NOTES:
Dim3D (Rev. 10.0)
163
Appendix A
EXEC
PURPOSE:
The purpose of EXEC is to execute a series of programs that have been
previously entered in a specially formatted batch file. Many users build
special jobs through the EDIT utility that they wish to add to a project such
as day end or month end. After building the commands and input
parameters in a batch file through EDIT, the batch file can be tested using
EXEC to make sure the program will run correctly.
FORMAT:
EXEC (filename)
PROCEDURE:
1 Create a text file using EDIT.
2 From the SuperDOS prompt, enter EXEC, the batch filename you wish to
execute, and press Enter. For example:
>EXEC DJ04201
DJ04201 is the name of a text file.
3 EXEC reads the batch file and executes the program found on the command
line of the text file. If a program has prompts and prompts have not been
answered in the batch file, the prompts are displayed on the screen. When
the prompts have been answered, the program continues automatically.
4 After the last program has been executed, you are returned to the SuperDOS
prompt.
NOTES:
See SuperDOS Utilities Guide for more specific information.
164
Dim3D (Rev. 10.0)
Appendix A
FIL
PURPOSE:
FIL performs the following file utilities – create, delete, view, fill, rename,
shrunk, modify, and initialize. These instructions will address only delete,
view, fill, and rename. Refer to SuperDOS Utilities Guide for the others.
FORMAT:
FIL
These programs can also be run individually from the SuperDOS prompt, if
desired, by entering:
F.DELETE
F.VIEW
F.FILL
F.RENAME
PROCEDURE:
1 From the SuperDOS prompt, enter FIL and press Enter.
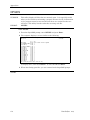
2 The computer displays:
FIL
Rev 6.1.0
File Utilities
mm/dd/yy
10:35:35
** File Utilities **
C
D
V
F
R
S
M
I
E
-
Create
Delete
View
Fill
Rename
Shrink
Modify Protect Switches
Initialize
End
OPTION:
Enter the letter corresponding to the option you wish to perform. You have
the following options:
C - Create
D - Delete
Create a new file. This option is usually done
through DS08911 found under System Manager,
File Management, Create Files.
Delete a specified filename. The computer asks:
Filename (Return to End):
Enter the filename (with drive:user group) you wish
to delete and press Enter. Or press Enter to end
this utility.
If you don’t know the filename, use DIR to print a
directory listing.
Dim3D (Rev. 10.0)
165
Appendix A
If the file is found, the computer displays:
filespec is type ‘xx’ with nn total sectors.
OK To Delete? (Y/N)
Enter Y if it is correct to delete the file, N if not.
Then you can delete another file or press Enter to
return to the FIL menu.
V - View
View all of the file control block information for the
specified file. The computer asks:
Filename (Return to End):
Enter the filename (with drive:user group) you wish
to view and press Enter. Or press Enter to end this
utility.
If you don’t know the filename, use DIR to print a
directory listing. The computer displays the
appropriate fields in the FCB for the selected file.
Then you can view another file or press Enter to
return to the FIL menu.
F - Fill
Fill a data file with a specified ASCII character.
Usually you enter 0 (zero) if you wish to clear out all
values in a file. Do not use this option unless
directed by a Dimensions support analyst. The
computer asks:
Filename (Return to End):
Enter the filename (with drive:user group) you wish
to fill and press Enter. Or press Enter to end this
utility.
If you don’t know the filename, use DIR to print a
directory listing.
If the file is found, the computer displays:
filespec is type ‘xx’ with nn total sectors. It currently
has nnn bytes of text.
Enter ASCII Value (o-255) For Fill Character or E to End
Enter the value with which to fill this file and press
Enter.
To fill it with zeroes, enter 0. The computer then
displays:
OK To Fill with < >? (Y/N)
Enter Y to fill the file or N to end this process
without changing the file. Then you can fill another
file or press Enter to return to the FIL menu.
R - Rename
Allows you to rename a file. You can change the
user group or the filename itself. This is similar to a
copy command, however the original file does not
remain. The computer asks:
Filename (Return to End):
166
Dim3D (Rev. 10.0)
Appendix A
Enter the filename (with drive:user group) you wish
to rename and press Enter. Or press Enter to end
this utility. If you don’t know the filename, use DIR
to print a directory listing.
Enter Desired Changes:
(Press Enter to leave
unchanged)
nn:nn:filename
The cursor is positioned on the user group portion of
the filename. Enter the new user group or press
Enter to leave unchanged. Then the cursor stops on
the filename. Enter the new filename or press
Enter to leave unchanged. If changes are made, the
computer displays:
Rename completed.
If no changes are made, the computer displays:
OK Won’t change anything.
Then you can rename another file or press Enter to
return to the FIL menu.
S - Shrink
M - Modify
I - Initialize
E - End
Allows you to reduce the size of a data file, down to
the current highest used record level.
Allows you to modify the protection switches for
individual files.. A switch can be set so that the
ability to delete, change, or read that file is limited
by the user level of the user attempting the action.
Initializes a newly create type I, J or D file to make
it ready for new data. This is normally handled
through the regular file management procedures.
Terminates the FIL utility.
NOTES:
See SuperDOS Utilities Guide for more specific information.
Dim3D (Rev. 10.0)
167
Appendix A
FREE
PURPOSE:
FREE lists the total sectors on a specified drive, the number of sectors
available and the largest block of sectors. Use it in conjunction with the
CRUNCH utility.
FORMAT:
FREE (switches) (drive number)
Switches
These are optional commands, which can further define the FREE command:
/S
Summarizes the output. This option does not display the sector
information as it is calculated, but only the final totals.
/P
Directs output to a system printer. Nothing will be printed on the
screen. You may indicate the number of printer using the following
format where “#” is “1” for system printer 1 or “2” for system printer
2:
FREE/P=# drive number
Most Dimensions systems have 1 system printer and drive number 5
so the command would be entered:
FREE/P=1 5
PROCEDURE:
1 From the SuperDOS prompt, enter FREE, any desired switches, and the
drive number (usually 5). Then press Enter to begin the process.
2 If the /S switch is not used, the computer begins listing in ascending order the
sector number, number of free sectors, and the maximum number of free
sectors. If the /S switch is used, the computer calculates the sector
information without displaying it.
3 The computer then displays the total of the calculations. For example:
Frespace listing as of hh:mm:ss on mm/dd/yy
Drive 5
Vol 5
Type
Sectors 635290
Total sectors
Largest free block
157035
67487
4 You are returned to the SuperDOS prompt.
NOTES:
168
Dim3D (Rev. 10.0)
Appendix A
MMI
PURPOSE:
The purpose of MMI is to display and modify task information. It allows you
to BYE off other ports (BY, AB, and IJ), to display the searchlist, and to
display or change the system date and time. MMI actually stands for “ManMachine Interface”.
FORMAT:
MMI
or
MMI (command)
Commands
AB
ABORT one or more tasks. This command is used to abort tasks that
have not been assigned to ports and to abort tasks whose terminals
have locked. The aborted terminals will be returned to the password
screen. Enter the command as follows where “x”, “y” and “z” are the
task numbers to be aborted:
AB=x,y,z
This command requires a user level of 6 or greater. The task
numbers are listed under the TA command. Make sure you enter the
task number and not the port number. NEVER ABORT TASK 2.
BY
BYE off one or more tasks. If the task is running a program, all
appropriate files are closed before BYEing off. The BYEed off
terminals will be returned to the password screen just as if they had
entered BYE themselves. Enter the command as follows where “x”,
“y”, and “z” are the task numbers to BYE off:
BY=x,y,z
This command requires a user level of 6 or greater. The task
numbers are listed under the TA command.
DA
Display/set current system date. The command is used in one of the
formats shown below:
DA
To display the current system date as
mm/dd/yy.
DA=mmddyy To set the current system date by month, day
year.
EN
END the interactive mode of MMI.
FO
Force the listed program to run on the listed task.
FO=task #,program
Before using this command, make sure the task is not signed on to
any other program.
HE
Display the HELP list of MMI commands.
IJ
Interrupt job to perform an IKEY (INTERRUPT KEY or Ctrl C) to
one or more tasks. The interrupted tasks will behave exactly as if the
user had pressed the IKEY Ctrl C on the keyboard. The terminal will
be returned to a previous menu or to the SuperDOS prompt
Dim3D (Rev. 10.0)
169
Appendix A
depending on where the program was when IJ was executed. Enter
the command as follows where “x” and “y” are the task number to be
IKEYed:
IJ=x,y
This command requires a user level of 6 or greater. The task
numbers are listed under the TA command.
SE
Display the searchlist for the current signed on task. This can be
temporarily changed by entering:
MMI SE=drive:user group
Up to six drive:user group entries can be entered at one time.
MMI SE=5:1, 6:51, 5:31, 5:30, 5:0
) NOTE:
5:0 must be included in every searchlist.
Shortcut method:
If you need to change only one user group in the searchlist, you can
enter the following:
>XSE 5:01 6:51 5:31 5:30 5:00 0:00
Use the left and right arrow keys to position the cursor to the values
you wish to change.
SH
Show all information related to the current signed on task. This
information is displayed upon entering the interactive mode of MMI
(see Step 2).
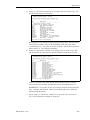
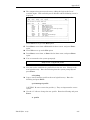
TA
List the following task information of all currently defined tasks. For
example:
TASK ACCOUNT LEVEL PROGRAM
BASE
SIZE
PORT ACTIVE
---------------------------------------------------------------------1
05D9C6
20000 ( 128K)
1
NO
2
T5286
7 *TOKEN286
07DF86
10000 (
64K)
0
NO
3
08E536
10000 (
64K)
0
NO
4
SLAN
7 *SUPERLAN
100000
20000 ( 128K)
0
NO
5
1205C0
79000 ( 484K)
2
NO
6
199BD8
20000 ( 128K)
3
NO
7
1BA198
20000 ( 128K)
*19 NO
8
1DA758
20000 ( 128K)
*20 NO
9
1FAD18
20000 ( 128K)
4
NO
10
21B2D8
20000 ( 128K)
*21 NO
Task number
Account Name (as defined in password file)
Level (as defined in password file)
Program name task is running (if any)
Base
Size
Port number
Active (YES or NO)
170
Dim3D (Rev. 10.0)
Appendix A
TI
Display/set current system time. The command is used in one of the
formats shown below:
TI
To display the current system time as
hh:mm:ss.
TI=hhmmss
To set the current system time by hour,
minute, and second in a 24-hour format.
PROCEDURE:
1 From the SuperDOS prompt, enter MMI and press Enter to enter the
interactive mode of MMI. Go to Step 2. Or enter MMI, the desired
command(s), and press Enter. This will not use the interactive mode but
perform the command and then automatically terminate to the SuperDOS
prompt.
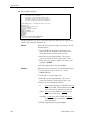
2 MMI displays the information related to the current signed on task. For
example:
TIME NOW 13:19:12
mm/dd/yy
TASK
8
11
FLAGS FOR
0
16
32
48
PORT
LOGON AT 13:19:00
LEVEL 7
USER GROUP ACCESS
1
2
3
4
5
17 18 19 20 21
33 34 35 36 37
49 50 51 52 53
6
22
38
54
08/24/98
SuperLAN Node #
7
23
39
55
8
24
40
56
9
25
41
57
10
26
42
58
TIME
ON 00:00:12
11
27
43
59
8
12
28
44
60
13
29
45
61
14
30
46
62
15
31
47
63
TASK OPTION FLAGS
SEARCH 5:0 SYSTEM=5:0
INFO BLK 000000-0005FF
TASKS IN SYSTEM
60
MEMORY
000600-00FFFF
TASKS SIGNED ON
DFAULT SEARCH SYSDRV IKEY
SHOW
HELP
TIME
FORCE
=
TERM
TASKS
KIND
ALLOC
6
TASKS ACTIVE NOW 1
CRAM
ABORT
DATE
END
Pn
BYE
IJOB
PTIME
REMOTE DELAY
3 At the bottom of the screen, the interactive mode prompt (=) is displayed.
Enter a command from the list above.
4 After performing the command, the = prompt is displayed again. Another
command can be performed if desired.
5 When done, enter EN and press Enter. You are returned to the SuperDOS
prompt. Or enter BY and Enter you are returned to the password screen.
NOTES:
See SuperDOS Utilities Guide for more specific information.
Dim3D (Rev. 10.0)
171
Appendix A
OFILES
PURPOSE:
This utility displays all files that are currently open. It is especially useful
when you are locked out of running a program because of a file lock situation
or if a program cannot be executed because there are certain files that are
still open. This utility lists the tasks that are using each file.
FORMAT:
OFILES
PROCEDURE:
1 From the SuperDOS prompt, enter OFILES and press Enter.
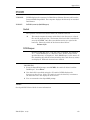
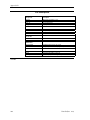
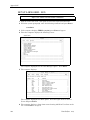
2 The computer displays a screen similar to the following:
OFILES
Rev 6.1.0
List Open Files
0mm/dd/yy
13:24:48
S.D. use
File Name
Mode Count Tasks with File Opened
5:0:SUPERDOS.SWP 80(H) 1
6:31:VM0.I1
00(H) 2
5:0:BASIC.COMMON 01(H) 1
6:31:VM0.D
00(H) 2
6:31:CM1.I1
00(H) 1
6:31:CM1.J1
00(H) 1
5:0:BASIC.ERR
00(H) 1
6:31:CM1.D
00(H) 1
6:31:IM1.I1
00(H) 2
6:31:BC1.I2
00(H) 1
6:31:WSM44.I1
80(H) 1
6:31:WSM44.D
80(H) 1
6:31:IM1.I2
00(H) 1
6:31:IM1.I3
00(H) 1
6:31:IM1.J1
00(H) 1
6:31:SM0.I4
00(H) 1
6:31:IM1.D
00(H) 2
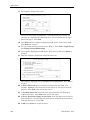
Hit C-Continue, E-End (0017 files so far)
To display more, enter C and Enter. To end, enter E and Enter.
3 When done listing open files, you are returned to the SuperDOS prompt.
NOTES:
172
Dim3D (Rev. 10.0)
Appendix A
PCDEL
PURPOSE:
PCDEL deletes one or more files from a DOS disk or diskette while under
Protected Mode SuperDOS. Wildcard characters are allowed. If wildcard
characters are used, a log file is created. The log file (default name PCDLOG)
summarizes the file deletion process, noting any errors that occur.
FORMAT:
PCDEL (switch) (DOSfilespec)
Switch
This optional command can further define the PCDEL command:
/L
Create a log file that contains a log of the file deletion activity. The
default log file name is PDCLOG. The computer automatically
creates a log file whenever you specify wildcards in the DOSfilespec
on the command line. You may use the /L switch, however, to force
creation of a log file, even when only one file is to be deleted. If you
use the /L switch, you must provide a log file name. You may use the
EDIT or TYPE utility to view the log file. Enter the switch in the
format shown below:
/L=log file
DOSfilespec
Specifies a DOS file name. If the disk drive is not specified, the
default drive will be C. The file specification must otherwise be a
complete file name including directory name. Wildcard characters
are allowed.
PROCEDURE:
1 From the SuperDOS prompt, enter PCDEL, the switch if desired, the
DOSfilespec, and Enter.
2 PCDEL then deletes the specified DOS file(s). A message reporting the
failure of a single file deletion is displayed on the screen if a log file has not
been created.
RETURN CODES
Code
Meaning
0
No errors. PCDEL was successful.
1
Errors occurred which are described in the log file.
>0
An error occurred and it was mapped to a standard SuperDOS error
number.
<1
Dim3D (Rev. 10.0)
173
Appendix A
3 You are returned to the SuperDOS prompt after the process finishes.
NOTES:
174
Dim3D (Rev. 10.0)
Appendix A
PCDIR
PURPOSE:
PCDIR displays the contents of a DOS disk or diskette directory while under
Protected Mode SuperDOS. The computer displays the directory in standard
DOS format.
FORMAT:
PCDIR (switch) (DOSfilespec)
Switch
This optional command can further define the PCDIR command:
/B
This switch outputs the names of the files in the directory to a batch
file, one file name per line. The format of the batch file is suitable for
use with PCXFER. Only files (not subdirectories) are copied to the
batch file. Enter the switch in the format shown below:
/B=batch file
DOSfilespec
Specifies a DOS file name. If no file name is specified, the default is
“C:\”. If the DOSfilespec is a directory name, all file names in that
specified directory are displayed. If the DOSfilespec is a file name, all
files matching that full file name (including drive and directory name)
are displayed. Wildcard characters are allowed.
PROCEDURE:
1 From the SuperDOS prompt, enter PCDIR, the switch if desired, and the
DOSfilespec. Press Enter.
2 If no batch file is specified using the “/B” switch, PCDIR displays the
directory on the screen. If the “/B” switch is used, the directory is written to
the batch file but is not displayed on the screen.
3 You are returned to the SuperDOS prompt.
NOTES:
See SuperDOS Utilities Guide for more information.
Dim3D (Rev. 10.0)
175
Appendix A
PCFORMAT
PURPOSE:
This command formats a blank diskette in DOS format while under Protected
Mode SuperDOS. PCFORMAT will not format a fixed disk.
FORMAT:
PCFORMAT (switches)
Switches
These optional commands can further define the PCFORMAT command:
/D
This switch specifies the diskette drive to be used (drive A or drive B).
If this switch is omitted, drive A is automatically selected as the
default drive. Enter the switch in one of the formats shown below:
/D=A
/D=B
/L
Formats drive A
Formats drive B
This switch is optional and specifies a label or volume name for the
diskette. IF this switch is not used, the diskette will not have a label
name. The specified label name will be used for every diskette
formatted by the current execution of PCFORMAT. Enter the switch
in the format shown below:
/L=Label Name
/S
This switch specifies the formatted storage capacity of the diskette. If
this switch is omitted, 360K 5 1/4” is automatically selected as the
default. Enter the switch in one of the formats shown below:
/S=360
/S=720
/S=1.2
/S=1.4
/1
For a 5 1/4” 360K diskette
For a 3 1/2” 720K diskette
For a 5 1/4” 1.2 M diskette
For a 3 1/2” 1.44 M diskette
This switch is optional and specifies that the program should
terminate after formatting one diskette. If this switch is not present,
the computer prompts you for second and subsequent diskettes for
formatting.
PROCEDURE:
1 Insert the diskette to be formatted in the diskette drive.
2 From the SuperDOS prompt, enter PCFORMAT, any desired switches, and
press Enter.
3 PCFORMAT then formats the specified diskette. The computer displays a
message reporting the success or failure of the operation on the screen.
NOTES:
See SuperDOS Utilities Guide for more information.
176
Dim3D (Rev. 10.0)
Appendix A
PCXFER
PURPOSE:
This utility transfers files from SuperDOS to DOS or from DOS to SuperDOS
under Protected Mode SuperDOS.
) NOTE:
This utility requires a task size of 128K. If the destination is a floppy diskette it
must already be formatted. Only one user a t a time may use PCXFER.
Please be aware that on many PCs, problems can occur when a program requires
a high capacity drive B to read low density diskettes, after the same program has
stated the session using drive B with high density diskettes. This problem can be
avoided by starting the program that uses drive B with a formatted 360K DSDD
diskette in the drive.
FORMAT:
PCXFER (switches) (source filespec) (destination location)
) NOTE:
The /D, /R, and /T switches are allowed only when copying file(s) from DOS to
SuperDOS, and only one of these can be used at a time.
Switches
These switches are optional commands, which can further define and control
the transfer process.
/B
Use a batch file as a source for a list of source filespecs. There can be
one source filespec per line in the batch file only. The /B option
replaces the source filespec on the command line. The batch file must
be located in a SuperDOS user group. Enter the switch in the format
shown below:
/B=batch file
/D
Create a new SuperDOS file as a data file when copying from DOS.
/L
Create a log file that contains a log of the file transfer activity. The
default log file name is PCXLOG. The computer automatically
creates a log file whenever you specify wildcards in the source filespec
on the command line or when you use the /B switch. You may use the
/L switch, however, to force creation of a log file even when only one
file is to be transferred. If you use the /L switch, you must provide a
log file name. You may use the EDIT or TYPE utility to view the log
file. Enter the switch in the format shown below:
/L=log file
/N
Do not transfer if the file already exists in the destination location.
/P
Transfer file(s) from DOS to SuperDOS (default).
/R
Create a new SuperDOS file as a relocatable (or program) file when
copying from DOS.
/S
Transfer file(s) from SuperDOS to DOS.
/T
Create a new SuperDOS file as a text file when copying from DOS
(default).
Dim3D (Rev. 10.0)
177
Appendix A
Source Filespec
This file specification identifies one or more files. Wildcard characters of “*”
for multiple character matches and “?” for single character match are allowed.
If the source file is on the DOS partition of the hard drive, you must fully
specify the path name, including drive, directory, and file name. If you do not
specify the drive, the default is the C drive.
If the source file is on the SuperDOS partition, the drive and user group must
be specified if the file does not reside in the current searchlist.
Because the parameters for file names differ between DOS and SuperDOS,
you should inspect the file names prior to the transfer. DOS limits file names
to 8 characters and permits a period (.) and then a three character extension.
SuperDOS permits 12 character file names inclusive of what DOS considers
the period and the file name extension. In SuperDOS, the filename can be
any length and the “extension” can be any length as long as file name plus dot
plus extension does not exceed 12 characters.
Destination Location
If the source filespec contains no wildcards and the /B switch was not
specified, the destination location can be any of the following:
For SuperDOS Destination
Enter any valid file name, with or without a drive and user group. Note that
the file will be placed in the default drive and user group if you do not specify
a drive and user group. Separate the drive number from the user group with
a colon (:).
For DOS Destination
Enter any valid file name, with a drive and path name, with or without a
trailing backslash (“\”).
If wildcards exist in the source filespec or you use the /B switch, the
destination location can only specify drive and user group (for SuperDOS
destination) or a directory name (for DOS destination).
PROCEDURE:
1 If you are copying to or from a diskette, place it in the diskette drive.
2 From the SuperDOS prompt, enter PCXFER, any desired switches, the
source filespec, the destination location, and optionally, a destination filespec.
Then press Enter.
3 PCXFER then transfers the specified file(s). The computer displays a
message reporting the successful completion or failure of a single file transfer
on the screen if a log file has not been created.
178
Dim3D (Rev. 10.0)
Appendix A
4 You are returned to the SuperDOS prompt.
NOTES:
See SuperDOS Utilities Guide for more information.
Dim3D (Rev. 10.0)
179
Appendix A
REBOOT
PURPOSE:
The purpose of REBOOT is to reboot the computer under Protected Mode
SuperDOS. This is the only means of rebooting Protected Mode SuperDOS
other than turning off the power to the computer.
FORMAT:
REBOOT
PROCEDURE:
1 Make sure all users are logged off the system before beginning this process.
2 Sign on with a user level 7 password.
3 From the SuperDOS prompt, enter REBOOT and press Enter.
4 The computer displays the following message:
Warning !!
This program cold-boots the machine.
Please make sure all tasks are logged off,
and that this is what you want to do.
Are you sure you want to reboot {Y/N}?
You have the following options:
Y
REBOOT checks that all tasks are logged off. If a task is found, the
computer displays the following message and REBOOT aborts:
Program XXXX is active in task number XX !!!!
All tasks must be logged off to run this program.
If no tasks are found, REBOOT continues with the process.
N
The computer aborts the program without rebooting the computer.
You are returned to the SuperDOS prompt.
5 If no tasks are logged on, REBOOT performs automatically and you are
returned to the password screen.
NOTES:
180
Dim3D (Rev. 10.0)
Appendix A
REN
PURPOSE:
REN allows you to rename a file. This is similar to the rename option in FIL
but it allows you to execute it directly from a SuperDOS prompt.
FORMAT:
REN (source filespec) (destination filespec)
PROCEDURE:
1 From the SuperDOS prompt, enter REN, the source filespec, the destination
filespec, and press Enter.
2 You are returned to the SuperDOS prompt.
NOTES:
Dim3D (Rev. 10.0)
181
Appendix A
REV
PURPOSE:
REV displays the current revision of SuperDOS, SuperDOS utility programs,
and dimensions programs (DS0####). Rev number are assigned to programs
as they are updated or changed. The higher the rev number the more up-todate the program.
FORMAT:
REV (filespec)
Filespec
The filespec can contain up to 3 parts – the drive, the user group, and the
program name. The program name can be SuperDOS, any of the SuperDOS
utilities (such as COPY, FIL, MMI), or any of the Dimensions programs
(DS0#### or CS0####). For example:
5:51:DS04000
5:0:SUPER
However, since the searchlist contains the drive:user group of all programs, it
is not necessary to enter the drive:user group as part of the filespec.
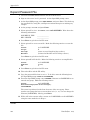
PROCEDURE:
1 From the SuperDOS prompt, enter REV and press Enter to enter the
interactive mode of REV. Go to Step 2. Or enter REV, the desired filespec,
and press Enter. This will not use the interactive mode but perform the
command and then automatically terminate to the SuperDOS prompt.
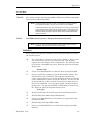
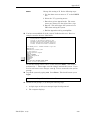
2 REV displays the following screen:
REV
Rev 6.1.0
Display Program Revision Numbers
mm/dd/yy
13:50:24
Protected-mode SuperDOS........................ is rev. # 6.1.111
Business Basic Double Precision Token Processor is rev. # 7.0.32
SuperDOS cache buffer cluster size is 4 sectors (2048 bytes).
CONFIG.P was used to configure this system.
FlipScreen/SDHELP.............................. is rev. # 1.2.74
Currently, 3 of a possible 250 Users are logged on.
Enter complete filespec to check (RETURN to end):
Enter the filespec of the program whose revision number you wish to check.
Or press Enter to end this utility. For example, 5:51:DS04000.
182
Dim3D (Rev. 10.0)
Appendix A
3 The computer displays the corresponding rev number. For example
Enter complete filespec to check (RETURN to end): 5:51:DS04000
5:51:DS04000...... is rev. 5.1.67
runtime is 64K Bus. Basic Double
Enter complete filespec to check (RETURN to end):
Enter another filespec to check or press Enter to end this process.
4 You are returned to the SuperDOS prompt.
NOTES:
Dim3D (Rev. 10.0)
183
Appendix A
STAPE
PURPOSE:
The purpose of this utility is to backup and restore files on magnetic tape
from the your computer’s hard disk. It can also list files on the tape and
rewind (or retension) new tapes. It must be run from the system monitor.
STAPE requires two tasks. The primary task must be 64K that has been
configured for a terminal. The secondary task must be 64K, usually a
background task that is not currently running. All other users must be
signed off their terminals and be displaying the password screen.
FORMAT:
STAPE
PROCEDURE:
1 Sign on with a user level 7 password.
2 From the SuperDOS prompt, enter STAPE and press Enter.
3 The computer displays the following menu:
MAIN MENU
1.
2.
3.
4,
5.
6.
Backup Files to Tape
Restore Files to Tape
Read Tape Directory
Verify Integrity of Backup
Retension Tape
End Tape Program
Option:
Select one of the following options:
1. Backup Files
to Tape
2. Restore Files
to Tape
3. Read Tape
Directory
184
Allows you to copy files from the hard disk to a tape.
You can back up individual files, groups of files, a
certain user group, or the entire hard disk. The files
on the hard disk remain unchanged during the
backup procedure but the previously stored
information on the tape will be replaced with
current information, even if you are backing up a
different user group. See Steps 4-9.
Allows you to copy files from a previously created
tape to the hard disk. Individual files, groups of
files, or the entire tape may be restored. The files on
the tape remain unchanged during the restore
procedure. See Steps 10-16.
Allows you to display a list of files on the tape. You
enter filespecs (as in backup and restore) for the files
you wish to display and also indicate where you wish
the list to print (terminal, printer 1, or printer 2).
You will most likely print the list to the terminal so
press Enter when the destination displays TERMINAL.
The tape rewinds automatically and the computer
displays Rewinding... The computer prints the list
and then displays: No more Directory Entries... Hit Esc to
Continue. Press Esc. You can print another list by
entering another filespec or Esc again to return to
the previous menu.
Dim3D (Rev. 10.0)
Appendix A
Allows you to check the data on the tape to verify
that it is readable by the tape drive. This option
begins by retensioning the tape. Then the verify
begins while the computer displays: Tape verify in
progress. Please wait... If any errors are detected, they
are recorded in TAPELOG. If no errors are
encountered, the computer displays Wrapping up
program. No errors... You are returned to the previous
menu.
4. Verify Integrity
of Backup
Allows you to retension (rewind) new tapes before
they are used for backup. You should retension all
new tapes before using them.
5. Retension Tape
Allows you to terminate the program. You are
returned to the SuperDOS prompt.
6. End Tape
Program
Steps 4-9 describe the backup option.
4 Insert the tape in the tape drive now. If you selected 1 above in Step 3, the
computer displays the backup screen:
STAPE
(F)
Rev 6.1.27
STAPE - SuperDOS Tape Utility
0mm/dd/yy
16:03:16
BACKUP
Filespec
Date
Type(s)
Exclude
1.
2.
3.
4.
5.
EXCLUSIVE : OFF
PARTIAL : OFF
---------------------------------------------------------------------------Filespec
Number
Total # files
OPTIONS (B=Backup to Tape, C=Change Global Switches, E=Return to Main Menu):
There are 2 sections on this screen, the entry section and the display section.
They are separated by a horizontal line. Use the entry section to enter
filespecs on 5 separate lines and to set switches. Use the display section to
display the filespecs as they are backed up.
)
NOTE: If you have the tape on SAFE, the computer will display:
Write Protected Cartridge
The program will end. Remove the tape and turn the black arrow away from SAFE.
“Write protected” indicates that no files can be put on the tape. Re-insert the tape
and select backup again.
5 The cursor is positioned at the first filespec entry line. Enter the filespec
(drive:user group:filename) you wish to back up. Press Enter. For example,
if you wish to backup all files on user group 1 on the hard disk, enter 5:1:*.
The “*” symbol is a wildcard which allows you to copy all files. Or if you wish
to copy all customer files, enter 5:1:CM*. All files beginning with “CM” will
be backed up. For a regular, daily backup, you will enter 5:1:*. Or press Esc
to discontinue the backup.
Dim3D (Rev. 10.0)
185
Appendix A
6 After you enter the first filespec, press Esc to bypass entering DATE, TYPE,
EXCLUDE, and the four remaining filespec entry lines. Esc terminates your
input for these fields.
7 Then the computer gives you some more options at the bottom of the screen:
OPTIONS (B=Backup to Tape, C=Change Global Switches, E=Return to Main Menu):
You have the following options:
B=Backup to Tape
C=Change Global
Switches
R=Return to Main
Menu
Continue to Step 8.
Allows you to determine how to handle files that
cannot be opened exclusively. Normally you will not
need to change this switch as all users will be signed
off during your backup anyway.
You are returned to Step 3 without continuing with
the backup process.
8 After you select B above, the computer begins the actual backup. A series of
messages is displayed as processing proceeds. For example:
Selecting files and building work files
Retensioning...
etc.
The computer displays the filespecs as they are backed up to the tape. The
red light on the tape drive remains on during this process. Merely wait until
it is completed.
9 When the backup process is complete, the computer displays:
Rewinding...
Wrapping Up Program.
No errors........
If there are no errors, you are returned to the SuperDOS prompt. If there
were errors detected during backup (bad file, etc.), an entry is made in the file
TAPELOG. When the backup is complete, type the TAPELOG. Use the
following command from the SuperDOS prompt:
>TYPE/P TAPELOG
This will show the errors encountered during the backup. It is rare that you
will experience backup errors. However, you may receive any of the following
errors:
186
Dim3D (Rev. 10.0)
Appendix A
Won’t back up a file because it is open
Have all users sign off and begin the backup again. If this doesn’t work, sign
off and turn the computer off. Let it wind down, then turn it back on. This
closes all files. Then turn on the computer and begin the backup again.
Fatal tape error/hardware error
Something has malfunctioned in your tape drive or there is no tape in the
tape drive. Write down the error exactly as it appears and then contact a
Dimensions support analyst for further instructions.
Steps 10-16 describe the restore option.
10 Insert the tape in the tape drive. Make sure the tape is write protected
(arrow points to SAFE). If you selected 2 above in Step 3 to restore files, the
computer displays the restore screen:
STAPE
(F)
Rev 6.1.27
STAPE - SuperDOS Tape Utility
0mm/dd/yy
16:03:16
RESTORE
Filespec
Date
Type(s)
Drive
UG
Exclude
1.
2.
3.
4.
5.
DELETE : OFF
USE : OFF
---------------------------------------------------------------------------Filespec
Number
Total # files
Sectors
OPTIONS (R=Restore from Tape, C=Change Global Switches, E=Return to Main Menu):
There are 2 sections on this screen, the entry section and the display section.
They are separated by a horizontal line. Use the entry section to enter
filespecs on 5 separate lines and to set switches. Use the display section to
display the files as they are being restored.
11 The cursor is positioned at the first filespec entry line. Enter the filespec
(drive:user group:filename) you wish to restore. Press Enter. For example, if
you wish to restore all files from the tape to the hard disk, enter 5:*:*. Or if
you wish to copy one specific file, enter the drive:user group:filename (i.e.,
5:1:CM1.D). Or press Esc to not continue with the restore.
12 After entering the first filespec, press Esc to bypass entering DATE, TYPE,
DRIVE, UG, EXCLUDE, and the four remaining filespec entry lines. Esc
terminates your input for these fields.
13 Then the computer gives you some more options at the bottom of the screen:
OPTIONS (R=Restore from Tape, C=Change Global Switches, E=Return to Main Menu):
Dim3D (Rev. 10.0)
187
Appendix A
Normally you need to change the global switch DELETE. Enter C to change
global switches. The cursor moves to DELETE : OFF. Press the space bar
one time to toggle this option to ON (pressing the space bar again toggles the
response back to OFF). This global switch indicates you wish to delete
existing files on the hard disk when the tape restores a file with the same
name from the tape. Press Esc to return to the options.
The global switch USE is not changed.
14 After you change the global switch, select R to restore from tape and press
Enter.
15 A series of messages is displayed as processing proceeds:
Selecting files and building work files
Retensioning...
etc.
The computer displays the filespecs as they are restored from the tape. The
red light on the tape drive remains on during this process. Merely wait until
it is completed.
16 When the restore process is complete, the computer displays:
Rewinding...
Wrapping Up Program.
No errors........
You are returned to the SuperDOS prompt.
NOTES:
188
Dim3D (Rev. 10.0)
Appendix A
TYPE
PURPOSE:
The purpose of TYPE is to print or display the contents of a text file. It can
only be printed on a system printer. To print a text file on other printers, you
can use the Dimensions program Print a Text File found in System Manager,
System Functions, System Utilities, SuperDOS Utilities (or DS08538 from
the SuperDOS prompt). You can specify the output device (P, T, S, PORT#)
and the compressed print option. If you print to the terminal, one screen is
displayed at a time and your can press Enter to view the next screen or # to
end the display.
FORMAT:
TYPE (switches) (filespec)
Switches
These optional commands can further define the TYPE command:
/B
Lists all files contained in a batch file. Enter the switch in the format
shown below:
/B=filespec
/C
This switch species the number of copies to make where “#” indicates
the number of copies. Enter it in the format shown below:
/C=#
/F
(/C=3 will print 3 copies)
Specifies the number of lines per page. The default is 61 lines per
page. If you wish to display a different number of lines, enter the
following format where “#” is the number of lines to display per page:
/F=#
(/F=25 will print 25 lines per page)
/H
Suppresses page headings. Used in conjunction with the /P switch.
/M
Stops the screen display after 22 line and asks for more:
More? (Enter “N” to abort)
Enter N to terminate the program or any other key to display the
next 22 lines.
/N
Suppresses form feeds. Used in conjunction with the /P switch.
/O
Lists text to an output file. Enter it in the format shown below:
/O=filespec
/O=MYFILE puts the text in a file called MYFILE.
/P
Directs the output to a system printer. You may indicate the number
of printer using the following format where “#” is “1” system printer 1
and “2” is system printer 2:
TYPE/P=1 filespec
Most Dimensions systems have 1 system printer so use the following
format:
TYPE/P filespec
Dim3D (Rev. 10.0)
189
Appendix A
Filespec
The filespec must be a text file. Common text files you may wish to
print are DSTEXT, jobs used in projects, and any files created EDIT
used in a word processing capacity.
PROCEDURE:
1 From the SuperDOS prompt, enter TYPE, any desired switches, and the
filespec you wish to type. Then press Enter to begin.
2 TYPE displays or prints the file you have specified according to the switches.
3 You are returned to the SuperDOS prompt.
NOTES:
190
Dim3D (Rev. 10.0)
Appendix A
DS09003 (Change Port Characteristics)
PURPOSE:
The purpose of this program is to change port characteristics such as baud
rate, data bits, stop bits, and parity of a specified port other than the port
you are currently running. This is a temporary change. When the computer
is rebooted, the port returns to its original set up as found in the config file.
This program can also be found in System Manager, System Functions, System
Utilities, SuperDOS Utilities.
FORMAT:
DS09003
PROCEDURE:
1 Obtain the port number requiring a change. You can run MMI TA from the
prompt to see what ports are running.
2 From the SuperDOS prompt, enter DS09003 and press Enter.
3 The computer displays:
PORTSET
CHANGE PORT PARAMETERS
mm/dd/yy
15:39:43
PORT: 8
ENTER THE PORT # (0 TO END):
The cursor is positioned at ENTER THE PORT # (0 TO END): . Enter the desired
port number and press Enter. Or enter 0 (zero) to end this program and
return to the SuperDOS prompt.
4 Then the computer displays:
ENTER THE BAUD RATE:
(110,300,600,1200,2400,4800,9600,19200,38400)
Enter the desired baud rate for the selected port. You must make an entry.
You cannot press Esc to go back a field. The most common baud rate is
19200.
5 Then the computer asks:
ENTER THE NUMBER OF DATA BITS:
(7 OR 8):
Enter the number of data bits to be used by the selected port. You must
make an entry. The standard Dimensions port setup is 8 data bits.
Dim3D (Rev. 10.0)
191
Appendix A
6 Then the computer asks:
ENTER THE NUMBER OF STOP BITS:
(1 OR 2):
Enter the number of stop bits to be used by the selected port. You must make
an entry. The standard Dimensions port setup is 1 stop bit.
7 The computer then asks:
ENTER THE PARITY:
(E)ven, (O)dd, (N)one, (M)ark, (S)pace
Enter the letter corresponding to the type of parity to be used by the selected
port. You must make an entry. The standard Dimensions port setup is (N)o
parity.
8 The computer makes the changes immediately and displays:
DONE !!
PRESS RETURN TO CONTINEU, ‘E’ TO END:
Press Enter to go back to Step 3 to change another port. Or enter E to end
this program. You are returned to the SuperDOS prompt.
NOTES:
192
Dim3D (Rev. 10.0)
Appendix B
APPENDIX B. UNIX UTILITIES USED MOST
OFTEN
Dim3D (Rev. 10.0)
193
Appendix B
APPENDIX B. Unix Utilities Used Most Often
¾
¾
¾
¾
¾
¾
¾
¾
¾
¾
¾
¾
¾
¾
¾
¾
¾
¾
¾
¾
¾
¾
¾
¾
¾
¾
¾
¾
194
cat
cd
chgrp
chmod
chown
cp
cron
df
disable (SCO)
enable (SCO)
find
kill
ls
man
mkdir
mv
pg
pipe
ps
mv
pwd
redirection
rm
rmdir
shutdown
shutdown
stty
what
Dim3D (Rev. 10.0)
Appendix B
cat
PURPOSE:
The purpose of this utility is to display the contents of a text file. This utility
simply dumps the entire contents of the file to the current standard output
device without pausing or stopping until the file has been completed. If a
large file is in the process of displaying and you wish to terminate it, use
Ctrl-\. This utility is very similar to the SuperDOS utility “TYPE” and the
PC-DOS utility “type”.
FORMAT:
cat (switches) (filename)
Switches
With no command line switches, the file will print as a simple text file with
only standard printable ASCII characters displayed. These switches are
commands, which can further define and control the cat process.
-v
Causes non-printable control characters to be displayed. A control
character is displayed with the “^” symbol in front of the letter that
corresponds to a particular character. For instance, “^M” is equal to a
carriage return character.
-t
Works in conjunction with the -v switch to cause tabs to be displayed
as “^I” and form feeds to be displayed as “^L”. This option is ignored
if the -v option is not used.
PROCEDURE:
1 From the system prompt, enter cat, any desired switches, and the filename to
be displayed. The computer displays the selected file and you are returned to
the system prompt.
2 This command can also be executed with input redirected in from another
file, which would contain a list of filenames to be displayed. For example:
# cat < filename
In this case, filename must be a text file containing only the list of files that
you wish to display.
NOTES:
You can redirect the output from this file into other utilities through the use of the “pipe”
command. It is commonly used when a batch type operation needs to be performed on lots of
files. It is important to remember that this utility simple dumps the file and has no way to
display one page at a time. If a long file needs to be read, it is generally better to use the “pg”
command.
Dim3D (Rev. 10.0)
195
Appendix B
cd
PURPOSE:
The purpose of this command is to allow a user to change from the current
working directory to another directory. The move can be “up” or “down” the
directory structure.
You can create a sub-directory using the “mkdir” utility or remove a subdirectory using the “rmdir” utility.
FORMAT:
cd directory
PROCEDURE:
1 From the UNIX prompt, enter cd, and the new directory name to move to.
You can move through the directory structure one level at a time. For
example, if you current working directory is /u/myfiles/letters and you want
to move back one directory, you can do this with the following format:
cd /u/myfiles
Or you could use the following format:
cd ..
To change directories from the current working directory of /u/myfiles to
/u/myfiles/letters/old, use the following format:
cd ./letters/old
Using the ./ tells the cd command to start at the current working directory
and go down the directory structure as specified.
NOTES:
196
Dim3D (Rev. 10.0)
Appendix B
chgrp
PURPOSE:
This utility is used to change the group affiliation of a file. It is used to
maintain the Discretionary Access Control (DAC) system of file permissions
in UNIX.
FORMAT:
chgrp (groupname) (filespec)
This utility does not have any switches but it is possible to use wildcards as
part of the filespec. The filespec can be one file or a group of files listed
separately or grouped with a wildcard. Available wildcards are:
*
The * (asterisk) stands for any number of characters. To change all
files that have start with an S, use the following format:
chgrp (groupname) S*
Or to change all files that end in .D, use this format:
chgrp (groupname) *.D
?
Each ? stands for one character – no more, no less. To change all files
that have 3-letter names, use this format:
chgrp (groupname) ???
Or to change all filenames that start with test and have 2 characters
following, use this format:
chgrp (groupname) test??
Or you can store a list of files in a file to be used as redirected input
for the utility. For example, a file called filelist was created using “ls”
and all files within it are to be changed:
chgrp billw < filelist
PROCEDURE:
1 From the system prompt, enter chgrp, the new group’s name, and the
filespec. The files are changed and you are returned to the system prompt.
NOTES:
Since this utility is part of the DAC system, it is important to be aware of the security related
issues. The significance of the group of the file comes from the relationship of the group and
the file permissions for the group. When listing a long directory of a file, the second three
permission fields are those that control file permissions for the group of the file. Any user
who is not the owner of the file but is identified as belonging to the same group as the file
will have those permissions for that file.
Dim3D (Rev. 10.0)
197
Appendix B
chmod
PURPOSE:
This utility change file permissions. It is used to maintain the Discretionary
Access Control (DAC) system. Use it set permission flags for files.
FORMAT:
chmod (permission) (filespec)
This command can be used in two different ways depending upon the
preference of the user. File permissions can be referenced as a numeric
representation or as a character representation.
Using the numeric representation, you must assign a numeric value to each
permission, “r”ead = 4, “w”rite = 2, and “x”ecutable = 1. The values are then
totaled to get the permission level for owner, group and rest of the world
(other user). For example, to change the permissions on the file myfile so the
owner has read, write and executable permission, the group has only read
and execute permission and the rest of the world has only execute
permission, the command would be:
chmod 751 myfile
This would then show on a directory listing as:
-rwxr-x--x myfile
Using the character representation, the user refers to each individual
permission using the same character represented in the directory listing, “r”
for read permission, “w” for write permission and “x” for execute permission.
Using the same file as above, in character representation, the command
would be:
chmod u+rwx g+rx o+x myfile
This command does not have any switches but it is possible to use wildcards
as part of the filespec. The filespec can be one file or a group of files listed
separately or grouped with a wildcard. Available wildcards are:
*
The * (asterisk) stands for any number of characters. To change all
files that have start with an S, use the following format:
chmod (permissions) S*
Or to change all files that end in .D, use this format:
chmod (permissions) *.D
?
Each ? stands for one character – no more, no less. To change all files
that have 3-letter names, use this format:
chmod (permissions) ???
Or to change all filenames that start with test and have 2 characters
following, use this format:
chmod (permissions) test??
198
Dim3D (Rev. 10.0)
Appendix B
Or you can store a list of files in a file to be used as redirected input
for the command. For example, a file called filelist was created using
“ls” and all files within it are to be changed:
chmod (permissions) < filelist
PROCEDURE:
1 From the UNIX prompt, enter chmod, the permissions, and the filespec. The
computer changes the permissions and you are returned to the system
prompt.
NOTES:
Since this command is part of the DAC system, it is important to be aware of the security
related issues. Only the current owner of the file or the superuser can change the
permissions of a file. Bill cannot change a file that is currently owned by Pete to allow access
by Bill. But Pete can change a file that he owns so that it becomes accessible by Bill.
Dim3D (Rev. 10.0)
199
Appendix B
chown
PURPOSE:
This utility changes the owner of a file. Use it to maintain the Discretionary
Access Control (DAC) system of file permissions in UNIX. Generally, a file is
“owned” by the user who initially create the file. This utility is used when it
is necessary to change the owner to some other user.
FORMAT:
chown (username) (filespec)
This utility does not have any switches but it is possible to use wildcards as
part of the filespec. The filespec can be one file or a group of files listed
separately or grouped with a wildcard. Available wildcards are:
*
The * (asterisk) stands for any number of characters. To change all
files that have start with an S, use the following format:
chown (username) S*
Or to change all files that end in .D, use this format:
chown (username) *.D
?
Each ? stands for one character – no more, no less. To change all files
that have 3-letter names, use this format:
chown (username) ???
Or to change all filenames that start with test and have 2 characters
following, use this format:
chown (username) test??
Or you can store a list of files in a file to be used as redirected input
for the utility. For example, a file called filelist was created using “ls”
and all files within it are to be changed:
chown billw < filelist
PROCEDURE:
1 From the system prompt, enter chown, the new user’s name, and the
filespec. The computer changes the files and you are returned to the system
prompt.
NOTES:
Since this utility is part of the DAC system, it is important to be aware of the security related
issues. Only the current owner of the file or the superuser can change the owner of a file.
Bill cannot change a file that is currently owned by Pete to be owned by Bill. But Pete can
change a file that he owns so that it becomes owned by Bill. The significance of the owner of
the file comes from the relationship of the owner and the file permissions for the owner.
When listing a long directory of a file, the first three permission fields are those that control
file permissions for the owner of the file.
200
Dim3D (Rev. 10.0)
Appendix B
cp
PURPOSE:
This command copies files from one location to another. This command can be
used with individual files or groups of files but not with directories. This
command will replace an existing file with the new file and will not inform
you that the file will be overwritten.
FORMAT:
cp (source filespec) (destination filespec)
Filespec
The filespec can be one file or a group of files listed separately or grouped
with a wildcard. Available wildcards are:
*
The * (asterisk) stands for any number of characters. To cp all files
that start with an S to the /tmp directory, use the following format:
cp S* /tmp
Or to cp all files to /tmp that end in .D, use this format:
cp *.D /tmp
?
Each ? stands for one character – no more, no less. To cp all files that
have 3-letter names, use this format:
cp ??? /tmp
To copy cm1.d to cm1.save, use this format
cp cm1.d cm1.save
PROCEDURE:
1 From the UNIX prompt, enter cp, the source filespec, and the destination
filespec. The files are copied and you are returned to the UNIX prompt.
NOTES:
Dim3D (Rev. 10.0)
201
Appendix B
cron
PURPOSE:
This utility is used to run the day end process at a pre-determined time each
business day. The day end reports are printed as a file to the hard drive and
then printed out at a later time, usually the next day. There are 3 reasons for
processing the day end this way as opposed to the standard day end:
1
2
3
Prevention. If a printer fails during the printing phase of a day end
report, the reports are lost. “Cron” allows the reports to be printed any
time before the next day end.
Convenience. You can set up “cron” once to have it run daily. You don’t
have to start it up daily.
Speed. The day end project runs faster because UBB is opened only
twice, not for every job.
System Requirements
This procedure runs in both AIX 3.1 and SCO 5.0. The Dimensions programs
must be 5.1 or higher and you must have the appropriate print to file scripts
and Dimensions job files. See the Script File Descriptions and Job Lists at
the end of this procedure.
Files Used in “cron”
There are 3 script files used during this process. They are located in /u/progs.
dayend
de
print_de
The job files are also located in /u/progs. The report files are located in the
“live” directory.
How this Procedure is Organized
This procedure is divided into 3 sections:
Installation
Used only once to install the day end jobs and scripts
and to set up “cron”.
Maintenance
Used to maintain day end jobs, adding, removing,
and changing the dayend report list by store. Also
used to add stores and set up output to printers.
Trouble Shooting
Used to diagnose and fix problems with the
procedure.
See below for detailed instructions for each section.
202
Dim3D (Rev. 10.0)
Appendix B
PROCEDURE - INSTALLATION:
1 SET UP
Log into root. Insert the installation diskette into the floppy drive. Turn off
Caps Lock so everything you type will be in lower case.
2 INSTALL THE FILES
From the system prompt, enter one of the following commands (be sure to
type the periods -- they are crucial for correct syntax):
AIX users: tar -xvf/dev/fd0 /u/progs
SCO users: ctar -xv8 /u/progs .
Or type: tar -xvf/dev/rfd0ds18 /u/progs/ .
If none of these commands work properly, contact a Dimensions support
analyst before continuing.
3 SET UP THE “CRON” JOB
a) From the system prompt, enter: crontab -e. Press Enter.
b) Press the down arrow to go to the bottom of the file.
c) Hold down the Shift key and press a. This should place the cursor at the
end of the line.
d) Enter the next 6 parameters for the time, day, and file you want “cron” to
run. Enter a number, a range of numbers, delimit multiple numbers by
using a comma, or use an asterisk to select all. They are entered all on
one line, separated by a space between each parameter. Enter them in
the following order and format:
Minute
Hour (military time, 24-hour clock)
Day of month (1-31). * for all days of the month.
Month of year (1-12). * for all months.
Day of week (0-6, 0=Sunday)
File to run (with path)
For example:
00 20 * * 1-6 /u/progs/dayend
Minute Hour Day of
month
Month Day of
week
File (with path)
This example will run /u/progs/dayend for all months, all days of the month,
Monday through Saturday, beginning at 8:00 pm.
e) Press Esc.
f) Type: :wq. Press Enter. (Be sure to enter the colon, then w and q.).
The job is saved and scheduled to be executed as a project in “cron”.
Dim3D (Rev. 10.0)
203
Appendix B
PROCEDURE - MAINTENANCE:
) NOTE:
You should have some basic knowledge of the UNIX editor “vi.” See SECTION 4,
Projects, for brief instructions on using “vi.” Also, you will need to know the store
numbers and default printer numbers (plain paper) for the store(s).
1 SET UP THE STORE INFORMATION
a) At the system prompt, type: cd /u/progs and press Enter.
b) Use the utility “copy_de” to add stores. For example, to create store 3,
you can copy the information from store 2. NOTE: Store 1 usually has
too many print jobs for a satellite store so it is not normally used to create
a new store. Use the following format:
copy_de 2 3
This command copies “print2.list” to “print3.list”.
c)
Using “vi”, edit the file “store.list” to add the new store, printer, and store
name. See the following example of “store.list”:
:
: Store Descriptions For Print To File Dayend
: Created 12/3/97 by Steve Dean
:
:Store#
Printer# Store Name
:-------------------1
90
One
2
90
Two
3
90
Three
~
~
~
~
~
~
~
~
~
~
"store.list" 9 lines, 220 characters
2 MAINTAIN THE JOB LISTS
The following table shows examples of jobs that can be added to the job lists
(prep.list, job.list, and wrap.list).
Job Examples
dayend.lock
df04201b
df04801
df09025
djunlock
dn09017b
df02390t
df04202
df04803c
df09115d
dn03000k
dn09028
df02390x
df04202a
df04803me
df09115s
dn03392
dn09115
df03301t
df04203
df04803p
dfctar
dn03397
dn09119
df03520
df04203m
df04803q
dftar
dn03712
dn09119c
df03531
df04204
df07010
djcpstm
dn03904
dnsh0
df03806
df04204ch
df07310
djdel
dn03907
dnsm0
df03807
df04204r
df07315aj
djlock
dn03908
dntd0
df04201a
df04207
df07315au
djprint
dn09014h
dnth0
df04201ab
df04211
df07315id
djtemp
dn09016
df04201all
df04319
df09019
djth0
dn09017
204
Dim3D (Rev. 10.0)
Appendix B
a) Using “vi”, edit the file “prep.list” to set up the jobs you want to run. See
the following example of “prep.list”:
\:
: Prepare System For Dayend - Job List
:
: insert a colon in front of line to remove a job
:-----------------------------------------------:Job
Description
:------------- --------------------------------: djlock places lock_msg in /u/tmp
: To remove lock run djunlock in wrap.list
djlock
Lock User Access To UBB
dfbye
Kill_All
:dftar
Backup Data Files AIX
:dfctar
Backup Data Files SCO
djdel
Delete /u/live/live01/*z@*
df09115d
Print/Purge SM0 - No Header
:dnsm0
Reindex SM0
df09115s
Print/Purge SH0 - No Header
:dnsh0
Reindex SH0
df09025
File Status Report
df04201all
Sales Analysis - All Stores Ave/Mkt
:df04201ab
Sales Analysis - All Stores Ave Cost
df04202a
Daily Report - All Stores
~
"prep.list" 22 lines, 816 characters
Existing jobs can be added by removing the leading colon. Or they can be
removed by inserting a colon at the beginning of the line (also called
“commenting out”). “Prep.list” is run for all stores and the file it produces
begins with a “0” (for example, 0z@9025).
b) Using “vi”, edit the file “job.list” to set up the jobs you want to run. The
jobs in this file are store specific. See the following example of “job.list”:
:
: Store Reports For Dayend - Job List
:
: insert a colon in front of line to remove a job
:-------------------------------------------------:Job
Description
:-------------------------------------------------:df04201b
Sales Analysis
:df04202
Daily Report
:df04203
Transaction Register
:df04204r
Transaction Dump
:df04207
GL/T2 Reconciliation
:df03806
Fab Items Sold
:df03807
Fab Components Sold
:dn04801
Transaction Dayend Update
:df04801p
Transaction Dayend Gpost
:df09019
Delete Quotes/Orders
:df04803p
Daily Sales By Item - Price Overrides
:df04803q
Daily Sales By Item - Qty < 0
:df04803me
Daily Sales By Item - Margin Exceptions
:df07310
PO & Receipt Register
:df07315au
PO & Receipt Dump
:df07010
PO & Receipt Update
"job.list" 25 lines, 936 characters
“Job.list” is run for each store and the files it produces have a leading
store number (for example, 2z@4202 for store 2, 3z@4202 for store 3).
IMPORTANT: To test this job list, you should comment out the following
lines – df04801 and df07010. These jobs perform updates for POS and
Purchasing & Receiving.
c)
Dim3D (Rev. 10.0)
Again using “vi”, edit the file “wrap.list” to set up the jobs you want to
run. See the following example of “wrap.list”:
205
Appendix B
:
: Wrap Up List For Dayend - Job List
:
: insert a colon in front of line to remove a job
:-----------------------------------------------:Job
Description
:-----------------------------------------------dn00010190
Change System Printer to 90
dn0001051
Change VM5 To Store 1
dn03712
Spiff Activate/Deactivate
df02390t
Customer Aging
dn09119
Manage Sales History Size
dn03000k
Rebuild Keyword Index
df03531
Delete By Batch If Stock Code = D
~
~
~
~
"wrap.list" 14 lines, 477 characters
“Wrap.list” is run for all stores and the files it produces have a leading “0”
(for example, 0z@2390t).
3 SET UP THE PRINT JOBS
a) Using “vi”, edit the print lists for each store. The print list for store 1 is
called “print1.list”. It contains the most print jobs because it is the main
store. The print lists for other stores are “print2.list”, print3.list” and so
on. See the following examples of “print1.list” and “print2.list”:
“print1.list”
:
: Print List For Dayend - Store_1
:
: insert a colon in front of line to remove a job
:-----------------------------------------------:Job
Description
:------------- --------------------------------:
: Multi-Store Reports
../../tapelog
Print Tapelog( do_backup )
0z@9025
Print File Status Report
0z@4201all
Sales Analysis - All Stores Ave/Mkt
:0z@4201ab
Sales Analysis - All Stores Ave Cost
0z@4202a
Daily Report - All Stores
0z@3520
Update Change Items By Batch
0z@3531
Delete By Batch If Stock Code = D
0z@9115d
Print/Purge SM0 - No Header
0z@9115s
Print/Purge SH0 - No Header
0z@2390t
Aging - Totals Only
:
: Store Reports
:1z@4201a
Sales Analysis - Average Cost Only
1z@4201b
Sales Analysis - Ave & Mkt Cost
"print1.list" 44 lines, 1877 characters
“print2.list”
:
: Print List For Dayend - Store_2
:
: insert a colon in front of line to remove a job
:-----------------------------------------------:Job
Description
:------------- --------------------------------:
: Multi-Store Reports
../../tapelog
Print Tapelog( do_backup )
:LAST_Backup
Print Dayend Status SCO/AIX
0z@9025
Print File Status Report
0z@4201all
Sales Analysis - All Stores Ave/Mkt
:0z@4201ab
Sales Analysis - All Stores Ave Cost
:0z@4202a
Daily Report - All Stores
:0z@3520
Update Change Items By Batch
:0z@3531
Delete By Batch If Stock Code = D
:0z@9115d
Print/Purge SM0 - No Header
:0z@9115s
Print/Purge SH0 - No Header
:
: Store Reports
:2z@4201a
Sales Analysis - Average Cost Only
:2z@4201b
Sales Analysis - Ave & Mkt Cost
"print2.list" 45 lines, 1943 characters
206
Dim3D (Rev. 10.0)
Appendix B
Existing jobs can be added by removing the leading colon. Or they can be
removed by inserting a colon at the beginning of the line (also called
“commenting out”). “
b) Using “vi”, edit the “de” script. Make sure the correct terminal is entered
in BBTERM. See the following example of the first page of “de”:
#
Last date modified 6/5/97
#
@(#) File name is de Rev. 1.0.0
#
ln="***************************************"
date | read dy mn dt tm tz yr junk
live="/u/live/live01"
moend="/u/live/moend1"
progs="/u/progs"
temp="/u/tmp"
log_file="$temp/"$mn"_"$dt".log"
fil=$temp/dayend.status
tmp=0
#
#
Now we'll do a line into the status file to show we ran this
#
echo "`date` <-- Beginning script $live/de" > $fil
#
#
Here we're going to set ourselves setup as a UBB user
#
BBENV=/u/ubb/BBENV
BBTERM=/u/ubb/tdf/wyse50.tdf #/u/ubb/wyse.tdf
BBUSER=MGR
BBSLEVEL=6
wyse50.tdf
PROCEDURE - TROUBLE SHOOTING:
1 File locations in the dayend scripts assume a certain location. The wyse50.tdf
file is used to set up a terminal type. If the screen looks odd when the dayend
in running or the script aborts with wyse50.tdf is not found, then you will
need to find and change the tdf file in “de” and “print_de”. To find tdf files,
type: find / -name wy*tdf -print and press Enter.
2 If a job stop or errors occur during dayend, bye off the dayend. Then make
changes to the job and test it from the ubb prompt. Type: run “exec
df04201.
3 If the dayend stops, you can find out where it left off and other information in
the following files:
/u/tmp/dayend.status
/u/tmp/print.status
/u/tmp/tapelog
/u/tmp/djbye.error
/u/progs/djdayend
4 If the dayend is interrupted and the computer won’t let you log in, log into
root and type the following: rm /u/tmp/lock_msg. Then try logging in
again.
Dim3D (Rev. 10.0)
207
Appendix B
File Descriptions
Script Files
Description
dayend
de
print_de
copy_de
Main script executed by “cron”
Print to file script
Print out files script
Copies print lists to add another store
Job Lists
prep.list
job.list
wrap.list
store.list
Dayend preparation job list
Main job list (run for each store)
Dayend wrap-up job list
Store information list
Print Lists
print1.list
print2.list
Print list for store 1
Print list for store 2
Status Files
dayend.status
print.status
Completed job list for the “de” script
Completed print list for the “print_de” script
Other Files
djdayend
djprint
tapelog
Compiled dayend job made by “de”
Temporary file made by “print_de”
Tape backup report from “do_backup”
NOTES:
208
Dim3D (Rev. 10.0)
Appendix B
df
PURPOSE:
This command displays a usage synopsis of all mounted filesystems or a
specified file system.
FORMAT:
df (switches) (file system)
If you enter the command without a file system name, then all currently
mounted file systems will be listed.
df
Will list all mounted file systems.
df /dev/root
Will list only the root file system.
Switches
These switches are commands, which can further define and control the df
command.
-v
Displays all information for the specified file system (AIX) and
percentages (SCO).
-L
Displays information on total K-bytes, used space, free space,
percentage of used space, and the mount point for the file system.
This is for AIX only and is the default view if no options are entered.
PROCEDURE:
1 From the UNIX prompt, enter df and any desired switches. The computer
lists the file systems and you are returned to the system prompt.
NOTES:
Dim3D (Rev. 10.0)
209
Appendix B
disable
PURPOSE:
This utility disables a port from logging in. Disabling a port shuts off the
program “getty” so that users cannot log in to that port. It is also possible to
use this utility to disable printers that are defined in the spooler.
To enable a port, see “enable”. This is the SCO UNIX format. For AIX, see
“pdisable”.
Options
The only options available for this utility are those related to disabling a
printer that has been set up in the spooler. When disabling a spooler printer,
you must disable the device as it is named in the spooler.
-c
Cancels any spooler requests that are currently printing.
-W
Disables the printer when the current print requests have
completed.
-r reason
Allows you to enter a reason why the printer is being
disabled.
PROCEDURE:
1 From the UNIX prompt, type disable, any desired options, followed by the
device to be disabled. For example, to disable /dev/tty10, enter the following:
disable /dev/tty10
If the device was already disabled, the computer displays a message and
terminates the command with no further action taken.
NOTES:
When attaching a printer to a port, it is best to disable the actual device name (/dev/tty10)
not the printer name in the spooler (prn10) so that a login prompt does not print on the
printer each time the system is rebooted.
210
Dim3D (Rev. 10.0)
Appendix B
enable
PURPOSE:
This utility makes a port ready for log on. Enabling a port forces the program
“getty” to run which is responsible for placing a login prompt on the terminal
screen and getting the login id and password from the user. It would be used
for a port that has been disabled. (See “disable”.)
There are no switches or options for this utility. This is the SCO UNIX
format. For AIX, see “penable”.
PROCEDURE:
1 From the UNIX prompt, type enable followed by the device to be enabled.
For example, to enable /dev/tty10, enter one of the following:
enable /dev/tty10
enable tty10
If the device was already enabled, the computer displays a message
terminates the command with no further action taken.
NOTES:
When enabling a port that has been previously disabled, you should see a new login prompt
displayed on the terminal (if all communications are working properly). This is true even if
the device has a printer attached to it. If you enable a printer port, the login prompt will be
printed.
Dim3D (Rev. 10.0)
211
Appendix B
find
PURPOSE:
This command allows you to search for a file or all occurrences of a file on a
hard drive.
FORMAT:
find (starting directory) (switches) (filespec) (switches)
This command can not be run without any switches. A basic find command
must include information as to where to start searching, what to search for,
and what to do with the file names that it finds.
Switches
-name
This switch tells the find command to search for the file by name.
The file name must follow the –name switch.
-user
This switch tells the find command to search for files of a specific
owner. The owner name must follow the –user switch.
-group
This switch tells the find command to search for files of a specific
group . The group name must follow the –group switch.
-print
This switch tells the find command to print the file name once it has
been found. If you run the find command and do not specify to print
the filenames, then UNIX will find the files and you will never
know.
PROCEDURE:
1 From the UNIX prompt, enter find, the starting directory name, the switch
defining how to find the file name, the file name, owner name, or group name
and then the action to be performed once the file has been found. The file (or
files) is listed and you are returned to the system prompt.
NOTES:
To see if the file ds04000 is in the /u file system, the command is as follows:
find /u –name ds04000 –print
To see if any files that start with ds04* are in the /u file system, the command is as follows:
find /u –name ds04* -print
To find all files that are owned by ubbuser, the command is as follows:
find / -group ubbuser –print
| “Pipe” to another command. This can be used to display the listing one page at a time.
For example:
find / -name ds04000 | pg
212
Dim3D (Rev. 10.0)
Appendix B
kill
PURPOSE:
This utility terminates a process that is currently running on the system. It
should only be used as a last resort when a terminal appears to be “hung up”.
You should run the “ps” utility to list the process id numbers before
attempting to use the “kill” utility. Run a full listing (-f). You must know the
proper process id # before beginning.
FORMAT:
kill (level) (process id #)
Level
The default kill level (-15) forces the program that is running to attempt a
normal shutdown. Enter the following:
kill (process id #)
If the process does not respond to the default kill level, use a kill level -9,
which will force an unconditional and immediate termination. Enter the
following format:
kill -9 (process id #)
PROCEDURE:
1 From the UNIX prompt, enter kill, the desired level, and process id #. The
selected process is terminated and you are returned to the system prompt.
NOTES:
When running a full listing of the “ps” utility, the process id number is displayed along with
the Parent Process id (PPID). Always kill the child processes before killing the parent
process. Killing a parent process that still has child processes running results in an “orphan”
process that then may become a “zombie” process that is stuck in the system.
Dim3D (Rev. 10.0)
213
Appendix B
ls
PURPOSE:
The purpose of this utility is to display a directory listing of filenames on any
hard drive storage device. It can be used in several different modes, to
display a short or long description of each file, and can also be used with
wildcards to allow the user to select only certain files to be displayed. This
utility is similar to the SuperDOS utility “DIR” and the PC-DOS utility “dir”.
FORMAT:
ls (switches) (filespec)
Switches
These switches are commands, which can further define and control the ls
process. The most common options are those that control the type of output
the utility can generate. The default output of the utility with no command
options included is to display filenames only, in a continuous scrolling list.
Switches can be grouped together behind one “-“ character.
-l
Displays the long listing of each file including file permissions, owner
name, group name, and file size.
-a
Displays all files including files that are normally hidden. Files that
begin with “.” are not normally displayed.
-R
Displays the contents of all sub-directories as they are encountered
(recursively).
-x
Displays output in columns with filenames sorted across the columns.
Filespec
The filespec can be one file or a group of files listed separately or grouped
with a wildcard. Available wildcards are:
*
The * (asterisk) stands for any number of characters. To list all files
that have start with an S, use the following format:
ls S*
Or to list all files that end in .D, use this format:
ls *.D
?
Each ? stands for one character – no more, no less. To list all files
that have 3-letter names, use this format:
ls ???
Or to list all filenames that start with test and have 2 characters
following, use this format:
ls test??
PROCEDURE:
1 From the UNIX prompt, enter ls, any desired switches, and the filespec to be
listed. The list is displayed and you are returned to the UNIX prompt.
214
Dim3D (Rev. 10.0)
Appendix B
2 This command can also be executed with output directed to another
destination – another output device using the “>” character or “piped” to
another valid command using the “|” character.
>
Redirect to another file. For example, the following format puts the
long listing into a file called myfiles:
ls -l > myfiles
|
“Pipe” to another command. This can be used to print the listing to a
printer. For example, the following format prints the long listing on
the system printer:
ls -l | lp
NOTES:
More Examples
ls -l ds04*
Displays a long listing of every file that begins with “ds04” regardless
of the length of the filename.
ls -l filea?
Displays a long listing of files beginning with “filea” with one
additional character.
You can redirect the output from this command to a file or another output device (such as a
printer) or “piped” to any other valid command. It is important to note that this utility will
load all arguments or filenames into a buffer as it works so when working with large
numbers of files it is possible to get the error “Argument List Too Long”. In this case, you
must limit the output of the utility by limiting the filespec. If you are preparing a batch file
and writing the output to text file for use as redirected input to another utility, “ls” must be
run without the long directory option so that the data written to the text file contains only
the filename.
Dim3D (Rev. 10.0)
215
Appendix B
man
PURPOSE:
The purpose of this command is to display or print pages from the on-line
help manual for any UNIX command. It is useful when you can’t remember
the options for a command or what to type where on the command line or for
more detailed information on the command.
FORMAT:
man (unixcommand) (options)
Options
These options help present the manual pages in different formats:
| more
Shows you to manual page a screen at a time.
| lpr
Prints the manual pages on the system printer.
> filename
Redirects the manual pages to a text file. For example, to
make a text file called lsmanual containing all the
information about ls, use the following format:
man ls > lsmanual
PROCEDURE:
1 From the UNIX prompt, enter man, the UNIX command you wish to see, and
any options. Press Enter. The computer prints or displays the manual and
you are returned to the system prompt.
NOTES:
216
Dim3D (Rev. 10.0)
Appendix B
mkdir
PURPOSE:
This utility creates a new directory. Directories divide your disk into
manageable chunks. UNIX directories are often referred to as a tree
structure. Naming directories in a logical manner helps you organize files on
your system.
FORMAT:
mkdir (directory name)
PROCEDURE:
1 From the UNIX prompt, type pwd and press Enter. This tells you the
present working directory name. If you are in the directory where you wish
to make a new sub-directory, continue to Step 2. If not, change to the proper
directory (cd).
2 To make a new directory, type mkdir and the new directory name and press
Enter. You are returned to the system prompt.
NOTES:
Dim3D (Rev. 10.0)
217
Appendix B
mv
PURPOSE:
This utility moves files without making a new copy, either from one name to
another or from one directory to another. In essence, it changes the name of
the file or the absolute pathname of the file but does not change the file’s
actual location on the hard disk.
FORMAT:
mv (switch) (source filename) (destination filename)
Switch
There is only one switch available for this utility.
-f
Suppresses any prompts that would normally be sent if a filename
already exists at the destination.
PROCEDURE:
1 From the system prompt, enter mv, the switch if desired, the source
filename, and the destination filename. The computer moves the file and you
are returned to the system prompt. This moves the file within the current
working directory. If a move is taking place from one directory to another, it
is preferable to include the full absolute pathnames.
NOTES:
In some cases, using this utility can be somewhat hazardous. Occasionally a file collision
may occur. In other words, if an attempt is made to move a file to a directory where a file
already exists with the same name, it is possible that the original file may be lost as a result
of the collision. Generally it is safer to cp the file to where it needs to go and then delete the
original file.
218
Dim3D (Rev. 10.0)
Appendix B
pg
PURPOSE:
This utility allows you to display a text file with user controls. It allows you
to control the flow of information to a terminal screen. It displays the text file
one screen page at a time, allowing you to scroll through file forward or
backward one page at a time. This utility can be used as a direct command to
view the contents of a text file or as a “pipe” destination, allowing the output
from any other command to be displayed one screen at a time. This utility is
similar to the SuperDOS utility “TYPE/M” and the PC-DOS utility “more”.
It is not used to redirect output to any other device besides a terminal screen.
FORMAT:
pg (filename)
PROCEDURE:
1 From the system prompt, enter pg, and the filename to be displayed.
2 The system displays one screen of information and then stop at a “:” symbol
There are additional commands that can be used at this point:
Enter
Displays the next screen.
-
Dash (-) displays the previous screen.
q
Stops output to the screen and terminates the process. You are
returned to the system prompt. If pg is being used as a “pipe”
from another utility, the other utility is also terminated.
NOTES:
You can use this utility as a “pipe” destination for any other command. For example, you can
use a utility such as “ls” to print a listing “piped” through the “pg” utility so that it is
displayed one screen at a time. Enter the following format:
ls -l ds0* | pg
This example runs the “ls” utility with its switch to display the long version of each file, using
“ds0*” as the filespec. The computer displays the output of this command through the “pg”
utility one screen at a time.
Dim3D (Rev. 10.0)
219
Appendix B
pipe
PURPOSE:
It can be useful to redirect the output of one program so that it becomes the
input of another program. This process is called “piping”. The symbol for a
pipe is a vertical bar (|). It is usually found on the same key as the back
slash (\). If you type two commands separated by a |, you tell UNIX to use
the output of the first command as input for the second command.
You can use the pipe command with the following utilities, among others:
cat
find
ls
pg
rm
See these utilities for examples on how to use the “pipe” command.
NOTES:
220
Dim3D (Rev. 10.0)
Appendix B
ps
PURPOSE:
This command displays information on the processes (jobs) that are currently
running on the system. This is used to find the process id of a port terminal
that is “hung up” so it can be killed.
FORMAT:
ps (switches)
Switches
-e
This switch returns information on every process that is currently
running.
-f
This switch returns a full listing of all processes.
-n
This will cause the listing to display only those processes associated
with the specified user. The user name must follow the switch.
-t
This causes the listing to display only those processes associated with
the specified terminal. The terminal device name must follow the
switch.
PROCEDURE:
1 From the UNIX prompt, enter ps and any switches.
2 The system displays the information requested based upon the switches used
and returns to the UNIX prompt. If you entered no switches, then the
computer displays processes associated with the current login only.
NOTES:
Dim3D (Rev. 10.0)
221
Appendix B
pwd
PURPOSE:
This command allows you to display the present working directory name.
FORMAT:
pwd
PROCEDURE:
1 From the UNIX prompt, enter pwd.
2 The system displays the absolute pathname of the current working directory
NOTES:
222
Dim3D (Rev. 10.0)
Appendix B
redirection
PURPOSE:
When you use a UNIX command like ls, the result (or output) of the
command is displayed on the screen. This is the standard place for the
output of most UNIX commands. Likewise, there is a standard source of
input – typing on the keyboard. You can change these standards by
redirecting the input or output of a command or program by any of these
sources:
A file. For example, you can store the output of ls (a directory listing) in a
file rather than display it on the screen.
A printer. This is useful only for output.
Another program or command. You can take the output of one command
and use it as the input for another command. This uses the pipe
command. See “pipe”.
Use the characters < and > for redirecting input and output. To redirect the
output of a command, use >. Think of it as an arrow pointing to a particular
destination.
You can use the redirection command with the following utilities, among
others:
cat
chgrp
chmod
chown
ls
man
rm
See these utilities for examples on how to use the “redirection” command.
NOTES:
Dim3D (Rev. 10.0)
223
Appendix B
rm
PURPOSE:
The purpose of this command is to delete or remove a file from a hard drive
storage device. It can be used in several different modes to display a short or
long description of each file. It can also be used with wildcards to allow you
to select only certain files to be displayed. This command is similar to the
SuperDOS command “DEL” and the PC-DOS command “del”.
FORMAT:
rm (switches) (filespec)
Switches
These switches are commands, which can further define and control the rm
command.
-i
Prompts you for confirmation of each file deletion that is about to
take place.
-r
Removes or deletes all files recursively through the directory
structure beneath the starting point. For example, using this switch
from the / directory will cause all files that match the filespec to be
deleted not only in the / directory, but all sub directories under /.
Exercise care when using this option.
Filespec
The filespec can be one file or a group of files removed separately or grouped
with a wildcard. Available wildcards are:
*
The * (asterisk) stands for any number of characters. To remove all
your files that start with an S, use the following format:
rm S*
Or to remove all files that end in .D, use this format:
rm *.D
?
Each ? stands for one character – no more, no less. To remove all files
that have 3-letter names, use this format:
rm ???
Or to remove all filenames that start with test and have 2 characters
following, use this format:
rm test??
PROCEDURE:
1 From the UNIX prompt, enter rm, any desired switches, and the filespec to
be listed. The computer removes (or deletes) the files and you are returned to
the system prompt.
224
Dim3D (Rev. 10.0)
Appendix B
2 You can also execute this command with output directed to another
destination – another output device using the “>” character or “piped” to
another valid command using the “|” character.
>
Redirect to another file. For example, the following format puts the
file names removed into a file called myfiles:
rm *.tmp > myfiles
<
Redirect from another file. For example, the following format reads
the file myfiles to get the list of files to be removed:
rm < myfiles
|
“Pipe” to another command. This can be used to print a listing of the
files being removed. For example:
rm *.tmp | lp
NOTES:
Dim3D (Rev. 10.0)
225
Appendix B
rmdir
PURPOSE:
This utility removes or deletes a directory. It also removes all files in the
directory so be sure to move any file you wish to keep to another directory
before doing this procedure.
FORMAT:
rmdir (directory name)
PROCEDURE:
1 From the UNIX prompt, type pwd and press Enter. This tells you the
present working directory name. UNIX doesn’t allow you to remove the
current working directory. If you are in a directory other than the one you
wish to delete, continue to Step 2. If not, change to the proper directory (cd).
2 To remove a directory, type rmdir and the directory name and press Enter.
You are returned to the system prompt.
NOTES:
226
Dim3D (Rev. 10.0)
Appendix B
shutdown
PURPOSE:
Since UNIX constantly maintains a large amount of system information in
RAM memory at all times, it must have a change to flush this information to
disk prior to shutting the system down. This utility performs an orderly safe
shutdown of the operating system to insure the integrity of this information.
Options
It is possible to run this utility to bring the system to various “run levels”
without performing a full shutdown of the system. Or the system can be
brought to a full stop. It is also possible to set the shutdown to happen at a
future time, allowing users some time to finish their work and sign off
normally before the system is halted.
-g time_in_mintues
This is the SCO UNIX format.
-y
This option bypasses the “Okay to proceed” prompt.
This is an SCO UNIX format only.
+ time_in_minutes
This is the AIX UNIX format.
PROCEDURE:
1 From the UNIX prompt, enter shutdown followed by any options. Then
press Enter.
SCO UNIX - If you enter the command without any options, shutdown
assumes a 1 minute delay before the beginning and asks the user if it should
proceed.
AIX UNIX - If you enter the command without any options, shutdown
assumes a 1 minute delay before beginning but does not ask the user if it
should proceed.
2 Before shutdown begins to prepare for a reboot, it broadcasts a message to all
users warning them of the impending shutdown. If the command was
entered with a delay, shutdown will re-broadcast the warnings at regular
intervals, with the intervals becoming more frequent as the deadline gets
closer.
NOTES:
It is extremely important that this utility be run each time a system is going to be shut down.
If it is not run, it will be necessary to “clean” all filesystems that were mounted when the
system was improperly shut off when the system comes back up.
Dim3D (Rev. 10.0)
227
Appendix B
stty
PURPOSE:
The purpose of this utility is to view and/or change the current serial
communication parameters for any serial device. It is used to adjust baud
rates, data bits, handshaking protocols, and so forth.
FORMAT:
stty (options) (device name)
Options
These are a few of the most basic options available for stty:
baudrate
Selects the appropriate baud rate for the port.
cs7 / cs8
Selects the character size (data bits) to either 7 or 8
characters.
-a
Output the entire configuration for the device.
ctsflow / -ctsflow
Either enables or disable CTS protocol.
PROCEDURE:
1 The first function of this utility is to report the current settings for any given
port. In order to see how the device /dev/tty10 is currently configured, use
the following format:
stty -a < /dev/tty10
2 The second function is to change or reset the configuration for a device. For
example, the following format will set the device /dev/tty10 to 19200 bps and
force it to begin using CTS flow control:
stty 19200 ctsflow > /dev/tty10
NOTES:
You can use this utility to change a port “on the fly” but it is often easier to edit the file
/etc/inittab to put the correct entry on that device for the proper configuration. After this file
has been changed, disable the port then enable it to force it to use the new inittab file. This
will cause a permanent change to the port setting.
228
Dim3D (Rev. 10.0)
Appendix B
what
PURPOSE:
This command displays the revision of a Dimensions program file.
FORMAT:
what (path) (filespec)
If you are using the command from the directory where the program files
resides (/u/progs), then the path is not required and the format would be:
what ds04000
If you are not in the /u/progs directory, then the command would be:
what /u/progs/ds04000
There are no switches to use with this command.
PROCEDURE:
1 From the UNIX prompt, enter what, the path if needed, and the filename.
The computer lists the revision of the program (and any include files) and you
are returned to the system prompt. If there is no revision set within the
program, then you are immediately returned to the system prompt without
any revision displayed.
NOTES:
Dim3D (Rev. 10.0)
229
Appendix C
APPENDIX C. KEY VALUES
230
Dim3D (Rev. 10.0)
Appendix C
APPENDIX C. Key Values
These are some key values that are either calculated for reports or set up in
data files. They are arranged alphabetically.
Available for Sale
Units for an item available for sale. Net to sell + on order
Average Cost
Dollar value / units on hand
Average Cost Dollars
Units x average cost
Average Dollar Value of
Inventory
Average dollar value is used in turnover and GMROI
calculations.
The more accurate the average dollar value, the more
accurate the turnover and GMROI.
Average Margin Dollars
Sales dollars - average cost dollars
Average Margin Percent
Average cost dollars / sales dollars x 100
Average Monthly Usage
Business Conditions
Dollar Value
Dollars Open to Buy
The average monthly usage (sales) of a selected item from the
13-Month History File (units month 1 + units month 2, etc.
going up to units month 13 / 13). If MONTHS ON SYSTEM is less
than 13, the computer uses that number to determine an
accurate average usage so far.
This is a factor used in calculating the Projected Monthly
Usage. The business conditions factor is a means of adjusting
the average units sold (IM3.D, 13-Month History File) to
reflect current business conditions. If you believe business
will be 10% better than last year, then the business conditions
factor would be set at 1.10. If business will be down 10%,
then the business conditions factor would be set at .90. The
system defaults to 1.00.
Dollar value of inventory at cost. For perpetual items this
would be the average cost x units on hand. For non-perpetual
items, this would be the dollar value accumulation.
The dollar value of the units open to buy are computed as
follows:
Units open to buy x Average cost
Economic Order
Excess inventory
The economic order quantity determined by the purchasing
agent and entered manually. This can be compared to the
computer-generated suggested order to determine the best
quantity to order.
Based on the projected turnover rate year-to-date. The
amount of excess inventory is computed based on the
following formula:
Dollar value - (Average cost YTD x 12/Months so far this year)
Turnover Goal
Dim3D (Rev. 10.0)
231
Appendix C
GMROI
Gross Margin Return on Inventory. Gross margin, inventory
investment, and rate of turnover combine to determine
product profitability.
Turnover rate x Markup %
A product with a high turnover rate with a low markup % can
be as profitable as a product with a low turnover rate and a
high markup %.
Lead Time
EXAMPLE 1.
Turnover Rate
Markup %
GMROI
= 5 times per year
= 30%
= 5 x 30 = 150
EXAMPLE 2.
Turnover Rate
Markup %
GMROI
= 10 times per year
= 15%
= 10 x 15 = 150
The total time that elapses from the time purchasing realizes
an order must be placed until the item arrives and the
receiving has been done on the computer. Lead time is stated
as percentage of a month.
1.00 = one month
.50 = approx. two weeks
Market Cost
Value set manually. Can be last cost, list/base, true market,
etc.
Market Cost Dollars
Units x Market cost
Market Margin Dollars
Sales dollars - Market cost dollars
Market Margin Percent
Market cost dollars / Sales dollars x 100
Maximum
An estimate of the maximum stock keeping level based on the
following formula:
Projected monthly usage + (Lead time x Projected monthly usage)
This is used to determine such things as suggested order and
open to buy figures.
Minimum
An estimate of a minimum stock keeping level based on the
following formula:
Projected monthly usage x Lead time x Safety factor
Also referred to as the order point. This is used to determine
such things as suggested order and open to buy figures.
When the stock level falls below minimum, you should order.
Net to Sell
Quantity available to sell - On hand - On reserve
On Hand
Quantity of an item that is physically on hand.
On Order
On Reserve
232
Accumulated quantity of an item that has been placed on
order using the P.O. system and not yet received.
Accumulated quantity of an item that has been entered as a
customer order using POS and not yet invoiced.
Dim3D (Rev. 10.0)
Appendix C
Projected Monthly Usage
Value in units computed from the following formula:
Ave Monthly Usage x Business Conditions x Seasonality
Safety Factor
The percentage which is used to calculate the amount of extra
stock you want to maintain as a safety cushion in order to
avoid costly stockouts – especially on key products. This
value is expressed as a percentage of a month:
1.00 = one month
.50 = approx. two weeks
Recommended to be .50
Sales Dollars
Sales to Inventory Ratio
(S/I)
Seasonality
Suggested Order
Units sold x Price
Sales
x
12
(if monthly; or 12 / months so far)
Average dollar value
Economic value which considers high or low demand
depending on the time of year.
The quantity needed to bring the current available units to
sell to the maximum level using the following formula:
Maximum - Available for sale
Turnover
Cost (average)
x
12
(if monthly; or 12 / months so far)
Average dollar value
Turnover Rate
Annualized inventory turnover rate:
Inventory Cost of Sales
Average Inventory Value
Units Open
The units of inventory open to buy based on the following
formula:
Maximum - On order - Net to Sell
Units Sold
Dim3D (Rev. 10.0)
Units of inventory sold for the period.
233
Appendix D
APPENDIX D. SuperDOS PASSWORDS
234
Dim3D (Rev. 10.0)
Appendix D
APPENDIX D. SuperDOS Passwords
¾
¾
¾
¾
¾
Dim3D (Rev. 10.0)
Password List
PASSWORDFM
MG500
Print a Password List
Expand Password File
235
Appendix D
Password List
LIVE COMPANY #1 (user group 1)
USER
NAME
USER
LEVEL
SEARCH
LIST
PRIORITY
MENU
FUNCTION
PASSWORD
ACCOUNT /
SIGNON
NAME
ROCK
INSTAL
INITIAL
INSTALL
6
5:1, 5:51, 5:0
999
DM0001
0
Installation
PLANE
ISTSIC
INITIAL
INSTALL
6
5:1, 5:51, 5:0
800
DM0001
0
Installation2nd level
MARS
MGR1
MANAGER
6
5:1, 5:51, 5:0
999
DM0000
0
System
Manager
SNOW
SIC
SECOND
6
5:1, 5:51, 5:0
800
DM0000
0
System
Manager-2nd
level
FLY
INVCON
INV. CNTRL
5
5:1, 5:51, 5:0
700
DM0000
0
Operations
DRINK
CNTR
COUNTER
3
5:1, 5:51, 5:0
300
DM1000
0
Transaction
Entry
MOEND
ME
MONTH END
FILES
6
5:31, 5:51,
5:1, 5:0
999
DM1890
0
Month EndSystem
Manager
PLAY COMPANY (user group 54)
USER
NAME
USER
LEVEL
SEARCH
LIST
PRIORITY
MENU
FUNCTION
PASSWORD
ACCOUNT /
SIGNON
NAME
XROCK
INSTAL
INITIAL
INSTALL
6
5:54, 5:51,
5:0
999
DM0001
0
Installation
XPLANE
ISTSIC
INITIAL
INSTALL
6
5:54, 5:51,
5:0
800
DM0001
0
Installation2nd level
XMARS
MGR1
MANAGER
6
5:54, 5:51,
5:0
999
DM0000
0
System
Manager
XSNOW
SIC
SECOND
6
5:54, 5:51,
5:0
800
DM0000
0
System
Manager-2nd
level
XFLY
INVCON
INV. CNTRL
5
5:54, 5:51,
5:0
700
DM0000
0
Operations
XDRINK
CNTR
COUNTER
3
5:54, 5:51,
5:0
300
DM1000
0
Transaction
Entry
SYSTEM MANAGER - USER LEVEL 7
Use for release installation, password changes, booting up, operating system functions, and
other system manager tasks. Use extreme caution whenever logged into this password.
PASSWORD
ACCOUNT /
SIGNON
NAME
BEGIN
BEGIN
236
USER
NAME
BEGIN
USER
LEVEL
7
SEARCH
LIST
5:0
PRIORITY
999
MENU
GEN1
FUNCTION
Operating
system access
Dim3D (Rev. 10.0)
Appendix D
OPERATING SYSTEM
NEVER use these passwords unless directed by a Dimensions support analyst. Never change
or delete them.
PASSWORD
ACCOUNT /
SIGNON
NAME
/DLOAD
FEPOS
/FAX
FAX
/FLIP
USER
NAME
USER
LEVEL
SEARCH
LIST
MENU
INITIAL PROGRAM
COMMAND LINE
7
5:0
FAX
6
5:1, 5:51, 5:0
FAX1
FLIPSC
FLIP SCREEN
7
5:0
FLIPSCRN
/LDRAM
LODRAM
LOAD RAM
DISK
7
5:0
EXEC LOAD.RAMDISK
/LOGON
LOGON
MODEM
LOGON
6
5:0
LOGON/M
/T1286
/T1286
7
1:0
------
/T5286
/T5286
TOKEN286
7
5:0
------
/REL
INSTAL
DIMENSIONS
7
5:0, 5:51
Dim3D (Rev. 10.0)
GEN1
DM0001
0
INSTALL
237
Appendix D
PASSWORDFM – How to Create a New Password
1 Log on to the user level 7 password.
2 At the SuperDOS prompt (>), enter PASSWORDFM and press Enter. The
computer displays the following screen:
PASSWORDFM
Rev 6.1
Maintain PASSWORD File
5:0:PASSWORD
Rec#
mm/dd/yy
9:34:52
Password..:
Account...:
User Name.:
User Level:
Minutes Signed On:
Last Date........:
---------- USER GROUP ACCESS FLAGS ---------1 2 3 4 5 6 7 8 9 10 11 12 13 14 15 16
---- OPTION FLAGS ---1 2 3 4 5 6 7 8
49 50 51 52 53 54 55 56 57 58 59 60 61 62 63
9 10 11 12 13 14 15 16
Searchlist:
17 18 19 20 21 22 23 24 25 26 27 28 29 30 31 32
33 34 35 36 37 38 39 40 41 42 43 44 45 46 47 48
:
:
:
:
:
:
Initial Program
Command Line:
--------------------SPOOLER
Printer#.:
# Copies...:
Form Type:
Page Length:
Priority.:
Retention?.:
FIELDS ---------------------Auto Print?:
Trailer?...:
Alignment? :
Banner?....:
Action (Add, Find, Change, Next, Prev, Delete, Sort,
End):
Enter A for Add and press Enter. Enter the first character of any
maintenance option only.
3 The cursor moves to the top of the screen at Password:. Enter up to 6 alphanumeric characters (no spaces) for this new password and press Enter. This
is what you will type at the password screen.
) NOTE:
) NOTE:
If the first character is “/”, the system does not allow the user signed on with that
password to gain access to the SuperDOS prompt.
Cursor movement on this screen includes the arrow keys and the Enter key.
Pressing Enter does not erase the field as it does in the Dimensions programs.
4 Account:
Enter a different word not related to the password, up to 6 characters. It
could be a descriptive word or name or initials of the person or department
using that password. This is what shows up when doing an MMI TA. It is
recommended that the account name be different from the password. The
ACCOUNT in PASSWORDFM is the same as the SIGNON NAME in the
SIGNON (XMENU) record in the menu generator (MG500). See the
illustration below.
238
Dim3D (Rev. 10.0)
Appendix D
PASSWORDFM
Rev 6.1
Maintain PASSWORD File
5:0:PASSWORD
Rec#
Password..:
Account...:
User Name.:
User Level:
mm/dd/yy
9:34:52
FLY
---------- USER GROUP ACCESS FLAGS ---------INVCON
1 2 3 4 5 6 7 8 9 10 11 12 13 14 15 16
INVENTORY CONTROL
6
17 18 19 20 21 22 23 24 25 26 27 28 29 30 31 32
etc.
MG500 - XSECUR FILE MAINTENANCE
REV 1.0
SIGNON NAME: INVCON
PRIORITY: 700
DEFAULT MENU: DM10000
AUTO BYE OFF:
PRINTER QUE:
5 User Name:
Enter a user name that defines the function of this password up to 15
characters, like POS for Point of Sale. This field is not used by the system
nor is it displayed at any time other than here in password maintenance and
on the password report.
6 User Level:
This field determines the relative level of the user signed on to this password.
The highest level is 7 which should only be used for actual system passwords
and the password used to maintain the password file. Dimensions software
contains some security features tied to the user level. They are:
a. Level 6
Can change customer’s credit data and can see costs
at POS. This should be the user level of the system
manager’s password.
b. Levels 4 & 5
Can see costs at POS but cannot change customer’s
credit data.
c. Less than level 4
Cannot see costs at POS and cannot change
customer’s credit data. The lowest level should be 3.
7 Allow access to ALL user groups? (Y/N):
Y
N
Allows availability to all user groups (0-64) from this password. This
option automatically enters an “X” under each user group number in
USER GROUP ACCESS FLAGS.
Allows you to mark the user groups you want this password to access.
The cursor moves to the USER GROUP ACCESS FLAGS area under
number 1. Type an “X” under the desired user group numbers. Use
the arrow keys to move around. For most installations, enter an “X”
under 1 (data files), 51 (Dimensions programs and jobs), and 31
(month end files).
If the password does not have an access flag in a specific user group, the user
will not be able to see any files in that user group with a directory listing nor
will they be able to access files in that user group in any way.
Dim3D (Rev. 10.0)
239
Appendix D
) NOTE:
To take out an “X”, use the arrow keys to position the cursor on the one you wish to
delete and press the Space Bar.
8 Searchlist:
Use this field to define the search “path” the system to use when searching
for a file. Duplicate the information entered under USER GROUP ACCESS FLAGS.
Enter 5 and press Enter. Then enter 1 and press Enter. The entry looks
like this:
5:1
The 5 on the left side of the colon signifies the hard disk drive. The 1 on the
right side of the colon signifies the user group. Continue entering the other
user groups indicated by X’s as well as the operating system (5:0) so you end
up with a configuration like this in the searchlist: 5:1 5:51 5:0 0:0 0:0
) NOTE:
Do not include 5:31 in the searchlist. An ‘X’ under USER GROUP ACCESS
FLAGS allows the month end files to be copied to 5:31 during month end
processing. To gain access later to the month end data, you would need to sign on
with the month end password.
9 Set ALL Option Flags to Off? (Y/N):
Enter Y and press Enter.
10 Initial Program
Command Line: __________________________________________
If you wish this password to go to a menu immediately after signing in with
it, enter MG200 and press Enter. If you wish it to go to the SuperDOS
prompt, leave blank.
11 The cursor moves to the SPOOLER FIELDS area at Printer#. Press the down
arrow through all these fields to take the default set ups. It is usually not
necessary to change these entries.
12 The computer displays Record Added. The computer adds the new password
and you may view it (enter V at the Action line). You can also view other
passwords, and change or delete existing passwords.
) CAUTION:
DO NOT DELETE THE SYSTEM MANAGER AND OPERATING SYSTEM
PASSWORDS AS SHOWN ON THE PASSWORD LIST!
13 After you add a new password containing MG200 in the Initial Program Command
Line, you must log the password to a menu using MG500. See the next part.
NOTES:
240
Dim3D (Rev. 10.0)
Appendix D
MG500 - How to Assign a Menu to a Password
1 Using PASSWORDFM, build a password with MG200 in the Initial Program
Command Line.
2 Sign on to the password just created.
3 The computer displays:
SIGNON RECORD NOT FOUND - CR TO ACKNOWLEDGE
Press Enter.
4 At the SuperDOS prompt (>), enter MG500 and press Enter.
5 The computer displays:
MG500 - XSECUR FILE MAINTENANCE
REV 1.0
SIGNON NAME:
PRIORITY:
DEFAULT MENU:
AUTO BYE OFF:
PRINTER QUE:
At SIGNON NAME, enter the account (not password) just created in
PASSWORDFM.
6 The computer asks:
THIS SIGNON RECORD DOES NOT EXIST – DO YOU WISH TO CREATE IT?
Enter Y and press Enter.
7 PRIORITY:
Enter 100 and press Enter. This is the standard. If you require more
sophisticated security for passwords, refer to your SuperDOS user manual.
8 DEFAULT MENU:
Enter the desired menu number. See SECTION 2 (System Functions), Menu
Maintenance.
9 AUTO BYE OFF:
Press Enter.
10 PRINTER QUE:
Press Enter.
11 The cursor moves to FUNCTION (C,D,E,?). If you would like this password to
Auto Bye Off, enter C for Change.
12 Press Enter at PRIORITY and DEFAULT MENU (this does not erase your entries).
Dim3D (Rev. 10.0)
241
Appendix D
13 AUTO BYE OFF:
Enter Y and press Enter.
14 Press Enter at PRINTER QUE.
15 At FUNCTION, enter E and press Enter.
16 At SIGNON NAME, enter E and press Enter. You are returned to the
SuperDOS prompt.
NOTES:
242
Dim3D (Rev. 10.0)
Appendix D
Print a Password List
1 Log on to any password with a user level 6.
2 At the SuperDOS prompt (>), enter DS09006 and press Enter.
3 The computer displays the Print Passwords/Accounts screen:
DS09006
Rev8.0.0
Print Passwords/Accts
DIM10 DATA
Date mm/dd/yy
Port 42
Store 01
1. Input Parameters
Print 1) Password Order (Password File)
1
2) Account Order (Password File)
3) Account Order (XSecur
File)
Number of Copies
1
Report Date
mmddyy
<Ent>=Print Report
(E)=End
(1)=Input Parameters
Press Enter to begin the standard print routine. Or enter 1 and Enter to
change the input parameters. This report includes a list of all passwords and
their corresponding MG500 information:
FIELD ON
REPORT
FIELD FROM
PASSWORD SETUP
COMMENTS
PSWORD
Password
From PASSWORDFM
ACCT
Account
From PASSWORDFM (same as SIGNON
NAME in XSECUR)
PRI
Priority
From XSECUR
MENU
Default Menu
From XSECUR
ABO
Auto Bye Off
From XSECUR
PRINT Q
Printer Que
From XSECUR
LVL
User Level
From PASSWORDFM
SEARCH LIST
Search List
From PASSWORDFM
4 After you print the report, you are returned to the SuperDOS prompt.
NOTES:
Dim3D (Rev. 10.0)
243
Appendix D
Expand Password File
1 Insert the SYSTEM FILES diskette into the diskette drive.
2 Sign on with a user level 7 password. At the SuperDOS prompt, enter:
3 At the SuperDOS prompt, enter EXEC SAVE.ALL and press Enter. This backs up
the password file, config file, and flipscreen information prior to making any
changes.
4 At the prompt, enter FIL and press Enter.
5 Select option V to view. At Filename, enter 5:0:PASSWORD. Write down the
following information:
MAX REC IN FILE
REC LENGTH
________________
________________
6 Press Enter to go back to the FIL menu.
7 Select option C to create a new file. Make the following entries to create the
file:
Filename:
File Type:
Rec Length:
Max # Recs:
5:1:PASSWORD
D
(same as record length in Step 3 above)
(2 times the Max Rec in File in Step 3 above)
Press Enter to go back to the FIL menu.
8 Select option F to fill the file. Make the following entries to accomplish this:
Filename:
ASCII Value:
OK:
5:1:PASSWORD
0 (zero)
Y
9 Press Enter to go back to the FIL menu.
10 Then select E to end the FIL utility.
11 Copy the password file from 5:0 to 5:1. To do this, enter the following from
the SuperDOS prompt: COPY/U 5:1 5:0:PASSWORD
12 From the SuperDOS prompt, enter F.RENAME. Rename 5:0:PASSWORD to an
unused user group. Make the following entries:
5:0:PASSWORD
Filename:
Enter Desired Changes (Return to leave unchanged)...
5:00:PASSWORD
The cursor is positioned on the first character of the user group. Enter
another user group that has no current data in it (i.e., 10). Do not change the
filename (PASSWORD). Merely press Enter.
13 While still in the rename utility, rename 5:1:PASSWORD to 5:0:PASSWORD
using the same method as in Step 11.
NOTES:
244
Dim3D (Rev. 10.0)
Appendix E
APPENDIX E. SET UP A USER - UNIX
¾ AIX
¾ SCO
Dim3D (Rev. 10.0)
245
Appendix E
APPENDIX E: Set Up a User - Unix
Depending on which kind of UNIX you are using – AIX or SCO, the following
procedures describe how to set up a new user.
SET UP A NEW USER - AIX
When developing a security scheme for any UNIX/AIX system, the system
administrator must assess the corporate security concerns and guidelines and
respond appropriately to determine the methods used to establish access
accounts for system users. For the sake of documentation clarity, it is
assumed that the system be established using separate login accounts for
each individual user and that the login id be generated using the user’s first
name combined with the first letter of the last name. Further, the example
shows setting up the initial login password the same as the login id.
Steps 1-10 – Create a User
1 Sign on as the “root” user. This gains access to the super user functions.
2 From the system prompt (#), enter the following command and press Enter:
smit
3 The computer displays the following screen:
System Management
Move cursor to desired item and press Enter.
Software Installation & Maintenance
Devices
Physical & Logical Storage
Security & Users
Diskless Workstation Management & Installation
Communications Applications and Services
Spooler (Print Jobs)
Problem Determination
Performance & Resource Scheduling
System Environments
Processes & Subsystems
Remote Customer Support and Services
Applications
Using SMIT (information only)
F1=Help
F9=Shell
F2=Refresh
F10=Exit
F3=Cancel
Enter=Do
F8=Image
Using the down arrow key, move to Security & Users. Then press Enter.
246
Dim3D (Rev. 10.0)
Appendix E
4 Then the computer displays:
Security & Users
Move cursor to desired item and press Enter.
Users
Groups
Passwords
F1=Help
F9=Shell
F2=Refresh
F10=Exit
F3=Cancel
Enter=Do
F8=Image
The computer highlights the Users option. Press Enter.
5 The computer displays the Users screen:
Users
Move cursor to desired item and press Enter.
List All Users
Add a User
Change / Show Characteristics of a User
Change / Show Initial Interface
Remove a User
F1=Help
F9=Shell
F2=Refresh
F10=Exit
F3=Cancel
Enter=Do
F8=Image
Using the down arrow, select Add a User. Then press Enter.
6 The computer displays:
Create User
Type or select values in entry fields.
Press Enter AFTER making all desired changes.
[TOP]
* User NAME
ADMINISTRATIVE User?
User ID
LOGIN user?
PRIMARY group
Group SET
ADMINISTRATIVE groups
SU groups
HOME directory
Initial PROGRAM
User INFORMATION
Another user can SU to user?
User can RLOGIN?
[MORE...13]
F1=Help
F5=Reset
F9=Shell
F2=Refresh
F6=Command
F10=Exit
[Entry Fields]
[]
false
[]
true
[]
[]
[]
[ALL]
[]
[]
[]
true
true
F3=Cancel
F7=Edit
Enter=Do
+
#
+
+
+
+
+
+
+
F4=List
F8=Image
Using the down arrow key, move to the following fields and make the
appropriate entries. Press the down arrow key at the end of an entry to move
to the next field. Do not press Enter until all changes are made.
Dim3D (Rev. 10.0)
247
Appendix E
User NAME
Enter the new login name in lower case letters.
PRIMARY GROUP
Enter ubbuser.
Group SET
Enter ubbuser.
Enter the directory where this user’s personal files
are to be stored. Generally, the home directory is
/home/{loginid}.
HOME directory
Enter /bin/ksh.
Initial PROGRAM
Enter a user comment, generally the full first and
last name of the user. This is simply a comment
field but it does print on the Dimensions user
account list report.
User INFORMATION
7 You have now filled in all of the “critical” fields for this user. Press Enter to
create the account. Here is a sample screen for the user John Public:
Create User
Type or select values in entry fields.
Press Enter AFTER making all desired changes.
[TOP]
* User NAME
ADMINISTRATIVE User?
User ID
LOGIN user?
PRIMARY group
Group SET
ADMINISTRATIVE groups
SU groups
HOME directory
Initial PROGRAM
User INFORMATION
Another user can SU to user?
User can RLOGIN?
[MORE...13]
F1=Help
F5=Reset
F9=Shell
F2=Refresh
F6=Command
F10=Exit
[Entry Fields]
[johnp]
false
[]
true
[ubbuser]
[ubbuser]
[]
[ALL]
[/home/johnp]
[/bin/ksh]
[john public]
true
true
F3=Cancel
F7=Edit
Enter=Do
+
#
+
+
+
+
+
+
+
F4=List
F8=Image
8 Then the computer displays the command status screen, showing that the
user was added:
COMMAND STATUS
Command: OK
stdout: no
stderr: no
Before command completion, additional instructions may appear below.
F1=Help
F8=Image
F2=Refresh
F9=Shell
F3=Cancel
F10=Exit
F6=Command
Press F3 to acknowledge this message and return to the previous screen
(Step 6).
9 You can enter more users if desired. Or press F3 to return to the Users
screen (Step 5).
10 Press F3 one more time to return to the Security & Users screen (Step 4).
248
Dim3D (Rev. 10.0)
Appendix E
Steps 11-15 – Change Password
11 To assign the password for the new account, select Passwords from the
displayed menu (down arrow and Enter).
12 The computer displays the change user password screen:
Change User Password
Type or select values in entry fields.
Press Enter AFTER making all desired changes.
[Entry Fields]
User NAME
F1=Help
F5=Reset
F9=Shell
[]
F2=Refresh
F6=Command
F10=Exit
F3=Cancel
F7=Edit
Enter=Do
+
F4=List
F8=Image
Enter the user name, same as in Step 6.
13 Then the computer displays:
Changing password for “johnp”
johnp’s New password:
The cursor is positioned at john’s New password. Enter the new password for
this login in lower case letters. For security purposes, the system does not
display as you type.
14 The computer continues:
Changing password for “johnp”
johnp’s New password:
Re-enter johnp’s new password:
Enter the password a second time to verify the accuracy of the password. If
both passwords are entered the same, the password is assigned to the new
account. NOTE: Whenever you set a new password for another user, the
system will force them to change their password the next time that user logs
in.
15 You are returned to the change user password screen (Step 12). Press F3
then F10 to exit the smit process. You are returned to the system prompt.
Dim3D (Rev. 10.0)
249
Appendix E
Steps 16-21 – Copy & Edit .profile
16 You now need to establish the .profile file for the new user. Change to the
new login directory. Enter the following from the system prompt (#), and
press Enter:
cd /u/johnp
17 Copy a current working .profile to the new login directory. Enter the
following and press Enter:
cp /u/manager/.profile .
CAUTION: Be sure to enter the periods (.). They are important for correct
syntax.
18 Use the “vi” editor to change the new .profile. Enter the following and press
Enter:
vi .profile
19 The computer displays:
:
#
@(#) sh.prof.src 1.3 88/05/10
#
#
Copyright (C) The Santa Cruz Operation, 1985.
#
This Module contains Proprietary Information of
#
The Santa Cruz Operation, Microsoft Corporation
#
and AT&T, and should be treated as Confidential.
#
#
# User $HOME/.profile - commands executed at login time
#
SHELL=/bin/ksh
PATH=u/ubb:/bin:/usr/bin:/u/bin
bin:/rusr/local/bin:.
MAIL=/usr/spool/mail/`logname`
umask 000
BBENV=/u/ubb/BBENV
BBTERM=/u/ubb/wyse50.tdf
TERM=wyse50
BBUSER=MGR
BBSLEVEL=7
BBBYE=N
export PATH MAIL TERM BBENV BBTERM BBUSER
".profile" 53 lines, 1349 characters
Using the down arrow key, move to the following fields and make the
appropriate entries. The caps lock should be off.
BBUSER
Enter the new account in upper case letters. Do the
following steps:
a. Delete MGR from the field by positioning the
cursor on the “M” of MGR. Press x three times.
The x key deletes one character at a time.
b. Enter A to go into Append mode. The cursor
moves one character to the right of the = sign.
c. Enter the new account in upper case letters. For
example: JOHNP
d. End the Append mode by pressing Esc.
250
Dim3D (Rev. 10.0)
Appendix E
BBSLEVEL
Enter the user account level. Do the following steps:
a. Use the down arrow to move to “7” on the
BBSLEVEL line.
b. Delete the “7” by pressing x once.
c. Enter A to go into Append mode. The cursor
moves one character to the right of the = sign.
d. Enter one of the following numbers:
6
Can change customer’s credit data and can
see costs at POS. This should be the user
level of the system manager’s password.
4&5
Can see costs at POS but cannot change
customer’s credit data.
3 or less Cannot see costs at POS and cannot
change customer’s credit data. The lowest
level should be 3.
e. End the Append mode by pressing Esc.
BBBYE
Change this setting to Y. Do the following steps:
a. Use the down arrow to move to “Y” on the BBBYE
line.
b. Delete the “Y” by pressing x once.
c. Enter A to go into Append mode. The cursor
moves one character to the right of the = sign.
d. Enter Y. This will trigger the system to leave
UBL when exiting the system.
e. End the Append mode by pressing Esc.
20 You have now modified all of the “critical” fields for this user. Here is a
sample screen for the user John Public:
:
#
@(#) sh.prof.src 1.3 88/05/10
#
#
Copyright (C) The Santa Cruz Operation, 1985.
#
This Module contains Proprietary Information of
#
The Santa Cruz Operation, Microsoft Corporation
#
and AT&T, and should be treated as Confidential.
#
#
# User $HOME/.profile - commands executed at login time
#
SHELL=/bin/ksh
PATH=u/ubb:/bin:/usr/bin:/u/bin
bin:/rusr/local/bin:.
MAIL=/usr/spool/mail/`logname`
umask 000
BBENV=/u/ubb/BBENV
BBTERM=/u/ubb/wyse50.tdf
TERM=wyse50
BBUSER=JOHNP
BBSLEVEL=6
BBBYE=Y
export PATH MAIL TERM BBENV BBTERM BBUSER
".profile" 53 lines, 1349 characters
Dim3D (Rev. 10.0)
251
Appendix E
To end this editing session, enter : (colon) and press Enter. The cursor is
positioned at “:” at the bottom of the screen. Enter wq to save the changes
and exit this screen. If you need to exit but not save changes, enter q!. You
are returned to the system prompt.
21 Log off the system by typing exit. Press Enter. This should return you to
login:.
Steps 22-29 – Make a New Dimensions Account
22 Obtain the ubl prompt ( * ) by doing the following steps:
a. At login, sign on with your manager login id and password.
b. The computer displays:
Dimensions Operating System Main Menu
Select a menu option by typing the number
1)
2)
3)
4)
Access Dimensions Software
Change Your Personal Password
Read Your Personal Email Messages
Log Off The System
Enter you option now and press [ENTER] -->
Enter 1 for Access Dimensions Software and press Enter.
c.
Press Enter again.
d. The computer displays the Dimensions Main Menu. Enter E and press Enter
to end this menu. Make sure you enter an upper case E.
e. The computer displays * in the upper left hand corner of the screen. This
is the ubl prompt.
23 Enter run “dsmg500 and press Enter.
24 The computer displays:
DSMG500 - XSECUR FILE MAINTENANCE
SIGN-ON NAME:
PRIORITY:
DEFAULT MENU:
The cursor is positioned at SIGN-ON NAME. Enter the account name – same as
the BBUSER in Step 19. Use all upper case letters and press Enter.
252
Dim3D (Rev. 10.0)
Appendix E
25 If the account name is not found, which is most likely the case since you are
creating a new account, the computer asks if you wish to create it. Enter Y
and press Enter.
26 Then the computer asks for 2 more fields:
PRIORITY
DEFAULT MENU
Enter 100 and press Enter. This is the standard for
your POS logins. If you require more sophisticated
security, contact a Dimensions support analyst.
Enter DM00000 to obtain the Dimensions Main
Menu when logging on with this account. Or if you
wish to use a different menu, print a menu listing
and pick another menu. See Section 5, System
Functions, Menu Maintenance, Print Menus.
27 Then the computer displays at the bottom of the screen:
FUNCTION (C D E):
Enter E for End and press Enter.
28 At SIGNON NAME, enter E and press Enter. You are returned to the ubl
prompt.
29 Press Esc to exit this screen. You are returned to the system prompt.
NOTES:
Dim3D (Rev. 10.0)
253
Appendix E
SET UP A NEW USER - SCO
Steps 1-30 – Add a User and Create a Password
1 Sign on as the “root” user. This gains access to the super user functions.
2 From the system prompt (#), enter the following command and press Enter:
scoadmin
3 If the computer displays TERM = (wy50), press Enter to bypass.
4 Then the computer displays the following screen:
start here
+---------------------------------- SCOadmin ----------------------------------+
¦+----------------------------------------------------------------------------+¦
¦¦ File
View
Options
Help ¦¦
¦+----------------------------------------------------------------------------+¦
¦+---------------------------------------------------------------------------+ ¦
¦¦* Account Manager
^ ¦
¦¦
Backup Manager
* ¦
¦¦
Hardware/Kernel Manager
* ¦
¦¦
Internet Configuration
* ¦
¦¦
License Manager
* ¦
¦¦
Process Manager
* ¦
¦¦
SendMail Configuration
* ¦
¦¦
Software Manager
* ¦
¦¦
Video Configuration Manager
* ¦
¦¦ > Filesystems
¦ ¦
¦¦ > Mail
¦ ¦
¦¦ > Netscape
v ¦
¦+---------------------------------------------------------------------------+ ¦
¦+----------------------------------------------------------------------------+¦
¦¦[(..)]
¦¦
¦+----------------------------------------------------------------------------+¦
¦------------------------------------------------------------------------------¦
¦
¦
+------------------------------------------------------------------------------+
The computer highlights the Account Manager option. Press Enter.
5 The computer displays:
+------------------------- Account Manager on valiant -------------------------+
¦+----------------------------------------------------------------------------+¦
¦¦ Host
Users
Groups
View
Options
Help ¦¦
¦+----------------------------------------------------------------------------+¦
¦ User accounts on valiant.dimen.com:
¦
¦
¦
¦ Status User
ID
Comment
¦
¦+---------------------------------------------------------------------------+ ¦
¦¦*
root
0
Superuser
^ ¦
¦¦
daemon
1
System daemons
* ¦
¦¦
bin
2
Owner of system commands
* ¦
¦¦
sys
3
Owner of system files
* ¦
¦¦
adm
4
System accounting
* ¦
¦¦
uucp
5
UUCP administrator
* ¦
¦¦
nuucp
6
Anonymous UUCP site
¦ ¦
¦¦
auth
7
Authentication administrator
¦ ¦
¦¦
asg
8
Assignable devices
¦ ¦
¦¦
cron
9
Cron daemon
¦ ¦
¦¦
sysinfo
11
System information
v ¦
¦+<**************************************************----------------------->+ ¦
¦
¦
¦------------------------------------------------------------------------------¦
¦
¦
+------------------------------------------------------------------------------+
The computer highlights the Host option. Press the right arrow to move to
Users and press Enter.
6 The computer displays a drop down menu showing Add New User first on the
list. Press Enter to accept it.
254
Dim3D (Rev. 10.0)
Appendix E
7 The computer displays the following screen:
+------------------------- Account Manager on valiant -------------------------+
¦+
-+¦
¦¦ +------------------------ valiant: Add New User ------------------------+ ¦¦
¦+ ¦
¦_-+¦
¦ ¦
Login: | ________|
¦_ ¦
¦ ¦
User ID: |231___|
¦_ ¦
¦ ¦
Comment: |__________________________________________________|¦_ ¦
¦+ ¦
+----------------------------------------------+
¦_+ ¦
¦¦ ¦
Password: ¦<*> Set password now
< > Set password later ¦
¦_^ ¦
¦¦ ¦
+----------------------------------------------+
¦_* ¦
¦¦ ¦ --------------------------------------------------------------------- ¦_* ¦
¦¦ ¦
¦_* ¦
¦¦ ¦
Login Shell: |sh_____________|
[(Change Login Shell...)]
¦_* ¦
¦¦ ¦
Networked Via: |_______________|
[(Change Distribution...)]
¦_* ¦
¦¦ ¦ Home Directory: |/usr___________|
[(Change Home Directory...)]
¦_¦ ¦
¦¦ ¦
Login Group: |group__________|
[(Change Group Membership...)] ¦_¦ ¦
¦¦ ¦
¦_¦ ¦
¦¦ ¦Enter the new user's login name
¦_¦ ¦
¦¦ ¦-----------------------------------------------------------------------¦_v ¦
¦+ ¦[
OK
]
[ Cancel ]
[ Help ]¦_+ ¦
¦ +-----------------------------------------------------------------------+_ ¦
¦- _________________________________________________________________________--¦
¦
¦
+------------------------------------------------------------------------------+
The cursor is at Login. Enter the new login id in lower case letters. Do not
press Enter at the end of the entry. Press Tab.
8 At User ID, press Tab again.
9 At Comment, enter the user’s full name.
10 At Password, press Tab twice to accept Set Password Now.
11 At Change Login Shell, press Enter.
12 The computer changes the display:
+----- valiant: Change Login Shell: New User ------+
¦
¦
¦ Select Login Shell:
¦
¦+-----------------------------------------------+ ¦
¦¦|sh__________________________________________|v¦ ¦
¦+-----------------------------------------------+ ¦
¦
¦
¦[ ] Add Shell Environment Files to Home Directory ¦
¦--------------------------------------------------¦
¦[
OK
]
[ Cancel ]
[ Help ]¦
+--------------------------------------------------+
You are in insert mode automatically. Enter /k and press Tab. The resulting
entry will be /ksh.
13 Press Tab again to bypass Add Shell Environment Files to Home Directory.
14 If the entry is correct, press Enter at OK to accept it.
15 You are returned to the previous screen (Step 7). The computer now asks for
the Home Directory. Press Tab to move the selection to Change Home
Directory.
16 Press Enter to change it.
Dim3D (Rev. 10.0)
255
Appendix E
17 The computer changes the screen:
+------ valiant: Change Home Directory: johnp -------+
¦
¦
¦ Home Directory:
¦
¦ |/usr/johnp__________|
¦
¦
¦
¦ Home Directory Permissions:
¦
¦ +------------------------------------------------+ ¦
¦ ¦
User
Group
Other
¦ ¦
¦ ¦
Read
+
[*]
[*]
¦ ¦
¦ ¦
Write
+
[ ]
[ ]
¦ ¦
¦ ¦
Execute
+
[*]
[*]
¦ ¦
¦ +------------------------------------------------+ ¦
¦
¦
¦ [*] Create Home Directory
¦
¦----------------------------------------------------¦
¦[
OK
]
[ Cancel ]
[ Help ]¦
+----------------------------------------------------+
You are in insert mode automatically. Press the delete key to delete one
character at a time from the displayed entry. Then enter /u/ and the login
entered in Step 7. Press Tab.
18 Press Tab until the computer highlight the OK option. If the entry is OK,
press Enter to accept it.
19 You are returned to the previous screen (Step 7). Press Tab at Login Group
and Change Group Membership.
20 The computer highlights the OK option. If the entry is OK, press Enter to
accept it.
21 Then the computer displays the set password screen:
+-------------------- valiant: Set Password: johnp ---------------------+
¦
¦
¦ +-----------------------------------+
¦
¦ ¦<*> Enter a new password
¦
¦
¦ ¦< > Use machine generated password ¦
¦
¦ ¦< > Remove password
¦
¦
¦ +-----------------------------------+
¦
¦
¦
¦
Enter Password: |______________________________|
¦
¦
Confirm Password: |______________________________|
¦
¦
¦
¦ Generated Password: |____________________|
[(Generate a password)]¦
¦
¦
¦[ ] Force password change at next login
¦
¦
¦
¦Enter a new password for this user
¦
¦-----------------------------------------------------------------------¦
¦[
OK
]
[ Cancel ]
[ Help ]¦
+-----------------------------------------------------------------------+
The computer highlights the option Enter a new password. Press Tab to
accept it.
22 At Enter Password, enter a temporary password for this login. For
example: mynew1. The characters do not appear as you type for security
purposes. Press Tab at the end of your entry.
23 At Confirm Password, enter the exact same password as in Step 22 to
confirm your entry. Press Tab at the end of your entry.
24 At Force password change at next login, press the space bar one time to
mark this option. This will force the new user to change their password the
next time they log in. Press Tab.
25 At OK, press Enter to accept the entry.
256
Dim3D (Rev. 10.0)
Appendix E
26 The computer then processes the entry, adding the login to the list of
available logins. Wait until this process finishes and the following screen is
displayed:
+------------------------- Account Manager on valiant -------------------------+
¦+----------------------------------------------------------------------------+¦
¦¦ Host
Users
Groups
View
Options
Help ¦¦
¦+----------------------------------------------------------------------------+¦
¦ User accounts on valiant.dimen.com:
¦
¦
¦
¦ Status User
ID
Comment
¦
¦+---------------------------------------------------------------------------+ ¦
¦¦
mmdf
17
MMDF administrator
^ ¦
¦¦
network
18
MICNET administrator
¦ ¦
¦¦
backup
19
Backup administrator
¦ ¦
¦¦
nouser
28
Network user with no access privileges
¦ ¦
¦¦
listen
37
Network daemons
¦ ¦
¦¦
lp
71
Printer administrator
¦ ¦
¦¦
audit
79
Audit administrator
* ¦
¦¦
rhetts
229
Rhett Smith
* ¦
¦¦
manager
211
Dimensions System Manager
* ¦
¦¦*
johnp
231
john public
v ¦
¦+<**************************************************----------------------->+ ¦
¦
¦
¦------------------------------------------------------------------------------¦
¦
¦
+------------------------------------------------------------------------------+
Press Tab twice to go to the Host option.
27 Press Enter, move down to Exit with the down arrow, and press Enter
again.
28 Press Tab once to go to the File option.
29 Press Enter, move down, to Exit with the down arrow, and press Enter
again.
30 You are returned to the system prompt (#).
Steps 31-36 – Copy & Edit .profile
31 You now need to establish the .profile file for the new user. Change to the
new login directory. Enter the following from the system prompt (#) and
press Enter:
cd /u/johnp
32 Copy a current working .profile to the new login directory. Enter the
following and press Enter:
cp /u/manager/.profile .
CAUTION: Be sure to enter the periods (.). They are important for correct
syntax.
33 Use the “vi” editor to change the new .profile. Enter the following and press
Enter:
vi .profile
Dim3D (Rev. 10.0)
257
Appendix E
34 The computer displays:
:
#
@(#) sh.prof.src 1.3 88/05/10
#
Copyright (C) The Santa Cruz Operation, 1985.
#
This Module contains Proprietary Information of
#
The Santa Cruz Operation, Microsoft Corporation
#
and AT&T, and should be treated as Confidential.
#
#
# User $HOME/.profile - commands executed at login time
#
SHELL=/bin/ksh
PATH=u/ubb:/bin:/usr/bin:/u/bin
bin:/rusr/local/bin:.
MAIL=/usr/spool/mail/`logname`
umask 000
BBENV=/u/ubb/BBENV
BBTERM=/u/ubb/wyse50.tdf
TERM=wyse50
BBUSER=MGR
BBSLEVEL=7
BBBYE=N
export PATH MAIL TERM BBENV BBTERM BBUSER
".profile" 53 lines, 1349 characters
Using the arrow keys, move to the following fields and make the appropriate
entries. The caps lock should be off.
BBUSER
Enter the new account in upper case letters. Do the
following steps:
a. Delete MGR from the field by positioning the
cursor on the “M” of MGR. Press x three times.
The x key deletes one character at a time.
b. Enter A to go into Append mode. The cursor
moves one character to the right of the = sign.
c. Enter the new account in upper case letters. For
example: JOHNP
d. End the Append mode by pressing Esc.
BBSLEVEL
Enter the user account level. Do the following steps:
a. Use the down arrow to move to “7” on the
BBSLEVEL line.
b. Delete the “7” by pressing x once.
c. Enter A to go into Append mode. The cursor
moves one character to the right of the = sign.
d. Enter one of the following numbers:
6
Can change customer’s credit data and can
see costs at POS. This should be the user
level of the system manager’s password.
4&5
Can see costs at POS but cannot change
customer’s credit data.
3 or less Cannot see costs at POS and cannot
change customer’s credit data. The lowest
level should be 3.
e. End the Append mode by pressing Esc.
258
Dim3D (Rev. 10.0)
Appendix E
BBBYE
Change this setting to Y. Do the following steps:
a. Use the down arrow to move to “Y” on the BBBYE
line.
b. Delete the “Y” by pressing x once.
c. Enter A to go into Append mode. The cursor
moves one character to the right of the = sign.
d. Enter Y. This will trigger the system to leave
UBL when exiting the system.
e. End the Append mode by pressing Esc.
35 You have now modified all of the “critical” fields for this user. Here is a
sample screen for the user John Public:
:
#
@(#) sh.prof.src 1.3 88/05/10
#
#
Copyright (C) The Santa Cruz Operation, 1985.
#
This Module contains Proprietary Information of
#
The Santa Cruz Operation, Microsoft Corporation
#
and AT&T, and should be treated as Confidential.
#
#
# User $HOME/.profile - commands executed at login time
#
SHELL=/bin/ksh
PATH=u/ubb:/bin:/usr/bin:/u/bin
bin:/rusr/local/bin:.
MAIL=/usr/spool/mail/`logname`
umask 000
BBENV=/u/ubb/BBENV
BBTERM=/u/ubb/wyse50.tdf
TERM=wyse50
BBUSER=JOHNP
BBSLEVEL=6
BBBYE=Y
export PATH MAIL TERM BBENV BBTERM BBUSER
".profile" 53 lines, 1349 characters
To end this editing session, enter : (colon) and press Enter. The cursor is
positioned at “:”. Enter wq to save the changes and exit this screen. If you
need to exit but not save changes, enter q!. You are returned to the system
prompt.
36 Log off the system by typing exit. Press Enter. This should return you to
login:.
Steps 37-44 – Make a New Dimensions Account
37 Obtain the ubl prompt ( * ) by doing the following steps:
a. At login, sign on with your manager login id and password.
b. The computer displays:
Dim3D (Rev. 10.0)
259
Appendix E
Dimensions Operating System Main Menu
Select a menu option by typing the number
1)
2)
3)
4)
Access Dimensions Software
Change Your Personal Password
Read Your Personal Email Messages
Log Off The System
Enter you option now and press [ENTER] -->
Enter 1 for Access Dimensions Software and press Enter.
c.
Press Enter again.
d. The Dimensions Main Menu is displayed. Enter E and press Enter to
end this menu. Make sure you enter an upper case E.
e. The computer displays * in the upper left hand corner of the screen. This
is the ubl prompt.
38 Enter run “dsmg500 and press Enter.
39 The computer displays:
DSMG500 - XSECUR FILE MAINTENANCE
SIGN-ON NAME:
PRIORITY:
DEFAULT MENU:
The cursor is positioned at SIGN-ON NAME. Enter the account name – same as
the BBUSER in Step 34. Use all upper case letters and press Enter.
40 If the computer does not find the account name, which is most likely the case
since you are creating a new account, the computer asks if you wish to create
it. Enter Y and press Enter.
41 Then the computer asks for 2 more fields:
PRIORITY
DEFAULT MENU
260
Enter 100 and press Enter. This is the standard for
POS logins. If you require more sophisticated
security, contact a Dimensions support analyst.
Enter DM00000 to obtain the Dimensions Main Menu
when logging on with this account. Or if you wish to
use a different menu, print a menu listing and pick
another menu. See Section 5, System Functions,
Menu Maintenance, Print Menus.
Dim3D (Rev. 10.0)
Appendix E
42 Then the computer displays at the bottom of the screen:
FUNCTION (C D E):
Enter E for End and press Enter.
43 At SIGNON NAME, enter E and press Enter. You are returned to the ubl
prompt.
44 Press Esc to exit this screen. You are returned to the system prompt.
NOTES:
Dim3D (Rev. 10.0)
261
Appendix F
APPENDIX F. ERROR MESSAGES
262
Dim3D (Rev. 10.0)
Appendix F
APPENDIX F. Error Messages
SYSTEM FAILURES
System failure messages typically occur when bringing the system up and
there is some type of hardware or security discrepancy.
SYSTEM FAILURE #
CAUSE
COMMENTS
SYSTEM FAILURE 02
System printer not on
Turn printer on & on-line.
Supercoder not connected
Make sure that the Supercoder
Is connected tightly on first
parallel port.
SYSTEM FAILURE 03-18 Security missing in CONFIG file
Call Dimensions support.
EXCEPTION ERRORS
Exception errors occur when software attempts to overwrite its allocated
memory. Exception errors stop the task that caused the exception and
displays an error message on the terminal of that task. Exception errors
occur very rarely but if they start occurring frequently it can denote a system
problem.
EXCEPTION ERROR #
CAUSE
COMMENTS
EXCEPTION ERROR 02
Power, memory
Reboot system. Call Dimensions
support if getting frequent
exception errors.
EXCEPTION ERROR 06
Power, memory
Reboot system. Call Dimensions
support if getting frequent
exception errors.
EXCEPTION ERROR 13
Power, memory
Reboot system. Call Dimensions
support if getting frequent
exception errors.
Dim3D (Rev. 10.0)
263
Appendix F
BASIC & SuperDOS ERRORS
BASIC and SuperDOS errors occur when the information used by the
program cannot be processed by the operating system. These errors typically
occur in reading and writing to a disk drive.
ERR BASIC SD #
CAUSE
COMMENTS
ERR BASIC –23 SD 3
Not enough disk space
Delete any .SV* files. Run
CRUNCH if necessary.
ERR BASIC -48 SD 5
File being used exclusively
Wait to run your program or job
later.
ERR BASIC -135 SD 8
Bad “deleted” record
Rebuild indexes of file. This error
is usually seen if system was
shut down while users were in
programs.
ERR BASIC -137 SD 10
Attempt to access sector
beyond file
The indexes of the file need to be
deleted and then rebuilt.
ERR BASIC -142 SD 15
No available records
File needs to be expanded.
ERR BASIC –149 SD 22
Read error file data record
This message can indicate a
possible hardware problem. Call
Dimensions support.
ERR BASIC -150 SD 23
File not found
Call Dimensions support.
ERR BASIC -163 SD 36
Bad FCB validation code
Indicates an error in a file. Call
Dimensions support.
ERR BASIC -165 SD 38
Invalid user group
Signed on under the wrong
password.
ERR BASIC –167 SD 40
Error in absolute sector I/O
Dirty floppy drive, bad floppy
diskette, or possible hard drive
problem.
ERR BASIC -78 SD 52
Not an executable program
Bad version of a program.
ERR BASIC -78 SD 58
Disk CRC error
Bad sectors on disk drive.
ERR BASIC -31 SD 10
Invalid subscript
File contains bad information.
Indexes need to be rebuilt.
ERR BASIC 23
No more data memory left
Task size too small to run
program.
ERR BASIC 16 SD 10
Divide by zero
A transaction or item has a bad
cost so margins can’t be
calculated.
For additional BASIC and SuperDOS errors, refer to SuperDOS Guide to
Operations.
264
Dim3D (Rev. 10.0)
Appendix F
PROGRAM ERRORS
These errors occur while in the Dimensions programs if there is invalid input
or information missing in a file.
ERROR
CAUSE
COMMENTS
nn:nn:nn NOT FOUND VM0
Missing information in the
Variable File
The first two digits stand for the
record type in the Variable File,
the second two digits stand for
the store, and the last two digits
stand for the relative number.
For example:
7:1:1
7 = Terms Information
1 = Store 1
1 = Terms Code 1
It means that a customer was
coded with terms code 1 but no
terms code 1 was defined in the
Variable File.
1:######## NOT FOUND IM2
Dim3D (Rev. 10.0)
An item exists in IM1 but
not in IM2
The number before the colon
represents the store number.
The number after the colon
represent the item number.
265
Appendix G
APPENDIX G. WHAT TO DO IN CASE OF …
266
Dim3D (Rev. 10.0)
Appendix G
APPENDIX G. What to Do in Case of ...
POWER FAILURE
All systems come equipped with an uninterruptible power source (UPS)
which serves as a battery backup and power conditioner for the CPU. If the
power to your system were to fail all of a sudden, the CPU would draw its
power from the UPS. Depending on the model of UPS, it could supply power
from 10-20 minutes. However, the power to all peripherals would be lost.
1 After power goes off, wait 5-10 minutes to see if it will come on again
momentarily. Most power failures are corrected in a matter of minutes. If it
looks as if you are in for a long-term wait, BYE or log off all terminals (from
the system monitor on SuperDOS systems, use MMI -- see Appendix A,
SuperDOS Utilities Used Most Often, MMI). BYE or log off the system
monitor too.
2 Turn off the computer (CPU) and wait until the power is restored. If desired,
you can write sales tickets by hand and enter them into the computer once
the power is restored.
3 When the power comes on, turn on the computer (CPU). The system monitor
will be at the Password or login screen but the other terminal ports will
probably return to the screen or previous menu where they were working
when the power failed. Any terminals which had been working in
Transaction Entry (POS) or Purchasing and Receiving may receive the option
of recovering the previous transaction when they go back in to start
processing. They can answer Y and finish the transaction or N to cancel the
previous transaction and not work on it.
4 Enter any hand-written sales tickets to record the transactions, which
occurred during the power failure. You can return to normal processing.
NOTES:
Dim3D (Rev. 10.0)
267
Appendix G
ELECTRICAL STORM
The UPS (uninterruptible power source) and surge protectors, which come
with your system, are adequate for mild fluctuations of power. They cannot,
however, prevent damage from electrical storms or direct lightning hits. If a
storm is threatening, you should take a few precautions to avoid extensive
damage.
1 Finish all transactions on every terminal and the system monitor as fast as
possible. BYE or log off every terminal.
2 Turn the power off to the computer, terminals, and printers.
3 Pull the plugs on the computer, terminals, and printers.
4 Wait until the storm passes. If desired, you can write sales tickets by hand
and enter them later when you bring the system up.
5 When it is safe to bring the system up, plug in everything you unplugged
earlier and turn the peripherals on. Turn on the computer (CPU) and resume
processing. Enter any hand-written sales tickets.
NOTES:
268
Dim3D (Rev. 10.0)
INDEX
C
13-Month History File (IM3.D), 12
13-Month Transfer History File (IM12.D),
13
A
A/P Check File AM4.D, 7
A/P Invoice File AM3.D, 7
A/R Credit History File CM9.D, 9
A/R Credit Note File CM16.D, 10
A/R Posting File CM7.D, 9
Accounts Payable, 7
Accounts Receivable, 8
Add / Maintain A/R Selected Fields
(VM32.D), 74
Add Inventory Fields (VM30.D), 73
Addon Information (VM09.D), 61
AIX
set up a user, 246
allocation tables, 11
Associated Items File (IM10.D), 13
available for sale, 231
average cost, 231
average cost dollars, 231
average dollar value of inventory, 231
average margin dollars, 231
average margin percent, 231
average monthly usage, 231
B
Backup Utilities (UNIX utility), 115
Bad Check File CM6.D, 8
Bar Code File (BC1.D), 15
Basic Company Information (Variable
File), 37
Begin Projects, 98
Bid/Spiff/Matrix Detail File (BD0.D), 15
Bid/Spiff/Matrix Header File (BH0.D), 15
business conditions, 231
BYE (SuperDOS utility), 144
Dim3D (Rev. 10.0)
calendar date, 140
Cash Receipts by Batch File CM15.D, 10
Cash Receipts File CM4.D, 8
Cash Receipts Transaction History File
CM4H.D, 8
Cash Settlement File CS1.D, 11
cat (Unix utility), 195
cd (Unix utility), 196
chgrp (Unix utility), 197
chmod (Unix utility), 198
chown (Unix utility), 200
Complete Variable File, 52
cross reference, 52
VM01.D, 54
VM02.D, 54
VM021.D, 55
VM03.D, 56
VM05.D, 57
VM05B.D, 57
VM06.D, 58
VM07.D, 59
VM08.D, 60
VM09.D, 61
VM10.D, 61
VM11.D, 61
VM12.D, 62
VM13.D, 64
VM14.D, 65
VM15.D, 66
VM16.D, 66
VM17.D, 66
VM18.D, 67
VM19.D, 67
VM20.D, 68
VM21.D, 68
VM22.D, 68
VM23.D, 69
VM27.D, 70
VM28.D, 71
VM29.D, 72
VM30.D, 73
VM32.D, 74
VM35.D, 75
VM36.D, 75
VM37.D, 76
VM38.D, 76
VM39.D, 77
VM40.D, 77
269
VM41.D, 77
VM44.D, 78
CONFIG.P, 102
Convert Calendar/Julian Dates, 140
COPY (SuperDOS utility), 145
Count Transactions File (IM7.D), 13
cp (Unix utility), 201
Create Files, 4
cron (Unix utility), 202
CRUNCH (SuperDOS utility), 148
Custom Help File HLPCUST.D, 24
Customer Change File CMC.D, 10
Customer Credit Note File CM10.D, 9
Customer Lien File CM8.D, 9
Customer Master File CM1.D, 8
Customer Misc. File CM2.D, 8
Customer Transaction File CM3.D, 8
D
data file, 25
DEL (SuperDOS utility), 150
Delete Items by Batch File (IMD.D), 14
Delete Port Records (Variable File), 49
Delete Records by Store (Variable File), 46
Delivery Prices (VM22.D), 68
Delivery Town Information (VM21.D), 68
df (Unix utility), 209
DIR (SuperDOS utility), 152
disable (Unix utility), 210
DISKINIT (SuperDOS utility), 155
Display File Status, 29
Display File Status (UNIX utility), 112
Display Highest Used Record, 32
Display System Activities (UNIX utility),
116
DKTEST (SuperDOS utility), 157
dollar value, 231
dollars open to buy, 231
DS09003 Change Port Characteristics
(SuperDOS utility), 191
Duplicate Port Records (Variable File), 47
Duplicate Records by Store (Variable File),
43
DV (SuperDOS utility), 158
E
economic order, 231
EDIT, 80, 89
EDIT (SuperDOS utility), 159
270
Edit Jobs, 80
SuperDOS, 80
Unix, 83
electrical storm, 268
Employe Misc. Data File PM9.D, 18
Employee Direct Deposit Info File PM8.D,
18
Employee Master File PM1.D, 17
Employee Swipecard Cross Reference File
PM12.D, 18
Employee Time Clock File PM6.D, 17
enable (Unix utility), 211
Error Messages, 263
Basic & SuperDOS errors, 264
exception errors, 263
program errors, 265
system failures, 263
excess inventory, 231
EXEC (SuperDOS utility), 164
expand password file, 244
extents, 27
Extra Signature File CM14.D, 9
F
Fabrication Master File (IM5.D), 12
Fabrication Production Master (IM4.D), 12
FIL (SuperDOS utility), 165
File Management, 3
Create Files, 4
Display File Status, 29
Display Highest Used Record, 32
Key Lookup, 34
Reindex/Resize Index Files, 25
find (Unix utility), 212
Fine Line Class Group Section File
(FL1.D), 15
Fix Flip Screen (SuperDOS utility), 101
Force Users OFF the System (UNIX
utility), 125
Format Master GM2.D, 11
FREE (SuperDOS utility), 168
G
G/L Yearly Transactions File GM4.D, 11
General Company Information (VM01.D),
54
General Ledger, 11
General Ledger Numbers (VM13.D), 64
General Store Information (VM02.D), 54
GMROI, 232
GPOST (GM3.D), 11
Dim3D (Rev. 10.0)
Grace Tables File PM10.D, 18
Group Information (VM08.D), 60
I
index file, 25
Inventory, 12
related files, 15
Inventory Adjustments File (OM3.D), 14
Inventory Count History File (IM7H.D),
13
Inventory Rank File (IM8.D), 13
Inventory Static File (IM1.D), 12
Inventory Store File (IM2.D), 12
Item Number Change File (IMC.D), 14
J
Job Master File JM1.D, 24
Julian date, 140
K
Key Lookup, 34
Key Values, 231
available for sale, 231
average cost, 231
average cost dollars, 231
average dollar value of inventory, 231
average margin dollars, 231
average margin percent, 231
average monthly usage, 231
business conditions, 231
dollar value, 231
dollars open to buy, 231
economic order, 231
excess inventory, 231
GMROI, 232
lead time, 232
market cost, 232
market cost dollars, 232
market margin dollars, 232
market margin percent, 232
maximum, 232
minimum, 232
net to sell, 232
on hand, 232
on order, 232
on reserve, 232
projected monthly usage, 233
safety factor, 233
sales dollars, 233
Dim3D (Rev. 10.0)
sales to inventory ratio, 233
seasonality, 233
suggested order, 233
turnover, 233
turnover rate, 233
units open, 233
units sold, 233
kill (Unix utility), 213
L
lead time, 232
Lock Users OFF the System (UNIX
utility), 123
Lot Detail File LD1.D, 22
Lot Header File LH1.D, 22
ls (Unix utility), 214
M
Maintain / Change IM1 Fields (VM28.D),
71
Maintain / Change IM2 Fields (VM29.D),
72
Maintain Menu File, 132
cancel, 133
change, 133
delete, 135
heading, 137
insert, 137
view, 138
man (Unix utility), 216
Manage Signon Records (UNIX utility),
122
Manage the Print Spooler (UNIX utility),
128
Manage Users on the System (UNIX
utility), 118
market cost, 232
market cost dollars, 232
market margin dollars, 232
market margin percent, 232
Master File GM1.D, 11
maximum, 232
Menu File XMENU.D, 24
Menu Maintenance, 131
Maintain Menu File, 132
Print Menus, 139
Messages (VM12.D), 62
MG500, 241
minimum, 232
Misc. Store Information (VM021.D), 55
miscellaneous, 24
271
Miscellaneous Descriptions (VM11.D), 61
Miscellaneous Numbers (VM23.D), 69
mkdir (Unix utility), 217
MMI (SuperDOS utility), 169
Multiple Location File (IM9.D), 13
Multiple Spread File OM10.D, 19
Multiple Vendor by Store File OM4S.D, 19
Multiple Vendor File OM4.D, 19
mv (Unix utility), 218
N
net to sell, 232
O
OFILES (SuperDOS utility), 172
on hand, 232
on order, 232
on reserve, 232
on-line help, 36
On-Line Ordering (VM38.D), 76
Open Item Applied File CM5.D, 8
Open Items Applied History File CM5H.D,
8
Order Entry Completion File OEC.D, 21
Overtime Tables File PM11.D, 18
P
Password Account Options (VM27.D), 70
password list, 236
PASSWORDFM, 238
Pay Thru Table File PM7.D, 18
Payroll, 17
Payroll Commission Information
(VM20.D), 68
Payroll Deduction Information (VM16.D),
66
Payroll Department Information
(VM15.D), 66
Payroll Detail Transaction File PM2.D, 17
Payroll Direct Deposit Information
(VM39.D), 77
Payroll General Information (VM14.D), 65
Payroll Master File PM1.D, 17
Payroll State Information (VM18.D), 67
Payroll Tax Tables (VM19.D), 67
Payroll Yearly Transactions PM3.D, 17
PCDEL (SuperDOS utility), 173
PCDIR (SuperDOS utility), 175
PCFORMAT (SuperDOS utility), 176
272
PCXFER (SuperDOS utility), 177
pg (Unix utility), 219
pipe (Unix utility), 220
Port – Assign/Unassign (SuperDOS
utility), 105
Port – Set Characteristics (SuperDOS
utility), 107
Port Information - Part B Information
(VM05B.D), 57
Port Information (Variable File)
Printer Assignments, 40
Port Information (Variable File), 38
Port Options, 39
Port Information (VM05.D), 57
Port Options (Variable File, 39
POS Password Accounts Options
(VM36.D), 75
power failure, 267
Price Maintenance by Batch File (OM7.D),
15
print a password list, 243
Print a Text File (SuperDOS utility), 103
Print a Text File (UNIX utility), 127
Print CONFIG.P (SuperDOS utility), 102
Print Login/Account List (UNIX utility),
120
Print Menus, 139
Print Programs (VM06.D), 58
Print Projects, 91
Print Test Lines (SuperDOS utility), 111
Print Test Lines (UNIX utility), 126
Printer Assignments (Variable File, 40
Printer Escape Sequences (Variable File),
50
projected monthly usage, 233
Projects, 79
Begin Projects, 98
Edit Jobs, 80, 83
menu, 79
Print Projects, 91
Projects File Maintenance, 89
Projects File Maintenance, 89
ps (Unix utility), 221
Purchase Order Master File OM1.D, 19
Purchasing & Receiving, 19
Purchasing/Receiving Password Accounts
Options (VM37.D), 76
pwd (Unix utility), 222
Dim3D (Rev. 10.0)
Q
Quote/Order Recap File QS2.D, 22
Quote/Order Select File QS1.D, 22
R
REBOOT (SuperDOS utility), 180
Receipt Master File OM2.D, 19
redirection (Unix utility), 223
Reindex/Resize Index Files, 25
Reman Defaults (VM35.D), 75
REN (SuperDOS utility), 181
Rental Messages (VM41.D), 77
Rentals Information (VM40.D), 77
Reports (Variable File), 51
REV (SuperDOS utility), 182
Revolving History File (IMH.D), 14
rm (Unix utility), 224
rmdir (Unix utility), 226
S
safety factor, 233
Sales, 21
Sales Analysis Totals File TOTG0.D, 22
sales dollars, 233
Sales History File SH0.D, 21
Sales Master File SM0.D, 21
Sales Tax Information (VM10.D), 61
sales to inventory ratio, 233
SCO
set up a user, 254
seasonality, 233
Serial Number File (SN0.D), 16
Set Up a User - Unix, 246
Setup Modem Port for CRT (SuperDOS
utility), 110
Setup Modem Port for Modem (SuperDOS
utility), 109
shutdown (Unix utility), 227
Sold or Reman/Committed Tag Detail File
(TS1.D), 16
Sold or Reman/Committed Tag Header
File (TS0.D), 16
Special Maintenance (Variable File), 42
Delete Port Records, 49
Delete Records by Store, 46
Duplicate Port Records, 47
Duplicate Records by Store, 43
Special Order Master File SP0.D, 20
Special Order Transaction File SP1.D, 20
standard Dimensions files, 7
Dim3D (Rev. 10.0)
STAPE (SuperDOS utility), 184
Stock Movement File (ISM.D), 14
Store Name & Address (Variable File), 41
stty (Unix utility), 228
suggested order, 233
Suggested Order by Store File OM5S.D,
19
Suggested Order File OM5.D, 19
SuperDOS Passwords, 235
expand password file, 244
MG500, 241
Password List, 236
PASSWORDFM, 238
print a password list, 243
SuperDOS Utilities Used Most Often, 143
BYE, 144
COPY, 145
CRUNCH, 148
DEL, 150
DIR, 152
DISKINIT, 155
DKTEST, 157
DS09002 Change Port Characteristics,
191
DV, 158
EDIT, 159
EXEC, 164
FIL, 165
FREE, 168
MMI, 169
OFILES, 172
PCDEL, 173
PCDIR, 175
PCFORMAT, 176
PCXFER, 177
REBOOT, 180
REN, 181
REV, 182
STAPE, 184
TYPE, 189
System Functions, 99
Convert Calendar/Julian Dates, 140
Menu Maintenance, 131
Maintain Menu File, 132
Print Menus, 139
System Utilities, 100
SuperDOS
Fix Flip Screen, 101
Port – Assign/Unassign, 105
Port – Set Characteristics, 107
Print a Text File, 103
Print CONFIG.P, 102
Print Test Lines, 111
Setup Modem Port for CRT, 110
Setup Modem Port for Modem, 109
273
UNIX
Backup Utilities, 115
Display File Status, 112
Display System Activities, 116
Force Users OFF the System, 125
Lock Users OFF the System, 123
Manage Signon Records, 122
Manage the Print Spooler, 128
Manage Users on the System, 118
Print a Text File, 127
Print Login/Account List, 120
Print Test Lines, 126
Unlock the System, 124
System Manager Variable File, 36
T
Tag Count File (TM2.D), 15
Tag Detail File (TR1.D), 16
Tag Header File (TR0.D), 16
Terms Information (VM07.D), 59
Time & Attendance (VM44.D), 78
Totals #2 File T2ssyy.D, 23
Transaction Numbers (VM03.D), 56
turnover, 233
turnover rate, 233
TYPE (SuperDOS utility), 189
U
units open, 233
units sold, 233
Unix Utilities Used Most Often, 194
cat, 195
cd, 196
chgrp, 197
chmod, 198
chown, 200
cp, 201
cron, 202
df, 209
disable, 210
enable, 211
find, 212
kill, 213
ls, 214
man, 216
mkdir, 217
274
mv, 218
pg, 219
pipe, 220
ps, 221
pwd, 222
redirection, 223
rm, 224
rmdir, 226
shutdown, 227
stty, 228
what, 229
Unlock the System (UNIX utility), 124
V
Variable File, 36, 52
Basic Company Information, 37
Port Information, 38
Port Options, 39
Printer Assignments, 40
Printer Escape Sequences, 50
Reports, 51
Special Maintenance, 42
Delete Port Records, 49
Delete Records by Store, 46
Duplicate Port Records, 47
Duplicate Records by Store, 43
Store Name & Address, 41
Variable Master File VM0.D, 24
Vendor Information File AM5.D, 7
Vendor Master File AM1.D, 7
Vendor Message/Fax File AM2.D, 7
vi, 83
W
what (Unix utility), 229
What to Do in Case of …, 267
electrical storm, 268
power failure, 267
Work File WSMpp.D, 23
Worker’s Compensation Information
(VM17.D), 66
X
XSECUR File, 24
Dim3D (Rev. 10.0)