
1
EXPLANATION OF GRAPHIC SYMBOLS:
CAUTION
RISK OF ELECTRIC SHOCK
DO NOT OPEN
CAUTION: TO REDUCE THE RISK OF
ELECTRIC SHOCK, DO NOT REMOVE COVER
(OR BACK). NO USER-SERVICEABLE PARTS
INSIDE. REFER SERVICING TO QUALIFIED
SERVICE PERSONNEL.
The lightning flash with arrowhead symbol,
within an equilateral triangle, is intended to
alert the user to the presence of uninsulated
“dangerous voltage” within the product’s
enclosure that may be of sufficient magnitude
to constitute a risk of electric shock to persons.
The exclamation mark within an equilateral
triangle is intended to alert the user to the
presence of important operating and
maintenance (servicing) instructions in the
literature accompanying the product.
IMPORTANT SAFETY AND INSTALLATION INSTRUCTIONS
INSTRUCTION PERTAINING TO A RISK OF FIRE, ELECTRIC SHOCK, OR INJURY TO PERSONS.
WARNING
- When using electric products, basic precautions should always be followed, including the following:
1. Read all the Safety and Installation instructions and explanations of Graphic Symbols before using the product .
2. This product must be earthed. If it should malfunction or breakdown, grounding provides a path of least resistance for
electric current to reduce the risk of electric shock. This product is equipped with a cord having an equipment-grounding
conductor and a grounding plug. The plug must be plugged into an appropriate outlet that is properly installed and earthed in
accordance with all local codes and ordinances.
DANGER - Improper connection of the equipment-grounding conductor can result in a risk of electric shock. Check
with a qualified electrician or serviceman if you are in doubt as to whether the product is properly grounded. Do not modify
the plug provided with the product - if it will not fit the outlet, have a proper outlet installed by a qualified electrician.
3. To reduce the risk of injury, close supervision is necessary when this product is used near children.
4. Do not use this product near water - for example, near a bathtub, washbowl, kitchen sink, in a wet basement, or near a
swimming pool or the like.
5. This product should only be used by a stand or cart that is recommended by the manufacturer.
6. This product, either alone or in combination with an amplifier and headphones or speakers, may be capable of producing
sound levels that could cause permanent hearing loss. Do not operate for a long period of time at a high volume level or at a
level that is uncomfortable. If you experience any hearing loss or ringing in the ears, you should consult an audiologist.
7. This product should be located so that its location or position does not interfere with its proper ventilation.
8. This product should be located away from heat sources such as radiators, heat registers, or other products that produce
heat.
9. The product should be connected to a power supply only of the type described in the operating instructions or as marked
on the product.
10. This product may be equipped with a polarized line plug (one blade wider than the other). This is a safety feature. If you
are unable to insert the plug into the outlet, contact an electrician to replace your obsolete outlet. Do not defeat the safety
purpose of the plug.
11. The power-supply cord of the product should be unplugged from the outlet when left unused for a long period of time.
When unplugging the power supply cord, do not pull on the cord, but grasp it by the plug.
12. Care should be taken so that objects do not fall and liquids are not spilled into the enclosure through openings.
13. The product should be serviced by qualified service personnel when:
A. The power-supply cord or the plug has been damaged; or
B. Objects have fallen, or liquid has been spilled into the product; or
C. The products has been exposed to rain; or
D. The product does not appear to be operating normally or exhibits a marked change in performance; or
E. The product has been dropped, or the enclosure damaged.
14. Do not attempt to service the product beyond that described in the user-maintenance instructions. All other servicing
should be referred to qualified service personnel.
15.
WARNING - Do not place objects on product power cord or place it in a position where anyone could trip
over, walk on or roll anything over it. Do not allow the product, or its bench, or its pedal board to rest on or to be installed
over power cords of any type. Improper installations of this type create the possibility of fire hazard and/or personal injury.
16. Electromagnetic interference (RFI). This electronic product utilizes digital sampled wave processing technology (S.W.P.) that
may adversely affect radio/tv reception. Read FCC information inside back cover for additional information.
SAVE THESE INSTRUCTIONS
MUSICPROCESSORS
OWNER’S MANUAL
Registered trademarks cited in this publication
Amiga is a registered trademark of Commodore/Amiga, Inc. Akai and Akai S1000 are registered trademarks of Akai
Professional. Apple File Exchange and Macintosh are registered trademarks of Apple Computer, Inc. Atari and Atari ST
are registered trademarks of the Atari Corporation. Sound Designer is a registered trademark of DigiDesign, Inc. Notator
and Notator Logic are registered trademarks of Emagic GmbH. AccesPC is a registgered trademark of Insignia Solutions,
Inc. MS-DOS and Wave are registered trademarks of the Microsoft Corporation. Avalon and Cubase are registered
trademarks of Steinberg Research GmbH. Sample Vision is a registered trademark of Turtle Beach Systems, Inc. All other
trademarks cited are the property of the respective manufacturer.
********************************
The information contained in this publication has been carefully prepared and checked. However, no responsibility will be
taken for eventual errors. All rights are reserved and this document may not be copied, photcopied or reproduced in part or
in whole without prior consent from Generalmusic S.p.A.. Generalmusic S.p.A. reserves the right to apply whatever
aesthetic, design or functional modifications are considered necessary to any of their products without prior notice.
Generalmusic S.p.A. assumes no responsibility for the use or application of the products or circuits described herein.
© 1994 by Generalmusic S.p.A. All rights reserved.
This symbol, silkscreened on the instrument’s back panel, is an indication that the S Series unit incorporates
two rechargeable Ni/Cd (Nickel-Cadmium) batteries which are recharged while the instrument is in use.
These batteries maintain data intact (when the instrument is off) in the Ram (if installed), and any userprogrammed data in EDIT GENERAL (date, time, footswitch polarity and operating status, General MIDI
compatibility, Dynamic and Aftertouch sensitivity in S2/S3 and the Sound Test note in S2R).
SUBJECT INDEX
This index lists all the subjects discussed in the manual. Each subject shows the section and relative chapter where
the subject appears.
Abbreviations
U/S
ST
User Interface/Selection
SampleTranslator
P
R
Practical guide
Reference
For example, “Song-load from disk, P2, R11” shows that the description of the procedure to load a Song from disk
is described in the Practical Guide section, chapter 2 and also in the Reference section, chapter 11.
Song
-
load from disk
load as Midi-file
save to disk
save as Midi-file
erase from memory
copy to another Bank/Song
create a Bank/Song
Edit Song
Effects
P2, R11
P4, R11
P3, R11
P4, R11
P7, R9
R16
P7, R8
R9
Sequencer
-
controls
select a Song
playback a Song
record a Song
P6,
U/S, P6,
P6,
P9,
R8
R8
R8
R8
Performance
- how to programme a Performance
- programming the tracks
- viewing options of the tracks
P8, R3
P8, R4
U/S, R1
Sound
P2, R11
P3, R11
R12
R12
- selection (and assignment to a track)
from the control panel
via Midi
U/S
P12
- Real time Sound editing
- Edit Sound via M IDI
loading from disk (as an Effects Libraries Setup)
save to disk (as an Effects Libraries Setup)
organisation
-
Edit Effects
assignment to the Performance
activation of the tracks
selecting the Effects via Midi
modifying the Effects via Midi
P2, R11
P3, R11
R13
R14
P8, R13
P8, R13
P13
P13
Drumkits & Sound Patch
- definition and editing
R7
Midi
-
assigning the Midi channels to the tracks
difinition and programming the Midi-Common
Midi-Merge
General Midi
communcating with an external sequencer
R4
R10
R10
P4, R10
P15
- assigning the functions
- activation of the tracks
P8, R3-10
P8, R4
Wheels
- assigning the functions
- activation of the tracks
P8, R3
P8, R4
Function Controllers
- Edit Sound
select the type of Sound
select the Waveform
creat a Waveform
definition of an Envelope
definition of Tracking
U/S
Pedals, Footswitches
- Sound Library
load from disk (as a Sound Library Setup )
save to disk (as a Sound Library Setup )
import a Song from disk
organisation
- Effects Bypass
- Effects Libraries
R5
R5
ST, R6
P11
P11
P10
P14
- use
- editing
P10 (S2R: R3)
R3
Audio Outputs
- programming
R4
SUBJECT INDEX
GENERAL
I
GENERAL INDEX
1. INTRODUCTION ............................................................................. 1
INTRODUCTION ........................................................................................................................................ 2
About the S Series instruments ...................................................................................................................................... 2
How to use this manual .................................................................................................................................................. 3
Convention used in the manual ...................................................................................................................................... 4
2. LAYOUTS ........................................................................................ 5
FRONT PANEL S2/S3 ............................................................................................................................... 6
REAR PANEL S2/S3 .................................................................................................................................. 9
FRONT PANEL S2R ................................................................................................................................ 10
REAR PANEL S2R ................................................................................................................................... 12
3. OVERVIEW OF THE INSTRUMENT
& ITS EDIT/DATA HANDLING CAPACITY ....................................... 13
OVERVIEW OF THE INSTRUMENT ....................................................................................................... 14
The Music Processor concept ...................................................................................................................................... 14
Sound synthesis ........................................................................................................................................................... 14
Sampling ............................................................................................................................................................................ 14
Waveforms ......................................................................................................................................................................... 15
Filters and Sounds ............................................................................................................................................................. 15
Bank/Song and Performance ........................................................................................................................................ 16
Performance ...................................................................................................................................................................... 16
Tracks ........................................................................................................................................................................... 16
The Track playing mode .................................................................................................................................................... 16
Bank/Song ......................................................................................................................................................................... 16
Track configuration ........................................................................................................................................................... 17
Multi-timbral ..................................................................................................................................................................... 17
The mixer ........................................................................................................................................................................... 17
“Mute” and “Solo” ........................................................................................................................................................... 17
Sources and Destinations ............................................................................................................................................. 18
MIDI events ....................................................................................................................................................................... 18
Sources .............................................................................................................................................................................. 18
Destinations ....................................................................................................................................................................... 18
Internal memory and disks ............................................................................................................................................ 19
Overview of the data and the memorising facilities (floppy disk and Ram-disk) .............................................................. 19
The data ............................................................................................................................................................................. 19
MODES OF OPERATION: NORMAL, EDIT/HANDLING ......................................................................... 20
Normal operative mode ..................................................................................................................................................... 20
Edit/Data Handling mode ................................................................................................................................................. 20
Multitasking ....................................................................................................................................................................... 20
II
GENERAL INDEX
OVERVIEW OF THE EDIT/HANDLING ENVIRONMENTS ..................................................................... 21
Edit, handling, utility environments ............................................................................................................................... 21
The pages ..................................................................................................................................................................... 21
The menus .................................................................................................................................................................... 22
The structure and selection of the menus .......................................................................................................................... 22
Commands/options ....................................................................................................................................................... 22
Parameters ................................................................................................................................................................... 22
Simple parameter .............................................................................................................................................................. 22
Main menu and secondary menus ..................................................................................................................................... 22
Multiple parameter ............................................................................................................................................................ 23
Graphic parameter ............................................................................................................................................................ 23
Escape from edit/handling ............................................................................................................................................ 24
Analysis of the ‘edit sound’ edit environment ................................................................................................................... 24
Analysis of two edit/handling environments .................................................................................................................. 24
The “Are you sure?” display ............................................................................................................................................. 24
Analysis of the ‘disk’ handling environment ..................................................................................................................... 25
4. INSTALLATION, POWER UP, DEMO ........................................... 27
CONNECTING THE POWER CABLE ..................................................................................................... 28
CONNECT THE AUDIO CABLES ............................................................................................................ 28
Connecting to an external amplification system ............................................................................................................... 28
Stereo headphones ............................................................................................................................................................. 28
S2R: CONNECTING TO A MASTER KEYBOARD OR TO AN EXTERNAL SEQUENCER .................... 29
Connecting to a Master keyboard ................................................................................................................................. 29
Connect the Midi ports ...................................................................................................................................................... 29
Connecting to a monosplit master keyboard (via Midi-Common) .................................................................................... 29
Connecting to a multisplit master keyboard ..................................................................................................................... 29
Connecting to an external sequencer ........................................................................................................................... 30
Connecting the Midi ports ................................................................................................................................................. 30
Check the track status of the midi in Source ..................................................................................................................... 30
Deactivation of Midi-Common .......................................................................................................................................... 30
How to deactivate the Midi-Common channel .............................................................................................................. 31
Save the Midi-Common status to disk .......................................................................................................................... 31
How to save the Midi-Common status to floppy disk ........................................................................................................ 31
Save the Midi-Common status to the Ram-disk ................................................................................................................. 32
POWER UP .............................................................................................................................................. 33
Powering up with empty disk drive RAM-disk .................................................................................................................. 33
Powering up with a floppy disk inserted in the drive ........................................................................................................ 33
Powering up with data in the RAM-disk ........................................................................................................................... 33
Regulating the volume ....................................................................................................................................................... 33
Before turning off the instrument... ................................................................................................................................... 33
S2R: “SOUND TEST” ............................................................................................................................... 34
Sound Test in the main display .......................................................................................................................................... 34
Sound Test in the Sample Translator ................................................................................................................................. 34
DEMO ...................................................................................................................................................... 35
The ROM demonstration Song ..................................................................................................................................... 35
The “Demo Disk 01” and “Demo Disk 02” demo songs ................................................................................................ 35
Load the contents of “Demo Disk 01” automatically ....................................................................................................... 35
Play back the “Demo Disk 01” demo songs ..................................................................................................................... 35
Interrupt the “Demo Disk 01” demo songs ...................................................................................................................... 35
GENERAL INDEX
III
Load the contents of “Demo Disk 02” in Ram ................................................................................................................. 36
Playback the “Demo Disk 02” demo song ....................................................................................................................... 36
Cancel the “Demo Disk 02” demo song from the Music Processor’s memory ................................................................ 36
5. USER INTERFACE / SELECTION ................................................ 37
DATA ENTRY COMMANDS ..................................................................................................................... 38
Dial, +1/> and -1/<, Enter, Exit ...................................................................................................................................... 38
Alphanumeric keypad ................................................................................................................................................... 38
How to specify numeric data ............................................................................................................................................. 38
How to enter alphabetic characters .................................................................................................................................. 39
Navigating with the Dial, Enter and Exit ........................................................................................................................ 39
Use of the numeric keypad to navigate in the menus ................................................................................................... 40
«EMERGENCY» BUTTONS .................................................................................................................... 41
PANIC ................................................................................................................................................................................ 41
MIDI OFF (S2/S3) ............................................................................................................................................................ 41
EFF. BYPASS ..................................................................................................................................................................... 41
UNDO ............................................................................................................................................................................... 41
DISPLAY AND ASSOCIATED CONTROLS ............................................................................................. 42
MAIN DISPLAY / SAVE PERFORMANCE ............................................................................................... 43
“Performance” mode ........................................................................................................................................................ 43
“Sounds” mode ................................................................................................................................................................. 43
“Save Performance” (save) .............................................................................................................................................. 44
“Save Performance” in S2/S3 ........................................................................................................................................... 44
“Save Performance” in S2R ............................................................................................................................................. 44
BANK/SONG AND PERFORMANCE SELECTION ................................................................................. 45
Selecting the Bank/Songs and Performances in S2/S3 ................................................................................................ 45
Selecting with the buttons of the Bank/Song and Performance sections .......................................................................... 45
Selecting the Bank/Songs and Performances in S2R .................................................................................................. 45
Selecting in “Performance” mode .................................................................................................................................... 45
Selecting Bank/Song and Performances in “Sounds” mode ............................................................................................. 45
Selecting in “Performance” mode .................................................................................................................................... 45
Selecting a Performance of the active Bank/Song in “Sounds” mode .............................................................................. 45
SELECTING SOUNDS ............................................................................................................................ 46
Selecting Sounds with the Dial (or the +1/> and -1/< buttons) ....................................................................................... 46
Selecting Sounds with the alphanumeric keypad .............................................................................................................. 46
Selecting Sounds directly from the Sound Library ............................................................................................................ 46
CORRECT TRACK VISUALISATION ...................................................................................................... 47
Visualisation of the tracks that can be played on a keyboard ........................................................................................... 47
Visualisation of the tracks that can be played via Midi In (not Midi-Common) ............................................................... 47
Visualisation of the tracks played by a Song ..................................................................................................................... 47
TRACK PLAYING MODE ......................................................................................................................... 48
Track playing modes available for each Source ............................................................................................................... 48
Description of the track playing modes ............................................................................................................................ 48
i How to set a split point for the split track playing mode ................................................................................................ 49
PLAY, MUTE, SOLO................................................................................................................................. 50
Play ................................................................................................................................................................................... 50
Mute ................................................................................................................................................................................... 50
Solo .................................................................................................................................................................................... 50
IV
GENERAL INDEX
6. PRACTICAL GUIDE ...................................................................... 51
1 PREPARE A WORK DISK WITH THE S SERIES DISK DRIVE .......................................................... 52
2 LOAD THE CONTENTS OF A DISK INTO MEMORY ......................................................................... 53
Load all the instrument’s data from disk ........................................................................................................................... 53
Load a Group of Bank/Songs ............................................................................................................................................ 54
Load a Single Bank/Song .................................................................................................................................................. 54
Load a Setup ...................................................................................................................................................................... 55
3 SAVE THE CONTENTS OF MEMORY TO DISK................................................................................. 57
Save all the instrument’s data to disk ................................................................................................................................ 57
Save all the Bank/Songs in a Group .................................................................................................................................. 58
Save a single Bank/Song ................................................................................................................................................... 58
Save a single Setup ............................................................................................................................................................ 59
4 LOAD AND SAVE A MIDI-FILE ............................................................................................................ 61
Memory format and Midi-files .......................................................................................................................................... 61
Compatibility of the sounds (Midi-files in General Midi/GS standard) ............................................................................ 61
Activation of the General Midi/GS compatibility .............................................................................................................. 61
Load a Midi-file ............................................................................................................................................................. 62
Save a Midi-file ............................................................................................................................................................. 63
5 OVERVIEW OF THE DISKS SUPPLIED WITH THE INSTRUMENT .................................................. 65
“Demo Disk 01” ............................................................................................................................................................. 65
The Bank/Song directory ................................................................................................................................................... 65
The Setup directory ........................................................................................................................................................... 66
Check the Ram-Sounds contained in Demo Disk 01 ......................................................................................................... 67
Load the Bank/Songs and Setups from Demo Disk 01 ...................................................................................................... 67
“Demo Disk 02” ............................................................................................................................................................. 68
Load the new pianoforte from Demo Disk 02 ................................................................................................................... 68
“Freeware Disk” ............................................................................................................................................................ 69
The “Hardcopy” program ................................................................................................................................................. 69
The “Disk_Dir” program .................................................................................................................................................. 69
The “Copy_Prg” program ................................................................................................................................................ 69
6 SONG PLAYBACK / THE SEQUENCER CONTROLS ........................................................................ 70
Load a Song using the standard procedure ....................................................................................................................... 70
Use Preload to load a Song in background ...................................................................................................................... 70
How to select the Song ...................................................................................................................................................... 70
The Sequencer ................................................................................................................................................................... 71
7 CREATE OR MODIFY THE BANK/SONGS......................................................................................... 72
Cancel Song 1 (Demo) ................................................................................................................................................. 72
Prepare a start-up disk to power up without Song 1 (Demo) ........................................................................................ 72
Record a new Song using the Performances of an existing Bank/Song ...................................................................... 73
Using a Bank/Song already present in memory ................................................................................................................ 73
Using a Bank/Song contained in a disk ............................................................................................................................. 73
Create a new Bank/Song .............................................................................................................................................. 74
Cancel one of the 10 default Bank/Songs present in memory ........................................................................................... 74
Create a completely new Bank/Song ................................................................................................................................. 74
8 EDITING THE PERFORMANCES ....................................................................................................... 75
Create, copy and cancel the tracks .............................................................................................................................. 75
How to cancel tracks ......................................................................................................................................................... 75
How to create tracks ......................................................................................................................................................... 75
Copy a track to another ..................................................................................................................................................... 76
GENERAL INDEX
V
How to assign the Sounds to the tracks ....................................................................................................................... 76
Select the Sounds from the main display ........................................................................................................................... 76
Select the Sounds from the Sound Library ........................................................................................................................ 76
Set the tracks to Play or Mute ....................................................................................................................................... 77
Track volumes .............................................................................................................................................................. 77
How to vary the track Volumes with the Function Controllers ......................................................................................... 77
How to vary the Volumes in edit performance/tracks ....................................................................................................... 78
TRANSPOSE ........................................................................................................................................... 78
How to vary the track transposition in the track transposer ............................................................................................ 78
How to vary the track transposition in edit performance/tracks ...................................................................................... 79
Effects ........................................................................................................................................................................... 79
How to assign the Effects to a Performance ..................................................................................................................... 79
How to engage the Effects to the tracks ............................................................................................................................ 80
How to activate and programme the pedals and wheels .............................................................................................. 80
How to assign a function to a pedal and wheel ................................................................................................................ 80
How to activate/deactivate the pedals and wheels for the tracks ..................................................................................... 81
Save the modifications to the Performance .................................................................................................................. 81
9 HOW TO RECORD A SONG ............................................................................................................... 82
What is a Song? ................................................................................................................................................................. 82
The Song tracks ................................................................................................................................................................. 82
Prepare the tracks for the recording ................................................................................................................................. 82
Activate Record mode and select the recording options ................................................................................................... 83
Select the parameters of the Song ..................................................................................................................................... 84
The Song pointer (locator) ................................................................................................................................................ 84
Now record the Song ......................................................................................................................................................... 85
Recording methods ............................................................................................................................................................ 85
10 REAL TIME SOUND EDITING ........................................................................................................... 86
The S2/S3 hardware Function Controllers .................................................................................................................... 86
Panel mode ........................................................................................................................................................................ 87
User mode ......................................................................................................................................................................... 88
The S2R Function Controller ........................................................................................................................................ 88
Save the modifications to the Performance .................................................................................................................. 89
11 EDITING SOUNDS IN THE STUDIO ................................................................................................. 90
Types of Sound ............................................................................................................................................................. 90
The three fundamental Sound types .................................................................................................................................. 90
The combinations: Sound Patch and Drumkits ................................................................................................................. 90
Rom-Sound, Ram-Sound, Ram
Sound .......................................................................................................................... 91
Waveform ...................................................................................................................................................................... 91
Filters ............................................................................................................................................................................ 91
The filters and the Cutoff-frequency .................................................................................................................................. 91
Resonance ......................................................................................................................................................................... 91
The filter envelopes ........................................................................................................................................................... 92
Envelopes ..................................................................................................................................................................... 92
Types of Envelopes ............................................................................................................................................................ 92
Programming the envelopes .............................................................................................................................................. 92
Tracking ........................................................................................................................................................................ 93
Types of Tracking .............................................................................................................................................................. 93
Programming the Tracking ............................................................................................................................................... 93
Lfo, Pitch, Pan .............................................................................................................................................................. 94
Lfo ..................................................................................................................................................................................... 94
Pitch .................................................................................................................................................................................. 94
Pan .................................................................................................................................................................................... 94
Memorising the Sound in the Sound Library ................................................................................................................. 95
VI
GENERAL INDEX
Escape from edit sound ..................................................................................................................................................... 95
Escape edit sound and cancel the modifications ............................................................................................................... 95
Escape from edit sound saving the Sound in the Sound Library ....................................................................................... 95
Save the Sound Library to disk .......................................................................................................................................... 95
12 SELECTING THE SOUNDS VIA MIDI ............................................................................................... 96
Selecting the Sounds with Bank Select and Program Change ..................................................................................... 96
The Program Change ........................................................................................................................................................ 96
The Bank Select (Midi Controller 0) ................................................................................................................................. 96
Select the Sounds via the Performance Change event ................................................................................................ 98
Programming the Midi-Common channel ......................................................................................................................... 98
Select the Performances via Midi-Common ...................................................................................................................... 98
13 SELECTING THE EFFECTS VIA MIDI ............................................................................................ 100
Programming the Midi-Common channel ....................................................................................................................... 100
Controlling the Effects via Midi-Common ...................................................................................................................... 100
14 EDITING SOUNDS VIA MIDI ........................................................................................................... 101
15 PROGRAMMING WITH AN EXTERNAL SEQUENCER — PERFORMANCE 10 OF BANK/SONG 1 ... 102
7. SAMPLE TRANSLATOR............................................................. 105
SAMPLE TRANSLATOR 2.0 .................................................................................................................. 106
About Sample Translator ................................................................................................................................................. 106
Waveforms and multi-samples ......................................................................................................................................... 106
Accessing Sample Translator .......................................................................................................................................... 107
Temporary escape from Sample Translator .................................................................................................................... 107
The “Waveform” display .............................................................................................................................................. 108
The “Waveform” command functions ............................................................................................................................. 108
Loading samples (“Load”) ........................................................................................................................................... 109
1. Loading a sample contained in a Ram-Sound ............................................................................................................. 109
2. Loading a sample via MIDI ........................................................................................................................................ 109
3. Loading samples from Ms-Dos/Atari floppy disks ....................................................................................................... 111
4. Loading Samples and Programs from an Akai S1000 floppy disk ...............................................................................112
“Cut End” ........................................................................................................................................................................ 114
Assigning samples to a keyboard range (“Assign”) ..................................................................................................... 114
Cancelling assignments (“UnAssign”) ............................................................................................................................ 115
Re-assigning limits after an Unassign command .............................................................................................................115
“Play Single” display .................................................................................................................................................... 116
“Zoom” ............................................................................................................................................................................ 116
“Gain” ............................................................................................................................................................................. 117
“Loop nr:(x)” ...................................................................................................................................................................117
“Send” .............................................................................................................................................................................. 117
“Exit” ............................................................................................................................................................................... 118
The “Info about” display ............................................................................................................................................... 118
“Note” .............................................................................................................................................................................. 118
“SR” ................................................................................................................................................................................. 119
“Length” (cannot be modified) ........................................................................................................................................ 119
“Loop Start” & “Loop End” ...........................................................................................................................................119
“Loop Type” .................................................................................................................................................................... 120
“Note range” (cannot be modified) ................................................................................................................................ 120
Commands in the right-hand column .............................................................................................................................. 121
Cancelling a sample (“Delete”) ................................................................................................................................... 121
Copying a sample to a different location (“Copy & Paste) .......................................................................................... 121
Saving a Waveform (“Save”) ....................................................................................................................................... 122
Escape from Sample Translator ................................................................................................................................. 123
GENERAL INDEX
VII
8. REFERENCE GUIDE .................................................................. 125
1 THE SOURCE SECTION ................................................................................................................... 126
The buttons in the Source section .................................................................................................................................... 126
Local Source .................................................................................................................................................................... 126
i The Set split command ................................................................................................................................................. 127
Midi in Source ................................................................................................................................................................. 127
Song Source ..................................................................................................................................................................... 128
Option Source .................................................................................................................................................................. 128
The solo button ................................................................................................................................................................ 128
2 TRACK TRANSPOSER / MASTER TRANSPOSER .......................................................................... 129
The track transposer button ............................................................................................................................................ 129
Track Transposer ............................................................................................................................................................. 129
Master Transposer .......................................................................................................................................................... 129
The master transpose buttons (only S2/S3) ..................................................................................................................... 129
3 EDIT PERFORMANCE/CONTROLS ................................................................................................. 131
Page 1 Effects .................................................................................................................................................................. 131
Page 2 Controllers (S2/S3) ............................................................................................................................................. 131
Page 3: User Keys (S2/S3) .............................................................................................................................................. 132
Page 4: User Controllers (S2/S3) ................................................................................................................................... 132
Page 2: Controllers (S2R) ............................................................................................................................................... 132
Page 3: Function Controller (S2R) ................................................................................................................................. 132
Assignable MIDI messages ........................................................................................................................................... 133
4 EDIT PERFORMANCE/TRACKS ...................................................................................................... 134
General commands .......................................................................................................................................................... 134
Page 1: Configuration ..................................................................................................................................................... 135
Page 2: Common ............................................................................................................................................................. 136
Page 3: Local (S2/S3) ..................................................................................................................................................... 137
Page 3: Local (S2R) ........................................................................................................................................................ 138
Page 4: Internal Sound ................................................................................................................................................... 139
Page 5: Midi Filter In ..................................................................................................................................................... 139
Page 6: Midi Filter Out ................................................................................................................................................... 140
MIDI messages assignable to the Midi Filters (In & Out) ........................................................................................ 140
Notes and suggestions ..................................................................................................................................................... 141
5 EDIT SOUND ..................................................................................................................................... 142
Single Oscillator (SO), Dual Oscillator (DO), Dual Crossfade (DC) Sounds ............................................................... 142
Sound types ...................................................................................................................................................................... 142
Polyphony obtained with different types of sounds ......................................................................................................... 143
Maximum polyphony obtainable in the various track playing modes ............................................................................. 143
Access the edit sound environment .................................................................................................................................. 143
The edit environment (the editors of the edit sound menu) ............................................................................................. 143
The editors of the edit sound menu ................................................................................................................................. 143
......................................................................................................................................................................................... 143
The options of the main menu and of the editors ............................................................................................................ 144
The options of the main menu ......................................................................................................................................... 144
The editor options (secondary menus) ............................................................................................................................ 144
Status of the instrument in edit sound mode .................................................................................................................... 144
Temporary escape from edit sound .................................................................................................................................. 144
Escaping from edit sound and saving the modified sound .............................................................................................. 144
Possible error messages during the Sound save task ...................................................................................................... 145
Escape from edit sound without memorising the modified sound ................................................................................... 145
Converting a Sound to a different type ....................................................................................................................... 146
Conversion limits ............................................................................................................................................................ 146
Waveset ...................................................................................................................................................................... 147
Waveform (Sound Dual Crossfade) ................................................................................................................................. 147
Waveform (Single Oscillator Sound) ............................................................................................................................... 147
VIII
GENERAL INDEX
Page 1 Waveform (Dual Oscillator Sound) ..................................................................................................................... 148
Page 2 Oscillator Balance (Dual Oscillator Sound) ...................................................................................................... 148
Volume ........................................................................................................................................................................ 149
Page 1 Volume ................................................................................................................................................................. 149
Page 2 Volume Tracking .................................................................................................................................................. 149
Amplitude envelope .................................................................................................................................................... 150
Page 1 Amplitude Envelope Control ............................................................................................................................... 150
Page 2 Amplitude Key On ............................................................................................................................................... 151
Page 3 Amplitude Key Off ............................................................................................................................................... 152
Page 4 Amplitude Envelope Tracking ............................................................................................................................. 152
Lfo ............................................................................................................................................................................... 153
Lfo ................................................................................................................................................................................... 153
Filter 1/2 ...................................................................................................................................................................... 154
Page 1 Filter 1 ................................................................................................................................................................ 155
Page 2 Filter 2 ................................................................................................................................................................ 155
Page 3 Filter 1 Tracking ................................................................................................................................................. 156
Page 4: Filter 2 Tracking ................................................................................................................................................ 156
Filter Envelope (dc and do sounds) ............................................................................................................................ 157
Page 1 Filter Envelope Control ...................................................................................................................................... 157
Page 2: Filter Key On Envelope ..................................................................................................................................... 157
Page 3 Filter Key Off Envelope ...................................................................................................................................... 158
Page 4 Filter Envelope Tracking .................................................................................................................................... 159
Pitch Envelope ............................................................................................................................................................ 160
Page 1 Pitch Envelope Control ....................................................................................................................................... 160
Page 2 Pitch Key On Envelope ....................................................................................................................................... 160
Page 3: Pitch Key Off Envelope ...................................................................................................................................... 161
Page 4 Filter Envelope Tracking .................................................................................................................................... 162
Pan ............................................................................................................................................................................. 163
Page 1 Pan Envelope Control (DC and DO Sounds) ..................................................................................................... 163
Page 2 Pan Key On Envelope (DC and DO Sounds) ...................................................................................................... 163
Page 3 Pan Key Off Envelope (Sound DC and DO) ....................................................................................................... 164
Page 4 Pan Tracking (DC and DO Sounds) ................................................................................................................... 165
Pan Control (Sound SO) ................................................................................................................................................. 165
ROM-Waveforms with separate Pitch Envelopes for the two oscillatori even when Detune=0 ............................ 166
Notes and suggestions ..................................................................................................................................................... 167
6 SAMPLE TRANSLATOR .................................................................................................................... 169
Accessing Sample Translator .......................................................................................................................................... 169
The instrument status during the Sample Translator tasks ............................................................................................. 170
Controlling the S2R ......................................................................................................................................................... 170
Temporary escape from Sample Translator .................................................................................................................... 170
A closer look at Sample Translator ............................................................................................................................. 170
The Waveform display ..................................................................................................................................................... 171
Load ................................................................................................................................................................................. 171
Save ................................................................................................................................................................................. 172
Assign .............................................................................................................................................................................. 172
UnAssign ......................................................................................................................................................................... 172
Play Single ...................................................................................................................................................................... 173
Info About ........................................................................................................................................................................ 173
Exit .................................................................................................................................................................................. 174
Cut End ............................................................................................................................................................................ 175
Delete .............................................................................................................................................................................. 175
Copy ................................................................................................................................................................................ 175
Paste ................................................................................................................................................................................ 175
7 SOUND PATCH AND DRUMKIT ....................................................................................................... 176
The Sound Patch edit environment .................................................................................................................................. 176
Commands/options .......................................................................................................................................................... 176
Parameters ...................................................................................................................................................................... 177
GENERAL INDEX
IX
Notes and suggestions ..................................................................................................................................................... 178
8 SEQUENCER AND SONG ................................................................................................................ 179
What is a Sequencer – The S Series Sequencer ............................................................................................................... 179
Playback and Record ...................................................................................................................................................... 179
The Song and the Performance Bank .............................................................................................................................. 179
The sequencer controls .................................................................................................................................................... 180
Creating a Song ............................................................................................................................................................... 180
Creating a Bank/Song ..................................................................................................................................................... 180
Creating a Performance with default values ................................................................................................................... 180
Cancelling the Song ........................................................................................................................................................ 181
Recording a new Song ..................................................................................................................................................... 181
“Undo” ........................................................................................................................................................................... 182
Notes and suggestions ..................................................................................................................................................... 182
9 EDIT SONG MODE ............................................................................................................................ 184
Accessing edit song mode ................................................................................................................................................ 184
The main menu editors of edit song ................................................................................................................................ 184
Options of the main menu of edit song ............................................................................................................................ 184
Options of the secondary menus ..................................................................................................................................... 184
Selecting the Tracks in Edit ............................................................................................................................................. 185
Selection Screen .............................................................................................................................................................. 185
“Execute” ........................................................................................................................................................................ 185
“Undo” ........................................................................................................................................................................... 185
Erase events .............................................................................................................................................................. 186
Page 1: Erase from track ................................................................................................................................................ 186
Page 2: Erase from Master Track ................................................................................................................................... 186
Move events .............................................................................................................................................................. 187
Move from track .............................................................................................................................................................. 187
Insert/delete bars ....................................................................................................................................................... 188
Page 1: Insert bars .......................................................................................................................................................... 188
Page 2: Delete bars ......................................................................................................................................................... 188
Dynamic ..................................................................................................................................................................... 189
Dynamic .......................................................................................................................................................................... 189
Transpose .................................................................................................................................................................. 189
Transpose ........................................................................................................................................................................ 189
Quantize .................................................................................................................................................................... 190
Page 1: Quantize Key On ................................................................................................................................................ 190
Page 2: Quantize Key Off ............................................................................................................................................... 191
Copy .......................................................................................................................................................................... 191
Page 1: Copy from single track ....................................................................................................................................... 192
Page 2: Copy all tracks ................................................................................................................................................... 192
Page 3: Append ............................................................................................................................................................... 192
Microscope ................................................................................................................................................................ 193
Accessing the events of the Event List and their parameters .......................................................................................... 193
Moving to a data bar ....................................................................................................................................................... 193
Selecting an event with Catch Locator ............................................................................................................................ 194
Programmable Events and Parameters .......................................................................................................................... 194
The Command/Options Column ...................................................................................................................................... 195
Commands/options .......................................................................................................................................................... 195
“Undo” ........................................................................................................................................................................... 196
Utility .......................................................................................................................................................................... 196
Utility ............................................................................................................................................................................... 196
Master Track .............................................................................................................................................................. 197
Accessing the events on the Event List and their values ................................................................................................. 197
Moving to a data bar ....................................................................................................................................................... 197
Selecting an event with Catch Locator ............................................................................................................................ 198
Programmable Events and Parameters .......................................................................................................................... 198
The Command/Options Column ...................................................................................................................................... 198
X
GENERAL INDEX
Commands/options .......................................................................................................................................................... 198
“Undo” ........................................................................................................................................................................... 199
Notes and suggestions ..................................................................................................................................................... 200
10 EDIT GENERAL ............................................................................................................................... 201
Tuning/Scale .............................................................................................................................................................. 201
Page 1: Tuning/Scale ...................................................................................................................................................... 201
Page 2: Edit Keyboard Scale .......................................................................................................................................... 202
Footswitch controls .................................................................................................................................................... 203
MIDI ....................................................................................................................................................... 203
Page 1: Midi (1) .............................................................................................................................................................. 204
Page 2: Midi (2) .............................................................................................................................................................. 205
Date/Time set ............................................................................................................................................................ 205
Date & Time .................................................................................................................................................................... 205
Dynamic/touch sensitivity (s2/s3) .............................................................................................................................. 205
Sensitivity ........................................................................................................................................................................ 205
Sound test (s2r) ......................................................................................................................................................... 206
Sound test ........................................................................................................................................................................ 206
General Midi .............................................................................................................................................................. 206
General Midi ................................................................................................................................................................... 207
Notes and suggestions ..................................................................................................................................................... 208
11 DISK ................................................................................................................................................. 209
Automatic loading when powering up............................................................................................................................. 209
The Ram-disk ................................................................................................................................................................... 210
The Groups ...................................................................................................................................................................... 210
Organisation of the disk environment .......................................................................................................................... 211
General commands/options .............................................................................................................................................. 211
i Directory ....................................................................................................................................................................... 212
i Data displayed in the directories .................................................................................................................................. 213
The Disk environment pages (Load, Save, Erase, Utility) ......................................................................................... 214
Load ................................................................................................................................................................................. 214
Save ................................................................................................................................................................................. 215
Erase ............................................................................................................................................................................... 216
Utility ............................................................................................................................................................................... 216
Possible error messages during disk operations ........................................................................................................ 219
Errors common to all operations .................................................................................................................................... 219
Load errors ...................................................................................................................................................................... 219
Load and Erase Errors .................................................................................................................................................... 219
Formats of the magnetic supports used .......................................................................................................................... 220
Notes and suggestions ..................................................................................................................................................... 220
12 SOUND LIBRARY ............................................................................................................................ 221
How the Sound Library is organised ............................................................................................................................... 221
The Sound Library display .............................................................................................................................................. 221
Selecting Families and Sounds ........................................................................................................................................ 221
Selecting Sounds by entering the Program Change and Bank Select number ................................................................ 222
Selecting Sounds with the search function ...................................................................................................................... 222
Commands/options .......................................................................................................................................................... 222
Types of Sounds and their identification symbols ........................................................................................................... 224
13 EFFECTS LIBRARIES ..................................................................................................................... 225
How the Effects Libraries are organised ......................................................................................................................... 225
Selecting the Effects ........................................................................................................................................................ 225
Command/options ........................................................................................................................................................... 226
Library 1 (standard) ..................................................................................................................................................... 226
Library 2 (standard) ..................................................................................................................................................... 226
GENERAL INDEX
XI
14 EDIT EFFECT .................................................................................................................................. 227
How to access the effect edit ........................................................................................................................................... 227
How to escape from the effect edit .................................................................................................................................. 227
How the edit effect environment is organised ................................................................................................................. 227
How to Programme the Effects of Library 1 ................................................................................................................ 228
Reverbs without programmable early-reflections ........................................................................................................... 228
Reverbs with programmable early-reflections ................................................................................................................ 228
How to Programme the Effects of Library 2 ................................................................................................................ 229
Delay, Panecho, Dubbing ............................................................................................................................................... 229
Chorus ............................................................................................................................................................................. 229
Flanger ............................................................................................................................................................................ 230
Phaser, Ensemble ............................................................................................................................................................ 230
Rotary .............................................................................................................................................................................. 231
Fladel, Panmix ................................................................................................................................................................ 231
Notes and suggestions ..................................................................................................................................................... 232
15 CLIPBOARD .................................................................................................................................... 234
Layout of the “Clipboard” page ..................................................................................................................................... 234
How to copy an edit page ................................................................................................................................................ 234
How to copy a clip to an edit page .................................................................................................................................. 234
How to cancel a clip from the Clipboard ........................................................................................................................ 234
16 UTILITY ............................................................................................................................................ 235
“Juke_box” ..................................................................................................................................................................... 235
Utility ............................................................................................................................................................................... 235
17 PRELOAD ........................................................................................................................................ 237
APPENDIX............................................................................................ i
MIDI IMPLEMENTATION CHART ............................................................................................................. IV
MESSAGGI MIDI / MIDI CONTROLLERS ................................................................................................. V
MIDI SYSTEM EXCLUSIVE CODE INTERFACE ..................................................................................... VI
LIST OF THE WAVEFORMS RESIDENT IN ROM (ROM-WAVEFORMS) ............................................ XIV
THE ROM SOUND MAP ......................................................................................................................... XV
TABLE OF THE PERFORMANCES CONTAINED IN ROM ................................................................. XXII
THE DRUMKITS OF THE STANDARD SOUND LIBRARY ................................................................. XXVI
PERCUSSION SAMPLES .................................................................................................................XXXVI
TECHNICAL SPECIFICATIONS ......................................................................................................XXXVIII
GLOSSARY / ALPHABETICAL INDEX .............................................. a
GLOSSARY ............................................................................................................................................... B
MIDI MESSAGES/MIDI CONTROLLERS .................................................................................................. E
TROUBLESHOOTING ................................................................................................................................ I
XII
GENERAL INDEX
INTRODUCTION
❏
INTRODUCTION
1
INTRODUCTION
1
INTRODUCTION
Congratulations and thanks for purchasing the S Series Music Processor - an instrument
conceived and developed with the most up-to-date technology to guarantee a high degree
of reliability and durability.
The name “Music Processor” describes the instrument’s ability to handle the complete
creative process, starting from sound synthesis right down to the registration of multitimbric songs and the complete control of the entire MIDI setup.
We are confident that you will find your S Series Music Processor beyond all expectations.
About the S Series instruments
S2 Turbo and S3 Turbo Music Processors are keyboard synthesizers with 61 keys and
76 keys respectively. This manual also refers to the previous models upgraded with the
“Turbokit” board. S2 and S3 also operate as Master Keyboards, thanks to the integrated
controls (Wheels, Function Controllers) and extensive MIDI programmability.
S2R is the 19” rack version of the S2/S3 Turbo. It is totally compatible with these two
keyboard synthesizers.
•
Multitimbral generator
The S Series instruments are 16 part multi-timbral units with a maximum polyphony
of 32 notes.
•
Sound generation method
Sound generation is based on a mixed digital/analog technology which permits,
through the use of analog techniques, the manipulation of Samples of real or synthetic
origin. The S Series Sounds are based on sampled Waveforms which are processed by
one or two digital State Variable Filters with programmable envelope. Separately,
each filter provide a 12 dB per octave slope (2 pole). Combined, they operate as a 4
pole filter with a 24 dB per octave slope.
•
ROM and RAM Sounds
The permanent memory (ROM) houses 6 Megabytes of Waveform, the basic element
which provides more than 500 Rom Sounds.
2 Megabytes of Sample RAM are ready to receive (from disk or M IDI ) other Waveforms, for the creation of Sounds based on new Waveforms created with the Sample
Translator.
The new Waveforms can be loaded from Atari/MS-DOS floppy disks in the formats
Sound Designer, Avalon, Sample Vision, Wave. They can be loaded from Akai S1000
disks, or received via MIDI.
The Sound Library is where the Sounds are housed. It can contain up to 2048
Sounds (ROM + RAM Sounds).
•
Amount of RAM
The S Series units are fitted with 4 Megabytes of R AM (volatile):
– 2 Megabytes of Operative-Ram to process and control the Banks and the Songs;
– 2 Megabytes of Sample-Ram to control the Waveforms created with Sample Translator or loaded with the R AM -Sounds.
•
2 Digital Signal Processors
Two Digital Effects Processors, controlled in real time, enrich the sound with environ-
2
INTRODUCTION
mental and creative effects (reverbs and modulations). The Effects Libraries house the
Effects and they can store up to 64 reverbs and 64 modulations.
•
Sequencer
The multi-track sequencer can memorise 250.000 events in the 2 Megabyte OperativeR AM . This 16 track sequencer has a very extensive Event Edit facility, including the
functions Master Track, Copy, Insert/Delete Events, Quantize, Microscope and others.
•
Disk drive
The S Series Music Processor data can be saved to floppy disk via the disk drive,
which handles 3.5” HD floppy disks and force-formats them with a capacity of 1.62
Megabytes. The drive can also format and use Ms-Dos floppy disks (1.44 Mb or 720
Kb) or Atari (720 Kb), for the transferring of MIDI Files and Samples read by Sample
Translator.
•
R AM -disk
The S Series Music Processor can be fitted with a 512 kb or 2 Mb optional Static R AM
( NON - VOLATILE ), backed by a small rechargeable Nickel/Cadmium battery. The R AM disk is a fixed disk with high speed accessing facilities.
•
M IOS multitasking operating system
The S Series Music Instrument Operating System allows simultaneous operation of
several tasks, such as modifying a Sound, playing back a Song, loading a Song in
background, etc..
•
User Program
The MIOS can be expanded by User Programs, made available from time to time by
Generalmusic, providing the instrument with additional functions by loading appropriate software via floppy disk.
•
Advanced M IDI control
The S Series Music Processors incorporate 2 independent MIDI lines with M IDI -Merge
and M IDI -Thru functions. These instruments are fully implemented MIDI units.
•
SampleTranslator 2.0 incorporated
SampleTranslator is a Waveform creating programme which allows the creation of
new Sounds starting from samples originating from Akai S1000 floppies, from
floppies containing files generated by the more popular computer editors, or from data
received via M IDI .
•
Samples and Programs read from Akai S1000™ floppy disks
The possibility of reading the Akai format allows the S Series instruments to gain
access to the greatest sample library available on the market. The Programs
(multisamples) are converted into Music Processor Waveforms.
How to use this manual
This manual is divided into several sections.
❑ Overview of the instrument and the edit/handling environments describes the sound
synthesis technique and how the data handling operations are organised.
❑ Installation, power up, demo explains how to setup and turn on the instrument and
how to listen to the demonstration songs (demo).
❑ User interface/selection explains how to use the Data Entry controls, examines the
display and takes a look at the operations common to sound and data selection.
❑ Practical guide is a simplified guide for the non-expert synth user. The information
contained in this section is sufficient for a normal use of the instrument: how to load
songs and new Sounds from disk, how to record and play back a song, how to control
INTRODUCTION
3
the instrument via MIDI.
❑ Sample Translator is the practical guide to the Sample Translator 2.0.
❑ Reference guide lists all the edit environment parameters and describes the instrument
and all its functions in detail.
❑ Appendix contains schematic information (standard Sound Library, M IDI tables,
technical specifications...).
❑ Glossary/Index contains the Glossary and an Alphabetical Index. The Glossary provides a list of the most commonly used technical terms. The alphabetical index lists all
arguments dealt with in alphabetical order, indicating the relative page number and its
relation to other arguments. This section also contains a Troubleshooting table to help
you solve problems of a technical nature which may occur from time to time.
Convention used in the manual
The appearance of the symbols “S2/S3” or “S2R” indicate that the paragraph which
follows is dedicated only to S2/S3 or S2R respectively.
The symbol (s.) indicates the presence of a detailed explanation of the argument in
another part of the manual or glossary.
The symbols “Rom-” or “Ram-” cited before “Sound” or “Waveform” indicate, respectively, that the elements are contained in the instrument’s Rom (and, therefore, are a
standard part of the instrument’s library), or in Ram (and, therefore, erasable and exchangeable).
4
INTRODUCTION
LAYOUTS
❏
2
LAYOUTS
-
S2/S3 Front panel
S2/S3 Rear panel
S2R Front panel
S2R Rear panel
5
FRONT
PANEL
S2/S3
1
2
3
FUNCTION CONTROLLERS
MASTER
VOLUME
A
B
C
D
EDIT
E
F
G
4
SOURCE
PERF. CONTR.
SOLO
PERF. TRACKS
LOCAL
SOUND
MIDI IN
A
MUSIC PROCESSOR
B
A
B
C
C
SONG
SONG
OPTION
OPTION
D
D
E
E
F
F
G
G
USER
1
2
3
4
5
6
7
PANEL
VOLUME
ATTACK
RELEASE
FILTER 1
FILTER 2
PAN
SHOW
TRACK
GENERAL
TRANSPOSER
21
EFF. BYPASS
20
22
23
24
1. VOLUME. Slider to regulate the general volume.
2. FUNCTION CONTROLLERS. Sliders and keys that control
the sound parameters. The Function Controllers marked A, B, C,
D, E, F, G, correspond to the silk-screened letters on the left of
the display; each letter relates to one of the tracks that appear in
the display.
3. EDIT SECTION. These buttons gain access to the edit
environments:
– PERF.CONTR allows the programming of the general
Performance parameters (effects, footswitch) and the
Function Controllers.
– PERF.TRACKS gains access to the programming tasks of the
Performance tracks (MIDI channels, configuration, volume,
transpose, delay, aftertouch, footswitch activation, audio
outputs, MIDI filters).
6
LAYOUTS
– SOUND allows the modification of the Sound assigned to the
currently selected Track and gains access to the Sample
Translator.
– SONG controls the sequencer. Pressing this button gains
access to the “Playback” display, which shows the Song
Pointer in playback mode. From here you can gain access to
the Edit of the currently selected song.
– OPTION is available for future expansion programs loaded
from disk (User Programs).
– GENERAL controls all the general keyboard parameters:
keyboard transpose and tuning, footswitch polarity, MIDI
parameters, Data/Time, compatibility General Midi On/Off
switch.
4. SOURCE SECTION. Allows the independent check and edit
of the Track configurations relating to each Source. The Sources
RECORD
5
6
7
8
9
PERFORMANCE
PANIC
UNDO
A
A
B
B
C
ABC
DEF
GHI
1
2
3
JKL
MNO
PQR
4
5
6
STU
VWX
YZ*
7
8
BANK / SONG
1
2
1
2
3
4
3
4
5
6
5
6
7
8
7
8
9
10
9
10
UTILITY
PRELOAD
9
C
D
D
,./
1/>
E
&( )
0
E
F
G
’-
F
1/<
G
ENTER
EXIT
NORMAL
CLIPBOARD
SOUND
STOP
PLAY
<<
>>
CLOCK
19
DISK
LIBRARY
EFFECTS
LIBRARIES
MASTER TRANSPOSE
MIDI OFF
18 17 16 15 14 13
are the origins of MIDI DATA which control the sound generation:
keyboard (LOCAL), events received at Midi In (MIDI IN), internal
sequencer (SONG), future expansions (OPTION).
5. DISPLAY AND ASSOCIATED CONTROLS. The backlit
LCD display has dimensions of 240 x 64 pixel. The triangular
buttons on the left select the tracks (TRACK SELECT KEYS), the
buttons on the right operate according to the commands and
options which appear in the display (FUNCTION KEYS).
The two small rectangular buttons on the left allow you to bring
into view, on seven lines, 16 tracks of the current Performance
(TRACK SCROLL BUTTONS). The two small rectangular buttons on
the right operate according to the commands which appear in the
display (MULTIFUNCTION BUTTONS).
When the main display is showing (the one that appears after
powering up) the FUNCTION KEYS select the viewing mode
b
#
12
11
10
(Performance or Sounds). In Sounds mode (as shown in the
illustration), these buttons select the track playing mode (Single,
Multi…). The RIGHT MULTIFUNCTION BUTTON gains access to the
Save Performance command.
6. DATA ENTRY SECTION. This section is divided into two
distinct parts:
– the DIAL can be rotated freely in both directions to change
the current data value continuously, to change Performance
or Sound, to move the reverse-highlighted cursor within the
edit page menus. The +1/> and -1/< buttons operate in
exactly the same manner as the Dial, but increases or
decreases data in single units.
ENTER confirms data entered or commands; in edit environments, it gains access to parameters that require modifications. EXIT annuls values inserted or cancels some commands.
S2/S3 Front panel
7
– the ALPHANUMERIC KEYPAD is used to specify absolute
numeric data or alphabetic data. For numeric data entry,
confirmation with ENTER is always required. It is also used to
gain direct access to the menu parameters in edit environments (without the use of ENTER).
The Data Entry section also makes use of the UNDO function. UNDO
undoes or reverses the most recent action or restores the last
saved situation. There is also an UNDO specific to the sequencer.
7. PANIC. Emergency button which sends an “All Note Off”, a
“Reset Controls” and an “unlock” message to notes and controls
“locked” by, for example, the reception of a “bad” MIDI event.
8. PERFORMANCE. Performance select buttons.
9. BANK/SONG. Bank/Song select buttons.
10. PRELOAD. Allows background song loading (while the
sequencer is in playback).
11. UTILITY. Gains access to several useful applications: change
Performance or Bank/Song name, cancel Bank/Song and
Performance, copy Bank/Song and Performance.
12. MASTER TRANSPOSE. General transposer, in semitone
steps.
13. MIDI OFF. Allows the temporary disconnection of the MIDI
ports (when the led is on).
14. EFFECTS LIBRARIES. Storage facilities for the Effects,
one for the Reverberations and another for the Modulations.
15. SOUND LIBRARY. An archive which stores all the Sounds
in the instrument’s memory. Incorporated are functions which
permit the importation of single Sounds from floppy disks
containing other Sound Libraries (imp_disk and imp_ramd).
16. DISK. Gains access to all the data handling procedures on
floppy disk and Ram-disk. The operations are Load, Save, Erase
and a Utility menu with several functions (Format, Disk Name,
MIDI-file conversion).
17. CLIPBOARD. An application which allows “clips” of edit
situations to be stored and used in other edit environments to save
time.
18. NORMAL. Returns to the main display from any situation.
19. CONTRAST. Controls the brightness of the display and
requires adjustment for different viewing angles.
20. EFF. BYPASS. A temporary deactivating device for the
Effects (led on) - the sounds are emitted “dry” from the Stereo
Left & Right Outputs. Normally (led off), the sounds are emitted
“wet” from this output pair.
21. TRACK TRANSPOSER. Individual and independent Track
Transposer. Also provides the “Master” command which gains
access to the general transposition of the instrument.
22. DISK DRIVE. Reads and formats 3.5” HD floppy disks
(force-format to 1.62 Mb) for the saving and loading of S Series
data. Also formats, reads and writes on 3.5” DD floppies (MsDos or Atari) for MIDI-file data exchange. Recognises and loads
samples from Akai S/1000 format disks.
23. WHEELS. Two wheels completely and independently
programmable. The left Wheel is predisposed for Pitch Bend and
is spring loaded to return to the centre position. The right wheel,
normally assigned to provide Modulation, is centre-dented so that
you can take it exactly to centre position. Its normal position is
with the centre-dented mark at its lowest point to avoid hearing
Sounds with Modulation.
24. PHONES. Stereo headphones socket.
CAUTION
RISK OF ELECTRIC SHOCK
DO NOT OPEN
AVIS:
1
8
LAYOUTS
2
!
RISQUE DE CHOC ELECTRIQUE-NE PAS OUVRIR
“WARNING” TO REDUCE THE RISK OF FIRE OR ELECTRIC
SHOCK DO NOT EXPOSE THIS PRODUCT TO RAIN OR MOISTURE
“COMPLIES WITH THE LIMITS FOR A ”CLASS B“ COMPUTING
DEVICE PURSUANT TO SUBPART J OF PART 15 OF FCC RULES”
MOD.
N
SER.
D Fl
AC ~
MADE IN ITALY by GENERALMUSIC S.p.A.
REAR
PANEL
S2/S3
1. POWER SWITCH. Small rocker switch with On/Off positions.
4. PEDAL / FOOTSWITCH 1 & 2. Connections for continuous
control Pedals (to control parameters such as Volume, Expression, etc.), or Footswitch pedals (switch control pedals) to control
parameters such as Damper, Start/Stop, Performance advance,
etc.. The programming facilities of the pedals are found in EDIT
PERFORMANCE/CONTROLS, EDIT PERFORMANCE/TRACKS, EDIT GENERAL.
2. MAINS SOCKET. Connect the supplied power cable to this
socket. Connect the other end to an AC outlet of the correct
voltage.
Warning: check for the correct voltage before connecting your
instrument. The correct voltage is silk-screened close to the
mains socket.
5. MIDI PORTS. A double series of MIDI ports: MIDI IN 1&2, MIDI
OUT 1&2 and MIDI THRU 1&2. Set “1” are active by default. The
MIDI ports allow S2/S3 to be controlled by external MIDI
controlling units and allow slaved devices to be controlled by S2/
S3.
2. OUTPUTS. Audio outputs which can operate as six separate
mono outputs or as three stereo pairs.
LEFT/RIGHT: “wet” signal emitters. The instrument checks the
insertion of the jacks; if only one output is connected, the
complete mono signal is emitted from the relative socket.
IN 1 – IN 2: connections for any MIDI controlling device
(master keyboard, sequencer, guitar controller, Midi Accordion …).
OUT 1 – OUT 2: connections for instruments slaved to the S2/
S3 which can be controlled by S2/S3’s internal sequencer. If
MIDI-MERGE is active, these ports also transmit the MIDI data
received at MIDI IN.
1, 2, 3, 4: “dry” signal emitters.
3. PEDAL VOLUME. Connection for a continuous control pedal
to control the general Volume.
THRU 1 – THRU 2: the data received at MIDI IN escape from
these ports.
OUTPUTS
4
3
2
1
PEDAL
RIGHT
LEFT
VOLUME
PEDALS / FOOTSWITCHES
2
1
MIDI
IN 2
OUT 2
THRU 2
IN 1
OUT 1
THRU 1
MUSIC PROCESSOR
3
4
5
6
S2/S3 Back panel
9
PANEL
3
4
EDIT
SOURCE
PERF. CONTR.
SOLO
PERF. TRACKS
LOCAL
SOUND
MIDI IN
SONG
SONG
OPTION
OPTION
GENERAL
TRACK
TRANSPOSER
PHONES
VOLUME
S2R
5
EFF. BYPASS
RECORD
U
S
PLAY
I
C
P
<<
R
O
C
>>
E
S
S
CLOCK
O
R
®
GEN
ERA
LM
US
M
STOP
IC
FRONT
1
2
18
17
1. PHONES. Stereo headphones socket.
2. VOLUME. Slider to regulate the general volume of S2R.
3. EDIT SECTION. These buttons gain access to the S2R edit
environments:
– PERF.CONTR. allows the programming of the general
Performance parameters (effects, footswitch) and contains
the Function Controller “software”.
– PERF.TRACKS gains access to the programming tasks of the
Performance tracks (MIDI channels, configuration, volume,
transpose, delay, aftertouch, footswitch activation, audio
outputs, MIDI filters).
– SOUND allows the modification of the Sound assigned to the
currently selected Track and gains access to the Sample
Translator.
– SONG controls the sequencer. Pressing this button gains
access to the “Playback” display, which shows the Song
Pointer in playback mode. From here you can gain access to
the Edit of the currently selected song.
– OPTION is available for future expansion programs loaded
from disk (User Programs).
10
LAYOUTS
16
– GENERAL controls all the general parameters: S2R transpose
and tuning, footswitch polarity, MIDI parameters, Data/Time,
Sound Test, compatibility General Midi On/Off switch.
4. SOURCE SECTION. Allows the independent check and edit of
the Track configurations relating to each Source. The Sources are
the origins of MIDI DATA which control the sound generation:
keyboard (LOCAL), events received at Midi In (MIDI IN), internal
sequencer (SONG), future expansions (OPTION).
5. DISPLAY AND ASSOCIATED CONTROLS. The backlit
LCD display has dimensions of 240 x 64 pixel. The triangular
buttons on the left select the tracks (TRACK SELECT KEYS), the
buttons on the right operate according to the commands and
options which appear in the display (FUNCTION KEYS).
The two small rectangular buttons on the left allow you to bring
into view, on seven lines, 16 tracks of the current Performance
(TRACK SCROLL BUTTONS). The two small rectangular buttons on
the right operate according to the commands which appear in the
display (MULTIFUNCTION BUTTONS).
When the main display is showing (the one that appears after
powering up) the FUNCTION KEYS select the viewing mode
(Performance or Sounds). In Sounds mode (as shown in the
6
7
8
6
9
PANIC
ABC
DEF
GHI
UNDO
JKL
MNO
PQR
STU
VWX
YZ *
,./
’-
&( )
1/>
1/<
PERFORM.
B/SONG
The Data Entry section also makes use of the UNDO function. UNDO
undoes or reverses the most recent action or restores the last
saved situation. There is also an UNDO specific to the sequencer.
7. PANIC. Emergency button which sends an “All Note Off”, a
“Reset Controls” and an “unlock” message to notes and controls
“locked” by, for example, the reception of a “bad” MIDI event..
UTILITY
8. B/SONG and PERFORM. The B/SONG and PERFORM buttons
permit the selection of one of the 10 Bank/Songs which can be
present in the S2R memory and one of the 10 possible Performances contained in the selected Bank/Song.
9. UTILITY. Gains access to several useful applications: change
ENTER
NORMAL
EXIT
CLIPBOARD
DISK
SOUND
LIBRARY
EFFECTS
LIBRARIES
PRELOAD
Performance or Bank/Song name, cancel Bank/Song and
Performance, copy Bank/Song and Performance.
10. PRELOAD. Allows background song loading (while the
sequencer is in playback).
OFF
20
19
15
14
ON
13
12
11
10
11. EFFECTS LIBRARIES. Storage facilities for the Effects, one
for the Reverberations and another for the Modulations.
12. SOUND LIBRARY. An archive which stores all the Sounds in
the instrument’s memory. Incorporated are functions which
permit the importation of single Sounds from floppy disks which
contain other Sound Libraries (imp_disk and imp_ramd).
13. DISK. Gains access to all the data handling procedures on
floppy disk and Ram-disk. The operations are Load, Save, Erase
and a Utility menu with several functions (Format, Disk Name,
MIDI-file conversion).
illustration), these buttons select the track playing mode (Single,
Multi…). The RIGHT MULTIFUNCTION BUTTON gains access to the
Save Performance command.
6. DATA ENTRY SECTION. This section is divided into two
distinct parts:
– the DIAL can be rotated freely in both directions to change
the current data value continuously, to change Performance
or Sound, to move the reverse-highlighted cursor within the
menu of the edit pages. The +1/> and -1/< buttons operate in
exactly the same manner as the Dial, but with single
increments.
ENTER confirms data entered or commands; in edit environments, it gains access to parameters that require modifications. EXIT annuls values inserted or cancels some commands.
Pressing ENTER when a main display is showing, or when the
Sample Translator is active, will play a note (Sound Test).
– the ALPHANUMERIC KEYPAD is used to specify absolute
numeric data or alphabetic data entry. For numeric data
entry, confirmation with ENTER is always required. It is also
used to gain direct access to the menu parameters in edit
environments (without the use of ENTER).
14. CLIPBOARD. An application which allows “clips” of edit
situations to be stored and used in other edit environments to save
time.
15. NORMAL. Returns to the main display from any situation.
16. CONTRAST. Controls the brightness of the display and
requires adjustment for different angles.
17. EFF. BYPASS. A temporary deactivating device for the
Effects (led on) - the sounds are emitted “dry” from the Stereo
Left & Right Outputs. Normally (led off), the sounds are emitted
“wet” from this output pair.
18. TRACK TRANSPOSER. Individual and independent Track
Transposer. Also provides the “Master” command which gains
access to the general transposition of the instrument.
19. DISK DRIVE. Reads and formats 3.5” HD floppy disks
(force-format to 1.62 Mb) for the saving and loading of S2/S3
data. Also formats, reads and writes on 3.5” DD floppies (MsDos or Atari) for MIDI-file data exchange. Recognises and loads
samples from Akai S/1000 format disks.
20. ON/OFF PUSH BUTTON. Press this button to turn S2R on or
off.
S2R Front panel
11
IN 2
GEN
ERA
LM
®
US
IC
OUT 2
OUT 1
D Fl
N
THRU 1
P R O C E S S O R
IN 1
MADE IN ITALY by GENERALMUSIC S.p.A.
MIDI
M U S I C
THRU 2
MOD.
SER.
AC ~
1
4
3
“WARNING”
2
RIGHT
LEFT
PEDAL
VOLUME
FOOTSWITCHES
2
1
4
AVIS:
CAUTION
RISK OF ELECTRIC SHOCK
DO NOT OPEN
RISQUE DE CHOC ELECTRIQUE-NE PAS OUVRIR
5
Warning: check for the correct voltage before connecting your instrument. The correct
voltage is silk-screened close to the mains socket.
5. MAINS SOCKET. Connect the supplied power cable to this socket. Connect the
other end to an AC outlet of the correct voltage.
to control parameters such as Damper, Start/Stop, Performance advance, etc..
4. FOOTSWITCHES 1 & 2. Connections for Footswitch pedals (switch control pedals)
Volume.
3. PEDAL VOLUME. Connection for a continuous control pedal to control the general
1, 2, 3, 4: “dry” signal emitters.
if only one output is connected, the complete mono signal is emitted from the
relative socket.
3
THIS DEVICE COMPLIES WITH PART 15 OF THE FCC RULES. OPERATION
IS SUBJECT TO THE FOLLOWING TWO CONDITIONS:
(1) THIS DEVICE MAY NOT CAUSE HARMFUL INTERFERENCE AND
(2) THIS DEVICE MUST ACCEPT ANY INTERFERENCE RECEIVED,
INCLUDING INTERFERENCE THAT MAY CAUSE UNDESIRED OPERATION.
OUTPUTS
2
1
TO REDUCE THE RISK OF FIRE OR
ELECTRIC SHOCK DO NOT EXPOSE THIS
PRODUCT TO RAIN OR MOISTURE
1. MIDI PORTS. A double series of MIDI ports: MIDI IN 1&2, MIDI OUT 1&2 and MIDI
THRU 1&2. Set “1” are active by default. The MIDI PORTS ALLOW S2R to be controlled
by external MIDI controlling units and allow slaved devices to be controlled by S2R.
IN 1 – IN 2: connections for any MIDI controlling device (master keyboard,
sequencer, guitar controller, Midi Accordion …).
OUT 1 – OUT 2: connections for instruments slaved to the S2R which can be
controlled by S2R’s internal sequencer. If MIDI-MERGE is active, these ports also
transmit the MIDI data received at MIDI In.
THRU 1 – THRU 2: the data received at MIDI IN escape from these ports.
three stereo pairs.
2. OUTPUTS. Audio outputs which can operate as six separate mono outputs or as
LEFT/RIGHT: “wet” signal emitters. The instrument checks the insertion of the jacks;
LAYOUTS
12
S2R
PANEL
REAR
OVERVIEW OF THE INSTRUMENT
EDITING & DATA HANDLING CAPACITY
❏
3
OVERVIEW OF THE INSTRUMENT
-
The Music Processor concept
Sound synthesis
Sources and Destinations
Tracks, Performances, Bank/Songs
❏
INTERNAL MEMORY AND DISKS
❏
OPERATING MODES
❏
OVERVIEW OF THE EDITING & DATA HANDLING ENVIRONMENTS
13
OVERVIEW
OF THE INSTRUMENT
The Music Processor concept
The S Series instruments are so called because they are,
as the name suggests, processors of music, a long step
away from synthesizer workstations.
These instruments allow the creation of new sounds (as
in synthesizers), the creation of Songs and the possibility of simplifying the unit’s programming tasks in live
situations (as in workstations), they incorporate a sophisticated MIDI implementation, which allow them to
operate as a control centre in the studio as well as on
stage, operating as a programmable master keyboard or
a MIDI processor with powerful MIDI Thru and MIDI
Merge functions.
Sound synthesis
The sound generation of the Generalmusic S Series
instruments utilises a hybrid system based on sampling
and subtractive synthesis, all digitally controlled.
A the Attack phase, which starts from the moment of
the initial sound emission (key on) to the moment of
maximum intensity. [ → Attack]
• Sampling guarantees a high degree of sound authenticity, indispensable for the simulation of multi-instrument situations as well as for the simplification of
sound creation starting from common timbral sources.
D the Decay phase, in which the emission starts to
“fade” after reaching the maximum peak. [ → Decay]
• The part relating to subtractive syntheses allows sounds
of real or synthetic origin to be subjected to the action
of one or two programmable filters, which deeply intervene on the harmonic content of the original sound,
rendering it extremely “live”.
Sampling
Sampling technology is a technique of recording sounds
“live”, which permits the reconstruction of the original
acoustic instrument using an electronic musical instrument.
The development over time of the intensity of a sound is
represented by the envelope. The Envelope of a sound any sound - can be represented graphically in the following manner:
Amplitude A
R
Time
“Amplitude” measures the intensity reached by the sound
within a certain period of “Time”. The letters A, D, S, R
indicate the various phases of the sound’s development:
14
OVERVIEW
R the Release phase, which proceeds from the moment
in which the action of the musician terminates (note
off), and the emission continues towards total silence. For example, when a piano key is released
with the right pedal held down. [ → Release]
Sampling records the entire attack and decay phases and
only a part of the sustain phase, while the release is
completely ignored. This limitation in sampling is due
to the fact that the recording of a sound occupies RAM,
which, being costly, cannot be exploited to record the
entire envelope. The better the quality of the sample, the
more RAM is required to contain it.
The “missing parts” are substituted by intervening on
the recorded part with the musical instrument. The
sustain phase is electronically simulated by repeating a
sampled fragment. This repetition of the sampled fragment in the sustain phase is called the “Loop”.
D
S
S the Sustain phase (sound “prolongation”), where,
after the first turbulent instances, the emission tends
towards stabilisation (e.g. Strings) or reduction (e.g.
Piano). [ → Sustain]
The loop, however, often generates a “defect” created
by the interaction of the terminal and initial points of
the sampled fragment - similar to what is heard when the
needle of a vinyl disk jams.
The problem derives from the fact that the “loop” is only
one element, based on a single fragment of the sustain
phase. To overcome this problem, Generalmusic have
adopted an innovative system called the “Multiloop”
technique, which is the sampling of 8 minute fragments
of the sustain phase.
In sounds generated by two paired oscillators, the S
Series reads the loops alternately with increasing fading
(“crossfade”) between the two oscillators. Crossfading
completely eliminates the disturbances created by the
loop.
Waveforms
When an acoustic sound is sampled and played on a
keyboard, the sound can only be used on notes that are
close to the sample note. The greater the distance from
the sample note, the more inferior the quality of the
sound.
By combining a series of samples at various frequencies
along the scale, otherwise called a multisample, you
obtain a Waveform.
The high authenticity of the S Series sounds is due to the
fact that they are based on Waveforms consisting of
several Samples which cover the frequency extension of
the original acoustic instrument.
The harmonic band is called the “timbre”. The timbre of
a double bass differs to that of a trombone, because their
respective harmonic bands are different. If some harmonics are removed, or their intensity altered, the timbre of the sound also changes.
The technique of synthesis incorporated in S Series
instruments treats the Waveforms in the same manner as
the “old” analog synthesizers, which intervened on the
elementary waveforms (sinus, square, saw-tooth). The
Waveform is modified by the action of one or two filters
[ → DCF]. These filters attenuate or enhance several
harmonics. The example shows how the higher harmonics of a sound are “filtered” and attenuated until they
disappear:
level
frequency
Filters and Sounds
All sounds consist of a band of harmonics; very simple
sounds that, when combined with one another, contribute to the production of a complex sound (the sound
actually heard). The harmonic band can be analysed
with the Fourier diagram:
level
DCF
level
frequency
The diagram shows the harmonic bands along the “frequency” axis and the length of the bars that represent
them correspond to their intensity (“level”) and to their
importance in the sound that we hear. The harmonic
band shown with the greater intensity is known as the
fundamental and its pitch coincides with the audible
sound.
frequency
The filters intervene on the Waveform by modifying the
harmonic band and consequently its timbre. The filters
of the S Series are programmable and they can change in
time with an envelope, as occurs with the intensity of
the sound.
The sound processed by the S Series filters is called,
simply, a Sound, and this constitutes the basic sonic
material.
Overview of the instrument
15
Bank/Songs and Performances
The Sounds can be combined to form “Performances”,
and stored in slots called “Bank/Songs”.
controlled by data received at MIDI In.
The Performance, therefore, is a “global setting” corresponding to a complex instrumental setup, recalled instantly while playing or while recording a Song.
Up to 10 Banks of 10 Performances each can be memorised in the Music Processor’s RAM, a total of 100
multi-timbral Performances.
Bank/Song
Performance
The Bank/Song consists of two parts: a bank of 10
Performances and a Song. The Song exploits the Performances of the Bank to which it is associated.
The Performance is a combination of several tracks with
various “playing” parameters (volume, pan, programmed
pedal configuration, DSP activation.....).
The sequencer controls which control the Song playback are situated under the display:
In the Performance, a Sound and/or a MIDI OUT channel is assigned to each Track. For each Track, it is
possible to independently programme various parameters ( example: the volume and pan).
RECORD
In practice, the Performance is a combination of several
Sounds “mixed” in order to obtain a complex sound to
use live, or a multi-timbral combination to use in a
Song, or another multi-timbral combination that can be
STOP
<<
PLAY
>>
CLOCK
The Music Processor can store up to 10 Bank/Songs in
RAM.
Tracks
The Track playing mode
Each Performance can simultaneously memorise four
different track playing modes, one for each of the four
possible origins (Sources) of MIDI events (Source s.
further ahead).
Each Performance consists of a maximum of 16 tracks which
can be arranged in various different ways. The way in which
the tracks can be arranged is called the “playing mode”.
• layer is an overlapping paired track combination;
For example, the Track playing mode for the Local
Source could be set to Single mode, in order to play a
piano Sound with the keyboard; for the Song Source, the
Track playing mode could be set to Multi, so that the
internal sequencer could play a 16 part multi-timbral
song.
• split is a combination of two tracks which divide the
keyboard.
To view the playing mode set for each Source, press the
relative button in the “Source” section: by pressing one
There are four track playing modes:
• single is a single track situation;
• multi is a multitrack combination;
1
=
P
ia
n
o
s
Fig. 1: Examples of different track playing modes for the various Sources
16
OVERVIEW
N
O
G
PT
I
N
O
SO
T
1
T =P
2
ia
T = B no
3
a
T = P ss
4
= ad
S s
tr
in
g
T
ce
e
T =P
2
ia
T = B no
3
a
T = P ss
4
= ad
S s
tr
in
g
ur
c
1
so
ur
T
T
so
so
u
so
ur
rc
ce
e
M
LO
ID
C
II
A
N
L
PERFORMANCE
s
...
1
T =P
2
ia
T = B no
3
a
T = P ss
4
= ad
S s
tr
in
g
s
Track configuration
The MIDI data are also processed by a MIDI Delay
which retards the sending of the data to the Destinations, creating a situation of “postponed playing”, used
to generate replay effects between the tracks.
Each track can be connected to or disconnected from
one or more Sources and to/from the track data Destinations.
The Sounds are directed to the two DSPs (effects processors) which further process the signals by adding
reverberation, delay, chorus, echo or rotary to the Sound
of each track.
of the buttons, the main display will change to show the
track playing mode for the selected Source.
For example, if track 1 is connected only to the Local
Source (keyboard or master keyboard) and only to the
destination “Generation” (internal Sound engine), the
keyboard will be able to play one of the Music Processor
Sounds. The remaining fifteen tracks could be connected to the MIDI IN Source and to both the Destinations “Generation” and “MIDI OUT”, in order that an
external controlling device can play the Music Processor Sounds and transmit the MIDI messages from the
Music Processor’s MIDI OUT to play an external expander.
Furthermore, the pitch of each track is individually
programmed to obtain octave “duplication” or pitch
adjustments.
Finally, the MIDI data are sent to MIDI OUT, with the
volume and pan settings, while the Sounds are destined
to the Audio Outputs and, subsequently, to an external
amplifier (Fig. 2).
“Mute” and “Solo”
As in any respectable mixer, the tracks in the S Series
can be “muted” directly from the principal display. This
condition is a temporary disconnection of the Source
which finds it use in many applications. For example,
while a Song is in playback mode, you can mute some
tracks of the Song Source to listen to those remaining.
The same applies to the other Sources: you can mute
tracks of the Local , of the MIDI In …
The Track Configuration, therefore, is a network of
connections between Sources and Destinations.
Multi-timbral
To each of the 16 tracks, it is possible to assign a Sound
and/or a MIDI channel with which you can pilot another
musical instrument. In practice, the Music Processor is
a combination of 16 different instruments. Instruments
able to operate with several different channels are otherwise known as Multi-timbral instruments.
Another function, “SOLO”, operates in an inverse manner: it isolates a single track in multitrack situations,
permitting you to hear the selected track while all others
are muted.
The mixer
The MIDI data that converge on the tracks are processed
as in a mixer. Before being sent to the Destinations, they
are processed by the volume and transposition controls
and by the stereo panorama positions (Pan).
T1
T2
T3
T4
T5
T6
T7
T8
T9
T10
T11
T12
T13
T14
T
Volume
Pan
Effects
L
R
L
R
L
R
L
R
L
R
L
R
L
R
L
R
L
R
L
R
L
R
L
R
L
R
L
R
L
Reverb
Modulation
Audio Outputs
Fig. 2: The internal mixer
Overview of the instrument
17
Sources and Destinations
MIDI events
Music Processor’s internal sequencer (which is precisely a MIDI data recorder).
A master keyboard or a sequencer sends a string of
MIDI data to the Music Processor’s computer; these are
instructions on the way in which the Sounds must be
played. The MIDI data can also be recorded by the
LOCAL
MIDI IN
…
GENERATION
Tracks
(1~16)
SONG
MIDI data, or “events”, are generated by the Sources,
they are controlled by the Tracks and, finally, they are
sent to the Destinations: (Fig. 3)
OPTION
MIDI OUT
SONG
…
OPTION
Fig. 3: Transit of MIDI data (SOURCES —> TRACKS —> DESTINATIONS)
Sources
The Sources are the M IDI event generators. There are
four Sources, each one corresponding to a device capable of generating the data:
•
LOCAL
•
MIDI IN
•
•
SONG
OPTION
keyboard or master keyboard (via M IDI -C OMMON ).
data entering at M IDI I N (an external
sequencer or a multi-split master keyboard).
internal sequencer.
(left at the disposal of a User Program).
LOCAL
MIDI IN
Tracks
(1~16)
SONG
…
OPTION
T1
T2
T3
T4
T5
T6
T7
T8
T9
…
Fig. 4: Map of the SOURCES —> TRACKS communications
Destinations
The Destinations are where the MIDI data are sent.
There are four Destinations, each corresponding to a
sound generator or recorder of data:
GENERATION
MIDI
SONG
OPTION
internal
sound generator.
MIDI
OUT
ports.
internal
sequencer.
(left at the
disposal of a
User
Program).
Tracks
(1~16)
T1
T2
T3
T4
T5
T6
T7
T8
T9
…
GENERATION
MIDI OUT
GrandPiano
Strings1
AcoustcBass
Shakuhaki
Nyl_Guitar
Contrabass
Timpani
Trombone
FrenchHorn
…
Out 1, Channel 1; ProgramChange 1
Out 1, Channel 2; ProgramChange 49
Out 1, Channel 3; ProgramChange 33
Out 1, Channel 4; ProgramChange 78
Out 1, Channel 5; ProgramChange 25
Out 1, Channel 6; ProgramChange 44
Out 1, Channel 7; ProgramChange 48
Out 1, Channel 8; ProgramChange 57
Out 1, Channel 9; ProgramChange 61
…
Fig. 5: Map of the TRACKS —> DESTINATIONS communications
18
OVERVIEW
INTERNAL
MEMORY AND DISKS
Overview of the data and the memorising
facilities (floppy disk and RAM-disk)
The data are organised in memory and in the disks
according to the type and order of hierarchy.
As in any computer, the Music Processor is an elaborator of data, which consist of Sounds, Songs and any
other element or parameter used during the elaboration
or execution.
The structure of the disk data is as follows:
The data can be utilised for the purpose of elaboration
for playing, or they can be memorised for future use.
The “physical environment” which houses the data during the course of an elaboration or execution is the
RAM, or the instrument’s operative memory. The S
Series RAM is divided into two parts:
FLOPPY DISK & RAM-DISK
SETUPs
General
Sound Library
Effects Libraries
Clipboard
GROUPs
10 Groups
USER PROGRAMs
10x10 Bank/Songs
10x10X10 Performances
The structure of the data in memory is as follows:
a) OPERATIVE-RAM, which is exploited by the microprocessor for every single operation, and which
contains the Sounds, the Songs, the Performances
and any other data necessary to make the instrument work;
b) SAMPLE-RAM, which, while the instrument is on,
contains the Samples loaded together with one or
more Sounds or via the Sample Translator.
RAM is volatile: all the data it contains will be irretrievably lost when the instrument is turned off. Therefore,
before turning off the instrument, this kind of data must
be saved in devices capable of conserving the data intact
for future use. These devices are the Floppy Disk and
the Ram-disk.
The floppy disk is the classic diskette which is inserted
in the instrument’s disk drive, and it serves to store your
data and to exchange it with other people or other
instruments.
The Ram-disk is a fixed internal device of the Music
Processor, which serves to memorise all data at high
speed. This device is an optional item which can be
fitted upon request in all the S Series instruments, but it
is highly advisable to install it to speed up the operations.
The exchange of data takes place in the direction Disks
<—> R AM :
RAM
SETUPs
General
Sound Library
Effects Libraries
Clipboard
GROUPs
1 Group
USER PROGRAMs
10 Bank/Songs
10X10 Performances
The data between memory and disk is completely exchangeable. The only data that can be read by the floppy
disk and not saved are the User Programs.
The data
Setups Basic settings of the instrument. These include
the General setups, the Sound Library, the Effects
Libraries (reverbs/modulations), Clipboard (edit page
“clips”).
Ram and disks are able to store only one Setup of the
same type (only one Sound Library, only one General Setup...).
Groups Bank/Song groups. Only one Bank/Song group
can be loaded at a time from disks containing up to 10
Bank/Songs.
User Programs Programs which provide the instrument with new functions.
Operative-RAM
Sample-RAM
floppy disk
RAM-disk
Overview of the instrument
19
MODES
OF OPERATION: NORMAL, EDIT/HANDLING
The instrument has two operating modes: normal, which
is the operating mode dedicated to playing, and edit/
handling, which permits the modification of data, its
memorisation and its organisation for future use.
Edit/Data Handling mode
The Edit/Data Handling mode is activated by pressing
one of the buttons of the “Edit” section ( PERF. CONTR,
PERF. TRACKS, SONG, SOUND, GENERAL) or one of the
buttons that recall data handling situations ( DISK, UTILITY, SOUND LIBRARY...).
Normal operative mode
The instrument powers up in Normal mode, which allows the primary control of the instrument through the
main display.
The main display can show the Performance (allowing
high speed selection), or it can show the Sounds assigned to the tracks which make up the Performance
(allowing their selection at high speed):
Main display - Performance mode
(default situation)
Main display - Sound mode
20
OVERVIEW
Multitasking
The S Series operating system is one based on
multitasking, making is possible to work in different
parts of the instrument simultaneously.
For example, while you are playing back a song, you can
load another (background loading), or while you are
performing editing tasks on a sample with the Sample
Translator, you can temporarily escape edit mode to
program a Performance or modify the transposition of a
track without data loss.
OVERVIEW
EDIT,
OF THE EDIT/HANDLING ENVIRONMENTS
HANDLING, UTILITY ENVIRONMENTS
When you press one of the buttons of the “Edit” group
( PERF. CONTR, PERF. TRACKS, SONG, SOUND, GENERAL) or
one of the handling or utility buttons ( SOUND LIBRARY,
EFFECTS LIBRARIES, DISK, PRELOAD...) you will gain access
to one of the edit/handling displays.
Edit/handling
environment
‘Element’ in edit
The structure and constituting elements are common to
all the edit/handling displays. The common elements
are the pages, the menus and the commands/options.
Page number
Page title
Erase
Events
Tracks
Main menu
(Edit Song)
Commands/options
Secondary menu
(Erase Events)
The pages
Pages are displays which contain a menu or a series of
parameters. Some environments consist of only one
page, others can contain more than one.
For example, the Disk environment distributes the four
principal Disk functions across four pages: Load (page
1), Save (page 2), Erase (page 3), Utility (page 4).
The presence of more pages is shown by one or two
arrows in the top right hand corner of the display, each
corresponding to one of the multifunction buttons:
(The appearance of one arrow means that the current
page is the first or last, and it is not possible to advance
further).
To return to the previous page, press the left
multifunction button; to advance to the next page press
the right multifunction button.
PAGE 4
PAGE 3
PAGE 2
PAGE 1
Overview of the edit/handling environments
21
The menus
The structure and selection of the menus
Main menu and secondary menus
The list of parameters, functions, procedures, etc. shown
at the centre of a page is called the menu. The following
display shows the main menu of the Edit Sound environment:
Some environments consist of several pages, without
secondary menu levels (example: Disk).
To select a menu item, you can choose from two methods:
•
select the item with the
•
specify the corresponding menu item on the alphanumeric keypad (for direct and instant access).
DIAL
and press
Other environment present a main menu which contains
various environment modules. By selecting one of the
modules, you gain access to a secondary menu which
contains a set of parameters or functions (example: Edit
Sound):
Edit Sound, main menu
ENTER;
Edit Sound, secondary menu relating to the Waveset module
Secondary menus show the “Menu” command, which returns to the main menu.
Commands/options
The commands and/or options appear in the right column of the various environments. These are selected
with the function keys and the items displayed vary
according to the environment and/or the page currently
showing.
Parameters
The edit pages (Performance, Sound...) which do not have secondary menus contain, instead, a list of editable
parameters which are broken down into three types: simple, multiple, graphic.
Simple parameter
This consists of a single element which can be modified:
Use the following procedure to edit the parameter:
1. Select the parameter with the DIAL and press ENTER to
activate the edit; or specify the parameter number on
the ALPHANUMERIC KEYPAD to gain direct access to the
edit:
22
OVERVIEW
2. To modify the parameter value, rotate the
DIAL ; or
specify the new parameter value on the NUMERIC
KEYPAD (in some cases, “ ENTER ” is necessary to confirm the value specified, s. User Interface section,
chapter Data Entry devices).
3. Escape from the parameter edit with
firm the new value) or with
fication):
EXIT
ENTER (to con(to annul the modi-
Multiple parameter
2. To modify the first part, rotate the DIAL; or specify the new
value on the NUMERIC KEYPAD.
This consists of several editable parts:
3. Press ENTER to gain access to the edit of the next part:
Press enter repeatedly to access each following part of
the parameter. Follow this procedure:
1. Select the parameter with the DIAL and press ENTER; or
specify the corresponding number on the
ALPHANU -
MERIC KEYPAD .
The first part of the parameter is placed in edit:
4. To modify the second part, rotate the DIAL; or specify the
new value on the NUMERIC KEYPAD ( ENTER may be necessary to confirm the value entered).
5. Escape from the parameter edit with
firm the new value) or with
fication):
EXIT
ENTER (to con(to annul the modi-
Graphic parameter
This consists of several simple parameters and graphic
representations of their interaction.
There are several different types of graphic parameter:
track configuration, envelopes, tracking. In all cases,
the “objects” are selected by rotating the dial and access
to the edit is gained by pressing enter.
In some cases (envelopes, tracking) the graph also shows
a line of numerical value of an explanatory or subsidiary
nature.
For example, modify the “Key On Envelope” graph:
1. Enter Edit Sound, select the Amplitude Envelope
module and open the second page.
The display appears are shown in the previous drawing. Each “Segment” corresponds to one of the segments of the envelope. The segment’s duration (Time)
is represented by the horizontal axis and the sound’s
intensity (Level) by the vertical axis.
2. The “Segment” parameter is shown selected. Rotate
the DIAL to select one of the segments of the envelope.
3. Press
ENTER
to select the “Time” parameter.
4. Rotate the
Edit Performance/Tracks, page 1. “Configuration”
graphic parameter.
DIAL to modify the “Time” value. Or,
specify the value on the NUMERIC KEYPAD (press ENTER to confirm or EXIT to annul).
5. Press
ENTER
to select the “Level” parameter.
6. Rotate the
DIAL to modify the “Time” value. Or,
specify the value on the NUMERIC KEYPAD (press ENTER to confirm or EXIT to annul).
7. Select “Menu” to return to the main menu (Function
Edit Sound, module AMPLITUDE ENVELOPE: Graphic
Parameter “Key On Envelope”
Select Key A). To escape Edit Sound, select the
“Abort” command with Function Select Key F.
Note: If you escape an edit/handling environment while a parameter is currently in edit, the parameter will remain in edit. If
you change page while the parameter is still in edit, the modification is confirmed and you will escape the edit of the parameter.
a - If you escape edit, the parameter will remain like this.
b - If you change page, the parameter will be confirmed.
Overview of the edit/handling environments
23
Escape from
EDIT/HANDLING
Two possibilities are available: (1) possibility of escaping without confirmation, (2) necessity of escaping with
confirmation or cancellation of the modification.
To escape from Edit Performance, Edit Song, Disk,
Sound Library, Preload... press the button which gains
access to the environment, or press the Normal button.
The “Are you sure?” display
As a security measure, before the instrument memorizes
or cancel the changes, confirmation of the operation is
always requested. When you select either “Save” or
“Abort”, the following display is shown:
From Edit Sound, Edit Sound Patch, Edit Effect, Sample
Translator, you escape by confirming or annulling the modifications applied to the data. In the commands/option column,
the two possible choices are always shown: “Save” or “Abort”.
“Save” memorizes the modifications, “Abort” cancels
them.
Analysis of two
EDIT/HANDLING ENVIRONMENTS
Analysis of the ‘EDIT SOUND’ edit environment
EDIT SOUND shows a main menu with several different
editors (each one corresponding to a Sound element):
AMPLITUDE ENVELOPE editor, page 3
Edit Sound, main menu
Each editor gains access to a page containing several
parameters. Some editort are composed of several pages.
For example, the Amplitude Envelope editor contains four
pages:
AMPLITUDE ENVELOPE editor, page 1
AMPLITUDE ENVELOPE editor, page 2
24
OVERVIEW
AMPLITUDE ENVELOPE editor, page 4
Every page of the various editors shows the “Menu” command which returns to the main menu, where you can
select another module.
While you are in Edit Sound, you can select another Edit
environment, open its entry level page and access the
relative functions. When you return to Edit Sound by
pressing the Sound button, the situation shown will be
exactly the same as it was when you left. During the
temporary escape, the led on the Sound button will flash as
a “reminder” that you have some unfinished work to do.
To escape from Edit Sound, press the Sound button, or (if
a modification has been applied to the Sound in edit),
select the “Save” command to save the changes or “Abort”
to cancel.
Analysis of the ‘DISK’ handling environment
DISK does not have any main menus: the relative functions
are grouped in four pages according to homogeneous
criteria:
Disk, page 3 (“Erase”)
Disk, page 1 (“Load”)
Disk, page 4 (“Utility”)
Access to a function is gained the instant it is selected.
To escape Disk mode, press DISK or NORMAL.
Disk, page 2 (“Save”)
Overview of the edit/handling environments
25
26
OVERVIEW
INSTALLATION, POWER UP, DEMO
4
❏
CONNECTING THE MAINS CABLE
❏
CONNECTING THE AUDIO CABLES
❏
S2R: MIDI CONNECTIONS
❏
POWER UP
❏
S2R: “SOUND TEST”
❏
DEMO
27
Connecting the power cable
Connect the power cable to the appropriate socket on the instrument’s rear panel. Insert the plug into an A.C. mains
outlet of the correct voltage.
Warning: The voltage of the instrument is shown on the small plate close to the power socket on the rear panel. Make sure
that the voltage indicated corresponds to your mains supply voltage.
Connect the Audio cables
Connecting to an external amplification system
To connect to an external amplification system, use standard 1/4” jacks connected to the OUTPUTS rear panel
sockets.
Stereo connection
Connect the LEFT and RIGHT sockets to the amplification system.
Mono connection
Connect the LEFT or RIGHT socket to the amplification system, leaving the other output free.
Separate outputs
(The outputs will require appropriate programming in EDIT PERFORMANCE /TRACKS, in order to
direct each track to a single output or to an output pair. S. Reference).
Warning: Always connect audio cables with the amplifier’s volume setting set to its lowest level or when it is switched off, in
order to avoid unwanted noises or damage to the audio setup.
Stereo headphones
Connect a set of stereo headphones to the instrument’s headphone socket.
28
INSTALLATION, POWER UP, DEMO
S2R:
CONNECTING TO A MASTER KEYBOARD
OR TO AN EXTERNAL SEQUENCER
Connecting to a Master keyboard
Connect the MIDI
PORTS
Connect the master keyboard’s M IDI O UT to the S2R’s M IDI I N .
For normal use, connect the S2R’s MIDI IN 1, MIDI OUT 1, MIDI THRU 1 ports. The MIDI IN 2, MIDI OUT 2 and MIDI THRU 2 ports require
appropriate programming in EDIT PERFORMANCE/TRACKS.
Connecting to a monosplit master keyboard (via MIDI-COMMON)
In monosplit mode, the master keyboard can be used as an integrated keyboard for the S2R. The Midi-Common is a
special channel which permits the complete control of S2R with the master keyboard. When S2R is controlled via
Midi-Common, it becomes the S2/S3 equivalent.
The master keyboard generates LOCAL events (it becomes the LOCAL Source). To see the status of the S2R tracks being
controlled by the master keyboard, the led on the LOCAL Source button must be on.
S2R powers up in Midi-Common mode (by default) with channel 1 assigned to the Midi-Common. Program the
master keyboard to transmit on Midi channel 1.
If, for technical reasons, the master keyboard cannot use channel 1 for MIDI-Common, program the S2R MIDI
Common to the same channel assigned to the master keyboard (s. EDIT GENERAL - MIDI in the Reference section).
MIDI-COMMON
Active, M IDI CHANNEL 1.
Source
LOCAL.
Connecting to a multisplit master keyboard
In multisplit mode, each split of the master keyboard can control one of the S2R tracks. By default, the S2R tracks
are set with Midi channel numbers corresponding to the track numbers (track 1 = channel 1, track 2 = channel 2...).
To activate this setting, it is sufficient to deactivate the Midi-common channel (off).
In this situation, the master keyboard acts as the MIDI IN Source. To see the status of the S2R tracks being controlled
by the master keyboard, the led on the MIDI Source button must be on.
The procedure required to deactivate Midi-common is explained in the section at the end of this chapter.
MASTER KEYBOARD
MUSIC PROCESSOR (S2R)
OUT
IN
THRU
EXPANDER
IN
Connection of a master keyboard to S2R. The optional connection Thru—In between S2R and another expander will also allow the master keyboard to
control the additional expander.
Connecting S2R to a master keyboard
29
MIDI-COMMON
Deactivated (Off)
Source
MIDI IN .
Connecting to an external sequencer
The external sequencer can be a hardware sequencer or a computer, fitted with a Midi interface, which runs a
sequencing programme.
Connecting the MIDI ports
To control S2R with the external sequencer, connect the sequencer’s Midi Out to the S2R Midi In. To exchange songs
(in both directions) between both units, connect the sequencer’s Midi In to the S2R’s Midi Out.
For normal use, connect the S2R’s MIDI IN 1, MIDI OUT 1, MIDI THRU 1 ports. The MIDI IN 2, MIDI OUT 2 and MIDI THRU 2 ports require
appropriate programming in EDIT PERFORMANCE/TRACKS.
Check the track status of the
MIDI IN
Source
In this situation, the sequencer is the MIDI IN Source. To check the status of the S2R tracks controlled by the sequencer,
the led on the Midi In button in the Source section must be on.
DEACTIVATION
OF
MIDI-COMMON
This kind of setup requires that the Midi-Common be deactivated (off) in order to render the S2R tracks individually
accessible. The procedure required to deactivate the Midi-common channel is shown at the end of this chapter.
MIDI-COMMON
Deactivated (Off)
Source
MIDI IN .
OUT
IN
Sequencer connection—S2R. In—Out is optional.
IN
OUT
IN
IN
OUT 2
OUT 1
IN
THRU
OUT
IN
A
B
MUSIC PROCESSOR
A
B
C
C
D
D
E
E
F
G
A
1
2
A
4
5
6
C
7
8
9
3
B
B
*
C
D
D
E
F
F
G
G
E
0
F
G
OUT
IN
A
B
MUSIC PROCESSOR
A
B
C
C
D
D
E
E
F
G
A
1
2
A
4
5
6
C
7
8
9
3
B
B
*
C
D
D
E
F
F
G
G
E
0
F
G
Possible connection master keyboard—sequencer—S2R.
Possible connection master keyboard—sequencer—S2R.
30
INSTALLATION, POWER UP, DEMO
How to deactivate the MIDI-COMMON channel
1. Enter Edit General by pressing the General button in
the Edit section:
4. To deactivate M IDI -C OMMON specify 0 (off) and
press ENTER :
5. To confirm the new status, press ENTER three times:
2. Specify 3 on the numeric keypad to gain access to
the “Midi” function:
6. Press
NORMAL
to return to the main display:
3. Specify 1 to enter the edit of the “Midi Common”
parameter:
Save the MIDI-COMMON
STATUS TO DISK
The new Midi-Common status will be lost when the instrument is turned off. When you power up again, the default status
(Midi-Common active on channel 1) will be restored.
To avoid repeating the Midi-Common deactivation procedure, you can save the setting to a floppy disk so that, when you
power up with the disk inserted in the drive, the instrument will be set to the required status automatically.
Alternatively, if your S Series instrument is fitted with the Ram-disk, you can save the Midi-Common status to Ram-disk.
When the instrument is powered up without a floppy inserted in the drive, the setting memorised in the Ram-disk will be
recognised and the Midi-Common status will be programmed automatically.
The MIDI -COMMON status is saved using Setup General.
How to save the MIDI-COMMON status to floppy
disk
❑ Phase a—Format the floppy disk
4. Specify 1 on the numeric keyboard to select “Format work disk (1.62 Mb)”. The display shows a
message which invites you to insert the floppy
disk in the drive:
1. Prepare a new 3.5” HD floppy disk.
2. Press the DISK button to gain access to the Disk
handling procedures:
5. Insert the floppy disk into the drive and press
ENTER (or EXIT if you want to cancel the formatting
procedure). A dialogue window appears where
you can insert the name of the disk:
3. Press the right MULTIFUNCTION
you reach the Utility page:
BUTTON
repeatedly until
6. For the moment, ignore the disk name and press
ENTER to continue. “Are you sure?” appears asking
for a re-confirmation of the formatting process:
Connecting S2R to an external sequencer
31
Save the MIDI-COMMON status to the RAMdisk
7. Press ENTER to confirm (or EXIT to interrupt the formatting procedure).
1. Press the D ISK button to gain access to the disk
handling procedure:
“Wait please....” appears for the entire duration of
the formatting process:
2. Press the right MULTIFUNCTION
the Save page:
BUTTON
once to open
❑ Phase b—Save the “General” Setup
8. At the end of the formatting process, press the left
MULTIFUNCTION BUTTON twice to reach the Save page:
3. Select the ram.d option with the Function Select
Key B:
9. Specify 3 on the NUMERIC KEYPAD to gain access to the
“Save Single Setup” procedure:
4. Select and access the “Save Single Setup” procedure:
10.Specify 1 to select the “General” Setup.
11.With “Are you sure?” showing, press
firm (or EXIT to annul).
ENTER
to con-
5. Press ENTER twice to save the
Ram-disk.
32
INSTALLATION, POWER UP, DEMO
EDIT GENERAL
setup to
POWER
UP
Powering up with an empty disk drive and
RAM-disk
Powering up with a floppy disk inserted in
the drive
Press the power switch to turn on the instrument.
If you power up when a floppy disk is inserted in the
drive, the data contained in the disk will be automatically loaded into the instrument’s Ram (operative
memory). The data loaded:
When the Music Processor powers up with no disk inserted in
the drive and no data saved to Ram-disk, the display shown
below appears:
Track column
Selected Bank/Song
•
Bank/Songs and Performances
•
Sounds (Sound Library Setup)
•
Effects (Effects Libraries Setup)
•
General Setup.
Powering up with data in the RAM-disk
Selected Performance
Command/option column
This is the default display, and it appears every time
you power up with no disk inserted in the drive (and
with an empty R AM -disk). This is the instrument’s main
display shown in “Performance” mode (s.). This display
shows the name of the currently selected Performance
and the name of the Bank/Song to which it belongs.
If you select the Sounds option (Function Select Key
A), the display changes to “Sound” mode, which shows
the name of the Sounds assigned to the tracks of the
current Performance together with the relative Program
Changes and Bank Select numbers:
Track column
Bank/Song
Performance
If, at the moment of powering up, no floppy disk is
inserted in the drive but the Ram-disk contains data,
these are automatically loaded into the instrument’s
memory.
You can, if necessary, impede the reading of the Ramdisk data at the moment of powering up by pressing (and
holding) the ENTER button for a few seconds an instant
after pressing the “Power On” button.
Regulating the volume
As soon as you turn on, the instrument is ready to play.
Regulate the overall volume using the MASTER VOLUME
slider (S2R: the small VOLUME knob). If no sounds are
heard, check one of the following possibilities:
•
the volume of the amplifier may be incorrectly set.
•
the audio or M IDI connections may have been incorrectly carried out.
Put the problem right. If all seem to have been carried
out according to the instructions, perhaps there is a
malfunction. S. Troubleshooting.
Sounds
Program Change
Bank Select
Command/option
column
The button shown active (led on) in the Source section
is LOCAL. When this button is active, the display is
showing the status of the tracks for the Source LOCAL
(keyboard, master keyboard via M IDI -C OMMON ). Close
to the tracks that play, a small line appears, such as in a
V-meter.
Before turning off the instrument...
...remember to save all your modified or created data (Song,
Sound, Effects, Performance...). If you omit saving this data
to floppy disk or to the RAM -disk, the instrument’s Ram will
empty when you turn off, cancelling all your edited data.
Power up
33
S2R: “SOUND TEST”
In the main display (set to “Sounds” mode) and in the Sample Translator, pressing ENTER activates the Sound Test,
which allows you to listen to the Sound and check the M IDI O UT connection, regardless of the status of the keyboard
(even if not connected).
Sound Test in the main display
If you press ENTER when the main display is showing “Sounds” mode, the Sound assigned to the currently selected
track (in reverse highlight) will play:
Press ENTER to hear the Sound “Devil” and
an expander connected to the S2R MIDI OUT.
You will also play the Sound assigned to the corresponding track of the expander connected to the S2R M IDI O UT .
The Sound Test can be programmed in the
1. Press the
GENERAL
EDIT GENERAL
environment:
button in the Edit section to gain access to
EDIT GENERAL:
2. Specify the number 5 on the keypad to access the display Sound Test:
3. Modify the note and the dynamic value. The factory settings are, however, suitable for most situations.
4. Select the “Memorize” command with the FUNCTION SELECT KEY G. The setting will be permanently memorised until
replaced by a new setting.
5. Return to the main display by pressing
NORMAL.
Sound Test in the Sample Translator
In the Sample Translator pressing ENTER will play the note indicated by the “SR” parameter in the Info About display.
The note is not sent to the M IDI O UT .
34
INSTALLATION, POWER UP, DEMO
DEMO
The ROM demonstration Song
The non-volatile memory of the instrument (R OM ) contains a demonstration Song, which is inserted to the “Bank/
Song 1” slot automatically after powering up.
To listen to the playback of the Demo Song, simply press the PLAY button. To interrupt the playback, press STOP. To
cancel the Demo Song from the “Bank/Song 1” slot, consult the Song and Sequencer chapters.
The “Demo Disk 01” and “Demo Disk 02” demo songs
Two floppy disks (“3.5” HD) are supplied with the instrument, both containing some Sounds and demonstration
Songs.
Load the contents of “Demo Disk 01” automatically
With the instrument turned off, insert the floppy entitled “Demo Disk 01” into the disk drive and turn on the
instrument. The display shows the name of the instrument and an animated clock. The disk drive is operating; it is
loading the entire contents of the floppy disk into the Ram.
The loading time is approximately one and a half minutes. At the end of the loading period, adjust the volume level
to a suitable setting. Check the volume level by playing some notes on the keyboard.
Play back the “Demo Disk 01” demo songs
Press the
UTILITY
button. The following display is shown ( Utility display):
Press the FUNCTION SELECT KEY D (Juke-box) to start the sequencer: all the Songs contained in Ram will play one after
the other (the “Juke_Box” command chains all the Songs contained in R AM ).
Interrupt the “Demo Disk 01” demo songs
When the chained Songs reach the end, the Juke_box stops automatically. If you want to interrupt the playback at
any point, press the sequencer’s STOP button:
RECORD
STOP
PLAY
<<
>>
CLOCK
Demo
35
Load the contents of “Demo Disk 02” in Ram
The first method consists in turning off the instrument, replacing the floppy “Demo Disk 01” with “Demo Disk 02”
and repeating the procedure already explained for “Demo Disk 01”.
The second method consists in replacing the floppy “Demo 01” with “Demo 02” and using the Load All procedure,
which loads the contents of the floppy disk in R AM .
After changing disk and inserting “Demo Disk 02” into the drive, press the
DISK
button:
Specify the number 1 on the NUMERIC KEYPAD to start the Load All procedure. Confirmation of the operation will be
requested which, if given, cancels all the data already present in Ram, replacing it with the new data:
Press ENTER to confirm. The disk drive starts to operate and loads the entire contents of the “Demo Disk 02” floppy in RAM.
Playback the “Demo Disk 02” demo song
Press the PLAY button to listen to the single demonstration song contained in “Demo Disk 02”. Press STOP to stop the
playback.
Cancel the “Demo Disk 02” demo song from the Music Processor’s memory
After listening to the demo song, turn the instrument off then on again before proceeding with the reading of the manual. All the
songs previously loaded will be erased from memory.
36
INSTALLATION, POWER UP, DEMO
USER INTERFACE / SELECTION
5
❏
DATA ENTRY
❏
DISPLAY AND ASSOCIATED CONTROLS
❏
MAIN DISPLAY / “SAVE PERFORMANCE”
❏
SELECTION
- Select the Bank/Songs
- Select the Performances
- Select the Sounds
❏
CORRECT VIEW OF THE TRACKS
❏
TRACK PLAYING MODE
❏
PLAY, MUTE, SOLO
37
DATA ENTRY COMMANDS
The Data Entry commands permit the insertion of numerical and alphabetical data, the change of sound as well as various navigating tasks
within the edit/data handling pages.
The Data Entry group consists of two distinct parts: the cursor controls
( DIAL, +1/> and -1/<, ENTER, EXIT) and the ALPHANUMERIC keypad.
DIAL, +1/> and -1/<, ENTER, EXIT
PANIC
• Increases the value of the selected parameter continuously when rotated in a clockwise direction. When
rotated in an anticlockwise direction, the value of the
selected parameter is decreased continuously.
• In the main display, this control changes Performance
(in “Performance” mode) or the Sound of the selected
track (in “Sounds” mode) in a continuous manner. In the
edit pages, it moves the reverse-highlight cursor from
one parameter or menu item to another.
+1/> and -1/< • +1/> increases the value of the selected parameter by
one unit. -1/< decreases the value of the selected parameter by one unit.
• In the main display they change the Performance (in
Performance mode) or Sound of the currently selected
track (in Sounds mode) in single steps. In the edit pages
they move the reverse-highlight cursor across the parameters or menu items.
DIAL
ENTER
EXIT
1/>
1/<
ENTER
EXIT
These controls are equivalent to the DIAL, but increase or
decrease existing data value by one unit at a time. The
DIAL is best used to change existing data value by a
significant amount.
• Confirms the specified parameter value.
• In edit, it gains access to the modification of the
parameter and confirms the value specified.
S2R: In the main display, when the instrument is set to
Sounds mode, striking E NTER plays a note (Sound Test),
permitting you to hear the Sound assigned to the currently selected track. The Sound Test also plays expanders connected to the S2R M IDI O UT .
• Cancels the value that is about to be assigned to the
selected parameter.
• With the “Are you sure?” window, it aborts the
current edit operation.
Alphanumeric keypad
The A LPHANUMERIC
KEYPAD
is used to specify numbers and letters.
How to specify numeric data
The numbers are silk-screened on the buttons. To specify positive
values, simply press the relative number (n° + the symbol required). To
specify a negative value, press the “-” button before entering the required number.
38
UNDO
USER INTERFACE / SELECTION
ABC
DEF
GHI
1
2
3
JKL
MNO
PQR
4
5
6
STU
VWX
YZ*
7
8
9
,./
’0
&( )
Numeric data is inserted in an edit zone which activates the instant you specify the first
entry:
In some cases, the number specified requires confirmation with ENTER , in other instances,
confirmation is not necessary. When Sounds are selected with the NUMERIC KEYPAD
(Program Change), confirmation with ENTER is always required.
Selection of the Sound 112-13. Confirm with ENTER.
During the specification of a number,
EXIT
can cancel the entry.
The cursor can be moved in the edit zone with the
permit the correction of a wrong number:
DIAL
or the +1/> and -1/< buttons to
—>
How to enter alphabetic characters
Each keypad button also recalls three letters of the alphabet. Simply press the button as
many times as necessary until the required letter appears in the active zone of the display.
Navigating with the DIAL, ENTER and EXIT
The Data Entry controls are also used to navigate within the menus and to select the menu
items and parameters.
The way in which these controls operate are equivalent to the “mouse” of a computer (now
a very common computer accessory): the DIAL moves the reverse-highlight cursor, ENTER
corresponds to the “click” on the mouse button to confirm a selection; EXIT corresponds to
the Escape button.
Main Menus
-
rotate the
-
press
DIAL
ENTER
to select a voice (or editor);
to access a menu item and to open the corresponding secondary menu.
Edit Sound, main menu
Secondary menus (or lists of parameters)
-
rotate the
-
press
DIAL
ENTER
to selection an item (or parameter);
to place the parameter in edit:
Modify the value with the DIAL, or specify the new value on the numeric keypad.
-
press ENTER once (with a simple parameter) or several times (with a complex parameter) to confirm the value assigned to the parameter in edit;
-
press
EXIT
to cancel the value assigned to the parameter in edit.
Data Entry commands
39
Edit Sound, secondary menu (or editor) “Filter 1”
Use of the numeric keypad to navigate in
the menus
In all menus, specify the number of the item or parameter that requires selection on the
alphanumeric keypad. Access is instant.
40
USER INTERFACE / SELECTION
«Emergency» buttons
These buttons provide a means of escaping from “locked” situations or to carry out a “quick
check” of MIDI connections and sounds without effects, and they are available at all times.
PANIC
MIDI communications can sometimes “lock” the instrument due to the transmission of an
excessive quantity of data, or by an incorrect message. The PANIC button sends “All notes
off” and “Reset Controls” messages the internal sound generation and to all MIDI devices
connected to the MIDI OUT, interrupting any locked notes and controllers.
MIDI OFF (S2/S3)
Activating this button (led on) deactivates the M IDI ports. Warning: Do not press this
button while the S Series instrument is transmitting or receiving data; otherwise, the entire
M IDI setup can lock.
EFF. BYPASS
* The OUTPUTS 1, 2, 3, 4
always emit the sounds in
their “pure” form (dry).
The Sounds emitted by the LEFT and RIGHT * Audio Outputs is processed by the two DSPs
(Effects processors - sounds are said to be emitted “wet”). If you want to use an external
effects processor, or if you want to listen to your sound in its pure form (dry), press the EFF.
BYPASS button to bypass the DSP.
When the DSPs are deactivated, the led on the button is on.
Reactivate the Effects to the Audio Outputs by repressing the button.
UNDO
In most parts of the edit environments, UNDO cancels the most recent operation, restoring
the original status of the element in edit. UNDO also “undoes” itself: by pressing it a second
time, it restores the cancelled situation: this is a useful way of comparing two different
situations before making a final decision.
“Emergency” buttons
41
DISPLAY
AND ASSOCIATED CONTROLS
The display is surrounded by controls which allow the user to navigate within the area - the display and associated
controls is the principal means of communication between the user and machine.
3
2
6
A
A
B
C
D
E
F
A
A
B
B
C
C
D
D
E
E
F
F
G
G
B
C
D
E
F
G
G
1
1. Track select keys
These select the corresponding tracks in the track
column. If you press the relative key of a selected
track, the track will be muted (x) or set back to play
mode (e).
2. Track scroll buttons
These bring the tracks not displayed into view. The
track column can show a maximum of 7 of the 16
tracks of a Performance). If the buttons are held
pressed, the tracks scroll continuously until released.
3. Track column
This column can show 7 of the 16 Performance
tracks. The symbols shown next to the track number
indicate the status of the currently active Source:
e shows that the track is active to play, or that it
contains recorded notes (for the Song Source).
x shows that the track is “mute”.
– shows that the track is disconnected from the
LOCAL or M IDI I N Source, or that the track does not
contain recorded notes (Song Source).
i shows that the track is connected to the internal
sound engine (G ENERATION ) If the symbol is not
shown, the track cannot play the Sound.
e shows that the track is communicating with M IDI
O UT (if the symbol is not shown, the track cannot
transmit MIDI).
42
USER INTERFACE / SELECTION
4
5
A track is selected when it is shown in reversehighlight.
When a track is played by a keyboard, a small symbol is flashed close the track number (as in a VU
meter).
4. Command/Option column
Depending on the currently selected display, this
column shows commands and options which can be
selected with the Function Select keys (A -G).
The commands execute an action (ex. in the main
menu, the command “Sounds” or “Perf” changes the
Performance viewing mode). The options are mode
selectors relating to commands or functions (ex. in
the main display, in “Sounds” mode, the track playing options for the LOCAL Source single, layer, split,
multi).
A selected option is shown in reverse-highlight.
5. Function select keys A - G
These select the corresponding commands/options
shown in the display.
6. Multifunction buttons
These select the corresponding commands shown in
the top right corner of the display. In the Edit pages,
they normally select the next and previous pages. In
the main display, the right button corresponds to the
SAVE PERFORMANCE command.
MAIN
DISPLAY
/ SAVE PERFORMANCE
The main display can be shown in two different viewing modes: “Performance” or
“Sounds”. In the first mode, the Performance is displayed in large type, useful for rapid
selection during a concert. In the second mode, the Sounds assigned to the tracks are
shown, to allow complete control of the situation in Sound changing situations and
Sound edit access.
“Performance” mode
* The Performances are numbered
from 1 to 10. ‘0’ selects
Performance 10
The instrument powers up by default in “Performance” mode: in this situation the
display shows the name of the current Bank/Song and Performance. The Performances
can be scrolled with the DIAL, the +1/> and -1/< buttons or the ALPHANUMERIC KEYPAD*.
Track column
Selected Bank/Song
Selected Performance
Select the
SOUNDS
“Save Performance”
Command/Option column
command to pass to the “Sounds” mode.
“Sounds” mode
In this situation, the Sounds assigned to the tracks of the current Performance are
displayed, as well as the track playing mode selectors (single, layer, split, multi). The
track status is also shown which relates to the currently selected Source.
Track column
Bank/Song
Performance
“Save Performance”
Track situation for the LOCAL Source (led LOCAL on)
Track situation for the MIDI IN Source (led MIDI IN on)
Sounds
Program Change
Bank Select
Command/Option
column
This operative mode allows the assignment of different Sounds to the tracks (s. Sound
selection further ahead).
Main display / Save Performance
43
“Save Performance” (SAVE)
* The “Save Performance”
command is disabled when the
led on the “record” button is
flashing (Song in record):
The main display shows the SAVE command, selected with the RIGHT MULTIFUNCTION
BUTTON *. The command saves all modifications made to the Performance.
The modifications saved by the Performance: track playing mode (for LOCAL and MIDI
Sound assignments to the tracks, track status: “mute” ( x) or “play” (e), modifications made in EDIT PERFORMANCE/CONTROLS and in EDIT PERFORMANCE/TRACKS.
IN),
The status of the Function Controllers (active buttons and values inserted with the
sliders) is also memorised in the Performance.
The Save Performance procedure in S2/S3 differs slightly to that in S2R.
“Save Performance” in S2/S3
1. Select the “Save Performance” command. A dialogue window is displayed which
asks you to specify the Bank/Song and Performance where the memorisation is
going to take place:
2. If you want to save the modifications in the current Performance, press ENTER twice.
(Ignore the “Are you sure?” message, s. further ahead).
3. If you want to memorise the modifications to a different Performance of the same
Bank, press the corresponding button in the Performance group and ENTER twice.
This operation cancels all data in the selected Performance button.
4. If you want to memorise the modifications to a Performance of a different Bank/
Song, press (a) a button in the Bank/Song group and (b) a button in the Performance
group. Press ENTER twice to confirm. This operation cancels the data present in the
selected Performance and creates a new Bank/Song if an empty one is selected.
“Save Performance” in S2R
1. Select the “Save Performance” command. A dialogue window is displayed which
asks you to specify the Bank/Song and Performance where the memorisation is
going to take place:
2. If you want to save the modifications in the current Performance, press ENTER twice.
3. If you want to memorise the modifications to a different Performance of the same
Bank, (a) press ENTER, (b) indicate the number of the Performance with the
the NUMERIC KEYPAD, (c) confirm with ENTER.
DIAL
or
4. If you want to memorise the modifications to a different Performance of a different
Bank/Song, (a) indicate the number of the Bank/Song with the DIAL or NUMERIC
(b) press ENTER, (c) indicate the number of the Performance with the DIAL
or NUMERIC KEYPAD, (d) press ENTER to confirm.
KEYPAD,
Note: The Performances saved will be irremediably lost when the instrument is turned off.
To conserve your modified Performances, save the relative Bank/Songs to disk (s. Practical
guide, chapter: Save the contents of the Ram to disk).
44
USER INTERFACE / SELECTION
BANK/SONG AND PERFORMANCE SELECTION
Selecting the Bank/Songs and Performances in S2/S3
Selecting with the buttons of the Bank/Song
and Performance sections
This method can be used regardless of the current operating mode of the instrument.
Leds indicate the currently selected Bank/Song and
Performance.
Selecting in “Performance” mode
In the main display of the Performance mode, one of the
10 Performances of the currently active Bank/Song can
be selected by rotating the DIAL, or by specifying the
corresponding number on the ALPHANUMERIC KEYPAD (‘0’
corresponds to Performance 10).
1. Press the button corresponding to the Bank/Song to
select.
2. Press the button corresponding to the Performance
to select.
If the Performance belongs to the currently active Bank/
Song, step 1 can be ignored.
Selecting the Bank/Songs and Performances in S2R
Selecting in “Performance” mode
2. Specify the number corresponding to the Bank/Song.
In the main display of the Performance mode, one of the
10 Performances of the currently active Bank/Song can
be selected by rotating the DIAL, or by specifying the
corresponding number on the ALPHANUMERIC KEYPAD (‘0’
corresponds to Performance 10).
A list of the Performances contained in the selected
Bank/Song is shown:
3. Specify the corresponding Performance number on
the ALPHANUMERIC KEYPAD.
The Bank/Song and Performance selections in the
dialogue windows can be performed using the DIAL and
confirming with ENTER.
Selecting Bank/Song and Performances in
“Sounds” mode
In “Sounds” mode, use is made of the
PERFORM buttons.
B/SONG
and
Selecting a Performance of the active Bank/
Song in “Sounds” mode
1. Press the
PERFORM
button:
1. Press the B/SONG button to display the list of Bank/
Songs present in memory:
2. Specify the corresponding number of the Perform-
ance on the ALPHANUMERIC KEYPAD, or rotate the DIAL
to select the Performance and press ENTER to confirm
the selection.
Bank/Song and Performance selection
45
SELECTING SOUNDS
If modifications have been made to the current Performance, selecting the same Performance, a different Performance, or
one of the sequencer control buttons (RECORD, PLAY, STOP, <<, >>) will restore the original Performance. To conserve the newly
assigned Sounds to the tracks, save the Performance to memory (s. Main display / Save Performance).
Selecting Sounds with the Dial (or the +1/>
and -1/< buttons)
The selection is confirmed with ENTER:
This method is used with the main display is showing
“Sounds” mode.
The Sounds are arranged in a list which can be continuously scrolled forwards or in reverse order by rotating
the DIAL.
•
rotate to the right to scroll the Sounds forwards;
•
rotate to the left to scroll the Sounds in reverse order.
The +1/> and -1/< buttons operate in the same manner
as the DIAL but in single steps.
1. Select the track to which the Sound is to be assigned
in the track column.
2. Select the Sound.
Selecting Sounds directly from the Sound
Library
The Sounds are stored in the Sound Library, where they
reside in order of Sound Family and identified by the
Program Change and Bank Select numbers. The standard Sound Library is shown in the Appendix.
1. Access the Sound Library by pressing the
SOUND
LIBRARY button:
Selecting Sounds with the alphanumeric
keypad
The method can be used when the main display is in
“Sounds” mode.
The Sounds are identified by a Program Change number
(1~128) and by a Bank Select number (1~16). The
Program Change and Bank Select numbers found in the
Sound Library are listed in the Appendix.
1. Specify the Program Change number.
2. If necessary, select, in the track column, the track to
which the Sound is going to be assigned.
3. Scroll to the Family of the Sound that you are looking for using the MULTIFUNCTION BUTTONS . For example, the “Guitar” Family:
2. Insert the separating “dash” (the minus ‘-’ symbol).
3. Specify the Bank Select number.
4. Confirm the selection with
ENTER.
To select the Sounds with Bank Select=1 it is sufficient
to specify only the Program Change number, without
the Bank Select number.
For example, to recall Sound “Vibes2 [12-3]”, select the
Program Change number 12 and the Bank Select number
3:
4. Rotate the DIAL to select the required Sound (rotate to
the right to scroll forwards).
5. Press ENTER to assign the Sound to the selected track.
6. Escape from the Sound Library by pressing
or SOUND LIBRARY.
You can select the Sounds in the Sound Library by
specifying the Program Change-dash-Bank Select
combination on the alphanumeric keypad (as in the
previous case).
46
USER INTERFACE / SELECTION
NORMAL
CORRECT
TRACK VISUALISATION
The tracks which appear in the main display differ according to the button selected in the Source section.
The instrument powers up with the LOCAL button selected by default. The LOCAL Source corresponds to the keyboard
or the master keyboard connected via M IDI -C OMMON . Therefore, the default display shows the tracks which can be
played by the keyboard or by the master keyboard connected via M IDI -C OMMON .
Visualisation of the tracks that can be played on a keyboard
The keyboard (S2/S3) or master keyboard connected via Midi-Common (S2R) generate
button must be selected in the Source section.
LOCAL
events. The
LOCAL
Main display, Perf 1, LOCAL button selected
Symbols showing the status of the tracks: e = track in play, x = track mute, i = the track is connected to the internal sound
generator, e = the track is connected to the MIDI OUT. If “i” does not appear, neither does the name of the Sound appear, it is
substituted by a row of dashes (-- -- -- --).
Visualisation of the tracks that can be played via MIDI IN (not MIDI-COMMON)
The
MIDI IN
button must be selected in the Source section.
Main display, Perf 1, MIDI IN button selected.
Symbols showing the status of the tracks: e = track in play, x = track mute, i = the track is connected to the internal sound
generator, e = the track is connected to the MIDI OUT. If “i” does not appear, neither does the name of the Sound appear, it is
substituted by a row of dashes (-- -- -- --).
Visualisation of the tracks played by a Song
The SONG button must be selected in the Source section. This display setting is selected automatically when the SONG
button is selected in the Edit group.
Main display, Perf 1, SONG button selected.
Symbols showing the status of the tracks: e = the track contains recorded notes, – = the track does not contain recorded
notes, x = track mute, i = the track is connected to the internal sound generator, e = the track is connected to the MIDI OUT. If
“i” does not appear, neither does the name of the Sound appear, it is substituted by a row of dashes (-- -- -- --).
Correct track visualisation
47
TRACK
PLAYING MODE
If modifications have been made to the current track playing mode, selecting the same Performance, a different Performance,
or one of the sequencer control buttons (RECORD, PLAY, STOP, <<, >>) will restore the original track playing mode. To conserve
track playing mode changes, save them to the required Performance (s. Main display / Save Performance ).
The tracks of the Performance can be combined in different ways to provide several track playing modes. In “Sounds”
mode, from two to four different track playing modes can be selected, depending on which Source is currently active.
The track playing mode for the LOCAL and MIDI IN Source can be saved to the Performance.
The command buttons that select the various track playing modes are in the Command/Option column of the main
display when it is set to “Sounds” mode.
Track playing modes available for each Source
LOCAL Source
Single, layer, split, multi.
MIDI IN Source
Single, multi.
SONG Source
Single, multi.
OPTION Source
Single, multi
Description of the track playing modes
Single
A single track. The displayed track plays across the entire keyboard extension. The other
tracks can be selected one by one by scrolling with the TRACK SCROLL BUTTONS.
Layer (LOCAL only)
Activates two superimposed tracks which play across the entire keyboard extension. Other
tracks can be selected by scrolling with the TRACK SCROLL BUTTONS.
Split (LOCAL only)
Activates two track that split the keyboard. The first track is assigned to the lower part, the
second to the upper part. Other tracks can be selected by scrolling with the TRACK SCROLL
BUTTONS. ❉
48
USER INTERFACE / SELECTION
Multi
Activates all the tracks of the Performance. The configuration of the tracks will vary according to the Performance: some track will be in “mute” and will not play (“x” symbol in the
track column), others may be cancelled. The individual track extensions for the LOCAL
Source are determined in EDIT PERFORMANCE /TRACKS, page 3 (s.).
❉ How to set a split point for the split track playing mode
In “Sounds” mode, the main display shows a new command called “Set split” when the split track playing
mode is selected.
1. Select the “Set split” command. The following se-
• by rotating the
DIAL.
• by playing the note which represents the new split
point. (In S2R the master keyboard must be connected via M IDI -C OMMON ).
lecting window appears:
3. Confirm the split point with
2. You can set a new split in two different ways:
operation with
ENTER
(or cancel the
EXIT).
Track playing modes
49
PLAY, MUTE, SOLO
The track status can be set to “play”, “mute” and “solo”.
The play and mute status can be memorised to the
Performance.
track (if not already shown in reverse-highlight) and
press the corresponding TRACK SELECTION KEY a second
time.
Play
Solo
The play status is shown in the track column with the
note symbol “e”. To mute a track currently set in play,
first select the track (if not already shown in reversehighlight) and press the corresponding TRACK SELECTION
KEY a second time.
The Solo status isolates the selected track and silences
all others.
Mute
The mute status is shown in the track column with the
symbol “ x”. To set a mute track in play, first select the
50
USER INTERFACE / SELECTION
Select the track that requires to be set to solo and press
the SOLO button. The led on the button starts to flash.
If the selected track is currently set to mute, setting the
solo status will activate the track for playing.
Press SOLO to deactivate the solo status. The led on the
button stops flashing.
PRACTICAL GUIDE
❏
PREPARE A WORK DISK WITH THE S SERIES DISK DRIVE
❏
LOAD THE CONTENTS OF A DISK INTO RAM
-
❏
Load
Load
Load
Load
all
a Group
a Bank/Song
a Setup
SAVE THE CONTENTS OF RAM TO DISK
-
Save
Save
Save
Save
all
a Group
a Bank/Song
a Setup
6
❏
LOAD AND SAVE A SONG IN MIDI-FILE FORMAT
❏
OVERVIEW OF THE DISKS SUPPLIED WITH THE INSTRUMENT
❏
PLAYBACK A SONG / SEQUENCER CONTROLS / PRELOAD
❏
CREATE OR MODIFY THE BANK/SONGS
❏
EDITING THE PERFORMANCES
❏
HOW TO RECORD A SONG
❏
REAL TIME SOUND EDITING
- Using the Function Controllers
❏
SOUND EDITING IN THE STUDIO
-
Type of Sound
Waveform
Filters
Envelopes
Tracking
Lfo, Pitch, Pan
Memorising the Sound in the Sound Library and saving the SL
❏
SELECTING SOUNDS VIA MIDI
❏
SELECTING EFFECTS VIA MIDI
❏
EDITING THE SOUND PARAMETERS VIA MIDI
❏
PROGRAMMING WITH THE EXTERNAL SEQUENCER
- The “LOCAL OFF” Performance
51
1 PREPARE
A WORK DISK WITH THE
S SERIES
DISK DRIVE
Before saving any data to a new floppy disk, you must format it (or initialize it) in order
that the S Series instrument can recognise and use it.
The floppy disk should be a 3,5” HD type, in perfect condition.
1. Press the
DISK
button to gain access to the
2. Press the
RIGHT MULTIFUNCTION BUTTON
DISK
operations.
repeatedly until you reach the last page ( Utility):
3. Specify number 1, corresponding to the “Format work disk (1.62 Mb)” operation.
A message appears inviting you to insert the floppy disk into the drive:
4. Insert the floppy into the drive and press
ENTER to confirm. A dialogue window is
displayed where you can insert a name to identify the disk. (This is not an obligatory
operation - do it just the same).
Insert the characters with the alphanumeric keypad.
Insert: inserts a space at the cursor position.
Capitals: allows the insertion of uppercase letters.
Delete: cancels an entry at the cursor position.
ENTER
5. Press
ENTER
to confirm (or
EXIT
to confirm, EXIT to cancel.
to annul and interrupt the operation).
Warning: The formatting process destroys all data contained in a floppy disk. Use the Format
operation only on new disks, or on disks that contain data that you are not interested in keeping.
52
PRACTICAL GUIDE
2 LOAD THE CONTENTS OF A DISK INTO MEMORY
Load all the instrument’s data from disk
It is possible to load, in a single operation, all the data required by the instrument to
make it work. The data necessary is the following:
Setup
General, Sound Library, Effects Libraries, Clipboard.
GENERAL
General instrument settings (tuning, pedal assignments...).
SOUND LIBRARY
Ram-Sounds and modified Sound maps.
EFFECTS LIBRARIES
Effects maps assigned to the two DSPs.
CLIPBOARD
Edit page “Clips”.
Bank/Song
Up to 10 Bank/Songs.
The Bank/Song consists of a Song and a Bank of 10 Performances. In the disk, the Bank/Songs
are organised in 10 Groups of 10 Bank/Songs. In memory, only one Group (10 Bank/Song) can be
loaded.
1. If you need to load data from floppy disk, insert the disk into the disk drive.
2. Press the
DISK
button to access the
DISK HANDLING
environment.
3. If a page other than the Load page appears, press the
REPEATEDLY
LEFT MULTIFUNCTION BUTTON
( = previous Page) to go to the Load page:
4. Select the source element to load from (disk =
FUNCTION SELECT A;
R AM -disk =
FUNC-
TION SELECT B):
5. Select the required Bank/Song Group, by pressing the corresponding
FUNCTION SELECT
repeatedly until the number of the required Group appears next to the name of the
selected element.
KEY
6. Specify number 1, corresponding to the “Load All” operation. You are asked for
confirmation of the operation:
7. Press
ENTER
to confirm (or
EXIT
to cancel).
(2) Load the disk contents into memory
53
Load a Group of Bank/Songs
A disk can contain up to 10 Groups of 10 Bank/Songs each. It is possible to load only one
Group (10 Bank/Songs) into the instrument’s memory.
1. If you are loading from floppy disk, insert the disk into the disk drive.
2. Press the
DISK
button to access the
DISK HANDLING
environment.
3. If a page other than the Load page appears, press the
LEFT MULTIFUNCTION BUTTON
repeatedly ( = previous page) to go to the Load page:
4. Select the source element to load from (disk =
FUNCTION SELECT A;
R AM -disk =
FUNC-
TION SELECT B):
5. Select the required Bank/Song Group, by pressing the corresponding
FUNCTION SELECT
repeatedly. If at least one Bank/Song is present on disk, the number of the relative
Group will appear next to the name of the selected element.
KEY
6. Specify number 4, corresponding to the “Load all Bank/Song” operation. The instru-
ment requests confirmation of the current operation:
7. Press
ENTER to confirm (or EXIT to annul). The Songs and Performances contained in
Ram are cancelled and substituted by the data loaded from disk.
Load a Single Bank/Song
A single Bank/Song consists of a Song and a Bank of 10 Performances (maximum). It is
necessary to specify the source Group from which the Bank/Song will be loaded.
1. If you are loading from floppy disk, insert the disk into the disk drive.
2. Press the
DISK
button to access the
DISK HANDLING
environment.
3. If a page other than the Load page appears, press the
LEFT MULTIFUNCTION BUTTON
repeatedly ( = previous page) to go to the Load page:
4. Select the source element to load from (disk =
TION SELECT B):
54
PRACTICAL GUIDE
FUNCTION SELECT A;
R AM -disk =
FUNC-
5. Select the required Bank/Song Group, by pressing the corresponding
FUNCTION SELECT
repeatedly. If at least one Bank/Song is present on disk, the number of the relative
Group will appear next to the name of the selected element.
KEY
To navigate in the menus,
you can (1) specify the
number corresponding to
the menu item, or (2)
select the item with the DIAL
and press ENTER to confirm
the selection.
(S. “Overview of the
instrument and its edit/
data handling capacity”).
6. Specify number 5, corresponding to the “Load single Bank/Song” operation. The list
of Bank/Songs present in disk contained in the selected Group appear in the display:
7. Specify the number corresponding to the required Bank/Song to load (‘0’ corresponds
to Bank/Song 10). The list of the 10 Bank/Song memory destination slots is displayed:
8. Specify the number corresponding to the Bank/Song destination slot. If the selected
location already contains a Bank/Song, this will be cancelled and substituted by the
incoming Bank/Song.
The “Are you sure?” display is shown:
9. Press
ENTER
to confirm (or
EXIT
to annul).
Load a Setup
There are four Setups: General, Sound Library, Effects Library, Clipboard. A disk can
contain one Setup of each type (for ex.. a single Sound Library and a single General).
The most frequency loaded setup it the Sound Library.
1. If you are loading from floppy disk, insert the disk into the disk drive.
2. Press the
DISK
button to access the
DISK HANDLING
environment.
3. If a page other than the Load page appears, press the
LEFT MULTIFUNCTION BUTTON
repeatedly ( = previous page) to go to the Load page:
4. Select the source element to load from (disk =
FUNCTION SELECT A;
R AM -disk =
FUNC-
TION SELECT B):
(2) Load the disk contents into memory
55
5. Specify number 3, corresponding to the “Load single Setup” operation. A list of the
Setups contained in the disk appears:
6. Specify the number corresponding to the required source Setup. “Are you sure?” is
shown:
7. Press
ENTER to confirm (or EXIT to cancel). The incoming Setup cancels and substitutes
the existing Setup in memory.
Warning: If you have modified some Sounds and have no desire to loose them, save the Sound
Library to a new floppy disk, following the instructions explained in the next chapter. After saving
the old Sound Library, load the new one to substitute the old.
The same warning is valid for the Effects Libraries and General Setups.
56
PRACTICAL GUIDE
3 Save the contents of memory to disk
Save all the instrument’s data to disk
It is possible to save, in a single operation, all the data required by the instrument to
make it work. The data necessary is the following:
Setup
General, Sound Library, Effects Libraries, Clipboard.
GENERAL
General instrument settings (tuning, pedal assignments...).
SOUND LIBRARY
Ram-Sounds and modified Sound maps.
EFFECTS LIBRARIES
Effects maps assigned to the two DSPs.
CLIPBOARD
Edit page “Clips”.
Bank/Song
Up to 10 Bank/Songs.
The Bank/Song consists of a Song and a Bank of 10 Performances. In the disk, the Bank/Songs
are organised in 10 Groups of 10 Bank/Songs. When you save the Bank/Songs you must specify
the Group to which the Bank/Songs will be saved.
1. If you are saving to floppy disk, insert a formatted disk into the disk drive.
2. Press the
DISK
button to access the
DISK HANDLING
environment.
3. If a page other than the Save page appears, press the
BUTTON REPEATEDLY
LEFT OR RIGHT MULTIFUNCTION
to go to the Save page:
4. Select the destination element to save to (disk =
FUNCTION SELECT A;
R AM -disk =
FUNCTION SELECT B)
5. Select the Group of Bank/Songs, to which the Bank/Songs contained in memory are
going to be saved, by pressing the corresponding FUNCTION SELECT KEY repeatedly until
the number of the required Group appears next to the name of the selected element. An
asterisk (*) shows that the Group is empty; in this case, saving the Bank/Songs
contained in memory does not destroy the Bank/Songs eventually present on disk.
6. Specify number 1 corresponding to the “Save All” operation. The instrument requests
confirmation of the current operation:
7. Press
ENTER
to confirm (or
EXIT
to cancel).
(3) Save the contents of memory to disk
57
Save all the Bank/Songs in a Group
A disk can contain up to 10 Groups of 10 Bank/Song each. The 10 Bank/Songs contained
in memory is saved to one of the Groups present on disk. The empty Groups are identified by an asterisk (*) after the Group number.
1. If you are saving to floppy disk, insert a formatted disk into the disk drive.
2. Press the
DISK
button to access the
DISK HANDLING
environment.
3. If a page other than the Save page appears, press the
BUTTON REPEATEDLY
LEFT OR RIGHT MULTIFUNCTION
to go to the Save page:
4. Select the destination element to save to (disk =
FUNCTION SELECT A;
R AM -disk =
FUNCTION SELECT B):
5. Select the Group where the Bank/Songs contained in memory are going to be saved by
pressing the corresponding FUNCTION SELECT KEY repeatedly, until the number of the
required Group appears next to the name of the selected element. An asterisk (*)
shows a completely empty Group.
6. Specify number 4, corresponding to the “Save all Bank/Song” operation. The instru-
ment requests confirmation of the current operation:
7. Press
ENTER to confirm (or EXIT to annul). All Songs and Performances contained in the
selected Group will be cancelled and substituted by the incoming data from memory.
Save a single Bank/Song
A single Bank/Song consists of a Song and a Bank of 10 Performances (maximum). The
destination Group in the disk where the Bank/Song will be saved must be specified.
1. If you are saving to floppy disk, insert a formatted disk into the disk drive.
2. Press the
DISK
button to access the
DISK HANDLING
environment.
3. If a page other than the Save page appears, press the
BUTTON REPEATEDLY
4. Select the destination element to save to (disk =
FUNCTION SELECT B):
58
PRACTICAL GUIDE
LEFT OR RIGHT MULTIFUNCTION
to go to the Save page:
FUNCTION SELECT A;
R AM -disk =
5. Select the destination Group where the Bank/Song is to be saved by pressing the
corresponding FUNCTION SELECT KEY repeatedly, until the number of the required Group
appears next to the name of the selected element. The asterisk (*) shows a completely
empty Group.
6. Specify number 5, corresponding to the “Save single Bank/Song” operation. A list of
the Bank/Songs present in memory appears:
7. Specify the number corresponding to the Bank/Song to save (‘0’ corresponds to Bank/Song
10). A list of the 10 Bank/Song slots contained in the destination Group is shown:
8. Specify the number corresponding to the location where the Bank/Song is to be saved.
If the location already contains a Bank/song, it will be cancelled and substituted by
the incoming Bank/Song.
Confirmation with “Are you sure?” is requested:
9. Press
ENTER
to confirm (or
EXIT
to annul).
Save a single Setup
There are four Setups: General, Sound Library, Effects Library, Clipboard. A disk can
contain one Setup of each type (ex. a single Sound Library and a single General).
The most frequently saved setup is the Sound Library.
1. If you are saving to floppy disk, insert a formatted disk into the disk drive.
2. Press the
DISK
button to access the
DISK HANDLING
environment.
3. If a page other than the Save page appears, press the
REPEATEDLY
LEFT MULTIFUNCTION BUTTON
( = previous Page) to go to the Save page:
(3) Save the contents of memory to disk
59
4. Select the destination element to save to (disk =
FUNCTION SELECT A;
R AM -disk =
FUNCTION SELECT B):
5. Specify number 3, corresponding to the “Save single Setup” operation. A list of the
Setups contained in memory is shown:
6. Specify the number corresponding to the Setup to save. Confirmation is requested with
“Are you sure?”:
7. Press
ENTER to confirm (or
present on disk.
60
PRACTICAL GUIDE
EXIT
to annul). The saved Setup substitutes the Setup
4 LOAD
AND SAVE A
MIDI-FILE
Memory format and MIDI-files
Each instrument equipped with a disk drive uses its own format for the disks and Songs.
This format is not directly legible by other musical instruments. For example, an S Series
instrument is not able to read a Song created and memorised to a disk by a WX Series
instrument.
* The S Series reads MIDIfiles in format 0 (single
track) and format 1 (multitrack); saves MIDI-files in
format 1.
The S Series and many of the more recent instruments and sequencers can save Songs in a
format called “Standard MIDI-file”* on MS-DOS or Atari format disks.
Compatibility of the sounds (MIDI-files in General Midi/GS standard)
When a musical instrument reads a M IDI -file created by a different musical instrument, it
is highly probable that the song selects incorrect sounds. Most instrument, in fact, organise their sound maps in a non-standard manner.
General Midi (GM) and GS are standards adopted by most manufacturers, conceived to
standardise the organisation of the sound maps in different musical instruments. For
example, the S Series — which is compatible with General Midi and with GS — has a
Sound Library organised in a manner similar to the sound maps of other General Midi/GS
compatible instruments.
As well as the sound mappings, General Midi/GS also renders drumkits compatible. In
General Midi/GS STANDARD M IDI -files, the drumkit is assigned to M IDI channel 10. (By
default, in the Performances of the S Series, M IDI channel 10 is assigned to track 10).
General Midi Standardising regulations for sound maps to apply to different musical instruments.
GS An extension of the General Midi standard. Standardises the Program Change numbers of
drumkits.
Midi channel 10 Reserved for the drumkits. In the S Series, Midi channel 10 is assigned to Track
10 of all the Performances by default.
Activation of the General Midi/GS compatibility
The default status of the S Series does not fully comply to General Midi: the program
change numbers that recall the drumkits on M IDI channel 10 differ to those specified by
the standard.
To render the S Series fully General Midi/GS compatible, it is necessary to activate the
“General Midi” parameter (in EDIT GENERAL).
When the General Midi/GS compatibility is active (on), the exchange of M IDI -files (and
M IDI communications) between the Music Processor and a General Midi/GS instrument is
instant and does not require further adjustments. The correct drumkits will be recalled on
Midi channel 10.
1. Press
GENERAL in the Edit section to gain access to the EDIT GENERAL environment (the
example shows a display relating to S2/S3. S2R differs slightly):
(4) Load and save a MIDI-file
61
2. Specify 6 to access the “General Midi” parameter:
3. Specify 1 (or press
ENTER)
4. Specify 1 (or rotate the
5. Press
* Memory which
conserves userprogrammed settings
relating to Date & Time,
Footswitch status, Sound
Test programming (S2R),
and General Midi status.
(These parameters are
programmed in EDIT
GENERAL).
ENTER
to place the “General Midi” parameter in edit:
DIAL)
to set the parameter to On:
to confirm. Escape from the edit with
NORMAL.
6. If the new status is required in all situations, save the parameter status to the battery-
backed memory* with the “Memorize” command ( FUNCTION SELECTED KEY G).
Load a MIDI-file
1. Press the
DISK
button to gain access to the
DISK
environment and go to the Utility page:
2. Select the “Load Midi standard file” operation. You are invited to insert an Atari/M S -
D OS disk containing the M IDI -file:
3. Insert the floppy into the drive and press
ENTER. The disk’s main directory is displayed
where the M IDI -files contained in the disk are shown (files with the extension “.MID”):
4. Select the sub-directories (items identified by the symbol
), which can contain other
M IDI -files. To gain access to one of the sub-directories, select it and press ENTER. To
return from the sub-directory to the main directory, select the “Back” command
( FUNCTION SELECT G).
62
PRACTICAL GUIDE
5. Select the required M IDI -file and confirm. The list of the Bank/Songs contained in
memory appears:
6. Select a memory destination where the file will be loaded and confirm with
ENTER. If
you select an occupied location, the existing Bank/Song will be cancelled and substituted by the M IDI -file.
7. The M IDI -file will be converted to an S Series standard Song. A new Bank will be
created with only one Performance (1), with standard programmed values.
8. Assign the correct Sounds to the tracks of the Performance and carry out all the
operations necessary to optimise the converted Song (particularly the track transpose
and track volume settings).
Save a MIDI-file
You’ll need an Atari/M S -D OS formatted floppy disk. If you don’t have one on hand, you
can initialise a disk to the required format using procedures 2 and 3 in the Disk Utility
page. Consult the Disk chapter in the Reference section.
The more recent computers are able to make use of disks with a greater capacity (1.44 Mb
- HD type disks). The 720 kb format is used by the Atari ST computer non fitted with the
drive for HD floppies.
1. Press the
DISK
button to gain access to the
DISK
environment and go to the Utility page:
2. Select the “Save Midi standard file” operation. You are invited to insert an Atari/M S -
D OS disk containing the M IDI -file:
3. Insert the floppy into the drive and press
ENTER.
The list of the Bank/Songs contained
in memory is shown:
(4) Load and save a MIDI-file
63
4. Select the Song to save as a M IDI -file and confirm. The disk’s main directory is
displayed where M IDI -files contained in the disk may be shown (files with the extension “.MID”):
4. You can save the M IDI -file in a sub-directory (item identified by the symbol
). To
gain access to one of the sub-directories, select it and press ENTER. To return from the
sub-directory to the main directory, select the “Back” command ( FUNCTION SELECT G)
5. Select the “New” command to create the new M IDI -file. You will need to enter a name
for the new M IDI -file:
Insert the characters with the alphanumeric keypad.
Insert: inserts a space at the cursor position.
Capitals: allows the insertion of uppercase letters.
Delete: cancels an entry at the cursor position.
ENTER
to confirm, EXIT to annul.
6. Press
ENTER to confirm the name. The instrument requests confirmation of the save
M IDI -file operation:
7. As an alternative to points 5 and 6 above: instead of selecting the “New” command,
you can select an existing file and press
ENTER.
The previous file will be cancelled.
8. The Song will be converted to a Type 1 M IDI -file (multi-track M IDI -file). The Program
Change numbers of the Performance will be inserted at the beginning of each track.
64
PRACTICAL GUIDE
5 OVERVIEW OF THE DISKS SUPPLIED WITH THE INSTRUMENT
Your instrument is supplied with three floppy disks. The floppies “Demo Disk 01” and
“Demo Disk 02” contain new Sounds, new Waveforms and some demonstration Songs.
The floppy called “Freeware Disk” contains User Programs which implement some useful
functions. By means of the “Directory” command, you can see what elements each disk
contains. The “Directory” is none other than a list of the disk’s contents.
“Demo Disk 01”
This floppy disk contains 10 demonstration Songs and some Ram-Sounds based on new
Waveforms.
The Bank/Song directory
1. With the instrument turned on, insert the floppy into the disk drive and press the
button to access the
DISK
DISK
environment:
Disk, page 1 (Load)
2. Select (if necessary) the “Disk” option by pressing
FUNCTION SELECT KEY A.
3. Select the “Load all bank/song” or “Load single bank/song” menu item with the
DIAL:
The “Load all Bank/Song” operation is selected.
The number (1) of the Bank/Song Group contained in the floppy is
shown next to the “disk” option. The Demo Disk contains Group 1 only.
The asterisk (*) shows that the Ram-disk does not contain any Bank/Songs.
4. Select the “Directory” command with
FUNCTION SELECT KEY G.
The directory of the
Bank/Songs contained in the disk is displayed:
.
10 Bank/Songs are present. Rotate the DIAL to select one of the
Bank/Songs shown and to obtain information on the dimensions (Size) of
the file and the date of the last saved modification (Date).
(5) Overview of the disks supplied with the instrument
65
The Performance directory
5. It is also possible to see the Performances contained in each Bank/Song. Select the
Bank/Song that you’re interested in with the
DIAL,
then pass to page 2 with the
RIGHT
MULTIFUNCTION BUTTON:
Directory of the Performances contained in a Bank/Song. You can
return to the Bank/Song directory with the left multifunction button.
6. Escape from the “Directory” with
EXIT.
The Setup directory
Setups are data blocks which radically change the instrument’s general settings. A disk
can contain four Setups (and four in memory):
•
General: general settings;
•
Sound Library: a Sound archive;
•
Effects Libraries: the Effects archives;
•
Clipboard: “clips” from various edit pages.
1. With the instrument turned on, insert the floppy into the disk drive and press the
button to access the
DISK
DISK
environment:
Disk, page 1 (Load)
2. Select (if necessary) the “Disk” option by pressing
FUNCTION SELECT KEY A.
3. Select “Load all setup” or “Load single setup” with the
DIAL:
“Load all Setup” is shown selected.
A Bank/Song Group number is not shown because
the disk (and memory) can contain only one Setup of each type.
4. Select the “Directory” command with
FUNCTION SELECT KEY G.
The Setup directory of
the disk is displayed:
.
The General and Sound Library Setups are present. Rotate the DIAL to
select one of the Setups and to obtain information on the dimensions (Size)
of the file and the date of the last saved modification (Date).
66
PRACTICAL GUIDE
6. Escape from the “Directory” with
EXIT.
Check the RAM-Sounds contained in Demo Disk 01
1. Press the
SOUND LIBRARY
button to access the SOUND LIBRARY:
2. Select the “Imp_disk” (=import from floppy disk) command to display the R AM -
Sounds contained in Demo Disk 01. While the internal Sound Library shows the R OM
and Ram-Sounds, the Disk Sound Library shows only the R AM -Sounds:
Ram-Sounds contained in Demo Disk 01. To scroll the Sounds, use the DIAL.
The MULTIFUNCTION BUTTON passes to the next or previous Family of Sounds.
The
symbol shows that the Ram-Sound is based on a Waveform
not contained in ROM.
3. Escape from the Disk Sound Library with
FUNCTION SELECT KEY G.
EXIT, or select the “Exit” command with
Escape from the Sound Library with NORMAL or SOUND LIBRARY.
Load the Bank/Songs and Setups from Demo Disk 01
The loading procedures are described in this section, chapter “Load the contents of a disk
into memory”, and in the “Disk” chapter of the Reference section.
* The same can be
obtained by powering up
with the disk inserted in
the drive.
• It is possible to load all the data contained in the floppy disk using the “Load all”*
procedure. This cancels all the data already present in memory.
• It is possible to load all the Bank/Songs contained in the Demo Disk using the “Load all
bank/song” procedure. This cancels all the Bank/Songs already present in memory. The
demonstration song present by default after powering up will be temporarily cancelled.
• It is possible to load a single Bank/Song, using the “Load single bank/song” procedure.
** It is not possible to load
the Sound Library Setup if
a Sound is currently in
edit. It is not possible to
load the Effects Libraries
Setup if an Effect is
currently in edit.
• It is possible to load all the Setups contained in the Demo Disk using the “Load all
setup” procedure. This cancels the Setup already present in memory, causing the loss of
all R AM -Sounds and new Effects**. The general settings can be modified by loading the
General Setup, changing the following settings:
-
the
the
the
the
M IDI -C OMMON status;
M IDI -Clock On/Off status;
footswitch assignments;
intonation scale (Scale).
• You can load a preferred Setup using the “Load single Setup” procedure. The Setup
already present in memory will be modified.
(5) Overview of the disks supplied with the instrument
67
“Demo Disk 02”
This disk contains a demonstration song (“Classic”) and a piano Sound (“Piano
based on a new Waveform.
”)
You can load the contents of the disk using the “Load all” procedure.
If you are only interested in the new piano Sound, you can use the “Load single setup”
procedure, selecting the Sound Library.
To load the new pianoforte without substituting the current Sound Library, you can use
the “Imp_disk” command described below.
Load the new pianoforte from Demo Disk 02
1. Press the
SOUND LIBRARY
button to access the Sound Library:
2. Select the “Imp_disk” (= Import from R AM -disk) command to see the R AM -Sounds
contained in Demo Disk 02:
3. Given its large dimensions, the “Gr_Piano2
” Sound is the only one present in the
disk. It is already selected. Select the “Import” command to confirm the selection; the
Sound Library is shown with free locations, (-- -- -- --):
4. Select the “Store” command to load the Sound “Gr_Piano2
” to the selected loca-
tion.
The new Sound will be imported to the internal Sound Library and it can be assigned
to a track using the standard procedure. You can save the updated Sound Library to a
new floppy disk; this will save the Sound “Gr_Piano2
” and relative Waveform.
68
PRACTICAL GUIDE
“Freeware Disk”
This disk contains three User Programs which add new functions to the instrument’s
operating system. You can load these programs (one at a time) using the “Load user
program” procedure.
The “Hardcopy” program
Hardcopy allows you to capture and save any display image in “.IMG” format (Ventura
Image) to a floppy disk (M S -D OS format).
The “Disk_Dir” program
Disk Directory allows you to check the contents of a floppy disk, and to save the entire
directory to a floppy (Ms-Dos format), including the list of the Bank/Songs, or the
contents of the Libraries (Sound Library and Effects Libraries), storing them as text files
(“.TXT”).
The “Copy_Prg” program
Copy Program can copy unprotected User Programs contained in a floppy disk (source
disk) to another floppy disk (target disk). Some user Programs are protected by copyright
and cannot be copied by “Copy Prg”.
(5) Overview of the disks supplied with the instrument
69
6 SONG PLAYBACK / THE SEQUENCER CONTROLS
Load a Song using the standard procedure
Before playing back a Song contained in a disk you must load the relative Bank/Song.
You can load a single Song (procedure [DISK] [LOAD SINGLE BANK/SONG]) or all ten Bank/Songs
that can be stored in memory (procedure [DISK] [LOAD ALL BANK/SONG]).
The procedure is described in the section in chapter Load the contents of a disk into
memory, and in the Reference guide, Disk chapter.
Use Preload to load a Song in background
Preload allows you to load a Song while another one is in playback. Together with the
relative Bank/Song, the Sound Library and Effect Libraries Setups are loaded (if different
from the ones currently residing in memory, and if the “Auto” option is selected).
Preload is a great time saver, particularly during a concert.
1. While a Song is in playback, press the
PRELOAD button. The list of the Bank/Songs
contained in the disk and the relative Group selected is displayed:
The “Auto” option must be selected (as shown).
If it is not selected, press the FUNCTION SELECT KEY D.
2. Select the source element to load from (disk =
FUNCTION SELECT A;
R AM -disk =
FUNC-
TION SELECT B).
3. Select the required Group by repeatedly pressing the
FUNCTION SELECT KEY
correspond-
ing to the selected disk option ( A or B).
4. Specify the corresponding number of the Bank/Song to load on the
KEYPAD .
ALPHANUMERIC
5. The Bank/Song will be loaded in the first or second Bank/Song location according to
the following rule:
- in the first location (Bank/Song 1) by default;
- in the second location (Bank/Song 2) if Bank/Song 1 is selected.
More information regarding Preload and the “Auto” option appears in the Reference
section.
How to select the Song
Follow the standard procedure used to select a Bank/Song (s. User Interface section).
70
PRACTICAL GUIDE
The Sequencer
Control the Song playback with the Sequencer controls:
RECORD
RECORD
STOP
PLAY
STOP
PLAY
<<
>>
CLOCK
Activates the Song “record” mode.
Stops the Song playback or the recording.
Starts the playback (or the recording).
<< high velocity “rewind”. Tapping on the button takes the Song back one bar at a time. Held
pressed, it rewinds the Song at high speed.
>> Fast “forward”. Tapping on the button advances the Song by one bar at a time. Held pressed,
it advances the Song at high speed.
Activates the Clock display which allows you to control the Tempo (metronomic) of the
Song with the DIAL:
CLOCK
Escape this display with EXIT.
(6) Song Playback / the Sequencer controls
71
7 CREATE
OR MODIFY THE
BANK/SONGS
The 10 Bank/Songs of the Music Processor are already programmed to suit many “standard” playing situations. The Bank/Songs can, however, be modified to meet particular
needs by changing the Performances, or by recording Songs.
The Song contained in a Bank/Song exploits the Performances of the same Bank/Song. A
Performance should be programmed in relation to the sonic requirements of the Song that
will be recorded later. The Performances provide Songs with changes of Sound assigned
to the tracks, of Effects, of Panorama at the outputs and of the individual track volumes.
Cancel Song 1 (Demo)
A demonstration Song (Song 1 -Demo) is present in memory by default. If you want to
liberate this location and conserve only the Performances of the Bank/Song, you must
cancel the Song.
1. If necessary, select Bank/Song 1.
2. Press the
SONG
button in the Edit section to access the Playback display or the
EDIT SONG
environment.
3. If the Playback display appears, select the “Edit” command (with
B ) to gain access to EDIT SONG :
Playback display
FUNCTION SELECT KEY
Main EDIT SONG display
4. Select the “Erase Song” command. Confirm “Are you sure?” with
ENTER
to cancel the
Song 1 (Demo).
Prepare a start-up disk to power up without
Song 1 (Demo)
Even after having cancelled it, Song 1 (Demo) is always restored to memory each time
the instrument is turned on (with the R AM -disk empty and no floppy disk inserted in the
disk drive - default situation). This is because the Song is memorised in R OM , and cannot
be permanently cancelled.
To impede the Song’s reappearance, you can prepare a “start-up” disk in the following
manner:
1. Cancel the Demo Song using the method described above.
2. Press
72
PRACTICAL GUIDE
DISK
to access
DISK
mode:
3. Go to the second page ( Save) with the
MULTIFUNCTION BUTTONS:
4. Select the disk where you intend to save the start-up settings ( FUNCTION
SELECT A
=
floppy disk, FUNCTION SELECT B = R AM -disk).
5. Specify 1 (or press
ENTER)
to save the entire contents of memory to disk.
6. If the start-up disk chosen is the R AM -disk, turn on the instrument with no floppy disk
inserted in the drive. The instrument will power up with settings contained in the
Ram-disk (Bank/Song 1 with no Song).
If you want to override the Ram-disk when you turn on, in order to obtain standard default
conditions, turn on the instrument holding the ENTER button pressed during the start-up - this will
exclude the RAM-disk.
7. If the start-up disk is the floppy, turn the instrument on with the floppy disk inserted in
the drive. The instrument will power up with settings contained in the disk (Bank/
Song 1 with no Song).
To restore default conditions, turn on the instrument with no disk inserted in the drive. (If the
Ram-disk contains data, hold ENTER pressed during the start-up).
Record a new Song using the Performances
of an existing Bank/Song
To record a new Song, you can use the Performances of an existing Bank/Song present in
memory or one saved to disk.
•
Select the Bank/Song and record a Song using the relative Performances. If necessary,
you can cancel the Song already present in the Bank.
•
You can load a Bank/Song from disk and use it to record your Song. If the Bank/Song
already contains a Song, you can cancel it.
Using a Bank/Song already present in memory
1. Select the Bank/Song.
2. If necessary, cancel the existing Song.
Warning: Conserve a copy of the original Bank/Song in a disk, if you do not want to loose the
original Song.
3. Record the Song, following the procedure described in this section under the title How
to record a Song.
Using a Bank/Song contained in a disk
1. Load the Bank/Song from disk using the procedure [DISK] [LOAD SINGLE BANK/SONG] de-
scribed in this section under the title Loading the contents of disk to memory.
2. Record the Song, following the procedure described in this section under the title How
to record a Song.
(7) Create or modify the Bank/Songs
73
Create a new Bank/Song
You can create a new Bank/Song in two ways: (a) create a completely new Bank/Song, or
(b) modify an existing Bank/Song.
You can then save the new Bank/Song to disk, for future use.
Cancel one of the 10 default Bank/Songs present in memory
1. Select the Bank/Song that you wish to cancel.
2. Press the
UTILITY
button to access the
UTILITY
data handling environment:
3. Specify 3 (or select “Delete Bank/Song” and press
ENTER)
to cancel the selected Bank/
Song.
4. Confirm “Are you sure?” with
ENTER.
Create a completely new Bank/Song
1. If necessary, cancel one of the Bank/Songs present in memory.
2. In the main display, select the “Save Performance” command.
3. Select an empty Bank/Song and the slot where you want to save the Performance.
4. Confirm the selection of the Bank/Song and Performance. A new Bank/Song will be
created.
5. Use the “Save Performance” command of the main display to create the other Perform-
ances of the new Bank/Song.
Copy the same Performance in all the required locations of the new Bank/Song and
then modify each Performance as required.
6. Or, use the “Copy Performance” function in the
UTILITY
environment.
Copy the Performances of other Bank/Songs into the empty slots of the new Bank/
Song. (S. the Reference guide under the title: Utility).
74
PRACTICAL GUIDE
8 EDITING
THE
PERFORMANCES
This chapter takes a look at Performance editing, allowing the creation of a completely
new Performance by modifying an existing one. Although the 100 Performances residing
in Rom may cover a wide range of musical tastes, it is often necessary to create a completely new set of Performances that adapt themselves to a particular situation or personal
need.
The main display is where you can assign the Sounds to the tracks, select the various
track playing modes for each Source and set them in “play” or in “mute” for each Source.
Other parameters of the selected Performance are edited in the
and EDIT PERFORMANCE/TRACKS environments.
EDIT PERFORMANCE/CONTROLS
Create, copy and cancel the tracks
The Performance can consist of any number of tracks from 1 to 16, giving a maximum of
16 different Sounds that can play simultaneously.
It is possible to cancel some tracks, or create new ones with default parameters.
How to cancel tracks
1. Access the
EDIT PERFORMANCE/TRACKS environment
by pressing the PERF. TRACKS button in
the Edit section:
Edit Performance/Tracks, page 1
2. Select the track you wish to cancel with the corresponding
TRACK SELECTION KEY.
Scroll
to the tracks out of view with the TRACK SCROLL BUTTONS.
3. Select “Delete” and confirm the cancellation of the track.
How to create tracks
1. Access the
EDIT PERFORMANCE/TRACKS environment by pressing the
the Edit section: (s. display above).
PERF. TRACKS
button in
2. If you want to substitute an existing track with a new one that has default parameters,
select the track to substitute.
3. Select “Create”. A selection window opens where you can select the track to create:
4. If necessary, specify the number of the track to create with the
KEYPAD
DIAL
or the
NUMERIC
and confirm the operation.
(8) Editing the Performances
75
Copy a track to another
1. Access the EDIT PERFORMANCE/TRACKS environment by pressing the PERF. TRACKS button in
the Edit section: (s. display above).
2. Select the track to copy.
3. Select “Copy”. A selection window opens where you can select the destination track:
4. Specify the destination track with the
operation.
DIAL
or the
NUMERIC KEYPAD
and confirm the copy
How to assign the Sounds to the tracks
In order to be able to assign a sound to a track, the track must be selected. Use the
the TRACK SCROLL BUTTONS.
TRACK
SELECT KEYS and
Select the Sounds from the main display
There are two ways to assign a Sound to a track directly from the main display (in
“Sounds” mode):
a) rotate the DIAL until you reach the required Sound - this control allows continuous
selection (use the +1/> and -1/< buttons to select sounds one at a time).
b) specify the Program Change-Bank Select numbers of the Sound on the NUMERIC
KEYPAD, and confirm with ENTER. ( ENTER is essential to transmit the specified Program
Change data).
The Program Change and Bank Select combination must be specified in the following order: (1)
specify the Program Change number, (2) insert the separating hyphen “–”, (3) specify the Bank
Select number. If the Bank Select = 1, it is sufficient to specify only the Program Change.
The R OM -Sound Program Change-Bank Select numbers are listed in the Sound table in
the Appendix.
Select the Sounds from the Sound Library
* The Sounds of the S
Series are organized in the
Sound Library in
“Families”: sound groups
that show marked
similarities with others.
The Families follow the
order according to
specifications stipulated
by General Midi:
1. Open the Sound Library by pressing the
SOUND LIBRARY
button:
PIANO
CHROMATIC
PERCUSSION
ORGAN
GUITAR
BASS
STRINGS
ENSEMBLE
BRASS
REEDS
PIPES
SYNTH LEAD
SYNTH PAD
EFFECTS
ETHNIC
PERCUSSIVE
DRUMKITS.
76
PRACTICAL GUIDE
2. Go to the Sound Family* to which the required Sound belongs with the
BUTTONS.
3. Rotate the
4. Press
MULTIFUNCTION
For example, Violin 41-1 belongs to the Strings Family.
DIAL
ENTER
to select the required Sound.
to assign the selected Sound to the currently selected track.
5. Without escaping the Sound Library, select other tracks and assign them the Sounds as
required using the method described.
Set the tracks to Play or Mute
The tracks of a Performance can be set to “play” or can be temporarily deactivated “mute”. The “play”’ and “mute” track situations are related to the currently selected
Source. Each Source will require separate track “play/mute” settings.
For example, track 1 can be set to “play” status for the
status for the MIDI IN Source.
LOCAL
Source and to “mute”
The symbol that indicates “play” status active for all the Sources is “e”, “mute” is “ X ”.
1. Select a track (if not selected) with the relative
2. Press the relative
TRACK SELECT KEY
TRACK SELECT KEY .
again to alter the track status.
Track volumes
There are two ways to change the track volumes:
a) by means of the Function Controllers;
b) in EDIT PERFORMANCE/TRACKS, page 2.
How to vary the track Volumes with the Function Controllers
In the S Series keyboard models, check that the USER/PANEL button is not inserted (led
off), then select the VOLUME button. Modify the volumes of the displayed tracks by
moving the relative Function Controller sliders. Each slider (A-F) corresponds to a track
identified by the same letters (A-F).
FUNCTION CONTROLLERS
MASTER
VOLUME
A
B
C
E
D
F
G
USER
1
2
3
4
5
6
7
PANEL
VOLUME
ATTACK
RELEASE
FILTER 1
FILTER 2
PAN
SHOW
In S2R, access page 3 of EDIT PERFORMANCE/CONTROLS:
Select the “Volume” parameter, then select a track and rotate the
volume level. Select other tracks and repeat the operation.
DIAL
to modify its
(8) Editing the Performance
77
How to vary the Volumes in
EDIT PERFORMANCE/TRACKS
Access EDIT PERFORMANCE/TRACKS by pressing the PERF. TRACKS button in the Edit section, and
go to the second page:
Edit Performance/Tracks, page 2:
1. Select the Volume parameter and enter into the edit of the parameter.
2. Select the first track to modify and specify the volume level required with the
the
DIAL
or
NUMERIC KEYPAD.
3. With the parameter still in edit, select other tracks and repeat the procedure.
4. Press
ENTER
to escape from the edit of the parameter.
Transpose
There are two ways of changing the track transposition settings:
a) in the TRACK TRANSPOSER;
b) in EDIT PERFORMANCE/TRACKS, page 2.
The transposition is always expressed in semitones.
How to vary the track transposition in the
TRACK TRANSPOSER
1. Press the TRACK TRANSPOSER button:
2. Select the required track and rotate the
DIAL, or specify the numeric value of the
transposition with the NUMERIC KEYPAD. The “Octave up” and “Octave down” commands respectively increase or decrease the current pitch by one octave above or
below the current setting.
3. The “Reset” command restores the Transpose settings of all the tracks to zero (stand-
ard pitch setting).
4. The “Master” command gains access to the Master Transposer, where you can vary the
pitch of the instrument as a whole:
Modify the Master Transpose setting with the DIAL or the
with ENTER to return to the TRACK TRANSPOSER display.
78
PRACTICAL GUIDE
NUMERIC KEYPAD
and confirm
How to vary the track transposition in
Access EDIT PERFORMANCE/TRACKS by pressing the
go to the second page:
EDIT PERFORMANCE/TRACKS
PERF. TRACKS
button in the Edit section, and
Edit Performance/Tracks, page 2
1. Activate the edit of the Transpose parameter.
2. Select the first track to modify and enter the required transposition with the
DIAL
or the
NUMERIC KEYPAD.
3. With the parameter still in edit, select other tracks and repeat the procedure.
4. Press
ENTER
to escape from the edit of the parameter.
Effects
The Sounds of the S Series can be directed to two effects processors (Effect 1 & Effect
2), which generate reverberations and modulations. The Effects are stored in the two
Effects Libraries (Effect 1 = reverbs, Effect 2 = modulations).
Each Performance can recall one effect from each processor (a reverb from Effect 1 and a
modulation from Effect 2). The Effects are assigned to the Performance in the first page
of EDIT PERFORMANCE/CONTROLS:
Edit Performance/Controls, page1
Each track can be individually programmed to play with or without the Effects assigned
to the Performance - these tasks are carried out in page four of EDIT PERFORMANCE/TRACKS:
Edit Performance/Controls, page 4
How to assign the Effects to a Performance
1. Access the first page of
EDIT PERFORMANCE/CONTROLS,
and select the required Effects. There
are two ways to select an Effect:
a) activate the edit of the parameter and rotate the
effect with the NUMERIC KEYPAD.
DIAL,
or specify the number of the
(8) Editing the Performance
79
b) open the Effects Libraries by means of the
EFFECTS LIBRARIES
button:
Select one of the Effects with the DIAL or NUMERIC KEYPAD . Press ENTER to assign the
Effect to the Performance. Repeat the operation for the second Effects Library. Return
to EDIT PERFORMANCE/CONTROLS by pressing PERF. CONTR.
2. Regulate the volume of each Effect. When the Effect volume is at its maximum value
(127), the Sound emitted by the Stereo output pair is a “mixture” of 50% “wet” and
50% “dry”.
How to engage the Effects to the tracks
1. Go to page four of
EDIT PERFORMANCE/TRACKS,
and activate the edit of the Effects multiple
parameter.
2. Select the first track to modify and engage (on) or disengage (---) Ef1 and/or Ef2 by
rotating the
DIAL.
Pass from Ef1 to Ef2 and vice-versa by pressing
ENTER
repeatedly.
3. Select another track and repeat the procedure.
How to activate and programme the pedals
and wheels
S2 and S3 have two rear panel programmable PEDAL/FOOTSWITCH SOCKETS (1 and 2) which
can receive “pedal” type physical controllers and “footswitch” type physical controllers.
Pedals are “continuous controllers” (or analog) and are normally used to control Volume, Pan, Expression etc. Footswitches are “switch action” pedals (or logic), normally
used to control Damper/Sustain, Start/Stop, etc.. The Footswitch Polarity can also be
programmed in EDIT GENERAL .
S2R has two programmable “footswitch” sockets.
The keyboard models are also equipped with two programmable wheels, generally used to
control Pitch Bend and Modulation.
How to assign a function to a pedal and wheel
1. Access page 2 of
EDIT PERFORMANCE/CONTROLS:
Edit Performance/Controls, page 2 (S2/S3)
Edit Performance/Controls, page 2 (S2R)
80
PRACTICAL GUIDE
2. Activate the “Wheel”, “Pedal” or “Footswitch” parameters. In the keyboard models,
the first part of the multiple parameter can determine which Pedal/Footswitch input
will receive one or the other type of Foot controllers:
3. Select the second part of the parameter, which represents the M IDI message generated
by the pedal/footswitch or by the wheel:
Pedal 1 controls Main Volume (controller 7)
The M IDI message assignable to the pedals and footswitches differ owing to the
different nature of the two controllers. The assignment of a specific M IDI message
depends on the nature of the pedal selected. The Reference section lists the messages
assignable to each controller.
How to activate/deactivate the pedals and wheels for the tracks
1. Access page 3 of
EDIT PERFORMANCE/TRACKS:
Edit Performance/Tracks, page 3 (S2/S3)
Edit Performance/Tracks, page 3 (S2R)
2. Select the track that you are interested in editing.
3. Set the selected controller (wheel, pedal, footswitch) to “On” or “---” (Off).
Save the modifications to the Performance
The modifications made to the current Performance must be saved to avoid losing them
when you select another Performance or re-select the same Performance.
Select the Save Performance command in the main display and confirm the procedure
with ENTER . You can memorise the modifications to the current Performance, to another
Performance of the same Bank/Song, or of a different Bank/Song.
If you select a different Performance, bear in mind that the Performance that will be
replaced will be irremediably lost.
Furthermore, for future use, save the updated Bank/Song to floppy disk or to R AM -disk;
remember that turning off the instrument will result in the loss of the modified Performance.
(8) Editing the Performance
81
9 HOW
TO
RECORD
A
SONG
What is a Song?
A Song is a recorded musical piece made up of several instrumental “parts”. Each Bank/
Song consists of a Song (or an empty slot where a Song can be recorded) which exploits
the Performances of the Bank/Song to which it belongs.
The playback and recording of the Song is controlled by the Music Processor’s on-board
Sequencer. It is possible to record a Song, or load it from disk in the form of a Bank/Song
or a M IDI -file.
A Song can be saved to floppy disk (as a Bank/Song) for the purpose of building a library
of Songs and exchange with other S Series instruments. It is possible to save a Song in
Standard M IDI -file format in order to play it on other equipment, regardless of the manufacturer.
Finally, it is possible to carry out multi-track recordings via MIDI, and the Song can play
external musical instruments connected to the Music Processor’s M IDI O UT .
The Song tracks
Each part of a Song corresponds to one of the Tracks of a Performance. A Performance is
always selected when you enter Song mode and, during the course of the Song playback
or recording, you can select other Performances in order to modify the status and configuration of the tracks. A Song can utilise all the Performances of the Bank/Song to
which it belongs.
To visualise the status of the tracks engaged by the Song, press the
Source section (led on).
SONG
button in the
The status of each track of the Song is identified by the following symbols shown in the
track column:
e The track contains recorded notes.
– The track is completely empty.
x The track is set to “mute”.
Prepare the tracks for the recording
A Song records the data generated by the LOCAL Source (keyboard or master keyboard via
M IDI -C OMMON ) and the MIDI IN Source (instruments connected to the M IDI I N not via M IDI C OMMON ). It is important, therefore, to set one or both Sources correctly before you start
to record your Song:
the status of this Source determines the number of tracks that can be recorded in the Song
among those activated for recording. For example, if you activate 6 tracks in Record mode with
the local Source set to layer , the Song will record two layered tracks that have the lowest numbers
among the six tracks activated in Record. It is of no importance if the local tracks are set to mute
(“x” symbol).
LOCAL
MIDI IN if you are recording data generated by the Midi In Source, the Sequencer will only record
tracks activated to receive Midi In events (shown with the symbol “e” ), provided that they are also
activated for recording. If the Midi In Source is set to single, the Sequencer will record only one
track of Midi In events, regardless of how many tracks are activated for recording.
Configure the LOCAL and MIDI IN Sources. Select the required playing mode for the LOCAL
Source. For the MIDI IN Source, select multi and activate the tracks for the reception of
Midi In events (symbol “e” in the track column).
82
PRACTICAL GUIDE
After configuring the Sources, save the modifications in the current Performance with the
“Save Performance” command in the main display ( [SAVE] [ENTER] [ENTER]). If you omit this
important step, activating Record mode recalls the original settings of the Performance,
cancelling the newly configured status.
Activate Record mode and select the recording options
1. Press the
RECORD button to access Record mode. A dialogue window appears, above
the “record pending” display, which invites you to select the tracks and the recording
options shown in the command/options column:
“Record pending” display; partially covered by a dialogue window.
This is an S2/S3 display. In S2R “P.vol.rec” is substituted by “C.vol.rec”.
2. Select the tracks to record with the respective
SCROLL BUTTONS
TRACK SELECTION KEYS.
Use the
TRACK
to bring other tracks into view.
Tracks activated for recording are identified with the symbol “ R” in the track column.
You can deactivate the tracks in record by repressing the respective TRACK SELECT KEY.
Attention: If you record from the keyboard of from a master keyboard via MIDI-COMMON, the
number of tracks recorded will be equal to the number that appear in the LOCAL Source. The
tracks having the lowest numbers will be recorded among those selected in Record. All other
tracks will be ignored and, at the end of the recording, they will be identified by the hyphen (“-”),
which indicates an empty track.
3. If necessary, select the options which appear in the command/options column:
• if you want to record the Tempo changes effected from the control panel during the
course of the recording, activate the “Tempo rec” option.
• if you want to record the regulations of the general volume effected with the S2/S3
Volume Pedal, activate the “P. vol. rec” option. S2R can record Pedal Volume events
travelling on M IDI -C OMMON and not originating from the pedal connected to the rear
panel pedal volume socket; the option is called “C.vol. rec”.
• if you want to record the changes made to the Effects and Effect Volumes using the
Function Controllers (in USER mode), or by means of M IDI messages, activate the
“Effect rec” option.
• if you want to listen to the metronome “tick” during the recording, activate the
“Metronome” option.
4. Select the required recording option (“Overdub” to add new notes to those already
present, or “Replace” to replace notes already recorded with new ones in the tracks
shown with the “R” symbol).
Once you have set all the required recording options, press
settings (or EXIT to cancel and escape Record mode):
ENTER
to confirm the
You can, however, select the options after confirming the track selections with ENTER.
(The metronome can be freely activated and deactivated during the recording). Therefore,
if you set one or more of the options incorrectly, confirm with ENTER then correct the
error before starting the recording.
(9) Recording a Song
83
Select the parameters of the Song
Rotate the DIAL to select one of the displayed parameters in the central part of the “Record
pending” display, and press ENTER to activate the edit of the selected parameter.
5. Select the required Quantize (auto-correct) value. “Free” will record your events
exactly as played; other values represent the number of “divisions” that make up a bar.
The Quantize effect is not noticeable during the recording but it is effective on recorded tracks.
6. Set a suitable Tempo value (playing speed) for the Song.
7. Set the required Time Signature (3/4, 4/4, etc.).
The Song pointer (locator)
* The beat resolution is the
smallest impulse of the
Sequencer.
In the S Series, there are
192 ‘ticks’ per quarter.
In MIDI, there are 24
impulses per quarter.
The recording starts at the bar indicated by the “Locator” parameter (“Loc”, at the centre
of the display shown on the previous page). This parameter (otherwise know as the “Song
pointer”), composed of three numbers, shows the bar, the beat and the beat resolution*. In
the record pending display, only the bar can be modified, and, unless you start a recording right at the beginning (1 - 1 - 1), the start bar must always be indicated.
You are free to end your recording at any point: press STOP to stop the recording process.
For a precise end-record point, you can make use of the “Edit stop to bar” parameter in
EDIT SONG—Utility. Follow this procedure:
8. If the
RECORD led is on, press the record button to escape the Record pending display
and return to the Playback display. (This operation annuls some of the options selected
in Record).
9. Select the “Edit” command in the Playback display. The
EDIT SONG menu appears (or the
last EDIT SONG editor selected; in this case, press the “Menu” command to return to the
main EDIT SONG menu):
10. Access the Utility editor:
11. Activate the edit of the “Edit Stop to Bar” parameter:
12. Use the
NUMERIC KEYPAD (or the DIAL) to specify the last bar of the recording. At the
end of the specified bar, the recording will stop automatically.
13. Select the “Rec/play” command to return to the Playback display.
14. Press
RECORD to enter the “Record pending” display. Repeat the track selection process
and the selection of the options as already described.
84
PRACTICAL GUIDE
Now record the Song
15. With the “Record pending” display showing, press
PLAY and start to play. The tracks
shown with the “R” symbol will be recorded (provided that they are active in LOCAL or
MIDI IN).
16. End your recording with
STOP. If you have programmed the “Edit Stop to Bar” parameter, the recording stops automatically at the end of the selected bar of the Song
pointer.
17. You can use the “rewind” button (<<) to go back to any point of the Song, press the
button again to return to the beginning, or modify the “Locator” parameter to
reach a precise point. You can press PLAY to record other notes (adding new notes in
“Overdub”, or substitute old notes with new ones in “Replace”).
STOP
18. During the recording you can select a different Performance (in the currently selected
Bank/Song). You can also make use of the Function Controllers, the pedals and the
wheels.
If you are recording with the “Tempo rec” option activated, all Tempo variations
effected from the control panel (but not via M IDI ) will be recorded. Vary the Tempo
using the DIAL, in the appropriate window which opens when you press CLOCK:
“Clock” window: Rotate the dial to modify the Tempo and escape with EXIT.
19. Press
RECORD
to escape the “Record pending” display and to recall the Playback display:
20. If you want to record other tracks, or the same tracks in “Overdub” or in “Replace”,
repeat the procedure from the beginning (point 1).
Recording methods
There are two Song recording methods to choose from:
•
record all the tracks of the Performance in a single step; in this way you can secure a
live performance;
•
record one track at a time, creating the Song by superimposing the instrument parts
that make up the Song.
In the first case, set all the tracks required of the Performance in Record. If you want to
change Performance during the recording, activate all the tracks that you think you will
record (nevertheless, you will only record the tracks in which notes or M IDI events are
effectively inserted).
In the second case, activate one track at a time. If you are recording from a keyboard or
master keyboard via M IDI -C OMMON , activate the single mode for the LOCAL source. Repeat
the recording procedure for each track until the song is finished.
While you are recording new tracks, those already recorded will be heard in playback. If
you want to isolate the track in record, press the SOLO button.
When you record jazz, rock, pop, etc. music, it is generally best to record the drum track
first, then the tracks dedicated to the accompaniment, then the melody. The drum track
(drumkit) is usually assigned to track 10 (to conform to GM standards). If you are not an
expert with the Sequencer, listen to the demonstration Songs supplied by Generalmusic;
they are excellent examples of how the S Series can be programmed.
(9) Recording a Song
85
10 REAL
TIME
SOUND
EDITING
This chapter explains how to tweak (rapidly edit) some Sound parameters while performing, for example, a concert. The modifications described could be required for creative
purposes as well as for reasons of rendering the musing being played more suitable on
stage, otherwise considered perfect in the studio.
The S Series keyboard models are equipped with hardware Function Controllers. This
system of sliders and keys gives direct access to some of the more important parameters
of the Sounds assigned to the tracks and provides a means of instantly cancelling the real
time modifications made, by means of a “reset” function.
The rack model contains software Function Controllers, which allow a not so rapid but
nevertheless powerful access to the Sound parameters.
The modifications can be saved in the Performance and - eventually - to disk for future
use. Saving to the Performance is essential, to avoid cancelling the modifications when
you select a different or the same Performance (operations which would annul any modification carried out).
The S2/S3 hardware Function Controllers
The Function Controllers are located on the extreme left of the S2/S3 control panel; they
consist of seven sliders and eight buttons identified by silk-screened numbers, letters and
parameter names.
FUNCTION CONTROLLERS
MASTER
VOLUME
A
B
C
D
E
F
G
Note:
The MASTER VOLUME
slider is not included as
one of the FUNCTION
CONTROLLERS.
USER
1
2
3
4
5
6
7
PANEL
VOLUME
ATTACK
RELEASE
FILTER 1
FILTER 2
PAN
SHOW
The Function Controllers have two operating modes:
a) if the led on the USER/PANEL button is off, the Function Controllers operate in
mode (= as indicated on the control panel);
b) if the led on the USER/PANEL button is on, the Function Controllers operate in
(= user programmable).
86
PRACTICAL GUIDE
PANEL
USER
mode
PANEL mode
In this mode, each cursor affects one of the seven tracks currently shown in the display.
Both cursors and tracks are identified by a letter of the alphabet (A-G). The tracks can be
scrolled but the correspondence between cursors and tracks is shown at all times be these
letters.
Six buttons are identified with the name of a Sound or Track parameter: Volume, Attack,
Release, Filter 1, Filter 2, Pan. The last button activates the Show function, which
displays the current status of the active parameter for the seven tracks.
Example: How to modify the Track Volumes
1. Select the VOLUME button (is necessary).
2. Regulate the volume of the seven track that appear in the display by moving the seven
cursors.
Example: How to modify the Release of the Sounds
1. Select the RELEASE button (if necessary).
2. Regulate the Release time of the Sounds assigned to the tracks which appear in the
display by moving the seven cursors.
* Attack, Release, Filter 1,
Filter 2. parameters
The “F.C.” symbol When a Sound* parameter is modified with the
Function Controllers in PANEL mode, the symbol F.C. (=Function
Controllers) appears in the top right hand corner of the main display.
This is a reminder that the Sound parameters have been altered with respect to the original status memorised in the Performance. To recall the default status of the parameters,
select the “F.C. Reset” command which appears in the SHOW display (s. below).
The SHOW BUTTON This button activates a graphic representation of the currently active
parameter (Volume, Attack, Release, Filter 1, Filter 2, Pan):
This display is only an indicator of the current parameter status; the elements displayed
cannot be modified with the Data Entry commands. If, however, you move the cursors,
the graphic representation changes accordingly.
Each horizontal bar reflects the current status of one of the tracks shown in the display.
The current parameter value is also shown next to the bars.
To visualise the status of one of the other parameters, simply press the corresponding
button of the Function Controller group.
The “F.C. RESET” command in the SHOW DISPLAY Select this command to recall the default settings
of the parameters of the Sound (Attack, Release, Filter 1, Filter 2).
(10) Real time Sound editing
87
USER
MODE
In this mode, both cursors (A-G) and keys (1-7) operate as programmed in the currently
selected Performance. The Function Controllers can be programmed in EDIT PERFORMANCE/
CONTROLS, pages 3 and 4:
Keys
Sliders
The Function Controllers (sliders and keys) are independently programmable for each
Performance. In USER mode, you can assign a parameter and a track to each slider and key.
This will permit the control of tracks not currently shown in the display.
Example: Assign a Program Change to key 2 for track 16.
1.
2.
3.
4.
5.
6.
Select and activate the edit of “Key” 2.
Select a parameter to assign to the key, in this case a Program Change.
Press ENTER to pass to the second part of the line (“V”).
Assign a value to the Program Change.
Press ENTER to pass to the third part of the line (“Tr”).
Select a track number to which the Program Change is to be assigned.
Key 2 (in USER mode) will recall the indicated Program Change for track 16. This operation assigns the corresponding Sound to track 16 and sends the relative message (Program
Change 120 and Bank Select 3) to the M IDI O UT destination.
The S2R Function Controller
S2R contains a software Function Controller, accessed in page 3 of
CONTROLS:
EDIT PERFORMANCE/
1. Select a parameter in the options column (Volume, Attack, Release, Filter 1, Filter 2,
Pan). The central part of the display shows a graphical representation of the parameter
for the tracks that appear in the track column. The current parameter value is also
shown next to the horizontal bars.
88
PRACTICAL GUIDE
2. Select a track that requires the modification.
3. Rotate the
DIAL
or specify the parameter value with the
NUMERIC KEYPAD.
4. Select another track, as required, and repeat the operation.
5. Select another parameter, as required, and carry out the modifications.
Example: How to modify the track Volumes
1. Select the VOLUME button (if necessary).
2. Select the first track to modify and rotate the
MERIC KEYPAD .
3. Select other tracks and repeat the operation.
DIAL
or insert the value with the
NU -
Example: How to modify the Release of the Sounds
1. Select the RELEASE parameter (if necessary).
2. Select the first track to modify and rotate the DIAL or insert the value with the
MERIC KEYPAD .
3. Select other tracks and repeat the operation.
* Attack, Release, Filter 1,
Filter 2. parameters
NU -
The “F.C.” symbol When a Sound* parameter is modified with the
Function Controller, the symbol F.C. (=Function Controllers) appears
in the top right hand corner of the main display.
This is a reminder that the Sound parameters have been altered with respect to the original status memorised in the Performance. To recall the default status of the parameters,
select the “F.C. Reset” command which appears in the Function Controller page.
Select this command to recall the
default settings of the parameters of the Sound (Attack, Release, Filter 1, Filter 2).
The “F.C. RESET” command in the FUNCTION CONTROLLER DISPLAY
Save the modifications to the Performance
The modifications made with the Function Controllers must be memorised to avoid losing
them when you select the same Performance or a different Performance.
In the main display, select the Save Performance command and confirm the memorising procedure. You can memorise the modifications in the current Performance, or in
another Performance of the same Bank/Song or of another Bank/Song.
If you select another Performance, remember that, as well as the modifications made with
the Function Controllers, you will also memorise all the other Performance parameters
(Sound, Transpose, Volume...). This operation is equivalent to the creation of a new
Performance, if necessary to replace another.
The modified Performance will be cancelled when the instrument is turned off. Save the
relative Bank/Song to a floppy disk or to R AM -disk if the Performance is required for
future use
Note: The modifications made to the Performance caused by the messages received at
M IDI I N (Volume, Pan, Effects selections and Effects Volume changed) do not trigger the
appearance of the “F.C.” symbol and cannot be memorised in the Performance.
(10) Real time Sound editing
89
11 EDITING SOUNDS
IN THE STUDIO
The S Series instruments are equipped with very powerful Sound editing facilities.
Sounds can be modified or created by means of a highly refined editing system. The
general techniques of synthesis are discussed in the first part of this manual.
* The led on the button
can show the status of the
EDIT SOUND:
- it is on for the duration of
the edit tasks for the
sound in edit;
- it flashes when you
temporarily escape EDIT
SOUND provided that the
“Save” or “Abort”
command is not selected
(the Sound remains in
edit).
To access the EDIT SOUND environment, you must (a) assign the Sound you want to edit to
the currently selected track, then (b) press the SOUND button in the Edit* section:
Detailed instructions of the EDIT SOUND procedures are in the Reference section. This
chapter discusses the general procedures, which can be useful as a first approach to the
modification of existing Sounds. If you are interested in the synthesis of Sounds with a
view of intensifying your knowledge, it can be very useful to start with an analysis of the
existing Sounds, and then proceed with the simple modifications which will give you an
idea of all the possibilities available from the EDIT SOUND environment.
Types of Sound
The three fundamental Sound types
The S Series can house three fundamental sound types in the Sound Library:
SO (Single Oscillator) Sounds generated by the action of only one oscillator. The oscillator reads
only one Waveform. These Sounds provide a maximum polyphony of 32 notes.
DC (Dual Crossfade) Sound generated by the action of two oscillators, which read only one
Waveform. These Sounds provide a maximum polyphony of 16 notes, but obtain a very high
quality of Sound.
DO (Dual Oscillator) Sounds generated by the action of two oscillators, each reading a different
Waveform. These Sounds provide a maximum polyphony of 16 notes, producing complex sounds.
The Sounds can be converted into any one of the three types of Sound. The converting
command is found in the edit WAVESET editor.
The combinations: Sound Patch and Drumkits
The fundamental Sound types can be combined together in the Sound Patch sounds and
the Drumkits. These combinations reside in the Sound Library together with the fundamental Sound types, but they are identified with the symbol .
Sound Patch In their simplest form, they are two superimposed Sounds assigned to all the notes
of the keyboard and separated by a dynamic threshold where the Sound on the higher dynamic
level is recalled by striking the keys harder. In the more complex forms, these Sounds can consist
of several zones assigned to different parts of the keyboard, each with two superimposed sounds
separated by a dynamic threshold.
Drumkit Set of percussion instruments, each one assigned to a different note of the keyboard.
The Drumkits are Sound Patches of a particular type. These “sounds” are modified in the same
edit environment as the Sound Patch (EDIT SOUND PATCH).
90
PRACTICAL GUIDE
ROM-Sound, RAM-Sound, RAM
Sound
The S Series houses over 500 permanent Sounds, called R OM -Sounds. These Sounds
cannot be cancelled or modified, but, starting from a Rom-Sound copy, you can apply one
or more modifications to produce R AM -Sounds.
R AM -Sounds are user-created Sounds, which can be saved to disk as a Setup Sound
Library.
The R AM
Sounds are R AM -Sounds based on Waveform created with the Sample Translator, or loaded from floppy disks.
The Sounds are all organised and accessed in the Sound Library.
Waveform
There are two types of Waveform:
Rom-Waveform Waveform contained in Rom. These are the waveforms which are the basis of the
Rom-Sounds and the Ram-Sounds (not the Ram-Sound with the symbol ).
Ram-Waveform Waveform created with the Sample Translator or loaded from commercial floppy
(Ram
Sound).
disks. These waveforms are the basis of the Ram-Sounds with the symbol
The Waveform or Waveforms upon which the Sounds are based are selected in the
W AVESET editor.
Filters
The filters and the Cutoff-frequency
In the Sounds, the Waveforms are modified by two state-variable 2-pole filters connected
in series (Filter 1 —> Filter 2). The programmable filters enrich or impoverish the
harmonic content of the sound.
Each filter can be set to operate as one of the following:
low-pass . Attenuates the higher frequencies, allowing only the lower frequencies to pass.
high-pass. Attenuates the lower frequencies, allowing only the higher frequencies to pass.
band-pass. Attenuates the frequencies above and below a given frequency.
parametric-boost. Enhances a given frequency.
parametric-cut. Attenuates a given frequency.
The frequency at which the Filter begins to “cut into” the harmonic band of a waveform
is called the “cutoff-frequency”. This frequency is programmable and it corresponds to
the level at which the filter acts on all the notes of the Sound.
The cut-off frequency can, however, be modified across the keyboard scale by means of
the “Filter Tracking” (s.) parameter.
Resonance
Resonance creates a high peak of emphasis at the cut-off frequency, rendering the harmonic content of a sound richer. This parameter is commonly used to create “analog”
type sounds.
(11) Editing Sounds in the Studio
91
The filter envelopes
The DC and DO Sounds can be affected by dynamic filters which can be made to vary
over time. The variation is programmed by means of an Envelope (s.). The Filter Envelope is extremely useful to render a sound “live”.
Envelopes
Types of Envelopes
The envelopes vary the quality of the Sound over time. There are the Key On Envelopes,
which affect the Sound continuously during the period that the note is held pressed, and
the Key Off Envelopes, which affect the Sound after the note has been released (Release
phase).
The S Series Sounds can have programmable envelopes for the following sound parameters:
Amplitude The Amplitude Envelope represents the Volume displacement in relation to time. In the
most common cases, the Volume of a sound increases sharply immediately after attack, then there
is a sharp decay to a lower level, then it remains more or less at a constant level (such as Strings)
or decays slowly (such as the Piano). In the phase that follows the release of the note, or the “key
off” phase, the sound gradually fades to “zero” level. With the synthesizer it is also possible to
create non-realistic envelopes.
Filter The Filter Envelope modifies the cut-off frequency over time, modifying, therefore, the
harmonic content of the timbre being affected. SO Sounds cannot be affected by this envelope.
Pan The Pan Envelope modifies the position of the sound within the stereo panorama over time.
(This editor is not available for SO Sounds).
Pitch The Pitch Envelope modifies the Pitch of the sound over time. This parameter can be useful
to simulate the unpredictable initial pitch of Brass or Strings sounds.
Balance Only available for the DO Sounds. The Balance Envelope (in reality it corresponds to the
Pan Envelope or to the Pitch Envelope) varies the Volume displacement over time of the two
oscillators which constitute the Sound.
Programming the envelopes
The envelope edit pages consist of a graphic parameter. For example, the following
display shows the Key On Amplitude Envelope, identical to all the other envelopes:
Segment A section of the selected envelope.
Time Duration of the segment.
Level Generally, the level reached by the parameter when the segment of the selected envelope
is played. For.ex. in the Amplitude Envelope it represents the Volume of the sound, in the Filter
Envelope it is the cut-off frequency, in the Pan Envelope it is the position of the sound.
92
PRACTICAL GUIDE
Use the following procedure to modify the envelopes:
1. Press ENTER repeatedly to select one of the parameters: “Segment”, “Time”, “Level”.
2. Rotate the
DIAL to select a “Segment”, modify its relative “Time” or “Level” value.
The “Time” and “Level” values can be inserted with the NUMERIC KEYPAD.
3. Press
ENTER to select the next parameter. After “Level” , the “Segment” parameter will
be selected again.
4. Select the “Add segm.” command to add a new segment directly after the one selected. Select
the “Del. segm.” command to cancel the selected segment.
Tracking
Types of Tracking
Tracking follows the movements of a parameter across the keyboard. In practice, you can
control the variation of a parameter (Volume or Pan) with respect to the note played.
Tracking is indispensable for the correct simulation of real sounds, because it renders the
lower, medium and high frequencies of the scale homogeneous.
Tracking can be applied to the following parameters:
Volume Volume Tracking modifies the volume of the Sound across the keyboard.
Pan Pan Tracking modifies the position of the sounds in the stereo panorama across the keyboard.
For.ex. the higher frequencies can be moved to the left and the lower ones to the right (or vice-versa).
Filter Filter Tracking modifies the cut-off frequency with respect to the note played. It is useful to
avoid the complete “filtration” of the notes above the cut-off frequency. It is also useful to provide
more or less “brilliance” to the sound across the keyboard.
Amplitude Envelope The Amplitude Envelope Tracking modifies the completion velocity of the
Amplitude Envelope across the keyboard. Acoustic instruments are characterised by having a
shorter (faster) envelope for the higher notes with respect to the lower ones.
Filter Envelope The Filter Envelope Tracking modifies the completion velocity of the Filter Envelope across the keyboard.
Pitch Envelope The Pitch Envelope Tracking modifies the completion velocity of the Pitch
Envelope across the keyboard.
Programming the Tracking
The Tracking edit pages consist of a graphic parameter. For example, the following
display shows the Amplitude Envelope Tracking curve, almost identical to all other
Tracking curves:
Point One of the extreme ends of the selected segment of the Tracking.
Key The keyboard position corresponding to the Point in edit. The Points at the extremes have a
Key parameter which cannot be modified (A#0, G8).
Level Determines the offset value of the envelope or sound parameter at the selected Point
(Volume Tracking curves have negative Level values, because they represent offset values with
respect to the maximum Volume of the Sound).
(11) Editing Sounds in the Studio
93
Use the following procedure to modify the Tracking:
1. Press ENTER repeatedly to select one of the parameters: “Point”, “Key”, “Level”.
2. Rotate the
DIAL to select a “Point”, modify its relative “Key” or “Level” value. The
“Key” and “Level” values can be inserted with the NUMERIC KEYPAD. (“Key” can also be
represented in numeric form: each M IDI note is numbered. Middle C — C4 — has the
M IDI note number 36).
3. Press
ENTER to select the next parameter. After “Level” , the “Point” parameter will be
selected again.
LFO, Pitch, Pan
LFO
Lfo is a low frequency oscillation which can be applied to generate interference in a
sound. In the S Series, the Lfo can be applied to the following sound parameters:
Pitch Vibrato effect.
Amplitude Tremolo effect.
Filter1/Filter2 “Wha-wha” effect.
The L FO oscillation can have a programmable waveform, selected among Sinus, Triangle,
Saw, Square, Random, Sample&Hold. (S. Reference, chapter Edit Sound).
Pitch
The pitch of a note can be subjected to changes while a note is held pressed (Key On
Pitch Envelope) or in the Release phase (Key Off Pitch Envelope).
The Pitch Envelope can be useful to simulate the small pitch variations characteristic of
acoustic sounds (listen to Brt_Piano [2-1]) as well as for creative effects (listen to Devil
[89-4]).
Pan
The Pan is the position of the sound within the stereo panorama (stereo outputs pairs:
LEFT+RIGHT, 1+2, 3+4). Pan can be modified in a fixed manner across the keyboard with
Pan Tracking, or dynamically with the Pan Envelope.
94
PRACTICAL GUIDE
Memorising the Sound in the Sound Library
Escape from
EDIT SOUND
After having created or modified a Sound, it is possible to escape from
it or cancelling the modifications made.
Escape
EDIT SOUND
EDIT SOUND,
saving
and cancel the modifications
Select the “Abort” command in the main menu. Confirm the “Are you sure?” dialogue
window with ENTER.
Escape from
EDIT SOUND
saving the Sound in the Sound Library
1. Select the “Save” command from the main menu. The Sound Library page is dis-
played:
2. If you have edited a R AM -Sound, and want to save the modifications in the source
Sound, select the “Store” command. Confirm “Are you sure?” with
ENTER.
3. If you have modified a R OM -Sound, you must select a free location (-- -- -- --). Rotate
the DIAL to select the new location for the Sound, then select the “Store” command.
Confirm “Are you sure?” with ENTER.
Note: If you want to change the name of the Sound, select the “Name” command before
selecting “Store”:
Insert the characters with the alphanumeric keypad:
Insert: inserts a space as the cursor position.
Capitals: allows the insertion of uppercase letters.
Delete: cancels an entry at the cursor position.
ENTER
to confirm, EXIT to annul.
Save the Sound Library to disk
The Sounds are stored in the Sound Library. The Sound Library stores all types of Sound
(R OM , R AM , R AM ), organised in Family groups*.
* The ROM-Sound Families
are listed in the Appendix.
The Sound Library can be modified (Sound remappings, new R AM -Sounds) and saved to
disk as a Sound Library Setup.
The save Sound Library Setup procedure is described at the beginning of the section in
chapter Save the contents of memory to disk. S. also the Reference section in chapters
Disk and Sound Library.
The Sound Library Setup can be loaded from disk. If the disk containing the Sound Library is
inserted in the disk when you power up, or if the Sound Library is stored in the RAM-disk, the
Sound Library Setup will be loaded to memory automatically when the instrument is turned on
and the standard Sound Library residing in ROM will be modified.
(11) Editing Sounds in the Studio
95
12 SELECTING
THE
SOUNDS
VIA
MIDI
Selecting the Sounds with Bank Select and
Program Change
The Sounds assigned to each track can be selected via M IDI with appropriate Program
Change and Bank Select* messages.
*Note:
The Bank Select message
does not refer to the S2R
Bank/Songs. It is a
standard MIDI message
which permits the
selection of the “variation”
tones of the basic Sounds
with Program Change and
Bank Select numbers of
the type XXX-1.
The S2/S3 User Manual
refers to this message as
“Extended Program
Change”.
The S Series uses the term
“Bank” in two different
cases:
- Bank/Song (Bank of
Performances);
- Bank Select or Sound
Bank (Bank of Sounds).
Each Sound is identified by a Program Change number and a Bank Select number, displayed near the name of the Sound (in Sound mode):
Sound names
Bank Select
Program Change
The Program Change and Bank Select numbers also appear in the Sound Library, which is
accessed by pressing the SOUND LIBRARY button:
Sound names
Bank Select
Program Change
The Sound map, with relative Program Change and Bank Select numbers appears in the
Appendix.
The Program Change
To change the Sound assigned to each track, it is possible to transmit (from a sequencer
of a master keyboard not connected via M IDI -C OMMON ) a different Program Change
message to each track.
The Program Change is a standard message, available in all sequencers. With the Program
Change message, it is possible to select only the Sound with the Bank Select number “1”.
In the S Series, the Program Change numbers range from 1 to 128. Some instruments and
sequencers use the numbering system based on the range 0 to 127.
The Bank Select (MIDI Controller 0)
Note: Bank Select “1” is not obligatory.
The Bank Select message has only recently become a standard, therefore, it is quite
possible that some sequencers are not able to send this message. Some sequencers implement this message as “M IDI Controller 0”.
96
PRACTICAL GUIDE
For example, the Steinberg Cubase™ sequencer can send this message in various different ways. In order to be received correctly by the S Series, it must be assigned to the
track of the Song (in Cubase the song is called, Arrangement). The Bank Select is inserted before the Program Change.
1. Create a track in one of the “Arrange” windows of Cubase:
Note: Sequencers of
other manufacturers will
most probably use
different procedures and
terminology. Consult the
relative owner’s manual.
2. Create a Pattern at the beginning of the track:
3. Select the Grid command from the Edit menu. The “Grid Edit” palette will open.
4. Select the “pencil” tool:
5. Select the “Control Change 0” M IDI event. “Control Change 0” is called “Bank Se-
lect”:
6. Assign the number to the “Bank Select” event (in the Val2 column in Cubase™). In
this window, Cubase™ shows the numbers according to the range “0 ~ 127” and not
the range “1 ~ 128” of the S Series; scale down by one number to insert the correct
Bank Select number.
7. Select the “Program Change” M IDI event. Insert the “Program Change” event directly
after the “Bank Select” event:
8. Assign the correct number to the “Program Change” event, bearing in mind that
Cubase™ conforms to the range “0 ~ 127” and not “1 ~ 128” of the S Series; scale
down by one number to insert the correct Program Change number.
(12) Selecting the Sounds via MIDI
97
Select the Sounds via the Performance
Change event
If the sequencer or master keyboard that you are using is not able to transmit the Bank
Select message (Control Change 0), it will not be possible to select Sounds with Program
Change numbers other than the type XXX-1 and, therefore, not the “variation” of the
basic Sounds.
You can, however, program your Performances accordingly, and select them with a
Performance Program Change message.
You must activate the M IDI -C OMMON channel and assign it one of the 16 M IDI channels,
bearing in mind that the channel assigned can no longer be used for instrument data.
Programming the MIDI-Common channel
1. Press the
GENERAL
2. Specify 3 on the
button to access
NUMERIC KEYPAD
EDIT GENERAL:
to access the “Midi” editor:
3. Press 1 to activate the edit of the “Midi Common” parameter:
4. Specify the required M IDI channel, for example, channel 16; and press
5. Press
ENTER
6. Press
NORMAL
ENTER:
three times to confirm the programming:
to return to the main display:
Select the Performances via MIDI-COMMON
External
Sequencer
Track
dedicated
to the control of the
Performance
98
Musicprocessor
MIDI Common
PRACTICAL GUIDE
Dedicate one of the tracks of the external sequencer’s song for the purpose of sending
Performance Program Change data (assigned the same M IDI channel as the M IDI -C OMMON ).
Insert the relative Program Change number slightly before the point where the Performance has to change.
The table in the following page shows the Program Change numbers that correspond to
the 100 Performances of the S Series.
PC
Bank-Perf
PC
Bank-Perf
PC
Bank-Perf
PC
Bank-Perf
PC
Bank-Perf
1
1-1
11
2-1
21
3-1
31
4-1
41
5-1
2
1-2
12
2-2
22
3-2
32
4-2
42
5-2
3
1-3
13
2-3
23
3-3
33
4-3
43
5-3
4
1-4
14
2-4
24
3-4
34
4-4
44
5-4
5
1-5
15
2-5
25
3-5
35
4-5
45
5-5
6
1-6
16
2-6
26
3-6
36
4-6
46
5-6
7
1-7
17
2-7
27
3-7
37
4-7
47
5-7
8
1-8
18
2-8
28
3-8
38
4-8
48
5-8
9
1-9
19
2-9
29
3-9
39
4-9
49
5-9
10
1-10
20
2-10
30
3-10
40
4-10
50
5-10
PC
Bank-Perf
PC
Bank-Perf
PC
Bank-Perf
PC
Bank-Perf
PC
Bank-Perf
51
6-1
61
7-1
71
8-1
81
9-1
91
10-1
52
6-2
62
7-2
72
8-2
82
9-2
92
10-2
53
6-3
63
7-3
73
8-3
83
9-3
93
10-3
54
6-4
64
7-4
74
8-4
84
9-4
94
10-4
55
6-5
65
7-5
75
8-5
85
9-5
95
10-95
56
6-6
66
7-6
76
8-6
86
9-5
96
10-6
57
6-7
67
7-7
77
8-7
87
9-6
97
10-7
58
6-8
68
7-8
78
8-8
88
9-7
98
10-8
59
6-9
69
7-9
79
8-9
89
9-8
99
10-9
60
6-10
70
7-10
80
8-10
90
9-10
100 10-10
Warning: The Performance Program Change table shows numbers based on the range 1 ~ 128. Some MIDI controlling
devices (master keyboard, sequencer) will be based on the range 0 ~ 127. In this case, scale down by one unit to obtain
the correct Program Change data shown in the table.
(12) Selecting the Sounds via MIDI
99
13 SELECTING
THE
EFFECTS
VIA
MIDI
The Effects assigned to the two DSPs (digital signal processors), and their Effects Volumes, can be selected via M IDI . Owing to the fact the Effects are elements that relate to
the Performances and not to the individual tracks, it is not possible to activate or deactivate an effect for each track via M IDI .
Effect 1 is a reverberation, Effect 2 is a modulation (delay, chorus, flanger, phaser,
rotary).
To control the Effects, use is made of the following M IDI -Controller data, received by the
Music Processor on the M IDI -C OMMON channel:
- selection of Effect 1: Contr. 21 (with values 1...64 or 0...63)
- selection of Effect 2: Contr. 22 (with values 1...64 or 0...63)
- control of Effect 1 Volume: Contr. 23 (with values 1...128 or 0...127)
- control of Effect 2 Volume: Contr. 24 (with values 1...128 or 0...127)
Programming the MIDI-Common channel
Follow the instructions outlined in the chapter “Selecting the Sounds via M IDI ”.
Controlling the Effects via MIDI-COMMON
Dedicate one of the tracks of the external song (assigned the same M IDI channel as the
M IDI -C OMMON channel) to the control of the Effects. This track can be the same as that
used to select the Performances via M IDI .
External
Sequencer
Track
dedicated
to the
control of
the Effects
Musicprocessor
MIDI Common
Insert the M IDI Controller event in the track dedicated to the M IDI -C OMMON . The M IDI
Controller data is divided into two parts: the first is the number that identifies the Controller (in this case, 21, 22, 23 or 24), the second is the value of the Controller, (in this
case the number of the Effect — from 1 to 64 or from 0 to 63, according to the numbering
system used by the external sequencer — and the value of the Effect Volume — from 1 to
128 or from 0 to 127).
For example: in the typical sequencer “Event List”, the M IDI Controllers could appear as
follows:
Assignment of Effect number 4 to DSP 1.
100
PRACTICAL GUIDE
14 EDITING SOUNDS VIA MIDI
It is possible to modify the following Sound parameters via M IDI : Attack, Release, Cutoff
of Filter 1, Cutoff of Filter 2. Each parameter can be controlled via M IDI by an appropriate M IDI Controller, received by the track to which the Sound in edit is assigned. The
tracks which receive this kind of data must be assigned a M IDI channel that is not the
M IDI -C OMMON .
ATTACK : Contr. 12 (0 = faster, 64 = standard level, 127 = slower).
RELEASE : Contr. 13 (0 = faster, 64 = standard level, 127 = slower).
FILTER 1 CUTOFF: Contr. 14.
FILTER 2 CUTOFF: Contr. 15.
FILTER 1 + F ILTER 2 CUTOFF : Contr. 20.
Sound modifications via M IDI Controller data do not cause the appearance of the F.C.
symbol in the main display, and they cannot be saved in the Performance.
The sound parameters tied to the tracks can also be modified (Volume and Pan):
VOLUME: Contr. 7.
PAN : CONTR 10.
(14) Editing Sounds via MIDI
101
15 PROGRAMMING WITH AN EXTERNAL SEQUENCER
— PERFORMANCE 10 OF BANK/SONG 1
PERFORMANCE
"LOCAL OFF"
SEQUENCER
TRACK 1
IN Chann. 1
Songs can be recorded on an external
sequencer in a simplified manner by
exploiting Perfomance 10 of Bank/Song 1
(the default situation). This Performance
is called “Local Off”.
TRACK 2
Performance 10 is programmed in order
to be able to send data to an external
sequencer on M IDI channel 1, and to
received data from the external sequencer
on channels 1 to 15. Channel 16 is not
used.
TRACK 5
Most sequencers are preset to receive
data on Midi channel 1, and are
configured so that the data received on
this channel plays the currently selected
track in the sequencer itself. Therefore, if
the Music Processor display shows track
16 — in LOCAL — set to transmit on Midi
channel 1, you can play the sequencer
track (currently selected or set to record)
on the S2/S3 keyboard.
TRACK 9
IN Chann. 2
TRACK 3
IN Chann. 3
TRACK 4
IN Chann. 4
IN Chann. 5
TRACK 6
IN Chann. 6
TRACK 7
IN Chann. 7
TRACK 8
IN Chann. 8
IN Chann. 9
TRACK 10
IN Chann. 10
TRACK 11
IN Chann. 11
TRACK 12
IN Chann. 12
TRACK 13
IN Chann. 13
TRACK 14
IN Chann. 14
TRACK 15
IN Chann. 15
TRACK 16
NO IN - OUT Chann 1
102
PRACTICAL GUIDE
OUT
IN
1. After powering up the instrument in default conditions (no floppy disk in the drive and
no data in R AM -disk), select Performance 10 of Bank/Song 1.
2. Set the viewing mode for the
LOCAL Source (and activate “Sounds” mode). If this
Source does not appear in the display, press the LOCAL button in the Source section:
Performance “Local Off”, default, “Sounds” mode: On the keyboard it is possible to
play track 15 (with the Sound “Syn_Lead_1”).
3. To send data to the external sequencer, press the
RIGHT TRACK SCROLL BUTTON, to bring
track 16 into view. The track will be shown selected. If you now play on the keyboard,
the data generated will be transmitted to the external sequencer (on M IDI channel 1).
Performance “Local Off”, track 16. The keyboard
transmits data to the sequencer (on MIDI channel 1).
4. The external sequencer transmits data to tracks 1 to 15 of the Music Processor. To see
the status of the tracks that receive M IDI data, press the MIDI IN button in the Source
section. The display shows the Performance tracks relating to the MIDI IN Source. The
tracks receiving data are identified in the track column by the small dots which appear
while data is being received.
Performance “Local Off”, the tracks of the MIDI IN SOURCE :
The tracks receiving data from the external sequencer shows the small dashes (V-meter)
in the track column.
5. Programme the Performance as required and selected the “Save Performance” com-
mand. You can assign the Effects, the Track Transpose, all the EDIT PERFORMANCE/CONTROL
edited status as well as those from EDIT PERFORMANCE/TRACKS (s. Reference).
(15) Programming with an external sequencer — Performance “Local Off”
103
104
PRACTICAL GUIDE
SAMPLE TRANSLATOR
❏
7
SAMPLE TRANSLATOR 2.0
-
Waveform theory
Conversion of Akai Samples and Programs into Waveform
Sample edit
Creating a Waveform and a Sound
105
Sample Translator 2.0
The Edit Sound menu includes the Sample Translator command, giving access to the
Sample import and edit program.
About Sample Translator
The Sample Translator program enables you to:
•
read samples from Ms-Dos/Atari floppy disks, in Avalon, Sound Designer, Sample
Vision and Wave formats;
•
read samples from Akai S1000 floppy disks;
•
receive samples via MIDI;
•
modify samples and create a multi-sample (the multi-sample becomes a standard
Waveform of the Music Processor);
•
modify the waveform of the R AM -Sounds that contain an imported sample (Sounds
with the
symbol).
Previous versions of Sample Translator were available as User Programs. This manual
refers to version 2.0, incorporated in the Turbokit R OM .
Waveforms and multi-samples
Every S Series Sound is based on a Waveform, the fundamental component of the Sound.
The Waveform is a sampled sound that represents a brief “recording” of the first part of
an authentic sound source. A Waveform usually comprises several of these recordings,
executed in different keyboard ranges, so that sound quality is not impaired by transpositions of the sampled sound.
Quite obviously, every sampled sound is called a “sample”. As a Waveform is made up of
several samples, it is referred to as a “multi-sample”.
S Series Waveform
sample 1
sample 2
sample 3
sample 4
C6
C5
C4
C3
C2
Sample Translator can modify several aspects of a multi-sample, such as the keyboard
range to which a sample is assigned, the sample assigned to a range, the volume of each
sample (“gain”) and “loop”.
A “loop” is a repetition of the last part of the sample, which usually comprises the
Sustain and Release phases in the envelope.
loop
106
SAMPLE TRANSLATOR
Accessing Sample Translator
When the Sample Translator command is selected from the
currently in edit will be cancelled.
EDIT SOUND
menu, the Sound
Once you have entered the Sample Translator environment, one of the following situations may be found:
❑ Access from a Sound that does not contain imported samples (e.g. from a R OM -Sound).
• Sample Translator enters edit without samples:
❑ Access from a R AM -Sound containing imported samples (Sound with the
not created with Sample Translator;
symbol),
• Sample Translator enters edit without samples.
❑ • Access from a R AM -Sound containing imported samples (Sound with the
created with Sample Translator;
symbol),
• Sample Translator enters edit with the sample of the initial Sound (or samples, if the
Waveform is made up of a multi-sample). If the Sound is a DO type, the Waveform
will enter edit only if it is the Waveform of the first oscillator.
Note: Sample Translator ignores all modifications to the Sound made after Edit Sound is
accessed, and places in edit the original Waveform of the Sound with which the edit
environment was accessed.
The “solo” mode is activated automatically when you enter Edit Eound. However, in
Edit Eound you can exclude the “solo” function while in Sample Translator, you cannot.
Temporary escape from Sample Translator
Thanks to multitasking it is possible to temporarily escape from Sample Translator to
access other operation environments, without losing current edit data in Sample Translator. The Edit Sound button continues to flash to let you know that a Sound is currently in
edit. To return to Sample Translator, just press the Sound button of the Edit section.
Access/escape from the programme
107
The “Waveform” display
The main Waveform display contains a list of the 16 samples that can compose the
Waveform. Locations without samples are shown as “EMPTY”. The commands in the
right-hand column are shown on 2 pages.
Note:
When the instrument is
played in Local or
Common, a small square
may appear before the
selected sample:
This symbol shows that the
sample is playing,
because the keyboard
range to which the sample
has been assigned is
being played.
A sample can be selected by rotating the DIAL . The overall dimension of the Waveform
(in kilobytes) is shown on the top line (“Size”).
Next to each sample, three notes are usually shown, representing the lower limit of the
keyboard range to which the sample has been assigned, the original sample pitch, and the
upper keyboard limit:
The “Waveform” command functions
Load:
Save:
Assign:
Unassign:
Play Single:
Info About:
Exit:
Cut End:
Delete:
Copy:
Paste:
108
SAMPLE TRANSLATOR
Loads a sample into the selected location, from MIDI or a floppy disk.
Saves the Waveform created. The samples to which an extension limit has
been assigned with the Assign command become a part of the Waveform.
Assigns the selected sample to a keyboard range. This “assigned” sample
plays together with the other “assigned” samples that make up the Waveform. The keyboard ranges to which the samples are assigned may not
overlap.
Cancels the extension limits of the selected sample.
Gains access to a page that shows the waveform of the sample. On this
page, the sample can be listened to on its own (even if it has been “assigned”); its level can be modified and it can be sent via MIDI to an
external device (sampler, computer).
Gains access to a page that can display information about the dimensions
of the Waveform and the sample selected, the pitch of the sample and the
position of the Loop Start and Loop End points of the sample.
The pitch and the loop points can be modified from this display.
Concludes your Sample Translator work session. If confirmed with ENTER ,
all samples present in the edit buffer are cancelled; if EXIT is pressed, you
return to Sample Translator.
Selectable/deselectable option. If selected, the parts that follow the Loop
End of samples loaded after selection are cut off.
Cancels the selected sample from memory.
Copies the selected sample to a clipboard.
(Appears after a Copy command). Enables you to insert the copied sample
at the selected location. This operation allows you to save memory, as the
sample is not literally copied, but just read twice by Sample Translator.
Loading samples (“Load”)
There are four possible ways of loading one or more samples into Sample Translator:
•
Access Sample Translator from a R AM -Sound based on a Waveform created with
Sample Translator (many of the Sounds with the
symbol). If this is a DO Sound,
the sample will be the sound produced by the first oscillator.
•
Receive a sample via MIDI from a sample editor or sampler, in the 16-bit MMA_sds
format (Sample Dump Standard).
•
Read samples from Ms-Dos/Atari floppy disks, in Avalon, Sound Designer, Sample
Vision or Wave formats.
•
Read Samples or Programs from an Akai S1000™ floppy disk (HD format).
1. Loading a sample contained in a RAM-Sound
Note:
The Sample-RAM (RAM
dedicated to samples) has
a 2 megabyte capacity. It
is therefore impossible to
enter edit with a Waveform
made up of more than 1
Megabyte of samples.
In general, it is not
possible to access edit if
the overall size of the
samples present in RAM
and the sample to be
edited exceeds 2
Megabytes.
Note: This operation can be carried out only with R AM -Sounds having a Waveform
created by Sample Translator.
1. Assign a R AM -Sound with a Waveform created by Sample Translator (many of the
Sounds with the
symbol) to a selected track:
2. Access Edit Eound and then Sample Translator.
If the R AM -Sound contains a Waveform that was not created by Sample Translator, the
Waveform will not be loaded. If the Sound is a DO type, the Waveform will be loaded
only if it is used by the first oscillator.
2. Loading a sample via MIDI
Check that the following connections with the sampler or computer have been made:
•
The Music Processor’s MIDI OUT 1 socket to the MIDI IN socket of external device;
•
The Music Processor’s MIDI IN 1 socket to the MIDI OUT socket of external device.
If Midi Common is “Off”, the external device must transmit on Channel 1. If Midi
Common is “On”, the external device must transmit on the Midi Common channel.
1. From the Waveform display, after having selected a location for the sample, choose
the Load command:
Loading samples (“Load”)
109
* Samplers that operate on
the MMA_sds standard
(Sample Dump Standard)
identify the memorized
sample with a number
(0~255). To shift a sample
from one device to
another, the sample
number must correspond
on both devices.
2. Use the DIAL to select MMA_sds and press ENTER . The Music Processor requests the
number* of the sample to be received from the external device (0~255):
3. When the sample number has been given, press
ENTER
to start reception:
The sample received will occupy the location selected in Waveform:
To receive other samples, select another location with the DIAL and repeat the operation.
A previously imported sample can be replaced by another.
Reception errors If connections have not been made correctly, or if the external device
is unable to send the sample in MMA_sds format, the following error messages appear:
Check the connections. If no fault is discovered, check the transmission channel of the
external device (the Music Processor receives on channel 1 if Midi Common is “Off”, or
on the assigned Midi Common channel if Midi Common is “On”).
It is also possible that the external device is unable to receive the Dump Request message
transmitted by the Music Processor. In this case, return to the Waveform display and start
the transmission directly from the external device.
110
SAMPLE TRANSLATOR
3. Loading samples from Ms-Dos/Atari floppy disks
* The Wave format (.WAV)
is the standard format of
sounds under Windows.
**To save samples created
with an Apple Macintosh
computer on an Ms-Dos
disk, programs such as
“Apple File Exchange”,
“AccesPC” or similar must
be used. For Commodore
Amiga files, use the
“Dos2Dos” program or
similar.
If you have a computer and a sample editing program that can save data in Avalon, Sound
Designer, Sample Vision or Wave* formats, the Music Processor can read samples
created with the editor from floppy disks. The floppy disk must be formatted Ms-Dos or
Atari (720k)**.
1. From the Waveform display, after having selected a location for the sample, activate
the Load command:
2. Press
ENTER
3. Press
ENTER ;
and use the
DIAL
to select “Dos/Atari”:
the directory of the Ms-Dos/Atari floppy disk will appear:
The items marked with the symbol
are sub-directories (S. Disk ) that can contain
samples. Access the sub-directory by pressing ENTER , and return to the main directory
with the B ACK command.
4. Use the DIAL to select a sample and press
Waveform.
Note:
Samples which cannot
enable the Detune
parameter have Loop
Start and Loop End points
with widely differing
amplitudes. To correct this
problem, select the Loop
Start and Loop End points
with similar amplitudes,
using an external sampling
editor.
ENTER
to load it in the location selected in
Conversion limits Some samples deactivate Detune (which, when edited in the
Waveset editor, operates as a Fine Pitch function):
These Sounds cannot be converted in SO or DO:
Loading samples (“Load”)
111
4. Loading Samples and Programs from an Akai S1000 floppy disk
• Akai S1000™ Samples and Programs
Akai samplers compatible with S1000 save two types of data on floppy disks: Samples
(equivalent to the S Series samples) and Programs (similar to the S Series Waveforms).
A Program organizes the Samples by defining the keyboard ranges to which they are
assigned. Unlike the Waveform of the S Series, an Akai Program can distribute the
Samples over several different “Levels” (dynamic levels). The S Series Waveform can
distribute Samples only on a single dynamic level.
Akai S1000 Program
Level 4
Level 3
Sample 13
Sample 14
Sample 8 Sample 9 Sample 10 Sample 11
Sample 5
Level 2
Sample 1
Level 1
Sample 6
Sample 2
Sample 12
Sample 7
Sample 3
Sample 4
C6
C5
C4
C3
C2
S Series Waveform
sample 1
sample 2
sample 3
sample 4
C6
C5
C4
C3
C2
Sample Translator can load single Samples, or in a single operation, it can convert an
entire “level” of the S1000 Program into an S Series Waveform. If a Program contains
more than one “level”, it can be converted entirely in successive phases, using (a) a
Sound Patch, (b) a multi track configuration, with different dynamic ranges for each
track.
Level 4
Level 3
Level 2
Level 1
Akai S1000 Program
GrandPiano ff
GrandPiano mf
GrandPiano mp
GrandPiano pp
Track 4
Track 3
Track 2
Track 1
S Series Performance
GrandPiano ff
GrandPiano mf
GrandPiano mp
GrandPiano pp
• Conversion limitations
A Waveform can contain only 16 samples. As an S1000 level can contain up to 99 Samples, when a conversion is carried out only the 16 Samples from the lowest register are
loaded.
S1000 Samples can overlap even inside a dynamic Level. Sample Translator eliminates
this overlap, using the lowest limit-note of the highest pitched sample as the limit between samples.
Some samples do not allow Sounds created with Sample Translator to be converted into
SO or DO types.
112
SAMPLE TRANSLATOR
• Loading a Sample or Program
1. From the Waveform display, after having selected a location for the sample, choose
the Load command:
2. Press
ENTER
and use the
DIAL
to select “Akai”:
3. Press ENTER ; the directory of the Akai S1000 floppy disk appears. The Samples show
the letter “S” extension, and the extension on Programs is “P”:
4. Select a Sample or a Program with the
form.
DIAL ,
and press
ENTER
to load it into the Wave-
• If you are loading a Sample, this will occupy the location selected in the Waveform.
• If you are loading a Program, all the samples already loaded will be cancelled and
replaced:
The following steps refer to the loading of a Program.
5. Press ENTER to confirm. If the Program has more than one Level, you must select the
one to be loaded:
6. Select the Level with the DIAL and press ENTER to load. Loading the Program may take
some time, and during the operation the display will show the name of the Samples
that are being loaded:
7. At the end of the conversion, the Waveform will contain the first 16 Samples of the
Level selected, all assigned to the keyboard ranges defined by the Akai Program and
correctly pitched:
Loading samples (“Load”)
113
Empty Levels Levels without Samples are recognized by Sample Translator as being
empty and indicated, therefore, by a bar and cannot be selected.
Some Akai Programs may contain Levels that contain no samples, but nevertheless are
shown as present, and are therefore recognized by Sample Translator as capable of
being loaded. In these cases, Sample Translator will start loading procedures, but will
not insert samples into the Waveform.
“Cut End”
The Cut End option appears on the second page of Waveform.
The “loop” of a sample has a starting point (“Loop Start”) and an end point (“Loop
End”). When a Sample is loaded from Sample Translator, the part that is used by the
Waveform is the one that runs from the start of the Sample (“Sample Start”) to the end of
the loop (“Loop End”).
As the part of the Sample that follows the “Loop End” is not played, it is advisable to
save space by not loading it into memory. The Cut End function can be activated before
carrying out a loading operation. All samples loaded with the Cut End option selected
will be loaded without the part that follows the “Loop End”.
Assigning samples to a keyboard range
(“Assign”)
A sample has note extension limits beyond which it cannot play. Acoustic instruments
have similar limitations, and are unable to play above or below a certain note.
When a Sample is loaded, it can play across its full extension. Until it is assigned to a
specific keyboard area, it will play (alone) over this range.
114
SAMPLE TRANSLATOR
You can listen to the sample to help you decide in what keyboard area you can obtain the
best results.
Use the Assign command to define the keyboard range to which the selected sample will
be assigned. Once the Assign operation has been carried out, the sample will play together with the other saamples assigned to the keyboard range:
Only assigned samples become a part of the Waveform. The overall size of the assigned
samples (and consequently the size of the Waveform) is shown on the top line of Waveform:
1. Select the Assign command from the Waveform display. The range defining window
appears:
2. Play the lower limit-note and press ENTER to confirm. Play the upper limit-note and
press ENTER to confirm. Keyboard range limits can also be set with DIAL + ENTER . In
Waveform, the keyboard range is shown next to the sample name (notes C1 and D#3 in
the example); the note in the middle (D#3 in the example) represents the original pitch
of the sample:
The keyboard range to which a sample is assigned cannot overlap the range of another
sample.
* This symbol appears
only if you are playing from
the keyboard (Local) or
from Common.
After being assigned, the sample played on the keyboard will be shown by a small square
that appears next to its name*:
Cancelling assignments (“UnAssign”)
The Unassign command cancels the keyboard extension limits to which a sample is
assigned. After this command, the sample will play only if it is selected, and a new assign
procedure must be carried out to insert the sample into the Waveform again.
Re-assigning limits after an Unassign command
After the assignment of a sample to a keyboard range has been cancelled, the note limits
of a new assignment will be those of the previous one. In this case, it is usually sufficient
to press ENTER twice, without carrying out further assign operations.
Assigning the samples to the keyboard zones (“Assign”/”UnAssign”)
115
“Play Single” display
The “Play Single” command gives access to a display where you can:
•
listen to the individual samples already assigned to a keyboard range (these can also
be heard in Waveform, but only together with the other samples assigned to the
keyboard range);
•
display the waveform of the sample;
•
send the sample to an external MIDI device (sampler, computer with editor).
From the Waveform display, select the sample from which to enter “Play Single”, and
select the Play Single command:
The sample will play over its original range, without the limits set by the Assign command.
The image that appears on the display is the graphic representation of the sample. This
shows the entire sample from the “Sample Start” point to the “Sample End” point. The
horizontal axis represents the duration of the sound, and the vertical axis its intensity.
The letters “S” and “E” that may appear over the image show the “Loop Start” and “Loop
End” points. These can be programmed from the Info About display (explained in the
next section).
“Zoom”
This function allows you to examine a section of the sample in fine detail.
1. Select the Zoom command.
2. An intermittent vertical line will appear on the display, showing the start of the
section to be examined. Move the line with the DIAL , and press ENTER to confirm the
position:
3. A second intermittent vertical line will now appear, showing the end of the zoom
section. Move the line with the DIAL , and press ENTER to confirm the final zoom
position:
116
SAMPLE TRANSLATOR
4. The display will show a “close-up” of the section selected:
Return to full vision of the sample with the UnZoom command.
“Gain”
This allows you to modify the volume of the sample with respect to the other samples of
the Waveform. Select Gain. A small window appears on the display where you can insert
the relative volume of the sample. The volume is expressed as a percentage of the maximum volume possible:
Insert the desired value with the DIAL or the numeric keypad, and confirm with ENTER .
You will have to wait for a few seconds while the new sample volume is being calculated:
The undo button can be used to revert to the original volume setting and back to the
modified volume, so that you can compare results.
“Loop nr:(x)”
This command allows you to display the “Loop Start” and “Loop End” points of the eight
loops that can be received, for example, with an Akai sample.
Although the S Series can use only the first loop of a sample, Sample Translator can also
modify the “Start” and “End” points of the other loops (from the Info About display).
These changes can be used by a sampler to which the sample can be sent with the Send
command.
“Send”
The sample can be sent to a sampler or a computer. Check that these connections have
been made:
•
The Music Processor’s MIDI OUT 1 socket to the MIDI IN socket of external device;
•
The Music Processor’s MIDI IN 1 socket to the MIDI OUT socket of external device.
Prepare the external device for sample reception. Program channel 1 as the reception
channel. Press Send to transmit the sample:
The “Play Single” display
117
Transmission errors If the connections have not been made correctly or if the external
device is unable to receive the sample in MMA_sds format, the following error message
will appear:
Check the connections. If no fault is discovered, check the reception channel of the
external device (the Music Processor transmits on channel 1).
It is also possible that the external device is unable to recognize the Music Processor’s
transmit message. In this case, return to the Waveform display and send a Dump Request
message from the external device, followed by the number of the sample to be received
(0~15).
“Exit”
This returns you to the Waveform display.
The “Info about” display
The “Info about” display allows you to modify these sample parameters:
•
original sample pitch;
•
definition of “Loop Start” and “Loop End” points;
•
definition of loop type.
“Note”
Shows the original pitch of the sample. This information is not always received when a
sample is loaded, so it can often be necessary to define the correct pitch setting after
loading. To help you with this operation, use the Tuning function, which plays notes with
the exact Music Processor pitch. (Tuning plays a sinusoidal that is superimposed on the
sample).
“Note Link” The Note and SR parameters can be linked while Note is being modified.
When Note edit is accessed, the Note Link option will appear, and if this is selected, it
will modify SR at the same time as Note:
118
SAMPLE TRANSLATOR
“SR”
“SR” stands for “Sampling Rate” - the frequency with which the Sample is read. If the
Sampling Rate is modified, the sample pitch is also proportionally modified. For example, if the “SR” value is raised, the sample pitch will also become higher.
Basically, this function provides a fine tuning for the sample, avoiding dissonance
between the samples that make up the Waveform.
“Length” (cannot be modified)
Length of the sample in words. In this case, word is the measuring unit of the sample.
Since the S Series uses a 16-bit sampling technique, a word is composed of 16 bits
(corresponding to 2 bytes).
*Use the following table as
a guide.
1 word
= 2 byte
1024 byte = 1 kbyte
1024 kbyte = 1 Mbyte
Therefore, to calculate the length of the sample in bytes, multiply the number shown on
the display by 2*.
“Loop Start” & “Loop End”
These parameters modify the “Loop Start” and “Loop End” points. Any one of the eight
loops of the sample can be selected by pressing the “Loop nr:(x)” command the required
number of times.
The S Series uses only the first loop, but Sample Translator can also modify the other
loops, acting as an editor for samplers.
Access your changes with the ENTER , and insert the desired value with the
numeric keypad. The value inserted will be expressed in words.
DIAL
or the
The “Start” and “End” points must lie within the limits of the sample. The maximum
value that can be given to “Loop End”, therefore, coincides with the length of the sample.
For example, if the “Length” parameter indicates a value of 40000, the maximum value
that can be given to “Loop End” is 40000.
Why the loop limits should be modified The loop very often produces a troublesome
“click” every time the cycle is repeated. This is caused by the difference created between
the end of one loop cycle and the beginning of the next one:
“click”
The extreme points of the loop should be modified so that the amplitude at the “Start”
point” is matched as precisely as possible to the amplitude at the “End” point, so that the
“click” can be heard only very faintly or disappears entirely.
When the loop extremes are modified, you should bear in mind that a loop which gives
excellent results, for example, in the central part of the keyboard, can be unsatisfactory in
other extensions. This is yet another reason why the multi-sampling technique should be
used.
The “Info About” display
119
Deactivating Detune With some samples, changes made to the “Start Loop” point
cause Detune to be deactivated:
The Detune parameter will still be shown in the Waveset editor, but it will act as Fine
Pitch.
These Sounds cannot be converted in SO or DO:
“Loop Type”
This parameter allows you to change the loop type. Even though S Series uses only the
first loop, the others can be modified for use with a sampler. Select one of the eight loops
by pressing the “Loop nr:(x)” command the required number of times.
Type 0:
“Loop Off”. The loop is not played, and therefore the sample has no
sustain phase, and will terminate rapidly. This type of loop is used in
percussive samples that fade out very quickly.
Type 1:
The loop is played only in a forwards direction, as in this example:
Loop
Start
Type 2:
Loop
End
The loop is played forwards and backwards again, as shown by this
diagram:
Loop
Start
Loop
End
Although this loop type is not used by the S Series, it can be transmitted
to samplers or other sample editors.
“Note range” (cannot be modified)
* The line appears only if
you are playing from the
keyboard (Local) or from
Common.
This shows the keyboard range to which the sample has been assigned. As the keyboard
can play all assigned samples when you are in the Info About display, if the sample
whose parameters are being modified is played, a line will appear beneath this range of
notes*:
If the sample has not yet been assigned, an “Unassigned” message will appear in place of
these notes.
120
SAMPLE TRANSLATOR
Commands in the right-hand column
Tuning:
Provides a reference for the sample pitch, producing the exact note played
on the S2/S3 (or master keyboard) with a sinusoidal.
Loop nr.:(x): Allows you to select one of the eight loops of the sample. Only the first
loop is used by the Music Processor, but the others can be modified so
that the sample can be sent to an external sampler.
Note Link:
(Appears only if the Note parameter is modified.) This links the SR
parameter to the Note parameter, modifying both at the same time.
Exit:
Returns to the Waveform display.
Cancelling a sample (“Delete”)
The Delete command, located on the second page of Waveform, cancels the sample
selected.
1. Use
DIAL
to select the sample for deletion.
2. Select the Delete command and press
it).
ENTER
to confirm the deletion (or
EXIT
to annul
Copying a sample to a different location
(“Copy & Paste”)
A selected sample can be copied to a clipboard with the Copy command on the second
page of Waveform.
Note:
Copying a sample does
not occupy memory
space. The sample copied
is never actually
‘duplicated”. The Copy
operations make
SampleTranslator read the
same sample two or more
times, in different locations
and with specific
parameters.
As soon as the sample is copied, the Paste command will appear in the command/option
column. Select a location into which the sample can be copied:
Press Paste to insert the sample into the new location:
The “pasted” sample can be any sample of the Waveform. After the Copy & Paste operation, range limits must be given to the new sample.
“Delete”, “Copy”
121
Saving a Waveform (“Save”)
*Note:
Avoid giving two different
Waveforms of your sound
library the same name.
The “Import” function of
the Sound Library checks
that the Waveform of the
Sound you are importing
from a floppy disk is not
already present in
memory. If the name of the
Waveform is the same as
that of a Waveform already
present in memory, the
Sound will be loaded
without its Waveform,
which will be replaced by
the Waveform already in
memory.
As a result, if the two
Waveforms are different
despite their common
name, the characteristics
of the Sound will be
drastically altered.
**Note:
It is not possible to give
the new Waveform the
name of a Waveform
already present in
memory.
If you entered
SampleTranslator with a
Waveform contained in a
RAM-Sound, the original
Waveform will not be
modified. A new name
must be inserted.
The Waveform created with Sample Translator must be saved as a standard S Series R AM Waveform. In the Waveform, all the samples assigned to a keyboard range are saved
(unassigned samples are lost).
1. Select the Save command on the first page of Waveform. A space will appear where
you can insert the name of the Waveform and of a new Sound that uses it:
2. Assign a name of maximum 8 characters to the Waveform*. The alphanumeric
keypad inserts characters, and the DIAL moves the cursor forwards or back. I NSERT
inserts a space at the cursor position, D ELETE cancels the character in the cursor
position, and C APITALS allows you to use capital letters. Confirm the Waveform name
with ENTER .
3. A new Sound must be created. Give the Sound a name and press
EXIT to return to SampleTranslator):
ENTER
to confirm (or
4. Assign a Program Change or a Bank Change to the new Sound (in the usual X-Y
form). Use the numeric keypad or the DIAL , in the same way that you select a Sound.
Press Enter to confirm**.
It is advisable to save the new Sound in a Family of Sounds to which it is similar (or
related). For example, if the new Sound is called “FatStrings”, it would best be saved in
the “Ensemble” Family.
As soon as the new Sound has been memorized, it should be saved on the disk to avoid
losing it when the instrument is switched off.
The Waveform can also be used by other Sounds, by selecting it in Edit Sound-Waveform.
122
SAMPLE TRANSLATOR
Escape from Sample Translator
To escape from Sample Translator, select the Exit command on the first page of the
Waveform display. If a Waveform has been created, Sample Translator asks if you want
to lose or save it:
If you press ENTER , the Waveform will be lost. If you do not want to lose the programmed
Waveform, press EXIT to remain in Sample Translator and select the Save command to
save the Waveform.
“Save”, “Exit”
123
124
SAMPLE TRANSLATOR
REFERENCE GUIDE
❏
SOURCE buttons
❏
TRACK TRANSPOSER / MASTER TRANSPOSER
❏
EDIT PERFORMANCE/CONTROLS
❏
EDIT PERFORMANCE/TRACKS
❏
EDIT SOUND
❏
SAMPLE TRANSLATOR
❏
EDIT SOUND PATCH
❏
SEQUENCER & SONG
8
- The Sequencer controls
- Recording a Song
❏
EDIT SONG
❏
EDIT GENERAL
❏
DISK
❏
SOUND LIBRARY
❏
EFFECTS LIBRARIES
❏
CLIPBOARD
❏
UTILITY
- Bank/Song and Performance name
- Delete Bank/Song, Clipboard & Performance
- Copy Bank/Song & Performance
❏
PRELOAD
125
1 THE SOURCE section
The buttons in the Source section
The Performance tracks have a different configuration for each Source. For example, while LOCAL Source is set to layer, the MIDI IN and SONG Sources can be set to
multi.
The main display shows the track configuration relating to the currently active
Source (shown by the button with the led ON in the SOURCE section).
The track column displays the configuration of the tracks for the selected Source.
The symbols which show the status of the Source (e, x, -) may change according to
the Source selected, while the symbols which show the status of the Destinations (i,
e) are the same in all the displays.
Local Source
This Source is represented by the integrated keyboard of the instrument, or by the master
keyboard (or another MIDI controlling device) connected via MIDI-COMMON.
The possible track playing modes The option/command column shows the following four options to choose from.
SINGLE The keyboard or the master keyboard (connected via MIDI -COMMON ) can play only
one track. When you select single mode from another mode, only the selected track will
remain active.
You can scroll the tracks with the TRACK SCROLL BUTTONS (the tracks are automatically selected
and ready to use).
LAYER The keyboard or the master keyboard (connected via M IDI-C OMMON ) can play two
superimposed tracks. When you select layer mode from another mode, the selected track
and the next track will remain active.
You can scroll the tracks with the TRACK SCROLL BUTTONS (the tracks are automatically selected
and ready to use).
The keyboard or the master keyboard (connected via MIDI -COMMON) can play two
tracks which share the keyboard extension. The track with the lowest number plays the
lower part of the keyboard. For example, if you split tracks 1 and 2, track 1 plays on the
lower part of the keyboard.
When you select split mode from another mode, the selected track and the next track will
remain active.
You can scroll the tracks with the TRACK SCROLL BUTTONS (the tracks are automatically selected
and ready to use).
SPLIT
If you select this mode, another option (SET SPLIT ) appears in the option/command column
which allows you to set the split point on the keyboard. ❉
Default display: LOCAL Source example
Default display: MIDI IN Source example
Default display: SONG Source example
Default display: OPTION Source example
126
REFERENCE GUIDE
The keyboard or the master keyboard (connected via MIDI-COMMON) can play up to
sixteen tracks which can coexist over the entire keyboard extension or share the extension
and the dynamic zones (s. EDIT Performance/Tracks, page 3).
The number of tracks that the keyboard will actually play depends (a) on the number of
tracks memorised in the Performance, (b) on the number of tracks set to play (e).
MULTI
Track column symbols
The status of each track is indicated by the symbols which appear in the track column.
e The track is in “play” mode, in other words it will play when you play on the keyboard or
the master keyboard. To place the track on “mute”, select the track (if it has not already
been selected) and press the corresponding TRACK SELECT KEY again.
X the track is in “mute” mode. To set the track to “play”, select the track (if it has not
already been selected) and press the corresponding TRACK SELECT KEY again.
– The track is disconnected from the LOCAL Source. Full instructions on how to connect the
track to the Source are provided in the chapter on EDIT Performance/Tracks, on page 1.
i The track is connected to the GENERATION Destination (internal sound generation). Full
instructions on how to disconnect the track from this Destination are provided in the chapter
on EDIT Performance/Tracks, on page 1.
e The track is connected to the MIDI OUT Destination. Full instructions on how to disconnect
the track from this Destination are provided in EDIT Performance/Tracks, on page 1.
❉ The Set split command
1. Select SET SPLIT. The split set window appears on the display:
2. Play the note which corresponds to the upper limit of the first track. Or, rotate the Dial to
move the split indicator.
Note: The split point can be set on the master keyboard only if it is connected via MIDICOMMON.
3. Press ENTER to confirm. The split set window closes.
Midi in Source
This Source is represented by the MIDI instruments connected to the MIDI IN of the Music
Processor (not via M IDI-COMMON). E.g. the tracks of an external sequencer.
The possible track playing modes The option/command column shows the following two options to choose from.
SINGLE The instrument—or computer—connected to the MIDI I N (not MIDI-C OMMON ) can play
only one track. When you select single mode from another mode, only the selected track will
remain active.
You can scroll the tracks with the TRACK SCROLL BUTTONS (the tracks are selected automatically
and are ready to play).
MULTI The instrument—or the computer—connected to MIDI I N (not M IDI-C OMMON ) can play
up to sixteen separate tracks, completely independent and not limited by the current
keyboard extension.
The number of tracks the keyboard will actually play depends (a) on the number of tracks
memorised in the Performance, (b) on the number of tracks set to “play” (e).
Track column symbols
The status of each track is indicated by the symbols which appear in the track column.
e The track is in “play” mode, in other words it will play when a messages is received via
MIDI IN. To place the track in “mute” mode, select the track (if it has not already been
selected) and press the corresponding TRACK SELECT KEY again.
X The track is in “mute” mode. To place the track in “play” mode, select the track (if it has
not already been selected) and press the TRACK SELECT KEY again.
(1) Source
127
– The track is disconnected from the MIDI IN Source. For instructions on how to connect the
track to Source see. EDIT Performance/Tracks on page 1.
i The track is connected to the GENERATION Destination (internal sound generation). To
disconnect the track from this Destination see. EDIT Performance/Tracks on page 1.
e The track is connected to the MIDI OUT Destination. To disconnect the track from this
Destination see. EDIT Performance/Tracks on page 1.
Note: The MIDI data from the MIDI IN Source can be transmitted to MIDI OUT only if MIDI -MERGE is
active (see. General—Midi).
Song Source
This Source corresponds to the Song in the selected Bank/Song.
The possible track playing modes The option/command column shows the following two options to choose from.
SINGLE Plays back only one track of the Song. When you select single mode from another
mode, only the selected track will remain active.
You can scroll the tracks with the TRACK SCROLL BUTTONS (the tracks are selected and are
ready to playback). You can also scroll the tracks to check which ones have been recorded).
MULTI Plays back all the tracks recorded and activated to play (in other words the tracks in
play mode, shown with the symbol e).
Track column symbols
The status of each track is indicated by the symbols which appear in the track column.
e The Song track contains recorded notes and is in “play” mode. To “mute” the track,
select it (if it has not already been selected) and press the corresponding TRACK SELECT KEY .
X The track is in “mute” mode. To place the track in “play” mode, select the track (if it has
not already been selected) and press the corresponding TRACK SELECT KEY again.
– The Song track does not contain recorded notes. It can be recorded as a new track.
i The track is connected to the GENERATION Destination (internal sound generation). To
disconnect the track from this Destination see EDIT Performance/Tracks on page 1.
e The track is connected to the MIDI OUT Destination. To disconnect the track from this
Destination see EDIT Performance/Tracks on page 1.
Track in “record” mode
When you enter “record” mode by pressing RECORD , the SONG Source is automatically shown
on the display (and the corresponding button in the Source section is selected). Once you
have selected the tracks you wish to record, the symbol R (=record) appears in the track
status column. See. EDIT Song.
Option Source
This Source is represented by new functions implemented by a User Program. The symbols
and track configurations depend on the User Program.
THE
SOLO BUTTON
The SOLO button isolates the currently selected track and temporarily deactivates all
the remaining tracks of all the Sources. If the currently selected track is in “mute”
mode, it is momentarily reactivated by the SOLO function.
The led on the button flashes until you press the button again to deactivate “solo”.
A track set in “solo” may not play in one of the following cases:
128
REFERENCE GUIDE
•
for LOCAL Source, the track may be set beyond the split range or out of the
dynamic range;
•
for the
MIDI IN
•
for the
SONG
Source, the track may not receive events via M IDI ;
Source, there may be no notes recorded in the track.
2 TRACK TRANSPOSER / MASTER TRANSPOSER
The tracks can be individually transposed in the EDIT TRACK TRANSPOSER environment
(figure 1). They can be globally transposed (the instrument as a whole) by means of
the MASTER TRANSPOSER button (only S2/S3) or in the “Master Transpose” window
of the EDIT TRACK TRANSPOSER environment (figure 2).
All modifications effected with the Track Transposer are shown in
ANCE / TRACKS , page 2. They can be saved in the Performance.
The
TRACK TRANSPOSER
EDIT PERFORM -
button
Track Transposer
Follow this procedure:
1. Select the track to transpose in the track column.
2. Rotate the DIAL or specify the required transpose value with the NUMERIC KEYPAD.
Each transposition unit represents one semitone.
Default: 0. Value range: -60 ... +60.
Octave up
Transpose one octave up.
Octave down
Transpose one octave down.
Master
Opens the Master Transposer window.
Reset
Resets all the track transpose values to zero. This command does not affect the Master
Transpose setting.
Master Transposer
Access this editor in the TRACK TRANSPOSER.
1. Access the TRACK TRANSPOSER.
2. Select the “Master” command.
Regulate the Master Transpose setting in the following manner:
1. Rotate the DIAL or specify the required transpose value with the NUMERIC KEYPAD .
2. Press ENTER to confirm and to escape from the window (or press EXIT to annul the command
and escape).
Default: 0. Value range: -24 ... +24 semitone.
In S2/S3, the value of Master shown in the window or in the first line of the Track Transposer relates to the MASTER TRANSPOSE buttons.
The
MASTER TRANSPOSE
buttons (only S2/S3)
These buttons are identified by the silk-screened symbols representing “sharp” ( # )
and “flat” ( b ). When pressed repeatedly, they decrease or increase the global pitch
of the instrument by one semitone at a time.
Figure 1: Track Transposer
Figure 2: Master Transpose
(2) Track Transposer / Master Transposer
129
If a negative transposition is active (pitch lowered), the led on the flat button is
shown ON. Conversely, if a positive transposition is active (pitch increased), the
led on the sharp button is shown ON.
To restore the standard pitch of the instrument, you can press the deactivated button
repeatedly until the led on the active button goes off, or you can regulate the setting
in the “Master Transpose” window of the EDIT TRACK TRANSPOSER environment.
The setting effected with the MASTER TRANSPOSE buttons is reflected in the Master Transpose
value shown in the Track Transposer display.
130
REFERENCE GUIDE
3 EDIT PERFORMANCE/CONTROLS
The modifications made to a
Performance must be stored in
memory with [SAVE PERFORMANCE].
The Performance stored in
memory must be saved to Ramdisk or floppy disk for future use.
All the operations performed in
can be annulled with
UNDO before carrying out another
task.
EDIT SOUND
The EDIT PERFORMANCE / CONTROLS environment is where you can programme the
general parameters of the Performance. A Performance can memorise: the two
effects assigned to the DSPs, the maximum Pitch Bend excursion, the effect of the
Wheels and Pedals and how the Function Controllers operate.
With these settings, changing a Performance reconfigures the instrument automatically, rendering it immediately available to modify a live playing situation or the
track situation for a Song recording task.
You can create a new Performance by saving an existing Performance to a new
Performance slot (Procedure: [ SAVE PERFORMANCE ] [ SELECT THE BANK ] [ SELECT THE
PERFORMANCE ]).
Page 1: Effects
Effect 1
Reverb assigned to DSP 1. If you select a reverb in Effects Library 1, this parameter will be
modified automatically.
Value range: see table in the Appendix.
Effect 1 Volume
Determines the total volume of the signal effected by the DSP 1. The higher the value
assigned to this parameter, the more evident the effect will be.
Effect 2
Determines the type of Modulation assigned to DSP 2 such as Echo, Chorus, Flanger,
Fladel, Panmix, Phaser, Ensemble, Panecho, Dubbing. If you select a modulation in Effects
Library 2, this parameter will be modified automatically.
Value range: see table in the Appendix.
Effect 2 Volume
Determines the total volume of the signal effected by the DSP 2. The higher the value
assigned to this parameter, the more evident the effect will be.
Page 2: Controllers (S2/S3)
Pitch Bend Sensitivity
Maximum Pitch Bend excursion, in semitones.
Value range: -12 ... +12.
Pedal/Footswitch 1
Multiple parameter: selects the type of pedal ( pedal or footswitch) and assigns the MIDI
message it can generate.
Note: The footswitch polarity can be defined in EDIT GENERAL.
Value range: see table at the end of the chapter.
Pedal/Footswitch 2
As above.
Page 1: Effects
Page 2: Controllers (S2/S3)
Page 3: User Keys (S2/S3)
Page 4: User Sliders (S2/S3)
(3) Edit Performance/Controls
131
Rotary
Initial velocity of Rotary modulation. When the DSP receives the MIDI Control Change 90
message, the Rotary velocity passes gradually from slow to fast or vice versa.
Value range: Slow or Fast.
Wheel 1
MIDI message generated by Wheel 1 (left). Wheel 1 is spring loaded and returns automatically to its central position after use, and it is therefore advisable to assign parameters with
neutral values at the centre (Pitch Bend, Pan).
Value range: see table at the end of the chapter.
Wheel 2
MIDI message generated by Wheel 2 (right). Wheel 2 is not spring loaded but is centredented for quick recognition of the central position.
Value range: see table at the end of the chapter.
Page 3: User Keys (S2/S3)
Keys 1 ... 7
Function assigned to the buttons in the FUNCTION CONTROLLERS section when the led on the
USER/ PANEL button is ON.
Value range: see table at the end of the chapter.
V Value assigned to the function when the User Key is pressed. The Control Change
messages 64 ... 79 cannot be controlled by these keys.
T The Track activated by the User Key. This parameter appears only for MIDI channel
messages (Program Change, Volume, Pan, Damper...).
Page 4: User Controllers (S2/S3)
Sliders 1 ... 7
The function assigned to the cursors of the FUNCTION CONTROLLERS when the led on the USER/
PANEL button is ON.
Value range: see table at the end of the chapter.
Page 2: Controllers (S2R)
Pitch Bend Sensitivity
Maximum Pitch Bend excursion in semitones (for messages received via MIDI ).
Value range: -12 ... +12.
Footswitch 1
MIDI message generated by Footswitch 1.
Note: The footswitch polarity can be set in EDIT General.
Value range: see table at the end of the chapter.
Footswitch 2
As described above.
Rotary
Initial velocity of the Rotary modulation. When the DSP receives the MIDI Control Change 90
message, the Rotary velocity passes gradually from slow to fast or vice versa.
Value range: Slow or Fast.
Page 3: Function Controller (S2R)
The Function Controller page shows a series of horizontal bars which can be modified with
the DIAL, each corresponding to one of the tracks displayed. The bars represent the value of
the parameter selected in the option column.
Parameters
Volume, Attack, Release, Filter 1, Filter 2, Pan.
F.C. Reset
Resets the Attack, Release, Filter 1 and Filter 2 values to their default settings.
Page 2: Controllers (S2R)
132
REFERENCE GUIDE
Page 3: Function Controller (S2R)
Assignable MIDI messages
Only the messages shown in reverse highlight affect the sound generation of the S Series. The notes shown in
brackets [] indicate a special implementation of the message in the S Series. The messages indentified with an
asterisk (*) are transmitted to the M IDI O UT on the Common Channel and not on the channel assigned to the track.
Footswitch
Rotary s/f* (trasm. Cntrl 90)
Pedals, Wheels, User Sliders
(04) Foot Controller
Prop. Volume (trasm. Cntrl 07)
(01) Modulation
(08) Balance [Osc 1/2]
(64) Damper
(65) Portamento
(66) Sostenuto
(67) Soft Pedal
(68) Control 68
(69) Hold 2
(70 ... 79) Controls 70 ... 79
Pitch Bend
Pitch +
Pitch Eff 1 Volume* (trasm. Cntrl 21)
Eff 2 Volume* (trasm. Cntrl 22)
(00) Control 0 / BankSelect
(01) Modulation
(02) Breath
(03) Control 3
(05) Portamento Time
(06) Data Entry
(07) Main Volume
(08) Balance [Osc 1/2]
(09) Control 9
(10) Panorama
(11) Expression
(12) [Attack]
(13) [Release]
(05) Portamento Time
(06) Data Entry
(07) Main Volume
(08) Balance [Osc 1/2]
(09) Control 9
(10) Panorama
(11) Expression
(12) [Attack]
(13) [Release]
(14) [Filter 1 Cutoff]
(15) [Filter 2 Cutoff]
(16) Gen. purp. control. 1
(17) Gen. purp. control. 2
(18) Gen. purp. control. 3
(19) Gen. purp. control. 4
(20) [Filters 1+2 Cutoff]
(21 ... 31) Controls 21 ... 31
(64) Damper
User Keys
Effect 1* (trasm. Cntrl 21)
Effect 2* (trasm. Cntrl 22)
Rotary s/f* (trasm. Cntrl 90)
Program Change
(00) Control 0 / BankSelect
(01) Modulation
(02) Breath
(03) Control 3
(04) Foot Controller
(14) [Filter 1 Cutoff]
(15) [Filter 2 Cutoff]
(16) Gen. purp. control. 1
(17) Gen. purp. control. 2
(18) Gen. purp. control. 3
(19) Gen. purp. control. 4
(20) [Filters 1+2 Cutoff]
(21 ... 31) Controls 21 ... 31
(65) Portamento
(66) Sostenuto
(67) Soft Pedal
(68) Control 68
(69) Hold 2
(70 ... 79) Controls 70 ... 79
(3) Edit Performance/Controls
133
4 EDIT PERFORMANCE/TRACKS
The modifications made to a
Performance must be stored in
memory with [SAVE PERFORMANCE].
The Performance stored in
memory must be saved to Ramdisk or floppy disk for future use.
All the operations performed in
EDIT SOUND can be annulled with
UNDO before carrying out another
task.
The EDIT PERFORMANCE / TRACKS section allows you to individually and independently
edit each track of a Performance. For each track you can define; the Sources and
Destinations, the M IDI I N and M IDI O UT channels, the mixer parameters such as
Volume and Transpose, the activation of controls such as the Wheel, Pedal,
Aftertouch, the extension and dynamic limits, the activation of the Effects, the
Audio Outputs and Pan assignments and the activation of the MIDI Filters.
All editing tasks are carried out on the selected track. You can also select a different track in this environment using the TRACK SELECT KEYS and TRACK SCROLL BUTTONS
as used in normal situations.
By combining the Performance tracks, complex orchestrations can be achieved. For
example, keyboard extension limits allows you to split the keyboard into several
different zones, each with a different sound (multisplit situations). Dynamic limitations allow you to create sounds with a dynamic threshold which trigger a different
timbre according to how hard a note is played (e.g. a Pick Bass with low dynamic
value and a Slap Bass with high dynamic value).
Editing the effects and the Audio Outputs allows you to configure the Performance
for studio recording or to ensure proper mixing of the tracks.
You can edit a completely new Performance with default settings using the “Create” command in the command/option column.
General commands
Create
Creates a track or all the tracks with default settings. If you select an existing track its
parameters are reset to default values (GrandPiano, Volume 127, Transpose 0, Source and
Destination connected).
Value range: 1 ... 16, All.
Page 1: Configuration
Page 2: Common
Page 3: Local (S2/S3)
Page 4: Internal Sound
Page 5: Midi Filter In
Page 6: Midi Filter Out
134
REFERENCE GUIDE
1. Press Create. The following dialogue window will appear:
2. Enter the track number you wish to create (1 ... 16). The option “All” appears after the
number 16. “All” creates all the tracks (resetting the values of the existing tracks to default
settings).
Copy
Copies the selected track to another track or to all the tracks.
Value range: 1 ... 16, All.
1. Press Copy. The following dialogue window will appear:
2. Enter the track number to copy (1 ... 16). The option “All” appears after the number 16.
“All” copies to all the tracks.
Delete
Cancels the selected track, removing it from the track column.
Note: It is not possible to cancel a track of a Performance that is exploited by a Song
present in the current Bank/Song.
Hint: Use this command to cancel tracks which are not used in the Performance. If you
erroneously cancel a track you can undo the operation with “Revert”.
Revert
Cancels the last “Create”, “Copy” or “Delete” operation carried out.
Page 1: Configuration
Page editors
The Configuration page shows four icons, which are graphic representations of the complex
parameters. Each icon represents one of the four Sources LOCAL/MIDI-COMMON and MIDI IN
and the Destinations GENERATION and MIDI OUT.
The icons can be selected by rotating the DIAL. To gain access to the icon’s incorporated
text parameters, simply select the required icon and tap on ENTER. To escape an icon edit,
tap on ENTER or press EXIT once.
LOCAL/ MIDI- COMMON Source. When the arrow is shown the track is connected to the keyboard or to the controlling device connected to the Midi-Common (master keyboard, guitar
controller, Midi accordion...).
Select the icon and press ENTER to disconnect or connect the Source.
Source. When the arrow is shown the track is connected to the Midi In (non M IDICOMMON channels). Select the icon and press ENTER to connect or disconnect the Source and
to access the text parameters IN and CH.
MIDI IN
MIDI I N port to which the track is connected. Select the icon with the DIAL and press ENTER
to access this parameter:
IN
Enter the number of the M IDI I N port (1 or 2). Press ENTER to pass on to the next parameter.
MIDI IN channel assigned to the track. You can enter this parameter either from the
previous parameter, or by selecting the icon and pressing ENTER twice.
CH
(4) Edit Performance/Tracks
135
Enter the number of the MIDI IN channel. Press ENTER to confirm the setting of the MIDI IN
Source and return to the icon selection mode.
Destination. When the arrow is shown the track is connected to the internal
sound generator. Select the icon and press ENTER to connect or disconnect the Destination.
The connection of this Destination is shown in the track column by the letter “i”. If “i” is not
displayed, this Destination is disconnected from the track.
GENERATION
Destination. When the arrow is shown the track is connected to the MIDI OUT (non
MIDI -COMMON channels). Select the icon and press ENTER to connect or disconnect the
Destination and to access the text parameters OUT and CH.
MIDI OUT
OUT
ENTER
MIDI OUT port to which the track is connected. Select the icon with the DIAL and press
to access this parameter:
Enter the number of the MIDI OUT port (1 or 2). Press ENTER to pass on to the next parameter.
MIDI OUT channel assigned to the track. You can access this parameter from the
previous one or by selecting the icon and pressing ENTER twice.
CH
Enter the number of the M IDI O UT channel. Press ENTER to confirm the setting of the MIDI OUT
Destination and return to the icon selection mode.
Hint: If you want to direct data received at MIDI IN to the MIDI out destination together with
Midi data generated by the Music Processor, you must activate the MIDI MERGE function
in the EDIT GENERAL section.
Page 2: Common
Parameters common to GENERATION and to the MIDI OUT.
Volume
The Track volume. Allows you to mix the Performance tracks. This parameter affects the
internal sound generation and is transmitted from MIDI OUT. It corresponds to the adjustments made with the Function Controllers (S2R: in the “Function Controller” page ).
Value range: 0 ... 127.
Transpose
Transposes the track. Allows you to increase or decrease the track pitch in semitone steps.
This parameter affects the internal sound generation and is transmitted from MIDI OUT. It
corresponds to the editing carried out in TRACK TRANSPOSER environment.
Value range: -60 ... +60 (semitones).
Delay
This parameter delays the transmission of the message to the Destinations. Allows you to
delay the production of the sound with respect to the action of playing on the keyboard.
The delay value is indicated in 1/192nds of a quarter note (crotchet) and it is synchronised
with the Sequencer Clock (the corresponding musical note appears together with the the
parameter value).
Value range: 0 ... 192 (q) ... 384 (h) ... 576 (h.) ... 768 (w).
Dynamic curve
Dynamic response curves. Each curve represents a different way in which the Sound
intensity responds to changes in keyboard velocity.
Curves 0 to 3 provide increasing degrees of sensitivity of the Sound to velocity changes.
Curves 4 to 7 provide inverse effects.
EFFECT
Value range: 0 ... 7.
DYNAMIC
0
1
2
3
4
5
6
7
Hint: By programming two tracks with opposing dynamic curves, you can create cross-fade
effects between the two tracks.
136
REFERENCE GUIDE
Master Transpose
Enables/disables the Master Transpose function. Tracks disabled for Transpose are
automatically tuned to play the “Equal Intonation Scale” (s.). Disable Master Transpose for
the drumkit track to prevent the drum configuration from being altered.
Value range: Enable/Disable (---).
Page 3: Local (S2/S3)
Parameter for the “local” controls (keyboard and controllers) and for the MIDI-COMMON.
Aftertouch
Activates/deactivates the Aftertouch for the track. Aftertouch is the pressure applied to the
note while you hold it down. Aftertouch can affect both the track and the corresponding MIDI
channel (Channel or Mono) or affect only the note which is pressed (Poly).
Note: When “Aftertouch” is disabled, Aftertouch messages received at MIDI IN (non MIDICOMMON channels) will continue to affect the notes played.
Value range: Off (---), Channel/Poly.
Wheel 1
Activates/deactivates Wheel 1 (left) for the track.
Value range: On/Off (---).
Wheel 2
Activates/deactivates Wheel 2 (right) for the track.
Value range: On/Off (---).
Pedal 1
Activates/deactivates Pedal/Footswitch 1 for the track.
Value range: On/Off (---).
Pedal 2
Activates/deactivates Pedal/Footswitch 2 for the track.
Value range: On/Off (---).
Valid only in multi mode (local & common)
The following two parameters affect the tracks of a Performance only when it is set to MULTI
and only for the LOCAL /MIDI-COMMON Source.
MODE
Key range
The keyboard extension across which the track can play. This is a useful setting to create
Performances with different sounds assigned to different sections of the keyboard (e.g.
Acoustic Bass at the lower end, GrandPiano at the centre and Flute at the higher).
1. Select the parameter. A keyboard with a horizontal bar will appear on the display showing
the current track extension:
2. Select the lowest note by pressing a note on the keyboard or by rotating the DIAL.
3. Press ENTER to pass to the next note limit. Select the highest note by pressing the note on
the keyboard or rotating the DIAL.
4. Press ENTER to confirm the Key Range or EXIT to escape.
Dynamic range
Dynamic range of the track. Above and below these limits the track will not play. If the limits
fall between 0 and 127 the track will always play.
Value range: 0 ... 127 - 0 ... 127.
Hint: By programming two tracks with adjacent Dynamic ranges (e.g. 0-112 and 113-127)
you can create cross-switch combinations without using the Sound Patches (s.).
(4) Edit Performance/Tracks
137
Page 3: Local (S2R)
Parameters valid for LOCAL /MIDI-COMMON.
Page 3: Local (S2R)
Aftertouch
Activates/deactivates the Aftertouch for the track. Aftertouch is the pressure applied to the
note while you hold it down. Aftertouch can affect both the track and the corresponding
MIDI channel (Channel or Mono Touch) or affect only the note which is pressed (Poly
Touch).
Note: “Aftertouch” affects messages originating from MIDI -COMMON. Even when Off,
Aftertouch messages originating from the other MIDI IN channels (not M IDI-COMMON) will affect
the notes played.
Value range: Off (---), Channel/Poly.
Footswitch 1 & 2
Activates/deactivates Footswitches 1 and 2 for the track.
Value range: On/Off (---).
Valid only in multi mode (local & common)
The following two parameters affect the tracks of a Performance only when it is set to multi
mode and only for the LOCAL/MIDI-COMMON Source.
Key range
The keyboard extension across which the track can play. This is a useful setting to create
Performances with different sounds assigned to different sections of the keyboard (e.g.
Acoustic Bass in the bass section, GrandPiano at the centre and Flute in the higher section).
1. Select the parameter. A keyboard with a horizontal bar will appear on the display showing
the current track extension:
2. Select the lowest note by pressing a note on the keyboard or by rotating the DIAL.
3. Press ENTER to pass to the next note limit. Select the highest note by pressing the note on
the keyboard (only if connected via Midi-Common) or by rotating the DIAL.
4. Press ENTER to confirm the Key Range or EXIT to escape.
Dynamic range
Dynamic range of the track. Above and below these limits the track will not play. Between 0
and 127 the track will always play.
Value range: 0 ... 127 - 0 ... 127.
Hint: By programming two tracks with adjacent Dynamic Ranges (e.g. 0-112 and 113-127)
you can create cross-switch combinations without using the Sound Patches (s.).
138
REFERENCE GUIDE
Page 4: Internal Sound
Mode
Selects the polyphonic/monophonic mode of the track. A track is said to be polyphonic
when it plays more than one note simultaneously and monophonic when it plays one note
only (regardless of how many notes are pressed simultaneously - typical of many synthesizers produced in the 70’s).
A monophonic track excludes all the notes but one of a chord played on the keyboard;
when you play a chord, only the highest note (mono right) or the lowest (mono left) will play.
Note: Sound Patches and Drumkits are always in poly mode.
Value range: Poly/Mono left/Mono right.
Priority
Assigns a “special Polyphonic status” to a track in multi-timbral situations to prevent “note
stealing”. The term “note stealing” describes what occurs when the total number of notes
played exceed the maximum permitted polyphony: in such cases, one or more notes are
freely “eliminated” to maintain the instruments maximum permitted polyphony. By assigning
Priority to a Track, it will be protected from “note stealing” and the freely eliminated notes
will be lost elsewhere.
Value range: On/Off (---).
Hint: Enable Priority on tracks dedicated to the drumkit, the bass line, the melody line and
the more important backings. Do not enable Priority for too many tracks since this will
render the function inactive.
Detune
Fine tunes any Sound assigned to the track, in steps of 1/64th semitone.
Value range: -64 ... +64.
Analog out
Audio outputs. The track can be directed to any of the audio outputs (STEREO OUTPUTS LEFT/
RIGHT, 1, 2, 3, 4). The combinations possible are as follows.
STEREO LEFT / RIGHT
The sound is “effected” by the internal DSPs (wet). It is routed to the LEFT
and RIGHT outputs, balanced by the Pan programmed for the track.
1+2 The sound has no effects (dry), overriding the internal DSPs. It is routed to
outputs 1 and 2, balanced by the Pan programmed for the track.
OUT
3+4 The sound has no effects (dry), overriding the internal DSPs. It is routed to
outputs 3 and 4, balanced by the Pan programmed for the track.
OUT
1, 2, 3, 4 The sound has no effects (dry). These are mono outputs and are not affected by
Pan modifications.
Effects
Activates/deactivates the two DSPs for the track. Eff 1 is the reverb processor, Eff 2 is the
modulation processor (delay, chorus...).
The effects assigned to the two DSPs and their overall level are shown in EDIT PERFORMANCE /
CONTROLS ( S .).
Pan
= Panorama, position of the sound in the stereophonic “panorama”. It affects sound
generation and is sent to the M IDI O UT. Pan has no effect on the acoustic signal of the tracks
which escape from the single audio outputs (1, 2, 3, 4).
This parameter must be controlled while you are playing by means of the Function Controllers (S2R: see page on Function Controller).
Value range:
Random pitch
(-31, all left)) ...
(0, centre) ...
(+31, all right).
Creates slight pitch variations freely and is useful for simulating the pitch instability typical
of instruments such as bells or some types of ethnic instruments.
Value range: 0 (Off), 1 ... 7.
Random pan
Creates Pan variations freely (position of the sound in the stereophonic panorama).
Value range: 0 (Off), 1 ... 7.
Page 5: MIDI Filter In
Filter 1 ... 7
MIDI I N filters. It is possible to filter, or exclude, from any track (not MIDI -COMMON ), up to seven
MIDI messages from the incoming MIDI DATA STREAM. The Filter is active when the name of a
MIDI message appears in place of the word “Off”. The messages which can be filtered are
listed in the table at the end of the chapter.
(4) Edit Performance/Tracks
139
Hint: If you are controlling the Music Processor with an instrument which does not conform
to General Midi standards, it is advisable to filter the Program Change messages from each
track, because the same Program Change numbers will very probably correspond to
different sounds on the two instruments.
Select the sounds of the Music Processor manually.
Page 6: MIDI Filter Out
Filter 1 ... 7
MIDI OUT filters. It is possible to filter, or exclude, from any track (not M IDI -COMMON), up to
seven MIDI messages from the outgoing M IDI DATA STREAM. The Filter is active when the name
of a M IDI message appears in place of the word “Off”. The messages which can be filtered
are listed in the table at the end of the chapter.
Hint: If you are controlling an instrument which does not conform to General Music standards with the Music Processor, it is advisable to filter the Program Change messages from
each track, because the same Program Change numbers will very probably correspond to
different sounds on the two instruments.
Select the sounds of the instrument controlled by the Music Processor manually.
MIDI messages assignable to the Midi Filters (In & Out)
Only the messages shown in reverse highlight affect the sound generation of the S Series. The notes shown in
brackets [] indicate a special implementation of the S Series message.
ProgramChange
Pitch Bend
Mono Touch
Poly Touch
(00) Control 0 / BankSelect
(01) Modulation
(02) Breath
(03) Control 3
(04) Foot Controller
(05) Portamento Time
(06) Data Entry
(07) Main Volume
(08) Balance [Osc 1/2]
(09) Control 9
(10) Panorama
(11) Expression
(12) [Attack]
(13) [Release]
(14) [Filter 1 Cutoff]
(15) [Filter 2 Cutoff]
(16) Gen. purp. control. 1
(17) Gen. purp. control. 2
(18) Gen. purp. control. 3
(19) Gen. purp. control. 4
(20) [Filters 1+2 Cutoff]
(21 ... 31) Controls 21 ... 31
(64) Damper
(65) Portamento
(66) Sostenuto
(67) Soft Pedal
(68) Control 68
(69) Hold 2
(70 ... 79) Controls 70 ... 79
(80) Gen. purp. control. 5
(81) Gen. purp. control. 6
(82) Gen. purp. control. 7
(83) Gen. purp. control. 8
(84 ... 90) Controls 84 ... 90
(91) External Effect Depth
(92) Tremolo Depth
(93) Chorus Depth
(94) Celeste Depth / Detune
(95) Phaser Depth
(96) Data increment
(97) Data decrement
(98) Non-Reg.Par.Num.(LSB)
(99) Non-Reg.Par.Num.(MSB)
(100) Reg.Par.Num. (LSB)
(101) Reg.Par.Num. (MSB)
(102...120) Controls 102...120
(121) Reset control
(122) Local control
(123) All Note off
(124) Omni Mode off
(125) Omni on
(126) Mono Mode on
(127) Poly Mode on
Note: The Control Changes numbered 21 ... 24 and 90 are generally used by the S Series to control the DSPs.
These messages must be transmitted via the M IDI -C OMMON which is not, however, affected by the M IDI Filters.
Consequently the chapter dedicated to the M IDI Filters does not describe the function of these messages in the
case of the S Series.
140
REFERENCE GUIDE
Notes and suggestions
Delete Track If you cannot cancel a track from a Performance because the same track is
exploited by the Song in the same Bank/Song, use the following “trick”:
1. Save the Performance to another Bank/Song.
2. Cancel the track.
3. Save the modified Performance back to the original Bank/Song.
Delay You can combine different tracks with different delay values to create complex
repeating effects. An example of this application is heard in the R OM -Performance “Modern
Gnome”.
Aftertouch Aftertouch can be simultaneously activated in some tracks and deactivated in
others. An example of this application is a Performance in layer mode with Piano and
Strings assigned to the two tracks. By activating Aftertouch for just the Strings track you
can change the Volume of this sound by pressing the notes on the keyboard, while Piano
(whose track has Aftertouch deactivated) will not be changed.
M IDI Filter The M IDI O UT Filters can be very useful when combined with M IDI M ERGE .
Consider, for example, a M IDI setup with a sequencer connected to the M IDI I N of the Music
Processor and an expander connected to its M IDI O UT :
Local
Track 1
Midi Out
Midi In
The M IDI M ERGE is active. The sequencer transmits Program Changes to track 1 to select the
Sound. The Program Change transmitted to track 1 selects both the Sound of the Music
Processor ( GENERATION Destination) and a sound for the expander ( MIDI OUT Destination).
The expander sound may not correspond to that of the Music Processor and may not be
suitable, therefore, you should assign the ProgramChange message to one of the M IDI Out
Filters. Consequently, the Sound of the Music Processor will be selected, while the filter
excludes the Program Change message from the M IDI O UT .
(4) Edit Performance/Tracks
141
5 EDIT SOUND
All the EDIT SOUND operations can
be cancelled by pressing the
UNDO button before carrying out
other operations.
The elements which make up a Sound can be modified in the EDIT SOUND environment. Press the SOUND button to activate the edit of the sound assigned to the
currently selected track. Here you can edit the basic sample, the volume, the
amplitude envelope, the LFO, the filters and respective envelope, pitch variations
over time and Pan.
also incorporates the SAMPLE TRANSLATOR with which you can read
samples from Ms-Dos/Atari or Akai S1000 disks, and receive or transmit samples
via Midi and create new Waveforms.
EDIT SOUND
Single Oscillator (SO), Dual Oscillator (DO), Dual Crossfade (DC)
Sounds
Sounds are produced by generators known as oscillators. The S Series oscillators
can be combined in three different ways to produce three types of Sounds: Single
Oscillator Sounds (SO), Dual Oscillator Sounds (DO) and Dual Crossfade Sounds
(DC).
The Sound type can be selected in the W AVESET editor (s.). It is also possible to
convert the Sounds from one type to another.
Sound types
Single Oscillator (SO)
Only one oscillator is exploited to read a single Waveform. Sounds of this type are 32-voice
polyphonic due to the individual exploitation of the instrument’s 32 oscillators.
OSC 1
Dual Oscillator (DO)
Two oscillators are exploited to read two different Waveforms. A Sound is composed of two
different fundamental sounds. By using two oscillators per voice, the maximum polyphony
permitted by these sounds is 16 voices.
OSC 1
OSC 2
Dual Crossfade (DC)
Two oscillators are exploited to read a single Waveform. The reading process is a very
efficient method (Crossfade, Multiwave Looping) which provides high quality results. The
use of two oscillators per voice permits a maximum polyphony of 16 voices.
OSC 1
OSC 1
OSC 2
Figure 1: Main menu (DC and DO Sounds)
142
REFERENCE GUIDE
OSC 2
Figure 2: Main menu (DC and DO Sounds)
Polyphony obtained with different types of sounds
The maximum permitted polyphony of the Music Processor depends (1) on the
current track playing mode and (2) on the type of Sounds assigned to the tracks.
Maximum polyphony obtainable in the various track playing modes
Note: The Sound Patches and Drumkits behave as the DC Sounds.
single
With an SO Sound, the polyphony is 32 notes. With a DO or DC Sound polyphony is 16
notes.
layer
With two SO Sounds, the polyphony is 16 notes. With two DO or DC Sounds the polyphony
is 8 notes. With one SO Sound and one DC or DO Sound you can obtain approximately 24note polyphony.
split
With two SO Sounds, the polyphony is 32 notes. With DO and DC Sounds polyphony is 16
notes. With one SO sound and one DC or DO Sound, you can obtain approximately 24-note
polyphony.
multi
The polyphony depends on the complexity of the configuration. With only SO Sounds, a
minimum polyphony of approximately 24 notes is guaranteed.
Access the
Access to the
EDIT SOUND
EDIT SOUND
environment
environment is via the same method for all Sound types:
1. Select the Sound (track) you wish to edit from the main display.
2. Press the Sound button (the main
EDIT SOUND
menu is displayed).
Different displays will appear according to the type of Sound selected (figures 1,
2). The first difference lies between the Sound and the Sound Patch/Drumkits. The
second difference lies in the access to the edit with an SO Sound or with a DO or
DC Sound.
The edit environment (the editors of the edit sound menu)
The elements that make up the EDIT SOUND environment are grouped in different
editors, listed in the main menu (figures 1 and 2).
The editors of the edit sound menu
Waveset
Selects the Waveform (fundamental waveform or waveforms of the Sound).
Volume
Volume of the Sound.
Amplitude envelope
Varies the volume over time, defined by two graphic representations consisting of ten
segments each: Key On Envelope and Key Off Envelope.
LFO
Modulation. Can be tied to the Sequencer Clock. Generates cyclic variations in the amplitude or in the cutoff frequency of the filters.
Filter 1/2
Filters 1 and 2. Modify the timbric quality of the Sound, attenuating or enhancing certain
frequencies, such as in an equalizer.
Filter envelope
(Not present in the case of SO Sounds, s.). Variation of the Filter’s effect over time.
Pitch envelope
Variation of the Pitch over time.
Pan
Position of the Sound within the Stereophonic panorama. In DC and DO Sounds it is also
possible to programme the Pan envelope.
(5) Edit Sound
143
The options of the main menu and of the editors
The options of the main menu
Save
Allows you to save the modified or created Sound to the Sound Library.
Abort
Cancels. Escapes from the edit without saving the modifications or the created Sound.
Sample Translator
Activates the program which acquires and edits the Sample Translator samples (s.).
The editor options (secondary menus)
Menu
Escapes from the editor and returns to the main EDIT SOUND menu.
Compare
Momentarily recalls the original version of the Sound currently in edit, in order to compare
the two versions. The display also shows the parameter status of the original Sound.
While you are in “Compare” mode, the following two commands will appear in the command/option column:
copy Copies the displayed parameter status relating to the original Sound to the page of
the Sound in edit, and escapes from “Compare” mode.
comp/exit Escapes from “Compare” without effecting any changes or loss of edit data.
Special options
Each editor and page shows options specific to the page.
Status of the instrument in edit sound mode
When you enter the EDIT SOUND environment, the instrument is set to “solo” status
automatically (the led on the Solo button flashes) - this is to isolate the Sound in
edit from the rest of the tracks. You can exclude “solo” (by pressing SOLO button led OFF) in order to listen to the Sound currently in edit together with all the tracks
of the Performance. This will give you an idea of what your edited Sound is like
when combined with other Sounds. Press “solo” again to re-isolate the Sound and
continue with the edit tasks.
The settings of the Wheel, Pedal, Aftertouch, Transpose and the other parameters of
the Performance are those of the currently selected Performance.
In EDIT SOUND mode you can play back a Song, but any changes of Performance will
be ignored.
Temporary escape from edit sound
Thanks to multitasking, you can temporarily escape EDIT SOUND mode by pressing
SOUND , NORMAL , or the button of another operating section. The Sound remains in
edit, but the selected track plays the original Sound. To return to the sound in edit
press SOUND .
The Sound button will flash while the Sound is in edit mode.
If you escape EDIT SOUND mode without making changes to the Sound, the led on the
Sound button goes off.
Escaping from edit sound and saving the modified sound
Once you have completed your editing tasks, you can save the new or modified
Sound in the Sound Library (s.).
1. Select “Save” from the main sound edit menu. The SOUND LIBRARY will appear.
This is where all the instrument’s Sounds are stored in order of Program Change
144
REFERENCE GUIDE
number and Family. The name of the Sound to memorise is shown in a small
window:
* If you have modified a RamSound, you can save the modified
Sound to the same location you
started from.
2. Select an empty location where the Sound* can be memorised. The selected
location is defined by a Program Change number and a Bank Select number,
messages with which the Sound can be recalled via Midi or from the control
panel. Select the location using one of the following procedures:
• go to the Family to which the Sound belongs with the
rotate the DIAL to select the location within the Family;
MULTIFUNCTION KEYS ,
then
• specify the Program Change and Bank Select numbers on the NUMERIC KEYPAD
as if you were selecting the Sound from the control panel (form xxx-yyy).
3. If necessary, select “Name” to change the Sound’s name:
Insert: inserts a space at the cursor position. Capitals: inserts capital letters.
Delete: cancels a character at the cursor position. ENTER to confirm, EXIT to
cancel.
4. Select “Store” to memorise the Sound to the selected location.
Note: The Sound is saved to the Sound Library resident in memory; remember that
when you turn off the instrument, the edited Sound (and all other edited work) will
be irremediably lost. To store your Sound permanently, save the Sound Library to
disk or to the Ram-disk. Refer to the chapters dedicated to the SOUND LIBRARY
buttons or DISK for further information.
Possible error messages during the Sound save task
The Destination is occupied by another Sound. Solution: repeat the operation and select a
different location.
You have given your Sound a name which already exists in the Sound Library. Solution:
repeat the operation and assign a different name to the edited Sound.
You can not overwrite a Rom-Sound. Repeat the operation and select an empty location.
Escape from edit sound without memorising the modified sound
If you decide to abandon Sound editing, you can escape from the environment with
the “Abort” command in the main menu. If you confirm, the edit environment will
close without memorising the modified Sound.
(5) Edit Sound
145
Converting a Sound to a different type
The options required to transform the Sound currently in edit into a Single Oscillator (SO), Dual Oscillator (DO) or Dual Crossfade (DC) type appear in the options
column of the Waveset editor:
The Sound currently in edit can be converted into either of the two remaining
Sound types. Obviously, its characteristics will change quite notably according to
which parameters are altered during the conversion.
Conversion limits
DC and DO Sounds that are converted into the SO type retain
the information on their Filter envelopes, but they are not, however, used. Reconverting to DC or DO types, the information is recuperated in its original form.
Filter envelopes
When a DC Sound is
converted to an SO or DO Sound, the Waveforms consisting of two different
samples (e.g. Vocal_Gtr, Strings_Glkn or Fantasy) will lose the second sample.
Reconverting to DC mode, the second sample will be restored.
Waveforms consisting of two different samples
SO Sounds have an output level that is -6 dB lower than DC and DO Sounds.
When you convert a Sound to an SO type, you may need to adjust the G AIN parameter in the Filter 1/2 page to balance your levels. Bear in mind that an opposite
change may be necessary when returning from SO to DC or DO.
Gain
Sample Translator creates DC Sounds that can be subsequently converted. Not all Sounds created with the S AMPLE T RANSLATOR can be
converted to SO or DO. This occurs when the amplitude at the Loop Start point is
much larger than that of the Sample Start. If you want to be sure of converting the
Sounds created with S AMPLE T RANSLATOR into SO Sounds, choose a Loop Start point
with an amplitude very similar to that of the Sample Start.
Sample Translator
146
REFERENCE GUIDE
Waveset
The Waveset editor provides access to the principal control parameters of the
Waveform, that is, the basic waveform of the Sound.
Waveform (Sound Dual Crossfade)
Waveform
Basic waveform of the Sound. Here you can select one of the 209 Rom Waveforms, or a
Waveform loaded in memory with a Ram-Sound, or one created with the SAMPLE TRANSLATOR
(Waveforms numbered from 210 onwards).
The Waveforms are numbered progressively and can be selected by specifying their
number. The list of Rom-Waveforms appears in the Appendix.
Transpose
Transposes the Waveform in semitones.
Value range: -64 ... +64.
Detune
Detune creates an equal and opposite pitch offset between two oscillators in steps of 1/64th
of a semitone. The pitch of one of the oscillators is increased while the pitch of the other one
is decreased. Positive values correspond to an increase of Oscillator 1.
When you convert the Sound to an SO type, this parameter it transformed to Fine Pitch,
which will probably require an adjustment.
Value range: -64 ... +64.
Note: With most of the Waveforms, the “Pitch depth” (s.) of the two Oscillators can be
separated only if Detune has any value other than 0. In Sounds based on these Waveforms
it is possible, for example, to increase the Pitch of Osc.1 while the Pitch of Osc.2 is
lowered.
When Detune = 0, however, the Pitch Envelope of Osc.2 follows that of Osc.1, regardless
of the status of the “Pitch depth ch 2” parameter.
At the end of this chapter is a table of the Rom-Waveforms which allow a different programming of the Pitch Envelope even when Detune = 0.
Pitch touch sensitivity
Sensitivity of Pitch to Aftertouch variations. The Pitch of the Sound can be varied by applying pressure on the notes of the keyboard after key on .. Positive values increase the Pitch
while negative ones have the inverse effect.
Value range: -7 (lowest sensitivity = -2 semitones) ... +7 (highest sensitivity = +2 semitones).
Waveform (Single Oscillator Sound)
Waveform
Basic waveform of the Sound. Here you can select one of the 209 Rom Waveforms, or a
Waveform loaded in memory with a Ram-Sound, or one created with the SAMPLE TRANSLATOR
(Waveforms numbered from 210 onwards).
The Waveforms are numbered progressively and can be selected by specifying their
number. The list of Rom-Waveforms appears in the Appendix.
Transpose
Transposes the Waveform in semitones.
Value range: -64 ... +64.
WAVESET editor (Dual Crossfade Sounds, DC)
WAVESET editor (Single Oscillator Sounds, SO)
WAVESET editor, Page 1 (Dual Oscillator Sounds, DO )
WAVESET editor, Page 2 (Dual Oscillator Sounds, DO)
(5) Edit Sound
147
Fine pitch
Fine pitch of the Waveform in steps of 1/64th of a semitone.
Value range: -64 ... +64.
Pitch touch sensitivity
Sensitivity of Pitch to Aftertouch variations. The Pitch of the Sound can be varied by applying pressure on the notes of the keyboard after key on. Positive values increase the Pitch
while negative ones have the inverse effect.
Value range: -7 (lowest sensitivity = -2 semitones) ... +7 (highest sensitivity = +2 semitones).
Page 1: Waveform (Dual Oscillator Sound)
Waveform osc.1
Basic waveform of the Sound. Here you can select one of the 209 Rom Waveforms, or a
Waveform loaded in memory with a Ram-Sound, or one created with the SAMPLE TRANSLATOR
(Waveforms numbered from 210 onwards).
The Waveforms are numbered progressively and can be selected by specifying their
number. The list of Rom-Waveforms appears in the Appendix.
Waveform osc.2
Waveform assigned to Oscillator 2. As above.
Transpose osc. 1/2
Separate transposition (in semitones) for the two Oscillators.
Value range: -24 ... +24.
Fine pitch osc. 1/2
Separate Fine pitch (in steps of 1/64th of a semitone) for the two Oscillators.
Value range: -64 ... +64.
Pitch touch osc. 1/2
Sensitivity of the Pitch of the two Oscillators to Aftertouch variations. The Pitch of the two
oscillators can be varied by applying pressure on the notes of the keyboard after key on.
Positive values increase the Pitch while negative ones have the inverse effect.
Value range: -7 (lowest sensitivity = -2 semitones) ... +7 (highest sensitivity = +2 semitones).
Page 2: Oscillator Balance (Dual Oscillator Sound)
Balance
Mixer for the two Waveforms. Positive values render the first Waveform louder, negative
values enhance the second Waveform.
This parameter can be controlled through the M IDI Control Change 08 message (“Balance”),
assignable to a Pedal, Wheel or User Slider (S2/S3).
Value range: -127 ... +127.
Balance envelope sensitivity
Depth of the action of the envelope on Balance. The envelope is activated by the Balance
Envelope Control parameter below.
Value range: -7 ... +7.
Balance envelope control
Links Balance to the graphic representations of the Pitch or Pan envelope. If dashes are
displayed (---) the Balance is fixed and does not follow any form of envelope:
Note: It is not necessary for the Pan or Pitch envelopes to be active; Balance requires only
the graphic form of the envelope.
Balance dynamic sensitivity
Response of Balance to dynamic variations. Positive values enhance the presence of the
first Waveform with increased dynamic intensity, negative values enhance the presence of
the second Waveform with increased dynamic intensity.
Value range: -7 ... +7.
Balance touch sensitivity
Response of Balance to Aftertouch variations. Positive values enhance the presence of the
first Waveform with increased Aftertouch pressure, negative values enhance the presence
of the second Waveform with increased Aftertouch pressure.
Value range: -7 ... +7.
148
REFERENCE GUIDE
Volume
The Volume editor gains access to the Sound volume controls. The volume programmed on these pages relates to the Sound’s basic volume, which interacts with
the track and instrument volume settings. In any case, it is the maximum level
available of the Sound in any situation.
In the second page you can programme the Volume Tracking, or the variation of the
level programmed in the first page across the keyboard. It is sometimes necessary
to enhance the presence of a sound more or less across the keyboard in order to
simulate to a greater degree that which occurs in reality. For example, an acoustic
piano can reach a higher sound level in the bass register, while the higher notes are
less intensive.
Page 1: Volume
Volume
Maximum Sound level.
Value range: 0 … 127.
Dynamic sensitivity
Volume response to dynamic variations. Positive values increase the sound’s intensity with
greater dynamic values, while negative values lower the sound’s intensity with increased
dynamics.
Value range: -7 ... +7.
Volume touch sensitivity
Positive values increase the sound’s intensity with increased aftertouch pressure, while
negative values gives the inverse effect with increased aftertouch.
Value range: -7 ... +7.
Page 2: Volume Tracking
Options
Here you can divide the Tracking curve into several different segments, in order to obtain a
more refined Tracking across the keyboard.
1 segm One Segment. The Tracking curve is essential, representing a constant Volume
offset across the keyboard. The parameter “Key” cannot be modified.
3 segm Three Segments. The Tracking curve consists of 3 segments which allow the
construction of a situation offering different variations across the keyboard.
6 segm Six segments. The Tracking curve is divided into many parts; allowing a more
complex programming of the Volume offsets across the keyboard.
Parameters
The three parameters displayed across the bottom parts of the Tracking curve can be
accessed by tapping repeatedly on ENTER. The selected parameter can be modified with the
DIAL (the “Key” and “Level” parameters also with the NUMERIC KEYPAD ).
point One of the extreme ends of a segment. Rotation of the DIAL selects one of the points
of the Tracking curve (1, 2, or 1, 2, 3, 4, or 1, 2, 3, 4, 5, 6, 7).
key Determines the keyboard position for the point in edit. The extreme points (A#0, C8)
cannot be modified.
level Determines the volume offset (at the selected KEY position) with respect to the
Volume parameter programmed in the first page. The parameter value is always negative.
Value range: -63 … 0.
Page 1: Volume
Page 2: Volume tracking
(5) Edit Sound
149
Detailed procedure
Carry out the following steps to access and edit the Tracking
parameters:
1. Tap ENTER to select one of the parameters “Point”, “Key” (if possible) or
“Level”.
2. Rotate the
DIAL
to select a P OINT , to change the K EY note or modify the L EVEL .
3. Press ENTER to pass on to the next parameter. After “Level” you will return to
“Point”.
Amplitude envelope
The A MPLITUDE E NVELOPE is the volume displacement of the Sound level over time.
The Amplitude Envelope editor allows you to programme the Key On Envelope, the
Key Off Envelope and the Envelope Tracking.
The Key On Envelope is a 10 segment curve (maximum) that represents the variation of the sound for the entire duration that the notes are held pressed.
Key Off Envelope is a 10 segment curve (maximum) that represents the variation of
the sound after the notes have been released. This envelope phase is often called
Release.
In practice, the Key On and Key Off Envelopes correspond to the traditional ADSR
parameters (Attack, Decay, Sustain, Release).
The Envelope Tracking controls the keyboard’s effect on the envelope completion
velocity (rate) across the keyboard. The Envelope completion (of Key On and Key
Off) can be faster or slower across the keyboard of acoustic instruments (e.g. the
bass notes of the piano or guitar whose duration is longer than the higher notes).
Page 1: Amplitude Envelope Control
Envelope finish
This parameter determines the note from which the Key Off envelope cannot interrupt the
amplitude envelope on its natural course to completion. The Envelope Finish parameter is
indispensable to simulate, for example, the piano where no dampers are applied from the
note A6 onwards; the sound continues indefinitely after release.
When this parameter is not set to “Off”, the last segment of the Key On Envelope sets to 0
automatically (and cannot be modified) to prevent the sound from playing infinitely (owing to
the deactivated Key Off Envelope).
Page 1: Amplitude envelope control
Page 2: Amplitude Key On
Page 3: Amplitude Key Off
Page 4: Amplitude envelope tracking
150
REFERENCE GUIDE
Segment 1 rate dynamic sens. Response of Segment 1 of the Key On Envelope to dynamic variations. Segment 1 corresponds to the Attack phase. This parameter ties the Attack of the Sound to dynamics.
Positive values increase the Attack rate with increased dynamics while negative values give
the inverse effect with increased dynamics.
Value range: -7 ... +7.
Key Off rate dynamic sens.
Response of the Key Off Envelope to the release dynamics. The Key Off Envelope corresponds to the Release phase. This parameter ties the Sound’s Release to the velocity with
which the notes are released (Note Off Velocity or Dynamic Off).
Positive values increase the completion speed of the Key Off Envelope with increased
release dynamics, while negative values slow it down with increased release dynamics.
Page 2: Amplitude Key On
Commands
The option/command column shows specific options for this page.
set loop Activates the loop (envelope repetition). Determines the starting point of the
envelope repetition. When the envelope reaches its terminal point, it loops back to the
beginning. The cycle repeats continuously until you release the keys.
The loop is represented by an arrow which indicates the initial loop point.
To eliminate the loop, select its first segment again and then select “Set Loop”.
Note: You can programme a loop only if “Envelope finish” parameter (previous page) is set
to “Off”.
add segm Adds a segment. Inserts a new segment in the envelope curve immediately
after the currently selected segment. N.B.: a maximum of up to 10 segments is permitted.
del segm Cancels the segment selected. N.B .: The Key On Envelope must have at least
one segment (corresponding to Attack), which cannot be cancelled.
zoom in Enlarges the field of vision of the envelope up to 4 times.
zoom out Reduces the field of vision of the envelope; it also cancels a zoom in. Reduces
the envelope up to three times its standard size.
Parameters
Tap ENTER to access the three parameters displayed under the Key On Envelope curve. Edit
the selected parameter with DIAL (“Time” and “Level” also with the NUMERIC KEYPAD).
segment One of the envelope segments (1 - 10), whose end point is selected.
time Duration of the Segment. The maximum segment time is approximately 21 seconds.
Value range: 0 ... 127.
level Sound level of the selected segment at its terminal point. The maximum level
corresponds to the volume programmed in the Volume editor N.B.: the initial level of the first
segment is always zero (it cannot be modified).
Value range: 0 ... 127.
Detailed procedure…Follow these steps to access and modify the parameter:
1. Tap
ENTER
to select one of the parameters “Segment”, “Time”, “Level”.
2. Rotate the DIAL to select a segment or to modify its duration or level. You can
enter a “Time” and “Level” value on the NUMERIC KEYPAD .
3. Press ENTER to select the next parameter. After “Level” you will return to
“Segment”.
4. Select “Add segm.” to add a new segment after the selected segment. Select
“Del. segm.” to cancel the selected segment.
(5) Edit Sound
151
Page 3: Amplitude Key Off
Commands
The option/command column shows specific options for this page.
add segm Adds a segment. Inserts a new segment in the envelope curve immediately
after the currently selected segment. N.B.: a maximum of up to 10 segments is permitted.
del segm Cancels the segment selected. N.B.: The Key Off Envelope must have at least
one segment (corresponding to Attack), which cannot be cancelled.
zoom in..Enlarges the field of vision of the envelope up to 4 times.
zoom out Reduces the field of vision of the envelope; it also cancels a zoom in. Reduces
the envelope up to three times its standard size.
Parameters
Tap ENTER to access the three parameters displayed under the Key Off Envelope curve. Edit
the selected parameter with DIAL (“Time” and “Level” also with the NUMERIC KEYPAD).
segment One of the envelope segments (1 - 10), whose end point is selected.
time Duration of the Segment. The maximum segment time is approximately 21 seconds.
Value range: 0 ... 127.
level Sound level of the selected segment at its terminal point. The maximum level
corresponds to the volume programmed in the Volume editor N.B .: the level at the terminal
point of the Key Off Envelope is always zero.
Value range: 0 ... 127.
Detailed procedure Follow these steps to access and modify the parameters:
1. Tap
ENTER
to select one of the parameters “Segment”, “Time”, “Level”.
2. Rotate the DIAL to select a segment or to modify its duration or level. You can
enter a “Time” and “Level” value on the NUMERIC KEYPAD .
3. Press ENTER to select the next parameter. After “Level” you will return to
“Segment”.
4. Select “Add segm.” to add a new segment after the selected segment. Select
“Del. segm.” to cancel the selected segment.
Page 4: Amplitude Envelope Tracking
Options
These three options permit you to divide the Tracking “curve” into different segments; in
order to permit a more or less refined programming of the Tracking across the keyboard.
1 segm 1 segment. The Tracking is essential and provides a constant variation of the
completion velocity of the envelope across the keyboard. The “Key” parameter cannot be
modified.
3 segm 3 segments. The Tracking consists of 3 segments which create a curve with
different variations across the keyboard.
6 segm 6 segments. The Tracking curve is greatly divided, allowing a complex programming of the envelope completion velocity variations across the keyboard.
Parameters
The three parameters displayed across the bottom parts of the Tracking curve can be
accessed by tapping repeatedly on ENTER. The selected parameter can be modified with the
DIAL (the “Key” and “Level” parameters also with the NUMERIC KEYPAD ).
point One of the extreme ends of a segment. Rotation of the DIAL selects one of the points
of the Tracking curve (1, 2, or 1, 2, 3, 4, or 1, 2, 3, 4, 5, 6, 7).
key Determines the keyboard position for the point in edit. The extreme points (A#0, C8)
cannot be modified.
level The envelope completion velocity offset (Key On and Key Off). Positive values
increase the completion velocity, negative values slow it down. 0 corresponds to the
“standard” duration of the segments programmed in the previous pages.
Value range: -63 … 0…+63.
152
REFERENCE GUIDE
Detailed procedure
Follow the steps set out below to access and edit the Tracking
parameters:
1. Tap ENTER to select one of the parameters “Point”, “Key” (if possible), or
“Level”.
2. Rotate the
DIAL
to select a P OINT , to change the K EY note or modify the L EVEL .
3. Press ENTER to pass on to the next parameter. After “Level” you will return to
“Point”.
Lfo
LFO or Low Frequency Oscillator is a periodic (repeating) control source. It
produces a low speed waveform (low frequency) that can be applied to various
aspects of the sound to cause patterns of cyclic change. Because of its periodic
nature, the LFO can be used to create effects like Tremolo (cyclic amplitude
modulation), Vibrato (cyclic pitch modulation) or, for example, “Wah-wah” (applied to the filter cutoff-frequency).
Lfo
“Midi sync” option
MIDI synchronism. When this option is selected, it synchronises the Lfo to the Music Processor’s MIDI Clock, synchronising the Lfo to the Tempo of the Song or of external impulses.
(For access to the MIDI Clock, press the CLOCK button).
Wave
The waveform of the low frequency oscillation. Given the low frequency of the oscillation,
the waveform is clearly perceptible. You can choose from the following waves:
Sine
Rate
Triangle Saw-tooth
Square
Random Sample&Hold
Defines how frequently the LFO repeats. When “MIDI sync” is selected the value shown
indicates the musical note that the oscillation corresponds to.
Value range: 1 ... 200 or 1/1 ... 1/128th of a note (w).
Delay
Determines the delay before the Lfo appears. Entry of the Lfo becomes gradual.
Value range: 0 ... 64.
Pitch
Applies Lfo to the Pitch to produce a Vibrato effect. You can programme both the first and
the second part of the multiple parameter, which interact.
Pitch Determines the modulation depth of Lfo on Pitch. Positive and negative values
indicate an opposed sense of vibration at the starting phase (upwards or downwards
respectively).
Value range: -7 ... +7.
Touch sensitivity Links the depth of the Pitch modulation to Aftertouch. By applying
pressure to the keys, the “Delay” parameter is ignored and the oscillation starts immediately.
Value range: 0 ... +7.
LFO Editor (Dual Crossfade, DC, and Dual Oscillator Sounds, DO)
LFO Editor (Single Oscillator Sounds, SO)
(5) Edit Sound
153
Amplitude
Applies Lfo to the Amplitude to produce Tremolo effects. You can programme both the first
and the second parts of this multiple parameter, which interact.
Amplitude Determines the modulation depth of the Lfo on the Amplitude (the output
level). The positive and negative values indicate an opposed sense of increase/decrease of
the Tremolo output level (the choice between positive or negative values give perfectly
equivalent results). Higher positive or negative values increase the modulation depth.
Value range: -7 ... +7.
Touch sensitivity Links the depth of the Amplitude modulation to Aftertouch, permitting
the control of the amount of Tremolo by varying the pressure applied to the keys. The
“Delay” parameter is ignored when pressure is applied to the keys and the oscillation starts
immediately.
Value range: 0 ... +7.
Filter 1 (DC and DO Sounds)
Applies Lfo to the Cutoff Frequency of Filter 1 to produce a “Wha-Wha” effect (obtained by
“opening” and “closing” the Filter). You can programme both the first and the second parts
of this multiple parameter, which interact.
Filter 1 Determines the modulation depth of the Lfo on the Cutoff Frequency. The positive
and negative values indicate an opposed sense of “opening” and “closing”, otherwise, the
choice between a positive or negative value give perfectly equivalent results. Higher
positive or negative values increase the Filter modulation depth.
Value range: -7 ... +7.
Touch sensitivity Links the depth of the Filter modulation to Aftertouch. By applying
pressure to the keys, the “Delay” parameter is ignored and the oscillation starts immediately
(toggles between open and closed filter). The value 0 is equivalent to no effect and the
higher values produce a greater amount of modulation.
Value range: 0 ... +7.
Filter 2 (DC and DO Sounds)
As above, but for Filter 2.
Filter 1/2
Filters enhance or attenuate certain frequencies of the Waveform (or the Waveforms). The sound changes according to the type of filter selected (“Type” parameter).
The two filters of the S Series are connected in series, so that Filter 2 operates on
the sound already processed by Filter 1. In the case of DO Sounds, the filters have
the same effect on both the basic Waveforms.
Page 1: Filter 1
Page 2: Filter 2
Page 3: Filter 1 tracking
Page 4: Filter 2 tracking
154
REFERENCE GUIDE
4-pole Filter:
Programme identicali parameter
values for the “Filter 1” and “Filter
2” pages in this editor; the “Filter 1
Tracking” and “Filter 2 Tracking”
pages in this editor; the Envelope
Amount F1 and F2 parameters in
the “Fitler Envelope Control” page
of the next editor (only DC and DO
Sounds).
The filters are 2 pole filters with rolloff curves at 12 dB per octave. If both filters
are programmed with identical parameter values, they become a single 4 pole filter
with a rolloff at 24 dB per octave, perfect for those classic analog synth sounds.
The Filter Tracking parameters, programmed on pages 3 and 4, ensure that the
Cutoff Frequency does not remain fixed for all the notes of a Sound, but moves
according to the note played. Tracking can prevent, for example, the “cutting” of
the higher notes of a Sound which is affected by a Low Pass Filter.
In the case of DC and DO Sounds, the filters have a complex envelope that allows
them to vary the quality of the timbre over time. In SO Sounds the envelope is not
present. In the former case, the filters are dynamic, while in the latter the filters are
static.
Page 1: Filter 1
Type
Filter type. (S. information on the types of filters in “Notes and suggestions” at the end of the
chapter). “Off” means that the filter is not active.
Value range: Off, Low Pass, High Pass, Band Pass, Parametric Boost, Parametric Cut.
Cutoff Frequency
Filter cutoff frequency, or frequency at which the filter intervenes. The Cutoff Frequency is
the same for all the notes of a Sound, unless you programme Filter Tracking (s. ).
The Cutoff Frequency can be modified by the Filter Envelope, the Key On Velocity, the
Aftertouch, the Lfo and by the Midi Controllers 14, 15, 20.
Default: 0. Value range: 0 ... 191.
Resonance
Resonance creates a peak of emphasis at the Cutoff frequency. Resonance with a high
value can place the filter on “auto-oscillation”, producing a whistling sound rich in harmonics. To avoid distortion, assign a negative value to the “Out gain” parameter.
Resonance can be modified by Key On Velocity.
Value range: 0 ... 127.
Cutoff dynamic sensitivity
Links the Cutoff Frequency to Key On Velocity. Positive values increase the Cutoff Frequency by playing harder (the filter opens allowing more partials to pass and the sound
becomes brighter), negative values produce the inverse effect (the filter is closed and the
sound becomes “dull”). The value 0 does not affect the Cutoff Frequency.
Value range: -7 ... +7.
Resonance dynam. sens.
Links Resonance to Key On Velocity. Positive values enhance the Resonance with increased dynamic force while negative values give the inverse effect. The value 0 does not
affect the Resonance.
Value range: -7 ... +7.
Cutoff touch sensitivity
Links the Cutoff Frequency to Aftertouch. Positive values increasingly open the filters with
increased Aftertouch pressure, negative values have the inverse effect. The value 0 does
not affect the cutoff frequency.
Value range: -7 ... +7.
Out gain
Increases or attenuates the output level of the signal. This parameter has two applications:
(1) attenuation of the output level when the Resonance or a Parametric Boost produces a
signal distortion, (2) intensification of the signal when a Parametric Cut attenuates the
signal, or when you want to create a distorted signal.
Value range: -2 ... +2.
Important: The “Out Gain” parameter may produce signal peaks that can distort the signal
or even damage the audio system. Use this parameter with caution.
Page 2: Filter 2
The parameters are identical to those described above, but applied to Filter 2.
Suggestion: To copy the parameters of Filter 1 page to the Filter 2 page and obtain a single
4-pole filter, use the Clipboard in the following manner:
1. Set the display to the “Filter 1” page.
(5) Edit Sound
155
2. Press the CLIPBOARD button to open the Clipboard:
3. Select one of the six Clipboard locations and copy the “Filter 1” page by selecting the
“Save” command. The “Filter 1” page is copied as a “clip” in the Clipboard:
4. Return to the edit by pressing EXIT or the SOUND button in the Edit section and pass on to
the “Filter 2” page.
5. Press CLIPBOARD to open the Clipboard, select the clip you have just saved and select the
“Move” command.
6. The “Filter 1” page is copied into the “Filter 2” page and the clip is removed from the
Clipboard.
Additional information on use of the Clipboard are given in the chapter on Clipboard.
Page 3 Filter 1 Tracking
Options
These three options permit you to divide the Tracking “curve” into different segments; in
order to permit a more or less refined programming of the Tracking across the keyboard.
1 segm 1 segment.The Tracking is essential and provides a constant variation of the
Cutoff frequency across the keyboard. The “Key” parameter cannot be modified.
3 segm 3 segments. The Tracking consists of 3 segments which create a curve with
different variations across the keyboard.
6 segm 6 segments. The Tracking curve is greatly divided, allowing a complex programming of the Cutoff Frequency across the keyboard.
Parameters
The three parameters displayed across the bottom part of the Tracking curve can be
accessed by tapping repeatedly on ENTER. The selected parameter can be modified with the
DIAL (the “Key” and “Level” parameters also with the NUMERIC KEYPAD ).
point One of the extreme ends of a segment. Rotation of the DIAL selects one of the points
of the Tracking curve (1, 2, or 1, 2, 3, 4, or 1, 2, 3, 4, 5, 6, 7).
key Determines the keyboard position for the point in edit. The extreme points (A#0, C8)
cannot be modified.
level The Cutoff Frequency offset with respect to the value programmed on the first page.
Normal use of this parameter requires that the Tracking curve be an ascending whole or
broken line.
Value range: -63 … 0…+63.
Detailed procedure Follow the steps set out below to access and edit the Tracking parameters:
1. Tap ENTER to select one of the parameters “Point”, “Key” (if possible), or
“Level”.
2. Rotate the
DIAL
to select a P OINT , to change the K EY note or modify the L EVEL .
3. Press ENTER to pass on to the next parameter. After “Level” you will return to
“Point”.
Page 4: Filter 2 Tracking
Identical to the Tracking described above, but applied to Filter 2. Use the Clipboard if you
want to copy the “Filter 1 Tracking” page to the “Filter 2 Tracking” page to obtain a 4-pole
filter.
156
REFERENCE GUIDE
Filter Envelope (DC and DO sounds)
4-pole Filter:
Programme identicali parameter
values for the “Filter 1” and “Filter
2” pages in the previous editor;
the “Filter 1 Tracking” and “Filter 2
Tracking” pages in this editor; the
Envelope Amount F1 and F2
parameters in the “Filter Envelope
Control” page of this editor (only
DC and DO Sounds).
DC and DO Sounds have dynamic filters which modify the harmonic content of the
sound with respect to time. SO Sounds have static filters and consequently do not
have the Filter Envelope editor in the main edit sound menu.
One envelope curve is common to both filters, even if the modulation depth can be
programmed independently in the two filters. The envelope consists of two parts
accessed in pages 2 and 3: “Filter Key On Envelope”, which controls the filter
variations while pressure is applied to the note, and “Filter Key Off Envelope”,
which controls filter variations after releasing the notes (Release phase).
The filter envelope can have different velocities across the keyboard extension
thanks to the “Filter Envelope Tracking” programmed in page four.
Page 1: Filter Envelope Control
Envelope amount F1
Activates the envelope for Filter 1 and regulates its modulation depth on the Cutoff Frequency. Negative values invert the Filter Envelope.
Value range: -10 ... +10.
Envelope amount F2
This operates in the same way as Envelope amount F1, but refers to Filter 2.
Note: In order to produce a 4 pole filter, assign the same “Envelope amount” value to Filters
1 and 2.
Page 2: Filter Key On Envelope
Commands
The option/command column shows specific options for this page.
set loop Activates the loop (envelope repetition). Determines the starting point of the
envelope repetition. When the Filter Key On envelope reaches its terminal point, it loops
back to the beginning. The cycle repeats continuously until you release the keys.
The loop is represented by an arrow which indicates the initial loop point.
To eliminate the loop, select its first segment again and then select “Set Loop”.
A loop on the Filter Envelope causes a cycle of opening/closing of the Sound.
Note: Remember that the Filter Envelope is effective only if the Envelope Amount parameters have a non-zero value, and if Filters 1/2 have been used.
add segm Adds a segment. Inserts a new segment in the envelope curve immediately
after the currently selected segment. N.B.: a maximum of up to 10 segments is permitted.
del segm Cancels the segment selected.
zoom in Enlarges the field of vision of the envelope up to 4 times.
zoom out Reduces the field of vision of the envelope; it also cancels a zoom in. Reduces
the envelope up to three times its standard size.
Page 1: Filter Envelope Control
Page 2: Filter Key On Envelope
Page 3: Filter Key Off Envelope
Page 4: Filter Envelope Tracking
(5) Edit Sound
157
Parameters
Tap ENTER to access the three parameters displayed under the Filter Key On Envelope
curve. Edit the selected parameter with the DIAL (“Time” and “Level” also with the NUMERIC
KEYPAD).
segment One of the envelope segments (1 - 10), whose end point is selected.
time Duration of the Segment. The maximum segment time is approximately 21 seconds.
Value range: 0 ... 127.
level The Cutoff Frequency variation which the end point of the selected segment must
reach. 0 corresponds to the Cutoff Frequency programmed, including the Filter Tracking
programming (see page four of Filter 1/2).
Value range: -63 ... +63.
Detailed procedure Follow these steps to access and modify the parameters:
1. Tap
ENTER
to select one of the parameters “Segment”, “Time”, “Level”.
2. Rotate the DIAL to select a segment or to modify its duration or level. You can
enter a “Time” and “Level” value on the NUMERIC KEYPAD .
3. Press ENTER to select the next parameter. After “Level” you will return to
“Segment”.
4. Select “Add segm.” to add a new segment after the selected segment. Select
“Del. segm.” to cancel the selected segment.
Page 3: Filter Key Off Envelope
Commands
The option/command column shows specific options for this page.
set loop Activates the loop (envelope repetition). Determines the starting point of the
envelope repetition. When the Filter Key Off envelope reaches its terminal point, it loops
back to the beginning. The cycle repeats continuously until you release the keys.
The loop is represented by an arrow which indicates the initial loop point.
To eliminate the loop, select its first segment again and then select “Set Loop”.
A loop on the Filter Envelope causes a cycle of opening/closing of the Sound.
add segm Adds a segment. Inserts a new segment in the envelope curve immediately
after the currently selected segment. N.B.: a maximum of up to 10 segments is permitted.
del segm Cancels the segment selected.
zoom in Enlarges the field of vision of the envelope up to 4 times.
zoom out Reduces the field of vision of the envelope; it also cancels a zoom in. Reduces
the envelope up to three times its standard size.
Parameters
Tap ENTER to access the three parameters displayed under the Filter Key Off Envelope
curve. Edit the selected parameter with the DIAL (“Time” and “Level” also with the NUMERIC
KEYPAD).
segment One of the envelope segments (1 - 10), whose end point is selected.
time Duration of the Segment. The maximum segment time is approximately 21 seconds.
Value range: 0 ... 127.
level The Cutoff Frequency variation which the end point of the selected segment must
reach. 0 corresponds to the Cutoff Frequency programmed, including the Filter Tracking
programming (s. page four of Filter 1/2). The Filter Key Off Envelope can terminate with
non-zero values.
Value range: -50 ... +50.
158
REFERENCE GUIDE
Detailed procedure…Follow these steps to access and modify the parameters:
1. Tap
ENTER
to select one of the parameters “Segment”, “Time”, “Level”.
2. Rotate the DIAL to select a segment or to modify its duration or level. You can
enter a “Time” and “Level” value on the NUMERIC KEYPAD .
3. Press ENTER to select the next parameter. After “Level” you will return to
“Segment”.
4. Select “Add segm.” to add a new segment after the selected segment. Select
“Del. segm.” to cancel the selected segment.
Page 4: Filter Envelope Tracking
Options
These three options permit you to divide the Tracking “curve” into different segments, in
order to permit a more or less refined programming of the Tracking across the keyboard.
1 segm 1 segment.The Tracking is essential and provides a constant variation of the
envelope completion velocity across the keyboard. The “Key” parameter cannot be modified.
3 segm 3 segments. The Tracking consists of 3 segments which create a curve with
different variations across the keyboard.
6 segm 6 segments. The Tracking curve is greatly divided, allowing a complex programming of the Cutoff Frequency across the keyboard.
Parameters
The three parameters displayed across the bottom part of the Tracking curve can be
accessed by tapping repeatedly on ENTER. The selected parameter can be modified with the
DIAL (the “Key” and “Level” parameters also with the NUMERIC KEYPAD ).
point One of the extreme ends of a segment. Rotation of the DIAL selects one of the points
of the Tracking curve (1, 2, or 1, 2, 3, 4, or 1, 2, 3, 4, 5, 6, 7).
key Determines the keyboard position for the point in edit. The extreme points (A#0, C8)
cannot be modified.
level The Filter Envelope completion velocity offset (Key On and Key Off). Positive values
increase the completion velocity, negative values slow it down. 0 corresponds to the
“standard” duration of the segments programmed in the previous pages.
Value range: -63 … 0…+63.
Detailed procedure
Follow the steps set out below to access and edit the Tracking
parameters:
1. Tap ENTER to select one of the parameters “Point”, “Key” (if possible), or
“Level”.
2. Rotate the
DIAL
to select a P OINT , to change the K EY note or modify the L EVEL .
3. Press ENTER to pass on to the next parameter. After “Level” you will return to
“Point”.
(5) Edit Sound
159
Pitch Envelope
The tuning (pitch) of the Oscillators can vary over time, thanks to Pitch Envelope
which is divided into two parts: the “Pitch Key On Envelope”, that regulates pitch
variations while the note is pressed and the “Pitch Key Off Envelope”, that regulates pitch variations when the note is released (Release phase).
The Pitch Envelope can have different completion velocities across the keyboard
extension, thanks to the “Pitch Envelope Tracking” programmed on page four.
To render the Pitch Envelope
independent from the two
oscillators, assign a non-zero
value to the “Detune” parameter in
the WAVESET editor.
The Sounds based on the
Waveforms listed in the end of this
chapter can have “Detune = 0”.
The Pitch Envelope graphic representation is common to both oscillators, but you
can programme the modulation depth and the positive/negative pitch values separately for each of the two oscillators.
In SO Sounds, the Pitch Envelope for Oscillator 2 (CH2) has no effect, but you can
programme it in the eventaul case that the Sound is converted to a DC or DO
Sound.
Page 1 Pitch Envelope Control
Pitch depth Ch1
Determines the depth of the action of the Pitch Envelope on the Sound-Channel (Oscillator)
1. Negative values invert the Pitch Envelope shape and 0 excludes the action.
Value range: -7 ... +7.
Pitch depth Ch2
As above, but for the Sound-Channel (Oscillator) 2.
Dynamic rate
Sensitivity of the Envelope to dynamic variations. With positive values, increasing the
dynamics (playing harder) speeds up the Envelope development (the completion velocity).
Negative values act inversely with increased dynamics.
Value range: -7 ... +7.
Page 2£ Pitch Key On Envelope
Commands
The command/option column shows specific options for this page.
set loop Activates the loop (envelope repetition). Determines the starting point of the
envelope repetition. When the Pitch Key On envelope reaches its terminal point, it loops
back to the beginning. The cycle repeats continuously until you release the keys.
The loop is represented by an arrow which indicates the initial loop point.
To eliminate the loop, select its first segment again and then select “Set Loop”.
add segm Adds a segment. Inserts a new segment in the envelope curve immediately
after the currently selected segment. N.B.: a maximum of up to 10 segments is permitted.
del segm Cancels the segment selected.
Page 1: Pitch Envelope Control
Page 2: Pitch Key On Envelope
Page 3: Pitch Key Off Envelope
Page 4: Pitch Envelope Tracking
160
REFERENCE GUIDE
zoom in Enlarges the field of vision of the envelope up to 4 times.
zoom out Reduces the field of vision of the envelope; it also cancels a zoom in. Reduces
the envelope up to three times its standard size.
Parameters
Tap ENTER to access the three parameters under the Pitch Key On Envelope symbol. Edit the
selected parameter with the DIAL (“Time” and “Level” also with the NUMERIC KEYPAD).
segment One of the envelope segments (1 - 10), whose end point is selected.
time Duration of the Segment. The maximum segment time is approximately 21 seconds.
Value range: 0 ... 127.
level Determines the value of the Pitch offset (the difference with respect to the standard
value) at a given point. 0 represents the standard pitch.
Value range: -63 ... +63.
Detailed procedure Follow these steps to access and modify the parameters:
1. Tap
ENTER
to select one of the parameters “Segment”, “Time”, “Level”.
2. Rotate the DIAL to select a segment or to modify its duration or level. You can
enter a “Time” and “Level” value on the NUMERIC KEYPAD .
3. Press ENTER to select the next parameter. After “Level” you will return to
“Segment”.
4. Select “Add segm.” to add a new segment after the selected segment. Select
“Del. segm.” to cancel the selected segment.
Page 3: Pitch Key Off Envelope
Commands
The command/option column shows specific options for this page.
set loop Activates the loop (envelope repetition). Determines the starting point of the
envelope repetition. When the Pitch Key Off Envelope reaches its terminal point, it loops
back to the beginning. The cycle repeats continuously until you release the keys.
The loop is represented by an arrow which indicates the initial loop point.
To eliminate the loop, select its first segment again and then select “Set Loop”.
add segm Adds a segment. Inserts a new segment in the envelope curve immediately
after the currently selected segment. N.B.: a maximum of up to 10 segments is permitted.
del segm Cancels the segment selected.
zoom in Enlarges the field of vision of the envelope up to 4 times.
zoom out Reduces the field of vision of the envelope; it also cancels a zoom in. Reduces
the envelope up to three times its standard size.
Parameters
Tap ENTER to access the three parameters under the Pitch Key Off Envelope symbol. Edit the
selected parameter with the DIAL (“Time” and “Level” also with the NUMERIC KEYPAD).
segment..One of the envelope segments (1 - 10), whose end point is selected.
time Duration of the Segment. The maximum segment time is approximately 21 seconds.
Value range: 0 ... 127.
level Determines the value of the Pitch offset (the difference with respect to the standard
value) at a given point. 0 represents the standard pitch.
Value range: -63 ... +63.
(5) Edit Sound
161
Detailed procedure Follow these steps to access and modify the parameters:
1. Tap
ENTER
to select one of the parameters “Segment”, “Time”, “Level”.
2. Rotate the DIAL to select a segment or to modify its duration or level. You can
enter a “Time” and “Level” value on the NUMERIC KEYPAD .
3. Press ENTER to select the next parameter. After “Level” you will return to
“Segment”.
4. Select “Add segm.” to add a new segment after the selected segment. Select
“Del. segm.” to cancel the selected segment.
Page 4: Filter Envelope Tracking
Options
These three options permit you to divide the Tracking “curve” into different segments, in
order to permit a more or less refined programming of the Tracking across the keyboard.
1 segm 1 segment. The Tracking is essential and provides a constant variation of the
envelope completion velocity across the keyboard. The “Key” parameter cannot be modified.
3 segm 3 segments. The Tracking consists of 3 segments which create a curve with
different variations across the keyboard.
6 segm 6 segments. The Tracking curve is greatly divided, allowing a complex programming of the completion velocity variation across the keyboard.
Parameters
The three parameters displayed across the bottom part of the Tracking curve can be
accessed by tapping repeatedly on ENTER. The selected parameter can be modified with the
DIAL (the “Key” and “Level” parameters also with the NUMERIC KEYPAD ).
point One of the extreme ends of a segment. Rotation of the DIAL selects one of the points
of the Tracking curve (1, 2, or 1, 2, 3, 4, or 1, 2, 3, 4, 5, 6, 7).
key Determines the keyboard position for the point in edit. The extreme points (A#0, C8)
cannot be modified.
level The Pitch Envelope completion velocity offset (Key On and Key Off). Positive values
increase the completion velocity, negative values slow it down. 0 corresponds to the
“standard” duration of the segments programmed in the previous pages.
Value range: -63 … 0…+63.
Detailed procedure
Follow the steps set out below to access and edit the Tracking
parameters:
1. Tap ENTER to select one of the parameters “Point”, “Key” (if possible), or
“Level”.
2. Rotate the
DIAL
to select a P OINT , to change the K EY note or modify the L EVEL .
3. Press ENTER to pass on to the next parameter. After “Level” you will return to
“Point”.
162
REFERENCE GUIDE
Pan
In DC and DO sounds, the position of the sound in the “stereo panorama” (Pan) can
be controlled dynamically by means of an envelope divided in two parts: the “Pan
Key On Envelope”, that regulates the pan during the period that the key is pressed,
and the “Pan Key Off Envelope”, that regulates the pan after releasing the keys
(Release phase).
The “Pan Tracking” programmed in page four modifies the “relative” position of
the sound across the keyboard extension. E.g. the sound in the bass section may be
further to the left while in the treble section it may be further to the right.
In SO sounds the Pan is static; therefore there is no Pan envelope. In the only
editing page available, you can link Pan to dynamics and Aftertouch.
Page 1: Pan Envelope Control (DC and DO Sounds)
Pan Envelope
Activates/deactivates the Pan Envelope.
Status assignable: On/Off (---).
Pan dynamic sensitivity
Sensitivity of the Pan to dynamic variations. Positive values move the sound further right by
increasing the dynamic force while negative values act inversely with increased dynamics.
Value range: -7 ... +7.
Pan touch sensitivity
Sensitivity of the Pan to Aftertouch variations. Positive values move the sound further right
by increasing the Aftertouch pressure, while negative values act inversely with increased
Aftertouch.
Value range: -7 ... +7.
Page 2: Pan Key On Envelope (DC and DO Sounds)
Commands
The command/option column shows specific options for this page.
set loop Activates the loop (envelope repetition). Determines the starting point of the
envelope repetition. When the Pan Key On Envelope reaches its terminal point, it loops
back to the beginning. The cycle repeats continuously until you release the keys.
The loop is represented by an arrow which indicates the initial loop point.
To eliminate the loop, select its first segment again and then select “Set Loop”.
add segm Adds a segment. Inserts a new segment in the envelope curve immediately
after the currently selected segment. N.B.: a maximum of up to 10 segments is permitted.
del segm Cancels the segment selected.
zoom in Enlarges the field of vision of the envelope up to 4 times.
zoom out Reduces the field of vision of the envelope; it also cancels a zoom in. Reduces
the envelope up to three times its standard size.
Page 1: Pan Envelope Control (DC and DO Sounds)
Page 2: Pan Key On Envelope (DC and DO Sounds)
Page 3: Pan Key Off Envelope (DC and DO Sounds)
Page 4: Pan Tracking (DC and DO Sounds)
(5) Edit Sound
163
Parameters
Tap ENTER to enter the three parameters under the Pan Key On Envelope symbol. Edit the
selected parameter with the DIAL (“Time” and “Level” also with the NUMERIC KEYPAD).
segment One of the envelope segments (1 - 10), whose end point is selected.
time Duration of the Segment. The maximum segment time is approximately 21 seconds.
Value range: 0 ... 127.
level Determines the value of the Pan offset (the difference with respect to the standard
value) at a given point. 0 represents the centre of the Stereo Panorama.
Value range: -63 ... +63.
Detailed procedure Follow these steps to access and modify the parameters:
1. Tap
ENTER
to select one of the parameters “Segment”, “Time”, “Level”.
2. Rotate the DIAL to select a segment or to modify its duration or level. You can
enter a “Time” and “Level” value on the NUMERIC KEYPAD .
3. Press ENTER to select the next parameter. After “Level” you will return to
“Segment”.
4. Select “Add segm.” to add a new segment after the selected segment. Select
“Del. segm.” to cancel the selected segment.
Page 3: Pan Key Off Envelope (Sound DC and DO)
Commands
The command/option column shows specific options for this page.
set loop Activates the loop (envelope repetition). Determines the starting point of the
envelope repetition. When the Pan Key Off Envelope reaches its terminal point, it loops
back to the beginning. The cycle repeats continuously until you release the keys.
The loop is represented by an arrow which indicates the initial loop point.
To eliminate the loop, select its first segment again and then select “Set Loop”.
add segm Adds a segment. Inserts a new segment in the envelope curve immediately
after the currently selected segment. N.B.: a maximum of up to 10 segments is permitted.
del segm Cancels the segment selected.
zoom in Enlarges the field of vision of the envelope up to 4 times.
zoom out Reduces the field of vision of the envelope; it also cancels a zoom in. Reduces
the envelope up to three times its standard size.
Parameters
Tap ENTER to access the three parameters under the Pan Key Off Envelope symbol. Edit the
selected parameter with the DIAL (“Time” and “Level” also with the NUMERIC KEYPAD).
segment One of the envelope segments (1 - 10), whose end point is selected.
time Duration of the Segment. The maximum segment time is approximately 21 seconds.
Value range: 0 ... 127.
level Determines the value of the Pan offset (the difference with respect to the standard
value) at a given point. 0 represents the centre of the Stereo Panorama.
Value range: -63 ... +63.
164
REFERENCE GUIDE
Detailed procedure Follow these steps to access and modify the parameters:
1. Tap
ENTER
to select one of the parameters “Segment”, “Time”, “Level”.
2. Rotate the DIAL to select a segment or to modify its duration or level. You can
enter a “Time” and “Level” value on the NUMERIC KEYPAD .
3. Press ENTER to select the next parameter. After “Level” you will return to
“Segment”.
4. Select “Add segm.” to add a new segment after the selected segment. Select
“Del. segm.” to cancel the selected segment.
Page 4: Pan Tracking (DC and DO Sounds)
Options
These three options permit you to divide the Tracking “curve” into different segments, in
order to permit a more or less refined programming of the Tracking across the keyboard.
1 segm 1 segment. The Tracking is essential and provides a constant variation of the Pan
across the keyboard. The “Key” parameter cannot be modified.
3 segm 3 segments. The Tracking consists of 3 segments which create a curve with
different variations across the keyboard.
6 segm 6 segments. The Tracking curve is greatly divided, allowing a complex programming of the completion velocity variation across the keyboard.
Parameters
The three parameters displayed across the bottom part of the Tracking curve can be
accessed by tapping repeatedly on ENTER. The selected parameter can be modified with the
DIAL (the “Key” and “Level” parameters also with the NUMERIC KEYPAD ).
point One of the extreme ends of a segment. Rotation of the DIAL selects one of the points
of the Tracking curve (1, 2, or 1, 2, 3, 4, or 1, 2, 3, 4, 5, 6, 7).
key Determines the keyboard position for the point in edit. The extreme points (A#0, C8)
cannot be modified.
level The Pan offset (the position with respect to the centre). This parameter determines
the starting position of the Pan across the keyboard extension, and represents the actual
value upon which the Pan Envelope acts.
Value range: -50 … 0…+50.
Detailed procedure
Follow the steps set out below to access and edit the Tracking
parameters:
1. Tap ENTER to select one of the parameters “Point”, “Key” (if possible), or
“Level”.
2. Rotate the
DIAL
to select a P OINT , to change the K EY note or modify the L EVEL .
3. Press ENTER to pass on to the next parameter. After “Level” you will return to
“Point”.
Pan Control (Sound SO)
Pan Controls (SO Sounds)
Pan
Position of the Pan. Use the DIAL or the NUMERIC KEYPAD to modify this graphic parameter. “0”
corresponds to the central position.
Value range: -31 (All Left) ... +31 (All Right).
(5) Edit Sound
165
Pan dynamic sensitivity
Sensitivity of the Pan to dynamics. Positive values move the sound further right by increasing the dynamic force while negative values act inversely.
Pan touch sensitivity
Sensitivity of the Pan to Aftertouch. Positive values move the sound further right by increasing the Aftertouch pressure, while negative values act inversely.
ROM-Waveforms with separate Pitch Envelopes for the two oscillatori even when Detune=0
02 Honky Tonk
18 Dulcimer
29 Syn_Organ
38 Accordion
39 Vocal_Gtr
41 12st_Gtr
60 Str_Glockn
61 Orch_Str
62 Choir
66 Symph_Orch
166
REFERENCE GUIDE
71 Muted_Trp2
72 FrenchHorn
75 Brass-Trp
77 Dual_Brass
83 Eng_Horn
87 Hardflute_1
88 Hardflute_2
89 Panflute
109 SpectBells
110 Machinery
112 Spatial
113 Fantasy_1
114 Fantasy_2
115 Fantasy_3
116 Fantasy_4
117 Fantasy_5
118 VoiceBells
119 Vocal_Brth
120 Voice_Glk
121 Angels
122 Atmosphere
125 Syn_perc1
126 Syn_perc2
127 Syn_perc3
128 Syn_perc4
129 Syn_perc5
130 Syn_perc6
131 Syn_perc7
132 Syn_perc8
133 Syn_perc9
Notes and suggestions
Waveform Not all Waveforms cover the entire extension of the keyboard. This becomes
particularly evident when you use an 88 note master keyboard on which you can reach the
extremes of the extension.
The problem is due to a lack of samples at the extremes of the keyboard. During the creating
phase of a Waveform, considerations are made for the quality of the sound and the amount
of memory necessary to store all the samples which consitute the Waveform; if some high or
low end samples are lacking in musical quality (e.g., the lower notes of a violin Waveform,
or the higher notes of a doublebass Waveform), it is preferable to eliminate them to avoid
using up precious memory.
Volume, Dynamic & Aftertouch The Volume of a Sound can be controlled in live
situations by dynamics and aftertouch variations (programming in the Volume editor). If
you set very sensitive values for both controls (e.g. +7 assigned to both dynamics and
aftertouch) the Sound will be very difficult to control and easily susceptible to sudden
volume variations.
Loop and Lfo By programming a loop on two segments of a Key On Envelope which
create an ascending and descending ramp ( ) you can simulate a Tremolo effect, without
using the Lfo editor.
A loop of this kind on a Key On Pitch Envelope will simulate a more realistic Vibrato effect
than the effect obtained with the Lfo.
Key Off Envelope Thanks to the greatly articulated Key Off Envelope (Release envelope)
of the S Series, you can create some very interesting effects. In practice, you can render a
Sound “live” after releasing the keys.
For example, try programming a Key Off Envelope of the following kind with a Sound such
as 12_St_Gtr:
When you release the key the sound begins to fade and then reappears, it is held for an
instant and then fades away gradually.
Lfo Lfo can be applied to several different sound parameters. The effect produced depends
on the parameter affected:
Amplitude
–>
Vibrato
Pitch
–>
Tremolo
Cutoff Freq. –>
Wha-wha
Filters The action of the filters on the sound is represented by curves:
dB
Low Pass (attenuates the high end frequencies)
Hz
dB
High Pass (attenuates the low end frequencies)
Hz
dB
Band Pass (attenuates the frequencies above and below the C.F.)
Hz
(5) Edit Sound
167
dB
Parametric Boost (enhances the frequencies around the Cutoff
Hz
Frequency)
dB
Parametric Cut (attenuates the frequencies around the Cutoff Frequency)
Hz
The slope of these curves is determined by the attraction capacity of the “poles”. The S
Series can have two 2-pole filters or one 4-pole filter. The 4-pole filter creates a clearer
slope and consequently a fuller and more aggressive sound.
Resonance enhances the frequencies in close proximity of the Cutoff Frequency, rendering
the filter curves more complex:
dB
Resonance
Hz
Resonance was a very typical feature of classic analog synthesisers. As an example, listen to
the Sound Invasion 82-2.
Amplitude
Some examples of filter curves:
cutoff
freq.
Rolloff
24 dB/octave
Frequency
4 Pole Lowpass
0
Rolloff
12 dB/octave
Frequency
cutoff
freq.
0
OR
Rolloff
12 dB/octave
Frequency
Filter 1 = 2 Pole Lowpass
Filter 2 = 2 Pole Lowpass
Amplitude
cutoff
freq.
Amplitude
Amplitude
0
Rolloff
12 dB/octave
cutoff
freq.1
cutoff
freq.2
0
Rolloff
24 dB/octave
Frequency
4 Pole Lowpass
0
0
Frequency
cutoff
freq.
0
Frequency
Filter 1 = 2 Pole Lowpass + Resonance
Frequency
cutoff
freq.HP
0
Frequency
Bandpass
Filter 2 = 2 Pole Highpass
Amplitude
Amplitude
Filter 1 = 2 Pole Lowpass
cutoff
freq.
cutoff
freq.
0
Frequency
Filter 1 = 2 Pole Highpass + Resonance
Amplitude
cutoff
freq.
Amplitude
Amplitude
Amplitude
cutoff
freq.LP
Frequency
Parametric Boost
The two filters of the S Series can be also be considered as two band equalizers and can be
programmed accordingly.
168
REFERENCE GUIDE
6 SAMPLE TRANSLATOR
Sample Translator is a Waveform creator and editor incorporated in the S Series.
Its principal functions are as follows::
•
the reading of samples from Ms-Dos/Atari floppy disks, in Avalon, Sound
Designer, Sample Vision and Wave formats;
•
the reading of samples from Akai S1000 floppy disks;
•
the reception and transmission of samples via MIDI;
•
the modification of samples and the creation of a multi-sample (the multisample becomes a standard Waveform of the S Series);
•
the modification of the waveform of the R AM -Sounds that contain an imported
sample (Sounds with the
symbol).
Accessing Sample Translator
Note: Sample Translator ignores
all editing tasks carried out on a
Sound after accessing edit sound,
and places in edit the original
Waveform of the Sound with which
you entered the edit environment.
1. Enter EDIT SOUND with any type of Sound. The “Sample Translator” command
appears in the main menu:
2. Select the “Sample Translator” command from the main menu of EDIT SOUND .
Any modifications being made to the Sound currently in edit will be cancelled:
Once you have entered the Sample Translator mode, one of the following situations
may be shown:
❑ Access from a Sound that does not contain imported samples (e.g. from a RomSound).
• Sample Translator enters edit without samples:
Waveform, page 1. (No sample is loaded).
❑ Access from a Ram-Sound containing imported samples (Sound showing the
symbol ) not created with Sample Translator;
• Sample Translator enters edit without samples.
❑ Access from a Ram-Sound containing imported samples (Sounds showing the
symbol ), created with Sample Translator;
• Sample Translator enters edit with the sample of the initial Sound (or the
samples, if the Waveform is made up of a multi-sample). If the Sound is a DO
(6) Sample Translator
169
type, the Waveform will enter edit only if it is the Waveform of the first oscillator.
“Load the Waveform ‘Hit’?”
Waveform, page 1. (A sample loaded to slot 00).
The instrument status during the Sample Translator tasks
The “Solo” mode is activated automatically when you enter EDIT SOUND .
However, in EDIT SOUND you can exclude the “solo” function, while you cannot in
Sample Translator.
Controlling the S2R
The S2R must operate in Midi-Common mode, or track 1 must be selected.
If Midi 1 channel is not assigned to track 1, remember to select track 1 before you
enter Sample Translator.
Temporary escape from Sample Translator
Thanks to multitasking it is possible to temporarily escape from Sample Translator
to access other operating environments, without losing work in progress in Sample
Translator. The SOUND button in the Edit section continues to flash to remind you
that a Sound is currently in edit. To return to Sample Translator simply press the
SOUND button of the Edit section.
A closer look at Sample Translator
The operating environment of the Sample Translator consists of a main display
(spread over two pages), called W AVEFORM , from which you can access secondary
displays by means of the commands which appear on the right.
The list of samples making up the Waveform are displayed at the centre of the
W AVEFORM display (from 1 to 16). The sixteen locations are selected with the DIAL .
The commands and options are in the two Waveform pages.
Waveform, page 1
170
REFERENCE GUIDE
Waveform, page 2
The Waveform display
Sample location (00-15)
Dimension of the Waveform
Lowest note, original sample
note, highest note
Page number (1 or 2)
Comands/options
Load
Loads a sample from Akai S1000 or Atari/Ms-Dos floppy disks, or sets the instrument to
receive samples in MMA/sds format via Midi.
The sample received is loaded to the currently selected location, replacing the existing
sample, if present.
1. Select the command. The selection window appears which permits you to choose between
the source “disk” and an “MMA/sds” file received via Midi:
Select with the DIAL and press ENTER.
2. A different window will appear according to your choice:
“disk” choice
Disk
“MMA/sds” choice
Select one of the two options with the DIAL and press ENTER.
dos/atari Floppy disk in Ms-Dos (DD or HD) format or Atari (only DD) format. It can
contain samples in Sound Designer (.SD), Sample Vision (.SMP), Avalon (.SMP) or Wave
(.WAV) formats.
akai Floppy disks in Akai S1000 (type HD) format. It can contain Samples (.S) or Programs
(.P).
MMA/sds
Enter the number of the sample to be received via Midi from the external device (sampler or
computer). Specify the number (0 ... 255) and press ENTER to receive the sample in the
currently selected location.
Note: The MIDI channel on which the sample must be received is the MIDI-COMMON, or
Channel 1 if MIDI-COMMON is deactivated.
Possible error messages during reception:
The transmission channel of the external device probably does not correspond to the MIDI COMMON or to channel 1. Alternatively, the external device is not able to receive the transmission request; in this case you must start transmission from the control panel of the external
device.
Set the appropriate MIDI channels or return to the Waveform display and start the transmission from the control panel of the external device.
(6) Sample Translator
171
Save
Saves the Waveform created in a new Sound. Only samples which have been assigned an
extension limit with the “Assign” command are saved in the Waveform.
The new Waveform is added at the end of the list of Waveforms (accessed in EDIT SOUND from
the W AVESET editor) and may be used to create other new Sounds.
1. Select the command and enter the name of the Waveform:
2. Press ENTER to confirm and enter the name of the Sound:
3. Press ENTER to confirm and select a location in the Sound Library where the new Sound can
be saved (form Bank Select-Program Change, xxx-yyy):
(Sample Translator displays only empty locations of the Sound Library).
Assign
Once loaded, a sample will play across its entire note range. This command assigns a note
range to the selected sample, delimited by a low note and a high note.
The keyboard zones to which the samples are assigned cannot be superimposed.
Note: Only the assigned samples become part of the Waveform and are saved at the end
of the edit operations in Sample Translator.
1. Select the command. The following selection window is displayed:
2. Play the lowest note (or rotate the DIAL) and press ENTER. Play the highest note (or rotate the
DIAL) and press ENTER.
Once the assign procedure has been completed, the lowest note of the scale, the original
sample pitch and the highest note of the scale are displayed next to the name of the
sample.
UnAssign
Erases all the extension limits of the currently selected sample.
172
REFERENCE GUIDE
Play Single
Opens the Play Single display where you will find the graphical representation of the
waveform relating to the sample selected in the Waveform display. In this page you can
play back the sample on its own (even if has been “assigned”), modify its level and transmit
it via Midi to an external device (sampler, computer).
Loop Start and Loop End indicators
Sample dimension
Graph of the waveform of the sample
(from Sample Start to Sample End)
Zoom
Enlarges the sample.
1. Select the command. A vertical line representing Zoom Start appears.
2. Move the line with the DIAL and press ENTER to confirm.
3. Another vertical line appears representing Zoom End. Move the line with the DIAL and press
ENTER to confirm.
unzoom Removes the zoom. This command appears when the zoom is active.
Gain
Regulates the volume of the sample with respect to other samples of the Waveform. The
value is shown as a percentage.
Loop nr: (x)
Selects the loops whose Loop Start and Loop End points are shown.
Note: The S Series uses only the first loop of any sample.
Send
Sends the sample to an external device (sampler or computer) connected via MIDI.
Note: The MIDI channel on which the sample is received from the external device must be
the channel corresponding to the MIDI-COMMON, or, if this is not active, MIDI Channel 1.
Possible transmission errors:
Very probably the Midi channel of the external device does not correspond to the MidiCommon of the Music Processor or to channel 1. Alternatively, the external device is not
able to receive the transmission start message.
Programme the Midi channels correctly, or return to the Waveform display and start the
reception from the control panel of the external device.
Exit
Returns to the Waveform display.
Info About
Opens the INFO ABOUT display which shows information on the dimensions of the Waveform
and the selected sample, the sample pitch, the position of the Loop Start and Loop End
points of the sample.
Dimension of the Waveform
Information about the selected sampìe
(6) Sample Translator
173
Commands/options
tuning Provides a reference for the sample pitch, producing the exact note played on the
keyboard with a sinusoidal wave.
loop nr. (x) Permits the selection of one of the eight loops of the sample. Only the first
loop is used by the S Series , but it is also possible to modify the other loops.
note link This option appears only when the “Note” parameter is in edit mode. It automatically varies the “SR” parameter when the “Note” parameter is modified.
exit Returns to the Waveform display.
Info About (cannot be modified)
Name of the sample.
Note
Original pitch of the sample.
note link See above
SR
Sampling Rate. The frequency corresponding to the note shown by the “Note” parameter.
Length (can not be modified)
Length of the sample in words. A word is the unit of measure of the sample. Since the S
Series uses a 16 bit sampling technique, 1 word = 2 bytes. (1 byte = 8 bit).
Loop Start
The starting point of the loop. It is possible to modify any one of the eight sample loops, but
only the first loop is exploited by the Sounds created with Sample Translator. To select the
loop that requires modifying, use the “Loop nr: (x)” command in the command/options
column.
Loop End
Ending point of the loop. See the previous parameter.
Possible error messages during the edit of the Loop Start and Loop End:
The Sounds based on this Waveform cannot be converted into Dual Oscillator or Single
Oscillator Sounds.
Loop type
The possible loop types are as follows:
type 0 (loop deactivated)
type 1 (loop is read in forward direction only)
Loop
Start
Loop
End
type 2 (loop alternately read forwards and backwards; it is not exploited by the S Series but
it can be transmitted to a sampler)
Loop
Start
(cannot
be modified)
Note range
Loop
End
The keyboard zone to which the sample has been assigned.. If the sample has not been
assigned, the message “Unassigned” appears in place of the notes.
Exit
Escape command from the Sample Translator. If you have created a Waveform the instrument asks you if you wish to cancel your edit work
If you press ENTER the Waveform will be lost. If you press EXIT, you can save your Waveform
with “Save” before escaping.
174
REFERENCE GUIDE
Cut End
An option which can be selected or de-selected. If selected, the section following the Loop
End is “cut away” after loading the sample.
Delete
Erases the currently selected sample from memory.
Copy
Copies the currently selected sample to a “clipboard”.
Paste
(This function appears after a Copy operation). Inserts the sample copied to the “clipboard”
to the currently selected location. This operation saves memory because the sample is not
copied “physically”, but only read twice by Sample Translator. It is extremely useful for
inserting the same sample in two sections of the keyboard which are not adjacent without
having to load the sample twice.
(6) Sample Translator
175
7 Sound Patch and Drumkit
Two or more Sounds can be combined to form S OUND P ATCHES or D RUMKITS with the
advantage that you can obtain a variety of sounds which occupy only one location
in the Sound Library. Sound Patches and Drumkits allow the use of only one Midi
channel to control complex sounds which would otherwise require the use of
several tracks.
In the SOUND LIBRARY the Sound Patches and Drumkits are identified by a symbol
“ ” next to the name. The EDIT SOUND PATCH environment is different to EDIT SOUND .
Sound Patches are combinations of different Sounds that play across the keyboard,
separated by a dynamic threshold so that the higher level is triggered by playing
harder (two different dynamic levels: layer 1 & 2). An example of a Sound Patch is
shown below. The keyboard is divided into two sections, with a combination of
Fretless and Slap Bass in the bass section (the first activated by a low dynamics
value and the second by a high dynamics value) and Tenor Sax in the treble section.
Slap Bass
Layer#2
Tenor Sax
Switch
Point: 105
C6
C5
Fretless
C4
C3
C2
Layer#1
Tenor Sax
The Drumkits are Sound Patches consisting of percussion instruments, a different
one assigned to each note of the keyboard. Drumkits allow you to use just one track
for all the percussion instruments required for a musical composition.
To edit Sound Patch or a Drumkit, assign it to the selected track and press the
SOUND button in the Edit section.
The SOUND PATCH edit environment
The edit environment is spread over two pages, each dedicated to one of the two
dynamic levels of Sound Patch/Drumkit.
All the parameters which appear on a page refer to the currently selected note
(“Key note”).
Commands/options
Expand
Copies the parameter settings of the displayed note across a note range (saves repeating a
series of identical parameter settings for a given number of notes).
1. Select the command. The image of a keyboard appears on the display:
2. Play the lowest note required (or rotate the DIAL) then press ENTER.
Play the highest note required (or rotate the DIAL) and press ENTER.
Edit SoundPatch/Drumkit, Patch Level 1
176
REFERENCE GUIDE
Edit SoundPatch/Drumkit, Patch Level 2
Set dynamic switch
The dynamic threshold that divides the two levels. This sets the maximum dynamic level of
the first level. 126 and 127 exclude the second level.
Value range: 0 ... 127.
Copy to level (x)
Copies the entire programmed status of level 1 to level 2, or vice versa.
Suggestion: Use this command to differentiate just a few notes between the two levels; for
example, only the roll of a Drumkit.
1. Programme level 1, note by note, with all the instruments of the drumkit. Insert the “Roll”
in D2:
2. With the “Copy to #2” command, copy all the programming of level 1 to level 2.
3. Pass on to the second level, in the second page of the display, and access the edit of
note D2:
4. Assign the Sound “Snare Drum 1” to note D2 of the second level:
Save
Saves the Sound Patch/Drumkit.
1. Select the command. The Sound Library entry page is displayed:
2. Select an empty location.
3. If necessary, change the name of the Sound Patch using “Name”.
If the original Sound Patch is a Rom-Sound, the Music Processor automatically attaches an
asterisk (*) after the new name in order to avoid duplications of the name in the Sound
Library.
4. Press ENTER to save the SoundPatch.
Abort
Erases all the modifications made to the Sound Patch and escapes from edit mode.
Catch note
Assigns the note played on the keyboard to the “Key Note” parameter.
To be rendered operative, S2R must be controlled via MIDI-COMMON.
1. Select the command. The following message appears on the display:
2. Play the note you wish to assign to the “Key Note” parameter.
Parameters
Key Note
Shows the note currently in edit in the active level. Use the DIAL or the command “Catch
note” to select the note.
Sound
Determines the sound assigned to the note.
Volume
Determines the Volume of the edited note.
Value range: 0 ... 127.
(7) SoundPatch e Drumkit
177
Pan
Position of edited note in the stereo panorama.
Value range: -32 (All Left) ... +32 (All Right).
Transpose/Tuning
transpose Transposes the edited note by semitones.
Value range: -88 ... +88.
tuning Fine tunes the transposition in steps of 1/64th of a semitone.
Value range: -64 ... +64.
Exclude
A linking number between notes which exclude each other. Notes that have been assigned
the same “Exclude” number cannot play simulataneously. For example, if an Open Hi-Hat in
a drumkit has the same Exclude number as a Closed Hi-Hat, when one of the two instruments plays, it excludes the other, interrupting it abruptly. This parameter allows you to
simulate the abrupt sound change of an acoustic instrument when it is played in different
ways. Other examples: Conga, Conga Slap, Conga Accented; Snare Drum and Roll; Ride
and Ride Cup; Pick Bass and Slap Bass.
Value range: 0, 1 ... 3.
Effects
Effects active for the edited note.
Value range: Eff1+Eff2, Eff1, Eff2, ––– (Off).
Notes and suggestions
Pan In a drumkit it is extremely important to programme the Pan very accurately in order
to position the percussion instruments realistically in the stereophonic panorama. A very
common “trick” is to stagger the Toms, so that the sound gives the impression of moving
through the stereo channel during the rolls.
Examine the drumkits of the standard Sound Library to discover other programming tricks.
Effects Assigning a different effect to each instrument of the drumkit can create extremely
suggestive effects. For example, you can assign reverb (Eff1) to the Bass Drum and both
reverb and delay (Eff1+Eff2) to the Snare Drum.
Or you can assign Eff2 to Patch Level 1 (low dynamics) and both Eff1 and Eff2 to Patch
Level 2 (higher dynamic level), so that the reverb effect appears only when the volume of
the sound is higher.
178
REFERENCE GUIDE
8 SEQUENCER
AND
SONG
What is a Sequencer – The S Series Sequencer
The Sequencer (or M IDI recorder) is a recorder of M IDI events (notes, pitch bend,
modulation...), capable of creating multi-timbral songs (tracks) and reproducing
them using the internal sound generator of the instrument or the sound generator of
other instruments connected to M IDI O UT .
The Sequencer of the S Series can record songs consisting of 16 tracks, modifying
the events recorded with the general commands or single event-edit procedures.
In addition to the 16 tracks where notes can be recorded, a “ghost” track (the
Master Track) is also recorded which contains all the data pertaining to the Performance and Effect changes, Tempo and main Volume variations.
In the S Series the Songs are associated to Banks of Performances, and these
constitute the Banks/Songs.
Playback and Record
While a Song is in Record mode
(RECORD BUTTON FLASHING) it is not
possible to access certain
functions, such as the “Save
Performance” command:
A Song can be recorded (Record) or played back (Playback). Song playback and
recording can be controlled in the Playback and Record displays (Figs. 1 and 2).
•
Press RECORD to activate the Record display (and to access all the recording
operations).
To enter Playback you must (a) enter EDIT SONG by pressing SONG in the Edit
section, and, if necessary (b) select “Rec/play” in the Edit Song display.
The Playback display shows the Song parameters and allows you to modify the
Tempo. You can edit the other parameters in EDIT SONG (s.).
The Song and the Performance Bank
During the recording you can record the Sound changes for each track as well as
the Performance changes which change the general configuration of the instrument
while the Song is playing. The Performance can be used to perform complex tasks,
such as changing the track configurations and all the Sounds played, as well as
simple variations, such as assigning Effects to the tracks.
A Song requires a Bank/Song with suitable Performances. If none of the ten standard Bank/Songs contain Performances which suit the Song, you must create a Bank/
Song with different Performances.
A new Bank/Song must be created even when the instrument has only one Bank/
Song (this can happen when you load the contents of a floppy disk or cancel a
Bank/Song).
In some cases it may be necessary to cancel the Song that resides in the Bank/Song
to record a new Song with the Bank/Song Performances (e.g. cancel the Demo Song
of the Bank/Song 1 to record a new Song).
Figure 1: “Playback” display
Figure 2: “Record” display
(8) Sequencer e Song
179
The sequencer controls
The buttons situated directly below the display control the recording or playback of
a song:
record Places the Song selected in “record” mode.
play Starts the playback and the recording of the Song .
<< and >> Fast forward and rewind of the Song. Holding them down increase the velocity
of the forward and rewinding action. These commands are not active during recording.
clock Displays the metronome Tempo (clock) and allows you to modify it in real time by
means of the DIAL.
Creating a Song
Creating a Bank/Song
There are two ways to choose from: create a new Bank/Song or prepare a copy of an
existing Bank/Song.
(A) Creating a new Bank/Song:
1. Select the “Save Performance” command from the main display.
2. Specify the new Bank/Song to create.
3. Confirm the save operation. As well as a new Performance, a new Bank/Song which
houses the Performance is created.
Note: Ten Bank/Songs are already present by default. These can be cancelled with the
“Delete Bank/Song” function of the UTILITY button.
(B) Copying from another Bank/Song (both the Performance Bank and associated Song):
1. Select the Bank/Song to copy.
2. Press the UTILITY button to gain access to the Utility display:
3. Select the <Copy “Bank/Song”> option. You are prompted to specify a destination for the
copied Bank/Song:
4. Select the Bank/Song destination and confirm.
Creating a Performance with default values
You can reset all the tracks to default values:
1. Enter EDIT PERFORMANCE/PRACKS by pressing the PERF. TRACKS button in the Edit section:
180
REFERENCE GUIDE
2. Use the DIAL to select “All” and press ENTER twice to create 16 tracks with default values
(Sound = GrandPiano, Volume = 127, Transpose = 0 ...)
Cancelling the Song
You can cancel a Song and maintain the Performance Bank intact in the following manner:
1. Select the Bank/Song.
2. Press the SONG button in the Edit section. If the Playback display appears, select the “Edit”
option to recall the Edit Song display:
3. Select the “Erase Song” command and confirm.
Recording a new Song
Select the Bank/Song in which you want to record the new Song.
1. Press the RECORD to activate the Song “record” mode. The button starts to flash and the
“Record” display is shown, partially covered by a dialogue window which prompts you to
select the track or tracks to record:
2. Select the tracks to record using the corresponding TRACK SELECT KEYS. The tracks in
“record” mode are displayed with the letter “R”. The symbol e indicates the tracks already
recorded, the symbol - indicates the empty tracks. You can deactivate the tracks set to
“record” mode by pressing the corresponding TRACK SELECT KEYS again.
3. Press ENTER to confirm the track selection (or EXIT to escape from “record” mode). The
dialogue window now closes.
“Locator” (current Song
position)
Track column
Bank/Song name
Options column
Song parameters
4. Select the parameters of the Song and/or tracks, and programme them as required.
quantize Quantization or auto-correction of imperfectly recorded tracks.
Default: Free. Value range: Free, 1/4 ... 1/96.
tempo Starting tempo of the Song.
time signature Division of the bar. This parameter cannot be modified after the Song
has been recorded.
Default: 4/4. Value range: 1/2 ... 15/16.
(8) Sequencer e Song
181
free memory A non-modifiable indicator showing the current space available for the
Song being recorded. The maximum space available for a Song is 400 kb.
5. Select the recording options.
replace/overdub Replace cancels existing events and replaces them with those you are
recording. Overdub adds the new events recorded to existing events.
tempo record Records Tempo variations (carried out with “Clock” directly by the Music
Processor; the Tempo variations received via MIDI cannot be recorded).
pedal volume record (S2/S3) Records Volume variations effected with the Volume
Pedal.
common volume record (S2R) As above, but only for variations received via MIDI COMMON. S2R does not record Volume variations effected with a pedal connected to the
PEDAL VOLUME socket.
effect record Records changes of Effects and Effect Volumes introduced with the User
Keys and User Sliders (S2/S3), or received via MIDI such as M IDI C ONTROLLER 21-24.
metronome Activates/deactivates the metronome during recording tasks.
6. If necessary, you can select the “Locator” to select any starting position of the Song by
rotating the DIAL. You can start recording from the first bar, from an existing bar or from the
bar immediately following the last bar recorded.
7. Press PLAY to start the recording. The “Locator” shows a count down for two bars before
recording, beating in time if the “Metronome” is activated.
Start playing when the “Locator” shows the position required. The Song starts at position 11-1.
8. Stop recording by pressing STOP. You can escape from “record” mode or repeat the
recording either in OVERDUB or REPLACE modes.
Note: You can end the Song automatically by programming an “end bar” in the Utility editor
(EDIT STOP TO BAR parameter) of EDIT SONG.
9. You can escape from “record” mode by pressing the RECORD button. The button stops
flashing.
Note: The Song and its Performance Bank will be lost if you switch off your instrument.
Save the Bank/Song to a floppy disk or Ram-disk for future use.
“Undo”
Any recording operation can be cancelled simply by pressing UNDO immediately
after the operation. You can, for example, cancel the recording of a badly recorded
track.
Press
UNDO
again to restore an
UNDO
operation.
Notes and suggestions
Recording a Song If you record a song from the keyboard, remember to check that the
tracks in record mode are connected to the Local Source (in EDIT PERFORMANCE / TRACKS , page
1). If you want to record several tracks simultaneously, check that the Local Source is not
set to SINGLE , otherwise you will record only one track.
182
REFERENCE GUIDE
Recording via MIDI When you exchange a Song between two sequencers remember to
synchronise their Clocks. The recording Start and Play command must be controlled by only
one sequencer so that the start is perfectly synchronised. The Clock of the controlling
sequencer must be on “Internal”, while the Clock of the controlled sequencer must be on
“External”.
If you use the Music Processor to record a Song that has been created with another
sequencer, all the Performance tracks must be set to “record” mode so that the entire Song
can be transferred with one operation.
Metronome During Play and Record, the leds of the << and >> buttons act as a visual
metronome. The led of << flashes at the first beat of a bar while the led of >> flashes the
remaining beats of the bar.
The ‘click’ is not sent to the Midi Out.
Song Position Pointer / Clock Resolution The S Series transmits and receives the Song
Position Pointer precisely. This message stops, moves forwards or backwards and starts the
Song in precise positions at the minimum resolution of the Midi Clock (24 bpq, exactly one
quarter of the Clock resolution of the S Series).
Chase Events or True Events The S Series Sequencer recognises the status of the
ProgramChanges and Midi Controllers during a fast forward or fast rewind operation. If, for
example, you press >>, the Volume is adjusted to the value of the arrival point, even if the
Volume event was not actually performed by the Sequencer.
This system is often called Chase Events (Cubase and Notator Logic) or True Events
(Notator).
Songs with different Time Signatures Use the “Insert” function to create Songs with
different Time Signatures. Before you start recording, create a “basic structure” of bars with
Insert: (a) insert the first group of bars with the initial Time Signature, (b) insert the second
group of bars with the second Time Signature, (c) insert the remaining groups of bars with
different Time Signatures, (d) record the Song; the Time Signature changes automatically
during recording.
The Structure of a Song The following table shows how a Song is structured
MasterTrack
TEMPO
PERF. CH.
Track 1
Analog_1
Track 2
Mooog_Wv
Track 3
PEDAL VOLUME
PERF. CH.
GrandPiano1
Track 4
Track 5
Track 6
Dyn_Bass
Track 7
Fretless_B
PERF. CH.
EFFECT CHANGE
PERF. CH.
Tot_Horn_2
Arp_260000
SoftSax
GrandPiano
GrandPiano
SoundTrack1
SoundTrack1
Dyn_ElGuit
Ac_Bass
Fretless_B
Track 8
Track 9
Door
Track 10
Track 11
Drum_kit1
Strings 1
Strings 2
Track 12
Synth Strings
Track 13
Track 14
Choir
Analog_Pad
Track 15
Track 16
Strings 2
APPLAUSE
BIRDS
BIRDS
Used Track
Unused Track
(8) Sequencer e Song
183
9 EDIT Song mode
Accessing Edit Song mode
You can gain access to E DIT S ONG in the following manner:
1. Press song in the Edit section. This may open the Playback display or the E DIT
S ONG environment.
2. If the Playback display appears, select “Edit”.
The main menu editors of edit song
Erase events
Cancels the currently specified MIDI events.
Move events
Moves all the MIDI events from one section of the track to another.
Insert/delete bars
Inserts or deletes the number of bars specified.
Dynamic
Modifies the Key On Velocity.
Transpose
Transposes one note or a vertical range of notes.
Quantize
Quantizes a note or a vertical range of notes.
Copy
Copies a section of a track or all the tracks to different position.
Microscope
“Microscopic” Edit of each single event of the track.
Utility
Sets the recording and playback functions.
Mastertrack
“Microscopic Edit” of the Mastertrack (a “ghost” track that contains the Tempo variations,
volume variations and the Performance and Effects variations).
Options of the main menu of
EDIT SONG
Rec/Play
Opens the Playback display, where you can enter Record mode. The Playback display and
the EDIT SONG environment are “superimposed” and simultaneously active; one environment
is recalled from the other (s. figure at the foot of the page).
Erase Song
Cancels the Song.
Options of the secondary menus
Menu
Returns to the main menu.
Rec/Play
Opens the Playback display.
Execute
Executes the specific operation of the display or page (e.g. quantize or copy), after assigning values to the various parameters.
“EDIT”
“REC/PLAY”
“Playback” display
184
REFERENCE GUIDE
Edit Song, main menu
Selecting the Tracks in Edit
All the operations are carried out on the currently selected track. You can select a
different track at any time, without escaping from the current edit page. The track
is displayed on the first line of the display.
Selection Screen
The selection of the events to be edited takes place on two axes; a vertical axis
(note height) and a horizontal axis (position of the Song, in the form Bars-QuartersTic).
The expressions used in the edit pages are “Note range” for the vertical axis and
“From locator... to locator...” for the horizontal axis:
"Note range"
"From locator... to locator..."
Bar 1
Bar 2
Bar 3
“Execute”
This command appears in many secondary menus; it must be selected to confirm
and apply the modifications.
“Undo”
Most edit operations can be anulled by pressing
tion.
Press
UNDO
UNDO
immediately after the opera-
again to restore the cancelled modifications.
(9) Edit Song
185
Erase events
This operation erases all MIDI events of a specified type from a specified range of
bars. You can perform this operation on the currently selected Track (page 1) as
well as the Master Track (page 2).
Page 1: Erase from track
Event
Determines type of M IDI event to erase from the specified locator range. You can also
cancel Duplicate notes (the note with the lowest dynamic value is cancelled).
Default: All. Value range: Duplicate note, All, Note, PitchBend, Mono touch, Poly touch,
Dynamic release (Key Off Velocity), ProgramChange, Midi Controller 0 ... 127.
Note range from... to...
Determines the range of notes which will be affected by the Erase procedure. To select one
note only, enter the same value in “from” and “to”.
From locator.....
.....To locator
Determines the Locator range (start and end) from which the specified events will be
erased..
Page 2: Erase from Master Track
Event
Determines the type of event to cancel from the specified locator range.
Default: All. Value range: All, Tempo, Perf, Volume, Eff.1/Eff.2, Eff.1 volume/Eff.2 volume,
Rotary slow/fast, Scale.
From locator.....
.....To locator
Determines the Locator range (start and end) from which the specified events will be
erased.
Note: It is not possible to cancel the starting events of the Master Track (Tempo, Performance, Volume) - they can, however, be modified.
Page 1: Erase from track
186
REFERENCE GUIDE
Page 2: Erase from Master Track
Move events
This operation moves all the events within a specified locator range in a track to a
specified destination Locator. The data occupying the range being moved are
completely erased. The data being moved merges with the data, if any, at the
destination locator.
Start locator
bar 1
bar 2
bar 3
Move from track
From locator.....
.....To locator
Determines the Locator range (start and end) from which the specified events will be
moved.
Start locator
Determines the starting point of the destination.
MOVE EVENTS Editor
(9) Edit Song
187
Insert/delete bars
This operation inserts a specified number of empty bars of a specified Time
Signature into all the recorded tracks at the specified starting point (page 1), OR,
deletes a specified number of bars from all the tracks of the Song (page 2).
“Insert bars” procedure:
bar 1
bar 2
bar 3
Insert two bars starting from bar 2.
bar 1
bar 2
bar 3
bar 4
bar 5
[bar 1]
[*]
[*]
[bar 2]
[bar 3]
The two new bars are inserted, and the existing bars are moved forwards.
Delete bars” procedure:
bar 1
bar 2
bar 3
bar 4
bar 5
bar 4
bar 5
Cancel bars 2 and 3.
bar 1
DELETE
bar 1
bar 2
bar 3
[bar 1]
[bar 4]
[bar 5]
The bars after the cancelled bars are moved backwards.
Page 1: Insert bars
Number of bars
Defines the number of bars to insert.
Bar time
Specifies the Time Signature of the bars being inserted - this value can differ from the rest
of the recorded Song.
Suggestion: Use “Insert bars” to record a Song containing different Time Signatures.
From bar
Determines where the additional bars will be inserted. All existing bars that follows those
being inserted are moved forwards.
Page 2: Delete bars
Number of bars
Determines the number of bars to cancel.
From bar
Indicates the first bar of those to cancel.
Pagina 1: Insert bars
188
REFERENCE GUIDE
Pagina 2: Delete bars
Dynamic
This is a great option if, for
example, you want to open the
Filters of a sound that is sensitive
to dynamic variations, otherwise
not possible unless you repeat the
recording with the modified
Sound.
This operation modifies the Note on Dynamic values (keystrike velocities) for all
note events within the specified bars of the currently selected track.
There are two ways of correcting the values:
•
Normal adds or subtracts the specified value indicated in the Change velocity
parameter to the notes.
•
Fixed modifies all the recorded Dynamic values to the specified value indicated
in the Change velocity parameter.
Dynamic
Dynamic mode
Selects the mode (Normal or Fixed).
Change velocity
Indicates the amount by which the dynamic values can be modified.
Note range from... to...
Determines the range of notes which will be affected by the Dynamic procedure. To select
one note only, enter the same value in “from” and “to”.
From locator....
.....To locator
Determines the Locator range (start and end) within which the modification is to be effected.
Transpose
This operation transposes all single notes or a range of notes by a specified interval.
Transpose
Transpose
Determines the transposition interval expressed in semitones. Value range: -64... 0... + 64.
Note range from... to....
Sets the lowest and highest limits of the range of notes to be transposed. To select one note
only, assign the same value to “from...” and “to...”.
Suggestion: Select one note only to substitute a drum instrument (assigned to a note) with
another (assigned to another note).
From locator....
....To locator
DYNAMIC Editor
Determines the Locator range (start and end) within which the transposition is to be effected.
TRANSPOSE Editor
(9) Edit Song
189
Quantize
This operation adjusts the timing of each event to the nearest interval (quantisation)
of the specified value. You can quantize the Note on events (the attack phase) as
well as those relating to Note off (the release phase, hence the duration of the note
[Gate time]).
The Quantize procedure is not destructive. You can select a different Qujantize
value also on a Song already saved and loaded from disk.
Key On Quantize
Key On not quantized (‘Free’).
Key On quantized at 1/4.
Key On quantized at 1/8.
Key Off Quantize:
Key Off not quantized (‘Free’).
Key On quantized at 1/4, Key Off not quantized (‘Free’).
Key On and Key Off quantized at 1/4.
Page 1: Quantize Key On
Note ‘On’ quantize
Page 1: Quantize Key On
190
REFERENCE GUIDE
Determines the Key On Quantize value. Triplets are also included in the values:
1/2
1/4
1/8
1/16
1/24
1/48
1/3
1/6
1/12
1/24
1/32
1/64
Page 2: Quantize Key Off
Default: Free (no correction). Value range: 1/4, 1/8, 1/12, 1/16, 1/12, 1/32, 1/48, 1/64, 1/96
and Free. “Free” returns tracks precisely to their real time recorded status, cancelling the
Quantize value used (if any).
Note range from... to...
Determines the range of notes which will be affected by the Quantize procedure. To select
one note only, enter the same value in “from” and “to”.
From bar....
.....To bar
Determines the range of bars (start and end) which will be affected by the Quantize Note
On procedure.
Page 2: Quantize Key Off
Note ‘Off’ quantize
Determines the Key Off Quantize value.
Default: Free (no correction). Value range: 1/4, 1/8, 1/12, 1/16, 1/12, 1/32, 1/48, 1/64, 1/96
and Free..
From bar....
....To bar
Determines the range of bars (start and end) which will be affected by the Quantize Note
Off procedure.
Copy
Contains the procedures for copying a portion of a single track, copying a portion of all
tracks and the Append function.
Append copies an entire Song to the “tail” of the Song currently in edit. It doesn’t
copy the source Song’s original Performances, therefore the compied part makes
use of the Performances belonging to the Song currently in edit.
Copy does not destroy the source data, but data at the destination can be destroyed.
A copy can be carried out once or several times:
bar 1
bar 2
bar 3
bar 4
bar 5
bar 2
bar 3
bar 4
bar 5
Copy once
bar 1
Copy 3 times.
Page 1: Copy from single track
Page 2: Copy from all tracks
(9) Edit Song
191
Page 1: Copy from single track
The data to copy are taken from a single track (the currently selected track shown in the
track column).
Copy mode
Provides two copying alternatives.
Replace: the copied data substitutes the data already present at destination.
Merge: the copied data is combined with the data already present at destination. You can
use this application to copy, for example, a pattern of bongo drums from one track to a
pattern of toms and snare on another track..
Copy track... to track... b/s...
Source track to copy from, destination track to copy to and the destination Bank/Song. The
source track is the one shown currently selected in the tack column, the destinatoin track
must be specified. You can select a Song desitnation that differs to the one currently in edit;
if the specified Bank/Song is non existent, it will be created by the copy procedure.
Note range from... to...
Range of notes to be copied. To copy a single note only, assign the same value to “from...”
and “to...”.
From bar... to bar...
First and last bar of the portion to copy.
Start bar
First bar of the destination of the copy.
Copy times
Determines the number of times the copy can be repeated. Each copy “tags” on to the
previous copy.
Page 2: Copy all tracks
Copies a portion of all the Tracks of the Song.
Careful! This operation copies to the destination in Replace mode only - all data already
present at the destination will be cancelled by the incoming copy.
From bar... to bar...
First and last bar of the portion to copy.
Start bar
First bar of the destination of the copy.
Copy times
Determines the number of times the copy can be repeated. Each copy “tags” on to the
previous copy.
Page 3: Append
Append Song number...
Select the Song that can be copied to the tail (coda) of the Song currently in edit. The first
bar of the copies Song is attached to the last bar of the Song in edit.
Suggestion: Enter the Mastertrack and reassign the Performances to the part added to the
Song. The current Performance changes present in the Mastertrack probably recall
unsatisfactory Performances, valid for the Performances of the source Bank but not for
those belonging to the Bank/Song currently in edit.
Pagina 3: Append
192
REFERENCE GUIDE
Microscope
The Microscope operations permit you to edit every event recorded in the currently
selected Track. It also permits the insertion of new events without actually playing
them on the keyboard, by means of the Insert function.
The events recorded in the track are shown in the Event List shown at the centre of
the display.
MULTIFUNCTION KEY
function
indicator
Event List
Commands/options
Type of event (‘Status’)
Position of the event
Parameters 1V, 2V, 3V,
Gate
Accessing the events of the Event List and their parameters
1. Select the track whose events you want to display in the Event List.
2. Scroll the Event List with the DIAL . As the notes are selected they are played so
that you can check them immediately.
3. Enter the parameters of the event selected with the
MULTIFUNCTION KEYS :
Note Event, Modifies parameter 1V.
Note event, Modifies the parameter Locator
4. Modify the parameter value with the
DIAL
or the
NUMERIC KEYPAD .
5. Escape from the event edit mode with ENTER (or EXIT to cancel the modifications). At this point you can select another event and repeat the edit procedure.
Moving to a specified bar
If there is no event in edit, you can go directly to a bar by specifying its number on
the NUMERIC KEYPAD .
1. If necessary, escape from the edit of the event currently being edited (by pressing
ENTER or EXIT ).
MICROSCOPE Editor
MICROSCOPE Editor in edit
(9) Edit Song
193
2. Specify the bar number on the
NUMERIC KEYPAD
and press
ENTER
to confirm:
Selecting an event with Catch Locator
You can select an event automatically.
1. Play the Song by pressing
PLAY .
2. When you hear the note (or another event) that you want to see displayed, select
“Catch Locator” in the command/options column. The event closest to the
current Locator of the Song is selected and appears in the Event List.
Programmable Events and Parameters
There are different types of events–indicated in the Status column of the Event
List–to which different parameters correspond 1V, 2V, 3V, Gate (“V” means
Value). Some parameters may not be accessible for all the different types of events.
Status = Note
Note.
1v Note name. [C-1 ... G9].
2v Dynamic value (or Key On Velocity). [1 ... 127].
3v Release dynamics (or Key Off Velocity). [0 ... 127].
gate Note duration. The duration is expressed in “ticks” (q = 192). [0 ... 65535].
Status = ProgramChange
Program Change (selects the Sound; the value corresponds to the number of the Sound in
the Sound Library).
1v First number of the Extended Program Change of the S Series, corresponding to the
Program Change [0 ... 127] MIDI message.
2v Second number of the Extended Program Change of the S series. This can be recorded
only by selecting the Sound from the control panel. During M IDI reception it is replaced by a
Bank Select message (Midi Controller 0) [0 ... 127]. This message is sent to the MIDI OUT as
Bank Select.
Note: If a Program Change of a track and a Performance Change occur at the same point
of the Song, the Program Change prevails over the Performance Change and the Sound
selected will be the one recalled by the Program Change and not the one programmed in
the Performance. The same occurs with Volume events.
Status = ControlChange
Midi Controller messages, (S. the Midi Controllers in the Appendix).
1v Type of Midi Controller (e.g. 0 = Bank Select, 1 = Modulation, 7 = Main Volume...).
2v Midi Controller value.
Status = Bend
Pitch Bend.
1v LSB value (Least Significant Byte) of the Pitch Bend.
2v MSB value (Most Significant Byte). Actual bending value. [0 ... 63 = pitch down; 64 =
neutral position; 65 ... 127 = pitch up].
Status = Mono touch
Monophonic Aftertouch (or channel touch ).
1v Aftertouch intensity. [0 ... 127].
Status = Poly touch
Polyphonic Aftertouch (applied to a specific note).
1v Note to which aftertouch is applied. [C-1 ... G9].
2v Aftertouch intensity. [0 ... 127].
194
REFERENCE GUIDE
The Command/Options Column
The command/options of Microscope are different to those of the other modes.
Commands/options
Menu
Returns to the main menu of EDIT SONG.
Rec/Play
Opens the Playback display (from which you can enter Record).
Mask
Opens a window where you can select the events to view in the Event List.
1. Select the command. The selection window appears:
The events shown in the Event List are marked by a “tick” (√).
2. Select the events to mask in the Event List. Press ENTER to confirm (the sign next to the
event disappears).
3. Select all the other types of events you wish to conceal in the Event List in the same way.
Follow the same steps to make the sign reappear next to the events that you wish to view.
4. Press “Execute” to confirm and close the window.
Ins: (x)
Specifies the type of event to insert manually with INSERT .
1. Select the command Ins: (x). A window with a list of the events to insert, appears:
2. Select the type of event to insert with DIAL + ENTER or with the NUMERIC KEYPAD.
Your entry is confirmed and the window closes. The event code appears next to the
command “Ins”:
Insert
Inserts an event of the type indicated in the “Ins” command at the selected Locator.
1. Select an event in the Event List whose Locator is closest to the position in which you want
to insert the new event.
2. Select the “Insert” command.
The new event (with default values) is inserted immediately before the currently selected
event
3. Modify the Locator of the new event in order to position it correctly.
4. Modify the values of the event.
Delete
Cancels the event selected.
1. Select the event to cancel in the Event List.
2. Press the “Delete” command.
Catch locator
Selects the event which is currently playing, or the event immediately after the current
Locator.
1. Let the sequencer play.
2. While the required event is playing, press “Catch locator”.
The event will now appear in the Event List.
(9) Edit Song
195
“Undo”
If you have modified a series of events, you can press UNDO to restore them to their
original value. Press UNDO again to recover the modifications cancelled with undo.
This is an excellent means of comparing the “previous” and “new” status.
Utility
Contains some useful Song controlling functions.
Utility
Metronome volume
Volume of the metronome.
Default: 90. Value range: 40 ... 127.
Countdown
Activates/deactivates a “lead” of two bars before the recording.
Default: On. Value range: On, Off (–––).
Song loop
Activates/deactivates the “song loop”. This function makes the Song start from the beginning when it reaches the end.
Default: On. Value range: On, Off (–––).
Edit stop to bar
Activates/deactivates and programmes a compulsory stop bar for the Song at any point
before the actual last bar.
Default: Off (–––). Value range: Any bar of the Song, Off (–––).
Suggestion: This parameter can be used to set the exact ending point of a recording.
Undo
Activates/deactivates the “Undo” function, activated by the “undo” button. This function
consumes a great deal of memory, and may reduce the space available for your Song quite
considerably.
Default: On. Value range: On, Off (–––).
UTILITY Editor
196
REFERENCE GUIDE
Master Track
The Master Track editor allows you to modify the value and position of each event
recorded in the Master Track - the “ghost” track where the events recorded can be
Performance changes, Effect and Scale changes, the Volume variations performed
with the Volume Pedal (S2/S3) or the Common Volume (S2R), the Effect Volume
and Tempo changes, the Rotary control.
It operates in a very similar way to Microscope.
The events recorded in the Master Track are shown in the Event List at the centre
of the display:
MULTIFUNCTION KEY
function
indicator
Event List
Commands/options
Type of event (‘Status’)
Position of the event
Value of the event
Accessing the events on the Event List and their values
1. Scroll the events in the Event List by rotating the
DIAL .
2. Access the parameters of the event selected (Locator, Value) with the
MULTIFUNCTION KEYS :
Performance event, Modifies the Value.
Performance event, Modifies the Locator
3. Modify the value of the parameter with
DIAL
or on the
NUMERIC KEYPAD .
4. Escape from the event edit mode by pressing ENTER (or EXIT to cancel the modifications). At this point you can select another event and repeat the edit procedure.
Moving to a specified bar
If there is no event in edit, you can go directly to a bar by specifying its number on
the NUMERIC KEYPAD .
1. If necessary, escape from the edit of the event currently being edited (by pressing ENTER or EXIT ).
2. Specify the bar number on the
NUMERIC KEYPAD
and press
ENTER
to confirm:
(9) Edit Song
197
Selecting an event with Catch Locator
You can select an event automatically.
1. Play the Song by pressing
PLAY .
2. When you hear the note (or another event) that you want to see displayed, select
“Catch Locator” in the command/options column. The event closest to the
current Locator of the Song is selected and appears in the Event List.
Programmable Events and Parameters
The types of events–indicated in the Status column of the Event List–are different,
and each one corresponds to a different value.
Note: The Tempo, Performance and Volume events are always present at the Locator 1-11. Their respective values can be modified, but not the Locator. It is not possible to cancel
these starting events, which represent fundamental elements of the Song.
Status = Tempo
Tempo.
Status = Perf.
Performance.
Status = Volume
Pedal Volume (in S2/S3) or Common Volume (in S2R).
Status = Effect 1
Number of Effect 1.
Status = Eff. 1 Vol
Volume of Effect 1.
Status = Effect 2
Number of Effect 2.
Status = Eff. 2 Vol
Volume of Effect 2.
Status = Rotary s/f
Rotary slow/fast inversion.
Status = Scale
Scale parameter, tuning of the instrument. (S. Edit General).
The Command/Options Column
The command/options of Microscope are different to those of the other modes.
Commands/options
Menu
Returns to the main menu of EDIT SONG.
Rec/Play
Opens the Playback display (from which you can enter Record).
Mask
Opens a window where you can select the events to view in the Event List.
1. Select the command. The selection window appears:
The events shown in the Event List are marked by a “tick” (√).
2. Select the events to mask in the Event List. Press ENTER to confirm (the sign next to the
event disappears).
3. Select all the other types of events you wish to conceal in the Event List in the same way.
Follow the same steps to make the sign reappear next to the events that you wish to view.
4. Press “Execute” to confirm and close the window.
198
REFERENCE GUIDE
Ins: (x)
Specifies the type of event to insert manually with INSERT .
1. Select the command Ins: (x). A window with a list of the events which can be inserted
appears:
2. Select the type of event to insert with DIAL + ENTER or with the NUMERIC KEYPAD.
Your entry is confirmed and the window closes. The event code appears next to the
command “Ins”:
Insert
Inserts an event of the type indicated in the “Ins” command at the selected Locator.
1. Select an event in the Event List whose Locator is closest to the position in which you want
to insert the new event.
2. Select the “Insert” command.
The new event (with default values) is inserted immediately before the currently selected
event
3. Modify the Locator of the new event in order to position it correctly.
4. Modify the values of the event.
Delete
Cancels the event selected.
1. Select the event to cancel in the Event List.
2. Press the “Delete” command.
Catch locator
Selects the event which is currently playing, or the event immediately after the current
Locator.
1. Let the sequencer play.
2. While the required event is playing, press “Catch locator”.
The event will now appear in the Event List.
“Undo”
If you have modified a series of events, you can press UNDO to restore them to their
original value. Press UNDO again to recover the modifications cancelled with UNDO .
This is an excellent means of comparing the “previous” and “new” status.
(9) Edit Song
199
Notes and suggestions
COPY The “Merge” mode, which does not destroy data at the destination, can be exploited to
programme the percussion instruments separately then copy all of them to a single track.
APPEND The Append function is used to copy any other Song present in Ram to the “tail” of
the Song currently in edit. This can be useful if you want to programme different parts of
the Song separately, perhaps to create a Song with different Time signatures. In fact, the
copied Song retains its original Time signature, even if it differs to the Song to which it is
united.
MICROSCOPE The Event List of the Microscope is a window which looks into the list of
events contained in the track. By rotating the DIAL , you can scroll through all the events in
the window:
EDIT STOP TO BAR In Record mode, the Locator in the “Record” display can be considered as a
Punch In, and the parameter “Edit Stop to bar” as a Punch Out; these elements define the
start and finish of a recording precisely.
UNDO If, while you’re recording, you notice that your free memory is beginning to be a
little on the low side too soon, you can stop (at an appropriate point), enter Edit Song, go to
the Utility section and disable the song’s Undo buffer. This memory buffer uses up the same
amount of memory as the Song as it is being recorded, in order to provide you with the
option of “undoing” (cancelling) your recording (you can also undo the undo command and
restore the cancelled events).
With the Undo buffer emptied, the reclaimed memory is subtracted from the “Used” readout and you should be able to finish your song without fear of running out of memory.
Naturally, you will no longer be able to exploit the Undo function.
200
REFERENCE GUIDE
10 EDIT GENERAL
The General section is a Setup; a set of data and settings that influence the way the
instrument works. The General section groups together the pitch and tuning settings, the footswitch polarity status, Midi setup, the date and time, the dynamic and
aftertouch (S2/S3) sensitivity setting and General Midi compatibility switch.
There is only one General section for the instrument. It can be loaded with the
functions of disk after switching on your instrument, or automatically when you
switch on the instrument. In both cases it reconfigures the instrument.
Tuning/Scale
Pitch and tuning parameters.
Page 1: Tuning/Scale
Master pitch
Fine pitch of the instrument in steps of 1/64th of a semitone.
Default: 0. Value range: -64 ... +64.
Keyboard scale
Keyboard tuning scale. This parameter provides a selection of preset historic scales
(temperaments), plus four programmable scales (User scales). You can select this parameter from the Song, with the “Scale” event in the Master Track.
0
Equal Temperamet
1
Pure Major C
2
Pure Major A
3
Mean Tone C
4
Pythagoric C
5
Werckmeister
6
Kirnberg
7
Vallotti & Young
8
Invers
9
Chord
10 1/4 Tone
11 Arabian
12 User 1
13 User 2
14 User 3
15 User 4
Note: When Master Transpose is deactivated, the tracks are automatically tuned to the
Equal Temperament. S. Edit Performance/Tracks.
Edit General, Main Menu (S2/S3)
Edit General, Main Menu (S2R)
(10) Edit General
201
Page 2: Edit Keyboard Scale
This is where you can programme one of the four User Scales:
Previous note
Note in edit
Next note
At the centre of the display are the parameters of the note before the one currently in edit,
the note in edit and the note immediately after. In fact, this page is a window which looks at
three consecutive notes of the keyboard.
Note: You enter EDIT with the currently selected Scale.
Edit note:
The note of the keyboard.
Coarse
The actual note assigned to the note of the keyboard.
Fine tune:
Fine tune of the assigned pitch of the note expressed in steps of 1/64ths of a semitone.
Value range: -63 ... +63.
Command/options
The command/options column contains the following selections:
kbd up Moves up one note at a time. The note after the note in edit becomes the note in
edit.
kbd down Moves down one note at a time. The note before the note in edit becomes the
note in edit.
catch note Opens a window which prompts you to play the note you want to edit:
Play the note you wish to edit. S2R must be controlled via Midi-Common.
save Saves the Scale in the General Setup. Follow these steps:
1. Select SAVE. The following dialogue window appears:
2. Enter one of the four User Scales with the DIAL or on the NUMERIC KEYPAD. If the location is
occupied, the previous scale is cancelled or replaced.
3. Press ENTER to confirm or EXIT to cancel the save procedure.
abort Cancels all the modifications.
TUNING/SCALE Editor, Page 1
202
REFERENCE GUIDE
TUNING/SCALE Editor, Page 2
FOOTSWITCH
CONTROLS
Here you can define the polarity of the Footswitches and assign them a function.
The possibility of programming the polarity of the footswitches allows you to use
footswitches of other manufacturers available on the market.
The footswitch polarity can be set either to Normally Open (N.O., open at rest) or
Normally Closed (N.C., closed at rest).
The footswitches produced by Generalmusic are N.C footswitches.
This page is not saved in the General Setup, it is memorised in a small battery-backed
Ram by selecting “Memorize”.
Footswitch 1 polarity
Polarity of Footswitch 1.
Default: N.O. Value range: N.C., N.O.
Footswitch 1 control
Function controlled by footswitch 1. The footswitch can operate in any of the following ways:
• in the mode determined in the Performance, in the second page of EDIT PERFORMANCE/
CONTROLS (“Edit Perf. Contr” option);
• Performance advance - selection of the successive Performance (“Perf+” option);
• selection command of the previous Performance (option “Perf-”);
• Start/Stop control of the sequencer (“Start/Stop” option).
Note: A Performance advance command (“Perf +”) with Performance 10 advances to
Performance 1. Pressing “Perf -” when Performance 1 is selected returns you to Performance 10.
Footswitch 2 polarity
As described for “Footswitch 1 polarity”, but referring to footswitch 2.
Footswitch 2 control
As described for “Footswitch 2 control”, but referring to footswitch 2.
MIDI
This is where you can programme the general M IDI parameters (the individual
assignments of the M IDI channels and the M IDI IN and M IDI OUT ports are carried out
in EDIT PERFORMANCE / TRACKS ).
This page contains the settings of the M IDI -C OMMON , M IDI M ERGE and C LOCK O UT . It
also contains the activation/deactivation of System Exclusive and Extended Program Change.
In the second page you can assign the M IDI channels to each track relating to the
instrument as a whole, so that it can transmit/receive on the same settings for all
Performances; these settings can override the individual programmings carried out
in EDIT PERFORMANCE / TRACKS if the “Midi channel lock” function in the first page is
set to “On”.
FOOTSWITCH CONTROLS Editor
(10) Edit General
203
Page 1: Midi (1)
Midi Common
Activates/Deactivates the MIDI -COMMON, and assigns it a MIDI channel.
ch The Midi channel assigned to the Midi-Common. This channel cannot be used to
control a single track in standard MIDI mode. If it is “Off”, the Midi-Common is deactivated.
Value range: Off, 1 ... 16.
in the In port of the MIDI -COMMON channel. If this parameter is set to “---” (Off), the incoming
Midi-Common is deactivated.
Value range: Off (---), 1, 2.
out The Out port of the Midi-Common channel. If the parameter is set to “---” (Off), the
outgoing Midi-Common is deactivated.
Default: 1. Value range: Off (---), 1, 2.
Note: If the MIDI-COMMON is deactivated, the S2R will be deprived of the Local Source. In
such a case, you can only control the individual tracks of the expander with a MIDI channel
for each track.
Midi Merge
Activates/deactivates the MIDI MERGE function. MIDI MERGE addresses all M IDI signals received at MIDI IN to the MIDI OUT:
Local
Track 1
Midi Out
Midi In
(In normal conditions, only the signals generated by the Local Source are directed to the
MIDI OUT, while signals from the M IDI IN Source are directed to the internal generation and
would then be redirected only to MIDI THRU ).
Default: Off (---). Value range: On, Off (---).
System Exclusive Midi filter
Activates/deactivates the transmission and reception of the System Exclusive. When it is
“On” this filter prevents the transmission and reception of S.E.
Default: On. Value range: On, Off (---).
Midi Extended Prog Change
The S Series PROGRAM C HANGE consists of two parts, in the form xxx-yyy:
• the principal number (part xxx), transmitted as a PROGRAM CHANGE;
• the secondary number (part yyy), transmitted as BANK SELECT (or Midi Controller 0).
In some cases, the secondary number (Bank Select) may interfere with other data in the
receiving device, above all if it is an outdated instrument non capable of receiving Bank
Select data, therefore it can be filtered from the Midi data stream in transmission. If the
parameter is “Off” the secondary number is filtered and not transmitted.
Default: On. Value range: On, Off (---).
Clock out
MIDI CLOCK OUT synchronises the Tempo of an instrument connected to the MIDI OUT of the
Music Processor with the M IDI CLOCK of the Music Processor. If this parameter is “On”, the
Tempo is sent to the MIDI OUT and can synchronise the receiving instrument (sequencer,
rhythm unit, instrument with automatic accompaniments...).
Default: On. Value range: On, Off (---).
Midi channel lock
MIDI editor, Page 1
204
REFERENCE GUIDE
Assigns the MIDI channels programmed in the next page to the tracks of any Performance,
overriding the individual settings of each Performance.
MIDI editor, Page 2
Page 2: Midi (2)
Assigning Midi channels to the tracks programmed in this page overrides the programming
of each individual Performance if the “Midi Channel lock” function (on the previous page) is
set to “On”.
Rotate the DIAL to select the track to programme.
ch MIDI Channel assigned to the track.
in MIDI IN Port 1 or 2.
out M IDI OUT Port 1 or 2.
DATE/TIME
SET
The S Series has an incorporated clock/calendar which can be displayed by pressing
CLOCK . It is used to assign date and time of modification to the files stored on
floppy disks.
Date & Time
Date
Current date in European standards (gg-mm-aa).
Time
Current time in the twenty four hour clock cycle (hh-mm-ss).
DYNAMIC/TOUCH
SENSITIVITY
(S2/S3)
Here you can regulate the dynamic and aftertouch sensitivity of keyboard models
and memorise the setting to a buffer memory.
This page is not memorised in the General Setup, it is stored to a small battery-backed
Ram by selecting “Memorise”.
Sensitivity
Keyboard sensitivity
Regulates the dynamics. The standard value is “3”. Higher values render the keyboard the
more sensitive to changes in keystrike velocity. Use lower values if you prefer a harder
keyboard with less immediate response.
Aftertouch sensitivity
Regulates the aftertouch. The standard value is “3”. Higher values correspond to a more
sensitive aftertouch; while lower values correspond to a less sensitive aftertouch.
DATE/TIME SET Editor
DYNAMIC/TOUCH SENSITIVITY Editor (S2/S3 only)
(10) Edit General
205
SOUND
TEST
(S2R)
Given that S2R does not have a keyboard, and that it is possible to use it without
connecting it to a master keyboard or other controlling device, the S OUND T EST
allows you to play a note of the currently selected track (in S OUNDS mode).
Press ENTER to play the note in the track selected. The note is also sent to the M IDI
O UT , and will trigger a sound from any expanders that are connected. (The track
must be connected to the MIDI OUT D ESTINATION ).
This page is not memorised to the General Setup file, but you can memorise it in a buffer
Ram by selecting “Memorize”.
Sound test
Note
Note played by pressing ENTER.
Dynamic
Dynamics (Key On Velocity) of the note played.
GENERAL MIDI
General Midi (GM) is an addition to the standard Midi protocol which stipulates (a)
how the Sounds are organised in the Sound Libraries and (b) which percussion
sounds to use in the Drumkits. The GS standard also adds to the GM standard the
Program Changes required to select the Drumkits.
GM/GS instruments can communicate with one another by selecting similar sounds
with the same Program Change (for example, the PrCh 1 always corresponds to the
Grand Piano, PrCh 49 always corresponds to Strings...).
Briefly, the GM/GS compatibility standards are as follows:
• similar organisation of the Sound Libraries;
• compatible drumkits;
• drumkits assigned to M IDI channel 10 (generally track 10).
The Sound Library and the Drumkits of the S Series are organised according to
General Midi standards, with some minor variations. The Program Changes of the
Drumkits, on the other hand, are different and can be rendered compatible if the
“General Midi” parameter is set to “On”.
This page is not memorised in the General Setup file, but you can memorise it in a batterybacked Ram by selecting “Memorise”.
SOUND TEST Editor (S2R only)
206
REFERENCE GUIDE
GENERALMIDI editor
General Midi
General Midi
Activates/deactivates the compatibility with the GS Program Changes for the selection of
the Drumkits. If the compatibility is active, the following situation will be in force:
• during Midi communications, the Music Processor transmits and receives the correct
Program Change for the selection of the Drumkits on MIDI channel 10;
• when you save Midi-files, the Music Processor converts the Program Changes of MIDI
channel 10 into GS Program Changes.
• when you read Midi-files created in GS standard, the Music Processor converts the
Program Changes of Midi channel 10 into the Program Changes of the S Series Sound
Library.
GS STANDARD
S SERIES
0 ... 7
Standard
121-5
Standard
8 ... 15
Room
122-5
Room Kit
16 ... 23
Power
123-5
Power Kit
24
Electric
124-5
Electric
25 ... 31
TR808
125-5
House Drums
32 ... 39
Jazz
126-5
Jazz Drums
40 ... 47
Brush
127-5
Brush Kit
48 ... 127
Orchestra
128-5
Orchest Kit
Conversion table for Program Changes which travel on Midi channel 10 SerieS <—> GS.
(10) Edit General
207
Notes and suggestions
Keyboard Scale The scales included in the S Series Rom are temperaments of historic
origin and non-European scales. The following is a list of the scales available.
(0) Equal: Used since the times of Bach to our times.
(1) Pure Major C: Scale based on the formula F=f+n, where F is the frequency to
calculate, f the previous frequency and n a constant. The calculation starts from the note C.
(2) Pure Major A: Identical to the previous scale, except that the calculation starts from
the note A.
(3) Mean Tone C: “Mesotonic” temperament used in the XVIth and XVIIth centuries,
calculated from the note C. Favours the perfect major third interval. The chromatic scale
is very irregular and the major 3rd intervals B-D#, F#-A#, C#-E#, Ab-C are diminished
fourths. The diminished sixth interval G#-Eb is known as the “fifth of the wolf”. The
scales used in the period when this temperament was used are C major/A minor, D
major/B minor, G major/E minor, A major/F# minor, Bb major/G minor.
(4) Pythagoric C: Temperament calculated by the mathematician, physicist and philosopher Pythagoras, in use until the 15th century. It is based on a purely arithmetical
calculation of the eighth and the fifth. The scale is calculated starting from C.
(5) Werckmeister: Temperament proposed by the organist Andreas Werckmeister. It is
suitable for performing the German musical repertoire between the end of the XVIIth
century and the XVIIIth century. The keys with greater alterations appear variously
distinctive.
(6) Kirnberger: Temperament proposed by J.P. Kirnberger, pupil of J.S. Bach. This is
equally suitable for Bach’s works and the German Baroque repertoire. The keys with
greater alterations appear variously distinctive.
(7) Vallotti&Young: This Italian Temperament of Giuseppe Tartini and Francescantonio
Vallotti and later revived in England by Thomas Young is used effectively for the Italian
XVIIIth century repertoire as well as for the English repertoire of the same period. The
keys with greater alterations appear variously distinctive.
(8) Invers: This is an inverted equal temperament. The scale starts from the right instead
of the left.
(9) Chord: The notes of a scale belong to different octaves. This temperament can be
useful with Strings or Pads Sounds, to fill the overall sound by covering a wider extension.
(10) 1/4 Tone: One of the two Arabian scales, where, with respect to the Equal temperament, the notes E and B are flattened by 1/4 of a tone.
(11) Arabian: The second Arabian scale where the notes E and A are flattened by 1/4 of
a tone.
(12..15) User 1...4: Programmable scales.
Midi channel lock A general assignment of the Midi channels to the tracks which can be
saved in the General Setup. This locks the MIDI assignments for the instrument as a whole,
overriding the individual channel settings of each Performance. In this way you can have at
your disposal different Midi configurations for different situations (studio setup, concerto
setup). It also protects your entire MIDI setup from being destroyed by loading Songs which
have complex Midi setups.
208
REFERENCE GUIDE
11 DISK
The floppy disk and the Ram-disk (if installed) are data storage systems which
store data contained in the instrument’s Ram. Owing to the fact that Ram is volatile
(the contents are cancelled when you switch off your instrument), it is necessary to
store your data on disk.
Floppy disks permits the storage and transportation of data, while the Ram-disk
provides high speed access to stored data.
The DISK environment - consisting of four pages - contains operations for the
exchange of data between the Ram and disk systems (floppy disk and Ram-disk)
and disk handling functions (formatting and erase...).
The DISK environment also has functions which allow you to exchange Midi-files
with other sequencers.
Automatic loading when powering up
The entire contents of the Ram-disk or a floppy disk can be loaded automatically
when you power up your instrument.
(A) Powering up with no disk in the disk drive.
- The entire contents of the Ram-disk are loaded. If the Ram-disk is empty, the instrument
powers up with a default configuration. The default display will appear:
(B) Powering up with a disk inserted in the disk drive.
- The entire contents of the floppy disk are loaded. The display of Performance 1 of Bank/
Song 1 contained in the floppy disk will appear.
In order to power up the instrument with a default configuration, even when the Ram-disk
contains data, press and hold down ENTER for several seconds immediately after turning on
the instrument.
Page 1: Load
Page 2: Save
Page 3: Erase
Page 4: Utility
(11) Disk
209
The Ram-disk
Some models of the S Series incorporate 512 kb of static Ram that implement the
Ram-disk. All the models in the S Series are designed to be fitted with 512 kb or 2
Mb of static Ram.
The operations that can be performed on the Ram-disk are identical to those that
can be carried on a floppy disk.
You can access the Ram-disk in the
DISK
pages by pressing
FUNCTION KEY B :
Ram-disk not installed If the Ram-disk is not installed, any attempt to access the
Ram-disk displays the following error message::
The Groups
A Group is a set of 10 Bank/Songs that can be loaded into the memory at the same time.
FLOPPY DISK / RAM-DISK
GROUP 1
B/S 1 B/S 2 B/S 3 B/S 4 B/S 5 B/S 6 B/S 7 B/S 8 B/S 9 B/S 10
GROUP 2
B/S 1 B/S 2 B/S 3 B/S 4 B/S 5 B/S 6 B/S 7 B/S 8 B/S 9 B/S 10
GROUP 3
B/S 1 B/S 2 B/S 3 B/S 4 B/S 5 B/S 6 B/S 7 B/S 8 B/S 9 B/S 10
GROUP 1
B/S 1 B/S 2 B/S 3 B/S 4 B/S 5 B/S 6 B/S 7 B/S 8 B/S 9 B/S 10
RAM
B/S 1 B/S 2 B/S 3 B/S 4 B/S 5 B/S 6 B/S 7 B/S 8 B/S 9 B/S 10
The Group is indicated in the option column by the symbol
and by the corresponding number. This symbol appears when you select an operation that includes
the Bank/Songs (for example, Load All, Load All Bank/Song, Load Single Bank/
Song):
Up to 10 Groups can be stored to a disk. Numbering starts from 1 and “0” represents Group 10.
The “Load All” operation loads, among other data, the Bank/Songs of the Group
selected.
Accessing the Groups In order to gain access to successive Groups, press the
FUNCTION KEY corresponding to the disk (floppy or Ram) repeatedly in the Load,
Save and Erase operations. The number of the Group selected appears next to the
symbol:
210
REFERENCE GUIDE
Displaying the Groups In the Save operations you can select all the Groups from
1 to 0 (10). In the Load and Erase operations, only the Groups containing at least
one Bank/Song are displayed.
For example: if there are Bank/Songs only in Groups 2 and 5, only the numbers 2 5 are shown in the relative Load and Erase pages.
Empty groups Empty Groups are identified by an asterisk next to the number:
In these Groups you can carry out a Save All operation without fear of losing any
of the Bank/Songs stored previously on the disk.
Organisation of the disk environment
Disk operations are spread over four pages, each containing similar operations
(Load, Save, Erase, Utility). The layout of all four pages is similar:
Menu of the page
Page number of DISK
Floppy disk/RAM-disk selectors
and Group selectors
General commands/options
disk/ram.d
Selectors for the storage devices (floppy disk or ram-disk) and the Groups.
The Group number and an asterisk (*) indicating an empty Group may appear next to the
selectors.
number One of the ten Groups contained in the disk. Numbering starts from 1 and “0”
represents Group 10. Tap the function key repeatedly to access the various Groups.
asterisk The Group is empty (it does not contain a Bank/Song).
Note: Empty Groups appear only in the Save page (in the Load and Erase pages they are
not shown).
New disk
Updates the disk directory. It is used when the floppy disk inserted in the disk drive is
changed.
Directory
Displays the contents (directory) of the device selected. “Directory” allows you to check the
contents of disks or the operative Ram. The directory which appears differs according to
the type of data selected (All, Bank/Song, Setup). ❉
General procedure to display the directory:
1. In the Disk page (Load, Save, Erase) select the data whose directory you wish to be
displayed. For example, “Bank/Song”:
(11) Disk
211
2. Select the “Directory” command. The contents of the currently selected device are shown
(floppy disk, Ram-disk, operative Ram):
3. Escape from the Directory display by pressing EXIT.
❉ Directory
An example of a “Directory” display:
Device selected
Type of directory
Device selectors and
Group indicators
Space remaining in
the device
Directory
Storage device selectors
Dimensions and last modified
date of the element selected
Select the devices whose directory you wish to see.
INTERNAL
Operative RAM.
DISK floppy disk. (You cannot select the Bank/Song Group; in order to select the Group you
must first escape from the directory by pressing EXIT).
ramdisk Ram-disk. (You can not select the Bank/Song Group; in order to select the Group
you must first escape from the directory by pressing EXIT).
Types of directories
Different Directories will appear (All, Bank/Song, Setup) depending on the type of data
selected in the Disk page (Load, Save, Erase pages). For example, if you select “Load All
Bank/Song” or “Load Single Bank/Song”, the “Bank/Song” directory is displayed. ❉
dir all Main directory. Shows the presence or absence of the various data.
dir setup Displays the presence or absence of the four Setups:
212
REFERENCE GUIDE
dir bank/song Displays the names of the Bank/Songs stored. (To select a different
Group you must escape from the “Directory” display).
The second page displays the Performances contained in the Bank/Songs highlighted by
the cursor:
❉ Data displayed in the directories
dir all
setup Displays the presence or absence of the Setups: General, Sound Library, Effects
Libraries, Clipboard.
bank/song Displays the presence or absence of the Bank/Songs stored in memory or in
the Group selected.
user program Displays the presence or absence of one of the User Programs stored on
disk or in memory.
data Displays the presence or absence of data generated by a User Program.
dir setup
general General instrument settings.
sound library Customised Sound Library, with new Sounds not contained in the standard Rom Sound Library.
effects libraries Customised Effects Libraries, different to those contained in the Rom.
clipboard Clips from the “Clipboard” page.
dir bank/song
The first page displays the Bank/Songs stored in memory or on disk. The second page
displays the Performances in the Bank/Song highlighted by the cursor in the first page.
(11) Disk
213
The Disk environment pages (Load, Save, Erase, Utility)
The DISK environment consists of four pages (Load, Save, Erase, Utility), each with
similar functions.
Load
Commands/options
Standard commands/options (disk, ramdisk, new disk, directory).
Load all
Loads the entire contents of the disk. Loads the Bank/Songs of the Group selected.
Important: the contents of the memory will be cancelled and replaced by the data being
loaded.
Load all setup
Load single setup
Loads all the Setups (General, Sound Library, Effects Libraries, Clipboard).
Loads one of the Setups.
1. Select “Load single setup”. The directory of the Setups on the disk selected is displayed
“Load single setup”. In this disk the Clipboard
is not present.
2. Select the Setup to load and confirm the operation.
Important: Loading a Setup from disk modifies the instrument’s operating mode. For
example, the General Setup can alter the MIDI-COMMON status, a Sound Library may change
the Sounds used by the tracks.
Load all bank/song
Load single bank/song
Loads all the Bank/Songs of the Group selected.
Loads one of the Bank/Songs of the Group selected.
1. Select the “Load single bank/song” procedure. The directory of the Bank/Songs contained
in the currently selected Group is displayed. (You can press EXIT to interrupt the operation,
and then select a different Group to repeat the operation).
“Load — select source”. Directory of the
Bank/Songs included in the selected Group (on disk).
2. Select the Bank/Song to load and confirm. The directory of the Bank/Songs in memory is
displayed:
“Load — select destination”. Directory of
the Bank/Songs present in memory.
3. Select the Bank/Song destination and confirm.
Important: The Bank/Song occupying the location (if any) will be replaced by the incoming
Bank/Song.
Load User Program
Loads one of the User Programs on the floppy disk.
1. Select “Load User Program”. The directory of the User Programs on the floppy disk is
displayed.
2. Select the User Program to load and confirm.
214
REFERENCE GUIDE
Save
Commands/options
The standard commands/options (disk, ramdisk, new disk, directory) also include the option
“S.compr.” (= Sample compression).
s. compr. Compresses the samples during the Save procedure. A compressed sample
occupies less space on the disk, meaning that the 2 Megabytes of Sample-Ram can be
stored on one floppy disk.
Note: Compressed samples are decompressed automatically during the Load procedure.
Save all
Saves the entire contents of the memory. The Bank/Songs are saved in the selected Group.
Important: The data being saved will erase the contents on disk. (The Groups not selected
remain unaltered).
Save all setup
Saves all the Setups present in memory (General, Sound Library, Effects Libraries, Clipboard) and replaces those stored on the disk.
Save single setup
Saves one of the Setups in memory and replaces the one stored on disk.
1. Select “Save single setup”. The directory of the Setups in the memory is displayed:
“Save single setup”. The example given shows no Clipboard in the memory.
2. Select the Setup to save and confirm the operation.
Save all bank/song
Saves all the Bank/Songs of the Group selected. If the Group selected is empty (marked by
an asterisk: *) it is created automatically.
Save single bank/song
Saves one of the Bank/Songs in the memory in the Group selected. If the Group selected is
empty it is created automatically.
1. Select “Save single bank/song”. The directory of the Bank/Songs in the memory is displayed.
“Save — select source”. Directory of the
Bank/Song present in memory .
2. Select the Bank/Songs to save, and confirm. The directory of the Bank/Songs contained in
the Group selected on the disk is displayed (you can interrupt the operation by pressing
EXIT, select another Group and repeat the operation):
“Save— select destination”. Directory of the
Bank/Song included in the Group selected (on disk).
3. Select location in which to save the Bank/Song and confirm.
Important: The Bank/Song occupying the location (of any) will be replaced by the Bank/
Song being saved.
(11) Disk
215
Erase
Command/options
Standard commands/options (disk, ramdisk, new disk, directory).
Erase all
Cancels the entire contents of the disk.
Erase all setup
Cancels all the Setups (General, Sound Library, Effects Libraries, Clipboard).
Erase single setup
Cancels one of the Setups.
1. Select “Erase single setup”. The directory of the Setups in the disk selected is displayed:
“Erase single setup”. In this disk only the
Sound Library is present.
2. Select the Setup to cancel and confirm the operation.
Erase all bank/song
Cancels all the Bank/Songs of the Group selected.
Erase single bank/song
Cancels one of the Bank/Songs of the Group selected.
1. Select “Erase single bank/song”. The directory of the Bank/Songs in the Group selected is
shown. (If necessary, you can press EXIT to interrupt the procedure and then select a
different Group to repeat the operation).
“Erase— select Bank/Song”. Directory of the
Bank/Songs included in the Group selected (on disk).
2. Select the Bank/Song to cancel and confirm.
Erase all B/S groups
Cancels all the Groups of the Bank/Song on the disk.
Utility
Format work disk (1.62 Mb)
Formats a 3.5” HD floppy disk in the standard S Series format (to memorise Songs, Performances, Sounds). The operation is a force-formatting procedure which formats the disk to a
capacity of 1.62 Megabytes (1591 Kb effectively available).
1. Select “Format work disk (1.62 Mb)”:
“Insert a floppy disk of the HD type”
2. Insert the unprotected floppy disk and confirm. Previously used floppies are reformatted.
The flashing cursor shows the position of the first entry
3. Enter a name for the disk. This step is optional but you are strongly recommended to name
all your floppy disks to avoid confusing different disks.
4. Confirm the procedure. The formatting procedure lasts about two minutes.
216
REFERENCE GUIDE
Format Ms-Dos (1.44 Mb)
Formats a 3.5” HD floppy disk in Ms-Dos format for the exchanging of Midi-files. The
formatted disk has a capacity of 1.44 Megabytes.
The procedure is identical to the one described above.
Format Ms-Dos/Atari (720 Kb)
Formats a 3.5” DD floppy disk in Ms-Dos/Atari double density format, for the exchanging of
Midi-files. The formatted disk has a capacity of 720 Kb.
The procedure is identical to the one described above (you are however prompted to insert
a 3.5” DD floppy disk).
Change disk name
Procedure to change the name of a disk.
1. Insert the floppy disk (in “work” format, S Series disk) whose name you want to change.
2. Select “Change disk name”.
3. Enter the new name and confirm.
Load standard Midi-file
Loads a Midi-file from Ms-Dos (3.5” HD) or Ms-Dos/Atari (3,5” DD) floppy disks.
1. Select “Load standard Midi-file”.
2. Insert the floppy disk and press ENTER. The directory of the MIDI-files on the floppy disk is
displayed:
3. Select the “.MID” file to load and confirm . ❉
Directory of the Bank/Songs contained in memory.
4. Select a memory destination for the Midi-file and confirm.
5. The Midi-file is converted into a standard S Series Song. A new Bank with only Performance 1 and standard settings, is created.
❉ The following two elements may appear in the display of an Ms-Dos or Ms-Dos/Atari
floppy disk:
symbol ‘ ’ Sub-directory of the floppy disk. This may contain other Midi-files. Access the
sub-directory by selecting it and pressing ENTER.
‘back’ command Returns from a sub-directory to the main directory.
Save standard Midi-file
Saves a Song in Midi-file format. You will need a 3,5” HD disk in Ms-Dos format or a 3,5” DD
disk in Ms-dos/Atari format.
1. Select “Save standard Midi-file”.
(11) Disk
217
2. Insert the floppy disk and press ENTER. The directory of the Songs in the memory is displayed:
3. Select the Song to convert into a Midi-file and confirm.
Directory of the Ms-Dos or Ms-Dos/Atari floppy disk.
4. Select “New” to create a new file on the disk:
5. Assign a name to the Midi-file and confirm.
Suggestion: Instead of selecting “New”, you can select the name of an existing Midi-file
and press ENTER. The Midi-file is replaced by a new Midi-file originating from the conversion
of the selected Song.
218
REFERENCE GUIDE
Possible error messages during disk operations
Errors which occur during disk operations may be caused by incorrect procedures,
interference with other functions in current use on the instrument (edit of a Sound
or Effect), by a bad quality floppy disk or insufficient memory space.
Errors common to all operations
Ram-disk not installed.
Disk not inserted. Insert the floppy disk and repeat the operation.
The disk was removed during an operation, The operation has been interrupted. Insert the
floppy disk and repeat the operation.
The disk is protected. Remove the protection and repeat the operation.
Load errors
Insufficient memory space. It is not possible to complete the procedure.
Sound currently in edit. It is not possible to load a new Sound Library. Escape from Sound
Edit.
Effect currently in edit. It is not possible to load a new Effect Library. Escape from Effect
Edit.
Load and Erase Errors
No Setup is present on the disk.
No Bank/Songs are present on the disk.
No User Programs on the disk.
(11) Disk
219
Notes and suggestions
Formats of the magnetic supports used
3,5 HD
1,62 Mb “work disk” format . To save and/or load S Series data (Bank/Song, Setup, User
Program).
1,44 Mb Ms-Dos format. To save and/or load Midi File to exchange with an Ms-dos computer (also Macintosh or Amiga).
3,5 DD
720 kb Ms-Dos/Atari format. To save and/or load Midi Files to exchange with an Atari ST/TT/
Falcon or Ms-Dos computer (also Macintosh or Amiga).
floppy disk write protection You will find instructions for the disk write protection
procedure on the disk packing. Floppy disks are protected when the small window in the
corner is open; they are unprotected when the tab covers the window:
Unprotected
Protected
Structure of Ms-Dos Disks Ms-Dos disks are organised in directories and sub-directories.
Files can be stored in both the main directory (root or disk) or in the sub-directories. The
following illustration gives an idea of this structure:
files
sub-directories
disk
Using Ms-Dos Disks with Macintosh and Amiga Macintosh and Amiga apparatus can
read and write on Ms-Dos floppy disks. Apple computers use a programme called Apple File
Exchange™, which allows you to read and write files on this type of floppy disk; we
recommend the use of more practical programmes, such as AccessPC™, DosMounter™ or
PC Exchange™. Commodore computers can read Ms-Dos disks thanks to the programme
Dos2Dos™.
Storing floppy disks There are a number of rules to follow to avoid damaging your floppy
disks and losing data.
- Keep the disks in a dry, dust-free place which is not subject to extreme temperatures.
- Do not touch the magnetic disk (the part of the disk covered by the metal protection
shutter).
- Never remove the disk from the drive while the disk drive led is on.
- Label disks with the name and the data contained.
- Store your disks in the special disk containers available in any computer store.
- Do not layer labels and do not insert your disk in the driver if the label is torn or partially
unglued.
Erasing speed Remember that the Erase All operation is always faster than the individual
Erase operations. While Erase All cancels the disk directory (FAT), Erase All Bank/Song
cancels all the Bank/Songs and relative Performances.
220
REFERENCE GUIDE
12 SOUND LIBRARY
The Sound Library is where the Sounds are stored. Organised in family groups with
a simple “search” system available, finding and selecting Sounds is a simple task.
A Sound Library can be saved and loaded as a Setup-Sound Library. The standard
Sound Library has 518 Rom-Sounds. Customised Sound Libraries also include the
Ram-Sounds (Sound with the symbol ).
You can load Ram-Sounds from standard disks available on the market or create
them in EDIT SOUND . Thanks to the Sample Translator you can enrich the Sound
Library with Sounds containing samples loaded from disk or received via Midi
(Ram-Sound with symbol “ ”).
The Sounds are organised almost completely according to General Midi standards,
with the exception of the Family “Special FX” which is replaced by the
“Drumkits”. You can remap the Sounds in the Sound Library so that the Program
Changes and Bank Select numbers coincide with the sound mappings of other
instruments.
How the Sound Library is organised
•
The Sounds are organised in 16 Families, each consisting of 8 Program Changes
(16x8 = 128).
•
Each Program Change can belong to 16 “sound banks” (Bank Select 1...16).
ProgramChange
BankSelect
“Program Change 26 of the Sound Bank 2”
The Rom-Sound map listed in Family groups appears in the Appendix.
The Sound Library display
Sound
Date of creation/
last modification
ProgramChange
Family
BankSelect
Family selector
Commands
Selecting Families and Sounds
1. Select the Family with the
MULTIFUNCTION BUTTONS .
2. Select the Sound by rotating the
3. Press
ENTER
DIAL ,
or with the +1/> and -1/< buttons.
to assign the Sound selected to the currently selected track.
Step 1 can be skipped, but the search time will be longer.
(12) Sound Library
221
Selecting Sounds by entering the Program Change and Bank
Select number
1. Enter (a) the Program Change number, (b) the dash, (c) the Bank Select number.
2. Confirm your entries by pressing
3. Press
ENTER
ENTER .
again to assign the Sound selected to the currently selected track.
Selecting Sounds with the search function
The “Search” function allows you to search for a Sound by specifying some of the
characters in the name.
1. Select “Search”. The following edit zone appears where you can enter the
characters:
2. Specify the first two or three letters of the Sound’s name and press
ENTER .
3. The cursor highlights a Sound. If it is not the sound you require, select “Search
Next” to repeat the search task. Continue pressing “Search Next” until the cursor
highlights the Sound you require.
4. Press
ENTER
to assign the Sound to the currently selected track.
Save the Performance to memorise the Sounds assigned to the tracks.
Commands/options
Search
A Sound searching procedure by specifying some of the first characters of a Sound’s name.
(S. previous paragraph).
Search Next
Repeats the search operation.
Mask
An option which allows specific types of Sound to be displayed by masking others, to
simplify the Sound viewing possibilities in the Sound Library.
1. Select “Mask”. A selection window opens showing three types of Sounds:
Rom Sounds The Sounds of the standard Sound Library; these can not be cancelled.
Ram Sounds The Sounds created by the user or loaded from disk (with the “Load”
command or the IMP.DISK or IMP.RAMD commands of the Sound Library); these are based on
the Rom Waveforms.
Ram
Sounds The Sounds created by the user or loaded from disk (with the “Load”
command or the IMP.DISK or IMP.RAMD commands of the Sound Library); these are based on
Waveforms created with Sample Translator.
2. Select the type of Sounds to visualise (with the sign √) and those to mask (without the
sign). Press ENTER to show or remove the sign √.
222
REFERENCE GUIDE
3. Select “Execute” with FUNCTION KEY D. The Sound Library display shows only the Sound type
selected . For example.
4. To return to the normal viewing mode (all Sounds) or to view other Sound types, repeat
steps (1), (2) and (3).
Move
Procedure to moves a Sound to a different location. The move reassigns a different Program
Change and Bank Select number to the Sound.
1. Select Sound to move.
2. Select the command “Move”. The current Sound Library in memory is displayed, showing
the empty locations as a string of dashes (-- -- -- --):
3. If necessary, you can change the name of the Sound (only Ram-Sound) with the “Name”
command.
4. Select the destination location for the Sound. For example.
5. Select “Store” to execute the move operation.
Problems you may encounter (with relative displayed warning):
The Move affects the Sound Patch. The Sound Patch (and Drumkits) consists of Sounds in
different locations. If you move a Sound that is used by a Sound Patch, the Sound Patch will
be altered. In such a case you must reprogramme the Sound Patch accordingly.
If you attempt to move to an occupied location. Select an empty location marked with
dashes (-- -- -- --).
Delete
Cancellation command of a Ram-Sound from the Sound Library. There are a number of
rules to bear in mind when cancelling a Sound:
• Rom-Sounds can not be cancelled;
• you can not cancel a Sound currently in edit;
• if you cancel a Sound utilised by a Sound Patch, the Sound Patch will be damaged.
1. Select the Sound to cancel.
2. Activate the “Delete” command.
Imp.disk
Use this command to import data from floppy disks. Loads a Ram-Sound from the Sound
Library contained in the floppy disk. The Sound becomes part of the Sound Library in the
memory.
1. Insert the floppy disk containing the Ram-Sound to import in the drive.
2. Select “Imp.disk”. The directory of the Ram-Sounds on the floppy disk is displayed:
(12) Sound Library
223
3. Select the Sound and select the “Import” command. The internal Sound Library is displayed showing the empty locations (-- -- -- --). Select an empty location in which to load
the Sound:
4. If necessary you can change the name of the imported Sound with the “Name” command.
5. You can also select a different location if necessary. Use the procedure you would use to
select a Sound.
6. Select the “Store” command to load the Sound to the location selected.
Imp.ramd
Imports Sound from a Ram-disk. Loads a Sound from the Sound Library contained in the
Ram-disk. The Sound becomes part of the Sound Library in the memory.
Follow the same procedure described for importing a Sound from floppy disk.
Types of Sounds and their identification symbols
Rom-Sound
Sound permanently resident in the Rom. These are not marked by any identification symbol.
Ram-Sound
User-created Sounds, based on the Waveforms resident in Rom. These are marked with a
small dot after the name ( ).
Ram
User-created Sounds based on Waveforms created with Sample Translator or contained in
Sound loaded from commercial floppy disks.
the Ram
Sound
Sound Patch and Drumkit
224
REFERENCE GUIDE
Combinations of Sounds of the types described above. These are identified by the symbol
“ ” (or by the symbol “ ” if they are user-created).
13 EFFECTS LIBRARIES
The Effects Libraries are two archives for the Effects (one for each of the two
Digital Signal Processors, DSP). Library 1 contains the Reverbs and Library 2
contains the Modulations.
Library 1 Reverb.
Library 2 Delay, Chorus, Flanger, Phaser, Rotary, etc.
The Effects Libraries can be saved and loaded (always coupled) as an Effects
Libraries–Setup. The standard Effects Libraries have 24 Effects each. Customised
Effects Libraries can hold up to 64 Effects each.
The Effects can be edited by means of the
Effects Libraries displays.
EDIT EFFECT
tasks, accessed from the
The Effects are recalled by the Performances ( EDIT PERFORMANCE / CONTROL ) and
activated or deactivated for each track ( EDIT PERFORMANCE / TRACKS ).
Only the audio left and right outputs emit “wet” sounds. The Sounds emitted from
the other audio outputs is “dry”. The EFF . BYPASS button deactivates the DSPs (led
on).
How the Effects Libraries are organised
There are two pages, each containing a Library. Both pages have identical layouts
The Library name
List of Effects
Command column
Date of the last modification
Selecting the Effects
1. Access the Effects Libraries and select the page containing the Effect you wish
to select.
2. Select the Effect by rotating the
on the NUMERIC KEYPAD .
3. Press
ENTER
DIAL
or by specifying its corresponding number
to assign the Effect to the current Performance.
Save the Performance to memorise the assigned Effect.
(13) Effects Libraries
225
Command/options
Edit
Gains access to the EFFECT EDIT environment. The Effect with which you enter edit is is the
one highlighted by the cursor.
Move
Procedure to move the Effect to a different location within its own Library.
1. Select the Effect to move and press “Move”:
2. If necessary you can change the name of the Effect with the “Name” command.
3. Select an empty location, shown by the string of dashes (-- -- -- --).
4. Confirm the move by selecting “Store” command.
Delete
Cancels the Effect highlighted by the cursor.
Note: The Effects Libraries cannot be completely empty. At least one Effect must reside in
each Library.
Library 1 (standard)
0 Hall_1
1 Hall_2
2 Hall_3
3 St_Hall_1
4 St_Hall_2
5 St_Hall_3
6
7
8
9
10
11
Concert_1
Concert_2
Church_1
Vocal_1
Plate_1
Plate_2
12
13
14
15
16
17
SmallRoom 1
Med_Room 1
LargeRoom 1
LargeRoom 2
LargeRoom 3
Early1_1
18
19
20
21
22
23
Early2_1
Early3_1
Stereo1_1
Stereo2_1
Stereo3_1
Stereo4_1
6
7
8
9
10
11
Panecho_3
Dubbing_1
Chorus1_1
Chorus1_2
Chorus2_1
Chorus2_2
12
13
14
15
16
17
Flanger1_1
Flanger2_1
Phaser1_1
Phaser2_1
Phaser3_1
Ensemble_1
18
19
20
21
22
23
Rotary1_1
Rotary2_1
Fladel_1
Panmix_1
Panmix_2
Panmix_3
Library 2 (standard)
0
1
2
3
4
5
Delay1_1
Delay1_2
Delay2_1
Delay2_2
Panecho_1
Panecho_2
226
REFERENCE GUIDE
14 EDIT EFFECT
How to access the EFFECT EDIT
1. Select the Effect to modify in the effects libraries.
2. Press “Edit”.
How to escape from the EFFECT EDIT
Select “Save” (saves your edits) or “Abort” (cancels your edits).
How the EDIT EFFECT environment is organised
Effect in edit
Parameters
Commands column
Parameters
The parameters change according to the type of effect being edited (“Effect Type”).
Save
Saves the modifications made to the Effect.
1. Select “Save”. The list of Effects is shown, with the original Effect selected:
2. You can overwrite the original Effect or select an empty location, shown by the string of
dashes (-- -- -- --).
3. Press “Store” to confirm the save operation.
Abort
Cancels the modifications and escapes from edit mode.
(14) Edit Effect
227
How to Programme the Effects of Library 1
Library 1 contains Reverbs with or without programmable early-reflections.
Programmable early-reflections permit the best determination of the position of the
sound source with respect to the wall, specifying the quantity of the initial reflections (early reflections) before the reverb halo.
Reverbs without programmable early-reflections
Effect type
Effect type – simulates a “room”.
Value range: Hall1, Hall2*, Concert Hall*, Church, Vocal, Plate, Small Room, Medium Room,
Large Room*.
*The reverbs identified by the asterisk are pseudo-stereophonic. They are effective only on
the Stereo Left+Right outputs, or Head Phones.
Level
General level of the effect.
Value range: 0 (-63.50 dB) ... 127 (0.0 dB).
Delay
Reverb delay. Determines the position of the sound source with respect to the “wall”. A
longer delay corresponds to a greater distance from the “wall”.
Value range: 0 ... 99 ms.
H.F. Decay
“High Frequency Decay”, decay of the high frequencies, or “attenuation”. Determines the
reflection capacity of the walls. Walls with a low reflecting capacity have a greater decay
velocity (major attenuation).
This parameter is a dynamic filter. Low values correspond to greater attenuation.
Value range: 0 [Bypass], 1 [1 khz] ... 10 [16 khz].
Reverb time
Duration of the Reverb. Determines the size of the “room”. The longer the reverb time the
greater the dimensions of the “room”.
Value range: 1 [0.1 sec] ... 100 [10 sec].
Filter type
Type of equalisation (High Pass or Low Pass). This is associated to the next parameter.
Filter frequency
Equalisation frequency (associated to the previous parameter).
Value range: 0 [Bypass], 1 [0.1 khz] ... 13 [16 khz].
Reverbs with programmable early-reflections
Effects type
Type of effect, simulates a “room”.
Value range: Early1, Early2, Early3*, Stereo1*, Stereo2*, Stereo3*, Stereo4*.
*The reverbs identified by an asterisk are pseudo-stereophonic. They affect only the Stereo
Left+Right outputs or Head Phones.
Level
General level of the effect.
Value range: 0 (-63.50 dB) ... 127 (0.0 dB).
Room size
Size of the “room”.
Value range: 0 ... 64.
Reverb without programmable early-reflections
228
REFERENCE GUIDE
Reverb with programmable early-reflections
Attenuation
Reverb attenuation.
Value range: 0 [-63.50 dB] ... 127 [0.0 dB].
Diffusion
Diffusion. Inserts a halo in the final part of the reverb.
Value range: 0 ... 60.
Filter type
Filter frequency
Type of equalisation (High Pass or Low Pass). This is associated to the next parameter.
Equalisation frequency (associated to the previous parameter).
Value range: 0 [Bypass], 1 [0.1 khz] ... 13 [16 khz].
How to Programme the Effects of Library 2
Library 2 contains the modulations (different types of Delay, Chorus, Flanger,
Phaser, Rotary).
Delay, Panecho, Dubbing
Effect Type
Type of Delay/Panecho/Dubbing.
Value range: Delay1, Delay2, PanEcho, Dubbing.
Level
Level of the effect.
Value range: 0 [-63.50 dB] ... 127 [0.0 dB].
Feedback gain
Number of repetitions. With a “Delay” time of 510 ms and this parameter set to 99% the total
duration of the effect is 11 seconds.
Value range: 0 [4%] ... 14 [99%].
Delay
Determines the time lapse between repetitions.
Value range: 0 ... 510 ms.
Filter
Dynamic equalisation. The high frequencies are gradually attenuated with each repetition.
High values correspond to slower timbric changes.
Value range: 0 [Bypass], 1 [0.1 khz] ... 12 [16 khz].
Chorus
Effect type
Type of Chorus. “Chorus2” is pseudo-stereophonic and affects only the stereophonic audio
Left+Right outputs.
Value range: Chorus1, Chorus2.
Level
Level of the effect.
Value range: 0 [-63.50 dB] ... 127 [0.0 dB].
Delay, Panecho, Dubbing
Chorus
(14) Edit Effect
229
Frequency modulation
Modulation speed of Chorus.
Value range: 0 [0.3 khz] ... 28 [6.0 khz].
Depth
Modulation depth.
Value range: 0 [-63.50 dB] ... 127 [0.0 dB].
Filter
Static equalisation. Modifies the high frequencies, which modify the timbric quality of
Chorus.
Value range: 0 [Bypass], 1 [0.1 khz] ... 12 [16 khz].
Flanger
Effect type
Type of Flanger. “Flanger2” is pseudo-stereophonic and affects only the stereophonic audio
Left+Right outputs.
Value range: Flanger1, Flanger2.
Level
Flanger level.
Value range: 0 [-63.50 dB] ... 127 [0.0 dB].
Feedback
Automodulation of the Flanger. Enriches the harmonic content of the effect.
Value range: 0 [0%] ... 17 [96%].
Depth
Modulation depth.
Value range: 0 [-63.50 dB] ... 127 [0.0 dB].
Frequency modulation
Modulation speed of the Flanger.
Value range: 0 [0.3 khz] ... 28 [6.0 khz].
Initial delay
Determines the initial delay before the Flanger begins to affect the sound.
Value range: 0 ... 30 ms.
Phaser, Ensemble
Effect type
Type of Phaser/Ensemble. The effects identified with an asterisk (*) are pseudo-stereophonic, and affect only the Stereo Left-Right outputs.
Value range: Phaser1, Phaser2*, Phaser3*, Ensemble*.
Level
Level of the effect.
Value range: 0 [-63.50 dB] ... 127 [0.0 dB].
Feedback
Automodulation of the Phaser/Ensemble. Enriches the harmonic content of the effect.
Value range: 0 [0%] ... 17 [96%].
Depth
Modulation depth.
Value range: 0 [-63.50 dB] ... 127 [0.0 dB].
Frequency modulation
Modulation speed of Phaser/Ensemble.
Value range: 0 [0.3 khz] ... 28 [6.0 khz].
Flanger
230
Phaser, Ensemble
REFERENCE GUIDE
Rotary
Effect type
Type of Rotary. Rotary is always pseudo-stereophonic and affects only the Stereo
Left+Right outputs.
Value range: Rotary1, Rotary2.
Level
Level of the effect.
Value range: 0 [-63.50 dB] ... 127 [0.0 dB].
Feedback
Automodulation of the Rotary. Enriches the harmonic contents of the effect.
Value range: 0 [0%] ... 17 [96%].
Speed
Determines the time required to pass from slow to fast or vice versa (check it by pressing
FUNCTION SELECT KEY D).
Value range: 0 [0.6 sec] ... 30 [9.6 sec].
Filter
Static equalisation. Attenuates the high frequencies, modifying the timbric quality of the
effect.
Value range: 0 [Bypass], 1 [0.1 khz] ... 12 [16 khz].
FUNCTION SELECT KEY D
Changes the initial direction of slow-fast vector. This parameter is useful during the edit
phase; during its execution the vector is established for each Performance in EDIT PERFORM ANCE /CONTROLS , page 2.
Fladel, Panmix
Effect type
Type of Fladel/Panmix. These effects are combinations of Flanger+Delay. Panmix is
pseudo-stereophonic and affects only the Stereophonic Left+Right outputs.
Value range: Fladel, Panmix.
Level
Level of the effect.
Value range: 0 [-63.50 dB] ... 127 [0.0 dB].
Delay
The time that elapses between one repetition and the next.
Value range: 0 ... 510.
Depth
Modulation depth of Flanger.
Value range: 0 [-63.00 dB] ... 127 [0.0 dB].
Frequency modulation
Modulation speed of the Flanger.
Value range: 0 [0.3 khz] ... 28 [6.0 khz].
Rotary
Fladel, Panmix
(14) Edit Effect
231
Notes and suggestions
Reverb Reverberation consists of a series of “waves”, called reflections, which comprise
early-reflections and tail reflections. In the diagram, the early reflections are shown by the
letters a and b while the tail reflections are between c and d:
y = Amplitude
a
b
c
d
x, y = 0
x = Time
The DSP1 of the S Series can operate in two different ways:
• by keeping the distance that separates the early reflections constant, from point x=0 to
point c (reverbs with non- programmable ER);
• by varying the distances that separate the early reflections (reverbs with programmable
ER).
In the reverberation with programmable ER, the distance between x=0 and a is determined
by the “Room Size” parameter. The distance between points c and d is determined by the
“Diffusion” parameter. The harmonic quality of the reflections is obtained by combining the
“Attenuation” parameter with the equalisation filter (“Filter type”, “Filter freq.”).
In reverberation with non-programmable ER, while the distance between points a and c is
fixed, it is possible to edit the distances between x=0 and a with the “Delay” parameters,
between c and d with the “Rev. time” parameter, and the harmonic quality of the reflections
with “H.F.Decay”, “Filter type” and “Filter freq.”.
Types of reverbs In all effect processors (DSP), reverberation has standard names which
indicate the type of “room” simulated (Hall, Room, Concert...). The following is a description of the characteristics of the S Series reverbs:
Hall1, Hall2, Concert
Concert hall.
Small Room, Medium Room,
Large Room
Recording rooms of progressively larger dimension, respectively.
Vocal
Vocal recording rooms with extremely attenuated reflections.
Church
Cathedral with a high number of reflections.
Plate
Imitation of a plate reverberation consisting of an oscillating metal plate that was very
popular in the past.
Types of modulation DSP2 can produce standard and very different special effects. Here
is a description of the different modulations that can be obtained with the “non standard”
modulations shown in italics:
Delay
Repetition of the sound, with decreasing intensity and gradual diminishing of the high
frequencies.
Panecho
Delay with alternating repetitions between the two stereo channels.
Dubbing
Delay with repetitions on only one stereo channel.
Chorus
Duplication of the sound and phasing between the two components. Produces a multiplication of the sound sources, as occurs in an orchestra section, creating a softer sound.
232
REFERENCE GUIDE
Flanger
Similar to Chorus, dynamically enriches and reduces the harmonic content of the sound.
Phaser
Similar to Flanger, but with a faster modulation.
Ensemble
Similar to Phaser, accentuates the sensation of multiplication of the sound sources.
Rotary
Simulates the rotating speakers featured by many electric organs. The rotation speed varies
dynamically from slow to fast.
Fladel
Combination of Flanger+Delay.
Panmix
Similar to the previous, but pseudo-stereophonic and with double speed.
(14) Edit Effect
233
15 CLIPBOARD
In EDIT PERFORMANCE / CONTROLS , EDIT PERFORMANCE / TRACKS , EDIT SOUND and EDIT EFFECT
you can “copy” a page of parameter settings and place the copy in the Clipboard.
The Clipboard has six locations. It can be saved or loaded as a Clipboard-Setup.
The Clipboard is particularly useful for the creation of four-pole Filters in EDIT
SOUND (s.). To create a filter of this kind you must copy the pages of Filter 1
(programming, envelope) to the corresponding pages of Filter 2.
Layout of the “Clipboard” page
Active section
Element in edit
Active page
Comands/options
How to copy an edit page
1. Go to the edit page to copy.
2. Press the
CLIPBOARD
button. to activate the Clipboard display.
3. Select one of the six Clipboard locations. Press “Save” to memorise the current
edit page in the Clipboard.
4. The page is memorised as “clipXX” (where XX is a number from 01 to 06). You
can change the number with the command “Name”.
5. Return to the
to escape.
EDIT
by pressing the button relating to the edit section or press
How to copy a clip to an edit page
1. Go to the edit page to which you want to copy the clip.
2. Press
CLIPBOARD .
The Clipboard page is displayed.
3. Select the clip to copy.
4. To copy the clip to the current edit page, press “Move” (the clip is removed
from the Clipboard) or “Copy” (the clip remains in the Clipboard).
The Clipboard closes automatically after selecting “Move” or “Copy”.
How to cancel a clip from the Clipboard
1. Select the clip to cancel.
2. Press “Delete”.
234
REFERENCE GUIDE
EXIT
16 UTILITY
The UTILITY section includes functions to rename, erase and copy Bank/Songs and
Performances. It also contains the function to cancel the Clipboard–Setup from the
internal memory.
“Juke_box”
This command chains the Song stored in the memory without interruptions, starting
from the currently selected Song.
Press
STOP
to stop the playback.
Note: << and >> interrupt the Juke_Box; the sequencer stops when the Song currently playing ends.
Important: If a Song incorporates a “Song Loop” ( EDIT SONG , “Utility” editor which
repeats some bars), the “Juke–box” function is, in practice, terminated by the
execution of the repeating section of the Song.
Utility
Bank/Song name
Changes the name of the Bank/Song selected.
1. Select the Bank/Song.
2. Access UTILITY and select the “Bank/Song name” function:
3. Change the name and confirm.
Performance name
Changes the name of the Performance selected.
1. Select the Performance.
2. Enter Utility and select the “Performance name” function:
3. Change the name and confirm.
Delete Bank/Song
Cancels the Bank/Song selected.
Delete Performance
Cancels the Performance selected.
Delete Clipboard
Cancels the Clipboard–Setup.
Utility
(16) Utility
235
Copy Bank/Song
Copies the Bank/Song selected to another Bank/Song (both the Performance Bank and the
Song).
1. Select the Bank/Song to copy.
2. Select the “Copy Bank/Song” function:
3. Select a location in which to copy the Bank/Song. If the location selected is not empty, the
previous Bank/Song is replaced by the Bank/Song you are copying.
4. Confirm your selection. You can change the name of the Bank/Song copy:
5. Confirm the operation. The Bank and Song are copied.
Suggestion: Make a copy of a Song that you are about to edit radically. This will allow you
to compare the two versions of the Song and choose the best Song.
Copy Performance
Copies the Performance selected to the same Bank/Song or to another Bank/Song.
1. Select the Performance to copy.
2. Select the “Copy Performance” function. The directory of the Bank/Songs in the memory is
displayed:
3. Select the Bank/Song to which you wish to copy the Performance. Confirm the Bank/Song.
The list of Performances is displayed:
4. Select a location to which to copy the Performance. If the location is not empty, the
previous Performance is replaced.
5. Confirm your selection. You can change the name of the Performance copy:
6. Confirm the operation. The Performance is copied.
236
REFERENCE GUIDE
17 PRELOAD
The Auto-Preload function is not
operative when a Sound or an
Effect is currently in edit.
Preload is a background loading facility which permits the loading of a Bank/Song
while the sequencer is in playback mode (Song play). By choosing an appropriate
option, the Song loaded can also take with it the associated Sound Library and
Effects Libraries (with the “Auto” option active).
If the “Auto” option is deactivated, the Preload function is equivalent to a highspeed version of the “Load Single Bank/Song” operation (some of the steps that are
performed in the normal loading mode are eliminated).
With the “Auto” option selected, the current Sound Library and the Effects Libraries in memory are replaced by those associated to the Song being loaded (if they
differ to those already present). The current Bank/Songs present in memory are also
cancelled (only the Preloaded Bank/Song remains).
For example, after powering up, play the Demo Song resident in memory. While the
Song is playing, Preload the Song contained in Demo Disk 01, with the “Auto”
option active. The default Sound Library and the Effects Libraries are replaced with
the corresponding Setups contained in Demo Disk 01.
1. While a Song is playing, press the
PRELOAD
button. The disk Bank/Song direc-
tory is displayed:
If no disk is inserted, an error message is shown:
If the R AM -disk is installed, the Bank/Song directory contained in the R AM -disk
is displayed:
2. If necessary, select a different Group of Bank/Songs, by pressing repeatedly the
function key corresponding to the selected disk (S. Disk).
3. Activate or deactivate the “Auto” option.
4. Select a Bank/Song to load and confirm.
5. If “Auto” is not selected, select a destination Bank/Song in memory (you can
also select the Bank/Song of the Song currently in playback - in this case, the
Song will stop playing):
(17) Preload
237
6. Confirm the Preload operation and, depending on the selected Preloading status,
the following will occur:
• If the “Auto” option is not selected the Bank/Song being preloaded will be
loaded to the selected destination. If the destination is already occupied, the old
Bank/Song will be replaced by the one being loaded. If you choose to replace
the Song in playback, it will stop playing.
• If the “Auto” option is selected, the Bank/Song will be loaded to B/S location
1 or 2 ( B/S 1 will be picked if the Song in playback belongs to the B/S from 2 10; otherwise B/S 2 if Song 1 is playing or if only one Song is present in
memory).
The Sound Library and Effects Libraries setups are loaded but do not substitute
the old Setups until the Song in playback stops playing. If the total dimensions
of the Setups in memory and those to load exceed 2 Megabytes (the dimensions
of the Sample-Ram), the samples present in memory (contained in the Ram
Sounds) must be replaced, and the instrument requests confirmation before
proceeding:
238
REFERENCE GUIDE
APPENDIX
❏
MIDI
- MIDI Implementation Chart
- MIDI Messages / MIDI Controllers
- MIDI System Exclusive Code Interface
❏
ROM-WAVEFORMS, SOUNDS, PERFORMANCES
❏
DRUMKITS & PERCUSSION SAMPLES
❏
TECHNICAL SPECIFICATIONS
MIDI
i
II
APPENDIX
MIDI IMPLEMENTATION CHART,
MIDI CONTROLLERS,
SYSTEM EXCLUSIVE
MIDI
iii
MIDI IMPLEMENTATION CHART
DATE: 25.10.1993
MIDI IMPLEMENTATION CHART
Function
MODEL S2/S3/S2R
Transmitted
Recognised
VERSION: 1.0
Remarks
Basic
Channel
Default
Changed
Mode
Default
Messages
Altered
MULTI MODE
X
X
MULTI MODE
X
X
FOR MIDI:
SINGLE MODE can be
memorized
0 – 127
*******
0 – 127
True Voice
TRUE VOICE:
depends on selected sounds
Velocity
Note ON
Note OFF
O
O
O
O
After Touch
Key’s
Ch’s
O
O
O
O
O
O
Note
Number
Pitch Bend
2 MIDI IN/OUT/THRU
EXTRA COMMON CH.
MIDI COMMON CHANNEL:
7 MAIN VOLUME 4MASTER7
21 EFF.1 NUMBER 0 ~ 63
22 EFF.2 NUMBER 0 ~ 63
23 EFF.1 VOLUME
24 EFF.2 VOLUME
90 ROTARY SLOW/FAST
MIDI Common Channel also
receives Aftertouch,
Modulation (Cntrl.1) and
Damper (Cntrl.64) messages
and assigns them to all active
tracks.
OTHER CHANNELS:
CONTROL 0 TO 31
0 EXTEND.PR.CH.
Balance (Cntrl.8) only affects
CONTROL 64 TO 79
BANK SELECT Dual Oscillator Sounds.
1 MODULATION
Control Change
7 VOLUME
8 BALANCE
10 PANORAMA
12 ATTACK TIME
13 RELEASE TIME
14 FILT.1 CUT. FREQ.
15 FILT.2 CUT. FREQ.
20 FILT. 1+2 CUT. FREQ.
64 DAMPER PEDAL
66 SOSTENUTO
67 SOFT PEDAL
Program
Change
0 – 127 / 0 – 99*
*******
0 – 127 / 0 – 99*
System Exclusive
O
O
System
Common
:Song Pos
:Song Sel
:Tune
O
X
X
O
X
X
System
Real/Time
:Clock
:Commands
O
O
O
O
:Local On/Off
:All Notes Off
:Active Sens
:Reset
X
O
O
X
X
O
O
X
Aux Messages
Notes
IV
APPENDIX
True
Number
*
PERFORMANCE / SONG CHANGE
ON COMMON CHANNEL
MIDI MESSAGES / MIDI CONTROLLERS
The M IDI messages transmitted and received by the S Series (and by the more
recent M IDI instruments) are:
NOTE : Note data, consisting of four values: note name, velocity on, velocity
off, gate (note duration).
PITCH BEND : Lowering or highering of the pitch, sent by a dedicated controller
(e.g. a Wheel).
M ONO TOUCH (or Channel Pressure): Pressure applied to a key after playing
the note (key on). Applying pressure to one note affects all the notes of the
same Midi channel.
Poly Touch (or Poly Pressure): Pressure applied to a key after playing the
note (key on). Applies to the note playing and does not affect other notes
being played. It consists of two values: note on which the pressure is applied,
the intensity of the pressure applied.
Program Change: Sound selecting data.
Control Change: Various messages which control single Sound parameters
(volume, pan) or the overall setting of the instrument (All note off, Omni mode
on, Reset).
A Control Change message activates a M IDI Controller, a series of software
controls of the sound. The Control Change message consists of two numerical parts: (n1) the number which determines the activation of the Midi
Controller, (n2) the value of the M IDI Controller:
Control Change, n1, n2
The following table lists all the Midi Controllers in numerical order. Next to
the decimal number of the Controller is the name of the function that is
controlled. Controllers 0 … 31 are “continuous” controls, which affect a
parameter for the duration that they are applied. Controllers 64 … 127 are
“switch action” controllers, which remain active until the Controller is
applied again.
Controllers 32 … 63 are the LSB (Least Significant Byte) part of the message
transmitted by the Controllers 0 … 31 (which are the part MSB (Most
significant Byte). The coupling between the MSB and LSB takes place
without user intervention.
Some Midi Controllers, coded as “unused” in the Midi protocol standard,
have been utilized by the S Series as specific controllers which permit the
modification via Midi of some of the S Series Sound parameters (Attack,
Release, Filters, Effects). The function implemented in the S Series is shown
in square brackets [ ].
Messages shown in grey affect the S Series sound generation. Messages
identified by an asterisk (*) travel on the Midi-Comon Out channel and not
on the channel assigned to the track.
(00) Control 0 / BankSelect
(01) Modulation
(02) Breath
(03) Control 3
(04) Foot Controller
(05) Portamento Time
(06) Data Entry
(07) Main Volume
(08) Balance [Osc 1/2]
(09) Control 9
(10) Panorama
(11) Expression
(12) [Attack]
(13) [Release]
(14) [Filter 1 Cutoff]
(15) [Filter 2 Cutoff]
(16) Gen. purp. control. 1
(17) Gen. purp. control. 2
(18) Gen. purp. control. 3
(19) Gen. purp. control. 4
(20) [Filters 1+2 Cutoff]
(21) Effect 1 number*
(22) Effect 2 number*
(23) Effect 1 volume*
(24) Effect 2 volume*
(25 ... 31) Controls 25 ... 31
(32 ... 63) LSB Cntrl 0 ... 31
(64) Damper
(65) Portamento
(66) Sostenuto
(67) Soft Pedal
(68) Control 68
(69) Hold 2
(70 ... 79) Controls 70 ... 79
(80) Gen. purp. control. 5
(81) Gen. purp. control. 6
(82) Gen. purp. control. 7
(83) Gen. purp. control. 8
(84 ... 89) Controls 84 ... 89
(90) Rotary slow/fast*
(91) External Effect Depth
(92) Tremolo Depth
(93) Chorus Depth
(94) Celeste Depth / Detune
(95) Phaser Depth
(96) Data increment
(97) Data decrement
(98) Non-Reg.Par.Num.(LSB)
(99) Non-Reg.Par.Num.(MSB)
(100) Reg.Par.Num. (LSB)
(101) Reg.Par.Num. (MSB)
(102...120) Controls 102...120
(121) Reset control
(122) Local control
(123) All Note off
(124) Omni Mode off
(125) Omni on
(126) Mono Mode on
(127) Poly Mode on
MIDI
v
MIDI SYSTEM EXCLUSIVE CODE INTERFACE
Introduction
MSECI (Midi System Exclusive Code Interface) is a
tool which permits a full operational interface with
other devices (Host computer, other GENERALMUSIC
device, etc.).
The user can access many resources contained in
GENERALMUSIC devices (files, edit structures, global structures).
3) Device Commands
In this part you will find commands for a general access
to the internal system.
The use of these commands is a valid alternative for
internal file access and their use is recommended.
This is an example of a general MSECI string:
F0
midi system exclusive identifier
MSECI permits the programmer to write software for
many features, such as Machine Backup, Host Edit
Interface, etc..
2F
GENERAL MUSIC exclusive code
fc
f = function number (0-7) c=channel(0-F)
ss
ss = subfunction (0-6F, 70-7F reserved)
An expert programmer with a good knowledge of the
uses of MSECI can write an excellent software for the
complete control of GENERALMUSIC devices.
rc
rc = request channel(0-F)
Communications are achieved using MMA standard similar protocol.
In this document, all software examples are written in C
language and the italic characters are identifiers defined
in include files.
General Overview
MSECI consists of three parts:
1) File Functions
Here you will find the commands for a low level internal
file access.
The use of these commands are recommended for expert
programmers, because their incorrect use can damage
the internal file structure. However, File Functions aren’t
often useful.
..
..
data
..
cc
cc=checksum if implemented
F7
end midi system exclusive
MSECI also includes a series of HANDSHAKE commands.
A special conversion mode, from 8 bit to 7 bit MIDI
data, is used for binary data transmission, in which 7
real bytes are converted to 8 MIDI bytes, known as an
OCTECT (fig.1,ex.1,ex.2).
When the above conversion is performed in reverse, the
receiving algorithm must be written with care, because
the data packet is a finite number of octects and the
number of received bytes can be more than the real bytes
transmitted, therefore, the receiver must refer to the
data header for the exact number of bytes.
The function and subfunction identifiers are defined in
the include file “sys_id.h”.
2) Edit Functions
Here you will find the commands to access internal data
structures which can be edited.
To write a software program which performs external
editing functions, the programmer must be acquainted
with the specific internal edit structures, which can
differ from one GENERALMUSIC device to another.
Fig. 1: 8 to 7 bit conversion
VI
APPENDIX
Example 1: 8 to 7 bit conversion
12 45 F7 A3 53 B0 3A—conv8_7 —> 09 22 7F 51 29 58 1D 1E
(7 bytes)
(8 bytes)
FILE
FUNCTIONS
FILE_F
F_DHDR
void conv8_7 ( dest, src )
FILE DUMP HEADER
unsigned char *dest, *src;
F0 2F 0c 01 oc <file name> ff <info> <location> cc F7
{
c = channel (0-F)
int i;
oc = own channel (0-F)
unsigned char accum = 0;
file name = 8 chars file name + 3 chars extension
ff = flags
for (i=0; i<7; i++)
{
info = 2 octects = 16 bytes of bynary info time/date/length/
instrument ID/file id
accum |= ((*src & 0x1) << i);
location = 1 up 80 chars string NULL terminate
*dest++ = (*src++ >> 1);
cc = checksum (xor of all bytes from 2F)
}
*dest = accum;
}
Example 2: 7 to 8 bit conversion
void conv7_8 (dest, src)
char *dest, *src;
{
int i;
After the receiver has received the header, the _WAIT
command is sent back and the checksum test is then
performed; if the checksum test fails, the receiver sends
back a NACK command and the host must repeat the
header transmission. If the test is ‘ok’, the receiver sends
back an ACK command and the host can then send the
next packet.
When the receiver has performed the <info> with conversion (conv7_8), the result is an 14 byte structure, as shown
in ex. 3 below.
char bit8 = src [7];
for (i = 7; i > 0; i—, bit8 >>= 1)
*dest++ = (*src++ << 1) + (bit8 & 1);
}
Example: 3 INFO structure
typedef struct
{
Handshake Commands
F0 2F fc ss hh oc F7
f = function number (0-7)
c = channel(0-F)
ss = subfunction (0-6F, 70-7F reserved)
hh = 7F = ACK (ok or go on)
7E = NACK (not ok, repeat last)
7D = CANCEL (abort operation)
short
Time;
short
Date;
long
Length;
char
DeviceClass;
char
DeviceSubClass;
char
DeviceRelease;
char
FileType;
char
FileFormat;
char
FileRelease;
}INFO;
7C = _WAIT (wait for response)
oc = own channel(0-F)
MIDI
vii
FILE DUMP DATA BLOCK
F_DPKT
FILE DIRECTORY REQUEST
F0 2F 0c 02 oc oo <pkt> cc F7
F0 2F 0c 04 rc <dir name> <location> cc F7
c = channel (0-F)
c = channel (0-F)
oc = own channel (0-F)
rc = request channel (0-F)
oo = number of octects
dir name = 8 chars file name + 3 chars extension
pkt = binary data in octects
location = 1 up 80 chars string NULL terminate
cc = checksum (xor of all bytes from 2F)
cc = checksum (xor of all bytes from 2F)
After the receiver has received the data packet, the _WAIT
command is sent back and the checksum test is then
performed; if the checksum test fails, the receiver sends
back a NACK command and the host must repeat the
same data. If the test is ‘ok’, the receiver converts (conv7_8
ex.2) then sends back an ACK command and the host can
then send the next packet.
FILE ERROR
DIR_DRQ
F_ERR
F0 2F 0c 7B oc ee cc F7
c = channel (0-F)
oc = own channel (0-F)
ee = error number (0-7F) (ex. 4)
FILE DUMP REQUEST
F_DREQ
F0 2F 0c 03 rc <file name> <location> cc F7
Example 4: FILE ERROR IDENTIFIERS
c = channel (0-F)
enum {
rc = request channel (0-F)
file name = 8 chars file name + 3 chars extension
No_error,
location = 1 up 80 chars string NULL terminate
Job_invalid, Job_in_use, Operation_invalid,
cc = checksum (xor of all bytes from 2F)
Drive_invalid, Drive_no_write,
After the receiver has received the F_DREQ command,
the _WAIT command is sent back and the checksum test
is then performed; if the checksum test fails, the receiver
sends back a NACK command and the host must repeat
the command. If the test is ‘ok’, the receiver tries to open
the file. If an error occurs during this operation, an
F_ERR command is sent back, otherwise an F_DHDR is
sent back.
FILE DIRECTORY HEADER
DIR_HDR
F0 2F 0c 00 oc <dir name> ff <info> <location> cc F7
c = channel (0-F)
oc = own channel (0-F)
dir name = 8 chars file name + 3 chars extension
ff = flags
info = 2 octects = 16 bytes of bynary info time/date/length/
instrument ID/file id
location = 1 up 80 chars string NULL terminate
cc = checksum (xor of all bytes from 2F)
This command is used to send directory information.
VIII
APPENDIX
Media_invalid, Media_corrupt, Media_protected,
Media_full,
Media_not_inserted, Media_not_equal,
File_not_found, File_open, File_in_write, File_protected,
File_exists,
MFH_error
};
EDIT
FUNCTIONS
EDIT_F
EDIT PARAMETER
SEND+REQUEST
PAR_SND
F0 2F 2c 03 rc oo <data> cc F7
c = channel (0-F)
EDIT PARAMETER REQUEST
PAR_REQ
rc = request channel (0-F)
F0 2F 2c 02 rc oo <hdr> cc F7
c = channel (0-F)
data = 1st octect contains data header and the next contains
data parameters (ex. 5)
rc = request channel (0-F)
cc = checksum (xor of all bytes from 2F)
oo = octects number
oo = octects number = 1
When the device receives this command, after checking
for data errors or data range, it sends back the correct
data.
hdr = 1 octect of request header (ex. 5)
cc = checksum (xor of all bytes from 2F)
Example 5: EDIT HEADER (see “edt_ifc.h”)
typedef struct
EDIT EXECUTE
{
F0 2F 2c 05 rc oo <hdr> cc F7
uchar family,group,index,type ;
c = channel (0-F)
uchar nr_bytes,user_nr;
rc = request channel (0-F)
} EDT_IFC_HEAD;
EXECUTE
oo = octects number = 1
hdr = 1 octect of edit execute header (ex. 5)
Below is an example of a request parameter of the slot
“MOVE EVENTS” of the sequencer:
In many edit slots, the user must perform an execute
command to complete the edit.
EDT_ICF_HEAD hdr;
hdr.family = F _song;
/* see “edt_ifc.h” */
hdr.group = G_move;
/* see “s2_sequ.h”, or other
device’s include file*/
hdr.index = 0;
/* not used */
hdr.type = Group_data;
/* see ëdt_ifc.h”*/
hdr.nr_bytes = 0;
sponse */
/*used only for re-
hdr.user_nr = 0x7F;
cc = checksum (xor of all bytes from 2F)
/* not used */
For example, when we need to modify a sequence with a
MOVE operation, after we have edited the MOVE parameter we must perform an EXECUTE command.
EDIT UPDATE
_UPDATE
F0 2F 2c 06 ff gg oc F7
c = channel (0-F)
EDIT PARAMETER
ANSWER
PAR_ASW
ff = family
F0 2F 2c 04 rc oo <data> cc F7
oc = own channel. (0-F)
gg = group
c = channel (0-F)
rc = request channel (0-F)
oo = octects number
data = 1st octect contains data header and the next contains
data parameters (ex. 5)
When the receiver receives an _UPDATE command, it
must perform a PAR_REQ command to refresh the data.
cc = checksum (xor of all bytes from 2F)
MIDI
ix
DEVICE
COMMAND
DEVICE_CMD
UNPREPARE SOUND
ACCESS
UNPREPARE_soundAccess
F0 2F 5c 04 oc F7
STATUS REQUEST
STAT_REQUEST
c = channel (0-F)
oc = own channel. (0-F)
F0 2F 5c 00 oc F7
c = channel (0-F)
oc = own channel (0-F)
PREPARE BANK
ACCESS
PREPARE_bankAccess
F0 2F 5c 05 bb oc F7
c = channel (0-F)
STATUS ANSWER
STAT_ANSWER
F0 2F 5c 01 oc <data> cc F7
bb = bank
oc = own channel. (0-F)
c = channel oc = own channel.
<data> = 3 octets filled with the STAT structure
cc = checksum (xor of all byte from 2F)
UNPREPARE BANK
ACCESS
UNPREPARE_bankAccess
F0 2F 5c 06 bb oc F7
Example 6: STAT (see “sys_id.h”)
c = channel (0-F)
typedef struct
bb = bank
{
oc = own channel. (0-F)
unsigned char iClass,iSubClass,iRelease;
unsigned char dummy;
long
short
short
TotalMem,FreeMem,FreeSampleMem;
ReadyFor; /*bit0=Sound, bit1=Setup, bit2=Song/
perf*/
ActBankPerf;
} STAT;
PREPARE EFFECT
ACCESS
PREPARE_effectAccess
F0 2F 5c 07 oc F7
c = channel (0-F)
oc = own channel. (0-F)
BANK PERFORMANCE
CHANGE
BANK_PERF_CHG
c = channel (0-F)
UNPREPARE EFFECT
ACCESS
UNPREPARE_effectAcces
oc = own channel (0-F)
F0 2F 5c 08 oc F7
bb = bank
c = channel (0-F)
pp = performance.
oc = own channel. (0-F)
F0 2F 5c 02 oc bb pp F7
PREPARE SOUND
ACCESS
PREPARE_soundAccess
F0 2F 5c 03 oc F7
PREPARE GENERAL
ACCESS
PREPARE_generalAccess
c = channel (0-F)
F0 2F 5c 09 oc F7
oc = own channel.(0-F)
c = channel (0-F)
oc = own channel. (0-F)
X
APPENDIX
UNPREPARE GENERAL
ACCESS UNPREPARE_generalAccess
DATA DUMP
F0 2F 5c 0A oc F7
c = channel (0-F)
c = channel (0-F)
oc = own channel (0-F)
oc = own channel. (0-F)
oo = number of octects
DATA_DUMP
F0 2F 5c 0D oc oo <pkt> cc F7
pkt = binary data in octects
cc = checksum (xor of all bytes from 2F)
PREPARE STYLE
ACCESS
PREPARE_StyleAccess
F0 2F 5c 18 bb oc F7
c = channel (0-F)
bb = bank
oc = own channel. (0-F)
After the receiver has received the data packet, the _WAIT
command is sent back and the checksum test is then
performed; if the checksum test fails, the receiver sends
back a NACK command and the host must repeat the
same data. If the test is ‘ok’, the receiver converts (conv7_8
ex.2) then sends back an ACK command and the host can
then send the next packet.
UNPREPARE STYLE
ACCESS
UNPREPARE_StyleAccess
DELETE
F0 2F 5c 19 bb oc F7
c = channel (0-F)
c = channel (0-F)
oc = own channel (0-F)
bb = bank
dd = enum {Sound, Sample, Soundmap, Effect1, Effect2,
General, Song, Perf, Global, StylePerf, Realtime
Perf, Riff} (see “sys_id.h”)
oc = own channel. (0-F)
DELETE
F0 2F 5c 0E oc dd bb pp <file name> ck F7
bb = ASCI Bank number (used only on Song & Perf )
pp = ASCI Perf number (used only on Perf)
<file name > = 11 byte filename
DATA DUMP HEADER
DATA_HEADER
ck = checksum (xor of all byte from 2F)
F0 2F 5c 0C oc dd bb pp <file name1> f1 <inf1> <file name2>
ck F7
c = channel (0-F)
oc = own channel (0-F)
dd =
enum {Sound,Sample,Soundmap,Effect1,
Effect2,General,Song,Perf}
DIRECTORY REQUEST
DIR_REQUEST
F0 2F 5c 0F oc dd bb pp <file name1> ck F7
bb = ASCI Bank number (used only on Song & Perf )
c = channel (0-F)
pp = ASCI Perf number (used only on Perf)
oc = own channel (0-F)
<file name1> = 11 byte filename
dd = enum {Sound, Sample, Soundmap, Effect1, Effect2,
General, Song, Perf, Global, StylePerf, RealtimePerf, Riff}
f1 = file flags
<inf1> = 2 octects (time/date/length/instr.ID/file ID)
<file name2> = 11 byte filename (used only on Perf for song
name)
bb = ASCI Bank number (used only on Song & Perf )
ck = checksum (xor of all byte from 2F)
<file name > = 11 byte filename (wildcard)
pp = ASCI Perf number (used only on Perf)
ck = checksum (xor of all byte from 2F)
MIDI
xi
DIRECTORY ANSWER
DIR_ANSWER
MESSAGE SEND
MESSAGESEND
F0 2F 5c 10 oc dd bb pp <file name1> f1 <inf1> <file name2>
ck F7
F0 2F 5c 13 <message> oc ck F7
c = channel (0-F)
<message> = message string (asci) (see MIOS doc.)
oc = own channel (0-F)
oc = own channel. (0-F)
dd =
ck = checksum (xor of all byte from 2F)
enum {Sound,Sample,Soundmap,Effect1,
Effect2,General,Song,Perf, Global, StylePerf, RealtimePerf, Riff}
c = channel (0-F)
bb = ASCI Bank number (used only on Song & Perf )
<file name1> = 11 byte filename
MESSAGE
ANSWER
f1 = file flags
F0 2F 5c 11oc rr F7
<inf1> = 2 octects (time/date/length/instr.ID/file ID)
c = channel (0-F)
<file name2> = 11 byte filename (used only on Perf for song
name)
oc = own channel. (0-F)
pp = ASCI Perf number (used only on Perf)
MESSAGEANSWER
rr = return code (1-5)
ck = checksum (xor of all byte from 2F)
Must repeat for all the file and directory. At the end a
cancel is send for terminate dump.
ENABLE EDIT
UPDATE
ENABLEEDITUPDATE
F0 2F 5c 15 oc F7
c = channel (0-F)
oc = own channel. (0-F)
DATA REQUEST
DATA_REQUEST
F0 2F 5c 0B oc dd bb pp <file name> ck F7
oc = own channel (0-F)
DISABLE EDIT
UPDATE
DISABLEEDITUPDATE
dd =
F0 2F 5c 16 oc F7
c = channel (0-F)
enum {Sound,Sample,Soundmap,Effect1,
Effect2,General,Song,Perf}
bb = ASCI Bank number (used only on Song & Perf )
c = channel (0-F)
oc = own channel. (0-F)
pp = ASCI Perf number (used only on Perf)
<file name > = 11 byte filename (used only on Sound &
Sample)
ck = checksum (xor of all byte from 2F)
DEVICE ERROR
D_ERR
F0 2F 5c 7B oc ee cc F7
c = channel (0-F)
oc = own channel (0-F)
ee = error number (0-7F) (ex. 7)
MESSAGE CAPTURE
ON
MESSAGECAPTUREON
F0 2F 5c 11oc F7
c = channel (0-F)
oc = own channel. (0-F)
Example 7: DEVICE ERROR IDENTIFIERS
enum {
ActiveBankAccess=MFH_error+1,
IncompatibleObject,BadObjOperation, StyleRecAccess
};
MESSAGE CAPTURE
OFF
MESSAGECAPTUREOFF
WRITE KEY
F0 2F 5c 12 oc F7
F0 2F 5c 17 mm ll F7
c = channel (0-F)
c = channel (0-F)
oc = own channel. (0-F)
mm = Msb key
ll = Lsb key
XII
APPENDIX
PUT_KEY
WAVEFORMS, SOUNDS AND PERFORMANCES
Waveforms, Sounds, Performances
xiii
LIST OF THE WAVEFORMS
(ROM-WAVEFORMS)
1)
2)
3)
4)
5)
6)
7)
8)
9)
10)
11)
12)
13)
14)
15)
16)
17)
18)
19)
20)
21)
22)
23)
24)
25)
26)
27)
28)
29)
30)
31)
32)
33)
34)
35)
36)
37)
38)
39)
40)
41)
42)
43)
44)
45)
46)
47)
48)
49)
50)
51)
52)
53)
54)
55)
56)
57)
58)
59)
60)
61)
62)
63)
64)
65)
66)
67)
68)
69)
70)
Piano
Honky Tonk
El.Piano 1
El.Piano 2
El.Piano 3
El.Piano 4
El.Piano 5
El.Piano 6
El.Piano 7
Harpsich_1
Harpsich_2
Clavinet
Vibes_1
Vibes_2
Glockenspl
Marimba
Bell
Dulcimer
Barchimes
Theatre Org
Organ 1
Organ 2
Organ 3
Organ 4
Organ 5
Organ 6
Jazz_Org
Rock_Org
Syn_Organ
Wired_Org
Digit_1_Wv
Digit_2_Wv
Pipe_Org_1
Pipe_Org_2
Pipe_Org_3
Accordion
Harmonica
Nyl_st_Gtr
Vocal_Gtr
Stl_st_Gtr
12st_Gtr
Jazz_Gtr_1
Jazz_Gtr_2
Oct_Jz_Gtr
Electr_Gtr
Muted_Gtr1
Muted_Gtr2
Dist_Gtr
Acous_Bass
Elect_Bass
Pick_Bass
Fretless_B
Slap_Bass1
Slap_Bass2
Cello_Viol
Strings
Pizz_Str
Harp
Timpani
Str_Glockn
Orch_Str
Choir_1
Choir_2
Vocalboy
Symphony
Symph_Orch
Trumpet
Flugelhorn
Trombone
Muted_Trp1
XIV
APPENDIX
71)
72)
73)
74)
75)
76)
77)
78)
79)
80)
81)
82)
83)
84)
85)
86)
87)
88)
89)
90)
91)
92)
93)
94)
95)
96)
97)
98)
99)
100)
101)
102)
103)
104)
105)
106)
107)
108)
109)
110)
111)
112)
113)
114)
115)
116)
117)
118)
119)
120)
121)
122)
123)
124)
125)
126)
127)
128)
129)
130)
131)
132)
133)
134)
135)
136)
137)
138)
139)
140)
Muted_Trp2
FrenchHorn
Brass
Brass_Rips
Brass_Trp
Anlg_Brass
Dual_Brass
Brass_2
Sopran_Sax
Soft_Sax
Tenor_Sax
Oboe
Eng_Horn
Bassoon
Clarinet
Flute
Hardflute_1
Hardflute_2
Panflute
Bottle
Whistle
Sinus_Wv
Trian_Wv
Square_Wv
Pulse_05Wv
Pulse_10Wv
Pulse_15Wv
Pulse_20Wv
Pulse_25Wv
Pulse_30Wv
Pulse_35Wv
Pulse_40Wv
Pulse_45Wv
Saw_Wv
Sup_Saw_Wv
Frog_Wv
Spectrum_1
Spectrum_2
SpectBells
Machinery
CityBreath
Spatial
Fantasy_1
Fantasy_2
Fantasy_3
Fantasy_4
Fantasy_5
VoiceBells
Vocal_Brth
Voice_Glk
Angels
Atmosphere
Noise
Breath
Syn_perc1
Syn_Perc2
Syn_Perc3
Syn_Perc4
Syn_Perc5
Syn_Perc6
Syn_Perc7
Syn_perc8
Syn_Perc9
Drop
Water
Voice_1
Voice_2
Voice_3
Vox_HH_Cl
Vox_Tap
RESIDENT IN
141)
142)
143)
144)
145)
146)
147)
148)
149)
150)
151)
152)
153)
154)
155)
156)
157)
158)
159)
160)
161)
162)
163)
164)
165)
166)
167)
168)
169)
170)
171)
172)
173)
174)
175)
176)
177)
178)
179)
180)
181)
182)
183)
184)
185)
186)
187)
188)
189)
190)
191)
192)
193)
194)
195)
196)
197)
198)
199)
200)
201)
202)
203)
204)
205)
206)
207)
208)
209)
Vox_Tip
Car_Horn
Door
Rapsy_Ride
Baby_Vox
Dolly_Vox
Kitchen
Logdrum
Noise_Perc
Agogo
Conga
Conga_acc
Conga_slap
Cowbell
Bongos
Darbuka_hi
Darbuka_lo
Guiro
Quica_hi
Quica_lo
Vibraslap
Castanets
Tambourine
Timbales
Cabasa
Bdrum_elet
Bdrum_gate
Bdrum_hard
Bdrum_jazz
Bass_drum1
Bass_drum2
Woodblock
Claves
FingerSnap
Side_Stick
Snare_dr_1
Snare_dr_2
Snare_rim1
Snare_rim2
Concert_sd
Rimshot
Snare_El_1
Snare El_2
Sd_brush_1
Sd_brush_2
Brush_long
Brush
Roll
Tom_normal
Tom_gated
Tom_room
House_bdrm
House_sdrm
House_hhat
House_ride
House_clap
HH_closed1
HH_open_1
HH_closed2
HH_open_2
HH_pedal
Ride_cymb
Ride_cup
Crash
China
Splash
Trian_long
Trian_shrt
Empty
ROM
THE ROM SOUND
MAP
The Sound Library The table shown in the pages which follow represents the Sound
Library that resides in the instrument’s ROM, and which is automatically loaded into
memory when the instrument is powered up in the following conditions:
-
no floppy disk inserted in the disk drive, or the disk inserted does not contain a
Sound Library;
-
The R AM -disk, if installed, is empty, or does not contain a Sound Library.
Reading the tables The Sounds are organised in 16 Families, which group together 16
sound of the same type. The Families conform to General MIDI standards, with the
exception of the last family (“Drumkits”) which replaces the GM “Special FX”.
The Sounds are arranged vertically in increasing order of Program Change number and
in horizontal direction, in increasing order of Bank Select number. The Extended
Program Change of the S Series—exploited in Songs to recall Sounds—groups these
two values in a single parameter (the Program Change is the first part and the Bank
Select is the second).
Sounds with 32 note polyphony Sounds shown in grey are Single Oscillator Sounds (SO),
which permits a maximum polyphony of 32 notes. Consult the Edit Sound chapter in the
Reference section for detailed information.
This table can be photocopied and used to list the Sounds loaded into RAM and saved
in a user-programmed Sound Library. The last page shows a blank table.
A table listing the Performances contained in ROM follows after the ROM Sounds.
Here also you will find two blank tables that can be photocopied for personal use.
MIDI
CLOCK
LFO
WAVEFORM
STAGE
mod. source
aftertouch
semitone
transp.
dynamics
aftertouch
mod. source
aftertouch
dynam. dynam.
cut
off
reson.
reson.
cut
off
digital oscillator
pitch bend
digital filter 1
digital filter 2
low pass
high pass
band pass
par. boost
param. cut
low pass
high pass
band pass
par. boost
param. cut
oscillator 2
amount
pitch
envelope
dynamics
aftertouch
mod. source
AMPLIFIER
STAGE
PAN
STAGE
EFFECTS
STAGE
aftertouch
sound
volume
oscillator 1
detune
aftertouch
FILTER
STAGE
aftertouch
amount
filter
envelope
rate
rate
dynamics
left
amplitude
right
dynamics
aftertouch
mod. source
left
digital effects
1 - 2
pan
volume
right
dynamics
aftertouch
mod. source
pan
envelope
amplitude
envelope
rate
dynamics
note
tracking
Diagram showing the development of a DC Sound
Waveforms, Sounds, Performances
xv
1
2
3
4
5
6
7
8
PIANO Family
1
GrandPiano
Env_Piano
2
Brt_Piano
3
El_GrPiano
ElGrPiano
4
Honky_Tonk
Western
5
El_Piano_1
El_Piano_2
Rhodx
El_P_Chim
ElPiano_32
Syn_El_P1
Syn_El_P2
6
El_Piano_3
El_Piano_4
El_Piano_5
Det_Piano
El_Piano_6
El_Piano_7
El_P_Glock
7
Harpsich_1
Harpsich_2
Harpsich32
8
Clavinet
Syn_Clav_1
Syn_Clav_2
Wawaclav
Clav_Filt
Clavinet32
Organ_4
Organ_5
Organ_6
Solo_A_Gtr
EspaNoise
Nyl_Gtr32
Spanish
Vangel_Gtr
Syn_Guitar
Jazz_Gtr_3
George
MultiPluck
FunkGtr_32
Wha_Gtr1
Wha_Gtr2
SlapB_32_1
Expres_Slp
CHROMATIC PERCUSSION Family
9
Celesta
CelestaPlk
Kocis
10
Glockenspl
Attack
Glockensp2
11
Music_Box
Wine_Gls1
Wine_Gls2
12
Vibraphone
Syn_Vibes
Vibes_2
13
Marimba
Marimba_32
14
Xylophone
Xylophon32
15
Tub_Bells
SharpBells
HappyBells
16
Dulcimer
Barchimes
Ooh_Lalaa
DrunkChime
ORGAN Family
17
TheatreOrg
Organ_1
Organ_2
Organ_3
18
JazzOrgan1
JazzOrgan2
Syn_Organ
Jazz_Org32
19
Rock_Organ
RockOrg_32
20
Pipe_Org_1
Pipe_Org_2
21
Pipe_Org_3
22
Accordion
Accord_32
23
Harmonica
Toots
24
Bandoneon
Accordion2
Musette
Vocal_Gtr
Dyn_Gtr
TheatOrg32
GUITAR Family
25
Nyl_Guitar
26
Steel_Gtr
12_Str_Gtr
SteelGtr32
27
Jazz_Gtr_1
Jazz_Gtr_2
Oct_Jz_Gtr
28
Elect_Gtr
Chorus_Gtr
Hawai_Gtr
29
Muted_Gtr1
Muted_Gtr2
Dyn_M_Gtr
30
Overdr_Gtr
Power_Gtr
31
Dist_Gtr
32
Harm_Gtr
NewHarmGtr
BASS Family
33
Acous_Bass
AcoBass_32
NewAcoBass
34
Elect_Bass
Dyn_Bass_1
El_Bass_32
35
Pick_Bass
Dyn_Bass_2
PickBass_Q
36
Fretless_B
SynFretls
37
Slap_Bass1
Dyn_Slap_B
Stanley
38
Slap_Bass2
Slap_B_2
SlapB_32_2
39
Syn_Bass_1
Syn_Bass_2
Anl_Bass_1
Anl_Bass_2
Anl_Bass_3
OldSynBas1
OldSynBas2
FilterBass
40
Mooog_Bass
Syn_Bass_3
Syn_Bass_4
Syn_Bass_5
FM_Bass_1
FM_Bass_2
Syn_Bass_6
Syn_Bass_7
XVI
APPENDIX
9
10
11
12
13
14
15
16
1
2
3
4
5
6
7
8
9
10
11
12
13
14
15
16
17
18
19
20
21
22
23
24
25
26
27
28
29
30
31
32
33
34
35
36
37
38
39
40
Seq_Bass
Waveforms, Sounds, Performances
xvii
1
2
3
4
5
6
7
8
STRINGS Family
41
Violin
42
Viola
43
Cello
44
Contrabass
45
TremoloStr
46
Pizz_Str
47
Harp
48
Timpani
Dyn_Orch
ENSEMBLE Family
49
Strings_1
Str_Glockn
Strings_32
50
Strings_2
Orch_Str
51
Synth_Str1
Synth_Str2
52
Synth_Str3
Synth_Str4
53
Choir
Choir_32
54
Voice_Oohs
LyriconØØ
55
SynthVoice
Anl_Voice
Vocoder_1
56
Symphony
Symph_Orch
Reson_Orch
Vocoder_2
BRASS Family
57
Trumpet
FlugelHorn
Trp_Swell
Trumpet_32
58
Trombone
TrombSwel1
TrombSwel2
Trombone32
59
Tuba
60
Muted_Trp1
Muted_Trp2
Dyn_M_Trp
MutedTrp32
61
FrenchHorn
62
Brass_1
Brass_Rips
Brass_Trp
Brass_2
63
Syn_Brass1
Syn_Horns
New_Horns
64
Tot_Horn_1
Tot_Horn_2
Slow_Horn
Deep_Horn
HardFlute2
FlugHorn32
Brass_3
REEDS Family
65
SopranoSax
SoprSax_32
66
Soft_Sax
SoftSax_32
67
Tenor_Sax
TenorSax32
68
Baritone_S
BaritSax32
69
Oboe
Oboe_32
70
Eng_Horn
71
Bassoon
72
Clarinet
Clarinet32
PIPES Family
73
Piccolo
Piccolo_32
74
Flute
Dyn_Flute
HardFlute1
75
Recorder
76
Panflute
NewPanfl
DynPanfl
77
Bottle
78
Shakuhachi
79
Whistle_1
Whistle_2
80
Ocarina
Ocarina_32
XVIII
APPENDIX
Flute_32
Brass_4
BrassNoise
Brass_40th
9
10
11
12
13
14
15
16
41
42
43
44
45
46
47
48
49
50
51
52
53
54
55
56
57
58
59
60
61
62
BrasSwell1
BrasSwell2
BrassRip32
63
64
65
66
67
68
69
70
71
72
73
74
75
76
77
78
79
80
Waveforms, Sounds, Performances
xix
1
2
3
4
5
6
7
8
SYNTH LEAD Family
81
Pulse_1
Pulse_2
Pulse_Ø5
Pulse_1Ø
Pulse_15
Pulse_2Ø
Pulse_25
Pulse_35
82
O_B_Filter
Invasion
TriangleWv
Sinus
SadJupiter
Anl_Brass1
Anl_Brass2
Anlg_Pan
83
Arp_26ØØØØ
Azimut
Syn_Lead_1
Snd_Track1
Snd_Track2
Snd_Track3
Sawix1_CM
Old_Lead
84
Chopper
Frog
Digital_1
Digital_2
Zerbino
AnalogiX
Analog_Y
Joe
85
Jump_ØØ
Jump_Ø1
Break_ØØ
Cluster
Reson_Park
ChoOrg
Lyle
86
FilterRes1
FilterRes2
Filt_LFO
FallFilter
HighP_Filt
FilterSync
Komityx
87
Decay_Ø1
Decay_Ø2
Decay_Ø3
Decay_Ø4
Decay_Ø5
Decay_Ø6
Decay_Ø7
88
O_B_X_1
O_B_X_2
O_B_X_3
Sympho_FX
Old_Synth1
Old_Synth2
Pad_Sound
Xi_Pass_X1
SYNTH PAD Family
89
Spectrum
SpectBells
Machinery
Devil
Reson_Loop
90
Wired_Org
CityBreath
Spatial
Synkilter
CelesGlide
Inox_Sound
91
Fantasy_1
Fantasy_2
Fantasy_3
Fantasy_4
Fantasy_5
S&H_Wave
92
VoiceBells
Vocal_Brth
Voice_Glk
Angels
Atmosphere
AirlinePad
Atmosph_CM
93
Alien
Pitch
Galaxy
94
Prophet_1
Prophet_2
Pops_1
Quauh_Ø1
95
Slave
Muted_City
96
Waiting
SpaceWorld
Power_Bad
Budweis
Submarine
ZAP--ØØ
Big_Room
EFFECTS Family
97
Noise_Res
98
Lunar_Wind
99
Wind
100
Breath
101
Resonance
WithGas
On/Off
102
NoGravity
Popop_1
UnderWater
PopUp_2
103
SYNTHEX_1
SYNTHEX_2
SYNTHEX_3
SYNTHEX_4
SYNTHEX_5
104
Helicopter
Voice_1
Voice_2
Voice_3
Vox_HH_Cl
Vox_Tap
Vox_Tip
Jets
Shot1
ETHNIC Family
105
Syn_Perc_1
106
Syn_Perc_2
107
Syn_Perc_3
108
Syn_Perc_4
109
Syn_Perc_5
110
Syn_Perc_6
111
Syn_Perc_7
112
Syn_Perc_8
Syn_Perc_9
PERCUSSIVE Family
113
Drop
114
Agogo
Conga_Acc
Conga
Conga_Slap
Cowbell
Bongos
Darbuka_Hi
DarbukaLow
115
Bdrum_Elet
Bdrum_Gate
Bdrum_Hard
Bdrum_Jazz
Bass_Drum1
Bass_Drum2
Bd_Boost_Q
El_Bd_Res
116
Woodblock
Claves
FingerSnap
Stick
Sd_FiltCut
Sdrum_Filt
RimSh_FltQ
ElectricSd
117
Snr_Drum1
Snr_Drum2
Sdrum_Rim1
Sdrum_Rim2
Concert_Sd
Rimshot
Snare_El_1
Snare_El_2
118
Tom
Gated_Tom
Tom_Room
Tom_Reson
CowbellRes
Sd_Reson
Tom_Room_2
Electr_Tom
119
HouseBdrum
HouseSdrum
House_Hhat
House_Ride
House_Clap
Hh_Filter1
HhOpen_Res
Crash_Res
120
Hh_Closed1
Hh_Open_1
Hh_Closed2
Hh_Open_2
Hh_Pedal
Ride
Ride_Cup
Crash
XX
APPENDIX
Water
9
10
Pulse_45
11
Pulse_Harp
12
13
14
15
16
Space_Harp
Celestial
Pulse_32
Mooog_Wv
Sinus_32
MooXLoopX
81
Pulse_4Ø
82
Anlg_Synth
Synt_Res1
Waveaura
Analog_1
SyntSquare
83
Soft_Sound
SimpLead
Sharp_CM
Sawix2_CM
Sawix3_CM
84
ChopRes
Car_Horn
Door
Raspy_Ride
Baby_Vox
Dolly_Vox
Kitchen
Log_Drum
Noise_Perc
114
Guiro
Guica_High
Guica_Low
Vibraslap
Castanets
Tambourine
Timbales
Cabasa
115
Bd_Filters
Steeldrum
BDrumShort
Bd_Rock_1
Hard_BDrum
BD_Equaliz
Sd_Brush_1
Sd_Brush_2
Brush_Long
Brush
Roll
SynthSnare
Sd_HPF_Res
Sd_Filters
TrianShort
Hh_Open_3
HhClosed_3
Cup_Reson
Ride_R
85
86
87
88
89
90
91
92
93
94
95
96
97
98
99
100
101
102
103
104
105
106
107
108
109
110
111
112
113
116
117
118
BrushNoise
119
TambouRes
Splash_Res
Rev_Cymb
120
China
Splash
Trian_Long
Waveforms, Sounds, Performances
xxi
1
2
3
4
5
6
7
8
DRUM KITS Family
121
Drum_Kit1
Drum_Kit2
Drum_Kit3
Drum_Kit4
122
Drum_Kit5
Room_Kit
123
Drum_Kit6
Power_Kit
124
Drum_Kit7
Electr_Kit
125
Drum_Kit8
HouseDrums
126
Jazz_Kit
Jazz_Drums
127
House_Kit
128
Drum_WS
Drum_Filt
Standard
Brush_Kit
OrchestrKit
LIST OF THE PERFORMANCES CONTAINED IN ROM
BANK/SONG
PERFORMANCE 1
2
3
4
5
1 Europe
Great Xpectat.
Techno Vintage
Ouverture
Soloist
2 Toy Land
Hurry Up
Pink Sunrise
Midi Guitar
Aliens
3 Developement
Summer Journey
Mad Hatter
Unstable
Monolith
4 Total Horn
Smoothing
Doom Ballade
Scamp Stabs
Odyssey
5 More
Deep Quiet
UHMM Keys
Fat Butterfly
Saucer
6 Underground
Thin Shocks
Glass Vibe
Alias
Sound Track
7 Mega Track
Loom Voice
Mutant Stab
ChopChop
SYNTHEX
8 Demo Perf 1
Lone Voice
Bad Pad
Solar Light
Space Solo
9 Demo Perf 2
Lunar Sea
Drilling Solo
Lunar Happyness Ambient
Black Event
Twilight Tale
On Alert
Morning
7
Solar Wind
8
George
9
Analog Brass
10
Steps
2 Old Good Times
Cycling Frogs
Solo Accordion
Lyle
Warm Ice
3 White Organ
Vector
Solo Harmonica
Fall Interlude
Assembly
4 Circle
Gelid Line
Solo Violin
5th Combo
Soft Flight
5 Modern Organ
Sea Wake
Solo Sax
Pleyades
Buddy Neck
6 Expressive Organ Winter Age
Solo Clarinet
Grand Entering
Strya Strings
7 Smooth
Alien Man
Solo Panflute
Tropical Nights
Deeper
8 Anglican
Blue Passage
The Real Vibe
Let's Solo
Gas Danger
9 Light Sound
Pad Sound
Old Century
Equinox
Clavinet
New City
Church
Dark Quack
Crisp Ends
10 LOCAL OFF
BANK/SONG
PERFORMANCE 6
1 Maneater
10 Planets
XXII
APPENDIX
9
10
11
12
13
14
15
16
121
122
123
124
125
126
127
128
Empty
Disk: ____________________________
BANK/SONG
PERFORMANCE 1
Author: __________ Notes: _____________________________
2
3
4
5
7
8
9
10
1
2
3
4
5
6
7
8
9
10
BANK/SONG
PERFORMANCE 6
1
2
3
4
5
6
7
8
9
10
Waveforms, Sounds, Performances
xxiii
XXIV
APPENDIX
DRUMKITS AND PERCUSSION SAMPLES
ROM-Drumkits and Percussion Samples
xxv
Voice _2 113-4
Crash 120-8
Tambourine 114-14
Gated_Tom 118-2
Stick 116-4
Kitchen 113-14
Bdrum_Elet 115-1
Bass_Drum2 115-6
Snr_Drum1 117-1
Sdrum_Rim1 117-3
Tom_Room L 118-3
Gated_Tom L 118-2
Tom_Room M 118-3
Gated_Tom M 118-2
Tom_Room H 118-3
Gated_Tom H 118-2
China 120-9
Ride_Cup 120-7
Splash 120-10
Crash L 120-8
Ride L 120-6
Bongos H 114-6
Conga_Acc 114-2
Conga L 114-3
Timbales H 114-15
Agogo H 114-1
Cabasa 114-16
Whistle1 H 79-1
Whistle1 L 79-1
Guiro L 114-9
Woodblock H 116-1
Woodblock L 116-1
Quica_Low 114-11
Trian_Long 120-11
SharpBells 15-2
DrunkChime 16-4
Darbuka_Hi 114-7
Drop 113-1
Water 113-2
Vox_Tap 113-7
Car_Horn 113-9
Raspy_Ride 113-11
Baby_Vox 113-12
C1
24
XXVI
APPENDIX
C2
36
C3
48
C4
60
General MIDI
C5
72
Drum_Kit 2 121-2
C6
84
Voice_1 113-3
Vox_Tip 113-8
Door 113-10
C5
72
Castanets 114-13
DarbukaLow 114-8
Quica_High 114-10
TrianShort 120-12
Vox_HH_Cl 113-6
C4
60
Guiro H 114-9
Claves 116-2
Timbales L 114-15
Agogo L 114-1
FingerSnap 116-3
C3
48
Bongos L 114-6
Conga H 114-3
Tambourine 114-14
Cowbell 114-5
Vibraslap 114-12
C2
36
Crash H 120-8
Ride H 120-6
Hh_Closed2 120-3
Hh_Pedal 120-5
Hh_Open_2 120-4
Voice _2 113-4
Submarine 97-2
Resonance 101-1
Snare_El_2 117-8
Stick 116-4
Kitchen 113-14
Bass_Drum 1 115-5
Bdrum_Gate 115-2
Snr_Drum2 117-2
Snare_El_1 117-7
Tom L 118-1
Gated_Tom L 118-2
Tom M 118-1
Gated_Tom M 118-2
Tom H 118-1
Gated_Tom H 118-2
China 120-9
Ride_Cup 120-7
Splash 120-10
Crash L 120-8
Ride L 120-6
Bongos H 114-6
Conga_Acc 114-2
Conga L 114-3
Timbales H 114-15
Agogo H 114-1
Cabasa 114-16
Whistle_1 H 79-1
Whistle_1 L 79-1
Guiro L 114-9
Woodblock H 116-1
Woodblock L 116-1
Quica_Low 114-11
Trian_Long 120-11
Tub_Bells 15-1
Barchimes 16-2
Darbuka_Hi 114-7
Drop 113-1
Water 113-2
Vox_Tap 113-7
Car_Horn 113-9
Raspy_Ride 113-11
Baby_Vox 113-12
C1
24
Rimshot 117-6
House_Clap 119-5
Noise_Perc 113-16
Logdrum 113-15
Dolly_Vox 113-13
Noise_Perc 113-16
Drop 113-1
Voice_1 113-3
Vox_Tip 113-8
Door 113-10
Castanets 114-13
Darbuka_Low 114-8
Quica_High 114-10
TrianShort 120-12
Vox_HH_Cl 113-6
Guiro H 114-9
Claves 116-2
Timbales L 114-15
Agogo L 114-1
FingerSnap 116-3
Bongos L 114-6
Conga H 114-3
Tambourine 114-14
Cowbell 114-5
Vibraslap 114-12
Crash H 120-8
Ride H 120-6
Hh_Closed1 120-1
Hh_Pedal 120-5
Hh_Open_1 120-2
Rimshot 117-6
House_Clap 119-5
Noise_Perc 113-16
Logdrum 113-15
Dolly-Vox 113-13
Alien 93-1
Helicopter 104-1
THE DRUMKITS OF THE STANDARD SOUND LIBRARY
C6
84
C7
96
C7
96
C8
108
Drum_Kit 1 121-1
General MIDI
C8
108
C1
24
Bass_Drum1 115-1
Bdrum_Elet 115-1
Bdrum_Gate 115-2
Snr_Drum2 117-2
Sdrum_Rim1 117-3
Snare_El_1 117-7
Snare_El_2 117-8
Tom L 118-1
Tom M 118-1
Tom H 118-1
Hh_Closed1 120-1
Hh_Pedal 120-5
Hh_Open_1 120-2
House_Hhat L 119-3
Crash 120-8
Ride 120-6
Cabasa 114-16
Vox_HH_Cl 113-6
Bongos L 114-6
DarbukaLow 114-8
Conga L 114-3
Conga H 114-3
TrianShort 120-12
Trian_Long 120-11
oise_Perc H 113-16
Door 113-10
Sdrum_Rim2 117-4
Concert_Sd 117-5
C2
36
C3
48
C4
60
Noise_Perc L 113-16
Raspy_Ride 113-11
Roll 117-13
C4
60
Timbales 114-15
Timbales 114-15
House_Clap 119-5
Bongos H 114-6
Darbuka_Hi 114-9
C3
48
China 120-9
Ride_Cup 120-7
House_Hhat H 119-3
House_Ride 119-4
Tambourine 114-14
C2
36
Gated_Tom L 118-2
Gated_Tom H 118-2
Snr_Drum1 117-1
House_Sdrum 119-2
Rimshot 117-6
Bdrum_Hard 115-3
HouseBdrum 119-1
Voice _2 113-4
Crash 120-8
Tambourine 114-14
Gated_Tom 118-2
Stick 116-4
Kitchen 113-14
Bdrum_Elet 115-1
Bdrum_Gate 115-2
Snare_El_1 117-7
Snare_El_2 117-8
Tom_Room L 118-3
Gated_Tom L 118-2
Tom_Room M 118-3
Gated_Tom M 118-2
Tom_Room H 118-3
Gated_Tom H 118-2
China 120-9
Ride_Cup 120-7
Splash 120-10
Crash L 120-8
Ride L 120-6
Bongos H 114-6
Conga_Acc 114-2
Conga L 114-3
Timbales H 114-15
Agogo H 114-1
Cabasa 114-16
Whistle1 H 79-1
Whistle1 L 79-1
Guiro L 114-9
Woodblock H 116-1
Woodblock L 116-1
Quica_Low 114-11
Trian_Long 120-11
SharpBells 15-2
DrunkChime 16-4
Darbuka_Hi 114-7
Drop 113-1
Water 113-2
Vox_Tap 113-7
Car_Horn 113-9
Raspy_Ride 113-11
Baby_Vox 113-12
C1
24
C5
72
C6
84
C5
72
C6
84
C7
96
C7
96
C8
108
Drum_Kit 3 121-3
General MIDI
C8
108
Drum_Kit 4 121-4
Korg M1
ROM-Drumkits and Percussion Samples
xxvii
Voice_1 113-3
Vox_Tip 113-8
Door 113-10
Castanets 114-13
DarbukaLow 114-8
Quica_High 114-10
TrianShort 120-12
Vox_HH_Cl 113-6
Guiro H 114-9
Claves 116-2
Timbales L 114-15
Agogo L 114-1
FingerSnap 116-3
Bongos L 114-6
Conga H 114-3
Tambourine 114-14
Cowbell 114-5
Vibraslap 114-12
Crash H 120-8
Ride H 120-6
Hh_Closed2 120-3
Hh_Pedal 120-5
Hh_Open_2 120-4
Rimshot 117-6
House_Clap 119-5
Noise_Perc 113-16
Logdrum 113-15
Dolly_Vox 113-13
Noise_Perc 113-16
Drop 113-1
Stick 116-4
Kitchen 113-14
Door 113-10
Bdrum_Elet 115-1
Snare_El_1 117-7
Sdrum_Rim1 117-3
Gated_Tom L 118-2
Kitchen L 113-14
Gated_Tom M 118-2
Kitchen M 113-14
Gated_Tom H 118-2
Kitchen H 113-14
China 120-9
Ride_Cup 120-7
Splash 120-10
Crash L 120-8
Ride L 120-6
Vox_Tap L 113-7
Conga H 114-3
Conga L 114-3
Timbales H 114-15
Agogo H 114-1
Cabasa 114-16
Whistle1 H 79-1
Whistle1 L 79-1
VoiceBells L 92-1
Machinery L 89-3
Lunar_Wind 98-1
Big_Room 97-4
Fantasy_1 91-1
Brass_Rips 62-2
Baby_Vox 113-12
Water 113-2
Voice_2 113-4
Machinery H 89-3
Raspy_Ride 113-11
Car_Horn 113-9
Fantasy_3 91-3
City_Breath 90-2
C1
24
XXVIII
APPENDIX
C2
36
C3
48
C4
60
C5
72
Drum_Kit 6 123-1
C6
84
WithGas 101-2
Helicopter 104-1
Door 113-10
Voice_1 113-3
C5
72
Castanets 114-13
Voice_1 113-3
VoiceBells H 92-1
NoGravity 102-1
Drop 113-1
C4
60
Breath 100-1
Wind 99-1
Timbales L 114-15
Agogo L 114-1
FingerSnap 116-3
C3
48
Vox_Tap H 113-7
Conga M 114-3
Tambourine 114-14
Cowbell 114-5
Vibraslap 114-12
Bass_Drum1 115-1
Bdrum_Elet 115-1
Tom D 118-1
Tom L 118-1
Tom H 118-1
Bass_Drum2 115-6
Gated_Tom D 118-2
Gated_Tom L 118-2
Gated_Tom M 118-2
Snare_El_1 117-7
Gated_Tom H 118-2
Cowbell 114-5
Hh_Closed1 120-1
Hh_Open_1 120-2
Crash 120-8
Ride 120-6
Tub_Bells L 15-1
Tub_Bells M 15-1
Kitchen L 113-14
DarbukaLow 114-8
Bottle L 77-1
Bottle H 77-1
C2
36
Crash H 120-8
Ride H 120-6
Hh_Closed1 120-1
Hh_Open1 120-2
Hh_Open_2 120-4
Sdrum_Rim2 117-4
Raspy_Ride 113-11
Noise_Perc 113-16
Logdrum 113-15
Dolly_Vox 113-13
C1
24
C6
84
Drum_Kit 5 122-1
Yamaha SY77
C7
96
C8
108
C7
96
C8
108
Voice_1 113-3
Vibraslap 114-12
Tub_Bells H 15-1
Kitchen H 113-14
Darbuka_Hi 114-9
Roll 117-13
Ride_Cup 120-7
House_Clap 119-5
Cabasa 114-16
Tambourine 114-14
Sdrum_Rim1 117-3
RimShot 117-6
Tom M 118-1
House_Bdrum 119-1
Snr_Drum2 117-2
Bdrum_Hard 115-3
Bdrum_Gate 115-2
C1
24
Stick 116-4
Kitchen 113-14
Bass_Drum1 115-5
Bdrum_Elet 115-1
Sdrum_Rim2 117-4
Concert_Sd 117-5
Tom L 118-1
Gated_Tom L 118-2
Tom M 118-1
Gated_Tom M 118-2
Tom H 118-1
Gated_Tom H 118-2
China 120-9
Ride_Cup 120-7
Splash 120-10
Crash L 120-8
Ride L 120-6
Bongos H 114-6
Conga_Slap 114-4
Conga 114-3
Timbales H 114-15
Agogo H 114-1
Cabasa 114-16
Whistle1 H 79-1
Whistle1 L 79-1
Guiro L 114-9
Woodblock H 116-1
Woodblock L 116-1
Quica_Low 114-11
Trian_Long 120-11
Darbuka_Hi 114-7
DarbukaLow 114-8
Water 113-2
Voice_2 113-4
Voice_3 113-5
Vox_Tap 113-7
Car_Horn 113-9
Raspy_Ride 113-11
Baby_Vox 113-12
C2
36
C3
48
C4
60
C5
72
C6
84
Vox_HH_Cl 113-6
Vox_Tip 113-8
Door 113-10
C5
72
Castanets 114-13
Voice_1 113-3
Quica_High 114-10
TrianShort 120-12
Drop 113-1
C4
60
Guiro H 114-9
Claves 116-2
Timbales L 114-15
Agogo L 114-1
FingerSnap 116-3
C3
48
Bongos L 114-6
Conga_Acc 114-2
Tambourine 114-14
Cowbell 114-5
Vibraslap 114-12
Stick 116-4
Kitchen 113-14
Bdrum_Jazz 115-4
Bdrum_Elet 115-1
HouseSdrum 119-2
Sdrum_Rim1 117-3
Gated_Tom L 118-2
Brush_Long 117-11
Gated_Tom M 118-2
Brush 117-12
Gated_Tom H 118-2
Roll 117-13
China 120-9
Ride_Cup 120-7
Splash 120-10
Crash L 120-8
Ride L 120-6
Bongos H 114-6
Conga H 114-3
Conga L 114-3
Timbales H 114-15
Agogo H 114-1
Cabasa 114-16
Whistle_1 H 79-1
Whistle_1 L 79-1
Guiro L 114-9
Woodblock H 116-1
Woodblock L 116-1
Quica_Low 114-11
Trian_Long 120-11
Darbuka_Hi 114-7
DarbukaLow 114-8
Water 113-2
Voice_2 113-4
Voice_3 113-5
Vox_Tap 113-7
Car_Horn 113-9
Raspy_Ride 113-11
Baby_Vox 113-12
C2
36
Crash H 120-8
Ride H 120-6
Hh_Closed1 120-1
Hh_Open_1 120-2
Hh_Open_2 120-4
Rimshot 117-6
House_Clap 119-5
Noise_Perc 113-16
Logdrum 113-15
Dolly_Vox 113-13
C1
24
C6
84
C7
96
C7
96
C8
108
Drum_Kit 7 124-1
C8
108
Drum_Kit 8 125-1
ROM-Drumkits and Percussion Samples
xxix
Vox_HH-Cl 113-6
Vox_Tip 113-8
Door 113-10
Castanets 114-13
Voice_1 113-3
Quica_High 114-10
TrianShort 120-12
Drop 113-1
Guiro H 114-9
Claves 116-2
Timbales L 114-15
Agogo L 114-1
FingerSnap 116-3
Bongos L 114-6
Conga M 114-3
Tambourine 114-14
Cowbell 114-5
Vibraslap 114-12
Crash H 120-8
Ride H 120-6
Hh_Closed1 120-1
Hh_Open_1 120-2
Hh_Open_2 120-4
Rimshot 117-6
House_Clap 119-5
Noise_Perc 113-16
Logdrum 113-15
Dolly-Vox 113-13
Voice _2 113-4
Submarine 97-2
Resonance 101-1
Snare_El_2 117-8
Stick 116-4
Kitchen 113-14
Bass_Drum 1 115-5
HouseBdrum 119-1
HouseSdrum 119-2
Concert_Sd 117-5
Tom L 118-1
Gated_Tom L 118-2
Tom M 118-1
Gated_Tom M 118-2
Tom H 118-1
Gated_Tom H 118-2
China 120-9
Ride_Cup 120-7
Splash 120-10
Crash L 120-8
Ride 120-6
Bongos H 114-6
Conga H 114-3
Conga L 114-3
Timbales H 114-15
Agogo H 114-1
Cabasa 114-16
Whistle_1 H 79-1
Whistle_1 L 79-1
Guiro L 114-9
Woodblock H 116-1
Woodblock L 116-1
Quica_Low 114-11
Trian_Long 120-11
Tub_Bells 15-1
Barchimes 16-2
Darbuka_Hi 114-7
Drop 113-1
Water 113-2
Vox_Tap 113-7
Car_Horn 113-9
Raspy_Ride 113-11
Baby_Vox 113-12
C1
24
XXX
APPENDIX
C2
36
C3
48
C4
60
GS TR-808
C5
72
House_Kit 127-1
C6
84
Voice_1 113-3
Vox_Tip 113-8
Door 113-10
C5
72
Castanets 114-13
Darbuka_Low 114-8
Quica_High 114-10
TrianShort 120-12
Vox_HH_Cl H 113-6
C4
60
Guiro H 114-9
Claves 116-2
Timbales L 114-15
Agogo L 114-1
FingerSnap 116-3
C3
48
Bongos L 114-6
Conga M 114-3
Tambourine 114-14
Cowbell 114-5
Vibraslap 114-12
Voice _2 113-4
Submarine 97-2
Resonance 101-1
Snare_El_2 117-8
Stick 116-4
Kitchen 113-14
Bass_Drum1 115-5
Bdrum_Jazz 115-4
Sd_Brush_1 117-9
Sd_Brush_2 117-10
Tom L 118-3
Brush_Long 117-11
Tom M 118-1
Brush 117-12
Tom H 118-1
Roll 117-13
China 120-9
Ride_Cup 120-7
Splash 120-10
Crash L 120-8
Ride L 120-6
Bongos H 114-6
Conga_Slap 114-4
Conga M 114-3
Conga H 114-3
Agogo H 114-1
Cabasa 114-16
Whistle1 H 79-1
Whistle1 L 79-1
Guiro L 114-9
Woodblock H 116-1
Woodblock L 116-1
Quica_Low 114-11
Trian_Long 120-11
TubBells 15-1
BarChimes 16-2
Darbuka_Hi 114-7
Drop 113-1
Water 113-2
Vox_Tap 113-7
Car_Horn 113-9
Raspy_Ride 113-11
Baby_Vox 113-12
C2
36
House_Ride 119-4
Crash H 120-8
House_Hhat H 119-3
House_Hhat L 119-3
Vox_HH_Cl L 113-6
Rimshot 117-6
House_Clap 119-5
Noise_Perc 113-16
Logdrum 113-15
Dolly-Vox 113-13
Alien 93-1
Helicopter 104-1
C1
24
C6
84
C7
96
C7
96
C8
108
Jazz_Kit 126-1
C8
108
Voice_1 113-3
Vox_Tip 113-8
Door 113-10
Castanets 114-13
DarbukaLow 114-8
Quica_High 114-10
TrianShort 120-12
Vox_HH_Cl 113-6
Guiro H 114-9
Claves 116-2
Conga H 114-3
Agogo L 114-1
FingerSnap 116-3
Bongos L 114-6
Conga_Acc 114-2
Tambourine 114-14
Cowbell 114-5
Vibraslap 114-12
Crash H 120-8
Ride H 120-6
Hh_Closed1 120-1
Hh_Pedal 120-5
Hh_Open_1 120-2
Rimshot 117-6
Sdrum_Rim1 117-3
Noise_Perc 113-16
Logdrum 113-15
Dolly_Vox 113-13
Alien 93-1
Helicopter 104-1
Bdrum_Gate 115-2
Snare_El_1 117-7
Tom_Room D 118-3
Tom_Room L 118-3
Tom_Room M 118-3
Tom_Room H 118-3
Rimshot 117-6
Bdrum_Jazz 115-4
Sd_Brush_1 117-9
Tom L 118-1
Tom H 118-1
Tom M 118-1
Woodblock 116-1
House_Clap 119-5
Bass_Drum1 115-5
Snr_Drum2 117-2
Gated_Tom L 118-2
Gated_Tom M 118-2
Gated_Tom H 118-2
Vibraslap 114-12
FingerSnap 116-3
Bongos H 114-6
Conga_Slap 114-4
Conga L 114-3
Guiro 114-3
Timbales H 114-15
Agogo 114-1
Whistle_1 79-1
HouseBdrum 119-1
HouseSdrum 119-2
Voice_3 113-5
Voice_2 L 113-4
Voice_2 H 113-4
Vox_Tip 113-8
Car_Horn 113-9
Dolly_Vox 113-13
Roll 117-13
Hh_Closed1 120-1
Claves 116-2
Quica_High 114-10
Stick H 116-4
Stick L 116-4
Sticks 116-4
C6
84
C7
96
Conga H 114-3
Agogo 114-1
Stick M 116-4
Tambourine 114-14
Concert_Sd 117-5
Vox_HH_Cl H 113-6
Vox_HH_Cl L 113-6
Vox_Tap 113-7
Noise_Perc 113-16
Voice_1 113-3
Quica_Low 114-11
Timbales L 114-15
Trian_Long 120-11
Bongos L 114-6
Conga_Acc 114-2
Splash 120-10
Crash 120-8
China 120-9
Ride 120-6
Ride_Cup 120-7
Hh_Closed2 120-3
Hh_Pedal 120-5
Hh_Open_2 120-4
Brush_Long 117-11
Brush 117-12
Cabasa 114-16
Tambourine 114-14
Cowbell 114-5
Snare_El_2
Sdrum_Rim2 117-4
114-8
113-2
113-4
113-5
113-7
113-9
113-11
Baby_Vox 113-12
DarbukaLow
Water
Voice_2
Voice_3
Vox_Tap
Car_Horn
Raspy_Ride
Whistle_1 79-1
Guiro 114-9
Woodblock 116-1
Woodblock 116-1
Quica_Low 114-11
Trian_Long 120-11
Darbuka_Hi 114-7
Bongos 114-6
Conga_Acc 114-2
Conga 114-3
Timbales 114-15
Agogo 114-1
Cabasa 114-16
Whistle_1 79-1
BD_Equaliz 115-14
Sdrum_Filt 116-6
SD_HPF_Res 117-15
Tom_Reson 118-4
Tom_Reson 118-4
Tom_Reson 118-4
Tom_Reson 118-4
Tom_Reson 118-4
Tom_Reson 118-4
China 120-9
Cup_Reson 120-15
Splash_Res 119-10
Splash 120-10
Ride_Cup 120-7
Stick 116-4
Kitchen 113-14
Bass_Drum2 115-6
C8
C5
72
C7
C4
60
C6
C5
C3
48
C4
C2
36
C3
C1
24
C2
C1
Drum_Filt 127-2
C8
108
Drum_WS 128-1
GEM WS2
ROM-Drumkits and Percussion Samples
xxxi
Vox_HH_Cl 113-6
Vox_Tip 113-8
Door 113-10
Castanets 114-13
Voice_1 113-3
Quica_High 114-10
TrianShort 120-12
Drop 113-1
Guiro 114-9
Claves 116-2
Timbales 114-15
Agogo 114-1
Vox_HH_Cl 113-6
Bongos 114-6
Conga 114-3
TambouRes 119-9
CowbellRes 118-5
Vibraslap 114-12
Crash_Res 1119-8
Ride_R 120-16
Hh_Filter1 119-6
Hh_Open_Res 119-7
Hh_Open_Res 119-7
RimSh_FltQ 116-7
BD_Reson 118-6
Noise_Perc 113-16
Logdrum 113-15
Dolly_Vox 113-13
Voice_2 113-4
Submarine 97-2
Resonance 101-1
Snare_El_2 117-8
Stick 116-4
Kitchen 113-14
Bd_Boost_Q 115-7
Bd_Filters 115-9
Snr_Drum2 117-2
Sd_Filters 117-16
Gated_Tom 118-2
Gated_Tom 118-2
Gated_Tom 118-2
Gated_Tom 118-2
Gated_Tom 118-2
Gated_Tom 118-2
China 120-9
Ride_Cup 120-7
Splash 120-10
Crash 120-8
Ride 120-6
C7
Whistle_1 79-1
Guiro 114-9
Woodblock 116-1
Woodblock 116-1
Quica_Low 114-11
Trian_Long 120-11
Tub_Bells 15-1
Barchimes 16-2
Darbuka_Hi 114-7
Drop 113-1
Water 113-2
Vox_Tap 113-7
Car_Horn 113-9
Raspy_Ride 113-11
Baby_Vox 113-12
C8
C6
Bongos 114-6
Conga_Acc 114-2
Conga 114-3
Timbales 114-15
Agogo 114-1
Cabasa 114-16
Whistle_1 79-1
Voice_1 113-3
Vox_Tip 113-8
Door 113-10
Castanets 114-13
DarbukaLow 114-8
Quica_High 114-10
TrianShort 120-12
Vox_HH_Cl 113-6
Guiro 114-9
Claves 116-2
Timbales 114-15
Agogo 114-1
Vox_HH_Cl 113-6
Bongos 114-6
Conga 114-3
Tambourine 114-14
Cowbell 114-5
Vibraslap 114-12
Crash 120-8
Ride 120-6
Hh_Closed1 120-1
Hh_Pedal 120-5
Hh_Open_1 120-2
Rimshot 117-6
House_Clap 119-5
Noise_Perc 113-16
Logdrum 113-15
Dolly_Vox 113-13
Alien 93-1
Helicopter 104-1
Bd_Rock_1 115-12
Snr_Drum2 117-2
Sd_Filters 117-16
Tom_Room_2 118-7
Tom_Room_2 118-7
Tom_Room_2 118-7
Tom_Room_2 118-7
Tom_Room_2 118-7
Tom_Room_2 118-7
China 120-9
Ride_Cup 120-7
Splash 120-10
Crash 120-8
Ride 120-6
Baby_Vox
113-12
Barchimes 16-2
Darbuka_Hi 114-7
Drop 113-1
Water 113-2
Vox_Tap 113-7
Car_Horn 113-9
Raspy_Ride 113-11
Whistle_1 79-1
Guiro 114-9
Woodblock 116-1
Woodblock 116-1
Quica_Low 114-11
Trian_Long 120-11
Tub_Bells 15-1
Bongos 114-6
Conga_Acc 114-2
Conga 114-3
Timbales 114-15
Agogo 114-1
Cabasa 114-16
Whistle_1 79-1
Voice_2 113-4
Submarine 97-2
Resonance 101-1
Snare_El_2 117-8
Stick 116-4
Kitchen 113-14
Bass_Drum1 115-5
C8
C5
GS Room Kit
C7
C4
Room_Kit 122-5
C6
C5
C4
C3
C2
APPENDIX
C3
C2
C1
XXXII
C1
Standard 121-5
GS Standard
Voice_1 113-3
Vox_Tip 113-8
Door 113-10
Castanets 114-13
DarbukaLow 114-8
Quica_High 114-10
TrianShort 120-12
Vox_HH_Cl 113-6
Guiro 114-9
Claves 116-2
Timbales 114-15
Agogo 114-1
Vox_HH_Cl 113-6
Bongos 114-6
Conga 114-3
Tambourine 114-14
Cowbell 114-5
Vibraslap 114-12
Crash 120-8
Ride 120-6
Hh_Closed1 120-1
Hh_Pedal 120-5
Hh_Open_1 120-2
Rimshot 117-6
House_Clap 119-5
Noise_Perc 113-16
Logdrum 113-15
Dolly_Vox 113-13
Alien 93-1
Helicopter 104-1
BDrum_Elet 115-1
Sdrum_Rim1 117-3
Snare_El_1 117-7
Electric_Tom 118-8
Electric_Tom 118-8
Electric_Tom 118-8
Electric_Tom 118-8
Electric_Tom 118-8
Electric_Tom 118-8
China 120-9
Ride_Cup 120-7
Splash 120-10
Crash 120-8
Ride 120-6
Barchimes 16-2
Darbuka_Hi 114-7
Drop 113-1
Water 113-2
Vox_Tap 113-7
Car_Horn 113-9
Raspy_Ride 113-11
Baby_Vox 113-12
Whistle_1 79-1
Guiro 114-9
Woodblock 116-1
Woodblock 116-1
Quica_Low 114-11
Trian_Long 120-11
Tub_Bells 15-1
C8
C7
C5
C6
C4
Bongos 114-6
Conga_Acc 114-2
Conga 114-3
Timbales 114-15
Agogo 114-1
Cabasa 114-16
Whistle_1 79-1
Voice_1 113-3
Vox_Tip 113-8
Door 113-10
Castanets 114-13
DarbukaLow 114-8
Quica_High 114-10
TrianShort 120-12
Vox_HH_Cl 113-6
Guiro 114-9
Claves 116-2
Timbales 114-15
Agogo 114-1
FingerSnap 116-3
Bongos 114-6
Conga 114-3
Tambourine 114-14
Cowbell 114-5
Vibraslap 114-12
Crash 120-8
Ride 120-6
Hh_Closed1 120-1
Hh_Pedal 120-5
Hh_Open_1 120-2
Rimshot 117-6
House_Clap 119-5
Noise_Perc 113-16
Logdrum 113-15
Dolly_Vox 113-13
Alien 93-1
Helicopter 104-1
Hard_BDrum 115-13
Snare_El_1 117-7
Sd_Filters 117-16
Gated_Tom 118-2
Gated_Tom 118-2
Gated_Tom 118-2
Gated_Tom 118-2
Gated_Tom 118-2
Gated_Tom 118-2
China 120-9
Ride_Cup 120-7
Splash 120-10
Crash 120-8
Ride 120-6
Baby_Vox 113-12
Barchimes 16-2
Darbuka_Hi 114-7
Drop 113-1
Water 113-2
Vox_Tap 113-7
Car_Horn 113-9
Raspy_Ride 113-11
Whistle_1 79-1
Guiro 114-9
Woodblock 116-1
Woodblock 116-1
Quica_Low 114-11
Trian_Long 120-11
Tub_Bells 15-1
Bongos 114-6
Conga_Acc 114-2
Conga 114-3
Timbales 114-15
Agogo 114-1
Cabasa 114-16
Whistle_1 79-1
Voice_2 113-4
Submarine 97-2
Resonance 101-1
Snare_El_2 117-8
Stick 116-4
Kitchen 113-14
Bd_Boost_Q 115-7
C8
C7
C6
C5
C4
C2
C3
C1
Voice_2 113-4
Submarine 97-2
Resonance 101-1
Snare_El_2 117-8
Stick 116-4
Kitchen 113-14
Bd_Boost_Q 115-7
C2
C3
C1
Power_Kit 123-5
GS Power Kit
Electr_Kit 124-5
GS Electric Kit
ROM-Drumkits and Percussion Samples
xxxiii
Voice_1 113-3
Vox_Tip 113-8
Door 113-10
Castanets 114-13
DarbukaLow 114-8
Quica_High 114-10
TrianShort 120-12
Vox_HH_Cl 113-6
Guiro 114-9
Claves 116-2
Timbales 114-15
Agogo 114-1
Vox_HH_Cl 113-6
Bongos 114-6
Conga 114-3
Tambourine 114-14
Cowbell 114-5
Vibraslap 114-12
Crash 120-8
Ride 120-6
Hh_Closed1 120-1
Hh_Pedal 120-5
Hh_Open_1 120-2
Rimshot 117-6
House_Clap 119-5
Noise_Perc 113-16
Logdrum 113-15
Dolly_Vox 113-13
Alien 93-1
Helicopter 104-1
Voice_2 113-4
Submarine 97-2
Resonance 101-1
Snare_El_2 117-8
Stick 116-4
Kitchen 113-14
Bass_Drum1 115-5
Bdrum_Jazz 115-4
Sd_Brush_1 117-9
Sd_Brush_2 117-10
Tom 118-1
Tom 118-1
Tom 118-1
Tom 118-1
Tom 118-1
Tom 118-1
China 120-9
Ride_Cup 120-7
Splash 120-10
Crash 120-8
Ride 120-6
C7
Whistle_1 79-1
Guiro 114-9
Woodblock 116-1
Woodblock 116-1
Quica_Low 114-11
Trian_Long 120-11
Tub_Bells 15-1
Barchimes 16-2
Darbuka_Hi 114-7
FingerSnap 116-3
Water 113-2
Vox_Tap 113-7
Car_Horn 113-9
Raspy_Ride 113-11
Baby_Vox 113-12
C8
C6
Bongos 114-6
Conga_Acc 114-2
Conga 114-3
Timbales 114-15
Agogo 114-1
Cabasa 114-16
Whistle_1 79-1
Voice_1 113-3
Vox_Tip 113-8
Door 113-10
Castanets 114-13
DarbukaLow 114-8
Quica_High 114-10
TrianShort 120-12
Vox_HH_Cl 113-6
Guiro 114-9
Claves 116-2
Timbales 114-15
Agogo 114-1
Vox_HH_Cl 113-6
Bongos 114-6
Conga 114-3
Tambourine 114-14
Cowbell 114-5
Vibraslap 114-12
Crash 120-8
Ride 120-6
Hh_Closed2 120-3
Hh_Pedal 120-5
Hh_Open_1 120-2
Rimshot 117-6
Sdrum_Rim1 117-3
Noise_Perc 113-16
Logdrum 113-15
Dolly_Vox 113-13
Alien 93-1
Helicopter 104-1
HouseBdrum 119-1
HouseSdrum 119-2
Snare_El_1 117-7
HouseBdrum 119-1
House_Bdrum 119-1
HouseBdrum 119-1
HouseBdrum 119-1
HouseBdrum 119-1
HouseBdrum 119-1
China 120-9
Ride_Cup 120-7
Splash 120-10
Crash 120-8
Ride 120-6
Baby_Vox 113-12
Barchimes 16-2
Darbuka_Hi 114-7
Drop 113-1
Water 113-2
Vox_Tap 113-7
Car_Horn 113-9
Raspy_Ride 113-11
Whistle_1 79-1
Guiro 114-9
Woodblock 116-1
Woodblock 116-1
Quica_Low 114-11
Trian_Long 120-11
Tub_Bells 15-1
Bongos 114-6
Conga_Acc 114-2
Conga 114-3
Timbales 114-15
Agogo 114-1
Cabasa 114-16
Whistle_1 79-1
Voice_2 113-4
Submarine 97-2
Resonance 101-1
Snare_El_2 117-8
Stick 116-4
Kitchen 113-14
Bd_Boost_Q 115-7
C8
C5
Jazz_Drums 126-5
C7
C4
GS Jazz Drums
C6
C5
C4
C3
C2
APPENDIX
C3
C2
C1
XXXIV
C1
HouseDrums 125-5
GS House Drums
Voice_1 113-3
Vox_Tip 113-8
Door 113-10
Castanets 114-13
DarbukaLow 114-8
Quica_High 114-10
TrianShort 120-12
Vox_HH_Cl 113-6
Guiro 114-9
Claves 116-2
Timbales 114-15
Agogo 114-1
Vox_HH_Cl 113-6
Bongos 114-6
Conga 114-3
Tambourine 114-14
Cowbell 114-5
Vibraslap 114-12
Ride_R 120-16
Ride 120-6
House_Hhat 119-3
House_Hhat 119-3
House_Ride 119-4
Rimshot 117-6
House_Clap 119-5
Noise_Perc 113-16
Logdrum 113-15
Dolly_Vox 113-13
Alien 93-1
Helicopter 104-1
Baby_Vox 113-12
Whistle_1 79-1
Guiro 114-9
Woodblock 116-1
Woodblock 116-1
Quica_Low 114-11
Trian_Long 120-11
Tub_Bells 15-1
Barchimes 16-2
Darbuka_Hi 114-7
Drop 113-1
Water 113-2
Vox_Tap 113-7
Car_Horn 113-9
Raspy_Ride 113-11
Bongos 114-6
Conga_Acc 114-2
Conga 114-3
Timbales 114-15
Agogo 114-1
Cabasa 114-16
Whistle_1 79-1
C8
C7
C5
C6
C4
Splash 120-10
Crash 120-8
Ride 120-6
Bd_Rock_1 115-12
Sd_Filters 117-16
Concert_Sd 117-5
Timpani 48-1
Voice_1 113-3
Vox_Tip 113-8
Door 113-10
Castanets 114-13
DarbukaLow 114-8
Quica_High 114-10
TrianShort 120-12
Vox_HH_Cl 113-6
Guiro 114-9
Claves 116-2
Timbales 114-15
Agogo 114-1
Vox_HH_Cl 113-6
Bongos 114-6
Conga 114-3
Tambourine 114-14
Cowbell 114-5
Vibraslap 114-12
Timpani 48-1
Rimshot 117-6
Castanets 114-13
Noise_Perc 113-16
Logdrum 113-15
Dolly_Vox 113-13
Alien 93-1
Helicopter 104-1
Bdrum_Jazz 115-4
Sd_Brush_1 117-9
BrushNoise 118-11
Tom 118-1
Tom 118-1
Tom 118-1
Tom 118-1
Tom 118-1
Tom 118-1
China 120-9
Ride_Cup 120-7
Splash 120-10
Crash 120-8
Ride 120-6
Baby_Vox 113-12
Barchimes 16-2
Darbuka_Hi 114-7
FingerSnap 116-3
Water 113-2
Vox_Tap 113-7
Car_Horn 113-9
Raspy_Ride 113-11
Whistle_1 79-1
Guiro 114-9
Woodblock 116-1
Woodblock 116-1
Quica_Low 114-11
Trian_Long 120-11
Tub_Bells 15-1
Bongos 114-6
Conga_Acc 114-2
Conga 114-3
Timbales 114-15
Agogo 114-1
Cabasa 114-16
Whistle_1 79-1
Voice_2 113-4
Submarine 97-2
Resonance 101-1
Snare_El_2 117-8
Stick 116-4
Kitchen 113-14
Bass_Drum2 115-6
C8
C7
C6
C5
C4
C2
C3
C1
Voice_2 113-4
Submarine 97-2
Resonance 101-1
Snare_El_2 117-8
Stick 116-4
Kitchen 113-14
Tom 118-1
C2
C3
C1
Brush_Kit 127-5
GS Brush Kit
OrchestKit 128-5
GS Orchestra Kit
ROM-Drumkits and Percussion Samples
xxxv
Voice_1 113-3
Vox_Tip 113-8
Door 113-10
Castanets 114-13
DarbukaLow 114-8
Quica_High 114-10
TrianShort 120-12
Vox_HH_Cl 113-6
Guiro 114-9
Claves 116-2
Timbales 114-15
Agogo 114-1
Vox_HH_Cl 113-6
Bongos 114-6
Conga 114-3
Tambourine 114-14
Cowbell 114-5
Vibraslap 114-12
Crash 120-8
Ride 120-6
Hh_Closed1 120-1
Hh_Pedal 120-5
Hh_Open_1 120-2
Rimshot 117-6
Brush 117-12
Noise_Perc 113-16
Logdrum 113-15
Dolly_Vox 113-13
Alien 93-1
Helicopter 104-1
PERCUSSION SAMPLES
This table lists the percussion samples resident in the instrument’s ROM (the relative Waveforms appear last in the
Waveform list).
Each sample is listed with a sample note, which corresponds to the frequency which provides optimum timbre
quality. As you move further away from this note, the sample assumes particular characteristics and its quality
gradually decays.
Using samples on notes that differ to the original sample note it effective in cases which involve tuning a percussion
instrument (for example, Toms and Cymbals) or with percussion sounds of synthetic origin (Door, Logdrum,
Noise_Perc).
In a Drumkit, the samples are transposed until they are taken to the optimum level, or to a level that obtains a
particular effect.
Timpani
Whistle_1
Drop
Water
Voice_1
Voice_2
Voice_3
Vox_HH_Cl
Vox_Tap
Vox_Tip
Car_Horn
Door
Raspy_Ride
Baby_Vox
Dolly_Vox
Kitchen
Logdrum
Noise_Perc
Agogo
Conga_Acc
Conga
Conga_Slap
Cowbell
Bongos
Darbuka_Hi
DarbukaLow
Guiro
Quica_High)
Quica_Low
Vibraslap
Castanets
Tambourine
Timbales
Cabasa
Bdrum_Elet
Bdrum_Gate
Bdrum_Hard
Bdrum_Jazz
Bass_Drum1
XXXVI
E4
E4
G4
E4
E4
E4
E4
E5
C4
C4
C4
G4
G4
E4
C4
E4
C4
C5
G4-C5
E4
C4
E4
G4
G4-C5
E4
C4
E4
C4
C4
E4
E4
C5
E4
E5
B4
E4
E4
E4
E4
APPENDIX
Bass_Drum2
Woodblock
Claves
Fingersnap
Stick
Snr_Drum1
Snr_Drum2
Sdrum_Rim1
Sdrum_Rim2
Concert_Sd
Rimshot
Snare_El_1
Snare_El_2
Sd_Brush_1
Sd_Brush_2
Brush_Long
Brush
Roll
SynthSnare
Tom
Gated_Tom
Tom_Room
HouseBdrum
HouseSdrum
House_Hhat
House_Ride
House_Clap
Hh_Closed1
Hh_Open_1
Hh_Closed_2
Hh_Open_2
Hh_Pedal
Ride
Ride_Cup
Crash
China
Splash
Trian_Long
TrianShort
C4
C4
C4
E5
E4
E5
E5
C5
E5
B4
C4
G4
G4
E4
E4
C4
C5
E4
E4
E4
G4
E4
C4
E4
E5
E5
C4
E5
E5
E5
E5
E5
E5
E5
E5
E5
E5
E5
E5
TECHNICAL SPECIFICATIONS
TECHNICAL SPECIFICATIONS
xxxvii
TECHNICAL SPECIFICATIONS
Keyboard
Display
61 notes (S2), 76 notes (S3), weighted keys (synthesizer
type). Sensitive to Dynmaics (Key On, Key Off) and
polyphonic Aftertouch.
Resolution: 240 x 64 pixels backlit.
Sound Generation
Tracks: 16.
Resolution: 192 Beats Per Quarter (BPQ).
Recordable events: approx. 250.000.
Background Song loading (Preload).
Editing: Realtime, Overdub/Replace, Quantize, Realtime
Delay, Microscope Editing.
Standard MIDI File compatible (on Atari/IBM floppy
disks).
PCM, Wavetables, Multiloop, Crossfade Multiwave and
Subtractive Synthesis.
6 Megabytes of ROM-Waveforms.
2 Megabytes of Sample-RAM for RAM-Waveforms.
6 x 18 Bit Digitale/analog converters (DAC).
2 Digital Effects Processors (DSP1/Reverb + DSP2/
Modulation).
32 Oscillators.
Polyphony: 32 note max.. Dynamic voice allocation
with assignable Priority.
16 multi-timbral parts, 16 layers (with independent
dynamic Range), 16 split zones.
32 Programmable Digital Filters – 2 Filters per voice
(5 types with Resonance Q: Low Pass, High Pass, Band
Pass, Parametric Boost, Parametric Cut).
Dynamic Stereo Panning.
S/N ratio: >96dB (referred to the ‘Sinus’ Waveform).
Dynamics: >96dB.
Passing Band: 10Hz~18KHz.
Sampling Rate: 41.7 KHz.
Controllers
S2/S3: 2 Wheels, 2 Foot controllers, 7 Function Keys
and 7 Function Sliders, all programmable.
S2R: 2 Programmable Foot controllers.
All: Volume Pedal.
Internal Elaboration
Microprocessor: Motorola MC68302 (16 MHz).
2 Mbytes of Operative-RAM, data handling tasks (except RAM-Waveforms).
Sounds Library (518 ROM Sounds + up to 1600 RAM
Sounds).
DSP Effects Library (64 + 64)
100 Performances
10 Songs
Sound Patch Matrix
XXXVIII
TECHNICAL SPECIFICATIONS
Sequencer
Disk Drive
3.5" HD (1.62 M Byte format).
Loads and saves PCM data, Sounds, Songs, Performances, DSP Effects, MIDI Files.
Loads software upgrades (User programs) and data
from Akai S1000™ (Samples e Programs).
Full background operation.
MIDI
16+16 independent MIDIchannels.
2 MIDI IN, 2 MIDI THRU, 2 MIDI OUT.
MIDI-Merge.
Clock In/Out.
Transmission and reception of Samples in MMA Sample
Dump Standard format.
Audio (Analog Outs)
Wet (with effects): Stereo L/R.
Dry (without effects): Stereo OUT1+OUT2, Stereo
OUT3+OUT4, Mono OUT 1, 2, 3, 4.
Headphones.
Dimensions
S2: (L x A x P) - 1055 x 116 x 350 mm
S3: (L x A x P) - 1077 x 116 x 350 mm
S2R: (L x A x P) - 434 x 132,5 x 276,5 mm
Weight
S2: 16 kg
S3: 18,5 kg
S2R: 7,3 kg
GLOSSARY / ALPHABETICAL INDEX
/ TROUBLESHOOTING
❏
GLOSSARY
❏ ALPHABETICAL INDEX
❏ TROUBLESHOOTING
GLOSSARY
a
Glossary
-1/<, +1/>: Buttons to increase/decrease data value by one step
at a time. Also used in the name writing procedure, to
move the flashing cursor left or right, or to move the
reverse-highlighted zone in most edit situations.
Abort: Annul - Cancel. After carrying out the majority of the
edit tasks, the Operating System asks for the confirmation or cancellation of the edit task effected, and provides
a choice between Save and Abort. Abort cancels the
modifications.
After Touch: MIDI message activated by applying pressure
after a note on event. Its action is graduated (128 steps),
and is directly proportional to the pressure applied. It is
usually used to control Modulation or Volume. Aftertouch
in the S Series is completely programmable, as are all
other controllers.
Analog Out: The analog audio output - any one of the six audio
outputs located on the bank panel of S2/S3/S2R.
Bypass: To ignore, “go around”. Used on the EFF. BYPASS
button; when pressed (led on the button on), it cuts all
DSP Effects (reverb, delay/modulations) added to sounds
emitted by the Stereo outputs Left/Right. Pressed again
(led off) defeats the bypass.
Clipboard: A “note pad” which is part of the S Series memory.
The Clipboard can contain “clips” of Edit pages which
can be used (pasted) in other similar Edit situations, and
so avoid having to repeat a series of identical parameter
modifications.
Common: See MIDI Common.
Controllers: Sound controlling devices (Wheels, Pedals,
Function Controllers).
Cutoff Frequency: Central Frequency of the intervention
band of a Filter. Around the vicinity of the Cutoff
Frequency, the action of the Filter gradually becomes
less marked, creating a “bell” in the audio band.
Data Entry: An operation involving the use of specific
controls which insert data both in normal playing mode
as well as in edit mode. The Data Entry controls include:
the Dial, the -1/< and +1/> buttons, the alphanumeric
keypad, the Enter and Exit buttons and the Undo button.
Delete: Cancels. It is a command found in the Disk and Edit
Song environments.
Destination: Refers to all that to which a MIDI message
generated by a Track can be directed. S2/S3 can direct
MIDI messages to the internal Sound Generation, to
MIDI Out and to the Sequencer.
Dial: The Data Entry wheel to the right of the Display.
Increases or decreases Data value by large amounts
(continuously). Also used to move the reverse-highlighted Edit zone in almost all applications.
Dynamics: MIDI message always coupled to the activation of
a note. Dynamics controls the sound’s intensity, proportionally to the keystrike velocity.
Directory: “Catalogue” of the contents of a floppy disk. In the
S Series, you can see the data contained in a floppy disk
inserted in the drive (“disk-dir”), in the Ram-disk (“ramddir”), or in the instrument’s RAM. The directories are
divided into Setups, Bank/Songs, Performances, User
Programs.
Display: The “small” monitor incorporated in the front panel
of S Series. The Display permits the monitoring of all
information relating to the instrument’s means of control
(sound generation, commands, connections). Its high
resolution permits you to communicate with the musical
instrument through pages rich with graphics which are
easily understood.
B
GLOSSARY
Disk Drive: Device that “reads” a floppy disk. The disk drive
is built-in and has a capacity of 1.65 Megabytes. It can
also use 3.5” HD or 3.5” DD disks.
Drum Kit: Refers to the layout of the percussion sounds across
the keyboard. A Drum Kit permits you to use only one
Track for all the drum sounds, or for a part of them. Each
note of the scale corresponds to a percussion instrument
sound. In the S Series, the Drum Kits can be freely userconfigured, by means of the Sound Patch. A series of
Drum Kits are available as ROM Sounds.
Dry: Refers to the audio output signal from S Series not
processed by the DSP. The Auxiliary outputs 1, 2, 3 and
4 always emit dry sounds.
DSP: (Digital Signal Processor). A chip contained in S Series
which modifies the sound produced by the Oscillators,
adding Reverb, Delay/Echo, and Modulations. Many
different types of DSP units are commercially available,
also known as Multi Effects units.
Edit: Modify. Refers to the entire Operating System of the S
Series User Interface, and includes Edit Performance,
Edit Sound, Edit Song, Edit General and Edit Effect.
Envelope: Term that graphically represents the change in the
characteristics and quality of a Sound with time. In the S
Series, this time lapse is applied to the programming of
several elements that constitute the Sound: Intensity
(Amplitude), Filters, Intonation (Pitch), Position within
the Stereo Panorama (Pan).
Erase: Cancel, Eliminate. A command found within the Disk,
Edit Performance and Edit Song environments. Destroys
a set of data permanently (a Disk file, a Track, a part of
a Song).
Expander: A modular Sound generating unit which operates
as a Midi Slave device, requiring to be controlled by a
controlling device such as a Master Keyboard, Midi
keyboard, Midi Accordion, Wind controller, and others.
Filter: A device used to modify sounds by altering its harmonic content. The S Series uses two Filters for each voice,
programming their development over time (Envelope),
the cut-off frequency, the type of intervention (Band
Pass, High Pass, Low Pass, Parametric Cut, Parametric
Boost), and the intervention of Resonance Q.
Floppy Disk: A magnetic Data support. It consists of a disk,
protected by a plastic container, in which data can be
memorised - as in any other computer - in numeric form.
The data can be created, restored, cancelled or updated at
any moment.
Footswitch: A physical switch action controller operated with
the foot. Two Footswitches can be connected to the S
Series rear panel sockets and both are completely and
independently programmable.
Headphones: Set of Stereo sound propagating devices that
can be used for private listening. These are connected to
S2/S3 by means of the appropriate socket located underneath the Wheels panel. In S2R, the socket is located on
the front panel.
Import: A Sound Library function that permits a Sound to be
copied from a Sound Library contained on a floppy disk
or RAM-disk into the Sound Library of the instrument’s
RAM.
Load: A command found in the Disk environment. Copies
data from a floppy disk into the Ram, and becomes
available to be modified or used for other purposes (a
Song, a Sound Library, a User Program...).
Loop: Cyclic repetition. A function found in the Edit Sound
environment, used to repeat portions on Envelopes, and
also in the Edit Sound environments, used to repeat a
specified number of bars of a Song.
Master Keyboard: A controlling device (keyboard). Usually,
a MK is a generator of MIDI events, incapable of generating Sounds. It is connected to the MIDI IN port of an
external Sound generating device (an Expander), or
another MIDI compatible musical instrument. The Master Keyboard’s utility is its capacity of supplying advanced control functions, centralised in a single system
of controllers. S2 and S3 can operate as advanced Master
Keyboards, with functions such as Split, Merge and the
programmability of the MIDI Controllers.
Menu: List of items. In Edit situations, you can access single
functions or proceed to others from a list (menu) of
different items, by moving the reverse-highlighted zone
with the Dial and pressing Enter. In menus, each function
or procedure corresponds to a number which, if specified
on the numeric keypad, allows you to access the relative
function directly.
Merge: See MIDI Merge.
Microscope: Refers to a particular function of the S Series
Sequencer (Edit Song), in which every recorded MIDI
event of a Track can be individually modified in terms of
the song position as well as the value.
MIDI: (Musical Instrument Digital Interface). A system of
communication between different digital musical instruments. MIDI is based on the connection via three types of
ports: IN, OUT, THRU. The MIDI system renders all
electronic digital instruments completely programmable
at a distance (e.g. from a computer).
The MIDI data provides the receiving instrument with all
information necessary to produce sounds.
MIDI Common: A programmed MIDI channel to, (1) simulate the S2/S3 keyboards on a connected Master Keyboard, (2) send control messages (Bank/Song change,
Performance change, Effect Change...) from an S-Series
instrument to another instrument of the same series.
MIDI Controllers: MIDI messages which transmit information relating to performance parameters (Modulation,
Main Volume, Damper Pedal...).
MIDI Merge: The function which “mixes” MIDI signals
originating from different Sources, sent by the S Series
MIDI processor to the MIDI OUT. In cases relating to
signals arriving from a MIDI In Source, the MIDI processor acts as a redirecting device, given that a MIDI
signal is usually directed to the MIDI THRU and not
MIDI OUT.
MIOS: (Musical Instrument Operating System). Refers to the
S Series Operating System, that is, the program that
makes the instrument work. MIOS is resident in ROM
and cannot be modified, but it can be expanded by means
of User Programs.
Modulation: Dynamic modification over time. Modulation
can affect Amplitude (Tremolo), Pitch (Vibrato) and the
Filter. It is usually activated by the right Wheel or by
After Touch.
Move: A function of the Sound Library and Effects Libraries
that permits you to reconfigure the respective maps, by
moving a Sound or Effect from its default position to
another location.
Multitasking: The Operating System’s capability of performing several operating tasks simultaneously without blocking the machine. The S Series Musical Instrument Operating System (MIOS) is Multitasking, because, for
example, you can modify a Song while the Sequencer is
in Playback mode, you can “freeze” the Edit Sound and
access any other operating system (“Normal” or “Edit”),
you can load or save a Song while listening to another
Song...
Normal: The basic S Series operating environment. It includes
all the Source section. It is the environment in which you
can assign different Sounds to a Track and where you can
select the four different playing modes, Single, Multi,
Layer or Split for the Track configuration.
Operating System: See MIOS.
Option: A space predisposed for the functions implemented
by User Programs.
Oscillator: The chip which produces the sound. The S Series
utilises two oscillators per polyphonic voice. The oscillator reads a Waveform, which is then modified with
Envelopes and Filters, in relation to Dynamic, After
Touch and Pitch Bend messages etc., arriving from the S
Series Controllers and from MIDI IN.
Pan: Abbreviation for Panorama. The Pan is the position of the
Sound between two Stereo audio outputs.
Pedal: Programmable continuous physical controlling devices that can be connected to the appropriate sockets on the
back panel of S2/S3.
Performance: The Track configuration that can be used by a
song at any moment, or in a live situation.
Pitch: Intonation, frequency.
Pitch Bend: Dynamic modification of the intonation. Usually
activated by the left Wheel of the S2 or S3 or by a MIDI
Message.
Playback: The term that describes the Sequencer’s capability
of reproducing a Song. Also the name given to the display
which is seen when you press the Song button in the Edit
section.
Preload: “Background” Song loading while the Sequencer in
playing another Song (the machine is not blocked by
Preload).
Program Change: A MIDI Message which changes the
Sound in a Track. The Program Change can be sent by the
Data Entry section to the Internal Sound Generation, or
sent via MIDI OUT to an external musical instrument. It
can also be recorded in a Song.
Quantize: Correction of imperfect timing errors committed
during Song recordings (including Rhythm patterns).
RAM: (Random Access Memory). A part of the S Series
Memory which can be updated and in which new data can
be loaded. The S Series are provided with 2 Megabytes of
RAM dedicated to new Samples and 2 Megabytes of
RAM dedicated to the operations performed by the
microprocessor, the Bank/Songs, parts of the Setup (General, Sound Library, Effects Libraries, Clipboard) and to
the User Programs. RAM memory is volatile, that is, it is
cancelled when the instrument is switched off.
RAM-disk: A hard disk with high speed accessing possibilities, consisting of static RAM chips which retain their
data after turning off the instrument. If installed, the S
Series RAM-disk can have dimensions of 512 kb or 2 Mb.
ROM: (Read Only Memory). A part of the S Series memory
which cannot be modified, and in which factory programmed data is conserved, such as the 518 ROM Sounds,
the 209 Waveforms, the MIOS Operating System. ROM
memory is not cancelled when the instrument is switched
off.
Sample: Refers to a portion of the sound recorded in numeric
form. The combination of several samples across various
ranges of the scale is called a multi-sample. In the S
Series, the multi-sample is called the Waveform and it
forms the basis of the Sound, which assumes new Envelope and Filter information etc. during its stages of
development.
Save: Memorize. This is a command found in the Disk
environment as well as the Normal (Save Performance).
Save renders all the modifications carried out to particular data permanent, or renders a set of data available for
future use (a Song, a Sound Library...).
Search: The function found in the Sound Library which
permits you to look for a Sound quickly by specifying
two or more letters that are contained in the Sounds name.
GLOSSARY
c
Sequencer: A system of recording MIDI data. The Sequencer
permits you to record a polyphonic song sound by sound,
and so reproduce the song after carrying out any necessary corrections. The quality of a recording made with a
Sequencer is maintained and does not decay, even after
recording a large quantity of data and after many recordings: the Sequencer does not record sound, it records
MIDI data.
Sliders: Controlling devices in the form of potentiometers,
used for the Function Controllers group of the S2 and S3.
S2R has software equivalents.
Song: A piece of music, recorded or reproduced (played back)
by the Sequencer. The S Series can store 10 Songs in
RAM, each one with its own Bank of 10 Performances.
Sound: In the S Series, the Sound is the final part of the multisampled element (Waveform) on which modifications of
the Envelopes, Filters, Pan, etc. have been performed, in
order to render the sound musically useful.
The Sounds are controlled by the Sound Library. 518
Sounds are in ROM, other can be loaded from floppy
disk.
Sound Map: The configuration of the Sound in the Sound
Library. Each Sound corresponds to a Program Change
and Bank Select. The S Series Sound map can be remapped
to correspond with other instruments of other manufacturers should they have different Sound maps.
Sound Patch: A layout of different sounds for each key, or two
different sounds separated by a dynamic threshold. In the
first case, sounds are assigned to various zones of the
keyboard (maximum of 128 zones) and a typical use is a
Drumkit. In the second case, two different Sounds can be
assigned on two different dynamic levels, so that the
second sound is triggered by varying the velocity (dynamics) with which a note is struck.
Source: A provider of MIDI events that can be directed to the
S Series Tracks. The Sources are, the keyboard (local/
Common), the MIDI In, the Sequencer (Song) and Option.
Store: Memorize. A command associated to the move command of the Sound Library and the Effects Libraries.
Track: A multitimbric part of a Song. A Track has its own
programming and timbric characteristics. In the S Series,
the Track is also the “elaborating centre” for MIDI data
originating from the Sources (keyboard, MIDI In,
Sequencer): this data is then redistributed to the destinations (internal Sound Generation, MIDI Out and
Sequencer).
D
GLOSSARY
Transpose: The change in pitch (higher or lower) of a note
with respect to a standard value.
Tweak: A term that describes the slight modification of one or
more of a Sound’s parameters.
User Interface: All that which appears within the Display.
The means with which the user communicates with the
musical instrument - that is, the availability of information relating to the status of the data - and in general with
all computers. The S Series User Interface is a graphic
system of superimposable windows containing parameters in graphical and text form.
Undo: Annul. A command available within the Edit environments that cancels the last performed task, or the last
performed series of tasks. Undo can also cancel an undo
operation, restoring an annulled task to its original status.
User: Generally, this term indicates all that can be programmed by the operator. For example, the User Controllers are the Function Controllers activated to operate in
the mode programmed by the user.
User Programs: software programs that are loaded into the S
Series RAM from a disk. These type of programs expand
the Operating System and are commercially available
through the normal Generalmusic channels of distribution. They are produced both by Generalmusic as well as
external developers.
Waveform: In the S Series, the Waveform is always a multisample; the combination of several samples across different parts of the keyboard scale. A Sample is a portion
of the sound recorded in numerical form. The Waveform
is the Sound base which assumes particular characteristics by means of Envelope shaping, Filter programming,
etc..
Wet: The term that is given to the audio signal directed to the
Stereo Left/Right outputs processed by at least one of the
two DSPs.
Wheels: The two controlling devices located on the extreme
left of the control panel of the keyboard versions of the S
Series (S2 and S3). In default conditions, they are set to
provide Pitch Bend (Wheel 1/left) and Modulation (Wheel
2/right). The wheels are completely and independently
programmable.
ALPHABETICAL INDEX
A
D
Aftertouch
activation/deactivation 137, 138, 141
Balance control 148
Pan control 166
Pitch control 147, 148
Volume control 149
cutoff frequency control 155
Attack control 151
keyboard sensitivity 205
Akai S1000 106, 112–114, 171
Amplitude envelope 14. See also Envelopes (general info)
envelope finish 150
modifying via MIDI 101
tracking 152. See also Tracking (general info)
Analog out. See Audio Outputs
Append. See Edit Song: Append
Attack. See Amplitude Envelope
Audio outputs 28, 139
Avalon 106, 111, 171
Date 205
Decay. See Amplitude Envelope
Delay (of the track) 17, 136, 141
Destinations 18, 42, 126, 135–136
Internal generation 42, 126–128, 136–137, 139
Midi Out 42, 126–128, 136–137
Detune (of the tracks). See Tracks: detune
Detune of the Waveform (Detune of the
oscillators). See Waveform: detune
Dynamics
Balance control 148
Pan control 163, 166
Pitch envelope control 160
Volume control 149
Cutoff frequency control 155
Resonance control 155
Attack control 151
response curves 136
keyboard sensitivity 205
Disk 209–220
Directory 211, 212
Erase
(all, single) 216
Format 52, 216
Load
(all, single) 214
load all 53
load all, automatic at power up 209
modify the name 217
Save
(all, single) 215
save all 57
Drumkit 90, 176–178
DSP. See Effects
Dynamic curve. See Dynamics: response curves
Dynamic range. See Tracks: dynamic limits
B
Bank/Song 16, 72–74, 179
erasing from disk 216
erasing from memory 235
loading 53, 70, 214
copy 236
create 74, 180
modify name 235
save 57, 58, 215
select 45, 70
Bank Select 96, 204, 221
C
Catch locator 194, 198
Chase Events 183
Clipboard 234
cancel from memory 235
load. See Setup: loading
save. See Setup: save
Clock 183. See also Song: Tempo
Clock Out 204
activation/deactivation 204
Commands/options (general info) 22, 42
Common Volume 182, 198
Countdown 196. See also Song: recording: initial
countdown
Cross-switch. See Tracks: dynamic limits
Cut end 114
Cutoff frequency. See Filters: cutoff frequency
E
Edit Effect 227–233
Edit environment (general info) 21–25
Edit General 201–208
Edit Performance/Controls 44, 131–133
Edit Performance/Tracks 44, 134–141
Edit Song 184–200
- "from locator... to locator..." 185
- "note range" 185
Append 192, 200
Copy editor 191
Dynamic editor 189
Erase events editor 186
Insert/delete bars editor 188
Mastertrack editor 197
ALPHABETICAL INDEX
e
Microscope editor 193, 200
Move events editor 187
Quantize editor 190
Transpose editor 189
Utility editor 196
Edit Sound 90–95, 142–168
Amplitude envelope editor 150–153. See also
Amplitude envelope
Filter 1/2 editor 154–156
Filter envelope editor 157–159
LFO editor 153–154
Pan editor 163–166
Pitch envelope editor 160–162
Volume editor 149–150
Waveset editor 147–148
saving the Sound to the SoundLibrary 144
escape without saving 145
Edit Stop To Bar 84, 182, 196, 200
Eff. Bypass 41
Effects 17, 79
activation/deactivation 139
recording 182, 198
rotary 132, 198
selection 131, 225
via MIDI 100
volume 131
Effects Libraries 225–226
loading. See Setup: loading
saving. See Setup: saving
Envelope (general information) 92–93
Event list 193, 198, 200
Extended Program Change. See MIDI Extended
Program Change
F
F.C. reset 89, 132
Family. See Sound Library: Sound families
Filters 15, 91–92. See also Edit Sound: Filter 1/2
editor
cutoff frequency 91, 155
envelope 92, 146
modifying via MIDI 101
out gain 155
resonance 91, 155, 168
filter types 167
tracking 156
tracking of the envelope 159
Fine Pitch. See Waveform: Fine Pitch
Floppy disk 19. See also Disk
Footswitches 131, 132
activation/deactivation 137, 138
Start/Stop control, Perf+ and Perf- 203
assignable MIDI messages 133
polarity 203
Formatting. See Disk: Format
Free memory. See Song: Free memory
Function Controller (S2R) 88–89, 132
Function Controllers 44, 77, 86–88
programming the User Keys 132
F
ALPHABETICAL INDEX
assignable MIDI messages 133
programming the User Sliders 132
assignable MIDI messages 133
G
Gain 106, 117, 146
General Setup
loading. See Setup: loading
saving. See Setup: saving
General MIDI 61, 206
Group of Bank/Songs 19, 210
loading from disk 216
loading 54
saving 58
GS 61
I
Import 223–224
Initialization. See Disk: Format
Internal memory 19
J
Juke Box. See UTILITY: Juke Box
K
Key range. See Tracks: keyboard limits
L
Layer. See Tracks: track playing mode: layer
LFO 94. See also Edit Sound: LFO editor
applied to the filters 154
applied to the pitch 153, 167
applied to the amplitude 154, 167
MIDI sync 153
Load all. See Disk: Load: load all
automatic at power up. See Disk: Load: Load all,
automatic at power up
Locator 84, 182
Loop (of sample) 106, 117, 119, 120, 146. See also
Sampling
Loop (of Song). See Song loop
M
Master keyboard
connection to S2R 29–30
Master Track. See Edit Song: Mastertrack editor
Master Transpose 129
enable/disable 137
Menu
selection with Dial+Enter 39–40
selection with numeric keypad 40
Menu (general info) 22
Metronome 182, 183, 196
Microscope. See Edit Song: Microscope editor
MIDI
compatibility General MIDI/GS. See General
MIDI; GS
MIDI Channel lock 204, 208
MIDI Clock. See Clock
MIDI Extended Program Change 204
MIDI file 61–64
loading 62, 217
saving 63, 217
MIDI filters 139–140, 141
MIDI Merge 204
MIDI OFF 41
MIDI System Exclusive 204
MIDI-Common 29, 30, 98, 100, 137, 204
saving the editing 32
MMA sds (Sample Dump Standard) 110, 118, 171
Multi. See Tracks: Track playing mode: multi
Multisample 106. See also Waveform
Multitasking 20
Multitimbral 17
Mute 17, 44, 50, 77
"in mute" symbol 42, 82, 126–128
N
Normal 20
O
Oscillator. See Waveform
Outputs. See Audio outputs
Overdub. See Song: recording: replace/overdub
P
Pages (general info) 21
Pan 17, 94, 139
envelope 163
modifying via MIDI 101
tracking 165
Pan envelope. See Pan: envelope
Pan tracking. See Pan: tracking
PANIC 41
Parameters (general info) 22–23
Pedal Volume 182
Pedals 80, 131
activation/deactivation 137
assignable MIDI messages 133
recording 182, 198
Performance 16, 75–81
erase from memoria 235
copy 236
create 180
modify name 235
"Performance" viewing mode 43
"Save Performance" 44, 81, 89, 95
selection
from panell 43, 45
in a Song 179, 198
via MIDI 98
Pitch Bend 131, 132
Pitch envelope 166. See also Envelope (general info)
tracking 162
Pitch envelope tracking. See Pitch envelope: tracking
Play 44, 50, 77
"in play" symbol 42, 82, 126–128
Playback. See Sequencer internal: controls; Song:
playback
Poliphony 143
Preload 70, 237
Priority 139
Program Change 96, 204, 221
Q
Quantize. See Edit Song: Quantize editor; Song:
Quantize
R
RAM-disk 19. See also Disk
RAM-Sounds. See Sounds: RAM-Sounds
Record. See Sequencer internal: controls; Song:
recording
Release. See Amplitude Envelope
Replace. See Song: recording: replace/overdub
Resonance. See Filters: resonance
ROM-Sounds. See Sounds: ROM-Sounds
Rotary. See Effects: rotary
S
Sample 106
loading 109, 171
sending via MIDI 117, 173
Sample Vision 106, 111, 171
Sampling 14–15
Sampling rate 119
Save all. See Disk: Save: save all
Save Performance 44, 81, 89, 95
Scale 198, 201, 208
Sequencer external
connection to S2R 30–33
programming from S2/S3 102
Song exchange 183
Sequencer internal 70–71, 179–183
controlls 71, 180
Set split 49
Setup 19
erasing from disk 216
loading 53, 55, 214
saving 57, 59, 215
Source section 126–128
Single. See Tracks: playing mode: single
Solo 17, 50, 128, 170
Song 179–183, 183. See also Edit Song
erase from memory 72, 181
load. See Bank/Song: load
free memory 182
ALPHABETICAL INDEX
g
mastertrack 186
playback 179
quantize 84, 181
recording 82–85, 83–85, 179, 181–182
countdown 182
Edit Stop To Bar 182
Locator 182
replace/overdub 182
via MIDI 183
selection. See Bank/Song: selection
Tempo 84, 181, 182
in the Mastertrack 198
Time Signature 84, 181, 183
tracks 82, 179
Song loop 196
Song Position Pointer 183
Sound Library 91, 221–224
load. See Setup: load
save. See Setup: save
Sound family 221
Sound synthesis 14–15
Sound Test 35, 206
Sound Designer 106, 111, 171
Sound Patch 90, 176–178
Sounds
load with "import" 223–224
modify via MIDI 101
RAM-Sounds 91
ROM-Sounds 91
selection
from panel 43, 46
via MIDI 96
"Sounds" viewing mode 43
type of Sounds 90, 111, 142
selection in edit 146
Sounds (general info) 15
Sounds DC (Dual Crossfade). See Sounds: type of
Sounds
Sounds DO (Dual Oscillator). See Sounds: type of
Sounds
Sounds SO (Single Oscillator). See Sounds: type of
Sounds
Sources 18, 42, 48, 126–128, 135–136
recording data generated by the S in a Song 82
Split. See Tracks: playing mode: split
Sustain. See Amplitude Envelope
System Exclusive. See MIDI System Exclusive
T
Tempo. See Song: Tempo
Time 205
Time Signature. See Song: Time Signature
Tracks
assigning the Effects 80, 139
assigning the Sounds 76
H
ALPHABETICAL INDEX
track playing modes 16, 43, 44, 48–49
- resulting polyphony 143
layer 48
multi 49
single 48
split 48
erase 75, 135, 141
configuratoin of the tracks 17, 44, 135–136
copy 76, 135
correct track visualisation 47
creation 75, 134
of the Song 82
detune 139
Dynamic range 137, 138
Key range 137, 138
transpose 78, 136
volume 77
modify via MIDI 101
Track Transposer 78, 129–130
Tracking (general info) 93–94
Transpose 78, 129–130
True Events 183
Tuning 201
U
UNDO 41, 182, 185, 196, 199, 200
User Keys. See Function Controllers: programming
the User Keys
User Program 19
load 214
User Sliders. See Function Controllers: programming
the User Sliders
UTILITY 235–236
Juke Box 235
V
Volume tracking 149. See also Tracking
W
Wave 106, 111, 171
Waveform 15, 90, 91, 106, 108, 147, 148
balance 148
detune 120, 146, 147, 160, 166
fine pitch 120, 148
Wheels 80, 132
activation/deactivation 137
assignable MIDI messages 133
TROUBLESHOOTING
Problem
Possible cause
Solution
The instrument doesn't turn on.
The power cable is not inserted
correctly.
Check the connection and make sure
that the plug is inserted fully home.
The instrument (fitted with a Ramdisk) locks when you power up.
The data contained in the Ram-disk
is damaged (probably due to a
power failure during a previous
"Save to Ram-disk" procedure.
Press ENTER an instant after
turning on the instrument to exclude
the Ram-disk. Access the Disk
Erase operations and cancel the
Ram-disk contents.
No sound is heard.
Check the amplifier and make sure
it is turned on. If on, check the
volume levels of the amplifier and
instrument .
If the amplifier is off, turn it on. If
the volume levels of one or both
units are set to "zero", adjust them
accordingly.
The Tracks are not connected to the
Keyboard source.
Configure the tracks of the
Performance correctly for Local
Source playing.
You are playing (in Local/Common
mode) on a section of the keyboard
to which no sound has been
assigned, or an incorrect
transposition setting has taken the
sound "out of range".
Check the remainder of the
keyboard and adjust the keyboard
range if necessary, or set the
transposition to the correct value.
The floppy disk is protected or
damaged.
Remove the protection, or use a
better quality disk.
You are using an incorrectly
formatted floppy (e.g. 3.5" DD
"work" format).
Use a correctly formatted floppy
(3.5" HD "work" format.
It is not possible to format a floppy
disk.
It is not possible to load the contents The floppy may be an incorrect
format for the load operation (Msof a floppy disk into the
Dos instead of S Series), or it could
instrument's memory.
be damaged.
Use the correct loading procedure
for the floppy in question (e.g.
"Load Midi-File" for an MsDos/Atari disk).
The Sequencer does not start when
you press PLAY.
The clock is set to "External".
Set the Clock to "Internal", or start
the sequencer by sending a start
command from an external
controlling device.
An empty Bank/Song has been
selected.
Select a Bank/Song which contains
a Song.
MIDI communications are not
possible.
The MIDI cables are incorrectly
connected, or the tracks have not
been assigned to the "Midi Out"
destination.
Connect the Midi cables correctly
and check that the tracks are
connected to the "Midi Out"
destination.
A note "locks" and cannot be
stopped playing.
A MIDI error has occurred.
Press the PANIC button.
TROUBLESHOOTING
I
J
TROUBLESHOOTING
FEDERAL COMMUNICATIONS COMMISSION
Note: This equipment has been tested and found to comply with the limits for a Class B digital
device, pursuant to Part 15 of FCC Rules. These limits are designed to provide reasonable
protection against harmful interference in a residential installation. This equipment generates,
uses, and can radiate radio frequency energy and, if not installed and used in accordance with
the instructions, may cause harmful interference to radio communications. However, there is
no guarantee that interference will not occur in a particular installation. If this instrument does
cause harmful interference to radio or television reception, which can be determined by turning
the instrument off and on, the user is encouraged to try to correct the interference by one or
more of the following measures:
- Reorient or relocate the receiving antenna.
- Increase the separation between the equipment and the receiver.
- Connect the equipment into an outlet on a circuit different from that to which the receiver
is connected.
- Consult the dealer or an experienced radio/TV technician for help.
CAUTION:
Changes or modifications to this product not expressly approved by the
manufacturer could void the user’s authority to operate this product.
Specifications are subject to change without prior notice.
PRINTED IN ITALY
Sales Division: I -47048 S.Giovanni in Marignano (RN) - Italy – Via delle Rose, 12 Tel. +39 541 959511 – fax +39 541 957404
– tlx 550555 GMUSIC I - Internet: http://www.generalmusic.com


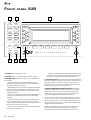
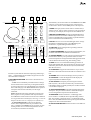
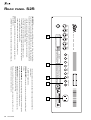


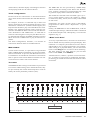

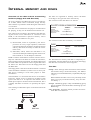

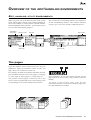


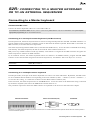


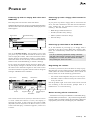

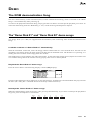

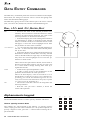
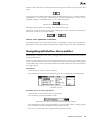

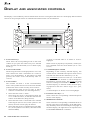
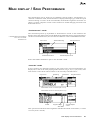
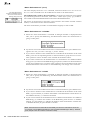
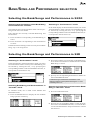
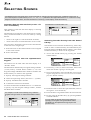
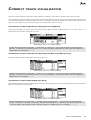
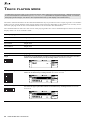
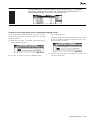


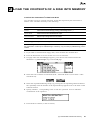

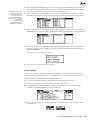
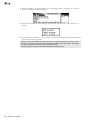

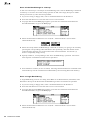
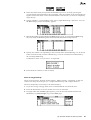


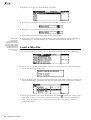

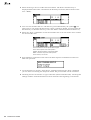


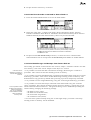


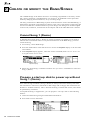
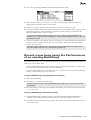
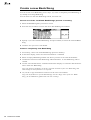
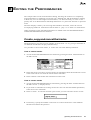
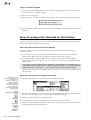
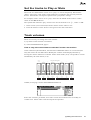
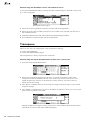

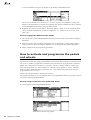
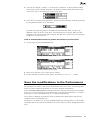
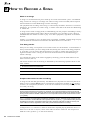


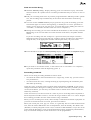
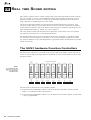
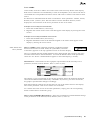


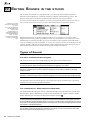
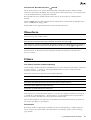
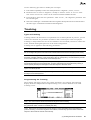

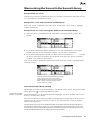
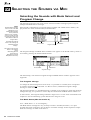
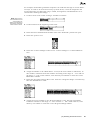


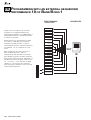
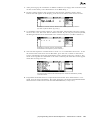


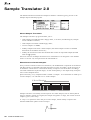
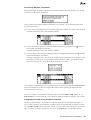

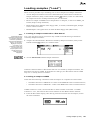


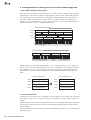
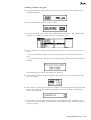


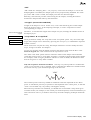
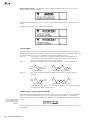
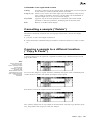
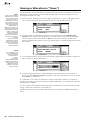
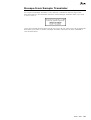


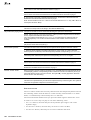


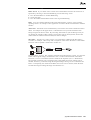


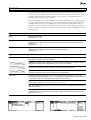


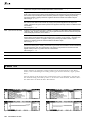
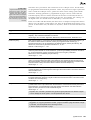


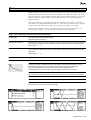


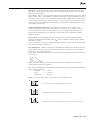


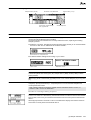

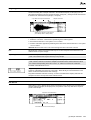

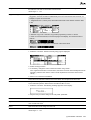
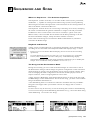
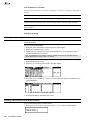
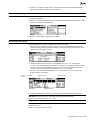

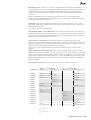
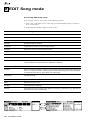


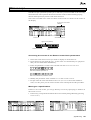

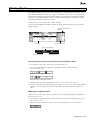
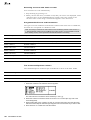


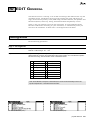
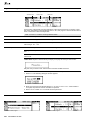


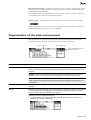
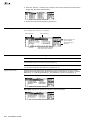
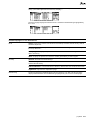

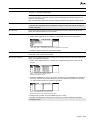


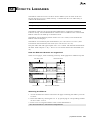
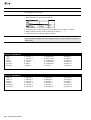
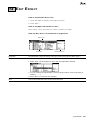


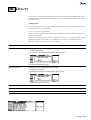
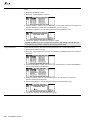


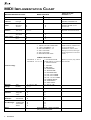
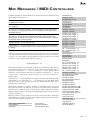


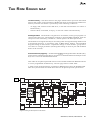
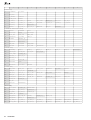

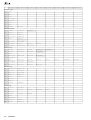

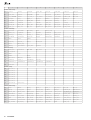

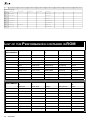
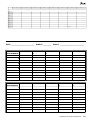
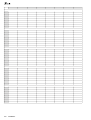


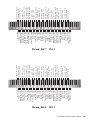


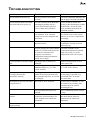


![Overture 2 Owner`s Manual [US]](http://vs1.manualzilla.com/store/data/005690862_1-0f7bb48baaf3473aa086657512069e12-150x150.png)