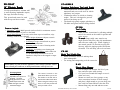
1
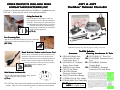
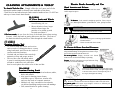
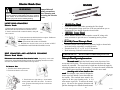
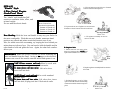
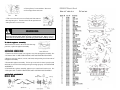
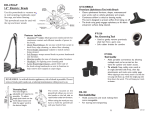
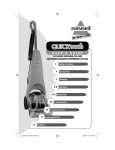
ASP1 & ASP2
Defender ElectroKit
www.lindsaymfg.com
Copyright © 2004 by Lindsay Manufacturing, Inc. All rights reserved. No part of this
publication may be reproduced or transmitted in any form or by any means without
written consent. Any unauthorized copies will be prosecuted for civil damages to the
fullest extent of the law.
L6150
5/07
© Lindsay Manufacturing , Inc. 2004
Printed in USA by LMI
USER GUIDE
IMPOR
TANT SAFETY
IMPORT
INSTR
UCTIONS
INSTRUCTIONS
Please read all instructions before using the Electric Powerhead.
When using this electrical appliance, basic precautions should always be followed,
including the following:
WARNING
Electric shock could occur if used outdoors or on wet surfaces.
1) Unplug and disconnect power before
servicing.
9) Do not allow to be used as a toy. Pay
close attention when used by or near small
children.
2) Always turn off this appliance before
connecting or disconnecting either hose or
motorized nozzle.
10) The hose contains electrical wires. Do
not use if damaged, cut, or punctured.
Avoid picking up sharp objects.
3) Do not vacuum up anything that is
burning or smoking, such as cigarettes,
matches, or hot ashes.
11) Do not put any object into openings.
12) Do not use with any opening blocked;
keep free of dust, lint, hair, and anything
that may reduce air flow.
4) Do not pick up flammable or combustible liquids such as gasoline or use it in
areas where they may be present.
13) Keep hair, loose clothing, fingers, and
all parts of the body away from openings
and moving parts.
5) Use only as described in this manual.
Use only manufacturers recommended attachments.
14) Do not leave vacuum or brush when
plugged in. Unplug from outlet when not
in use and before servicing.
6) Do not unplug by pulling on cord. To
unplug, grasp plug, not the cord.
8) Turn off all controls before uplugging.
15) If appliance is not working as it should,
has been dropped, damaged, left outdoors,
or dropped into water, return it to your
distributor.
9) Do not use with damaged cord or plug.
16) Use extra care when cleaning on stairs.
7) Do not handle system or appliances
with wet hands.
Wet Pic
k-Up*
Pick-Up*
This unit allows the powerful built-in central
vacuum system to pick up liquid and wet debris,
but prevents it from entering the vacuum tubing
and dirt canister. It can be used to unclog drains,
clean up spills and overflows, and even suck out
the leftover water when draining hot tubs.
Capacity=Approx. 4 gallons.
(WP-312MA)
*Wet Pick-Up Unit comes with bucket, cart, 5’ x 1-1/4” hose and 2 cuffs.
(Additional 30’ standard hose should also be purchased. Do NOT use SFH-630 or any
other high or low voltage hose with this product. )
Vibr
ating Upholster
y Tool
ibra
Upholstery
This tool vibrates the surface being cleaned to
loosen dust and dirt allowing you to get a more
deep down clean. (UT-501)
For more details on these or any other Lindsay products,
contact your local Vacu-Maid® or Astro-Vac® dealer or visit our
.v
acumaid.com and www
.astr
ovac
.com
websites at www
www.v
.vacumaid.com
www.astr
.astro
ac.com
.com.
CARING FOR YOUR CARPET
“Proper maintenance will extend the time you can enjoy
your carpet and help keep its fresh appearance. Vacuum regularly, remove spills promptly, and extraction clean periodically...
Use a strong, well functioning vacuum cleaner with a
powerful airflow, adjustable brushes, and an enclosed, highefficiency filtration bag. It is best to purchase a vacuum cleaner
ogram la
bel,
that bears the CRI Indoor Air Quality Testing Pr
Pro
label
assuring that the cleaner will remove soil well, contain the dust
”
within the machine, and protect the carpet’s appearance.”
--The Carpet & Rug Institute (CRI)
SAVE THESE INSTRUCTIONS
INTENDED FOR HOUSEHOLD USE ONLY
For more information on caring for your carpet, please visit the
pet-r
ug
.com
.car
CRI website at www
www.car
.carpet-r
pet-rug
ug.com
1
14
ASP1 & ASP2
DustMate ® Defender ElectroKit
OTHER PR
ODUCTS AVAILABLE FR
OM
PRODUCTS
FROM
LINDSA
Y MANUF
ACTURING
INC.
LINDSAY
MANUFA
CTURING,, INC
A variety of accessories and tools are available to complement your
ASP kit.** Below are just a few of the options available.
Ceiling F
an Br
ush Kit
Fan
Brush
8
For the one place we all forget to clean, but
know that we should, we offer the Ceiling Fan
Brush Kit. This kit helps you reach the tops of
your fan blades and ensures that you get rid of
all of the dust build-up. With its unique
design and powerful suction, it eliminates
dust from scattering below.
6
(CT-5)
Pet Gr
ooming Tool
Grooming
11
9
12
5
This pet tool’s soft rubber bristles are great for comfortably
removing previously shed hair from a pet’s coat.
1
7
2
3
10
4
(PT-530)
*Individual tools may vary and are subject to change at any time.
Tool Kit Inc
ludes:
Includes:
Hand Held Air T urbine with Cr
Cree vice Tool
This accessory can be used on stairs, in vehicles, or on
upholstery. The fold out crevice tool can be used to
reach into cracks and crevices or folded back when not
needed. This tool has an open face which allows the
vacuum to clean the corners on the risers of stairs
allowing for a more complete clean.
(PB-255)
Mini-V
acuum Attac
hment Kit
Attachment
Mini-Vacuum
This mini kit is perfect for cleaning small, delicate
objects, computers, and keyboards.
(CT-6)
**Do NOT use these accessories with the top and lower electric powerbrush
wands. They are to be used with the hose or telescopic ratchet wand.
13
1.
2.
3.
4.
5.
6.
7.
8.
Accessories
Cleaning Attac
hments & Tools
Attachments
(SFH-630) Slimfit Style
9. (FB-215BLK) 12” Floor Tool
4-Wire Swivel Electric
10. (CT-630BLK) Premium Crevice
Crush-Proof Hose **
Tool
(EB-250AT) 14” Defender
11. (DB-630BLK) Premium
Electric Power Brush
Dusting Brush
(BW240) Lower Wand
12. (UT-630BBLK) Premium
(W-535) Top Wand
Upholstery Tool with Brush
(W-419H) Chrome
The following Central Vacuum units when used in conjunction with the listed electric floor brushes, have
Telescopic Ratchet Wand
been tested and approved by the Carpet and Rug Institute for use on carpet. The list of approved Vacu-Maid/
(H-431) Plastic Hose Hanger
Silent Partner models are; S-3240, S-3200, S-2600, SS-1600, S-1200, P-350P, P-325, P-225, P-215,
(CT3BL) Clip-On Tool Caddy 2000,
P-125P, and P-110. The list of approved Astro-Vac
Models
are; SL-2940, SL-2340, SR-89, SR-88, SR-50,
(CB-180) Mesh Tool Caddy Bag SR-40, SR-40V
and SR-36. The approved electric floor
**ASP1
**ASP1-Direct Plug-In;
ASP2
ASP2-6ft. Pigtail Cord
2
brushes are; EB-180 Super Groom, EB-210 Super
Groom II, EB-240 Vacu-Maid and the EB-260 VacuMaid, which have been approved for use on carpeting
when used in conjunction with the aforementioned
Vacu-Maid/Silent Partner and Astro-Vac central
vacuum units.
EB-250A
T
EB-250AT
14” Electric Br ush
UT-630BBLK
Pr
emium Upholster
y Tool with Br ush
Premium
Upholstery
• Cleans upholstered furniture, drapes,
Use this powerbrush to vacuum wall
to wall carpeting, handmade carpets,
fine rugs, and other flooring.
•
This powerbrush must be used
with the top and lower wands.
•
Fea
tur
es inc
lude:
eatur
tures
include:
• QuietdriveTM V-Belt--Multi-grooved reinforced belt for continuous contact
and efficient transfer of power to the brush.
• Quick Wand Release--for an easy switch from carpet to hard floor, edge
cleaning, or above floor cleaning.
• 4-level height adjustment--adjusts to match
surface being cleaned.
• Soft Bumper--wraps around brush to protect
baseboards and furniture.
• Slim-line profile--for ease of cleaning under
furniture.
• Headlight-- for lighting your cleaning path
• Active Brush Edge Cleaner-- guide either side
of the brush along baseboards or next to
furniture to help remove dirt trapped at carpet
edges.
CT-3BL
Tool Cad
dy
Cadd
•
•
•
Holds accessories and tools making them
more manageable.
For storing and transporting tools & accessories
H-431
Plastic Hose Hanger
•
Telescoping Wand
The wand length is
adjustable and requires no
assembly. To adjust,
simply push down on the
wand adjust button and
slide the upper wand to
the desired height.
The swivel, located on the
powerbrush allows you to turn
the handle to the left side to
reach further under low furniture.
When raising the wand you may
have to hold the powerbrush
with your hand or foot.
3
Adds portable convenience by allowing multiple
tools to be carried on the wand for quicker and
easier access.
To aattac
ttac
h: Snap caddy onto wand at an
ttach:
angle (beveled side first), then slip attachments
and tools onto caddy pegs. When clipping it
onto wand, attach it so that the two-peg side
faces up, while the single-peg side faces down
the wand. This will keep your tools on better.
CB-180
Mesh Tool Cad
d y Ba
g
Cadd
Bag
•
REMEMBER: As with all electric appliances, risk of shock is possible. Do not
remove brush, pull wands out, or attempt maintenance while power is on.
mattresses,and even works well on vehicle
upholstery and carpets.
Continuous airflow is critical to cleaning
results. This tool is designed to prevent
airflow from being cut off.
The brush strip gently engages upholstery to
lift debris and groom surfaces being cleaned.
•
•
•
Accessories shown may not be to scale.
Use of hanger can increase the life of your
hose and save space while storing.
Coil your hose around this hanger to store it
when not in use.
Mount on a wall in a closet, garage, or any
other convenient location for hose storage,
and place it high enough so you can loop your
hose only four times and still clear the floor.
Mounts using only one stud and two screws.
12
L6150
CLEANING ATT
ACHMENTS & TOOLS*
TTA
To Attac
h Tools ffor
or Use: Simply slide the tool onto end of the
Attach
telescopic ratchet wand or directly onto stub tube of the hose.
*Tools are to be used with telescopic ratchet wand or handle on hose. Do NOT use
with top or lower electric brush wands.
Electric Br ush Assemb
Assemblly and Use
Wand Inser
tion and R
elease
Insertion
Release
To Inser
t: Insert wand into electric brush until the wand
Insert:
button snaps into place.
FB-215BLK
12” Floor Brush with Wheels
• Works well to clean bare floors,
•
wood flooring, tile, etc.
Shorter bristles in front, longer
in back--allows larger dirt
particles to be picked up with
forward movement.**
**F
or best rresults
esults
**For
esults,, do not force the front of the brush down when moving
forward. Allow the brush to gently glide across the floor. The front of
the brush should allow particles to enter through the raised bristles.
CT-630BLK
Pr
emium Cr
Premium
Cree vice Tool
• 13” tool to reach into cracks and crevices
•
•
such as tracks of sliding glass doors, corners,
along baseboards, and even in the cracks of
couches and other furniture.
Notched end and slotted side vents help
maintain air flow and proper suction.
This tool has a flat side which makes
it great for reaching under refrigerators,
around air conditioner coils, and other
hard to reach places that collect a lot of dust and dirt.
DB-630BLK
Premium Dusting Brush
• Use for dusting furnishings such as bookcases, tables,
desks, and mantles.
• Also great for dusting picture frames,
collectibles, tops of televisions, window sills,
and even the backs of computer monitors.
• Molded, soft vinyl construction--less abrasive
on delicate furnishings and prevents wall markings.
• Full, natural bristles for gentle cleaning.
11
To R
emo
ve: Lock wands in straight-up position. Then, step on
Remo
emov
the “Wand Quick Release” pedal with foot. Now, pull up on wand.
!
WARNING
DO NOT attach or remove handle or wands while cleaner is ON. This
could cause sparking and damage the electrical contacts.
To Star t:
1. To lower wand, press on the large pedal marked
“Handle Release”.
2. Start vacuum and electric brush.
To Cor
eset Ov
er
load Pr
otector
Corrr ect & R
Reset
Over
erload
Protector
otector::
The overload protector protects the motor from brush jamming and belt breakage. If the agitator slows down or stops,
the overload protector shuts the brush off.
To cor
ob
lem: Unplug electrical cord. Check
corrrect pr
prob
oblem:
brush area for excessive lint buildup or jamming.
eset: Press the reset button on top of the brush. Plug
To rreset:
in and turn on vacuum and brush.
To Chang
Changee Pile Setting:
Select a pile height setting by using the pile height
lever on the electric brush. The pile height setting
is shown on the control. The deeper the pile of
the carpet, the higher the setting.
Sug
gested Pile Height Settings: For best deep down cleaning, use the XLO
Sugg
setting. However, you may need to raise the height to make some jobs easier.
As a ggener
ener
al guide: XLO-most carpet heights, LO-short to medium pile,
eneral
MED-medium to long pile, HI-long pile.
4
Electric Br
ush Car
Brush
Caree
!
WARNING
Electric Shock or Personal Injury Hazard
Disconnect electrical supply before servicing or cleaning
the unit. Failure to do so could result in electrical shock or
personal injury from cleaner suddenly starting.
WANDS
Always follow all
safety precautions
when cleaning and
servicing the electric
brush.
3
2
1
LIGHT BULB CHANGING
Electric Brush:
-535) Top Wand
(W-535)
1. (W
1. Remove the electric brush cover as shown in BELT
CHANGING & AGITATOR CLEANING section.
2. Push in and turn bulb counterclockwise, then pull
out to remove.
3. Push in and turn the bulb clockwise to replace. Bulb must
not be higher than 130 volts/15 watts.
Note: replacement bulb number is EB26028.
4. Reinstall the electric brush cover as shown in BELT
CHANGING & AGITATOR CLEANING section
•
•
-240) Lo
wer Wand
(BW-240)
Low
2. (BW
•
Disconnect hose and brush from electrical outlet. Frequently check and
remove hair, string and lint buildup in brush area. If buildup becomes excessive,
disconnect the brush from wand and follow steps below.
To R
emo
ve Belt:
Remo
emov
1. Turn the electric brush upside down.
2. Unscrew the brush cover screws.
3. Turn brush over right side up. Press handle
release pedal and lower the swivel. To remove
cover, grasp the sides and pull out to release the
outside cover.
5
Swivel Wand Connector--allows wand to rotate 90° along with
wrist movement to provide ease of vacuuming and to prevent
strain
-419H) Chr
ome Telescopic Wand
(W-419H)
Chrome
3. (W
• Extension wand--can be adjusted to necessary height to lessen back
•
•
BEL
T CHANGING AND A GIT
AT OR CLEANING
BELT
GITA
Electric Brush Model:
Connects to lower wand when operating the floor brush
Cord management--keeps cords out of the way and allows you to
disengage the hose handle from the electric brush
strain and can be extended to reach high areas
Extends from 23-1/2” to 39” in 3/4” increments
Hole in the top, friction fit on the bottom
IMPORTANT: Do NOT remove wands while power is on.
Telescopic Wand Oper
ating Instr
uctions
Opera
Instructions
To eextend
xtend w
and: Push the black button in the direction of the
wand:
arrow and hold in place. This releases the ratchet and allows the inner
wand to be extended. The wand can be locked into the desired length by
releasing the button at any of the notches. To retract the wand, hold down
on the black button and push the wand back into the outer wand.
Attaching tools or hose handle to the
wand: The straight, outer wand is designed to
fit into your hose handle. Insert the wand into
the handle. The notched inner wand is designed to fit into your cleaning tools. A 1/4
turn ensures a good fit. To remove the wand,
give a 1/4 turn in the opposite direction and
pull the cleaning tool or handle from the wand.
10
L6150
SFH-630
“Slimfit” Style
4-W
ir
vel Electric
4-Wir
iree Swi
Swiv
Cr ush-Pr
oof Hose*
ush-Proof
4. Lift rear latches up and tilt cover forward
from back until front snaps free.
The “slimfit” style handle has 360°
rotation to minimize kinks, effort, and
in-hand weight.
For use with the electric brush.
T hr
ee-P
osition Switc
h:
hree-P
ee-Position
Switch:
Allows vacuum to be
controlled from the handle.
• Vacuum off, Brush off
• Vacuum on, Brush off
• Vacuum on, Brush on
Hose Handling: Hold the hose and handle in any way you find to be
the most comfortable. With this new style handle, numerous hand
positions are offered and reduce strain and increase ease of use.
Also, for added ease while vacuuming, try keeping the hose behind you
rather than out in front of you. Use one hand to hold the handle and the
other hand to hold and guide the hose. Again, do what feels comfortable to you.
IMPOR
TANT
IMPORT
ANT:: Make sure power is turned off before removing the
hose and handle from the wand. Arcing or damage to the electrical
contacts can occur if the wand is removed while brush power is on.
*ASP1-Direct connect wall-end
-wall-end---Must be used with
an electric inlet valve such as the Electravalve.
To inser
alv
e: Lift valve door,
insertt hose cuf
cufff into vvalv
alve:
insert cuff into hole.
*ASP2-Pigtail cord wall-end
-wall-end---Use with standard
pin-jack valve.
To inser
alv
insertt hose cuf
cufff into vvalv
alvee : Lift valve door, insert
cuff into hole, & plug cord into 110 electrical outlet.
L6150
9
5. Depress tabs on rear of agitator cover and rotate
forward to release from the electric brush base.
6. Lift agitator assembly out and remove worn belt.
To R
Ree place Belt:
1. Install new belt over motor drive,
then over brush sprocket. NOTE: belt
replacement number for is EB29010.
2. Replace agitator assembly back into the electric brush.
3. Reinstall agitator cover by lining
up the front tabs and slots and rotating
downward until the latches snap into
place.
6
4. Line up front of cover and base. Rest cover
on front edge of base as shown.
EB250AT Electric Brush
5. Tilt cover to back. Press cover firmly until side and rear
tabs snap into place. Turn the electric brush upside down
and replace the 2 cover screws.
!
WARNING
Electric Shock or Personal Injury Hazard
Disconnect electrical supply before servicing or cleaning the unit. Failure to do so
could result in electrical shock or personal injury from cleaner suddenly starting.
To Chec
k Agita
tor Assemb
Agitator
Assembll y:
Check
When brushes are worn to the level of the base support bars, replace the agitator assembly.
A GIT
AT OR SER
VICING:
GITA
SERVICING:
1. Remove the electric brush cover, agitator cover, belt and agitator assembly. See
“To Remove Belt” in BELT CHANGING AND AGITATOR CLEANING.
2. Remove end caps, washers, screws, end brush, and sprocket pieces from ends of
old agitator assembly.
3. Reassemble agitator assembly. To line up screw holes in dowel, sprocket and
end brush, be sure all of the brush sprocket pieces align properly. See AGITATOR
ASSEMBLY.
4. Reinstall belt, agitator assembly, agitator cover, and electric brush cover. See
“To Replace Belt” in BELT CHANGING AND AGITATOR CLEANING.
A GIT
AT OR ASSEMBL
Y
GITA
ASSEMBLY
Electric Brush
7
8
SFH-630
“Slimfit” Style
4-W
ir
vel Electric
4-Wir
iree Swi
Swiv
Cr ush-Pr
oof Hose*
ush-Proof
4. Lift rear latches up and tilt cover forward
from back until front snaps free.
The “slimfit” style handle has 360°
rotation to minimize kinks, effort, and
in-hand weight.
For use with the electric brush.
T hr
ee-P
osition Switc
h:
hree-P
ee-Position
Switch:
Allows vacuum to be
controlled from the handle.
• Vacuum off, Brush off
• Vacuum on, Brush off
• Vacuum on, Brush on
Hose Handling: Hold the hose and handle in any way you find to be
the most comfortable. With this new style handle, numerous hand
positions are offered and reduce strain and increase ease of use.
Also, for added ease while vacuuming, try keeping the hose behind you
rather than out in front of you. Use one hand to hold the handle and the
other hand to hold and guide the hose. Again, do what feels comfortable to you.
IMPOR
TANT
IMPORT
ANT:: Make sure power is turned off before removing the
hose and handle from the wand. Arcing or damage to the electrical
contacts can occur if the wand is removed while brush power is on.
*ASP1-Direct connect wall-end
-wall-end---Must be used with
an electric inlet valve such as the Electravalve.
To inser
alv
e: Lift valve door,
insertt hose cuf
cufff into vvalv
alve:
insert cuff into hole.
*ASP2-Pigtail cord wall-end
-wall-end---Use with standard
pin-jack valve.
To inser
alv
insertt hose cuf
cufff into vvalv
alvee : Lift valve door, insert
cuff into hole, & plug cord into 110 electrical outlet.
L6150
9
5. Depress tabs on rear of agitator cover and rotate
forward to release from the electric brush base.
6. Lift agitator assembly out and remove worn belt.
To R
Ree place Belt:
1. Install new belt over motor drive,
then over brush sprocket. NOTE: belt
replacement number for is EB29010.
2. Replace agitator assembly back into the electric brush.
3. Reinstall agitator cover by lining
up the front tabs and slots and rotating
downward until the latches snap into
place.
6
Electric Br
ush Car
Brush
Caree
!
WARNING
Electric Shock or Personal Injury Hazard
Disconnect electrical supply before servicing or cleaning
the unit. Failure to do so could result in electrical shock or
personal injury from cleaner suddenly starting.
WANDS
Always follow all
safety precautions
when cleaning and
servicing the electric
brush.
3
2
1
LIGHT BULB CHANGING
Electric Brush:
-535) Top Wand
(W-535)
1. (W
1. Remove the electric brush cover as shown in BELT
CHANGING & AGITATOR CLEANING section.
2. Push in and turn bulb counterclockwise, then pull
out to remove.
3. Push in and turn the bulb clockwise to replace. Bulb must
not be higher than 130 volts/15 watts.
Note: replacement bulb number is EB26028.
4. Reinstall the electric brush cover as shown in BELT
CHANGING & AGITATOR CLEANING section
•
•
-240) Lo
wer Wand
(BW-240)
Low
2. (BW
•
Disconnect hose and brush from electrical outlet. Frequently check and
remove hair, string and lint buildup in brush area. If buildup becomes excessive,
disconnect the brush from wand and follow steps below.
To R
emo
ve Belt:
Remo
emov
1. Turn the electric brush upside down.
2. Unscrew the brush cover screws.
3. Turn brush over right side up. Press handle
release pedal and lower the swivel. To remove
cover, grasp the sides and pull out to release the
outside cover.
5
Swivel Wand Connector--allows wand to rotate 90° along with
wrist movement to provide ease of vacuuming and to prevent
strain
-419H) Chr
ome Telescopic Wand
(W-419H)
Chrome
3. (W
• Extension wand--can be adjusted to necessary height to lessen back
•
•
BEL
T CHANGING AND A GIT
AT OR CLEANING
BELT
GITA
Electric Brush Model:
Connects to lower wand when operating the floor brush
Cord management--keeps cords out of the way and allows you to
disengage the hose handle from the electric brush
strain and can be extended to reach high areas
Extends from 23-1/2” to 39” in 3/4” increments
Hole in the top, friction fit on the bottom
IMPORTANT: Do NOT remove wands while power is on.
Telescopic Wand Oper
ating Instr
uctions
Opera
Instructions
To eextend
xtend w
and: Push the black button in the direction of the
wand:
arrow and hold in place. This releases the ratchet and allows the inner
wand to be extended. The wand can be locked into the desired length by
releasing the button at any of the notches. To retract the wand, hold down
on the black button and push the wand back into the outer wand.
Attaching tools or hose handle to the
wand: The straight, outer wand is designed to
fit into your hose handle. Insert the wand into
the handle. The notched inner wand is designed to fit into your cleaning tools. A 1/4
turn ensures a good fit. To remove the wand,
give a 1/4 turn in the opposite direction and
pull the cleaning tool or handle from the wand.
10
L6150
CLEANING ATT
ACHMENTS & TOOLS*
TTA
To Attac
h Tools ffor
or Use: Simply slide the tool onto end of the
Attach
telescopic ratchet wand or directly onto stub tube of the hose.
*Tools are to be used with telescopic ratchet wand or handle on hose. Do NOT use
with top or lower electric brush wands.
Electric Br ush Assemb
Assemblly and Use
Wand Inser
tion and R
elease
Insertion
Release
To Inser
t: Insert wand into electric brush until the wand
Insert:
button snaps into place.
FB-215BLK
12” Floor Brush with Wheels
• Works well to clean bare floors,
•
wood flooring, tile, etc.
Shorter bristles in front, longer
in back--allows larger dirt
particles to be picked up with
forward movement.**
**F
or best rresults
esults
**For
esults,, do not force the front of the brush down when moving
forward. Allow the brush to gently glide across the floor. The front of
the brush should allow particles to enter through the raised bristles.
CT-630BLK
Pr
emium Cr
Premium
Cree vice Tool
• 13” tool to reach into cracks and crevices
•
•
such as tracks of sliding glass doors, corners,
along baseboards, and even in the cracks of
couches and other furniture.
Notched end and slotted side vents help
maintain air flow and proper suction.
This tool has a flat side which makes
it great for reaching under refrigerators,
around air conditioner coils, and other
hard to reach places that collect a lot of dust and dirt.
DB-630BLK
Premium Dusting Brush
• Use for dusting furnishings such as bookcases, tables,
desks, and mantles.
• Also great for dusting picture frames,
collectibles, tops of televisions, window sills,
and even the backs of computer monitors.
• Molded, soft vinyl construction--less abrasive
on delicate furnishings and prevents wall markings.
• Full, natural bristles for gentle cleaning.
11
To R
emo
ve: Lock wands in straight-up position. Then, step on
Remo
emov
the “Wand Quick Release” pedal with foot. Now, pull up on wand.
!
WARNING
DO NOT attach or remove handle or wands while cleaner is ON. This
could cause sparking and damage the electrical contacts.
To Star t:
1. To lower wand, press on the large pedal marked
“Handle Release”.
2. Start vacuum and electric brush.
To Cor
eset Ov
er
load Pr
otector
Corrr ect & R
Reset
Over
erload
Protector
otector::
The overload protector protects the motor from brush jamming and belt breakage. If the agitator slows down or stops,
the overload protector shuts the brush off.
To cor
ob
lem: Unplug electrical cord. Check
corrrect pr
prob
oblem:
brush area for excessive lint buildup or jamming.
eset: Press the reset button on top of the brush. Plug
To rreset:
in and turn on vacuum and brush.
To Chang
Changee Pile Setting:
Select a pile height setting by using the pile height
lever on the electric brush. The pile height setting
is shown on the control. The deeper the pile of
the carpet, the higher the setting.
Sug
gested Pile Height Settings: For best deep down cleaning, use the XLO
Sugg
setting. However, you may need to raise the height to make some jobs easier.
As a ggener
ener
al guide: XLO-most carpet heights, LO-short to medium pile,
eneral
MED-medium to long pile, HI-long pile.
4
EB-250A
T
EB-250AT
14” Electric Br ush
UT-630BBLK
Pr
emium Upholster
y Tool with Br ush
Premium
Upholstery
• Cleans upholstered furniture, drapes,
Use this powerbrush to vacuum wall
to wall carpeting, handmade carpets,
fine rugs, and other flooring.
•
This powerbrush must be used
with the top and lower wands.
•
Fea
tur
es inc
lude:
eatur
tures
include:
• QuietdriveTM V-Belt--Multi-grooved reinforced belt for continuous contact
and efficient transfer of power to the brush.
• Quick Wand Release--for an easy switch from carpet to hard floor, edge
cleaning, or above floor cleaning.
• 4-level height adjustment--adjusts to match
surface being cleaned.
• Soft Bumper--wraps around brush to protect
baseboards and furniture.
• Slim-line profile--for ease of cleaning under
furniture.
• Headlight-- for lighting your cleaning path
• Active Brush Edge Cleaner-- guide either side
of the brush along baseboards or next to
furniture to help remove dirt trapped at carpet
edges.
CT-3BL
Tool Cad
dy
Cadd
•
•
•
Holds accessories and tools making them
more manageable.
For storing and transporting tools & accessories
H-431
Plastic Hose Hanger
•
Telescoping Wand
The wand length is
adjustable and requires no
assembly. To adjust,
simply push down on the
wand adjust button and
slide the upper wand to
the desired height.
The swivel, located on the
powerbrush allows you to turn
the handle to the left side to
reach further under low furniture.
When raising the wand you may
have to hold the powerbrush
with your hand or foot.
3
Adds portable convenience by allowing multiple
tools to be carried on the wand for quicker and
easier access.
To aattac
ttac
h: Snap caddy onto wand at an
ttach:
angle (beveled side first), then slip attachments
and tools onto caddy pegs. When clipping it
onto wand, attach it so that the two-peg side
faces up, while the single-peg side faces down
the wand. This will keep your tools on better.
CB-180
Mesh Tool Cad
d y Ba
g
Cadd
Bag
•
REMEMBER: As with all electric appliances, risk of shock is possible. Do not
remove brush, pull wands out, or attempt maintenance while power is on.
mattresses,and even works well on vehicle
upholstery and carpets.
Continuous airflow is critical to cleaning
results. This tool is designed to prevent
airflow from being cut off.
The brush strip gently engages upholstery to
lift debris and groom surfaces being cleaned.
•
•
•
Accessories shown may not be to scale.
Use of hanger can increase the life of your
hose and save space while storing.
Coil your hose around this hanger to store it
when not in use.
Mount on a wall in a closet, garage, or any
other convenient location for hose storage,
and place it high enough so you can loop your
hose only four times and still clear the floor.
Mounts using only one stud and two screws.
12
L6150
ASP1 & ASP2
DustMate ® Defender ElectroKit
OTHER PR
ODUCTS AVAILABLE FR
OM
PRODUCTS
FROM
LINDSA
Y MANUF
ACTURING
INC.
LINDSAY
MANUFA
CTURING,, INC
A variety of accessories and tools are available to complement your
ASP kit.** Below are just a few of the options available.
Ceiling F
an Br
ush Kit
Fan
Brush
8
For the one place we all forget to clean, but
know that we should, we offer the Ceiling Fan
Brush Kit. This kit helps you reach the tops of
your fan blades and ensures that you get rid of
all of the dust build-up. With its unique
design and powerful suction, it eliminates
dust from scattering below.
6
(CT-5)
Pet Gr
ooming Tool
Grooming
11
9
12
5
This pet tool’s soft rubber bristles are great for comfortably
removing previously shed hair from a pet’s coat.
1
7
2
3
10
4
(PT-530)
*Individual tools may vary and are subject to change at any time.
Tool Kit Inc
ludes:
Includes:
Hand Held Air T urbine with Cr
Cree vice Tool
This accessory can be used on stairs, in vehicles, or on
upholstery. The fold out crevice tool can be used to
reach into cracks and crevices or folded back when not
needed. This tool has an open face which allows the
vacuum to clean the corners on the risers of stairs
allowing for a more complete clean.
(PB-255)
Mini-V
acuum Attac
hment Kit
Attachment
Mini-Vacuum
This mini kit is perfect for cleaning small, delicate
objects, computers, and keyboards.
(CT-6)
**Do NOT use these accessories with the top and lower electric powerbrush
wands. They are to be used with the hose or telescopic ratchet wand.
13
1.
2.
3.
4.
5.
6.
7.
8.
Accessories
Cleaning Attac
hments & Tools
Attachments
(SFH-630) Slimfit Style
9. (FB-215BLK) 12” Floor Tool
4-Wire Swivel Electric
10. (CT-630BLK) Premium Crevice
Crush-Proof Hose **
Tool
(EB-250AT) 14” Defender
11. (DB-630BLK) Premium
Electric Power Brush
Dusting Brush
(BW240) Lower Wand
12. (UT-630BBLK) Premium
(W-535) Top Wand
Upholstery Tool with Brush
(W-419H) Chrome
The following Central Vacuum units when used in conjunction with the listed electric floor brushes, have
Telescopic Ratchet Wand
been tested and approved by the Carpet and Rug Institute for use on carpet. The list of approved Vacu-Maid/
(H-431) Plastic Hose Hanger
Silent Partner models are; S-3240, S-3200, S-2600, SS-1600, S-1200, P-350P, P-325, P-225, P-215,
(CT3BL) Clip-On Tool Caddy 2000,
P-125P, and P-110. The list of approved Astro-Vac
Models
are; SL-2940, SL-2340, SR-89, SR-88, SR-50,
(CB-180) Mesh Tool Caddy Bag SR-40, SR-40V
and SR-36. The approved electric floor
**ASP1
**ASP1-Direct Plug-In;
ASP2
ASP2-6ft. Pigtail Cord
2
brushes are; EB-180 Super Groom, EB-210 Super
Groom II, EB-240 Vacu-Maid and the EB-260 VacuMaid, which have been approved for use on carpeting
when used in conjunction with the aforementioned
Vacu-Maid/Silent Partner and Astro-Vac central
vacuum units.
IMPOR
TANT SAFETY
IMPORT
INSTR
UCTIONS
INSTRUCTIONS
Please read all instructions before using the Electric Powerhead.
When using this electrical appliance, basic precautions should always be followed,
including the following:
WARNING
Electric shock could occur if used outdoors or on wet surfaces.
1) Unplug and disconnect power before
servicing.
9) Do not allow to be used as a toy. Pay
close attention when used by or near small
children.
2) Always turn off this appliance before
connecting or disconnecting either hose or
motorized nozzle.
10) The hose contains electrical wires. Do
not use if damaged, cut, or punctured.
Avoid picking up sharp objects.
3) Do not vacuum up anything that is
burning or smoking, such as cigarettes,
matches, or hot ashes.
11) Do not put any object into openings.
12) Do not use with any opening blocked;
keep free of dust, lint, hair, and anything
that may reduce air flow.
4) Do not pick up flammable or combustible liquids such as gasoline or use it in
areas where they may be present.
13) Keep hair, loose clothing, fingers, and
all parts of the body away from openings
and moving parts.
5) Use only as described in this manual.
Use only manufacturers recommended attachments.
14) Do not leave vacuum or brush when
plugged in. Unplug from outlet when not
in use and before servicing.
6) Do not unplug by pulling on cord. To
unplug, grasp plug, not the cord.
8) Turn off all controls before uplugging.
15) If appliance is not working as it should,
has been dropped, damaged, left outdoors,
or dropped into water, return it to your
distributor.
9) Do not use with damaged cord or plug.
16) Use extra care when cleaning on stairs.
7) Do not handle system or appliances
with wet hands.
Wet Pic
k-Up*
Pick-Up*
This unit allows the powerful built-in central
vacuum system to pick up liquid and wet debris,
but prevents it from entering the vacuum tubing
and dirt canister. It can be used to unclog drains,
clean up spills and overflows, and even suck out
the leftover water when draining hot tubs.
Capacity=Approx. 4 gallons.
(WP-312MA)
*Wet Pick-Up Unit comes with bucket, cart, 5’ x 1-1/4” hose and 2 cuffs.
(Additional 30’ standard hose should also be purchased. Do NOT use SFH-630 or any
other high or low voltage hose with this product. )
Vibr
ating Upholster
y Tool
ibra
Upholstery
This tool vibrates the surface being cleaned to
loosen dust and dirt allowing you to get a more
deep down clean. (UT-501)
For more details on these or any other Lindsay products,
contact your local Vacu-Maid® or Astro-Vac® dealer or visit our
.v
acumaid.com and www
.astr
ovac
.com
websites at www
www.v
.vacumaid.com
www.astr
.astro
ac.com
.com.
CARING FOR YOUR CARPET
“Proper maintenance will extend the time you can enjoy
your carpet and help keep its fresh appearance. Vacuum regularly, remove spills promptly, and extraction clean periodically...
Use a strong, well functioning vacuum cleaner with a
powerful airflow, adjustable brushes, and an enclosed, highefficiency filtration bag. It is best to purchase a vacuum cleaner
ogram la
bel,
that bears the CRI Indoor Air Quality Testing Pr
Pro
label
assuring that the cleaner will remove soil well, contain the dust
”
within the machine, and protect the carpet’s appearance.”
--The Carpet & Rug Institute (CRI)
SAVE THESE INSTRUCTIONS
INTENDED FOR HOUSEHOLD USE ONLY
For more information on caring for your carpet, please visit the
pet-r
ug
.com
.car
CRI website at www
www.car
.carpet-r
pet-rug
ug.com
1
14
ASP1 & ASP2
Defender ElectroKit
www.lindsaymfg.com
Copyright © 2004 by Lindsay Manufacturing, Inc. All rights reserved. No part of this
publication may be reproduced or transmitted in any form or by any means without
written consent. Any unauthorized copies will be prosecuted for civil damages to the
fullest extent of the law.
L6150
5/07
© Lindsay Manufacturing , Inc. 2004
Printed in USA by LMI
USER GUIDE