1
Hierarchical Storage
Management for OpenVMS
Guide to Operations
Order Number: AA-PWQ3S-TE
This manual contains information and guidelines for operation of HSM and
Media, Device and management Services (MDMS).
Required Operating System OpenVMS V6.2 or higher
Required Software
Storage Library System for OpenVMS V2.9B or
higher, or Media, Device and Management
Services for OpenVMS Version V4.1
DECnet (Phase IV) or DECnet-Plus (Phase V)
TCP/IP Services for OpenVMS
Revision/Update Information:
This manual replaces version AA-PWQ3R-TE.
Software Version: HSM Version V4.1
January 2003
© Hewlett-Packard Development Company, L.P. 2003.
Confidential computer software. Valid license from HP and/or its subsidiaries required for possession, use, or
copying.
Consistent with FAR 12.211 and 12.212, Commercial Computer Software, Computer Software Documentation, and
Technical Data for Commercial Items are licensed to the U.S. Government under vendor’s commercial license.
Neither HP nor any of its subsidiaries shall be liable for technical or editorial errors or omissions contained herein. The
information in this document is provided "as is" without warranty of any kind and is subject to change without notice.
The warranties for HP products are set forth in the express limited warranty statements accompanying such products.
Nothing herein should be construed as constituting an additional warranty.
Printed in the U.S.A.
Contents
Preface . . . . . . . . . . . . . . . . . . . . . . . . . . . . . . . . . . . . . . . . . . . . . . . . . . . . . . . . . . . . . . . . . . . xv
1 Introduction to HSM
1.1 Storage Management in the OpenVMS Environment . . . . . . . . . . . . . . . . . . . . . . . . . . . . . . . . . . . . . . . . 1-1
1.1.1
Data Categories . . . . . . . . . . . . . . . . . . . . . . . . . . . . . . . . . . . . . . . . . . . . . . . . . . . . . . . . . . . . . . . . . 1-1
1.1.2
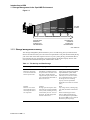
Device Capacity, Cost, and Performance . . . . . . . . . . . . . . . . . . . . . . . . . . . . . . . . . . . . . . . . . . . . . . 1-1
1.1.3
Storage Management Planning . . . . . . . . . . . . . . . . . . . . . . . . . . . . . . . . . . . . . . . . . . . . . . . . . . . . . . 1-2
1.2 Storage Management with HSM . . . . . . . . . . . . . . . . . . . . . . . . . . . . . . . . . . . . . . . . . . . . . . . . . . . . . . . . 1-3
1.2.1
File Headers and Location . . . . . . . . . . . . . . . . . . . . . . . . . . . . . . . . . . . . . . . . . . . . . . . . . . . . . . . . . 1-3
1.2.2
Controlling File Movement . . . . . . . . . . . . . . . . . . . . . . . . . . . . . . . . . . . . . . . . . . . . . . . . . . . . . . . . 1-3
1.3 HSM Storage Management Concepts . . . . . . . . . . . . . . . . . . . . . . . . . . . . . . . . . . . . . . . . . . . . . . . . . . . . 1-4
1.3.1
Shelf . . . . . . . . . . . . . . . . . . . . . . . . . . . . . . . . . . . . . . . . . . . . . . . . . . . . . . . . . . . . . . . . . . . . . . . . . . 1-4
1.3.2
Archive Class . . . . . . . . . . . . . . . . . . . . . . . . . . . . . . . . . . . . . . . . . . . . . . . . . . . . . . . . . . . . . . . . . . . 1-4
1.3.3
HSM Policies . . . . . . . . . . . . . . . . . . . . . . . . . . . . . . . . . . . . . . . . . . . . . . . . . . . . . . . . . . . . . . . . . . . 1-4
1.4 The Shelving Process . . . . . . . . . . . . . . . . . . . . . . . . . . . . . . . . . . . . . . . . . . . . . . . . . . . . . . . . . . . . . . . . 1-4
1.4.1
Starting the Shelving Process . . . . . . . . . . . . . . . . . . . . . . . . . . . . . . . . . . . . . . . . . . . . . . . . . . . . . . . 1-4
1.4.2
File Selection for Explicit Shelving . . . . . . . . . . . . . . . . . . . . . . . . . . . . . . . . . . . . . . . . . . . . . . . . . . 1-5
1.4.3
File Selection for Implicit Shelving . . . . . . . . . . . . . . . . . . . . . . . . . . . . . . . . . . . . . . . . . . . . . . . . . . 1-5
1.4.4
Modifying File Attributes of a Shelved File . . . . . . . . . . . . . . . . . . . . . . . . . . . . . . . . . . . . . . . . . . . . 1-6
1.5 The Unshelving Process . . . . . . . . . . . . . . . . . . . . . . . . . . . . . . . . . . . . . . . . . . . . . . . . . . . . . . . . . . . . . . 1-6
1.5.1
Starting the Unshelving Process . . . . . . . . . . . . . . . . . . . . . . . . . . . . . . . . . . . . . . . . . . . . . . . . . . . . . 1-6
1.5.2
Process Default Unshelving Action . . . . . . . . . . . . . . . . . . . . . . . . . . . . . . . . . . . . . . . . . . . . . . . . . . 1-6
1.5.3
The Results of Unshelving a File . . . . . . . . . . . . . . . . . . . . . . . . . . . . . . . . . . . . . . . . . . . . . . . . . . . . 1-7
1.5.4
Handling Duplicate Requests to Unshelve a File . . . . . . . . . . . . . . . . . . . . . . . . . . . . . . . . . . . . . . . . 1-7
1.6 The Preshelving Process . . . . . . . . . . . . . . . . . . . . . . . . . . . . . . . . . . . . . . . . . . . . . . . . . . . . . . . . . . . . . . 1-7
1.7 The Unpreshelving Process . . . . . . . . . . . . . . . . . . . . . . . . . . . . . . . . . . . . . . . . . . . . . . . . . . . . . . . . . . . . 1-7
1.8 File Headers and Access Security . . . . . . . . . . . . . . . . . . . . . . . . . . . . . . . . . . . . . . . . . . . . . . . . . . . . . . . 1-8
1.9 HSM File State Diagram . . . . . . . . . . . . . . . . . . . . . . . . . . . . . . . . . . . . . . . . . . . . . . . . . . . . . . . . . . . . . 1-8
1.10 HSM Cache . . . . . . . . . . . . . . . . . . . . . . . . . . . . . . . . . . . . . . . . . . . . . . . . . . . . . . . . . . . . . . . . . . . . . . . . 1-8
1.10.1 HSM Operations with Cache . . . . . . . . . . . . . . . . . . . . . . . . . . . . . . . . . . . . . . . . . . . . . . . . . . . . . . . 1-9
1.10.2 Cache in the Shelving and Preshelving Processes . . . . . . . . . . . . . . . . . . . . . . . . . . . . . . . . . . . . . . . 1-9
1.10.3 Unshelving from Cache . . . . . . . . . . . . . . . . . . . . . . . . . . . . . . . . . . . . . . . . . . . . . . . . . . . . . . . . . . . 1-9
1.10.4 Exceeding Cache Capacity . . . . . . . . . . . . . . . . . . . . . . . . . . . . . . . . . . . . . . . . . . . . . . . . . . . . . . . . 1-10
1.10.5 Flushing Cache . . . . . . . . . . . . . . . . . . . . . . . . . . . . . . . . . . . . . . . . . . . . . . . . . . . . . . . . . . . . . . . . . 1-10
1.11 HSM Catalogs . . . . . . . . . . . . . . . . . . . . . . . . . . . . . . . . . . . . . . . . . . . . . . . . . . . . . . . . . . . . . . . . . . . . . 1-10
1.12 HSM Archive Repacking . . . . . . . . . . . . . . . . . . . . . . . . . . . . . . . . . . . . . . . . . . . . . . . . . . . . . . . . . . . . . 1-10
1.13 HSM Software Modes . . . . . . . . . . . . . . . . . . . . . . . . . . . . . . . . . . . . . . . . . . . . . . . . . . . . . . . . . . . . . . . 1-11
1.13.1 HSM Basic Mode Functions . . . . . . . . . . . . . . . . . . . . . . . . . . . . . . . . . . . . . . . . . . . . . . . . . . . . . . 1-11
1.13.2
HSM Plus Mode Functions . . . . . . . . . . . . . . . . . . . . . . . . . . . . . . . . . . . . . . . . . . . . . . . . . . . . . . 1-11
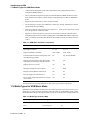
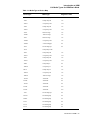
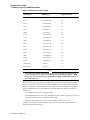
1.14 Media Types for HSM Basic Mode . . . . . . . . . . . . . . . . . . . . . . . . . . . . . . . . . . . . . . . . . . . . . . . . . . . . . 1-12
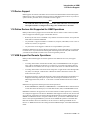
1.15 Device Support . . . . . . . . . . . . . . . . . . . . . . . . . . . . . . . . . . . . . . . . . . . . . . . . . . . . . . . . . . . . . . . . . . . . 1-15
1.16 Online Devices Not Supported for HSM Operations . . . . . . . . . . . . . . . . . . . . . . . . . . . . . . . . . . . . . . . 1-15
1.17 HSM Support for Remote Operations . . . . . . . . . . . . . . . . . . . . . . . . . . . . . . . . . . . . . . . . . . . . . . . . . . . 1-15
iii
2 Understanding HSM Concepts
2.1 The HSM Environment . . . . . . . . . . . . . . . . . . . . . . . . . . . . . . . . . . . . . . . . . . . . . . . . . . . . . . . . . . . . . . . 2-1
2.2 The HSM Facility . . . . . . . . . . . . . . . . . . . . . . . . . . . . . . . . . . . . . . . . . . . . . . . . . . . . . . . . . . . . . . . . . . . 2-2
2.2.1
HSM Mode . . . . . . . . . . . . . . . . . . . . . . . . . . . . . . . . . . . . . . . . . . . . . . . . . . . . . . . . . . . . . . . . . . . . 2-2
2.2.2
HSM Operations . . . . . . . . . . . . . . . . . . . . . . . . . . . . . . . . . . . . . . . . . . . . . . . . . . . . . . . . . . . . . . . . . 2-3
2.2.3
Shelf Servers . . . . . . . . . . . . . . . . . . . . . . . . . . . . . . . . . . . . . . . . . . . . . . . . . . . . . . . . . . . . . . . . . . . 2-3
2.2.4
Event Logging . . . . . . . . . . . . . . . . . . . . . . . . . . . . . . . . . . . . . . . . . . . . . . . . . . . . . . . . . . . . . . . . . . 2-4
2.3 The Shelf . . . . . . . . . . . . . . . . . . . . . . . . . . . . . . . . . . . . . . . . . . . . . . . . . . . . . . . . . . . . . . . . . . . . . . . . . . 2-5
2.3.1
Using Multiple Shelf Copies . . . . . . . . . . . . . . . . . . . . . . . . . . . . . . . . . . . . . . . . . . . . . . . . . . . . . . . 2-5
2.3.2
Defining Shelf Copies . . . . . . . . . . . . . . . . . . . . . . . . . . . . . . . . . . . . . . . . . . . . . . . . . . . . . . . . . . . 2-6
2.3.2.1
Archive Lists and Restore Archive Lists . . . . . . . . . . . . . . . . . . . . . . . . . . . . . . . . . . . . . . . . . . . 2-6
2.3.2.2
Primary and Secondary Archive Classes . . . . . . . . . . . . . . . . . . . . . . . . . . . . . . . . . . . . . . . . . . . 2-7
2.3.2.3
Multiple Shelf Copies . . . . . . . . . . . . . . . . . . . . . . . . . . . . . . . . . . . . . . . . . . . . . . . . . . . . . . . . . . 2-7
2.3.3
Shelving Operations . . . . . . . . . . . . . . . . . . . . . . . . . . . . . . . . . . . . . . . . . . . . . . . . . . . . . . . . . . . . . . 2-8
2.3.4
Shelf Catalog . . . . . . . . . . . . . . . . . . . . . . . . . . . . . . . . . . . . . . . . . . . . . . . . . . . . . . . . . . . . . . . . . . . 2-8
2.3.5
Save Time . . . . . . . . . . . . . . . . . . . . . . . . . . . . . . . . . . . . . . . . . . . . . . . . . . . . . . . . . . . . . . . . . . . . . . 2-8
2.3.6
Number of Updates for Retention . . . . . . . . . . . . . . . . . . . . . . . . . . . . . . . . . . . . . . . . . . . . . . . . . . . 2-8
2.4 HSM Basic Mode Archive Class . . . . . . . . . . . . . . . . . . . . . . . . . . . . . . . . . . . . . . . . . . . . . . . . . . . . . . . 2-9
2.5 HSM Plus Mode Archive Class . . . . . . . . . . . . . . . . . . . . . . . . . . . . . . . . . . . . . . . . . . . . . . . . . . . . . . . 2-10
2.6 Device . . . . . . . . . . . . . . . . . . . . . . . . . . . . . . . . . . . . . . . . . . . . . . . . . . . . . . . . . . . . . . . . . . . . . . . . . . . 2-10
2.6.1
Sharing and Dedicating Devices . . . . . . . . . . . . . . . . . . . . . . . . . . . . . . . . . . . . . . . . . . . . . . . . . . . 2-10
2.6.2
Device Operations . . . . . . . . . . . . . . . . . . . . . . . . . . . . . . . . . . . . . . . . . . . . . . . . . . . . . . . . . . . . . . 2-11
2.6.3
Devices and Archive Classes . . . . . . . . . . . . . . . . . . . . . . . . . . . . . . . . . . . . . . . . . . . . . . . . . . . . . . 2-12
2.6.4
Magazine Loaders for HSM Basic Mode . . . . . . . . . . . . . . . . . . . . . . . . . . . . . . . . . . . . . . . . . . . . . 2-13
2.6.5
Compatible Media for HSM Basic Mode . . . . . . . . . . . . . . . . . . . . . . . . . . . . . . . . . . . . . . . . . . . . . 2-14
2.6.6
Automated Loaders and HSM Plus Mode . . . . . . . . . . . . . . . . . . . . . . . . . . . . . . . . . . . . . . . . . . . . 2-15
2.7 Volume . . . . . . . . . . . . . . . . . . . . . . . . . . . . . . . . . . . . . . . . . . . . . . . . . . . . . . . . . . . . . . . . . . . . . . . . . . 2-15
2.7.1
Shelf . . . . . . . . . . . . . . . . . . . . . . . . . . . . . . . . . . . . . . . . . . . . . . . . . . . . . . . . . . . . . . . . . . . . . . . . . 2-15
2.7.2
Shelving Operations . . . . . . . . . . . . . . . . . . . . . . . . . . . . . . . . . . . . . . . . . . . . . . . . . . . . . . . . . . . . . 2-16
2.7.3
Volume Policy . . . . . . . . . . . . . . . . . . . . . . . . . . . . . . . . . . . . . . . . . . . . . . . . . . . . . . . . . . . . . . . . . 2-16
2.7.4
High Water Mark . . . . . . . . . . . . . . . . . . . . . . . . . . . . . . . . . . . . . . . . . . . . . . . . . . . . . . . . . . . . . . . 2-16
2.7.5
Files Excluded from Shelving . . . . . . . . . . . . . . . . . . . . . . . . . . . . . . . . . . . . . . . . . . . . . . . . . . . . . 2-16
2.8 Cache Usage . . . . . . . . . . . . . . . . . . . . . . . . . . . . . . . . . . . . . . . . . . . . . . . . . . . . . . . . . . . . . . . . . . . . . . 2-17
2.8.1
Advantages and Disadvantages of Using a Cache . . . . . . . . . . . . . . . . . . . . . . . . . . . . . . . . . . . . . 2-17
2.8.2
Cache Flushing . . . . . . . . . . . . . . . . . . . . . . . . . . . . . . . . . . . . . . . . . . . . . . . . . . . . . . . . . . . . . . . . . 2-17
2.8.3
Cache Attributes . . . . . . . . . . . . . . . . . . . . . . . . . . . . . . . . . . . . . . . . . . . . . . . . . . . . . . . . . . . . . . . . 2-18
2.8.3.1
Timing of Shelf Copies . . . . . . . . . . . . . . . . . . . . . . . . . . . . . . . . . . . . . . . . . . . . . . . . . . . . . . . 2-18
2.8.3.2
Cache Block Size . . . . . . . . . . . . . . . . . . . . . . . . . . . . . . . . . . . . . . . . . . . . . . . . . . . . . . . . . . . . 2-18
2.8.3.3
High Water Mark . . . . . . . . . . . . . . . . . . . . . . . . . . . . . . . . . . . . . . . . . . . . . . . . . . . . . . . . . . . . 2-18
2.8.3.4
Cache Flush Interval . . . . . . . . . . . . . . . . . . . . . . . . . . . . . . . . . . . . . . . . . . . . . . . . . . . . . . . . . . 2-18
2.8.3.5
Cache Flush Delay . . . . . . . . . . . . . . . . . . . . . . . . . . . . . . . . . . . . . . . . . . . . . . . . . . . . . . . . . . . 2-18
2.8.3.6
Delete and Modify File Action . . . . . . . . . . . . . . . . . . . . . . . . . . . . . . . . . . . . . . . . . . . . . . . . . . 2-19
2.8.4
Optimizing Cache Usage . . . . . . . . . . . . . . . . . . . . . . . . . . . . . . . . . . . . . . . . . . . . . . . . . . . . . . . . . 2-19
2.8.5
Using Magneto-Optical Devices . . . . . . . . . . . . . . . . . . . . . . . . . . . . . . . . . . . . . . . . . . . . . . . . . . . 2-19
2.9 Policy . . . . . . . . . . . . . . . . . . . . . . . . . . . . . . . . . . . . . . . . . . . . . . . . . . . . . . . . . . . . . . . . . . . . . . . . . . . . 2-19
2.9.1
HSM Policy Options . . . . . . . . . . . . . . . . . . . . . . . . . . . . . . . . . . . . . . . . . . . . . . . . . . . . . . . . . . . . . 2-20
2.9.2
Trigger Events . . . . . . . . . . . . . . . . . . . . . . . . . . . . . . . . . . . . . . . . . . . . . . . . . . . . . . . . . . . . . . . . . 2-20
2.9.2.1
Scheduled Trigger . . . . . . . . . . . . . . . . . . . . . . . . . . . . . . . . . . . . . . . . . . . . . . . . . . . . . . . . . . . 2-21
2.9.2.2
User Disk Quota Exceeded Trigger . . . . . . . . . . . . . . . . . . . . . . . . . . . . . . . . . . . . . . . . . . . . . . 2-21
2.9.2.3
High Water Mark Trigger . . . . . . . . . . . . . . . . . . . . . . . . . . . . . . . . . . . . . . . . . . . . . . . . . . . . . 2-22
2.9.2.4
Volume Full Trigger . . . . . . . . . . . . . . . . . . . . . . . . . . . . . . . . . . . . . . . . . . . . . . . . . . . . . . . . . . 2-22
2.9.3
File Selection Criteria . . . . . . . . . . . . . . . . . . . . . . . . . . . . . . . . . . . . . . . . . . . . . . . . . . . . . . . . . . . . 2-22
iv
2.9.4
Policy Goal . . . . . . . . . . . . . . . . . . . . . . . . . . . . . . . . . . . . . . . . . . . . . . . . . . . . . . . . . . . . . . . . . . . .
2.9.5
Make Space Requests and Policy . . . . . . . . . . . . . . . . . . . . . . . . . . . . . . . . . . . . . . . . . . . . . . . . . . .
2.10 Schedule . . . . . . . . . . . . . . . . . . . . . . . . . . . . . . . . . . . . . . . . . . . . . . . . . . . . . . . . . . . . . . . . . . . . . . . . . .
2.10.1 Online Volumes . . . . . . . . . . . . . . . . . . . . . . . . . . . . . . . . . . . . . . . . . . . . . . . . . . . . . . . . . . . . . . . .
2.10.2 Execution Timing and Interval . . . . . . . . . . . . . . . . . . . . . . . . . . . . . . . . . . . . . . . . . . . . . . . . . . . . .
2.10.3 Server Node . . . . . . . . . . . . . . . . . . . . . . . . . . . . . . . . . . . . . . . . . . . . . . . . . . . . . . . . . . . . . . . . . . .
2.11 HSM System Files and Logical Names . . . . . . . . . . . . . . . . . . . . . . . . . . . . . . . . . . . . . . . . . . . . . . . . . .
2.11.1 HSM$MANAGER . . . . . . . . . . . . . . . . . . . . . . . . . . . . . . . . . . . . . . . . . . . . . . . . . . . . . . . . . . . . . .
2.11.2 HSM$LOG . . . . . . . . . . . . . . . . . . . . . . . . . . . . . . . . . . . . . . . . . . . . . . . . . . . . . . . . . . . . . . . . . . . .
2.11.3 HSM$REPACK . . . . . . . . . . . . . . . . . . . . . . . . . . . . . . . . . . . . . . . . . . . . . . . . . . . . . . . . . . . . . . . .
2-24
2-24
2-25
2-25
2-25
2-25
2-26
2-26
2-27
2-27
3 Customizing the HSM Environment
3.1 Configuring a Customized HSM Environment . . . . . . . . . . . . . . . . . . . . . . . . . . . . . . . . . . . . . . . . . . . .
3.1.1
Customizing the HSM Facility . . . . . . . . . . . . . . . . . . . . . . . . . . . . . . . . . . . . . . . . . . . . . . . . . . . . . .
3.1.2
Creating Shelf Definitions . . . . . . . . . . . . . . . . . . . . . . . . . . . . . . . . . . . . . . . . . . . . . . . . . . . . . . . . .
3.1.3
Enabling and Disabling a Shelf Definition . . . . . . . . . . . . . . . . . . . . . . . . . . . . . . . . . . . . . . . . . . . . .
3.1.4
Modifying Archive Classes . . . . . . . . . . . . . . . . . . . . . . . . . . . . . . . . . . . . . . . . . . . . . . . . . . . . . . . .
3.1.5
Creating Device Definitions . . . . . . . . . . . . . . . . . . . . . . . . . . . . . . . . . . . . . . . . . . . . . . . . . . . . . . . .
3.1.6
Modifying Device Definitions . . . . . . . . . . . . . . . . . . . . . . . . . . . . . . . . . . . . . . . . . . . . . . . . . . . . . .
3.1.7
Enabling and Disabling a Volume Definition . . . . . . . . . . . . . . . . . . . . . . . . . . . . . . . . . . . . . . . . . .
3.1.8
Working with Caches . . . . . . . . . . . . . . . . . . . . . . . . . . . . . . . . . . . . . . . . . . . . . . . . . . . . . . . . . . . . .
3.1.9
Enabling and Disabling a Policy Definition . . . . . . . . . . . . . . . . . . . . . . . . . . . . . . . . . . . . . . . . . . . .
3.1.10 Scheduling Policy Executions . . . . . . . . . . . . . . . . . . . . . . . . . . . . . . . . . . . . . . . . . . . . . . . . . . . . . .
3.2 Implementing Shelving Policies . . . . . . . . . . . . . . . . . . . . . . . . . . . . . . . . . . . . . . . . . . . . . . . . . . . . . . . .
3.2.1
Determining the Disk Volumes . . . . . . . . . . . . . . . . . . . . . . . . . . . . . . . . . . . . . . . . . . . . . . . . . . . . .
3.2.2
Creating Volume Definitions . . . . . . . . . . . . . . . . . . . . . . . . . . . . . . . . . . . . . . . . . . . . . . . . . . . . . . .
3.2.3
Determining File Selection Criteria . . . . . . . . . . . . . . . . . . . . . . . . . . . . . . . . . . . . . . . . . . . . . . . . . .
3.2.4
Creating Policy Definitions . . . . . . . . . . . . . . . . . . . . . . . . . . . . . . . . . . . . . . . . . . . . . . . . . . . . . . . .
3.2.5
Using Expiration Dates . . . . . . . . . . . . . . . . . . . . . . . . . . . . . . . . . . . . . . . . . . . . . . . . . . . . . . . . . . . .
3.2.6
Creating Schedule Definitions . . . . . . . . . . . . . . . . . . . . . . . . . . . . . . . . . . . . . . . . . . . . . . . . . . . . . .
3.2.7
Enabling Preventive Policy . . . . . . . . . . . . . . . . . . . . . . . . . . . . . . . . . . . . . . . . . . . . . . . . . . . . . . . .
3-1
3-1
3-1
3-2
3-2
3-3
3-3
3-3
3-3
3-4
3-4
3-5
3-5
3-5
3-6
3-6
3-7
3-8
3-8
4 Using HSM
4.1 What the User Sees in an HSM Environment . . . . . . . . . . . . . . . . . . . . . . . . . . . . . . . . . . . . . . . . . . . . . .
4.1.1
Identifying Shelved Data using the DIRECTORY Command . . . . . . . . . . . . . . . . . . . . . . . . . . . . . .
4.1.1.1
DIRECTORY/FULL . . . . . . . . . . . . . . . . . . . . . . . . . . . . . . . . . . . . . . . . . . . . . . . . . . . . . . . . . .
4.1.1.2
DIRECTORY/FULL for Unpopulated Index Files . . . . . . . . . . . . . . . . . . . . . . . . . . . . . . . . . . .
4.1.1.3
DIRECTORY/FULL for Populated Indexed Files . . . . . . . . . . . . . . . . . . . . . . . . . . . . . . . . . . . .
4.1.1.4
DIRECTORY/SHELVED_STATE . . . . . . . . . . . . . . . . . . . . . . . . . . . . . . . . . . . . . . . . . . . . . . .
4.1.1.5
DIRECTORY/SIZE . . . . . . . . . . . . . . . . . . . . . . . . . . . . . . . . . . . . . . . . . . . . . . . . . . . . . . . . . . .
4.1.2
Accessing Files . . . . . . . . . . . . . . . . . . . . . . . . . . . . . . . . . . . . . . . . . . . . . . . . . . . . . . . . . . . . . . . . . .
4.1.3
Decreasing Volume Full and Disk Quota Exceeded Errors . . . . . . . . . . . . . . . . . . . . . . . . . . . . . . . .
4.1.4
Viewing Messages . . . . . . . . . . . . . . . . . . . . . . . . . . . . . . . . . . . . . . . . . . . . . . . . . . . . . . . . . . . . . . .
4.2 Controlling Shelving and Unshelving . . . . . . . . . . . . . . . . . . . . . . . . . . . . . . . . . . . . . . . . . . . . . . . . . . .
4.2.1
Automatic Shelving Operations . . . . . . . . . . . . . . . . . . . . . . . . . . . . . . . . . . . . . . . . . . . . . . . . . . . .
4.2.2
User-Controlled Shelving Operations . . . . . . . . . . . . . . . . . . . . . . . . . . . . . . . . . . . . . . . . . . . . . . . .
4.2.3
Unshelving Files . . . . . . . . . . . . . . . . . . . . . . . . . . . . . . . . . . . . . . . . . . . . . . . . . . . . . . . . . . . . . . . . .
4.3 Finding Lost Data . . . . . . . . . . . . . . . . . . . . . . . . . . . . . . . . . . . . . . . . . . . . . . . . . . . . . . . . . . . . . . . . . . .
4.4 Working with Remote Files . . . . . . . . . . . . . . . . . . . . . . . . . . . . . . . . . . . . . . . . . . . . . . . . . . . . . . . . . . . .
4.5 Resolving Duplicate Operations on the Same File . . . . . . . . . . . . . . . . . . . . . . . . . . . . . . . . . . . . . . . . . .
4.5.1
Resolving Conflicting Operations on the Same File . . . . . . . . . . . . . . . . . . . . . . . . . . . . . . . . . . . . .
4-1
4-1
4-2
4-2
4-3
4-4
4-4
4-5
4-5
4-6
4-6
4-6
4-6
4-8
4-8
4-8
4-8
4-9
v
4.6 Controlling Other HSM Functions . . . . . . . . . . . . . . . . . . . . . . . . . . . . . . . . . . . . . . . . . . . . . . . . . . . . . . 4-9
5 Managing the HSM Environment
5.1 Dismounting Disks . . . . . . . . . . . . . . . . . . . . . . . . . . . . . . . . . . . . . . . . . . . . . . . . . . . . . . . . . . . . . . . . . . 5-2
5.2 Copying Shelved Files . . . . . . . . . . . . . . . . . . . . . . . . . . . . . . . . . . . . . . . . . . . . . . . . . . . . . . . . . . . . . . . 5-2
5.3 Renaming Disks . . . . . . . . . . . . . . . . . . . . . . . . . . . . . . . . . . . . . . . . . . . . . . . . . . . . . . . . . . . . . . . . . . . . 5-3
5.4 Restoring Files to a Different Disk . . . . . . . . . . . . . . . . . . . . . . . . . . . . . . . . . . . . . . . . . . . . . . . . . . . . . . 5-4
5.5 Protecting System Files from Shelving . . . . . . . . . . . . . . . . . . . . . . . . . . . . . . . . . . . . . . . . . . . . . . . . . . 5-4
5.5.1
Critical HSM Product Files . . . . . . . . . . . . . . . . . . . . . . . . . . . . . . . . . . . . . . . . . . . . . . . . . . . . . . . . 5-4
5.5.2
OpenVMS System Files and System Disks . . . . . . . . . . . . . . . . . . . . . . . . . . . . . . . . . . . . . . . . . . . . 5-5
5.5.3
Files Not Shelved . . . . . . . . . . . . . . . . . . . . . . . . . . . . . . . . . . . . . . . . . . . . . . . . . . . . . . . . . . . . . . . . 5-6
5.6 DFS, NFS and PATHWORKS Access Support . . . . . . . . . . . . . . . . . . . . . . . . . . . . . . . . . . . . . . . . . . . . 5-6
5.6.1
DFS Access . . . . . . . . . . . . . . . . . . . . . . . . . . . . . . . . . . . . . . . . . . . . . . . . . . . . . . . . . . . . . . . . . . . . 5-6
5.6.2
NFS Access . . . . . . . . . . . . . . . . . . . . . . . . . . . . . . . . . . . . . . . . . . . . . . . . . . . . . . . . . . . . . . . . . . . . 5-6
5.6.3
PATHWORKS . . . . . . . . . . . . . . . . . . . . . . . . . . . . . . . . . . . . . . . . . . . . . . . . . . . . . . . . . . . . . . . . . . 5-7
5.6.4
Logical Names for NFS and PATHWORKS Access . . . . . . . . . . . . . . . . . . . . . . . . . . . . . . . . . . . . . 5-8
5.7 Ensuring Data Safety with HSM . . . . . . . . . . . . . . . . . . . . . . . . . . . . . . . . . . . . . . . . . . . . . . . . . . . . . . . . 5-8
5.7.1
Access Control Lists for Shelved Files . . . . . . . . . . . . . . . . . . . . . . . . . . . . . . . . . . . . . . . . . . . . . . . 5-8
5.7.2
Handling Contiguous and Placed Files . . . . . . . . . . . . . . . . . . . . . . . . . . . . . . . . . . . . . . . . . . . . . . . . 5-9
5.8 Using Backup Strategies with HSM . . . . . . . . . . . . . . . . . . . . . . . . . . . . . . . . . . . . . . . . . . . . . . . . . . . . . 5-9
5.8.1
Backing up Critical HSM Files . . . . . . . . . . . . . . . . . . . . . . . . . . . . . . . . . . . . . . . . . . . . . . . . . . . . . 5-9
5.8.1.1
Defining a Backup Strategy . . . . . . . . . . . . . . . . . . . . . . . . . . . . . . . . . . . . . . . . . . . . . . . . . . . . . 5-9
5.8.1.2
Using OpenVMS BACKUP to Save the Files . . . . . . . . . . . . . . . . . . . . . . . . . . . . . . . . . . . . . . . 5-9
5.8.1.3
Maintaining a Manual Copy of the Files . . . . . . . . . . . . . . . . . . . . . . . . . . . . . . . . . . . . . . . . . . 5-10
5.8.2
Backing Up Shelved Data . . . . . . . . . . . . . . . . . . . . . . . . . . . . . . . . . . . . . . . . . . . . . . . . . . . . . . . . 5-10
5.8.2.1
Considerations for OpenVMS BACKUP and Shelving . . . . . . . . . . . . . . . . . . . . . . . . . . . . . . . 5-10
5.8.2.2
Using Multiple HSM Archive Classes for Backup . . . . . . . . . . . . . . . . . . . . . . . . . . . . . . . . . . 5-10
5.8.2.3
Storing HSM Archive Classes Offsite . . . . . . . . . . . . . . . . . . . . . . . . . . . . . . . . . . . . . . . . . . . . 5-11
5.8.3
Backing Up Data Stored in an Online Cache . . . . . . . . . . . . . . . . . . . . . . . . . . . . . . . . . . . . . . . . . . 5-11
5.8.3.1
Flushing the Cache . . . . . . . . . . . . . . . . . . . . . . . . . . . . . . . . . . . . . . . . . . . . . . . . . . . . . . . . . . . 5-11
5.9 Finding Lost User Data . . . . . . . . . . . . . . . . . . . . . . . . . . . . . . . . . . . . . . . . . . . . . . . . . . . . . . . . . . . . . . 5-11
5.10 Disaster Recovery . . . . . . . . . . . . . . . . . . . . . . . . . . . . . . . . . . . . . . . . . . . . . . . . . . . . . . . . . . . . . . . . . . 5-12
5.10.1 Recovering Data Shelved Through HSM . . . . . . . . . . . . . . . . . . . . . . . . . . . . . . . . . . . . . . . . . . . . . 5-12
5.10.2 Recovering Critical HSM Files . . . . . . . . . . . . . . . . . . . . . . . . . . . . . . . . . . . . . . . . . . . . . . . . . . . . 5-12
5.10.3 Recovering Boot-Up Files . . . . . . . . . . . . . . . . . . . . . . . . . . . . . . . . . . . . . . . . . . . . . . . . . . . . . . . . 5-13
5.10.4 Reshelving an Archive Class . . . . . . . . . . . . . . . . . . . . . . . . . . . . . . . . . . . . . . . . . . . . . . . . . . . . . . 5-13
5.11 Maintaining Shelving Policies . . . . . . . . . . . . . . . . . . . . . . . . . . . . . . . . . . . . . . . . . . . . . . . . . . . . . . . . . 5-13
5.11.1 The HSM Policy Model . . . . . . . . . . . . . . . . . . . . . . . . . . . . . . . . . . . . . . . . . . . . . . . . . . . . . . . . . . 5-14
5.11.1.1
Concepts of HSM Policy . . . . . . . . . . . . . . . . . . . . . . . . . . . . . . . . . . . . . . . . . . . . . . . . . . . . . . 5-14
5.11.1.2
Policy Governs the Shelving Process . . . . . . . . . . . . . . . . . . . . . . . . . . . . . . . . . . . . . . . . . . . . . 5-15
5.11.1.3
The Balance to Achieve When Implementing Policy . . . . . . . . . . . . . . . . . . . . . . . . . . . . . . . . 5-16
5.11.2 HSM Policy Situations and Resolutions . . . . . . . . . . . . . . . . . . . . . . . . . . . . . . . . . . . . . . . . . . . . . . 5-16
5.11.2.1
Situation : Volume Occupancy Full Event . . . . . . . . . . . . . . . . . . . . . . . . . . . . . . . . . . . . . . . . . 5-16
5.11.2.2
Situation : Shelving Goal Not Reached . . . . . . . . . . . . . . . . . . . . . . . . . . . . . . . . . . . . . . . . . . . 5-17
5.11.2.3
Situation : Frequent Reactive Shelving Requests . . . . . . . . . . . . . . . . . . . . . . . . . . . . . . . . . . . 5-18
5.11.2.4
Situation : Application and User Performance Impeded . . . . . . . . . . . . . . . . . . . . . . . . . . . . . . 5-19
5.11.3 Ranking Policy Execution . . . . . . . . . . . . . . . . . . . . . . . . . . . . . . . . . . . . . . . . . . . . . . . . . . . . . . . . 5-20
5.12 Managing HSM Catalogs . . . . . . . . . . . . . . . . . . . . . . . . . . . . . . . . . . . . . . . . . . . . . . . . . . . . . . . . . . . . 5-21
5.13 Repacking Archive Classes . . . . . . . . . . . . . . . . . . . . . . . . . . . . . . . . . . . . . . . . . . . . . . . . . . . . . . . . . . . 5-23
5.13.1 Repack Performance . . . . . . . . . . . . . . . . . . . . . . . . . . . . . . . . . . . . . . . . . . . . . . . . . . . . . . . . . . . . . 5-25
5.14 Replacing and Creating Archive Classes . . . . . . . . . . . . . . . . . . . . . . . . . . . . . . . . . . . . . . . . . . . . . . . . . 5-25
5.15 Replacing A Lost or Damaged Shelf Volume . . . . . . . . . . . . . . . . . . . . . . . . . . . . . . . . . . . . . . . . . . . . . 5-25
vi
5.16 Catalog Analysis and Repair . . . . . . . . . . . . . . . . . . . . . . . . . . . . . . . . . . . . . . . . . . . . . . . . . . . . . . . . . .
5.17 Consolidated Backup with HSM . . . . . . . . . . . . . . . . . . . . . . . . . . . . . . . . . . . . . . . . . . . . . . . . . . . . . . .
5.17.1 Setting up SLS . . . . . . . . . . . . . . . . . . . . . . . . . . . . . . . . . . . . . . . . . . . . . . . . . . . . . . . . . . . . . . . . .
5.17.2 Preshelving Files . . . . . . . . . . . . . . . . . . . . . . . . . . . . . . . . . . . . . . . . . . . . . . . . . . . . . . . . . . . . . . .
5.17.3 Nightly Backups . . . . . . . . . . . . . . . . . . . . . . . . . . . . . . . . . . . . . . . . . . . . . . . . . . . . . . . . . . . . . . . .
5.17.4 Restoring Volumes . . . . . . . . . . . . . . . . . . . . . . . . . . . . . . . . . . . . . . . . . . . . . . . . . . . . . . . . . . . . . .
5.17.5 Restoring Files . . . . . . . . . . . . . . . . . . . . . . . . . . . . . . . . . . . . . . . . . . . . . . . . . . . . . . . . . . . . . . . . .
5.17.6 Repacking . . . . . . . . . . . . . . . . . . . . . . . . . . . . . . . . . . . . . . . . . . . . . . . . . . . . . . . . . . . . . . . . . . . . .
5.17.7 Other Recommendations . . . . . . . . . . . . . . . . . . . . . . . . . . . . . . . . . . . . . . . . . . . . . . . . . . . . . . . . .
5.18 Determining Cache Usage . . . . . . . . . . . . . . . . . . . . . . . . . . . . . . . . . . . . . . . . . . . . . . . . . . . . . . . . . . . .
5.19 Maintaining File Headers . . . . . . . . . . . . . . . . . . . . . . . . . . . . . . . . . . . . . . . . . . . . . . . . . . . . . . . . . . . .
5.19.1 Determining File Header Limit . . . . . . . . . . . . . . . . . . . . . . . . . . . . . . . . . . . . . . . . . . . . . . . . . . . .
5.19.2 Specifying a Volume’s File Headers . . . . . . . . . . . . . . . . . . . . . . . . . . . . . . . . . . . . . . . . . . . . . . . .
5.19.3 Extending the Index File . . . . . . . . . . . . . . . . . . . . . . . . . . . . . . . . . . . . . . . . . . . . . . . . . . . . . . . . .
5.19.4 Maintaining the Number of File Headers . . . . . . . . . . . . . . . . . . . . . . . . . . . . . . . . . . . . . . . . . . . . .
5.20 Event Logging . . . . . . . . . . . . . . . . . . . . . . . . . . . . . . . . . . . . . . . . . . . . . . . . . . . . . . . . . . . . . . . . . . . . .
5.20.1 Accessing the Logs . . . . . . . . . . . . . . . . . . . . . . . . . . . . . . . . . . . . . . . . . . . . . . . . . . . . . . . . . . . . . .
5.20.2 Shelf Handler Log Entries . . . . . . . . . . . . . . . . . . . . . . . . . . . . . . . . . . . . . . . . . . . . . . . . . . . . . . . .
5.21 Activity Logging . . . . . . . . . . . . . . . . . . . . . . . . . . . . . . . . . . . . . . . . . . . . . . . . . . . . . . . . . . . . . . . . . . .
5.22 Converting from Basic Mode to Plus Mode . . . . . . . . . . . . . . . . . . . . . . . . . . . . . . . . . . . . . . . . . . . . . .
5.22.1 Shutting Down the Shelf Handler . . . . . . . . . . . . . . . . . . . . . . . . . . . . . . . . . . . . . . . . . . . . . . . . . . .
5.22.2 Disabling the Shelving Facility . . . . . . . . . . . . . . . . . . . . . . . . . . . . . . . . . . . . . . . . . . . . . . . . . . . .
5.22.3 Entering Information for MDMS . . . . . . . . . . . . . . . . . . . . . . . . . . . . . . . . . . . . . . . . . . . . . . . . . . .
5.22.4 Changing from Basic Mode to Plus Mode . . . . . . . . . . . . . . . . . . . . . . . . . . . . . . . . . . . . . . . . . . . .
5.22.5 Restarting the Shelf Handler . . . . . . . . . . . . . . . . . . . . . . . . . . . . . . . . . . . . . . . . . . . . . . . . . . . . . .
5.22.6 Using the Same Archive Classes . . . . . . . . . . . . . . . . . . . . . . . . . . . . . . . . . . . . . . . . . . . . . . . . . . .
5.22.7 Enabling the Facility . . . . . . . . . . . . . . . . . . . . . . . . . . . . . . . . . . . . . . . . . . . . . . . . . . . . . . . . . . . . .
5.22.8 Example Mode Conversion . . . . . . . . . . . . . . . . . . . . . . . . . . . . . . . . . . . . . . . . . . . . . . . . . . . . . . .
5-26
5-28
5-29
5-29
5-30
5-31
5-31
5-32
5-32
5-32
5-32
5-32
5-33
5-33
5-33
5-33
5-34
5-34
5-36
5-37
5-38
5-38
5-38
5-38
5-38
5-39
5-39
5-39
6 Operator Activities in the HSM
Environment
6.1 Enabling the Operator Interface . . . . . . . . . . . . . . . . . . . . . . . . . . . . . . . . . . . . . . . . . . . . . . . . . . . . . . . . .
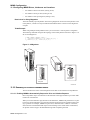
6.2 Loading and Unloading Single Tapes for HSM Basic Mode . . . . . . . . . . . . . . . . . . . . . . . . . . . . . . . . . .
6.2.1
Load Volume, No Reply Needed . . . . . . . . . . . . . . . . . . . . . . . . . . . . . . . . . . . . . . . . . . . . . . . . . . . .
6.2.2
Load Volume . . . . . . . . . . . . . . . . . . . . . . . . . . . . . . . . . . . . . . . . . . . . . . . . . . . . . . . . . . . . . . . . . . .
6.2.3
Reinitialize Volume . . . . . . . . . . . . . . . . . . . . . . . . . . . . . . . . . . . . . . . . . . . . . . . . . . . . . . . . . . . . . .
6.2.4
Volume Initialization Confirmation . . . . . . . . . . . . . . . . . . . . . . . . . . . . . . . . . . . . . . . . . . . . . . . . . .
6.2.5
Unload Label Request . . . . . . . . . . . . . . . . . . . . . . . . . . . . . . . . . . . . . . . . . . . . . . . . . . . . . . . . . . . .
6.3 Responding to BACKUP Requests for HSM Basic Mode . . . . . . . . . . . . . . . . . . . . . . . . . . . . . . . . . . . .
6.4 Working with Magazine Loaders for HSM Basic Mode . . . . . . . . . . . . . . . . . . . . . . . . . . . . . . . . . . . . .
6.4.1
Load Magazine . . . . . . . . . . . . . . . . . . . . . . . . . . . . . . . . . . . . . . . . . . . . . . . . . . . . . . . . . . . . . . . . . .
6.4.2
Illegal Magazine . . . . . . . . . . . . . . . . . . . . . . . . . . . . . . . . . . . . . . . . . . . . . . . . . . . . . . . . . . . . . . . . .
6.4.3
Unload Magazine . . . . . . . . . . . . . . . . . . . . . . . . . . . . . . . . . . . . . . . . . . . . . . . . . . . . . . . . . . . . . . . .
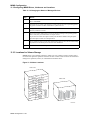
6.5 Working with Automated Loaders for HSM Plus Mode . . . . . . . . . . . . . . . . . . . . . . . . . . . . . . . . . . . . .
6.5.1
Providing the Correct Magazine . . . . . . . . . . . . . . . . . . . . . . . . . . . . . . . . . . . . . . . . . . . . . . . . . . . . .
6.5.2
Providing the Correct Volume for a TL820 . . . . . . . . . . . . . . . . . . . . . . . . . . . . . . . . . . . . . . . . . . . .
6.6 Other MDMS Messages . . . . . . . . . . . . . . . . . . . . . . . . . . . . . . . . . . . . . . . . . . . . . . . . . . . . . . . . . . . . . .
6.7 Drive Selection and Reservation Messages for Both Modes . . . . . . . . . . . . . . . . . . . . . . . . . . . . . . . . . .
6.7.1
Unavailable Drive . . . . . . . . . . . . . . . . . . . . . . . . . . . . . . . . . . . . . . . . . . . . . . . . . . . . . . . . . . . . . . . .
6.7.2
Reservation Stalled . . . . . . . . . . . . . . . . . . . . . . . . . . . . . . . . . . . . . . . . . . . . . . . . . . . . . . . . . . . . . . .
6.7.3
Wrong Tape Label . . . . . . . . . . . . . . . . . . . . . . . . . . . . . . . . . . . . . . . . . . . . . . . . . . . . . . . . . . . . . . .
6-1
6-1
6-2
6-2
6-2
6-2
6-3
6-3
6-3
6-3
6-3
6-3
6-4
6-4
6-5
6-5
6-6
6-6
6-6
6-7
vii
6.8 Informational Operator Messages . . . . . . . . . . . . . . . . . . . . . . . . . . . . . . . . . . . . . . . . . . . . . . . . . . . . . . . 6-7
7 Solving Problems with HSM
7.1 Introduction to Troubleshooting . . . . . . . . . . . . . . . . . . . . . . . . . . . . . . . . . . . . . . . . . . . . . . . . . . . . . . . . 7-1
7.2 Troubleshooting Tools . . . . . . . . . . . . . . . . . . . . . . . . . . . . . . . . . . . . . . . . . . . . . . . . . . . . . . . . . . . . . . . 7-2
7.2.1
Startup Logs . . . . . . . . . . . . . . . . . . . . . . . . . . . . . . . . . . . . . . . . . . . . . . . . . . . . . . . . . . . . . . . . . . . . 7-2
7.2.2
After a problem occurs, the first things you should check are the event logs: . . . . . . . . . . . . . . . . . . 7-3
7.2.3
Activity Log . . . . . . . . . . . . . . . . . . . . . . . . . . . . . . . . . . . . . . . . . . . . . . . . . . . . . . . . . . . . . . . . . . . . 7-3
7.2.4
SMU LOCATE . . . . . . . . . . . . . . . . . . . . . . . . . . . . . . . . . . . . . . . . . . . . . . . . . . . . . . . . . . . . . . . . . . 7-3
7.2.5
UNSHELVE/OVERRIDE . . . . . . . . . . . . . . . . . . . . . . . . . . . . . . . . . . . . . . . . . . . . . . . . . . . . . . . . . 7-4
7.2.6
SMU RANK . . . . . . . . . . . . . . . . . . . . . . . . . . . . . . . . . . . . . . . . . . . . . . . . . . . . . . . . . . . . . . . . . . . . 7-4
7.2.7
SMU SET and SHOW Commands . . . . . . . . . . . . . . . . . . . . . . . . . . . . . . . . . . . . . . . . . . . . . . . . . . . 7-4
7.2.8
MDMS Tools for HSM Plus Mode . . . . . . . . . . . . . . . . . . . . . . . . . . . . . . . . . . . . . . . . . . . . . . . . . . 7-5
7.3 Installation Problems . . . . . . . . . . . . . . . . . . . . . . . . . . . . . . . . . . . . . . . . . . . . . . . . . . . . . . . . . . . . . . . . . 7-5
7.4 HSM Startup Problems . . . . . . . . . . . . . . . . . . . . . . . . . . . . . . . . . . . . . . . . . . . . . . . . . . . . . . . . . . . . . . . 7-6
7.4.1
SMU Does Not Run . . . . . . . . . . . . . . . . . . . . . . . . . . . . . . . . . . . . . . . . . . . . . . . . . . . . . . . . . . . . . . 7-6
7.4.2
The Shelf Handler Does Not Start Up . . . . . . . . . . . . . . . . . . . . . . . . . . . . . . . . . . . . . . . . . . . . . . . . 7-6
7.4.3
Policy Execution Process Does Not Start Up . . . . . . . . . . . . . . . . . . . . . . . . . . . . . . . . . . . . . . . . . . . 7-8
7.4.4
HSM Does Not Shut Down . . . . . . . . . . . . . . . . . . . . . . . . . . . . . . . . . . . . . . . . . . . . . . . . . . . . . . . . 7-8
7.4.5
Shelving and SMU Commands Do Not Work . . . . . . . . . . . . . . . . . . . . . . . . . . . . . . . . . . . . . . . . . . 7-9
7.5 Mass Shelving . . . . . . . . . . . . . . . . . . . . . . . . . . . . . . . . . . . . . . . . . . . . . . . . . . . . . . . . . . . . . . . . . . . . . . 7-9
7.6 Shelving on System Disks . . . . . . . . . . . . . . . . . . . . . . . . . . . . . . . . . . . . . . . . . . . . . . . . . . . . . . . . . . . 7-10
7.6.1
HSM Plus Mode (MDMS) Problems . . . . . . . . . . . . . . . . . . . . . . . . . . . . . . . . . . . . . . . . . . . . . . . . 7-11
7.7 HSM VMScluster Problems . . . . . . . . . . . . . . . . . . . . . . . . . . . . . . . . . . . . . . . . . . . . . . . . . . . . . . . . . . 7-12
7.8 Online Disk Problems . . . . . . . . . . . . . . . . . . . . . . . . . . . . . . . . . . . . . . . . . . . . . . . . . . . . . . . . . . . . . . . 7-13
7.9 Cache Problems . . . . . . . . . . . . . . . . . . . . . . . . . . . . . . . . . . . . . . . . . . . . . . . . . . . . . . . . . . . . . . . . . . . . 7-14
7.10 Magneto-Optical Device Problems . . . . . . . . . . . . . . . . . . . . . . . . . . . . . . . . . . . . . . . . . . . . . . . . . . . . . 7-15
7.11 Offline Device Problems . . . . . . . . . . . . . . . . . . . . . . . . . . . . . . . . . . . . . . . . . . . . . . . . . . . . . . . . . . . . . 7-16
7.12 Magazine and Robotic Loader Problems . . . . . . . . . . . . . . . . . . . . . . . . . . . . . . . . . . . . . . . . . . . . . . . . . 7-17
7.13 Shelving Problems . . . . . . . . . . . . . . . . . . . . . . . . . . . . . . . . . . . . . . . . . . . . . . . . . . . . . . . . . . . . . . . . . . 7-19
7.14 Unshelving Problems . . . . . . . . . . . . . . . . . . . . . . . . . . . . . . . . . . . . . . . . . . . . . . . . . . . . . . . . . . . . . . . . 7-20
7.15 Policy Problems . . . . . . . . . . . . . . . . . . . . . . . . . . . . . . . . . . . . . . . . . . . . . . . . . . . . . . . . . . . . . . . . . . . . 7-21
7.16 HSM System File Problems . . . . . . . . . . . . . . . . . . . . . . . . . . . . . . . . . . . . . . . . . . . . . . . . . . . . . . . . . . 7-22
7.17 HSM Limitations . . . . . . . . . . . . . . . . . . . . . . . . . . . . . . . . . . . . . . . . . . . . . . . . . . . . . . . . . . . . . . . . . . . 7-23
7.17.1 OpenVMS Limit on File Headers . . . . . . . . . . . . . . . . . . . . . . . . . . . . . . . . . . . . . . . . . . . . . . . . . . 7-23
7.17.2 Attempting to Cancel Execution of a Shelved File . . . . . . . . . . . . . . . . . . . . . . . . . . . . . . . . . . . . . 7-24
7.17.3 Automatic Unshelving of Files across a Network . . . . . . . . . . . . . . . . . . . . . . . . . . . . . . . . . . . . . . 7-24
7.17.4 Opening and Deleting RMS Indexed Files . . . . . . . . . . . . . . . . . . . . . . . . . . . . . . . . . . . . . . . . . . . . 7-24
8 What is MDMS?
8.1 MDMS Objects . . . . . . . . . . . . . . . . . . . . . . . . . . . . . . . . . . . . . . . . . . . . . . . . . . . . . . . . . . . . . . . . . . . . . 8-1
8.2 MDMS Interfaces . . . . . . . . . . . . . . . . . . . . . . . . . . . . . . . . . . . . . . . . . . . . . . . . . . . . . . . . . . . . . . . . . . . 8-2
9 Basic MDMS Operations
9.1 MDMS User Interfaces . . . . . . . . . . . . . . . . . . . . . . . . . . . . . . . . . . . . . . . . . . . . . . . . . . . . . . . . . . . . . . .
9.2 DCL Interface . . . . . . . . . . . . . . . . . . . . . . . . . . . . . . . . . . . . . . . . . . . . . . . . . . . . . . . . . . . . . . . . . . . . . .
9.2.1
Syntax Overview . . . . . . . . . . . . . . . . . . . . . . . . . . . . . . . . . . . . . . . . . . . . . . . . . . . . . . . . . . . . . . . .
9.2.2
Object Lists . . . . . . . . . . . . . . . . . . . . . . . . . . . . . . . . . . . . . . . . . . . . . . . . . . . . . . . . . . . . . . . . . . . . .
9.2.3
Qualifier List . . . . . . . . . . . . . . . . . . . . . . . . . . . . . . . . . . . . . . . . . . . . . . . . . . . . . . . . . . . . . . . . . . .
9.2.4
Inherit . . . . . . . . . . . . . . . . . . . . . . . . . . . . . . . . . . . . . . . . . . . . . . . . . . . . . . . . . . . . . . . . . . . . . . . . .
viii
9-1
9-1
9-1
9-2
9-3
9-3
9.2.5
Symbols . . . . . . . . . . . . . . . . . . . . . . . . . . . . . . . . . . . . . . . . . . . . . . . . . . . . . . . . . . . . . . . . . . . . . . . 9-3
9.2.6
Help and Reference . . . . . . . . . . . . . . . . . . . . . . . . . . . . . . . . . . . . . . . . . . . . . . . . . . . . . . . . . . . . . . 9-3
9.3 User Interface Restrictions . . . . . . . . . . . . . . . . . . . . . . . . . . . . . . . . . . . . . . . . . . . . . . . . . . . . . . . . . . . . 9-4
9.4 Graphical User Interface . . . . . . . . . . . . . . . . . . . . . . . . . . . . . . . . . . . . . . . . . . . . . . . . . . . . . . . . . . . . . . 9-4
9.4.1
Starting MDMSView . . . . . . . . . . . . . . . . . . . . . . . . . . . . . . . . . . . . . . . . . . . . . . . . . . . . . . . . . . . . . 9-5
9.4.1.1
OpenVMS Systems . . . . . . . . . . . . . . . . . . . . . . . . . . . . . . . . . . . . . . . . . . . . . . . . . . . . . . . . . . . 9-5
9.4.1.2
Windows Systems . . . . . . . . . . . . . . . . . . . . . . . . . . . . . . . . . . . . . . . . . . . . . . . . . . . . . . . . . . . . 9-5
9.4.2
Look and Feel . . . . . . . . . . . . . . . . . . . . . . . . . . . . . . . . . . . . . . . . . . . . . . . . . . . . . . . . . . . . . . . . . . . 9-5
9.4.3
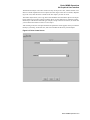
Logging In . . . . . . . . . . . . . . . . . . . . . . . . . . . . . . . . . . . . . . . . . . . . . . . . . . . . . . . . . . . . . . . . . . . . . 9-6
9.4.4
Selecting A View . . . . . . . . . . . . . . . . . . . . . . . . . . . . . . . . . . . . . . . . . . . . . . . . . . . . . . . . . . . . . . . . 9-7
9.4.5
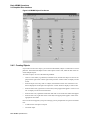
Creating Objects . . . . . . . . . . . . . . . . . . . . . . . . . . . . . . . . . . . . . . . . . . . . . . . . . . . . . . . . . . . . . . . . . 9-8
9.4.6
Showing and Modifying Objects . . . . . . . . . . . . . . . . . . . . . . . . . . . . . . . . . . . . . . . . . . . . . . . . . . . 9-10
9.4.7
Deleting Objects . . . . . . . . . . . . . . . . . . . . . . . . . . . . . . . . . . . . . . . . . . . . . . . . . . . . . . . . . . . . . . . . 9-11
9.4.8
Viewing Relationships Between Objects . . . . . . . . . . . . . . . . . . . . . . . . . . . . . . . . . . . . . . . . . . . . . 9-11
9.4.9
Performing Operations on Objects . . . . . . . . . . . . . . . . . . . . . . . . . . . . . . . . . . . . . . . . . . . . . . . . . . 9-13
9.4.10 Showing Current Operations . . . . . . . . . . . . . . . . . . . . . . . . . . . . . . . . . . . . . . . . . . . . . . . . . . . . . . 9-13
9.4.11 Reporting on Volumes . . . . . . . . . . . . . . . . . . . . . . . . . . . . . . . . . . . . . . . . . . . . . . . . . . . . . . . . . . . 9-14
9.4.12 Viewing MDMS Audit and Event Logging . . . . . . . . . . . . . . . . . . . . . . . . . . . . . . . . . . . . . . . . . . . 9-16
9.4.13 Errors . . . . . . . . . . . . . . . . . . . . . . . . . . . . . . . . . . . . . . . . . . . . . . . . . . . . . . . . . . . . . . . . . . . . . . . . 9-17
9.4.14 Help . . . . . . . . . . . . . . . . . . . . . . . . . . . . . . . . . . . . . . . . . . . . . . . . . . . . . . . . . . . . . . . . . . . . . . . . . 9-17
9.5 Access Rights for MDMS Operations . . . . . . . . . . . . . . . . . . . . . . . . . . . . . . . . . . . . . . . . . . . . . . . . . . . 9-18
9.5.1
Description of MDMS Rights . . . . . . . . . . . . . . . . . . . . . . . . . . . . . . . . . . . . . . . . . . . . . . . . . . . . . 9-18
9.5.1.1
Low Level Rights . . . . . . . . . . . . . . . . . . . . . . . . . . . . . . . . . . . . . . . . . . . . . . . . . . . . . . . . . . . . 9-18
9.5.1.2
High Level Rights . . . . . . . . . . . . . . . . . . . . . . . . . . . . . . . . . . . . . . . . . . . . . . . . . . . . . . . . . . . 9-19
9.5.2
Granting MDMS Rights . . . . . . . . . . . . . . . . . . . . . . . . . . . . . . . . . . . . . . . . . . . . . . . . . . . . . . . . . . 9-19
9.6 Creating, Modifying, and Deleting Object Records . . . . . . . . . . . . . . . . . . . . . . . . . . . . . . . . . . . . . . . . 9-21
9.6.1
Creating Object Records . . . . . . . . . . . . . . . . . . . . . . . . . . . . . . . . . . . . . . . . . . . . . . . . . . . . . . . . . . 9-21
9.6.1.1
Naming Objects . . . . . . . . . . . . . . . . . . . . . . . . . . . . . . . . . . . . . . . . . . . . . . . . . . . . . . . . . . . . . 9-21
9.6.1.2
Differences Between the CLI and GUI for Naming Object Records . . . . . . . . . . . . . . . . . . . . . 9-22
9.6.2
Inheritance on Creation . . . . . . . . . . . . . . . . . . . . . . . . . . . . . . . . . . . . . . . . . . . . . . . . . . . . . . . . . . 9-22
9.6.3
Referring to Non-Existent Objects . . . . . . . . . . . . . . . . . . . . . . . . . . . . . . . . . . . . . . . . . . . . . . . . . . 9-22
9.6.4
Rights for Creating Objects . . . . . . . . . . . . . . . . . . . . . . . . . . . . . . . . . . . . . . . . . . . . . . . . . . . . . . . 9-23
9.6.5
Modifying Object Records . . . . . . . . . . . . . . . . . . . . . . . . . . . . . . . . . . . . . . . . . . . . . . . . . . . . . . . . 9-23
9.6.6
Protected Attributes . . . . . . . . . . . . . . . . . . . . . . . . . . . . . . . . . . . . . . . . . . . . . . . . . . . . . . . . . . . . . 9-23
9.6.7
Rights for Modifying Objects . . . . . . . . . . . . . . . . . . . . . . . . . . . . . . . . . . . . . . . . . . . . . . . . . . . . . . 9-23
9.6.8
Deleting Object Records . . . . . . . . . . . . . . . . . . . . . . . . . . . . . . . . . . . . . . . . . . . . . . . . . . . . . . . . . . 9-23
9.6.9
Reviewing Managed Objects for References to Deleted Objects . . . . . . . . . . . . . . . . . . . . . . . . . . 9-24
9.6.10 Reviewing DCL Command Procedures for References to Deleted Objects . . . . . . . . . . . . . . . . . . 9-24
9.6.11 Rights for Deleting Objects . . . . . . . . . . . . . . . . . . . . . . . . . . . . . . . . . . . . . . . . . . . . . . . . . . . . . . . 9-27
10 Media Management
10.1 MDMS Domain Configuration . . . . . . . . . . . . . . . . . . . . . . . . . . . . . . . . . . . . . . . . . . . . . . . . . . . . . . . .
10.2 Domain . . . . . . . . . . . . . . . . . . . . . . . . . . . . . . . . . . . . . . . . . . . . . . . . . . . . . . . . . . . . . . . . . . . . . . . . . .
10.2.1 ABS Rights . . . . . . . . . . . . . . . . . . . . . . . . . . . . . . . . . . . . . . . . . . . . . . . . . . . . . . . . . . . . . . . . . . . .
10.2.2 Application Rights . . . . . . . . . . . . . . . . . . . . . . . . . . . . . . . . . . . . . . . . . . . . . . . . . . . . . . . . . . . . . .
10.2.3 Check Access . . . . . . . . . . . . . . . . . . . . . . . . . . . . . . . . . . . . . . . . . . . . . . . . . . . . . . . . . . . . . . . . . .
10.2.4 Deallocate State . . . . . . . . . . . . . . . . . . . . . . . . . . . . . . . . . . . . . . . . . . . . . . . . . . . . . . . . . . . . . . . .
10.2.5 Default Rights . . . . . . . . . . . . . . . . . . . . . . . . . . . . . . . . . . . . . . . . . . . . . . . . . . . . . . . . . . . . . . . . . .
10.2.6 Mail Users . . . . . . . . . . . . . . . . . . . . . . . . . . . . . . . . . . . . . . . . . . . . . . . . . . . . . . . . . . . . . . . . . . . .
10.2.7 Maximum Scratch Time . . . . . . . . . . . . . . . . . . . . . . . . . . . . . . . . . . . . . . . . . . . . . . . . . . . . . . . . . .
10.2.8 Media Type . . . . . . . . . . . . . . . . . . . . . . . . . . . . . . . . . . . . . . . . . . . . . . . . . . . . . . . . . . . . . . . . . . . .
10.2.9 Offsite Location . . . . . . . . . . . . . . . . . . . . . . . . . . . . . . . . . . . . . . . . . . . . . . . . . . . . . . . . . . . . . . . .
10-1
10-1
10-2
10-2
10-2
10-2
10-2
10-2
10-3
10-3
10-3
ix
10.2.10 Onsite Location . . . . . . . . . . . . . . . . . . . . . . . . . . . . . . . . . . . . . . . . . . . . . . . . . . . . . . . . . . . . . . . . 10-3
10.2.11 OPCOM Classes . . . . . . . . . . . . . . . . . . . . . . . . . . . . . . . . . . . . . . . . . . . . . . . . . . . . . . . . . . . . . . . . 10-3
10.2.12 Operator Rights . . . . . . . . . . . . . . . . . . . . . . . . . . . . . . . . . . . . . . . . . . . . . . . . . . . . . . . . . . . . . . . . 10-3
10.2.13 Protection . . . . . . . . . . . . . . . . . . . . . . . . . . . . . . . . . . . . . . . . . . . . . . . . . . . . . . . . . . . . . . . . . . . . . 10-3
10.2.14 Relaxed Access . . . . . . . . . . . . . . . . . . . . . . . . . . . . . . . . . . . . . . . . . . . . . . . . . . . . . . . . . . . . . . . . . 10-4
10.2.15 Request ID . . . . . . . . . . . . . . . . . . . . . . . . . . . . . . . . . . . . . . . . . . . . . . . . . . . . . . . . . . . . . . . . . . . . 10-4
10.2.16 Scheduler Type . . . . . . . . . . . . . . . . . . . . . . . . . . . . . . . . . . . . . . . . . . . . . . . . . . . . . . . . . . . . . . . . . 10-4
10.2.17 Scratch Time . . . . . . . . . . . . . . . . . . . . . . . . . . . . . . . . . . . . . . . . . . . . . . . . . . . . . . . . . . . . . . . . . . . 10-4
10.2.18 SYSPRV . . . . . . . . . . . . . . . . . . . . . . . . . . . . . . . . . . . . . . . . . . . . . . . . . . . . . . . . . . . . . . . . . . . . . . 10-4
10.2.19 Transition Time . . . . . . . . . . . . . . . . . . . . . . . . . . . . . . . . . . . . . . . . . . . . . . . . . . . . . . . . . . . . . . . . 10-5
10.2.20 User Rights . . . . . . . . . . . . . . . . . . . . . . . . . . . . . . . . . . . . . . . . . . . . . . . . . . . . . . . . . . . . . . . . . . . . 10-5
10.3 Drives . . . . . . . . . . . . . . . . . . . . . . . . . . . . . . . . . . . . . . . . . . . . . . . . . . . . . . . . . . . . . . . . . . . . . . . . . . . . 10-5
10.3.1 Access . . . . . . . . . . . . . . . . . . . . . . . . . . . . . . . . . . . . . . . . . . . . . . . . . . . . . . . . . . . . . . . . . . . . . . . . 10-5
10.3.2 Automatic Reply . . . . . . . . . . . . . . . . . . . . . . . . . . . . . . . . . . . . . . . . . . . . . . . . . . . . . . . . . . . . . . . . 10-5
10.3.3 Device . . . . . . . . . . . . . . . . . . . . . . . . . . . . . . . . . . . . . . . . . . . . . . . . . . . . . . . . . . . . . . . . . . . . . . . . 10-5
10.3.4 Disabled . . . . . . . . . . . . . . . . . . . . . . . . . . . . . . . . . . . . . . . . . . . . . . . . . . . . . . . . . . . . . . . . . . . . . . 10-6
10.3.5 Drive Number . . . . . . . . . . . . . . . . . . . . . . . . . . . . . . . . . . . . . . . . . . . . . . . . . . . . . . . . . . . . . . . . . . 10-6
10.3.6 Groups . . . . . . . . . . . . . . . . . . . . . . . . . . . . . . . . . . . . . . . . . . . . . . . . . . . . . . . . . . . . . . . . . . . . . . . 10-6
10.3.7 Jukebox . . . . . . . . . . . . . . . . . . . . . . . . . . . . . . . . . . . . . . . . . . . . . . . . . . . . . . . . . . . . . . . . . . . . . . . 10-6
10.3.8 Media Types . . . . . . . . . . . . . . . . . . . . . . . . . . . . . . . . . . . . . . . . . . . . . . . . . . . . . . . . . . . . . . . . . . . 10-6
10.3.9 Nodes . . . . . . . . . . . . . . . . . . . . . . . . . . . . . . . . . . . . . . . . . . . . . . . . . . . . . . . . . . . . . . . . . . . . . . . . 10-6
10.3.10 Read-Only Media Types . . . . . . . . . . . . . . . . . . . . . . . . . . . . . . . . . . . . . . . . . . . . . . . . . . . . . . . . . . 10-6
10.3.11 Shared . . . . . . . . . . . . . . . . . . . . . . . . . . . . . . . . . . . . . . . . . . . . . . . . . . . . . . . . . . . . . . . . . . . . . . . . 10-6
10.3.12 Stacker . . . . . . . . . . . . . . . . . . . . . . . . . . . . . . . . . . . . . . . . . . . . . . . . . . . . . . . . . . . . . . . . . . . . . . . 10-7
10.3.13 State . . . . . . . . . . . . . . . . . . . . . . . . . . . . . . . . . . . . . . . . . . . . . . . . . . . . . . . . . . . . . . . . . . . . . . . . . 10-7
10.3.14 Allocate Drive (DCL Only) . . . . . . . . . . . . . . . . . . . . . . . . . . . . . . . . . . . . . . . . . . . . . . . . . . . . . . . 10-7
10.3.15 Deallocate Drive (DCL Only) . . . . . . . . . . . . . . . . . . . . . . . . . . . . . . . . . . . . . . . . . . . . . . . . . . . . . 10-8
10.3.16 Load Drive . . . . . . . . . . . . . . . . . . . . . . . . . . . . . . . . . . . . . . . . . . . . . . . . . . . . . . . . . . . . . . . . . . . . 10-8
10.3.17 Unload Drive . . . . . . . . . . . . . . . . . . . . . . . . . . . . . . . . . . . . . . . . . . . . . . . . . . . . . . . . . . . . . . . . . . 10-8
10.4 Groups . . . . . . . . . . . . . . . . . . . . . . . . . . . . . . . . . . . . . . . . . . . . . . . . . . . . . . . . . . . . . . . . . . . . . . . . . . . 10-9
10.4.1 Nodes . . . . . . . . . . . . . . . . . . . . . . . . . . . . . . . . . . . . . . . . . . . . . . . . . . . . . . . . . . . . . . . . . . . . . . . . 10-9
10.5 Jukeboxes . . . . . . . . . . . . . . . . . . . . . . . . . . . . . . . . . . . . . . . . . . . . . . . . . . . . . . . . . . . . . . . . . . . . . . . . . 10-9
10.5.1 Access . . . . . . . . . . . . . . . . . . . . . . . . . . . . . . . . . . . . . . . . . . . . . . . . . . . . . . . . . . . . . . . . . . . . . . . . 10-9
10.5.2 ACS ID . . . . . . . . . . . . . . . . . . . . . . . . . . . . . . . . . . . . . . . . . . . . . . . . . . . . . . . . . . . . . . . . . . . . . . . 10-9
10.5.3 Automatic Reply . . . . . . . . . . . . . . . . . . . . . . . . . . . . . . . . . . . . . . . . . . . . . . . . . . . . . . . . . . . . . . . . 10-9
10.5.4 Cap Size . . . . . . . . . . . . . . . . . . . . . . . . . . . . . . . . . . . . . . . . . . . . . . . . . . . . . . . . . . . . . . . . . . . . . 10-10
10.5.5 Control . . . . . . . . . . . . . . . . . . . . . . . . . . . . . . . . . . . . . . . . . . . . . . . . . . . . . . . . . . . . . . . . . . . . . . 10-10
10.5.6 Disabled . . . . . . . . . . . . . . . . . . . . . . . . . . . . . . . . . . . . . . . . . . . . . . . . . . . . . . . . . . . . . . . . . . . . . 10-10
10.5.7 Groups . . . . . . . . . . . . . . . . . . . . . . . . . . . . . . . . . . . . . . . . . . . . . . . . . . . . . . . . . . . . . . . . . . . . . . 10-10
10.5.8 Library ID . . . . . . . . . . . . . . . . . . . . . . . . . . . . . . . . . . . . . . . . . . . . . . . . . . . . . . . . . . . . . . . . . . . . 10-10
10.5.9 Location . . . . . . . . . . . . . . . . . . . . . . . . . . . . . . . . . . . . . . . . . . . . . . . . . . . . . . . . . . . . . . . . . . . . . 10-10
10.5.10 LSM ID . . . . . . . . . . . . . . . . . . . . . . . . . . . . . . . . . . . . . . . . . . . . . . . . . . . . . . . . . . . . . . . . . . . . . . 10-10
10.5.11 Nodes . . . . . . . . . . . . . . . . . . . . . . . . . . . . . . . . . . . . . . . . . . . . . . . . . . . . . . . . . . . . . . . . . . . . . . . 10-11
10.5.12 Robot . . . . . . . . . . . . . . . . . . . . . . . . . . . . . . . . . . . . . . . . . . . . . . . . . . . . . . . . . . . . . . . . . . . . . . . 10-11
10.5.13 Slot Count . . . . . . . . . . . . . . . . . . . . . . . . . . . . . . . . . . . . . . . . . . . . . . . . . . . . . . . . . . . . . . . . . . . . 10-11
10.5.14 State . . . . . . . . . . . . . . . . . . . . . . . . . . . . . . . . . . . . . . . . . . . . . . . . . . . . . . . . . . . . . . . . . . . . . . . . 10-11
10.5.15 Threshold . . . . . . . . . . . . . . . . . . . . . . . . . . . . . . . . . . . . . . . . . . . . . . . . . . . . . . . . . . . . . . . . . . . . 10-11
10.5.16 Topology . . . . . . . . . . . . . . . . . . . . . . . . . . . . . . . . . . . . . . . . . . . . . . . . . . . . . . . . . . . . . . . . . . . . . 10-12
10.5.17 Usage . . . . . . . . . . . . . . . . . . . . . . . . . . . . . . . . . . . . . . . . . . . . . . . . . . . . . . . . . . . . . . . . . . . . . . . 10-12
10.5.18 Inventory Jukebox . . . . . . . . . . . . . . . . . . . . . . . . . . . . . . . . . . . . . . . . . . . . . . . . . . . . . . . . . . . . . 10-12
10.6 Locations . . . . . . . . . . . . . . . . . . . . . . . . . . . . . . . . . . . . . . . . . . . . . . . . . . . . . . . . . . . . . . . . . . . . . . . . 10-13
10.6.1 Parent Location . . . . . . . . . . . . . . . . . . . . . . . . . . . . . . . . . . . . . . . . . . . . . . . . . . . . . . . . . . . . . . . . 10-14
x
10.6.2 Spaces . . . . . . . . . . . . . . . . . . . . . . . . . . . . . . . . . . . . . . . . . . . . . . . . . . . . . . . . . . . . . . . . . . . . . . .
10.7 Magazines . . . . . . . . . . . . . . . . . . . . . . . . . . . . . . . . . . . . . . . . . . . . . . . . . . . . . . . . . . . . . . . . . . . . . . .
10.7.1 Jukebox, Start Slot and Position . . . . . . . . . . . . . . . . . . . . . . . . . . . . . . . . . . . . . . . . . . . . . . . . . . .
10.7.2 Onsite and Offsite Locations and Dates . . . . . . . . . . . . . . . . . . . . . . . . . . . . . . . . . . . . . . . . . . . . .
10.7.3 Slot Count . . . . . . . . . . . . . . . . . . . . . . . . . . . . . . . . . . . . . . . . . . . . . . . . . . . . . . . . . . . . . . . . . . . .
10.7.4 Spaces . . . . . . . . . . . . . . . . . . . . . . . . . . . . . . . . . . . . . . . . . . . . . . . . . . . . . . . . . . . . . . . . . . . . . . .
10.7.5 Move Magazine(s) . . . . . . . . . . . . . . . . . . . . . . . . . . . . . . . . . . . . . . . . . . . . . . . . . . . . . . . . . . . . .
10.8 Media Types . . . . . . . . . . . . . . . . . . . . . . . . . . . . . . . . . . . . . . . . . . . . . . . . . . . . . . . . . . . . . . . . . . . . .
10.8.1 Capacity . . . . . . . . . . . . . . . . . . . . . . . . . . . . . . . . . . . . . . . . . . . . . . . . . . . . . . . . . . . . . . . . . . . . .
10.8.2 Compaction . . . . . . . . . . . . . . . . . . . . . . . . . . . . . . . . . . . . . . . . . . . . . . . . . . . . . . . . . . . . . . . . . . .
10.8.3 Density . . . . . . . . . . . . . . . . . . . . . . . . . . . . . . . . . . . . . . . . . . . . . . . . . . . . . . . . . . . . . . . . . . . . . .
10.8.4 Length . . . . . . . . . . . . . . . . . . . . . . . . . . . . . . . . . . . . . . . . . . . . . . . . . . . . . . . . . . . . . . . . . . . . . . .
10.9 Node . . . . . . . . . . . . . . . . . . . . . . . . . . . . . . . . . . . . . . . . . . . . . . . . . . . . . . . . . . . . . . . . . . . . . . . . . . . .
10.9.1 Database Server . . . . . . . . . . . . . . . . . . . . . . . . . . . . . . . . . . . . . . . . . . . . . . . . . . . . . . . . . . . . . . .
10.9.2 Disabled . . . . . . . . . . . . . . . . . . . . . . . . . . . . . . . . . . . . . . . . . . . . . . . . . . . . . . . . . . . . . . . . . . . . .
10.9.3 OPCOM Class . . . . . . . . . . . . . . . . . . . . . . . . . . . . . . . . . . . . . . . . . . . . . . . . . . . . . . . . . . . . . . . .
10.9.4 Transports and Full Names . . . . . . . . . . . . . . . . . . . . . . . . . . . . . . . . . . . . . . . . . . . . . . . . . . . . . . .
10.10 Pools . . . . . . . . . . . . . . . . . . . . . . . . . . . . . . . . . . . . . . . . . . . . . . . . . . . . . . . . . . . . . . . . . . . . . . . . . . .
10.10.1 Authorized Users . . . . . . . . . . . . . . . . . . . . . . . . . . . . . . . . . . . . . . . . . . . . . . . . . . . . . . . . . . . . . .
10.10.2 Default Users . . . . . . . . . . . . . . . . . . . . . . . . . . . . . . . . . . . . . . . . . . . . . . . . . . . . . . . . . . . . . . . . .
10.10.3 Threshold . . . . . . . . . . . . . . . . . . . . . . . . . . . . . . . . . . . . . . . . . . . . . . . . . . . . . . . . . . . . . . . . . . . .
10.11 Volumes . . . . . . . . . . . . . . . . . . . . . . . . . . . . . . . . . . . . . . . . . . . . . . . . . . . . . . . . . . . . . . . . . . . . . . . .
10.11.1 Allocation Fields - Account, Username, UIC and Job . . . . . . . . . . . . . . . . . . . . . . . . . . . . . . . . . .
10.11.2 Allocation and Movement Dates . . . . . . . . . . . . . . . . . . . . . . . . . . . . . . . . . . . . . . . . . . . . . . . . . .
10.11.3 History Dates . . . . . . . . . . . . . . . . . . . . . . . . . . . . . . . . . . . . . . . . . . . . . . . . . . . . . . . . . . . . . . . . .
10.11.4 State . . . . . . . . . . . . . . . . . . . . . . . . . . . . . . . . . . . . . . . . . . . . . . . . . . . . . . . . . . . . . . . . . . . . . . . .
10.11.5 Media Types . . . . . . . . . . . . . . . . . . . . . . . . . . . . . . . . . . . . . . . . . . . . . . . . . . . . . . . . . . . . . . . . . .
10.11.6 Pool . . . . . . . . . . . . . . . . . . . . . . . . . . . . . . . . . . . . . . . . . . . . . . . . . . . . . . . . . . . . . . . . . . . . . . . . .
10.11.7 Previous and Next Volumes . . . . . . . . . . . . . . . . . . . . . . . . . . . . . . . . . . . . . . . . . . . . . . . . . . . . . .
10.11.8 Placement - Jukebox, Magazine, Locations, Drive . . . . . . . . . . . . . . . . . . . . . . . . . . . . . . . . . . . .
10.11.9 Formats - Brand, Format, Block Factor, Record Size . . . . . . . . . . . . . . . . . . . . . . . . . . . . . . . . . .
10.11.10 Protection . . . . . . . . . . . . . . . . . . . . . . . . . . . . . . . . . . . . . . . . . . . . . . . . . . . . . . . . . . . . . . . . . . . .
10.11.11 Counters . . . . . . . . . . . . . . . . . . . . . . . . . . . . . . . . . . . . . . . . . . . . . . . . . . . . . . . . . . . . . . . . . . . . .
10.11.12 Allocate Volume . . . . . . . . . . . . . . . . . . . . . . . . . . . . . . . . . . . . . . . . . . . . . . . . . . . . . . . . . . . . . . .
10.11.13 Allocate Volume(s) by Selection Criteria . . . . . . . . . . . . . . . . . . . . . . . . . . . . . . . . . . . . . . . . . . .
10.11.14 Deallocate Volume . . . . . . . . . . . . . . . . . . . . . . . . . . . . . . . . . . . . . . . . . . . . . . . . . . . . . . . . . . . . .
10.11.15 Bind Volume . . . . . . . . . . . . . . . . . . . . . . . . . . . . . . . . . . . . . . . . . . . . . . . . . . . . . . . . . . . . . . . . .
10.11.16 Unbind Volume . . . . . . . . . . . . . . . . . . . . . . . . . . . . . . . . . . . . . . . . . . . . . . . . . . . . . . . . . . . . . . .
10.11.17 Load Volume . . . . . . . . . . . . . . . . . . . . . . . . . . . . . . . . . . . . . . . . . . . . . . . . . . . . . . . . . . . . . . . . .
10.11.18 Unload Volume . . . . . . . . . . . . . . . . . . . . . . . . . . . . . . . . . . . . . . . . . . . . . . . . . . . . . . . . . . . . . . .
10.11.19 Move Volume(s) . . . . . . . . . . . . . . . . . . . . . . . . . . . . . . . . . . . . . . . . . . . . . . . . . . . . . . . . . . . . . . .
10.11.20 Initialize Volume(s) . . . . . . . . . . . . . . . . . . . . . . . . . . . . . . . . . . . . . . . . . . . . . . . . . . . . . . . . . . . .
10-14
10-14
10-14
10-15
10-15
10-15
10-15
10-16
10-16
10-16
10-16
10-16
10-16
10-17
10-17
10-17
10-17
10-17
10-18
10-18
10-18
10-18
10-20
10-20
10-21
10-21
10-22
10-22
10-22
10-23
10-23
10-24
10-24
10-24
10-25
10-25
10-26
10-26
10-27
10-27
10-27
10-28
11 MDMS Configuration
11.1 The MDMS Management Domain . . . . . . . . . . . . . . . . . . . . . . . . . . . . . . . . . . . . . . . . . . . . . . . . . . . . .
11.1.1 The MDMS Database . . . . . . . . . . . . . . . . . . . . . . . . . . . . . . . . . . . . . . . . . . . . . . . . . . . . . . . . . . . .
11.1.1.1
Database Performance . . . . . . . . . . . . . . . . . . . . . . . . . . . . . . . . . . . . . . . . . . . . . . . . . . . . . . . .
11.1.1.2
Database Safety . . . . . . . . . . . . . . . . . . . . . . . . . . . . . . . . . . . . . . . . . . . . . . . . . . . . . . . . . . . . .
11.1.1.3
Moving the MDMS Database . . . . . . . . . . . . . . . . . . . . . . . . . . . . . . . . . . . . . . . . . . . . . . . . . .
11.1.2 The MDMS Process . . . . . . . . . . . . . . . . . . . . . . . . . . . . . . . . . . . . . . . . . . . . . . . . . . . . . . . . . . . . .
11.1.2.1
Server Availability . . . . . . . . . . . . . . . . . . . . . . . . . . . . . . . . . . . . . . . . . . . . . . . . . . . . . . . . . . .
11.1.2.2
The MDMS Account . . . . . . . . . . . . . . . . . . . . . . . . . . . . . . . . . . . . . . . . . . . . . . . . . . . . . . . . .
11-1
11-2
11-3
11-3
11-5
11-6
11-6
11-6
xi
11.1.3 The MDMS Start Up File . . . . . . . . . . . . . . . . . . . . . . . . . . . . . . . . . . . . . . . . . . . . . . . . . . . . . . . . . 11-7
11.1.3.1
MDMS$DATABASE_SERVERS - Identifies Domain Database Servers . . . . . . . . . . . . . . . . 11-7
11.1.3.2
MDMS$LOGFILE_LOCATION . . . . . . . . . . . . . . . . . . . . . . . . . . . . . . . . . . . . . . . . . . . . . . . . 11-8
11.1.3.3
MDMS Shut Down and Start Up . . . . . . . . . . . . . . . . . . . . . . . . . . . . . . . . . . . . . . . . . . . . . . . . 11-8
11.1.4 Managing an MDMS Node . . . . . . . . . . . . . . . . . . . . . . . . . . . . . . . . . . . . . . . . . . . . . . . . . . . . . . . 11-9
11.1.4.1
Defining a Node’s Network Connection . . . . . . . . . . . . . . . . . . . . . . . . . . . . . . . . . . . . . . . . . . 11-9
11.1.4.2
Defining How the Node Functions in the Domain . . . . . . . . . . . . . . . . . . . . . . . . . . . . . . . . . . . 11-9
11.1.4.3
Enabling Interprocess Communication . . . . . . . . . . . . . . . . . . . . . . . . . . . . . . . . . . . . . . . . . . 11-10
11.1.4.4
Describing the Node . . . . . . . . . . . . . . . . . . . . . . . . . . . . . . . . . . . . . . . . . . . . . . . . . . . . . . . . . 11-10
11.1.4.5
Communicating with Operators . . . . . . . . . . . . . . . . . . . . . . . . . . . . . . . . . . . . . . . . . . . . . . . . 11-10
11.1.5 Managing Groups of MDMS Nodes . . . . . . . . . . . . . . . . . . . . . . . . . . . . . . . . . . . . . . . . . . . . . . . 11-10
11.1.6 Managing the MDMS Domain . . . . . . . . . . . . . . . . . . . . . . . . . . . . . . . . . . . . . . . . . . . . . . . . . . . . 11-11
11.1.6.1
Domain Configuration Parameters . . . . . . . . . . . . . . . . . . . . . . . . . . . . . . . . . . . . . . . . . . . . . . 11-12
11.1.6.2
Domain Options for Controlling Rights to Use MDMS . . . . . . . . . . . . . . . . . . . . . . . . . . . . . 11-12
11.1.6.3
Domain Default Volume Management Parameters . . . . . . . . . . . . . . . . . . . . . . . . . . . . . . . . . 11-12
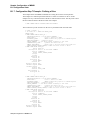
11.1.7 MDMS Domain Configuration Issues . . . . . . . . . . . . . . . . . . . . . . . . . . . . . . . . . . . . . . . . . . . . . . 11-13
11.1.7.1
Adding a Node to an Existing Configuration . . . . . . . . . . . . . . . . . . . . . . . . . . . . . . . . . . . . . . 11-13
11.1.7.2
Removing a node from an existing configuration . . . . . . . . . . . . . . . . . . . . . . . . . . . . . . . . . . 11-14
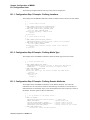
11.2 Configuring MDMS Drives, Jukeboxes and Locations . . . . . . . . . . . . . . . . . . . . . . . . . . . . . . . . . . . . . 11-14
11.2.1 Configuring MDMS Drives . . . . . . . . . . . . . . . . . . . . . . . . . . . . . . . . . . . . . . . . . . . . . . . . . . . . . . 11-14
11.2.1.1
How to Describe an MDMS Drive . . . . . . . . . . . . . . . . . . . . . . . . . . . . . . . . . . . . . . . . . . . . . . 11-14
11.2.1.2
How to Control Access to an MDMS Drive . . . . . . . . . . . . . . . . . . . . . . . . . . . . . . . . . . . . . . 11-15
11.2.1.3
How to Configure an MDMS Drive for Operations . . . . . . . . . . . . . . . . . . . . . . . . . . . . . . . . 11-15
11.2.1.4
Determining Drive State . . . . . . . . . . . . . . . . . . . . . . . . . . . . . . . . . . . . . . . . . . . . . . . . . . . . . . 11-15
11.2.1.5
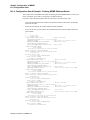
Adding and Removing Managed Drives . . . . . . . . . . . . . . . . . . . . . . . . . . . . . . . . . . . . . . . . . 11-15
11.2.1.6
Configuring MDMS Jukeboxes . . . . . . . . . . . . . . . . . . . . . . . . . . . . . . . . . . . . . . . . . . . . . . . . 11-16
11.2.1.7
How to Describe an MDMS Jukebox . . . . . . . . . . . . . . . . . . . . . . . . . . . . . . . . . . . . . . . . . . . 11-16
11.2.1.8
How to Control Access to an MDMS Jukebox . . . . . . . . . . . . . . . . . . . . . . . . . . . . . . . . . . . . 11-16
11.2.1.9
How to Configure an MDMS Jukebox for Operations. . . . . . . . . . . . . . . . . . . . . . . . . . . . . . . 11-16
11.2.1.10
Attribute for DCSC Jukeboxes . . . . . . . . . . . . . . . . . . . . . . . . . . . . . . . . . . . . . . . . . . . . . . . . . 11-16
11.2.1.11
Attributes for MRD Jukeboxes . . . . . . . . . . . . . . . . . . . . . . . . . . . . . . . . . . . . . . . . . . . . . . . . 11-16
11.2.1.12
Determining Jukebox State . . . . . . . . . . . . . . . . . . . . . . . . . . . . . . . . . . . . . . . . . . . . . . . . . . . 11-17
11.2.1.13
Magazines and Jukebox Topology . . . . . . . . . . . . . . . . . . . . . . . . . . . . . . . . . . . . . . . . . . . . . . 11-17
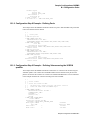
11.2.2 Summary of Drive and Jukebox Issues . . . . . . . . . . . . . . . . . . . . . . . . . . . . . . . . . . . . . . . . . . . . . 11-18
11.2.2.1
Enabling MDMS to Automatically Respond to Drive and Jukebox Requests . . . . . . . . . . . . 11-18
11.2.2.2
Creating a Remote Drive and Jukebox Connection . . . . . . . . . . . . . . . . . . . . . . . . . . . . . . . . . 11-19
11.2.2.3
How to Add a Drive to a Managed Jukebox . . . . . . . . . . . . . . . . . . . . . . . . . . . . . . . . . . . . . . 11-19
11.2.2.4
Temporarily Taking a Managed Device From Service . . . . . . . . . . . . . . . . . . . . . . . . . . . . . . 11-19
11.2.2.5
Changing the Names of Managed Devices . . . . . . . . . . . . . . . . . . . . . . . . . . . . . . . . . . . . . . . 11-19
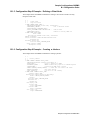
11.2.3 Locations for Volume Storage . . . . . . . . . . . . . . . . . . . . . . . . . . . . . . . . . . . . . . . . . . . . . . . . . . . . 11-20
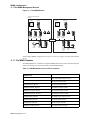
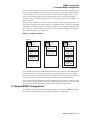
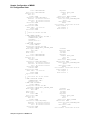
11.3 Sample MDMS Configurations . . . . . . . . . . . . . . . . . . . . . . . . . . . . . . . . . . . . . . . . . . . . . . . . . . . . . . . 11-21
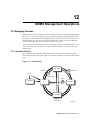
12 MDMS Management Operations
12.1 Managing Volumes . . . . . . . . . . . . . . . . . . . . . . . . . . . . . . . . . . . . . . . . . . . . . . . . . . . . . . . . . . . . . . . . .
12.1.1 Volume Life Cycle . . . . . . . . . . . . . . . . . . . . . . . . . . . . . . . . . . . . . . . . . . . . . . . . . . . . . . . . . . . . . .
12.1.2 Volume States by Manual and Automatic Operations . . . . . . . . . . . . . . . . . . . . . . . . . . . . . . . . . . .
12.1.2.1
Creating Volume Object Records . . . . . . . . . . . . . . . . . . . . . . . . . . . . . . . . . . . . . . . . . . . . . . .
12.1.2.2
Initializing a Volume . . . . . . . . . . . . . . . . . . . . . . . . . . . . . . . . . . . . . . . . . . . . . . . . . . . . . . . . .
12.1.2.3
Allocating a Volume . . . . . . . . . . . . . . . . . . . . . . . . . . . . . . . . . . . . . . . . . . . . . . . . . . . . . . . . .
12.1.2.4
Holding a Volume . . . . . . . . . . . . . . . . . . . . . . . . . . . . . . . . . . . . . . . . . . . . . . . . . . . . . . . . . . .
12.1.2.5
Freeing a Volume . . . . . . . . . . . . . . . . . . . . . . . . . . . . . . . . . . . . . . . . . . . . . . . . . . . . . . . . . . . .
12.1.2.6
Making a Volume Unavailable . . . . . . . . . . . . . . . . . . . . . . . . . . . . . . . . . . . . . . . . . . . . . . . . .
xii
12-1
12-1
12-2
12-3
12-3
12-3
12-4
12-4
12-4
12.1.3 Matching Volumes with Drives . . . . . . . . . . . . . . . . . . . . . . . . . . . . . . . . . . . . . . . . . . . . . . . . . . . . 12-4
12.1.4 Magazines for Volumes . . . . . . . . . . . . . . . . . . . . . . . . . . . . . . . . . . . . . . . . . . . . . . . . . . . . . . . . . . 12-5
12.1.5 Symbols for Volume Attributes . . . . . . . . . . . . . . . . . . . . . . . . . . . . . . . . . . . . . . . . . . . . . . . . . . . . 12-5
12.2 Managing Operations . . . . . . . . . . . . . . . . . . . . . . . . . . . . . . . . . . . . . . . . . . . . . . . . . . . . . . . . . . . . . . . . 12-6
12.2.1 Setting Up Operator Communication . . . . . . . . . . . . . . . . . . . . . . . . . . . . . . . . . . . . . . . . . . . . . . . . 12-6
12.2.1.1
Set OPCOM Classes by Node . . . . . . . . . . . . . . . . . . . . . . . . . . . . . . . . . . . . . . . . . . . . . . . . . . 12-6
12.2.1.2
Identify Operator Terminals . . . . . . . . . . . . . . . . . . . . . . . . . . . . . . . . . . . . . . . . . . . . . . . . . . . . 12-6
12.2.1.3
Enable Terminals for Communication . . . . . . . . . . . . . . . . . . . . . . . . . . . . . . . . . . . . . . . . . . . . 12-6
12.2.2 Activities Requiring Operator Support . . . . . . . . . . . . . . . . . . . . . . . . . . . . . . . . . . . . . . . . . . . . . . . 12-7
12.3 Serving Clients of Managed Media . . . . . . . . . . . . . . . . . . . . . . . . . . . . . . . . . . . . . . . . . . . . . . . . . . . . . 12-8
12.3.1 Maintaining a Supply of Volumes . . . . . . . . . . . . . . . . . . . . . . . . . . . . . . . . . . . . . . . . . . . . . . . . . . 12-8
12.3.1.1
Preparing Managed Volumes . . . . . . . . . . . . . . . . . . . . . . . . . . . . . . . . . . . . . . . . . . . . . . . . . . . 12-8
12.3.2 Servicing a Stand Alone Drive . . . . . . . . . . . . . . . . . . . . . . . . . . . . . . . . . . . . . . . . . . . . . . . . . . . . . 12-9
12.3.3 Servicing Jukeboxes . . . . . . . . . . . . . . . . . . . . . . . . . . . . . . . . . . . . . . . . . . . . . . . . . . . . . . . . . . . . . 12-9
12.3.3.1
Inventory Operations . . . . . . . . . . . . . . . . . . . . . . . . . . . . . . . . . . . . . . . . . . . . . . . . . . . . . . . . 12-10
12.3.4 Managing Volume Pools . . . . . . . . . . . . . . . . . . . . . . . . . . . . . . . . . . . . . . . . . . . . . . . . . . . . . . . . 12-11
12.3.4.1
Volume Pool Authorization . . . . . . . . . . . . . . . . . . . . . . . . . . . . . . . . . . . . . . . . . . . . . . . . . . . 12-12
12.3.4.2
Adding Volumes to a Volume Pool . . . . . . . . . . . . . . . . . . . . . . . . . . . . . . . . . . . . . . . . . . . . . 12-12
12.3.4.3
Removing Volumes from a Volume Pool . . . . . . . . . . . . . . . . . . . . . . . . . . . . . . . . . . . . . . . . 12-12
12.3.4.4
Changing User Access to a Volume Pool . . . . . . . . . . . . . . . . . . . . . . . . . . . . . . . . . . . . . . . . 12-12
12.3.4.5
Deleting Volume Pools . . . . . . . . . . . . . . . . . . . . . . . . . . . . . . . . . . . . . . . . . . . . . . . . . . . . . . 12-12
12.3.5 Taking Volumes Out of Service . . . . . . . . . . . . . . . . . . . . . . . . . . . . . . . . . . . . . . . . . . . . . . . . . . . 12-13
12.3.5.1
Temporary Volume Removal . . . . . . . . . . . . . . . . . . . . . . . . . . . . . . . . . . . . . . . . . . . . . . . . . . 12-13
12.3.5.2
Permanent Volume Removal . . . . . . . . . . . . . . . . . . . . . . . . . . . . . . . . . . . . . . . . . . . . . . . . . . 12-13
12.4 Rotating Volumes from Site to Site . . . . . . . . . . . . . . . . . . . . . . . . . . . . . . . . . . . . . . . . . . . . . . . . . . . . 12-13
12.4.1 Required Preparations for Volume Rotation . . . . . . . . . . . . . . . . . . . . . . . . . . . . . . . . . . . . . . . . . 12-13
12.4.2 Sequence of Volume Rotation Events . . . . . . . . . . . . . . . . . . . . . . . . . . . . . . . . . . . . . . . . . . . . . . 12-13
12.5 Scheduled Activities . . . . . . . . . . . . . . . . . . . . . . . . . . . . . . . . . . . . . . . . . . . . . . . . . . . . . . . . . . . . . . . 12-15
12.5.1 Logical Controlling Scheduled Activities . . . . . . . . . . . . . . . . . . . . . . . . . . . . . . . . . . . . . . . . . . . 12-15
12.5.2 Job Names of Scheduled Activities . . . . . . . . . . . . . . . . . . . . . . . . . . . . . . . . . . . . . . . . . . . . . . . . 12-15
12.5.3 Log Files for Scheduled Activities . . . . . . . . . . . . . . . . . . . . . . . . . . . . . . . . . . . . . . . . . . . . . . . . . 12-16
12.5.4 Notify Users When Volumes are Deallocated . . . . . . . . . . . . . . . . . . . . . . . . . . . . . . . . . . . . . . . . 12-16
13 MDMS High Level Tasks
13.1
13.2
13.3
13.4
Creating Jukeboxes, Drives, and Volumes . . . . . . . . . . . . . . . . . . . . . . . . . . . . . . . . . . . . . . . . . . . . . . .
Deleting Jukeboxes, Drives, and Volumes . . . . . . . . . . . . . . . . . . . . . . . . . . . . . . . . . . . . . . . . . . . . . . .
Rotating Volumes Between Sites . . . . . . . . . . . . . . . . . . . . . . . . . . . . . . . . . . . . . . . . . . . . . . . . . . . . . .
Servicing Jukeboxes Used for Backup Operations . . . . . . . . . . . . . . . . . . . . . . . . . . . . . . . . . . . . . . . . .
13-1
13-4
13-5
13-7
14 Remote Devices
14.1 The RDF Installation . . . . . . . . . . . . . . . . . . . . . . . . . . . . . . . . . . . . . . . . . . . . . . . . . . . . . . . . . . . . . . . .
14.2 Configuring RDF . . . . . . . . . . . . . . . . . . . . . . . . . . . . . . . . . . . . . . . . . . . . . . . . . . . . . . . . . . . . . . . . . . .
14.3 Using RDF with MDMS . . . . . . . . . . . . . . . . . . . . . . . . . . . . . . . . . . . . . . . . . . . . . . . . . . . . . . . . . . . .
14.3.1 Starting Up and Shutting Down RDF Software . . . . . . . . . . . . . . . . . . . . . . . . . . . . . . . . . . . . . . . .
14.3.2 The RDSHOW Procedure . . . . . . . . . . . . . . . . . . . . . . . . . . . . . . . . . . . . . . . . . . . . . . . . . . . . . . . .
14.3.3 Command Overview . . . . . . . . . . . . . . . . . . . . . . . . . . . . . . . . . . . . . . . . . . . . . . . . . . . . . . . . . . . . .
14.3.4 Showing Your Allocated Remote Devices . . . . . . . . . . . . . . . . . . . . . . . . . . . . . . . . . . . . . . . . . . . .
14.3.5 Showing Available Remote Devices on the Server Node . . . . . . . . . . . . . . . . . . . . . . . . . . . . . . . .
14.3.6 Showing All Remote Devices Allocated on the RDF Client Node . . . . . . . . . . . . . . . . . . . . . . . . .
14.4 Monitoring and Tuning Network Performance . . . . . . . . . . . . . . . . . . . . . . . . . . . . . . . . . . . . . . . . . . . .
14.4.1 DECnet Phase IV . . . . . . . . . . . . . . . . . . . . . . . . . . . . . . . . . . . . . . . . . . . . . . . . . . . . . . . . . . . . . . .
14-1
14-1
14-2
14-2
14-2
14-2
14-2
14-3
14-3
14-3
14-3
xiii
14.4.2 DECnet-Plus (Phase V) . . . . . . . . . . . . . . . . . . . . . . . . . . . . . . . . . . . . . . . . . . . . . . . . . . . . . . . . . . 14-4
14.4.3 Changing Network Parameters . . . . . . . . . . . . . . . . . . . . . . . . . . . . . . . . . . . . . . . . . . . . . . . . . . . . . 14-4
14.4.4 Changing Network Parameters for DECnet (Phase IV) . . . . . . . . . . . . . . . . . . . . . . . . . . . . . . . . . . 14-5
14.4.5 Changing Network Parameters for DECnet-Plus(Phase V) . . . . . . . . . . . . . . . . . . . . . . . . . . . . . . . 14-6
14.4.6 Resource Considerations . . . . . . . . . . . . . . . . . . . . . . . . . . . . . . . . . . . . . . . . . . . . . . . . . . . . . . . . . 14-6
14.4.7 Controlling RDF’s Effect on the Network . . . . . . . . . . . . . . . . . . . . . . . . . . . . . . . . . . . . . . . . . . . . 14-8
14.4.8 Surviving Network Failures . . . . . . . . . . . . . . . . . . . . . . . . . . . . . . . . . . . . . . . . . . . . . . . . . . . . . . . 14-8
14.5 Controlling Access to RDF Resources . . . . . . . . . . . . . . . . . . . . . . . . . . . . . . . . . . . . . . . . . . . . . . . . . . 14-9
14.5.1 Allow Specific RDF Clients Access to All Remote Devices . . . . . . . . . . . . . . . . . . . . . . . . . . . . . . 14-9
14.5.2 Allow Specific RDF Clients Access to a Specific Remote Device . . . . . . . . . . . . . . . . . . . . . . . . . 14-9
14.5.3 Deny Specific RDF Clients Access to All Remote Devices . . . . . . . . . . . . . . . . . . . . . . . . . . . . . 14-10
14.5.4 Deny Specific RDF Clients Access to a Specific Remote Device . . . . . . . . . . . . . . . . . . . . . . . . . 14-10
14.6 RDserver Inactivity Timer . . . . . . . . . . . . . . . . . . . . . . . . . . . . . . . . . . . . . . . . . . . . . . . . . . . . . . . . . . . 14-10
14.7 RDF Error Messages . . . . . . . . . . . . . . . . . . . . . . . . . . . . . . . . . . . . . . . . . . . . . . . . . . . . . . . . . . . . . . . 14-11
A HSM Error Messages
A.1 OpenVMS Messages . . . . . . . . . . . . . . . . . . . . . . . . . . . . . . . . . . . . . . . . . . . . . . . . . . . . . . . . . . . . . . . . . A-1
A.2 Shelf Handler Messages . . . . . . . . . . . . . . . . . . . . . . . . . . . . . . . . . . . . . . . . . . . . . . . . . . . . . . . . . . . . . . A-1
A.3 Shelf Management Utility Messages . . . . . . . . . . . . . . . . . . . . . . . . . . . . . . . . . . . . . . . . . . . . . . . . . . . . A-15
B Sample Configuration of MDMS
B.1 Configuration Order . . . . . . . . . . . . . . . . . . . . . . . . . . . . . . . . . . . . . . . . . . . . . . . . . . . . . . . . . . . . . . . . . . B-1
B.1.1
Configuration Step 1 Example - Defining Locations . . . . . . . . . . . . . . . . . . . . . . . . . . . . . . . . . . . . . B-2
B.1.2
Configuration Step 2 Example - Defining Media Type . . . . . . . . . . . . . . . . . . . . . . . . . . . . . . . . . . . B-2
B.1.3
Configuration Step 3 Example - Defining Domain Attributes . . . . . . . . . . . . . . . . . . . . . . . . . . . . . . B-2
B.1.4
Configuration Step 4 Example - Defining MDMS Database Nodes . . . . . . . . . . . . . . . . . . . . . . . . . B-4
B.1.5
Configuration Step 5 Example - Defining a Client Node . . . . . . . . . . . . . . . . . . . . . . . . . . . . . . . . . B-5
B.1.6
Configuration Step 6 Example - Creating a Jukebox . . . . . . . . . . . . . . . . . . . . . . . . . . . . . . . . . . . . B-5
B.1.7
Configuration Step 7 Example - Defining a Drive . . . . . . . . . . . . . . . . . . . . . . . . . . . . . . . . . . . . . . . B-6
B.1.8
Configuration Step 8 Example - Defining Pools . . . . . . . . . . . . . . . . . . . . . . . . . . . . . . . . . . . . . . . . B-7
B.1.9
Configuration Step 9 Example - Defining Volumes using the /VISION qualifier . . . . . . . . . . . . . . B-7
C MDMS Messages
D Converting SLS/MDMS V2.X to MDMS V4
D.1 Converting SLS/MDMS V2.X Symbols and Database . . . . . . . . . . . . . . . . . . . . . . . . . . . . . . . . . . . . . . . D-1
D.1.1
Executing the Conversion Command Procedure . . . . . . . . . . . . . . . . . . . . . . . . . . . . . . . . . . . . . . . . D-1
D.1.2
Resolving Conflicts During the Conversion . . . . . . . . . . . . . . . . . . . . . . . . . . . . . . . . . . . . . . . . . . . . D-2
D.2 Things to Look for After the Conversion . . . . . . . . . . . . . . . . . . . . . . . . . . . . . . . . . . . . . . . . . . . . . . . . . D-5
D.3 Using SLS/MDMS V2.x Clients With the MDMS V4 Database . . . . . . . . . . . . . . . . . . . . . . . . . . . . . . . D-9
D.3.1
Limited Support for SLS/MDMS V2 during Rolling Upgrade . . . . . . . . . . . . . . . . . . . . . . . . . . . . . D-9
D.3.2
Upgrading the Domain to MDMS V4 . . . . . . . . . . . . . . . . . . . . . . . . . . . . . . . . . . . . . . . . . . . . . . . . D-9
D.3.3
Reverting to SLS/MDMS V2 . . . . . . . . . . . . . . . . . . . . . . . . . . . . . . . . . . . . . . . . . . . . . . . . . . . . . . D-10
D.3.4
Restrictions . . . . . . . . . . . . . . . . . . . . . . . . . . . . . . . . . . . . . . . . . . . . . . . . . . . . . . . . . . . . . . . . . . . . D-11
D.4 Convert from MDMS Version 3 to a V2.X Volume Database . . . . . . . . . . . . . . . . . . . . . . . . . . . . . . . . D-11
xiv
Preface
Purpose of this Document
This document contains information about Hierarchical Storage Management for OpenVMS™
(HSM) and Media, Device and Management Services (MDMS) software. Use this document to
define, configure, operate, and maintain your HSM and MDMS environment. Installation information is found in a separate Installation and Configuration Guide listed in the related documents table. Command information for both HSM and MDMS is found in the HSM Command
Reference Guide also listed in the related documents table.
Audience
The audience for this document includes people who apply HSM for OpenVMS™ (HSM) to
solve storage management problems in their organization. The users of this document should
have some knowledge of the following:
•
OpenVMS™ system management
•
DCL commands and utilities
Document Structure
This document is organized in the following manner and includes the following information:
Chapter 1
Introduction to HSM.
Chapter 2
Understanding HSM Concepts.
Chapter 3
Customizing the HSM Environment.
Chapter 4
Contains information on using HSM.
Chapter 5
Managing the HSM Environment.
Chapter 6
Operator Activities in the HSM Environment.
Chapter 7
Solving Problems with HSM.
Chapter 8
Provides an introduction to Media, Device and Management Services
(MDMS).
Chapter 9
Contains information on MDMS menu Operations.
xv
Chapter 10
Contains information on Media Management.
Chapter 11
Contains information on MDMS Configuration.
Chapter 12
Contains information on MDMS Management Operations.
Chapter 13
Contains information on MDMS Tasks.
Chapter 14
Contains information on Remote Device Facility.
Appendix A
Lists HSM-specific status messages and error messages.
Appendix B
Gives a Sample Configuration of MDMS.
Appendix C
Lists MDMS-specific status messages and error messages.
Appendix D
Converting SLS/MDMS V2.x to MDMS V4
Related Documents
The following documents are related to this documentation set or are mentioned in this manual.
The lower case x in the part number indicates a variable revision letter.
xvi
Document
Order No.
HSM for OpenVMS™ Installation and Configuration Guide
AA-QUJ1x-TE
HSM for OpenVMS™ Guide to Operations
AA-PWQ3x-TE
HSM for OpenVMS™ Command Reference Guide
AA-R8EXx-TE
HSM for OpenVMS™ Software Product Description
AE-PWNTx-TE
HSM Hard Copy Documentation Kit (Consists of the above HSM documents and a cover letter)
QA-0NXAA-GZ
OpenVMS™ System Management Utilities Reference Manual: A-L
AA-PV5Px-TK
OpenVMS™ DCL Dictionary: A-M
AA-PV5Kx-TK
OpenVMS™ DCL Dictionary: N-Z
AA-PV5Lx-TK
OpenVMS ™License Management Utility Manual
AA-PVXUx-TK
OpenVMS™ User’s Manual
AA-PV5Jx-TK
Related Products
The following related products are mentioned in this documentation.
Product
Description
HSM
HSM refers to Hierarchical Storage Management for OpenVMS™ software.
MDMS
MDMS refers to Media, Device and Management Services for OpenVMS ™ software.
SMF
SMF refers to Sequential Media File System for OpenVMS™ software.
SLS
SLS refers to Storage Library System for OpenVMS ™ software.
Conventions
The following conventions are used in this document.
Convention
Description
{}
In format command descriptions, braces indicate required elements.
You must include one of the elements.
[]
Brackets show optional elements in a command syntax. You can omit
these elements if you wish to use the default response.
..
.
Horizontal ellipsis points indicate the omission of information from a
sentence or paragraph that is not important to the topic being discussed.
...
Vertical ellipsis points indicate the omission of information from an
example or command format. The information has been omitted
because it is not important to the topic being discussed.
boldface
Boldface type in text indicates the first type instance of terms defined
in the Glossary or in text.
italic
Italic type emphasizes important information, type indicates variables,
indicates complete titles of manuals, and indicates parameters for system information.
Starting test . . .
This type font denotes system response, user input, and examples.
Ctrl/x
Hold down the key labeled Ctrl (Control) and the specified key simultaneously (such as Ctrl/Z).
PF1 x
The key sequence PF1 x indicates that you press and release the PF1
key, and then you press and release another key (indicated here by x).
n
A lowercase italic n indicates the generic use of a number. For example, 19nn indicates a four-digit number in which the last two digits are
unknown.
xvii
Convention
Description
x
A lowercase italic x indicates the generic use of a letter. For example,
xxx indicates any combination of three alphabetic characters.
OpenVMS™
Alpha
This term refers to the OpenVMS™ Alpha operating system.
OpenVMS™ VAX
This term refers to the OpenVMS™ VAX operating system.
Determining and Reporting Problems
If you encounter a problem while using HSM, report it to HP through your usual support channels. Review the Software Product Description (SPD) and Warranty Addendum for an explanation of warranty. If you encounter a problem during the warranty period, report the problem as
indicated previously or follow alternate instructions provided by HP for reporting SPD nonconformance problems.
xviii
1
Introduction to HSM
This chapter provides an introduction to the general concepts of storage management in the
OpenVMS™ environment and defines the role of HP’s Hierarchical Storage Management
(HSM) for OpenVMS™ software. Henceforth in this book, the term HSM is used as a replacement for Hierarchical Storage Management.
1.1 Storage Management in the OpenVMS Environment
Storage management is the means by which you control the devices on which the frequently
accessed (active) data on your system is kept. To be useful, active data must be available for use
and remain unchanged (persistent) in the event of unexpected events, such as disasters.
1.1.1 Data Categories
Typically, data exists in one of three categories:
•
Active-Data that you access frequently. You want virtually immediate access to this data.
•
Dormant-Data that you access less frequently and are willing to wait a short time to access.
•
Inactive-Data that you do not expect to access again but must keep. Generally, this type of
data is kept in an archive for legal or business purposes.
On most systems, 80 percent of the I/O requests access only 20 percent of stored data. The
remaining 80 percent of your data occupies expensive media (magnetic disks), but is used infrequently.
1.1.2 Device Capacity, Cost, and Performance
There are many different devices on which your data can be stored, and the selection of which
device best meets your storage needs depends on three factors:
•
Performance
•
Capacity
•
Cost
The relationship among these three factors is illustrated in Figure 1-1. In general, high-performance devices have a lower capacity and higher cost than high-capacity devices. High-capacity
devices trade performance for the ability to store large amounts of data.
Introduction to HSM 1–1
Introduction to HSM
1.1 Storage Management in the OpenVMS Environment
Figure 1–1
SOLID
STATE
DISK
DEVICES
MAGNETOMAGNETIC OPTICAL
DEVICE
DISK
VOLUME
OF DATA
NEARLINE
DEVICE
OFFLINE
DEVICE
TIME TO RETRIEVE DATA
QUICKER DATA
RETRIEVAL
HIGHER COST
PER MEGABYTE
SLOWER DATA
RETRIEVAL
LOWER COST
PER MEGABYTE
CXO-4355A-MC
1.1.3 Storage Management Planning
Your storage management plan should allow you to cost effectively place your data on those
devices best suited to meet your cost and access requirements. This plan should include placing
your active data on the most responsive devices in your system, placing your dormant data on
less responsive devices, and placing your inactive data on the highest capacity devices. File
activity and associated data storage are summarized in Table 1-1.
Table 1–1 File Activity and Data Storage
File Activity
Storage Type
HSM Storage Classification
Active
Data that is frequently
accessed and needs the
fastest response time
Online
Immediately available space that
the system uses to store the active
data. This is usually mounted
magnetic disk space, but this data
type could include other kinds of
fast-access devices.
Primary
Online storage managed through the
OpenVMS™ file system. HSM
moves these files to shelf storage
when they have not been accessed
for a predetermined time or when
the storage device's remaining
capacity exceeds a predefined
threshold. These criteria are termed
policy.
Dormant
Data that is accessed
less frequently and for
which response time is
less important.
Nearline
Storage space that requires some
intervention to be made available
to the system, including access by
robotic library devices. Access is
fairly fast, but takes longer than
from an online device.
Shelf
Any storage device, including magnetic disk, that holds dormant data
files.
Data in shelf storage is termed
shelved. When shelved files are
accessed through the OpenVMS™
file system, HSM moves he shelved
files back to primary storage.
Introduction to HSM 1-2
Introduction to HSM
1.2 Storage Management with HSM
Table 1–1 File Activity and Data Storage
File Activity
Storage Type
Inactive
Data that is not expected
to be accessed frequently
but must be kept for
archival or legal purposes.
Offline
Access to this data requires
human intervention for operations
such as mounting tape media.
Because the operator response is
the significant factor, the access
time is unpredictable.
HSM Storage Classification
1.2 Storage Management with HSM
HSM software is an extension of the OpenVMS™ file system that allows you to manage your
dormant data efficiently. It moves your dormant data from primary storage (where your active
data is usually kept) to shelf storage. This frees the space in primary storage for use, while the
dormant data remains available on lower cost media. The movement of your dormant data to
shelf storage is called shelving.
To meet your storage management requirements, HSM:
•
Operates as an integrated part of OpenVMS™
•
Maintains accessibility and reliability of files in shelf storage and primary storage
•
Supports user-initiated and system-initiated data movement between primary storage and
shelf storage
•
Provides caching to temporarily keep data in online storage and to decrease the impact of
shelving on other operations
•
Maintains access to file data within a suitable and definable time frame
•
Minimizes the occurrence of volume full and user disk quota exceeded conditions
Data managed by HSM resides in one of the following states:
•
Online - Located in primary storage (preshelved, unshelved, and never shelved data)
•
Shelved - Located in shelf storage (shelved data)
1.2.1 File Headers and Location
While a file is shelved, the file’s header information is maintained in primary storage. When you
display the header of a shelved file, the allocated file size is shown as zero blocks, indicating that
the data contents are located in shelf storage.
The directory information and file headers for your shelved data are maintained in directories on
your primary storage devices. The data itself is located in shelf storage. When access is
requested for the shelved data, HSM automatically returns it to primary storage. Introduction to
HSM
Information on your files always can be found in your active directories, even though the actual
data resides in shelf storage.
1.2.2 Controlling File Movement
You can control shelving in the following ways:
•
You can specify which files are to be moved between primary storage and shelf storage.
•
You can specify which files are not to be moved from primary storage.
Introduction to HSM 1–3
Introduction to HSM
1.3 HSM Storage Management Concepts
•
You can set a high water mark on primary storage to automatically trigger shelving of your
dormant data to shelf storage. A high water mark is a defined percentage of disk space
used that, when exceeded, causes shelving to begin.
•
You can set a low water mark as a space-recovered goal to limit the number of files that are
moved to shelf storage. A low water mark is a defined percentage of disk space used that,
when reached, causes policy-defined shelving to stop.
To implement shelving control, you use HSM policies. For additional information about HSM
policies, see Section 1.3.3
1.3 HSM Storage Management Concepts
There are several key storage management concepts required to properly understand and use
HSM. These concepts include:
•
Shelf
•
Archive class
•
HSM policies and policy creation
These concepts are described in detail in Chapter 2.
1.3.1 Shelf
An HSM shelf is a logical software object that relates the data in a set of online disk volumes, on
which shelving is enabled, to a set of archive classes that contain the shelved data for those volumes.
1.3.2 Archive Class
An archive class is a logical software object that represents a single copy of shelved data. Identical copies are written to one or more archive classes when a file is shelved. For each shelf, you
can specify the number of archive classes (data copies) to have to ensure reliability of the data.
Because shelved data is not backed up automatically, multiple shelf copies provide the only
means of recovery if the primary copy of the shelf data is lost or destroyed. HP recommends you
have at least two archive classes for each shelf.
1.3.3 HSM Policies
An HSM policy is a defined set of parameters that controls when shelving begins and ends.
HSM implements data management through HSM policies that specify responses to events.
HSM policies contain HSM-specific commands to shelve or unshelve data in response to a
scheduled or situational trigger event. Trigger events, used in conjunction with appropriately
designed file selection criteria, work to provide enough online disk space to satisfy users’ needs.
For detailed information about HSM policies, see Section 2.9.3.
1.4 The Shelving Process
The shelving process moves files from primary storage to shelf storage. The header information
for files that have been shelved is still visible to users through the OpenVMS™ directory command, even though the file’s data contents are not stored online. You can modify these file headers without unshelving the files.
1.4.1 Starting the Shelving Process
Your control over the start of the shelving process is either explicit or implicit.
Explicit shelving is a process that starts in response to the DCL SHELVE command. You can
issue the SHELVE command directly to the OpenVMS™ operating system, or you can execute it
in an OpenVMS™ command procedure.
Introduction to HSM 1-4
Introduction to HSM
1.4 The Shelving Process
Implicit shelving is a process that occurs in response to one of the following triggers:
•
Volume full, user disk quota exceeded, or high water mark exceeded requests initiated by
OpenVMS™. These conditions trigger reactive policy.
•
Scheduled policy execution initiated by HSM. This condition triggers preventive policy.
1.4.2 File Selection for Explicit Shelving
The DCL SHELVE command accepts file specifications, including wildcards, for files to process. Qualifiers to this command allow flexibility in selecting files for explicit shelving. Refer to
HSM Command Reference Guide for complete information about using the SHELVE command.
1.4.3 File Selection for Implicit Shelving
File selection for implicit shelving is specified through HSM policy. Once you understand the
file selection process, you can use Shelf Management Utility (SMU) commands to specify file
selection criteria and achieve efficient use of primary storage.
Make Space Requests
When an application or user creates a file or extends the file, the operation may not complete
because the disk volume is full or the user has exceeded the disk quota.
If shelving is enabled on the volume, this situation generates a make space request to HSM to
free up enough disk space to satisfy the request. If responding to make space requests is enabled,
HSM executes the defined policy for the volume and shelves enough files to free up the
requested space. While shelving files, HSM sends an informational message to notify the user
that the file access may take much longer than usual due to the shelving activity.
File Selection
Table 1-2 lists the stages of file selection for implicit shelving.
Table 1–2 Process for Selecting Files According to Policy
Stage
Event
1
HSM creates an ordered file selection list with the name and the number of
allocated blocks for each file on the disk that meets the file selection criteria. This file selection list is based on the primary occupancy or quota policy defined for the online volume
2
The amount of space to be recovered is calculated based upon the volume’s
low water mark.
3
HSM then shelves eligible files on the file selection list until either the low
water mark is reached or the list is exhausted and execution goes to step 4.
Because a volume’s usage is dynamic, the low water mark is checked after
each successful shelve operation and is adjusted accordingly. If the low
water mark is met, policy execution completes successfully and is terminated.
4
If the primary policy does not recover sufficient disk volume space, the volume is rescanned using the secondary policy to build a secondary policy
candidate list, and execution returns to step 3.
5
If both primary and secondary policies have been executed and the policy
goals still have not been achieved, policy execution terminates with an
HSM$_ INCOMPLETE error
Introduction to HSM 1–5
Introduction to HSM
1.5 The Unshelving Process
1.4.4 Modifying File Attributes of a Shelved File
After a file has been shelved, its header remains on the disk. You still see the file in directories,
and you may view and modify the file’s attributes without having to access the data in shelf storage. Any modifications you make to the shelved file’s header will be in effect when the file is
unshelved.
1.5 The Unshelving Process
The unshelving process moves files from shelf storage to primary storage. Once the file has been
unshelved, you can access it normally.
1.5.1 Starting the Unshelving Process
Your control over the start of the unshelving process is either explicit or implicit.
Explicit unshelving is a process that starts in response to the DCL UNSHELVE command.
You can issue the UNSHELVE command directly to the OpenVMS™ operating system, or you
can execute it in an OpenVMS™ command procedure. The UNSHELVE command accepts one
or more file specifications, including wildcard file specifications.
Implicit unshelving is a process that HSM starts in response to a file fault. A file fault is a highpriority request that occurs when a shelved file is accessed for a read, write, extend, or truncate
operation.
Table 1-3 shows the process for unshelving a file.
Table 1–3 Process for Unshelving a File
Stage
Event
1
The user specifically requests a file to be unshelved or attempts to access a shelved
file through a read, write, extend, or truncate operation (which causes a file fault).
Opening a file does not generate a file fault, except for RMS indexed files, or files
accessed through NFS or PATHWORKS.
2
When a file fault occurs, HSM sends an informational message to notify the user
that the file access may take longer than expected because the file must be
unshelved.
3
HSM searches its catalog to find where the shelved data is located. The first file
copy it accesses for unshelving is the one listed in the restore archive list for the
shelf.
4
The file is restored to primary storage as an unattended operation if the shelf resides
on a nearline storage device. If the shelf is offline, operator intervention may be
required.
5
The user process that requested access to the file waits for the file to be unshelved.
If the file cannot be unshelved for any reason, an error is returned to the requester.
1.5.2 Process Default Unshelving Action
For each user process, you can specify a default unshelving action that controls implicit unshelving initiated by DCL commands and applications. By default, access to a shelved file causes a
file fault.
However, you can specify instead that an error be returned on such access by issuing a SET
PROCESS/NOAUTO_UNSHELVE command. This is especially useful
for commands such as wildcard searches when you do not need to unshelve files to examine
them for the matching string.
Introduction to HSM 1-6
Introduction to HSM
1.6 The Preshelving Process
1.5.3 The Results of Unshelving a File
When a file is unshelved, its data contents are moved into the location defined by its current
directory entry in the(online) file header. If you renamed the file header while the file was
shelved, the file will be unshelved into its new location or its new name. After a file has been
unshelved from nearline/offline media, the copy remains on the nearline/offline media. Once
unshelved, the file can be shelved again. If the file has been modified, a new shelf copy is made
and the old copy is invalidated. If a file has not been modified since it was shelved originally, the
previously shelved file copy remains valid and a new copy is not made.
1.5.4 Handling Duplicate Requests to Unshelve a File
Subsequent requests to unshelve a given file while the file is undergoing the unshelving process
are treated as duplicate requests. HSM signals that both requests have completed after the first
request (the one that initiated the unshelving process) completes.
1.6 The Preshelving Process
The preshelving process is a variation of the shelving process. It is similar to the shelving process in that it copies the file’s data to shelf storage. It differs from the shelving process in that it
allows the file to remain online and accessible even though a shelf copy is made.
A request to preshelve a file that has already been shelved or preshelved succeeds immediately.
After a file is preshelved, it can still be accessed normally. If the online file is modified, the shelf
copy is invalidated. Any subsequent shelve or preshelve operation causes the file to be shelved
again. If the preshelved file is not modified, a subsequent shelve operation simply truncates the
file’s data which removes the data from primary storage.
Benefits of Preshelving Files
Preshelving files allows the system to respond rapidly to make space requests. Because
preshelved files already are copied to shelf storage, HSM only needs to truncate files to respond
to make space requests.
1.7 The Unpreshelving Process
When a shelved file is unshelved, it goes into the preshelved state. That is, the file’s HSM shelf
data is still valid. If the file is later shelved without being modified, no additional data copies are
made and the existing shelf data is used.
However, if the file is modified, its shelf data becomes obsolete. This process is called
unpreshelving, and occurs automatically if an application writes to the file. It can also be explicitly requested using the UNPRESHELVE DCL command. When a file is unpreshelved, its HSM
shelf data is marked invalid, and may be subject to deletion during repack according to the
updates parameter set on the associated shelf. In addition, if the shelf data is in a cache with the
/NOHOLD qualifier, the cache copy of the file (and its associated catalog entry) are immediately
deleted.
If a file has been unpreshelved for any reason, a subsequent shelve or preshelve operation will
cause a new copy of the data to be made. An unpreshelved file is effectively identical to a file
that has never been shelved.
Introduction to HSM 1–7
Introduction to HSM
1.8 File Headers and Access Security
1.8 File Headers and Access Security
When a file is shelved, a copy of its header is kept with the data and the original header remains
in primary storage (on the disk). The header that remains in primary storage is the valid file
header.
HSM maintains file access security even when the contents of the file are not present on the
online disk volume, because the online file header contains file owner, protection flags, and
access control lists. If you change the file protection or ownership while a file is shelved, the user
who shelved the file may not be allowed to unshelve it.
1.9 HSM File State Diagram
Figure 1-2 illustrates the various HSM states in which a file can reside, the locations of the file’s
directory, header, and data, and the operations that transition a file from one state to another.
Figure 1–2
Shelf
Disk
Directory
Header
Shelve
Shelf
Data
Fi nsh
le e
Fa lve
ul
t
el
U
e
lv
he
ve
es
el
Pr
sh e
re at
np Upd
ve
Shelved
State
U
Online
State
Sh
Disk
Directory
Header
Data
Preshelved
State
Disk
Directory
Header
Data
Shelf
Data
CXO-5428A-MC
1.10 HSM Cache
Cache is shelf storage comprised of one or more online or nearline storage devices. These
devices can include magnetic and magneto-optical disks. You can use any number of devices for
the cache. The cache temporarily stages shelved data between its primary online storage location
and the nearline/offline media used for shelf storage. Cache is fully described in Section 2.8.
Using a Cache Has Significant Advantages
Using a cache greatly improves shelving performance, because the time needed to complete the
operation is only as long as it takes to copy a file to another disk. The cache then can be
Introduction to HSM 1-8
Introduction to HSM
1.10 HSM Cache
flushed to a nearline or offline device at a later time when the shelving operation will have less
impact on system performance.
Using Magneto-Optical Devices as Cache
Magneto-optical (MO) devices make an ideal repository for shelved data because they cost less
than magnetic disks but still provide excellent response time. HSM supports MO devices as
cache devices, rather than nearline devices, because the OpenVMS™ system sees them as system-mounted, Files-11 devices. This means you can define an MO device as temporary cache
or as permanent (nonflushing) cache that functions as shelf storage.
1.10.1 HSM Operations with Cache
There are four HSM operations that involve the cache:
•
Shelving
•
Preshelving
•
Unshelving
•
Flushing
1.10.2 Cache in the Shelving and Preshelving Processes
Because cache is an alternate location for temporarily storing shelved files, the shelving and
preshelving processes differ only slightly when cache is enabled.
The file selection process does not function differently when cache is used. Table 1-4 describes
both the shelving and preshelving processes in which cache is used.
Table 1–4 Process for Shelving and Preshelving with Cache
Stage
Event
1
The HSM system creates a cache file on a cache device.
2
The file data is copied from the original file to the cache file. The cache file is
closed.
3
Subsequent events are determined by the SMU SET CACHE command’s
/BACKUP qualifier as follows:
The /BACKUP qualifier is
used for the cache
The file also is copied to the nearline/offline
media used for shelf storage when the file is
shelved.
The / NOBACKUP qualifier is used for the cache
(default)
The file is not immediately copied to the nearline/offline media. The file is copied later,
when the cache is flushed. media. The file is
copied later
1.10.3 Unshelving from Cache
The time taken to unshelve a file from cache is almost the same as that for copying the file from
one disk to another.
Introduction to HSM 1–9
Introduction to HSM
1.11 HSM Catalogs
1.10.4 Exceeding Cache Capacity
Files that exceed the capacity of the cache are moved directly to the nearline/offline media. You
can limit the amount of storage the cache can use on each online volume you designate as a
cache, or you can use the entire volume for the cache.
1.10.5 Flushing Cache
Flushing the cache is the process used to reclaim cache space. Any of the following events can
start the cache flushing process:
•
The used cache capacity meets or exceeds the defined high water mark for the cache volume.
•
The cache disk experiences a volume full event.
•
A periodic cache flush trigger event occurs.
Depending on how you defined the cache, the following events occur when the cache is
flushed:
WHEN...
The /BACKUP qualifier is used
the cache
THEN...
for
The /NOBACKUP qualifier is used for
the cache
The files on the cache disk are deleted, because
they have already been copied to shelf storage
The files on the cache disk are copied to the nearline/offline media used for shelf storage and are
then deleted.
1.11 HSM Catalogs
HSM catalogs contain the information HSM needs to locate and unshelve all shelved files. There
is one default catalog, used for maintaining global HSM information, and a number of shelf catalogs that are related to specific shelves and volumes. If an HSM catalog suffers an unrecoverable loss, the associated shelved data may be lost. For this reason, HSM catalogs are an essential
part of the HSM environment.
For information on setting up shelf catalogs, see Section 2.3.4. For information on protecting
HSM catalogs from loss or corruption, see Section 5.5.
1.12 HSM Archive Repacking
HSM provides the capability to repack shelf media on a per-archive class basis (optionally with
selected volumes) by copying valid shelf data to new media in the same or different archive
classes; deleted and obsolete files are not copied. The old media can then be reused. In addition, the catalog entries of deleted and obsolete files are deleted. The system administrator can
specify a delay in deleting shelf data after an online delete, and also the number of updates a file
undergoes before a shelf copy is considered obsolete. Refer to Section 5.13 for more detailed
information.
Introduction to HSM 1-10
Introduction to HSM
1.13 HSM Software Modes
1.13 HSM Software Modes
HSM software operates in one of two modes:
•
HSM Basic mode-Provides shelving, preshelving, and unshelving functionality using simple devices, Digital Linear Tape (DLT) magazine loaders, and 4mm DAT loaders.
•
HSM Plus mode-Provides shelving, preshelving, and unshelving functionality using the full
suite of devices supported through Media, Device and Management Services for OpenVMS™ (MDMS), including robotically-controlled devices like TL820s and StorageTek™
silos.
Except for the media, device and management configuration and support, both modes operate
identically.
Note
MDMS software must be installed on your system before HSM operates in Plus mode.
MDMS software is available from various sources as an installable product. In addition, MDMS functionality installs as part of the Storage Library System for OpenVMS™ Version software.
You choose a mode to operate when you install the HSM for OpenVMS™ software. However,
you can change modes after you make the initial decision. The following restrictions apply to
changing modes after installation:
•
You can always change from Basic mode to Plus mode. For more information, see Section
5.22.
•
You can change from Plus mode to Basic mode only if you have not written any shelved
file information to a catalog in Plus mode. Once you write information to a catalog in Plus
mode, you cannot change back to Basic mode.
•
For a change in operating mode to have effect, you must restart HSM.
1.13.1 HSM Basic Mode Functions
HSM Basic mode provides the following functionality and features:
•
Complete HSM functionality for small to medium customer environments that can use
smaller capacity tape loaders (for example, DLT loaders), standalone tape devices, and
magneto-optical devices
•
A simple, integrated user interface provided completely by HSM
•
Limited media management that is not integrated with other storage management products
•
Support of up to 36 archive classes for data reliability
•
An HSM naming convention for tape volume labels
•
Local tape device support within the VMScluster ™ environment: the shelf server nodes
must have visibility to all tape devices (this can include TMSCP-served devices)
1.13.2 HSM Plus Mode Functions
HSM Plus mode provides the following functionality and features:
•
Complete HSM functionality for medium to large customer environments that use large tape
jukeboxes and for locations that already have the MDMS or SLS software installed
•
Support for large capacity nearline devices that support multiple terabytes of data, such as
the TL820 and StorageTek™ silos
Introduction to HSM 1–11
Introduction to HSM
1.14 Media Types for HSM Basic Mode
•
Common media management with other OpenVMS™ storage management products
through the MDMS software
•
Device and media management support provided through the MDMS command line and
menu interfaces; this requires a more complex configuration process than for HSM Basic
mode
•
Support of up to 9999 archive classes for data reliability
•
No fixed naming conventions for HSM tape volumes; the Storage Administrator controls
volume names through MDMS
•
Tape device support within the cluster: the shelf server
ity to all tape devices within the cluster
•
Support for remote tape devices, those that are not directly connected within the cluster,
through the Remote Device Facility™ (RDF) portion of MDMS HSM Mode Comparison
Table 1-5 identifies the functionality HSM for OpenVMS™ provides and which mode provides it.
nodes do not require direct visibil-
Table 1–5 HSM Basic and Plus Functionality
Function
Basic
Plus
OpenVMS™ Versions
6.1, 6.2
6.1, 6.2
Supported hardware platforms
VAX, Alpha
VAX, Alpha
Common media and device management with
other HP storage products
No
Yes, through MDMS
Support for Digital Linear Tape (DLT) magazine loaders as robotically-controlled devices
Yes
Yes
Support for TL81x, TL82x
No
Yes
Maximum number of archive classes
36
9999
Requires specific HSM volume names
Yes
No
Provides support for remote devices
No
Yes
Uses a single, integrated interface for configuration and use
Yes
No
All other functions, including HSM policies and cache, are provided in both modes.
1.14 Media Types for HSM Basic Mode
HSM Basic mode automatically determines the media type based on the specific device(s) you
define for use. Table 1-6 shows how media types map to devices for HSM Basic mode. Check
the HSM Software Product Description (SPD 46.38.xx) for the latest list of supported devices.
Table 1–6 Media Type to Device Map
Device Type
Media Type
Magazine Loader
TA78
9-Track Magtape
No
TA79
9-Track Magtape
No
Introduction to HSM 1-12
Introduction to HSM
1.14 Media Types for HSM Basic Mode
Table 1–6 Media Type to Device Map
Device Type
Media Type
Magazine Loader
TA81
9-Track Magtape
No
TA85
CompacTape III
No
TA857
CompacTape III
Yes
TA86
CompacTape III
No
TA867
CompacTape III
Yes
TA90
3480 Cartridge
No
TA90E
3480 Cartridge
No
TA91
3480 Cartridge
No
TAD85
CompacTape III
No
TAPE9
9-Track Magtape
No
TE16
9-Track Magtape
No
TF70
CompacTape II No
TF85
CompacTape III
No
TF857
CompacTape III
Yes
TF86
CompacTape III
No
TF867
CompacTape III
Yes
TK50
CompacTape I
No
TK50S
CompacTape I
No
TK70
CompacTape II
No
TK70L
CompacTape II
No
TKZ60
3480 Cartridge
No
TLZ04
4mm DAT
No
TLZ06
4mm DAT
No
TLZ07
4mm DAT
No
TLZ6L
4mm DAT
Yes
TLZ7L
4mm DAT
Yes
TS11
9-Track Magtape
No
TSV05
9-TrackMagtape
No
TSZ05
9-TrackMagtape
No
TU45
9-TrackMagtape
No
TU70
9-TrackMagtape
No
TU72
9-TrackMagtape
No
Introduction to HSM 1–13
Introduction to HSM
1.14 Media Types for HSM Basic Mode
Table 1–6 Media Type to Device Map
Device Type
Media Type
Magazine Loader
TU77
9-TrackMagtape
No
TU78
9-TrackMagtape
No
TU80
9-TrackMagtape
No
TU81+
9-TrackMagtape
No
TZ30
CompacTape I
No
TZ30S
CompacTape I
No
TZ85
CompacTape III
No
TZ857
CompacTape III
Yes
TZ86
CompacTape III
No
TZ867
CompacTape III
Yes
TZ87
CompacTape III
No
TZ875
CompacTape III
Yes
TZ877
CompacTape III
Yes
TZ88
CompacTape IV
No
TZ885
CompacTape IV
Yes
TZ887
CompacTape IV
Yes
TZK10 6320
Cartridge
No
TZK116320
Cartridge
No
Note
The media type defined for HSM Basic mode is the media type that HSM recognizes
for the specified device. This is very different from the media type used for HSM
Plus mode, which is the media type defined in the MDMS TAPESTART.COM file for
the associated drives.
With these device types and media types, HSM Basic mode provides formal support and identification of the device and media types. In addition, HSM Basic mode checks that devices and
media are compatible to support operations within an archive class. HSM Basic mode does not
formally support other devices and media types, but they might work under the following circumstances:
•
The unsupported type is not a magazine loader.
•
The unsupported device is not a large, multiple drive, tape jukebox; specifically, the TL81x
and TL82x jukeboxes are not supported in Basic mode.
•
Supported and unsupported types are not mixed within a single archive class.
Generally, a nonmagazine loader third-party tape drive with any media type may work as an
‘unknown’ device and media type.
Introduction to HSM 1-14
Introduction to HSM
1.15 Device Support
1.15 Device Support
HSM supports the nearline and offline devices listed in the HSM Software Product Description
(SPD 46.38.xx). HP is continually testing new devices and adding them to the list. If you have a
question about a particular device, contact HP customer support.
Note
The STK 9360 Wolfcreek Silo is supported in Plus Mode when host access from VAX
and Alpha machines is configured according to the manufacturer’s directions.
1.16 Online Devices Not Supported for HSM Operations
HSM provides shelving support for most online disk devices within a cluster. However, HSM
does not support the following types of online disk devices:
•
Read-only devices such as CD-ROM or any disk that is software-locked or write-protected
Disks that are mounted /FOREIGN
•
Any disk that is a physical member of a shadow set, stripeset, or RAIDset; access to the virtual device, however, is supported
•
Any device that is not flagged as a disk device in OpenVMS™ system calls
In addition, HSM does not support shelving and unshelving of local disks that are not connected
to a shelf server. If you want to use shelving and unshelving with local disks, HP recommends
you make the local disks accessible to the cluster using MSCP protocols.
1.17 HSM Support for Remote Operations
HSM provides limited support for remote operations. For HSM Version 3.2A, this support
includes:
•
Accessing shelved files on disks that are DFS, NFS, or PATHWORKS-served via applications or DCL commands. See Section 5.5.3. However, you cannot issue explicit shelving
commands on served disks; this can only be done on the cluster on which the disks reside.
•
Accessing shelved files from remote nodes using DCL or applications routed through DECnet (FAL). For example, a remote DCL command to TYPE a shelved file causes a file
fault on the local system.
•
Requesting a directory of shelved files from a remote node, although not all information is
displayed. Generating make space requests and user disk quota exceeded events on an
HSM-supported cluster, based on a file create or extend command issued from a remote
node.
HSM does not support the following kinds of remote operations:
•
Remote PRESHELVE, SHELVE, UNPRESHELVE, or UNSHELVE DCL commands with
a node name in the file descriptor, or on disks that are DFS, NFS, or PATHWORKS-served.
HSM Basic mode does not support the use of remote nearline or offline tape devices, unless they
are configured to appear as local devices. HSM Plus mode supports remote devices (devices that
are not directly connected to the cluster) through the Remote Device Facility (RDF) portion of
MDMS. For HSM Plus mode to recognize a remote device, you must have defined the remote
device correctly through MDMS and you must use the /REMOTE qualifier on the SMU SET
DEVICE command. For more information, see the section on “Working with RDF-served
Devices” in HSM Plus Mode in the Getting Started with HSM Chapter of the HSM Installation
Guide.
Introduction to HSM 1–15
2
Understanding HSM Concepts
Before running HSM in your production environment, you need to understand various definitions and concepts. For each concept, HSM provides a configuration option that you use to manage the HSM environment. This chapter presents an explanation of the HSM concepts and
configuration options, structured around the following managed entities in the system:
•
Facility
•
Shelf
•
Archive class
•
Device
•
Volume
•
Cache
•
Policy
•
Schedule
This chapter also defines the relationships among the managed entities, and provides guidelines
for their definition to create an optimal HSM environment. Once you understand the configuration options, you can proceed with the required configuration tasks, as described in the Getting
Started with HSM Chapter of the HSM Installation Guide.
For additional information and guidelines for migrating to a more specialized environment that
best meets your system requirements, see Chapter 3.
2.1 The HSM Environment
The HSM environment consists of the definitions you create and the relationships that exist
among the definitions. The definitions described in the following sections are maintained in definition databases. The HSM environment is shown in Figure 2–1.
Understanding HSM Concepts 2–1
Understanding HSM Concepts
2.2 The HSM Facility
Figure 2–1
VOLUME
DEFINITION
SHELF
DEFINITION
REACTIVE
POLICY
POLICY
DEFINITION
SCHEDULE
DEFINITION
12
11 11 112 1
12 1
112
10 10
2
10
2
3
9
3
9
3
4
8
4
8
7
4
85
67 67 5
5
6
9
PREVENTIVE
POLICY
ARCHIVE
CLASS
DEVICE
DEFINITION
CXO-4101A-MC
2.2 The HSM Facility
The HSM facility entity allows you to control HSM functions across the entire cluster. You can
control the following functions at the facility level:
2.2.1
•
HSM mode
•
HSM operations
•
Shelf servers
•
Event logging
HSM Mode
You can specify whether HSM operates in Basic or Plus mode.
•
Basic mode -Provides shelving, preshelving, and unshelving functionality using simple
devices, Digital Linear Tape (DLT) magazine loaders, and 4mm DAT load
ers. All interaction occurs through SMU commands.
•
Plus mode - Provides shelving, preshelving, and unshelving functionality using the full
suite of devices supported through Media, Device and Management Services
for OpenVMS(MDMS), including robotically-controlled devices like
TL820s. Interaction requires a combination of SMU commands, STORAGE
commands, and forms-driven menus.
Note
Once you change the facility to operate in Plus mode and preshelve or shelve a file
(which means you have written to a catalog), you cannot go back to operating in Basic
mode.
Understanding HSM Concepts 2-2
Understanding HSM Concepts
2.2 The HSM Facility
Considerations for Choosing HSM Operating Mode
When deciding whether to operate in Basic or Plus mode, consider the following:
•
If you are using other storage management products that use MDMS or SLS, use HSM Plus
mode. You then have one interface for media and device management across the storage
management products.
•
If you require support for large automated tape libraries, such as the TL820, use HSM Plus
mode.
•
If you do not require additional device support and are not using other products that use
MDMS functionality, use HSM Basic mode.
•
If you are using only magneto-optical devices and no tape devices, use Basic Mode.
2.2.2 HSM Operations
You can specify whether shelving or unshelving operations are enabled across the cluster as a
whole. This includes operations initiated as a result of policy triggers, cache flush operations,
and manually initiated HSM commands.
The shelving parameter controls shelving, preshelving and cache flush operations. The unshelving parameter controls unshelving and automatically-generated file faults.
Under normal circumstances, you should enable both shelving and unshelving across your cluster. This allows HSM to maintain desired disk usage through automatic policy operations and
also allows users access to shelved data at all times.
Considerations for Disabling Shelving and Unshelving
You may need to disable HSM operations at certain times if they conflict with other activities
(such as backups) and there are limited offline devices available. For example, if backups are
performed nightly at midnight, you could set up a policy to disable shelving at that time.
When necessary, you can disable shelving and probably not cause problems with disk usage
exceeding the defined goals. However, if you disable unshelving, your users and applications
may experience errors accessing shelved files. You should disable unshelving only if you do not
anticipate needing access to shelved data.
2.2.3 Shelf Servers
A shelf server is a single HSM node in a cluster that performs all operations to nearline and
offline devices on behalf of all nodes in the cluster. It also coordinates clusterwide operations
such as checkpointing archive classes and resetting event logs.
If the facility option Catalog_Server is enabled, all cache operations and catalog updates are also
performed by the shelf server. By default, cache operations are performed by the requesting client node for performance reasons. Such operations are passed from other (client) nodes to the
shelf server for processing. The shelf server consolidates requests from all nodes and optimizes
operations to minimize tape loading and positioning, as well as to support dedicated device
access.
Eligible Servers
Although many nodes can be authorized for shelf server operation, only one HSM node functions as the shelf server at any given time. This way, if the current shelf server node fails, operations are immediately transferred and recovered by another authorized shelf server node. You
can specify up to 10 specific nodes to be authorized for shelf server operation. By default, all
nodes in the cluster are authorized. The current shelf server node can be displayed using an
SMU SHOW FACILITY command.
Understanding HSM Concepts 2–3
Understanding HSM Concepts
2.2 The HSM Facility
When deciding whether to authorize a node as a shelf server, consider the following:
•
In Basic mode, all specified nearline and offline devices must be accessible to all shelf
server nodes. By contrast, they do not need to be accessible to client nodes.
•
The shelf server undertakes the bulk of shelving operations for the cluster, so more powerful
CPUs are recommended.
•
To support transparent operations when a node fails, multiple shelf servers should be authorized.
•
Scheduled policy execution should be run on an authorized shelf server node for optimal
performance (unless a cache is defined).
Using the default authorization of all nodes is acceptable if the above conditions are met and all
your nodes have similar capabilities.
If you operate a cluster with a few large systems and many satellite workstations, restricting
shelf server operations to the large systems provides much better performance for all cluster
users. Defining specific shelf servers is highly recommended in this case.
Catalog Server
HSM gives you the option of directing all HSM operations and all catalog updates through the
shelf server by enabling the Catalog_Server option. With this option, all cache operations and
catalog updates are performed by the shelf server node in a similar manner to tape operations.
There are two main reasons you may want to enable this feature:
•
If you choose to protect your catalogs using RMS after-image Journaling, enabling the catalog server allows you to purchase an RMS Journaling license only for the eligible server
nodes. Otherwise, it would be required on all nodes in the cluster.
•
If you are using magneto-optical cache devices as a permanent shelf, the catalog server
option allows you to mount the JB: platters on only the eligible shelf server nodes. This
greatly speeds system reboots.
The downside of enabling the catalog server option is that caching speed is somewhat reduced
due to extra intracluster communications, and possible delays in shelf server response time.
2.2.4 Event Logging
HSM provides four event log files that enable you to monitor and tune the HSM environment, as
well as to detect errors in HSM operation:
•
HSM$LOG:HSM$SHP_AUDIT.LOG: The shelf handler audit log, containing information
on the parameters and final status of all requests
•
HSM$LOG:HSM$PEP_AUDIT.LOG: The policy audit log, containing information on the
parameters, number of files processed, and final status of all policy executions
•
HSM$LOG:HSM$SHP_ERROR.LOG: The shelf handler error log, containing detailed
information about any serious errors encountered during request processing, including
exception information
•
HSM$LOG:HSM$PEP_ERROR.LOG: The policy error log, containing detailed information about any serious errors encountered during policy execution, including exception
information
Understanding HSM Concepts 2-4
Understanding HSM Concepts
2.3 The Shelf
Event logging can be enabled and disabled within the following categories:
•
Audit log: Records all HSM requests
•
Error log: Provides information on important errors
•
Exception log: Provides error information that is useful to HP in the error logs
HP recommends that you enable all logging at all times to keep track of all activity. This is especially important when you have to report a problem.
2.3 The Shelf
A shelf is a named entity that relates a set of online disk volumes, on which shelving is enabled,
to a set of archive classes that contains the shelved file data for those disk volumes. For each
shelf, you can control the following:
•
Shelf copies
•
Shelving operations
•
Shelf catalog
•
Delete save time
•
Number of updates to retain
You can define any number of shelves, but any specific online disk volume can be associated
with only one shelf.
The Default Shelf (HSM$DEFAULT_SHELF)
HSM provides a default shelf, named HSM$DEFAULT_SHELF, to which all volumes are associated if no other associations are defined.
If your data reliability requirements are the same across all disk volumes, you can simply use the
default shelf and specify the desired number of copies to use on that shelf. All volumes acquire
the data reliability specified by the default shelf.
If your data reliability requirements differ from volume to volume, you can define multiple
shelves, each of which can contain different numbers of copies for data reliability purposes. You
can then relate each volume to the shelf that has the appropriate number of copies.
HP recommends that you specify at least two copies for each volume.
If you have a very large number of online disk volumes, HP recommends that you define multiple shelves, each with a separate catalog. This prevents any particular catalog from becoming so
large that catalog access performance degrades. HP recommends that you associate between 10
and 50 online disk volumes with each shelf, depending on the amount of shelving you plan to do.
The shelf entity does not define the volumes associated with the shelf. Instead, you associate
individual volume entities (see Section 2.7) with the shelf. You can associate a particular volume
with exactly one shelf. If you do not define volumes explicitly, all volumes implicitly use the
default shelf.
2.3.1 Using Multiple Shelf Copies
This section explains why you need multiple shelf copies and how to define them.
One of the most important decisions that you need to make concerns the number of copies of
shelved file data that you need for data safety purposes.
Understanding HSM Concepts 2–5
Understanding HSM Concepts
2.3 The Shelf
Shelved data is not normally backed up in the normal backup regimen because the OpenVMS
BACKUP utility (and layered products like Storage Library System software that use BACKUP)
work in the following way:
•
An image backup saves only the headers of shelved files.
•
An incremental backup does save the entire file, but the files that are selected for backup are
those that have been recently modified and are not the files that usually are shelved.
In other words, after a file is shelved, it is likely that its data will not be backed up again. A typical backup strategy recycles the backup tapes when a certain number of more recent copies have
been made. This cycle may be anywhere from a few days to several years.
However, there eventually will come a time when all of the backup tapes contain only the headers of shelved files.
Unless the tapes are never recycled, the shelved file data on the backup media will eventually be
lost. As such, the easy way to enhance reliability of shelved file data is to make duplicate copies
of the data by using multiple shelf copies.
2.3.2 Defining Shelf Copies
Shelf copies are defined using a concept called an archive class.
An archive class is a named entity that represents a single copy of shelf data. Identical copies of
the data are written to each archive class when a file is shelved.
For each shelf, you can specify the archive classes to be used for shelf copies for all volumes
associated with the shelf.
The minimum recommended number of copies (archive classes) for each shelf is two.
Archive classes are represented by both an archive name and an archive identifier. Archive identifiers are used in Shelf Management Utility (SMU) commands for ease of use. HSM Basic
mode supports 36 archive classes named HSM$ARCHIVE01 to HSM$ARCHIVE36, with associated archive identifiers of 1 to 36 respectively. HSM Plus mode supports up to 9999 archive
classes, named HSM$ARCHIVE01 through HSM$ARCHIVE9999, with associated archive
identifiers of 1 to 9999.
2.3.2.1
Archive Lists and Restore Archive Lists
For each shelf, you must specify two lists of archive identifiers:
•
The archive list, representing the desired number of shelf copies. Up to 10 archive identifiers can be specified in this list.
•
The restore archive list, representing an ordered list of archive classes from which restore
attempts are made. Up to 36 archive identifiers can be specified in this list.
The archive and restore archive lists are defined using the SMU SET SHELF command with the
/ARCHIVE and /RESTORE qualifiers. See HSM Command Reference Guide for a complete
description of the shelf management utility and its commands.
Restore archive classes are used for unshelving files in the order specified in the restore archive
list. The first attempt to restore a file’s data is made from the first archive class specified in the
restore list. If this fails, an attempt is made from the next archive class, and so on. Although only
10 archive classes are supported for shelf copies, up to 36 are supported for restore, because the
restore list must contain a complete list of all archive classes that have ever been used for shelving on the shelf. This enables files to be restored not only from the current list of shelf archive
classes, but also from all previously-defined shelf archive classes. In this way, you can add or
change archive classes for a shelf by:
Understanding HSM Concepts 2-6
Understanding HSM Concepts
2.3 The Shelf
Changing the archive classes in the archive list, which affects subsequent shelving operations
only
Adding new archive classes to the restore list, while keeping the existing definitions in place, so
that files shelved under those definitions still can be restored Archive classes also are related to
media types and devices, as discussed in Section 2.6. When a shelf is first created, the archive
classes specified in the archive list are copied to the restore list if the restore list is not specified.
Thereafter, the two lists must be maintained separately.
2.3.2.2
Primary and Secondary Archive Classes
When defining your restore archive list, it is useful to think of the first archive class in the restore
list as a primary archive class and all the others as secondary archive classes. For shelving operations, all of the archive classes in the archive list receive the same amount of operations,
because HSM copies data to all archive classes at the time of shelving. However, for unshelving,
this is different. In most cases, HSM only needs to read from the primary archive class to restore
the data. These concepts are useful when deciding how to relate your archive classes to media
types and devices as described in Section 2.6.3.
2.3.2.3
Multiple Shelf Copies
You need to determine the appropriate number of shelf copies for your shelved file data, depending on the importance of the data being shelved.
HP recommends a minimum of at least two shelf copies of all data, because media can be lost or
destroyed. If the data is especially critical, you can make additional copies, some of which might
be taken offsite and stored in a vault. HSM provides a mechanism called checkpointing to synchronize your shelved data media and backup media so that they can be removed to an offline
location together (see HSM Command Reference Guide).
Figure 2–2 illustrates the relationship between volumes and archive classes. Each disk volume
has an associated archive class and restore archive class, as shown in the archive and restore
archive lists. In this example, as with most cases, the archive and restore lists are identical.
Figure 2–2
ARCHIVE CLASSES
(3 SHELF COPIES)
DISK VOLUMES
WITH CRITICAL
DATA
HSM$ARCHIVE01 (1)
HSM$ARCHIVE02 (2)
HSM$ARCHIVE03 (3)
ARCHIVE
LIST
HSM$ARCHIVE01 (1)
HSM$ARCHIVE02 (2)
HSM$ARCHIVE03 (3)
RESTORE
ARCHIVE
LIST
CXO-4164A-MC
Understanding HSM Concepts 2–7
Understanding HSM Concepts
2.3 The Shelf
2.3.3 Shelving Operations
You can control the same operations for a shelf as you can for the facility, except that the operations defined for the shelf affect only the volumes associated with the shelf.
This gives you a finer level of shelving control, which might be useful if certain classes of volumes are not regularly accessed at certain times, and you want to disable shelving activity. However, as with the facility control, it is expected that shelving and unshelving operations usually
are enabled.
2.3.4 Shelf Catalog
The shelf catalog contains information regarding the location of near-line and off-line data for all
volumes associated with the shelf. HP recommends that you define a separate catalog for each
shelf, but it is possible for several shelves to share a catalog, or for all shelves to use the default
catalog.
Defining a separate catalog for each shelf has the following advantages:
•
It restricts the impact of a temporary loss of a catalog to a known set of volumes associated
with the shelf
•
It reduces the size of the catalog file, allowing more flexible placement in your storage subsystem
•
It increases catalog access performance, since the catalog is smaller and there are fewer
records to scan
•
It reduces the time for a restoration of a catalog from BACKUP tapes
As a guideline, HP recommends that each shelf be associated with between 10 and 50 volumes,
and that each shelf has its own catalog. A shelf catalog needs to be protected with a similar level
of protection as the default catalog, namely:
•
The catalog should be in a shadow-set or RAID-set
•
The catalog should be backed up on a regular basis.
It is also recommended that the catalog for a shelf be placed on a disk volume other than one
associated with the shelf itself. In very large environments, it might be appropriate to dedicate
one or more shadowed disk sets for HSM catalogs, and to disable shelving on those disks. When
defining a new catalog for a shelf, or a new shelf for a volume, HSM automatically splits all
associated shelving data from the old catalog, and merges it into the new catalog. See Section
5.12 for more information on this process.
2.3.5 Save Time
You can specify a delete save option for shelved files that have been deleted. This option allows
the specification of a delta time which keeps a file’s shelved data in the HSM subsystem for this
period after the file is deleted. The actual purging of deleted files (after the specified delay) is
performed by the REPACK function.
2.3.6 Number of Updates for Retention
This option allows the specification of a number of updates to a shelved file that will be kept in
the HSM subsystem.
This option applies to files that have been updated in place, not new versions of files that have
been created after an update. New versions are controlled by online disk maintenance outside the
scope of HSM. The actual purging of obsolete shelf data is performed by the REPACK function.
Understanding HSM Concepts 2-8
Understanding HSM Concepts
2.4 HSM Basic Mode Archive Class
2.4 HSM Basic Mode Archive Class
As previously discussed, HSM Basic mode supports 36 archive classes named
HSM$ARCHIVE01 through HSM$ARCHIVE36, with archive identifiers of 1 to 36 respectively. You must configure archive classes by using the SMU SET ARCHIVE command to identify the archive class name. Once you have defined the archive class, you can then associate
archive classes with shelves and devices using appropriate commands. From these associations,
HSM Basic mode determines the appropriate media type for the archive class.
There is a separate set of tape volumes with specific labels associated with each archive class for
HSM Basic mode. HSM allows limited maintenance on archive classes by allowing you to modify the shelving volume label attribute. The volume labels must be in the proper format for each
archive class, as listed in Table 2-1.
Table 2-1 HSM Basic Mode Archive Class Identifier/Label Reference
Table 2–1 HSM Basic Mode Archive Class Identifier/Label Reference
Archive Id
Volume
Label
Archive Id
Volume Label
Archive Id
Volume
Label
1.
HS0xxx
13
HSCxxx
25
HSOxxx
2.
HS1xxx
14
HSDxxx
26
HSPxxx
3.
HS2xxx
15
HSExxx
27
HSQxxx
4.
HS3xxx
16
HSFxxx
28
HSRxxx
5.
HS4xxx
17
HSGxxx
29
HSSxxx
6.
HS5xxx
18
HSHxxx
30
HSTxxx
7.
HS6xxx
19
HSIxxx
31
HSUxxx
8.
HS7xxx
20
HSJxxx
32
HSVxxx
9.
HS8xxx
21
HSKxxx
33
HSWxxx
10.
HS9xxx
22
HSLxxx
34
HSXxxx
11.
HSAxxx
23
HSMxxx
35
HSYxxx
12.
HSBxxx
24
HSNxxx
36
HSZxxx
For each of the 36 archive classes, the first three characters of the volume label are fixed and represent the archive class. The last three characters of the volume label (shown in Table 2-1 as xxx)
represent a sequence number in the range 001 to Z99, allowing up to 3600 tape volumes per
archive class. At any one time, there is one shelving volume for each archive class. This volume
represents the volume on which the next shelve (write) operation is to be performed.
In the case of an error, you can explicitly change the shelving volume label for the archive class.
However, if you do so, the specified volume label must adhere to the convention shown in the
table, otherwise HSM cannot use it.
Manually setting the shelving volume label is not recommended. By default, HSM uses the first
shelving volume label for an archive class (for example HSA001), then increments the labels
automatically (HSA002, HSA003, and so forth) as the volumes become full. If you want to
remove the current shelving volume and go to the next one, use the CHECKPOINT command
rather than resetting the label manually.
Understanding HSM Concepts 2–9
Understanding HSM Concepts
2.5 HSM Plus Mode Archive Class
2.5 HSM Plus Mode Archive Class
As previously discussed, HSM Plus mode supports up to 9999 archive classes named
HSM$ARCHIVE01 through HSM$ARCHIVE9999, with archive identifiers of 1 to 9999
respectively.
You must configure archive classes by using the SMU SET ARCHIVE command to identify the
archive class, media type, and optionally density. When specifying media type and density, they
must exactly match the corresponding media type and density defined in the MDMS TAPESTART.COM file.
Once you have defined the archive class, you can then associate archive classes with shelves and
devices using appropriate commands.
Unlike HSM Basic mode, HSM Plus mode does not require special naming conventions for volumes, because MDMS chooses the volumes for HSM Plus mode to use.
2.6 Device
When setting up your HSM environment, you need to consider which nearline and offline
devices you want to use. When setting up a device for HSM, you can control:
•
Whether the device is shared or dedicated
•
Whether operations are enabled for the device
•
Which archive classes use the device
Note
To use magneto-optical devices for shelf storage, you define these devices as caches,
not as shelving devices. For more information, see Section 2.8.5.
Default Device (HSM$DEFAULT_DEVICE)
HSM provides a default device record that has the following attributes:
•
Device is shared
•
Device is enabled for HSM use
•
No archive class is associated with the device
These defaults are applied if you specify a device for HSM without identifying these attributes.
Once the device is defined, you can modify the attributes for that device. You also can modify
the default device record attributes if you find that you are typically using a different set of
attributes for your devices.
2.6.1 Sharing and Dedicating Devices
For HSM use, you can specify a nearline or offline device to be used for dedicated or shared
usage.
When a device is dedicated, HSM does not release it to other applications and keeps the current
volume mounted until the drive is needed for another HSM volume.
When a device is shared, HSM releases the device, and dismounts and unloads the associated
media within one minute of inactivity on the device. The media is unloaded for security reasons.
When thinking about devices, you should consider the trade-offs involved in dedicating devices
to HSM.
Understanding HSM Concepts 2-10
Understanding HSM Concepts
2.6 Device
Advantages of Dedicating a Device
Dedicated devices have the following advantages:
•
The device is always available for HSM use and pending HSM operations should not be
blocked by other potentially long-running applications.
•
Slow operations like tape loading and positioning are minimized, as is operator intervention.
•
Response time for shelving and unshelving operations is generally better.
Disadvantages of Dedicating a Device
Dedicated devices have the following disadvantages:
•
The device is not available for other purposes while the device is dedicated.
•
Additional nearline/offline devices may be needed for non-HSM operations.
Device Mixed Mode Operations
It is possible to operate in a mixed mode, whereby the device is sometimes shared and sometimes dedicated. For example, you can set up a scheduled policy with a script that toggles
between the two modes at specified times. A useful application of this would be to dedicate
devices to HSM during normal working hours and at policy execution time, but switch to shared
devices during the backup cycle.
2.6.2 Device Operations
For each device, you can specify which operations are enabled. The choices are shelving and
unshelving. By default, both operations are enabled when a device is specified.
When operating in Plus mode it is recommended that all devices are defined for both shelving
and unshelving as MDMS, not HSM, actually chooses the optimal device. Restricting operations
sometimes leads to conflicts between HSM and MDMS.
When you are using multiple devices in Basic mode, you can optimize operations by specifying
that only shelving or only unshelving is enabled on the device. This will effectively guide those
operations to the enabled device rather than allowing many load/unload operations as the
requests come in. For example, if you are using two devices, you might specify that one is used
for shelving and the other is used for unshelving. A special override allows unshelving on a
shelving device if the currently mounted media contains the requested file, which is common if
the file is unshelved shortly after it is shelved.
If you specify only a single device for HSM, it must support both operations for correct usage.
Media Type Compatibility
When setting up a device for HSM use, you define a media type by relating the device to one or
more archive classes whose media type and density are compatible with the device.
This does not mean that shelving devices have to be identical for any archive class. For example,
a TK50 device might be specified for shelving and a TK70 device be specified for unshelving.
This is valid because a TK70 can read a TK50 written cartridge, but not vice versa.
However, if you do use compatible but not identical media types, you must control the operations on the devices so the tapes are always written in a compatible format. The media must be
written in the format readable by both device types (in this case TK50), and all media must be in
the same format for a specified archive class.
Understanding HSM Concepts 2–11
Understanding HSM Concepts
2.6 Device
2.6.3 Devices and Archive Classes
Nearline and offline devices are associated with archive classes that relate to shelves. When
specifying archive classes for shelf copies, you must consider the media type on which you
want these copies to reside. Each archive class uses exactly one media type, so that all data
written to a specific archive class uses compatible media. Be aware that multiple archive
classes can use the same media type.
You establish the relationship between archive classes, devices, and media type by using the
SMU SET DEVICE command and specifying an archive list. Remember that for HSM Plus
mode, you also use the media type definitions in the MDMS TAPESTART.COM file to encapsulate the media type and drives relationship. Regardless of how archive classes and shelves
relate, the relationship between archive classes and devices is not one-to-one. This means that:
•
A single device (for example a TA90 tape drive) can support multiple archive classes of the
same media type.
•
Operations on different shelves and archive classes can share devices.
•
An archive class can use one or more compatible tape drives.
•
Different volumes from within an archive class can be mounted simultaneously on separate
compatible drives.
Figure 2–3 shows the archive class/media type/device relationship for three archive classes and
the associated TA90 and TK50 tape devices. As shown in the figure, the two TA90 devices can
each archive data belonging to their common archive classes, but the TK50 device can only
operate with a single archive class.
Figure 2–3
ARCHIVE CLASSES
AND MEDIA TYPES
DEVICES
HSM$ARCHIVE01
TA90
TA90
#1
HSM$ARCHIVE02
TK50
TK50
HSM$ARCHIVE03
TA90
TA90
#2
CXO-4267A-MC
Ideally, an HSM configuration uses identical media types for all archive classes, allowing the
maximum sharing of devices, because each device could support all archive classes. However,
this is not always possible or desirable. For example, you may want to define a primary archive
class that uses a robot-controlled nearline device and some secondary archive classes that use
human-operated 9-track magnetic tape devices.
Understanding HSM Concepts 2-12
Understanding HSM Concepts
2.6 Device
Associating Devices with Archive Classes
When selecting the devices associated with an archive class, you should consider such aspects
as:
•
Device speed
•
Automatic or human intervention for loading and unloading
•
Device cost
A robot-controlled nearline device is recommended for primary archive classes, because users
will be able to access shelved files without human intervention, on a 24 - hour basis. The need
for such devices is less on secondary archive classes, especially if an online cache is used (see
Section 2.8).
2.6.4 Magazine Loaders for HSM Basic Mode
HSM Basic mode supports certain tape magazine loaders as nearline devices that can be associated with archive classes. A magazine is a stacker containing one or more tape volumes that can
be loaded into a single drive. The following magazine loaders are fully supported with randomaccess loading and unloading of tape volumes:
•
TA857, TF857, TZ857
•
TA867, TF867, TZ867
•
TLZ6L, TLZ7L
•
TZ875, TZ877
•
TZ885, TZ887
HSM Basic mode supports multiple magazines, with multiple volumes per magazine. In addition, volumes for multiple archive classes may reside in a single magazine. However, there are a
few restrictions that must be observed for HSM:
•
All volumes placed in magazines must be initialized prior to use with the OpenVMS INITIALIZE command. Volume labels are the same as for nonmagazine loaders and must conform to the conventions shown in Table 2-1. In addition, it is vital that all tape volumes have
unique labels. HSM does not support multiple volumes with the same label, which can
result in the loss of access to
shelved data.
•
An archive class must be specified for loader operations, or nonloader operations exclusively, and must be assigned to appropriate devices. You cannot
mix loader and nonloader tape operations for the same archive class at the same time. However, you can
migrate an archive class from nonloader to loader (or vice versa) as long as it has the same
media type.
Magazine Initialization (Basic Mode only)
At initialization time, and when a new magazine is loaded, HSM performs an inventory on the
magazine. Each volume in the magazine is loaded and mounted, and its label is noted. This
information is stored in a device database, which has multiple magazine entries. This operation
takes 20 to 30 minutes, during which time the drive cannot be used.
HP highly recommends that volumes are not shuffled around in a magazine or moved to different magazines after initial configuration, because this will cause HSM to perform another inventory on the magazine. If the shelf handler discovers an inventory error, it loads all volumes and
retakes inventory on the magazine. A new magazine entry is entered into the database.
In addition, all existing magazine entries containing any of the volumes are then invalidated.
Understanding HSM Concepts 2–13
Understanding HSM Concepts
2.6 Device
Under ideal circumstances, inventory on any magazine should have to be done only once,
regardless of system crashes and other disruptions.
Once inventory is taken, the shelf handler uses random- access load and unload commands to
load the appropriate volumes into the drive. The device database is updated on all load and
unload operations, so that the state of the drive and magazine is known at all times, even after
system disruptions.
If an inventory detects an illegal configuration with duplicate tape labels, the shelf handler prints
an OPCOM message to the operator and will not use the magazine.
Robot Name (Basic Mode only)
When defining a device as a magazine loader, it is necessary to specify a robot name to be associated with the device. The robot name depends on the controller to which the tape device is connected, as follows:
•
A directly-connected SCSI device- such a device will have a name in the format
alloc$MKxnn0:. The associated robot name is alloc$GKxnn1: or alloc$MKxnn1:. For
example, for device $1$MKB100:, the associated robot name is $1$GKB101: or
$1$MKB101:.
•
A directly-connected DSA device, such as a TF867-in this case, the robot name is identical
to the device name, but must still be specified.
•
A device connected to an MSCP-controller, such as an HSC, HSJ or HSD - in this case, the
robot name is the name of the controller’s command disk. An example might be
$1$DUA812:.
The robot name should include the allocation class if there is one.
Note
Upgrading from HSM V1.x
If you are upgrading from HSM V1.x, please note that the robot name replaces the
HSM$device_name logical defined for MSCP-controllers. The robot name must be
specified for all Basic mode magazine loaders after installing this version before
robotic operations will occur. This applies to devices connected to all types of controller.
2.6.5 Compatible Media for HSM Basic Mode
HSM Basic mode makes a first-level attempt to ensure that tape device configurations and loading are directed to compatible media. For this level, HSM ensures that the media type is physically capable of being loaded into the specified device, and that the media can support the
operation. HSM also verifies that media contained in magazine loaders are not requested for
nonloader drives and vice versa.
Table 2-2 lists the compatible media types HSM supports. HSM also supports unknown media
types, but does not check them for compatibility. It is therefore possible to specify different
types of tape devices with "Unknown" media type into an impractical configuration. If using
such drives and media, you must ensure that the configuration is practical.
Table 2–2 Compatible Media Types
Devices That Write...
Can_Read...
Comments
9-Track Magtape
9-Track Magtape
No density checking is performed.
Understanding HSM Concepts 2-14
Understanding HSM Concepts
2.7 Volume
Table 2–2 Compatible Media Types
Devices That Write...
Can_Read...
Comments
3480 Cartridge
3480 Cartridge
No compression checking is performed.
DigitalTape I
CompacTape I
TK50 Format.
DigitalTape II
CompacTape I, II
TK70 Format.
DigitalTape III
CompacTape I, II, III
TK8x
DigitalTape IV
CompacTape I, II, III, IV
Format-Number of tracks not
checked.
4mmDAT
4mmDAT
Differences in length not
checked.
Unknown
Any
No checking is performed.
2.6.6 Automated Loaders and HSM Plus Mode
HSM Plus mode supports automated loaders according to the MDMS functionality and requirements. In general, MDMS recognizes automated loaders and the volumes contained therein only
by process of how you configure the information in TAPESTART.COM and through the STORAGE commands. For more information, see the Getting Started with HSM Chapter of the HSM
Installation and Configuration Guide.
2.7 Volume
HSM allows you to customize HSM activity on a per-volume basis. By default, there is only one
HSM volume entity, HSM$DEFAULT_VOLUME, which is used as the basis for HSM activity
for all volumes in the cluster. You can add any number of specific volumes, each relating to a
single online disk volume, as you want. Any disk volumes not associated with a specific volume
entry are implicitly associated with the default volume.
Default Volume Attributes
The default volume is preconfigured with a default set of attributes. You can modify any or all of
the attributes on the default volume, which are then applied to all volumes associated with the
default volume. The attributes of the default volume also are used as a template for specific volume entities.
With the volume entity, you can specify the following attributes:
•
Shelf
•
Shelving operations
•
Volume policy
•
High water mark
•
Files excluded from shelving
2.7.1 Shelf
The shelf attribute relates the disk volume definition to a single shelf definition. The shelf must
be set up before associating a volume with it. For information on setting up the shelf, see Section
2.3 By default, all volumes use the default shelf HSM$DEFAULT_ SHELF.
Understanding HSM Concepts 2–15
Understanding HSM Concepts
2.7 Volume
2.7.2 Shelving Operations
HSM provides volume definition options that allow you to control shelving operations on the
online disk volume for which the volume definition applies. If no volume definition is found,
HSM uses the HSM$DEFAULT_VOLUME definition.
The following operations can be enabled on a per-volume basis:
•
High water mark-The ability to trigger the specified occupancy policy if disk usage exceeds
the specified high water mark.
•
Occupancy-The ability to trigger the specified occupancy policy if an application attempts
to exceed the volume capacity.
•
Exceeded quota-The ability to trigger the specified occupancy policy if an application
attempts to exceed a file owner’s quota.
•
Shelving-Any shelving or preshelving operation, including those initiated by policy and
manual operations.
•
Unshelving-Any unshelving operation, including those initiated by file access and manual
operations.
By default, implicit operations (high water mark, occupancy, and quota) are disabled and explicit
operations (shelve and unshelve) are enabled on the volume.
2.7.3 Volume Policy
The volume policy parameters identify the policy definitions used to shelve files when a critical
need for space on the disk is encountered. This policy implementation reacts to critical situations
in which additional primary storage space is needed.
A reactive policy is implemented with a disk volume definition. Reactive policy determines how
to react to high water mark, volume occupancy exceeded, and user disk quota exceeded events.
In these instances, some event takes place that requires primary storage space be made available.
HSM takes action to make the space available only when the event takes place. A reactive policy
execution can be disabled by specifying that no policy is desired for the specified event.
2.7.4 High Water Mark
You can specify a percentage of the volume’s capacity that will be used as a trigger for running
the occupancy policy on the volume. See Section 2.9 for more details.
2.7.5 Files Excluded from Shelving
There are two types of files that you should give special attention to when considering their disposition in an HSM environment:
•
Files marked contiguous
•
Files placed at specific logical block numbers
These files have special attributes when they are created that may not be possible to recreate
when the files are shelved and later unshelved.
Understanding HSM Concepts 2-16
Understanding HSM Concepts
2.8 Cache Usage
Contiguous Files
Files that are marked contiguous must occupy contiguous logical block numbers on the disk.
When such a file is shelved, its storage is released. During unshelving operations, this type of
file must be restored contiguously. If this is not possible because the available space on the disk
is fragmented, the unshelve operation fails. To avoid this problem, you should specify that files
marked contiguous are ineligible for shelving. By default, files marked contiguous are not shelvable.
Placed Files
Placed files are assigned specific logical block numbers on the disk volume when created. When
such a file is shelved and later restored, it is virtually guaranteed that they cannot be restored to
the originally assigned logical blocks. If the file must be assigned to the assigned logical blocks,
it should not be shelved. One way of disabling such shelving is to disable shelving on all placed
files on the volume. Another way is to mark the file as not shelvable using an OpenVMS command.
By default, HSM allows shelving on placed files. To prevent this behavior, you need to specifically disable shelving of placed files for the volume.
2.8 Cache Usage
The cache is storage comprised of one or more online disk storage devices or magneto-optical
devices. You can use cache volumes for one of two purposes:
2.8.1
•
As a temporary online staging area to speed shelving operations. A cache used for this purpose is set up with a limited block size and a regular flush interval. Shelving operations
are directed initially to the cache and complete in a similar amount of time as a normal
file copy. At a later time, the cache is flushed to the archive classes defined for nearline or
offline storage, and files in the cache are deleted.
•
As an alternative shelf, using magneto-optical devices or excess online disk devices. A
cache used for this purposes usually uses the entire device for caching, but does not flush
the files to nearline or offline storage. Optionally, additional copies can be made to nearline or offline archive classes at shelving time, using the /BACKUP qualifier. When using a
cache as a permanent shelf, you cannot also use it for staging.
Advantages and Disadvantages of Using a Cache
By using a cache, you gain speed for shelving operations by dedicating additional online storage
for the HSM system. With online cache, a shelving operation can complete in the time it takes
for the files to be copied to another disk.
The archive/backup system is not needed immediately. However, you lose online storage capacity otherwise dedicated to applications and users. This is the trade-off to consider when using
online cache. If your system includes some older, slower online drives, then online cache provides multilevel hierarchical storage management.
All cache devices must be system-mounted and accessible to all nodes in the cluster except when
the Catalog Server facility option is enabled. In this case, the cache devices need only be systemmounted and accessible to all designated shelf server nodes.
2.8.2 Cache Flushing
Another major advantage to using online cache is that flush operations to
nearline/offline storage can be performed at regular intervals. These flush operations are optimized to reduce the amount of tape reloading and positioning compared to individual shelve
operations directly to tape. This is especially true when multiple archive classes are specified,
and the archive classes are sharing devices.
Understanding HSM Concepts 2–17
Understanding HSM Concepts
2.8 Cache Usage
2.8.3 Cache Attributes
You can specify the following attributes for each online disk volume supporting the cache:
2.8.3.1
•
Timing of shelf copies
•
Block size
•
High water mark
•
Flush interval
•
Flush delay
•
Delete and modify file action
Timing of Shelf Copies
You can specify that data copies to the shelf archive classes be performed at one of two times:
•
When the file is shelved
•
When the cache is flushed
By default, the shelf copies are made when the cache is flushed, and this is the recommended
mode of operation when using the cache as a staging area. With this configuration, operations to
and from the cache are fast, taking about as much time as a normal disk copy.
Permanent Cache
If you are using the cache as a permanent shelf instead of a staging area (for example, using a
magneto-optical device), there is no cache flushing, so any shelf copies need to be made at shelving time. When the shelf copies are made at flush time, the shelving process is not complete until
all shelf copies of a file have been made to the shelf archive classes.
2.8.3.2
Cache Block Size
You can specify the maximum amount of space on the online volume to be used for HSM caching. HSM never exceeds this amount. If shelving a file would exceed this amount, it is diverted
to another cache device that can hold the data, or the file is copied directly to the shelf archive
classes.
To allow an unlimited amount of space on a disk to be used for caching, you can enter a block
size of zero, which defaults to the device capacity. This is useful when using magneto-optical
devices as a permanent shelf.
If you do not specify a block size, HSM uses a default value of 50,000 blocks.
2.8.3.3
High Water Mark
You can specify that a cache flush be triggered when a specified percentage of the cache block
size is exceeded. In this way, you should never get into a situation where the block size is
exceeded. By default, cache flushing begins when 80 percent of the block size is used.
2.8.3.4
Cache Flush Interval
In addition to high water mark cache flushing, you also can flush the cache at regular intervals.
This allows you to restrict all nearline or offline shelving operations to occur at a specific time of
day, ideally at times other than during the backup cycle. By default, the cache is flushed every 6
hours.
2.8.3.5
Cache Flush Delay
In conjunction with the flush interval, you can specify a delay to start the first cache flush.
Thereafter, the delay is used in conjunction with the interval to flush at regularly timed intervals.
Understanding HSM Concepts 2-18
Understanding HSM Concepts
2.9 Policy
2.8.3.6
Delete and Modify File Action
You can specify how the cache reacts when an online file that is shelved to the cache is deleted,
or if it is unshelved and modified. You can choose that the file remains in the cache when these
events occur, or is deleted together with its associated catalog entries. The former action is safer
in that the cache copy can be used to recover the file data if it is erroneously deleted or modified.
However, it also means that extraneous copies of obsolete data are retained in the cache, which
may eventually be flushed to tape. When migrated to tape, shelf options such as delete save time
and number of updates can be used to purge any obsolete data during a repack operation.
2.8.4 Optimizing Cache Usage
The following guidelines on configuring the cache will provide optimal HSM performance for
all users on the cluster:
•
Set your cache size to be between 100 percent and 150 percent of the typical amount of data
shelved within the flush interval. For example, if about 100,000 blocks of data are shelved
daily, and your flush interval is 24 hours, then set your cache size at 150,000 blocks. You
can then expect that no shelving operations to the shelf archive classes will be needed until
the cache is flushed.
•
Distribute the total cache size across several online volumes, with different sizes for each
volume. This enables you to use ‘low usage’ disk volumes effectively and provides an effective way to equalize the usage across all your disk volumes.
•
Schedule the cache flush so that it happens when your nearline and offline devices are idle.
HSM optimizes all operations during the cache flush to minimize tape loading and positioning.
By using a cache effectively, you are using HSM in the most efficient way and providing the
best overall service to the system users.
2.8.5 Using Magneto-Optical Devices
Magneto-optical (MO) devices make an ideal repository for shelved file data, because their cost
is significantly lower than magnetic disks but their response time is good. HSM supports magneto-optical as cache devices only; they cannot be defined like tape devices to support archive
classes.
To configure a magneto-optical device, you should define a label and mount the volume as a
normal Files-11 disk. The volume label should not be an HSM label in the HSxxxx format, but
should be of the system administrator’s choosing. If you are using a magneto-optical robot
loader with multiple platters, each platter that you want HSM to use should:
•
Be system-mounted as a Files-11 device with a specific ‘device name’
•
Be defined in an SMU SET CACHE command
You can define the magneto-optical devices as either a cache staging area, or as a permanent
shelf for fast response time using the /BACKUP attribute of the SET CACHE command. For
more information and an example, see the SMU SET CACHE command in HSM Command
Reference Guide.
2.9 Policy
HSM policy is at the center of the shelving process. The policy options you define establish the
conditions that start the shelving process and determine the amount of primary storage available
when shelving operations end.
Understanding HSM Concepts 2–19
Understanding HSM Concepts
2.9 Policy
2.9.1 HSM Policy Options
HSM policies are implemented through the available file selection options. These options allow
you to define how HSM will implement storage management on your system. The HSM policy
file selection options which may be set are:
•
Trigger events
•
File selection criteria
•
Goal
Figure 2-4 shows the general sequence of HSM policy operations. Once a reactive or preventative policy is established, system operations continue normally until a trigger event occurs. The
trigger event activates HSM policy and files are shelved in accordance with the file selection criteria until the policy goal is reached.
2.9.2 Trigger Events
The trigger is an event that causes the shelving process to begin moving files to shelf storage.
These events activate HSM policies that fall into two general categories, based on the kind of
trigger used:
•
Preventive-Preventive policy criteria include scheduled movement of files between primary
and shelf storage using such determinants as file event dates and file size.
•
Reactive-Reactive policy criteria include reactions to system events, such as exceeding the
amount of space available on a disk volume (volume full), exceeding a high water mark
(the amount of space defined for use on a disk volume), or exceeding a user’s disk quota.
When you install HSM, you get a set of default policy definitions. You can obtain the most value
from HSM by modifying the default preventive and reactive policies according to the exact types
and usage of data in your installation and the specific archive storage devices that are installed.
Understanding HSM Concepts 2-20
Understanding HSM Concepts
2.9 Policy
Figure 2–4
PREVENTIVE
REACTIVE
SCHEDULED
USER QUOTA EXCEEDED
HIGH WATER MARK REACHED
VOLUME OCCUPANCY FULL
TRIGGER EVENT
FILE SELECTION
LEAST RECENTLY USED
SPACE/TIME WORKING SET
SCRIPT
GOAL
LOW WATER MARK
CXO-4097A-MC
2.9.2.1
Scheduled Trigger
A scheduled trigger is generated according to a schedule definition. You define a schedule that
specifies a time interval on which HSM initiates the shelving process. This trigger, used with
appropriate file selection criteria, makes sure enough online capacity is available to meet a
steady demand for storage space.
2.9.2.2
User Disk Quota Exceeded Trigger
The user disk quota exceeded trigger is an event that occurs when a process requests additional
online storage space that would force it to exceed the allowable permanent disk quota. The
shelving process selects to shelve files owned by the owner of the file being created or extended.
This trigger, used in conjunction with an appropriately designed file selection criteria, provides
enough online disk space to satisfy the request. This trigger uses the quota policy defined for the
volume. The shelving process initiated with the disk quota exceeded trigger shelves files owned
by the owner of the file being created or extended. This trigger is independent of the owner of
the process that extends the file; only the file ownership is significant.
Understanding HSM Concepts 2–21
Understanding HSM Concepts
2.9 Policy
For example, if user A creates a file, and user B extends the file beyond user A’s disk file quota,
user A’s files will be shelved.
2.9.2.3
High Water Mark Trigger
The high water mark trigger is an event that occurs when the amount of online disk storage space
used exceeds a defined percentage of capacity. The HSM system regularly polls all online disk
devices and compares the used storage with a defined value. This trigger, used with appropriately designed file selection criteria, ensures enough online capacity is available to meet a steady
demand of storage space. This trigger uses the occupancy policies defined for the volume.
2.9.2.4
Volume Full Trigger
The volume full trigger is an event that occurs when the file system encounters a request for
more space than is currently available on the disk volume. This trigger, used in conjunction with
an appropriately designed file selection criteria, provides enough online disk space to satisfy the
request. This trigger uses the occupancy policies defined for the volume. The shelving policy
implemented with the volume full trigger shelves any files on the disk volume that meet the
defined file selection criteria.
2.9.3 File Selection Criteria
The file selection criteria determine the best files to be shelved in response to the need for shelving. You define the file selection criteria depending on your need to create and access data.
Examples of file selection criteria include:
•
Least recently used (LRU)-Files are moved to shelf storage based on the time that has
elapsed since they were accessed, created, modified, or backed up.
•
Space time working set (STWS)-Files are moved to shelf storage based on an algorithm
that takes into account the file’s size and the defined LRU criteria.
•
By running a script-The file is shelved during execution of a user-defined OpenVMS command procedure.
Selecting Files Based on Time
The first consideration for defining file selection criteria involves selecting files that have been
accessed or that have expired within a certain time frame. There are four file dates from which to
choose:
•
Expiration (default)
•
Creation
•
Modification
•
Backup
OpenVMS does not support a last access date as such. However, you can set up policies using an
effective last access date by:
•
Setting volume retention time on each volume
•
Using the expiration date as the selection criteria for HSM policies
Using the expiration date coupled with volume retention time is the recommended and default
configuration for HSM policies. This ensures that files are shelved only if they have not been
accessed for read or write operations within a certain time frame. Use of the other date fields,
while supported, may result in some frequently-accessed files being shelved.
For more information, see Section 3.2.5.
Understanding HSM Concepts 2-22
Understanding HSM Concepts
2.9 Policy
Candidate file ordering is then achieved by using one of the following algorithms which use the
specified date:
•
Least recently used (LRU)
•
Space time working set (STWS)
Least Recently Used
The least recently used policy selects files based on the selected date option and the last time the
date changed. It creates a listing of files ranked from the greatest time since last accessed to the
smallest time since last accessed.
Space Time Working Set
The space time working set policy selects files based on a combination of the file size and the
LRU ranking. STWS is the product of the file size and the time since last access. Candidates are
ordered from the greatest to the least ranking value returned for all files. Larger files tend to be
ranked higher than smaller files.
Script
The script is a DCL command file containing SHELVE, PRESHELVE, or UNSHELVE commands. Other DCL commands also may be included.
Primary and Secondary Policy
Each HSM policy supports both a primary and a secondary policy definition. The primary policy
definition is always executed. If the volume’s lowwater mark is reached after the primary policy
execution completes, the secondary policy definition is not executed. If the volume’s lowwater
mark is not reached after the primary policy execution completes, the secondary policy definition may be executed. This second execution occurs only when either one or both policy definitions is a user-defined script.
Refer to the SMU SET POLICY command description in HSM Command Reference Guide for a
detailed description of primary and secondary policy.
File Exclusion Criteria
When using the predefined file selection algorithms STWS and LRU, you can specifically
exclude files that may be selected based on a relative or absolute date. For example, you may
want to always exclude files that have been accessed within the last 60 days. There are three
fields from which you can choose to exclude files:
•
Elapsed time - Specified as a delta-time, this is a relative period of time that applies to the
selected date, which exclude files from being shelved during the policy execution. For
example, if you specify the expiration date with volume retention, and an elapsed time of
180 days, then files accessed within the last 180 days are excluded from shelving. This is
the default value.
•
Before time - Specified as an absolute time, this restricts shelving of files to those accessed
before a certain date. For example, if you specify modification date and a before time of
01-Jan-1999, then only files that had been modified before 01-Jan-1999 will be eligible for
shelving.
•
Since time - Specified as an absolute time, this restricts shelving of files to those accessed
after a certain date. For example, if you specify creation date and a since time of 30-Jun1998, then only files that were created after 30-Jun-1998 are eligible for shelving.
Understanding HSM Concepts 2–23
Understanding HSM Concepts
2.9 Policy
Specifying a relative elapsed time is mutually exclusive of defining absolute before and/or since
times. The time fields apply to only the predefined STWS and LRU algorithms. They do not
apply to script files.
Script Files
A script file is a user-written command procedure that can be executed instead of the pre-defined
algorithms supplied with HSM. When the script file is executed, parameter P1 contains the name
of the volume on which the policy was triggered. This can be used to perform custom shelving
operations on the specified volume. When a script is defined, the file selection criteria, file
exclusion criteria and goal defined for the policy are not applied. The script file executes to completion exactly as written in all cases.
2.9.4 Policy Goal
The goal is the condition that causes the shelving process to stop. There are two ways to reach
the shelving goal:
•
Shelve enough files to recover the specified percentage of the disk volume as defined by the
low water mark. Recovering sufficient space to reach the low water mark is adequate to
continue using the disk volume.
•
Shelve all files that meet the policy but do not reach the specified percentage of recovered
capacity. This condition could indicate your file selection criteria is not broad enough.
The low water mark is checked at the completion of, but not during, a script execution. The secondary policy is run if the primary policy did not reach the low water mark.
2.9.5 Make Space Requests and Policy
Make Space Requests
When an application or user creates or extends a file, the operation may not complete because
the disk volume is full or the user has exceeded his disk quota. If shelving is enabled on the volume, this situation generates a make space request to HSM to free up enough disk space to satisfy the request. If responding to make space requests is enabled, HSM executes the defined
policy for the volume and shelves enough files to free up the requested space. While shelving
files, HSM sends an informational message to notify the user that the file access may take much
longer than usual due to the shelving activity. After the requested disk space is made available,
the create or extend operation continues normally. If for any reason the make space operation
fails, the user’s original request to create or extend a file fails with one of the following two error
messages:
%SYSTEM-E-DEVICEFUL, device full - allocation failure
or
%SYSTEM-E-EXDISKQUOTA, exceeded disk quota
Because make space operations may take a significant amount of time, and because you may
prefer certain applications to issue an immediate error rather than wait for the request to complete, you can disable make space requests on a per- policy, per-volume, or per-process basis.
Make Space Policy
Make space requests start a policy execution for the volume. The user process that requested the
make space allocation is allowed to continue as soon as the amount of space allocation that was
requested is satisfied. However, in anticipation of future make space requests, the policy continues executing until a defined low water mark is reached. Make space requests cannot free up
space below the defined low water mark.
Understanding HSM Concepts 2-24
Understanding HSM Concepts
2.10 Schedule
If the make space operation is triggered by a user disk quota exceeded condition, the files are
selected based on the owner of the file being created or extended, rather than the user of the
requesting process.
The cause of a make space request determines the scope of online disk storage that is involved
with file selection as follows:
WHEN the make space request is
initiated by...
THEN...
A high water mark reached or volume
full event
All files on the disk volume are potential candidates for the
file selection process.
A user disk quota exceeded event
Only files owned by the user whose disk quota was
exceeded are potential candidates for the file selection process._
2.10 Schedule
To prevent storage problems, you set up scheduled execution for preventive policies at regular
intervals. HSM provides the capability to schedule policy execution with the following
attributes:
•
Online volumes
•
Execution timing and interval
•
Server node
2.10.1 Online Volumes
When you schedule a policy execution, you specify the online volumes on which to apply the
policy. When setting up a schedule, a separate entry is created for the policy execution for each
volume. The volume selection should be based on the goal of maintaining volume capacity
between the low water mark and the high water mark at all times. Thus, you need to schedule
policies to execute more often on those volumes on which files are frequently created or modified and less often on those volumes on which files are infrequently created or modified.
2.10.2 Execution Timing and Interval
Policies can be scheduled to execute at a certain time of day, and at regular intervals. HP recommends you run nightly scheduled policy runs at an hour that does not conflict with high system
activity or system backups. Ideally, the frequency of policy runs should coincide with the rate of
new data creation on the specified volumes. The preventive policy should be run prior to the volume reaching its high water mark capacity, so that all shelving operations can be controlled to
occur at certain times of day. This not only reduces overhead of reactive policy execution during
the period of high system activity, but also minimizes the use of nearline/offline resources for
HSM purposes.
2.10.3 Server Node
You can specify the node on which you want the policy to run. Although policies can run on any
node that has access to the online volume, cache devices, and nearline/offline devices, it is more
efficient if it runs on a shelf server node. If the shelf server node changes, you can use HSM’s
requeue feature to requeue any and all policy entries to run on an alternative shelf server node.
Understanding HSM Concepts 2–25
Understanding HSM Concepts
2.11 HSM System Files and Logical Names
2.11 HSM System Files and Logical Names
HSM uses four logical names that point to devices and directories that hold important files for
HSM operations. The logical names are needed because different levels of data reliability are
required to ensure proper HSM operation, and for the security of user data. The four logical
names are:
•
HSM$CATALOG
•
HSM$MANAGER
•
HSM$LOG
•
HSM$REPACK
The first three logical names must be defined at installation, or later, as system wide logical
names affecting all processes. Moreover, the definitions must be the same on all nodes in the
cluster. The logical name HSM$REPACK is optional.
HSM$CATALOG The HSM$CATALOG logical name points to the location of the default
HSM catalog. The catalog contains the information needed to locate a shelved file’s data in the
cache or the shelf. HSM supports multiple catalogs, which can be specified on a per-shelf basis.
Warning
Loss of any catalog is a critical problem and will probably result in losing the data for
shelved files served by that catalog.
HSM catalogs are considered critical files and should be stored on devices and in a directory that
has the maximum protection for loss. In particular:
•
The devices should be shadowed to recover from disk rashes.
•
The devices should be backed-up regularly, and media removed offsite, for disaster recovery.
The size of the catalog file depends on the number of files you intend to shelve on the system.
Approximately 1.25 blocks are used for each copy of a file in the cache or the shelf. When a
cache copy is flushed to the shelf, the cache catalog entry is deleted. However, copies to the
nearline/offline shelf remain permanently in the catalog. For information on backing up the catalog, see Section 5.12.
2.11.1 HSM$MANAGER
The files stored in the location referenced by HSM$MANAGER are important in HSM operations, but can usually be recovered. These files include:
•
All SMU databases
•
The shelf handler request log
•
The magazine loader database, for HSM Basic mode
Loss of these files will result in a temporarily unusable HSM system, until SMU commands are
entered to restore the environment. However, as long as the catalog is available, user data can be
recovered. Although the critical level of files in HSM$MANAGER is not as high as HSM$CATALOG, the same protection mechanisms are recommended, if possible. At a minimum, a backup
of the current SMU database should always be available. The size of the files in HSM$MANAGER is relatively fixed, but depends on the number of nodes in the cluster. You should allocate
5000 blocks plus 2049 blocks for each node in the cluster.
Understanding HSM Concepts 2-26
Understanding HSM Concepts
2.11 HSM System Files and Logical Names
2.11.2 HSM$LOG
HSM uses the HSM$LOG location for storing event logs. These logs are written during HSM
operation, but their content is designed for the use of the system administrator to monitor HSM
activity. As such, their existence is not critical. The size of the event log files can grow rather
large if not maintained. However, once the logs have been analyzed by the system administrator,
they can be RESET and then deleted.
Note
The directory specified by HSM$LOG should have no version limit for files. Failure to
do this could result in HSM not starting up on some nodes.
2.11.3 HSM$REPACK
HSM uses the optional HSM$REPACK logical name to point to a staging area used while
repacking archive classes. If the logical name is not defined, the repack function uses
HSM$MANAGER instead. Repack needs a staging area in order to repack files into multi-file
savesets. The staging area must be at least 100,000 blocks for repack to function. The staging
area is cleaned up after a repack operation.
Repack can be a time consuming process if the catalogs are huge. Repack can be performed in 2
phases which is facilitated by the use of the following qualifiers:
•
/REPORT
If REPORT option is specified, Repack will only perform the analysis phase of a repack and not
actual repacking. This feature would be extremely useful for a system manager to:
•
analyze repacking requirements/benefits
•
select the most useful threshold values and
•
schedule repacks at convenient times.
If used with the /SAVE option, the resultant candidates file will be saved and can be used in subsequent repack/s if the system manager wants the entire repack, as analyzed, to proceed.
•
/RESTART
Since repacks can take several hours/days to complete, it would be useful to allow the continuation of a repack that had been interrupted for any reason. The /RESTART qualifier would help
do this along with /SAVE which would preserve the current candidates file. The repack can be
started later from where it left off, without a further analysis or repacking files/volumes that had
already been repacked.
Understanding HSM Concepts 2–27
3
Customizing the HSM Environment
This chapter provides a task-oriented description for changing the HSM environment to better
suit your operating environment. It contains the following sections:
•
Configuring a customized environment
•
Implementing shelving policies
For a complete example of a custom configuration for HSM Basic mode or PLUS mode, see the
Appendix in the HSM Installation Guide.
3.1 Configuring a Customized HSM Environment
This section describes the various definitions used to customize an HSM environment and the
operations enabled and disabled by each command.
3.1.1 Customizing the HSM Facility
Commands submitted to the HSM facility control operations across the entire cluster.
Enabling and Disabling the Facility
The following options are for enabling or disabling the HSM facility using the SMU SET
FACILITY command.
IF You Want to . . .
THEN Use . .
Enable all HSM operations on the
cluster
SMU SET FACILITY /ENABLE=ALL
Enable shelving operations throughout the cluster
SMU SET FACILITY /ENABLE=SHELVE
Enable unshelving operations
throughout the cluster
SMU SET FACILITY/ENABLE=UNSHELVE
Disable all HSM operations on the
cluster
SMU SET FACILITY /DISABLE=ALL
Disable shelving operations
throughout the cluster
SMU SET FACILITY /DISABLE=SHELVE
Disable unshelving operations
throughout the cluster
SMU SET FACILITY /DISABLE=UNSHELVE
3.1.2 Creating Shelf Definitions
Create shelf definitions that include the archive classes for shelving and unshelving data.
Customizing the HSM Environment 3–1
Customizing the HSM Environment
3.1 Configuring a Customized HSM Environment
Limitations
The following limitations apply to the number of archive classes, volume sets per archive class,
and members per volume set:
For
Basic Mode Limit
Plus Mode Limit
Shelve archive classes
10
10
Restore archive classes
36
36
Total archive classes
36
9999
Tape volume sets
36
Unlimited
Tape volumes per set
99
Unlimited
Prevent Inadvertent Application
To prevent inadvertent application of a new shelf definition, disable all operations with the /DISABLE=ALL qualifier and value.
3.1.3 Enabling and Disabling a Shelf Definition
There are three options for enabling and disabling shelving operations that use a particular
shelf. The following table lists the options that may be used with the SET SHELF /ENABLE or
SET SHELF/DISABLE command.
IF You Want to Control . . .
THEN Use Option . . .
All HSM operations using the named shelf
ALL
Shelving operations using the named shelf
SHELVE
Unshelving operations using the named shelf
UNSHELVE
3.1.4 Modifying Archive Classes
HSM provides multiple archive classes for you to use. You cannot modify the archive class
names. You can, however, determine the devices to which an archive class is written and reassign volumes to allow you to move archive class to offsite storage.
IF You Want to . . .
THEN Use . . .
Dismount the current tape volume for specific archive
class and continue shelving operations with the next
volume in the archive class sequence a
SMU CHECKPOINT archive_id
Assign a nearline or offline tape device or magazine
loader to a specific archive class
SMU SET DEVICE/ARCHIVE_ID
In HSM Plus mode, you can modify the media type and density only if the archive class has not
been used and no devices or shelves reference the archive class. You can add or remove volume
pools as desired.
Customizing the HSM Environment 3-2
Customizing the HSM Environment
3.1 Configuring a Customized HSM Environment
3.1.5 Creating Device Definitions
Create device definitions to identify the devices you will use for shelving operations. Also
decide whether to dedicate the devices for the sole use by HSM or to share them with other
applications.
3.1.6 Modifying Device Definitions
The device definitions let HSM know which devices to use for a given archive class and whether
to dedicate or share the devices.
IF You Want to...
THEN Use...
Associate a device with a specific archive class
SMU SET DEVICE/ARCHIVE_ID
Dedicate a device to be used only by HSM
SMU SET DEVICE/DEDICATE
Allow other operations to share a device with HSM
SMU SET DEVICE/SHARED
Remove a device definition from the database
HSM SMU SET DEVICE/DELETE
Disable a device for HSM use
SMU SET DEVICE/DISABLE
Enable a device for HSM use
SMU SET DEVICE/ENABLE
3.1.7 Enabling and Disabling a Volume Definition
The volume definition allows you to enable and disable specific reactive policy operations or
control operations on the entire volume.
IF You Want to Control ...
THEN Use Option/Qualifier...
All HSM operations on the
named volume
SMU SET VOLUME/{ENABLE | DISABLE}=ALL
Shelving operations on the
named volume
SMU SET VOLUME/{ENABLE |DISABLE}=SHELVE
Unshelving operations on the
named volume
SMU SET VOLUME/{ENABLE | DISABLE}=UNSHELVE
Shelving operations initiated by
the high water mark event
/SMU SET VOLUME/{ENABLE | DISABLE}=HIGHWATER_MARK
Shelving operations initiated by
the volume full event
/SMU SET VOLUME/{ENABLE | DISABLE}=OCCUPANCY
Shelving operations initiated by
the user disk quota exceeded
event
/SMU SET VOLUME/{ENABLE | DISABLE}=QUOTA
3.1.8 Working with Caches
HSM allows you to defines temporary caches or permanent caches. If you want to use magnetooptical devices with HSM, you must define them as a cache
Customizing the HSM Environment 3–3
Customizing the HSM Environment
3.1 Configuring a Customized HSM Environment
.
IF You Want to . . .
THEN Use . . .
Define an online disk cache
SMU SET CACHE
Tell the cache to flush its data to nearline or
offline storage
SMU SET CACHE/AFTER
Control whether the data shelved through the
cache is copied to nearline or offline storage when
shelving occurs or when the cache is flushed
(/NOBACKUP)(/BACKUP)
SMU SET CACHE/{BACKUP | NOBACKUP}
Control whether files shelved to the cache are
deleted when the online file is deleted or modified
SMU SET CACHE/[NO]HOLD
Define a magneto-optical device as a permanent cache !/SMU SET
CACHE/BLOCK=0/BACKUP /NOINTERVAL/HIGHWATER_MARK=100
3.1.9 Enabling and Disabling a Policy Definition
You can enable or disable specific policy definitions.
IF You Want to . . .
THEN Use . . .
Enable a policy definition
SMU SET POLICY/ENABLE
Disable a policy definition
SMU SET POLICY/DISABLE
Disabling a policy definition affects both primary and secondary policy as follows:
•
Disabling a preventive policy causes the files on any disk volume scheduled for shelving
with that policy to not be shelved with that policy. If other policies scheduled for the disk
volume are enabled, they remain operable.
•
The files on any disk volume subject to a make space request-high water mark reached, volume occupancy full, or disk quota exceeded event-are not shelved when the named policy is
disabled.
3.1.10 Scheduling Policy Executions
Once you have defined and enabled preventive policies, you may want to ensure they run only at
particular times or according to some specific interval.
IF You Want to . . .
THEN Use . . .
Schedule a policy to run immediately
SMU SET SCHEDULE/AFTER
Schedule a policy to run after a specific time
SMU SET SCHEDULE/AFTER=time
Schedule a policy to run according to a regular
time interval
SMU SET SCHEDULE/INTERVAL=delta
Schedule a policy to run on a specific shelf server
name
SMU SET SCHEDULE/SERVER=node
Customizing the HSM Environment 3-4
Customizing the HSM Environment
3.2 Implementing Shelving Policies
3.2 Implementing Shelving Policies
After installing HSM, you can consider, then implement, your own policies. This section provides a series of tasks implementing both preventive and reactive policies. The guidelines
expressed in this section include the commands, definitions, and values that apply to each aspect
of creating and implementing policy.
See HSM Command Reference Guide for a complete description of the commands used in this
section.
3.2.1 Determining the Disk Volumes
Determine the disk volumes on which you want to manage storage capacity. The following
example commands are used to perform this task.
To . . .
Use This Command . . .
Determine names of online disk volumes and the
amount of capacity used
$ SHOW DEVICE
Determine user disk quotas and shelving option
in user processes
$ RUN SYS$SYSTEM:AUTHORIZE
UAF>SHOW username
3.2.2 Creating Volume Definitions
Create volume definitions for the disk volumes. Use the SMU SET VOLUME command to create a volume definition and consider the capabilities offered by the volume definitions.
To . . .
Use the Qualifier . . .
Shelve contiguous files Enable all HSM operations and policies on the volume.
/CONTIGUOUS/ENABLE=ALL
Enable the volume for handling a specific trigger
condition
/ENABLE=OCCUPANCY or
/ENABLE=QUOTA or
/ENABLE=HIGHWATER_MARK
Enable shelving or unshelving operations on the
volume
/ENABLE=SHELVE or /ENABLE=UNSHELVE
Disable all HSM operations and policies on the
volume.
/DISABLE=ALL
Disable the volume for handling a specific trigger
condition.
/DISABLE=OCCUPANCY or /DISABLE=QUOTA or /DISABLE=HIGHWATER_MARK
Disable shelving or unshelving operations on the
volume
/DISABLE=SHELVE or /DISABLE=UNSHELVE
Define a high water mark for the volume.
/HIGHWATER_MARK=percent
Specify the policy to be executed for volume full
or high water mark events.
/OCCUPANCY=policy_name
Specify whether placed files can be shelved.
/PLACEMENT (default)
Specify the policy to be executed for user disk
quota exceeded events
/QUOTA=policy_name
Customizing the HSM Environment 3–5
Customizing the HSM Environment
3.2 Implementing Shelving Policies
To . . .
Use the Qualifier . . .
Identify the shelf on which to shelve this volumeís
data. If you do not specify a shelf, HSM
uses_HSM$DEFAULT_SHELF
/SHELF_NAME=shelf_name
Prevent Inadvertent Application
To prevent application of a new volume definition before you are ready to do so, disable all
operations with the /DISABLE=ALL qualifier and value.
Contiguous Files
Files marked contiguous are not normally shelved. If they are, they must be unshelved contiguously. The operation fails if the files cannot be unshelved contiguously.
3.2.3 Determining File Selection Criteria
Determine how files should be selected for shelving on a regular basis. The following list gives
you some planning considerations:
•
Do all disk volumes require the same or different file selection criteria?
•
How many users are storing data?
•
How much data is being stored by each user?
•
What is the purpose of the data stored on the defined disk volumes?
•
How often are files created or extended?
•
What are the sizes of the files created or extended?
•
How would applications or users having to unshelve files be affected?
•
How many files are temporary or are expected to be deleted shortly after they are created?
3.2.4 Creating Policy Definitions
Create policy definitions that specify the file selection criteria anticipated to be most useful. Use
the SMU to create a policy definition considering the capabilities offered.
IF you want to . . .
THEN Use . . .
Choose a file event and time frame
/BACKUP, /CREATED, /EXPIRED, or/MODIFIED,
and /BEFORE, /ELAPSED, or /SINCE
Implement file selection algorithms
LRU, STWS or /PRIMARY_POLICY and
/SECONDARY_POLICY SCRIPT.
Confirm operations with the policy
/CONFIRM
Use a log file to monitor operations with the
policy definition
/LOG
Specify preshelving instead of shelving operations. Note that preshelving is only useful for
preventive policies because preshelving does
not free disk space
PRESHELVE command
Customizing the HSM Environment 3-6
Customizing the HSM Environment
3.2 Implementing Shelving Policies
Prevent Inadvertent Application
To prevent inadvertent application of a new policy definition, disable all operations with the
/DISABLE qualifier.
3.2.5 Using Expiration Dates
If you plan on using a files expiration date as an event for file selection, you must make sure the
OpenVMS file system is processing them. Follow the procedure in Table 3–1 to establish file
expiration dates for the files on the disk volumes.
Verifying Privileges
You must be allowed to enable the system privilege SYSPRV or have write access to the disk
volume index file to perform this procedure.
Setting File Expiration Dates
To set file expiration dates, follow the procedure in Table 3–1. For more information about the
OpenVMS command SET VOLUME/RETENTION, see the OpenVMS DCL Dictionary.
Table 3–1 Procedure for Setting File Expiration Dates
Step
Action
1
Enable the system privilege for your process:$ SET PROCESS/PRIVILEGE=SYSPRV
2
Enable retention times for each disk volume on your system:$ SET VOLUME/RETENTION=(min,[max])
For min and max, specify the minimum and maximum period of time you want the
files retained on the disk using delta time values. If you enter only one value, the
system uses that value for the minimum retention period and calculates the maximum retention period as either twice the minimum or as the minimum plus 7 days,
whichever is less.
Once you set volume retention on a volume, and define a policy using expiration date as a file
selection criteria, the expiration dates on files on the volume must be initialized. HSM automatically initializes expiration dates on all files on the volume that do not already have an expiration
date upon the first running of the policy on the volume. The expiration date is set to the current
date and time, plus the maximum retention time as specified in the SET VOLUME/RETENTION command.
After the expiration date has been initialized, the OpenVMS file system automatically updates
the expiration date upon read or write access to the file, at a frequency based on the minimum
and maximum retention times.
Example of Setting Volume Retention
The following command sets the minimum retention period to 15 days and the maximum to 20
days:
$ SET VOLUME DUA0: /RETENTION=(15-0:0, 20-0:0)
The following command sets the minimum retention period to 3 days and calculates the maximum. Twice the minimum is 6 days; the minimum plus 7 days is 10. Thus, the value for the
maximum is 6 days because that is the smaller value:
$ SET VOLUME DUA1: /RETENTION=(3)
Customizing the HSM Environment 3–7
Customizing the HSM Environment
3.2 Implementing Shelving Policies
If you are not already using expiration dates, the following settings for retention times are suggested:
$ SET VOLUME/RETENTION=(1-, 0-00:00:00.01)
3.2.6 Creating Schedule Definitions
Use the SMU SET SCHEDULE command to create the schedule definitions that apply the policy definitions to the volume definitions.
IF You Want To
THEN Use the Qualifier
Confirm operations with the schedule
/CONFIRM
Specify the time that the schedule should be first
implemented and the interval thereafter at which
the policy will be applied to the volume
/INTERVAL and /AFTER
3.2.7 Enabling Preventive Policy
Enable preventive policy on the system by enabling and disabling operations as follows:
Definition
Enable or Disable Qualifiers
Volume
/ENABLE=(SHELVING,UNSHELVING)/DISABLE=(HIGHWATER_MARK,OCCUPANCY,QUOTA)
Policy
/ENABLE
Shelf
/ENABLE=ALL
Customizing the HSM Environment 3-8
4
Using HSM
This chapter contains information about what a user, not the storage administrator or operator,
sees in an HSM environment and explains HSM functions the user can control. It includes the
following topics:
•
A general description of the user’s HSM environment
•
Control of file shelving and unshelving
4.1 What the User Sees in an HSM Environment
If the storage administrator has defined policies that control file shelving and unshelving, you (as
a typical user) may not be aware that HSM is on the system. Shelving and unshelving files may
be almost transparent to you. Or, you may work in an environment where the storage administrator lets you do more of your own data management, in which case you will know HSM is
installed. Whether or not you know HSM is on your system, there are some things you will see
that let you know just what is going on. There are a few specific ways you will know that HSM
is on the system:
•
Certain qualifiers on the OpenVMS DIRECTORY command indicate the shelved status of
files.
•
File access to certain files takes longer than expected.
•
You see very few volume full or quota exceeded errors.
•
You see messages that refer to shelving or unshelving.
4.1.1 Identifying Shelved Data using the DIRECTORY Command
As described in Chapter 1, HSM shelves file data but retains the file header information in online
storage. You can use the DCL DIRECTORY command, with specific qualifiers, to determine if
a file is shelved.
To find out which, if any, files have been shelved, use one of the following qualifiers on the
DCL DIRECTORY command:
•
/FULL
•
/SHELVED_STATE
•
/SIZE=ALL
Using HSM 4–1
Using HSM
4.1 What the User Sees in an HSM Environment
4.1.1.1
DIRECTORY/FULL
The DIRECTORY/FULL command lists all available information about a file as contained in
the file header.
Example:
$ DIR/FULL
Directory SYS$SYSDEVICE:[COLORADO]
CONFIG_LOG.TXT;1
File ID: (3346,2,0)
Size:
56/0
Owner:
[COLORADO]
Created: 08-Jan-2003 12:04:56.85
Revised: 08-Jan-2003 14:24:01.41 (7)
Expires:
<None specified>
Backup:
<No backup recorded>
Effective: <None specified>
Recording: <None specified>
File organization: Sequential
Shelved state:
Shelved
File attributes:
Allocation: 0, Extend: 0, Global buffer
count: 0
Version limit: 3
Record format:
Variable length, maximum 137 bytes
Record attributes: Carriage return carriage control
RMS attributes:
None
Journaling enabled: None
File protection:
System:RWED, Owner:RWED, Group:RE, World:R
DECW$SM.LOG;2
File ID: (3270,13,0)
Size:
5/6
Owner:
[COLORADO]
Created: 08-Jan-2003 08:16:14.08
Revised: 08-Jan-2003 14:24:01.47 (3)
Expires:
<None specified>
Backup:
<No backup recorded>
Effective: <None specified>
Recording: <None specified>
File organization: Sequential
Shelved state:
Online
File attributes:
Allocation: 6, Extend: 0, Global buffer
count: 0
Version limit: 3, Not shelvable
Record format:
VFC, 2 byte header
Record attributes: Print file carriage control
RMS attributes:
None
Journaling enabled: None
File protection:
System:RWED, Owner:RWED, Group:RE, World:
Access Cntrl List: None
4.1.1.2
DIRECTORY/FULL for Unpopulated Index Files
If you shelve an empty (unpopulated) index file, the file size will look different after you shelve
it if you do a DIRECTORY/FULL on the file. In Example 4-1 notice that the file size before
shelving is 3/3 and after shelving, its 0/0. When you see this, do not be alarmed. No data has
been lost. This is a normal representation of an unpopulated index file.
Example 4–1 Shelve an empty (unpopulated) indexed file
$ CREATE/FDL=HSM$CATALOG.FDL EMPTY_INDEXED.DAT
$ DIRECTORY/FULL EMPTY_INDEXED.DAT
Directory DISK$USER1:[SHELVING_FILES]
Example 4-1 (Cont.) Shelve an empty (unpopulated) indexed file
EMPTY_INDEXED.DAT;1
File ID: (645,26,0)
Size:
3/3
Owner:
[SYSTEM]
Created: 08-Jan-2003 14:18:13.79
Revised: 08-Jan-2003 14:18:13.93 (1)
Expires:
<None specified>
Backup:
<No backup recorded>
Effective: <None specified>
Using HSM 4-2
Using HSM
4.1 What the User Sees in an HSM Environment
Recording: <None specified>
File organization: Indexed, Prolog: 3, Using 5 keys
Shelved state:
Online
File attributes:
Allocation: 3, Extend: 0, Maximum bucket size: 2
Global buffer count: 0, Version limit: 3
Contiguous best try
Record format:
Variable length, maximum 484 bytes, longest 0 bytes
Record attributes: None
RMS attributes:
None
Journaling enabled: None
File protection:
System:R, Owner:RWED, Group:, World:
Access Cntrl List: None
Total of 1 file, 3/3 blocks.
$ SHELVE EMPTY_INDEXED.DAT
$ DIRECTORY/FULL EMPTY_INDEXED.DAT
Directory DISK$USER1:[SHELVING_FILES]
EMPTY_INDEXED.DAT;1
File ID: (645,26,0)
Size:
0/0
Owner:
[SYSTEM]
Created: 08-Jan-2003 14:18:13.79
Revised: 08-Jan-2003 14:18:13.93 (5)
Expires:
<None specified>
Backup:
<No backup recorded>
Effective: <None specified>
Recording: <None specified>
File organization: Indexed, further information shelved
Shelved state:
Shelved
File attributes:
Allocation: 0, Extend: 0, Maximum bucket size: 2
Global buffer count: 0, Version limit: 3
Contiguous best try
Record format:
Variable length, maximum 484 bytes, longest 0 bytes
Record attributes: None
RMS attributes:
None
Journaling enabled: None
File protection:
System:R, Owner:RWED, Group:, World:
Total of 1 file, 0/0 blocks.
4.1.1.3
DIRECTORY/FULL for Populated Indexed Files
When you shelve a populated index file, and do a DIRECTORY /FULL on it afterwards, the file
size will look different afterwards. In Example 4-2 you will notice that the file size went from
84/84 to 84/0. This is normal. The displayed size of a populated indexed file appears normal in
the directory listing.
Example 4–2 Shelve a Populated indexed file
$ COPY HSM$CATALOG:HSM$CATALOG.SYS POPULATED_INDEXED.DAT
$ DIRECTORY/FULL POPULATED_INDEXED.DAT
Directory DISK$USER1:[SHELVING_FILES]
POPULATED_INDEXED.DAT;1
File ID: (691,51007,0)
Size:
84/84
Owner:
[SYSTEM]
Created: 08-Jan-2003 14:30:47.15
Revised: 08-Jan-2003 14:30:47.31 (1)
Expires:
<None specified>
Backup:
<No backup recorded>
Effective: <None specified>
Recording: <None specified>
File organization: Indexed, Prolog: 3, Using 5 keys
Shelved state:
Online
File attributes:
Allocation: 84, Extend: 0, Maximum bucket size: 2
Global buffer count: 0, Version limit: 3
Record format:
Variable length, maximum 484 bytes, longest 0 bytes
Record attributes: None
RMS attributes:
None
Journaling enabled: None
File protection:
System:RWED, Owner:RWED, Group:RE, World:
Access Cntrl List: None
Total of 1 file, 84/84 blocks.
$ SHELVE POPULATED_INDEXED.DAT;1
Using HSM 4–3
Using HSM
4.1 What the User Sees in an HSM Environment
$ DIRECTORY/FULL POPULATED_INDEXED.DAT
Directory DISK$USER1:[SHELVING_FILES]
POPULATED_INDEXED.DAT;1
File ID: (691,51007,0)
Size:
84/0
Owner:
[SYSTEM]
Created: 08-Jan-2003 14:30:47.15
Revised: 08-Jan-2003 14:30:47.31 (5)
Expires:
<None specified>
Backup:
<No backup recorded>
Effective: <None specified>
Recording: <None specified>
File organization: Indexed, further information shelved
Shelved state:
Shelved
File attributes:
Allocation: 0, Extend: 0, Maximum bucket size: 2
Global buffer count: 0, Version limit: 3
Record format:
Variable length, maximum 484 bytes, longest 0 bytes
Record attributes: None
RMS attributes:
None
Journaling enabled: None
File protection:
System:RWED, Owner:RWED, Group:RE, World:
Total of 1 file, 84/0 blocks.
4.1.1.4
DIRECTORY/SHELVED_STATE
The DIRECTORY/SHELVED_STATE command lists the files and a keyword that tells you if
the file is online or shelved.
Example:
$ DIR/SHELVED
Directory DISK$MYDISK:[IAMUSER]
A1.DAT;1
Shelved
AA.A;1
Shelved
BAD_LOGIN.COM;1
Shelved
BOINK.EXE;1
Shelved
BUILD.DIR;1
Online
CLUSTER_END_031694.COM;1
Shelved
CLUSTER_TEST_030194.COM;2
Shelved
CLUSTER_TEST_030394.COM;1
Shelved
CMA.DIR;1
Online
CODE.DIR;1
Online
COSI.DIR;1
Online
COSI_TEST.DIR;1
Online
...
Z6.DAT;1
Shelved
Z7.DAT;1
Shelved
Z8.DAT;1
Shelved
Z9.DAT;1
Shelved
Total of 153 files.
4.1.1.5
DIRECTORY/SIZE
The DIRECTORY/SIZE command lists the size of the files in the directory. The allocated file
size for a shelved file is 0. If you use /SIZE=ALL, OpenVMS displays both the used and allocated blocks for the files (as shown in the example below). If you use /SIZE=ALLOC, OpenVMS displays only the allocated file size for the files.
Example:
$ DIR/SIZE=ALL
Directory DISK$MYDISK:[IAMUSER]
A1.DAT;1
1/0
AA.A;1
5/0
BAD_LOGIN.COM;1
6/0
BOINK.EXE;1
10/0
BUILD.DIR;1
4/24
Using HSM 4-4
Using HSM
4.1 What the User Sees in an HSM Environment
CLUSTER_END_031694.COM;1
CLUSTER_TEST_030194.COM;2
CLUSTER_TEST_030394.COM;1
CMA.DIR;1
1/3
CODE.DIR;1
21/54
COSI.DIR;1
1/54
COSI_TEST.DIR;1
8/9
...
Z6.DAT;1
1/0
Z7.DAT;1
1/0
Z8.DAT;1
1/0
Z9.DAT;1
1/0
Total of 153 files, 42199/42339 blocks.
2/0
1/0
1/0
4.1.2 Accessing Files
You use the same DCL commands and application programs to access shelved files as you
would online data files. If you are working on a system that is running HSM, you will notice
some differences in file access time. When shelving is occurring, file access time may be temporarily lengthened while the shelving process completes.
When you access a currently shelved file through a read, write, extend, or truncate operation, it
may take longer for that file to be accessed than you would expect. You may see a message indicating that unshelving is occurring.
Depending on the storage device being used to shelve and unshelve the data, you may experience a large or small increase in the access time. Table 4–1shows how various storage devices
relate to file access time in an HSM environment.
Table 4–1 Typical File Access Time by Storage Device
Storage Device
Typical Access Time
HSM cache
Approximately two times the normal access time
for online storage
Magneto-optical jukebox
Within 30 seconds
Nearline robotic tape
Less than 5 minutesdevice
Offline device using human retrieval
May range from minutes to several days
These access times depend on the type of storage device used, rather than on the working time of
HSM. In other words, if you already use various storage devices to access your data, using HSM
will not significantly increase your access time.
4.1.3 Decreasing Volume Full and Disk Quota Exceeded Errors
Well-defined shelving policies will decrease the number of volume full and user disk quota
exceeded conditions on your system. However, if the volume should become full or if you
exceed your OpenVMS-defined disk quota, HSM may shelve files according to policies defined
by the storage administrator.
Using HSM 4–5
Using HSM
4.2 Controlling Shelving and Unshelving
4.1.4 Viewing Messages
When you access a currently shelved file through a read, write, extend, or truncate operation,
you might see a message like this:
%HSM-I-UNSHLVPRG, unshelving file $1$DUA0:[MY_DIR]AARDVARKS.TXT
If you attempt to create or extend a file and there is not enough space available to do so, you
might see this message:
%HSM-I-SHLVPRG, shelving files to free disk space
You see these messages only if you have enabled /BROADCAST on your terminal.
4.2 Controlling Shelving and Unshelving
From your perspective, shelving and unshelving files can be defined to occur automatically or
manually. In the case of automatic shelving and unshelving, the storage administrator defines
policies that control this behavior and you may not realize shelving and unshelving are occurring. In the case of manual shelving and unshelving, you issue specific commands to shelve and
unshelve files.
4.2.1 Automatic Shelving Operations
If the storage administrator defines policies to shelve and unshelve files, you do not need to specifically request files be shelved and unshelved. In this case, the storage administrator decides
when data ought to be shelved based on various criteria discussed in Chapter 2.
You may not notice when the files are shelved and may only notice when a file is unshelved if
the file access time is significantly longer than expected. You can find out if you have shelved
files using the qualifiers discussed above for the DIRECTORY command.
4.2.2 User-Controlled Shelving Operations
To specifically shelve a file (or files), use the DCL SHELVE command or the DCL
PRESHELVE command.
Using the SHELVE command frees up disk space by shelving files you do not expect to need
soon and by minimizing the possibility that files you do intend to use are not shelved automatically.
Using the PRESHELVE command copies the file to shelf storage. The data in the file remains in
your work area. Preshelving files allows the system to respond more rapidly when it needs to
free up disk space for use.
Note
To shelve a file, you must have READ and WRITE access to that file.
Canceling an Explicit SHELVE or PRESHELVE Operation
To stop an explicit shelving operation, type Ctrl/Y. The operation will complete on the file that
is currently being shelved. All files that were shelved before you entered the Ctrl/Y will remain
shelved. To cancel any remaining pending operations, you must reenter the command using the
/CANCEL qualifier, as shown in the following example:
$ SHELVE *.TXT Ctrl/Y
$ SHELVE/CANCEL *.TXT
Using HSM 4-6
Using HSM
4.2 Controlling Shelving and Unshelving
File Selection for Explicit Shelving
HSM provides three methods to select files for explicit shelving:
•
Explicitly naming files
You can use one or more file specifications, including wildcards.
•
File event and time span
You can include files based on a time span around one of four file dates. The file dates used
include the following:
Creation date
Backup date
Modification date
Expiration date
Time values are specified with the /SINCE and /BEFORE qualifiers.
•
File size
In addition to specifying file names, file dates, and time spans, you have the option of further limiting the files selected for shelving. The additional criteria considers file size and is
specified with the /SELEC qualifier. Table 4–2 lists three options for applying the /SELECT
qualifier.
Table 4–2 File Selection
Files with Block Sizes . . .
Enter This Qualifier and Option . . .
Smaller than that specified
/SELECT=SIZE=MAXIMUM=n
Greater than or equal to that specified
/SELECT=SIZE=MINIMUM=n
Falling within the specified range
/SELECT=SIZE=(MINIMUM=n,MAXIMUM=m)
Shelving or Preshelving Specific File Versions
You have the option of specifying the number of file versions you shelve or preshelve with any
manual operation. In most cases, you want to shelve the earlier versions of a file, leaving later
versions of the file available for immediate access.
To specify the number of versions to keep in primary storage, use the /KEEP qualifier with the
SHELVE or PRESHELVE command.
Time to Complete Shelving Operations
When you enter the PRESHELVE or SHELVE command, the amount of time taken to complete
the operation depends on the following factors:
•
The amount of data
The number and size of the files to be preshelved or shelved will determine how long the
operation takes. More and/or larger files require more time to process than fewer and/or
smaller files.
•
Online cache
When you implement online cache, the operation requires approximately twice the amount
of time taken to perform an OpenVMS COPY operation to copy the files to another disk.
•
Using the /NOWAIT qualifier
Using HSM 4–7
Using HSM
4.3 Finding Lost Data
By using the /NOWAIT qualifier, HSM returns control of the user process in which the
PRESHELVE or SHELVE command was entered. The operation is then carried out in the
context of the HSM system process.
4.2.3 Unshelving Files
You can cause a shelved file to be returned to primary storage through one of the following
methods:
•
Enter a DCL command to read, write, extend, or truncate a shelved file. This causes a file
fault that initiates an implicit HSM unshelving operation.
•
Use the UNSHELVE command to explicitly unshelve a file. This operation requires that
you have read access to the file.
When you access the data of a shelved file through a file fault, you will receive the following message as the file is being routinely unshelved:
$ EDIT AARDVARKS.TXT
%HSM-I-UNSHLVPRG, unshelving file $1$DUA0:[MY_DIR]AARDVARKS.TXT
Canceling an UNSHELVE Request
To cancel an implicit unshelving of a file, enter Ctrl/Y. This action immediately stops the operation and results in the file remaining at its status before you entered the command that caused the
file to be unshelved.
To stop an explicit unshelving operation, enter Ctrl/Y. The operation will complete on the file
that is currently being unshelved. All files that were unshelved before you entered the Ctrl/Y will
remain unshelved. To cancel any remaining pending operations, you must reenter the command
using the /CANCEL qualifier, as shown in the following example:
$ UNSHELVE *.TXT Ctrl/Y
$ UNSHELVE/CANCEL *.TXT
4.3 Finding Lost Data
If you have lost data you think was shelved, see your storage administrator. There are several
procedures, explained in Section 5.9, that the storage administrator can use to find the lost data.
4.4 Working with Remote Files
You can perform all regular DCL command line operations on files residing in a system or
VMScluster from a remote node in the same manner as you can for operations on a local node.
However, you cannot use the HSM DCL commands (SHELVE, PRESHELVE, and
UNSHELVE) on remote files.
Implicit shelving and unshelving operations are possible for remote systems. Unlike local operations, you do not receive the "Unshelving filename" or "Shelving Files To Free Disk Space" status messages for remote operations.
If you cancel an implicit operation on a file from a remote node (implicit operations only are
allowed), the operation will continue at the HSM system, but the request will be canceled without returning the result of the operation to the remote node.
4.5 Resolving Duplicate Operations on the Same File
If two users simultaneously enter duplicate command on the same file, HSM performs the operation for both users as if each had entered the command alone. For example, if an UNSHELVE
command is entered on the same file, HSM unshelves the file once and issues duplicate success
messages.
Using HSM 4-8
Using HSM
4.6 Controlling Other HSM Functions
4.5.1 Resolving Conflicting Operations on the Same File
If two users simultaneously enter conflicting commands on the same file, the action taken by
HSM is dependent upon the nature of the conflicting commands. A summary of the actions taken
by HSM is given in Table 4–3
.
Table 4–3 How HSM Resolves Conflicting Requests
WHEN the first request is
...
AND the next request is ...
THEN this operation is
canceled...
DELETE
PRESHELVE
PRESHELVE
DELETE
UNSHELVE
UNSHELVE
PRESHELVE
DELETE
PRESHELVE
PRESHELVE
PRESHELVE
SHELVE
UNSHELVE
PRESHELVE
PRESHELVE
SHELVE
DELETE
SHELVE
SHELVE
DELETE
PRESHELVE
SHELVE
PRESHELVE
SHELVE
SHELVE
UNSHELVE
SHELVE
UNSHELVE
UNSHELVE
UNSHELVE
DELETE
PRESHELVE
SHELVE
UNSHELVE
PRESHELVE
SHELVE
•
Unshelve means either an explicit UNSHELVE or a file fault.
•
Shelve means either an explicit SHELVE or a make space request.
4.6 Controlling Other HSM Functions
In addition to explicitly shelving and unshelving files, you can perform the following file management tasks:
•
Use the SET FILE/NOSHELVABLE to specify that a file be excluded from HSM shelving
and preshelving operations. The default is to have all files shelvable.
•
Use the SET PROCESS/NOAUTO_UNSHELVE to require that a file be unshelved through
an explicit UNSHELVE command only. Accessing a file from a process on which this condition is set will result in a message that you must explicitly unshelve the file. The default is
that all shelved files can be implicitly unshelved by HSM.
Check with your system manager to determine if the defaults have been changed for your installation.
Using HSM 4–9
5
Managing the HSM Environment
This chapter provides information on managing and maintaining your systems in an HSM environment. Storage administrators will find this information especially useful. This chapter is
divided into two main parts:
1.
2.
Normal system management operations that require some changes due to the presence of
HSM. It is important that these procedures be following to maintain correct system operation and data integrity in an HSM environment. Such operations include:
–
Dismounting disks
–
Copying shelved files
–
Renaming disks
–
Restoring files to another disk
System management operations that are required to support HSM. These operations include:
–
Protecting system files from shelving
–
DFS, NFS, and PATHWORKS access support
–
Ensuring data safety with HSM
–
Using backup strategies with HSM
–
Recovering lost user data
–
Disaster recovery
–
Maintaining shelving policies
–
Managing HSM catalogs
–
Repacking archives and shelf volumes
–
Replacing and creating archive classes
–
Replacing a lost or damaged shelf volume
–
Catalog analysis and repair
–
Consolidated backup with HSM
–
Determining cache usage
–
Maintaining file headers
–
Event logging
–
Activity logging
–
Converting from Basic mode to Plus mode
Managing the HSM Environment 5–1
Managing the HSM Environment
5.1 Dismounting Disks
5.1 Dismounting Disks
When HSM performs shelving operations on online disk volumes, it opens a file on each disk.
This file can remain open for extended periods of time. If you need to dismount a disk that supports HSM operations, you may need to disable the HSM operations before the dismount can
take place.
For normal online volumes that HSM has accessed, disable all HSM operations on the disk:
$ SMU SET VOLUME device_name /DISABLE=ALL
In addition, if the disk has been defined as an HSM cache device, delete the cache definition or
disable the cache:
$ SMU SET CACHE device_name/DELETE
Because the cache disk contains files necessary to support HSM, the disk cannot be dismounted
until all the cache files are flushed to the nearline/offline archive classes. Deleting the cache initiates a cache flush, which may take from minutes to hours to complete.
If you need to dismount the disk immediately for any reason (without initiating a cache flush),
you should disable the cache instead using the following command:
$ SMU SET CACHE cache_name /DISABLE
Note that if you dismount a cache disk, users will not be able to access shelved file data that
remains in the cache.
You should not dismount the disks referenced by the logical names HSM$CATALOG,
HSM$MANAGER, or HSM$LOG, otherwise you will seriously disrupt HSM operations. If this
is absolutely necessary, follow these procedures:
•
Shut down HSM
•
Define a new location for the appropriate logical names
•
Copy HSM$*.* from the old locations to the new locations
•
Start up HSM
If you need to dismount a disk containing a shelf catalog, you should move the catalog to another
disk using the SET SHELF command prior to dismounting the original disk. For example:
$ SMU SET SHELF shelf_name/CATALOG=new_location
Note that this operation may take tens of minutes to hours to complete. See Section 5.12 for
more details on this operation.
5.2 Copying Shelved Files
Very often, it is necessary to move a directory tree of files from one location to another, most
often to a new larger disk. If you use the normal OpenVMS facilities COPY or BACKUP to perform this operation, any shelved files in the source directory will be unshelved prior to copying
to the destination. While this is safe, it is usually undesirable because it forces the unshelving of
dormant data, which only becomes active due to the COPY or BACKUP being performed.
HSM provides a means to copy shelved files in the shelved state and update the HSM catalog to
the new locations. This is achieved by using the SMU COPY command, which accepts a full file
specification as input, and a disk/directory specification on output - files are not renamed.
If you are "moving" shelved files from one location to another on the same disk, the OpenVMS
RENAME command is recommended. SMU COPY should be used to copy shelved files to
another disk in the same HSM environment. If you are copying files to be taken to a different
Managing the HSM Environment 5-2
Managing the HSM Environment
5.3 Renaming Disks
system (outside of the current HSM environment), then COPY or BACKUP should be used to
unshelve the files prior to the copy.
The SMU COPY command implicitly uses the BACKUP utility which has different semantics to
the OpenVMS COPY command, especially when using wildcard directory trees. Therefore, you
should review the behavior of BACKUP wildcard operations when using this command. Specifically, the following are examples of correct operation:
$ SMU COPY DISK$USER1:[JONES...]*.*;* DISK$USER15:[JONES...]
$ SMU COPY DISK$PROD1:[ACCOUNTS...]*.*;* DISK$PRODARC:[ARCHIVE.ACCOUNTS...]
$ SMU COPY $1$DKA100:[000000...]*.*;* $15$DKA100:[*...]
The first example moves user JONES’ directory tree from one disk to another, preserving all
subdirectories from the input disk on the output disk.
The second example moves all files from DISK$PROD1:[ACCOUNTS...] and all subdirectories
to a new disk and new subdirectory structure, preserving all subdirectories from
DISK$PROD1:[ACCOUNTS] to DISK$PRODARC:[ARCHIVE.ACCOUNTS].
The third example moves all files from $1$DKA100: to $15$DKA100: preserving all subdirectories. Note, however, that the following syntax does not provide the expected results:
$ SMU COPY $1$DKA100:[000000...]*.*;* $15$DKA100:[000000...]
The above example flattens the (sub)directory structure in somewhat unpredictable ways, which
is usually not desired. Please avoid this form of the command.
Note also that SMU COPY will not preserve more than seven levels of subdirectory, which is a
restriction imposed by BACKUP.
Warning
Do not use HSM$BACKUP to copy shelved files from one disk to another. While this
might appear to work, the HSM catalog is not updated and the output files may not be
able to be unshelved. SMU COPY is the only supported mechanism to copy shelved
files from one location to another.
5.3 Renaming Disks
It is often necessary to rename disks on the system, and this has an impact on the ability of HSM
to process shelved files. There are two ways to rename disks from an HSM viewpoint:
•
Change a logical name pointing to a disk, but leaving the alldevnam alone. For example,
you may change the logical name pointing to $1$DKA100: from DISK$CURRENT_
ACCOUNTS to DISK$PAST_ACCOUNTS, but the actual contents of the disk as referred
to by its alldevnam does not change. For this kind of change, no HSM action is required,
since HSM stores catalog information using alldevnam.
•
Rename the alldevname of a disk in any way. For example, you might want to change the
allocation class of a disk from $2$DUA400: to $15$DUA400:, or change the physical unit
number of a disk.
If you perform the second type of rename you must:
•
Ensure that the SMU volume database for the old and new disk names refer to the same
HSM shelf. This is vital so that HSM can access the correct catalog for access. There are
three possible valid configurations:
–
Neither volume is defined in the SMU database, and by default use the shelf defined in
the default volume record
Managing the HSM Environment 5–3
Managing the HSM Environment
5.4 Restoring Files to a Different Disk
•
–
Both volumes are defined in the SMU database, and both are using the same shelf (not
necessarily the default shelf)
–
One of the volumes is defined in the SMU database, and this volume uses the same
shelf as defined in the default volume record
Run SMU ANALYZE/REPAIR on the newly-renamed disk. This creates catalog entries for
(pre)shelved files on the new disk.
Note
Please note that failure to assign the same shelf for the old and new disks and/or failure
to run SMU ANALYZE/REPAIR after the name change may result in the inability
to unshelve files.
5.4 Restoring Files to a Different Disk
Very often after a disk failure, or other reason, it is desirable to restore files from a backup copy
to a different disk than the one from which the backup was originally taken. If the backup copy
contains shelved and preshelved files, such a restore will create a discrepancy between the online
location of the files, and the location stored in the HSM catalogs.
As such, it is necessary to perform the same recovery operations as for renaming disks, namely:
•
Ensure the new disk name is served by the same shelf as the original disk
•
Restore the files
•
Run SMU ANALYZE/REPAIR to correct the HSM catalog information for the new disk
See Section 5.3 for complete details.
5.5 Protecting System Files from Shelving
There are certain critical files that you must not delete or shelve if you are using HSM. These
files include:
•
Critical HSM product files
•
OpenVMS operating system files on the system disk
•
Other files that HSM will not shelve
Considerations regarding the handling of these files are discussed in this section.
5.5.1 Critical HSM Product Files
The HSM product files listed in Table 5-1 must not be deleted or shelved. During installation,
these files are protected from deletion and marked /NOSHELVABLE, but care must be taken to
prevent inadvertent deletion or shelving.
HP strongly recommends that the disks on which these files reside be shadowed and backed up
on a regular basis (both image and incremental).1
Managing the HSM Environment 5-4
Managing the HSM Environment
5.5 Protecting System Files from Shelving
Table 5–1 Critical HSM Files
Files
Remarks
HSM$CATALOG:*.*;*
Required HSM default catalog file.
HSM$MANAGER:*.*;*
Required HSM database files.
[000000]HSM$UID.SYS
Contains the volume UID structure. Note that
HSM$UID.SYS is not created until the first use of HSM
after installation. There will be an HSM$UID.SYS file on
each volume that has HSM operations enabled.
Any shelf catalog
Defined in the shelf structure
Shelf Catalogs
The HSM shelf catalogs contain the information needed to locate and unshelve all files that have
been shelved. The catalog locations are defined in the SMU SHELF database. It is recommended
that all catalog names begin with "HSM$" to preclude any possibility that they could be shelved.
If a shelf catalog suffers an unrecoverable loss, access to the associated shelved file data can also
be lost. For this reason, the shelf catalogs are an essential part of the HSM environment.
You must protect the shelf catalogs from loss or corruption by using one or more of the following procedures:
•
Backing up the catalogs on a regular basis; daily backups are recommended
•
Shadowing the disk(s) containing the catalogs
•
For additional protection, periodically copying the catalog files to different file names and
locations
Recovering Critical Files
If any or all of the critical HSM product files are deleted, they should be restored from the latest
backup sets as soon as possible. HSM should be shut down during the restore process.
Data shelved since the last backup may be lost.
5.5.2 OpenVMS System Files and System Disks
HP recommends that shelving be disabled on system disks. If shelving is allowed on system
disks, critical files may be shelved when a policy is triggered. Serious performance degradation
or a deadlock during boot operations may result when these files are accessed. You can disable
shelving on system disks with the following command:
SMU> SET VOLUME/DISABLE=ALL SYS$SYSDEVICE:
If shelving is allowed on system disks, care should be taken to avoid shelving system-critical
files by using SET FILE/NOSHELVABLE for each system file. The HSM installation process
will perform this operation on OpenVMS system files but not on layered product files. Certain
files on the system disk have the /NOSHELVABLE flag set by default. These flags should not
be reset.
Managing the HSM Environment 5–5
Managing the HSM Environment
5.6 DFS, NFS and PATHWORKS Access Support
5.5.3 Files Not Shelved
HSM does not shelve or preshelve the following files:
•
Directory files
•
Open files
•
Deleted and corrupted files
•
Empty files
•
Files whose names begin with HSM$
•
Files with defined logical block placements (optional)
•
Files marked by the SET FILE /NOMOVE command
•
Files marked by the SET FILE /NOSHELVABLE command
•
Files on volumes marked by the SMU SET VOLUME volume_name/DISABLE=SHELVE
command
•
Contiguous files (optional, see Section 5.7.2)
•
Files that are larger than 45 percent of the total online volume capacity
5.6 DFS, NFS and PATHWORKS Access Support
HSM Version 3.0A supports access to shelved files from client systems where access is through
DFS, NFS and PATHWORKS. At installation, HSM sets up such access by default. However,
you may want to review this access and change it as needed, because it can potentially affect all
accesses.
5.6.1 DFS Access
File faulting (and therefore file events) work as expected, with the exception of Ctrl/Y. Typing
Ctrl/Y during a file fault has no effect. The client process waits until the file fault completes and
the file fault is not canceled.
In addition, with DFS one can determine the shelved state of a file just as if the disk were local
(i.e. DIRECTORY /SHELVED and DIRECTORY/SELECT both work correctly).
The SHELVE and UNSHELVE commands do not work on files on DFS-served devices. The
commands do work on the cluster that has local access to the devices, however.
5.6.2 NFS Access
The normal default faulting mechanism (fault on data access), does not work for NFS-served
files. The behavior is as if the file is a zero-block sequential file. Performing "cat", for example,
(or similar commands) results in no output.
However, at installation time, HSM Version 3.0A enables such access by defining a logical
name that causes file faults on an OPEN of a file by the NFS server process. By default, the following logical name is defined:
$ DEFINE/SYSTEM HSM$FAULT_ON_OPEN "NFS$SERVER"
This definition supports access to NFS-served files upon an OPEN of a file. If you do not want
NFS access to shelved files, simply de-assign the logical name as follows:
$ DEASSIGN/SYSTEM HSM$FAULT_ON_OPEN
For a permanent change, this command should be placed in:
SYS$STARTUP:HSM$LOGICALS.COM
Managing the HSM Environment 5-6
Managing the HSM Environment
5.6 DFS, NFS and PATHWORKS Access Support
For NFS-served files, file events (device full and user quota exceeded) occur normally with the
triggering process being the NFS$SERVER process. The quota exceeded event occurs normally
because any files extended by the client are charged to the client’s proxy not NFS$SERVER.
If the new logical is defined for the NFS$SERVER, the fault will occur on OPEN and will
appear transparent to the client, with the possible exception of messages as follows:
% cat /usr/bubble/shelve_test.txt.2
NFS2 server bubble not responding still trying
NFS2 server bubble ok
The first message appears when the open doesn’t complete immediately. The second message
(ok) occurs when the open completes. The file contents, in the above example, are then displayed.
Typing Ctrl/C during the file fault returns the user to the shell. Since the NFS server does not
issue an IO$_CANCEL against the faulting I/O, the file fault is not canceled and the file will be
unshelved eventually.
It is not possible to determine whether a given file is shelved from the NFS client. Further, like
DFS devices, the SHELVE and UNSHELVE commands are not available to NFS clients.
5.6.3 PATHWORKS
Normal attempts to access a shelved file from a PATHWORKS client initiate a file fault on the
server node. If the file is unshelved quickly enough (e.g. from cache), the user sees only the
delay in accessing the file. If the unshelve is not quick enough, an application-defined timeout
may occur and a message window pops up indicating the served disk is not responding. The timeout value depends on the application. No retry is attempted. However, this behavior can be
modified by changing HSM’s behavior to a file open by returning a file access conflict error,
upon which most PC applications retry (or allow the user to retry) the operation after a delay.
After a few retries, the file fault will succeed and the file can be accessed normally. To enable
PATHWORKS access to shelved files using the retry mechanism, HSM defines the following
logical name on installation:
$ DEFINE/SYSTEM HSM$FAULT_AFTER_OPEN "PCFS_SERVER, PWRK$LMSRV"
This definition supports access to PATHWORKS files upon an OPEN of a file. If you do not
want PATHWORKS to access shelved files via retries, simply de-assign the logical name as follows:
$ DEASSIGN/SYSTEM HSM$FAULT_AFTER_OPEN
For a permanent change, this command should be placed in:
SYS$STARTUP:HSM$LOGICALS.COM
The decision on which access method to use depends upon the typical response time to access
shelved files in your environment.
If the logical name is defined, HSM imposes a 3-second delay in responding to the OPEN
request for PATHWORKS accesses only. During this time, the file may be unshelved: otherwise, a "background" unshelve is initiated which will result in a successful open after a delay
and retries.
At this point, the file fault on the server node is under way and cannot be canceled.
The affect of the access on the PC environment varies according to the PC operating system. For
windows 3.1 and DOS, the computer waits until the file is unshelved. For Windows NT and
Windows-95, only the windows application itself waits.
Managing the HSM Environment 5–7
Managing the HSM Environment
5.7 Ensuring Data Safety with HSM
File events (device full and user quota exceeded) occur normally with the triggering process
being the PATHWORKS server process. The quota exceeded event occurs normally because
any files extended by the client are charged to the client’s proxy not the PATHWORKS server.
It is not possible from a PATHWORKS client to determine whether a file is shelved. In addition,
there is no way to shelve or unshelve files explicitly (via shelve or unshelve commands). There
is also no way to cancel a file fault once it has been initiated.
Most PC applications are designed to handle "file sharing" conflicts. Thus, when HSM detects
the PATHWORKS server has made an access request, it can initiate unshelving action, but
return "file busy". The typical PC application will continue to retry the original open, or prompt
the user to retry or cancel. Once the file is unshelved, the next OPEN succeeds without shelving
interaction.
5.6.4 Logical Names for NFS and PATHWORKS Access
As just discussed, HSM supports two logical names that alter the behavior of opening a shelved
file for NFS and PATHWORKS access support. These are:
•
HSM$FAULT_ON_OPEN - This logical name forces a file fault on an Open of a file for the
processes listed in the equivalence name, and the open waits until the file fault is complete. Designed for use with the NFS server.
•
HSM$FAULT_AFTER_OPEN - This logical name forces a deferred file fault on the file
when it is opened. If the fault completes within three seconds, the open completes successfully, otherwise it fails with "file busy", but initiates a "background" file fault. Repeated
attempts to open the file will eventually succeed. Designed for use with the PATHWORKS server.
The default behavior is to perform no file fault on Open; rather the file fault occurs upon a read
or write to the file.
Each logical name can take a list of process names to alter the behavior of file faults on open. For
example:
$ DEFINE/SYSTEM HSM$FAULT_ON_OPEN "NFS$SERVER, USER_SERVER, SMITH"
The HSM$FAULT_ON_OPEN can also be assigned to "HSM$ALL", which will cause a file
fault on open for all processes. This option is not allowed for HSM$FAULT_AFTER_OPEN.
As these logicals are defined to allow NFS and PATHWORKS access, they are not recommended for use with other processes, since they will cause many more file faults than are actually needed in a normal OpenVMS environment. When used, the logicals must be system-wide,
and should be defined identically on all nodes in the VMScluster environment.
These logical name assignments or lack thereof take effect immediately without the need to
restart HSM.
5.7 Ensuring Data Safety with HSM
This section explains specific considerations about keeping shelved data safe.
5.7.1 Access Control Lists for Shelved Files
Access control lists (ACLs) for shelved files should not be deleted. In particular, the following
commands should not be entered for shelved or preshelved files:
$ SET ACL /DELETE=ALL
$ SET FILE /ACL /DELETE=ALL
Managing the HSM Environment 5-8
Managing the HSM Environment
5.8 Using Backup Strategies with HSM
If the ACLs for shelved files are deleted, data is usually recovered automatically because a full
catalog scan is performed. This causes a degradation of HSM performance. If the catalog scan
fails, the data usually can be recovered manually using the SMU LOCATE command.
You may modify or delete ACE entries not used by HSM, for example, file protection ACEs.
5.7.2 Handling Contiguous and Placed Files
By default, HSM does not shelve files marked contiguous, files that must occupy sequential
blocks of disk space. If these files are shelved, HSM will not unshelve them to noncontiguous
disk space. If HSM cannot unshelve the file to contiguous space, it aborts the operation and displays an error message. When this happens, defragment the disk to restore contiguous space and
retry the operation.
Placed files are files that are placed on specific blocks of disk space by an application. By
default, HSM shelves these files, but does not necessarily unshelve placed files to their original
location on the disk volume.
Usually, this change is not critical to the operation of an application. If a problem arises with a
placed file after unshelving, the file should be set to NOSHELVABLE, or you can use the SMU
SET VOLUME/NOPLACEMENT command to cause these files to not be shelved for a specified volume.
5.8 Using Backup Strategies with HSM
This section explains backup strategies you may want to use to protect data shelved through
HSM. There are several areas of concern:
•
Backing up critical HSM files
•
Backing up data shelved through HSM
•
Backing up information stored in an online cache
5.8.1 Backing up Critical HSM Files
As explained in Section 5.5.1, HSM requires certain files to operate. To facilitate HSM recovery
in the event a disaster occurs, HP strongly recommends you backup these critical files using one
of the methods described in this section. This is a preventive situation; if you do not use one of
these methods to backup the critical files, you may not be able to easily recover shelved data
after a disaster.
5.8.1.1
Defining a Backup Strategy
If you already have a backup strategy designed and implemented on your system for the volume
on that the critical HSM project files reside, then these files will be backed up as part of that
implementation.
If, however, you do not have an existing strategy defined, you will need to define one. You need
to consider the following things:
5.8.1.2
•
What data needs to be saved
•
How often does that data need to be saved
•
Where does the data need to be stored when saved
Using OpenVMS BACKUP to Save the Files
The OpenVMS BACKUP utility provides two major methods of backing up your files: image
backup (also called full backup) and incremental backup. The image backup saves all files on a
disk into a save set. The incremental backup saves only those files that have been created or
modified since the last image or incremental backup.
Managing the HSM Environment 5–9
Managing the HSM Environment
5.8 Using Backup Strategies with HSM
5.8.1.3
Maintaining a Manual Copy of the Files
If you do not want to use a general backup strategy or product to back up your critical HSM files
or if you just want an additional way to ensure they are safe, you can always create manual copies of the files. Just use the OpenVMS COPY command to copy the files to another location,
probably on another disk. If you do this, HP recommends you develop an automated procedure
to do this on a regular basis.
5.8.2 Backing Up Shelved Data
Once data is shelved, there are several mechanisms you can use to ensure there is a backup copy
of that data:
5.8.2.1
•
Use multiple archive classes for each shelf
•
Move archive classes to offsite locations
•
Use OpenVMS BACKUP to back up the shelved file headers for disaster recovery purposes
(image backup only)
Considerations for OpenVMS BACKUP and Shelving
If you want to use OpenVMS BACKUP to maintain backup copies of your shelved data, there
are some specific issues you need to consider.
Image Backups
HSM can reduce the amount of space needed on your image backups, and the time required to do
them. When doing image backups under HSM, only the file headers of shelved files are backed
up. The data itself remains shelved.
Incremental Backups
Files modified since the last backup are backed up as a part of the incremental process unless
specifically excluded. If a modified file is shelved before the next incremental backup, it is
unshelved for the incremental backup.
To avoid the delay caused by retrieving file contents needlessly during an incremental backup,
you should do incremental backups at a shorter interval than specified by HSM policy. This
causes the files to be backed up before being shelved, thereby avoiding the unshelving delay.
When planning your image backups, remember that only the file headers are backed up. If you
have shelved a file that has been modified or created since the last incremental backup, its data is
not backed up. This can be avoided by keeping the files online for at least one incremental
backup.
When an otherwise unmodified file is shelved, it is not unshelved and backed up again during
the next incremental backup because its revision date is not changed by the shelve operation.
This precludes unnecessarily long incremental backup times when infrequently used files are
shelved.
5.8.2.2
Using Multiple HSM Archive Classes for Backup
Safety of shelved data is ensured by establishing multiple archive classes per shelf. Through the
multiple archive classes, duplicate copies of your data are automatically made when files are
shelved. HP recommends that one or more of these copies be stored in the same place as your
system backups, perhaps in a remote location and preferably in a vault.
Managing the HSM Environment 5-10
Managing the HSM Environment
5.9 Finding Lost User Data
5.8.2.3
Storing HSM Archive Classes Offsite
The SMU CHECKPOINT command allows you to dismount the current tape used for shelving
that is associated with a specific archive class. In this way, copies can be removed from the system and separately stored for disaster recovery purposes. The next shelve operation for the
archive class will be applied to the next tape volume for the archive class.
5.8.3 Backing Up Data Stored in an Online Cache
Because an online cache is part of online storage, it is backed up as part of your defined backup
strategy. If, however, you use the online cache as a staging area to a shelf, there are some additional considerations for ensuring the information in the cache is backed up.
5.8.3.1
Flushing the Cache
When you "flush" the cache, data that was stored in the cache is copied to the specified nearline
or offline device. Once the copy is complete, the data in the cache is deleted. As a result, you
need to ensure that the data is backed up while in the cache or is flushed to multiple archive
classes for shelf storage.
5.9 Finding Lost User Data
There are two particular areas in which HSM can be used to recover lost user data:
•
Access to shelved data has been lost
•
An online file header has been deleted
In each of these instances, if you have defined multiple archive classes for HSM, you should be
able to retrieve the data automatically from one of the defined archive classes. In other instances,
such as when the online file has been deleted, you may need to use SMU LOCATE to find the
shelved file data.
Using SMU LOCATE
The SMU LOCATE command retrieves full information about a file’s data locations from the
shelving catalog. SMU LOCATE reads the HSM catalog(s) directly to find a shelved file’s data
locations.
You should note that SMU LOCATE does not work quite the same way as a typical OpenVMS
utility when it comes to look-up and wildcard processing. The file-descriptor you supply as input
(including any wildcards) applies to the file as stored in the HSM catalog at the time of shelving.
Thus, for example:
•
You may locate a shelved file by name, even if it has been deleted from the online system,
unless the file was shelved to a cache defined with /NOHOLD.
•
If the file has been renamed on the online system, you should use the old name (current at
the time of shelving) to locate it.
•
You also can identify a file by file identifier (FID), which together with a device name,
uniquely identify a file, regardless of any renaming that may have been done after shelving.
•
If you do not specify a device and/or directory
default of *:[000000...]*.*;*.
in the SMU LOCATE command, it uses a
When you retrieve information using SMU LOCATE, several instances or groups of stored locations may be displayed. These reflect the locations of the file when it was shelved at various
stages of its life. You should carefully review the shelving time and revision time of the file to
determine which, if any, is the appropriate copy to restore.
Managing the HSM Environment 5–11
Managing the HSM Environment
5.10 Disaster Recovery
Recovering Data from a Lost Shelved File
Although HSM tries to restore data from all known locations automatically, even when some of
the file’s metadata is missing, there may be occasions when this fails. In these situations, you
should use SMU LOCATE to locate the file’s data, then attempt to restore the data through
BACKUP (from tape) or COPY (from cache).
If the user is certain file data was shelved, but is unable to simply retrieve that data through
either an implicit or explicit unshelving operation, use the following procedure to find and
retrieve the missing data:
1.
Use SMU LOCATE to search the shelving catalog for the location of the shelved data.
2.
Try to unshelve the data, perhaps using UNSHELVE /OVERRIDE.
3.
If this fails, use BACKUP to restore the data from nearline or offline media or use the
COPY command to restore the data from an online cache.
5.10 Disaster Recovery
HSM provides tools that allow you to prevent loss of HSM data. This section describes various
ways you can use these tools.
5.10.1 Recovering Data Shelved Through HSM
If you have a site disaster in which your onsite data is unavailable, you may be able to recover
that data from BACKUP files and tapes dismounted using the SMU CHECKPOINT command.
Once onsite, the following sequence is recommended:
1.
Using the OpenVMS BACKUP utility, restore your files from the most recent image
backup.
2.
Then, also using the OpenVMS BACKUP utility, restore any since that image backup.
3.
For any additional data you shelved and moved offsite through SMU CHECKPOINT, use
the media with your archive classes from the offsite storage location as your shelf media.
4.
Finally, in case another disaster occurs, you should recreate the offsite archive class, or
selected volumes, by using SMU REPACK and the /FROM_ARCHIVE qualifier. This
allows you to either keep the formerly offsite volume onsite and take the new volumes offsite, or keep the new volumes onsite and remove the original offsite volumes back offsite.
Alternatively, you could use the SHELVE/SELECT=NOONLINE command to reshelve
files, although this is much slower.
5.10.2 Recovering Critical HSM Files
If you lose any of the following HSM data, you must recover it before HSM will function correctly:
•
HSM database
•
HSM catalogs
•
HSM$UID files
Managing the HSM Environment 5-12
Managing the HSM Environment
5.11 Maintaining Shelving Policies
Recovering Critical Files
If any or all of the critical HSM product files are deleted and you have backed up this information through a mechanism such as the OpenVMS BACKUP utility, you should restore them
from the latest backup sets (including incremental backups) as soon as possible. Then, you
should restart HSM.
Note
You may lose data shelved since the last image (or incremental) backup.
Recovering the HSM Database
Although you could reinstall the HSM database from your installation kit, this procedure would
lose all the current information in your HSM database. Because this is policy data, you can recreate it easily.
Recovering the HSM Catalogs
The HSM catalogs are essential to recovering shelved data. If you do not use BACKUP to create
a backup of the catalogs, you could backup the catalogs by making copies of the catalog files and
storing them in a safe location. Then, once you have restored any other pieces of the HSM system, you can copy the catalog files back over into the proper locations for HSM to use it. These
locations are defined by the logical name HSM$CATALOG for the default catalog, and the locations specified in the SMU SHELF database for other shelf catalogs.
Recovering the HSM$UID File
If you do not have a backup copy of the HSM$UID file, HSM will create a new one with a different UID. If you then attempt to unshelve files, you may see an error message. To correct this
problem, use UNSHELVE/OVERRIDE to override the UID conflict.
5.10.3 Recovering Boot-Up Files
If you inadvertently shelved your boot-up files, you can only recover them if you have an alternate system disk you can use to boot the system and then unshelve the files.
5.10.4 Reshelving an Archive Class
The most efficient way to recover an archive class is to use the SMU REPACK command, and
specify a /FROM_ARCHIVE and one or more volumes with the /VOLUME qualifier. This command uses the /FROM_ARCHIVE to retrieve shelved data and copy it to the archive class containing the lost shelf media. See Section 5.15 for more details.
An alternative but much slower way to reclaim lost shelf media is to reshelve files. Use the following command:
$ SHELVE/SELECT=NOONLINE
This variation of the SHELVE command shelves only data whose status is SHELVED, not
ONLINE. It transparently unshelves the data from its current archive class and reshelves the data
to any new archive classes. Data in an archive class is reshelved also if the online ACL is
deleted.
5.11 Maintaining Shelving Policies
This section explains how to evaluate your policy definitions with respect to the HSM policy
model. Understanding this model will help you define the most effective policies for your environment.
Managing the HSM Environment 5–13
Managing the HSM Environment
5.11 Maintaining Shelving Policies
5.11.1 The HSM Policy Model
This section presents a model-related concepts-that explains how shelving works. Understanding
the model will help you define and manage an effective shelving policy.
By implementing HSM, you can maintain a reasonable amount of available online storage
capacity, and reduce the cost of storing large amounts of data.
Your particular disk configurations and their usage dictate specific values to consider when you
create the various definitions. The policies you implement with HSM determine how you meet
your storage management needs.
5.11.1.1 Concepts of HSM Policy
To apply these concepts, first think of each of your online disk volumes in terms of its total
online storage capacity. Then, consider how much space should always remain available.
The central element of policy is the latitude of available online storage capacity you maintain.
,,
,,
,,
,
Figure 5-1 shows the HSM policy model. Table 5-2 provides definitions for each of the concepts
shown in the figure.
Figure 5–1
ONLINE STORAGE CAPACITY
HIGH WATER MARK
CAPACITY
LATITUDE
LOW WATER MARK
Legend
= Unused Capacity
= Total Available
Capacity Within
Capacity Latitude
= Used Storage
Capacity
CXO-4095A-MC
.
Table 5–2 HSM Policy Model Concept Definitions
Concepts
Definitions
Maximum capacity
The total online storage capacity you are allowed to occupy on an online disk
volume. This is a threshold for reactive shelving determined by the capacity
of the online disk volume.
High water
A value you define to automatically trigger mark the shelving process. This
is a threshold for reactive shelving that you determine.
Low water
The shelving goal expressed in terms of a mark percentage of disk capacity.
Managing the HSM Environment 5-14
Managing the HSM Environment
5.11 Maintaining Shelving Policies
Table 5–2 HSM Policy Model Concept Definitions
Concepts
Definitions
Capacity latitude
The capacity latitude is the range you create, monitor, and manage to make
sure you are efficiently using your online storage resources. Adjusting the
limits of this latitude determines the operating efficiency of your system.
5.11.1.2 Policy Governs the Shelving Process
The policies you implement by creating and modifying the various HSM definitions govern the
shelving process. This example of reactive policy shows you how the HSM system reacts to a
high water mark event, returning the available capacity to the low water mark.
Figure 5-2 shows the policy model in the stages of the shelving process. Table 5-3 lists the stages
of the shelving process as they occur in response to reactive policy
,,
,
,,
,
,,
,,
,
,,
,
Figure 5–2
1. SYSTEM IN USE
2. USED CAPACITY
EXCEEDS HIGH
WATER MARK
3. AVAILABLE
CAPACITY
INCREASED
HIGH WATER MARK
LOW WATER MARK
Legend
= Unused Capacity
= Total Available
Capacity Within
Capacity Latitude
= Available Storage
Capacity Below
Low Water Mark
= Used Storage
Capacity
CXO-4094A-MC
Managing the HSM Environment 5–15
Managing the HSM Environment
5.11 Maintaining Shelving Policies
.
Table 5–3 Process for Shelving to Reactive Policy
Stage
Event
1
The system is in use. Online storage capacity is within the limits that define the capacity
latitude.
Implications:
When the amount of online storage capacity lies within the capacity latitude, it implies
the following:
2
3
•
The files on the disk are frequently accessed, meeting the demands of their
applications and users for immediate access.
•
Enough space is available to accommodate new files or extensions to files
on the disk volume.
•
Enough space is available to accommodate unshelved files if they need to
be accessed.
•
Average access latency is acceptable for the users and applications whose
files are shelved from the disk volume
Used storage capacity exceeds the defined high water mark. This condition is caused by a
user or application requiring more capacity than is allowed by definition on the online
disk volume. Any of the following require more online storage:
•
Creating a new file
•
Extending an existing file
•
Unshelving a file
Available capacity increases in response to the event. HSM automatically moves those
files meeting the selection criteria in the policy definition to shelf storage.
Implications:
Having completed the shelving process implies the following:
•
The likelihood that shelved files will be accessed soon is small because the
use and access patterns were matched to the file selection criteria.
•
Adequate disk space has been made available to satisfy additional requests
for storage for an acceptable of time.
5.11.1.3 The Balance to Achieve When Implementing Policy
An effective HSM policy balances these two conditions:
•
Maintaining an adequate amount of available online storage space
•
Achieving adequate overall system response time by shelving files that are least likely to be
accessed
5.11.2 HSM Policy Situations and Resolutions
The model described in Section 5.11.1 has practical application. This section demonstrates how
the model can be applied to help monitor the effectiveness of policy in various situations.
5.11.2.1 Situation : Volume Occupancy Full Event
One of the benefits of HSM is the ability to implement a preventive policy that helps avoid volume occupancy full events. Figure 5-3 shows the policy model as it applies during a volume
occupancy full event.
Managing the HSM Environment 5-16
Managing the HSM Environment
5.11 Maintaining Shelving Policies
,,
,
,,
,,
,
,,
,,
,
,,
Figure 5–3
1. SYSTEM IN USE
2. VOLUME FULL
EVENT
3. AVAILABLE
CAPACITY
INCREASED
HIGH WATER MARK
LOW WATER MARK
Legend
= Unused Capacity
= Total Available
Capacity Within
Capacity Latitude
= Available Storage
Capacity Below
Low Water Mark
= Used Storage
Capacity
CXO-4096A-MC
Resolution
If volume occupancy full events occur while your preventive policy is in effect, you can do
either or both of the following actions to avoid them:
•
Decrease the high water mark
•
Increase the frequency of scheduled policy
5.11.2.2 Situation : Shelving Goal Not Reached
The goal is an important part of policy as it is the result of the shelving process controlled
through file selection criteria in the policy definition. Figure 5-4 shows the policy model when a
shelving policy fails to reach its defined goal.
Managing the HSM Environment 5–17
Managing the HSM Environment
5.11 Maintaining Shelving Policies
Figure 5–4
,
,,
,,
,,
,
,,
1. SYSTEM IN USE
2. HIGH WATER
MARK EXCEEDED
3. SHELVING GOAL
(LOW WATER MARK)
NOT REACHED
HIGH WATER MARK
LOW WATER MARK
Legend
= Unused Capacity
= Total Available
Capacity Within
Capacity Latitude
= Available Storage
Capacity Below
Low Water Mark
= Used Storage
Capacity
CXO-4099A-MC
Resolution
If shelving operations fail to reclaim the defined capacity, you can do either or both of the following actions to make sure your shelving goal is reached:
•
Change the file selection criteria to include more files
•
Increase the low water mark value
5.11.2.3 Situation : Frequent Reactive Shelving Requests
Your reactive policy should be planned and implemented as a contingency. As such, shelving in
response to reactive policy should occur infrequently. The policy model in Figure 5-5 shows the
policy that creates frequent requests for reactive policy.
Managing the HSM Environment 5-18
Managing the HSM Environment
5.11 Maintaining Shelving Policies
Figure 5–5
,,,
,,
,,
,
,,
1. SYSTEM IN USE
2. USED CAPACITY
EXCEEDS HIGH
WATER MARK
3. AVAILABLE
CAPACITY
INCREASED
HIGH WATER MARK
LOW WATER MARK
Legend
= Unused Capacity
= Total Available
Capacity Within
Capacity Latitude
= Available Storage
Capacity Below
Low Water Mark
= Used Storage
Capacity
CXO-4100A-MC
Resolution
If your system experiences frequent reactive shelving requests, you can take the following
actions:
WHEN the Trigger Is . . .
THEN You Should . ..
High water mark reached
Increase the high water mark value, decrease the
low water mark value or both.
User disk quota exceeded
Decrease the low water mark.
5.11.2.4 Situation : Application and User Performance Impeded
With HSM, you design and implement policy that allows you to maintain available online capacity and retain data on less expensive media. The trade-off with implementing HSM is that when
shelved files are needed, applications and users trying to access them must wait until the files are
restored. Figure 5-6 shows the policy model in a situation when available storage is maintained
at the expense of application and user performance.
Managing the HSM Environment 5–19
Managing the HSM Environment
5.11 Maintaining Shelving Policies
Figure 5–6
,
,,
,
,,
1. SYSTEM IN USE
2. USED CAPACITY
EXCEEDS HIGH
WATER MARK
3. AVAILABLE
CAPACITY
INCREASED
HIGH WATER MARK
LOW WATER MARK
Legend
= Unused Capacity
= Total Available
Capacity Within
Capacity Latitude
= Available Storage
Capacity Below
Low Water Mark
= Used Storage
Capacity
CXO-4098A-MC
Resolution
If your applications or users experience delays in their work, or if productivity drops because
files must frequently be unshelved to be accessed, you can do any or all of the following actions:
•
Implement online cache
•
Increase the high water mark value
•
Increase the low water mark value
5.11.3 Ranking Policy Execution
HSM provides the means to determine what a policy execution would do before the policy is
run. This process is called ranking a policy on a volume, and is initiated by the SMU RANK
command.
This feature helps you determine the effectiveness of your policies by letting you see exactly
what files would be shelved if the policy were run. The files are listed in the order that they
would be shelved. Ranking applies only to policies that use the automatic algorithms STWS and
LRU. HSM cannot rank policies based on user script files.
HP recommends that you rank all your policies before putting them into a production environment.
Managing the HSM Environment 5-20
Managing the HSM Environment
5.12 Managing HSM Catalogs
The following example shows how to rank a policy:
$ SMU RANK DISK$USER1: HSM$DEFAULT_OCCUPANCY
Policy HSM$DEFAULT_OCCUPANCY is enabled for shelving
Policy History:
Created: 28-OCT-1999 10:36:36.45
Revised: 28-OCT-1999 11:26:21.09
Selection Criteria:
State:
Enabled
Action:
Shelving
File Event:
Expiration date
Elapsed time:
180 00:00:00
Before time:
<none>
Since time:
<none>
Low Water Mark:
80 %
Primary Policy:
Space Time Working Set(STWS)
Secondary Policy:
Least Recently Used(LRU)
Verification:
Mail notification: <none>
Output file:
<none>
Volume capacity:
2271640 blocks
Current utilization:
1818245 blocks
Volume lowwater mark:
1817312 blocks
Blocks to be reclaimed:
933
Executing primary policy definition
DISK$USER1:[SMITH]WATCH_BATCH.COM;5
date: 28-OCT-1999 size: 462
DISK$USER1:[SMITH]LOCAL_DB.COM;1
date: 28-OCT-1999 size: 279
DISK$USER1:[SMITH]PERSONAL.LGP;1
DISK$USER1:[SMITH]REMOTE.MEM;1
date: 28-OCT-1999 size: 57
Total of 4 files ranked which will recover 951 blocks
Volume lowwater mark can be reached
5.12 Managing HSM Catalogs
When you install HSM for the first time, all HSM shelving data is placed in the default catalog,
located at:
HSM$CATALOG:HSM$CATALOG.SYS
As the amount of shelving information increases over time, HP recommends that you define
multiple shelves, distribute your disk volumes amongst these shelves, and define a separate catalog for each shelf. HP recommends that a shelf be associated with between 10 and 50 volumes
each, depending on the size of the volumes and the amount of shelving activity on those volumes.
After analyzing your storage subsystem and coming up with a distribution plan for volumes and
shelves, the following commands can be used to implement this distribution, for example:
$!
$! Define new shelves with separate catalogs
$!
$ SMU SET SHELF PRODUCTION_SHELF1 _$ / CATALOG=DISK$SYSTEM2:[HSM.CATALOG]HSM$PRODUCTION_SHELF1_CAT.SYS
$ SMU SET SHELF PRODUCTION_SHELF2 _$ / CATALOG=DISK$SYSTEM2:[HSM.CATALOG]HSM$PRODUCTION_SHELF2_CAT.SYS
$!
$! Re-associate volumes to the new shelves
$!
$ SMU SET VOLUME DISK$USER1:/SHELF=PRODUCTION_SHELF1
$ SMU SET VOLUME DISK$USER2:/SHELF=PRODUCTION_SHELF1
$ .
.
.
.
.
.
.
$ .
.
.
.
.
.
.
$ SMU SET VOLUME DISK$USER20:/SHELF=PRODUCTION_SHELF2
$ SMU SET VOLUME DISK$USER21:/SHELF=PRODUCTION_SHELF2
$
Managing the HSM Environment 5–21
Managing the HSM Environment
5.12 Managing HSM Catalogs
It is recommended that the catalog file names are preceded by "HSM$" to eliminate any possibility that they might be shelved: shelving a catalog file is not supported and can lead to serious
problems.
These are the only commands you need to enter to distribute your volumes among shelves, and
to populate the catalogs.
When you enter these commands, HSM begins a process called split-merge, which moves shelving data from the old catalog to the new catalog for a volume. A split-merge operation can be initiated by either command.
Since potentially thousands of catalog entries are affected by a spit-merge, the process can take
several minutes or even hours to complete. During this time, the associated volume and/or shelf
is associated with two catalogs - the old and the new. These can be seen by issuing an SMU
SHOW VOLUME or SMU SHOW SHELF during a split-merge, which have special displays as
shown in the examples below:
$!
$! SMU displays when changing a shelf for a volume:
$!
$ SMU SHOW VOLUME _$15$DKA300:/FULL
Volume _$15$DKA300: on Shelf HSM$DEFAULT_SHELF, Shelving is enabled,
Unshelving is enabled, Highwater mark detection is disabled, Occupancy full detection is disabled, Disk quota exceeded detection is disabled
Created:
8-FEB-1998 15:57:54.32
Revised:
8-FEB-19986 15:58:28.44
Ineligible files:
<contiguous>
Highwater mark:
90%
OCCUPANCY Policy:
HSM$DEFAULT_OCCUPANCY
QUOTA Policy:
HSM$DEFAULT_QUOTA
Split/Merge state: COPY
Alternate shelf:
PRODUCTION_SHELF1
$!
$! SMU displays when changing a catalog for a shelf:
$!
$ SMU SHOW SHELF
Shelf TEST_SHELF1 is enabled for Shelving and Unshelving
Catalog File:
DISK$USER1:[HSM.CATALOG]HSM$CAT1.SYS
Shelf History:
Created:
1-DEC-1998 11:44:46.26
Revised:
28-DEC-1998 15:22:00.91
Backup Verification: Off
Save Time:
<none>
Updates Saved:
All
Archive Classes:
Archive list:
HSM$ARCHIVE01
id: 1
Restore list:
HSM$ARCHIVE01
id: 1
Split/Merge state:
COPY
Alternate Catalog:
DISK$USER1:[HSM.CATALOG]HSM$CAT2.SYS
You may notice that the catalogs change positions during the split-merge between While a splitmerge is in progress, certain HSM operations may proceed normally, some HSM operations are
suspended, while certain others are rejected. Suspending an operation means that the operation is
queued until the split-merge is completed, while rejection means that the command must be reentered at a later time. The following table indicates the disposition of requests during a splitmerge:
Managing the HSM Environment 5-22
Managing the HSM Environment
5.13 Repacking Archive Classes
Table 5–4 HSM Request Disposition During a Split-Merge Operation
Operation
Disposition
(Pre)shelve to cache
Processed
(Pre)shelve to tape
Suspended
Unshelve from cache
Processed
Unshelve from tape
Processed
Unpreshelve
Processed
Cache flush to tape
Suspended
Compatible split- merge
Processed
Incompatible split- merge
Rejected
Repack archive class
Suspended
All other requests
Processed
HSM initiates split-merge operations in the background; the SMU command that initiated the
split merge does not wait for the operation to complete. As such, it is possible to request an
incompatible split-merge operation, for example:
$ SMU SET VOLUME DISK$USER1/SHELF=SHELF1
$ SMU SET VOLUME DISK$USER1/SHELF=SHELF2
In this example, the second command is rejected while the split-merge for the first command is
processed.
If an error occurs during a background split-merge operation, the final completion state of the
operation will either revert to the old definition, or the new definition, depending on the phase of
split-merge that failed. There are essentially two phases of split-merge:
•
COPY - Copying the shelf data from the old to the new catalog
•
DELETE - Deleting the information from the old catalog
If an error occurs during the copy phase, the SMU database is reset to the old catalog/shelf. If an
error occurs during the delete phase, the new catalog/shelf definition stays in effect.
You may wish to examine the database later with SMU to determine if the operation succeeded
and the definitions are as you expect. Also, the shelf handler audit and error logs contain entries
for all split-merge operations for further information.
5.13 Repacking Archive Classes
Shelf media used by HSM contain shelved file data from many sources, some of which remains
valid for a long time, but some also becomes obsolete. Unlike BACKUP tapes, which can be
recycled regularly, this is not the case with HSM media, since they contain the only copies of the
shelved file data. Without some sort of custom analysis of HSM media, the media would have to
be retained indefinitely. After a long time, where the majority of the data is obsolete, this would
result in shelf media having a very low percentage of valid data, resulting in wastage.
Managing the HSM Environment 5–23
Managing the HSM Environment
5.13 Repacking Archive Classes
HSM provides the SMU REPACK function to perform an analysis of valid and obsolete data on
shelf media, and copy the valid data to other media, allowing the old media to be freed up. In
addition, REPACK purges the catalog entries associated with the obsolete data.
Shelf file data can become obsolete in two ways:
•
The online copy of the shelved file is deleted
•
The online copy of the shelved file is unshelved, updated, and shelved again
HSM provides the system administrator a way to control the obsolescence of files for use in
repacking. It may not be appropriate for a file to become obsolete as soon as it is deleted or
updated, as it may need to be recovered in its old state at a later date. As such, two new options
are provided in the SMU SHELF definition as follows:
•
SAVE_TIME - This option allows the specification of a delta time which keeps a file’s
shelved data in the HSM subsystem for this period after the file is deleted.
•
UPDATES - This option allows the specification of a number of updates to a shelved file
that will be kept in the HSM subsystem. This option applies to files that have been updated
in place, not new versions of files that have been created after an update. New versions are
controlled by online disk maintenance outside the scope of HSM.
Complete flexibility is applied to both options ranging from zero delete save time and no
updates, to indefinite delay and number of updates, and anything in between. The options apply
to all preshelved and shelved files on all volumes in the shelf.
Repacking is normally applied to all volumes in an archive class. However, the system administrator can restrict the volumes being repacked by specifying them in a /VOLUME qualifier. If
any of the specified volumes are part of a volume set, all volumes in the volume set will be
repacked.
Finally, it may or may not be worth repacking a particular volume or volume set depending on
the percentage of valid data on the volume. For example, if a volume contains 90% valid data,
the 10% bonus in space acquired by repacking the volume may not justify the effort of repacking, at least not yet. As such, the system administrator can apply a threshold percentage value of
obsolete data that is used to determine whether to repack a particular volume or volume set. The
default threshold value is 50%.
A threshold value should only be applied when repacking to the same archive class. When
repacking to create a new archive class or replacing a shelved volume, all valid files should be
repacked by specifying /NOTHRESHOLD.
Repacking requires two compatible tape devices in order to proceed. For this reason, HSM
allows only ONE repack operation at a time. In addition, a REPACK request is suspended while
a catalog split-merge operation is in progress; the two operations cannot safely proceed simultaneously.
The following example shows a normal repack operation:
$ SMU REPACK 1
This command repacks archive class 1 to new media also in archive class 1. The default threshold value of 50% is applied. When the operation is complete, the old media for archive class 1
are deallocated.
Managing the HSM Environment 5-24
Managing the HSM Environment
5.14 Replacing and Creating Archive Classes
Repack requires a disk staging area of at least 100,000 blocks in order to produce optimal multifile savesets on output. For example, files shelved with HSM V1.x into single-file savesets are
consolidated into more efficient multi-file savesets on output. The staging area used is referenced by the system-wide logical name HSM$REPACK, which should be assigned to a suitably
sized disk/directory combination. If this logical name is not defined, the logical HSM$MANAGER is used instead. The staging area is cleaned up after a repack operation.
5.13.1 Repack Performance
The repack operation, especially on tape volumes created under HSM V1.x, is likely to take several days to complete. While repacking is being performed, certain tape-oriented operations are
suspended and queued to avoid conflicts. However, when HSM detects that a conflicting tape
operation is pending, the repack operation is suspended temporarily, usually within 10 minutes,
to allow the other operations to proceed. Therefore, despite the duration of the repack operation,
other HSM operations will only suffer minor delays, and the long duration of repack should not
be a concern.
5.14 Replacing and Creating Archive Classes
HSM provides a mechanism for replacing and/or creating new archive classes, and populating
associated shelf media with valid data. You may wish to create a new archive class to provide
additional data safety. More likely though, you may wish to create a new archive class to
upgrade your tape hardware to new technology or move your shelved data to a new tape library.
Although HSM provides the reshelving function to accomplish this, this is slow and involves
intermediate disk transfers. A much more efficient way is to use the REPACK function and
specify a NEW_ARCHIVE qualifier. When performing a repack for this purpose, you must not
specify any volumes in the volume list, and no threshold value. It is important that all valid files
are copied to the new archive class. However, the purging of obsolete files is still performed
when creating a new archive class using repack.
The following example creates a new archive class:
$ SMU REPACK 1/TO_ARCHIVE=3/NOTHRESHOLD
This command creates a new archive class 3, using all valid data from archive class 1. Archive
class 3 may be of a different media type than archive class 1.
5.15 Replacing A Lost or Damaged Shelf Volume
If you lose or damage a shelf tape, you will not be able to recover the data on that tape, and are at
risk for not providing the level of data safety that HSM provides. As soon as you discover that a
shelf tape has been lost or damaged, you should take steps to replace it by using REPACK to
copy the contents of the tape, from another archive class, to new media.
When discovering the lost or damaged tape, you should determine which archive class it
belonged to. Then issue a REPACK command specifying an alternate archive class that is or was
defined for the shelf. When performing this operation, you should specify the volume to be
replaced but no thresholds for the copy. However, as with all repack operations, obsolete files
are not copied.
The following example replaces a lost or damaged shelf volume:
$ SMU REPACK 1/VOLUME=ACG001/FROM_ARCHIVE=2/NOTHRESHOLD
Managing the HSM Environment 5–25
Managing the HSM Environment
5.16 Catalog Analysis and Repair
This example replaces shelf volume ACG001 from archive class 1, using media from archive
class 2. It may take several volumes from archive class 2 to replace the data in the volume. Also,
the replacement volume will have a different label to ACG001, but its contents contain the valid
replacement data for ACG001. If the archive class is not checkpointed after the operation, the
replacement volume becomes the current shelving volume for the archive class, and will be
filled up.
This function cannot be performed if only one archive class is specified for the shelf, which is
not recommended for this very reason.
If you have a site disaster, and most or all of the media for an archive class are damaged, then
you should create a new archive class as described in the previous section, rather than recover
each volume individually.
5.16 Catalog Analysis and Repair
The ANALYZE/REPAIR utility is used to align the contents of the HSM catalog(s) with a disk
that has been backed up and later restored, or has been renamed. It is also useful to run this utility if you suspect that any other discrepancies between the online disk state and the HSM catalog(s) may have occurred.
SMU ANALYZE will scan all files on a disk looking for shelved and preshelved files. When a
file is found that is of interest, its HSM metadata (file header and ACE information) is compared
against entries in the HSM catalog(s) and any discrepancies are reported. If the /REPAIR qualifier is used, the discrepancy can be repaired. If /CONFIRM is not used with /REPAIR, then the
default repair action will be applied.
Example of the ANALYZE Command With No /REPAIR
$ SMU ANALYZE DKB500
%SMU-I-PROCESSING, processing input device DKB500
%SMU-I- scanning for shelved files on disk volume _$1$DKB500:
File (14,1,0) "$1$DKB500:[ANALYZE_TEST]STATUS.RPT;1"
Stored in catalog as:
FID (13,1,0) "BOGUS$DEVICE1:[ANALYZE_TEST]STATUS.RPT;1"
Invalid HSM metadata found for
File (15,1,0) "$1$DKB500:[ANALYZE_TEST]LOGIN.COM;1"
Stored in catalog as:
FID (12,1,0) "$1$DKB500:[ANALYZE_TEST]LOGIN.COM;1"
Invalid HSM metadata found for
File (16,1,0) "$1$DKB500:[ANALYZE_TEST]Q4_RESULTS.TXT;1"
No catalog entry found - file not repairable
Invalid HSM metadata found for
File (17,1,0) "$1$DKB500:[ANALYZE_TEST]ANALYSIS.DAT;1"
File (18,1,0) "$1$DKB500:[ANALYZE_TEST]RECIPE.MEM;1"
Revision date mismatch Current:
9-JUL-1999 16:45:39.37
Catalog: 10-JUL-1999 15:54:21.74
File (19,1,0) "$1$DKB500:[ANALYZE_TEST]MAIL.SAV;1"
Stored in catalog as:
FID (19,1,0) "BOGUS$DEVICE1:[ANALYZE_TEST]MAIL.SAV;1"
%SMU- completed scan for shelved files on disk volume _
%SMU-I-ERRORS, 6 error(s) detected, 0 error(s) repaired
Example of the ANALYZE Command with Default Confirmation
$ SMU ANALYZE/REPAIR DKB500
%SMU-I-PROCESSING, processing input device DKB500
%SMU-I-scanning for shelved files on disk volume _$1$DKB500:
File (14,1,0) "$1$DKB500:[ANALYZE_TEST]STATUS.RPT;1"
Stored in catalog as:
FID (13,1,0) "BOGUS$DEVICE1:[ANALYZE_TEST]STATUS.RPT;1"
File entry repaired - 1 repairs made.
Invalid HSM metadata found for
File (15,1,0) "$1$DKB500:[ANALYZE_TEST]LOGIN.COM;1"
Managing the HSM Environment 5-26
Managing the HSM Environment
5.16 Catalog Analysis and Repair
Stored in catalog as:
FID (12,1,0) "$1$DKB500:[ANALYZE_TEST]LOGIN.COM;1"
File entry not repaired.
Invalid HSM metadata found for
File (16,1,0) "$1$DKB500:[ANALYZE_TEST]Q4_RESULTS.TXT;1"
No catalog entry found - file not repairable
Invalid HSM metadata found for
File (17,1,0) "$1$DKB500:[ANALYZE_TEST]ANALYSIS.DAT;1"
File entry repaired - 1 repairs made.
File (18,1,0) "$1$DKB500:[ANALYZE_TEST]RECIPE.MEM;1"
Revision date mismatch Current:
9-JUL-1999 16:45:39.37
Catalog: 10-JUL-1999 15:54:21.74
File entry repaired - 1 repairs made.
File (19,1,0) "$1$DKB500:[ANALYZE_TEST]MAIL.SAV;1"
Stored in catalog as:
FID (19,1,0) "BOGUS$DEVICE1:[ANALYZE_TEST]MAIL.SAV;1"
File entry repaired - 1 repairs made.
%SMU- completed scan for shelved files on disk volume _
%SMU-I-ERRORS, 6 error(s) detected, 4 error(s) repaired
Example of ANALYZE/REPAIR/CONFIRM
$ SMU ANALYZE/REPAIR/CONFIRM DKB500
%SMU-I-PROCESSING, processing input device DKB500
%SMU-I- scanning for shelved files on disk volume _$1$DKB500:
File (14,1,0) "$1$DKB500:[ANALYZE_TEST]STATUS.RPT;1" Stored in catalog as:
FID (13,1,0) "BOGUS$DEVICE1:[ANALYZE_TEST]STATUS.RPT;1"
** Repair catalog entry to reset volume, FID to _ (14,1,0)? [Y]: N
File entry not repaired.
Invalid HSM metadata found for
File (15,1,0) "$1$DKB500:[ANALYZE_TEST]LOGIN.COM;1"
Stored in catalog as:
FID (12,1,0) "$1$DKB500:[ANALYZE_TEST]LOGIN.COM;1"
** Repair catalog entry to reset FID to (15,1,0) ?
** WARNING: Repair may affect the wrong file - with caution [N]: Y
File entry repaired - 1 repairs made.
Invalid HSM metadata found for
File (16,1,0) "$1$DKB500:[ANALYZE_TEST]Q4_RESULTS.TXT;1"
No catalog entry found - file not repairable
Invalid HSM metadata found for
File (17,1,0) "$1$DKB500:[ANALYZE_TEST]ANALYSIS.DAT;1"
** Repair by adding HSM metadata for file (17,1,0) ? [Y]:
File entry repaired - 1 repairs made.
File (18,1,0) "$1$DKB500:[ANALYZE_TEST]RECIPE.MEM;1"
Revision date mismatch Current:
9-JUL-1999 18:29:09.96
Catalog: 10-JUL-1999 17:37:52.33
** Repair by deleting HSM metadata for file (18,1,0) ? [Y]: Y
File entry repaired - 1 repairs made.
File (19,1,0) "$1$DKB500:[ANALYZE_TEST]MAIL.SAV;1"
Stored in catalog as:
FID (19,1,0) "BOGUS$DEVICE1:[ANALYZE_TEST]MAIL.SAV;1"
** Repair catalog entry to reset volume to _ ?
[Y]: Y
File entry repaired - 1 repairs made.
%SMU- completed scan for shelved files on disk volume _
%SMU-I-ERRORS, 6 error(s) detected, 4 error(s) repaired
Example of ANALYZE/REPAIR/CONFIRM/OUTPUT
$ SMU ANALYZE/REPAIR/CONFIRM/OUTPUT=ANALYZE.OUT DKB500
File (14,1,0) "$1$DKB500:[ANALYZE_TEST]STATUS.RPT;1"
Stored in catalog as:
FID (13,1,0) "BOGUS$DEVICE1:[ANALYZE_TEST]STATUS.RPT;1"
** Repair catalog entry to reset volume, FID to _ (14,1,0) ? [Y]: Y
File entry repaired - 1 repairs made.
Invalid HSM metadata found for
File (15,1,0)
"$1$DKB500:[ANALYZE_TEST]LOGIN.COM;1"
Stored in catalog as:
FID (12,1,0) "$1$DKB500:[ANALYZE_TEST]LOGIN.COM;1"
** Repair catalog entry to reset FID to (15,1,0) ?
Managing the HSM Environment 5–27
Managing the HSM Environment
5.17 Consolidated Backup with HSM
** WARNING: Repair may affect the wrong file - with caution [N]: Y
File entry repaired - 1 repairs made.
Invalid HSM metadata found for
File (16,1,0) "$1$DKB500:[ANALYZE_TEST]Q4_RESULTS.TXT;1"
No catalog entry found - file not repairable
Invalid HSM metadata found for
File (17,1,0) "$1$DKB500:[ANALYZE_TEST]ANALYSIS.DAT;1"
** Repair by adding HSM metadata for file (17,1,0) ? [Y]:
File entry repaired - 1 repairs made.
File (18,1,0) "$1$DKB500:[ANALYZE_TEST]RECIPE.MEM;1"
Revision date mismatch - Current:9-JUL-1999 18:38:58.06
Catalog: 10-JUL-1999 17:47:40.42
** Repair by deleting HSM metadata for file (18,1,0) ? [Y]: Y
File entry repaired - 1 repairs made.
File (19,1,0) "$1$DKB500:[ANALYZE_TEST]MAIL.SAV;1"
Stored in catalog as:
FID (19,1,0) "BOGUS$DEVICE1:[ANALYZE_TEST]MAIL.SAV;1"
** Repair catalog entry to reset volume to _ ? [Y]: Y
File entry repaired - 1 repairs made.
$
$ TYPE ANALYZE.OUT
%SMU-I-PROCESSING, processing input device DKB500
%SMU-I- scanning for shelved files on disk volume _$1$DKB500:
File (14,1,0) "$1$DKB500:[ANALYZE_TEST]STATUS.RPT;1"
Stored in catalog as:
FID (13,1,0) "BOGUS$DEVICE1:[ANALYZE_TEST]STATUS.RPT;1"
File entry repaired - 1 repairs made.
Invalid HSM metadata found for
File (15,1,0)
"$1$DKB500:[ANALYZE_TEST]LOGIN.COM;1"
Stored in catalog as:
FID (12,1,0) "$1$DKB500:[ANALYZE_TEST]LOGIN.COM;1"
File entry repaired - 1 repairs made.
Invalid HSM metadata found for
File (16,1,0) "$1$DKB500:[ANALYZE_TEST]Q4_RESULTS.TXT;1"
No catalog entry found - file not repairable
Invalid HSM metadata found for
File (17,1,0) "$1$DKB500:[ANALYZE_TEST]ANALYSIS.DAT;1"
File entry repaired - 1 repairs made.
File (18,1,0) "$1$DKB500:[ANALYZE_TEST]RECIPE.MEM;1"
Revision date mismatch - Current:
9-JUL-1999 18:38:58.06
Catalog: 10-JUL-1999 17:47:40.42
File entry repaired - 1 repairs made.
File (19,1,0) "$1$DKB500:[ANALYZE_TEST]MAIL.SAV;1"
Stored in catalog as:
FID (19,1,0) "BOGUS$DEVICE1:[ANALYZE_TEST]MAIL.SAV;1"
File entry repaired - 1 repairs made.
%SMU- completed scan for shelved files on disk volume %SMU-I-ERRORS, 6 error(s) detected, 5 error(s) repaired
5.17 Consolidated Backup with HSM
HSM offers a paradigm to consolidate HSM shelf data with that required for backup/restore purposes. This paradigm is called Consolidated Backup With HSM, and is designed for use with
very large sites where the number of tapes is problematic, or sites who are reaching the limit of
their backup window. This paradigm is also known as Backup via shelving.
We refer to this as a paradigm, rather than an HSM function, because no special HSM functions
are required; the paradigm is implemented using normal HSM and BACKUP (or SLS) commands. The paradigm consists of the following elements, which are described in subsequent sections:
•
Setting up SLS to handle shelved and preshelved files if you are using SLS as your regular
backup product
•
Preshelving most files on the system
•
Backing up only the headers of shelved and preshelved files in both image and incremental
backups
Managing the HSM Environment 5-28
Managing the HSM Environment
5.17 Consolidated Backup with HSM
•
Restoring disks and files with files being restored in the shelved state
•
File-faulting file data as it is needed, or unshelving recently-accessed files
•
Repacking shelf tapes regularly
To implement this paradigm, HSM has provided a special version of BACKUP, called
HSM$BACKUP, with this release. This version allows backing up only the headers of
preshelved and shelved files, and in the shelved state. It is expected that this functionality will be
incorporated into a future version of OpenVMS BACKUP.
5.17.1 Setting up SLS
If you are using SLS as your regular BACKUP product, you need to configure SLS to use the
new HSM$BACKUP image for your regular backups. This feature is supported only with SLS
V2.8 or later.
The steps you need to take are:
•
Defining a logical name to reference HSM$BACKUP
•
Changing the SBK files to handle shelved and preshelved files
•
Optionally adding qualifiers to manual system backups
•
Optionally adding qualifiers to user backups
You set up SLS to use HSM$BACKUP by defining the following logical name:
$ DEFINE/TABLE=LNM$SLS$VALUES SLS$HSM_BACKUP 1
Depending on the type of backups or restores you are performing, you may want to include the
new /[NO]SHELVED and /[NO]PRESHELVED qualifiers (as described in Section 5.17.3) in
the following cases:
•
In the SBK files for regular system backups
•
In the Manual System Backup screen (from the SLSOPER menu) for special system backups
•
In the /QUALIFIERS qualifier in the STORAGE SAVE command
This paradigm is not yet supported for Archive/Backup System (ABS).
5.17.2 Preshelving Files
The key to this paradigm is preshelving most files on the system. From HSM V2.0, preshelved
files have a unique state, and are flagged as preshelved in the file header. Since the data of a
preshelved file remains online, the file can be modified at any time. If a preshelved file is modified, extended, or truncated, a new HSM function changes the file from preshelved to unshelved.
Also, in V2.0 and later, the eligibility for preshelving files is the same as shelved file, and the
following types of files cannot be preshelved:
•
Open files
•
Directory files
•
Files beginning with HSM$
•
Files marked /NOSHELVABLE
•
Files marked /NOMOVE
•
Files on disks with shelving disabled
•
Bad files
Managing the HSM Environment 5–29
Managing the HSM Environment
5.17 Consolidated Backup with HSM
•
Empty files
However, all other files (except those on system disks) can and should be preshelved to utilize
this paradigm. This can be done in two ways:
$!
$! This sets up a preshelve policy to regularly execute on all
$! affected volumes on a regular basis:
$!
$ SMU SET POLICY policy_name /PRESHELVE /NOELAPSED /LOWWATER_MARK=0
$ SMU SET SCHEDULE volume_list policy_name/AFTER=time
$!
$! This manually preshelves all files on a volume; this command may
$! be placed in an HSM policy script file.
$!
$ PRESHELVE volume:[000000...]*.*;*
HSM will not preshelve files that are already preshelved or shelved, so these commands affect
only files that have been created or modified since the last preshelve operation. Since HSM does
not preshelve open files, you can perform the preshelving during the day.
When starting this paradigm up for the first time, however, thousands of files per volume will be
preshelved, so it is recommended that only one volume at a time is processed during this startup
phase.
5.17.3 Nightly Backups
While using this paradigm, it is still necessary to perform regularly (for example, nightly) backups using your regular backup regimen. This is required to restore a disk’s index file and directory structure following a disk failure.
For this paradigm to work, you must use "HSM$BACKUP" as provided with the HSM kit as
your backup engine. This backup engine can be supported by SLS. The paradigm substantially
reduces the backup window because only the 512-byte header for each preshelved file is backed
up: the data is stored in the HSM subsystem.
The recommended paradigm for regular backups is:
•
A regular (for example, weekly/monthly) image backup
•
A more regular (for example, nightly) incremental backup
Two new qualifiers are provided to HSM$BACKUP to implement this paradigm:
•
/NOPRESHELVED - NOPRESHELVED backs up only the headers of preshelved files;
should be applied to image and incremental backup commands. /PRESHELVED (the
default) backs up the data of preshelved files.
•
/NOSHELVED - NOSHELVED backs up only the headers of shelved files; should be
applied to incremental backups only. SHELVED causes a file fault and backs up the data of
formerly shelved, now unshelved files. IMAGE backup always backs up only the headers of
shelved files.
Managing the HSM Environment 5-30
Managing the HSM Environment
5.17 Consolidated Backup with HSM
The following examples contain the recommended options for performing image and incremental backups using this paradigm:
$!
$! Image BACKUP
$!
$ HSM$BACKUP/IMAGE/IGNORE=INTERLOCK/RECORD/LOG/NOPRESHELVED _$ volume: device:saveset/SAVESET
$!
$! Incremental BACKUP
$!
$ HSM$BACKUP/RECORD/SINCE=BACKUP/NOPRESHELVED/NOSHELVED/LOG/ IGNORE=INTERLOCK
_$ volume: device:saveset/SAVESET
$!
Each of these commands backs up only the headers of shelved and preshelved files, and they are
copied to the backup saveset in the shelved state. The online state remains unchanged.
5.17.4 Restoring Volumes
If there becomes a need to restore a disk volume because it has become damaged, the normal restoration process is follows, namely:
•
Restore the last image backup
•
Use BACKUP/INCREMENTAL to restore incremental BACKUP in reverse chronological
order
After applying the image and incremental backups, you have restored all the metadata and directory structure for the volume, and also have restored most of the files to the shelved state (that is,
all files that were preshelved and shelved during the backup are restored to the shelved state).
You can use either HSM$BACKUP or normal OpenVMS Backup for the restore process.
Before making the volume available to users, it is necessary to repair the HSM catalog, since the
file identifiers (FIDs) of shelved and preshelved files may have changed. You can repair them
with the following command, which will take several minutes to run:
$ SMU ANALYZE/REPAIR volume:
Note that this operation completes successfully if you restore the files to the same volume
(device name) or to a different device.
Once this command completes, the disk volume is ready for use. Note, however, that most files
are still shelved. If you wish to avoid file faults on first file access on recently-accessed files,
you may want to initiate an unshelve procedure such as the following:
$ UNSHELVE volume:[000000...]*.*;*/SINCE=10-OCT-1999/EXPIRED
This command unshelves all files that have been accessed since 10-OCT-1999 (assuming you
have enabled volume retention as recommended). The use of this command is optional.
5.17.5 Restoring Files
You restore individual files by locating the volume that has the latest (or desired) copy of the file
and restoring the file in the usual way. If, however, the file is restored in the shelved state, you
should run the SMU ANALYZE/REPAIR command to reset its file identifier in the catalog.
Managing the HSM Environment 5–31
Managing the HSM Environment
5.18 Determining Cache Usage
5.17.6 Repacking
Since you are using HSM as the repository of virtually all files on your system, the number of
HSM media is liable to become very large. In order to keep this under control, it is recommended
that you repack your archive classes regularly. Once every three-six months is recommended in
such an environment. See section 7.14 for information on repacking archive classes.
5.17.7 Other Recommendations
You should not use consolidated backup with HSM on system disks. Preshelving files on system
disks (and having them restored in the shelved state) will likely result in an inability to reboot
your system. This is highly unrecommended.
Also, you should define multiple shelves and multiple catalogs for this environment. The catalogs should be stored on shadowed disks with preshelving disabled. You should not preshelve
any HSM-internal files, otherwise unshelving may not be possible after a restore.
5.18 Determining Cache Usage
If you wish to see how many files and blocks are being used for a cache device, you can enter a
DIRECTORY command for the cache directory. For each cache device defined using SMU, the
cache directory is located at device:[HSM_CACHE]. To determine usage, enter a command as
shown in the following example:
$ DIRECTORY/GRAND/SIZE=ALL $1$DKA100:[HSM_CACHE]
Grand total of 1 directory, 221 files, 9021/9021 blocks.
5.19 Maintaining File Headers
Because HSM keeps file headers in online storage while moving the file data to shelf storage,
you need to consider your system limits for the number of file headers that can be on a given volume. If you exceed the allowable number of file headers on a given volume, users may see
INDEXFILEFULL and HEADERFULL errors when creating files. To prevent this problem, you
need to understand how OpenVMS limits the number of file headers on your disk and how you
can control this information.
5.19.1 Determining File Header Limit
OpenVMS limits the number of file headers you can have on a volume by calculating a value
for MAXIMUM_FILES, using the following equation:
MAXIMUM_FILES = maxblock / (cluster_factor + 1)
Where maxblock is the value for "total blocks" from SHOW DEVICE/FULL and
cluster_factor must be between:
Min value: maxblock / (255 * 4096) (or 1 whichever is greater)
Max value: maxblock / 100
Many systems use the default value for cluster_factor, which is 3 for disks whose capacity is
greater than or equal to 50,000 blocks. Occasionally, you may have a problem with very large
disks when the default value of three does not work and you need to calculate the minimum
value using the equation. For additional information, see the INITIALIZE command in the
OpenVMS DCL Dictionary.
By default, MAXIMUM_FILES is (maxblock / ((cluster_factor + 1) * 2)), which is half of the
actual maximum.
Managing the HSM Environment 5-32
Managing the HSM Environment
5.20 Event Logging
5.19.2 Specifying a Volume’s File Headers
To initialize a volume with the greatest number of file headers possible, use the following DCL
command:
$ INITIALIZE {device} {label}/CLUSTER = (maxblock/(255*4096)) /MAXIMUM_FILES = (maxblock/(cluster + 1)) /HEADERS = (maxblock/(cluster + 1))
If you initialize a volume with the largest number of file headers, the index file will be very
large, and none of that space can be used for anything but file headers. This is not necessary nor
desirable, because you end up using approximately 25 percent of your disk space for file metadata. In reality, you probably want to set aside about 1 percent of your disk space for file metadata.
Note in the INITIALIZE command that /MAXIMUM_FILES reserves space for the index file
while /HEADERS allocates space for the index file. Using the /HEADERs qualifier is the only
way to guarantee you can create that many files. Once initialized, you cannot ever have more
files on the disk than the value given with the MAXIMUM_FILES qualifier.
5.19.3 Extending the Index File
If you do not initialize your volumes using the /HEADERS qualifier, the file system will extend
INDEXF.SYS for you as it needs file headers. The file system will not allow INDEXF.SYS to
become multiheadered, which means you can have a maximum of approximately 77 extents in
the header before you will get an error saying the index file is full.
You can tell how close you are to the index file limit using
DUMP/HEADER/BLOCK=COUNT=0 [000000]INDEXF.SYS. The display contains a field
called "Map area words in use." This field has a maximum of 155 for INDEXF.SYS. If the number of mapping words in use is around 120 to 130, you should schedule an image backup/restore
cycle for the volume.
5.19.4 Maintaining the Number of File Headers
To prevent your system from reaching its file header limit, make sure you delete file headers as
appropriate. What this means is, when you no longer need a file, do not leave it shelved with the
file header on disk. Use another strategy to archive the file, just in case you need it someday.
Then, delete the file from the disk.
5.20 Event Logging
HSM provides a comprehensive set of event logging capabilities that you can use to analyze
shelving activity on your cluster and tune your system to provide an optimal computational environment.
Two types of logging are supported:
•
Audit logging, which logs every visible operation in the system, its source, and its status.
•
Error logging, which logs "unexpected" errors in HSM operation, with complete details of
the requested operation and the error.
Event logging is supported by both the shelf handler process and the policy execution process.
You can use the shelf handler log to obtain a complete summary of all shelving operations initiated on the cluster. You can use the policy log to obtain information relating to all policies run
on the system.
Logging may be enabled or disabled at your discretion with one or more of the following selections: AUDIT, ERROR, and EXCEPTION.
Managing the HSM Environment 5–33
Managing the HSM Environment
5.20 Event Logging
5.20.1 Accessing the Logs
The event logs are human-readable and can be displayed with the TYPE command while HSM is
in operation. Access to the logs require SYSPRV, READALL, or BYPASS privileges. Table 5-5
lists their locations.
Table 5–5 HSM Event Logging
Description
Location
Shelf Handler Audit Log
HSM$LOG:HSM$SHP_AUDIT.LOG
Shelf Handler Error Log
HSM$LOG:HSM$SHP_ERROR.LOG
Policy Audit Log
HSM$LOG:HSM$PEP_AUDIT.LOG
Policy Error Log
HSM$LOG:HSM$PEP_ERROR.LOG
You can read the event logs at any time during HSM operation, using a TYPE command, a
SEARCH command, or other OpenVMS read_only tools. You also can obtain a dynamic output
of events by issuing the following command on any of the event log files:
$ TYPE/TAIL/INTERVAL=1/CONTINUOUS HSM$LOG:log_file_name.LOG
The logs grow with use, and are not re-created on HSM startup. If you wish to reinitialize the
logs, you can do so with the SMU SET FACILITY/RESET command, which opens a new version of each log file. The old files can then be purged, renamed and shelved, or otherwise disposed of to make space available.
Internally generated HSM requests are generally not reported in the audit log, as these are not
visible to either the user or the system manager. However, they may be reported in the error log
if they fail. Such internal requests include:
•
Information requests, upon an OPEN operation of a shelved file
•
Delete requests, upon a DELETE operation of a shelved file
•
File flush requests, an individual request to flush a cache file to shelf storage
•
SMU SHOW REQUESTS and SHOW VERSION requests
If you wish to see the "invisible" requests logged in the audit log, as well as shelf server logging
of requests, you can enable the following logical name:
$ DEFINE/SYSTEM HSM$SHP_REMOTE_AUDIT 1
Please note that this will more than double the size of the audit log, and is only recommended
when troubleshooting problems.
5.20.2 Shelf Handler Log Entries
The shelf handler error log reports only requests that have not succeeded because of an unexpected error. It does not report all errors: for example, if an error occurs because of a user syntax
error, or because of a valid but illogical HSM configuration, these are generally not reported in
the error log.
If you see an entry in the error log, this means that it is worth investigating for more information.
It does not necessarily mean that there is a problem with the HSM system, the hardware, or the
media that contains the shelved file data. For more information on solving problems, see Chapter
7.
Managing the HSM Environment 5-34
Managing the HSM Environment
5.20 Event Logging
Each entry in the shelf handler log is tagged with a request number, which is incremented in the
audit log. If a serious error occurs on a request, the request number in the audit log can be reconciled with the request number in the error log to obtain more information about the error.
The following are examples of audit and error log entries:
Example of a Shelf Handler Audit Log Entry
Shelf handler V3.0A (BL22), Oct 20 1999 started at 2217:23:25.32
Shelf handler client enabled on node SYS001
29 20-OCT-1999 19:53:05.58, 22-SEP 19:53:06.62: Status: Error
Application request from node SYS001, process 604003B9, user SMITH
Shelve file $1$DKA100:[SMITH]TESTJLM.DAT;1
30 20-OCT-1999 20:03:04.66, 22-SEP20:03:13.08: Status: Success
System request from node SYS002, process 40201C31, user SMITH
File fault (unshelve) file DISK$MYNODE:[SMITH]TESTJLM.DAT;1
31 20-OCT-1999 20:03:13.66, 20-OCT20:03:13.98: Status: Success
System request from node SYS002, process 40201C31, user SMITH
Unpreshelve file DISK$MYNODE:[SMITH]TESTJLM.DAT;1
Example of a Policy Audit Log Entry
6648 20-OCT-1999 18:33:03.31, 20-OCT- 18:33:04.16 status: Success
Reset PEp logs request from node MYNODE, PID 20200687, user BAILEY
6649 20-OCT-1999 18:36:40.36, 22-SEP17:23:04.16 status: Success
Scheduled request from node MYNODE, PID 20200687, user SYSTEM
Reactive execution on volume _$1$DKA100:
Using policy definition HSM$DEFAULT_OCCUPANCY
Volume capacity is 5841360 blocks
Current utilization is 5286012 blocks
Lowwater mark is 90% or 5257224 blocks used
Primary policy definition Space Time Working Set(STWS) was executed.
Secondary policy definition Least Recently Used(LRU) was not executed.
A total of 1454 requests for 28867 blocks were successfully sent
To reach the lowwater mark 0 blocks must be reclaimed.
6650 20-OCT-1999 19:25:04.10, 22-SEP- 18:36:47.42 status: Success
Exceeded quota request from node MYNODE, PID 20200687, user SYSTEM
Reactive execution on volume _$1$DKA200:
Using policy definition HSM$DEFAULT_QUOTA
Quota capacity is 194865 blocks
Current utilization is 203416 blocks
Lowwater mark for UIC [107,34] is 80% or 155892 blocks used
Primary policy definition Space Time Working Set(STWS) was executed.
Secondary policy definition Least Recently Used(LRU) was not executed.
A total of 2051 requests for 48042 blocks were successfully sent
To reach the lowwater mark 0 blocks must be reclaimed.
Example of a Shelf Handler Error Log Entry
***************************************************************************
** 29 **
REQUEST ERROR REPORT
Error detected on request number 29 on node SYS001
Entry logged at 20-OCT-1999 19:53:06.86
** Request Information:
Identifier: 1
Process:
604003B9
Username:
SMITH
Timestamp: 20-OCT-1999 19:53:05.58
Client Node: SYS001
Source:
Application
Type:
Shelve file
Flags:
Nowait Notify
State:
Original Validated
Status:
Error
** Request Parameters:
Managing the HSM Environment 5–35
Managing the HSM Environment
5.21 Activity Logging
File:
$1$DKA100:[SMITH]TESTJLM.DAT;1
** Error Information:
%HSM-E- shelf access information unavailable for
$1$DKA100:[SMITH]TESTJLM.DAT;1
%SYSTEM-E-SHELFERROR, access to shelved file failed
** Request Disposition:
Non-fatal shelf handler error
Fatal request error
Operation was completed
** Exception Information:
Exception Module Line
SHP_NO_OFFLINE_INFO SHP_3851
Exception Module Line
SHP_INVALID_OFFLINE_INFOSHP_4015
5.21 Activity Logging
The event logs contain information that is logged at the end of each request, together with its
final status. However, there is often a need to examine activity in progress for the following reasons:
•
To monitor HSM activity
•
To troubleshoot a problem
•
To see what files are being shelved during a policy run
•
To determine if an emergency termination of requests is necessary
To this end, HSM provides an SMU SHOW REQUESTS command that indicates the number of
requests currently being processed. In addition, detailed information about requests can be
dumped to an activity log on a SHOW REQUESTS/FULL command. The activity log is named:
HSM$LOG:HSM$SHP_ACTIVITY.LOG
A new version of the file is created for each SHOW REQUESTS /FULL command. The format
of the activity log is similar to the shelf handler audit log, except that additional flags are displayed indicating the current state of the request.
In contrast to the event logs, which have clusterwide scope, the activity log is a node-specific log
that reflects only the operations in progress on the requesting node. To accurately see activity on
the entire cluster, you need to perform the SMU SHOW REQUESTS/FULL on every node in the
cluster.
The following is an example of the activity log display:
** HSM Activity Log for Node MYNODE at 20-OCT-1999 16:37:06.67 **
1 20-OCT-1999 16:35:58.68, - Request in progess - Status: Null status
System request from node MYNODE, process 20200B24, user BAILEY
FileID Original Validated
Free space of 100 blocks for user BAILEY on volume _$1$DKA100:
2 20-OCT-1999 16:35:15.46, - Request in progess - Status: Null status
System request from node MYNODE, process 20200B24, user BAILEY
FileID Original Validated
Free space of 171 blocks for user BAILEY on volume _$1$DKA100:
3 20-OCT-1999 16:34:42.02, - Request in progess - Status: Null status
Shelf request from node MYNODE, process 20200B26, user HSM$SERVER
Original Validated
Flush cache file _$1$DKA0:[HSM_CACHE]TEST2.DAT$7702292510;1 to shelf stor
age
4 20-OCT-1999 16:34:42.01, - Request in progess - Status: Null status
Shelf request from node MYNODE, process 20200B26, user HSM$SERVER
Original Validated
Flush cache file _$1$DKA0:[HSM_CACHE]TEST1.DAT$7702292519;3 to shelf stor
age
Managing the HSM Environment 5-36
Managing the HSM Environment
5.22 Converting from Basic Mode to Plus Mode
In the activity log, requests are logged in reverse order of being received. Also, all active
requests are logged, including internal requests that do not appear in the audit log.
Canceling Requests
If upon monitoring the activity log, or otherwise, you wish to cancel certain requests, there are
several means to accomplish this. This is useful if a policy has started that is about to shelve files
that you do not want to be shelved. Use the following table to determine how to cancel classes of
requests:
Table 5–6 Canceling Requests
To Cancel...
Issue the Following Command...
All requests
SMU SET FACILITY/DISABLE=ALL
All shelve requests
SMU SET FACILITY/DISABLE=SHELVE
All unshelve requests
SMU SET FACILITY/DISABLE=UNSHELVE
All requests on a shelf
SMU SET SHELF name/DISABLE=ALL
Shelve requests on a shelf
SMU SET SHELF name/DISABLE=SHELVE
Unshelve requests on a shelf
SMU SET SHELF name/DISABLE=UNSHELVE
All requests on a volume
SMU SET VOLUME name/DISABLE=ALL
Shelve requests on a volume
SMU SET VOLUME name/DISABLE=SHELVE
Unshelve requests on a volume
SMU SET VOLUME name/DISABLE=UNSHELVE
Cache flushing
SMU_SET_FACILITY/DISABLE=SHELVE
Any request that is in operation may or may not complete. However, all pending requests are terminated with an "OPERATION DISABLED" message.
Once a managed entity is disabled, it must be reenabled for operations on that entity to resume.
5.22 Converting from Basic Mode to Plus Mode
Although you specify whether to install HSM Basic mode or HSM Plus mode during the installation process, you can convert to HSM Plus mode after the installation if you choose. To convert to HSM Plus mode, you need to do the following:
•
Shut down the shelf handler.
•
Disable the facility.
•
Enter used tapes into MDMS volume database.
•
Change to Plus mode.
•
Restart the shelf handler.
•
If you intend to use the same archive classes for Plus mode, you must CHECKPOINT the
archive classes.
•
Enable the facility.
Managing the HSM Environment 5–37
Managing the HSM Environment
5.22 Converting from Basic Mode to Plus Mode
Note
Once you have shelved files in HSM Plus mode, you cannot go back to HSM Basic
mode.
The remainder of this section explains how to perform the conversion tasks in detail and provides recommendations that should make the transition easier.
5.22.1 Shutting Down the Shelf Handler
To shut down the shelf handler, you use the SMU SHUTDOWN command. This commands
shuts down and disables HSM in an orderly manner. To use this command, you must have
SYSPRV, TMPMBX, and WORLD privileges. If you do not shut down the shelf handler before
you convert to Plus mode, the database could become corrupted and files may become ineligible
for unshelving. Also, note that the mode change does not have effect until you restart HSM.
5.22.2 Disabling the Shelving Facility
To disable the facility across the cluster, you use the SMU SET FACILITY command. You also
use this same command, but with different qualifiers, to reenable the facility after the upgrade is
completed. Disabling the facility prevents people from attempting to shelve or unshelve files
while the conversion is in progress.
$ SMU SET FACILITY /DISABLE=ALL
5.22.3 Entering Information for MDMS
To enable HSM Plus mode to access the appropriate information, you need to make MDMS
aware of (tape) volumes that already have been used. For new shelving, you can use volumes
already in the MDMS database.
For volumes that have already been used for HSM Basic mode, you need to allocate those volumes for unshelving purposes to HSM, bearing in mind the specific volume names used for
HSM Basic mode. Because you need to use these volumes as "read-only" volumes, you may
want to create a special volume pool for all the old HSM Basic mode volumes.
For more information on preparing HSM to work with MDMS, see the Getting Started with
HSM Chapter of the HSM Installation and Configuration Guide.
5.22.4 Changing from Basic Mode to Plus Mode
To change from HSM Basic mode to HSM Plus mode without reinstalling the HSM software,
you need to change information about the facility and restart the shelf handler. Because HSM
Version 3.0A converts existing HSM information upon installation, you do not need to do any
additional conversion for HSM Plus mode to operate.
To change from HSM Basic mode to HSM Plus mode, use the following command:
$ SMU SET FACILITY /MODE=PLUS
5.22.5 Restarting the Shelf Handler
Once you have made all the HSM Basic mode volumes known to MDMS and have reset the
facility to HSM Plus mode, you are ready to restart HSM. To restart HSM, use the SMU STARTUP command.
Managing the HSM Environment 5-38
Managing the HSM Environment
5.22 Converting from Basic Mode to Plus Mode
5.22.6 Using the Same Archive Classes
If you intend to use the same archive classes for HSM Plus mode as you used for HSM Basic
mode, you need to be very careful about the information that has been stored in those archive
classes so far. To protect this information and enable HSM to use the same archive classes, you
need to checkpoint the existing archive classes before you enable the facility for shelving in Plus
mode.
The SMU CHECKPOINT command allows HSM to use the next volume in sequence for shelving operations within the archive class, but stops writing to the existing volumes for that archive
class.
5.22.7 Enabling the Facility
The last thing you need to do for HSM Plus to start running is to enable the facility for shelving
and unshelving operations, because you disabled it earlier. To do this, use the following command:
$ SMU SET FACILITY /ENABLE=ALL
5.22.8 Example Mode Conversion
The following is an example of a Basic mode configuration successfully converted to Plus mode.
The Basic mode configuration consists of:
•
One tape device used for HSM purposes ($1$MKA100:)
•
Two archive classes (1 and 2), of media type CompacTape III, used for HSM
•
Four volumes used in each archive class (HS0001 - HS0004 for archive class 1, and
HS1001 - HS1004 for archive class 2) that have been used in Basic mode.
For the initial conversion to Plus mode, we will retain the same devices and archive classes for
operation. Additional archive classes and devices can be added later in the usual way.
The following example shows the commands to issue to convert the above Basic mode configuration to Plus mode:
$!
$! Convert HSM to Plus Mode (does not affect current operations)
$!
$ SMU SET FACILITY/MODE=PLUS
$! Disable HSM shelving operations
$!
$ SMU SET FACILITY/DISABLE=ALL
$!
$! Shut Down HSM, and bring back up in Plus mode
$!
$ SMU SHUTDOWN
$!
$! Redefine the archive classes $!
TK85K is a standard MDMS/SLS media type for "CompacTape III"
$!
Pool TK85K_POOL is a pool for new volumes to be allocated in Plus mode
$!
$ SMU SET ARCHIVE 1,2 /MEDIA_TYPE=TK85K/ADD_POOL=TK85K_POOL
$!
$! If needed, define the HSM device in TAPESTART.COM, and restart
$! MDMS/SLS. If the device is a magazine loader, additional configuration
$! is necessary (see section 5.5.2 in the Guide to Operations).
$!
$!
MTYPE_1
:= TK85K
$!
DENS_1
:=
$!
DRIVES_1 := $1$MKA100:
$!
$ @SYS$STARTUP:SLS$STARTUP.COM
$!
$! Define the Basic mode volumes in the MDMS/SLS Database, using a
Managing the HSM Environment 5–39
Managing the HSM Environment
5.22 Converting from Basic Mode to Plus Mode
$! specific pool called HSM_BASIC. This helps prevent these volumes being
$! allocated by another application.
$!
$ STORAGE ADD VOLUME HS0001/MEDIA_TYPE=TK85K/POOL=HSM_BASIC
$ STORAGE ADD VOLUME HS0002/MEDIA_TYPE=TK85K/POOL=HSM_BASIC
$ STORAGE ADD VOLUME HS0003/MEDIA_TYPE=TK85K/POOL=HSM_BASIC
$ STORAGE ADD VOLUME HS0004/MEDIA_TYPE=TK85K/POOL=HSM_BASIC
$ STORAGE ADD VOLUME HS1001/MEDIA_TYPE=TK85K/POOL=HSM_BASIC
$ STORAGE ADD VOLUME HS1002/MEDIA_TYPE=TK85K/POOL=HSM_BASIC
$ STORAGE ADD VOLUME HS1003/MEDIA_TYPE=TK85K/POOL=HSM_BASIC
$ STORAGE ADD VOLUME HS1004/MEDIA_TYPE=TK85K/POOL=HSM_BASIC
$!
$! Allocate the Basic mode volumes for HSM use.
$!
$ STORAGE ALLOCATE TK85K/VOLUME=HS0001/USER=HSM$SERVER
$ STORAGE ALLOCATE TK85K/VOLUME=HS0002/USER=HSM$SERVER
$ STORAGE ALLOCATE TK85K/VOLUME=HS0003/USER=HSM$SERVER
$ STORAGE ALLOCATE TK85K/VOLUME=HS0004/USER=HSM$SERVER
$ STORAGE ALLOCATE TK85K/VOLUME=HS1001/USER=HSM$SERVER
$ STORAGE ALLOCATE TK85K/VOLUME=HS1002/USER=HSM$SERVER
$ STORAGE ALLOCATE TK85K/VOLUME=HS1003/USER=HSM$SERVER
$ STORAGE ALLOCATE TK85K/VOLUME=HS1004/USER=HSM$SERVER
$!
$! Create a volume set for each archive class - all but the first
$! volume in an archive class MUST BE APPENDED to the first volume
$! in the archive class. Also, the given user name must be correct.
$!
$! NOTE THE ORDER OF COMMANDS - THIS IS SIGNIFICANT TO GET THE
$!
CORRECT PROGRESSION OF VOLUMES IN THE ORDER:
$!
HSx001, HSx002, HSx003, HSx004
$!
$ STORAGE APPEND HS0001/VOLUME=HS0004/USER=HSM$SERVER
$ STORAGE APPEND HS0001/VOLUME=HS0003/USER=HSM$SERVER
$ STORAGE APPEND HS0001/VOLUME=HS0002/USER=HSM$SERVER
$ STORAGE APPEND HS1001/VOLUME=HS1004/USER=HSM$SERVER
$ STORAGE APPEND HS1001/VOLUME=HS1003/USER=HSM$SERVER
$ STORAGE APPEND HS1001/VOLUME=HS1002/USER=HSM$SERVER
$!
$! Define new volumes for the archive classes to use in Plus mode
$! (at least two per archive class).
$!
$ STORAGE ADD VOLUME DEC001/MEDIA_TYPE=TK85K/POOL=TK85K_POOL
$ STORAGE ADD VOLUME DEC002/MEDIA_TYPE=TK85K/POOL=TK85K_POOL
$ STORAGE ADD VOLUME DEC003/MEDIA_TYPE=TK85K/POOL=TK85K_POOL
$ STORAGE ADD VOLUME DEC004/MEDIA_TYPE=TK85K/POOL=TK85K_POOL
$!
$! Checkpoint the archive class to use new Plus mode volumes
$!
$ SMU CHECKPOINT 1,2
$!
$! Shut down HSM again
$!
$ SMU SHUTDOWN
$!
$! Restart HSM
$!
$ SMU STARTUP
$!
$! Enable HSM shelving operations
$!
$ SMU SET FACILITY/ENABLE=ALL
$!
At this point you can begin shelving files to the new volumes in Plus mode, as well as unshelve
files from the previous volumes written in Basic mode.
Managing the HSM Environment 5-40
6
Operator Activities in the HSM
Environment
This chapter provides information on operator activities in the HSM environment. It covers the
following:
•
Enabling and running the operator interface
•
Loading and unloading single volumes for HSM Basic mode
•
Responding to BACKUP requests for HSM Basic mode
•
Working with magazine loaders for HSM Basic mode
•
Working with automated loaders for HSM Plus mode
•
Identifying typical operator messages
6.1 Enabling the Operator Interface
In most environments, HSM performs operations to nearline and offline storage devices. In
many cases, manual loading and unloading of tape volumes and tape magazines are required.
This section describes the messages that HSM issues to the OpenVMS OPCOM interface, and
what the operator’s possible options are.
When running HSM, the OPCOM operator interface must be enabled to allow the operator to
perform such loading and unloading. To enable the operator interface, enter the following command:
$ REPLY/ENABLE=(CENTRAL, TAPES)
%%%%%%%%%%% OPCOM 08-Jan-2003 14:25:46.05 %%%%%%%%%%%
Operator _SYS001$RTA2: has been enabled, username SYSTEM
%%%%%%%%%%% OPCOM 08-Jan-2003 14:25:46.06
Operator status for operator _SYS001$RTA2:
CENTRAL, TAPES
%%%%%%%%%%%
6.2 Loading and Unloading Single Tapes for HSM Basic Mode
When an HSM operation is directed at a nonmagazine loader tape drive, the operator is responsible for loading and unloading tapes on the drive. The following messages apply to nonmagazine
loader tape drives.
Operator Activities in the HSM Environment 6–1
Operator Activities in the HSM Environment
6.2 Loading and Unloading Single Tapes for HSM Basic Mode
6.2.1 Load Volume, No Reply Needed
%%%%%%%%%%% OPCOM 28-OCT-13:52:47.09
%%%%%%%%%%%
Message from user HSM$SERVER on MYNODE
Please mount volume HSZ001 in device _ (no reply needed)
This request, issued by HSM, requests that you load a specific volume label into the specified
drive.
Do not issue a REPLY to this message.
6.2.2 Load Volume
%%%%%%%%%%% OPCOM 28-OCT- 13:52:48.04
%%%%%%%%%%%
Request 2324, from user HSM$SERVER on MYNODE
Please mount volume HSZ001 in device _ (OTHERNODE)
This request, issued by the OpenVMS mount command, requests that you load a specific volume
label into the specified drive. Do one of the following:
•
If the volume exists, load the requested volume into the
drive.
•
If the volume does not exist, load a scratch volume into the drive-the scratch volume can
can either have a blank label, or a label that is not in the HSM format.
•
Enter a $ REPLY/ABORT command to abort the operation.
If you load a volume into the drive, you can optionally reply with a confirmation:
$ REPLY/TO=2324
If you do not reply after loading a volume, the mount completes and HSM proceeds anyway.
6.2.3 Reinitialize Volume
%%%%%%%%%%% OPCOM 08-Jan-2003- 14:25:46.05
%%%%%%%%%%%
Request 2324, from user HSM$SERVER on MYNODE
Allow HSM to reinitialize volume TEST to HS0001 in drive $1$MUA0:
NOTE: Previous contents of volume will be lost
This message is displayed if you loaded a volume with a different label than the one requested.
Issue one of the following replies:
•
REPLY/TO=message_number if the volume can be safely
re-initialized and used by HSM
•
REPLY/ABORT=message_number if the volume contains useful
use it
data and HSM cannot
This reply is required. HSM will not proceed until the request is answered with one of the possible replies.
6.2.4 Volume Initialization Confirmation
%%%%%%%%%%% OPCOM 30-MAY- 14:25:46.05
%%%%%%%%%%%
Message from user HSM$SERVER on MYNODE
Volume in drive $1$MUA0: has been re-initialized to HS0001
Please place label HS0001 on volume when unloaded
This message is a confirmation that HSM has reinitialized a volume label. It serves as a reminder
to place a physical volume label with the name listed in the message when the volume is
unloaded.
Do not issue a REPLY to this message.
Operator Activities in the HSM Environment 6-2
Operator Activities in the HSM Environment
6.3 Responding to BACKUP Requests for HSM Basic Mode
6.2.5 Unload Label Request
%%%%%%%%%%% OPCOM 30-MAY- 14:25:46.05
%%%%%%%%%%%
Message from user HSM$SERVER on MYNODE
Please place label HS0001 on volume unloaded from drive $1$MUA0:
This message is displayed when a tape volume, initialized by HSM, is unloaded from a drive.
This is a final reminder to place the requested physical label on the tape volume, so that the volume can be located later. Do not issue a REPLY to this message.
6.3 Responding to BACKUP Requests for HSM Basic Mode
In addition to HSM-generated OPCOM requests, OpenVMS BACKUP also issues OPCOM
messages when handling continuation volumes for HSM Basic mode. Please refer to the OpenVMS Utilities Manual: A - Z for information relating to BACKUP requests.
6.4 Working with Magazine Loaders for HSM Basic Mode
HSM issues OPCOM messages to load and unload magazines into a magazine loader. The following requests are issued:
6.4.1 Load Magazine
%%%%%%%%%%% OPCOM 30-MAY- 14:25:46.05
%%%%%%%%%%%
Request 3, from user HSM$SERVER on MYNODE
Please load magazine containing volume HS0001 into drive $1$MUA0:
This message requests that you load a specific magazine (stacker) into a magazine loader tape
drive. The magazine itself is not identified, but the specific volume is identified. You should
locate the magazine containing the specific volume, which should be labeled, and load that entire
magazine into the magazine loader.
You should then enter one of the following:
•
$ REPLY/TO=message_number if you successfully loaded the magazine
•
$ REPLY/ABORT=message_number if you could not load the magazine for any reason
6.4.2 Illegal Magazine
%%%%%%%%%%% OPCOM 30-MAY- 14:25:46.05
%%%%%%%%%%%
Message from user HSM$SERVER on MYNODE
The magazine loaded in drive $1$MUA0: has an invalid HSM configuration.
Please reconfigure magazine before reloading
See HSM Guide to Operations - Magazine Loaders
The magazine contains duplicate HSM volumes. Each HSM volume must have a unique label in
the format HSyxxx, where y is the archive class minus 1, and xxx is a string in the format 001 Z99. Please review the labels in the magazine, and initialize as appropriate. It is recommended
that the labels in the magazine are ordered by archive class in ascending order. For example,
HS0001, HS0002, HS1001, HS1002 etc.
Do not issue a REPLY to this message.
6.4.3 Unload Magazine
%%%%%%%%%%% OPCOM 30-MAY- 14:25:46.05
%%%%%%%%%%%
Message from user HSM$SERVER on MYNODE
Please unload magazine from drive $1$MUA0:
This message requests that you unload the current magazine from the specified drive, and store it
in its usual place.
Do not enter a REPLY to this message
Operator Activities in the HSM Environment 6–3
Operator Activities in the HSM Environment
6.5 Working with Automated Loaders for HSM Plus Mode
6.5 Working with Automated Loaders for HSM Plus Mode
If HSM needs to use a volume or a volume contained in a magazine that is not currently
imported into the loader, there is a series of OPCOM requests and actions that need to occur for
HSM to continue without failing.
6.5.1 Providing the Correct Magazine
The following series of operator actions and replies occur when HSM needs to use a volume
contained in a magazine that is not imported into a loader.
1.
HSM issues an OPCOM request asking for the volume to be
loaded into the jukebox.
$
%%%%%%%%%%% OPCOM 08-Jan-2003 15:28:59.72 %%%%%%%%%%%
Request 65514, from user HSM$SERVER on SLOPER
Please import volume AEL008 or its associated magazine into jukebox containing drive _SLOPER$MKA500:
2.
The operator then tells MDMS to export the magazine currently in the loader.
$ STORAGE EXPORT MAGAZINE MAG002
3.
MDMS then issues a message requesting that the magazine currently imported be removed
from the jukebox and performs the logical export.
%%%%%%%%%%% OPCOM 08-Jan-2003 15:30:15.76 %%%%%%%%%%%
Message from user SLS on SLOPER
Remove Magazine MAG002 from Tape Jukebox JUKEBOX1
%SLS-S-MAGVOLEXP, magazine volume AEL001 exported from tape
%SLS-S-MAGVOLEXP, magazine volume AEL002 exported from tape
%SLS-S-MAGVOLEXP, magazine volume AEL003 exported from tape
%SLS-S-MAGVOLEXP, magazine volume AEL004 exported from tape
%SLS-S-MAGVOLEXP, magazine volume AEL005 exported from tape
%SLS-S-MAGVOLEXP, magazine volume AEL006 exported from tape
%SLS-S-MAGVOLEXP, magazine volume AEL007 exported from tape
jukebox
jukebox
jukebox
jukebox
jukebox
jukebox
jukebox
4.
The operator then physically removes the magazine from the jukebox.
5.
The operator then tells MDMS to import the magazine that contains the necessary volume.
$ STORAGE IMPORT MAGAZINE MAG001 JUKEBOX1
%%%%%%%%%%% OPCOM 08-Jan-2003 15:30:51.38 %%%%%%%%%%%
Request 65515, from user SLS on SLOPER
Place Magazine MAG001 into Tape Jukebox JUKEBOX1; REPLY when DONE
6.
The operator physically places the magazine into the jukebox.
7.
Once the magazine is physically in the jukebox, the operator needs to reply to the OPCOM
request to place the magazine in the jukebox. The operator’s reply must come from another
process besides the one that submitted the STORAGE IMPORT MAGAZINE command.
$ REPLY/TO=65515
15:31:08.27, request 65515 was completed by operator _SLOPER$FTA6:
8.
MDMS then logically imports the volumes into the jukebox.
%SLS-S-MAGVOLIMP,
%SLS-S-MAGVOLIMP,
%SLS-S-MAGVOLIMP,
%SLS-S-MAGVOLIMP,
%SLS-S-MAGVOLIMP,
%SLS-S-MAGVOLIMP,
%SLS-S-MAGVOLIMP,
magazine
magazine
magazine
magazine
magazine
magazine
magazine
Operator Activities in the HSM Environment 6-4
volume
volume
volume
volume
volume
volume
volume
AEL008
AEL009
AEL010
AEL011
AEL012
AEL013
AEL014
imported
imported
imported
imported
imported
imported
imported
into
into
into
into
into
into
into
tape
tape
tape
tape
tape
tape
tape
jukebox
jukebox
jukebox
jukebox
jukebox
jukebox
jukebox
Operator Activities in the HSM Environment
6.6 Other MDMS Messages
9.
At this point, the necessary volume is in the jukebox. The operator must then reply to the
original OPCOM message requesting that the volume be placed into the jukebox.
$ REPLY/TO=65514 15:31:17.45, request 65514 was completed by operator
_SLOPER$FTA6:
6.5.2 Providing the Correct Volume for a TL820
The following series of operator actions and replies occur when HSM needs to use a volume that
is not imported into a TL820 or similar device.
1.
HSM issues an OPCOM request asking for the volume to be loaded into the jukebox.
$
%%%%%%%%%%% OPCOM 08-Jan-2003 15:28:59.72 %%%%%%%%%%%
Request 65514, from user HSM$SERVER on SLOPER
Please import volume AWX001 or its associated magazine into jukebox containing
drive _SLOPER$MKA500:
2.
The operator then issues the STORAGE IMPORT command. When the green light on the
TL820 import goes on and an OPCOM message is issued requesting the load, the volume
can be inserted into the import. The command must be issued first since MDMS controls
access to the port door. The volume is physically inserted when MDMS asks for it.
$ STORAGE IMPORT CARTRIDGE AWX001 JUKEBOX1
3.
MDMS then logically imports the volume into the jukebox.
%SLS-S-VOLIMP, volume AWX001 imported into tape jukebox
4.
At this point, the necessary volume is in the jukebox. The operator must then reply to the
OPCOM message requesting that the volume be placed into the jukebox.
$ REPLY/TO=65514 15:31:17.45, request 65514 was completed by operator
_SLOPER$FTA6:
6.6 Other MDMS Messages
OPCOM messages are provided in Plus mode when an attempt to select a drive for HSM operations fails. An example of the messages follows:
%%%%%%%%%%% OPCOM 08-Jan-2003 12:01:23 %%%%%%%%%%%
Message from user HSM$SERVER on SYS001
MDMS/SLS error selecting a drive for volume DEC100, retrying
%%%%%%%%%%% OPCOM 08-Jan-2003 12:01:24 %%%%%%%%%%%
Message from user HSM$SERVER on SYS001bad density specified for given media
type
Two messages are written as a pair: the first message is a constant message from HSM identifying the problem volume. The second message is the MDMS/SLS error code received from the
call. Please note HSM does not consider a select failure as fatal, and retries the operation indefinitely. Please examine the OPCOM messages and correct the MDMS/SLS problem: refer to the
Media, Device and Management Services Guide to Operations for help in determining the problem. You can also use the command $ HELP STORAGE MESSAGE command for more information on specific MDMS/SLS messages for SLS /MDMS Versions prior to V2.6.
After the correction, HSM will proceed to process the requests normally. The OPCOM messages
are repeated every 10 minutes if the select error continues to occur.
Another MDMS OPCOM message is printed if MDMS selects a drive for a tape volume, but
cannot load the volume because it is already loaded in another drive.
Operator Activities in the HSM Environment 6–5
Operator Activities in the HSM Environment
6.7 Drive Selection and Reservation Messages for Both Modes
%%%%%%%%%%% OPCOM 08-Jan-2003 12:01:23 %%%%%%%%%%%
Message from user HSM$SERVER on SYS001
Volume APW032 cannot be loaded into selected drive $1$MKA100:
Volume is loaded in another drive
Check volume location and drive availability, REPLY when corrected
This message should not normally happen, but if it does you should check the following:
•
Determine whether another user (besides HSM) is using the volume. If so, you will need to
wait until that user has finished with the volume and has deallocated the other drive. Then
you can reply to the OPCOM message.
•
If no other user has allocated a drive with this volume, check access to the other drive via
STORAGE commands, MRU commands and/or OpenVMS MOUNT. If the volume cannot
be accessed on the other drive, please follow corrective procedures by troubleshooting the
hardware problem. When the volume is accessible, then reply to the OPCOM message.
In addition to the specific information given here about working with automated loaders, MDMS
may display other messages that you need to respond to or deal with on versions prior to V2.6.
For information about MDMS messages, see the MDMS online help.
$ HELP STORAGE messages
6.7 Drive Selection and Reservation Messages for Both Modes
The following OPCOM messages may be displayed when an error occurs trying to select and
reserve a drive for HSM operations.
6.7.1 Unavailable Drive
%%%%%%%%%%% OPCOM 08-Jan-2003 12:01:23 %%%%%%%%%%%
Message from user HSM$SERVER on SYS001
Drive "name" has been marked unavailable and disabled -Please re-enable or
disable using SMU SET DEVICE name /ENABLE or /DISABLE
HSM has detected multiple errors while trying to use the drive, has assumed the drive to be bad,
and has disabled operations on the drive. This message is repeated every 10 minutes until the
operator enters one of the following commands:
•
SMU SET DEVICE/DISABLED - This disables the device while possible repairs are
made. Entering this command stops the OPCOM message from being displayed. While the
device is disabled, alternative device(s) should be defined for HSM use.
•
SMU SET DEVICE/ENABLED - This re-enables the device for
use by HSM.
6.7.2 Reservation Stalled
%%%%%%%%%%% OPCOM 08-Jan-2003 12:01:23 %%%%%%%%%%%
Message from user HSM$SERVER on SYS001
Drive reservation for tape volume "name" stalled, retrying Optionally check drive availability and configuration
This message is an indication that a request for a tape drive is outstanding, and there are not
enough drives available to handle the request. This could be because all defined drives are busy,
or that a defined drive is disabled or otherwise cannot accept the request. Normally, no action is
needed on this message, and the request is processed when a drive frees up. However, if this
message persists for a long time, the operator should examine the HSM configuration and the
drives to see if there is a problem.
Operator Activities in the HSM Environment 6-6
Operator Activities in the HSM Environment
6.8 Informational Operator Messages
6.7.3 Wrong Tape Label
%%%%%%%%%%% OPCOM 30-MAY 12:01:23 %%%%%%%%%%%
Message from user HSM$SERVER on SYS001
Tape volume label on drive "name" detected
Expected volume "right_name" but read "wrong_name"
Please check volume and configuration
This message is displayed when HSM mounts the wrong tape for an operation. An accompanying message will be issued for non-robot tape devices to request a load of the correct volume to
the specified drive.
6.8 Informational Operator Messages
The following OPCOM messages are printed out to log significant events in HSM operations.
They are also logged in the shelf handler audit log.
HSM Startup Message
%%%%%%%%%%% OPCOM
6-JUN- 13:55:18.52
%%%%%%%%%%%
Message from user HSM$SERVER on SYS001
HSM shelving facility started on node SYS001
This message is printed out when HSM is started on a node via an SMU STARTUP command.
Do not issue a REPLY to this message.
HSM Shelf Server Message
%%%%%%%%%%% OPCOM
6-JUN- 13:55:18.39
Message from user HSM$SERVER on SYS001
HSM shelf server enabled on node SYS001
%%%%%%%%%%%
This message is printed out when an HSM shelf server becomes enabled on a certain node. This
means that all tape operations are handled by this node from this point on. This message is
printed out at startup of the server node or when a node takes over as the shelf server after a failure.
Do not issue a REPLY to this message.
HSM Shutdown Message
%%%%%%%%%%% OPCOM
6-JUN- 13:55:18.52
%%%%%%%%%%%
Message from user HSM$SERVER on SYS001
HSM shelving facility shutdown on node SYS001
This message indicates that HSM has been shut down with an SMU SHUTDOWN command.
Do not issue a REPLY to this message.
HSM Termination Message
%%%%%%%%%%% OPCOM
6-JUN- 13:55:18.52
%%%%%%%%%%%
Message from user HSM$SERVER on SYS001
HSM shelving facility terminated on node SYS001
This message indicates that HSM has terminated for some reason. It immediately follows any
shutdown message. If it appears without a shutdown message, then an error occurred. Refer to
the shelf handler error log to determine the cause of the error.
Do not issue a REPLY to this message.
Operator Activities in the HSM Environment 6–7
7
Solving Problems with HSM
This chapter explains how to identify and correct potential HSM problems.
7.1 Introduction to Troubleshooting
This chapter describes many of the common problems that can arise as a result of using HSM
and lists appropriate solutions. The chapter is structured into the following sections:
•
Introduction to Troubleshooting -Roadmap for locating appropriate log files, tools, and
problem categories while troubleshooting a problem
•
Troubleshooting Tools - An overview of HSM tools that you can use to diagnose and
resolve problems
•
Installation Problems - Problems that can arise when you install HSM
•
HSM Startup Problems - Problems that can arise when you startup or shutdown HSM in a
VMScluster environment
•
Mass Shelving Problems -The problem of unintentionally shelving a large number of files
all at once, how to avoid this problem, and how to recover if it proceeds
•
System Disk Shelving Problems - The potential problems associated with allowing files on
the system disks to be shelved, and recovery solutions
•
HSM Plus Mode (MDMS) Problems - Problems that HSM Plus mode may have that are
actually MDMS problems
•
VMScluster Problems - Problems associated with running HSM on multiple nodes in a
VMScluster system
•
Online Disk Problems - Problems associated with management of online disks in an HSM
environment
•
Cache Problems-Problems associated with the use of an online cache as a staging area or
permanent shelf
•
Magneto-Optical Device Problems - Problems associated with using magneto-optical
devices
•
Offline Device Problems - Problems associated with nearline or offline tape devices in an
HSM environment
•
Magazine Loader Problems for HSM Basic Mode - Problems associated with the various
magazine loaders supported by HSM Basic mode, which may be dependent on the busarchitecture to which they are connected
•
Robotic Device Problems for HSM Plus Mode - Problems associated with the various robotically-controlled devices supported by HSM Plus mode, which may be dependent on the
bus-architecture to which they are connected
Solving Problems with HSM 7–1
Solving Problems with HSM
7.2 Troubleshooting Tools
•
Shelving Problems - Problems associated with the shelving and preshelving operations in
general
•
Unshelving Problems - Problems associated with the unshelving and file fault operations in
general
•
Policy Problems - Problems associated with preventative and reactive policy execution, and
policy tuning
•
HSM System File Problems - Problems associated with the loss and corruptions of the system files that HSM uses for its operation
•
HSM Limitations - Some limitations to the extent that HSM can be used on online volumes,
and recovery actions if these limits are reached
The sections describing problems are in the following format:
•
Problem category
A problem category from the above list. Some problems may appear in several categories.
Read the above list to help determine the category of the problem you are experiencing.
Each problem category begins by describing the proper usage or configuration that can
avoid the problem in the first place. In many instances, reading this section is enough to
resolve the problem.
•
A table of specific problems in the following format:
Problem
A description of symptoms and possible problems within the category.
Solution
The solution is usually a specific solution to fix the specific problem assuming that it is a
problem. For example, the solution to the problem of not being able to shelve contiguous
files is:
SMU SET VOLUME /CONTIGUOUS.
However, before issuing this command, you should evaluate the advantages and disadvantages of shelving contiguous files.
Reference
A pointer to the section of the document that you should read for more details on the proposed solution.
HP recommends reading this chapter even if you have not experienced any problems. It can alert
you to potential problems to avoid when setting up and using HSM.
7.2 Troubleshooting Tools
HSM provides several tools and utilities to help troubleshoot problems and resolve them as they
occur. This section summarizes each tool and its purpose in troubleshooting.
7.2.1 Startup Logs
Two components of HSM have startup logs, which record the startup procedure and any failures
for the shelf handler process and the policy execution process:
•
HSM$LOG:HSM$SHELF_HANDLER.LOG - Shelf handler process startup log
•
HSM$LOG:HSM$SHELF_PEP.LOG - Policy execution process startup log
Solving Problems with HSM 7-2
Solving Problems with HSM
7.2 Troubleshooting Tools
If you have problems starting up HSM (using SMU STARTUP), examine these logs for more
information. All messages to SYS$OUTPUT from the startup process and its subprocesses are
written to this log. A new log file version is created for each startup event, and spans all nodes in
the VMScluster system. You need to read the log to determine the node to which the log file
refers.
Event Logs
7.2.2 After a problem occurs, the first things you should check are the event logs:
•
HSM$LOG:HSM$SHP_AUDIT.LOG-Shelf handler audit log
•
HSM$LOG:HSM$SHP_ERROR.LOG-Shelf handler error log
•
HSM$LOG:HSM$PEP_AUDIT.LOG-Policy execution audit log
•
HSM$LOG:HSM$PEP_ERROR.LOG-Policy execution error log
These logs report requests and errors, and have clusterwide scope. You should examine shelf
handler logs first, as these cover all activities performed by HSM. All user- visible requests are
reported in the shelf handler audit log, on both success and error.
If a problem occurs during the execution of a policy, whether scheduled preventative policy or
reactive policy, you can obtain more details on the error and associated policy execution in the
policy execution audit log. The policy audit log gives quite detailed information about the
progress of the policy execution and is logged for all policy runs. The policy error log gives
additional information if the policy failed because of an unexpected error. An error log entry is
not written if a policy simply fails to reach its goal-this information is written in the audit log.
Please note that entries are placed in the event logs at the completion of a request. Requests in
progress are not reported in the event logs, but rather in the activity log (see Section 7.2.3).
7.2.3 Activity Log
In contrast to the event logs, the activity log allows you to examine requests that are in progress.
This is useful if you suspect that an operation is hung, or there are requests that have been generated that you wish to cancel (such as an unintended mass shelving). An activity log can be
obtained using the SMU SHOW REQUESTS/FULL command, which dumps all in-progress
requests to the file HSM$LOG:HSM$SHP_ ACTIVITY.LOG. Note that the activity log is nodespecific.
The activity log is similar to the shelf handler audit log in format, except that the status and
"completion time" are necessarily different. In addition, flags showing the input options and
progress of the request also are displayed.
7.2.4 SMU LOCATE
If you are experiencing a problem in unshelving a shelved file's data, you can use the SMU
LOCATE command to retrieve full information about the file's data locations. Although HSM
tries to restore data from all known locations automatically, even when some of its metadata is
missing, there may be occasions when this is not possible. In these situations, you should use the
SMU LOCATE command to locate the file's data. Once you have found the data, you can restore
it manually using BACKUP (from tape) or COPY (from cache) commands. SMU LOCATE
reads the HSM catalog directly to find a shelved file's data locations.
You should note that the SMU LOCATE command does not work quite the same way as a typical OpenVMS commands when processing look-up and wildcard operations. The file name you
supply as input (including any wildcards) applies to the file as stored in the HSM catalog at the
time of shelving. Thus, for example:
•
You may locate a shelved file by name, even if it has
been deleted from the online system.
Solving Problems with HSM 7–3
Solving Problems with HSM
7.2 Troubleshooting Tools
•
If the file has been renamed on the online system, you
the time of shelving) to locate it.
must use the old name (current at
•
Alternatively, you can identify a file by file identifier, which together with a device name,
uniquely identify a file, regardless of any renaming that may have been done after shelving.
•
If you do not specify a device and/or directory in the SMU LOCATE command, it uses the
default of *:[000000...]*.*;*.
When you retrieve information using the SMU LOCATE command, several instances or groups
of stored locations may be displayed. These reflect the locations of the file when it was shelved
at various stages of its life. You should carefully review the shelving time and revision time of
the file to determine which, if any, is the appropriate copy to restore.
7.2.5 UNSHELVE/OVERRIDE
When a shelved file is accessed causing a file fault, or when a request to unshelve a file is made,
HSM performs consistency checking to validate that the shelved file data actually belongs to the
file being requested. There are many such tests, including verification of the file identifier,
device, and revision dates to ensure that the data being retrieved for the file is correct.
If any of the consistency checks fail, the file is not unshelved and the user-requested operations
fail with an error message. As the system manager, you may be able to force unshelving of the
file if some of these tests fail by using the UNSHELVE/OVERRIDE command, which requires
BYPASS privilege. This tool enables you to retrieve important file data in the event that an
unusual situation has occurred.
HP recommends that you examine the circumstances of the original consistency failure before
using the UNSHELVE /OVERRIDE option. For example, use the SMU LOCATE command to
verify the file revision dates. It is very likely that the data that you would restore is not exactly
current, and additional recovery may be needed. Under no circumstances should
UNSHELVE/OVERRIDE be used during normal operations (in policy scripts for example). The
consistency failure indicates that HSM has detected a real problem that needs to be examined.
7.2.6 SMU RANK
The SMU RANK command provides the capability of previewing an actual policy execution
against a volume, before any files are actually shelved. This lists the names of all files that would
be shelved if a policy were to be executed on a volume.
To avoid a mass shelving problem, HP recommends that you make extensive use of this command before enabling any automatic policy executions on a volume (see Section 7.5).
This command also can be used to tune your policies so that they select the correct files for
shelving based on usage in your environment and that the quantity of files that they select is
manageable.
7.2.7 SMU SET and SHOW Commands
Many operational problems are caused by invalid or illogical configurations as set up using
SMU commands. You can use the SMU SET and SHOW commands to determine if your configuration is valid and to make the configuration valid. The following are examples of common
configuration problems that can easily be corrected using the SMU SET and SHOW commands:
•
A shelf is defined with no archive classes.
•
A shelf with archive classes has no devices that support
•
Operations are disabled on the facility, the shelf, the
an operation.
Solving Problems with HSM 7-4
those archive classes.
device, the cache, or the volume for
Solving Problems with HSM
7.3 Installation Problems
•
An archive class is supported by a device with an
incompatible media type.
•
A magneto-optical (MO) device is set up using the SMU SET DEVICE instead of the
SMU SET CACHE command. MO devices are supported only as permanent shelves using
the SMU SET CACHE commands.
See Chapter 3 for a tutorial in configuring HSM and the appendix in the Installation Guide for an
example on how to set up a moderately complex configuration.
7.2.8 MDMS Tools for HSM Plus Mode
To verify the MDMS configuration and evaluate MDMS problems that affect HSM, use the following MDMS commands:
•
STORAGE SHOW DRIVE
•
STORAGE SHOW JUKEBOX
•
STORAGE SHOW MAGAZINE
•
STORAGE SHOW VOLUME
•
STORAGE REPORT
For more information on these commands, see the Media, Device and Management Services for
OpenVMS Guide to Operations.
7.3 Installation Problems
A number of problems can appear during the installation process. VMSINSTAL displays failure
messages as they occur. If the installation fails, you see the following message:
%VMSINSTAL-E-INSFAIL, The installation of HSM V2.1 has failed.
Depending on the problem, you may see additional messages that identify the problem. Then,
you can take appropriate action to correct the problem.
Sometimes, the problem does not show up until later in the installation process.
If the IVP fails, you see this message:
The HSM V2.1 Installation Verification Procedure failed.
%VMSINSTAL-E-IVPFAIL, The IVP for HSM V2.1 has failed.
Errors can occur during the installation if any of the following conditions exist:
•
The operating system version is incorrect.
•
Quotas necessary for successful installation are insufficient.
•
System parameter values for successful installation are insufficient.
•
The OpenVMS help library is currently in use.
•
The product license has not been registered and loaded.
•
HSM is currently running on at least one node in the cluster.
For descriptions of the error messages generated by these conditions, see the OpenVMS documentation on system messages, recovery procedures, and VMS software installation. If you are
notified that any of these conditions exist, you should take the appropriate action as described in
the message. For information on installation requirements, see Chapter 1 of the HSM Installation
Guide.
Solving Problems with HSM 7–5
Solving Problems with HSM
7.4 HSM Startup Problems
7.4 HSM Startup Problems
This section describes problems that can occur while starting up HSM.
7.4.1 SMU Does Not Run
If you cannot run the Shelf Management Utility (SMU), examine Table 7-1 for more information.
Note
In the reference column of a this table, IG refers to the HSM Installation Guide. When
IG is not mentioned, assume that the reference is to this HSM Guide to Operations
Manual.
Table 7–1 SMU Does Not_Run
Problem
Solution
Reference
HSM license not installed
Install the HSM License
IG Section 1.1.3
DECthreads images not
installed
Install DECthreads images
IG Section 1.1.4
HSM logical names not defined
Define HSM$CATALOG,
HSM$MANAGER, and
HSM$LOG
Section 2.11
Installation not complete
Complete installation
IG Section 1.3
Insufficient privilege
Check privileges in current account
IG Section 1.2.1
7.4.2 The Shelf Handler Does Not Start Up
If the shelf handler process (HSM$SHELF_HANDLER) does not start up, examine Table 7-2
and the following files for more information:
•
HSM$LOG:HSM$SHELF_HANDLER.LOG-Shelf handler startup log
•
HSM$LOG:HSM$SHP_ERROR.LOG-Shelf handler error log
Note
In the reference column of a this table, IG refers to the HSM Installation Guide. When
IG is not mentioned, assume that the reference is to this HSM Guide to Operations
Manual
Solving Problems with HSM 7-6
Solving Problems with HSM
7.4 HSM Startup Problems
.
Table 7–2 The Shelf Handler Does Not Start Up
Problem
Solution
Reference
HSM license not installed
Install the HSM License
IG Section 1.1.3
Catalog not created
Create a catalog
IG Section 1.4.2
SMU databases not created
Create databases; run SMU or
HSM$STARTUP.COM
HSDRIVER not loaded
On VAX systems: SYSGEN CONNECT/NOADAPTER On Alpha systems:SYSMAN IO_CONNECT
HSA0: /NOADAPTER
IG Section 1.4.1
HSM logical names not defined
Define HSM$CATALOG,
HSM$MANAGER, and HSM$LOG
Section 2.11
HSM logical names not systemwide
Use DEFINE/SYSTEM
Section 2.11
HSM logical names not same
clusterwide
Use SYSMAN to define
Section 2.11
HSM logical names not correct
Check and redefine HSM$CATALOG, HSM$MANAGER, and
HSM$LOG
Section 2.11
Version limits on HSM$LOG
directory
Remove version limits from
HSM$LOG directory
Section 2.11
Shelf handler already started
Nothing
Insufficient quotas
Increase quotas
IG Section1.2.4
Insufficient privilege
Check and change HSM$SERVER
account V
IG Section 1.2.1
Insufficient disk space on
HSM$MANAGER HSM$CATALOG, HSM$LOG
Delete some files or redirect to
another disk
Request log corrupted
DeleteHSM$SHP_REQUEST*.SYS;* and
restart
SMU database corrupted
Delete HSM$LOG:HSM$*.SMU,
recreate databases and restart; run
SMU or HSM$STARTUP.COM
Catalog corrupted
Recover catalog from BACKUP copy
and restart
Section 5.10.2
Installation not complete
Complete installation
IG Section 1.3
Shelf handler running in Basic
mode after converting to Plus
mode Verify all conversion
steps performed especially SM
SMU SET FACILITY
/MODE=PLUS
Section 5.22
Solving Problems with HSM 7–7
Solving Problems with HSM
7.4 HSM Startup Problems
7.4.3 Policy Execution Process Does Not Start Up
If the shelf handler successfully starts up, but the policy execution process does not, examine
Table 7-3 and the following files for more information:
•
HSM$LOG:SHELF_PEP.LOG - Policy execution startup log
•
HSM$LOG:PEP_ERROR.LOG - Policy execution error log
Note
In the reference column of a this table, IG refers to the HSM Installation Guide. When
IG is not mentioned, assume that the reference is to this HSM Guide to Operations
Manual.
Table 7–3 Policy Execution Process Does Not Start Up
Problem
Solution
Reference
Version limits on HSM$LOG
directory
Remove version limits from
HSM$LOG directory
Policy execution process
already started
Nothing
Insufficient quotas
Increase quotas
IG Section 1.2.4
Insufficient privilege
Check and change
HSM$SERVER account privileges
IG Section 1.2.1
Insufficient disk space on
HSM$MANAGER, HSM$LOG
Delete some files or redirect to
another disk
SMU database corrupted
Delete
HSM$LOG:HSM$*.SMU, recreate databases and restart; run
SMUor HSM$STARTUP.COM
Installation not complete
Complete installation
IG Section 1.3
7.4.4 HSM Does Not Shut Down
If you have entered a SHUTDOWN command, but HSM does not shut down, and you have
waited at least 30 seconds, examine Table 7-4 for more information.
Table 7–4 HSM Does Not Shut Down
Problem
Solution
HSM requests are in progress
SMU SHUTDOWN/NOW
BACKUP operation is in
progress
Wait 5 minutes- HSM does not
exit if a BACKUP SAVE operation is in progress unless a 5
minute timeout expires: look for
HSM$SERVER_xx processes
in SHOW SYSTEM to verify
HSM is hung
Use SYSMAN DO SMU
SHUTDOWN/FORCE on all
nodes
Solving Problems with HSM 7-8
Reference
Solving Problems with HSM
7.5 Mass Shelving
7.4.5 Shelving and SMU Commands Do Not Work
The following symptoms mean that parts of the HSM system are not running:
•
Shelving and SMU commands hang.
•
Shelving commands and SMU commands receive a shelf handler communications error
message.
•
The text unknown version appears on a component of the SMU SHOW VERSION command.
If the shelving driver is not loaded, issue the following command on OpenVMS VAX™ systems:
$ MCR SYSGEN CONNECT HSA0:/NOADAPTER
If the shelving driver is not loaded, issue the following command on OpenVMS Alpha™ systems:
$ MCR SYSMAN IO_CONNECT HSA0:/NOADAPTER
To recover any other component, issue the following command:
$ SMU STARTUP
7.5 Mass Shelving
Unintended mass shelving can occur when you enable OCCUPANCY, HIGHWATER_MARK,
and QUOTA operations on specific volumes, or the default volume, without careful preparation.
HP recommends that you stage automatic shelving, one volume at a time, and in manageable
quantities on those volumes by gradually lowering the volume's low water mark from its current
occupancy level to the desired level.
You should not attempt to shelve more than 1000 files at a time, otherwise HSM's performance
will degrade. Use the SMU RANK command to determine the quantity (and names) of files that
would be shelved, before enabling the policy.
If you have accidentally initiated a mass shelving operation on a volume, use Table 7-5 to
recover.
Note
In the reference column of a this table, IG refers to the HSM Installation Guide. When
IG is not mentioned, assume that the reference is to this HSM Guide to Operations
Manual.
Table 7–5 Accidentally Starting Mass Shelving
Problem
Solution
Reference
Cannot determine what would
be shelved
Use SMU RANK
HSM Command Reference
Guide
Do not know what's being
shelved
Use SMU SHOW
REQUESTS/FULL
HSM Command Reference
Guide
Want to stop shelving on volume
Use SMU SET VOLUME /DISABLE=SHELVE
Solving Problems with HSM 7–9
Solving Problems with HSM
7.6 Shelving on System Disks
Table 7–5 Accidentally Starting Mass Shelving
Problem
Solution
Reference
Want to stop all shelving
Use SET FACILITY /DISABLE=SHELVE
Want to recover all
shelved_files
Use UNSHELVE
device:[000000...]*.*;*
Additional options exist to cancel shelving operations at other granularities. See Table 5-6.
Note that once a shelving policy has begun, it is too late to simply disable the policy on the volume: SHELVING must be disabled. However, it is a good idea to disable OCCUPANCY,
HIGHWATER_MARK, and EXCEEDED QUOTA on the volume, in case a trigger initiates
another mass shelving on the volume.
7.6 Shelving on System Disks
Warning
HP strongly recommends that you do not enable shelving or any automatic shelving
policies on system disks.
Although the installation procedure marks OpenVMS system files as unshelvable, this could be
enabled (intentionally or unintentionally) later. The installation procedure does not protect layered product files from shelving. You should define system disks separately from the
HSM$DEFAULT volume and disable all HSM operations, as in the following example:
$ SMU SET VOLUME SYS$SYSDEVICE:/DISABLE=ALL
Note that if there is more than one system disk in a VMScluster system, the command should be
issued on each node that has its own system disk. This especially applies to mixed VAX and
Alpha VMScluster systems.
If OpenVMS system or key layered product files are shelved, the consequences are that it may
no longer be possible to boot any system in the VMScluster environment. Specifically, if a file
involved in the system startup stream is shelved, then accessed before HSM is started, the boot
procedure will fail. Recovery may require a complete reinstallation of OpenVMS and affected
layered products. It is much better to simply disable shelving on the system disks rather than to
have to worry about all these consequences.
The procedures in Table 7-6 should be adopted to prevent or recover from this condition.
Table 7–6 Shelving on System Disks
Problem
Solution
Prevent shelving on system
disks
SMU SET VOLUME
system_disk: /DISABLE=ALL
Prevent OpenVMS system files
from being shelved
SET FILE
disk:[directory_tree...]*.*;*/NO
SHELVABLE
Recover if system cannot boot
Reinstall OpenVMS and
affected layered products
Solving Problems with HSM 7-10
Reference
Solving Problems with HSM
7.6 Shelving on System Disks
7.6.1 HSM Plus Mode (MDMS) Problems
There are a number of problems that HSM Plus mode may have that are not HSM problems, but
are instead problems with MDMS. Many of these problems are related to MDMS configuration
issues. For more information, see the Plus Mode Offline Environment Chapter of the HSM
Installation and Configuration Guide and the Media, Device and Management Services for
OpenVMS Guide to Operations.
Note
In the reference column of a this table, IG refers to the HSM Installation Guide. When
IG is not mentioned, assume that the reference is to this HSM Guide to Operations
Manual unless otherwise specified.
Table 7–7 MDMS Problems
Problem
Solution
Reference
No volumes are defined in the
MDMS volume database for the
volume pool HSM is using
Use the following HSM command to add new volumes to the
volume pool $ STORAGE
ADD VOLUME 6 vol_name
/POOL=pool_name or use the
following command to add
existing volumes to the volume
pool: $ STORAGE SET VOLUME vol_name
/POOL=pool_name
Installation & Configuration:
Guide, Chapter
HSM is not authorized to access
the volume pool.
Use the MDMS Administrator
menu to authorize access to the
volume pool
HSM Installation & Configuration Guide, Chapter 6
The media type specified for the
archive class in HSM does not
match any valid media type
defined in TAPESTART.COM.
Look at TAPESTART.COM to
find a valid media type defintion. Use HSM $ SMU SET
ARCHIVE
/MEDIA_TYPE=media_ type
to associate the appropriate
media type with the archive
class.
Installation & Configuration
Guide, Chapter 6
MDMS is not running.
$Use the following command to
start up MDMS: @SYS$STARTUP:SLS$STARTUP
MDMS Guide to Operations
HSM asks you to load volumes
that are contained in a robotically controlled device
Check value for QUICKLOAD
in TAPESTART.COM; QUICKLOAD should be set to
1 to indicate the operator does
not need to respond to requests
to load volumes. Be sure all
jukeboxes are defined correctly.
MDMS Guide to Operations
Solving Problems with HSM 7–11
Solving Problems with HSM
7.7 HSM VMScluster Problems
7.7 HSM VMScluster Problems
HSM is designed to run in a VMScluster environment. It must run on all nodes in the cluster so
that files can be accessed from any node. The following requirements define how HSM must be
run in a cluster environment for correct operation:
•
HSM must be started on all nodes in the VMScluster system-it is recommended that HSM is
started automatically in each node's startup procedure.
•
The logical names HSM$MANAGER, HSM$LOG and HSM$CATALOG must be defined
as systemwide logical names with the same definition on all nodes in the VMScluster system. Use SYSMAN with VMScluster environment to define these logical names.
•
All devices defined as cache devices, including magneto-optical disks, must be systemmounted and accessible from all nodes in the VMScluster system.
•
In Basic mode, tape devices must be accessible from all nodes enabled as shelf servers in the
VMScluster system. If no shelf servers are specified, the devices must be accessible from
all nodes in the VMScluster system.
•
After installation, be sure to run HSM$STARTUP.COM on all cluster nodes of the same
architecture to install sharable images, define logical names, and correctly start up HSM.
Using SMU STARTUP after an installation or upgrade of HSM is not sufficient on the first
startup attempt.
If you are still having VMScluster problems, examine Table 7-8 for more information.
Note
In the reference column of this table, IG refers to the HSM Installation Guide. When
IG is not mentioned, assume that the reference is to this HSM Guide to Operations
Manual.
Solving Problems with HSM 7-12
Solving Problems with HSM
7.8 Online Disk Problems
Table 7–8 HSM VMScluster Problems
Problem
Solution
Reference
No control over shelf server
node
SMU SET FACILITY
/SERVER=node,
HSM Command Reference
Guide
Shelf server node is unavailable
Specify alternate /multiple shelf
server nodes
HSM Command Reference
Guide
No failover after shelf server
failure Verify that multiple
nodes are defined as designated
servers
HSM Command Reference
Guide
Cannot use cache disk on a node
System mount cache disk on
the node
Cannot use private cache disk
on a visible node
All cache disks must be
VMScluster
Cannot access tape drive from a
server node
All drives must be visible to all
shelf server nodes
Cannot locate a shelved file in
catalog
Define HSM$CATALOG with
same definition on all nodes
IG Section 1.5
SMU database definitions different on nodes
Define HSM$MANAGER with
same definitions on all nodes
IG Section 1.5
Do not know which node is
server
Search shelf handler audit log
for last server startup
No node comes up as server
Startup HSM on one or more
defined server nodes
7.8 Online Disk Problems
You can enable HSM operations on any or all of your online disks in the cluster as long as those
disks are served and accessible to all nodes in the VMScluster system. HSM operations on
purely local disks are not supported for HSM Version 2.2.
The online disks must be mounted and accessible to all nodes in the cluster. Any suitably privileged user can perform HSM operations on system-mounted disks. Access to group-mounted
disks are subject to the same restrictions for HSM as normal operations. Process-mounted disks
are ineligible for HSM operations.
HSM keeps a file open on all disks enabled for HSM operations: this file must be closed if the
disk needs to be dismounted for any reason. To do this, enter the following commands:
•
SMU SET VOLUME/DISABLE=ALL to close the file on the disk
•
If the disk is an HSM cache disk, you also need to enter one of the following commands:
–
SMU SET CACHE/DELETE to close the file following a cache flush: this keeps the
file open until the flush is complete, but maintains full access to
shelved file data:
the flush may take many minutes to complete.
–
SMU SET CACHE/DISABLE to close the file immediately: access to shelved file data
in the cache is not possible while the disk is dismounted.
Solving Problems with HSM 7–13
Solving Problems with HSM
7.9 Cache Problems
Table 7-9 shows problems that can occur with online disks.
Note
In the reference column of this table, IG refers to the HSM Installation Guide. When
IG is not mentioned, assume that the reference is to this HSM Guide to Operations
Manual.
Table 7–9 Online Disk Problems
Problem
Solution
Reference
HSM operation is disabled on
volume
SMU SET VOLUME/ENABLE=operation
HSM Command Reference Guide
Volume does not exist in SMU
database
Use attributes of
HSM$DEFAULT_VOLUME
HSM Command Reference Guide
Unintended mass shelving
started on volume
S MU SET VOLUME /DISABLE=SHELVE
Section 7.5
Cannot unshelve to local volume Use SMU LOCATE and
retrieve the data manually
HSM Command Reference Guide
Volume cannot be dismounted,
open file
SMU SET VOLUME/DISABLE=ALL
HSM Command Reference Guide
Cache volume cannot be dismounted, open file
SMU SET CACHE /DISABLE
HSM Command Reference Guide
Device full on unshelve
Purge/delete/shelve some files, or run
HSM policy, and retry.
Exceeded quota on unshelve
Purge/delete/shelve some files of the same
owner as the shelved file, or run HSM policy, and retry.
Run out of file headers
There is an OpenVMS limit on the number
of file headers available on a system. For
more information, see Section 7.18.1.
No HSM operations run, volume is mounted read-only
Mount volume read/write for any operation, even unshelving. Disable the volume
for all HSM operations if it is mounted
read-only.
HSM operations hang, writeprotect button pushed on disk
Reset write protect button. If you must
write-protect the disk, the proper operations are: disable all HSM operations on
volume, then mount the volume read-only.
7.9 Cache Problems
The following problems are related to using an online cache. Unless you use the /BACKUP
qualifier on the cache to create nearline/offline shelf copies at shelving time, your file data exists
as a single copy on one of the defined cache devices until the cache is flushed. To ensure that this
single copy provides the same level of protection as your online data, HP recommends the following:
•
Configure your cache disk as a shadowed disk-this
crashes
Solving Problems with HSM 7-14
eliminates problems due to disk head
Solving Problems with HSM
7.10 Magneto-Optical Device Problems
•
Back up your cache disk regularly-nightly is recommended
•
Synchronize your nightly backups with cache flushing: flush the caches first, then perform
nightly backups-in this way, the cache is usually empty
Table 7-10 shows problems that can occur with cache operations.
Note
In the reference column of this table, IG refers to the HSM Installation Guide. When
IG is not mentioned, assume that the reference is to this HSM Guide to Operations
Manual.
Table 7–10 Cache Problems
Problem
Solution
Reference
Cache is not used on all nodes
Ensure cache device is visible
and system-mounted on all
nodes
Cache disk is never used
Cache disks are filled to high
water mark before switching to
another cache
Cache is not used: files go to
tape
Cache disabled- enable the
cache
HSM Command Reference
Guide
Cache is not used: files go to
tape
Cache is full-define additional
cache disks or increase block
size
HSM Command Reference
Guide
Cache is not used: files go to
tape
File is too large to fit in the
cache- increase block size if
needed
HSM Command Reference
Guide
Cache gets device full Cache
disk is full- define additional
cache disks
HSM Command Reference
Guide
Cache is as slow as tape operation
Normal behavior with
/BACKUP qualifier
HSM Command Reference
Guide
Cache flush does not occur
when cache high water mark is
reached
Define a high water mark of less
than 100%
HSM Command Reference
Guide
Cache flush does not occur on
schedule
See Offline Device Problems
Section 7.12
7.10 Magneto-Optical Device Problems
You can use magneto-optical devices in HSM by defining them as cache devices. As with other
cache devices, each device must be accessible and system-mounted on all nodes in the
VMScluster system. You can use magneto-optical devices in one of two ways:
•
As a staging area prior to shelving to tape. Define the cache as /NOBACKUP with a
/HIGHWATER_MARK and /INTERVAL and /AFTER which enabled periodic cache
flushing.
•
As a permanent shelf. Define the cache with /BACKUP, with /HIGHWATER=100 and
/NOINTERVAL to inhibit cache flushes.
Solving Problems with HSM 7–15
Solving Problems with HSM
7.11 Offline Device Problems
Each platter (or side of platter) that you wish to use as a cache must be defined with an SMU
SET CACHE command, and system-mounted on all nodes in the VMScluster system. Use the
logical device name of the mounted MO volume (JBxxx:) in the SET CACHE commands, not
the name of the MO drives.
Table 7-11 shows problems that can occur with magneto-optical devices. See also cache problems in Section 7.10.
Note
In the reference column of this table, IG refers to the HSM Installation Guide. When
IG is not mentioned, assume that the reference is to this HSM Guide to Operations
Manual.
Table 7–11 MO Device Problems
Problem
Solution
MO devices do not work
Install and run OSMS V3.3
software
Other problems
See Cache Problems
Reference
Section 7.10
7.11 Offline Device Problems
You can configure any number of nearline/offline devices for HSM use.
In Basic mode, nearline and offline devices must be accessible by all nodes in the VMScluster
system designated as shelf servers, or all nodes in the VMScluster system if no servers are specified.
In Plus mode, you can use nearline and offline devices that are:
•
On the VMScluster system, but not directly accessible to the shelf server
•
On a VMScluster system that is physically remote from the shelf server through RDF and
the SMU SET DEVICE/REMOTE command
Remote devices cannot be dedicated for HSM use.
Non-remote devices can be shared or dedicated for HSM use. If you set up a device for dedicated
use, HSM will keep a tape mounted in the device at all times in anticipation of the next operation. With shared usage, HSM dismounts and unloads the device within one minute of the last
operation.
Except when you are using nearline devices exclusively, tape operations are requested using
OPCOM messages. You should enable OPCOM classes CENTRAL and TAPES at all times to
respond to such messages.
Table 7-12 shows problems that can occur with offline devices.
Solving Problems with HSM 7-16
Solving Problems with HSM
7.12 Magazine and Robotic Loader Problems
Note
In the reference column of a this table, IG refers to the HSM Installation Guide. When
IG is not mentioned, assume that the reference is to this HSM Guide to Operations
Manual.
Table 7–12 Offline Device Problems
Problem
Solution
Reference
Tape operations hang-device
allocated to another user
Wait until other user dismounts
tape, HSM will then proceed
Tape operations hang-no
OPCOM messages
Enable OPCOM classes CENTRAL and TAPES
Tape operations hang-media
offline or volume not software
enabled
Put media online with online
button; if this does not work,
there may be a subsystem
access error to the drive -see
Release Notes
Device not selected on node
(HSM Basic mode)
Ensure device is accessible
from all server nodes, or specify server nodes and shutdown
and restart HSM
Device not released to other
applications, device in use
SMU SET DEVICE /DISABLE
HSM Command Reference
Guide
Device not released to other
applications, device not in use
SMU SET
DEVICE/SHARE=operation
HSM Command Reference
Guide
Tape operations are slow for
online user
Use a cache
Magazine loader problems
See Section 7.13
Release Notes
7.12 Magazine and Robotic Loader Problems
HSM supports various types of Digital magazine loaders and robotically-controlled large tape
jukeboxes for use as nearline shelf storage. Specific support varies depending on whether you
are running HSM in Basic mode or Plus mode. You define these devices with SMU SET
DEVICE commands as you would for any offline device and additional MDMS commands for
HSM Plus mode. Table 7-13 shows problems that can occur with magazine or robotic loaders.
Note
In the reference column of a this table, IG refers to the HSM Installation Guide. When
IG is not mentioned, assume that the reference is to this HSM Guide to Operations
Manual.
Solving Problems with HSM 7–17
Solving Problems with HSM
7.12 Magazine and Robotic Loader Problems
Table 7–13 Loader Problems
Problem
Solution
Reference
Tape requests hang
Ensure robot name is defined
and connected to the appropriate driver
IG Section 1.4.4
Tape inventories are taken too
often(Basic mode)
Do not switch volumes in
magazines, the wrong magazine, or switch volumes
between magazines
Robot tape device not handled
as robot in Basic Mode
Check that robot name is
defined (Basic Mode in SMU
device only)Robot Name definition.
Robot tape device not handled
as robot name in Plus Mode
Check that robot is defined correctly in MDMS TAPESTART.COM
HSM Installation & Configuration Guide, Chapter 6
SCSI robot device cannot be
used when connected to SCSI
bus
Connect robot name to
GKDRIVER
IG Section 1.4.4
Loading does not work on DLT
loaders
Ensure key position is in locked
or system command position
(key or square symbol)
Load fault on magazine loader
Reset the loader, insert magazine with no volume in
drive,HSM will continue
HSM loses status, takes inventory of drive/magazine because
of manual loading
Do not manually change magazines or load other volumes
until HSM has completed operations and dismounted the volume in the drive (issue $SHOW
DEVICE)
HSM does not unload volume
after operations on shared
device (Basic mode)
HSM dismounts the volume, but
the unloading must be done
manually or under control of
another application
Cannot use loader because
HSM is using it
SMU SET DEVICE /DISABLE
Other problems
See Section 7.12
Solving Problems with HSM 7-18
HSM Command Reference
Guide
Solving Problems with HSM
7.13 Shelving Problems
7.13 Shelving Problems
Table 7-14 describes generic shelving problems. These problems may additional to specific
cache or device problems. Many of these problems also apply to preshelving.
Table 7–14 Shelving Problems
Problem
Solution
Reference
Cannot shelve, capacity license
exceeded
Delete obsolete files or increase
license capacity
Shelving operation disabled on
facility
SMU SET FACILITY
/ENABLE=SHELVE
HSM Command Reference
Guide
Shelving operation disabled on
shelf
SMU SET SHELF
/ENABLE=SHELVE
HSM Command Reference
Guide
Shelving operation disabled on
volume
SMU SET VOLUME/ENABLE=SHELVE
HSM Command Reference
Guide
Cannot shelve file, insufficient
privilege
Must have read and write
access, GRPPRV or BYPASS
privileges
Cannot shelve file, ineligible
file
SET FILE /SHELVABLE Certain types of file are always
ineligible however
Can shelve file, but want to disable
SET FILE/NOSHELVABLE
Cannot shelve contiguous file
SMU SET VOLUME /CONTIGUOUS
HSM Command Reference
Guide
Can shelve contiguous file, but
want to disable
SMU SET VOLUME/NOCONTIGUOUS
HSM Command Reference
Guide
Cannot shelve placed file
SMU SET VOLUME/PLACEMENT
HSM Command Reference
Guide
Can shelve placed file, but want
to disable
SMU SET VOLUME
/NOPLACEMENT
HSM Command Reference
Guide
Cannot shelve very large file
Files larger than 45% of disk
capacity can never be shelved
Cannot shelve file, volume ineligible
SMU SET VOLUME
/ENABLE=SHELVE
HSM Command Reference
Guide
Can shelve files on volume, but
want to disable
SMU SET VOLUME/DISABLE=SHELVE
HSM Command Reference
Guide
Cannot shelve files, no archive
classes for shelf
SMU SET SHELF
/ARCHIVE=n /RESTORE=n. If
shelving to cache only, be sure
that cache devices are defined
and enabled.
HSM Command Reference
Guide
Cannot shelve files, no devices
defined for archive
SMU SET DEVICE
/ARCHIVE=n
HSM Command Reference
Guide
Ctrl/Y does not cancel shelve
operation
SHELVE/CANCEL
HSM Command Reference
Guide
Section 5.5
Solving Problems with HSM 7–19
Solving Problems with HSM
7.14 Unshelving Problems
Table 7–14 Shelving Problems
Problem
Solution
Cache problems during shelving
See Section 7.10
Offline device problems during
shelving
See Section 7.12
Magazine loader problems during shelving
See Section 7.13
Reference
7.14 Unshelving Problems
Table 7-15 describes generic unshelving problems that are in addition to specific cache or device
problems. Unshelving problems also apply to file faults.
Table 7–15 Unshelving Problems
Problem
Solution
Reference
Unshelving operation disabled
on facility
SMU SET FACILITY
/ENABLE=UNSHELVE
HSM Command Reference
Guide
Unshelving operation disabled
on shelf
SMU SET SHELF
/ENABLE=UNSHELVE
HSM CommandReference
Guide
Unshelving operation disabled
on volume
SMU SET VOLUME
/ENABLE=UNSHELVE
HSM Command Reference
Guide
Cannot unshelve file, insufficient privilege
Must have read access, or GRPPRV, READALL or BYPASS
privilege
Cannot unshelve file, inconsistent state
UNSHELVE/OVERRIDE, but
use with caution
Section 7.2.5
Cannot unshelve file, access
information lost
SMU LOCATE and manually
recover
HSM Command Reference
Guide
Cannot unshelve file, catalog or
catalog entry missing
See Section 7.17
Ctrl/Y does not cancel unshelve
operation
UNSHELVE/CANCEL
Device full on unshelve
Purge/delete/shelve some files,
or run HSM policy, and retry
Exceeded quota on unshelve
Purge/delete/shelve some files of
the same owner as the shelved
file, or run HSM policy, and
retry
Cache problems during unshelving
See Section 7.10
Offline device problems during
unshelving
See Section 7.12
Solving Problems with HSM 7-20
HSM Command Reference
Guide
Solving Problems with HSM
7.15 Policy Problems
Table 7–15 Unshelving Problems
Problem
Solution
Magazine loader problems during unshelving
See Section 7.13
Reference
7.15 Policy Problems
HSM policies are designed to automatically shelve files based on triggers initiated by online disk
events, high water marks, or scheduled operation. All problems with policies should first be
examined by reading the following files:
•
HSM$LOG:HSM$PEP_AUDIT.LOG-Policy audit log
•
HSM$LOG:HSM$PEP_ERROR.LOG-Policy error log
In addition, details on specific policy runs can be found in the output file specified with SMU
SET POLICY/OUTPUT.
Because policy runs usually involve shelving operations, please see also Section 7.14 if the
shelving operations of the policy fail, rather than the policy itself.
Table 7-16 shows problems that can occur with policy execution.
Table 7–16 Policy Problems
Problem
Solution
Reference
No policies will run, policy process not started
SMU STARTUP
HSM Command Reference
Guide
Preventative policy defined, but
never runs
SMU SET SCHEDULE
HSM Command Reference
Guide
Policies shelve recently
accessed files
SMU SET POLICY /ELAPSED
HSM Command Reference
Guide
Reactive policy runs on system
disk
SMU SET VOLUME /DISABLE=(OCC,HIGH,QUOTA)
HSM Command Reference
Guide
Policy runs on wrong node
SET POLICY /SERVER=node
HSM Command Reference
Guide
Selection based on read access
does not work
SET VOLUME/RETENTION
Policy does not reach low water
mark
Selection criteria too narrow,
broaden criteria
Files are shelved, unshelved too
often
Policy criteria not optimal, redefine criteria
Nightly backups too long,
unshelving occurs
Policy shelves files that have
been modified during backup
interval, redefine policy
Unintended mass shelving on
volume
See Section 7.5
Solving Problems with HSM 7–21
Solving Problems with HSM
7.16 HSM System File Problems
Table 7–16 Policy Problems
Problem
Solution
Users exceed disk capacity or
quota even when HS M policies
turned on
Decrease low water and/or high
water mark
Too many small files shelved
Use STWS algorithm or script
Reactive policy does not shelve
enough files
Decrease low water mark
High water mark polling of 10
minutes is not frequent enough
Decrease high water mark
Need to change HSM configuration before policy runs
Define additional policy to run a
script to change configuration,
and schedule before policy runs
Policy does not shelve any files
using expiration date
$ SET VOLUME HSM
/RETENTION=(1-,000:00:00.01)
Reference
Installation & Configuration
Guide, Chapter 6
7.16 HSM System File Problems
HSM uses several files for its own purposes, and these files need to be carefully maintained.
These files include:
•
HSM$CATALOG:HSM$CATALOG.SYS (the HSM catalog)
•
HSM$MANAGER:HSM$*.SMU (the SMU databases)
•
HSM$MANAGER:HSM$SHP_REQUEST*.SYS (the recovery logs)
•
HSM$MANAGER:HSM$SHP_DEVICE.DAT (the magazine loader database)
•
HSM$LOG:*.LOG (the startup, event and activity logs)
It is imperative that the logical names associated with these files are defined on all nodes with
the same definitions, so that HSM uses the same files on all nodes. It is also vital that the files
contained within HSM$CATALOG and HSM$MANAGER are given the highest safety protection available, including:
•
Shadowing the devices
•
Backing up the HSM system files regularly
Specifically, the HSM catalog must be given the highest priority. An unrecoverable loss of the
catalog will usually mean that you have lost access to all shelved file data, unless you have kept
logs of locations of the data by regular SMU LOCATE commands, and stored them away.
Other restrictions include:
•
Do not redefine any of these logical names while HSM is running. You can move the files
and redefine the logical names while HSM is shut down, however.
•
Do not delete any of these files while HSM is running. You can delete the recovery logs
HSM$SHP_REQUEST*.SYS while HSM is shut down, if you do not wish recovery to
occur after startup: HSM automatically recreates the recovery logs on startup if they do not
exist.
•
Do not rename any of these files. You can, however, rename the directories while HSM is
shut down, but never the file names.
Solving Problems with HSM 7-22
Solving Problems with HSM
7.17 HSM Limitations
•
If these files are deleted or otherwise unavailable, you should shut down HSM, recover the
files from a BACKUP copy, and restart HSM. Please note that any changes to the files
since the last BACKUP interval will be lost.
•
If the HSM catalog has to be recovered, the access information to files shelved since the last
BACKUP copy will be lost.
Refer to Section 5.10 for more details about how to recover HSM system files.
7.17 HSM Limitations
At the current time, there are a few limitations to HSM operations of which you should be aware.
These limitations are not necessarily the fault of HSM, but are instead reliant upon OpenVMS
behaviors:
•
Number of file headers available for an online disk volume
•
Behavior of Ctrl/Y when a file fault occurs on an
•
Behavior of SET PROCESS/NOAUTO_UNSHELVE across a network
executable file
7.17.1 OpenVMS Limit on File Headers
OpenVMS limits the number of file headers available for an online disk volume based on how
the disk is initialized. As a result, as you shelve data and do not clean up your online disk, you
could eventually exceed the number of file headers available.
To prevent this problem, make sure you delete file headers as appropriate. What this means is,
when you no longer need a file, do not leave it shelved with the file header on disk. Use another
strategy to archive the file, just in case you need it someday. Then, delete the file from the disk.
If you experience either IDXFILEFULL or HEADERFULL errors while trying to create files,
you have exceeded the file header limit defined on your system. If you installed HSM on an
existing system and have not specifically initialized your volumes for HSM use, you may not
have planned for the additional number of files in INDEXF.SYS (the index file that contains the
file headers for both online and shelved files). Also, you may not have preallocated space for the
file headers using the /HEADERS qualifier on the disk initialization.
IDXFILEFULL Error
If your users get IDXFILEFULL errors while trying to create files on the volume it means they
are attempting to create more files than that specified on the MAXIMUM_ FILES qualifier when
the volume was initialized. There are two possible solutions to this:
•
Delete unwanted files from the disk
•
Perform an image backup of the disk, reinitialize the disk with a larger MAXIMUM_FILES
value, then do an image restore operation specifying the /NOINITIALIZE qualifier on
the BACKUP command line.
HEADERFULL Error
If your users get a HEADERFULL error on INDEXF.SYS when creating files, it means the
INDEXF.SYS file has reached its fragmentation limit. That is, adding one more file extent to
INDEXF.SYS causes the "Map area words in use" field of INDEXF.SYS's header to exceed
155. To solve this problem:
5.
Perform an image backup of the disk.
6.
Reinitialize the disk.
7.
Perform an image restore of the disk.
Solving Problems with HSM 7–23
Solving Problems with HSM
7.17 HSM Limitations
The second step (reinitialize the disk) is not necessary unless you want to increase the
MAXIMUM_FILES value of the disk or preallocate a larger INDEXF.SYS file (via /HEADERS). If you do reinitialize the disk, remember to use the /NOINITIALIZE qualifier on the
backup command when restoring the disk.
7.17.2 Attempting to Cancel Execution of a Shelved File
When you attempt to execute (via a RUN command, for example) a shelved executable file, this
causes a file fault. If you then try to cancel that execution, it does not. This occurs because OpenVMS does not actually allow you to cancel a DCL command using a Ctrl/Y. Normally, when you
submit a DCL command that operates on data located online and type a Ctrl/Y to cancel it, the
execution completes and then is canceled quickly enough that you do not notice.
7.17.3 Automatic Unshelving of Files across a Network
If you attempt to access a shelved file across a network but have set your process to
/NOAUTO_UNSHELVE, the file is unshelved.
7.17.4 Opening and Deleting RMS Indexed Files
If you perform an RMS open of a shelved, indexed file, a file fault occurs, because some of the
RMS metadata resides in the data section of the file. A file fault also occurs if you perform a
DELETE/LOG of a shelved, indexed file; use DELETE/LOG with caution. DELETE/NOLOG
works as expected.
Solving Problems with HSM 7-24
8
What is MDMS?
This chapter starts by describing the Media, Device and Management Services software
(MDMS)’ management concept and its implementation. Following that is a description of the
product’s internal interfaces.
Note
User interfaces are described in the following chapter.
Media, Device and Management Services V4.1 (MDMS), can be used to manage locations of
tape volumes in your IT environment. MDMS identifies all tape volumes by their volume label
or ID. Volumes can be located in different places like tape drives or onsite locations. Requests
can be made to MDMS for moving volumes between locations. If automated volume movement
is possible - like in a jukebox (tape loader, tape library) - MDMS moves volume/s without
human intervention. MDMS sends out operator messages if human intervention is required.
MDMS allows scheduled moves of volumes between onsite and offsite locations (e.g. vaults).
Multiple nodes in a network can be setup as an MDMS domain. Note that:
•
all nodes in a domain access one MDMS database
•
all MDMS objects like volumes and drives are described in the MDMS database
MDMS is a client/server application. At a given time only one node in an MDMS domain will be
serving user requests and accessing the database. This is the database server. All other MDMS
servers (which are not the database server) are clients to the database server. All user requests
will be delegated through the local MDMS server to the database server of the domain.
In case of failure of the designated database server, MDMS’ automatic failover procedures
ensure that any of the other nodes in the domain, that has the MDMS server running, can take
over the role of the database server.
8.1 MDMS Objects
MDMS manages all information in its database as objects. Table 8–1 lists and describes the
MDMS objects.
Table 8–1 MDMS Object Records and What they Manage
This Object Record...
Meets the Need to...
Domain
Manage domain-wide operating parameters. MDMS creates this object
record automatically.
Node
Describe a node in the MDMS domain. It defines the node’s network
names.You cannot operate MDMS without Node object records.
Group
Group node object records. Groups are a convenient shortcut to specify a
list of nodes.
What is MDMS? 8–1
What is MDMS?
8.2 MDMS Interfaces
Table 8–1 MDMS Object Records and What they Manage
This Object Record...
Meets the Need to...
Location
Describe a location in your environment. A location can be the name of a
building, a room or a facility.
Request
Handle all MDMS operations initiated by a user or an application.
Drive
Describe an OpenVMS drive to MDMS.
Jukebox
Describe a tape loader or tape library to MDMS.
Magazine
Describe a tape magazine to MDMS. The use of magazine objects, is
optional even if magazines are used in reality.
Media Type
Describe the different media types represented by volumes.
Pool
Describe a group of volumes. Pools control which user has access to volumes in a group.
Volume
Describe an individual magnetic tape medium.
MDMS tries to reflect the true states of objects in the database. MDMS requests by users may
cause a change in the state of objects. For some objects MDMS can only assume the state, for
example: that a volume has been moved offsite. Wherever possible, MDMS tries to verify the
state of the object. For example if MDMS finds a volume that should have been in a jukebox
slot, in a drive, it updates the database with the current placement of the volume.
8.2 MDMS Interfaces
MDMS provides an internal callable interface to ABS and HSM software. This interfacing is
transparent to the ABS or HSM user. However some MDMS objects can be selected from ABS
and HSM.
MDMS communicates with the OpenVMS OPCOM facility when volumes need to be moved,
loaded, unloaded, and for other situations where operator actions are required. Most MDMS
commands allow control over whether or not an OPCOM message will be generated and
whether or not an operator reply is necessary.
MDMS controls jukeboxes by calling specific callable interfaces. For SCSI controlled jukeboxes
MDMS uses the MRD/MRU callable interface. For StorageTek jukeboxes MDMS uses DCSC.
You still have access to these jukeboxes using the individual control software but doing so will
make objects in the MDMS database out-of-date.
What is MDMS? 8-2
9
Basic MDMS Operations
This chapter describes basic MDMS operations and functions that apply to many MDMS
actions.
9.1 MDMS User Interfaces
MDMS includes two interfaces: a command line interface (CLI) and a graphic user interface
(GUI). This section describes how these interfaces allow you to interact with MDMS.
9.2 DCL Interface
MDMS provides a DCL command line interface in addition to MDMSView. Some people prefer
a command line interface, and it can also be used for automated command procedures. With this
release, the entire command line interface is supported within MDMS, which maintains the database for media management.
9.2.1 Syntax Overview
The MDMS DCL interface uses a consistent syntax for virtually all commands in the format:
$ MDMS VERB OBJECT_KEYWORD OBJECT_NAME /QUALIFIERS
The verb is an simple action word, and may be one of the following:
•
ALLOCATE
•
BIND
•
CREATE
•
DEALLOCATE
•
DELETE
•
INITIALIZE
•
INVENTORY
•
LOAD
•
SET
•
SHOW
•
UNBIND
•
UNLOAD
The object keyword is the object class name that the verb is to operate on. In MDMS, the object
keyword cannot be omitted. MDMS supports the following object keywords:
•
DOMAIN
•
DRIVE
Basic MDMS Operations 9–1
Basic MDMS Operations
9.2 DCL Interface
•
GROUP
•
JUKEBOX
•
LOCATION
•
MAGAZINE
•
MEDIA_TYPE
•
NODE
•
POOL
•
SERVER
•
SCHEDULE
•
VERSION
•
VOLUME
Following the object keyword, you should enter an object name. This must be the name of an
already-existing object unless the verb is “Create”, in which case the object must not already
exist.
The qualifiers for all commands are non-positional and may appear anywhere in the command
line.
There are two exceptions to the general command syntax, as follows:
•
The Move verb takes two arguments. The first is the object name as normal, and the second
is a destination object name. The destination object name is not preceded by an object keyword. An example of a Move command is:
MDMS MOVE VOLUME TLZ234 TLZ_JUKE/SLOT=4
•
The Report verb, which takes a variable number of arguments. This verb uses the syntax of
the old SLS Storage Report Volume command. Since the Report verb does not operate on
any specific object, the first argument is always the keyword “Volume”, and the other argument is a comma-separated list of display and/or selection attributes. For example:
$ MDMS REPORT VOLUME VOLUME,STATE=ALLOCATED,SCRATCH_DATE,PLACEMENT,PLACNAME
9.2.2 Object Lists
With this release of MDMS, all of the following commands accept a list of objects, so that you
can operate on multiple objects in a single command:
•
CREATE
•
DELETE
•
SET
•
SHOW
If you specify an attribute in a CREATE or SET command and use an object list, then that
attribute value is applied to all objects in the list.
Basic MDMS Operations 9-2
Basic MDMS Operations
9.2 DCL Interface
9.2.3 Qualifier List
Certain qualifiers accept a list of attributes, and the list can be applied in one of three ways using
an appropriate qualifier:
•
/ADD - The specified value or list is added to any pre-existing list; this is the default option
if you do not specify a qualifier
•
/REMOVE - The specified value or list is removed from any pre-existing list
•
/REPLACE - The specified value or list replaces any pre-existing list.
Consider the following examples:
MDMS CREATE GROUP COLORADO/NODES=(DENVER, SPRINGS, PUEBLO)
The group Colorado contains nodes Denver, Springs and Pueblo
MDMS SET GROUP COLORADO/NODE=ASPEN
The group Colorado now contains nodes Denver, Springs, Pueblo and Aspen. With no list qualifier specified, /ADD is applied by default.
MDMS SET GROUP COLORADO/NODE=ASPEN/REPLACE
The group Colorado now contains only node Aspen.
9.2.4 Inherit
All MDMS objects now accept the /INHERIT qualifier on Create. This allows you to create new
objects and inherit most attributes of an existing object. This provides an easy way to “clone”
objects, then apply the any differences in individual commands. It saves the effort of typing in all
the attributes once a prototype has been established. In general, only non-protected fields of
objects can be inherited.
In addition, the object list capability allows you to clone multiple objects in a single command.
For example:
MDMS CREATE DRIVE DRIVE_2, DRIVE_3, DRIVE_4/INHERIT=DRIVE_1
This command creates three drives and applies all non-protected attributes of DRIVE_1 to the
three new drives.
9.2.5 Symbols
MDMS now supports symbols on all objects, which command procedures can read and process.
To use symbols, enter a Show command for a single object (symbols are not supported for object
lists). The symbols are generally in the format “MDMS_INQ_qualifier”, where “qualifier” is
almost always the associated qualifier name for the attribute. The list of symbols for each show
command is documented for that command, and is also available in DCL help.
When you issue a Show/Symbols, the show output is not displayed by default. If you wish to see
the output as well, use Show/Symbols/Output.
9.2.6 Help and Reference
MDMS supports the normal DCL help mechanisms, as follows:
$ MDMS HELP [VERB] [KEYWORD] [/QUALIFIER]
$ HELP MDMS [VERB] [KEYWORD] [/QUALIFIER]
In addition, you can request help on any error message, for example:
Basic MDMS Operations 9–3
Basic MDMS Operations
9.3 User Interface Restrictions
MDMS HELP MESSAGE NOSUCHOBJECT
You can request help on any MDMS logical name, for example:
MDMS HELP LOGICAL MDMS%$LOGFILTER
Finally, you can locate the mapping of the old (pre-version 4.0B) ABS commands to the MDMS
equivalent, for example:
MDMS HELP MAPPING CREATE ARCHIVE
The MDMS Reference Guide fully documents all DCL commands and qualifiers.
9.3 User Interface Restrictions
MDMSView and the MDMS DCL supports operations on Archive Backup System (ABS)
objects only if an ABS or SLS license is loaded on the system. The ABS objects are:
•
Archives
•
Environments
•
Restores
•
Saves
•
Selections
MDMS supports operations on the other media management objects if the system only has a
Hierarchical Storage Management (HSM) license installed, or with an ABS or SLS license.
In addition, if the ABS license is the restricted OMT license, the following operations are not
supported:
•
Creation of archives or environments
•
Support of the Remote Device Facility
•
Support of DCSC-controlled jukeboxes
•
Support of external scheduler products
•
Save/restore frequencies other than Daily_Full_Weekly, On_Demand and One_Time_Only
9.4 Graphical User Interface
MDMS provides a graphical user interface called MDMSView, which provides several views that
you can use to manage your MDMS domain. MDMSview provides support for both media management and (if you have an ABS license) the Archive Backup System. MDMSView is designed
to be the preferred interface to ABS and MDMS, with the goal of supporting most, if not all, of
the regular management tasks. MDMSView supersedes all previous graphical interfaces for both
ABS and MDMS.
MDMSview provides several views into the management of MDMS objects and requests,
including ABS objects managed by MDMS. In V4.1, a limited number of views have been
implemented, but many more are planned for future releases. MDMSView currently supports the
following views:
•
Domain View - With this view, you can see the relationship between objects. For example,
under a specific location, you can see the nodes, (child) locations and jukeboxes in that location. At the next level, you can, for example, see the drives in the jukebox. On selecting a
specific object, you can then examine and optionally change its attributes.
Basic MDMS Operations 9-4
Basic MDMS Operations
9.4 Graphical User Interface
•
Object View - Similar to the domain view, but the navigation is by object class and is not
hierarchical. For example, all 16 objects classes are listed, and all objects in those classes
are displayed. You can then select an object to manipulate.
•
Report View - This view allows you to generate reports on a class of object using selection
criteria and attribute display options. Currently, the report view supports only volumes.
•
Request View - This view allows you to examine current activities in the MDMS database
server. A request summary and detailed request information is available, with a single click
refresh.
•
Task View - While both the domain and object view allow manipulation on a single object at
a time, the task view allows you to perform operations on multiple objects at once, or use
selection criteria to allocate objects. For example, you can create, show, delete and modify
multiple objects (of the same type) in one operation.
Each view is provided in a tab from the main screen, and you can be working in several views at
the same time, although only one is visible at a time. When switching from one view tab to
another, the contents of the tab you are leaving are retained, and you can return to it at any time.
9.4.1 Starting MDMSView
9.4.1.1
OpenVMS Systems
MDMSView is installed at installation time on OpenVMS systems. Please refer to the Installation Guide for instructions on how to install MDMSView and Java on OpenVMS systems.
Once the installation is complete, the following commands are required to activate the GUI:
$ @SYS$STARTUP:JAVA$SETUP.COM
$ SET DISPLAY/CREATE/NODE=nodename/TRANSPORT=TCPIP
$ MDMS/INTERFACE=GUI
where nodename is the TCP/IP node name of the system on which the MDMSView display is to
appear. Although the GUI itself must run on an Alpha System V7.2-1 and higher, using Java 1.2
or higher, the MDMSView display can be redirected to any OpenVMS system, including VAX
systems and those running OpenVMS versions less than V7.2-1.
9.4.1.2
Windows Systems
A SETUP.EXE package is also installed on OpenVMS systems for use on Microsoft Windows
(R) PCs. This file may then be transported to any Microsoft Windows PC and executed. The
SETUP.EXE will install MDMSView at a default location of C:\MDMSView, although alternative locations are possible. Once the PC installation is complete, you can execute MDMSView
by clicking on the mdmsview.bat file in that directory.
9.4.2 Look and Feel
Once MDMSView is started, it will come up with the default look and feel for the system. For
OpenVMS systems, this is the Java/Metal look and feel. For Windows systems, this is the Windows look and feel. You can adjust the look and feel to your taste by using the View menu as follows:
•
OpenVMS systems: View>Java Look and Feel or View>Motif Look and Feel
•
Windows systems: View>Java Look and Feel, View>Motif Look and Feel or View>Windows look and feel
Changing the look and feel requires a new login, so it’s a good idea to change this before logging
in. The value is saved in the MDMSView initialization file, and is used on all subsequent invocations from this location.
Basic MDMS Operations 9–5
Basic MDMS Operations
9.4 Graphical User Interface
9.4.3 Logging In
Once MDMSView is started and the look and feel is set, you need to log into an OpenVMS system, even if you are running on an OpenVMS system already. You can log into any OpenVMS
node in the MDMS domain, as long as it supports TCP/IP communication. Logging in requires
three fields, as follows:
•
Node name: TCP/IP name, address or node name alias indicating the OpenVMS node that
you wish to log into. This node must be running MDMS.
•
User name: A valid OpenVMS user name on the selected node.
•
Password: The password associated with the user account on the selected node.
If there is a login failure for any reason, the node name and user name are retained for subsequent retries, but the password must always be re-entered.
After a successful login, the login screen disappears and the MDMSView splash screen is displayed.
Figure 9–1 MDMSView Main Screen
Basic MDMS Operations 9-6
Basic MDMS Operations
9.4 Graphical User Interface
9.4.4 Selecting A View
The next step is to select a view depending on what you want to do. Here are some tasks that you
might wish to perform, and the associated view(s) that support them:
•
Configure the MDMS domain - Domain view, object view or task view
•
Create new objects - Domain view, object view or task view
•
Modify object attributes - Domain view, object view or task view
•
See relationships between objects - Domain view
•
Delete objects - Domain view or object view
•
Observe current MDMS operations - Request view
•
Generate volume reports - Report view
•
Create multiple objects - Task view
•
Allocate volumes based on selection criteria - Task view
•
Initialize a set of volumes - Task view
•
Run and save or restore request - Domain view or object view
The domain view and object view produce attribute and operation screens that work on one
object at a time. The task view produces screens that can operate on multiple objects, but restrict
the display of attributes to those that are common across the objects. The request view is a specialized view that allows you to show current requests (as a whole or in detail), and allows you to
delete requests as needed. The report view is a specialized view that generates customized volume reports.
All view displays are divided into two parts:
•
A left screen containing tree nodes for navigation purposes. The structure of the nodes are
view-specific, but the general concept is that there is a level for object classes (for example,
Jukebox or Drive), and under the class is a list of relevant objects (e.g. JUKE_1, DRIVE_1).
You can expand or contract any node (except for leaf nodes) in a manner similar to Windows explorer. If you click on a class name, the associated list of objects are displayed on
the right side of the screen. If you click on an object name, the object’s attributes and operations screens are displayed on the right.
•
A right screen which contains the object attributes, request information or report that you
wish to view. When clicking a class name from the left side, the objects in that class are displayed as icons on the right side. You can double-click on any object icon to bring up the
object’s attributes and operations screens. In the request view, you can refresh the whole
request display or an individual request display by clicking the refresh button.
While resizing the MDMSview screens is not supported, you can choose to view only the left or
right screens by using the arrows at the top of the division between the left and right screens.
Clicking on the left arrow eliminates the left screen, and clicking on the right arrow eliminates
the right screen. To restore the dual screens, click on the opposite arrow.
Basic MDMS Operations 9–7
Basic MDMS Operations
9.4 Graphical User Interface
Figure 9–2 MDMS Object View Screen
9.4.5 Creating Objects
If you wish to create a new object, you can choose the Domain, Object or Task Views to accomplish this. The Domain and Object Views create objects one at a time, while the Task View can
create multiple objects.
To create an object, use one of the following methods:
•
Click on a class name (e.g. Jukebox) on the left screen, and the class object’s icons are displayed on the right screen. On the right screen press the “Create” button to display a create
screen.
•
From the object view only, click on “Object”, then double-click on one of the class icons
that are displayed. On the right screen press the “Create” button to display a create screen.
•
From the left screen, right-click on a class name, and a popup menu appears. Click on “Create” to display a create screen for that class.
•
From the task view, expand the Create task and click on one of the class names that appear.
•
From the task view, right click on the create task, and a popup menu appears. Click on the
appropriate class name.
Once a create screen appears, (except for catalogs) you are prompted for two pieces of information:
•
A name for the new object or objects
•
An inherit object
Basic MDMS Operations 9-8
Basic MDMS Operations
9.4 Graphical User Interface
The domain and object views allow creation of only one object at a time, whereas the task view
allows a comma-separated list of new objects (and also ranges in the case of volumes). Depending on the view, enter the name or names of the new objects you wish to create.
The inherit object allows you to copy most of the attributes from the inherit object to the object
being created. If you wish to specify an inherit object, use the combo box to select the existing
inherit object. This must be the same type of object, except in the case of restores, in which case
you can inherit from either a restore or a save object.
After clicking create, the new object attribute and operations screens appear, which you can then
modify to your liking. In the task view, this screen modifies all the newly created objects.
Figure 9–3 Drive Create Screen
Basic MDMS Operations 9–9
Basic MDMS Operations
9.4 Graphical User Interface
9.4.6 Showing and Modifying Objects
For objects that already exist, you can use the Domain View, Object View or Task View to show
and optionally modify objects, or to perform operations on them.
To view an object, use one of the following methods:
•
From the Domain or Object Views, from the left screen, expand a class name, and click on
an object name.
•
From the Domain or Object View, click on a class name from the left to bring up the class
object icons on the right screen, then double click on an object icon.
•
From the task View, expand the Show task, and click on one of the objects.
•
From the Task View, right click on the Show task, and a popup menu appears, then click on
an appropriate class and object.
When an object is selected, its attributes and operations are displayed in a two-dimensional tab
screen as follows:
•
Vertical tabs on the right side of the screen contain the Show and any operations associated
with the object. Many objects just have a Show tab, but some (for example, volumes) have a
whole list of operational tabs such as load, unload and so on. You can switch between the
tabs by simply clicking on them.
•
For the Show screen, there are also horizontal tabs that display related attributes about the
object. Many simple objects have only a General tab that shows all attributes. Other
attributes have General and Advanced tabs, if there is not enough room on one tab. Other
tabs include:
–
A Show Access tab, which shows the access controls on the object. This is in a common
format for all objects. If your site does not use access controls, you can disable these
tabs using the view menu: View>No Access Control Tabs
–
The Show screen for Jukeboxes and Magazines also has a Contents tab that shows the
current contents of the drives and slots in the jukebox, and the slots in a magazine.
–
Saves and Restores have a selections tab, that shows all selections for the save or
restore, and a log tab that displays the latest version of the associated log file.
If you select the Show screen and wish to modify attributes, use the tool tip text for help on any
field. Select appropriate values (from all the show tabs as needed), then click on Set. This sends
the currently displayed values from all tabs to the MDMS server. If you just wish to view the
object’s attributes without modification, click on Cancel after viewing the attributes. This returns
you to the object class screen.
MDMSView supports switching from one object to another during displaying of values. For
objects that appear in combo boxes or lists, you can view related objects without losing the context of the current object. Each combo box or list attribute supports two methods of viewing,
selecting and creating objects:
•
Click on a small button to the right of the combo box or list to receive a popup menu for the
field
•
Right-click on the combo box or list and receive the same popup menu for the field
From the menu, there are the following options:
•
Show - To show the selected object
•
Create - To create a new object
•
Reset - To go back to the previously selected objects
Basic MDMS Operations 9-10
Basic MDMS Operations
9.4 Graphical User Interface
•
Clear - To clear the selection
•
Add and Remove (list only) - To add and remove an object by name
•
List all (list only), lists all the objects
If you select Show or Create, you will go to an appropriate screen. When you then complete your
operation on that object, you will come back to the original object.
9.4.7 Deleting Objects
You can delete objects from the Domain, Object and Task Views. To delete an object, perform
one of the following:
•
Display the object as discussed in the previous section, then click the Delete button at the
bottom of the screen.
•
Right-click on the object name from the left screen, then select Delete from the pop-up
menu.
•
From the task view, select the Delete task, then select the object class, then select the object
names from the list on the delete screen.
A request to delete an object will always bring up a Delete dialog box for confirmation of the
delete. You can confirm “OK” or “Cancel” from here.
9.4.8 Viewing Relationships Between Objects
The Domain view provides a way to view the hierarchical structure of the MDMS domain. The
left side of the screen provides an object-class-object... hierarchy of objects belonging to other
objects, or objects contained in other objects. The left side of the screen displays most of the
object classes which contain other objects (the exceptions: selections, schedules and volumes,
which have no sub-objects). You can begin the hierarchical navigation at any level, and all sublevels can be displayed.
For example, starting at jukebox, you can view all objects that reside in a jukebox: Drives, Magazines and Volumes. If you then click on Drives, you will see all drives in this jukebox. If you
then select a drive and click on it, you can see the volume in the drive.
If your domain is sufficiently complex, you might want to expand the left side of the screen by
using the right arrow between the left and right screen. You can then view the entire hierarchy of
the domain.
Basic MDMS Operations 9–11
Basic MDMS Operations
9.4 Graphical User Interface
Figure 9–4 Domain View Showing Expanded Relationships
Basic MDMS Operations 9-12
Basic MDMS Operations
9.4 Graphical User Interface
9.4.9 Performing Operations on Objects
If you wish to perform an operation on an object (for example, to load a volume into a drive),
you should first display the object’s attributes and operations screens. Then select the desired
operation tab, on the right side of the screen. For example, to load a volume, show the volume
then click on the Load tab.
The load tab is called an operations tab, and they all follows the same basic concepts. You enter
options concerning the operation (for example, operator assistance), then press the appropriate
operation button on the bottom left of the screen. This button is always labelled with the appropriate operation (for example, Load).
MDMS has the capability of performing long-running operations synchronously or asynchronously. However, in MDMSView, long-running operations are always submitted asynchronously and control is returned to the user. Asynchronous operations show a dialog box that states
that the operation has been queued for processing, but has not yet completed. If you perform an
operation that does not result in the dialog box, then you can safely assume it has been completed synchronously.
If you receive a “queued” dialog box, it does not necessarily mean that the operation was fully
validated. If you want to check on the status of the operation, use the Request View to monitor
the request’s progress.
Figure 9–5 Load Volume Screen with Queued Dialog Box
9.4.10 Showing Current Operations
The Request View provides a monitoring capability for all current MDMS operations. You can
display all current requests by clicking on Show Requests - this results in a table of requests
being displayed. This includes all current requests, and some recently-completed requests.
You can also expand the requests on the left side of the screen and click on a specific request for
detailed information about the request. Or you can right-click on the request number on the left
screen and select Show.
If you feel that a request is not working correctly, or for any reason you wish to delete the
request, you can click on delete from the detailed request screen, or select a request number on
the left screen, right-click and select delete from the popup menu.
As with other deletes, a dialog box will appear to confirm the delete of the request.
Basic MDMS Operations 9–13
Basic MDMS Operations
9.4 Graphical User Interface
Figure 9–6 Show Requests Screen
9.4.11 Reporting on Volumes
The Report View provides the capability of generating custom reports on volumes. With this
view, you can choose attributes that can be displayed and/or used as selection criteria for volumes.
To select an attribute for display, simply click on the attribute and then press the right arrow button to move it to the display screen. The attributes are displayed in the report in the order
selected. If you change your mind or wish to re-order the attributes, select an attribute on the display screen and press the left arrow button to deselect it.
If you wish to use an attribute as a selection criterion, click on the attribute, then click on “Use
for Selection”. This will enable a field below (either a text field or combo box) to allow you to
enter a selection.
You may display any number of fields and use any number of selection criteria to customize the
report. When your selections are ready, you can generate the report by clicking on “Generate”.
You can see the resultant report in the “Report Results” tab.
Basic MDMS Operations 9-14
Basic MDMS Operations
9.4 Graphical User Interface
If you wish to save this report, enter a report title in the text field at the bottom of the screen and
click on save. The report is saved to the following locations:
•
OpenVMS Systems:
–
•
sys$common:[mdms.gui.vms]Report_year_month_day_hour_minut_second.txt
Windows Systems:
–
C:\MDMSView\Report_year_month_day_hour_minute_second.txt
For example, a report file name is: Report_2001_12_17_8_35_17.txt
Once the results screen is displayed, you can sort the report using any field by clicking on the
field’s header. You can reverse-sort the same field by clicking on the field header again.
Figure 9–7 Report View Selection Criteria Example
Basic MDMS Operations 9–15
Basic MDMS Operations
9.4 Graphical User Interface
Figure 9–8 Report View Results Screen
9.4.12 Viewing MDMS Audit and Event Logging
To examine past operations in MDMS, you can use the event view to view the MDMS audit and
event logfile. There are five pre-configured options and a fully flexible custom option to allow
you to select what you wish to see from the MDMS logfile. The five pre-configured options all
apply to the MDMS Database Server logfile and show all operations (auditing and events) for
the following amounts of time before the current time:
•
The last minute
•
The last 10 minutes
•
The last hour
•
The last 24 hours
•
The last 72 hours
If you wish to see the logfile using other selection criteria, you can use the “Custom” setting.
Byclicking on “Custom”, a selection screen appears that allows you to select the entries to be
displayed as follows:
•
Node selection: You can choose the default of the DB server (which contains the most complete information), or select a specific client node. Note that request IDs are not supported
on client nodes, and nor is selection by low and high request IDs.
•
Selection Options: You can select a range of entries in the logfile to display by one of:
–
Elapsed time in minutes (default of 60 minutes) -OR-
–
Before and/or since dates (specified as an absolute time) -OR-
Basic MDMS Operations 9-16
Basic MDMS Operations
9.4 Graphical User Interface
– Low and high request IDs (for DB server only)
•
Severity Options: For audit completion entries, you can select that only entries of a certain
combinations of completion status are displayed. You can select one or more of:
–
Success (S)
–
Informational (I)
–
Warning (W)
–
Error (E)
–
Fatal (F)
After entering the selection criteria, you click on the Show button to display. Depending on the
size of the log file, this operation may take several seconds to complete. You may want to
regularly reset your log files to avoid long response times. The code has been written to scan
previous versions of log files if the date and or request selections are not in the latest log file.
The Refresh button at the bottom of the screen refreshes whatever selection is currently on
thescreen. The Cancel button allows you to enter a new selection.
9.4.13 Errors
MDMSView can report two types of errors:
•
Those generated by MDMSView itself: these typically appear in a dialog box and in the status bar at the bottom of the screen. These errors normally explain an illegal user operation.
•
Those generated by the MDMS server on the log-in node. These errors appear in a dialog
box with the standard MDMS DCL syntax. These errors are documented in the MDMS Reference Guide.
9.4.14 Help
MDMSView provides three types of help:
•
Tool-tip Help for every field on every screen. To obtain tool-tip help on a field, simply position the cursor on that field. The help appears near the field within one second and remains
on the screen for 4 seconds.
•
Screen-sensitive Help. For every screen in the Domain, Object or Task Views there is a
“Help” button at the bottom right of each screen. If you press this “Help” button, a help
screen pops-up with information about the screen you from which you pressed the button.
The help information displayed is derived from this manual, the ABS Guide to Operations.
•
Finally, there is a “Help” pull-down menu from the main screen. This provides the same
type of Help as the “Help” button, but starts from the beginning of the manual. You can use
the left-screen navigation or a search capability to find what you are interested in.
Basic MDMS Operations 9–17
Basic MDMS Operations
9.5 Access Rights for MDMS Operations
Figure 9–9 Context-Sensitive Help Screen from Show Volume Screen
9.5 Access Rights for MDMS Operations
This section describes access rights for MDMS operations. MDMS works with the OpenVMS
User Authorization File (UAF), so you need to understand the Authorize Utility and OpenVMS
security before changing the default MDMS rights assignments.
MDMS rights control access to operations, not to object records in the database.
Knowing the security implementation will allow you to set up MDMS operation as openly or
securely as required.
9.5.1 Description of MDMS Rights
MDMS controls user action with process rights granted to the user or application through low
and high level rights.
9.5.1.1
Low Level Rights
The low level rights are named to indicate an action and the object the action targets. For
instance, the MDMS_MOVE_OWN right allows the user to conduct a move operation on a
volume allocated to that user. The MDMS_LOAD_ALL right allows the user to load any
managed volume.
For detailed descriptions of the MDMS low level rights, refer to the ABS or HSM Command
Reference Guide.
Basic MDMS Operations 9-18
Basic MDMS Operations
9.5 Access Rights for MDMS Operations
9.5.1.2
High Level Rights
MDMS associates high level rights with the kind of user that would typically need them. Refer
to the ABS or HSM Command Reference Guide for a detailed list of the low level rights
associated with each high level right. The remainder of this section describes the high level
rights.
MDMS User
The default MDMS_USER right is for any user who wants to use MDMS to manage their own
tape volumes. A user with the MDMS_USER right can manage only their own volumes. The
default MDMS_USER right does not allow for creating or deleting MDMS object records, or
changing the current MDMS configuration.
Use this right for users who perform non-system operations with ABS or HSM.
MDMS Application
The default MDMS_APPLICATION right is for the ABS and HSM applications. As MDMS
clients using managed volumes and drives, these applications require specific rights.
The ABS or HSM processes include the MDMS_APPLICATION rights identifier which
assumes the low level rights associated with it. Do not modify the low level rights values for the
Domain application rights attribute. Changing the values to this attribute can cause your
application to fail.
MDMS Operator
The default MDMS_OPERATOR right supports data center operators. The associated low level
rights allow operators to service MDMS requests for managing volumes, loading and unloading
drives.
The Default Right
The low level rights associated with the MDMS_DEFAULT right apply to any OpenVMS user
who does not have any specific MDMS right granted in their user authorization (SYSUAF.DAT)
file. Use the default right when all users can be trusted with an equivalent level of MDMS rights.
9.5.2 Granting MDMS Rights
The high level rights are defined by domain object record attributes with lists of low level rights.
The high level rights are convenient names for sets of low level rights.
For MDMS users, grant high and/or low level rights as needed with the Authorize Utility. You
can take either of these approaches to granting MDMS rights.
You can ensure that all appropriate low level rights necessary for a class of user are assigned to
the corresponding high level right, then grant the high level rights to users.
You can grant any combination of high level and low level rights to any user.
Basic MDMS Operations 9–19
Basic MDMS Operations
9.5 Access Rights for MDMS Operations
Use the procedure outlined in Table 9–1 to review and set rights that enable or disable access to
MDMS operations. CLI command examples appear in this process description but can use the
GUI to accomplish this procedure as well.
Table 9–1 Reviewing and Setting MDMS Rights
Step...
Action...
1.
Show the domain object record values for each high level right.
•
For all system users, examine the default rights attribute.
•
For MDMS operators, examine the operator rights attribute.
•
For MDMS users, examine the user rights attribute.
Review the low level rights associated with each high level right. If you have
questions about actions view the list of low level rights and the actions they
enable.
Example
$MDMS SHOW DOMAIN /FULL
2.
If the low level rights associated with the high level right are not adequate
for a class of user, then add appropriate rights.
If the low level rights associated with the high level right enable
inappropriate options for a class of user, then remove the inappropriate
rights.
Example:
$MDMS SET DOMAIN /OPERATOR_RIGHTS=MDMS_SET_PROTECTED/ADD
or
$MDMS SET DOMAIN /USER_RIGHTS=MDMS_ASSIST/REMOVE
3.
If you do not want all system users to have implicit access to MDMS
operations, then negate the domain object record default rights attribute.
$MDMS SET DOMAIN /NODEFAULT_RIGHTS
By default, a user with the OpenVMS SYSPRV privilege is granted all
MDMS rights. If you wish to disable this feature, disable the SYSPRV
privilege in the domain record:.
$MDMS SET DOMAIN /NOSYSPRV
Basic MDMS Operations 9-20
Basic MDMS Operations
9.6 Creating, Modifying, and Deleting Object Records
Table 9–1 Reviewing and Setting MDMS Rights
Step...
Action...
4.
If you want any user with ABS privileges to have access to appropriate
MDMS rights to support just ABS operations, set the domain object
record ABS rights attribute.
$MDMS SET DOMAIN /ABS_RIGHTS
For all system user accounts that need access to MDMS, grant the
appropriate rights.
If a user needs only the rights associated with a class of user, grant that
user the high level right associated with that class only.
UAF> GRANT/IDENTIFIER MDMS_USER DEVUSER
5.
If a user needs a combination of rights, then grant that user the high
and/or low level rights needed to enable the user to do their job with
MDMS. You must issue a separate command for each right granted.
UAF> GRANT/IDENTIFIER MDMS_OPERATOR DCOPER
%UAF-I-GRANTMSG, identifier MDMS_OPERATOR granted to
DCOPER
UAF> GRANT/IDENTIFIER MDMS_LOAD_SCRATCH DCOPER
%UAF-I-GRANTMSG, identifier MDMS_LOAD_SCRATCH granted to
DCOPER
If you do not want a particular user to acquire the default rights, then
disable the user’s ability to operate MDMS with the default rights.
UAF> GRANT/IDENTIFIER MDMS_NO_DEFAULT APPUSER
9.6 Creating, Modifying, and Deleting Object Records
This section describes the basic concepts that relate to creating, modifying, and deleting object
records.
9.6.1 Creating Object Records
Both the CLI and GUI provide the ability to create object records. MDMS imposes rules on the
names you give object records. When creating object records, define as many attribute values as
you can, or inherit attributes from object records that describe similar objects.
9.6.1.1
Naming Objects
When you create an object record, you give it a name that will be used as long as it exists in the
MDMS database. MDMS also accesses the object record when it is an attribute of another object
record; for instance a media type object record named as a volume attribute.
MDMS object names may include any digit (0 through 9), any upper case letter (A through Z),
and any lower case letter (a through z). Additionally, you can include $ (dollar sign) and _
(underscore).
Basic MDMS Operations 9–21
Basic MDMS Operations
9.6 Creating, Modifying, and Deleting Object Records
9.6.1.2
Differences Between the CLI and GUI for Naming Object Records
The MDMS CLI accepts all these characters. However, lower case letters are automatically
converted to upper case, unless the string containing them is surrounded by the “(double quote)
characters. The CLI also allows you to embed spaces in object names if the object name is
surrounded by the “ characters.
The MDMS GUI accepts all the allowable characters, but will not allow you to create objects
that use lower case names, or embed spaces. The GUI will display names that include spaces and
lower case characters if they were created with the CLI.
HP recommends that you create all object records with names that include no lower case letters
or spaces. If you create an object name with lower case letters, and refer to it as an attribute value
which includes upper case letters, MDMS may fail an operation.
Naming Examples
The following examples illustrate the concepts for creating object names with the CLI.
These commands show the default CLI behavior for naming objects:
$!Volume created with upper case locked
$MDMS CREATE VOLUME CPQ231 /INHERIT=CPQ000 !Standard upper case
$MDMS SHOW VOLUME CPQ231
$!
$!Volume created with lower case letters
$MDMS CREATE VOLUME cpq232 /INHERIT=CPQ000 !Standard lower case
$MDMS SHOW VOLUME CPQ232
$!
$!Volume created with quote-delimited lower case, forcing lower
$MDMS CREATE VOLUME ìcpq233î /INHERIT=CPQ000 !Forced lower case
$!
$!This command fails because the default behavior translates to
$MDMS SHOW VOLUME CPQ233
$!
$!Use quote-delimited lower case to examine the object record
$MDMS SHOW VOLUME ìcpq233î
DCL
DCL
case naming
DCL
upper case
9.6.2 Inheritance on Creation
This feature allows you to copy the attributes of any specified object record when creating or
changing another object record. For instance, if you create drive object records for four drives in
a new jukebox, you fill out all the attributes for the first drive object record. Then, use the inherit
option to copy the attribute values from the first drive object record when creating the
subsequent three drive object records.
If you use the inherit feature, you do not have to accept all the attribute values of the selected
object record. You can override any particular attribute value by including the attribute
assignment in the command or GUI operation. For CLI users, use the attribute’s qualifier with
the MDMS CREATE command. For GUI users, set the attribute values you want.
Not all attributes can be inherited. Some object record attributes are protected and contain values
that apply only to the specific object the record represents. Check the command reference
information to identify object record attributes that can be inherited.
9.6.3 Referring to Non-Existent Objects
MDMS allows you to specify object record names as attribute values before you create the
records. For example, the drive object record has a media types attribute. You can enter media
type object record names into that attribute when you create the drive object before you create
the media type object records.
Basic MDMS Operations 9-22
Basic MDMS Operations
9.6 Creating, Modifying, and Deleting Object Records
9.6.4 Rights for Creating Objects
The low level rights that enable a user to create objects are MDMS_CREATE_ALL (create any
MDMS object record) and MDMS_CREATE_POOL (create volumes in a pool authorized to the
user).
9.6.5 Modifying Object Records
Whenever your configuration changes you will modify object records in the MDMS database.
When you identify an object that needs to be changed you must specify the object record as it is
named. If you know an object record exists, but it does not display in response to an operation to
change it, you could be entering the name incorrectly. Section 9.6.1.1 describes the conventions
for naming object records.
9.6.6 Protected Attributes
Do not change protected attributes if you do not understand the implications of making the
particular changes. If you change a protected attribute, you could cause an operation to fail or
prevent the recovery of data recorded on managed volumes.
MDMS uses some attributes to store information it needs to manage certain objects. The GUI
default behavior prevents you from inadvertently changing these attributes. By pressing the
Enable Protected button on the GUI, you can change these attributes. The CLI makes no
distinction in how it presents protected attributes when you modify object records. Ultimately,
the ability to change protected attributes is allowed by the MDMS_SET_PROTECTED right and
implicitly through the MDMS_SET_RIGHTS right.
The command reference guide identifies protected attributes
9.6.7 Rights for Modifying Objects
The low level rights that allow you to modify an object by changing its attribute values are
shown below:.
Table 9–2 Low Level Rights
This right
Enables you to modify
MDMS_SET_ALL
Any MDMS database object record.
MDMS_SET_PROTECTED
Protected attributes used internally by
MDMS.
MDMS_SET_OWN
Attributes of volumes allocated to the user.
MDMS_SET_POOL
Attributes of volumes in pools authorized to
the user.
MDMS_SET_RIGHTS
The MDMS domain high level rights definition
9.6.8 Deleting Object Records
When managed objects, such as drives or volumes, become obsolete or fail, you may want to
remove them from management. When you remove these objects, you must also delete the
object records that describe them to MDMS.
When you remove object records, there are two reviews you must make to ensure the database
accurately reflects the management domain: review the remaining object records and change any
attributes that reference the deleted object records, review any DCL command procedures and
change any command qualifiers that reference deleted object records.
Basic MDMS Operations 9–23
Basic MDMS Operations
9.6 Creating, Modifying, and Deleting Object Records
9.6.9 Reviewing Managed Objects for References to Deleted Objects
When you delete an object record, review object records in the database for references to those
objects. Table 9–3 shows which object records to check when you delete a given object record.
Use this table also to check command procedures that include the MDMS SET command for the
remaining objects.
Change references to deleted object records from the MDMS database. If you leave a reference
to a deleted object record in the MDMS database, an operation with MDMS could fail.
Table 9–3 Reviewing Managed Objects for References to Deleted Objects
When you delete...
Review these object records...
Group
Drive
Jukebox
Pool (Authorized, Default Users)
Jukebox
Drive
Jukebox
Magazine (MDMS sets the attribute)
Volume (MDMS sets the attribute)
Location
Domain (Offsite, Onsite Location)
Location
Magazine (Offsite, Onsite Location)
Node
Volume (Offsite, Onsite Location)
Media Type
Domain
Drive
Volume
Node
Drive
Group
Jukebox
Pool (Authorized, Default Users)
Pool
Volume
9.6.10 Reviewing DCL Command Procedures for References to Deleted Objects
When you delete an object record, review any DCL command procedures for commands that
reference those objects. Other than the MDMS CREATE, SET, SHOW, and DELETE
commands for a given object record, Table 9–4 shows which commands to check. These
commands could have references to the deleted object record.
Basic MDMS Operations 9-24
Basic MDMS Operations
9.6 Creating, Modifying, and Deleting Object Records
Change references to deleted object records from DCL commands. If you leave a reference to a
deleted object record in a DCL command, an operation with MDMS could fail.
Table 9–4 Reviewing DCL Commands for References to Deleted Objects
When you delete...
Review these DCL commands...
Drive
MDMS ALLOCATE DRIVE
MDMS DEALLOCATE DRIVE
MDMS LOAD DRIVE
MDMS LOAD VOLUME
MDMS UNLOAD DRIVE
Group
MDMS ALLOCATE DRIVE
MDMS CREATE DRIVE
MDMS CREATE JUKEBOX
MDMS SET DRIVE
MDMS SET JUKEBOX
Jukebox
MDMS ALLOCATE DRIVE
MDMS ALLOCATE VOLUME
MDMS CREATE MAGAZINE
MDMS CREATE VOLUME
MDMS INITIALIZE VOLUME
MDMS INVENTORY JUKEBOX
MDMS SET MAGAZINE
MDMS SET VOLUME
MDMS REPORT VOLUME
Location
MDMS ALLOCATE DRIVE
MDMS ALLOCATE VOLUME
MDMS CREATE LOCATION (Location attribute)
MDMS CREATE JUKEBOX
MDMS CREATE MAGAZINE (Onsite, Offsite Location)
MDMS CREATE NODE
MDMS CREATE VOLUME (Onsite, Offsite Location)
MDMS MOVE VOLUME
MDMS REPORT VOLUME (Onsite, Offsite Location Fields)
MDMS SET DOMAIN (Onsite, Offsite Location)
MDMS SET JUKEBOX
Basic MDMS Operations 9–25
Basic MDMS Operations
9.6 Creating, Modifying, and Deleting Object Records
Table 9–4 Reviewing DCL Commands for References to Deleted Objects
When you delete...
Review these DCL commands...
MDMS SET LOCATION (Location attribute)
MDMS SET MAGAZINE (Onsite, Offsite Location)
MDMS SET NODE
MDMS SET VOLUME (Onsite, Offsite Location)
Media Type
MDMS ALLOCATE DRIVE
MDMS ALLOCATE VOLUME
MDMS CREATE DRIVE
MDMS CREATE VOLUME
MDMS INITITALIZE VOLUME
MDMS INVENTORY JUKEBOX
MDMS LOAD DRIVE
MDMS REPORT VOLUME
MDMS SET DOMAIN
MDMS SET VOLUME
Node
MDMS ALLOCATE DRIVE
MDMS CREATE DRIVE
MDMS CREATE GROUP
MDMS CREATE JUKEBOX
MDMS CREATE POOL (Authorized, Default Users)
MDMS SET DRIVE
MDMS SET GROUP
MDMS SET JUKEBOX
MDMS SET POOL (Authorized, Default Users)
Pool
MDMS ALLOCATE VOLUME
MDMS LOAD DRIVE
MDMS REPORT VOLUME
MDMS SET VOLUME
Volume
MDMS ALLOCATE DRIVE
MDMS ALLOCATE VOLUME/LIKE_VOLUME
Volume Set
Basic MDMS Operations 9-26
MDMS BIND VOLUME/TO_SET
Basic MDMS Operations
9.6 Creating, Modifying, and Deleting Object Records
9.6.11 Rights for Deleting Objects
The low level rights that enable a user to delete objects are MDMS_DELETE_ALL (delete any
MDMS object record) and MDMS_DELETE_POOL (delete volumes in a pool authorized to the
user).
Basic MDMS Operations 9–27
10
Media Management
This chapter expands on the MDMS object summary given in Chapter 2, and describes all the
MDMS objects in detail, including the object attributes and operations that can be performed on
the objects.
Before going into details on each object, however, the use of the MDMS$CONFIGURE.COM
procedure is recommended to configure your MDMS domain and the objects in it. In many cases
this should take care of your entire initial configuration.
10.1 MDMS Domain Configuration
If you are configuring your MDMS domain (including all objects in the domain) for the first
time, HP recommends that you use the MDMS$CONFIGURE.COM command procedure. This
procedure prompts you for most MDMS objects, including domain, drives, jukeboxes, media
types, locations and volumes, and establishes relationships between the objects. The goal is to
allow complete configuration of simple to moderately complex sites without having to read the
manual.
The configuration procedure offers extensive help, and contains much of the information contained in this chapter. Help is offered in a tutorial form if you answer “No” to “Have you used
this procedure before”. In addition, for each question asked, you can enter “?” to have help on
that question displayed. Furthermore, if you type “??” to a question, not only will the help be displayed, but in most cases a list of possible options is also displayed.
This procedure is also useful when adding additional resources to an existing MDMS configuration. To invoke this procedure, enter:
@MDMS$SYSTEM:MDMS$CONFIGURE.COM
and just follow the questions and help.
A complete example of running the procedure is shown in Appendix A.
10.2 Domain
The MDMS domain encompasses all objects that are served by a single MDMS database, and all
users that utilize those objects. A domain can range from a single OpenVMS cluster and its
backup requirements, to multi-site configurations that may share resources over a wide area network or through Fibre Channel connections. An OpenVMS system running MDMS is considered a node within the MDMS domain, and MDMS server processes within a domain can
communicate with one another.
The MDMS domain object is created at initial installation, and cannot be deleted. Its main focus
is to maintain domain-wide attributes and defaults, and these attributes are described in the following sections.
Media Management 10–1
Media Management
10.2 Domain
10.2.1 ABS Rights
The domain attribute ABS_RIGHTS controls whether a user having certain pre-V4.0B ABS
rights can map these to MDMS rights for security purposes (see Chapter 5, Security, for more
information about rights). Setting the attribute allows the mapping, and setting the attribute to
false disallows the mapping.
10.2.2 Application Rights
The right MDMS_APPLICATION_RIGHTS is a high-level right that maps to a set of low level
rights suitable for MDMS applications (for example, ABS and HSM). Normally these rights
should not be changed, or at least not reduced from the default settings otherwise ABS and HSM
may not function correctly. You may add rights to application rights if you have your own
MDMS applications or command procedures. The ABS and MDMS$SERVER accounts should
have MDMS_APPLICATION_RIGHTS granted in the User Authorization File.
10.2.3 Check Access
The check access attribute determines if access controls are checked in the domain. MDMS uses
two forms of security: Rights and Access Control. Rights checking is a task-oriented form of
security and is always performed. However, access control is an object-oriented form of security
and can be optionally enabled or disabled with this attribute. Setting Check Access enables
access control checking. Clearing Check Access disables access control checking even if there
are objects with access control entries.
10.2.4 Deallocate State
When a volume is deallocated after its data has expired, it may go into one of two states. The
transition state is an interim state that the volume goes into after deallocation, but it is not eligible to be used again until a period of time called the transition time expires. This is a safety feature that allows you to examine whether the data has legitimately expired, and if not to retain the
volume (put back to the allocated state). If you do not wish this feature, you can disable the transition state and allow volume to return directly to the free state, where it is eligible for immediate
allocation and initialization for new data. The domain deallocate state is applied to all volumes
that are automatically deallocated by MDMS. When manually deallocating volumes, you can
override the domain deallocate state with a state on the deallocate operation itself.
10.2.5 Default Rights
The MDMS default rights attribute maps a set of MDMS low-level rights to all users in the
domain. This allows you to give all users a limited set of rights to access MDMS objects and perform operations, without having to expressly modify their accounts. Be aware that default rights
are applied to all users on all nodes in the domain, so granting such rights should be carefully
reviewed. By default, MDMS maps no rights to the default rights.
10.2.6 Mail Users
When MDMS deallocates volumes based on their scratch date (an operation that is performed
once per day), it sends a mail message indicating which volumes were deallocated to the set of
users defined in the mail users attributes. You should enter a list of users in the format
node::username. Every user in the list will receive the deallocate volume mail messages.
Media Management 10-2
Media Management
10.2 Domain
10.2.7 Maximum Scratch Time
The maximum scratch time is the maximum scratch time that can be applied to any volume when
it is allocated. The scratch time is the period of time that you wish the volume to stay allocated
because its data is still valid. The maximum scratch time imposes a maximum limit and overrides the volume’s scratch time if it exceeds the maximum. For HSM, the maximum scratch time
should be set to zero (unlimited), as HSM volumes’ data remains valid until it is repacked. For
ABS uses, this value should be set to the longest period of time you wish to retain any volume.
10.2.8 Media Type
The domain media type attribute is the media type that is applied to new volumes and drives by
default when they are created. In a simple configuration, you may only have a single media type,
so specifying it in the domain allows you to not have to specify it when creating individual
drives and volumes. It may also be applied as a default to ABS archives. You may always override the domain default media type with a specific media type when you create or modify drives
and volumes.
10.2.9 Offsite Location
The domain offsite location attribute is applied by default to the offsite location field of new volumes when they are created. The offsite location is an MDMS location that is used for secure
storage of the volumes in case of a disaster. You can always override the domain default offsite
location when you create or modify volumes.
10.2.10Onsite Location
The domain onsite location attribute is applied by default to the onsite location field of new volumes when they are created. The onsite location is an MDMS location that is used for storage of
the volumes when they are onsite, or quickly accessible to jukeboxes and drives. You can always
override the domain default onsite location when you create or modify volumes.
10.2.11OPCOM Classes
The domain OPCOM classes attribute contains the default OPCOM classes that are applied to
new node objects by default when they are created. OPCOM classes are classes of users whose
terminals are enabled to receive certain OPCOM classes. You can override the domain default
OPCOM classes with specific classes on a per-node basis when you create or modify a node.
10.2.12Operator Rights
The right MDMS_OPERATOR_RIGHTS is a high-level right that maps to a set of low level
rights suitable for operators managing the domain. The default set of operator rights allow for
normal operator activities such as loading and unloading volumes into drives, showing any
object or operations, and moving volumes offsite and onsite. However, you can add or remove
low level rights to/from the operator rights as you wish.
10.2.13Protection
The domain protection attributes defines the default protection applied to new volumes when
they are created. This protection is used by MDMS when it initializes volumes, and writes the
protection on the magnetic tape volume itself. You can always override the domain default protection by specifying the protection specifically when creating or modifying a volume.
Media Management 10–3
Media Management
10.2 Domain
10.2.14Relaxed Access
The relaxed access attribute controls the security when a user or application tries to access an
object without any access control entries, and access control checking is enabled. If relaxed
access is set, such access is granted. If relaxed access is clear, such access is denied. The relaxed
access attribute is ignored if the check access attribute is clear.
10.2.15Request ID
MDMS uses sequentially increasing request identifiers for each request received by the MDMS
database server, and this attribute displays the ID of the next request. If this ID is becoming very
large, you can reset it to zero or one (or indeed any value) if you wish. The request ID automatically resets to one when it reaches one million.
10.2.16Scheduler Type
MDMS performs scheduling operations on behalf of itself and ABS. For ABS scheduling, you
can choose a scheduler type that best meets your needs, as follows:
•
Internal - The default internal scheduler type uses MDMS schedule objects and OpenVMS
batch queues. This option should be sufficient for most sites as the schedule object supports
many custom scheduling options.
•
External - This option uses MDMS schedule objects and OpenVMS batch queue, but the
scheduling is submitted through a command procedure. You can use this option if you have
a need to modify the command procedure to perform site-specific operations.
•
Scheduler - This option uses an external scheduler product via command procedures. ABS
supplies a template scheduler command procedure that you can modify to access your own
scheduler product. You can also use this option to invoke the pre-V3.0 ABS DECScheduler
V2.1B, as long as you have a license for that product.
MDMS-initiated scheduled operations such as MDMS$MOVE_VOLUMES always use the
internal MDMS scheduler.
10.2.17Scratch Time
The domain default scratch time is the default scratch time applied to new volumes when they
are created. Scratch time indicates how long a volume is to remain allocated (that is, how long its
data is valid and needs to be kept). You can override the domain volume scratch time when you
create, modify or allocate individual volumes. For HSM volumes, the scratch time should be set
to zero (unlimited), since HSM data remains valid until a volume is repacked.
10.2.18SYSPRV
MDMS uses user account rights as one mechanism for security within the domain. MDMS
allows you to control whether the OpenVMS privilege SYSPRV can map to the ultimate MDMS
right MDMS_ALL_RIGHTS. If you set the SYSPRV attribute, users with SYSPRV are
assigned MDMS_ALL_RIGHTS, which means they can perform any operation subject to access
control checks. Clearing SYSPRV gives users with SYSPRV no special rights.
Note
If you wish to use the SYSPRV attribute from the MDMSView GUI, the user’s authorization file must have SYSPRV defined as a privilege and a default privilege. Having
SETPRV is not sufficient as there is no way to set the SYSPRV privilege from the GUI.
Media Management 10-4
Media Management
10.3 Drives
10.2.19Transition Time
The domain default transition time is applied to volumes by default when they are deallocated
into the transition state. The transition time determines how long the volumes remain in the transition state before moving to the free state. This attribute is used alongside the deallocation state
attribute, which determines the default state that volumes are deallocated into. You can override
the domain default transition time when you create, modify, or deallocate a volume.
10.2.20User Rights
The right MDMS_USER_RIGHTS is a high-level right that maps to a set of low level rights
suitable for non-privileged users that perform ABS or HSM operations. The default set of user
rights allow for user activities such as creating and manipulating their own volumes and loading
and unloading those volumes into drives, showing their volumes. However, you can add or
remove low level rights to/from the user rights as you wish.
10.3 Drives
A drive is a physical resource that can read and write data to tape volumes. Drives can be standalone requiring operator intervention for loading and unloading, in a stacker configuration that
allows limited automatic sequential loading of volumes, or in a jukebox which provides full random-access automatic loading. Drives are named in MDMS using a unique name across the
domain; it may or may not be the same as the OpenVMS device name, as these may not be
unique across the domain.
The following sections describe the attributes of a drive.
10.3.1 Access
The access attribute controls whether the drive may be used from local access, remote access or
both. Local access includes direct SCSI access, access via a controller such as the HSJ70, access
via TMSCP, or access via Fibre Channel, and does not require use of the Remote Device Facility
(RDF). Remote access is via a DECnet network requiring RDF. You can set the access to one of
the following:
•
All - Allows both local and remote access (default)
•
Local - Allows only local access (as defined above)
•
Remote - Allows only remote access using RDF
10.3.2 Automatic Reply
Automatic reply is the capability of polling hardware to determine if an operator-assist action
has completed. For example, if MDMS requests that an operator load a volume into a drive,
MDMS can poll the drive to see if the volume was loaded, and if so complete the OPCOM
request without an operator reply. Set automatic reply to enable this feature, and clear to require
an operator response. Please note that some operations cannot be polled and always require an
operator reply. The OPCOM message itself clearly indicates if a reply is needed or automatic
replies are enabled.
10.3.3 Device
The device attribute is the OpenVMS device name for the drive. In many cases you can set up
the drive name to be the OpenVMS device name, and this is the default when you create a drive.
However, the drive name must be unique within the domain, and since the domain can consist of
multiple clusters there may be duplicate device names across the domain. In this case you must
use different drive names from the OpenVMS device names. Also, you can specify simple or
descriptive drive names which are used for most commands, and hide the OpenVMS device in
the device name attribute.
Media Management 10–5
Media Management
10.3 Drives
10.3.4 Disabled
By default, drives are enabled, meaning that they can be used by MDMS and its applications.
However, you may wish to disable a drive from use because it may need repair or be used for
some other application. Set the disabled flag to disabled the drive, and clear the flag to enable the
drive.
10.3.5 Drive Number
If the drive is in a robotically-controlled jukebox, and the jukebox is controlled by MRD, you
must set the drive number to the relative drive number in the jukebox used by MRD. Drives in
jukeboxes are numbered from 0 to n, according to the SCSI addresses of the drives. Refer to the
jukebox documentation on how to specify the relative drive number.
10.3.6 Groups
The groups attribute contains a list of groups containing nodes that have direct access to the
drive. Direct access includes direct-SCSI access, access via a controller such as an HSJ70,
access via TMSCP, and access via Fibre Channel. You can specify as many groups as you wish,
in addition to nodes that may not be in a group.
10.3.7 Jukebox
If the drive is in a jukebox, you must specify which jukebox using the jukebox attribute. Enter a
valid jukebox name from an MDMS-defined jukebox. If there is no jukebox, MDMS treats the
drive as a standalone drive or as a stacker.
10.3.8 Media Types
A drive must support one or more media types in order for volumes to be used on the drive. In
the media type attribute, specify one or more MDMS-defined media types that this drive can
both read and write. If you wish, you can restrict the media types to a subset that you wish this
drive to handle, and not all the media types it could physically handle. In this way, you can
restrict the drive’s usage somewhat.
10.3.9 Nodes
The nodes attribute contains a list of nodes that have direct access to the drive. Direct access
includes direct-SCSI access, access via a controller such as an HSJ70, access via TMSCP, and
access via Fibre Channel. You can specify as many nodes as you wish, in addition to groups of
nodes in the groups attribute.
10.3.10Read-Only Media Types
In addition to media types that a drive can read and write, a drive may support one or more additional media types that it can only read. In the read-only media type attribute, specify one or
more MDMS-defined media types that this drive can only read. This allows this drive to be used
when the application operation is read-only (for example, HSM unshelves or ABS restores). Do
not duplicate a media type in both the media type list and read-only media type list.
10.3.11Shared
You can designate whether a drive is to be used by MDMS applications and users only, or by
non-MDMS users. If the drive is not shared, the MDMS server process allocates the drive on all
clusters to prevent non-MDMS users and applications from allocating it. However, when an
MDMS user attempts to allocate the drive, MDMS will deallocate it and allow the allocation. Set
the shared attribute if you wish to share the drive with non-MDMS users, and clear if you wish to
restrict usage to MDMS users. ABS users who do their own user backups are considered MDMS
users, as are all system backups and HSM shelving/unshelving users.
Media Management 10-6
Media Management
10.3 Drives
10.3.12Stacker
Certain types of drive can be configured as a stacker, which allows a limited automatic sequential loading capability of a set of volumes. Such drives may physically reside in a loader or have
specialized hardware that allows stacker capabilities. If you wish the drive to support the stacker
loading capability, set this attribute and make sure the jukebox attribute does not contain a jukebox name. If you wish the drive to operate as a jukebox or standalone drive, clear this attribute.
10.3.13State
The drive state field determines the load state of the drive. The drive can be in one of four states:
•
Empty - There is no volume in the drive
•
Full - There is a volume in the drive
•
Loading - A volume is being loaded into the drive
•
Unloading - A volume is being unloaded from the drive
This is a protected field that is normally handled by MDMS. Only modify this field if you know
that there are no outstanding requests and the new state reflects the actual state of the drive.
10.3.14Allocate Drive (DCL Only)
You allocate a drive so that you can it for reading and writing data to a volume. If you allocate a
drive, your process ID and node is stored in the MDMS database, and the drive is allocated in
OpenVMS for your process. Because the MDMSView GUI does not operate in a process context, it is not possible to allocate drives from the GUI.
You can either allocate a drive by name, or you can specify selection criteria to be used for
MDMS to select an available drive for you and allocate it. The allocation selection criteria
include:
•
Media Type - Select a drive with the specified media type
•
Location - Used with media type, select a drive in the specified location
•
Jukebox - Used with media type, select a drive in the specified jukebox
•
Group - Used with media type, select a drive that is supported by a node in the group
•
Node - Used with media type, select a drive that is supported by the node
•
Volume - Select a drive that is compatible with the specified volume (media type and placement)
You can also specify the following options when allocating a drive:
•
Assist - A flag indicating whether you wish operator assistance if a drive cannot be allocated. Set if you wish assistance, and clear if you wish to use the retry limit and intervals to
automatically retry (that is, wait for drives to become available).
•
Define - Use define to set a logical name for the drive. The logical name evaluates to both
the MDMS Drive Name and the OpenVMS device name, and can be used in either MDMS
or other DCL commands.
•
Retry Limit and Interval - If you wish the allocate to retry if there are no available drives, set
the retry limit and interval, and specify noassist.
•
Preferred - If you allocated a drive for a specific volume, you can set preferred to request
that the same drive that the volume was last loaded is the preferred drive. If you clear preferred, this forces MDMS to perform a round-robin allocation of the drives.
•
Reply - You can specify a symbol to receive an operator’s reply message.
Media Management 10–7
Media Management
10.3 Drives
•
Nowrite - You can specify that the drive only has to be compatible for read-only media
types, as the desired operation will only read from the drive.
10.3.15Deallocate Drive (DCL Only)
If you allocated a drive using the DCL “Allocate Drive” command, you should deallocate the
drive when you are finished using it, otherwise the drive will remain allocated until your process
exits.
Simply issue a deallocate drive and specify the drive name or the logical name obtained from the
define option in “Allocate Drive”.
10.3.16Load Drive
MDMS supports two ways to load volumes into drives:
•
Load Drive - This loads a scratch volume into a drive via operator intervention or by stacker
operation. As such, this option is only for standalone and stacker controlled drives.
•
Load Volume - This loads a specific volume into a drive, and can apply to all types of drive.
This section discusses the load drive option. The load volume option is discussed under volumes.
The “Load Drive” operation requests either that a scratch volume (in the free state) be loaded
into the drive, or the next volume in the stacker is loaded into the drive. In either case, the volume ID of the volume is not known until the load completes, and MDMS reads the magnetic
tape label to determine the volume.
The loaded volumes may or may not already be defined in the MDMS database. You can choose
to create volume records by setting the “Create” flag, and optionally providing attributes to
apply to the volume as follows:
•
Inherit volume ID - This is the most comprehensive option as it allows the new volume to
inherit all non-protected fields from the specified volume.
•
Media type - Assign this media type to the volume. If you use inherit and media type, the
specified media type overrides the inherit media type
•
Pool - Assign this volume to the specified pool. If you use inherit and pool, the specified
pool overrides the inherit pool.
When issuing the load drive request, you can specify whether the load is for read/write (almost
always the case) or read-only, and whether operator assistance is required.
You can also specify an alternative message for the operator. This is included in the OPCOM
message instead of the normal MDMS operator message. Use of an alternative message is not
recommended.
When initiating a load from the DCL, you can choose a synchronous operation (default) or an
asynchronous operation using the /NOWAIT qualifier. From MDMSView, a load is always
asynchronous, so that you can continue performing other tasks.
10.3.17Unload Drive
Unlike the load drive operation, the unload drive can be applied to any type of drive at any time.
What it does is simply unload the current volume in the drive, and so you can use this when you
don’t know which volume is in the drive. Alternatively, you can use the unload volume operation if you know the volume ID in the drive.
The only option for unload drive is to request operator assistance if needed.
Media Management 10-8
Media Management
10.4 Groups
When initiating an unload from the DCL, you can choose a synchronous operation (default) or
an asynchronous operation using the /NOWAIT qualifier. From MDMSView, an unload is
always asynchronous, so that you can continue performing other tasks.
10.4 Groups
The group object is a logical object that is simply a list of nodes that have something in common.
Groups can be used to represent an OpenVMS cluster, a collection of nodes that have access to a
device, or for any other purpose. A node may appear in any number of groups. Groups can be
specified instead of, or in addition to nodes in drive, jukebox, save and restore objects, and can
be used interchangeably with nodes in pool authorization and access control definitions.
Groups contain only one attribute.
10.4.1 Nodes
The list of nodes that comprise the group. Nodes must be OpenVMS nodes that are defined in
the MDMS database. You should not use groups for non-OpenVMS nodes (for example, ABS
UNIX or Windows clients).
10.5 Jukeboxes
In MDMS, a jukebox is a generic term applied to any robot-controlled device that supports automatic loading of volumes into drives. Jukeboxes include small, single-drive loaders, large multidrive libraries and very large silos containing thousand of volumes. In general MDMS does not
make distinctions among the types of jukeboxes, except for the software subsystem used to control them. MDMS supports both the Media Robot Device (MRD) subsystem for SCSI-controlled
robots, and the Digital Cartridge Server Component (DCSC) subsystem for certain silos.
The next sections describe the jukebox attributes.
10.5.1 Access
The access attribute controls whether the jukebox may be used from local access, remote access
or both. Local access includes direct SCSI access, access via a controller such as the HSJ70, or
access via Fibre Channel, and does not require use of the Remote Device Facility (RDF).
Remote access is via a DECnet network requiring RDF. You can set the access to one of the following:
•
All - Allows both local and remote access (default)
•
Local - Allows only local access (as defined above)
•
Remote - Allows only remote access using RDF
10.5.2 ACS ID
For DCSC-controlled jukeboxes, the ACS identifier specifies the Automated Cartridge System
Identifier. Each MDMS jukebox maps to one Library Storage Module (LSM), and requires the
specification of the Library, ACS and LSM identifiers.
10.5.3 Automatic Reply
Automatic reply is a capability of polling hardware to determine if an operator-assist action has
completed. For example, if MDMS requests that an operator move a volume into a port, MDMS
can poll the port to see if the volume is there, and if so complete the OPCOM request without an
operator reply. Set automatic reply to enable this feature, and clear to require an operator
response. Please note that some operations cannot be polled and always require an operator
reply. The OPCOM message itself clearly indicates if a reply is needed or automatic replies are
enabled.
Media Management 10–9
Media Management
10.5 Jukeboxes
10.5.4 Cap Size
For DCSC-controlled jukeboxes equipped with Cartridge Access Points (CAPs), this attribute
specifies the number of cells for each CAP. The first number is the size for CAP 0, the second
for CAP 1, and so on. If a size is not specified, a default value of 40 is used. Specifying a cap
size optimizes the movement of volumes to and from the jukebox by filling the CAP to capacity
for each move operation.
10.5.5 Control
The control attribute determines the software subsystem that performs robotic actions in the
jukebox. The control may be one of the following:
•
MRD (Media Robot Device) - The default control uses SCSI commands to control the robot
in the jukebox. When you specify MRD, you should also specify slot count, robot device
name and a flag as to whether the jukebox supports magazines.
•
DCSC (Digital Cartridge Server Component) - MDMS uses the DCSC subsystem to control
the device. When you specify DCSC, you should also specify library ID, ACS ID, LSM ID
and CAP sizes. DCSC is used for certain large silo devices only.
10.5.6 Disabled
By default, jukeboxes are enabled, meaning that they can be used by MDMS and its applications. However, you may wish to disable a jukebox from use because it may need repair or be
used for some other application. Set the disabled flag to disabled the jukebox, and clear the flag
to enable the jukebox.
10.5.7 Groups
The groups attribute contains a list of groups containing nodes that have direct access to the
jukebox. Direct access includes direct-SCSI access, access via a controller such as an HSJ70,
and access via Fibre Channel. TMSCP access is not supported for jukeboxes. You can specify as
many groups as you wish, in addition to nodes that may not be in a group.
10.5.8 Library ID
For DCSC-controlled jukeboxes, the Library identifier specifies the library that this jukebox is
in. Each MDMS jukebox maps to one Library Storage Module (LSM), and requires the specification of the Library, ACS and LSM identifiers.
10.5.9 Location
The location attribute specifies the physical location of the jukebox. Location can be used as a
selection criterion for selecting volumes and drives. Specify an MDMS-defined location for the
jukebox. This location may be the same as, or different from, the onsite location that volumes are
stored in when not in a jukebox. If different, moves from the jukebox to the onsite location and
vice versa will be done in two phases: jukebox to jukebox location, then jukebox location to
onsite location, and vice versa.
10.5.10LSM ID
For DCSC-controlled jukeboxes, the Library Storage Module (LSM) identifier specifies the
LSM that comprises this jukebox. Each MDMS jukebox maps to one Library Storage Module
(LSM), and requires the specification of the Library, ACS and LSM identifiers.
Media Management 10-10
Media Management
10.5 Jukeboxes
10.5.11Nodes
The nodes attribute contains a list of nodes that have direct access to the jukebox. Direct access
includes direct-SCSI access, access via a controller such as an HSJ70, and access via Fibre
Channel. TMSCP access to jukeboxes is not supported. You can specify as many nodes as you
wish, in addition to groups of nodes in the groups attribute.
10.5.12Robot
For MRD-controlled jukeboxes, the robot name is the OpenVMS device name of the robot
device. Robot names normally fall into one of several formats:
•
GKx0 or GKxn01 for direct-connect SCSI
•
$n$DUAnnn for access via an HSJ-type controller
•
$2$GGnx for Fibre Channel access
If the jukebox is controlled by direct connect SCSI (first option), the device must be first loaded
on the system with one of the following DCL commands:
Alpha - $ MCR SYSMAN IO CONNECT GKxxx/NOADAPTER/DRIVER=SYS$GKDRIVER.EXE
VAX - $ MCR SYSGEN CONNECT GKxxx/NOADAPTER/DRIVER=GKDRIVER
and the device name must begin with GK.
10.5.13Slot Count
For MRD jukeboxes, the slot count is simply the number of slots (which can contain volumes) in
the jukebox. Volumes reside in numbered slots when they are not in a drive. Slots are numbered
from 0 to (slot count - 1). Filling in this field is optional: MDMS calculates the slot count by
polling the jukebox firmware.
10.5.14State
The state attribute is a protected field that describes the current state of the jukebox. A jukebox
can be in one of three states:
•
Available - Available for use, and not currently performing an operation
•
In-Use - Currently performing a robot operation: robot operations occur sequentially; any
new operation requested while the robot is in-use is queued
•
Unavailable - The robot is unavailable for use for some reason
This field is normally maintained by MDMS, so you should not modify it unless a problem has
occurred that needs manual cleanup (for example, the robot is stuck in the in-use state when it is
clear that it is not in-use).
10.5.15Threshold
MDMS provides the capability of monitoring the number of free volumes in a jukebox. A free
volume is one that is available for allocation and writing new data. Many users would like to
maintain a minimum number of free volumes in a jukebox to handle tape writing needs for some
period of time. You can specify a threshold value of free volumes, below which an OPCOM
message is issued that asks an operator move some more free volumes into the jukebox. In addition, the color status of the jukebox in MDMSView changes to yellow if the number of free volumes falls below the threshold, and to red if there are no free volumes in the jukebox. If you
wish to disable threshold OPCOM messages and color status, set the threshold value to 0.
Media Management 10–11
Media Management
10.5 Jukeboxes
10.5.16Topology
The topology attribute specifies the physical configuration of a certain type of jukebox when it is
being used with magazines. Topology is only useful when all of the following conditions are
true:
•
The jukebox is controlled by MRD
•
The jukebox is in the TL820 class that allows you to open the jukebox door and insert entire
magazines
•
The jukebox is configured with towers, faces and levels
You specify the topology of the jukebox so that you can move magazines into and out of the
jukebox by specifying a position rather than a start slot.
For each tower in the jukebox, you specify the number of faces in the tower, the number of levels in each face, and the number of slots in each level. For TL820-class jukeboxes, the typical
values for each tower are 8 faces, 2 or 3 levels per face and 11 slots per level. The associated
magazine contains 11 slots and fits into a position specified by tower, face and level. Other jukeboxes may vary.
10.5.17Usage
The usage attribute determines whether this jukebox is set up to use magazines, and has two values:
•
Magazine - The jukebox is configured to use magazines
•
Nomagazine - The jukebox is not configured to use magazines
You should only set usage to magazine if you plan to use MDMS magazine objects and move all
the volumes in the magazines together. An alternative is to move individual volumes separately,
even if they reside in a physical magazine; in this case set usage to nomagazine.
10.5.18Inventory Jukebox
MDMS provides the capability to inventory jukeboxes, and “discover” volumes in them and
optionally create volumes in the MDMS database to match what was discovered. With this feature, you can simply place new volumes in the jukebox and let MDMS create the associated volume records with attributes that you can specify.
There are two types of inventory:
•
Inventory using a vision system, which polls the jukebox’s firmware to locate volumes; this
option is available for most larger library and silo type jukeboxes, and this operation takes
only a few seconds to a few minutes depending on the size of the jukebox.
•
Physical inventory, which actually loads volumes into drives to read volume labels. This is
the only kind of inventory available for small loader-type jukeboxes that lack a vision system. This option is also available for larger jukeboxes, but is not recommended as it takes a
considerable amount of time.
You can inventory whole jukeboxes, or specify a volume range or slot range, as follows:
•
Volume range is supported for DCSC-controlled jukeboxes and MRD-based jukeboxes that
have a vision system. Specify a range of volumes such as ABC001-ABC024. Up to 1000
volumes can be specified in a single range. When specifying a volume range, only those
volumes are inventoried; other volumes in the jukebox are not.
•
Slot range is available only for MRD-controlled jukeboxes, and can be applied to either
vision or non-vision varieties. With slot range, only the specified slots are inventoried; other
slots are not.
Media Management 10-12
Media Management
10.6 Locations
While inventorying jukeboxes, MDMS can find volumes that are defined and in the jukebox,
that are not defined but are in the jukebox, and that are defined but missing from the jukebox.
MDMS provides several options to handle undefined and missing volumes.
If you set the “Create” flag during an inventory, MDMS will create a volume record for each
undefined volume it finds in the jukebox. You can specify in advance certain attributes to be
applied to this volume record:
•
Inherit volume ID - This is the most comprehensive option as it allows the new volume to
inherit all non-protected fields from the specified volume. You normally use a volume
known to be in the jukebox as the inherit volume ID.
•
Media type - Assign this media type to the volume. If you use inherit and media type, the
specified media type overrides the inherit media type
•
Preinitialized - If you set this flag, the volume will be set to the free state and is immediately
available for use. If you clear this flag, the volume will be set to the uninitialized state, and
needs to be initialized prior to use. You should set or clear this flag depending on whether
the volume is already physically initialized.
If you do not set the “Create” flag, then MDMS will not create new volume records for undefined volumes it finds.
Conversely, you can also define what to do if a volume that should be in the jukebox (according
to the database) is found not to be in the jukebox. There are three options that you can apply
using the “Missing” attribute:
•
Delete - Delete the volume from the database; this is not normally what you would want to
do because in most cases the volume is simply in another location and you probably want to
keep it.
•
Ignore - Do not change the database; this will probably leave the database in an inconsistent
state, but you may prefer to perform the changes manually.
•
Move - This is the default option, and changes the database to flag that the volume is in the
volume’s onsite location.
When initiating an inventory from the DCL, you can choose a synchronous operation (default)
or an asynchronous operation using the /NOWAIT qualifier. From MDMSView, an inventory is
always asynchronous, so that you can continue performing other tasks.
10.6 Locations
A location is an MDMS object that describes the physical location other objects. Nodes, jukeboxes, magazines, volumes and archives can all have locations associated with them. Locations
are used for volume and drive allocation selection criteria, and for placing volumes and magazines in known labelled locations.
Locations can be hierarchical, and locations in hierarchy that have a common source are considered compatible locations. For example, locations SHELF1 and SHELF2 are compatible if they
have a common parent location such as ROOM2. Compatible locations are used when allocating
drives and volumes using selection criteria, so you should only define hierarchies to the extent
that you wish compatible locations. Locations that extend beyond a room or floor are generally
not considered compatible, so you should not normally build location hierarchies beyond that
level.
Media Management 10–13
Media Management
10.7 Magazines
Locations can also contain “spaces”, that are normally labelled areas in a location that volumes
and magazines can be placed in an onsite location. If a volume or magazine contains a space definition, this is output in OPCOM messages so that operator can easily locate a volume or magazine when needed.
Locations contain two attributes, as defined in the following sections.
10.6.1 Parent Location
The parent location is an MDMS location object which is the next level up on the location hierarchy. For example, a location SHELF1 might have a parent location ROOM2, indicating that
SHELF1 is in ROOM2. You should define a parent location only if you wish all locations
belonging to the parent (including the parent itself) to be compatible when selecting volumes and
drives. For example, in a hierarchy of SHELF1 and SHELF2 in ROOM2, volumes in any of the
three locations would match a request to allocate a volume from ROOM2. Do not use the location hierarchy for other purposes.
10.6.2 Spaces
Locations can contain spaces, that are used in OPCOM messages when volumes and magazines
are being moved from one place to another. Enter a range of spaces in an alphanumeric range
separated by a dash. Examples of space ranges are 1-10, A-Z, AAA001-AAA099, 10A-10Z.
10.7 Magazines
A magazine is an MDMS object that contains a set of volumes that are planned to be moved
together as a group. It can also relate to physical magazines that some jukeboxes (most notably
small loaders) require to move volumes into and out of the jukebox. Magazines can be moved
into and out of MRD-controlled jukeboxes with all their volumes at once.
However, just because a jukebox requires a physical magazine does not necessarily mean that
you must use MDMS magazines. The physical magazine jukebox can be handled without magazines, and volumes are moved individually as far as MDMS is concerned. The choice should
depend on whether you wish the volumes to move independently (don’t use magazines) or as a
group together (use magazines).
Magazines are not supported for DCSC-controlled jukeboxes. Magazines have the following
attributes.
10.7.1 Jukebox, Start Slot and Position
The jukebox name contains the name of the jukebox if the magazine is in a jukebox. When in a
jukebox, a magazine can optionally have a start slot or position, as follows:
•
In a single-drive loader jukebox, only one magazine can be loaded at a time. In this case, the
start slot is always zero, and the number of slots in the jukebox becomes the number of slots
in the magazine.
•
In larger, TL820-type jukeboxes, the magazine can be placed in many different places. If
you have associated a topology with the jukebox, you can place the magazine in a “Position”, specified by a tower, face and level specification. This is easier to physically locate in
such jukeboxes than the alternative, which is a start slot designation. OPCOM messages for
Move Magazine operations will state either position or start slot depending on whether a
topology was specified.
All three fields are protected and normally managed by MDMS when a “Move Magazine” operation occurs. Only manipulate these fields if an error occurs and you need to recover the database to a consistent state.
Media Management 10-14
Media Management
10.7 Magazines
10.7.2 Onsite and Offsite Locations and Dates
When not in a jukebox, a magazine may be either in an onsite or offsite location. An onsite location is one where the magazine can be quickly accessed and moved into a jukebox, which is also
onsite. An offsite location is meant to be a secure location in the case of disaster recovery, and
generally does not have local access to a jukebox. However, nothing in MDMS precludes the
possibility of offsite locations having their own jukeboxes.
Each magazine should have an onsite and offsite location defined, so that operators know where
the magazine is physically located. They use these locations, the jukebox name and the placement to determine where a jukebox is at a certain time. Both onsite and offsite locations should
be MDMS-defined location objects.
Together with the offsite and onsite locations, you can associate an offsite and onsite date. These
dates represent the date the magazine is due to be moved offsite or onsite respectively. Typically,
magazines are moved offsite while their volumes’ data is still valid and needs to be protected in
a secure location. When the volumes’ data expires, the magazine should be scheduled to be
brought onsite, so that the newly-freed volumes can be used for other purposes.
If an offsite and/or onsite date is specified, MDMS initiates the movement of the magazines at
some point on the scheduled date automatically. This is performed by the “Move Magazine”
scheduled operation, which by default runs at 1:00 am each day. Operators will see OPCOM
messages to move the magazines to either the onsite or offsite location.
If you do not wish to have MDMS move magazines automatically, either remove the onsite and
offsite dates from the magazine, or disable the scheduled “Move Magazine” activity by assigning a zero time to its schedule object “MDMS$MOVE_MAGAZINES”.
10.7.3 Slot Count
The slot count specifies how many slots are in the magazine. Unlike jukeboxes, this value is
required to make magazines work properly.
10.7.4 Spaces
While in an onsite location, the magazine can occupy a space, which is a labelled part of a location that uniquely identifies where the magazine is. A space can be designed to handle a single
volume, but since magazines hold multiple volumes, multiple spaces can also be assigned. Enter
either a space or a range of spaces for the magazine.
10.7.5 Move Magazine(s)
The supported way to move magazines from one place to another is to use the “Move Magazine”
operation. You can move magazines on demand by issuing this operation, or you can let MDMS
automatically move magazines according to pre-defined onsite or offsite dates (this is called a
“scheduled” move). You can also force an early scheduled move if you want it to occur before
the time that MDMS would initiate the move. Moving magazines into jukeboxes must always be
performed manually.
When intiating a “Move Magazine”, you can choose a destination for the magazine if the move
is not a scheduled move. The destination can be one of three types of places:
•
Jukebox - You wish to move the magazine and all of its volumes into a jukebox; you would
then specify the jukebox name. If the jukebox is a large TL820-type jukebox, you must also
specify the “Position”, using tower, face and level, or start slot for the magazine.
•
Onsite location - You wish to move the magazine to a location that is onsite to the computer
hardware that normally uses it. You would then specify the onsite location name, and
optionally one or more spaces that the magazine (or volumes from the magazine) will
occupy.
Media Management 10–15
Media Management
10.8 Media Types
•
Offsite location - You wish to move the magazine to an offsite location for safety in case of
a disaster. Specify an offsite location name.
If you wish to force a scheduled move, you can select “Scheduled”. In most cases, the destination is predefined, so you don’t need to specify it. However, you can specify an alternative destination for the scheduled move if you wish by specifying a destination as outlined above.
Finally, you can specify if you need operator assistance. This is recommended with “Move Magazine” as magazines cannot be moved without human intervention. Only if you plan to do the
physical move yourself or you manually let someone know would you disable operator assistance.
10.8 Media Types
MDMS uses media type objects to hold information about the type of media that volumes and
drives can support. MDMS uses media type as a major selection criterion for allocating volumes
and drives, and volumes can only be loaded into drives with compatible media types.
Media types contain four attributes, as defined in the following sections.
10.8.1 Capacity
The capacity attribute indicates the capacity of the media in MB. This field is not used by ABS
or HSM, but is used by the obsolete product “Sequential Media Filesystem” (SMF).
10.8.2 Compaction
This important field indicates whether you wish the tape to be written with firmware compaction. Enabling compaction usually doubles the capacity of the tape, so this is a desirable option
which is set by default. Clear the attribute if you do not wish compaction.
10.8.3 Density
This field indicates the density of the tape that you desire. Many types of tape media (especially
DLT tapes) support multiple densities, and certain types of drive can either read and write a certain density, or just read some densities. As such, you can define many media types with different densities that can be assigned to volumes and drives.
MDMS uses the density field when initializing volumes, so the density must be a valid OpenVMS density for the version of the operating system being used. Issue a “HELP INITIALIZE
/DENSITY” command to determine the valid densities on the platform.
10.8.4 Length
The length field is used for information purposes only. If your media comes in various lengths,
you can differentiate between types by using the length field. Specify an integer value that has
meaning to your operators.
10.9 Node
An MDMS node is an OpenVMS system that is running MDMS. All nodes running MDMS
must have a node object defined in the database for MDMS to work properly. The node name
must be the DECnet Phase IV name of the system, if DECnet Phase IV is running or a Phase IV
alias is used. Otherwise it can be any name.
Nodes contain attributes as outlined in the following sections.
Media Management 10-16
Media Management
10.10 Pools
10.9.1 Database Server
MDMS operates as a group of co-operating processes running on multiple nodes in multiple
clusters in an MDMS domain. One of these MDMS processes is known as the “Database
Server”, and it actually controls all MDMS operations in the domain. Although only one node is
the database server at any one time, you should enable multiple nodes to be possible database
servers in case the actual database server node fails. In this way, failover is supported.
A database server must have direct access to the database files located in
MDMS$DATABASE_LOCATION. Direct access, access via MSCP, and access via Fibre
Channel are all considered local access. Access via a network protocol or DFS are not considered local access. It is recommended that you enable at least 3 nodes as potential database servers to ensure failover capabilities.
10.9.2 Disabled
Set to disable the node as an MDMS node. Clear to enable the node as an MDMS node.
10.9.3 OPCOM Class
You can specify the OPCOM classes to be used by MDMS for operator messages on this node.
By default, the domain default OPCOM classes are used, but you can override this on a node-bynode basis. Specify one or more of the standard OpenVMS OPCOM classes - messages are
directed to all login sessions with these OPCOM classes enabled.
10.9.4 Transports and Full Names
You can define which network transports are defined for this node. There are four choices:
•
DECnet - The DECnet transport is used
•
TCPIP - The TCP/IP transport is used, and the TCP/IP full name is specified
•
DECnet, TCPIP - The DECnet and TCP/IP transports can be used, with DECnet preferred
•
TCPIP, DECnet - The TCP/IP and DECnet transports can be used, with TCP/IP preferred
If you identify TCP/IP as a supported transport, you must define the TCP/IP fullname in the
TCP/IP fullname field. These fullnames are normally in the format “node.loc.org.ext”. For
example, SLOPER.CXO.CPQCORP.COM
If you identify DECnet as a transport, you need to specify a DECnet full name only if you are
using DECnet-Plus (Phase V). In this case, enter the full name, which is normally in a format
such as LOCAL:.node. If you are running DECnet Phase IV, do not specify a DECnet full name.
The node’s node name is used.
10.10Pools
A pool is a logical MDMS object that associates a set of volumes with a set of users that are
authorized to use those volumes. Every volume can be assigned one pool, for which we say that
the volume is in the pool. The pool is then assigned a set of users that are authorized to use the
volumes in the pool. If a volume does not have a pool specified, then it is said to belong to the
“scratch pool” for which no authorization is required.
Pools have three attributes that are discussed in the following sections.
Media Management 10–17
Media Management
10.11 Volumes
10.10.1Authorized Users
You can specify a list of authorized users for the pool, as a comma-separated list of users. Each
user should be specified as node::username or group::username, where both the node/group and
username portions can contain wildcard characters (*%). To authorize everyone, you can specify
*::*. To authorize everyone on a node you can specify nodename::*. Everyone in the authorized
user list is allowed to allocate volumes in the pool. Other users require MDMS_ALL_RIGHTS
or MDMS_ALLOCATE_ALL rights.
10.10.2Default Users
Default users are authorized like the authorized users, but in addition are assigned this pool as
their default pool. In this case, if they attempt to allocate a volume and don’t specify a pool, they
will allocate a volume from this pool. A particular user need only appear in one list: they do not
need to be listed in both lists to be an authorized user to their default pool.
10.10.3Threshold
Pools are useful for dividing volumes between groups or organizations, but they are only useful
is there are free volumes in the pool. MDMS provides the capability of monitoring the number of
free volumes in a pool. A free volume is one that is available for allocation and writing new data.
Many users would like to maintain a minimum number of free volumes in a pool to handle tape
writing needs for some period of time. You can specify a threshold value of free volumes, below
which an OPCOM message is issued that asks an operator add some more free volumes to the
pool. In addition, the color status of the pool in MDMSView changes to yellow if the number of
free volumes falls below the threshold, and to red if there are no free volumes in the pool. If you
wish to disable threshold OPCOM messages and color status, set the threshold value to 0.
10.11Volumes
A volume is a physical piece of tape media that contains (or will contain) data written by MDMS
applications (ABS or HSM), or user applications. Volumes have many attributes concerning
their placement, allocation status, life-cycle dates, protection attributes and many other things.
Volume records can be created manually with a “Create Volume” operation, or automatically be
MDMS with “Inventory Jukebox” and “Load Drive” operations. The MDMS$CONFIGURE
command procedure can also be used to create volumes.
Once a volume is created it acquires a state. This state determines how the volume may be used
at any time, and to an extent where the volume should be placed.
The following figure illustrates the life cycle of volumes, and the following table indicates how a
volume transitions from one state to another.
Media Management 10-18
Media Management
10.11 Volumes
Figure 10–1 Volume State
Allocated
Deallocate
Allocate
Create
Deallocate
Retain
Unitialized
Free
Transition
Release
Unavailable
Available
Unavailable
CXO6756A
Each row describes an operation with current and new volume states, commands and GUI actions that
cause volumes to change states, and if applicable, the volume attributes that MDMS uses to cause volumes
to change states. Descriptions following the table explain important aspects of each operation.
Table 10–1 MDMS Volume State Transitions
Current State
Transition to New State
New State
Blank
MDMS CREATE VOLUME
Volume Create
UNINTIALIZED
Blank
MDMS CREATE VOLUME/PREINIT
FREE
UNINITIALIZED
MDMS INITIALIZE VOLUME
Volume Initialize
FREE
FREE
MDMS INITIALIZE VOLUME
Volume Initialize
FREE
FREE
MDMS ALLOCATE VOLUME
Volume Allocate
ALLOCATED
ALLOCATED
MDMS DEALLOCATE VOLUME
Volume Deallocate
or automatically on
the volume scratch date
TRANSITION
ALLOCATED
MDMS DEALLOCATE VOLUME
Volume Deallocate
or automatically on
the volume scratch date
FREE
Media Management 10–19
Media Management
10.11 Volumes
Table 10–1 MDMS Volume State Transitions
Current State
Transition to New State
New State
TRANSITION
MDMS SET VOLUME /RELEASE
Volume Release
or automatically on
the volume transition time
FREE
Any State
MDMS SET VOLUME /UNAVAILABLE
Volume Unavailable
UNINITIALIZED
UNINITIALIZED
MDMS SET VOLUME /AVAILABLE
Volume Available
Previous State
UNINITIALIZED
MDMS DELETE VOLUME
Volume Delete
BLANK
FREE
MDMS DELETE VOLUME
Volume Delete
BLANK
The following sections describes all the volume attributes in detail, followed by operations that
you can perform on volumes.
10.11.1Allocation Fields - Account, Username, UIC and Job
The account, username and UIC fields are filled in automatically when a volume is allocated,
and reflect the calling user or specified user during the allocate. The username is a valid OpenVMS username on the client system performing the allocate, and the account and UIC is from
the user’s entry in the system Authorization (UAF) file.
These fields are normally maintained by MDMS and are protected fields. You should not modify
these fields unless the volume is deallocated. MDMS maintains the Account, Username and UIC
in the volume even after the volume is deallocated, so that you can “retain” the volume back to
the allocated state in case of accidental deallocation.
The job name field is not used by ABS, HSM or MDMS.
10.11.2Allocation and Movement Dates
There are several dates that maintain or control allocation and movement dates for volumes.
These are as follows:
•
Allocation Date - This is the date that the volume was last allocated using the “Allocate Volume” function. This field is protected and maintained by MDMS and should not normally
be manually changed.
•
Scratch date - This is the date the volume is due to be deallocated. MDMS will automatically deallocate the volume on the scratch date, but you can manually deallocate the volume
before the scratch date as needed.
•
Deallocation Date - This is the date the volume is actually deallocated. The volume may go
into either the transition state or the free state depending on whether there is a transition
time on the volume. This field is protected and maintained by MDMS and should not normally be manually changed.
•
Onsite Date - This is the date the volume is due to be moved onsite from an offsite location.
If this date is specified, MDMS automatically generates a “Move Volume” operation to
move the volume onsite. Clear this field if you do not wish MDMS to automatically move
the volume onsite.
Media Management 10-20
Media Management
10.11 Volumes
•
Offsite Date - This is the date the volume is due to be moved offsite. If this date is specified,
MDMS automatically generates a “Move Volume” operation to move the volume offsite.
Clear this field if you do not wish MDMS to automatically move the volume offsite.
•
Transition Time - The transition time indicates that the volume is to enter the transition state
when it is deallocated and remain in this state until the transition time has expired. In the
transition state, the volume cannot be allocated for use. When the transition time expires, the
volume enters the free state and may be re-used.
If an offsite and/or onsite date is specified, MDMS initiates the movement of the volumes at
some point on the scheduled date automatically. This is performed by the “Move Volumes”
scheduled operation, which by default runs at 1:00 am each day. Operators will see OPCOM
messages to move the volumes to either the onsite or offsite location.
If you do not wish to have MDMS move volumes automatically, either remove the onsite and
offsite dates from the volume, or disable the scheduled “Move Volumes” activity by assigning a
zero time to its schedule object “MDMS$MOVE_VOLUMES”.
10.11.3History Dates
The history dates are maintained by MDMS, but are for information purposes only. MDMS does
not use these dates to perform any operations. The following history dates are maintained:
•
Creation Date - The date the volume was created in the database. This field is protected and
maintained by MDMS and should not normally be manually changed.
•
Initialize Date - The date the volume was last initialized. This field is protected and maintained by MDMS and should not normally be manually changed.
•
Freed Date - This is the date the volume was last freed, either directly on deallocation, or
upon expiration of the transition time. This field is protected and maintained by MDMS and
should not normally be manually changed.
•
Last Access Date - The date the volume was last loaded (and presumably accessed). This
field is protected and maintained by MDMS and should not normally be manually changed.
•
Cleaned Date - If the volume is a cleaning volume, MDMS updates the cleaned date to
reflect the date that the volume was last used for cleaning. Otherwise it is set to the creation
date.
•
Purchase Date - The date the volume was purchased. MDMS makes this the same values as
the creation date, but you can adjust this if needed.
10.11.4State
The state field indicates where in a volume’s life cycle the volume exists. The state field itself is
protected, and you should not normally adjust it unless an error occurs. However, you can
“Update State” using certain keywords, which checks for validity and results in a consistent
database state.
A volume can be in one of the following states, which are shown in normal life-cycle order:
•
Uninitialized - The default state when a volume is created. This state indicates that the volume needs to be initialized prior to use, and cannot be allocated until then.
•
Free - When a volume is initialized, and after it has been freed, the volume is in the free
state. This means that the volume’s data (if any) is no longer valid and can be used to write
new data. This is the only state from which a user can allocate a new volume for use.
•
Allocated - After a volume is allocated, it enters the allocated state. It remains in this state
until the scratch date is reached. MDMS automatically deallocates the volume when the
Media Management 10–21
Media Management
10.11 Volumes
scratch date is reached, and it transitions to either the transition state (if there is a transition
time on the volume) or the free state.
•
Transition - If a volume is deallocated to the transition state, it remains in this state until the
transition time expires. At this point, the volume re-enters the free state.
•
Unavailable - This state is used by MDMS if it detects a problem with the volume. For
example, if MDMS cannot read the label on this volume during a load, it puts it in the
unavailable state. MDMS remembers the previous state (the “Available State”), so that
when it comes out of the unavailable state, it goes back to its previous state.
A picture showing the normal state transitions is provided at the top of the volumes section.
While changing the state directly is not recommended, there are several options for changing
state that are supported:
•
Available - This changes the state from the unavailable state to the volume’s previous state
•
Unavailable - This changes the current state to unavailable, and remembers the volume’s
previous state. The volume cannot be used in this state. You should set this if you believe
the volume is corrupted or broken and cannot be used.
•
Release - If the volume is in the Transition State and you have verified that its data has
expired, you can “Release” it to the free state immediately.
•
Retain - If the volume is in the Transition State and you have verify that its data has NOT
expired and is still useful, you can “Retain” the volume back to the allocated state. The
existing allocated user, UIC and account are maintained. If the volume was in a volume set,
the volume set is re-created.
•
Preinitialize - If you know that the volume is already initialized, and the volume is in the
Uninitialized state, this changes it to the Free state. It does not change the state if the volume
is in any other state.
10.11.5Media Types
A volume’s media types define the type of media for the volume, and what potential compaction
or density options the volume can support. As such, before a volume is initialized, it can potentially support many media types. However, once a volume is initialized, MDMS uses the density
and compaction attributes from a media type to physically write the tape. As such, a volume
should only support one media type at and after the first initialization.
If the volume is in the Uninitialized state, select one or more MDMS-defined media types for the
volume. If the volume is in any other state, select a single media type. If no media type is specified, the domain default media type is used.
10.11.6Pool
A pool contains a collection of volumes that can be used by a set of authorized users. To insert a
volume into a pool, simply specify a pool name in the volume’s pool field. If not defined, the
volume is placed in the “scratch pool”, and it can be allocated by any user. If the volume is in the
free state, the number of free volumes in the pool is incremented.
10.11.7Previous and Next Volumes
These read-only fields indicate if a volume is in a volume set, and what the previous and next
volumes are in the set, relative to this volume. A volume set is created when a tape write operation reaches end-of-tape and a new tape is required to complete the operation. ABS and HSM
bind the next volume to the current volume, and create a volume set.
These fields are manipulated by “Bind Volume” and “Unbind Volume” operations, both manually and under control of MDMS applications.
Media Management 10-22
Media Management
10.11 Volumes
10.11.8Placement - Jukebox, Magazine, Locations, Drive
The placement fields of a volume indicate where the volume resides, and where it should reside
when moved to an onsite or offsite locations. The placement attributes include the following:
•
Placement - The current placement of the volume - options can be:
–
Drive - The volume is in a drive, indicated by the drive field
–
Jukebox - The volume is in a jukebox, indicated by the jukebox field and the slot field
–
Magazine - The volume is in a magazine, indicated by the magazine field and slot field
–
Offsite - The volume is in an offsite location, indicated by the offsite location field
–
Onsite - The volume is in an onsite location, indicated by the onsite location field, with
optional space field
–
Moving - The volume is moving between one place and another
Placement is a protected field managed by MDMS. You should not change placement
unless error recovery is needed.
•
Drive - The name of the drive containing the volume. This field may contain a value even if
the volume is not currently in a drive. The drive is a protected field managed by MDMS.
You should not change drive unless error recovery is needed.
•
Jukebox - The name of the jukebox containing the volume. The jukebox is a protected field
managed by MDMS. You should not change jukebox unless error recovery is needed. The
slot field indicates the jukebox slot the volume is in, and is filled in even if the volume is
actually in a drive.
•
Magazine - The name of the magazine containing the volume. The magazine is a protected
field managed by MDMS. You should not change placement unless error recovery is
needed. The slot field indicates the magazine slot the volume is in (this may or may not be
the same as the jukebox slot). When the volume is in a magazine, its onsite and offsite location and date fields are invalid, as the magazine’s onsite and offsite location and dates are
used instead.
•
Offsite Location - The designated offsite location for the volume (not valid if the volume is
in a magazine)
•
Onsite Location - The designated onsite location for the volume (not valid if the volume is
in a magazine). The Space field indicates which space in the onsite location the volume is in
or would be in if the placement is onsite.
10.11.9Formats - Brand, Format, Block Factor, Record Size
The format fields are not used by ABS, HSM or MDMS, but can be used to document certain
characteristics of the volume and its data format. The fields are as follows:
•
Brand - The manufacturer of the volume - string
•
Format - The record format used on the tape volume. Options are:
–
ASCII
–
BACKUP
–
EBCDIC
–
NONE
–
RMUBACKUP
Media Management 10–23
Media Management
10.11 Volumes
•
Record Size - An integer
•
Block Factor - An integer
10.11.10Protection
The protection field provides System, Owner, Group and World access protection for the volume. This protection is written to the volume when it is initialized, and provides protection from
unauthorized use and re-initialization. The standard protection is:
SYSTEM(R, W) OWNER (R, W) GROUP (R) WORLD (None)
If protection is not set for the volume, the domain default protection is used.
10.11.11Counters
MDMS provides three counters for volumes, as follows:
•
Mount Count - This is a count of the number of times the volume is loaded - maintained by
MDMS and incremented every time MDMS loads this volume
•
Error Count - Not maintained by MDMS - set this field any integer you wish
•
Times Cleaned - If the volume is a cleaning volume, this value is incremented each time the
volume is loaded and used for cleaning. Otherwise it is set to 0.
10.11.12Allocate Volume
You allocate volumes so that you can use them for writing new data. Allocating a volume places
it into the Allocated state, and assigns the calling user (or specified user), UIC, and account in
the allocation fields. This effectively reserves the volume to the user. The volume remains allocated to the user and unavailable for other use until the scratch date is reached, or unless the volume is manually deallocated.
When allocating a volume, you may specify the user for which you are allocating the volume
(for example, ABS). If you do not specify a user, then you as the calling user are placed in the
allocation fields.
Also, during allocation, you can change the following fields in the MDMS database to reflect the
format to be used on the tape:
•
Format - The record format used on the tape volume. Options are:
–
ASCII
–
BACKUP
–
EBCDIC
–
NONE
–
RMUBACKUP
•
Record Size - An integer
•
Block Factor - An integer
•
Scratch Date - The date when the volume’s data becomes obsolete and the volume should
be deallocated - MDMS will automatically deallocate the volume at this time.
•
Transition Time - When the volume is deallocated, the volume should go into the Transition
State and remain in this state until the transition time expires, after which it will go into the
Free State. If not specified, the volume goes into the Free State immediately on deallocation.
Media Management 10-24
Media Management
10.11 Volumes
10.11.13Allocate Volume(s) by Selection Criteria
Instead of allocating a volume by name, you can specify selection criteria to be used for MDMS
to select a free volume for you and allocate it. You can also allocate a volume set by specifying a
count of volumes to allocate. The allocation selection criteria include:
•
Media Type - Select a volume with the specified media type
•
Location - Used with media type, select a volume in the specified location
•
Jukebox - Used with media type, select a volume in the specified jukebox
•
Pool - Select a volume in the specified pool
•
Like Volume - Select a volume like the specified volume (with the same media type, pool
and placement)
•
Bind Volume - Select a volume like the specified volume (with the same media type, pool
and placement) and bind the new volume to the specified volume in a volume set
If you specify a volume count of more than one, then that many volumes will be allocated and
placed in a volume set. If you also use the “Bind Volume” selection option, the new volume set
is bound to the specified volume set.
You can also specify that you wish to change certain attributes of the volume as follows:
•
Format - The record format used on the tape volume. Options are:
–
ASCII
–
BACKUP
–
EBCDIC
–
NONE
–
RMUBACKUP
•
Record Size - An integer
•
Block Factor - An integer
•
Scratch Date - The date when the volume’s data becomes obsolete and the volume should
be deallocated - MDMS will automatically deallocate the volume at this time.
•
Transition Time - When the volume is deallocated, the volume should go into the Transition
State and remain in this state until the transition time expires, after which it will go into the
Free State. If not specified, the volume goes into the Free State immediately on deallocation.
10.11.14Deallocate Volume
MDMS normally deallocates volumes when their scratch date expires. However, you can deallocate volumes manually in order to free them up earlier than planned. You can deallocate your
own volumes, or with the appropriate rights deallocate volumes allocated to other users.
If the volume is in a volume set, the volume is also unbound from the volume set.
The following options are available when you deallocate a volume:
•
Deallocation State - You can specify if the volume goes into the transition state or the free
state on deallocation. The transition state disallows allocation until the transition time
expires. You should make sure a transition time is specified, otherwise the domain default
transition time is used. If you select the free state, the volume immediately goes into the free
state.
Media Management 10–25
Media Management
10.11 Volumes
•
Transition Time - If the deallocation state is set to Transition, this is the length of time the
volume remains in the transition state. If not specified, the volume’s existing transition time
is used, or the domain default transition time is used.
•
User Name - If the volume is allocated to a user other than yourself, you must specify that
user name for the deallocation to occur. You need MDMS_DEALLOCATE_ALL for this
option.
•
Deallocate Volume Set - If the volume is in a volume set, the entire volume set is deallocated by default. You can avoid this by deallocating only the single volume clearing the volume set attribute. Note that the volume set is still unbound at the deallocated volume.
10.11.15Bind Volume
Binding volumes is the way to create volume sets, by binding one volume (or volume set) to
another volume (or volume set). Normally, MDMS applications such as ABS and HSM perform
automatic binding when they reach end-of-tape. However, it is sometimes necessary to perform
manual binding. For example, if a volume set has been accidentally deallocated but is still
needed, you may need to manually bind the set together (although the retain feature does this
quite well).
There are only two options when binding a volume set:
•
Bind Volume ID - The volume or volume set you wish to bind the current volume to. The
current volume is always bound to the end of the specified volume set. Note that the allocated user of the volume set must match the allocated user of the current volume for the bind
to be successful.
•
User Name - If this volume is allocated to a different user than yourself, you must specify
that user name. This requires the MDMS_BIND_ALL right.
When you bind a new volume to a volume or volume set, the new volume acquires the following
attributes of the volume set:
•
Onsite Date
•
Offsite Date
•
Scratch Date
The next and previous volumes are also updated appropriately.
10.11.16Unbind Volume
Unbinding a volume removes the volume from the volume set without deallocating it. When
unbinding a volume you can choose whether to unbind the entire volume set, or break the volume set at the point of the unbind. You can also unbind on behalf of the allocated user.
There are only two options for unbind:
•
User Name - If this volume is allocated to a different user than yourself, you must specify
that user name. This requires the MDMS_UNBIND_ALL right.
•
Unbind Volume Set - Set this flag if you wish to unbind the entire volume set (that is, none
of the volumes will be in a volume set anymore). Clear the flag if you wish to unbind at the
point of the current volume (that is, the volumes before and the volumes after will remain in
two separate volume sets).
Media Management 10-26
Media Management
10.11 Volumes
10.11.17Load Volume
MDMS supports two ways to load volumes into drives:
•
Load Drive - This loads a scratch volume into a drive via operator intervention or by stacker
operation. As such, this option is only for standalone and stacker controlled drives
•
Load Volume - This loads a specific volume into a drive, and can apply to all types of drive.
This section discusses the load volume option. The load drive option is discussed under drives.
When loading a specific volume, you normally need to specify the drive in which to load the volume, unless a drive has been specifically allocated for a volume (via DCL only). Select a drive
with a compatible media type for the volume.
If you are loading a volume into a jukebox drive, and the volume is not in the jukebox, you can
specify is an automatic “Move Volume” request to move the volume into the jukebox is desired.
If you do not specify this option, and the volume is not in the jukebox, the operation will fail.
Another option is to request MDMS to check the volume label. This is normally a good idea as
there can be mismatches between the volume’s magnetic label and its bar code label. If the labels
do not match, the load fails. If you do not set the label check flag, the load may succeed but the
label may be wrong. Use this option with caution.
When issuing the load volume request, you can specify whether the load is for read/write or
read-only, and whether operator assistance is required.
You can also specify an alternative message for the operator. This is included in the OPCOM
message instead of the normal MDMS operator message. Use of an alternative message is not
recommended.
10.11.18Unload Volume
You can unload a specific volume from a drive by issuing the “Unload Volume” operation.
Unlike the “Unload Drive” operation which unloads any volume from the drive, the “Unload
Volume” function checks the label on the volume on the drive before unloading it. If the label
can be read and does not match the specified volume, the unload fails.
There is only one option for unload volume - operator assistance. This is recommended unless
you are personally monitoring the unload operation.
10.11.19Move Volume(s)
The supported way to move volumes from one place to another is to use the “Move Volume”
operation. You can move volumes on demand by issuing this operation, or you can let MDMS
automatically move volumes according to pre-defined onsite or offsite dates (this is called a
“scheduled” move). You can also force an early scheduled move if you want it to occur before
the time that MDMS would initiate the move. Moving volumes into jukeboxes or magazines
must always be performed manually.
When intiating a “Move Volume”, you can choose a destination for the volume if the move is
not a scheduled move. The destination can be one of four types of places:
•
Jukebox - You wish to move the volume into a jukebox; you would then specify the jukebox
name. You can also specify slot: this is required for small loader jukeboxes unless you perform an inventory afterwards. For vision-equipped jukeboxes, MDMS can determine an
appropriate slot for the volume automatically.
•
Onsite location - You wish to move the volume to a location that is onsite to the computer
hardware that normally uses it. You would then specify the onsite location name, and
optionally a space that the volume will occupy.
Media Management 10–27
Media Management
10.11 Volumes
•
Offsite location - You wish to move the volume to an offsite location for safety in case of a
disaster. Specify an offsite location name.
•
Magazine - You wish to move the volume into a magazine, and specify a magazine slot for
the volume.
If you wish to force a scheduled move, you can select “Scheduled”. In most cases, the destination is predefined, so you don’t need to specify it. However, you can specify an alternative destination for the scheduled move if you wish by specifying a destination as outlined above.
Finally, you can specify if you need operator assistance. This is recommended with “Move Volume” because human intervention is necessary to move volumes. Only if you plan to do the
physical move yourself or you manually let someone know would you disable operator assistance.
10.11.20Initialize Volume(s)
MDMS supports initialization of volumes to make them available for use. Initializing a volume
consists of writing an ANSI label on the volume, and applying compaction and density attributes
and the volume protection field in the label. The volume is then free to be written. If the volume
was in the Uninitialized state, it will now change to the Free state. All volumes need to be initialized at least once before ABS and HSM can allocate and use them.
Volumes that are already written need to be initialized again if you wish to use the whole volume
for writing again. Both ABS and MDMS initialize volumes on every allocation.
When initializing volumes, you can specify four options:
•
Media Type - If the volume does not have a media type specified, or has more than one
media type specified, this is the time to specify a single media type for the volume. This is
because the initialize instantiates the density and compaction attributes of the media type
when writing to the volume.
•
Operator Assistance - Recommended if a problem occurs during loading/unloading during
the initialization.
•
Overwrite - If set, this indicates that you wish the volume label to be written regardless of
the label currently on the tape. If clear, the initialize will not take place if there is a different
label on the tape.
Media Management 10-28
11
MDMS Configuration
The Installation Guide provides information about establishing the MDMS domain configuration. The information in this chapter goes beyond the initial configuration of MDMS, explaining
concepts in more detail than the product installation and configuration guide. This chapter also
includes procedures related to changing an existing MDMS configuration.
The major sections in this chapter focus on the MDMS domain and its components, and the
devices that MDMS manages.
A sample configuration for MDMS is shown in Appendix B.
11.1 The MDMS Management Domain
To manage drives and volumes, you must first configure the scope of the MDMS management
domain. This includes placing the database in the best location to assure availability, installing
and configuring the MDMS process on nodes that serve ABS V3 or HSM V3 and defining node
and domain object record attributes. The MDMS Domain is defined by:
•
the MDMS database
•
start up files on the nodes which access it
•
node and domain object records
MDMS Configuration 11–1
MDMS Configuration
11.1 The MDMS Management Domain
Figure 11–1 The MDMS Domain
CAMPUS_MANAGEMENT
Domain
FIRST_FLOOR
Location
TL896_1_JUKE
Jukebox
SECOND_FLOOR TL896_2_JUKE
Location
Jukebox
X
X
Operator
Operators
BDT002
Node
BDT003
Node
BDT004
Node
BTM006
Node
BTM007
Node
Network
TZ89_1
Drive
BMR009
Node
BMR010
Node
BTC002
Backup
server
node
BTC001
Server
node
MDMS
Database
CXO6746A
Understanding MDMS configuration concepts is necessary to configure a reliable and available
service
11.1.1 The MDMS Database
The MDMS database is a collection of OpenVMS RMS files that store the records describing the
objects you manage. lists the files that make up the MDMS database.
Table 11–1 MDMS Database Files and Their Contents
Database File
Object Records
MDMS$DOMAIN_DB.DAT
The only Domain object record
MDMS$DRIVE_DB.DAT
All Drive object records
MDMS$GROUP_DB.DAT
All Group object records
MDMS$JUKEBOX_DB.DAT
All Jukebox object records
MDMS$LOCATION_DB.DAT
All Location object records
MDMS$MAGAZINE_DB.DAT
All Magazine object records
MDMS$MEDIA_DB.DAT
All Media Type object records
MDMS$NODE_DB.DAT
All Node object records
MDMS$POOL_DB.DAT
All Pool object records
MDMS$VOLUME_DB.DAT
All Volume object records
MDMS Configuration 11-2
MDMS Configuration
11.1 The MDMS Management Domain
11.1.1.1 Database Performance
If you are familiar with the structure of OpenVMS RMS files, you can tune and maintain them
over the life of the database. You can find File Definition Language (FDL) files in the
MDMS$ROOT:[SYSTEM] directory for each of the database files. Refer to the OpenVMS
Record Management System documentation for more information on tuning RMS files and
using the supplied FDL files.
11.1.1.2 Database Safety
MDMS keeps track of all objects by recording their current state in the database. In the event of
a catastrophic system failure, you would start recovery operations by rebuilding the system, and
then by restoring the important data files in your enterprise. Before restoring those data files, you
would have to first restore the MDMS database files.
Another scenario would be the failure of the storage system on which the MDMS files reside. In
the event of a complete disk or system failure, you would have to restore the contents of the disk
device containing the MDMS database.
The procedures in this section describe ways to create backup copies of the MDMS database.
These procedures use MDMS$SYSTEM:MDMS$COPY_DB_FILES.COM command procedure. This command procedure copies database files with the CONVERT/SHARE command.
The procedure in Table 11–2 describes how to copy MDMS database files only. The procedure
in Table 11–3 describes how to process the MDMS database files when they are copied as part of
an image backup on the disk device.
To Make Backup Copies of the MDMS Database
The procedure outlined in describes how you can make backup copies of just the MDMS database files using the OpenVMS Backup Utility. This procedure does not account for other files on
the device.
MDMS Configuration 11–3
MDMS Configuration
11.1 The MDMS Management Domain
Table 11–2 How to Back Up the MDMS Database Files
Step...
Action...
1.
Prepare for making back up copies by finding a disk with enough available space to temporarily hold a copy of each file in the MDMS database.
2.
Determine a time of relative inactivity by MDMS clients, ABS or HSM.
For ABS, this could be a few hours after the completion of system backups.
For HSM, this is more difficult to determine because a shelving policy could be activated
at any time.
If necessary, shut down ABS and/or HSM to make sure there are no requests of MDMS.
3.
Note
If you cannot shut down HSM or ABS, when running
MDMS$COPY_DB_FILES.COM, it is possible an update to the database file can occur after it has been opened. This can create a possibility
that the copy of the database file will be out of synchronization with
other database files.
At the determined time, copy the MDMS database files with the supplied command procedure MDMS$COPY_DB_FILES.COM.
$ @MDMS$ROOT:[TOOLS]MDMS$COPY_DB_FILES
After the MDMS$COPY_DB_FILES command procedure ends, copies of the
database files reside on the same disk as the original files.
4.
Use the OpenVMS Backup Utility to create a back up copy of the database files. You
must have at least one tape device configured to be shared with applications other than
MDMS. The following shows an example BACKUP command:
$BACKUP MDMS$DATABASE_LOCATION:*.DAT_COPY tape_device_name
5.
After the OpenVMS Backup Utility operation completes, delete the file copies from the
database directory.
6.
Store the copies of the MDMS database in a safe location.
To Process the MDMS Database for an Image Backup of the Device
The procedure in shows how to process the MDMS database files for an image backup. The
image backup could be part of a periodic full backup and subsequent incremental. This procedure also describes how to use the files in case you restore them.
MDMS Configuration 11-4
MDMS Configuration
11.1 The MDMS Management Domain
Table 11–3 Processing MDMS Database Files for an Image Backup
Step...
Action...
1.
Create a preprocessing command procedure to execute before the image backup on the
disk. The command procedure must first purge old database file copies from the directory, then creates a new set of copies.
$PURGE MDMS$DATABASE_LOCATION:*.DAT_COPY
$@MDMS$SYSTEM:MDMS$COPY_DB_FILES
2.
Plan the backup operation on the disk containing the MDMS database files, to make sure
that the preprocessing command procedure executes before the actual backup procedure.
3.
Run the backup operation. Each time you create a backup copy of the disk, you will get a
consistent copy of the MDMS database files.
4.
When you need to restore the data to the device, you need to use the consistent files.
Rename the .DAT_COPY files to become the .DAT files, then purge the .DAT files from
the directory.
$RENAME MDMS$DATABASE:*.DAT_COPY MDMS$DATABASE:*.DAT
$PURGE MDMS$DATABASE
11.1.1.3 Moving the MDMS Database
In the event the disk device on which you keep the MDMS database runs out of space, you have
the option of moving the MDMS database, or moving other files off the device. The procedure
described in this section explains the actions you would have to perform to move the MDMS
database. Use this procedure first as a gauge to decide whether moving the MDMS database
would be easier or more difficult than moving the other files. Secondarily, use this procedure to
relocate the MDMS database to another disk device.
Table 11–4 describes how to move the MDMS database to a new device location.
Table 11–4 How to Move the MDMS Database
Step...
Action...
1.
Shut down any applications using MDMS: ABS or HSM. Refer to the respective application documentation for specific commands.
2.
Shut down the MDMS process on all nodes in the domain.
3.
Using the OpenVMS Backup Utility, create a copy of the database files. Use the CRC
and VERIFY options to help ensure your copy is valid.
4.
Using the OpenVMS Backup Utility, restore the copy of the database files into the new
location. Use CRC and VERIFY options to ensure the restored copy is valid.
5.
In every MDMS start up file SYS$MANAGER:MDMS$SYSTARTUP.COM, define the
MDMS$DATABASE_FILES logical to point to the new location.
6.
Start up MDMS on a node enabled as a database server.
MDMS Configuration 11–5
MDMS Configuration
11.1 The MDMS Management Domain
Table 11–4 How to Move the MDMS Database
Step...
Action...
7.
From the node, make sure you can access the database by entering an MDMS SHOW
command to examine a record from each database file.
If you get an error, first check to make sure that the logical assignment for the
MDMS$DATABASE_FILES is correct.
If the logical assignment is correct, then you will have to determine why the files are not
accessible.
8.
Start up the remaining MDMS nodes.
9.
Keep the previous database files on-line, until you know the new database files are
accessible.
10.
After you are certain the new database files are accessible, delete the original
files.
11.1.2 The MDMS Process
This section describes the MDMS software process, including server availability, interprocess
communication, and start up and shut down operations.
11.1.2.1 Server Availability
Each node in an MDMS domain has one MDMS server process running. Within an MDMS
domain only one server will be serving the database to other MDMS servers. This node is designated as the MDMS Database Server, while the others become MDMS clients. Of the servers
listed as database servers, the first one to start up tries to open the database. If that node can successfully open the database, it is established as the database server. Other MDMS servers will
then forward user requests to the node that has just become the database server.
Subsequently, if the database server fails because of a hardware failure or a software induced
shut down, the clients compete among themselves to become the database server. Whichever client is the first to successfully open the database, becomes the new database server. The other clients will then forward user requests to the new database server. User requests issued on the node
which is the database server, will be processed on that node immediately.
11.1.2.2 The MDMS Account
During installation you create the MDMS user account as shown in Example 11–1. This account
is used by MDMS for every operation it performs.
Example 11–1 MDMS User Account
Username:
MDMS$SERVER
Owner: SYSTEM MANAGER
Account:
SYSTEM
UIC:
[1,4] ([SYSTEM])
CLI:
DCL
Tables:
Default:SYS$SYSROOT:[SYSMGR]
LGICMD:SYS$LOGIN:LOGIN
Flags: DisForce_Pwd_Change DisPwdHis
Primary days:
Mon Tue Wed Thu Fri Sat Sun
Secondary days:
No access restrictions
Expiration:
(none)
Pwdminimum: 14
Login Fails:
0
Pwdlifetime:
30 00:00
Pwdchange: 08-Jan-2003 12:19
MDMS Configuration 11-6
MDMS Configuration
11.1 The MDMS Management Domain
Maxjobs:
0
Fillm:
500
Bytlm:
100000
Maxacctjobs:
0
Shrfillm:
0
Pbytlm:
0
Maxdetach:
0
BIOlm:
10000
JTquota:
4096
Prclm:
10
DIOlm:
300
WSdef:
5000
Prio:
4
ASTlm:
300
WSquo:
10000
Queprio:
0
TQElm:
300
WSextent:
30000
CPU:
(none)
Enqlm:
2500
Pgflquo:
300000
Authorized Privileges:
DIAGNOSE NETMBX PHY_IO READALL SHARE SYSNAM SYSPRV TMPMBX WORLD
Default Privileges:
DIAGNOSE NETMBX PHY_IO READALL SHARE SYSNAM SYSPRV TMPMBX WORLD
11.1.3 The MDMS Start Up File
MDMS creates the SYS$STARTUP:MDMS$SYSTARTUP.COM command procedure on the
initial installation. This file includes logical assignments that MDMS uses when the node starts
up. The installation process also offers the opportunity to make initial assignments to the logicals.
If you install MDMS once for shared access in an OpenVMS Cluster environment, this file is
shared by all members. If you install MDMS on individual nodes within an OpenVMS Cluster
environment, this file is installed on each node.
In addition to creating node object records and setting domain and node attributes, you must
define logicals in the MDMS start up file. These are all critical tasks to configure the MDMS
domain.
Table 11–5 provides brief descriptions of most of the logical assignments in MDMS$SYSTARTUP.COM. More detailed descriptions follow as indicated.
Table 11–5 MDMS$SYSTARTUP.COM Logical Assignments
Logical Name
Assignment
MDMS$DATABASE_SERVERS
List of all nodes that can run as the MDMS database server.
See Section 11.1.3.1 for more information.
MDMS$ROOT
Device and directory of MDMS files.
MDMS$LOGFILE_LOCATION
Device and directory of the MDMS log file. See Section
11.1.3.2 for more information.
MDMS$DATABASE_LOCATION
Device and directory of the MDMS database files. All installations in any one domain must define this as a common
location. Section 11.1.1 identifies the MDMS database files
and describes how they should be managed.
MDMS$TCPIP_SENDPORTS
Range of ports for the node to use for out going connections.
The default range is for privileged ports; 1 through 1023.
MDMS$SUPPORT_PRE_V3
Support for SLS/MDMS Version 2.9x clients. The default
value is FALSE. If you need to support some systems running SLS/MDMS Version 2.9x, then set this value to TRUE.
11.1.3.1 MDMS$DATABASE_SERVERS - Identifies Domain Database Servers
Of all the nodes in the MDMS domain, you select those which can act as a database server. Only
one node at a time can be the database server. Other nodes operating at the same time communicate with the node acting as the database server. In the event the server node fails, another node
operating in the domain can become the database server if it is listed in the
MDMS$DATABASE_SERVERS logical.
MDMS Configuration 11–7
MDMS Configuration
11.1 The MDMS Management Domain
For instance, in an OpenVMS Cluster environment, you can identify all nodes as a potential
server node. If the domain includes an OpenVMS Cluster environment and some number of
nodes remote from it, you could identify a remote node as a database server if the MDMS database is on a disk served by the Distributed File System software (DECdfs). However, if you do
not want remote nodes to function as a database server, do not enter their names in the list for
this assignment.
The names you use must be the full network name specification for the transports used. shows
example node names for each of the possible transport options. If a node uses both DECnet and
TCP/IP, full network names for both should be defined in the node object
Note
When you specify the use of both DECnet and TCP/IP network transports in the configuration, you should include node names for each transport as appropriate. Specifying only one node name for a specific transport is allowable. However, when that node
attempts to locate a database server on start up, only the transport for which the name
applies will be used, thereby limiting reliability.
Table 11–6 Network Node Names for MDMS$DATABASE_NODES
Network Transport
Node Name Examples
DECnet
NODE_A,NODE_B
DECnet Plus
SITE:.NODE_A.SITE,SITE:.NODE_B.SITE
TCP/IP
node_a.site.inc.com,node_b.site.inc.com
11.1.3.2 MDMS$LOGFILE_LOCATION
Defines the location of the Log Files. For each server running, MDMS uses a log file in this
location. The log file name includes the name of the cluster node it logs.
For example, the log file name for a node with a cluster node name NODE_A would be:
MDMS$LOGFILE_LOCATION:MDMS$LOGFILE_NODE_A.LOG
11.1.3.3 MDMS Shut Down and Start Up
How to Shut Down MDMS
To shut down MDMS on the current node enter this command:
$@SYS$STARTUP:MDMS$SHUTDOWN.COM
How to Restart MDMS
To restart MDMS (shut down and immediate restart), enter the shut down command and the
parameter RESTART:
$@SYS$STARTUP:MDMS$SHUTDOWN RESTART
How to Start Up MDMS
To start up MDMS on the current node enter this command:
$@SYS$STARTUP:MDMS$STARTUP.COM
MDMS Configuration 11-8
MDMS Configuration
11.1 The MDMS Management Domain
11.1.4 Managing an MDMS Node
The MDMS node object record characterizes the function of a node in the MDMS domain and
describes how the node communicates with other nodes in the domain.
11.1.4.1 Defining a Node’s Network Connection
To participate in an MDMS domain, a node object has to be entered into the MDMS database.
This node object has 4 attributes to describe its connections in a network:
1.
If the node is part of a DECnet (Phase IV) network, then the name of the node object must
match exactly with the node's DECnet node name (i.e. SYS$NODE). Otherwise the name of
the node object may be any character string up to 31 characters.
2.
If the node is part of a DECnet-Plus (Phase V) network, the DECnet-Plus full name must be
supplied as an attribute to the node object, using the /DECNET_PLUS_FULLNAME Qualifier or GUI equivalent.
3.
If the node is part of an Internet or Intranet using TCP/IP, the TCP/IP full name must be
supplied as an attribute to the node object, using the /TCPIP_FULLNAME Qualifier or GUI
equivalent.
4.
Depending on which network or networks are available or should be used, the node's transport attribute has to be set to either DECNET, TCPIP or both.
When an MDMS server starts up it only has its network node name/s to identify itself in the
MDMS database. Therefore if a node has a network node name but it is not defined in the
node object records of the database, this node will be rejected as not being fully enabled. For
example, a node has a TCP/IP name and TCP/IP is running but the node object record shows the
TCP/IP full name as blank.
There is one situation where an MDMS server is allowed to function even if it does not have a
node object record defined or the node object record does not list all network names. This is in
the case of the node being an MDMS database server. Without this exception, no node entries
can be created in the database. As long as a database server is not fully enabled in the database it
will not start any network listeners.
11.1.4.2 Defining How the Node Functions in the Domain
This section describes how to designate an MDMS node as a database server, enable and disable
the node.
Designating Potential Database Servers
When you install MDMS, you must decide which nodes will participate as potential database
servers. To be a database server, the node must be able to access the database disk device.
Typically, in an OpenVMS Cluster environment, all nodes would have access to the database
disk device, and would therefore be identified as potential database servers.
Set the database server attribute for each node identified as a potential database server. For nodes
in the domain that are not going to act as a database server, negate the database server attribute.
Disabling and Enabling MDMS Nodes
There are several reasons for disabling an MDMS node.
•
Preventing the node you are disabling from becoming the database server.
•
Preventing applications and users on the node from issuing or processing MDMS requests.
Disable the node from the command line or the GUI and restart MDMS.
When you are ready to return the node to service, enable the node.
MDMS Configuration 11–9
MDMS Configuration
11.1 The MDMS Management Domain
11.1.4.3 Enabling Interprocess Communication
Nodes in the MDMS domain have two network transport options: one for DECnet, the other for
TCP/IP. When you configure a node into the MDMS domain, you can specify either or both
these transport options by assigning them to the transport attribute. If you specify both, MDMS
will attempt interprocessor communications on the first transport value listed. MDMS will then
try the second transport value if communication fails on the first.
If you are using the DECnet Plus network transport, define the full DECnet Plus node name in
the decnet fullname attribute. If you are using an earlier version of DECnet, leave the
DECnet-Plus fullname attribute blank.
If you are using the TCP/IP network transport, enter the node’s full TCP/IP name in the
TCPIP fullname attribute. You can also specify the receive ports used by MDMS to listen for
incoming requests. By default, MDMS uses the port range of 2501 through 2510. If you want to
specify a different port or range of ports, append that specification to the TCPIP fullname. For
example:
node_a.site.inc.com:2511-2521
11.1.4.4 Describing the Node
Describe the function, purpose of the node with the description attribute. Use the location
attribute to identify the MDMS location where the node resides.
11.1.4.5 Communicating with Operators
List the OPCOM classes of operators with terminals connected to this node who will receive
OPCOM messages. Operators who enable those classes will receive OPCOM messages pertaining to devices connected to the node.
For more information about operator communication, see Section 12.2.
11.1.5 Managing Groups of MDMS Nodes
MDMS provides the group object record to define a group of nodes that share common drives or
jukeboxes. Typically, the group object record represents all nodes in an OpenVMS Cluster environment, when drives in the environment are accessible from all nodes.
MDMS Configuration 11-10
MDMS Configuration
11.1 The MDMS Management Domain
Figure 11–2 Groups in the MDMS Domain
TL896_JUKE_B
Jukebox
TL896_JUKE_C
Jukebox
TL896_JUKE_D
Jukebox
Group
CLU002
Group
CLU001
Group
SHD001
TL896_JUKE_A
Jukebox
CXO6747A
Some configurations involve sharing a device between nodes of different OpenVMS Cluster
environments. You could create a group that includes all nodes that have access to the device.
When you create a group to identify shared access to a drive or jukebox assign the group name as
an attribute of the drive or jukebox. When you set the group attribute of the drive or jukebox
object record, MDMS clears the node attribute.
The following command examples create a functionally equivalent drive object records.
$!These commands create a drive connected to a Group object
$MDMS CREATE GROUP CLUSTER_A /NODES=(NODE_1,NODE_2,NODE_3)
$MDMS CREATE DRIVE NODE$MUA501/GROUPS=CLUSTER_A
$!
$!This command creates a drive connected to NODE_1, NODE_2, and NODE_3
$MDMS CREATE DRIVE NODE$MUA501/NODES=(NODE_1,NODE_2,NODE_3)
Figure 11–2 is a model of organizing clusters of nodes in groups and how devices are shared
between groups.
11.1.6 Managing the MDMS Domain
The domain object record describes global attributes for the domain and includes the description
attribute where you can enter an open text description of the MDMS domain. Additional domain
object attributes define configuration parameters, access rights options, and default volume management parameters. See Figure 11–1.
MDMS Configuration 11–11
MDMS Configuration
11.1 The MDMS Management Domain
11.1.6.1 Domain Configuration Parameters
Operator Communications for the Domain
Include all operator classes to which OPCOM messages should go as a comma separated list
value of the OPCOM classes attribute. MDMS uses the domain OPCOM classes when nodes do
not have their classes defined.
For more information about operator communication, see Section 12.2.
Resetting the Request Identifier Sequence
If you want to change the request identifier for the next request, use the request id attribute.
11.1.6.2 Domain Options for Controlling Rights to Use MDMS
This section briefly describes the attributes of the domain object record that implement rights
controls for MDMS users. Refer to Appendix on MDMS Rights and Privileges for the description of the MDMS rights implementation.
ABS Users
If you use MDMS to support ABS, you can set the ABS rights attribute to allow any user with
any ABS right to perform certain actions with MDMS. This feature provides a short cut to managing rights by enabling ABS users and managers access to just the features they need. Negating
this attribute means users with any ABS rights have no additional MDMS rights.
MDMS Client Applications
MDMS defines default low level rights for the application rights attribute according to what
ABS and HSM minimally require to use MDMS.
Caution
The ABS or HSM processes include the MDMS_APPLICATION_RIGHTS identifier
which assumes the low level rights associated with it. Do not modify the low level rights
for the domain application rights attribute. Changing the values to this attribute can
cause your application to fail.
Default Rights for Various System Users
If you want to grant all users certain MDMS rights without having to modify their UAF records,
you can assign those low level rights to the default rights attribute. Any user without specific
MDMS rights in their UAF file will have the rights assigned to the default rights identifier.
Use the operator rights attribute to identify all low level rights granted to any operator who has
been granted the MDMS_OPERATOR right in their UAF.
Use the SYSPRV attribute to allow any process with SYSPRV enabled the rights to perform any
and all operations with MDMS.
Use the user rights attribute to identify all low level rights granted to any user who has been
granted the MDMS_USER right in their UAF.
11.1.6.3 Domain Default Volume Management Parameters
The MDMS domain includes attributes used as the foundation for volume management. Some of
these attributes provide defaults for volume management and movement activities, others define
particular behavior for all volume management operations. The values you assign to these
attributes will, in part, dictate how your volume service will function. lists brief descriptions of
these attributes.
MDMS Configuration 11-12
MDMS Configuration
11.1 The MDMS Management Domain
Table 11–7 Default Volume Management Parameters
Attribute
Meaning
Offsite Location
MDMS uses this location for the volume and magazine offsite location unless
another location is specified.
Onsite Location
MDMS uses this location for the volume and magazine onsite location unless
another location is specified.
Maximum Scratch
Time
This is the maximum amount of time that can be set as the scratch time on any
volume in the domain.
Mail Users
A list of e-mail address for users or accounts to be notified when volumes are
deallocated. Any email address on this list must be in syntax that the OpenVMS
Mail Utility can process.
Deallocate State
Specifies whether a volume is immediately freed upon reaching the deallocation
date, or if the volume is put into a transition state for temporary protection before
being set free.
Transition Time
The amount of time a volume stays in the transition state.
Scratch Time
MDMS uses the time span specified here to set the default scratch date when
MDMS allocates a volume.
Protection
The default protection for volumes allocated to ABS and MDMS. The format is
the standard OpenVMS file protection specification format.
11.1.7 MDMS Domain Configuration Issues
This section addresses issues that involve installing additional MDMS nodes into an existing
domain, or removing nodes from an operational MDMS domain.
11.1.7.1 Adding a Node to an Existing Configuration
Once you configure the MDMS domain, you might have the opportunity to add a node to the
existing configuration. Table 11–8 describes the procedure for adding a node to an existing
MDMS domain.
MDMS Configuration 11–13
MDMS Configuration
11.2 Configuring MDMS Drives, Jukeboxes and Locations
Table 11–8 Adding a Node to an Existing Configuration
Step...
Action...
1.
Create a node object record with either the CLI or GUI.
Set the transport and network name attributes in accordance with available network options. For more information, see Section 11.1.4.3.
Decide if the node will be a database server or will only function as an MDMS client.
2.
•
If the node is to be a database server, set the database server attribute (default)
•
If the node is not to be a database server, negate the database server attribute.
3.
Set the remaining node object attributes, then complete the creation of the node.
4.
If the node will not share an existing startup file and database server image, then install the
MDMS software with the VMSINSTAL utility.
5.
If the new node is a database server, then add the node by its network transport names to the
MDMS$DATABASE_SERVERS list in all start up files in the MDMS domain.
11.1.7.2 Removing a node from an existing configuration
When you remove a node from the MDMS domain, there are several additional activities you
must perform after deleting the node object record.
•
If the node was a database server, remove its node names from all MDMS start up files in
the MDMS$DATABASE_SERVERS logical assignment.
•
Remove any references to the node that might exist in remaining MDMS object records.
•
Remove any references to the node that might exist in DCL command procedures.
11.2 Configuring MDMS Drives, Jukeboxes and Locations
MDMS manages the use of drives for the benefit of its clients, ABS and HSM. You must configure MDMS to recognize the drives and the locations that contain them. You must also configure
MDMS to recognize any jukebox that contains managed drives.
You will create drive, location, and possibly jukebox object records in the MDMS database. The
attribute values you give them will determine how MDMS manages them. The meanings of
some object record attributes are straightforward. This section describes others because they are
more important for configuring operations.
11.2.1 Configuring MDMS Drives
Before you begin configuring drives for operations, you need to determine the following aspects
of drive management:
•
How to describe the drive
•
Which systems need access to the drive
•
How the drive fits into your operations
11.2.1.1 How to Describe an MDMS Drive
You must give each drive a name that is unique within the MDMS domain. The drive object
record can be named with the OpenVMS device name, if desired, just as long as the name is not
duplicated elsewhere.
MDMS Configuration 11-14
MDMS Configuration
11.2 Configuring MDMS Drives, Jukeboxes and Locations
Use the description attribute to store a free text description of anything useful to your management of the drive. MDMS stores this information, but takes no action with it.
The device attribute must contain the OpenVMS allocation class and device name for the drive.
If the drive is accessed from nodes other than the one from which the command was entered, you
must specify nodes or groups in the /NODE or /GROUP attributes in the drive record. Do not
specify nodes or groups in the drive name or the device attribute.
If the drive resides in a jukebox, you must specify the name of the jukebox with the jukebox
attribute. Identify the position of the drive in the jukebox by setting the drive number attribute.
Drives start at position 0.
Additionally, the jukebox that contains the drives must also be managed by MDMS.
11.2.1.2 How to Control Access to an MDMS Drive
MDMS allows you to dedicate a drive solely to MDMS operations, or share the drive with other
users and applications. Specify your preference with the shared attribute.
You need to decide which systems in your data center are going to access the drives you manage.
Use the groups attribute if you created group object records to represent nodes in an OpenVMS
Cluster environment or nodes that share a common device.
Use the nodes attribute if you have no reason to refer to any collection of nodes as a single entity,
and you plan to manage nodes, and the objects that refer to them, individually.
The last decision is whether the drive serves locally connected systems, or remote systems using
the RDF software. The access attribute allows you to specify local, remote (RDF) or both.
11.2.1.3 How to Configure an MDMS Drive for Operations
Specify the kinds of volumes that can be used in the drive by listing the associated media type
name in the media types attribute. You can force the drive to not write volumes of particular
media types. Identify those media types in the read only attribute.
If the drive has a mechanism for holding multiple volumes, and can feed the volumes sequentially to the drive, but does not allow for random access or you choose not to use the random
access feature, then you can designate the drive as a stacker by setting the stacker attribute.
Set the disabled attribute when you have to exclude the managed drive from operations by
MDMS. If the drive is the only one of its kind (for example if it accepts volumes of a particular
media type that no other drives accept), make sure you have another drive that can take load
requests. Return the drive to operation by setting the enabled attribute.
11.2.1.4 Determining Drive State
Caution
Changing the value of the state attribute could cause MDMS or the applications using
it to fail.
The drive object record state attribute shows the state of managed MDMS drives. MDMS sets
one of four values for this attribute: Empty, Full, Loading, or Unloading.
11.2.1.5 Adding and Removing Managed Drives
The procedure described in describes how to add a drive to the MDMS domain.
The procedure described in describes how to remove a drive from the MDMS domain.
MDMS Configuration 11–15
MDMS Configuration
11.2 Configuring MDMS Drives, Jukeboxes and Locations
11.2.1.6 Configuring MDMS Jukeboxes
MDMS manages Media Robot Driver (MRD) controlled jukeboxes and DCSC controlled jukeboxes. MRD is a software that controls SCSI-2 compliant medium changers. DCSC is software
that controls large jukeboxes manufactured by StorageTek, Inc. This section first describes the
MDMS attributes used for describing all jukeboxes by function. Subsequent descriptions explain
attributes that characterize MRD jukeboxes and DCSC jukeboxes respectively.
11.2.1.7 How to Describe an MDMS Jukebox
Assign unique names to jukeboxes you manage in the MDMS domain. When you create the
jukebox object record, supply a name that describes the jukebox.
Set the control attribute to MRD if the jukebox operates under MRD control. Otherwise, set the
control to DCSC.
Use the description attribute to store a free text description of the drive. You can describe its role
in the data center operation or other useful information. MDMS stores this information for you,
but takes no actions with it.
11.2.1.8 How to Control Access to an MDMS Jukebox
You can dedicate a jukebox solely to MDMS operations, or you can allow other applications and
users access to the jukebox device. Specify your preference with the shared attribute.
You need to decide which systems in the data center are going to access the jukebox.
Use the groups attribute if you created group object records to represent nodes in an OpenVMS
Cluster environment or nodes that share a common device.
Use the nodes attribute if you have no reason to refer to any collection of nodes as a single entity,
and you plan to manage nodes, and the objects that refer to them, individually.
11.2.1.9 How to Configure an MDMS Jukebox for Operations.
Disable the jukebox to exclude it from operations. Make sure that applications using MDMS will
either use other managed jukeboxes, or make no request of a jukebox you disable. Enable the
jukebox after you complete any configuration changes. Drives within a disabled jukebox cannot
be allocated.
11.2.1.10 Attribute for DCSC Jukeboxes
Set the library attribute to the library identifier of the particular silo the jukebox objects represents. MDMS supplies 1 as the default value. You will have to set this value according the number silos in the configuration and the sequence in which they are configured.
11.2.1.11 Attributes for MRD Jukeboxes
Specify the number of slots for the jukebox. Alternatively, if the jukebox supports magazines,
specify the topology for the jukebox (see Section 11.2.1.13).
The robot attribute must contain the OpenVMS device name of the jukebox medium changer
(also known as the robotic device).
If the jukebox is accessed from nodes other than the one from which the command was entered,
you must specify nodes or groups in the /NODE or /GROUP attributes in the jukebox record. Do
not specify nodes or groups in the jukebox name or the robot attribute.
MDMS Configuration 11-16
MDMS Configuration
11.2 Configuring MDMS Drives, Jukeboxes and Locations
11.2.1.12 Determining Jukebox State
Caution
Changing the value of the state attribute could cause MDMS or the applications using
it to fail.
The jukebox object record state attribute shows the state of managed MDMS jukeboxes. MDMS
sets one of three values for this attribute: Available, In use, and Unavailable.
11.2.1.13 Magazines and Jukebox Topology
If you decide that your operations benefit from the management of magazines (groups of volumes moved through your operation with a single name) must set the jukebox object record to
enable it. Set the usage attribute to magazine and define the jukebox topology with the topology
attribute. See Figure 11–4 for a sample overview of how the 11 and 7 slot bin packs can be used
as a magazine.
Setting the usage attribute to nomagazine means that you will move volumes into and out of the
jukebox independently (using separate commands for each volume, regardless if they are placed
into a physical magazine or not).
Figure 11–3 Jukebox Topology
Topology = Tower, Faces, Levels, Slots
Tower 1
Tower 0
Ports
0
1
2
3
0
1
2
Drives
Tower 2
3
4
5
Level 0
Level 1
6
7
8
9
10
11
Faces
5
6
3
4
7
0
2
1
Slots
Level 2
CXO6748A
The following paragraphs explain jukebox topology.
Towers, Faces, Levels, and Slots
Some jukeboxes have their slot range subdivided into towers, faces, and levels. See Figure 11–3
for an overview of how the configuration of Towers, Faces, Levels and Slots constitute Topology. Note that the topology in Figure 11–3 comprises 3 towers. In the list of topology characteristics, you should identify every tower in the configuration. For each tower in the configuration,
you must inturn identify:
•
the tower by number (starting at zero)
MDMS Configuration 11–17
MDMS Configuration
11.2 Configuring MDMS Drives, Jukeboxes and Locations
•
the number of faces in the tower (starting at one)
•
the number of levels per face (starting at one)
•
the number of slots per magazine (starting at one)
Restrictions for Using Magazines
You must manually open the jukebox when moving magazines into and out of the jukebox. Once
in the jukebox, volumes can only be loaded and unloaded relative to the slot in the magazine it
occupies.
TL896 Example
While using multiple TL896 jukebox towers you can treat the 11 slot bin packs as magazines.
The following command configures the topology of the TL896 jukebox as shown in Figure 11–4
for use with magazines:
$ MDMS CREATE JUKEBOX JUKE_1/ $_ /TOPOLOGY=(TOWERS=(0,1,2), FACES=(8,8,8), $_ LEVELS=(3,3,2), SLOTS=(11,11,11))
Figure 11–4 Magazines
6
7
8
9
10
11
Slots
Slots
7-slot TZ887
magazine
11-slot TL820
bin pack
CXO6749A
11.2.2 Summary of Drive and Jukebox Issues
This section describes some of the management issues that involve both drives and jukeboxes.
11.2.2.1 Enabling MDMS to Automatically Respond to Drive and Jukebox Requests
Drive and jukebox object records both use the automatic load reply attribute to provide an additional level of automation.
When you set the automatic reply attribute to the affirmative, MDMS will poll the drive or jukebox for successful completion of an operator-assisted operation for those operations where polling is possible. For example, MDMS can poll a drive, determine that a volume is in the drive,
and cancel the associated OPCOM request to acknowledge a load. Under these circumstances,
an operator need not reply to the OPCOM message after completing the load.
MDMS Configuration 11-18
MDMS Configuration
11.2 Configuring MDMS Drives, Jukeboxes and Locations
To use this feature, set the automatic reply attribute to the affirmative. When this attribute is set
to the negative, which is the default, an operator must acknowledge each OPCOM request for the
drive or jukebox before the request is completed.
11.2.2.2 Creating a Remote Drive and Jukebox Connection
If you need to make backup copies to a drive in a remote location, using the network, then you
must install the Remote Device Facility software (RDF). The RDF software must then be configured to work with MDMS.
See Table 11–9 for a description of the actions you need to take to configure RDF software.
Table 11–9 Actions for Configuring Remote Drives
Stage
Action
1.
Install the appropriate RDF component on the node.
2.
•
Install the RDF Server software on all nodes that are connected to the tape
drives used for remote operations.
•
Install the RDF Client software on all nodes that initiate remote operations to
those tape drives.
For each tape drive served with RDF Server software, make sure there is a drive
object record in the MDMS that describes it.
Take note of each node connected to the drive, even if the drive object record includes a
group definition instead of a node.
3.
On each node connected to the tape drive, edit the file TTI_RDEV:CONFIG_node.DAT so
that all tape drives are represented. The syntax for representing tape drives is given in the
file.
11.2.2.3 How to Add a Drive to a Managed Jukebox
When you add another drive to a managed jukebox, just specify the name of the jukebox in
which the drive resides, in the drive object record.
11.2.2.4 Temporarily Taking a Managed Device From Service
You can temporarily remove a drive or jukebox from service. MDMS allows you to disable and
enable drive and jukebox devices. This feature supports maintenance or other operations where
you want to maintain MDMS support for ABS or HSM, and temporarily remove a drive or jukebox from service.
Note
If you remove a jukebox from service, you cannot access any of its volumes. Make sure
you empty the jukebox, or make sure your operations will continue, without the use of
the volumes in any jukebox you disable.
11.2.2.5 Changing the Names of Managed Devices
During the course of management, you might encounter a requirement to change the device
names of drives or jukeboxes under MDMS management, to avoid confusion in naming. When
you have to change the device names, follow the procedure in Table 11–10.
MDMS Configuration 11–19
MDMS Configuration
11.2 Configuring MDMS Drives, Jukeboxes and Locations
Table 11–10 Changing the Names of Managed Devices
Step...
Action...
1.
Either find a time when ABS or HSM is not using the drive or jukebox device or disable the
device with MDMS.
2.
Change the device names at the operating system. Verify the devices respond using operating system commands or MRU commands for a jukebox device.
3.
Change the MDMS drive device name, and/or the jukebox robot name as needed to reflect
the new system device names.
4.
If your drive and/or jukebox object records are named according to the operating system
device name, then you should create new object records.
If you want to create new object records, use the inherit feature and specify the
previous object record. For GUI operation.
5.
If you created new object records, then delete the old object records, and check and modify
any references to the old object records. For more information.
6.
Enable the new drive and/or jukebox with MDMS.
11.2.3 Locations for Volume Storage
MDMS allows you to identify locations in which you store volumes. Create a location object
record for each place the operations staff uses to store volumes. These locations are referenced
during move operations, load to, or unload from stand-alone drives.
Figure 11–5 Volume Locations
Onsite CXO
A1
A2
A3
A4
A5
A6
A7
A8
A9
A10
B1
B2
B3
B4
C1
C2
Offsite vault
C3
C4-C10
B5
B6
B7
B8
B9
B10
CXO6750A
MDMS Configuration 11-20
MDMS Configuration
11.3 Sample MDMS Configurations
If you need to divide your location space into smaller, named locations, define locations hierachically. The location attribute of the location object record allows you to name a higher level location. For example, you can create location object records to describe separate rooms in a data
center by first creating a location object record for the data center. After that, create object
records for each room, specifying the data center name as the value of the location attribute for
the room locations.
When allocating volumes or drives by location, the volumes and drives do not have to be in the
exact location specified; rather they should be in a compatible location. A location is considered
compatible with another if both have a common root higher in the location hierarchy. For example, in Figure 11–6, locations Room_304 and Floor_2 are considered compatible, as they both
have location Building_1 as a common root.
Figure 11–6 Named Locations
Location
Location
Floor_1
Location
Floor_2
Location
Floor_3
Location
Room_101
Location
Room_201
Location
Room_301
Location
Room_102
Location
Room_202
Location
Room_302
Location
Room_103
Location
Room_303
Location
Room_304
CXO6751A
Your operations staff must be informed about the names of these locations as they will appear in
OPCOM messages. Use the description attribute of the location object record to describe the
location it represents as accurately as possible. Your operations staff can refer to the information
in the event they become confused about a location mentioned in an OPCOM message.
You can divide a location into separate spaces to identify locations of specific volumes. Use the
spaces attribute to specify the range of spaces in which volumes can be stored. If you do not need
that level of detail in the placement of volumes at the location, negate the attribute.
11.3 Sample MDMS Configurations
The Appendix - Sample Configuration of MDMS, contains a set of sample MDMS V4 configurations. These samples will help you make necessary checks for completeness.
MDMS Configuration 11–21
12
MDMS Management Operations
12.1 Managing Volumes
MDMS manages volume availability with the concept of a life cycle. The primary purpose of the
life cycle is to ensure that volumes are only written when appropriate, and by authorized users.
By setting a variety of attributes across multiple objects, you control how long a volume, once
written, remains safe. You also set the time and interval for a volume to stay at an offsite location for safe keeping, then return for re-use once the interval passes.
This section describes the volume life cycle, relating object attributes, commands and life cycle
states. This section also describes how to match volumes with drives by creating media type
object records.
12.1.1 Volume Life Cycle
The volume life cycle determines when volumes can be written, and controls how long they
remain safe from being overwritten. Table 12–1 describes operations on volumes within the life
cycle.
Figure 12–1 Volume States
Allocated
Deallocate
Allocate
Create
Deallocate
Retain
Unitialized
Free
Transition
Release
Unavailable
Available
Unavailable
CXO6756A
MDMS Management Operations 12–1
MDMS Management Operations
12.1 Managing Volumes
Each row describes an operation with current and new volume states, commands and GUI
actions that cause volumes to change states, and if applicable, the volume attributes that MDMS
uses to cause volumes to change states. Descriptions following the table explain important
aspects of each operation.
Table 12–1 MDMS Volume State Transitions
Current State
Transition to New State
New State
Blank
MDMS CREATE VOLUME
Volume Create
UNINTIALIZED
Blank
MDMS CREATE VOLUME/PREINIT
FREE
UNINITIALIZED
MDMS INITIALIZE VOLUME
Volume Initialize
FREE
FREE
MDMS INITIALIZE VOLUME
Volume Initialize
FREE
FREE
MDMS ALLOCATE VOLUME
Volume Allocate
ALLOCATED
ALLOCATED
MDMS DEALLOCATE VOLUME
Volume Deallocate
or automatically on
the volume scratch date
TRANSITION
ALLOCATED
MDMS DEALLOCATE VOLUME
Volume Deallocate
or automatically on
the volume scratch date
FREE
TRANSITION
MDMS SET VOLUME /RELEASE
Volume Release
or automatically on
the volume transition time
FREE
Any State
MDMS SET VOLUME /UNAVAILABLE
Volume Unavailable
UNINITIALIZED
UNINITIALIZED
MDMS SET VOLUME /AVAILABLE
Volume Available
Previous State
UNINITIALIZED
MDMS DELETE VOLUME
Volume Delete
BLANK
FREE
MDMS DELETE VOLUME
Volume Delete
BLANK
12.1.2 Volume States by Manual and Automatic Operations
This section describes the transitions between volume states. These processes enable you to
secure volumes from unauthorized use by MDMS client applications, or make them available to
meet continuing needs. Additionally, in some circumstances, you might have to manually force a
volume transition to meet an operational need.
Understanding how these volume transitions occur automatically under MDMS control, or take
place manually will help you manage your volumes effectively.
MDMS Management Operations 12-2
MDMS Management Operations
12.1 Managing Volumes
12.1.2.1 Creating Volume Object Records
You have more than one option for creating volume object records. You can create them explicitly with the MDMS CREATE VOLUME command: individually, or for a range of volume identifiers.
You can create the volumes implicitly as the result of an inventory operation on a jukebox. If an
inventory operation finds a volume that is not currently managed, a possible response (as you
determine) is to create a volume object record to represent it.
You can also create volume object records for large numbers of volumes by opening the jukebox,
loading the volumes into the jukebox slots, then running an inventory operation.
Finally, it is possible to perform scratch loads on standalone or stacker drives using the MDMS
LOAD DRIVE /CREATE command. If the volume that is loaded is does not exist in the database, MDMS will create it.
You must create volumes explicitly through the MDMS CREATE VOLUME command, or
implicitly through the inventory or load operations.
12.1.2.2 Initializing a Volume
Caution
MDMS expects the internally initialized volume label on the physical medium will
match the printed label. Always initialize volumes so the recorded volume labels match
the printed labels. If the recorded volume label on the tape does not match the printed
label on the cartridge, MDMS operations will fail.
Use the MDMS initialize feature to make sure that MDMS recognizes volumes as initialized.
Unless you acquire preinitialized volumes, you must explicitly initialize them MDMS before
you can use them. If your operations require, you can initialize volumes that have just been
released from allocation.
When you initialize a volume or create a volume object record for a preinitialized volume,
MDMS records the date in the initialized date attribute of the volume object record.
12.1.2.3 Allocating a Volume
Typically, applications request the allocation of volumes. Only in rare circumstances will you
have to allocate a volume to a user other than ABS or HSM. However, if you use command procedures for customized operations that require the use of managed media, you should be familiar
with the options for volume allocation. Refer to the ABS or HSM Command Reference Guide
for more information on the MDMS ALLOCATE command.
Once an application allocates a volume, MDMS allows read and write access to that volume
only by that application. MDMS sets volume object record attributes to control transitions
between volume states. Those attributes include:
•
the allocated date attribute contains the date and time MDMS allocates the volume.
•
the scratch date attribute contains the date and time MDMS will deallocate the volume.
The application requesting the volume can direct MDMS to set additional attributes for controlling how long it keeps the volume and how it releases it. These attributes include:
•
the scratch date attributes indicates the date when MDMS automatically sets the volume to a
non-allocated state. A volume reaching the scratch date may be either free for use, or may
be placed in a transition state.
MDMS Management Operations 12–3
MDMS Management Operations
12.1 Managing Volumes
•
the transition time attribute contains the time interval a volume remains in the transition
state. The transition state allows you to buffer, or stage, the release of volumes between their
allocation (for keeping data safe) and their subsequent re-use (overwriting data). To release
volumes directly to a free state, negate the attribute.
12.1.2.4 Holding a Volume
MDMS allows no other user or application to load or unload a volume with the state attribute
value set to ALLOCATED, unless the user has MDMS_LOAD_ALL rights. This volume state
allows you to protect your data. Set the amount of time a volume remains allocated according to
your data retention requirements.
During this time, you can choose to move the volume to an offsite location.
12.1.2.5 Freeing a Volume
When a volume’s scratch date passes, MDMS automatically frees the volume from allocation.
If the application or user negates the volume object record scratch date attribute, the volume
remains allocated permanently.
Use this feature when you need to retain the data on the volume indefinitely.
After the data retention time has passed, you have the option of making the volume immediately
available, or you can elect to hold the volume in a TRANSITION state. To force a volume
through the TRANSITION state, negate the volume object record transition time attribute.
You can release a volume from transition with the DCL command MDMS SET VOLUME
/RELEASE. Conversely, you can re-allocate a volume from either the FREE or TRANSITION
states with the DCL command MDMS SET VOLUME /RETAIN.
Once MDMS sets a volume’s state to FREE, it can be allocated for use by an application once
again.
12.1.2.6 Making a Volume Unavailable
You can make a volume unavailable if you need to prevent ongoing processing of the volume by
MDMS. MDMS retains the state from which you set the UNAVAILABLE state. When you
decide to return the volume for processing, the volume state attribute returns to its previous
value.
The ability to make a volume unavailable is a manual feature of MDMS.
12.1.3 Matching Volumes with Drives
MDMS matches volumes with drives capable of loading them by providing the logical media
type object. The media type object record includes attributes whose values describe the attributes
of a type of volume.
The domain object record names the default media types that any volume object record will take
if none is specified.
Create a media type object record to describe each type of volume. Drive object records include
an attribute list of media types the drive can load, read, and write.
Volume object records for uninitialized volumes include a list of candidate media types. Volume
object records for initialized volumes include a single attribute value that names a media type.
To allocate a drive for a volume, the volume's media type must be listed in the drive object
record's media type field, or its read-only media-type field for read-only operations.
MDMS Management Operations 12-4
MDMS Management Operations
12.1 Managing Volumes
12.1.4 Magazines for Volumes
Use magazines when your operations allow you to move and manage groups of volumes for single users. Create a magazine object record, then move volumes into the magazine (or similar carrier) with MDMS. All the volumes can now be moved between locations and jukeboxes by
moving the magazine to which they belong.
Figure 12–2 Magazines
6
7
8
9
10
11
Slots
Slots
7-slot TZ887
magazine
11-slot TL820
bin pack
CXO6749A
The jukeboxes must support the use of magazines; that is, they must use carriers that can hold
multiple volumes at once. If you choose to manage the physical movement of volumes with
magazines, then you may set the usage attribute to MAGAZINE for jukebox object records of
jukeboxes that use them. You may also define the topology attribute for any jukebox used for
magazine based operations.
If your jukebox does not have ports, and requires you to use physical magazines, you do not have
to use the MDMS magazine object record. The jukebox can still access volumes by slot number.
Single volume operations can still be conducted by using the move operation on individual volumes, or on a range of volumes.
12.1.5 Symbols for Volume Attributes
MDMS provides a feature that allows you to define a series of OpenVMS DCL symbols that
describe the attributes of a given volume. By using the /SYMBOLS qualifier with the MDMS
SHOW VOLUME command, you can define symbols for all the volume object record attribute
values. Use this feature interactively, or in DCL command procedures, when you need to gather
information about volumes for subsequent processing.
Refer to the ABS or HSM Command Reference Guide description of the MDMS SHOW VOLUME command.
MDMS Management Operations 12–5
MDMS Management Operations
12.2 Managing Operations
12.2 Managing Operations
MDMS manages volumes and devices as autonomously as possible. However, it is sometimes
necessary - and perhaps required - that your operations staff be involved with moving volumes
or loading volumes in drives. When MDMS cannot conduct an automatic operation, it sends a
message through the OpenVMS OPCOM system to an operator terminal to request assistance.
Understanding this information will help you set up effective and efficient operations with
MDMS.
12.2.1 Setting Up Operator Communication
This section describes how to set up operator communication between MDMS and the OpenVMS OPCOM facility. Follow the steps in Table 12–2 to set up operator communication.
Table 12–2 Setting Up Operator Communication
Step...
Action...
1.
Check or set OPCOM classes for each MDMS node.
2.
Identify the operator terminals nearest to MDMS locations, drives, and jukeboxes.
3.
Enable the operator terminals to receive communication through the OPCOM classes set.
12.2.1.1 Set OPCOM Classes by Node
Set the domain object record OPCOM attribute with the default OPCOM classes for any node in
the MDMS management domain.
Each MDMS node has a corresponding node object record. An attribute of the node object
record is a list of OPCOM classes through which operator communication takes place. Choose
one or more OPCOM classes for operator communication to support operations with this node.
12.2.1.2 Identify Operator Terminals
Identify the operator terminals closest to MDMS locations, drives and jukeboxes. In that way,
you can direct the operational communication between the nodes and terminals whose operators
can respond to it.
12.2.1.3 Enable Terminals for Communication
Make sure that the terminals are configured to receive OPCOM messages from those classes.
Use the OpenVMS REPLY/ENABLE command to set the OPCOM class that corresponds to
those set for the node or domain.
$REPLY/ENABLE=(opcom_class,[...])
Where opcom_class specifications are those chosen for MDMS communication.
MDMS Management Operations 12-6
MDMS Management Operations
12.2 Managing Operations
12.2.2 Activities Requiring Operator Support
Several commands include an assist feature where you can either require or forego operator
involvement. Other MDMS features allow you to communicate with particular OPCOM classes,
making sure that specific operators get messages. You can configure jukebox drives for automatic loading, and stand alone drives for operator supported loading. See Table 12–3 for a list of
operator communication features and your options for using them.
Table 12–3 Operator Management Features
Use These Features...
To Manage These Operations...
Domain and node object records,
OPCOM classes attribute
Use this attribute of the node and domain object records to identify the operator terminals to receive OPCOM messages.
The domain OPCOM classes apply if none are specified for any
node.
Drive and jukebox object records,
automatic reply attribute
Use this attribute to control whether operator acknowledgments
are required for certain drive and jukebox operations. The
default (negated) value requires operator acknowledgment for
all operations.
Setting the attribute to the affirmative will result in MDMS polling the devices for most operations, and completing the request
without specific operator acknowledgment.
The operator should observe the OPCOM message and look for
one of two phrases:
•
•
Assist or noassist options and the
reply option for these commands or
actions:
–
–
–
–
–
–
–
–
Allocate drive
Initialize volume
Load drive
Load volume
Move magazine
Move volume
Unload drive
Unload volume
The message option for these commands:
–
–
Load drive
Load volume
"and reply when completed" - this means that the
OPCOM message must be acknowledged before the
request will continue
"(auto-reply enabled)" - this means that the OPCOM
message will be automatically cancelled and the
request will continue after the requested action has
been performed
For all listed commands, you can either request or forego operator assistance. When you use the assist option, MDMS will communicate with the operators specified by the OPCOM classes set
in the domain object record. Using the noassist option directs
MDMS not to send operator messages.
You must be granted the MDMS_ASSIST right to use the assist
option.
The reply option allows you to capture the operator reply to the
command. This feature facilitates the use of DCL command procedures to manage interaction with operators.
For load operations, use the message option to pass additional
information to the operator identified to respond to the load
request.
MDMS Management Operations 12–7
MDMS Management Operations
12.3 Serving Clients of Managed Media
12.3 Serving Clients of Managed Media
Once configured, MDMS serves ABS and HSM with uninterrupted access to devices and volumes for writing data. Once allocated, MDMS catalogs volumes to keep them safe, and makes
them available when needed to restore data.
To service ABS and HSM, you must supply volumes for MDMS to make available, enable
MDMS to manage the allocation of devices and volumes, and meet client needs for volume
retention and rotation.
12.3.1 Maintaining a Supply of Volumes
To create and maintain a supply of volumes, you must regularly add volumes to MDMS management, and set volume object record attributes to allow MDMS to meet ABS and HSM needs.
12.3.1.1 Preparing Managed Volumes
To prepare volumes for use by MDMS, you must create volume object records for them and initialize them if needed. MDMS provides different mechanisms for creating volume object
records: the create, load, and inventory operations. When you create volume object records, you
should consider these factors:
•
The situational demands under which you create the volume object records.
•
The application needs of the volumes for which you create object records.
•
Those additional aspects of the volume for which you will have little, if any, need to change
later on.
The following sections provide more detailed information.
Meeting Situational Demands
If you create volume object records with the use of a vision equipped jukebox, you must command MDMS to use the jukebox vision system and identify the slots in which the new volumes
reside. These two operational parameters must be supplied to either the create or inventory operation.
For command driven operations, these two commands are functionally equivalent.
$MDMS INVENTORY JUKEBOX jukebox_name /VISION/SLOTS=slot_range /CREATE
$MDMS CREATE VOLUME /JUKEBOX=jukebox_name /VISION/SLOTS=slot_range
If you create volume object records with the use of a jukebox that does not have a vision system,
you must supply the range of volume names as they are labelled and as they occupy the slot
range.
If you create volume object records for volumes that reside in a location other than the default
location (as defined in the domain object record), you must identify the placement of the volumes and the location in the onsite or offsite attribute. Additionally, you must specify the volume name or range of volume names.
If you create volume object records for volumes that reside in the default onsite location, you
need not specify the placement or onsite location. However, you must specify the volume name
or range of volume names.
MDMS Management Operations 12-8
MDMS Management Operations
12.3 Serving Clients of Managed Media
Meeting Application Needs
If you acquire preinitialized volumes for MDMS management, and you want to bypass the
MDMS initialization feature, you must specify a single media type attribute value for the volume.
Select the format to meet the needs of your MDMS client application. For HSM, use the
BACKUP format. For ABS, use BACKUP or RMUBACKUP.
Use a record length that best satisfies your performance requirements. Set the volume protection
using standard OpenVMS file protection syntax. Assign the volume to a pool you might use to
manage the consumption of volumes between multiple users.
Static Volume Attributes
Static volume attributes rarely, if ever, need to be changed. MDMS provides them to store information that you can use to better manage your volumes.
The description attribute stores up to 255 characters for you to describe the volume, its use, history, or any other information you need.
The brand attribute identifies the volume manufacturer.
Use the record length attribute to store the length or records written to the volume, when that
information is needed.
12.3.2 Servicing a Stand Alone Drive
If you use a stand alone drive, enable MDMS operator communication on a terminal near the
operator who services the drive. MDMS signals the operator to load and unload the drive as
needed.
You must have a ready supply of volumes to satisfy load requests. If your application requires
specific volumes, they must be available, and the operator must load the specific volumes
requested.
To enable an operator to service a stand alone drive during MDMS operation, perform the
actions listed in Table 12–4.
Table 12–4 Configuring MDMS to Service a Stand Alone Drive
Stage...
Action...
1.
Enable operator communication between nodes and terminals.
2.
Stock the location where the drive resides with free volumes.
3.
For all subsequent MDMS actions involving the drive, use the assist feature.
12.3.3 Servicing Jukeboxes
MDMS incorporates many features that take advantage of the mechanical features of automated
tape libraries and other medium changers. Use these features to support lights-out operation, and
effectively manage the use of volumes.
Jukeboxes that use built-in vision systems to scan volume labels provide the greatest advantage.
If the jukebox does not have a vision system, MDMS has to get volume names by other means.
For some operations, the operator provides volume names individually or by range. For other
operations, MDMS mounts the volume and reads the recorded label.
MDMS Management Operations 12–9
MDMS Management Operations
12.3 Serving Clients of Managed Media
12.3.3.1 Inventory Operations
The inventory operation registers the contents of a jukebox correctly in the MDMS database.
You can use this operation to update the contents of a jukebox whenever you know, or have reason to suspect the contents of a jukebox have changed without MDMS involvement.
Note
Changing the contents of a jukebox without using MDMS move or inventory features,
and not updating the MDMS database, will cause subsequent operations to fail.
Always use the MDMS INVENTORY operation to make sure the MDMS database
accurately reflects the contents of the jukebox whenever you know, or have reason to
suspect the contents of a jukebox has changed.
Inventory for Update
When you need to update the database in response to unknown changes in the contents of the
jukebox, use the inventory operation against the entire jukebox. If you know the range of slots
subject to change, then constrain the inventory operation to just those slots.
If you inventory a jukebox that does not have a vision system, MDMS loads and mounts each
volume, to read the volume’s recorded label.
Note
Running an inventory on a large number of slots without a vision system can take from
tens of minutes to several hours.
When you inventory a subset of slots in the jukebox, use the option to ignore missing volumes.
If you need to manually adjust the MDMS database to reflect the contents of jukebox, use the
nophysical option for the MDMS move operation. This allows you to perform a logical move for
to update the MDMS database.
Inventory to Create Volume Object Records
If you manage a jukebox, you can use the inventory operation to add volumes to MDMS management. The inventory operation includes the create, preinitialized, media types, and inherit
qualifiers to support such operations.
Take the steps in Table 12–5 to use a vision jukebox to create volume object records.
Table 12–5 How to Create Volume Object Records with INVENTORY
Step...
Action...
1.
If you plan to open the jukebox for this operation, disable the jukebox and all drives
inside it.
2.
Empty as many slots as necessary to accommodate the volumes.
If you cannot open the jukebox, use the MDMS MOVE command to keep the MDMS
database synchronized with the actual location of volumes removed.
If you open the jukebox and manually remove managed volumes, place the volumes in
the location specified by the volumes’ onsite location.
3.
Place labelled volumes in the open jukebox slots.
If you cannot open the jukebox to expose the slots, use the Media Robot Utility software
or front panel controls to move volumes to the slots.
MDMS Management Operations 12-10
MDMS Management Operations
12.3 Serving Clients of Managed Media
Table 12–5 How to Create Volume Object Records with INVENTORY
Step...
Action...
4.
Perform the MDMS inventory operation.
Use the create option to signal MDMS to create volume object records.
If volumes are initialized specify the preinitialized option and a single media
type name for the media types attribute, otherwise, just specify all possible media
types to which the volume could relate.
Use the inherit option to identify a volume object record from which to inherit other volume attribute values.
Use the slots option to specify the range of slots occupied by the volumes to be managed.
If the jukebox does not have a vision system, use the volume range and novision
options.
12.3.4 Managing Volume Pools
To assist with accounting for volume use by data center clients, MDMS provides features that
allow you to divide the volumes you manage by creating volume pools and assigning volumes to
them.
Figure 12–3 Pools and Volumes
Allocated
Deallocate
Allocate
Create
Deallocate
Retain
Unitialized
Free
Transition
Release
Unavailable
Available
Unavailable
CXO6756A
Use MDMS to specify volume pools. Set the volume pool options in ABS or HSM to specify
that volumes be allocated from those pools for users as needed. Figure 12–3 identifies the pools
respective to a designated group of users. Note that ‘No Pool’ is for use by all users.
MDMS Management Operations 12–11
MDMS Management Operations
12.3 Serving Clients of Managed Media
12.3.4.1 Volume Pool Authorization
The pool object record includes two attributes to assign pools to users: authorized users, and
default users.
Set the authorized users list to include all users, by node or group name, who are allowed to allocate volumes from the pool.
Set the default users list to include all users, by node or group name, for whom the pool will be
the default pool. Unless another pool is specified during allocation, volumes will be allocated
from the default pool for users in the default users list.
Because volume pools are characterized in part by node or group names, anytime you add or
remove nodes or groups, you must review and adjust the volume pool attributes as necessary.
12.3.4.2 Adding Volumes to a Volume Pool
After you create a volume pool object record, you can associate managed volumes with it. Select
the range of volumes you want to associate with the pool and set the pool attribute of the volumes to the name of the pool.
This can be done during creation or at any time the volume is under MDMS management.
12.3.4.3 Removing Volumes from a Volume Pool
There are three ways to remove volumes from a volume pool.
•
You can delete the volume object records.
•
You can set the pool attribute of selected volume object records to a different volume pool
name.
•
You can negate the pool attribute of selected volume object records.
12.3.4.4 Changing User Access to a Volume Pool
To change access to volume pools, modify the membership of the authorized users list attribute.
If you are using the command line to change user access to volume pools, use the /ADD and
/REMOVE command qualifiers to modify the current list contents. Use the
/NOAUTHORIZED_USERS qualifier to erase the entire user list for the volume pool.
If you are using the GUI to change user access to volume pools, just edit the contents of the
authorized users field.
You can also authorize users with the /DEFAULT_USERS attribute, which means that the users
are authorized, and that this pool is the pool for which allocation requests for volumes are
applied if no pool is specified in the allocation request. You should ensure that any particular
user has a default users entry in only one pool.
12.3.4.5 Deleting Volume Pools
You can delete volume pools. However, deleting a volume pool may require some additional
clean up to maintain the MDMS database integrity. Some volume records could still have a pool
attribute that names the pool to be deleted, and some DCL command procedures could still reference the pool.
If volume records naming the pool exist after deleting the pool object record, find them and
change the value of the pool attribute.
The MDMS CREATE VOLUME and MDMS LOAD DRIVE commands in DCL command procedures can specify the deleted pool. Change references to the delete pool object record, if they
exist, to prevent the command procedures from failing.
MDMS Management Operations 12-12
MDMS Management Operations
12.4 Rotating Volumes from Site to Site
12.3.5 Taking Volumes Out of Service
You might want to remove volumes from management for a variety of reasons:
•
You need to retain the information recorded on a volume, and remove any MDMS management access to it.
•
The volume cartridge has broken.
•
The volume has become unreliable.
12.3.5.1 Temporary Volume Removal
To temporarily remove a volume from management, set the volume state attribute to
UNAVAILABLE. Any volume object record with the state set to UNAVAILABLE remains
under MDMS management, but is not processed though the life cycle. These volumes will not be
set to the TRANSITION or FREE state. However, these volumes can be moved and their location maintained.
12.3.5.2 Permanent Volume Removal
Caution
Before you remove a volume from the MDMS database, MAKE SURE the volume is
not storing information for ABS or HSM. If you remove a volume from MDMS management that is referenced from ABS or HSM, you will not be able to restore the data
stored on it.
To permanently remove a volume from management, delete the volume object record describing
it.
12.4 Rotating Volumes from Site to Site
Volume rotation involves moving volumes to an off-site location for safekeeping with a schedule that meets your needs for data retention and retrieval. After a period of time, you can retrieve
volumes for re-use, if you need them. You can rotate volumes individually, or you can rotate
groups of volumes that belong to magazines.
12.4.1 Required Preparations for Volume Rotation
The first thing you have to do for a volume rotation plan is create location object records for the
on-site and off-site locations. Make sure these location object records include a suitable description of the actual locations. You can optionally specify hierarchical locations and/or a range of
spaces, if you want to manage volumes by actual space locations.
You can define as many different locations as your management plan requires.
Once you have object records that describe the locations, choose those that will be the domain
defaults (defined as attributes of the domain object record). The default locations will be used
when you create volumes or magazines and do not specify onsite and/or offsite location names.
You can define only one onsite location and one offsite location as the domain default at any one
time.
12.4.2 Sequence of Volume Rotation Events
Manage the volume rotation schedule with the values of the offsite and onsite attributes of the
volumes or magazines you manage. You set these values. In addition to setting these attribute
values, you must check the schedule periodically to select and move the volumes or magazines.
MDMS Management Operations 12–13
MDMS Management Operations
12.4 Rotating Volumes from Site to Site
Table 12–6 shows the sequence of volume rotation events and identifies the commands and GUI
actions you issue.
Table 12–6 Sequence of Volume Rotation Events
Stage...
Action...
1.
Set the volume object record onsite and offsite attributes.
•
Typically, once ABS has allocated a volume you will remove it until it is
about to reach the scratch date. Set the onsite location and date based on
when it will be freed.
Set the offsite location and date based on when it will be ready to be moved
offsite. However, make sure that the volume is not part of an ABS continuation set and still needed for subsequent ABS operation.
•
For HSM, identify volumes to go offsite based on the last access date. If a
volume has not been accessed for a long period of time, there has been no
need to unshelve the files stored on it. Set the offsite date based for any time
after the last access.
If multiple archive classes are used, the secondary archive class(es) can be
removed off site as soon as a volume is filled.
Set the onsite date for any time you might want to archive or delete the files
on the volume.
2.
Identify the volumes or magazines to be moved offsite by selecting the offsite schedule
option. You can use the MDMS report or show volume features, or the show magazine
feature. The following CLI examples illustrate this:
$MDMS SHOW VOLUME/SCHEDULE=OFFSITE
$MDMS SHOW MAGAZINE/SCHEDULE=OFFSITE
3.
Move the volumes offsite. With the GUI, you can move the volumes selected from the
display.
With the CLI, (interactive or command procedure) use the MDMS MOVE command
with the /SCHEDULE qualifier. For example:
$MDMS MOVE VOLUME /SCHEDULE=OFFSITE [location_name]
$MDMS MOVE MAGAZINE /SCHEDULE=OFFSITE [location_name]
MDMS communicates with operators through OPCOM, providing a list of volume identifiers for the volumes to be gathered and moved.
4.
If you need to retrieve volumes or magazines to service a restore or unshelve request, you
must physically move them back to the onsite location.
Use the MDMS GUI move feature for the selected volumes or magazines or use the CLI
MOVE command. For example:
$MDMS MOVE VOLUME volume_id location_name
$MDMS MOVE MAGAZINE magazine_id location_name
MDMS Management Operations 12-14
MDMS Management Operations
12.5 Scheduled Activities
Table 12–6 Sequence of Volume Rotation Events
Stage...
Action...
5.
To return volumes to the onsite location based on their scheduled return date, use the GUI
to select and move volumes and magazines based on their onsite schedule. With the GUI,
you can move the volumes selected from the display.
With the CLI, (interactive or command procedure) use the MDMS MOVE command
with the /SCHEDULE qualifier. For example:
$MDMS MOVE VOLUME /SCHEDULE=ONSITE volume_id location_name
$MDMS MOVE MAGAZINE /SCHEDULE=ONSITE $_ magazine_name location_name
6.
Once the volumes and magazines arrive at the onsite location, negate the offsite and
onsite schedules. This prevents the volumes from showing up in subsequent reports. With
the GUI, remove the location date values associated with the offsite and onsite attributes.
With the CLI, use the /NOONSITE and /NOOFFSITE qualifiers. For example:
SET VOLUME volume_id /NOONSITE /NOOFFSITE
12.5 Scheduled Activities
MDMS starts three scheduled activities at 1AM, by default, to do the following:
•
Deallocate all volumes in the database that have exceeded their scratch date.
•
Release all volumes in the database that have exceeded their transition time.
•
Schedule all volumes that have exceeded their onsite or offsite date.
•
Schedule all magazines that have exceeded their onsite or offsite date.
These three activities are controlled by a logical, are separate jobs with names, generate log files,
and notify users when volumes are deallocated. These things are described in the sections below.
12.5.1 Logical Controlling Scheduled Activities
The start time for scheduled activities is controlled by the logical:
MDMS$SCHEDULED_ACTIVITIES_START_HOUR
By default, the scheduled activities start a 1AM which is defined as:
$ DEFINE/SYSTEM/NOLOG MDMS$SCHEDULED_ACTIVITIES_START_HOUR 1
You can change when the scheduled activities start by changing this logical in SYS$STARTUP:MDMS$SYSTARTUP.COM. The hour must be an integer between 0 and 23.
12.5.2 Job Names of Scheduled Activities
When these scheduled activities jobs start up, they have the following names:
•
MDMS$DEALVOL - deallocates and releases volumes
•
MDMS$MOVVOL - moves scheduled volumes
•
MDMS$MOVMAG - moves scheduled magazines
If any volumes are deallocated, the users in the Mail attribute of the Domain object will receive
notification by VMS mail.
Operators will receive Opcom requests to move the volumes or magazines.
MDMS Management Operations 12–15
MDMS Management Operations
12.5 Scheduled Activities
12.5.3 Log Files for Scheduled Activities
These scheduled activities generate log files. These log files are located in
MDMS$LOGFILE_LOCATION and are named:
–
MDMS$DEALVOL.LOG - for deallocating and releasing volumes
–
MDMS$MOVVOL - for moving of scheduled volumes
–
MDMS$MOVMAG - for moving of scheduled magazines
These log files do not show which volumes or magazines were acted upon. They show the command that was executed and whether it was successful or not.
If the Opcom message is not replied to by the time the next scheduled activities is started, the
activity is cancel and a new activity is scheduled. For example, nobody replied to the message
from Saturday at 1AM, so on Sunday MDMS canceled the request and generated a new request.
The log file for Saturday night would look like this:
$ SET VERIFY
$ SET ON
$ MDMS MOVE VOL */SCHEDULE
%MDMS-E-CANCELED, request canceled by user
MDMS$SERVER job terminated at 08-Jan-2003 01:01:30.48
Nothing is lost because the database did not change, but this new request could require more volumes or magazines to be moved.
The following shows an example that completed successfully after deallocating and releasing the
volumes:
$ SET VERIFY
$ SET ON
$ MDMS DEALLOCATE VOLUME /SCHEDULE/VOLSET
MDMS$SERVER job terminated at 08-Jan-2003 01:03:31.66
Note
The number of these log files could grow to a large number. You may want to set the
version on these scheduled activities to 10 or so.
12.5.4 Notify Users When Volumes are Deallocated
To notify users when the volumes are deallocated, place the user names in the Mail attribute of
the Domain object. For example:
$ MDMS show domain
Description: Smith's Special Domain
Mail: SYSTEM,OPERATOR1,SMITH
Offsite Location: JOHNNY_OFFSITE_TAPE_STORAGE
Onsite Location: OFFICE_65
Def. Media Type: TLZ09M
Deallocate State: TRANSITION
Opcom Class: TAPES
Request ID: 496778
Protection: S:RW,O:RW,G:R,W
DB Server Node: DEBBY
DB Server Date: 08-Jan-2003 14:20:08
Max Scratch Time: NONE
Scratch Time: 365 00:00:00
Transition Time:
1 00:00:00
Network Timeout: NONE
$
MDMS Management Operations 12-16
MDMS Management Operations
12.5 Scheduled Activities
In the above example, users SYSTEM, OPERATOR1, and SMITH will receive VMS mail when
any volumes are deallocated during scheduled activities or when some one issues the following
command:
$ MDMS DEALLOCATE VOLUME /SCHEDULE/VOLSET
If you delete all users in the Mail attribute, nobody will receive mail when volumes are deallocated by the scheduled activities or the DEALLOCATE VOLUME /SCHEDULE command.
MDMS Management Operations 12–17
13
MDMS High Level Tasks
MDMS GUI users have access to features that guide them through complex tasks. These features
conduct a dialog with users, asking them about their particular configuration and needs, and then
provide the appropriate object screens with information about setting specific attribute values.
The features support tasks that accomplish the following:
•
Configuring a new drive or jukebox and/or add new volumes for management.
•
Removing drives or jukeboxes and/or deleting volumes from management.
•
Servicing a jukebox when it is necessary to remove allocated volumes and replace them
with scratch volumes.
•
Rotating volumes from the onsite location to an offsite location, and back.
The procedures outlined in this section include command examples with recommended qualifier
settings shown. If you choose to perform these tasks with the command line interface, use the
MDMS command reference for complete command details.
13.1 Creating Jukeboxes, Drives, and Volumes
This task offers the complete set of steps for configuring a drive or jukebox to an MDMS
domain and adding new volumes used by those drives. This task can be performed to configure a
new drive or jukebox that can use managed volumes.
MDMS High Level Tasks 13–1
MDMS High Level Tasks
13.1 Creating Jukeboxes, Drives, and Volumes
Figure 13–1 Configuring Volumes and Drives
TK85_COMP
Media Type
TK86_COMP
Media Type
TK87_COMP
Media Type
TK88_COMP
Media Type
Compaction
Compaction
Compaction
Compaction
"CompacTape III"
"CompacTape III"
"CompacTape III"
"CompacTape IV"
TZ85_DRIVE
TZ86_DRIVE
TZ87_DRIVE
TZ88_DRIVE
CXO6754A
This task can also be performed to add new volumes into management that can use managed
drives and jukeboxes.
Table 13–1 Creating Devices and Volumes
Step
Action
Create Jukebox and/or Drive
1.
Verify that the drive is on-line and available.
$SHOW DEVICE device_name /FULL
Verify that the jukebox is online and available.
$SHOW DEVICE device_name /FULL
2.
If you are connecting the jukebox or drive to a set of nodes which do not already share access
to a common device, then create a group object record.
$MDMS CREATE GROUP group_name /NODES=(node_1,...)
3.
If you are configuring a new jukebox into management, then create a jukebox object record.
$MDMS CREATE JUKEBOX jukebox_name /DISABLED
4.
If the drive you are configuring uses a new type of volume, then create a media type object
record.
$MDMS CREATE MEDIA_TYPE media_type
5.
If you need to identify a new place for volume storage near the drive, then create a
location object record.
$MDMS CREATE LOCATION location_name
MDMS High Level Tasks 13-2
MDMS High Level Tasks
13.1 Creating Jukeboxes, Drives, and Volumes
Table 13–1 Creating Devices and Volumes
Step
Action
6.
Create the drive object record for the drive you are configuring into MDMS management.
$MDMS CREATE DRIVE drive_name /DISABLED
7.
Enable the drive (and if you just added a jukebox, enable it too).
$MDMS SET DRIVE drive_name /ENABLED
$MDMS SET JUKEBOX jukebox_name /ENABLED
8.
If you are adding new volumes into MDMS management, then continue with Step
10.
9.
If you have added a new media type to complement a new type of drive, and you plan to use
managed volumes, set the volumes to use the new media type.
$MDMS SET VOLUME /MEDIA_TYPE=media_type_name
Process New Volumes
10.
Make sure all new volumes have labels.
11.
If the volumes you are processing are of a type you do not presently manage, complete the
actions in this step. Otherwise, continue with Step 12.
Create a media type object record.
$MDMS CREATE MEDIA_TYPE media_type
If the drives you manage do not accept the new media type, then set the drives to accept volumes of the new media type.
$MDMS SET DRIVE /MEDIA_TYPE=media_type
12.
If you are using a jukebox with a vision system to create volume object records, then continue
with Step 13. Otherwise, continue with Step 16 to create volume records.
Jukebox Inventory to Create Volume Object Records
13.
If you use magazines in your operation, then continue with this step. Otherwise, continue with
Step 14.
If you do not have a managed magazine that is compatible with the jukebox, then create a
magazine object record.
$MDMS CREATE MAGAZINE magazine_name
Place the volumes in the magazine.
Move the magazine into the jukebox.
$MDMS MOVE MAGAZINE magazine_name jukebox_name /START_SLOT=n
or
$MDMS MOVE MAGAZINE magazine_name jukebox_name/START_SLOT=(n,n,n)
14.
Place the volumes in the jukebox. If you are not using all the slots in the jukebox, note the slots
you are using for this operation.
Inventory the jukebox, or just the slots that contain the new volumes.
If you are processing pre-initialized volumes, use the /PREINITIALIZED qualifier, then your
volumes are ready for use.
$MDMS INVENTORY JUKEBOX jukebox_name /CREATE /VOLUME_RANGE=range
MDMS High Level Tasks 13–3
MDMS High Level Tasks
13.2 Deleting Jukeboxes, Drives, and Volumes
Table 13–1 Creating Devices and Volumes
Step
Action
15.
Initialize the volumes in the jukebox if they were not created as preinitialized.
$MDMS INITIALIZE VOLUME /JUKEBOX=jukebox_name /SLOTS=range
After you initialize volumes, you are done with this procedure.
Create Volume Object Records Explicitly
16.
Create volume object records for the volumes you are going to manage.
If you are processing preinitialized volumes, use the /PREINITIALIZED qualifier, then your
volumes are ready for use.
$MDMS CREATE VOLUME volume_id
17.
Initialize the volumes. This operation will direct the operator when to load and unload the volumes from the drive.
$MDMS INITIALIZE VOLUME volume_range /ASSIST
13.2 Deleting Jukeboxes, Drives, and Volumes
This task describes the complete set of decisions and actions you could take in the case of
removing a drive from management. That is, when you have to remove the last drives of a particular kind, and take with it all associated volumes, then update any remaining MDMS object
records that reference the object records you delete. Any other task of removing just a drive (one
of many to remain) or removing and discarding volumes involves a subset of the activities
described in this procedure.
Table 13–2 Deleting Devices and Volumes
Step
Action
1.
If there is a volume in the drive you are about to remove from management, then unload the
volume from the drive.
$MDMS UNLOAD DRIVE drive_name
2.
Delete the drive from management.
$MDMS DELETE DRIVE drive_name
3.
If you have media type object records to service only the drive you just deleted, then complete
the actions in this step. Otherwise, continue with Step 4.
Delete the media type object record.
$MDMS DELETE MEDIA TYPE media_type
If volumes remaining in management reference the media type, then set the volume attribute
value for those volumes to reference a different media type value. Use the following command
for uninitialized volumes:
$MDMS SET VOLUME /MEDIA_TYPE=media_type /REMOVE
Use the following command for initialized volumes:
$MDMS SET VOLUME /MEDIA TYPE=media_type
MDMS High Level Tasks 13-4
MDMS High Level Tasks
13.3 Rotating Volumes Between Sites
Table 13–2 Deleting Devices and Volumes
Step
Action
4.
If the drives you have deleted belonged to a jukebox, then complete the actions in this step.
Otherwise, continue with Step 5.
If the jukebox still contains volumes, move the volumes (or magazines, if you manage the
jukebox with magazines) from the jukebox to a location that you plan to keep under MDMS
management.
$MDMS MOVE VOLUME volume_id location
or
$MDMS MOVE MAGAZINE magazine_name location
5.
If a particular location served the drives or jukebox, and you no longer have a need to manage
it, then delete the location.
$MDMS DELETE LOCATION location_name
6.
Move all volumes, the records of which you are going to delete, to a managed location.
$MDMS MOVE VOLUME volume_id location
7.
If the volumes to be deleted exclusively use a particular media type, and that media type has a
record in the MDMS database, then take the actions in this step. Otherwise, continue with Step
8.
Delete the media type object record.
$MDMS DELETE MEDIA_TYPE media_type
If drives remaining under MDMS management reference the media type you just deleted, then
update the drives’ media type list accordingly.
$MDMS SET DRIVE /MEDIA_TYPE media_type /REMOVE
8.
If the volumes to be deleted are the only volumes to belong to a volume pool, and there is no
longer a need for the pool, then delete the volume pool.
$MDMS DELETE POOL pool_name
9.
If the volumes to be deleted exclusively used certain managed magazines, then delete the magazines.
$MDMS DELETE MAGAZINE magazine_name
10.
Delete the volumes.
$MDMS DELETE VOLUME volume_id
13.3 Rotating Volumes Between Sites
This procedure describes how to gather and rotate volumes from the onsite location to an offsite
location. Use this procedure in accordance with your data center site rotation schedule to move
backup copies of data (or data destined for archival) to an offsite location. Additionally, this procedure processes volumes from the offsite location into the onsite location.
MDMS High Level Tasks 13–5
MDMS High Level Tasks
13.3 Rotating Volumes Between Sites
Figure 13–2 Volume Rotation
0
1
2
Offsite
location
Onsite
location
Offsite
location
Onsite
location
Move
Move
Move
Move
0
1
2
Load and
Unload
Magazine
Jukebox
Move
Drive
CXO6753A
Table 13–3 Rotating Volumes Between Sites
Step
Action
1.
Prepare a report listing the offsite volumes or magazines due for rotation to your onsite location.
$MDMS REPORT VOLUME/SCHEDULE=ONSITE
or,
$MDMS SHOW MAGAZINE/SCHEDULE=ONSITE
Provide this information to the people responsible for shuttling volumes and magazines.
2.
Identify the volumes and/or magazines to move offsite.
$MDMS SHOW VOLUME /SCHEDULE=OFFSITE
or,
$MDMS SHOW MAGAZINE /SCHEDULE=OFFSITE
3.
Gather the volumes into your location. If you have to retrieve magazines and/or volumes from
a jukebox, then move those volumes and/or magazines out of the jukebox. Move them to an
onsite location from which they will be shipped offsite.
$MDMS MOVE VOLUME /SCHEDULE=OFFSITE location
or,
$MDMS MOVE MAGAZINE /SCHEDULE=OFFSITE location
MDMS High Level Tasks 13-6
MDMS High Level Tasks
13.4 Servicing Jukeboxes Used for Backup Operations
Table 13–3 Rotating Volumes Between Sites
Step
Action
4.
As the volumes are picked up for transportation, or when otherwise convenient, update the
volume and/or magazine records in the database. Specify the offsite location name in this command.
$MDMS MOVE VOLUME /SCHEDULE=OFFSITE location
or,
$MDMS MOVE MAGAZINE /SCHEDULE=OFFSITE location
5.
With MDMS, move the volumes and/or magazines to the onsite location.
$MDMS MOVE VOLUME /SCHEDULE=ONSITE location
or,
$MDMS MOVE MAGAZINE /SCHEDULE=ONSITE location
6.
Prepare spaces for the incoming volumes and magazines. This can be accomplished by moving volumes and magazines into jukeboxes, or placing them in other locations to support operations.
13.4 Servicing Jukeboxes Used for Backup Operations
This procedure describes the steps you take to move allocated volumes from a jukebox and
replace them with scratch volumes. This procedure is aimed at supporting backup operations, not
operations that involve the use of managed media for hierarchical storage management.
Figure 13–3 Magazine Placement
Offsite
location
Move
Onsite
location
0
1
2
Move
Jukebox
CXO6752A
MDMS High Level Tasks 13–7
MDMS High Level Tasks
13.4 Servicing Jukeboxes Used for Backup Operations
Note
This procedure supports backup operations. Do not remove volumes allocated to HSM
unless a response to a load request can be tolerated when moving the volume to the
jukebox.
Table 13–4 Servicing Jukeboxes
Step
Action
1.
Report on the volumes to remove from the jukebox.
$MDMS REPORT VOLUME ALLOCATED /USER=ABS
2.
If you manage the jukebox on a volume basis, perform this step with each volume, otherwise
proceed with Step 3 with instructions for magazine management.
$MDMS MOVE VOLUME volume_id location
3.
Identify the magazines to which the volumes belong, then move the magazines from the jukebox.
$MDMS SHOW VOLUME /MAGAZINE volume_id
then
$MDMS MOVE MAGAZINE magazine_name location_name
4.
If you manage the jukebox on a volume basis, perform this step, otherwise proceed with Step 5
for magazine management.
$MDMS MOVE MAGAZINE magazine_name location
5.
Move free volumes to the magazine, and move the magazine to the jukebox.
$MDMS MOVE VOLUME volume_id magazine_name
then
$MDMS MOVE MAGAZINE magazine_name jukebox_name
MDMS High Level Tasks 13-8
14
Remote Devices
This chapter explains how to configure and manage remote devices using the Remote Device
Facility (RDF). RDF is used for devices remotely connected over a wide-area network, and
DECnet is still a requirement for access to these remote devices. RDF is not required for devices
connected remotely via Fibre Channel, as these are considered local devices.
14.1 The RDF Installation
When you install ABS (non-standard installation) or MDMS, you are asked whether you want to
install the RDF software. With the ABS standard installation, the RDF client and server software
is installed by default.
During the installation you place the RDF client software on the nodes with disks you want to
access for ABS or HSM. You place the RDF server software on the systems to which the tape
devices (jukeboxes and drives) are connected. This means that when using RDF, you serve the
tape device to the systems with the client disks.
All of the files for RDF are placed in SYS$COMMON:[MDMS.TTI_RDF] for your system.
There are separate locations for VAX or Alpha.
Note
RDF is not available if you are running ABS/MDMS with the ABS-OMT license.
14.2 Configuring RDF
After installing RDF you should check the TTI_RDEV:CONFIG_nodename.DAT file to make
sure it has correct entries.
This file:
•
is located on the RDF server node with the tape device
•
is created initially during installation
•
is a text file
•
includes the definition of each device accessible by the RDF software. This definition consists of a physical device name and an RDF characteristic name.
Example:
Device $1$MIA0 MIAO
Verify:
Check this file to make sure that all RDF characteristic names are unique to this node.
Remote Devices 14–1
Remote Devices
14.3 Using RDF with MDMS
14.3 Using RDF with MDMS
The following sections describe how to use RDF with MDMS.
14.3.1 Starting Up and Shutting Down RDF Software
Starting up RDF software:
RDF software is automatically started up along with then MDMS software when you enter the
following command:
$ @SYS$STARTUP:MDMS$STARTUP
Shutting down RDF software:
To shut down the RDF software, enter the following command:
$ @SYS$STARTUP:MDMS$SHUTDOWN
14.3.2 The RDSHOW Procedure
Required privileges:
The following privileges are required to execute the RDSHOW procedure: NETMBX, TMPMBX.
In addition, the following privileges are required to show information on remote devices allocated by other processes: SYSPRV, WORLD.
14.3.3 Command Overview
You can run the RDSHOW procedure any time after the MDMS software has been started. RDF
software is automatically started at this time.
Use the following procedures:
$ @TTI_RDEV:RDSHOW CLIENT
$ @TTI_RDEV:RDSHOW SERVER node_name
$ @TTI_RDEV:RDSHOW DEVICES
node_name is the node name of any node on which the RDF server software is running.
14.3.4 Showing Your Allocated Remote Devices
To show remote devices that you have allocated, enter the following command from the RDF
client node:
$ @TTI_RDEV:RDSHOW CLIENT
Result:
RDALLOCATED devices for pid 20200294, user DJ, on node OMAHA::
Local logical
Rmt node Remote device
TAPE01
MIAMI::
MIAMI$MUC0
DJ is the user name and OMAHA is the current RDF client node.
Remote Devices 14-2
Remote Devices
14.4 Monitoring and Tuning Network Performance
14.3.5 Showing Available Remote Devices on the Server Node
The RDSHOW SERVER procedure shows the available devices on a specific SERVER node.
To execute this procedure, enter the following command from any RDF client or RDF server
node:
$ @TTI_RDEV:RDSHOW SERVER MIAMI
MIAMI is the name of the server node whose devices you want shown.
Result:
Available devices on node MIAMI::
Name
Status Characteristics/Comments
MIAMI$MSA0
in use msa0
...by pid 20200246, user CATHY (local)
MIAMI$MUA0
in use mua0
...by pid 202001B6, user CATHY, on node OMAHA::
MIAMI$MUB0
-free- mub0
MIAMI$MUC0
in use muc0
...by pid 2020014C, user DJ, on node OMAHA::
This RDSHOW SERVER command shows any available devices on the server node MIAMI,
including any device characteristics. In addition, each allocated device shows the process PID,
username, and RDF client node name.
The text (local) is shown if the device is locally allocated.
14.3.6 Showing All Remote Devices Allocated on the RDF Client Node
To show all allocated remote devices on an RDF client node, enter the following command from
the RDF client node:
$ @TTI_RDEV:RDSHOW DEVICES
Result:
Devices RDALLOCATED on node OMAHA::
RDdevice Rmt node Remote device User name
RDEVA0:
MIAMI::
MIAMI$MUC0
DJ
RDEVB0:
MIAMI::
MIAMI$MUA0
CATHY
PID
2020014C
202001B6
This command shows all allocated devices on the RDF client node OMAHA. Use this command
to determine which devices are allocated on which nodes.
14.4 Monitoring and Tuning Network Performance
This section describes network issues that are especially important when working with remote
devices.
14.4.1 DECnet Phase IV
The Network Control Program (NCP) is used to change various network parameters. RDF (and
the rest of your network as a whole) benefits from changing two NCP parameters on all nodes in
your network. These parameters are:
•
PIPELINE QUOTA
•
LINE RECEIVE BUFFERS
Remote Devices 14–3
Remote Devices
14.4 Monitoring and Tuning Network Performance
Pipeline quota
The pipeline quota is used to send data packets at an even rate. It can be tuned for specific network configurations. For example, in an Ethernet network, the number of packet buffers represented by the pipeline quota can be calculated as approximately:
buffers = pipeline_quota / 1498
Default:
The default pipeline quota is 10000. At this value, only six packets can be sent before acknowledgment of a packet from the receiving node is required. The sending node stops after the sixth
packet is sent if an acknowledgment is not received.
Recommendation:
The PIPELINE QUOTA can be increased to 45,000 allowing 30 packets to be sent before a
packet is acknowledged (in an Ethernet network). However, performance improvements have
not been verified for values higher than 23,000. It is important to know that increasing the value
of PIPELINE QUOTA improves the performance of RDF, but may negatively impact performance of other applications running concurrently with RDF.
Line receive buffers
Similar to the pipeline quota, line receive buffers are used to receive data at a constant rate.
Default:
The default setting for the number of line receive buffers is 6.
Recommendation:
The number of line receive buffers can be increased to 30 allowing 30 packets to be received at a
time. However, performance improvements have not been verified for values greater than 15 and
as stated above, tuning changes may improve RDF performance while negatively impacting
other applications running on the system.
14.4.2 DECnet-Plus (Phase V)
As stated in DECnet-Plus(Phase V), (DECnet/OSI V6.1) Release Notes, a pipeline quota is not
used directly. Users may influence packet transmission rates by adjusting the values for the
transport’s characteristics MAXIMUM TRANSPORT CONNECTIONS, MAXIMUM
RECEIVE BUFFERS, and MAXIMUM WINDOW. The value for the transmit quota is determined by MAXIMUM RECEIVE BUFFERS divided by Actual TRANSPORT CONNECTIONS.
This will be used for the transmit window, unless MAXIMUM WINDOW is less than this quota.
In that case, MAXIMUM WINDOW will be used for the transmitter window.
The DECnet-Plus defaults (MAXIMUM TRANSPORT CONNECTIONS = 200 and MAXIMUM RECEIVE BUFFERS = 4000) produce a MAXIMUM WINDOW of 20. Decreasing
MAXIMUM TRANSPORT CONNECTIONS with a corresponding increase of MAXIMUM
WINDO may improve RDF performance, but also may negatively impact other applications running on the system.
14.4.3 Changing Network Parameters
This section describes how to change the network parameters for DECnet Phase IV and DECnetPLUS.
Remote Devices 14-4
Remote Devices
14.4 Monitoring and Tuning Network Performance
14.4.4 Changing Network Parameters for DECnet (Phase IV)
The pipeline quota is an NCP executor parameter. The line receive buffers setting is an NCP line
parameter.
The following procedure shows how to display and change these parameters in the permanent
DECnet database. These changes should be made on each node of the network.
Table 14–1 How to Change Network Parameters
Step
Action
1
Enter:
$ run sys$system:NCP
NCP>show executor characteristics
Result:
Node Permanent Characteristics as of 24-MAY-1991 10:10:58
Executor node = 20.1 (DENVER)
Management version = V4.1.0
.
.
.
Pipeline quota = 10000
2
Enter:
NCP>define executor pipeline quota 45000
NCP>show known lines
Result:
Known line Volatile Summary as of 24-MAY-1991 10:11:13
Line
State
SVA-0
on
3
Enter:
NCP>show line sva-0 characteristics
Result:
Line Permanent Characteristics as of 24-MAY-1991 10:11:31
Line = SVA-0
Receive buffers
= 6
<-- value to change
Controller
= normal
Protocol
= Ethernet
Service timer
= 4000
Hardware address
= 08-00-2B-0D-D0-5F
Device buffer size
= 1498
4
Enter:
NCP>define line sva-0 receive buffers 30
NCP>exit
Requirement:
For the changed parameters to take effect, the node must be rebooted or DECnet must be shut
down.
Remote Devices 14–5
Remote Devices
14.4 Monitoring and Tuning Network Performance
14.4.5 Changing Network Parameters for DECnet-Plus(Phase V)
The Network Control Language (NCL) is used to change DECnet-Plus network parameters. The
transport parameters MAXIMUM RECEIVE BUFFERS, MAXIMUM TRANSPORT CONNECTIONS and MAXIMUM WINDOW can be adjusted by using NCL’s SET OSI TRANSPORT command. For example:
NCL> SET OSI TRANSPORT MAXIMUM RECEIVE BUFFERS = 4000
NCL> SET OSI TRANSPORT MAXIMUM TRANSPORT CONNECTIONS = 200
NCL> SET OSI TRANSPORT MAXIMUM WINDOWS = 20
!default value
!default value
!default value
To make the parameter change permanent, add the NCL command(s) to the SYS$MANAGER:NET$OSI_TRANSPORT_STARTUP.NCL file. Refer to the DENET-Plus (DECnet/OSI) Network Management manual for detailed information.
14.4.6 Resource Considerations
Changing the default values of line receive buffers and the pipeline quota to the values of 30 and
45000 consumes less than 140 pages of nonpaged dynamic memory.
In addition, you may need to increase the number of large request packets (LRPs) and raise the
default value of NETACP BYTLM.
Large request packets
LRPs are used by DECnet to send and receive messages. The number of LRPs is governed by
the SYSGEN parameters LRPCOUNT and LRPCOUNTV.
Recommendation:
A minimum of 30 free LRPs is recommended during peak times. Show these parameters and the
number of free LRPs by entering the following DCL command:
$ SHOW MEMORY/POOL/FULL
Result:
System Memory Resources on 24-JUN-1991 08:13:57.66
Large Packet (LRP) Lookaside List Packets Bytes
Current Total Size
36
59328
Initial Size (LRPCOUNT)
25
41200
Maximum Size (LRPCOUNTV)
200
329600
Free Space
20
32960
In the LRP lookaside list, this system has:
•
Current Total Size of 36
The SYSGEN parameter LRPCOUNT (LRP Count) has been set to 25. The Current Size is not
the same as the Initial Size. This means that OpenVMS software has to allocate more LRPs. This
causes system performance degradation while OpenVMS is expanding the LRP lookaside list.
The LRPCOUNT should have been raised to at least 36 so OpenVMS does not have to allocate
more LRPs.
Remote Devices 14-6
Remote Devices
14.4 Monitoring and Tuning Network Performance
Recommendation:
Raise the LRPCOUNT parameter to a minimum of 50. Because the LRPCOUNT parameter is
set to only 25, the LRPCOUNT parameter is raised on this system even if the current size was
also 25.
•
Free Space is 20
This is below the recommended free space amount of 30. This also indicates that LRPCOUNT
should be raised. Raising LRPCOUNT to 50 (when there are currently 36 LRPs) has the effect of
adding 14 LRPs. Fourteen plus the 20 free space equals over 30. This means that the recommended value of 30 free space LRPs is met after LRPCOUNT is set to 50.
•
The SYSGEN parameter LRPCOUNTV (LRP count virtual) has been set to 200.
The LRPCOUNTV parameter should be at least four times LRPCOUNT. Raising LRPCOUNT
may mean that LRPCOUNTV has to be raised. In this case, LRPCOUNTV does not have to be
raised because 200 is exactly four times 50 (the new LRPCOUNT value).
Make changes to LRPCOUNT or LRPCOUNTV in both:
–
SYSGEN (using CURRENT)
–
SYS$SYSTEM:MODPARAMS.DAT file (for when AUTOGEN is run with
REBOOT)
Example: Changing LRPCOUNT to 50 in SYSGEN
Username: SYSTEM
Password: (the system password)
$ SET DEFAULT SYS$SYSTEM
$ RUN SYSGEN
SYSGEN> USE CURRENT
SYSGEN> SH LRPCOUNT
Parameter Name
Current
LRPCOUNT
25
SYSGEN> SET LRPCOUNT 50
SYSGEN> WRITE CURRENT
SYSGEN> SH LRPCOUNT
Parameter Name
Current
LRPCOUNT
50
Default
4
Minimum
0
Maximum
4096
Default
4
Minimum
0
Maximum
4096
Requirement:
After making changes to SYSGEN, reboot your system so the changes take effect.
Example: Changing the LRPCOUNT for AUTOGEN
Add the following line to MODPARAMS.DAT:
$ MIN_LRPCOUNT = 50
! ADDED {the date} {your initials}
Result:
This ensures that when AUTOGEN runs, LRPCOUNT is not set below 50.
NETACP BYTLM
The default value of NETACP is a BYTLM setting of 65,535. Including overhead, this is enough
for only 25 to 30 line receive buffers. This default BYTLM may not be enough.
Recommendation:
Increase the value of NETACP BYTLM to 110,000.
Remote Devices 14–7
Remote Devices
14.4 Monitoring and Tuning Network Performance
How to increase NETACP BYTLM:
Before starting DECnet, define the logical NETACP$BUFFER_ LIMIT by entering:
$ DEFINE/SYSTEM/NOLOG NETACP$BUFFER_LIMIT 110000
$ @SYS$MANAGER:STARTNET.COM
14.4.7 Controlling RDF’s Effect on the Network
By default, RDF tries to perform I/O requests as fast as possible. In some cases, this can cause
the network to slow down. Reducing the network bandwidth used by RDF allows more of the
network to become available to other processes.
The RDF logical names that control this are:
RDEV_WRITE_GROUP_SIZE
RDEV_WRITE_GROUP_DELAY
Default:
The default values for these logical names is zero. The following example shows how to define
these logical names on the RDF client node:
$ DEFINE/SYSTEM RDEV_WRITE_GROUP_SIZE 30
$ DEFINE/SYSTEM RDEV_WRITE_GROUP_DELAY 1
Further reduction:
To further reduce bandwidth, the RDEV_WRITE_GROUP_DELAY logical can be increased to
two (2) or three (3).
Note
Reducing the bandwidth used by RDF causes slower transfers of RDF’s data across
the network.
14.4.8 Surviving Network Failures
Remote Device Facility (RDF) can survive network failures of up to 15 minutes long. If the network comes back within the 15 minutes allotted time, the RDCLIENT continues processing
WITHOUT ANY INTERRUPTION OR DATA LOSS. When a network link drops while RDF
is active, after 10 seconds, RDF creates a new network link, synchronizes I/Os between the
RDCLIENT and RDSERVER, and continues processing.
The following example shows how you can test the RDF’s ability to survive a network failure.
(This example assumes that you have both the RDSERVER and RDCLIENT processes running.)
$ @tti_rdev:rdallocate tti::mua0:
RDF - Remote Device Facility (Version 4.1) - RDALLOCATE Procedure
Copyright (c) 1990, 1996 Touch Technologies, Inc.
Device TTI::TTI$MUA0 ALLOCATED, use TAPE01 to reference it
$ backup/rewind/log/ignore=label sys$library:*.* tape01:test
from a second session:
$ run sys$system:NCP
NCP> show known links
Known Link Volatile Summary as of 13-MAR-1996 14:07:38
Link
Node
PID
Process
Remote link Remote user
24593 20.4 (JR)
2040111C MARI_11C_5
8244 CTERM
16790 20.3 (FAST)
20400C3A -rdclient16791 tti_rdevSRV
24579 20.6 (CHEERS)
20400113 REMACP
8223 SAMMY
Remote Devices 14-8
Remote Devices
14.5 Controlling Access to RDF Resources
24585 20.6 (CHEERS)
20400113
NCP> disconnect link 16790
.
.
.
REMACP
8224
ANDERSON
Backup pauses momentarily before resuming. Sensing the network disconnect, RDF creates a
new -rdclient- link. Verify this by entering the following command:
NCP> show known links
Known Link Volatile Summary as of 13-MAR-1996 16:07:00
Link
24593
24579
24585
24600
20.4
20.6
20.6
20.3
Node
(JR)
(CHEERS)
(CHEERS)
(FAST)
PID
Process
Remote link Remote user
2040111C MARI_11C_5
8244 CTERM
20400113 REMACP
8223 SAMMY
20400113 REMACP
8224 ANDERSON
20400C3A -rdclient24601 tti_rdevSRV
NCP> exit
14.5 Controlling Access to RDF Resources
The RDF Security Access feature allows storage administrators to control which remote devices
are allowed to be accessed by RDF client nodes.
14.5.1 Allow Specific RDF Clients Access to All Remote Devices
You can allow specific RDF client nodes access to all remote devices.
Example:
For example, if the server node is MIAMI and access to all remote devices is granted only to
RDF client nodes OMAHA and DENVER, then do the following:
1.
Edit TTI_RDEV:CONFIG_MIAMI.DAT
2.
Before the first device designation line, insert the /ALLOW qualifier
Edit TTI_RDEV:CONFIG_MIAMI.DAT
CLIENT/ALLOW=(OMAHA,DENVER)
DEVICE $1$MUA0: MUAO, TK50
DEVICE MSA0:
TU80, 1600bpi
OMAHA and DENVER (the specific RDF CLIENT nodes) are allowed access to all remote
devices (MUA0, TU80) on the server node MIAMI.
Requirements:
If there is more than one RDF client node being allowed access, separate the node names by
commas.
14.5.2 Allow Specific RDF Clients Access to a Specific Remote Device
You can allow specific RDF client nodes access to a specific remote device.
Example:
If the server node is MIAMI and access to MUA0 is allowed by RDF client nodes OMAHA and
DENVER, then do the following:
1.
Edit TTI_RDEV:CONFIG_MIAMI.DAT
2.
Find the device designation line (for example, DEVICE $1$MUA0:)
3.
At the end of the device designation line, add the /ALLOW qualifier:
Remote Devices 14–9
Remote Devices
14.6 RDserver Inactivity Timer
$ Edit TTI_RDEV:CONFIG_MIAMI.DAT
DEVICE $1$MUA0: MUA0, TK50/ALLOW=(OMAHA,DENVER)
DEVICE MSA0:
TU80, 1600bpi
OMAHA and DENVER (the specific RDF client nodes ) are allowed access only to device
MUA0. In this situation, OMAHA is not allowed to access device TU80.
14.5.3 Deny Specific RDF Clients Access to All Remote Devices
You can deny access from specific RDF client nodes to all remote devices. For example, if the
server node is MIAMI and you want to deny access to all remote devices from RDF client nodes
OMAHA and DENVER, do the following:
1.
Edit TTI_RDEV:CONFIG_MIAMI.DAT
2.
Before the first device designation line, insert the /DENY qualifier:
$ Edit TTI_RDEV:CONFIG_MIAMI.DAT
CLIENT/DENY=(OMAHA,DENVER)
DEVICE $1$MUA0: MUA0, TK50
DEVICE MSA0:
TU80, 16700bpi
OMAHA and DENVER are the specific RDF client nodes denied access to all the remote
devices (MUA0, TU80) on the server node MIAMI.
14.5.4 Deny Specific RDF Clients Access to a Specific Remote Device
You can deny specific client nodes access to a specific remote device.
Example:
If the server node is MIAMI and you want to deny access to MUA0 from RDF client nodes
OMAHA and DENVER, do the following:
1.
Edit TTI_RDEV:CONFIG_MIAMI.DAT
2.
Find the device designation line (for example, DEVICE $1$MUA0:)
3.
At the end of the device designation line, add the /DENY qualifier:
$ Edit TTI_RDEV:CONFIG_MIAMI.DAT
DEVICE $1$MUA0: MUA0, TK50/DENY=(OMAHA,DENVER)
DEVICE MSA0:
TU80, 16700bpi
OMAHA and DENVER RDF client nodes are denied access to device MUA0 on the server node
MIAMI.
14.6 RDserver Inactivity Timer
One of the features of RDF is the RDserver Inactivity Timer. This feature gives system managers more control over rdallocated devices.
The purpose of the RDserver Inactivity Timer is to rddeallocate any rdallocated device if NO I/O
activity to the rdallocated device has occurred within a predetermined length of time. When the
RDserver Inactivity Timer expires, the server process drops the link to the client node and deallocates the physical device on the server node. On the client side, the client process deallocates
the RDEVn0 device.
The default value for the RDserver Inactivity Timer is 3 hours.
The RDserver Inactivity Timer default value can be manually set by defining a system wide logical on the RDserver node prior to rdallocating on the rdclient node. The logical name is
RDEV_SERVER_INACTIVITY_TIMEOUT.
Remote Devices 14-10
Remote Devices
14.7 RDF Error Messages
To manually set the timeout value:
$ DEFINE/SYSTEM RDEV_SERVER_INACTIVITY_TIMEOUT seconds
For example, to set the RDserver Inactivity Timer to 10 hours, you would execute the following
command on the RDserver node:
$ DEFINE/SYSTEM RDEV_SERVER_INACTIVITY_TIMEOUT 36000
14.7 RDF Error Messages
CLIDENY
Access from this CLIENT to the SERVER is not allowed. Check for "CLIENT/ALLOW" in the RDserver’s configuration file.
CLIENTSBUSY
All 16 pesudo-devices are already in use.
DEVDENY
Client is not allowed to the Device or to the Node. This error message is dependent on the "CLIENT/ALLOW", "/ALLOW" or "CLIENT/DENY", "/DENY"
qualifiers in the configuration file. Verify that the configuration file qualifier is
used appropriately.
EMPTYCFG
The RDserver’s configuration file has no valid devices or they are all commented out.
LINKABORT
The connection to the device was aborted. For some reason the connection was
interrupted and the remote device could not be found. Check the configuration
file as well as the remote device.
NOCLIENT
The RDdriver was not loaded. Most commonly the
RDCLIENT_STARTUP.COM file was not executed for this node.
NOREMOTE
This is a RDF status message. The remote device could not be found. Verify the
configuration file as well as the status of the remote device.
SERVERTMO
The RDserver did not respond to the request. Most commonly the
RDSERVER_ STARTUP.COM file was not executed on the server node. Or,
the server has too many connections already to reply in time to your request.
Remote Devices 14–11
A
HSM Error Messages
This section defines all status and error messages that are produced by or on behalf of HSM,
together with the cause and suggested user actions when appropriate.
A.1 OpenVMS Messages
The following messages are generated by OpenVMS and returned to the user who is initiating a function.
%SYSTEM-E-DEVICEFULL, device full - allocation failure
Explanation: An attempt to create or extend a file failed because it would exceed the device
capacity, and any attempts to free disk space failed or did not free up the required space.
Files should be deleted from the disk to free up space. This is an existing OpenVMS message.
%SYSTEM-E-EXDISKQUOTA, exceeded disk quota
Explanation: An attempt to create or extend a file failed because it would exceed the user
disk quota (plus overdraft), and any attempts to free disk space failed or did not free up the
required space. The user should either reduce the number of online files, or request additional disk quota. This is an existing OpenVMS message.
%SYSTEM-E-SHELVED, file is shelved
Explanation: An attempt to access a currently shelved file has failed because unshelving of
the file is disallowed. This is a new OpenVMS message for HSM.
%SYSTEM-E-SHELFERROR, access to shelved file failed
Explanation: An attempt to access (read/write/extend /truncate) a file failed because the file
was shelved and HSM could not unshelve it for some reason. HSM adds further information
as to the root cause of the error. This is a new OpenVMS message for HSM.
A.2 Shelf Handler Messages
This section defines all status and error messages that are produced by or on behalf of HSM,
together with the cause and suggested user actions when appropriate
The HSM Shelf Handler Process (SHP) performs all preshelving, shelving, unshelving, and
unpreshelving operations for HSM. The following status and error messages are generated
by the shelf handler process and are either returned to the end-user or to the shelf handler
audit and error logs. All shelf handler messages use the message prefix of "HSM".
%HSM-W-ALLOCFAILED, failed to load/allocate/mount drive drivename
HSM Error Messages A–1
HSM Error Messages
A.2 Shelf Handler Messages
Explanation: An error occurred trying to ready the specified drive for operations. The
causes could be that the drive is not configured in SMU, or MDMS, or that the drive has
another volume mounted, or is otherwise unavailable. Please check the SHP error log and
the status of the drive.
%HSM-I-ALRPRESHELVED, file filename was already preshelved
Explanation: A preshelve request was issued for a file that was already preshelved or
shelved. No action is required.
%HSM-I-ALRSHELVED, file filename was already shelved
Explanation: A SHELVE/NOONLINE request was issued for a file that was already
shelved, and no reshelving is required. No action is required.
%HSM-F-BUGCHECK, internal consistency failure
Explanation: An internal error occurred and the shelf handler process terminated and is
automatically restarted. This error is nonrecoverable, and is written to the error log. Please
report this problem to HP and include relevant entries in the error and audit logs.
%HSM-W-CACHEERROR, shelf caching error
Explanation: An error occurred trying to access a cache disk or a cache file on a preshelve,
shelve, or unshelve request, or during a cache flush to tape. Consult the SHP error log for
more information.
%HSM-I-CACHEFULL, shelf cache full
Explanation: All disk and MO devices specified as caches have exhausted their capacity as
defined by the block size, or the physical size of the device.Either define additional cache
devices, or initiate cache flushing using SMU commands. Any preshelve or shelve operations are directed to tape, if defined.
%HSM-W-CANCELED, shelving operation canceled, on file filename
Explanation: The specified request has been canceled due to a specific cancel request, a
request that conflicts with another user, or a failure of a multi-operation request. In the last
case, please check the SHP error log for more information.
%HSM-E-CATOPENERROR, error opening shelf catalog file
Explanation: An unexpected error occurred trying to open the shelf catalog file(s). Consult
the SHP error log for further information. Please check the equivalence name of
HSM$CATALOG and redefine as needed. Also verify that any catalog files are accessible.
%HSM-E-CATSTATS_ERROR, error manipulating catalog statistics record
Explanation: An error occurred reading or writing the shelf catalog during a license capacity scan or SMU facility definition. Please check the equivalence name of HSM$CATALOG
and redefine as needed. If the catalog exists, you may need to recover the catalog from a
BACKUP copy.
%HSM-E-CLASS_DISABLED, command class disabled; re-enable with SMU SET FACILITY/REENABLE
HSM Error Messages A-2
HSM Error Messages
A.2 Shelf Handler Messages
Explanation: A repeated fatal error in the shelf handler has been detected on a certain class
of operations. Please refer to the SHP error log for detailed information, and report the problem to HP. Since the fatal error continually repeats, HSM disabled the class of operation
causing the problem, so that other operations might proceed. After fixing the problem, you
can re-enable all operations using SMU SET FACILITY/REENABLE.
%HSM-E-CLASSDIS, commandclass command class disabled
Explanation: A repeated fatal error in the shelf handler has been detected on the specified
class of operations. Please refer to the error log for detailed information, and report the
problem to HP. Since the fatal error continually repeats, HSM disabled this class of operation, so that other operations might proceed. After fixing the problem, you can re-enable all
operations using SMU SET FACILITY/REENABLE.
%HSM-E-DBACCESS_ERROR, unable to access SMU database
Explanation: The shelf handler process could not access one or more of the SMU databases. Please check the equivalence name of HSM$MANAGER and redefine as needed. If
the database does not exist, you can create a new version by simply running SMU and
answering "Yes" to the create questions - then use SMU SET commands to configure HSM.
%HSM-E-DBDATA_ERROR, consistency error in SMU database
Explanation: A consistency error was detected in the SMU database. This could be from
the number of archive classes exceeding the maximum allowed for a shelf, an invalid shelf
definition, inconsistent definitions, etc. Please examine the error log, then enter SMU SET
commands to correct the discrepancy.
%HSM-E-DBNOTIFY_ERROR, propagation error for SMU update to all shelf handlers
Explanation: There was a problem notifying all shelf handlers in the VMScluster about a
change to an SMU database. Please retry the SMU command, and report the problem to HP
if the problem persists.
%HSM-E-DEVICEIDERR, error accessing volume identifier
Explanation: An error occurred trying to access or create the file [000000]HSM$UID.SYS
on a disk volume or cache device. Please check the volume for read/write accessibility, and
ensure there is sufficient space to create this file (only one cluster factor is usually required).
This file is required on all disk volumes for which HSM operations are enabled.
%HSM-S-DMPACTREQS, shelving facility active with n requests
Explanation: Normal response to an SMU SHOW REQUESTS command with "n" active
requests. The messages indicates the number of requests active on the shelf handler on the
node from which the command was entered, not cluster-wide.
%HSM-I-DMPFILE, active requests dumped to file HSM$LOG:HSM$SHP_ ACTIVITY.LOG
Explanation: Normal response to an SMU SHOW REQUESTS/FULL command, indicating that the activity log was dumped to the fixed-named file. This message (and the activity
log) are only produced if there is at least one active request.
%HSM-W-DMPNOMUTEX, unable to lock shelf handler database
HSM Error Messages A–3
HSM Error Messages
A.2 Shelf Handler Messages
Explanation: An SMU SHOW REQUESTS operation proceeds even if it cannot lock the
appropriate mutexes after 5 seconds. This might occasionally be seen under heavy load and
is not a concern. However, if repeated requests display this message, the shelf handler might
be hung and a shutdown /restart may be necessary. When this message occurs, any resulting
activity log may contain entries with incomplete data.
%HSM-S-DMPNOREQS, shelving facility idle with no requests
Explanation: Normal response to an SMU SHOW REQUESTS when HSM has no outstanding requests. No activity log is generated on /FULL. Note that there may be outstanding requests on other shelf handlers in the VMScluster environment.
%HSM-F-DUPPROCESS, shelf handler already active
Explanation: An SMU START command was issued while a shelf handler was already
active on the node.Either no action is required, or SHUTDOWN the current shelf handler
and retry the START.
%HSM-E-EXCEEDED, The licensed product has exceeded current license limits
Explanation: On an attempt to shelve a file, you have exceeded the capacity defined in your
HSM license. You can either purchase a license upgrade, delete some shelved files, or do no
more shelving. However, all other operations are unaffected and will succeed.
%HSM-E-EXDISKQUOTA, unshelve operation exceeds disk quota
Explanation: An attempt to unshelve (or access a shelved file) fails because the unshelve
would exceed the file owner's disk quota. You can define a policy to shelve other files to be
initiated on this condition. Otherwise, you should shelve/delete other files to free sufficient
capacity to allow this unshelve to proceed.
%HSM-I-EXIT, HSM shelving facility terminated on node nodename
Explanation: This audit log message indicates that the HSM shelf handler terminated on
the named node. In the case of a fatal error, the shelf handler is normally restarted. In the
case of an SMU SHUTDOWN, it must be manually restarted.
%HSM-E-FILERROR, file filename access error
Explanation: HSM was unable to access or read the specified file from the online system.
This is written to the error log. This usually means that the file is opened by another user
(including HSM on another node), but could also mean the file has been deleted or is otherwise unavailable. Retry the operation later.
%HSM-E-HWPOLDIS, high-water mark policy execution disabled on volume volumename
Explanation: This message indicates that a high-water mark condition was detected but the
policy execution for this condition is disabled, and no policy was run on the volume. No
action is required if this is desired, but it is recommended that the policy is enabled.
%HSM-E-INCOMEDIA, Volume volumename media type mediatype inconsistent with
drive drivename media type mediatype
Explanation: This message appears in Basic Mode only, and indicates that the shelf handler
has detected a discrepancy in the media type used for shelving a file, and that requested for
unshelving it. You should re-check the media type with SMU LOCATE/FULL and reset the
SMU databases as needed. This should not normally occur.
%HSM-E-INCOMEDIATYPE, volume media type inconsistent with drive
HSM Error Messages A-4
HSM Error Messages
A.2 Shelf Handler Messages
Explanation: This message appears in Basic Mode only, and means that the drive(s) specified for an archive class cannot physically handle the media type of a tape volume containing a file requested to be unshelved. Please re-check the SMU DEVICE and ARCHIVE
definitions.
%HSM-E-INCONSTATE, file filename has inconsistent state for unshelving
Explanation: The state of the file is inconsistent for unshelving, and allowing an unshelve
may cause loss or overwriting of valid data. The file may be unshelved using the
UNSHELVE/OVERRIDE qualifier, which requires BYPASS privilege. After unshelving
the file, it should be checked for data integrity, especially with regards to being the right version of the data.
%HSM-E-INELIGPRESHLV, file filename is ineligible for preshelving
Explanation: The file is ineligible for preshelving. Reasons might include a SET
FILE/NOSHELVABLE operation on the file, the file resides on an ineligible disk, the filename begins with HSM$ or the file is too large.
%HSM-E-INELIGSHLV, file filename is ineligible for shelving
Explanation: The file is ineligible for shelving. Reasons might include a SET
FILE/NOSHELVABLE operation on the file, the file resides on an ineligible disk, the filename begins with HSM$ or the file is too large.
%HSM-E-INELIGUNPRESHLV, file filename is ineligible for unpreshelving
Explanation: The file is ineligible for unpreshelving because it is currently shelved. The
file must be unshelved first.
%HSM-E-INELIGUNSHLV, file filename is ineligible for unshelving
Explanation: The file is ineligible for unshelving, because of its type (directory file, file
marked for delete or locked, etc.). These should not normally be shelved in the first place.
%HSM-E-INELIGVOL, volume is ineligible for HSM operations
Explanation: The volume is ineligible for HSM operations because of an SMU SET VOLUME/DISABLE=operation, or is a remote volume of some type (including DFS-mounted
and NFS- mounted volumes).
%HSM-F-INITFAILED, shelf initialization failed
Explanation: There was a problem starting the shelf handler process. Please refer to the
error log for more details, correct problem, and retry.
%HSM-F-INSPRIV, insufficient privilege for HSM operation
Explanation: The HSM$SERVER account does not contain sufficient privileges to run
HSM. Although this is configured properly during installation, it could be changed later.
Please refer to the SMU STARTUP command in the Guide to Operations to set the appropriate privileges for this account.
%HSM-E-MAILSND, error sending to distribution maillist
Explanation: The policy execution process encountered an error sending mail to this distribution list or user. If a distribution list was specified for the policy, verify that the distribution file exists and is accessible.
%HSM-E-MANRECOVER, unable to access filename in shelf, manual recovery
required
HSM Error Messages A–5
HSM Error Messages
A.2 Shelf Handler Messages
Explanation: A problem was encountered trying to unshelve a file. Please refer to the error
log for more details. If the problem cannot be recovered (for example, a deleted online file),
use SMU LOCATE/FULL and OpenVMS BACKUP to restore the file from the shelf.
%HSM-E-NOARCHIVE, no archive classes defined for shelf
Explanation: An attempt to preshelve or shelve a file failed because no archive classes
were defined for the appropriate shelf. Use SMU SET SHELF/ARCHIVE to define archive
classes to shelve files.
%HSM-E-NODRIVEAVAIL, no drive available to perform operation
Explanation: An error occurred on any shelve/unshelve operation because no devices were
available to perform the operation.Ensure that an SMU device was defined to appropriate
archive classes. In Plus Mode, ensure that the SMU device and archive configurations are
compatible with the definitions in TAPESTART.COM, and the SMU SHOW DEVICE
shows as "Configured". If it shows as "Not Configured", you should re-verify the definitions
of archive media type /density and device name to be identical in the SMU and MDMS configurations. This message does not appear if the device is simply busy with other applications.
%HSM-F-NOLICENSE, license for HSM is not installed
Explanation: You must install an HSM license in order to use this software.
%HSM-E-NONEXPR, nonexistent process
Explanation: An SMU or policy execution request failed because HSM was not running.
Use SMU START to startup HSM and retry the operation.
%HSM-E-NOSUCHDEV, volumename - no such volume available
Explanation: The policy execution process was unable to assign a channel to the device or
get information about the device. Please check that the device is known and available to the
system. If the device is no longer in service, it should be removed from the HSM configuration.
%HSM-E-NOSUCH_FILE, - no such file filename found
Explanation: The policy execution process was unable to locate the distribution list to be
used for mail notification or requested a file to be shelved that no longer exists.
%HSM-E-NOSUCH_REQUEST, - no such request found
Explanation: The /CANCEL qualifier was used to cancel a request that has already been
completed by the shelf handler.
%HSM-E-NORESTARC, no restore archive classes defined for shelf
Explanation: This is a common error meaning that no restore archive classes are defined
for the shelf. Use SMU SHOW SHELF to make sure that the archive list and restore archive
lists are compatible, and add the restore archive list as needed, using SMU SET
SHELF/RESTORE=(list). In most cases, the archive and restore lists should be the same.
%HSM-I-NOTSHELVED, file filename was not shelved
Explanation: An UNSHELVE/ONLINE request was issued for a file that was not shelved.
No action is required.
%HSM-E-NOUIC_QUOTA, - no quota for user username found
HSM Error Messages A-6
HSM Error Messages
A.2 Shelf Handler Messages
Explanation: The policy execution process found no disk quota defined for this user or
quotas are not enabled for the disk. The policy execution process will assume that the lowwater mark has been reached by default.
%HSM-E-NOVOLAVAIL, new volume could not be allocated
Explanation: In Basic Mode this means you have exhausted the number of volumes
allowed for the archive class; define a new archive class. In Plus Mode, this means that the
volume pools(s) specified do not contain enough volumes to allocate a new volume.Either
add new volumes to the pool, or define additional pools for the archive class.
%HSM-E-OCCPOLDIS, - occupancy full policy execution disabled on volume volumename
Explanation: The occupancy full policy has been disabled on this volume. Use SMU SET
VOLUME command to enable occupancy full condition handling.
%HSM-E-OFFLINERROR, off-line system error, function not performed
Explanation: An error occurred trying to read or write to the near-line/off-line system.
Refer to the error log for more details, fix the problem, and retry. There are usually additional messages to explain the problem in the error log.
%HSM-E-OFFREADERR, off-line read error on drive drivename
Explanation: An error occurred trying to read a file on the specified near-line/off-line drive.
Refer to the error log for more details, fix the problem, and retry. There are usually additional messages to explain the problem in the error log.
%HSM-E-OFFWRITERR, off-line write error on drive drivename
Explanation: An error occurred trying to write a file on the specified near-line/off-line
drive. Refer to the error log for more details, fix the problem, and retry. There are usually
additional messages to explain the problem in the error log.
%HSM-E-ONLINERROR, unrecoverable online access error
Explanation: HSM was unable to access or read a file, or the disk itself, from the online
system. Refer to the error log for more details, fix the problem, and retry. There are usually
additional messages to explain the problem in the error log.
%HSM-E-OPCANCELED, operation canceled
Explanation: On a recovery of the shelf handler process, the operation was canceled
because it should not be retried.
%HSM-E-OPDISABLED, shelving operation disabled
Explanation: The requested operation has been disabled by the storage administrator. Operations can be disabled at the facility, shelf, disk volume and off-line device levels. To reenable, enter the appropriate SMU SET/ENABLED command. This message also appears
after an SMU SHUTDOWN, but before the facility has actually shut down.
%HSM-E-PEPCOMMERROR, unable to send to policy execution process
Explanation: The shelf handler process could not send a request to the policy execution
process. This usually means that the policy execution process has not been started. Issue an
SMU STARTUP command to recover.
%HSM-E-PEPMBX, - communication mailbox mailboxname not enabled
HSM Error Messages A–7
HSM Error Messages
A.2 Shelf Handler Messages
Explanation: The policy execution process was unable to establish communications with
the shelf handler process, which usually means that the shelf handler process is not running,
or create a mailbox for it's own use. Issue an SMU STARTUP command to recover.
%HSM-F-PEP_ALREADY_STARTED, - policy execution process already started
Explanation: The HSM policy execution process has already been started.
%HSM-E-PEP_INCOMPLETE, - policy execution unable to satisfy request
Explanation: The policy execution was unable to reach the specified lowwater mark. Verify
that the file selection criteria is suitable for the selected lowwater mark.
%HSM-F-POLACCESSFAIL, unable to access policy database
Explanation: The policy execution process was unable to access the policy database. Please
check the equivalence name of HSM$MANAGER and redefine as needed. Also verify that
any policy files are accessible.
%HSM-E-POLDISABLED, policy policyname is disabled
Explanation: On a scheduled policy run, the requested policy is disabled.Either enable it, or
cancel the scheduled policy run.
%HSM-E-POLDEF_NF, - policy definition policyname was not found
Explanation: The policy execution process was unable to locate this policy definition in the
policy database. Verify that any policies specified for volumes or scheduled have been
defined with SMU SET POLICY.
%HSM-E-POLEXEFAIL, unable to initiate policy execution
Explanation: The shelf handler process could not send a request to the policy execution
process. This usually means that the policy execution process has not been started. Issue an
SMU STARTUP command to recover.
%HSM-E-POLVOLDIS, - policy execution disabled on volume volumename
Explanation: The policy execution process has detected that shelving is currently disabled
on this volume. For policy execution to take place on the volume, shelving must be enable.
Use the SMU SET VOLUME command to enable shelving for the volume.
%HSM-S-PRESHELVED, file filename preshelved
Explanation: When the /NOTIFY qualifier is specified, this message is displayed on a successful completion of a preshelve operation. The file data has been copied to the cache or
the shelf, but the file is still accessible online.
%HSM-E-PSHLVERROR, - error preshelving file filename
Explanation: HSM encountered an error preshelving this file during policy execution. This
could be caused by such things as the file not being found, possibly deleted prior to the
shelving action, or the device containing the file being unavailable. Please check the SHP
error log for more information on the failure.
%HSM-W-PSHLVOPINCOM, preshelving operation incomplete for file filename
Explanation: HSM could not complete the preshelving operation for this file during policy
execution. Please check the SHP error log for more information on the failure.
%HSM-E-QUOPOLDIS, - quota exceeded policy execution disabled on volume volumename
HSM Error Messages A-8
HSM Error Messages
A.2 Shelf Handler Messages
Explanation: The policy execution process detected that quota exceeded policy events are
currently disabled on this volume. Use SMU SET VOLUME to enable.
%HSM-I-RECOVERSHLV, inconsistent state found, file shelved
Explanation: This message may be issued on recovery of a shelf handler process after finding a file in an inconsistent state. The file has been made into a consistent state by shelving
it (it was really already shelved). No action is required.
%HSM-I-RECOVERUNSHLV, inconsistent state found, file unshelved
Explanation: This message may be issued on recovery of a shelf handler process after finding a file in an inconsistent state. The file has been made into a consistent state by unshelving it (it was really already unshelved). No action is required.
%HSM-E-REPACKINPRG, cannot checkpoint during repack, please try later
Explanation: An attempt to checkpoint an archive class while that archive class was being
repacked was made. Checkpoint and repack are incompatible operations on an archive class.
Please re-enter the checkpoint command after the repack has completed.
%HSM-E-RESHELVERR, unable to re-shelve file filename, manual recovery
required
Explanation: An attempt to re-shelve a file to additional archive classes failed for some reason. Please examine the error log. As the result of this, the specified file may remain shelved
or be unshelved.Existing shelf copies remain available.
%HSM-W-SELECTFAILED, MDMS/SLS error selecting a drive for volume volumename,
retrying
Explanation: In Plus Mode, an error occurred trying to select a drive for an HSM operation.
Please read the error log for more details.
%HSM-I-SERVER, HSM shelf server enabled on node nodename
Explanation: This is an informational message indicating that a shelf handler on the specified node is now the shelf server. This message is printed in the audit log and to the OPCOM
terminal. If at any time you wish to determine which node is the shelf server, examine the
tail of the audit log for the last such message.
%HSM-E-SHELFERROR, unrecoverable shelf error, data for filename lost
Explanation: The file could not be found or accessed in the cache or shelf archive classes.
This failure results in the loss of the file data. This is written to the error log.
%HSM-E-SHELFINFOLOST, shelf access information unavailable for file filename
Explanation: There was a problem accessing the ACE and/or catalog information trying to
unshelve a file. Please use SMU LOCATE to retrieve the file information, then use
BACKUP to retrieve the file.
%HSM-S-SHELVED, file filename shelved
Explanation: With /NOTIFY specified, this message is displayed to the user upon successful completion of an explicit shelve operation. The operation is complete when the file is
shelved to the initial shelving location, which can be the cache or directly to the shelf.
%HSM-E-SHLVERROR, - error shelving file filename
HSM Error Messages A–9
HSM Error Messages
A.2 Shelf Handler Messages
Explanation: HSM encountered an error shelving this file during policy execution. This
could be caused by such things as the file not being found, possibly deleted prior to the
shelving action, or the device containing the file being unavailable. Please check the SHP
error log for more information on the failure.
%HSM-W-SHLVOPINCOM, shelving operation incomplete for file filename
Explanation: HSM could not complete the shelving operation for this file during policy
execution. Please check the SHP error log for more information on the failure.
%HSM-I-SHLVPRG, shelving files to free disk space
Explanation: This message occurs if a user request results in a DEVICEFULL or EXDISKQUOTA error, and the file system is requesting HSM to free space for the request. This
message is printed to indicate a possible delay in processing the user request.
%HSM-S-SHUTDOWN, HSM shelving facility shutdown on node nodename
Explanation: In the audit log, this message shows that HSM was shut down with an SMU
SHUTDOWN command. It is not automatically restarted.
%HSM-E-SPLITMERGSERR, - error during shelf split/merge, catalog not changed
Explanation: HSM encountered an error during shelf split /merge. The catalog was not
changed. Please check the SHP error log for more information on the failure.
%HSM-S-STARTED, shelving facility started on node nodename
Explanation: In the audit log and startup log, this message indicates that the shelf handler
process was successfully started. No action is required.
%HSM-F-STSACCESSFAIL, error accessing status log files
Explanation: HSM encountered and error while accessing the log files. This could be
caused by a device full condition. Please check the state of the HSM$LOG device.
%HSM-E-UNEXPERR, unexpected error on operation
Explanation: This message indicates that the shelf handler experienced an unexpected error
condition. Please check the SHP error log for more information about the failure and report
this to HP. This is not a fatal error condition.
%HSM-E-UNKNOWN_RESP, response unknown, unable to locate corresponding request
Explanation: The policy execution process has received a response from the shelf handler
for a shelve/preshelve request that has already been completed. No action is required.
%HSM-S-UNPRESHELVED, file filename unpreshelved
Explanation: With /NOTIFY specified, this message is displayed to the user upon successful completion of an unpreshelve operation.
%HSM-S-UNSHELVED, file filename unshelved
Explanation: With /NOTIFY specified, this message is displayed to the user upon successful completion of an unshelve operation. The file is now online and available for user
access.
%HSM-I-UNSHLVPRG, unshelving file filename
HSM Error Messages A-10
HSM Error Messages
A.2 Shelf Handler Messages
Explanation: A file fault is initiated as a result of attempting to read/write/extend/truncate/execute a file that is shelved. This message is printed to indicate a possible delay in processing the user request.
%HSM-F-VOLACCESSFAIL, unable to access volume database
Explanation: The policy execution process was unable to access a volume's policy information from the volume database. Please check the equivalence name of HSM$MANAGER
and redefine as needed. Also verify that the volume file is accessible and that all needed volumes have been defined with SMU SET VOLUME.
%HSM-E-VOLDEF_NF, volume definition volumedef was not found
Explanation: The policy execution process was unable to locate this volume or the default
volume definition in the volume database. Please verify that needed volumes have been
defined with SMU SET VOLUME. Also, the HSM$DEFAULT_VOLUME entry should
never be deleted.
%HSM-E-VOLNOTLOADED, off-line volume(s) could not be loaded
Explanation: An error occurred trying to load or mount a specific volume for a shelving
operation. Please refer to the error log for more information, fix, and retry.
%HSM-E-VOLUME_NF, volume volumename was not found
Explanation: For a REPACK operation, this tape volume or a member of the volume set
containing this volume was not found in the MDMS volume database. In plus mode, all
source tape volumes for REPACK must exist in the MDMS volume database.
The following messages are displayed by the utilities that support explicit SHELVE,
PRESHELVE and UNSHELVE commands. Although only the SHELVE command messages are listed here, there are similar messages for the PRESHELVE and UNSHELVE
commands.
%SHELVE-F-BADSEARCH, shelve search confused
Explanation: This failure message alerts you that the shelving operation got confused while
searching for the files specified on the command line. No HSM action took place.
%SHELVE-I-ALRSHELVED, file filename was previously shelved
Explanation: A shelve request was issued for a file that is already shelved. No action is
required.
%SHELVE-W-CANCELLED, shelving operation on file filename canceled
Explanation: The shelving request has been canceled due to a specific cancel request, a
request that conflicts with another user, or a failure of a multi-operation request. In the last
case, please check the SHP error log for more information.
%SHELVE-F-CLI, fatal error detected parsing command line
Explanation: This failure messages alerts you that a fatal error was encountered while parsing the command line. Verify the command syntax, fix and retry.
%SHELVE-F-CLI_BY_OWNER, value shelf-value invalid for /BY_OWNER qualifier
Explanation: This failure message alerts you that you entered an invalid value for the
/BY_OWNER qualifier on the command line. Verify that UIC syntax and that it exists.
%SHELVE-F-CLI_INVTIM, invalid absolute time - use DD-MMM- YYYY:HH:SS.CC format
HSM Error Messages A–11
HSM Error Messages
A.2 Shelf Handler Messages
Explanation: This failure message alerts you that you entered an invalid time value on the
command line. Verify the time value and make sure it conforms to the DD-MMMYYYY:HH:SS.CC format (use of TODAY, TOMORROW and YESTERDAY are also
valid).
%SHELVE-E-DISCLASS, command class has been automatically disabled
Explanation: A repeated fatal error in the shelf handler has been detected on a certain class
of operations. Please refer to the SHP error log for detailed information, and report the problem to HP. Since the fatal error continually repeats, HSM disabled the class of operation
causing the problem, so that other operations might proceed. After fixing the problem, you
can re-enable all operations using SMU SET FACILITY/REENABLE.
%SHELVE-W-ERROR, error shelving file filename
Explanation: This warning message alerts you than an error was encountered while trying
to shelve the file. There may be an accompanying error message that gives more information about any failure (privileges, communications failure, etc.). Also check the SHP error
log for more information about the failure.
%SHELVE-F-FATAL, fatal error condition detected
Explanation: This failure message alerts you that a fatal error condition was encountered
while shelving a file. Please check the SHP error log for more information.
%SHELVE-F-FATAL_P, fatal error condition detected
Explanation: An unexpected error was encountered while parsing/processing a confirmation action. Please see HELP or the reference documentation for valid responses.
%SHELVE-F-INCONSIST, internal inconsistency detected
Explanation: SMU was unable to generate a request for the shelf handler. This could be
caused by an insufficient memory condition.
%SHELVE-F-INTERNAL, internal error detected, code = value
Explanation: This failure message alerts you that an internal error condition was detected
with a code of value. This could have come from the policy execution process if memory
couldn't be allocated, there was a problem queuing a job or getting job information, there
was an unexpected error getting system information, etc. There may be more information
about the failure in the PEP error log. From SMU, this could mean that an unexpected error
was encountered while parsing/processing a confirmation action, getting job or system
information, etc.
%SHELVE-W-INVALANS, text is an invalid answer
Explanation: The response given to a confirmation action is incorrect. Please see HELP or
the reference documentation for valid responses.
%SHELVE-W-INVFILESPEC, invalid file specification format
Explanation: This warning message alerts you that your file specification format is invalid.
Please re-enter the command with a valid file specification.
%SHELVE-W-INVFORMAT, invalid internal format
HSM Error Messages A-12
HSM Error Messages
A.2 Shelf Handler Messages
Explanation: A request generated by SMU and sent to the shelf handler has an invalid
internal format. The request cannot be processed by the shelf handler. There may be more
information about the failure in the SHP error log.
%SHELVE-W-INVREQUEST, invalid shelving request
Explanation: For policy execution, the policy execution process received an unexpected
error from the shelf handler for the shelve request. This could include missing archive or
shelf definitions or an incorrectly formatted request. SMU may have also encountered these
problems or there was a problem communicating with the shelf handler. There may be more
information about the failure in the PEP or SHP error logs.
%SHELVE-S-MARKEDCANCEL, file filename was marked for cancel
Explanation: This status message informs you that your file has been marked for cancellation and won't be shelved.
%SHELVE-W-NOFILES, no files found
Explanation: SMU was unable to locate the specified files. Reasons include insufficient
memory, invalid file specification, file(s) already in requested state, etc. There may be an
accompanying message that gives more information about any failure.
%SHELVE-W-NOMODDATE, modification date not enabled for file
Explanation: Expiration dates are not currently enabled for this file/volume.Expiration
dates are needed for the /SINCE and /BEFORE qualifiers.
%SHELVE-W-NOSUCHDEVICE, no such device found
Explanation: For REPACK, an unload request was sent to the shelf handler for a tape
device that is not known. The shelf handler may have encountered an unexpected error trying to read a volume's UID file. The policy execution process may be trying to access a disk
volume that is no longer defined. Please check the PEP or SHP error logs for more information.
%SHELVE-W-NOSUCHFILE, no such file filename found
Explanation: A cache flush shelve request was made for a file that no longer exists. Please
see the SHP error log for more information.
%SHELVE-W-NOSUCHPOLICY, no such policy found
Explanation: This warning message alerts you that the policy you are specifying cannot be
found. There may be an accompanying message that gives more information about the failure. Please check the PEP and SHP error logs form more information.
%SHELVE-W-NOSUCHREQ, no such request found
Explanation: The /CANCEL qualifier was used to cancel a request that has already been
completed by the shelf handler.
%SHELVE-E-NOTSHELVED, file filename was not shelved
Explanation: This error message informs you that the file was not shelved. This could be
due to an error during the shelving process, or, for a restore request, the file wasn't shelved.
Please see the SHP error log for more information.
%SHELVE-W-OPINCOM, shelving operation incomplete for file filename
HSM Error Messages A–13
HSM Error Messages
A.2 Shelf Handler Messages
Explanation: The shelving operation was unable to complete due to an error. Please see the
SHP error log for more information.
%SHELVE-S-QUEUED, file filename queued for shelving
Explanation: When the /NOWAIT/LOG qualifiers are used, this message indicates that
your request has been queued for processing.
%SHELVE-E-RSPCOMM, response communications error
Explanation: SMU encountered an unexpected error while trying to read a response from
the shelf handler. There may be an accompanying message that gives more information
about any failure. Please verify that the shelf handler is running and restart as needed with
SMU START.
%SHELVE-F-SEARCHFAIL, error searching for file filename
Explanation: The specified file does not exist. Verify that the filename is correct and that
the file exists, then retry the command.
%SHELVE-S-SHELVED, file filename shelved
Explanation: This status message informs you that your file has been shelved successfully.
%SHELVE-F-SLFCOMM, shelf handler communications failure
Explanation: This message indicates that the shelf handler is not running. Use SMU
START to start the shelf handler and retry.
%SHELVE-F-SLFMESSAGE, corrupt response message detected
Explanation: The failure message alerts you that a bad response message was received
from the shelf handler or an error was encountered while trying to format and display an
error message.
%SHELVE-E-UNKSTATUS, unknown status returned from the shelf handler
Explanation: This error message informs you that the shelf handler process returned an
unknown status message. Please report this problem to HP and include relevant entries in
the error and audit logs.
%SHELVE-E-UNSUPP, operation unsupported
Explanation: This error message informs you that the operation you are attempting is
unsupported by this software. This is usually caused by a node name being included in a file
specification.
%SHELVE-F-USLFCOMM, user communications failure
Explanation: This failure message alerts you that the shelf handler detected a failure in user
communications. SMU was either unable to create a mailbox to receive responses from the
shelf handler on the user's behalf or get the name of the mailbox. There may be an accompanying message that gives more information about any failure.
HSM Error Messages A-14
HSM Error Messages
A.3 Shelf Management Utility Messages
A.3 Shelf Management Utility Messages
The following messages are printed out by the shelf management utility.
%SMU-F-ABORTANA, user aborted ANALYZE
Explanation: SMU ANALYZE was aborted when a ^Z was entered in response to a repair
confirmation.
%SMU-F-ABORTSCAN, aborted scan for shelved files on disk volume device-name
Explanation: SMU ANALYZE aborted processing of the device due to an error or ^Z was
entered in response to a repair confirmation.
%SMU-E-ARCHID_ADDERR, qualifier required on first SET ARCHIVE, archive-id not
created
Explanation: In plus mode, the /MEDIA_TYPE qualifier is required for the initial creation
of the archive class with the SMU SET ARCHIVE command. Subsequent use of the SMU
SET ARCHIVE command to modify the archive class does not require the /MEDIA_TYPE
qualifier. Re-enter the command using the qualifier.
%SMU-E-ARCHID_DELERR, error deleting archive-id
Explanation: For SMU SET ARCHIVE/DELETE, an error was encountered while trying
to delete the archive class. There may be an accompanying message that gives more information about any failure.
%SMU-E-ARCHID_DISPERR, error displaying archive-id
Explanation: For SMU SHOW ARCHIVE, an error was encountered while trying to read
the archive information. There may be an accompanying message that gives more information about any failure.
%SMU-E-ARCHID_INCOMPAT, device is an incompatible media type for this archive
class
Explanation: For SMU SET DEVICE, the media type of the archive class entered is not
compatible with the media type of the device. Verify your configuration and re-enter the
command with corrections.
%SMU-E-ARCHID_MANYPOOL, archive id archive-id has too many pools added, limit
is pool-limit
Explanation: This error message alerts you that you have exceeded the pool limit for the
archive. Verify your configuration and possibly remove pools that are no longer needed,
then retry the command.
%SMU-W-ARCHID_NF, archive class id class-id not found
Explanation: The archive class id was not found in the archive database or an unexpected
error was encountered while trying to read the volume database. There may be an accompanying message that gives more information about the failure. Verify your configuration then
retry the command.
%SMU-W-ARCHID_POOLNF, archive class id class-id pool pool-id not found, not
removed
Explanation: For SMU SET ARCHIVE/REMOVE_POOL, a pool was specified which is
not in the pool list for the archive class. Verify your configuration then retry the command.
%SMU-I-ARCHIVE_DELETED, archive id archive-id deleted
HSM Error Messages A–15
HSM Error Messages
A.3 Shelf Management Utility Messages
Explanation: The archive class was successfully deleted.
%SMU-W-ARCHIVE_NF, archive class archive-class not found
Explanation: For SMU SET ARCHIVE/DELETE, the archive class was not found in the
archive database. Verify your configuration then retry the command.
%SMU-E-ARCHIVE_READERR, error reading archive definition, archive-id
Explanation: For SMU SET ARCHIVE/DELETE, an unexpected error was encountered
while trying to delete the archive class. There may be an accompanying message that gives
more information about any failure. Please check the equivalence name of HSM$MANAGER and redefine as needed. Also verify that the archive file is accessible.
%SMU-I-ARCHIVE_UPDATED, archive id archive-id updated
Explanation: The archive class was successfully updated.
%SMU-W-ARCHUPDERR, unable to update archive information, archive-information
Explanation: An error was encountered while trying to modify the archive class information. This could have been directly from a SMU SET ARCHIVE command, or indirectly
from a SMU SET DEVICE/ARCHIVE command which may attempt to update the media
type for the archive class. There may be an accompanying message that gives more information about any failure. Please check your configuration, the equivalence name of
HSM$MANAGER and redefine as needed. Also verify that the archive file is accessible.
%SMU-E-BASIC_MODE_ONLY, basic-mode-feature, is a basic mode feature, see SET
FACILITY/MODE
Explanation: The use of this qualifier is for Basic mode only.
%SMU-I-CACHE_CREATED, cache device device-name created
Explanation: The cache device was successfully added.
%SMU-E-CACHE_DELERR, error deleting cache definition, cache- name
Explanation: A request was made to delete a cache device that does not exist in the database. Verify your configuration and re-enter the command.
%SMU-I-CACHE_DELETED, cache device device-name deleted
Explanation: The cache device was successfully deleted.
%SMU-E-CACHE_DISPERR, error displaying cache device, device- name
Explanation: For SMU SHOW CACHE, an error was encountered while trying to read the
cache information. There may be an accompanying message that gives more information
about any failure.
%SMU-W-CACHE_NF, cache device device-name was not found
Explanation: For SMU SET CACHE or SMU SHOW CACHE, the specified cache device
was not found in the cache database. Verify your configuration and re-enter the command.
%SMU-E-CACHE_READERR, error reading cache device definition, device-name
HSM Error Messages A-16
HSM Error Messages
A.3 Shelf Management Utility Messages
Explanation: An unexpected error was encountered while trying to read the cache data for a
delete or display operation. There may be an accompanying message that gives more information about any failure. Please check the equivalence name of HSM$MANAGER and
redefine as needed. Also verify that the cache file is accessible.
%SMU-I-CACHE_UPDATED, cache device device-name updated
Explanation: The cache device was successfully updated.
%SMU-E-CACHE_WRITERR, error writing cache device definition, device-name
Explanation: An unexpected error was encountered while adding or modifying a cache
device record. There may be an accompanying message that gives more information about
any failure. Please check the equivalence name of HSM$MANAGER and redefine as
needed. Also verify that the cache file is accessible.
%SMU-E-CANT_CHANGE_MODE, cannot set basic mode after shelving in plus mode
Explanation: For SMU SET FACILITY, you cannot set to Basic mode after files have been
shelved in Plus mode.
%SMU-E-CANT_DEDICATE, remote device can't be dedicated
Explanation: For SMU SET DEVICE, the /DEDICATE qualifier is not valid for use with
remote devices.
%SMU-E-CANT_DO_ARCASSOC, cannot action archive class archive- class, due to
nonzero reference
Explanation: For SMU SET ARCHIVE, archive classes with shelf and/or device associations cannot be deleted. The archive class must be removed from the shelf and all devices
prior to deletion.
%SMU-E-CANT_DO_ARCUSED, cannot action archive class archive- class, it has
been used
Explanation: For SMU SET ARCHIVE, a request was made to either delete an archive
class that has been used for shelving or modify certain attributes of an archive class (such as
density or media type) that has been used for shelving.
%SMU-E-CANT_SET_REMOTE, local device cannot be set to remote
Explanation: For SMU SET DEVICE, the /REMOTE qualifier is not valid for use with an
existing local device.
%SMU-E-CAT_CREATERR, error creating catalog catalog-name
Explanation: An error was encountered while trying to create the catalog. There may be an
accompanying message that gives more information about any failure. Please check the
equivalence name of HSM$CATALOG and redefine as needed. Also verify that the device
and directory are accessible.
%SMU-E-CAT_SYNTAXERR, catalog file syntax error catalog-name
Explanation: For SMU SET SHELF/CATALOG, a catalog file syntax error was encountered. Verify the format of the catalog filename and retry the command.
%SMU-F-CATOPENERR, error opening catalog catalog-name
HSM Error Messages A–17
HSM Error Messages
A.3 Shelf Management Utility Messages
Explanation: For SMU ANALYZE, an unexpected error was encountered opening the
associated catalog for the device. There may be an accompanying message that gives more
information about any failure. SMU ANALYZE will stop processing the current device.
%SMU-F-CATREADER, error reading catalog catalog-name
Explanation: For SMU ANALYZE, the catalog associated with this device was not found
or there was an unexpected error reading from the catalog. There may be an accompanying
message that gives more information about any failure. SMU ANALYZE will stop processing the current device.
%SMU-E-CATWRITERR, error encountered writing catalog - no repair
Explanation: For SMU ANALYZE, an unexpected error was encountered while writing the
new catalog entry for a repair. There may be an accompanying message that gives more
information about any failure. No repair will be made.
%SMU-E-CON_READERR, error reading configuration definition, configurationdefinition
Explanation: An unexpected error was encountered while trying to read the facility information for SMU SET FACILITY, SMU SET SCHEDULE, SMU SHOW SHELF or SMU
COPY. There may be an accompanying message that gives more information about any failure. Please check the equivalence name of HSM$MANAGER and redefine as needed. Also
verify that the configuration file is accessible.
%SMU-W-CONFIG_NF, configuration configuration-name was not found
Explanation: The facility information was not found in the configuration database for SMU
SET FACILITY, SMU SET SCHEDULE, SMU SHOW FACILITY or SMU COPY. This
error could also mean that the shelf handler was unable to locate the facility information
during a shelf update request. There may be an accompanying message that gives more
information about any failure. The SMU SET FACILITY command should be used to create
the facility data if none exists.
%SMU-E-COPYCHKERR, error(s) verifying shelf ACE
Explanation: For SMU COPY, an error was encountered during the initial phase that verifies that the shelving ACE on the files to be copied is correct. There may be an accompanying message that gives more information about any failure.
%SMU-I-COPYCHK, verifying shelving ACE on files to be copied
Explanation: SMU COPY is verifying that the shelving ACE on the files to be copied is
correct.
%SMU-E-COPYDEV, cannot copy to source device, use DCL RENAME instead
Explanation: The SMU COPY command has detected that the source and destination
devices are the same. If this is desired, then the DCL RENAME command should be used
instead.
%SMU-E-COPYDST, specify device or device and directory location only
Explanation: The SMU COPY command has detected that the destination specified contains more than a device and/or directory location. Node names are not allowed as are any
attempt to specify a file name or portion of one.
%SMU-I-COPYSTART, starting file copy
HSM Error Messages A-18
HSM Error Messages
A.3 Shelf Management Utility Messages
Explanation: SMU COPY has completed all initial verifications and is starting the actual
file copy.
%SMU-F-CREATERR, error creating database, database-name
Explanation: An error was encountered while trying to create a new database file. There
may be an accompanying message that gives more information about any failure. Please
check the equivalence name HSM$MANAGER and redefine as needed. Also verify that the
device is accessible and has enough free space.
%SMU-E-DATABASERR, error detected on database, database
Explanation: An unexpected error was encountered while trying to delete a record from
this database. There may be an accompanying message that gives more information about
any failure.
%SMU-E-DELERR, error deleting database record, database-record
Explanation: An unexpected error was encountered while trying to delete a record from
this database or the record entry does not exit. Other causes could be an attempt to delete a
default policy, facility record, default shelf record, a shelf that still has volume (disk) references, a shelf that contains a catalog reference other than the one assigned to the default
shelf, a shelf where a split /merge is currently active, default volume record, a volume that
contains a shelf reference other than the one assigned to the default volume or a volume
where a split/merge is currently active. There may be an accompanying message that gives
more information about any failure.
%SMU-E-DEV_DELERR, error deleting device definition, device- name
Explanation: An attempt was made to delete the default device record or a device that does
not exist in the database. There may be an accompanying message that gives more information about any failure. Verify your configuration and retry the command.
%SMU-E-DEV_DISPERR, error displaying device, device-name
Explanation: For SMU SHOW DEVICE, an error was encountered while trying to read the
device information. There may be an accompanying message that gives more information
about any failure.
%SMU-W-DEV_INELIG, device device-name is ineligible
Explanation: An attempt was made to use a device which is not currently available on the
system. This could come from SMU SET CACHE to add a new cache device, SMU SET
SCHEDULE on one of the listed volumes or SMU SET VOLUME to add a new volume.
There may be an accompanying message that gives more information about any failure.
%SMU-E-DEV_NOTREMOTE, device device is not a remote device specification
Explanation: For SMU SET DEVICE/REMOTE, the device name must contain a node
name or the node name must be included in a logical name assignment for the device.
%SMU-E-DEV_READERR, error reading device definition, device- name
Explanation: For SMU SET DEVICE or SMU SHOW DEVICE, an unexpected error was
encountered while trying to delete a device record or read a device record for display. There
may be an accompanying message that gives more information about any failure.
%SMU-E-DEV_WRITERR, error writing device definition, device- name
HSM Error Messages A–19
HSM Error Messages
A.3 Shelf Management Utility Messages
Explanation: For SMU SET DEVICE, an attempt was made to add a device where the
media type is not compatible with it's associated archive class(es), the /DEDICATE qualifier
was specified for a remote device, the /REMOTE qualifier was specified for an existing
local device or an unexpected error was encountered while writing a new or modified device
record. There may be an accompanying message that gives more information about any failure.
%SMU-I-DEVICE_CREATED, device device-name created
Explanation: The device was successfully created.
%SMU-I-DEVICE_DELETED, device device-name deleted
Explanation: The device was successfully deleted.
%SMU-W-DEVICE_NF, device device-name was not found
Explanation: For SMU SET DEVICE or SMU SHOW DEVICE, the device was not found
in the device database. For SMU SET SCHEDULE or SMU SHOW SCHEDULE, there
was no scheduled event for the volume.
%SMU-I-DEVICE_UPDATED, device device-name updated
Explanation: The device was successfully updated.
%SMU-E-DEVINFOERR, error getting device information for device- name
Explanation: For SMU ANALYZE, an unexpected error was encountered getting information about the device. SMU ANALYZE will stop processing this device/set.
%SMU-E-DISCLASS, command class has been automatically disabled
Explanation: A repeated fatal error in the shelf handler has been detected on a certain class
of operations. Please refer to the SHP error log for detailed information, and report the problem to HP. Since the fatal error continually repeats, HSM disabled the class of operation
causing the problem, so that other operations might proceed. After fixing the problem, you
can re-enable all operations using SMU SET FACILITY/REENABLE.
%SMU-E-DISPLAYERR, display error encountered
Explanation: An error was encountered while trying to display the requested information.
There may be an accompanying message that gives more information about any failure.
%SMU-I-ENDSCAN, completed scan for shelved files on disk volume device-name
Explanation: SMU ANALYZE has completed processing of this device.
%SMU-E-ENF, job entry not found
Explanation: For SMU SET SCHEDULE or SMU SHOW SCHEDULE, no job entry was
found for the listed volume(s) or specific entry number if /ENTRY was used. There may be
an accompanying message that gives more information about any failure.
%SMU-I-ERRORS, number error(s) detected, number error(s) repaired
Explanation: For SMU ANALYZE, this message is for the device indicating the number of
errors detected and repaired.
%SMU-I-FAC_UPDATED, HSM facility modified
Explanation: The facility was successfully modified.
%SMU-W-FACUPDERR, unable to update facility information
HSM Error Messages A-20
HSM Error Messages
A.3 Shelf Management Utility Messages
Explanation: For SMU SET FACILITY, an error was encountered while trying to modify
the facility information. There may be an accompanying message that gives more information about the failure. Please check your configuration and the equivalence name of
HSM$MANAGER and redefine as needed. Also verify that the configuration file is accessible.
%SMU-F-FNF, file not found
Explanation: For SMU SET SCHEDULE, the supplied command procedure to initiate policy execution was not found. There will be an accompanying message that give more information about the failure. The file may have to be restored from a previous backup or the
HSM distribution.
%SMU-W-HSMCOMM, shelf handler communications failure
Explanation: An error was encountered while trying to establish communications with the
shelf handler. There may be an accompanying message that give more information about
any failure. Verify that the shelf handler is running and startup with SMU START if needed.
%SMU-W-HSMMESSAGE, corrupt response message detected
Explanation: A message returned from the shelf handler contained too many FAO parameters or an error was encountered formatting the message for display. Please report this problem to HP.
%SMU-F-INDOPENERR, error opening INDEXF.SYS on device-name
Explanation: For SMU ANALYZE, an unexpected error was encountered opening
INDEXF.SYS for the device. There may be an accompanying message that gives more
information about any failure. SMU ANALYZE will stop processing this device.
%SMU-F-INITFAILED, fatal error encountered during initialization
Explanation: The shelf management utility failed to initialize.
%SMU-F-INREADERR, error reading INDEXF.SYS on device-name
Explanation: For SMU ANALYZE, an unexpected error was encountered while reading
INDEXF.SYS for the device. There may be an accompanying message that gives more
information about any failure. SMU ANALYZE will stop processing this device.
%SMU-F-INTERNAL, fatal internal error detected, error-string
Explanation: Internal inconsistency detected. There may be an accompanying message that
gives more information about any failure. If the problem can't be corrected locally, please
report this problem to HP.
%SMU-W-INVALANS, string - is an invalid answer
Explanation: The response given to a confirmation action is incorrect. Please see HELP or
the reference documentation for valid responses.
%SMU-E-INVALARCHIVE, invalid archive- archive-id
Explanation: For SMU SET ARCHIVE, the archive id is outside the range of valid values.
Currently, for Basic mode this range is 1 thru 36 and for Plus mode is 1 thru 9999.
%SMU-W-INVALDIR, invalid directory specification, directory- spec
HSM Error Messages A–21
HSM Error Messages
A.3 Shelf Management Utility Messages
Explanation: An invalid file specification was given for the /OUTPUT qualifier. Re-enter
the command with a valid output location.
%SMU-E-INVALIST, exceeded maximum list count of count
Explanation: Maximum number of parameter list elements were found. There will be an
accompanying message indicating which parameter or qualifier is in violation. Please see
HELP or the reference documentation for more information about the command.
%SMU-E-INVALPSIZE, exceeded maximum parameter size value
Explanation: A parameter value entered in the command exceeds it's valid range or size.
The maximum value will be displayed for reference. The accompanying message will indicate what value is in error. Re-enter the command with a corrected value.
%SMU-E-INVALQSIZE, invalid qualifier size qualifier-size
Explanation: A qualifier value entered in the command exceeds it's valid range or size. The
maximum value will be displayed for reference. The accompanying message will indicate
which qualifier is in error either by displaying the qualifier name or the value itself. Re-enter
the command with a corrected qualifier value.
%SMU-E-INVCONFIG, invalid tape drive configuration for repack request volumename
Explanation: For SMU REPACK, there is an invalid tape drive configuration. One possible
cause is that there are not enough tape drives; REPACK must use two. A second possibility
is that there are no devices associated with the archive classes specified in the command.
%SMU-W-INVNAME, invalid volume name volume-name
Explanation: For SMU RANK, a wildcard character was detected in the volume name
parameter. Wildcards are not allowed.
%SMU-E-INVPARAM, parameter or value for parameter parameter or parametervalue is invalid
Explanation: An invalid parameter or parameter value was detected in the command. There
will be an accompanying message to indicate which parameter is in violation. Re- enter the
command with corrected syntax. Please see HELP or the reference documentation for more
information about the command.
%SMU-E-INVPOLNAME, invalid policy name policy-name
Explanation: For SMU RANK or SMU SET SCHEDULE, a wildcard character was
detected in the policy name parameter. Wildcards are not allowed. Re-enter the command
with the correct syntax. Please see HELP or the reference documentation for more information about the command.
%SMU-E-INVQUAL, invalid qualifier or qualifier value qualifier
Explanation: An invalid qualifier or associated value was detected in the command. There
will be an accompanying message to indicate which qualifier is in violation. Re- enter the
command with corrected syntax. Please see HELP or the reference documentation for more
information about the command.
%SMU-W-INVREQUEST, invalid shelf handler request
HSM Error Messages A-22
HSM Error Messages
A.3 Shelf Management Utility Messages
Explanation: The shelf handler has received an invalid request from SMU. There may be
more information about the failure in the SHP error log. If this problem cannot be corrected,
please report it to HP.
%SMU-E-INVVOLNAME, invalid volume name volume-name
Explanation: For SMU SET ARCHIVE/LABEL in Basic mode, the volume name entered
does not conform to the Basic mode volume label convention. Please see the documentation
for a description of the correct format and re-try the command.
%SMU-E-JOBEXECUTING, job job executing on server prevents requested operation
Explanation: For SMU SET SCHEDULE, an update request was made for a job that is currently executing. No changes were made. Re-enter the command once the job has completed.
%SMU-W-LOCATE, error(s) occurred during locate processing
Explanation: For SMU LOCATE, one or more errors occurred during locate processing.
%SMU-E-LOCKERR, error locking database database-name
Explanation: An unexpected error was encountered while trying to unlock a record in the
database. There may be an accompanying message that gives more information about any
failure.
%SMU-E-LOCKTIMEOUT, timed out waiting for SPLIT/MERGE lock
Explanation: A SMU SET VOLUME or SMU SET SHELF command timed out waiting
for split/merge lock to become available. Re-try the command later.
%SMU-E-MEMALLOC, error allocating memory in routine routine
Explanation: An error was encountered while trying to allocate memory. There may be an
accompanying message that gives more information about any failure.
%SMU-E-MUSTUSEREMOTE, device device-name must be created using the /REMOTE
qualifier
Explanation: For SMU SET DEVICE, a remote device name was entered, contains a node
name, without use of the /REMOTE qualifier. Re-enter the command with the /REMOTE
qualifier, or remove the node name from the device specification.
%SMU-W-NOARCHIVE, archive class(es) not found
Explanation: A database read request sent to the shelf handler on an update failed because
the archive class was not found or was outside it's valid range.
%SMU-E-NOCACHELIST, no cache device name or list of devices names
Explanation: For SMU SET CACHE, no cache name or list of names was present in the
command. Re-enter the command and specify a cache device or list of devices.
%SMU-E-NODEFINLIST, the default device may not be in a device list
Explanation: For SMU SET DEVICE, the default device may not be specified in the command. Re-enter the command without using the default device.
%SMU-E-NODEVICELIST, no device name or list of devices found
HSM Error Messages A–23
HSM Error Messages
A.3 Shelf Management Utility Messages
Explanation: For SMU SET DEVICE, no device name or list of names was present in the
command. Re-enter the command and specify a device or list of devices.
%SMU-W-NOENTFND, no database entries found for string
Explanation: An unexpected error was encountered while trying to read from a SMU database. The message will contain the database involved. There may be an accompanying message that gives more information about any failure. Please check the equivalence name of
HSM$MANAGER and redefine as needed. Also verify that the database files are accessible.
%SMU-E-NOFILEATTR, error reading file attributes for file ID file-id
Explanation: For SMU ANALYZE, an unexpected error was encountered while reading the
file attributes. There may be an accompanying message that gives more information about
any failure. SMU ANALYZE will stop processing this file.
%SMU-W-NOFILES, no files found
Explanation: For SMU LOCATE, no files were found that matched the search criteria or
the catalog is empty.
%SMU-E-NONEXIST_SHELF, nonexistent shelf, shelf-name
Explanation: For SMU SET VOLUME/SHELF, a shelf name was given that doesn't exist
in the database. Re-enter the command and specify a defined shelf, or define the new shelf
and then re-enter the command.
%SMU-E-NONEXT, no next device found in set after device-name
Explanation: For SMU ANALYZE, an unexpected error was encountered getting information about the next device in the volume set. There may be an accompanying message that
gives more information about any failure. SMU ANALYZE will stop processing this
device/set.
%SMU-E-NOPOLSERV, no policy execution servers found
Explanation: For SMU SET SCHEDULE, since the /SERVER qualifier was not used, an
attempt was made to select a server from the facility definition. This attempt failed due to
errors getting system or cluster information.
%SMU-E-NOPOLLIST, no policy name or list of policies found
Explanation: For SMU SET POLICY, no policy name or list of names was present in the
command. Re-enter the command and specify a policy name or list of policies.
%SMU-E-NOSHELFLIST, no shelf name or list of shelves found
Explanation: For SMU SET SHELF, no shelf name or list of names was present in the command. Re-enter the command and specify a shelf name or list of shelves.%SMU-ENOSUCHENT, no such entry, entry-name
Explanation: For SMU SET SCHEDULE or SMU SHOW SCHEDULE, no job entry was
found for the listed volume(s) or specific entry number if /ENTRY was used. There may be
an accompanying message that gives more information about any failure.
%SMU-E-NOSUCHQUE, no such server queue, queue-name
Explanation: For SMU SET SCHEDULE, a request was made to modify or remove a policy job, but the queue was not found on the policy server.
%SMU-W-NOTSTARTED, process-name process was not started
HSM Error Messages A-24
HSM Error Messages
A.3 Shelf Management Utility Messages
Explanation: A startup or shutdown attempt was made from an account with insufficient
privileges, or an unexpected error was encountered while starting up the shelf handler process or the policy execution process. There may be an accompanying message that gives
more information about any failure.
%SMU-W-NOTUPDARCH, archive id archive-id-name was not updated, no new
attributes
Explanation: For SMU SET ARCHIVE, a negative response was given to the update confirmation, a delete was requested for a non-existent archive class or there was no new data to
change.
%SMU-W-NOTUPDCACHE, cache device device-name was not updated, no new
attributes
Explanation: For SMU SET CACHE, no new attributes were defined for the cache. The
update was not performed.
%SMU-W-NOTUPDDEVICE, device device-name was not updated, no new attributes
Explanation: For SMU SET DEVICE, no new attributes were defined for the device. The
update was not performed.
%SMU-W-NOTUPDFAC, facility was not updated, no new attributes
Explanation: For SMU SET FACILITY, no new attributes were defined for the facility. The
update was not performed.
%SMU-W-NOTUPDPOLICY, policy policy-name was not updated, no new attributes
Explanation: For SMU SET POLICY, no new attributes were defined for the policy. The
update was not performed.
%SMU-W-NOTUPDSCHED, scheduled entry entry-name was not updated, no new
attributes
Explanation: For SMU SET SCHEDULE, no new attributes were defined for the entry.
The update was not performed.
%SMU-W-NOTUPDSHELF, shelf shelf-name was not updated, no new attributes
Explanation: For SMU SET SHELF, no new attributes were defined for the shelf. The
update was not performed.
%SMU-W-NOTUPDVOLUME, volume volume-name was not updated, no new attributes
Explanation: For SMU SET VOLUME, no new attributes were defined for the volume.
The update was not performed.
%SMU-F-NOUID, no device UIDs found for device device-name %SMU-F-NOUID, no
device UIDs found for set device-name
Explanation: For SMU ANALYZE, no valid UIDs were found in the HSM$UID.SYS file.
SMU ANALYZE will stop processing this device/set.
%SMU-F-NOUIDFILE, HSM$UID.SYS not available for device device- name %SMU-FNOUIDFILE, HSM$UID.SYS not available for set device- name
HSM Error Messages A–25
HSM Error Messages
A.3 Shelf Management Utility Messages
Explanation: For SMU ANALYZE, no HSM$UID.SYS file was found on the device/set or
the file could not be opened. The missing file indicates that shelving has not taken place on
the disk. SMU ANALYZE will stop processing this device/set. Or, during a repair, no
HSM$UID.SYS file could be found and the repair is incomplete.
%SMU-E-NOVOLLIST, no volume name or list of volumes found
Explanation: For SMU SET VOlUME, no volume name or list of names was present in the
command. Re-enter the command and specify a volume name or list of volumes.
%SMU-E-OFLUPDERR, error updating offline information - no repair %SMU-EOFLUPDERR, error updating offline information - repair incomplete
Explanation: For SMU ANALYZE, an unexpected error was encountered while writing the
HSM metadata to the file and either no repair will be made, or a partial repair has been made
and a new catalog entry exists. There may be an accompanying message that gives more
information about any failure.
%SMU-F-OPENERR, error opening, storage-entity
Explanation: For any SMU command that uses the /OUTPUT qualifier, there was an error
opening the specified output file. For SMU SET SCHEDULE, there was an error opening
the policy execution command file. Or, there was an unexpected error opening one of the
SMU database files. There may be an accompanying message that gives more information
about any failure.
%SMU-E-OPERCONF, requested operation conflicts with current activity
Explanation: The requested SMU ANALYZE operation is in conflict with an active
Split/Merge operation on the device. SMU ANALYZE will stop processing this device or
stop the analysis completely depending on when the conflict was detected. Retry the command later.
%SMU-W-PEP_ALREADYSTARTED, policy execution process already started
Explanation: A SMU START was issued when there was already a policy execution process started. No action is required.
%SMU-S-PEP_STARTED, policy execution process started process-id
Explanation: The policy execution process has been successfully started.
%SMU-E-POL_DELERR, error deleting policy definition, policy- name
Explanation: For SMU SET POLICY, a request was made to delete a policy that does not
exist in the database. Verify your configuration and re-enter the command.
%SMU-E-POL_DISPERR, error displaying policy, policy-name
Explanation: For SMU SHOW POLICY, an error was encountered while trying to read the
policy information. There may be an accompanying message that gives more information
about any failure.
%SMU-E-POL_READERR, error reading policy definition, policy- name
HSM Error Messages A-26
HSM Error Messages
A.3 Shelf Management Utility Messages
Explanation: For SMU SET POLICY/DELETE, SMU SET SHELF or SMU SHOW POLICY, an unexpected error was encountered while trying to read the policy data for a delete
or display operation. There may be an accompanying message that gives more information
about any failure. Please check the equivalence name of HSM$MANAGER and redefine as
needed. Also verify that the policy file is accessible.
%SMU-E-POL_WRITERR, error writing policy definition, policy name
Explanation: For SMU SET POLICY, an unexpected error was encountered while adding
or modifying a policy. There may be an accompanying message that gives more information
about any failure. Please check the equivalence name of HSM$MANAGER and redefine as
needed. Also verify that the policy file is accessible.
%SMU-I-POLICY_CREATED, policy policy-name created
Explanation: The policy was successfully created.
%SMU-I-POLICY_DELETED, policy policy-name deleted
Explanation: The policy was successfully deleted.
%SMU-W-POLICY_NF, policy policy-name was not found
Explanation: For SMU SET POLICY, SMU SET SCHEDULE, SMU SHOW POLICY or
SMU RANK, the policy was not found in the policy database. Verify your configuration
then retry the command.
%SMU-I-POLICY_UPDATED, policy policy-name updated
Explanation: The policy was successfully updated.
%SMU-E-PLUS_MODE_ONLY, feature, is a plus mode feature, see SET FACILITY/MODE
Explanation: For SMU SET ARCHIVE or SMU SET DEVICE, the use of this qualifier is
for Plus mode only.
%SMU-W-PREREQSW, required prerequisite software, Save Set Manager, not found
Explanation: For SMU REPACK, the Save Set Manager software was not found on the
system or exists at a version below the minimum that is required. Please check the documentation for this version of HSM and install the appropriate version of Save Set Manager.
%SMU-I-PROCESSING, processing input device device-name
Explanation: The input device is currently being processed by SMU ANALYZE.
%SMU-F-READERR, fatal error encountered reading database, database-name
Explanation: An unexpected error was encountered while reading the catalog. There may
be an accompanying message that gives more information about any failure. Please check
the equivalence name of HSM$CATALOG and redefine as needed. Also verify that the catalog file is accessible.
%SMU-E-RDVOLSHLF, error reading volume or shelf data for device-name
Explanation: For SMU ANALYZE, an unexpected error was encountered getting volume
or shelf data for the device. There may be an accompanying message that gives more information about any failure. SMU ANALYZE will stop processing this device.
%SMU-W-RSPCOMM, shelf handler response communications error
HSM Error Messages A–27
HSM Error Messages
A.3 Shelf Management Utility Messages
Explanation: When SMU started processing a response from the shelf handler, it discovered that the shelf handler process no longer existed or there was an error reading the
response. There may be an accompanying message that gives more information about any
failure. Start the shelf handler with SMU START if needed.
%SMU-I-SCHED_CREATED, scheduled policy policy-name for volume volume-name was
created on server server-name
Explanation: The scheduled policy was successfully created.
%SMU-I-SCHED_DELETED, scheduled policy policy-name for volume volume-name was
deleted on server server-name
Explanation: The scheduled policy was successfully deleted.
%SMU-E-SCHED_DELERR, error deleting policy definition policy- name for volume
volume-name
Explanation: For SMU SET SCHEDULE/DELETE, an error was encountered while trying
to delete the scheduled event. There may be an accompanying message that gives more
information about any failure.
%SMU-W-SCHED_NF, schedule schedule-name for volume volume-name on server
server-name was not found
Explanation: For SMU SET SCHEDULE, the scheduled event for the volume was not
found in the database. There may be an accompanying message that gives more information
about any failure. Verify your configuration then retry the command.
%SMU-E-SCHED_WRITERR, error writing scheduled definition for volume volumename
Explanation: For SMU SET SCHEDULE/LOG, an unexpected error was encountered
while adding a schedule definition for the volume. There may be an accompanying message
that gives more information about any failure.
%SMU-I-SCHED_UPDATED, scheduled policy policy-name for volume volume-name was
updated on server server-name
Explanation: The scheduled policy was successfully updated.
%SMU-W-SCHEDUPDERR, unable to update schedule information
Explanation: For SMU SET SCHEDULE, an error was encountered while trying to modify
the scheduled policy attributes. There may be an accompanying message that gives more
information about any failure.
%SMU-I-SHELF_CREATED, shelf shelf-name created
Explanation: The shelf was successfully created.
%SMU-E-SHELF_DELERR, error deleting shelf definition, shelf- name
Explanation: For SMU SET SHELF/DELETE, a request was made to delete a shelf that
does not exist in the database. Verify your configuration and re-enter the command.
%SMU-I-SHELF_DELETED, shelf shelf-name deleted
Explanation: The shelf was successfully deleted.
%SMU-E-SHELF_DISPERR, error displaying shelf configuration, shelf-name
HSM Error Messages A-28
HSM Error Messages
A.3 Shelf Management Utility Messages
Explanation: For SMU SHOW SHELF, an error was encountered while trying to read the
shelf information from the configuration database. There may be an accompanying message
that gives more information about any failure. Please check the equivalence name of
HSM$MANAGER and redefine as needed. Also verify that the configuration file is accessible.
%SMU-W-SHELF_NF, shelf shelf-name was not found
Explanation: For SMU SET SHELF or SMU SHOW SHELF, the shelf was not found in
the configuration database. Verify your configuration then retry the command.
%SMU-E-SHELF_READERR, error reading shelf definition, shelf- name
Explanation: For SMU SET SHELF or SMU SET VOLUME, an error was detected while
trying to read the shelf information from the configuration database. There may be an
accompanying message that gives more information about any failure. Please check the
equivalence name of HSM$MANAGER and redefine as needed. Also verify that the configuration file is accessible.
%SMU-E-SHELF_REFERR, shelf is referenced by one or more volumes
Explanation: For SMU SET SHELF, an attempt was made to delete a shelf that has volume
references. Use SMU SET VOLUME to change the shelf assignment and retry the command.
%SMU-E-SHELF_SMIP, shelf split/merge is in process on shelf shelf-name
Explanation: For SMU SET SHELF, a delete was requested while a split/merge is in
progress on either the current shelf or the default shelf. For SMU SET VOLUME/SHELF,
an update request was made to use a shelf where a split/merge is in progress or the
split/merge is in progress on the shelf assigned to the default volume. Retry the command
later.
%SMU-I-SHELF_UPDATED, shelf shelf-name updated
Explanation: The shelf was successfully updated.
%SMU-E-SHELF_WRITERR, error writing shelf definition, shelf- definition-name
Explanation: For SMU SET SHELF, an error was encountered while trying to access the
split/merge lock or an unexpected error was encountered while trying to add or update a
shelf definition. There may be an accompanying message that gives more information about
any failure. Please check the equivalence name of HSM$MANAGER and redefine as
needed. Also verify that the configuration file is accessible.
%SMU-W-SHELFUPDERR, shelf handler process was unable to update information
Explanation: This is a generic companion message that is displayed when an error is
returned from the shelf handler. The accompanying message will give more information
about the failure.
%SMU-W-SHP_ALREADYSTARTED, shelf handler already started
Explanation: A SMU START was issued when there was already a shelf handler process
started. No action is required.
%SMU-S-SHP_STARTED, shelf handler process started process-id
Explanation: The shelf handler process has been successfully started.
%SMU-E-SHUTERR, error shutting down database database-name
HSM Error Messages A–29
HSM Error Messages
A.3 Shelf Management Utility Messages
Explanation: For SMUEXIT, an error was encountered while trying to close the database.
There may be an accompanying message that gives more information about any failure.
Please check the equivalence name of HSM$MANAGER and redefine as needed. Also verify that the database file is accessible.
%SMU-F-SMLOCKERR, error locking SPLIT/MERGE lock
Explanation: For SMU SET SHELF or SMU SET VOLUME, an unexpected error was
encountered while trying to acquire the split/merge lock.
%SMU-F-SNF, policy execution server not found
Explanation: For SMU SET SCHEDULE, the queue was not found on the policy server.
There will be accompanying messages that give more information about the queue involved
and the failure. Verify that the queue exists.
%SMU-I-STARTSCAN, scanning for shelved files on disk volume device-name
Explanation: SMU ANALYZE is currently processing the device.
%SMU-W-STARTQ, error encountered attempting to start HSM batch queue
Explanation: During startup, an error was encountered while trying to start the policy execution queue on this node. There may be an accompanying message that gives more information about any failure.
%SMU-W-UHSMCOMM, user communications failure
Explanation: An error was encountered while trying to establish a response mailbox for the
request. There may be accompanying messages that give more information about any failure. It is possible that the request was successfully sent to the shelf handler and will execute.
%SMU-E-UNDEL_CATREF, catalog referenced by shelf must match HSM$DEFAULT_SHELF
Explanation: For SMU SET SHELF/DELETE, the delete cannot take place until the catalog for the shelf is changed to be the same as the one assigned to HSM$DEFAULT_SHELF.
Use SMU SET SHELF to change the catalog and retry the command.
%SMU-E-UNDEL_DEFPOL, default policy definition cannot be deleted
Explanation: For SMU SET POLICY/DELETE, an attempt was made to delete one of the
default policies. Retry the command without specifying the default policy.
%SMU-E-UNDEL_DEFSHELF, default shelf definition cannot be deleted
Explanation: For SMU SET SHELF/DELETE, an attempt was made to delete the default
shelf. Retry the command without specifying the default shelf.
%SMU-E-UNDEL_DEFVOL, default volume definition cannot be deleted
Explanation: For SMU SET VOLUME/DELETE, an attempt was made to delete the
default volume. Retry the command without specifying the default volume.
%SMU-E-UNDEL_SHELFREF, shelf referenced by volume must match
HSM$DEFAULT_VOLUME
Explanation: For SMU SET VOLUME/DELETE, the delete cannot take place until the
shelf for the volume is changed to be the same as the one assigned to
HSM$DEFAULT_VOLUME. Use SMU SET VOLUME to change the shelf and retry the
command.
%SMU-F-UPDATERR, fatal error encountered updating database, database-name
HSM Error Messages A-30
HSM Error Messages
A.3 Shelf Management Utility Messages
Explanation: An unexpected error was encountered while updating one of the SMU database files or the catalog. There may be an accompanying message that gives more information about any failure. Please check the equivalence names of HSM$MANAGER and
HSM$CATALOG and redefine as needed. Also verify that the catalog and database files are
accessible.
%SMU-W-UNKSTATUS, shelf handler returned unknown status
Explanation: The shelf handler process returned an unknown status for the request. There
may be more information in the SHP error log.
%SMU-E-VOL_DELERR, error deleting volume definition, volume- name
Explanation: For SMU SET VOLUME/DELETE, a request was made to delete a volume
that does not exist in the database. Verify your configuration and re-enter the command.
%SMU-E-VOL_DISPERR, error displaying volume, volume-name
Explanation: For SMU SHOW VOLUME, an error was encountered while trying to read
the volume information from the database. There may be an accompanying message that
gives more information about any failure. Please check the equivalence name of
HSM$MANAGER and redefine as needed. Also verify that the volume file is accessible.
%SMU-E-VOL_NOTUPDATED, volume definition volume-name was not updated
Explanation: For SMU SET VOLUME, this is a general message indicating that the update
was not performed. This is usually because the specified shelf doesn't exist, or a split/merge
was in progress. There may be an accompanying message that gives more information about
any failure. Please check the equivalence name of HSM$MANAGER and redefine as
needed. Also verify that the volume file is accessible.
%SMU-E-VOL_READERR, error reading volume definition, volume- name
Explanation: An error was encountered while trying to read the volume information for
SMU SET VOLUME, SMU SHOW VOLUME or SMU LOCATE. There may be an
accompanying message that gives more information about any failure. Please check the
equivalence name of HSM$MANAGER and redefine as needed. Also verify that the volume file is accessible.
%SMU-E-VOL_SMIP, volume split/merge in progress on volume volume-name
Explanation: For SMU SET VOLUME/DELETE, a delete was requested on a volume
while a split/merge is in progress on this volume or the default volume. Retry the command
later.
%SMU-E-VOL_WRITERR, error writing volume definition, volume- definition
Explanation: For SMU SET VOLUME, an error was encountered while trying to access
the split/merge lock or an unexpected error was encountered while trying to add or update a
volume definition. There may be an accompanying message that gives more information
about any failure. Please check the equivalence name of HSM$MANAGER and redefine as
needed. Also verify that the volume file is accessible.
%SMU-I-VOLUME_CREATED, volume volume-name created
Explanation: The volume was successfully created.
%SMU-I-VOLUME_DELETED, volume volume-name deleted
HSM Error Messages A–31
HSM Error Messages
A.3 Shelf Management Utility Messages
Explanation: The volume was successfully deleted.
%SMU-W-VOLUME_NF, volume volume-name was not found
Explanation: For SMU SET SCHEDULE or SMU RANK, there was an error getting information about the online volume. For SMU SET VOLUME/DELETE or SMU SHOW VOLUME, a request we made for a volume that was not found in the volume database. There
may be an accompanying message that gives more information about any failure. Verify
that the online volumes exist and are available. Check your configuration and retry the command.
%SMU-I-VOLUME_UPDATED, volume volume-name updated
Explanation: The volume was successfully updated.
%SMU-F-WRITERR, fatal error encountered writing database, database-name
Explanation: An unexpected error was encountered while adding an entry to one of the
SMU database files or the catalog. There may be an accompanying message that gives more
information about any failure. Please check the equivalence names of HSM$MANAGER
and HSM$CATALOG and redefine as needed. Also verify that the catalog and database
files are accessible.
HSM Error Messages A-32
B
Sample Configuration of MDMS
This appendix shows a sample configuration of Media, Device Management Services (MDMS)
including examples for the steps involved.
B.1 Configuration Order
Configuration - which involves the creation or definition of MDMS objects, should take place in
the following order:
1.
Location
2.
Media type
3.
Node
4.
Jukebox
5.
Drives
6.
Pools
7.
Volumes
Creating these objects in the above order ensures that the following informational message, does
not appear:
%MDMS-I-UNDEFINEDREFS, object contains undefined referenced objects
This message appears if an attribute of the object is not defined in the database. The object is
created even though the attribute is not defined. The sample configuration consists of the
following:
•
Four nodes
SMITH1 - ACCOUN cluster node
SMITH2 - ACCOUN cluster node
SMITH3 - ACCOUN cluster node
JONES - a client node
•
TL826 Jukebox with robot $1$DUA560 and the following six drives:
$1$MUA560
$1$MUA561
$1$MUA562
$1$MUA563
$1$MUA564
$1$MUA565
Sample Configuration of MDMS B–1
Sample Configuration of MDMS
B.1 Configuration Order
The following examples illustrate each step in the order of configuration.
B.1.1 Configuration Step 1 Example - Defining Locations
This example lists the MDMS commands to define an offsite and onsite location for this domain.
$
$
$
$
!
!
create onsite location
!
MDMS CREATE LOCATION BLD1_COMPUTER_ROOM /DESCRIPTION="Building 1 Computer Room"
$ MDMS SHOW LOCATION BLD1_COMPUTER_ROOM
Location: BLD1_COMPUTER_ROOM
Description: Building 1 Computer Room
Spaces:
In Location:
$ !
$ ! create offsite location
$ !
$ MDMS CREATE LOCATION ANDYS_STORAGE /DESCRIPTION="Andy's Offsite Storage, corner of 5th and Main"
$ MDMS SHOW LOCATION ANDYS_STORAGE
Location: ANDYS_STORAGE
Description: Andy's Offsite Storage, corner of 5th and Main
Spaces:
In Location:
B.1.2 Configuration Step 2 Example - Defining Media Type
This example shows the MDMS command to define the media type used in the TL826.
!
$ ! create the media type
$ !
$ MDMS CREATE MEDIA_TYPE TK88K /DESCRIPTION="Media type for volumes in TL826 with TK88 drives" /COMPACTION
! volumes are written in compaction mode
$ MDMS SHOW MEDIA_TYPE TK88K
Media type: TK88K
Description: Media type for volumes in TL826 with TK88 drives
Density:
Compaction: YES
Capacity: 0
Length: 0
B.1.3 Configuration Step 3 Example - Defining Domain Attributes
This example shows the MDMS command to set the domain attributes. The reason this
command is not run until after the locations and media type are defined, is because they are
default attributes for the domain object. Note that the deallocation state (transition) is taken as
the default. All of the rights are taken as default also.
$
$
$
$
!
! set up defaults in the domain record
!
MDMS SET DOMAIN /DESCRIPTION="Smiths Accounting Domain" - ! domain name
/MEDIA_TYPE=TK88K ! default media type
/OFFSITE_LOCATION=ANDYS_STORAGE ! default offsite location
/ONSITE_LOCATION=BLD1_COMPUTER_ROOM - ! default onsite location
/PROTECTION=(S:RW,O:RW,G:RW,W)
! default protection for volumes
$ MDMS SHOW DOMAIN/FULL
Description: Smiths Accounting Domain
Sample Configuration of MDMS B–2
Sample Configuration of MDMS
B.1 Configuration Order
Mail: SYSTEM
Offsite Location: ANDYS_STORAGE
Onsite Location: BLD1_COMPUTER_ROOM
Def. Media Type: TK88K
Deallocate State: TRANSITION
Opcom Class: TAPES
Priority: 1536
Request ID: 2576
Protection: S:RW,O:RW,G:RW,W
DB Server Node: SPIELN
DB Server Date: 08-Jan-2003 08:18:20
Max Scratch Time: NONE
Scratch Time: 365 00:00:00
Transition Time:
14 00:00:00
Network Timeout:
0 00:02:00
ABS Rights: NO
SYSPRIV Rights: YES
Application Rights: MDMS_ASSIST
MDMS_LOAD_SCRATCH
MDMS_ALLOCATE_OWN
MDMS_ALLOCATE_POOL
MDMS_BIND_OWN
MDMS_CANCEL_OWN
MDMS_CREATE_POOL
MDMS_DEALLOCATE_OWN
MDMS_DELETE_POOL
MDMS_LOAD_OWN
MDMS_MOVE_OWN
MDMS_SET_OWN
MDMS_SHOW_OWN
MDMS_SHOW_POOL
MDMS_UNBIND_OWN
MDMS_UNLOAD_OWN
Default Rights:
Operator Rights: MDMS_ALLOCATE_ALL
MDMS_ASSIST
MDMS_BIND_ALL
MDMS_CANCEL_ALL
MDMS_DEALLOCATE_ALL
MDMS_INITIALIZE_ALL
MDMS_INVENTORY_ALL
MDMS_LOAD_ALL
MDMS_MOVE_ALL
MDMS_SHOW_ALL
MDMS_SHOW_RIGHTS
MDMS_UNBIND_ALL
MDMS_UNLOAD_ALL
MDMS_CREATE_POOL
MDMS_DELETE_POOL
MDMS_SET_OWN
MDMS_SET_POOL
User Rights: MDMS_ASSIST
MDMS_ALLOCATE_OWN
MDMS_ALLOCATE_POOL
MDMS_BIND_OWN
MDMS_CANCEL_OWN
MDMS_DEALLOCATE_OWN
MDMS_LOAD_OWN
MDMS_SHOW_OWN
MDMS_SHOW_POOL
MDMS_UNBIND_OWN
MDMS_UNLOAD_OWN
Sample Configuration of MDMS B–3
Sample Configuration of MDMS
B.1 Configuration Order
B.1.4 Configuration Step 4 Example - Defining MDMS Database Nodes
This example shows the MDMS commands for defining the three MDMS database nodes of the
cluster ACCOUN. This cluster is configured to use DECnet-PLUS.
Note that a node is defined using the DECnet node name as the name of the node.
•
If the node has DECnet-PLUS installed, the DECnet Fullname attribute must be the DECnet-PLUS full name.
•
If the node uses TCP/IP, the TCP/IP attribute should be defined.
•
If you use the GUI, you must define the TCP/IP attribute and include TCPIP in the Transports attribute.
$
$
$
$
!
!
create nodes
!
database node
MDMS CREATE NODE SMITH1 ! DECnet node name
/DESCRIPTION="ALPHA node on cluster ACCOUN" /DATABASE_SERVER ! this node is a database server
/DECNET_FULLNAME=SMI:.BLD.SMITH1 ! DECnet-Plus name
/LOCATION=BLD1_COMPUTER_ROOM /TCPIP_FULLNAME=SMITH1.SMI.BLD.COM - ! TCP/IP name
$ MDMS SHOW NODE SMITH1
Node: SMITH1
Description: ALPHA node on cluster ACCOUN
DECnet Fullname: SMI:.BLD.SMITH1
TCP/IP Fullname: SMITH1.SMI.BLD.COM:2501-2510
Disabled: NO
Database Server: YES
Location: BLD1_COMPUTER_ROOM
Opcom Classes: TAPES
Transports: DECNET,TCPIP
$ MDMS CREATE NODE SMITH2 ! DECnet node name
/DESCRIPTION="ALPHA node on cluster ACCOUN" /DATABASE_SERVER ! this node is a database server
/DECNET_FULLNAME=SMI:.BLD.SMITH2 ! DECnet-Plus name
/LOCATION=BLD1_COMPUTER_ROOM /TCPIP_FULLNAME=SMITH2.SMI.BLD.COM - ! TCP/IP name
/TRANSPORT=(DECNET,TCPIP)
! TCPIP used by JAVA GUI and JONES
$ MDMS SHOW NODE SMITH2
Node: SMITH2
Description: ALPHA node on cluster ACCOUN
DECnet Fullname: SMI:.BLD.SMITH2
TCP/IP Fullname: SMITH2.SMI.BLD.COM:2501-2510
Disabled: NO
Database Server: YES
Location: BLD1_COMPUTER_ROOM
Opcom Classes: TAPES
Transports: DECNET,TCPIP
$ MDMS CREATE NODE SMITH3 ! DECnet node name
/DESCRIPTION="VAX node on cluster ACCOUN" /DATABASE_SERVER ! this node is a database server
/DECNET_FULLNAME=SMI:.BLD.SMITH3 ! DECnet-Plus name
/LOCATION=BLD1_COMPUTER_ROOM /TCPIP_FULLNAME=CROP.SMI.BLD.COM ! TCP/IP name
/TRANSPORT=(DECNET,TCPIP)
! TCPIP used by JAVA GUI and JONES
$ MDMS SHOW NODE SMITH3
Node: SMITH3
Description: VAX node on cluster ACCOUN
DECnet Fullname: SMI:.BLD.SMITH3
TCP/IP Fullname: CROP.SMI.BLD.COM:2501-2510
Disabled: NO
Database Server: YES
Location: BLD1_COMPUTER_ROOM
Opcom Classes: TAPES
Transports: DECNET,TCPIP
Sample Configuration of MDMS B–4
Sample Configuration of MDMS
B.1 Configuration Order
B.1.5 Configuration Step 5 Example - Defining a Client Node
This example shows the MDMS command for creating a client node. TCP/IP is the only
transport on this node.
$
$
$
$
!
!
client node
!
only has TCP/IP
MDMS CREATE NODE JONES /DESCRIPTION="ALPHA client node, standalone" /NODATABASE_SERVER ! not a database server
/LOCATION=BLD1_COMPUTER_ROOM /TCPIP_FULLNAME=JONES.SMI.BLD.COM - ! TCP/IP name
/TRANSPORT=(TCPIP)
! TCPIP is used by JAVA GUI
$ MDMS SHOW NODE JONES
Node: JONES
Description: ALPHA client node, standalone
DECnet Fullname:
TCP/IP Fullname: JONES.SMI.BLD.COM:2501-2510
Disabled: NO
Database Server: NO
Location: BLD1_COMPUTER_ROOM
Opcom Classes: TAPES
Transports: TCPIP
B.1.6 Configuration Step 6 Example - Creating a Jukebox
This example shows the MDMS command for creating a jukebox
$
$
$
$
!
!
create jukebox
!
MDMS CREATE JUKEBOX TL826_JUKE /DESCRIPTION="TL826 Jukebox in Building 1" /ACCESS=ALL ! local + remote for JONES
/AUTOMATIC_REPLY ! MDMS automatically replies to OPCOM requests
/CONTROL=MRD ! controled by MRD robot control
/NODES=(SMITH1,SMITH2,SMITH3) - ! nodes the can control the robot
/ROBOT=$1$DUA560 ! the robot device
/SLOT_COUNT=176
! 176 slots in the library
$ MDMS SHOW JUKEBOX TL826_JUKE
Jukebox: TL826_JUKE
Description: TL826 Jukebox in Building 1
Nodes: SMITH1,SMITH2,SMITH3
Groups:
Location: BLD1_COMPUTER_ROOM
Disabled: NO
Shared: NO
Auto Reply: YES
Access: ALL
State: AVAILABLE
Control: MRD
Robot: $1$DUA560
Slot Count: 176
Usage: NOMAGAZINE
Sample Configuration of MDMS B–5
Sample Configuration of MDMS
B.1 Configuration Order
B.1.7 Configuration Step 7 Example - Defining a Drive
This example shows the MDMS commands for creating the six drives for the jukebox.
This example is a command procedure that uses a counter to create the six drives. In this
example it is easy to do this because of the drive name and device name. You may want to have
the drive name the same as the device name. For example:
$ MDMS CREATE DRIVE $1$MUA560/DEVICE=$1$MUA560
This works fine if you do not have two devices in your domain with the same name.
$ COUNT = COUNT + 1
$ IF COUNT .LT. 6 THEN GOTO DRIVE_LOOP
$DRIVE_LOOP:
$ MDMS CREATE DRIVE TL826_D1 /DESCRIPTION="Drive 1 in the TL826 JUKEBOX" /ACCESS=ALL ! local + remote for JONES
/AUTOMATIC_REPLY ! MDMS automatically replies to OPCOM requests
/DEVICE=$1$MUA561 - ! physical device
/DRIVE_NUMBER=1 - ! the drive number according to the robot
/JUKEBOX=TL826_JUKE ! jukebox the drives are in
/MEDIA_TYPE=TK88K ! media type to allocate drive and volume for
/NODES=(SMITH1,SMITH2,SMITH3)! nodes that have access to drive
$ MDMS SHOW DRIVE TL826_D1
Drive: TL826_D1
Description: Drive 1 in the TL826 JUKEBOX
Device: $1$MUA561
Nodes: SMITH1,SMITH2,SMITH3
Groups:
Volume:
Disabled: NO
Shared: NO
Available: NO
State: EMPTY
Stacker: NO
Automatic Reply: YES
RW Media Types: TK88K
RO Media Types:
Access: ALL
Jukebox: TL826_JUKE
Drive Number: 1
Allocated: NO
:
:
:
$ MDMS CREATE DRIVE TL826_D5 /DESCRIPTION="Drive 5 in the TL826 JUKEBOX" /ACCESS=ALL ! local + remote for JONES
/AUTOMATIC_REPLY ! MDMS automatically replies to OPCOM requests
/DEVICE=$1$MUA565 - ! physical device
/DRIVE_NUMBER=5 - ! the drive number according to the robot
/JUKEBOX=TL826_JUKE ! jukebox the drives are in
/MEDIA_TYPE=TK88K ! media type to allocate drive and volume for
/NODES=(SMITH1,SMITH2,SMITH3)! nodes that have access to drive
$ MDMS SHOW DRIVE TL826_D5
Drive: TL826_D5
Description: Drive 5 in the TL826 JUKEBOX
Device: $1$MUA565
Nodes: SMITH1,SMITH2,SMITH3
Groups:
Volume:
Disabled: NO
Shared: NO
Available: NO
State: EMPTY
Stacker: NO
Automatic Reply: YES
RW Media Types: TK88K
Sample Configuration of MDMS B–6
Sample Configuration of MDMS
B.1 Configuration Order
RO Media Types:
Access:
Jukebox:
Drive Number:
Allocated:
$ COUNT = COUNT +
$ IF COUNT .LT. 6
ALL
TL826_JUKE
5
NO
1
THEN GOTO DRIVE_LOOP
B.1.8 Configuration Step 8 Example - Defining Pools
This example shows the MDMS commands to define two pools: ABS and HSM. The pools need
to have the authorized users defined.
$
$
$
$
$
!
!
create pools
!
mdms del pool abs
MDMS CREATE POOL ABS /DESCRIPTION="Pool for ABS" /AUTHORIZED=(SMITH1::ABS,SMITH2::ABS,SMITH3::ABS,JONES::ABS)
$ MDMS SHOW POOL ABS
Pool: ABS
Description: Pool for ABS
Authorized Users: SMITH1::ABS,SMITH2::ABS,SMITH3::ABS,JONES::ABS
Default Users:
$ mdms del pool hsm
$ MDMS CREATE POOL HSM /DESCRIPTION="Pool for HSM" /AUTHORIZED=(SMITH1::HSM,SMITH2::HSM,SMITH3::HSM)
$ MDMS SHOW POOL HSM
Pool: HSM
Description: Pool for HSM
Authorized Users: SMITH1::HSM,SMITH2::HSM,SMITH3::HSM
Default Users:
B.1.9 Configuration Step 9 Example - Defining Volumes using the /VISION
qualifier
This example shows the MDMS commands to define the 176 volumes in the TL826 using the
/VISION qualifier. The volumes have the BARCODES on them and have been placed in the
jukebox. Notice that the volumes are created in the UNINITIALIZED state. The last command
in the example initializes the volumes and changes the state to FREE.
$
$
$
$
$
$
$
$
!
! create volumes
!
! create 120 volumeS for ABS
!
the media type, offsite location, and onsite location
!
values are taken from the DOMAIN object
!
MDMS CREATE VOLUME /DESCRIPTION="Volumes for ABS" /JUKEBOX=TL826_JUKE /POOL=ABS /SLOTS=(0-119) /VISION
$ MDMS SHOW VOLUME BEB000
Volume: BEB000
Description: Volumes for ABS
Placement: ONSITE BLD1_COMPUTER_ROOM
Media Types: TK88K
Username:
Pool: ABS
Owner UIC: NONE
Error Count:
0
Account:
Mount Count:
0
Job Name:
Sample Configuration of MDMS B–7
Sample Configuration of MDMS
B.1 Configuration Order
State: UNINITIALIZED
Avail State: UNINITIALIZED
Previous Vol:
Next Vol:
Format: NONE
Protection: S:RW,O:RW,G:RW,W
Purchase: 08-Jan-2003 08:19:00
Creation: 08-Jan-2003 08:19:00
Init: 08-Jan-2003 08:19:00
Allocation: NONE
Scratch: NONE
Deallocation: NONE
Trans Time:
14 00:00:00
Freed: NONE
Last Access: NONE
$ !
$ ! create 56 volumes for HSM
$ !
$ MDMS CREATE VOLUME /DESCRIPTION="Volumes for HSM" /JUKEBOX=TL826_JUKE /POOL=HSM /SLOTS=(120-175) /VISION
$ MDMS SHOW VOL BEB120
Volume: BEB120
Description: Volumes for HSM
Placement: ONSITE BLD1_COMPUTER_ROOM
Media Types: TK88K
Pool: HSM
Error Count:
0
Mount Count:
0
State: UNINITIALIZED
Avail State: UNINITIALIZED
Previous Vol:
Next Vol:
Format: NONE
Protection: S:RW,O:RW,G:RW,W
Purchase: 08-Jan-2003 08:22:16
Creation: 08-Jan-2003 08:22:16
Init: 08-Jan-2003 08:22:16
Allocation: NONE
Scratch: NONE
Deallocation: NONE
Trans Time:
14 00:00:00
Freed: NONE
Last Access: NONE
$ !
$ ! initialize all of the volumes
$ !
$ MDMS INITIALIZE VOLUME /JUKEBOX=TL826_JUKE /SLOTS=(0-175)
$ MDMS SHOW VOL BEB000
Volume: BEB000
Description: Volumes for ABS
Placement: ONSITE BLD1_COMPUTER_ROOM
Media Types: TK88K
Pool: ABS
Error Count:
0
Mount Count:
0
State: FREE
Avail State: FREE
Previous Vol:
Next Vol:
Format: NONE
Protection: S:RW,O:RW,G:RW,W
Purchase: 08-Jan-2003 08:19:00
Creation: 08-Jan-2003 08:19:00
Init: 08-Jan-2003 08:19:00
Allocation: NONE
Scratch: NONE
Sample Configuration of MDMS B–8
Magazine:
Jukebox: TL826_JUKE
Slot: 0
Drive:
Offsite Loc: ANDYS_STORAGE
Offsite Date: NONE
Onsite Loc: BLD1_COMPUTER_ROOM
Space:
Onsite Date: NONE
Brand:
Last Cleaned: 08-Jan-2003 08:19:00
Times Cleaned: 0
Rec Length: 0
Block Factor: 0
Username:
Owner UIC: NONE
Account:
Job Name:
Magazine:
Jukebox: TL826_JUKE
Slot: 120
Drive:
Offsite Loc: ANDYS_STORAGE
Offsite Date: NONE
Onsite Loc: BLD1_COMPUTER_ROOM
Space:
Onsite Date: NONE
Brand:
Last Cleaned: 08-Jan-2003 08:22:16
Times Cleaned: 0
Rec Length: 0
Block Factor: 0
Username:
Owner UIC: NONE
Account:
Job Name:
Magazine:
Jukebox: TL826_JUKE
Slot: 0
Drive:
Offsite Loc: ANDYS_STORAGE
Offsite Date: NONE
Onsite Loc: BLD1_COMPUTER_ROOM
Space:
Onsite Date: NONE
Brand:
Last Cleaned: 08-Jan-2003 08:19:00
Sample Configuration of MDMS
B.1 Configuration Order
Deallocation: NONE
Trans Time:
14 00:00:00
Freed: NONE
Last Access: NONE
Times Cleaned: 0
Rec Length: 0
Block Factor: 0
Sample Configuration of MDMS B–9
C
MDMS Messages
ABORT
request aborted by operator
Explanation: The request issued an OPCOM message that has been aborted by an operator. This
message can also occur if no terminals are enabled for the relevant OPCOM classes on the node.
User Action: Either nothing or enable an OPCOM terminal, contact the operator and retry.
ACCCTRLONLY
updated access control only
Explanation: You entered a SET command and you only had CONTROL access to the object,
so only the access control information (if any) was updated.
User Action: If this is what was intended no action is needed. If you wish to update other fields
in the object, you require SET access control. See your administrator.
ACCVIO
access violation
Explanation:
The MDMS software caused an access violation. This is an internal error.
User Action:
Provide copies of the MDMS command issued, the database files and the server's logfile for further analysis.
ALLOCDRIVE
drive !AD allocated
Explanation:
The named drive was successfully allocated.
User Action:
None.
ALLOCDRIVEDEV
drive !AD allocated as device !AD
Explanation:
The named drive was successfully allocated, and the drive may be accessed with DCL commands using the device name shown.
User Action:
None.
MDMS Messages C–1
MDMS Messages
ALLOCVOLUME
volume !AD allocated
Explanation:
The named volume was successfully allocated.
User Action:
None.
ALTSUCCESS
alternative success
Explanation:
The request was successful, but extended status contains information.
User Action:
Examine the extended status, and retry command as needed.
APIBUGCHECK
internal inconsistency in API
Explanation:
The MDMS API (MDMS$SHR.EXE) detected an inconsistency. This is an internal error.
User Action:
Provide copies of the MDMS command issued, the database files and the server's logfile for further analysis.
APIUNEXP
unexpected error in API !AZ line !UL
Explanation:
The shareable image MDMS$SHR detected an internal inconsistency.
User Action:
Provide copies of the MDMS command issued, the database files and the server's logfile for further analysis.
ARCUNDEFINED
referenced archive(s) !AZ undefined
Explanation:
When creating or modifying a valid object, the object's record contains a reference to a archive
name that does not exist. One or more of the specified archives may be undefined.
User Action:
Check spelling of the archive names and retry, or create the archive objects in the database.
ATTRINMAG
onsite/offsite attributes invalid for magazine-based volumes
Explanation:
You attempted to specify offsite or onsite dates or locations for a volume whose placement is in
a magazine. These attributes are controlled by the magazine and are not valid for individual volumes.
MDMS Messages C–2
MDMS Messages
User Action:
Specify the dates and locations in the magazine object, or do not use magazines for volumes if
you want the individual offsite/onsite dates to be different for each volume.
BINDVOLUME
volume !AD bound to set !AD
Explanation:
The specified volume (or volume set) was successfully bound to the end of the named volume
set.
User Action:
None.
BUGCHECK
internal inconsistency
Explanation:
The server software detected an inconsistency. This is an internal error.
User Action:
Provide copies of the MDMS command issued, the database files and the server's logfile for further analysis. Restart the server.
CANCELLED
request cancelled by user
Explanation:
The request was cancelled by a user issuing a cancel request command.
User Action:
None, or retry command.
CLEANVOL
cleaning volume loaded
Explanation:
During a load of a volume, a cleaning volume was loaded.
User Action:
During an inventory this message can be ignored. During a load of a requested volume or a
scratch load on a drive, or an initialize command, a cleaning volumes was loaded. Check location of the cleaning volume, update database as needed, and re-issue command using a noncleaning volume.
CONFLITEMS
conflicting item codes specified
Explanation:
The command cannot be completed because there are conflicting item codes in the command.
This is an internal error.
User Action:
Provide copies of the MDMS command issued, the database files and the server's logfile for further analysis.
MDMS Messages C–3
MDMS Messages
CREATVOLUME
volume !AD created
Explanation:
The named volume was successfully created.
User Action:
None.
DBLOCACC
local access to database
Explanation:
This node has the database files open locally.
User Action:
None.
DBRECERR
error !AZ !AZ record for !AZ:
Explanation:
The search for a database server received an error from a remote server.
User Action:
Check the logfile on the remote server for more information. Check the logical name
MDMS$DATABASE_SERVERS for correct entries of database server node.
DBREMACC
access to remote database server on node !AZ
Explanation:
This node has access to a remote database server.
User Action:
None.
DBREP
Database server on node !AZ reports:
Explanation:
The remote database server has reported an error condition. The next line contains additional
information.
User Action:
Depends on the additional information.
DCLARGLSOVR
DCL extended status format, argument list overflow
Explanation:
During formating of the extended status, the number of arguments exceeded the allowable limit.
This is an internal error.
MDMS Messages C–4
MDMS Messages
User Action:
Provide copies of the MDMS command issued, the database files and the server's logfile for further analysis.
DCLBUGCHECK
internal inconsistency in DCL
Explanation:
The MDMS comand line software (MDMS$DCL.EXE) detected an inconsistency. This is an
internal error.
User Action:
Provide copies of the MDMS command issued, the database files and the server's logfile for further analysis.
DCSCERROR
error accessing jukebox with DCSC
Explanation:
MDMS encountered an error when performing a jukebox operation. An accompanying message
gives more detail.
User Action:
Examine the accompanying message and perform corrective actions to the hardware, the volume
or the database, and optionally retry the operation.
DCSCMSG
!AZ
Explanation:
This is a more detailed DCSC error message which accompanies DCSCERROR.
User Action:
Check the DCSC error message file.
DECNETLISEXIT
DECnet listener exited
Explanation:
The DECnet listener has exited due to an internal error condition or because the user has disabled the DECNET transport for this node. The DECnet listener is the server's routine to receive
requests via DECnet (Phase IV and Phase V).
User Action:
The DECnet listener should be automatically restarted unless the DECNET transport has been
disabled for this node. Provide copies of the MDMS command issued, the database files and the
server's logfile for further analysis if the transport has not been disabled by the user.
DECNETLISRUN
listening on DECnet node !AZ object !AZ
Explanation:
The server has successfully started a DECnet listener. Requests can now be sent to the server via
DECnet.
MDMS Messages C–5
MDMS Messages
User Action:
None.
DEVNAMICM
device name item code missing
Explanation:
During the allocation of a drive, the drive name was not returned by the server. This is an internal error.
User Action:
Provide copies of the MDMS command issued, the database files and the server's logfile for further analysis.
DRIVEEXISTS
specified drive already exists
Explanation:
The specified drive already exists and cannot be be created.
User Action:
Use a set command to modify the drive, or create a new drive with a different name.
DRVACCERR
error accessing drive
Explanation:
MDMS could not access the drive.
User Action:
Verify the VMS device name, node names and/or group names specified in the drive record. Fix
if necessary. Verify MDMS is running on a remote node. Check status of the drive, correct and
retry.
DRVALRALLOC
drive is already allocated
Explanation:
An attempt was made to allocate a drive that was already allocated.
User Action:
Wait for the drive to become deallocated, or if the drive is allocated to you, use it.
DRVEMPTY
drive is empty or volume in drive is unloaded
Explanation: The specified drive is empty, or the volume in the drive is unloaded, spun-down
and inaccessible.
User Action:
Check status of drive, correct and retry.
DRVINITERR
error initializing drive on platform
Explanation:
MDMS could not initialize a volume in a drive.
MDMS Messages C–6
MDMS Messages
User Action:
There was a system error initializing the volume. Check the log file.
DRVINUSE
drive is currently in use
Explanation:
The specified drive is already in use.
User Action:
Wait for the drive to free up and re-enter command, or try to use another drive.
DRVLOADED
drive is already loaded
Explanation:
A drive unload appeared to succeed, but the specified volume was still detected in the drive.
User Action:
Check the drive and check for duplicate volume labels, or if the volume was reloaded.
DRVLOADING
drive is currently being loaded or unloaded
Explanation:
The operation cannot be performed because the drive is being loaded or unloaded.
User Action:
Wait for the drive to become available, or use another drive. If the drive is stuck in the loading or
unloading state, check for an outstanding request on the drive and cancel it. If all else fails, manually adjust the drive state.
DRVNOTALLOC
drive is not allocated
Explanation:
The specified drive could not be allocated.
User Action:
Check again if the drive is allocated. If it is, wait until it is deallocated. Otherwise there was
some other reason the drive could not be allocated. Check the log file.
DRVNOTALLUSER
drive is not allocated to user
Explanation:
You cannot perform the operation on the drive because the drive is not allocated to you.
User Action:
Either defer the operation or (in some cases) you may be able to perform the operation specifying a user name.
DRVNOTAVAIL
drive is not available on system
MDMS Messages C–7
MDMS Messages
Explanation:
The specified drive was found on the system, but is not available for use.
User Action:
Check the status of the drive and correct.
DRVNOTDEALLOC
drive was not deallocated
Explanation:
MDMS could not deallocate a drive.
User Action:
Either the drive was not allocated or there was a system error deallocating the drive. Check the
log file.
DRVNOTFOUND
drive not found on system
Explanation:
The specified drive cannot be found on the system.
User Action:
Check that the OpenVMS device name, node names and/or group names are correct for the
drive. Verify MDMS is running on a remote node. Re-enter command when corrected.
DRVNOTSPEC
drive not specified or allocated to volume
Explanation:
When loading a volume a drive was not specified, and no drive has been allocated to the volume.
User Action:
Retry the operation and specify a drive name.
DRVREMOTE
drive is remote
Explanation:
The specified drive is remote on a node where it is defined to be local.
User Action:
Check that the OpenVMS device name, node names and/or group names are correct for the
drive. Verify MDMS is running on a remote node. Re-enter command when corrected.
DRVSINUSE
all drives are currently in use
Explanation:
All of the drives matching the selection criteria are currently in use.
User Action:
Wait for a drive to free up and re-enter command.
MDMS Messages C–8
MDMS Messages
DRVUNDEFINED
referenced drive !AZ undefined
Explanation:
When creating or modifying a valid object, the object's record contains a reference to a drive
name that does not exist.
User Action:
Check spelling of the drive name and retry, or create the drive object in the database.
ENVUNDEFINED
referenced environment(s) !AZ undefined
Explanation:
When creating or modifying a valid object, the object's record contains a reference to a environment name that does not exist. One or more of the specified environments may be undefined.
User Action:
Check spelling of the environment names and retry, or create the environment objects in the
database.
ERROR
error
Explanation:
A general internal MDMS error occurred.
User Action:
Provide copies of the MDMS command issued, the database files and the server's logfile for further analysis.
EXECOMFAIL
execute command failed, see log file for more explanation
Explanation:
While trying to execute a command during scheduled activities, a system service called failed.
User Action:
Check the log file for the failure code from the system server call.
EXIT
MDMS server exiting with fatal error, restarting
Explanation:
The MDMS server has encountered a fatal error and is exiting. The server will be restarted.
User Action:
Report incident to HP.
EXSCHED
internal schedules are inoperable; external scheduler in use
MDMS Messages C–9
MDMS Messages
Explanation:
You have created or modified an MDMS schedule object. This is allowed, but since the domain
scheduler type is set up to an external scheduler product, this schedule object will never be executed.
User Action:
If you are not planning ot change the scheduler type to INTERNAL or EXTERNAL, you should
modify the associated save or restore request to use a standard frequency or an explicit frequency.
EXTRAVOL
extra volume(s) processed
Explanation:
One or more volumes unknown to MDMS have been processed by this command.
User Action:
See next message line(s) for more details. Use MDMS or jukebox utility programs (MRU or
CARTRIDGE) to correct the problem.
FAILALLOCDRV
failed to allocate drive
Explanation:
Failed to allocate drive.
User Action:
The previous message is the error that caused the failure.
FAILCONSVR
failed connection to server
Explanation:
The connection to an MDMS server either failed or could not be established. See additional message lines and/or check the server's logfile.
User Action:
Depends on additional information.
FAILCONSVRD
failed connection to server via DECnet
Explanation:
The DECnet connection to an MDMS server either failed or could not be established. See additional message lines and/or check the server's logfile.
User Action:
Depends on additional information.
FAILCONSVRT
failed connection to server via TCP/IP
Explanation:
The TCP/IP connection to an MDMS server either failed or could not be established. See additional message lines and/or check the server's logfile.
MDMS Messages C–10
MDMS Messages
User Action:
Depends on additional information.
FAILCREATE
failed to create !AZ
Explanation:
The reported file or object could not be created. The next line contains additional information.
User Action:
Depends on the additional information.
FAILDEALLOCDRV
failed to deallocate drive
Explanation:
Failed to deallocate drive.
User Action:
The previous message is the error that caused the failure.
FAILDELETE
failed to delete !AZ
Explanation:
The reported file or object could not be deleted. The next line contains additional information.
User Action:
Depends on the additional information.
FAILEDMNTVOL
failed to mount volume
Explanation:
MDMS was unable to mount the volume.
User Action:
The error above this contains the error that cause the volume not to be mounted.
FAILICRES
failed item code restrictions
Explanation:
The command cannot be completed because there are conflicting item codes in the command.
This is an internal error.
User Action:
Provide copies of the MDMS command issued, the database files and the server's logfile for further analysis.
FAILINIEXTSTAT
failed to initialize extended status buffer
Explanation:
The API could not initialze the extended status buffer. This is an internal error.
MDMS Messages C–11
MDMS Messages
User Action:
Provide copies of the MDMS command issued, the database files and the server's logfile for further analysis.
FAILLOOKUP
failed to lookup !AZ
Explanation:
The reported file or object could not be looked up. The next line contains additional information.
User Action:
Depends on the additional information.
FAILURE
fatal error
Explanation:
The MDMS server encountered a fatal error during the processing of a request.
User Action:
Provide copies of the MDMS command issued, the database files and the server's logfile for further analysis.
FILOPNERR
file !AZ could not be opened
Explanation:
An MDMS database file could not be opened.
User Action:
Check the server's logfile for more information.
FIRSTVOLUME
specified volume is first in set
Explanation:
The specified volume is the first volume in a volume set.
User Action:
You cannot deallocate or unbind the first volume in a volume set. However, you can unbind the
second volume and then deallocate the first, or unbind and deallocate the entire volume set.
FUNCFAILED
Function !AZ failed with:
Explanation:
An internal call to a system function has failed. The following lines identify the function called
and the failure status.
User Action:
Depends on information following this message.
GRPUNDEFINED
referenced group(s) !AZ undefined
MDMS Messages C–12
MDMS Messages
Explanation:
When creating or modifying a valid object, the object's record contains a reference to a group
name that does not exist. One or more of the specified groups may be undefined.
User Action:
Check spelling of the group names and retry, or create the group objects in the database.
ILLEGALOP
illegal move operation
Explanation:
You attempted to move a volume within a DCSC jukebox, and this is not supported.
User Action:
None.
INCOMFREQ
incompatible frequency for !AZ !AZ
Explanation:
After changing the domain scheduler type, MDMS has detemined that this save or restore
request has a frequency that is incompatible with the new scheduler type. The frequencies that
are not valid for the given scheduler types are:
•
INTERNAL and EXTERNAL: Explicit
•
DECSCHEDULER and SCHEDULER: Custom
User Action:
Modify the frequency to a valid one for this scheduler type.
INCOMPATMED
volume's media type incompatible with the drive
Explanation:
The media type for the volume is incompatible with the media type(s) for the drive on a load
operation.
User Action:
Verify that the volume can be physically loaded and used in the specified drive. If not, select
another drive. If so, then add the volume's media type to the drive or otherwise aligned the media
types of the volume and the drive.
INCOMPATOPT
incompatible options specified
Explanation:
You entered a command with incompatible options.
User Action:
Examine the command documentation and re-enter with allowed combinations of options.
INCOMPATTR
attributes incompatible with archive type
MDMS Messages C–13
MDMS Messages
Explanation:
You attempted to create or set an attribute which is incompatible with the archive type. The following attributes are incompatible for archive types:
•
DISK: CONSOLIDATION, DRIVES, MEDIA_TYPE, POOL, VOLUME_SETS
•
TAPE: DESTINATION
User Action:
Do not specify these attributes if they are incompatible with the archive type.
INCOMPATVOL
volume is incompatible with volumes in set
Explanation:
You cannot bind the volume to the volume set because some of the volume's attributes are
incompatible with the volumes in the volume set.
User Action:
Check that the new volume's media type, onsite location and offsite location are compatible with
those in the volume set. Adjust attributes and retry, or use another volume with compatible
attributes.
INSCMDPRIV
insufficient privilege to execute request
Explanation:
You do not have sufficient privileges to enter the request.
User Action:
Contact your system administrator and request additional privileges, or give yourself privs and
retry.
INSOPTPRIV
insufficient privilege for request option
Explanation:
You do not have sufficient privileges to enter a privileged option of this request.
User Action:
Contact your system administrator and request additional privileges, or give yourself privs and
retry. Alternatively, retry without using the privileged option.
INSSHOWPRIV
some volumes not shown due to insufficient privilege
Explanation:
Not all volumes were shown because of restricted privilege.
User Action:
None if you just want to see volumes you own. You need MDMS_SHOW_ALL privilege to see
all volumes.
INSSVRPRV
insufficient server privileges
MDMS Messages C–14
MDMS Messages
Explanation:
The MDMS server is running with insufficient privileges to perform system functions.
User Action:
Refer to the Installation Guide to determine the required privileges. Contact your system administrator to add these privileges in the MDMS$SERVER account.
INTBUFOVR
internal buffer overflow
Explanation:
The MDMS software detected an internal buffer overflow. This an internal error.
User Action:
Provide copies of the MDMS command issued, the database files and the server's logfile for further analysis. Restart the server.
INTINVMSG
internal invalid message
Explanation:
An invalid message was received by a server. This could be due to a network problem or, a
remote non-MDMS process sending messages in error or, an internal error.
User Action:
If the problem persists and no non-MDMS process can be identified then provide copies of the
MDMS command issued, the database files and the server's logfile for further analysis.
INTSCHEDULE
cannot modify or delete internal schedule
Explanation:
You attempted to modify or delete a schedule object that was internally generated for a save or
restore request. This is not allowed.
User Action:
Modify or delete the associated save or restore request instead, and the schedule will be updated
accordingly.
INVABSTIME
invalid absolute time
Explanation:
The item list contained an invalid absolute date and time. Time cannot be earlier than 1-Jan-1970
00:00:00 and cannot be greater than 7-Feb-2106 06:28:15
User Action:
Check that the time is between these two times.
INVALIDRANGE
invalid volume ID or invalid range specified
Explanation:
The specified volume ID, volume range, slot range or space range is invalid.
MDMS Messages C–15
MDMS Messages
User Action:
A volume ID may contain up to 6 characters. A volume range may contain up to 1000 volume
IDs where the first 3 characters must be alphabetic and the last 3 may be alphanumeric. Only the
numeric portions may vary in the range. Examples are ABC000-ABC999, or ABCD01ABCD99. A slot range can contain up to 1000 slots and must be numeric. Also, all slots in the
range must be less than the slot count for the jukebox or magazine. Example: 0-255 for a slot
count of 256. A space range can contain up to1000 spaces where the first and last spaces must
have the same number of characters. Spaces must be within the range defined for the location.
Examples: 000-999, or Space A1-Space C9
INVCONSOLVAL
invalid value for consolidation savesets or volumes
Explanation:
You specified an invalid value for consolidation savesets or volumes.
User Action:
Use a value in the range 0 to maximum integer.
INVDBSVRLIS
invalid database server search list
Explanation:
The logical name MDMS$DATABASE_SERVERS contains invalid network node names or is
not defined.
User Action:
Correct the node name(s) in the logical name MDMS$DATABASE_SERVERS in file
MDMS$SYSTARTUP.COM. Redefine the logical name in the current system. Then start the
server.
INVDELSTATE
object is in invalid state for delete
Explanation:
The specified object cannot be deleted because its state indicates it is being used.
User Action:
Defer deletion until the object is no longer being used, or otherwise change its state and retry.
INVDELTATIME
invalid delta time
Explanation:
The item list contained an invalid delta time.
User Action:
Check that the item list has a correct delta time.
INVDFULLNAM
invalid DECnet fullname
Explanation:
A node full name for a DECnet-Plus (Phase V) node specification has an invalid syntax.
MDMS Messages C–16
MDMS Messages
User Action:
Correct the node name and retry.
INVDRVCOUNT
invalid value for drive count, use 1-32
Explanation:
You specified an invalid value for drive count.
User Action:
Use a value in the range 1-32.
INVEXTSTS
invalid extended status item desc/buffer
Explanation:
The error cannot be reported in the extended status item descriptor. This error can be caused by
on of the following:
•
Not being able to read any one of the item descriptors in the item list
•
Not being able to write to the buffer in the extended status item descriptor
•
Not being able to write to the return length in the extended status item descriptor
•
Not being able to initialize the extended status buffer
User Action:
Check for any of the errors stated above in your program and fix the error.
INVFREQUENCY
invalid frequency for domain scheduler type
Explanation:
You specified an invalid save or restore frequency the scheduler type specified in the domain.
Invalid combinations include: CUSTOM, with NONE, DECSCHEDULER, SCHEDULER or
LOCAL EXPLICIT, with NONE, INTERNAL, EXTERNAL, or SINGLE
User Action:
Specify a valid frequency for the scheduler type specified in the domain.
INVINITOPT
invalid initialize options specified
Explanation:
You attempted initialize volumes in a jukebox by specifying a slot range and the jukebox is not a
vision-equipped, MRD-controlled jukebox.
User Action:
Specify a volume range instead of a slot range to initialize volumes in a DCSC jukebox or an
MRD jukebox without a vision system.
INVITCODE
invalid item code for this function
MDMS Messages C–17
MDMS Messages
Explanation:
The item list had an invalid item code. The problem could be one of the following:
•
Item codes do not meet the restrictions for that function.
•
An item code cannot be used in this function.
User Action:
Refer to the API specification to find out which item codes are restricted for each function and
which item codes are allowed for each function.
INVITDESC
invalid item descriptor, index !@UL
Explanation:
The item descriptor is in error. The previous message gives gives the error. Included is the index
of the item descriptor in the item list.
User Action:
Refer to the index number and the previous message to indicate the error and which item
descriptor is in error.
INVITLILENGTH
invalid item list buffer length
Explanation:
The item list buffer length is zero. The item list buffer length cannot be zero for any item code.
User Action:
Refer to the API specification to find an item code that would be used in place of an item code
that has a zero buffer length.
INVMAXSAVES
invalid value for maximum saves, use 1-36
Explanation:
You specified an invalid value for maximum saves.
User Action:
Use a value in the range 1-36.
INVMEDIATYPE
media type is invalid or not supported by volume
Explanation:
The specified volume supports multiple media types where a single media type is required, or
the volume does not support the specified media type.
User Action:
Re-enter the command specifying a single media type that is already supported by the volume.
INVMSG
invalid message via !AZ
Explanation:
An invalid message was received MDMS software. This could be due to a network problem or, a
non-MDMS process sending messages in error or, an internal error.
MDMS Messages C–18
MDMS Messages
User Action:
If the problem persists and no non-MDMS process can be identified then provide copies of the
MDMS command issued, the database files and the server's logfile for further analysis.
INVNODNAM
invalid node name specification
Explanation:
A node name for a DECnet (Phase IV) node specification has an invalid syntax.
User Action:
Correct the node name and retry.
INVPORTS
invalid port number specification
Explanation:
The MDMS server did not start up because the logical name MDMS$TCPIP_SND_PORTS in
file MDMS$SYSTARTUP.COM specifies and illegal port number range. A legal port number
range is of the form "low_port_number-high_port_number".
User Action:
Correct the port number range for the logical name MDMS$TCPIP_SND_PORTS in file
MDMS$SYSTARTUP.COM. Then start the server.
INVPOSITION
invalid jukebox position
Explanation:
The position specified is invalid.
User Action:
Position is only valid for jukeboxes with a topology defined. Check that the position is within the
topology ranges, correct and retry. Example: /POSITION=(1,2,1)
INVRETDAYS
invalid retention days specified
Explanation:
You entered an invalid value for the retention days. Valid values are 0 to 9999 days. If you wish
for no expiration of volumes, specify /NOEXPIRATION_DATE.
User Action:
Enter a value between 0 and 9999.
INVRETRY
invalid value for retry count or interval
Explanation:
You specified an invalid value for either or both the retry count or interval. In addition, it is
invalid to specify an interval with a retry limit of zero or nolimit.
MDMS Messages C–19
MDMS Messages
User Action:
Use values within the following ranges:
•
RETRY_LIMIT: 0 - 10000 or NOLIMIT
•
INTERVAL: 00:01:00 - 01:00:00 (1 - 60 mins)
INVRETRYINTERVAL
invalid value for retry interval
Explanation:
You specified an invalid value for retry interval. In addition, it is invalid to specify an interval
with a retry limit of zero.
User Action:
Use a value within the following range only if retry limit is non-zero: 00:01:00 - 01:00:00 (1 - 60
mins)
INVRETRYLIMIT
invalid value for retry limit
Explanation:
You specified an invalid value for retry limit.
User Action:
Use a value in the range 0 to maximum integer or use /NORETRY_LIMIT
INVSCHEDENUM
invalid scheduling translation defined
Explanation:
An invalid parameter translation was entered for a scheduling option.
User Action:
Report the incident to HP.
INVSCHEDOPT
invalid schedule options entered
Explanation:
You entered invalid schedule date/time options for a schedule object. The following values are
allowed:
•
DATES: List of values or ranges, values 1 - 31
•
DAYS: List of values or ranges, values MON - SUN
•
MONTHS: List of values or ranges, values JAN - DEC
•
TIMES: List of values, 00:00 - 23:59
•
INCLUDE: List of dates 01-Jan-yyyy - 31-Dec-yyyy
•
EXCLUDE: List of dates 01-Jan-yyyy - 31-Dec-yyyy
The yyyy for INCLUDE and EXCLUDE must be between the current year and up to 9 years into
the future (e.g. 2001-2010). If omitted, the current year is used.
User Action:
Re-enter the command with valid values.
MDMS Messages C–20
MDMS Messages
INVSCHEDPARAM
inavlid scheduling parameter defined
Explanation:
An invalid parameter was entered for a scheduling option.
User Action:
Report the incident to HP.
INVSELECT
invalid selection criteria
Explanation:
The selection criteria specified on an allocate command are invalid.
User Action:
Check the command with the documentation and re-enter with a valid combination of selection
criteria.
INVSLOT
invalid slot or slot range specified
Explanation:
The slot or slot range specified when moving volumes into a magazine or jukebox was invalid,
or the specified slots were already occupied.
User Action:
Specify valid empty slots and re-enter.
INVSLOTRANGE
invalid slot range
Explanation:
The slot range was invalid. It must be of the form: 1-100 1,100-200,300-400 The only characters
allowed are comma, dash, and numbers (0-9).
User Action:
Check that you are using the correct form.
INVSPACE
invalid space or space range specified
Explanation:
The space or space range specified when moving volumes into a location was invalid.
User Action:
Specify valid spaces already defined for the location, or specify a space range for the location
INVSRCDEST
invalid source or destination for move
Explanation:
Either the source or destination of a move operation was invalid (does not exist).
MDMS Messages C–21
MDMS Messages
User Action:
If the destination is invalid, enter a correct destination and retry. If a source is invalid, either create the source or correct the current placement of the affected volumes or magazines.
INVSTATE
volume !AZ is in an invalid state for initialization
Explanation:
The volume loaded in the drive for initialization was either allocated or in the transition state and
cannot be initialized.
User Action:
Either the wrong volume was loaded, or the requested volume was in an invalid state. If the
wrong volume was loaded, perform an inventory on the jukebox and retry. If the volume is allocated or in transition, you should not try to initialize the volume.
INVTFULLNAM
invalid TCP/IP fullname
Explanation:
A node full name for a TCP/IP node specification has an invalid syntax.
User Action:
Correct the node name and retry.
INVTOPOLOGY
invalid jukebox topology
Explanation:
The specified topology for a jukebox is invalid.
User Action:
Check topology definition; the towers must be sequentially increasing from 0; there must be a
face, level and slot definition for each tower. Example: /TOPOLOGY=(TOWER=(0,1,2),
FACES=(8,8,8), - LEVELS=(2,3,2), SLOTS=(13,13,13))
INVVOLPLACE
invalid volume placement for operation
Explanation:
The volume has an invalid placement for a load operation.
User Action:
Re-enter the command and use the move option.
INVVOLSTATE
volume in invalid state for operation
Explanation:
The operation cannot be performed on the volume because of the volume state does not allow it.
User Action:
Defer the operation until the volume changes state. If the volume is stuck in a transient state (e.g.
moving), check for an outstanding request and cancel it. If all else fails, manually change the
state.
MDMS Messages C–22
MDMS Messages
JUKEBOXEXISTS
specified jukebox already exists
Explanation:
The specified jukebox already exists and cannot be created.
User Action:
Use a set command to modify the jukebox, or create a new jukebox with a different name.
JUKENOTINIT
jukebox could not be initialized
Explanation:
An operation on a jukebox failed because the jukebox could not be initialized.
User Action:
Check the control, robot name, node name and group name of the jukebox, and correct as
needed. Check access path to jukebox (HSJ etc), correct as needed. Verify MDMS is running on
a remote node. Then retry operation.
JUKETIMEOUT
timeout waiting for jukebox to become available
Explanation:
MDMS timed out waiting for a jukebox to become available. The timeout value is 10 minutes.
User Action:
If the jukebox is in heavy use, try again later. Otherwise, check requests for a hung request - cancel it. Set the jukebox state to available if all else fails.
JUKEUNAVAIL
jukebox is currently unavailable
Explanation:
The jukebox is disabled.
User Action:
Re-enable the jukebox.
JUKUNDEFINED
referenced jukebox !AZ undefined
Explanation:
When creating or modifying a valid object, the object's record contains a reference to a jukebox
name that does not exist.
User Action:
Check spelling of the jukebox name and retry, or create the jukebox object in the database.
LOCATIONEXISTS
specified location already exists
Explanation:
The specified location already exists and cannot be created.
MDMS Messages C–23
MDMS Messages
User Action:
Use a set command to modify the location, or create a new location with a different name.
LOCUNDEFINED
referenced location !AZ undefined
Explanation:
When creating or modifying a valid object, the object's record contains a reference to a location
name that does not exist.
User Action:
Check spelling of the location name and retry, or create the location object in the database.
LOGRESET
Log file !AZ by !AZ on node !AZ
Explanation:
The server logfile has been closed and a new version has been created by a user.
User Action:
None.
MAGAZINEEXISTS
specified magazine already exists
Explanation:
The specified magazine already exists and cannot becreated.
User Action:
Use a set command to modify the magazine, or create a new magazine with a different name.
MAGUNDEFINED
referenced magazine !AZ undefined
Explanation:
When creating or modifying a valid object, the object's record contains a reference to a magazine
name that does not exist.
User Action:
Check spelling of the magazine name and retry, or create the magazine object in the database.
MBLISEXIT
mailbox listener exited
Explanation:
The mailbox listener has exited due to an internal error condition. The mailbox listener is the
server's routine to receive local user requests through mailbox MDMS$MAILBOX.
User Action:
The mailbox listener should be automatically restarted. Provide copies of the MDMS command
issued, the database files and the server's logfile for further analysis.
MBLISRUN
listening on mailbox !AZ logical !AZ
MDMS Messages C–24
MDMS Messages
Explanation:
The server has successfully started the mailbox listener. MDMS commands can now be entered
on this node.
User Action:
None.
MEDIATYPEEXISTS
specified media type already exists
Explanation:
The specified media type already exists and cannot be created.
User Action:
Use a set command to modify the media type, or create a new media type with a different name.
MEDUNDEFINED
referenced media type(s) !AZ undefined
Explanation:
When creating or modifying a valid object, the object's record contains a reference to a media
type that does not exist. One or more of the specified media types may be undefined.
User Action:
Check spelling of the media types and retry, or create the media type objects in the database.
MOVEINCOMPL
move is incomplete
Explanation:
When moving volumes into and out of a jukebox, some of the volumes were not moved.
User Action:
Check that there are enough empty slots in the jukebox when moving in and retry. On a move
out, examine the cause of the failure and retry.
MRDERROR
error accessing jukebox with MRD
Explanation:
MDMS encountered an error when performing a jukebox operation. An accompanying message
gives more detail.
User Action:
Examine the accompanying message and perform corrective actions to the hardware, the volume
or the database, and optionally retry the operation.
MRDMSG
!AZ
Explanation:
This is a more detailed MRD error message which accompanies MRDERROR.
User Action:
Check the MRU error message file.
MDMS Messages C–25
MDMS Messages
NOACCESS
no user access to object for operation
Explanation:
You attempted to perform an operation on an object for which you have no access.
User Action:
You need an authorized user to add you to the access control list, otherwise you cannot perform
the requested operation.
NOBINDSELF
volume is already in volume set
Explanation:
You cannot bind this volume into this volume set because it already a member of the volume set.
User Action:
Use another volume.
NOCHANGES
no attributes were changed in the database
Explanation:
Your set command did not change any attributes in the database because the attributes you
entered were already set to those values.
User Action:
Double-check your command, and re-enter if necessary. Otherwise the database is already set to
what you entered.
NOCHANGESOBJ
no attributes were changed for !AZ !AZ
Explanation:
Your set command did not change any attributes in the database because the attributes you
entered were already set to those values. The message indicates which object was not changed.
User Action:
Double-check your command, and re-enter if necessary. Otherwise the database is already set to
what you entered.
NOCHECK
drive not accessible, check not performed
Explanation:
The specified drive could not be physically accessed and the label check was not performed. The
displayed attributes are taken from the database.
User Action:
Verify the VMS device name, node name or group name in the drive object. Check availability
on system. Verify MDMS is running on a remote node. Determine the reason the drive was not
accessible, fix it and retry.
NODBACC
no access to database server
MDMS Messages C–26
MDMS Messages
Explanation:
This server has no access to a database server.
User Action:
Verify the setting of logical name MDMS$DATABASE_SERVERS. Check each node listed
using MDMS SHOW SERVER/NODE=... for connectivity and database access status. Check
the servers logfiles for more information.
NODCSC
DCSC not running
Explanation:
DCSC has not been started.
User Action:
Execute command procedure SYS$STARTUP:DCSC$STARTUP.COM and retry command.
NODEDISABLED
node disabled
Explanation:
The server failed to start up because it is disabled in the database.
User Action:
If necessary correct the setting and start the server again.
NODEEXISTS
specified node already exists
Explanation:
The specified node already exists and cannot be created.
User Action:
Use a set command to modify the node, or create a new node with a different name.
NODENOPRIV
node is not privileged to access database server
Explanation:
A remote server access failed because the user making the DECnet connection is not
MDMS$SERVER or the remote port number is not less than 1024.
User Action:
Verify with DCL command SHOW PROCESS that the remote MDMS server is running under a
username of MDMS$SERVER and/or, verify that logical name MDMS$TCPIP_SND_PORTS
on the remote server node specifies a port number range between 0-1023.
NODENOTENA
node not in database or not fully enabled
Explanation:
The server was not allowed to start up because there is no such node object in the database or its
node object in the database does not specify all network full names correctly.
MDMS Messages C–27
MDMS Messages
User Action:
For a node running DECnet (Phase IV) the node name has to match logical name SYS$NODE
on that node. For a node running DECnet-Plus (Phase V) the node's
DECNET_PLUS_FULLNAME has to match the logical name SYS$NODE_FULLNAME on
that node. For a node running TCP/IP the node's TCPIP_FULLNAME has to match the full
name combined from logical names *INET_HOST and *INET_DOMAIN.
NODENOTINDB
no node object with !AZ name !AZ in database
Explanation:
The current server could not find a node object in the database with a matching DECnet (Phase
IV) or DECnet-Plus (Phase V) or TCP/IP node full name.
User Action:
Use SHOW SERVER/NODES=(...) to see the exact naming of the server's network names. Correct the entry in the database and restart the server.
NODRIVES
no drives match selection criteria
Explanation:
When allocating a drive, none of the drives match the specified selection criteria.
User Action:
Check spelling and re-enter command with valid selection criteria.
NODRVACC
access to drive disallowed
Explanation:
You attempted to allocate, load or unload a drive from a node that is not allowed to access it.
User Action:
The access field in the drive object allows local, remote or all access, and your attempted access
did not conform to the attribute. Use another drive.
NODRVSAVAIL
no drives are currently available
Explanation:
All of the drives matching the selection criteria are currently in use or otherwise unavailable.
User Action:
Check to see if any of the drives are disabled or inaccessible. Re-enter command when corrected.
NODRVSGRP
no drives in the specified group were found
Explanation:
When allocating a drive, no drives on nodes in the specified group were found.
User Action:
Check group name and retry command.
MDMS Messages C–28
MDMS Messages
NODRVSJUKE
no drives in the specified jukebox were found
Explanation:
When allocating a drive, no drives in the specified jukebox were found.
User Action:
Check jukebox name and retry command.
NODRVSLOC
no drives in the specified location were found
Explanation:
When allocating a drives, no drives in the specified location were found.
User Action:
Check location name and retry command.
NODRVSMED
no drives with the specified media type were found
Explanation:
When allocating a drive, no drives with the specified media type were found.
User Action:
Check media type and retry command, or specify the media type for more drives.
NODRVSNOD
no drives on the specified node were found
Explanation:
When allocating a drive, no drives on the specified node were found.
User Action:
Check the node name and retry command.
NODRVSVOL
no drives that can support the specified volume were found
Explanation:
When allocating a drive, no drives that could support the specified volume were found.
User Action:
Check the volume ID and retry command, or check and adjust volume attributes to match a valid
drive.
NODUNDEFINED
referenced node(s) !AZ undefined
Explanation:
When creating or modifying a valid object, the object's record contains a reference to a node
name that does not exist. One or more of the specified nodes may be undefined.
User Action:
Check spelling of the node names and retry, or create the node objects in the database.
MDMS Messages C–29
MDMS Messages
NOFIELDS
no fields specified for report
Explanation:
A REPORT VOLUME command was entered with no fields to select or display.
User Action:
Enter at least one field for the report.
NOINCLUDE
selection attributes not set with no include data
Explanation:
You specified one or more of the following attributes which are not valid unless an include specification is present: DATA_TYPE, INCREMENTAL, NODES, GROUPS The save or restore
object was updated, but selection attributes were not set.
User Action:
These attributes are applicable only when an INCLUDE statement is present. Re-enter the command with an INCLUDE qualifier.
NOINCLUDES
no include specification for selection
Explanation:
A save or restore object had some selection attributes specified, but no include file specification.
The following attributes require an include specification:
•
Data type
•
Incremental
•
Groups
•
Nodes
User Action:
Re-enter the command with an include specification.
NOINTSCHED
internal scheduling not enabled
Explanation:
You attempted to create a schedule object but the domain's scheduler option is set to an external
scheduler. The MDMS schedule object is valid only with scheduler options INTERNAL,
EXTERNAL and SINGLE_SCHEDULER.
User Action:
Schedule your request using the specified external scheduler product and interface.
NOJUKEACC
access to jukebox disallowed
Explanation:
You attempted to use a jukebox from a node that is not allowed to access it.
MDMS Messages C–30
MDMS Messages
User Action:
The access field in the jukebox object allows local, remote or all access, and your attempted
access did not conform to the attribute. Use another jukebox.
NOJUKESPEC
jukebox required on vision option
Explanation:
The jukebox option is missing on a create volume request with the vision option.
User Action:
Re-enter the request and specify a jukebox name and slot range.
NOLICENSE
your current license does not support this operation
Explanation:
The requested operation is not licensed. If you are licensed for ABS_OMT only, you have
attempted to perform an operation that requires a full ABS license.
User Action:
Use an alternative mechanism to perform the operation. If this is not possible, you cannot perform the operation with your current license. You may purchase an upgrade ABS license to
enable full ABS functionality. Contact HP for details.
NOMAGAZINES
no magazines match selection criteria
Explanation:
On a move magazine request using the schedule option, no magazines were scheduled to be
moved.
User Action:
None.
NOMAGSMOVED
no magazines were moved
Explanation:
No magazines were moved for a move magazine operation. An accompanying message gives a
reason.
User Action:
Check the accompanying message, correct and retry.
NOMEDIATYPE
no media type specified when required
Explanation:
An allocation for a volume based on node, group or location also requires the media type to be
specified.
User Action:
Re-enter the command with a media type specification.
MDMS Messages C–31
MDMS Messages
NOMEMORY
not enough memory
Explanation:
The MDMS server failed to allocate enough virtual memory for an operation. This is an internal
error.
User Action:
Provide copies of the MDMS command issued, the database files and the server's logfile for further analysis. Restart the server.
NOOBJECTS
no such objects currently exist
Explanation:
On a show command, there are no such objects currently defined.
User Action:
None.
NOPARAM
required parameter missing
Explanation:
A required input parameter to a request or an API function was missing.
User Action:
Re-enter the command with the missing parameter, or refer to the API specification for required
parameters for each function.
NOPOOLSPEC
no free volumes with no pool or your default pool were found
Explanation:
When allocating a volume, no free volumes that do no have a pool defined or that are in your
default pool were found.
User Action:
Add a pool specification to the command, or define more free volumes with no pool or your
default pool.
NORANGESUPP
slot or space ranges not supported with volset option
Explanation:
On a set volume, you entered the volset option and specified either a slot range or space range.
User Action:
If you want to assign slots or spaces to volumes directly, do not use the volset option.
NORECVPORTS
no available receive port numbers for incoming connections
Explanation:
The MDMS could not start the TCP/IP listener because none of the receive ports specified with
this node's TCPIP_FULLNAME are currently available.
MDMS Messages C–32
MDMS Messages
User Action:
Use a suitable network utility to find a free range of TCP/IP ports which can be used by the
MDMS server. Use the MDMS SET NODE command to specify the new range with the
/TCPIP_FULLNAME then restart the server.
NOREMCONNECT
unable to connect to remote node
Explanation:
The server could not establish a connection to a remote node. See the server's logfile for more
information.
User Action:
Depends on information in the logfile.
NOREQUESTS
no such requests currently exist
Explanation:
No requests exist on the system.
User Action:
None.
NORESEFN
not enough event flags
Explanation:
The server ran out of event flags. This is an internal error.
User Action:
Provide copies of the MDMS command issued, the database files and the server's logfile for further analysis. Restart the server.
NORIGHTS
no rights are shown
Explanation:
When showing a domain, the rights are not shown because you don't have privilege to see the
rights.
User Action:
Nothing. To see rights you need MDMS_SHOW_RIGHTS.
NOSCHEDULE
schedule object invalid for scheduler type or frequency
Explanation:
You specified a schedule object for a non-custom frequency or for an external scheduler option.
A schedule object can only be specified for frequency CUSTOM with domain scheduler type of
INTERNAL, EXTERNAL or SINGLE.
User Action:
Do not specify a schedule name.
MDMS Messages C–33
MDMS Messages
NOSCRATCH
scratch loads not supported for jukebox drives
Explanation:
You attempted a load drive command for a jukebox drive.
User Action:
Scratch loads are not supported for jukebox drives. You must use the load volume command to
load volumes in jukebox drives.
NOSENDPORTS
no available send port numbers for outgoing connection
Explanation:
The server could not make an outgoing TCP/IP connection because none of the send ports specified for the range in logical name MDMS$TCPIP_SND_PORTS are currently available.
User Action:
Use a suitable network utility to find a free range of TCP/IP ports which can be used by the
MDMS server. Change the logical name MDMS$TCPIP_SND_PORTS in file MDMS$SYSTARTUP.COM. Then restart the server.
NOSLOT
not enough slots defined for operation
Explanation:
The command cannot be completed because there are not enough slots specified in the command, or because there are not enough empty slots in the jukebox.
User Action:
If the jukebox is full, move some other volumes out of the jukebox and retry. If there are not
enough slots specified in the command, re-enter with a larger slot range.
NOSTATUS
no status defined
Explanation:
An uninitialized status has been reported. This an internal error.
User Action:
Provide copies of the MDMS command issued, the database files and the server's logfile for further analysis.
NOSUCHDEST
specified destination does not exist
Explanation:
In a move command, the specified destination does not exist.
User Action:
Check spelling or create the destination as needed.
NOSUCHDRIVE
specified drive does not exist
MDMS Messages C–34
MDMS Messages
Explanation:
The specified drive does not exist.
User Action:
Check spelling or create drive as needed.
NOSUCHGROUP
specified group does not exist
Explanation:
The specified group does not exist.
User Action:
Check spelling or create group as needed.
NOSUCHINHERIT
specified inherited object does not exist
Explanation:
On a create of an object, the object specified for inherit does not exist.
User Action:
Check spelling or create the inherited object as needed.
NOSUCHJUKEBOX
specified jukebox does not exist
Explanation:
The specified jukebox does not exist.
User Action:
Check spelling or create jukebox as needed.
NOSUCHLOCATION
specified location does not exist
Explanation:
The specified location does not exist.
User Action:
Check spelling or create location as needed.
NOSUCHMAGAZINE
specified magazine does not exist
Explanation:
The specified magazine does not exist.
User Action:
Check spelling or create magazine as needed.
NOSUCHMEDIATYPE
specified media type does not exist
Explanation:
The specified media type does not exist.
MDMS Messages C–35
MDMS Messages
User Action:
Check spelling or create media type as needed.
NOSUCHNODE
specified node does not exist
Explanation:
The specified node does not exist.
User Action:
Check spelling or create node as needed.
NOSUCHOBJECT
specified object does not exist
Explanation:
The specified object does not exist.
User Action:
Check spelling or create the object as needed.
NOSUCHPOOL
specified pool does not exist
Explanation:
The specified pool does not exist.
User Action:
Check spelling or create pool as needed.
NOSUCHREQUESTID
specified request does not exist
Explanation:
The specified request does not exist on the system.
User Action:
Check the request id again, and re-enter if incorrect.
NOSUCHUSER
no such user on system
Explanation:
The username specified in the command does not exist.
User Action:
Check spelling of the username and re-enter.
NOSUCHVOLUME
specified volume(s) do not exist
Explanation:
The specified volume or volumes do not exist.
User Action:
Check spelling or create volume(s) as needed.
MDMS Messages C–36
MDMS Messages
NOSVRACCOUNT
username !AZ does not exist
Explanation:
The server cannot startup because the username MDMS$SERVER is not defined in file
SYSUAF.DAT.
User Action:
Enter the username of MDMS$SERVER (see Installation manual for account details) and then
start the server.
NOSVRMB
no server mailbox or server not running
Explanation:
The MDMS server is not running on this node or the server is not servicing the mailbox via logical name MDMS$MAILBOX.
User Action:
Use the MDMS$STARTUP procedure with parameter RESTART to restart the server. If the
problem persists, check the server's logfile and file SYS$MANAGER:MDMS$SERVER.LOG
for more information.
NOSYMBOLS
symbols not supported for multiple volumes
Explanation:
A SHOW VOLUME/SYMBOLS command was entered for multiple volumes. The /SYMBOLS
qualifier is only supported for a single volume.
User Action:
Re-enter command with a single volume ID, or don't use the /SYMBOLS qualifier.
NOTALLOCUSER
volume is not allocated to user
Explanation:
You cannot perform the operation on the volume because the volume is not allocated to you.
User Action:
Either use another volume, or (in some cases) you may be able to perform the operation specifying a user name.
NOTSCHEDULED
specified save or restore is not scheduled for execution
Explanation:
The save or restore request did not contain enough information to schedule the request for execution. The request requires the definition of an archive, an environment and a start time.
User Action:
If you wish this request to be scheduled, enter a SET SAVE or SET RESTORE and enter the
required information.
NOUNALLOCDRV
no unallocated drives found for operation
MDMS Messages C–37
MDMS Messages
Explanation:
On an initialize volume request, MDMS could not locate an unallocated drive for the operation.
User Action:
If you had allocated a drive for the operation, deallocate it and retry. If all drives are currently in
use, retry the operation later.
NOVOLSJUKE
no free volumes in the specified jukebox were found
Explanation:
When allocating a volume, no free volumes in the specified jukebox were found.
User Action:
Check jukebox name and retry command, or move some free volumes into the jukebox.
NOVOLSLOC
no free volumes in the specified location were found
Explanation:
When allocating a volume, no free volumes in the specified location were found.
User Action:
Check location name and retry command, or move some free volumes into the location.
NOVOLSMED
no free volumes with the specified media type were found
Explanation:
When allocating a volume, no free volumes with the specified media type were found.
User Action:
Check media type and retry command, or specify the media type for more free volumes.
NOVOLSMOVED
no volumes were moved
Explanation:
No volumes were moved for a move volume operation. An accompanying message gives a reason.
User Action:
Check the accompanying message, correct and retry.
NOVOLSPOOL
no free volumes in the specified pool were found
Explanation:
When allocating a volume, no free volumes in the specified pool were found.
User Action:
Check pool name and retry command, or specify the pool for more free volumes (add them to the
pool).
NOVOLSPROC
no volumes were processed
MDMS Messages C–38
MDMS Messages
Explanation:
In a create, set or delete volume command, no volumes were processed.
User Action:
Check the volume identifiers and re-enter command.
NOVOLSVOL
no free volumes matching the specified volume were found
Explanation:
When allocating a volume, no free volumes matching the specified volume were found.
User Action:
Check the volume ID and retry command, or add more free volumes with matching criteria.
NOVOLUMES
no volumes match selection criteria
Explanation:
When allocating a volume, no volumes match the specified selection criteria.
User Action:
Check the selection criteria. Specifically check the relevant volume pool. If free volumes are in a
volume pool, the pool name must be specified in the allocation request, or you must be a default
user defined in the pool. You can re-enter the command specifying the volume pool as long as
you are an authorized user. Also check that newly-created volumes are in the FREE state rather
than the UNITIALIZED state.
OBJECTEXISTS
specified object already exists
Explanation:
The specified object already exists and cannot be created.
User Action:
Use a set command to modify the object, or create a new object with a different name.
OBJNOTEXIST
referenced object !AZ does not exist
Explanation:
When attempting to allocate a drive or volume, you specified a selection object that does not
exist.
User Action:
Check spelling of selection criteria objects and retry, or create the object in the database.
OBJREFZERO
dereferenced object with zero count
Explanation:
The MDMS server software detected an internal inconsistency. This is an internal error.
User Action:
Provide copies of the MDMS command issued, the database files and the server's logfile for further analysis.
MDMS Messages C–39
MDMS Messages
PARTIALSUCCESS
some volumes in range were not processed
Explanation:
On a command using a volume range, some of the volumes in the range were not processed.
User Action:
Verify the state of all objects in the range, and issue corrective commands if necessary.
POLUNDEFINED
referenced pool !AZ undefined
Explanation:
When creating or modifying a valid object, the object's record contains a reference to a pool
name that does not exist.
User Action:
Check spelling of the pool name and retry, or create the pool object in the database.
POOLEXISTS
specified pool already exists
Explanation:
The specified pool already exists and cannot be be created.
User Action:
Use a set command to modify the pool, or create a new pool with a different name.
PROFERROR
profile specification error
Explanation:
You specified an invalid user profile for the environment. Verify that the user name specified
(default is ABS) exists on the specified node or cluster.
User Action:
Re-enter with a valid combination of node or cluster name and user name.
QUEUED
operation is queued for processing
Explanation:
The asynchronous request you entered has been queued for processing.
User Action:
You can check on the state of the request by issuing a show requests command.
RDFERROR
error allocating or deallocating RDF device
Explanation:
During an allocation or deallocation of a drive using RDF, the RDF software returned an error.
User Action:
The error following this error is the RDF error return.
MDMS Messages C–40
MDMS Messages
REQUESTID
request ID is !@UL
Explanation:
The number is the request ID for the command just queued.
User Action:
None
RESUNDEFINED
referenced restore(s) !AZ undefined
Explanation:
When creating or modifying a valid object, the object's record contains a reference to a restore
name that does not exist. One or more of the specified restores may be undefined.
User Action:
Check spelling of the restore names and retry, or create the restore objects in the database.
SAVUNDEFINED
referenced save(s) !AZ undefined
Explanation:
When creating or modifying a valid object, the object's record contains a reference to a save
name that does not exist. One or more of the specified saves may be undefined.
User Action:
Check spelling of the save names and retry, or create the save objects in the database.
SCHEDCREATEERR
failed to create a scheduling job
Explanation:
MDMS failed to create a scheduling job.
User Action:
Report the incident to HP.
SCHEDDELETEERR
failed to delete a scheduling job
Explanation:
MDMS failed to delete a scheduling job.
User Action:
Report the incident to HP.
SCHEDDISCONNECT
scheduler disconnected from mailbox
Explanation:
The scheduler was disconnected from a mailbox
User Action:
Report the incident to HP.
MDMS Messages C–41
MDMS Messages
SCHEDDUPJOB
duplicate scheduler job found
Explanation:
MDMS found a duplicate scheduling job
User Action:
Report the incident to HP.
SCHEDEXTSTATUS
external schedule job exited with bad status
Explanation:
An external schedule job exited with bad status
User Action:
Report the incident to HP.
SCHEDLOOPERR
schedule thread terminating with fatal error, restarting
Explanation:
The MDMS internal schedule thread encountered an error and terminated. The thread is
restarted.
User Action:
Report the problem to HP.
SCHEDMODIFYERR
failed to modify a scheduling job
Explanation:
MDMS failed to modify a scheduling job.
User Action:
Report the incident to HP.
SCHEDNOJOBCOMPLETE
no job complete time was returned from a scheduled job
Explanation:
No job complete time was returned from a scheduled job.
User Action:
Report the incident to HP.
SCHEDNOJOBEXISTS
no job exists was returned from a scheduled job
Explanation:
No job exists was returned from a scheduled job.
User Action:
Report the incident to HP.
SCHEDNOJOBNUM
no job number was returned from a scheduled job
MDMS Messages C–42
MDMS Messages
Explanation:
No job number was returned from a scheduled job.
User Action:
Report the incident to HP.
SCHEDNOJOBSTART
no job start time was returned from a scheduled job
Explanation:
No job start time was returned from a scheduled job.
User Action:
Report the incident to HP.
SCHEDNOJOBSTATUS
no job status was returned from a scheduled job
Explanation:
No job status was returned from a scheduled job.
User Action:
Report the incident to HP.
SCHEDNOSUCHJOB
failed to find a scheduling job
Explanation:
MDMS failed to find a scheduling job.
User Action:
Report the incident to HP.
SCHEDSHOWERR
failed to show a scheduling job
Explanation:
MDMS failed to show a scheduling job.
User Action:
Report the incident to HP.
SCHEDSYSTEMERR
failed to access the internal scheduler queue
Explanation:
An MDMS call to a system service failed in the scheduler functions.
User Action:
Report the incident to HP.
SCHEDULECONFL
schedule qualifier and novolume qualifier are incompatible
Explanation:
The /SCHEDULE and /NOVOLUME qualifiers are incompatible for this command.
MDMS Messages C–43
MDMS Messages
User Action:
Use the /SCHEDULE and /VOLSET qualifiers for this command.
SCHEDVOLCONFL
schedule qualifier and volume parameter are incompatible
Explanation:
The /SCHEDULE and the volume parameter are incompatible for this command.
User Action:
Use the /SCHEDULE qualifier and leave the volume parameter blank for this command.
SCHEDULECONFL
schedule qualifier and novolume qualifier are incompatible
Explanation:
The /SCHEDULE and /NOVOLUME qualifiers are incompatible for this command.
User Action:
Use the /SCHEDULE and /VOLSET qualifiers for this command.
SCHEDVOLCONFL
schedule qualifier and volume parameter are incompatible
Explanation:
The /SCHEDULE and the volume parameter are incompatible for this command.
User Action:
Use the /SCHEDULE qualifier and leave the volume parameter blank for this command.
SCHUNDEFINED
referenced schedule(s) !AZ undefined
Explanation:
When creating or modifying a valid object, the object's record contains a reference to a schedule
name that does not exist. One or more of the specified schedules may be undefined.
User Action:
Check spelling of the schedule names and retry, or create the schedule objects in the database.
SELUNDEFINED
referenced selection(s) !AZ undefined
Explanation:
When creating or modifying a valid object, the object's record contains a reference to a selection
name that does not exist. One or more of the specified selections may be undefined.
User Action:
Check spelling of the selection names and retry, or create the selection objects in the database.
SETLOCALEFAIL
an error occurred when accessing locale information
Explanation:
When executing the SETLOCALE function an error occurred.
MDMS Messages C–44
MDMS Messages
User Action:
A user should not see this error.
SETPROTECTED
protected field(s) set, verify consistency
Explanation:
You have directly set a protected field with this command. Normally these fields are maintained
by MDMS. This has the potential to make the database inconsistent and cause other operations
to fail.
User Action:
Do a SHOW /FULL on the object(s) you have just modified and verify that your modifications
leave the object(s) in a consistent state.
SLSDBINUSE
SLS$DB network object in use
Explanation:
The MDMS server could not be started because it could not declare the network task SLS$DB.
The network task SLS$DB is already in use.
User Action:
Check the server's logfile for more information.Check the logical MDMS$SUPPORT_PRE_V3
in the system table. If this is TRUE and the SLS$TAPMGRDB process is running the server
cannot be started. Shut down the SLS$TAPMGRDB process by shutting down SLS. Restart
MDMSV3.0 server and then restart SLS.
SNDMAILFAIL
send mail failed, see log file for more explanation
Explanation:
While sending mail during the scheduled activities, a call to the mail utility failed.
User Action:
Check the log file for the failure code from the mail utility.
SOMESUCCESS
some objects in list were not processed
Explanation:
The request was partially successful, but some of the objects were not processed as shown in the
extended status.
User Action:
Examine the extended status, and retry command as needed.
SPAWNCMDBUFOVR
spawn command buffer overflow
Explanation:
During the mount of a volume, the spawned mount command was too long for the buffer. This is
an internal error.
MDMS Messages C–45
MDMS Messages
User Action:
Provide copies of the MDMS command issued, the database files and the server's logfile for further analysis.
SVRBUGCHECK
internal inconsistency in SERVER
Explanation:
The MDMS server software (MDMS$SERVER.EXE) detected an inconsistency. This is an
internal error.
User Action:
Provide copies of the MDMS command issued, the database files and the server's logfile for further analysis. Restart the server.
SVRDISCON
server disconnected
Explanation:
The server disconnected from the request because of a server problem or a network problem.
User Action:
Check the server's logfile and file SYS$MANAGER:MDMS$SERVER.LOG for more information. Provide copies of the MDMS command issued, the database files and the server's logfile for
further analysis.
SVREXIT
server exited
Explanation:
Server exited. Check the server logfile for more information.
User Action:
Depends on information in the logfile.
SVRLOGERR
server logged error
Explanation:
The server failed to execute the request. Additional information is in the server's logfile.
User Action:
Depends on information in the logfile.
SVRRUN
server already running
Explanation:
The MDMS server is already running.
User Action:
Use the MDMS$SHUTDOWN procedure with parameter RESTART to restart the server.
SVRSTART
Server !AZ!UL.!UL-!UL started
MDMS Messages C–46
MDMS Messages
Explanation:
The server has started up identifying its version and build number.
User Action:
None.
SVRSTARTSTRING
Server !AZ started
Explanation:
The server has started up identifying its version and build number.
User Action:
None.
SVRTERM
Server terminated abnormally
Explanation:
The MDMS server was shut down. This could be caused by a normal user shutdown or it could
be caused by an internal error.
User Action:
Check the server's logfile for more information. If the logfile indicates an error has caused the
server to shut down then provide copies of the MDMS command issued, the database files and
the server's logfile for further analysis.
SVRUNEXP
unexpected error in SERVER !AZ line !UL
Explanation:
The server software detected an internal inconsistency.
User Action:
Provide copies of the MDMS command issued, the database files and the server's logfile for further analysis.
TCPIPLISEXIT
TCP/IP listener exited
Explanation:
The TCP/IP listener has exited due to an internal error condition or because the user has disabled
the TCPIP transport for this node. The TCP/IP listener is the server's routine to receive requests
via TCP/IP.
User Action:
The TCP/IP listener should be automatically restarted unless the TCPIP transport has been disabled for this node. Provide copies of the MDMS command issued, the database files and the
server's logfile for further analysis if the transport has not been disabled by the user.
TCPIPLISRUN
listening on TCP/IP node !AZ port !AZ
Explanation:
The server has successfully started a TCP/IP listener. Requests can now be sent to the server via
TCP/IP.
MDMS Messages C–47
MDMS Messages
User Action:
None.
TOOLARGE
entry is too large
Explanation:
Either entries cannot be added to a list of an MDMS object or existing entries cannot be renamed
because the maximum list size would be exceeded.
User Action:
Remove other elements from list and try again.
TOOMANY
too many objects generated
Explanation:
You attempted to perform an operation that generated too many objects.
User Action:
There is a limit of 1000 objects that may be specified in any volume range, slot range or space
range. Re-enter command with a valid range.
TOOMANYSELECTS
too many selections for a field, use only one
Explanation:
More than one selection was specified for a particular field.
User Action:
Specify only one field to select on.
TOOMANYSORTS
too many sort qualifiers, use only one
Explanation:
When specify more than one field to sort on.
User Action:
Specify only one field to sort on.
UNDEFINEDREFS
success, but object references undefined objects
Explanation:
The command was successful, but the object being created or modified has references to undefined objects. Subsequent messages indicate which objects are undefined.
User Action:
This allows objects to be created in any order, but some operations may not succeed until the
objects are defined. Verify/correct the spelling of the undefined objects or create the objects if
needed.
UNKVOLENT
unknown volume !AZ entered in jukebox !AZ
MDMS Messages C–48
MDMS Messages
Explanation:
A volume unknown to MDMS has been entered into a jukebox.
User Action:
Use the INVENTORY command to make the volume known to MDMS or use a jukebox utility
program (CARTRIDGE or MRU) to eject the volume from the jukebox.
UNSUPPORTED
unsupported function
Explanation:
You attempted to perform an unsupported function.
User Action:
None.
UNSUPPORTED1
unsupported function !AZ
Explanation:
You attempted to perform an unsupported function.
User Action:
None.
UNSUPRECVER
unsupported version for record !AZ in database !AZ
Explanation:
The server has detected unsupported records in a database file. These records will be ignored.
User Action:
Consult the documentation about possible conversion procedures provided for this version of
MDMS.
USERNOTAUTH
user is not authorized for volume pool
Explanation:
When allocating a volume, you specified a pool for which you are not authorized.
User Action:
Specify a pool for which you are authorized, or add your name to the list of authorized users for
the pool. Make sure the authorized user includes the node name or group name in the pool
object.
VISIONCONFL
vision option and volume parameter are incompatible
Explanation:
You attempted to create volumes with the vision option and the volume parameter. This is not
supported.
MDMS Messages C–49
MDMS Messages
User Action:
The vision option is used to create volumes with the volume identifiers read by the vision system
on a jukebox. Re-enter the command with either the vision option (specifying jukebox and slot
range), or with volume identifier(s), but not both.
VOLALRALLOC
specified volume is already allocated
Explanation:
You attempted to allocate a volume that is already allocated.
User Action:
Use another volume.
VOLALRINIT
volume is already initialized and contains data
Explanation:
When initializing a volume, MDMS detected that the volume is already initialized and contains
data.
User Action:
If you are sure you still want to initialize the volume, re-enter the command with the overwrite
option.
VOLIDICM
volume ID code missing
Explanation:
The volume ID is missing in a request.
User Action:
Provide voluem ID and retry request.
VOLINDRV
volume is currently in a drive
Explanation:
When allocating a volume, the volume is either moving or in a drive, and nopreferred was specified.
User Action:
Wait for the volume to be moved or unloaded, or use the preferred option.
VOLINJUKE
volume is in a jukebox
Explanation:
You attempted load a volume that is currently in a jukebox into a drive that is not in the jukebox.
User Action:
Load the volume into a drive within the current jukebox, or check the jukebox name for the
drive.
VOLINSET
volume is already bound to a volume set
MDMS Messages C–50
MDMS Messages
Explanation:
You cannot bind this volume because it is already in a volume set and is not the first volume in
the set.
User Action:
Use another volume, or specify the first volume in the volume set.
VOLLOST
volume location is unknown
Explanation:
The volume's location is unknown.
User Action:
Check if the volume's placement is in a magazine, and if so if the magazine is defined. If not,
create the magazine. Also check the magazine's placement.
VOLMOVE
volume cannot be loaded but can be moved to jukebox or drive
Explanation:
The volume is not currently in a placement where it can be loaded, but can be moved there.
User Action:
Move the volume to the drive, or use the automatic move option on the load and retry.
VOLMOVING
volume is currently being moved
Explanation:
In a move, load or unload command, the specified volume is already being moved.
User Action:
Wait for volume to come to a stable placement and retry. If the volume is stuck in the moving
placement, check for an outstanding request and cancel it. If all else fails, manually change volume state.
VOLNOTALLOC
specified volume is not allocated
Explanation:
You attempted to bind or deallocate a volume that is not allocated.
User Action:
None for deallocate. For bind, allocate the volume and then bind it to the set, or use another volume.
VOLNOTBOUND
volume is not bound to a volume set
Explanation:
You attempted to unbind a volume that is not in a volume set.
User Action:
None.
MDMS Messages C–51
MDMS Messages
VOLNOTINACS
one or more volumes are not in this ACS
Explanation:
One or more volumes for the command are not in this ACS.
User Action:
Verify that all volumes are in the same ACS and that the ACS id is correct.
VOLNOTINJUKE
volume is not in a jukebox
Explanation:
When loading a volume into a drive, the volume is not in a jukebox.
User Action:
Use the move option and retry the load. This will issue OPCOM messages to move the volume
into the jukebox.
VOLNOTINPOOL
loaded volume is not in the specified pool
Explanation:
During a scratch load of a volume in a drive, the volume loaded was not in the requested pool.
User Action:
Load another volume that is in the requested pool. A recommended volume is printed in the
OPCOM message. Note that if no pool was specified, the volume must have no pool defined.
VOLNOTLOADED
the volume is not loaded in a drive
Explanation:
On an unload request, the volume is not recorded as loaded in a drive.
User Action:
If the volume is not in a drive, none. If it is, issue an unload drive command to unload it.
VOLONOTHDRV
volume is currently in another drive
Explanation:
When loading a volume, the volume was found in another drive.
User Action:
Wait for the volume to be unloaded, or unload the volume and retry.
VOLSALLOC
!AZ volumes were successfully allocated
Explanation:
When attempting to allocate multiple volumes using the quantity option, some but not all of the
requested quantity of volumes were allocated.
User Action:
See accompanying message as to why not all volumes were allocated.
MDMS Messages C–52
MDMS Messages
VOLSDRIVES
one or more of the volumes are in drives or are moving
Explanation:
One or more of the volumes in the move request are in drives and cannot be moved. A show volume /brief will identify which volumes are in drives.
User Action:
Unload the volume(s) in drives and retry, or retry without specifying the volumes in drives.
VOLUMEEXISTS
specified volume(s) already exist
Explanation:
The specified volume or volumes already exist and cannot be be created.
User Action:
Use a set command to modify the volume(s), or create new volume(s) with different names.
VOLUNDEFINED
referenced volume !AZ undefined
Explanation:
When creating or modifying a valid object, the object's record contains a reference to a volume
ID that does not exist.
User Action:
Check spelling of the volume ID and retry, or create the volume object in the database.
VOLWRTLCK
volume loaded with hardware write-lock
Explanation:
The requested volume was loaded in a drive, but is hardware write-locked when write access
was requested.
User Action:
If you need to write to the volume, unload it, physically enable it for write, and re-load it.
WRONGLABEL
initializing volume !AZ as !AZ is disallowed
Explanation:
The label of the volume loaded in the drive for initialization does not match the requested volume label and there is data on the volume. Or initializing the volume with the requested label
causes duplicate volumes in the same jukebox or location.
User Action:
If you wish to overwrite the volume label, re-issue the command with the overwrite qualifier. If
there are duplicate volumes in the same location or jukebox you need to move the other volume
from the jukebox or location before retrying.
WRONGVOLUME
wrong volume label or unlabelled volume was loaded
MDMS Messages C–53
MDMS Messages
Explanation:
On a load volume command, MDMS loaded a volume with the wrong volume label or a blank
volume label into the drive.
User Action:
Check the volume, and optionally perform an initialization of the volume and retry. If this message is displayed in an OPCOM message, you will need another free drive to perform the initialization. The volume has been unloaded.
MDMS Messages C–54
D
Converting SLS/MDMS V2.X to MDMS V4
D.1 Converting SLS/MDMS V2.X Symbols and Database
This section describes how to convert the SLS/MDMS V2.X symbols and database to Media,
Device and Management Services Version 4 (MDMS). The conversion is automated as much as
possible, however, you will need to make some corrections or add attributes to the objects that
were not present in SLS/MDMS V2.X.
Before doing the conversion, you should read Chapter 11 - MDMS Configuration in this Guide
to Operations to become familiar with configuration requirements.
All phases of the conversion process should be done on the first database node on which you
installed MDMS V4. During this process you will go through all phases of the conversion:
1.
Convert the symbols in SYS$STARTUP:TAPESTART.COM into the following objects:
•
Locations
•
Domain
•
Nodes
•
Media types
•
Jukeboxes
•
Drives
2.
Convert the database authorization file, VALIDATE.DAT, into node objects.
•
Convert the rest of the database files:
•
Pool Authorization file (POOLAUTH.DAT)
•
Slot Definition file (SLOTMAST.DAT)
•
Volume Database file (TAPEMAST.DAT)
•
Magazine Database file (SLS$MAGAZINE_MASTER_FILE.DAT)
When you install on any other node that does not use the same TAPESTART.COM as the
database node, you only do the conversion of TAPESTART.COM
.
D.1.1 Executing the Conversion Command Procedure
To execute the conversion command procedure, type in the following command:
$ @MDMS$SYSTEM:MDMS$CONVERT_V2_TO_V3
The command procedure will introduce itself and then ask what parts of the SLS/MDMS V2.x
you would like to convert.
Converting SLS/MDMS V2.X to MDMS V4 D–1
Converting SLS/MDMS V2.X to MDMS V4
D.1 Converting SLS/MDMS V2.X Symbols and Database
During the conversion, the conversion program will allow you to start and stop the MDMS
server. The MDMS server needs to be running when converting TAPESTART.COM and the
database authorization file. The MDMS should not be running during the conversion of the other
database files.
During the conversion of TAPESTART.COM the conversion program generates the following
file:
$ MDMS$SYSTEM:MDMS$LOAD_DB_nodename.COM
This file contains the MDMS commands to create the objects in the database. You have the
choice to execute this command procedure or not during the conversion.
The conversion of the database files are done by reading the SLS/MDMS V2.x database file and
creating objects in the MDMS V4 database files.
You must have the SLS/MDMS V2.x DB server shutdown during the conversion process. Use
the following command to shut down the SLS/MDMS V2.x DB server:
$ @SLS$SYSTEM:SLS$SHUTDOWN
D.1.2 Resolving Conflicts During the Conversion
Because of the difference between SLS/MDMS V2.x and MDMS V4 there will be conflicts
during the conversion. Instead of stopping the conversion program and asking you about each
conflict, the conversion program generates the following file during each conversion:
$ MDMS$MDMS$LOAD_DB_CONFLICTS_nodename.COM
Where nodename is the name of the node you ran the conversion on. This file is not meant to be
executed, it is there for you to look at and see what commands executed and caused a change in
the database. This change is flagged because there was already an object in the database or this
command changed an attribute of the object.
An example could be that you had two media types of the same name but one specified
compressed and one other specified non compressed. This would cause a conflict. MDMS V4
does not allow two media types with the same name but different attributes. What you see in the
conflict file would be the command that tried to create the same media type. You will have to
create a new media type.
Table D–1 shows the symbols in TAPESTART.COM file and what conflicts they may cause.
At the completion of the conversion of the database files, you will see a message that notes the
objects that where in an object but not defined in the database. For example: the conversion
program found a pool in a volume record that was not a pool object.
Table D–1 Symbols in TAPESTART.COM
TAPESTART.COM
Symbol
MDMS V4 Attribute or
Object
Possible conflict
ALLOCSCRATCH
If defined, adds the
SCRATCH_TIME
attribute to the domain object.
If the ALLOCSCRATCH symbol is different in different TAPESTART.COM
files a line is added to the conflict file.
Converting SLS/MDMS V2.X to MDMS V4 D-2
Converting SLS/MDMS V2.X to MDMS V4
D.1 Converting SLS/MDMS V2.X Symbols and Database
Table D–1 Symbols in TAPESTART.COM
DB_NODES
If defined, creates a node object
for the nodes in the
DB_NODES list.
A conflict can be generated if the node
exists and an attribute changed with a
different TAPESTART.COM file. Every
drive and jukebox definition in the TAPESTART.COM can cause a node to be
created with a
/NODATABASE_SERVER qualifier. A
DB node will change the attribute to
database server, this can cause a line to
be added to the conflict file.
DCSC_n_NODES
If defined, creates a node object
and adds the node attribute to
the DCSC jukebox.
All adds of nodes to jukeboxes cause a
line to be added to the conflict file.
DCSC_DRIVES
If defined, creates a drive object
for DCSC.
If an attribute is different when adding
attributes a line is added to the conflict
file.
DENS_x
If defined, adds the density or
compaction attribute to a media
type. If the value is COMP or
NOCOMP then the compaction
attribute is define: YES or NO.
If the density is anything other
than COMP or NOCOMP then
the value is placed in the density
attribute.
A line is added to the conflict file if the
DENS_x is different.
FRESTA
If defined, adds the deallocate
state attribute to the domain
object.
If the FRESTA symbol is different in
different TAPESTART.COM files a line
is added to the conflict file.
LOC
Creates a location object and
also sets the
ONSITE_LOCATION attribute
in domain object.
If the object exists or is different than the
onsite location attribute in the domain
object a line to be added to the conflict
file. This can happen when you have different LOC symbol in two TAPESTART.COM files.
MAXSCRATCH
If defined, adds the maximum
scratch time attribute to the
domain object.
If the MAXSCRATCH symbol is different in different TAPESTART.COM files
a line is added to the conflict file.
MTYPE_x
Creates a media type object for
each MTYPE_x.
A line is added to the conflict file if a
media type is already in the database and
another one has the same name. In
SLS/MDMS V2.x you could have the
same media type name with compaction
and nocompaction. In MDMS you cannot have two media types with the same
name. You need to change the name of
one of the media type and enter it into
the database. You will also have to
change ABS or HSM to reflect this.
Also, you may have to change volume
and drive objects.
Converting SLS/MDMS V2.X to MDMS V4 D–3
Converting SLS/MDMS V2.X to MDMS V4
D.1 Converting SLS/MDMS V2.X Symbols and Database
Table D–1 Symbols in TAPESTART.COM
NET_REQUEST_TIM
EOUT
If defined, adds the
NETWORK_TIMEOUT
attribute to the domain object.
If the NET_REQUEST_TIMEOUT is
different in different TAPESTART.COM files a line is added to the
conflict file.
PROTECTION
Adds the default protection to
the domain object.
A line is added to the conflict file if the
protection is changed.
QUICKLOAD
When drives are created, this
attribute is added as automatic
reply.
A line is added to the conflict file if a
drive’s automatic reply is changed.
TAPE_JUKEBOXES
Creates a jukebox object for
each jukebox in the list.
A line is added to the conflict file if a
jukebox is already defined and any of the
attributes change.
TAPEPURGE_MAIL
If defined, adds the mail
attribute to the domain object.
If the TAPEPURGE_MAIL is different
in different TAPESTART.COM files a
line is added to the conflict file.
TOPERS
If defined, adds the Opcom
class attribute to the domain
object.
If the TOPERS symbol is different in
different TAPESTART.COM files a line
is added to the conflict file.
TRANS_AGE
If defined, adds the transition
time attribute to the domain
object.
If the TRANS_AGE symbol is different
in different TAPESTART.COM files a
line is added to the conflict file.
VLT
Creates a location object and
also sets the
OFFSITE_LOCATION
attribute in domain object.
If the object exists or is different than the
offsite location attribute in the domain
object, a line is added to the conflict file.
This can happen when you have different VLT symbol in two TAPESTART.COM files.
Converting SLS/MDMS V2.X to MDMS V4 D-4
Converting SLS/MDMS V2.X to MDMS V4
D.2 Things to Look for After the Conversion
D.2 Things to Look for After the Conversion
Because of the differences between SLS/MDMS V2.x and MDMS V4 you should go through
the objects and check the attributes and make sure that the objects have the attributes that you
want. Table D–2 shows the attributes of objects that you may want to check after the conversion.
Table D–2 Things to Look for After the Conversion
Object
Drive
Attribute
Drive
Description
Make sure you have all of the drives defined. In the MDMS V4
domain, you can only have one drive with a given name. In
SLS/MDMS V2.x you could have two drives with the same
name if they were in different TAPESTART.COM files. You
should make sure that all drives in your domain are in the database. You may have to create one drive with a name of say,
DRIVE1 with a device name of $1$MUA520 and a node of
NODE1. Then create another drive, DRIVE2, with a device
name of $1$MUA520 and a node of NODE2.
A line is added to the conflict file every time a node is added to
a drive. This flags you to check that the node really belongs to
this drive of if you need to create another drive.
Description
Make sure this is the description you want for this drive. This
attribute is not filled in during the conversion program.
Device
Make sure this device name does not have a node name as part
of it.
Nodes
Make sure this list of nodes contains the nodes that can reach
this drive.
Disabled
The conversion program enables all drives. If you want this
drive disabled, then set this attribute to YES.
Shared
The conversion program sets this attribute to NO. NO means
that MDMS does not have to compete with other applications
for this device. If MDMS is supposed to share this device with
other applications set this attribute to YES.
State
Make sure this drive is in the right state. If the drive is not in the
right state, you can set this attribute to the right state or issue the
following command:
$ MDMS SET DRIVE drive/CHECK
Automatic reply
The conversion program sets this attribute from the QUICKLOAD symbol. Make sure this is the way you want the drive to
react.
RW media types
The conversion program added media types to this drive as it
found them. Make sure these are the correct read-write media
types for this drive.
RO Media
Types
There are no read-only media types in SLS/MDMS V2.x so
none is added to the drives during conversion. You may want to
add some read-only media types to the drive object.
Access
The conversion program has no way of knowing what the
access should be, therefore, it sets the access attribute to ALL.
Make sure this is the access you want for this drive.
Jukebox
Make sure this is the jukebox that this drive is in.
Converting SLS/MDMS V2.X to MDMS V4 D–5
Converting SLS/MDMS V2.X to MDMS V4
D.2 Things to Look for After the Conversion
Table D–2 Things to Look for After the Conversion
Domain
Location
Drive Number
Make sure this is the drive number for robot commands.
Description
Make sure this is the description you want for your domain. The
default is: Default MDMS Domain.
Mail
Make sure this is where you want mail sent when a volume
reaches its scratch data and MDMS dellocates it. If you do not
want mail sent, make the value blank.
The default is: SYSTEM.
Offsite location
Make sure this is the offsite location that you want for the
default when you create objects. This was set to the value of
VLT from TAPESTART.COM file. This could be different in
each TAPESTART.COM file.
Onsite location
Make sure this is the onsite location that you want for the
default when you create objects.
Default media
type
Make sure this is the media type you want assigned to volumes
that you do not specify a media type for, while creating.
Deallocate state
Make sure this is the default state you want volumes to go to
after they have reached their scratch date. This could be
changed each time that you convert the TAPESTART.COM file
on a new node.
Opcom classes
Make sure these are the Opcom classes where you want MDMS
OPCOM messages directed. This could be changed each time
you convert the TAPESTART.COM file on a new node.
Protection
Make sure this is the default protection that you want assigned
to volumes that you do not specify a protection for.
Maximum
scratch time
Make sure this is the default maximum scratch time you want
for volumes in your domain. This could be changed each time
that you convert the TAPESTART.COM file on a new node.
Scratch time
Make sure this is the default scratch time you want for volumes
in your domain. This could be changed each time that you convert the TAPESTART.COM file on a new node.
Transition time
Make sure this is the default transition time you want for volumes in your domain. This could be changed each time that you
convert the TAPESTART.COM file on a new node.
Network timeout
Make sure this is the network timeout you want. This could be
changed each time that you convert the TAPESTART.COM file
on a new node.
Description
Make sure this is the description you want for this location. This
attribute is not filled in during the conversion program.
Spaces
The conversion program cannot fill in spaces so make sure you
set the spaces attribute.
In location
The conversion program cannot fill in this attribute so make
sure if this location is in a higher level location you set this
attribute.
Converting SLS/MDMS V2.X to MDMS V4 D-6
Converting SLS/MDMS V2.X to MDMS V4
D.2 Things to Look for After the Conversion
Table D–2 Things to Look for After the Conversion
Media type
Jukebox
Magazine
Media type
Make sure you have all the media types that you had before. In
the MDMS V4 you can only have on media type with the same
name. If you had two media types in SLS/MDMS V2.x with the
same name, the second one is not created in the MDMS V4
database.
Description
The conversion program does not add a description to this
attribute. Type in a description for this attribute.
Density
The density attribute is only changed when the DENS_x symbol in the TAPESTART.COM file is something other than
COMP or NOCOMP. Check to make sure this is correct.
Compaction
This attribute is set to YES if the DENS_x symbol in the TAPESTART.COM file is COMP. It is set to NO if the symbol is
NOCOMP. Check to make sure this is right.
Capacity
This attribute is set to the value of DENS_X from the TAPESTART.COM file if it is not defined as COMP or NOCOMP.
Check to make sure this right.
Description
The conversion program does not put a description for this
attribute. Type in a description to this attribute.
Nodes
Make sure this list of nodes contains the nodes that can reach
the robot.
Location
Make sure this is the location where this jukebox is located.
Disabled
The conversion program enables all jukeboxes. If you want this
jukebox disabled, set this attribute to YES.
Shared
The conversion program sets this attribute to NO. NO means
that MDMS does not expect to compete with other applications
for this jukebox. If MDMS is supposed to share this jukebox
with other applications set this attribute to YES.
Auto reply
The conversion program sets this attribute to NO. Make sure
this is the way you want the jukebox to react.
Access
The conversion program has no way of knowing what the
access should be, therefore, it sets the access attribute to ALL.
Make sure this is the access you want for this jukebox.
Control
Make sure that the attribute is set to MRD if MRD controls the
robot. If the robot is controlled by DCSC, this attribute should
be set to DCSC.
Robot
Make sure this is the robot for this jukebox.
Slot count
You need to set the slot count. The conversion program has no
way of finding out the slot count.
Usage
Make sure the usage is correct for the type of jukebox you have.
The conversion program has no way of finding out if the jukebox uses magazines or not. If this jukebox uses magazines, you
will need to configure it.
Description
The conversion program does not add a description to this
attribute. Type a description for this attribute.
Offsite location
The old magazine record had no offsite location, so you need to
add this attribute.
Converting SLS/MDMS V2.X to MDMS V4 D–7
Converting SLS/MDMS V2.X to MDMS V4
D.2 Things to Look for After the Conversion
Table D–2 Things to Look for After the Conversion
Node
POOL
Offsite date
The old magazine record had no offsite date, so you need to add
this attribute.
Onsite location
The old magazine record had no onsite location, so you need to
add this attribute.
Offsite date
The old magazine record had no onsite date, so you need to add
this attribute.
Description
The conversion program does not put a description in this
attribute. Type a description for this attribute.
DECnet-Plus
fullname
TAPESTART.COM does not support DECnet-Plus, therefore
the conversion program cannot put in the DECnet-Plus
fullname attribute. If this node uses DECnet-Plus, you should
set this attribute.
TCP/IP
fullname
TAPESTART.COM does not support TCP/IP, therefore the
conversion program cannot put in the TCP/IP fullname
attribute. If this node uses TCP/IP, you should set this attribute.
Disabled
The conversion program sets the enabled attribute. Make sure
you want this node enabled.
Database server
If this attribute is set to YES, this node has the potential to
become a database server.
The logical MDMS$DATABASE_SERVERS must have this
node name in is definition of nodes in the domain. This definition is defined in the SYS$STARTUP:MDMS$SYSTARTUP.COM file
Location
Make sure this is the location that this node is located in. During the conversion it could have been changed depending on the
TAPESTART.COM file or what the default was in the domain
object at the time of creation.
Opcom classes
This attribute is defined as the Opcom class in the domain
object when the node was created. Make sure this is the Opcom
class for this node.
Transports
Make sure this is the transport you want. The conversion program has no way of knowing the transports you want so it takes
the defaults.
Description
Make sure this is the description you want for this pool. This
attribute is not filled in during the conversion program.
Authorized
users
Make sure that the comma separated list contains all of the
authorized users for the pool. The users must be specified as
NODE::user
Default users
You need to set this attribute because conversion program does
not set this attribute. The users must be specified as node::user.
VOLUME
The conversion program fills in all needed attributes from the
old record.
This is included so you will not think the volume object was
forgotten.
Converting SLS/MDMS V2.X to MDMS V4 D-8
Converting SLS/MDMS V2.X to MDMS V4
D.3 Using SLS/MDMS V2.x Clients With the MDMS V4 Database
D.3 Using SLS/MDMS V2.x Clients With the MDMS V4 Database
This section describes how older versions of SLS/MDMS can coexist with the new version of
MDMS for the purpose of upgrading your MDMS domain. You may have versions of ABS, or
HSM or SLS which are using SLS/MDMS V2 and which cannot be upgraded or replaced
immediately. MDMS V4 provides limited support for older SLS/MDMS clients to make
upgrading your MDMS domain to the new version as smooth as possible. This limited support
allows rolling upgrade of all SLS/MDMS V2 nodes to MDMS V4. Also ABS and HSM version
3.0 and later have been modified to support either SLS/MDMS V2 or MDMS V2 to make it easy
to switch over to the new MDMS. The upgrade procedure has been completed as soon as all
nodes in your domain are running the new MDMS V4 version exclusively.
D.3.1 Limited Support for SLS/MDMS V2 during Rolling Upgrade
The major difference between SLS/MDMS V2 and MDMS V4 is the way information about
objects and configuration is stored. To support the old version the new server can be set up to
accept requests for DECnet object SLS$DB which was serving the database before. Any
database request sent to SLS$DB will be executed and data returned compatible with old
database client requests. This allows SLS/MDMS V2 database clients to still send their database
requests to the new server without any change.
The SLS$DB function in the new MDMS serves and shares information for the following
objects to a V2 database client:
•
Volume information - previously stored in TAPEMAST.DAT
•
Pool information - previously stored in POOLMAST.DAT
•
Magazine information - previously stored in MAGAZINE.DAT
•
Object information - not shared between the old and new MDMS:
•
Drive information - previously stored in TAPESTART.COM
•
Jukebox information - previously stored in TAPESTART.COM
•
Media type information - previously stored in TAPESTART.COM
•
Slot information - previously stored in SLOTMAST.DAT
•
Node information - previously stored in NODE_VALIDATE.DAT
The new MDMS server keeps all its information in a per object database. The MDMS V4
installation process propagates definitions of the objects from the old database to the new V4
database. However, any changes made after the installation of V4 have to be carefully entered by
the user in the old and new databases. Operational problems are possible if the databases
diverge. Therefore it is recommended to complete the upgrade process as quickly as possible.
D.3.2 Upgrading the Domain to MDMS V4
Upgrading your SLS/MDMS V2 domain starts with the nodes, which have been defined as
database servers in symbol DB_NODES in file TAPESTART.COM. Refer to the Installation
Guide for details on how to perform the following steps.
Step 1. Shut down all SLS/MDMS database servers in your SLS/MDMS domain.
Step 2. Install version MDMS V4 on nodes, which have been acting as database servers before.
Step 3. When the new servers are up-and-running check and possibly change the configuration
and database entries so that it matches your previous SLS/MDMS V2 setup
Step 4. Edit SYS$MANAGER:MDMS$SYSTARTUP.COM and make sure that:
Converting SLS/MDMS V2.X to MDMS V4 D–9
Converting SLS/MDMS V2.X to MDMS V4
D.3 Using SLS/MDMS V2.x Clients With the MDMS V4 Database
–
Logical name MDMS$DATABASE_SERVERS include this nodes DECnet (Phase IV)
node name
–
Logical name MDMS$PREV3_SUPPORT is set to TRUE to enable the SLS/MDMS
V2 support function in the new server
–
Logical name MDMS$VERSION3 is set to TRUE to direct ABS and/or HSM to use
the new MDMS V4 interface
If you had to change any of the logical name settings above you have to restart the server using
'@SYS$STARTUP:MDMS$STARTUP RESTART'. You can type the server's logfile to verify
that the DECnet listener for object SLS$DB has been successfully started.
Step 5. To support load, unload and operator requests from old SLS/MDMS clients you have to
edit SYS$MANAGER:TAPESTART.COM and change the line which defines
DB_NODES to read like this:
$ DB_NODES = ""
This prevents a SLS/MDMS V2 server from starting the old database server process
SLS$TAPMGRDB.
Step 6. Start SLS/MDMS V2 with @SYS$STARTUP:SLS$STARTUP.
Use a "STORAGE VOLUME" command to test that you can access the new MDMS V4
database.
Step 7. Now you are ready to start up ABS, HSM or SLS.
Note that no change is necessary for nodes running SLS/MDMS V2 as a database client. For any
old SLS/MDMS client in your domain you have to add its node object to the MDMS V4
database. In V4 all nodes of an MDMS domain have to be registered (see command MDMS
CREATE NODE). These clients can connect to a new MDMS DB server as soon as the new
server is up and running and has been added to the new database.
A node with either local tape drives or local jukeboxes which are accessed from new MDMS V4
servers need to have MDMS V4 installed and running.
A node with either local tape drives or local jukeboxes, which are accessed from old
SLS/MDMS V2 servers, need to have SLS/MDMS V4 running.
If access is required from both old and new servers then both versions need to be started on that
node. But in all cases DB_NODES in all TAPESTART.COM needs to be empty.
D.3.3 Reverting to SLS/MDMS V2
MDMS V4 allows you to convert the MDMS V4 volume database back to the SLS/MDMS V2
TAPEMAST.DAT file. Any changes you did under MDMS V4 for pool and magazine objects
need to be entered manually into V2 database. Any changes you did under MDMS V4 for drive,
jukebox or media type objects need to be updated in file TAPESTART.COM.
The following steps need to be performed to revert back to a SLS/MDMS V2 only domain:
Step 1. Shut down all applications using MDMS (i.e., ABS, HSM and SLS)
Step 2. Shut down all MDMS V4 servers in the domain and deassign system logical name
MDMS$VERSION3 on all nodes.
Step 3. .Convert the new database back to the old database files. Refer to section “Converting
SLS/MDMS V2 Symbols and Database” for instructions.
Step 4. Edit TAPESTART.COM on all SLS/MDMS nodes, which should be database servers
again. Add the node’s DECnet name to the symbol DB_NODES.
Converting SLS/MDMS V2.X to MDMS V4 D-10
Converting SLS/MDMS V2.X to MDMS V4
D.4 Convert from MDMS Version 3 to a V2.X Volume Database
Step 5. Remove the call to MDMS$STARTUP.COM from your SYSTARTUP_VMS.COM.
Step 6. Make sure a call to SLS$STARTUP.COM is included in your
SYSTARTUP_VMS.COM.
Step 7. Start up SLS/MDMS V2 and all applications using it.
D.3.4 Restrictions
During the rolling upgrade period, the following restrictions apply:
•
Only the first media type of a volume object can be used by a SLS/MDMS V2 client.
•
Node names must be exactly the nodes' DECnet (Phase IV) names.
•
Some functions of old V2 utilities will not work. All updates to pools, slots, magazines and
volumes should be preformed on a MDMS V4 node.
D.4 Convert from MDMS Version 3 to a V2.X Volume Database
This section describes how to convert the MDMS V4 volume database back to a SLS/MDMS
V2.X volume database.
If for some reason, you need to convert back to SLS/MDMS V2.X a conversion command
procedure is provided. This conversion procedure does not convert anything other than the
volume database. If you have added new objects, you will have to add these to
TAPESTART.COM or to the following SLS/MDMS V2.X database files:
•
database authorization file (VALIDATE.DAT)
•
Pool Authorization file (POOLAUTH.DAT)
•
Slot Definition file (SLOTMAST.DAT)
•
Volume Database file (TAPEMAST.DAT)
•
Magazine Database file (SLS$MAGAZINE_MASTER_FILE.DAT)
To execute the conversion command procedure, type in the following command:
$ @MDMS$SYSTEM:MDMS$CONVERT_V3_TO_V2
After introductory information, this command procedure will ask you questions to complete the
conversion.
Converting SLS/MDMS V2.X to MDMS V4 D–11
Index
A
Access control lists (ACLs) 5-8
Access Security 1-8
Activity logging 5-1
ANALYZE Command 5-26
Application and User Performance Impeded 5-19
Archive Class
definition 1-4
Archive class 5-13
create 5-24
multiple 5-10
repack 5-23
replace 5-26
reshelve 5-13
same in plus mode as basic 5-39
Audit logging 5-33
B
Backup
considerations 5-10
consolidated 5-28
critical files 5-9
image 5-9
incremental 5-9
nightly 5-30
online cache data 5-11
shelved data 5-10
shelved files 5-10
strategy 5-11
using OpenVMS 5-12
via shelving 5-28
with HSM 5-29
with multiple archive classes 5-10
Basic Mode
Converting to Plus Mode 5-37
C
Cache 1-7
advantages 1-8
exceeding cache capacity 1-10
flushing 1-10, 5-11
HSM Processes 1-9
Magneto-Optical device 1-9
Preshelving 1-9
shelving 1-9
Unshelving 1-9
usage 5-32
Cancelling requests 5-37
Capacity 5-15
Capacity latitude 5-15
Catalog 5-21
analysis 5-26
definition 1-10
managing 5-21
recovering 5-13
repair 5-26
Checkpoint
for Basic to Plus mode 5-37
CHECKPOINT command 5-12
Consolidated Backup 5-1
Converting Basic to Plus 5-1
Copying shelved files 5-2
Creating new archive classes 5-25
creating new archive classes 5-25
critical files 5-4
D
Data
critical files 5-9
safety 5-10
Device
dismounting 5-2
DFS 5-6
access 5-6
Directory files 5-29
Dismounting Disks 5-2
E
Event logging
capabilities 5-33
reinitialize 5-34
types 5-33
Example
ANALYZE Command with Default Confirmation
5-26
ANALYZE/REPAIR/CONFIRM 5-27
ANALYZE/REPAIR/CONFIRM/OUTPUT 5-27
Mode Conversion 5-39
Policy Audit Log Entry 5-35
Shelf Handler Audit Log Entry 5-35
Shelf Handler Error Log Entry 5-35
F
File
Index–1
file header limit 5-33
File header
back up 5-10
Files
contiguous 5-6
critical HSM files 5-5
Critical HSM product files 5-4
extending the index File 5-33
frequent reactive shelving requests 5-18
HSM$PEP_AUDIT.LOG 5-34
HSM$PEP_ERROR.LOG 5-34
HSM$SHP_AUDIT.LOG 5-34
HSM$SHP_ERROR.LOG 5-34
not Shelved 5-6
placed files 5-9
policy audit log 5-34
policy error log 5-34
preshelved 5-4
recovering boot-up files 5-13
recovering critical files 5-5
recovering the HSM$UID file 5-13
restoring 5-31
shelf handler audit log 5-34
shelf handler error log 5-34
should not be preshelved 5-32
that will not be preshelved 5-30
H
High water mark 5-15
HSM
catalog 5-21
data safety 5-25
managing the environment 5-1
recovering the database 5-13
HSM Basic
convert to Plus mode 5-38
HSM Plus
convert from Basic 5-38
HSM policy model 5-13
HSM$MANAGER directory 5-25
I
Image backup 5-9
Incremental backup 5-9
L
Large files 5-6
Latitude, storage capacity 5-14
Log files 5-34
Index–2
accessing 5-34
activity logs 5-36
event logs 5-36
policy audit log 5-35
shelf handler audit log 5-36
shelf handler error log 5-34
Logical Names
for NFS 5-8
for PATHWORKS 5-8
Low water mark 5-15
M
Managing HSM environment
access control lists 5-8
Backing up critical files 5-9
backing up critical files 5-9
backing up online cache 5-9
backup strategies 5-1
cache flushing 5-37
cache usage 5-1
canceling policy requests 5-37
catalog analysis and repair 5-1
catalogs 5-4
consolidated backup 5-28
contiguous and placed files 5-9
converting from Basic mode to Plus mode 5-37
copying shelved files 5-1
critical HSM product files 5-4
disable shelving 5-5
dismounting disks 5-1
enable facility for shelving/unshelving 5-39
ensuring data safety 5-1
entering MDMS information 5-38
extending the index file 5-33
files never shelved/preshelved 5-6
finding lost user data 5-11
image backup 5-12
incremental backup 5-12
Maintaining file headers limit 5-33
maintaining shelving policies 5-13
multiple archive classes 5-10
nightly backups 5-30
offsite storage 5-12
OpenVMS BACKUP 5-13
protecting system files from shelving 5-1, 5-4
ranking policy execution 5-20
recommendations 5-32
recover boot-up files 5-13
recovering data from a lost shelved file 5-12
recovering the HSM$UID files 5-12
renaming disks 5-1
repacking archive classes 5-23
replacing a lost or damaged shelf volume 5-25
Restarting the Shelf Handler 5-38
restore individual files 5-31
restoring critical files 5-5
restoring files to another disk 5-1
Restoring Volumes 5-31
shutting down the shelf handler 5-38
system files and disks 5-5
Using OpenVMS BACKUP 5-9
using SMU LOCATE 5-11
Maximum capacity 5-14
MDMS
entering appropriate information 5-38
Modify file headers 1-4
Multiple archive classes 5-10
N
NFS 5-1
access 5-6
file faults 5-6
Logical Names 5-8
R
Recovering
boot-up files 5-13
critical files 5-5
HSM catalogs 5-12
HSM database 5-12
user data 5-12
Reinitializing log files 5-34
Renaming Disks 5-3
Repack
archive class 5-23
archive classes 5-23
Repair catalog 5-27
Replacing
archive classes 5-1
lost or damaged shelf volume 5-1
replacing a lost/damaged shelf volume 5-25
Restoring
disks and files 5-29
volumes 5-31
Restoring files to a different/new disk 5-4
S
O
Operating efficiency 5-15
P
PATHWORKS 5-1
access 5-6, 5-8
file faults 5-7
logical names 5-8
Performance Impeded 5-19
Policy
audit log 5-34
concepts 5-14
creating 5-15
error logs 5-23
high water mark 5-16
implementing a balance 5-16
low water mark 5-18
maximum capacity 5-14
model 5-15, 5-16
ranking execution 5-20
reactive 5-18
shelving process 5-15
situations 5-16
volume occupancy 5-16
Shelf handler
audit log 5-35
error log 5-35
restart 5-38
shutdown 5-38
Shelved files
access control lists 5-8
copying 5-1
Shelving
catalog 5-11
disable 5-38
goal not reached 5-17
maintaining policies 5-13
Site disaster 5-26
SLS
SBK files 5-29
set up 5-29
SMU CHECKPOINT command 5-11, 5-39
Split-merge
operation 5-23
request disposition 5-23
System disk/file 5-5
System files
protection from shelving 5-1
System operating efficiency 5-15
Index–3