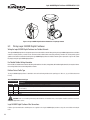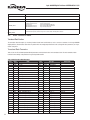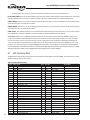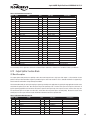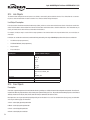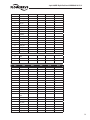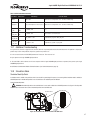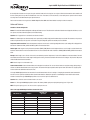
1
USER INSTRUCTIONS Logix 3400MD Digital Positioner FCD LGENIM3405-02 11/13 Installation & Reference Guide Logix 3400MD Digital Positioner LGENIM3405-02 11/13 Contents Introduction5 1 2 3 4 Logix 3400MD Digital Positioner Description 1.1Introduction 1.2 Fieldbus Logix 3400MD Digital Positioner 1.3 Fieldbus Overview Installation Overview 2.1Introduction 2.2 Installation Components 2.3 Installation / Operation Tasks Bench Configuration (Optional) 3.1Introduction 3.2 Bench Check Pre-installation Considerations 4.1Introduction 4.2 Considerations for Logix 3400MD Digital Positioner 10 10 10 12 13 13 13 14 15 15 15 16 16 17 5 Logix 3400MD Digital Positioner Installation18 5.1Introduction 18 5.2 Mounting Variations 18 5.3 Wiring Logix 3400MD Digital Positioner 20 6 Logix 3400MD Digital Positioner Configuration 23 6.1Introduction 23 6.2 Logix 3400MD Digital Positioner Communications 24 6.4 Device Configuration 24 6.6 Simulation Dip Switch 27 6.7 Establishing Communications 27 6.8 Making Initial Checks 28 7Operation 29 7.1Introduction 29 7.2 Operation Tasks 29 8 Configuration Description 29 8.1Introduction 29 8.2 Function Block Application Process 29 8.3 Block Description 30 8.4 Resource Block 32 8.5 Main Transducer Block 34 8.6 Tech Transducer Block 39 8.7 MD Transducer Block 42 8.8 Analog Output Function Block 44 8.9 Digital Output Function Block 47 8.10 Digital Input Function Block 48 8.11 Input Selector Function Block 48 8.12 Output Splitter Function Block 49 3 Logix 3400MD Digital Positioner LGENIM3405-02 11/13 8.13 PID Function Block 8.14 Link Objects 8.15 View Objects 8.16 Alert Objects 8.17 Alarm and Event Reporting 8.18 Trend Objects 8.19 Domain Objects 8.20 Device Description 8.21 Object Dictionary 8.22 System Management 8.23 Network Management 8.24 Logix 3400MD Digital Positioner Variable Enumeration 9Calibration 9.1Introduction 9.2Overview 9.3Calibration 10Troubleshooting 10.1Introduction 10.2Overview 10.3 Device Troubleshooting 10.4 Device Diagnostics 10.5 Block Configuration Errors 10.6 Clearing Block Configuration Errors 10.7 Additional Troubleshooting 10.8 Simulation Mode 10.9 Logix 3400MD Digital Positioner 10.10 Internal Positioner Issues 10.11 Stroke Characterization 10.12 Characterization Procedure 10.13 Initiating a Valve Signature 10.14 Signature Procedure 10.15 Logix 3400MD Function Block Execution Times 10.16 Logix 3400MD Diagnostic Parameters Enabled with TEST_MODE 10.17 Logix 3400MD Fault States 10.18 Logix 3400MD Digital Ouput (DO) Operation 10.19 Logix 3400MD Digital Input (DI) Operation 11 Software Maintenance 50 54 55 61 62 65 65 65 66 66 69 70 77 77 77 78 80 80 80 81 83 84 86 87 87 89 90 94 95 95 97 98 99 100 100 101 101 Appendix A: Sample Configuration Record 101 Glossary101 4 Logix 3400MD Digital Positioner LGENIM3405-02 11/13 Introduction Copyright, Notices and Trademarks While this information is presented in good faith and believed to be accurate, Flowserve disclaims the implied warranties of merchantability and fitness for a particular purpose and makes no express warranties except as may be stated in its written agreement with and for its customer. In no event is Flowserve liable to anyone for any indirect, special or consequential damages. The information and specifications in this document are subject to change without notice. Logix™ 3400MD digital positioner and ValveSight™ is a trademark of Flowserve Corporation. FOUNDATION™ Fieldbus is a trademark of the Fieldbus Foundation. Information Mapping is a trademark of Information Mapping Inc. Windows® is a registered trademark of Microsoft Corporation. Windows NT™ , Windows XP™ , Windows VISTA™ and Windows 7™ are trademarks of Microsoft Corporation. NI-FBUS Configurator™ is a trademark of National Instruments. About This Manual This manual is intended as a ‘how to’ reference for installing, wiring, configuring, starting up, and operating the Valtek Logix 3400MD digital positioner with FOUNDATION fieldbus (FF). This manual provides detailed information for installation and operation to assist first-time Logix 3400MD digital positioner users. This manual is written as the technical guide for the experienced fieldbus user. It does not contain information on fieldbus communications and usage. It is recommended that a user new to fieldbus attend the training courses that are taught by the Fieldbus Foundation to obtain the background knowledge that is needed to operate a fieldbus segment. The sections of information contained in the manual follow this order: • Background and pre-installation • Logix 3400MD digital positioner mechanical and electrical installation • Logix 3400MD digital positioner configuration • Operation • Reference information Symbol Abbreviations This caution symbol on the equipment refers the user to the installation manual for additional information. This symbol appears next to required information in the manual. ATTENTION, Electro-Static Discharge (ESD) hazard. Observe precautions for handling electrostatic sensitive devices. Earth Ground. Functional earth connection. NOTE: This connection shall be bonded to protective earth at the source of supply in accordance with national and local electrical code requirements. Abbreviations AI Analog Input AO Analog Output 5 Logix 3400MD Digital Positioner LGENIM3405-02 11/13 AWG American Wire Gauge DBDatabase DD Device Description DDL Device Description Language DI Digital Input DO Digital Output EEPROM Electrically Erasable Programmable Read Only Memory EMI Electromagnetic Interference FB Function Block FBAP Function Block Application Processor FF FOUNDATION fieldbus IS Input Selector mAMilliamperes MD Maintenance and Diagnostics mmHg Millimeters of Mercury LAS Link Active Scheduler MSP Manufacturer’s Signal Processing NM Network Management NMA Network Management Agent NMIB Network Management Information Base NPT National Pipe Taper (pipe threads) NVNon-volatile OD Object Dictionary OOSOut-of-service OS Output Splitter PC Personal Computer (workstation) PID Proportional Integral Derivative PROM Programmable Read Only Memory PWA Printed Wiring Assembly RAM Random Access Memory RFI Radio Frequency Interference ROM Read Only Memory SM System Management SMA System Management Agent SMIB System Management Information Base VCR Virtual Communication Reference VDC Volts Direct Current VFD Virtual Field Device XDTBMAINMain Transducer Block XDTBTECH Tech Transducer Block XDTBMD MD Transducer Block XMTRTransmitter 6 Logix 3400MD Digital Positioner LGENIM3405-02 11/13 Definitions Term Abbrev. Defininition Alarm The detection of a block leaving a particular state and when it returns back to that state. Application A software program that interacts with blocks, events and objects. One application may interface with other applications or contain more than one application. Block A logical software unit that makes up one named copy of a block and the associated parameters its block type specifies. It can be a resource block, transducer block or a function block. Configuration (of a system or device) A step-in system design: selecting functional units, assigning their locations and identifiers, and defining their interconnections. Device A physical entity capable of performing one or more specific functions. Examples include transmitters, actuators, controllers, operator interfaces. Device Description DD Description of FBAPs within a device. Device Description Language A standardized programming language (similar to C) used to write device descriptions. Device Tag User-defined identifier for device. Event FOUNDATION fieldbus FF Function Block FB An instantaneous occurrence that is significant to scheduling block execution and to the operational (event) view of the application. Communications protocol for a digital, serial, two-way system that interconnects industrial field equipment such as sensors, actuators, and controllers. An executable software object that performs a specific task, such as measurement or control, with inputs and outputs that connect to other entities in a standard way. Function Block Application Process FBAP The part of the device software that executes the function blocks (PID, AO, transducer, or resource blocks). Link Active Scheduler LAS A device which is responsible for keeping a link operational. The LAS executes the link schedule, circulates tokens, distributes time messages and probes for new devices. Macrocycle The least common multiple of all the loop times on a given link. Manufacturer’s Signal Processing MSP A term used to describe signal processing in a device that is not defined by FF specifications. Network Management NM A set of objects and services that provide management of a device’s communication system. Network Management Agent Network Management Information Base NMA NMIB Objects Object Dictionary Part of the device software that operates on network management objects. A collection of objects and parameters comprising configuration, performance and fault-related information for the communication system of a device. Entities, such as blocks, alert objects, trend objects, parameters, display lists, etc. OD Parameters Definitions and descriptions of network visible objects ofa device. Various object dictionaries are contained within a device. The dictionaries contain objects and their associated parameters which support the application in which they are contained. A value or variable which resides in block objects. Proportional Integral Derivative Control PID A standard control algorithm. Also refers to a PID function block. System Management SM Provides services that coordinate the operation of various devices in a distributed fieldbus system. System Management Agent SMA System Management Information Base SMIB Status Virtual Communication Reference VCR Virtual Field Device VFD Part of the device software that operates on system management objects. A collection of objects and parameters comprising configuration and operational information used for control of system management operations. A coded value that qualifies dynamic variables (parameters) in function blocks. This value is usually passed along with the value from block to block. Fully defined in the FFFBAP specifications. A defined communication end-point. Fieldbus communications can primarily only take place along active communications path that consists of two VCR end points. For example, to establish communications between a transducer AO block and another function block, a VCR must be defined at the transducer block and a VCR must be defined at the function block between the two function blocks. A logical grouping of ‘user layer’ functions. Function blocks are grouped into a VFD, and system and network management are grouped into a VFD. 7 Logix 3400MD Digital Positioner LGENIM3405-02 11/13 References Publications from the Fieldbus Foundation Flowserve recommends that the user obtain these publications, which provide additional information on Fieldbus technology: Publication Title Publication Number Technical Overview ,FOUNDATION fieldbus FD-043 Wiring and Installation 31.25 kbit/s, Voltage Mode, Wire MediumApplication Guide AG-140 31.25 kbit/s Intrinsically Safe Systems Application Guide AG-163 Engineering Guidelines AG-181 Function Block Application Process parts1&2 FF-890,FF-891 Fieldbus Specifications Various Documents Publisher Available from the Fieldbus Foundation Contained in the User Layer Specification FF-002 Technical Assistance If the user encounters a problem with the Logix 3400MD digital positioner, the configuration of the Logix 3400MD digital positioner should be checked to verify that all selections are consistent with the application. If the problem persists, call your local Flowserve representative or Flowserve Digital Products support listed in the contact information at www.valvesight.com. Do not return a Logix 3400MD digital positioner without authorization from Flowserve Product Technical Assistance, or until an RGA (Return Goods Authorization) has been issued by Flowserve. Fieldbus Device Version Checking To assure the proper operation of the fieldbus device, always make sure the DDs loaded in the host configurator’s library are the correct ones for the hardware version. Several different hardware versions of your fieldbus devices can possibly reside on various segments at the same time. Fieldbus Foundation has provided a means to tell which version of DD is needed for a particular device in its resource block. The resource block contains the following standard parameters: • MANUFAC_ID-- This contains the manufacture’s Fieldbus FoundationÔregistration ID number. Make sure this number matches the device used. • DEV_TYPE-- This is the Foundation registered device type to designate what kind of device it is. Make sure the device type is correct for the unit. • DEV_REV-- This is the current revision of the device. • DD_REV-- This is the required DD revision level for this device. Make sure the DD supports this revision level. An improper DD may cause unexpected operation or inability to use certain features. The DD files used with the host have names derived from DEV_REV and DD_REV as follows: <DEV_REV><DD_REV>.ffo <DEV_REV><DD_REV>.sym Example: IF DEV_REV is 0x01 and DD_REV is 0x03, then the DD files would be 0103.ffo and 0103 sym. In addition to these Fieldbus Foundation specified parameters, some manufactures may add additional device version information. The example below is of the resource block for a Flowserve Logix 3400MD digital positioner. The revision array is an optional resource parameter, but gives additional information about the internal firmware code versions. This array resides at the bottom of the parameter listing. 8 Logix 3400MD Digital Positioner LGENIM3405-02 11/13 • MANUFAC_ID: This should always equal Flowserve or 0x464c53 (4607059). • DEV_TYPE: This will be 0x0203 (515). This indicates the device is a Logix 3400MD digital positioner. • DEV_REV: This is the revision level of the device. • DD_REV: This is the revision level of the DDs. • REVSION_ARRAY: Contains four elements. These should be viewed in decimal. • Element number 1 (closest to the top) Fieldbus main software version IE.(300 = 3.00) • Element number 2 Fieldbus Softing Stack version number IE.(212 = 2.12). • Element number 3 The Major software version • Element number 4 The Minor software version. 9 Logix 3400MD Digital Positioner LGENIM3405-02 11/13 1 Logix 3400MD Digital Positioner Description 1.1Introduction This section is intended for users who have never worked with the Logix 3400MD digital positioner fieldbus positioner interface. It provides some general information to acquaint the user with the Logix 3400MD digital positioner. CAUTION: Flowserve recommends NI-FBUS Configurator software that runs on a variety of Personal Computer (PC) platforms using Windows NT™ , Windows XP™ , Windows VISTA™ or Windows 7™. It is a bundled Windows software and PC-interface hardware solution that allows quick, error-free configuration and diagnosis of Flowserve control products with FOUNDATION fieldbus communications. The NI-FBUS Configurator allows users to communicate with the Logix 3400MD digital positioner from a remote location to: • Configure the Logix 3400MD digital positioner by selecting and setting operating parameters. • Access diagnostic information to identify configuration, communication, Logix 3400MD digital positioner or process problems. • Calibrate Logix 3400MD digital positioner. • Request and display Logix 3400MD digital positioner data. • Configure the Fieldbus network. 1.2 Fieldbus Logix 3400MD Digital Positioner About the Logix 3400MD Digital Positioner The Logix 3400MD digital positioner includes FOUNDATION fieldbus electronics for operating in a Fieldbus network as an H1 device. It features standard fieldbus function blocks with manufacturerspecific additions for enhanced operation. This Logix 3400MD digital positioner is a Link Master device, which means it can function as the backup Link Active Scheduler in a fieldbus network. In addition to providing the Fieldbus Interface the Logix 3400MD digital positioner can also perform loop control functions. In conjunction with other FOUNDATION fieldbus compliant devices, its function block set allows the formation of an extensive set of basic control applications. Figure 1.1 Fieldbus Positioner (Logix 3400MD Digital Positioner) The Logix 3400MD digital positioner in conjunction with any valve will, in essence, form a Fieldbus valve. When configured in conjunction with an Honeywell ST3000 fieldbus transmitter (for example) a complete control loop can be configured. Figure 1.2 shows a block diagram of the Logix 3400MD digital positioner digital positioner operating with other instrument 10 Logix 3400MD Digital Positioner LGENIM3405-02 11/13 Logix 3400MD DP Valve ST3000 FF AI PID AO XD Fieldbus Figure 1.2 Functional Block Diagram of Logix 3400MD Digital Positioner Operating with other Instruments Theory of Operation Tubed ATO Air Supply Inner-Loop Hall Sensor Output Control Algorithm AO XD Linear Mode Characterization Soft Limits MPC Control Command + Deviation (CMD_USED) Pmax Pmin Gmult (HALL_SENSOR) (GAIN_UPPER) (GAIN_LOWER) D/A Output Percentage Sensor Piezo Valve Voltage Inner Loop Spool Control (GAIN_MULTI) Integration Summer Inner Loop Offset (IL_OFFSET) Stem Position Sensor Position Figure 1.3 Logix 3400MD Digital Positioner Block Diagram NOTE: Variable names inFigure1.3 are reference names only and not accessible to the user. They are for reference use only. The Logix 3400MD digital positioner receives power from the two-wire, fieldbus input signal. A digital signal, sent via fieldbus, is used as the command source. A value of 0 percent is always defined as the valve closed position and a value of 100 percent is always defined as the valve open position. Next, the command value is passed through a characterization/limits algorithm block. The positioner no longer uses cams or other mechanical means to characterize the output of the positioner. This function is done in software, which allows for in-the-field customer adjustment. The positioner has two basic modes: linear and custom characterization. In linear mode, the command signal is passed straight through to the control algorithm in a 1:1 transfer. If custom characterization is enabled, the command source is mapped to a new output curve via a 21-point, user-defined curve. In addition, two-user defined features, Soft Limits and MPC (Minimum Position Cutoff; in fieldbus terminology these are called FINAL_VALUE_CUTOFF_HI and FINAL_VALUE_CUTOFF_LO), may affect the final command signal. The actual command being used to position the stem is called FINAL_VALUE. The FINAL_VALUE is the actual positioning command after any characterization or user limits have been evaluated. The Logix 3400MD digital positioner uses a two-stage, stem positioning algorithm. The two stages are comprised of an inner-loop, spool control and an outer-loop, stem position control. Referring again to Figure 1.3, a stem position sensor provides a measurement of the stem movement. The control command is compared against the stem position. If any deviation exists, the control algorithm sends a signal to the inner-loop control to move the spool, up or down, depending upon the deviation. The inner-loop then quickly adjusts the spool position. The actuator pressures change and the stem begins to move. The stem movement reduces the deviation between control command and stem position. This process continues until the deviation goes to zero. The control algorithm is both proportional and integral. This algorithm will be further explained later in the document. A more detailed example to explain the control function follows. Assume the following configuration: • Unit will receive its command from the FBAP • Custom characterization is disabled (therefore characterization is linear) 11 Logix 3400MD Digital Positioner LGENIM3405-02 11/13 • Soft limits or MPC functions are disabled • Valve has zero deviation with a present input command of 50 percent • Actuator is tubed air-to-open Given these conditions, 50 percent represents a command of 50 percent. Custom characterization is disabled so the command is passed 1:1 to the FINAL_VALUE. Since zero deviation exists, the stem position is also at 50 percent. With the stem at the desired position, the spool valve will be at a position in which no air flow is allowed to either side of the actuator. This is commonly called the null or balanced spool position. Upon a change in the command from 50 percent to 75 percent the positioner sees this as a command of 75 percent. With linear characterization, the FINAL_VALUE becomes 75 percent. Deviation is the difference between control command and stem position: Deviation = 75 percent - 50 percent= +25 percent, where 50 percent is the present stem position. With positive deviation, the control algorithm sends a signal to move the spool upfrom its present position. As the spool moves up, the supply air is applied to the bottom of the actuator and air is exhausted from the top of the actuator. This new pressure differential causes the stem to start moving towards the desired position of 75 percent. As the stem moves, the deviation begins to decrease. The control algorithm begins to reduce the spool opening. This process continues until the deviation goes to zero. At this point, the spool will be back in its null or balanced position. Stem movement will stop. Desired stem position has now been achieved. One important parameter should be discussed at this point: Inner loop offset or spool offset. Referring to Figure 1.3, a number called inner loop offset (SPOOL_OFFSET) is added to the output of the control algorithm. In order for the spool to remain in its null or balanced position, the control algorithm must output a non-zero spool command. This is the purpose of the inner loop offset. The value of this number is equivalent to the signal that must be sent to spool position control to bring it to a null position with zero stem deviation. This parameter is important for proper control and will be discussed further in the Control and Tuning section. 1.3 Fieldbus Overview Understanding Fieldbus Fieldbus is an all-digital, serial, two-way communication system which interconnects industrial ‘field’ equipment such as sensors, actuators, and controllers. Fieldbus is a Local Area Network (LAN) for field instruments with built-in capability to distribute the control application across the network. See Figure 1.4. Control Room Device (Operator Interface) Fieldbus LAN ST 3000 FF Logix 3400IQ Digital Positioner Fieldbus Device Fieldbus Device Figure 1.4 Fieldbus Connecting Control Room and Field Devices The Fieldbus Foundation has defined standards to which field devices and operator/control stations communicate with one another. The communications protocol is an open system to allow all field devices and control equipment which are built to the FOUNDATION fieldbus standard to be integrated into a control system, regardless of the device manufacturer. This inter operability of devices using fieldbus technology is becoming the industry standard for automation and distributed control systems. Hardware Architecture The physical architecture of fieldbus allows installation of fieldbus devices using a twisted-pair cable. Often, existing wiring from analog devices can be used to wire up digital fieldbus devices. Multiple field devices can be connected on one cable (a multi-drop link), rather than conventional point-topoint wiring used for analog devices. See Wiring the Logix 3400MD Digital Positioner to a Fieldbus Network. Software Architecture 12 Fieldbus software architecture provides for more control functions to be available in the microprocessor-based field device. Since fieldbus is a digital communication system, more data is available to operators for process monitoring, trend analysis, report generation, and trouble analysis. Device software changes can be downloaded to field devices remotely from the operator station (or PC) in the control room. Logix 3400MD Digital Positioner LGENIM3405-02 11/13 Application An application is software that contains function block data and operating parameters (objects) which help define the operation of a device such as, sensor data acquisition or control algorithm processing. Some devices may contain more than one application. Function Blocks Usually, a device has a set of functions it can perform. These functions are represented as function blocks within the device. See Figure 1.5. Function blocks are software that provide a general structure for specifying different device functions. Each function block is capable of performing a control function or algorithm. Device functions may include analog input, analog output, and Proportional Integral Derivative (PID) control. These blocks can be connected together to build a process loop. The action of these blocks can be changed by adjusting the block’s configuration and operating parameters. Fieldbus Device Device Application Function Block Function Block Block Parameters Block Parameters Function Block Function Block Block Parameters Block Parameters Fieldbus LAN Figure 1.5 Fieldbus Devices Contain Device Applications and Function Logix 3400MD Digital Positioner Interface Application The Logix 3400MD digital positioner contains the electronics interface compatible for connecting to a fieldbus network. Logix 3400MD digital positioner application is configured using a fieldbus configuration software program. The NI-FBUS Configurator software allows the user to configure blocks, change operating parameters and create linkages between blocks that make up the Logix 3400MD digital positioner application. The changes to the Logix 3400MD digital positioner application are then written to the device and initialized. 2 Installation Overview 2.1Introduction This section provides a list of components needed to install and operate the Logix 3400MD digital positioner. Also provided is a list of typical start-up tasks and places where the user can find detailed information about performing the tasks. 2.2 Installation Components Components Needed for Installation The Logix 3400MD digital positioner contains electronics that enable it to operate using the FOUNDATION fieldbus . This digital interface requires a number of components to provide control and data communications between field devices and the control room environment. Table 2.1 outlines the basic component parts needed to install and operate the Logix 3400MD digital positioner on a fieldbus network. 13 Logix 3400MD Digital Positioner LGENIM3405-02 11/13 Table 2.1 Components Required for Logix 3400MD Digital Positioner Installation Components Description Logix3400MDDigitalPositioner Fieldbus positioner. Power supply Furnishes DC power to fieldbus devices. Power conditioner Acts as a filter to prevent the power supply from interfering with the fieldbus signaling. (May be part of a fieldbus power supply.) Fieldbus cable Twisted pair shielded wire used to interconnect fieldbus devices. Fieldbus terminators A signal termination device used to prevent reflected signals (noise) from distorting fieldbus communications. Fieldbus IS Barriers (For hazardous area installations) Intrinsic safety wire barriers are required for hazardous location installations. Fieldbus wiring blocks Wiring blocks allowing easy connection of devices, cable, terminators, surge suppressors and other fieldbus network components. Operator Interface In the control room an operator station, a personal computer or host computer acts as the operator interface to the fieldbus network. Using supervisory control software applications, the field devices on a fieldbus network can be monitored and controlled at the operator interface. Figure 2.1 shows how these components go together to operate on a fieldbus network. Operator Station or Host Computer T PC = Terminator = Power Conditioner Power Supply PC T Fieldbus Cable T Fieldbus Device Figure 2.1 Fieldbus Network Components 2.3 Installation / Operation Tasks Installation of the Logix 3400MD digital positioner is not difficult. The tasks for installing and operating the Logix 3400MD digital positioner are outlined in Table 2.2. 14 Logix 3400MD Digital Positioner LGENIM3405-02 11/13 Table 2.2 Installation / Operation Task Summary Task - Procedure Refer to . . . Bench Check (optional) (Bench configuration) Section 3, Bench Configuration (Optional) Pre-installation Considerations Section 4, Pre-installation Considerations 2 Install Logix 3400MD digital positioner Mounting •Wiring Section 5, Logix 3400MD Digital Positioner Installation Refer to Logix 3400MD Digital Positioner IOM 3 Power Up Logix 3400MD digital positioner 4 Establish Communications • Initial checks 5 Configure Logix 3400MD digital positioner 6 Operation Section 7, Operation. Also see supervisory control application documentation. - Periodic Maintenance •Calibration Section 9, Calibration Section 10, Troubleshooting - Troubleshooting (if problems arise) Section 11, Software Maintenance - Replacement (if needed) Section 9, Calibration 1 3 Section 5.4, Powering Up the Logix 3400MD Digital Positioner Section 6.7, Establishing Communications Section 6.8, Making Initial Checks Section 6.9, Configuration Tasks. The user manual supplied with the fieldbus configuration application. Bench Configuration (Optional) 3.1Introduction The bench configuration is an optional procedure for checking your device. This section provides a procedure for configuring the Logix 3400MD digital positioner. This allows the user to load configuration information into the device before it is connected in a fieldbus network. This enables the user to perform a bench check and configuration of the device before installation. Calibration is also possible before the device is installed in the field. Device Calibration A stroke calibration should be performed upon installation of the valve. The actuator pressure calibration should be verified on all advanced and pro models (Logix 341X MD and 342X MDdigital positioner). Instructions for performing this calibration can be found in Section 10. 3.2 Bench Check Configure Logix 3400MD Digital Positioner Before Installation Using the NI-FBUS Configurator (or other fieldbus device configuration application), the user can perform an bench check of the Logix 3400MD digital positioner before it is mounted and connected to the process hardware and the fieldbus network. By wiring the device to the fieldbus interface of a PC and using a fieldbus power supply to furnish power to the device, the user can read and write parameters in the Logix 3400MD digital positioner. 1. Connect fieldbus cable to junction block fieldbus interface card to the fieldbus network. CAUTION: Observe polarity of fieldbus cable throughout the network. 2. Loosen end-cap lock and remove end-cap cover from terminal block end of positioner housing. 3. The Logix 3400MD is not polarity sensitive. Connect either wire to either terminal screw. 15 Logix 3400MD Digital Positioner LGENIM3405-02 11/13 Figure 3.1 Connecting wiring device. 4. At the junction block, connect a fieldbus terminator in parallel with the device. 5. Connect a power supply , power conditioner (if needed) and a fieldbus terminator to the fieldbus cable. !Note: Do not connect the shield at the device connect only at the marshalling cabinet. 6. Turn on PC. 7. Turn on power supply. 8. Start fieldbus configuration application on PC. 9. Establish communications. Once communications have established between the Logix 3400MD digital positioner and the PC, the user can then query the Logix 3400MD digital positioner. Assign Bus Address and Device Tag Check the device ID of the Logix 3400MD digital positioner and assign a network node address to the device and assign tag names to the device. Note that the Logix 3400MD digital positioner is shipped with default node addresses and tag names that appear at start-up. These can be changed to actual network addresses and tag names. Typically the device tag and block tags are modified to be unique throughout the network. Device Configuration The user can view the various block parameters that make up the Logix 3400MD digital positioner configuration. Enter parameter values for your process application and write them to the device. Refer to the Logix 3400MD Digital Positioner Start-up Guide for supplemental help. Note: it is recommended to set the device address to at least 20hex or above if using the LAS feature to avoid possible conflicts with the host system. 4 Pre-installation Considerations 4.1Introduction This section reviews several topics which should be considered before installing the Logix 3400MD digital positioner. If replacing an existing Logix 3400MD digital positioner, this section can be skipped. 16 Logix 3400MD Digital Positioner LGENIM3405-02 11/13 4.2 Considerations for Logix 3400MD Digital Positioner Evaluate Conditions The Logix 3400MD digital positioner is designed to operate in common indoor industrial environments as well as outdoors. To assure optimum performance, conditions at the mounting area should be evaluated relative to published device specifications and accepted installation practices for electronic positioners including, but not limited to the following: • • • Environmental Conditions: • Ambient Temperature • Relative Humidity Potential Noise Sources: • Radio Frequency Interference (RFI) • Electromagnetic Interference (EMI) Vibration Sources: • Pumps • Motorized Valves • Process Characteristics: • Temperature • Maximum Pressure Rating Figure 4.1 Typical Mounting Area Considerations Prior to Installation 17 Logix 3400MD Digital Positioner LGENIM3405-02 11/13 Temperature Limits Table 4.1 lists the operating temperature limits for Logix 3400MD digital positioner. Table 4.1 Operating Temperature Limits Ambient Temperature For Intrinsically Safe Applications Logix 3400MD digital positioner Electronics Ratings for Explosion-proof Applications Mechnical Rating °C °F °C °F °C °F -52 to 60 -61 to 140 -52 to 85 -40 to 131 -40 to 80 -40 to 176 Power Requirements The Logix 3400MD digital positioner is a bus-powered (two-wire) device, meaning that it receives its power from the VDC on a fieldbus wiring segment. Certain guidelines and limitations exists regarding the wiring of fieldbus devices. See Section 5.4 for more information on wiring the device. Table 4.2 lists the operating power requirements for the Logix 3400MD digital positioner. Table 4.2 Logix 3400MD Power Requirements Static Power Minimum Maximum 10 VDC @ 23mA 32 VDC @ 23mA Air Supply Requirements The Logix 3400MD digital positioner requires an external air filter (preferably the Valtek coalescing air filter). The air supply should conform to ISA Standard S7.3 (with a dew point at least 18 °F (10°C) below ambient temperature, particle size below one micron, and oil content not to exceed one part per million). For a model with advanced or pro diagnostics (Logix 341X or 342X digital positioner), the internal pressure sensors are rated for continuous operation up to 150 psig. Minimum supply pressure for proper operation is 30 psig. Use of a regulator is highly recommended as it aids in the use of the diagnostics feature. 5 Logix 3400MD Digital Positioner Installation 5.1Introduction This section provides information about the mechanical and electrical installation of the Logix 3400MD digital positioner. It includes procedures for mounting, piping and wiring the Logix 3400MD digital positioner for operation. Refer to Logix 3400MD Digital Positioner IOM in for detailed information. 5.2 Mounting Variations The Logix 3400MD digital positioner can be mounted to a: • Valtek control valve • Other manufacturer’s control valve NOTE: Figure 5.1 through Figure 5.4 show typical installations for comparison 18 Logix 3400MD Digital Positioner LGENIM3405-02 11/13 Figure 5.1 Typical Linear Actuator-mounted Installation Figure 5.2 Rotary Transfer Case Mounting Figure 5.3 Rotary Valve with Four-bar Linkage 19 Logix 3400MD Digital Positioner LGENIM3405-02 11/13 Figure 5.4 Logix 3400MD Digital Positioner Mounted to a Diaphragm Actuator 5.3 Wiring Logix 3400MD Digital Positioner Wiring the Logix 3400MD Digital Positioner to a Fieldbus Network The Logix 3400MD digital positioner is designed to operate in a two-wire fieldbus network. Although wiring the Logix 3400MD digital positioner to a fieldbus network is a simple procedure, a number of rules exist that should be followed when constructing and wiring a network. This section provides general guidelines that should be considered when wiring the Logix 3400MD digital positioner to a fieldbus network segment. A procedure is given in this section for properly wiring the Logix 3400MD digital positioner. For Detailed Fieldbus Wiring Information Refer to Fieldbus Foundation document AG-140, Wiring and Installation 31.25 kbit/s, Voltage Mode, Wire Medium Application Guide, for complete information on wiring fieldbus devices and building fieldbus networks. Fieldbus Device Profile Type The Logix 3400MD digital positioner is identified as either of the following fieldbus device profile types in Table 5.1, (as per Fieldbus document FF-816): Table5.1FOUNDATION fieldbus Profile Types Device Profile Type: 111 113 X X X X X X X X Characteristic Uses standard-power signaling to communicate on a fieldbus network. Is a bus-powered device. (The Logix 3400MD digital positioner does not have an internal power supply and so it receives its DC power from the fieldbus.) Is acceptable for intrinsically safe (I.S.) applications Is acceptable for non I.S. applications FISCO CAUTION: If the user is installing intrinsically safe field devices in hazardous areas, several points should be considered. See Intrinsically Safe Applications section. Logix 3400MD Digital Positioner Wire Connections Fieldbus signal communications and DC power are supplied to the Logix 3400MD digital positioner using the same fieldbus twisted-pair cable. 20 Logix 3400MD Digital Positioner LGENIM3405-02 11/13 Inside the electronics housing of the Logix 3400MD digital positioner is the terminal block for connecting external wiring as shown in Figure 5.5. Table 5.2 explains the usage of the wiring terminals for fieldbus use. For reference purposes Figure 5.5 Logix 3400MD Digital Positioner Terminal Block Table 5.2 Logix 3400MD Digital Positioner Wiring Terminals Wiring Terminal Screw terminals Use Non-polarized Fieldbus cable connections Internal Ground Connection An internal ground terminal is available next to the terminal. (See Figure 5.5.) The terminal can be used to connect the Logix 3400MD digital positioner to earth ground. External Ground Connections While grounding the Logix 3400MD digital positioner is not necessary for proper operation, an external ground terminal on the outside of the electronics housing provides additional noise suppression as well as protection against lightning and static discharge damage. Note that grounding may be required to meet optional approval body certification. Intrinsically Safe Applications Fieldbus barriers should be installed per manufacturer’s instructions for Logix 3400MD digital positioners to be used in intrinsically safe applications. The Logix 3400MD digital positioner carries an intrinsically safe barrier rating of 125 mA. Currents up to 125 mA will not damage the device. The number of field devices on a segment may be limited due to power limitations in hazardous area installations. Special fieldbus barriers and special terminators may be required. Also, the amount of cable may be limited due to its capacitance or inductance per unit length. Detailed Intrinsically Safe Information Refer to Fieldbus Foundation document AG-163, 31.25 kbit/s Intrinsically Safe Systems Application Guide, for detailed information on connecting fieldbus devices for intrinsically safe applications. Logix 3400MD Digital Positioner Wiring Procedure The following procedure shows the steps for connecting fieldbus cable to the Logix 3400MD digital positioner. CAUTION: All wiring must comply with local codes, regulations, and ordinances. 1. Loosen end-cap lock and remove end-cap cover from terminal block end of positioner housing. 21 Logix 3400MD Digital Positioner LGENIM3405-02 11/13 2. Feed fieldbus cable through one of conduit entrances on either side of electronics housing. Plug whichever entrance not used. CAUTION: The Logix 3400MD digital positioner accepts up to 16 AWG (1.5 mm diameter) wire. For reference purposes Figure 5.6 Logix 3400MD Digital Positioner Terminal Block 3. Check ground on the fieldbus cable shield (Fieldbus Cable Shield Connection). Normal practice for grounding a fieldbus cable segment is that the cable shield should be grounded in only one place, preferably a ground point at the power supply, intrinsically safe barrier or near the fieldbus interface. 4. Replace end-cap, and tighten end-cap lock. 5. Connect a flat-braided wire to the external ground screw of the Logix 3400MD digital positioner housing. 6. Using the shortest length possible, connect the other end of the braided wire to a suitable earth ground. Lightning Protection The Logix 3400MD digital positioner contains moderate protection against near lightning strikes. External lightning protection measures should be employed as needed. Conduit Seal Logix 3400MD digital positioners installed as explosion-proof in a Class I, Division 1, Group B Hazardous (Classified) Location in accordance with ANSI/ NFPA 70, the US National Electrical Code (NEC), require a ‘LISTED’ explosion-proof seal to be installed in the conduit, within 18 inches of the Logix 3400MD digital positioner. Crouse-Hinds® type EYS/EYD or EYSX/EYDX are examples of ‘LISTED’ explosionproof seals that meet this requirement. Logix 3400MD digital positioners installed as explosion-proof in a Class I, Division 1, Group B, C or D Hazardous (Classified) Locations do not require an explosion-proof seal to be installed in the conduit. It is recommended that all seals installed on the Logix 3400MD positioner provide an environmental seal to keep moisture from entering into User Interface chamber of the positioner. NOTE: Installation should conform to all national and local electrical code requirements. CAUTION: Do not install in a Hazardous Location without following industry guidelines. Electrical Wiring Summary Verify polarity when making field termination connection. The Logix 3400MD digital positioner is reverse polarity protected. With a fieldbus power supply connected, verify that an LED is blinking to determine if the electronics are running. Only one LED will blink at any given time. Refer to guidelines in FF AG-181 for proper wiring and segment checkout methods. Electrical Wiring Frequently Asked Questions Question: My DCS uses 24VDC, can I run a Logix 3400MD? 22 Logix 3400MD Digital Positioner LGENIM3405-02 11/13 Answer: FF specifies a 10-32V operation range. A fieldbus compatible power supply with terminators should be used. NOTE: The Logix 3400MD is driven from a voltage source, not the typical 4-20 mA supply. Question: I accidentally reversed the voltage supply across the Logix 3400MD digital positioner. Howdo I know if I damaged something? Answer: The Logix 3400MD is non-polarized. Inadvertent connection of the fieldbus supply shouldn’t damage the unit. Question: What is the input resistance of the Logix 3400MD digital positioner? Answer: The Logix 3400MD digital positioner does not have a simple resistive input. This is because the Logix 3400MD digital positioner is an active device. The fieldbus specifications dictate that the input impedance cannot be less than 3k ohms. This will vary according to frequency of the fieldbus communications. Typical power requirements are 23 mA @ 10-32 VDC. NOTE: The user cannot measure across the terminals of an un-powered Logix 3400MD digital positioner and get the effective resistance. It is an impedance device, not a resistive device. 5.4 Powering Up the Logix 3400MD Digital Positioner Pre-power Checklist • Before applying power to the fieldbus network the user should make the following checks: • Verify that the Logix 3400MD digital positioner has been properly mounted and connected to a system. • The Logix 3400MD digital positioner has been properly wired to a fieldbus network. • The Logix 3400MD digital positioner housing has been properly connected to a suitable earth ground. • The operator station or host computer has been installed and connected to the fieldbus network. NOTE: If the user wants to enable the write-protect feature or change the operating mode of the Logix 3400MD digital positioner to simulation mode, the user must change hardware dip switches on the internal electronics boards. This may require that the power be removed from the Logix 3400MD digital positioner. See Section 6.5, Setting Write-protect Feature and Section 10.9, Simulation Mode for details. Power Up Procedure To apply power to the fieldbus network, perform the following steps: 1. Turn on all power supplies that furnish DC power to the fieldbus network. 2. Use a digital voltmeter and measure the DC voltage across the + and - Signal terminals to the Logix 3400MD digital positioner. 3. Verify that the terminal voltage is within the limits listed in Table 4.2, Logix 3400MD Digital Positioner Power Requirements. 6 Logix 3400MD Digital Positioner Configuration 6.1Introduction This section explains the tasks to establish communications and configure the Logix 3400MD digital positioner for the process application. An overview is given of the configuration tasks using the NI-FBUS Configurator application as an example. Detailed information on using the configurator application is found in the user manual supplied with the software. Prior to installing the Logix 3400MD refer to sections 5, 6 and 7 in the Logix 3400MD IOM for information on how to mount, install, wire and start up a Logix 3400MD. 23 Logix 3400MD Digital Positioner LGENIM3405-02 11/13 CAUTION Before proceeding with the tasks in this section the Logix 3400MD digital positioner must be installed and wired correctly. The user should be somewhat familiar with the fieldbus configuration. If the Logix 3400MD digital positioner has not been installed and wired, or if the user is not familiar with device configuration, and/or does not know if the Logix 3400MD digital positioner is configured, please read the other sections of this manual before configuring the Logix 3400MD digital positioner. 6.2 Logix 3400MD Digital Positioner Communications Communications and Control All communications with the Logix 3400MD digital positioner is through an operator station or host computer running supervisory control and monitoring applications. These applications provide the operator interface to fieldbus devices and the fieldbus network. Configuration Applications CAUTION Configuration of the Logix 3400MD digital positioner for the process application is performed also through the operator interface (operator station or PC) running a fieldbus configuration software application. A number of applications are available for the user to configure fieldbus devices. The examples presented in this manual refer to the NI-FBUS Configurator application. Software Compatibility The NI-FBUS Configurator application version specified in Section 1.1 is fully compatible with all Valtek control products with FOUNDATION fieldbus communications option. 6.3 Logix 3400MD Digital Positioner Configuration Process Logix 3400MD Digital Positioner Configuration Configuration of the Logix 3400MD digital positioner (device) involves the following steps: 1. Establishing communication between the operator interface and the device (bringing the Logix 3400MD digital positioner on-line in a fieldbus network). See Section 6.7, Establishing Communications. 2. Making initial checks on the device serial number and firmware revision numbers. See Section 6.8, Making Initial Checks. 3. Using a fieldbus configuration application, creating or making changes to the device configuration. See Section 6.9, Configuration Tasks. 4. Writing the device configuration changes to the device. See Section 6.9, Configuration Tasks. 5. Saving device configuration to disk. See Section 6.9, Configuration Tasks. 6.4 Device Configuration Function Block Application Process All fieldbus devices contain one or more Function Block Application Processes (FBAP) as part of their device configuration. The FBAP in the Logix 3400MD digital positioner is a software application that defines the particular characteristics of the Logix 3400MD digital positioner. The FBAP comprises function blocks, a transducer block and a resource block, plus other functions which support these blocks. Each function block contains a set of operating parameters (some of which can be userconfigured) that define the operating characteristics of the Logix 3400MD digital positioner. Function blocks perform (or execute) their specific functions according to a schedule. This schedule provides the sequence and timing of events which occur within a device and also between other fieldbus devices. This schedule is coordinated with the function block execution schedules in the device and other fieldbus devices on the network. Additional information on the FBAP contained in the Logix 3400MD digital positioner is found in Section 8, Device Configuration. 24 Logix 3400MD Digital Positioner LGENIM3405-02 11/13 Fieldbus Configuration Application The Logix 3400MD digital positioner is configured using a fieldbus configuration application running on a operator station or host computer. The configuration tool allows the user to: Connect function block inputs and outputs according to the process requirements. • Make changes to function block parameters according to the process requirements • Make changes to the schedule of function block execution. • Write the FBAP changes to the device. Mechanical Configuration Issues Air Action: Air-to-open and Air-to-close are determined by the actuator tubing, not the software. When air action selection is made during configuration, the selection is telling the control which way the actuator is tubed. The tubing should be verified as correct prior to a stroke calibration. The top output port on the positioner is called port 1. It should be tubed to the increase open side of the actuator. That is, for an air-to-open actuator, port 1 should go to the bottom of the actuator. The Logix 3400MD positioner has an electrical measurement range of 130°. That is, the electronics will sense stem position over a 130° range of travel of the follower arm. On a rotary valve, the typical rotation is 90°. When installing a Logix 3400MD positioner on a rotary valve, the 90° valve rotation must be centered within the 130° electrical range. If mechanical movement falls outside the electrical measurement range, the positioner can have a dead band at one end of travel in which valve movement cannot be sensed. Question: How do I know if the rotary linkage is centered within the 130° electrical range? Answer: The slot in the take-off arm has enough clearance around the roller pin to move the follower arm slightly. Move the valve to the fully closed position. At this position, move the follower arm within the slot clearance. If the valve does not respond to the movement; linkage adjustment is necessary. Repeat this test at the fully open position. To adjust the stem position linkage, use the A/D feedback variable viewed using AD_RAW_FB parameter. Set TEST_MODE bit ‘Enable diagnostic Variable access.’ With the valve in its mechanical fail position (i.e. no pressure applied), slightly move the follower arm while watching the A/D feedback. If the number does not change, the arm is not centered in the electrical range. (The number will bounce one or two counts due to noise at a fixed position and should not be considered a change, it should move greater than 10 to 20 counts if the linkage is centered correctly). Rotate the take-off arm, if necessary, to bring the linkage in range. This procedure is only necessary on a rotary mounting. For Linear mountings, the red LED will blink if 65° travel is exceeded. Refer to the Calibration section for further information on stroke calibration errors. Default Configuration An FBAP containing default configuration parameters is resident in the firmware of the device and is loaded on power-up. By using the NI-FBUS Configurator (or other fieldbus configuration) application, the user can create or make changes to a FBAP for the device’s process application. Device Configuration Configuring the Logix 3400MD digital positioner results in: • Function blocks that execute according to a user-defined schedule • Measurements that are processed according to various user-configured parameters found within function blocks • An output published on the fieldbus network according to a user-defined publishing schedule. Device Configuration Example A sample printout of a typical device configuration for the Logix 3400MD digital positioner is given in Appendix A, Sample Configuration Record. 25 Logix 3400MD Digital Positioner LGENIM3405-02 11/13 LAS Capability The Logix 3400MD digital positioner is capable of operating as the Link Active Scheduler (LAS). The LAS is a fieldbus device which controls traffic on the network, such as controlling token-rotation and coordinating data publishing. This fieldbus function is active in only one device at any given time on a network. Devices which can be designated as the LAS may be an operator station or a field device. The Logix 3400MD digital positioner can be designated as a LAS so that, in the event of a failure of the primary LAS, control in the field could continue. Please note that the Logix 3400MD digital positioner is not designed to be the primary LAS, and, therefore, the LAS capability in the positioner is regarded as a backup LAS. In some remote applications where there is no host computer continuously connected this device may be configured as the primary LAS. The LAS may be disabled by defining the Logix 3400MD as a Basic device in the host system or performing a factory default reset. Factory default resets the positioner to a basic device 6.5 Setting Write-Protect Feature Write-protect Feature The Logix 3400MD digital positioner is available with a write protect feature. It consists of a dip switch located on the device’s electronics board that can be set to enable read only access (write-protect) to the device’s configuration. When the dip switch is in the “On” position and the corresponding device parameter is set, the device’s configuration parameters and calibration data can only be read or viewed, (device configuration is write protected). ATTENTION: The dip switch is factory set for read- and write-access (not write-protected) “Off” position. (If the dip switch is in the “On” position, the positioner must be powered down before changing the dip switch.) NOTE: The write protect dip switch is used in conjunction with the FEATURE_SEL parameter and is explained below. Refer to the following steps to set the write protect dip switch. 1. Remove power to Logix 3400MD. 2. Loosen cap lock and unscrew the main housing cover of housing. 3. ATTENTION: Using a ground strap or ionizer is highly recommended when handling the electronics module because electrostatic discharges can damage certain circuit components. 4. Locate the dip switch on the main electronics boards in the housing. 5. Set write-protect dip switch to the appropriate position on the electronics board. See Figure 6.1 and Table 6.1. 6. Replace the cover and lock the locking screw DIP Switch Block Off On FF Write Protect Dip Switch Figure 6.1 Write-protect DIP Switch Location on Main PCB Cover 26 Logix 3400MD Digital Positioner LGENIM3405-02 11/13 Table 6.1 Write Protect dip Switch Settings To Set the Dip Switch to: Enable read and write access to the device’s configuration. (Factory-set Off position on the dip switch. default) Enable read only access to device’s configuration. (Write-protect) On position on the dip switch.* Off On Off On Enabling Write Protect Feature The write-protect feature is activated only when the HARD_W_LOCK option is set in the FEATURE_SEL parameter. Once the bit is set and W/R DIP switch is in R position, the device will remain write-protected until the device is powered down and the DIP switch is placed in the off position. See Table 6.2 for truth table. Table 6.2 Write-protect Feature Truth Table When the Write-protect dip switch ... and the FEATURE_SEL HARD_W_LOCK option is set to: main PCB cover is set to: 0 (No) 1 (Yes) Off position Write-protect Disabled Write Protect Disabled On position Write-protect Disabled Write Protect Enabled 6.6 Simulation Dip Switch Simulation dip switch A simulation parameter in the AO block is used to aid in system ‘debug’ if the process is not running. A hardware dip switch is provided to enable or disable the simulate parameter. See Section 10.8 for details on setting the simulation dip switch. (See Figure 10.1.) 6.7 Establishing Communications Starting Communications Once the Logix 3400MD digital positioner is connected to the fieldbus network and powered up, the user is ready to start communicating with the device. The procedure in Table 6.3 outlines the steps to initiate communications with a Logix 3400MD digital positioner using the NI-FBUS Configurator. Table 6.3 Starting Communications with Logix 3400MD Digital Positioner Step Action 1. Check that the fieldbus is powered up. Verify that the power supply is on and connected with the proper polarity. See Table 4.2, Logix 3400MD Digital Positioner Power Requirements for proper voltage levels. 2. Verify that the operator interface is loaded with the NIStart the application on the computer. FBUS Configurator or other configuration application. 3. View the active devices connected to the network. Start the NI-FBUS fieldbus driver and Configurator. NOTE: Network guidelines as out lined in AG181 have been followed 4. Access the Logix 3400MD digital positioner’s blocks and parameters. Start the NI-FBUS Configurator application. Tag Name Assignments If device or block tags have not been assigned to a device, the NI-FBUS Configurator will automatically assign a default device tag name. This is done so that the devices are visible on the network. The user can then change tag names according to the process requirements. 27 Logix 3400MD Digital Positioner LGENIM3405-02 11/13 6.8 Making Initial Checks Identifying the Logix 3400 Digital Positioner Before proceeding, verify the following to make sure that the user is communicating with the correct Logix 3400MD digital positioner: • Device type = 0 x 0203 • Device ID = 464C530203-FLS-LX3400MD-00nnnnnnnn • Device tag, (tag description of the Logix 3400MD digital positioner) • Firmware revision level (revision level of the firmware elements) Table 6.4 Logix 3400MD Digital Positioner Identification Step View Parameter Verify 1 RS.DEV_TYPE The value is = 0x0203 2 DEVICE_REVISION DD_REVISION The values are correct for the DD files provided. 3 6.9 Physical Device Tag NOTE: The device tag name is not contained in a parameter. It can be set and The physical device tag is correct. viewed using the field bus device configurator application. Configuration Tasks Device Configuration Procedure Overview A typical device configuration consists of the following tasks listed in Table 6.5 using the NI-FBUS Configurator application. Details on using the configurator application are found in the NI-FBUS Configurator user manual supplied with the application software. This procedure assumes that the hardware installation of the Logix 3400MD digital positioner is complete and the Logix 3400MD digital positioner is powered up. Table 6.5 Logix 3400MD Digital Positioner Configuration Task List Task Procedure Result 1 Start the fieldbus process application 2 Start the fieldbus configurator application Scans the fieldbus network and provides a listing of all active fieldbus devices on the network or selected link. 3 4 Select a fieldbus device for configuration Change the device and block tags, if desired. 5 28 Configurator windows are displayed on screen listing the active fieldbus devices. Any unassigned tags are given a default tag name by the configurator. Select/add/edit function blocks to create a function block Shows a representation of function blocks in the graphical interface window. application process. NOTE: Configure block objects in the following order: 1. Resource block 2. Transducer block 3. Analog Output block 4. PID block 6 Connect (or wire) function blocks to define process loops. Linkages between function block inputs and outputs are created by using wiring tools. Preconfigured templates can also be used. 7 Change block parameters, if necessary. Parameters changed for the process requirements. 8 Configure trends and alarms Trending and alarms configured according to the process requirements. 9 Adjust the block execution schedule. The function block execution schedule changed according to the process requirements. Logix 3400MD Digital Positioner LGENIM3405-02 11/13 10 Write configuration to the fieldbus network. The configuration changes are sent to the appropriate fieldbus devices on the network. 11 Save the device configuration to disk. A copy of the device configuration file is saved on the hard disk of the computer or other disk. 7 Operation 7.1Introduction This section outlines the tasks for operating and monitoring the Logix 3400MD digital positioner on a fieldbus network. Refer to the Logix 3400MD Digital Positioner Start-up Guide, for additional information. 7.2 Operation Tasks Fieldbus Device Operations Positioning – For the most basic operation of the Logix 3400MD digital positioner the user must write the desired final position value to OUT in the AO block. The AO block MODE_BLK would be set to Manual. The AO block SHED_OPT must be set to anything but uninitialized and the CHANNEL is set to1. The Transducer block MODE_BLK is set to Auto. The Resource block MODE_BLK is set to Auto. Note: A valid schedule must have been downloaded into the device for control from the AO block. Calibration – Set the AO block and Resource block to OOS. Next set the Transducer block MODE_ BLK to Out-of-Service (OOS). Write the desired calibration to CALIBRATE to perform the calibration routine. If performing the actuator pressure transducer calibration, the user will need to first write the supply pressure value into PRESSURE_SUPPLY_CAL_ REF and the correct pressure units (Same as PRESSURE_SUPPLY_CAL REF units) into PRESSURE_UNITS. These are found under the XDTB_MAIN block. When calibrating a pro model positioner (342X model) enter the ACT_SIZE and ACT_AREA before starting the calibration routine. 8 Configuration Description 8.1Introduction This section provides information about the construction and contents of the Logix 3400MD digital positioner Function Block Application Process (FBAP) — the application that defines Logix 3400MD digital positioner function and operation in the process application.) This information provides some understanding of the elements that make up the configuration of the device application. For More Information on FBAP The FBAP elements are described as they apply to the Logix 3400MD digital positioner in the following sections. More detailed information can be found in Fieldbus Foundation documents FF-890 and FF-891 Foundation Specification Function Block Application Process. 8.2 Function Block Application Process Introduction The FBAP comprises a set of elementary functions which are modeled as function blocks. Function blocks provide a general structure for defining different types of device functions (such as analog inputs, analog outputs and PID control). The FBAP also contains other objects that provide other device functions, such as furnishing alarm information, historical data and links to other blocks for transferring data. FBAP Elements 29 Logix 3400MD Digital Positioner LGENIM3405-02 11/13 The key elements of the FBAP are: • Logix block objects and their parameters (and consist of the following block types) • Resource block • Transducer blocks • PID Function block • AO Function block • DO Function block • DI Function block • IS Function block • OS Function block • Link Objects • Alert Objects • Trend Objects • View Objects • Domain Objects Device Objects Link objects allow the transfer of process data from one block to another. View, Alert and Trend objects handle function block parameters for operator interface of views, alarms and events, and historical data. A brief description of these objects is presented in the following sections. 8.3 Block Description Block Objects Blocks are elements that make up the FBAP. The blocks contain data (block objects and parameters) that define the application, such as the inputs and outputs, signal processing and connections to other applications. The Logix 3400MD digital positioner application contains the following block objects: • • • • • • • • • • Resource block Main Transducer block Tech Transducer block MD Transducer block Analog Output (AO) function block Digital Output (DO) function block Digital Input (DI) function block (DI_HI and DI_LO) Proportional Integral Derivative (PID) controller function block Input Selector (IS) function block Output Selector (OS) function block Section 10.15 describes the funtion block execution times. Table 8.1 briefly describes the operation of these blocks. 30 Logix 3400MD Digital Positioner LGENIM3405-02 11/13 Table 8.1 Function Block Application Process Elements Block Type Function Contains data which describes the hardware (physical) characteristics of the device. The resource block does not perform any action, but contains parameters that support application downloads. Transducer blocks Isolate the function blocks from I/O devices such as sensors, actuators, and switches. The transducer block interfaces with the hardware to produce an output. It also contains device-specific parameters, such as calibration and diagnostics parameters. Resource Main Transducer The main transducer block contains all of the parameters/data required for basic functionality of the device The tech transducer block contains parameters/data that can be used to troubleshoot or analyze the device. Tech Transducer The MD transducer block contains parameters/data that are associated with the advanced or pro diagnostics of the device. MD Transducer Performs basic automation functions that are integral to automated control and processing operations. The AO block performs functions like engineering units scaling, output scaling, alarming, and back calculation, when connected as a cascade to a PID or other block The DO block converts the value in SP_D to something useful for the hardware found at the CHANNEL selection. The DI block takes the manufacturer’s discrete input data, selected by channel number, and makes it available to other function blocks at its output. This block is intended to be used in a forward path only and is not intended to receive signals from the output of a controller. There is no back calculation support or propagation of control status values. Analog Output (AO) function block Digital Output (DO) function block Digital Input (DI) function block Input Selector (IS) function block Output Splitter (OS) function block Performs standard or robust proportional integral derivative algorithm used in closed-loop processing. PID Controller function block Resource Resource Block AO Block PID Block IN Algorithm OUT BKCAL_IN CAS_IN Scaling OUT Transducer Block channel Value Logix Positioner Circuitry BKCAL_OUT Subscribe read/write read/write read/write read/write Communication Stack Figure 8.1 FBAP Block Diagram Example Block Descriptions Each block contains parameters that are standard Fieldbus Foundation-defined parameters. In other words, the parameters are pre-defined as part of the FF protocol for all fieldbus devices. Additionally, parameters exist which are defined by Flowserve and are specific to the Valtek Logix 3400MD digital positioner. The following block descriptions list the predefined FF parameters included as part of the block as well as the Flowserve-defined parameters. A complete description for the FF parameters is provided in the Fieldbus Foundation document FF-891, Foundation Specification Function Block Application Process Part 2. The Flowserve parameter descriptions are included here as part of the block descriptions. Block Parameter Column Descriptions Tables on the following pages list all of the block parameters contained in each of the block objects. Table 8.2 explains the column headings for the parameter listings. 31 Logix 3400MD Digital Positioner LGENIM3405-02 11/13 Table 8.2 Block Parameter List Column Description Column Name Description A number that corresponds to the sequence of the parameter in the block parameter segment of the object dictionary. See Object Dictionary, Section 8.16. STND – Standard Fieldbus Parameter defined in FF specifications MFG – Enhanced Parameter Manufacturer defined Index Origin Name The mnemonic character designation for the parameter. Data Type / Structure Data type or structure for the parameter value: 1. Data types consist of simple variables or arrays and are: • Unsigned8, Unsigned16 Unsigned32 - An unsigned variable of 8, 16 or 32 bits. • Floating point - Floating point variable. • Visible string - Visible string variable. • Octet string - Octet string variable. • Bit string - Bit string variable. 2. Data Structures consist of a record which may be: • Value and Status - float - Value and status of a floating point parameter. • Scaling - Static data used to scale floating point values for display purposes. • Mode - Bit strings for target, actual, permitted and normal modes. • Access permissions - Access control flags for access to block parameters. • Alarm - float - Data that describes floating point alarms. • Alarm - discrete - Data that describes discrete alarms. • Event - update - Data that describes a static revision alarm. • Alarm - summary - Data that summarizes 16 alerts. • Simulate - Float - Simulate and transducer floating point value and status,and a simulate enable/disable discrete. • Test - Function block test read/write data. Store Indicates the type of memory where the parameter is stored: S - Static — Writing to the parameter changes the static revision counter parameter ST_REV N - Non-volatile — Parameter must be retained during a power cycle. It is not under the static update code. D - Dynamic — The value is calculated by the block, or read from another block. R - Readable — The value is readable by the host. W - Writeable — The value is writeable by the host. Default Value Default values for the block parameters. These are the values that are used when: • the FBAP is initialized for the first time, or • selecting restart with defaults of the resource block parameter RESTART. • Performing a factory reset 8.4 Resource Block Resource Block Function The resource block contains data and parameters related to overall operation of the device and the FBAP. Parameters that describe the hardware specific characteristics of the device and support application download operations make up the resource block. Resource Block Parameters Table 8.3 lists the FF and Flowserve-defined parameters and their default values contained in the resource block. Table 8.3 Resource Block Parameters Index 32 Origin Name Store Date Type Default Value 0 STND RESOURCE_BLOCK_2 SRW Record BLOCK 0 1 STND ST_REV SR Simple UNSIGNED16 0 2 STND TAG_DESC SRW Simple OCTET_STRING “ 3 STND STRATEGY SRW Simple UNSIGNED16 0 4 STND ALERT_KEY SRW Simple UNSIGNED8 0 5 STND MODE_BLK SRW Record MODE 0x01;0x01;0x11;0x10 6 STND BLOCK_ERR R Simple BIT_STRING 0 7 STND RS_STATE R Simple UNSIGNED8 4 8 STND TEST_RW WR Record TEST 0 9 STND DD_RESOURCE SR Simple VISIBLE_STRING “ “ “ Logix 3400MD Digital Positioner LGENIM3405-02 11/13 Index Origin Name Store Date Type Default Value 10 STND MANUFAC_ID SR Simple UNSIGNED32 RES_VAL_MANUFAC_ID 11 STND DEV_TYPE SR Simple UNSIGNED16 RES_VAL_DEV_TYPE 12 STND DEV_REV SR Simple UNSIGNED8 RES_VAL_DEV_REV 13 STND DD_REV SR Simple UNSIGNED8 RES_VAL_DD_REV 14 STND GRANT_DENY NRW Record ACCESS_PERM 0 15 STND HARD_TYPES SR Simple BIT_STRING RES_VAL_HARD_TYPES 16 STND RESTART RWB Simple UNSIGNED8 1 17 STND FEATURES SR Simple BIT_STRING RES_VAL_FEATURES 18 STND FEATURE_SEL SRW Simple BIT_STRING RES_FEATURE_SEL 19 STND CYCLE_TYPE SR Simple BIT_STRING 0x0001 20 STND CYCLE_SEL SRW Simple BIT_STRING 0x0000 21 STND MIN_CYCLE_T SR Simple UNSIGNED32 RES_VAL_MIN_CYCLE_T 22 STND MEMORY_SIZE SR Simple UNSIGNED16 0 23 STND NV_CYCLE_T SR Simple UNSIGNED32 0 24 STND FREE_SPACE R Simple FLOATING_POINT 0 25 STND FREE_TIME R Simple FLOATING_POINT 0 26 STND SHED_RCAS SRW Simple UNSIGNED32 640000 27 STND SHED_ROUT SRW Simple UNSIGNED32 640000 28 STND FAULT_STATE NR Simple UNSIGNED8 1 29 STND SET_FSTATE RW Simple UNSIGNED8 1 30 STND CLR_FSTATE RW Simple UNSIGNED8 1 31 STND MAX_NOTIFY SR Simple UNSIGNED8 RES_VAL_MAX_NOFITFY 32 STND LIM_NOTIFY SRW Simple UNSIGNED8 RES_VAL_MAX_NOFITFY 33 STND CONFIRM_TIME SRW Simple UNSIGNED32 640000 34 STND WRITE_LOCK SRW Simple UNSIGNED8 0 35 STND UPDATE_EVT RW Record ALARM_EVENT 0;0;0,0;0;0;9;0 36 STND BLOCK_ALM RW Record ALARM_DISC 0;0;0,0;0;0;0;8;0;0 37 STND ALARM_SUM|ALARM_SUM_RES2 SRW Record ALARM_SUMMARY 0;0;0;0 38 STND ACK_OPTION|ACK_OPTION_RES2 SRW Simple BIT_STRING 0 39 STND WRITE_PRI SRW Simple UNSIGNED8 0 40 STND WRITE_ALM RW Record ALARM_DISC 0;0;0,0;0;0;0;10;0;0 41 STND ITK_VER NR Simple UNSIGNED16 RES_VAL_ITK_VER 42 MFG DL_CMD1 RW Simple UNSIGNED8 0 43 MFG DL_CMD2 RW Simple UNSIGNED8 0 44 MFG DL_APPSTATE SR Simple UNSIGNED16 0 45 MFG DL_SIZE SR Simple UNSIGNED32 0 46 MFG DL_CHECKSUM SR Simple UNSIGNED16 0 47 MFG REVISION_ARRAY SR Array UNSIGNED16 0,0,0,0 48 MFG AUX_FEATURE RW Simple BIT_STRING 0 49 MFG RES_BLOCK_TEST R Array UNSIGNED8 0,0,0,0,0,0,0,0 50 MFG ERROR_DETAIL R Array UNSIGNED16 0,0,0 Resource Block Valtek Product-defined Parameter Descriptions Table 8.4 describes the Valtek product-defined parameters in the resource block, which are specific to the Logix 3400MD. Table 8.4 Resource Block Parameter Descriptions Name Description or Parameter Contents DL_CMD1 DL_CMD2 33 Logix 3400MD Digital Positioner LGENIM3405-02 11/13 DL_APPSTATE DL_SIZE DL_CHECKSUM A read-only parameter that contains the application firmware revision level for: FB Board Software Revision: Byte 0-4 Future Growth Stack Revision Byte 5 FF Board NV Ram CRC LSB CMD Board Major Revision Byte 6 FF Board NV Ram CRC MSB CMD Board Minor Revision Byte 7 FF Board EF Results REVISION_ARRAY RES_BLOCK_TEST An internal Valtek product test parameter. ERROR_DETAIL An internal Valtek product parameter array, which contains details of BLOCK_ERR conditions. 8.5 Main Transducer Block Transducer Block Function The transducer block de-couples (or insulates) function blocks from local I/O devices, such as sensors or actuators. In the Logix 3400MD digital positioner, the transducer block takes the position from the analog output block and sends it, along with other parameters, to the positioner subsystem. Transducer Block Parameters Table 8.5 lists the FF and Valtek product-defined parameters and their default values in the transducer block. The main transducer block contains themost widely used parameters for general operation and ID. Table 8.5 Main Transducer Block Parameters Index 0 34 Origin STND Name XDTB_MAIN Store SRW Date Type Record BLOCK Default Value 0 1 STND ST_REV SR Simple UNSIGNED16 1 2 STND TAG_DESC SRW Simple OCTET_STRING “7 3 STND STRATEGY SRW Simple UNSIGNED16 2 4 STND ALERT_KEY SRW Simple UNSIGNED8 4 5 STND MODE_BLK SRW Record MODE 0x01;0x01;0x11;0x10 6 STND BLOCK_ERR R Simple BIT_STRING 0 7 STND UPDATE_EVT RW Record ALARM_EVENT 0;0;0,0;0;0;0;0 8 STND BLOCK_ALM RW Record ALARM_DISC 0;0;0,0;0;0;0;0;0;0 9 STND TRANSDUCER_DIRECTORY NR Array UNSIGNED16 0 10 STND TRANSDUCER_TYPE NR Simple UNSIGNED16 106 11 STND XD_ERROR R Simple UNSIGNED8 0 12 STND COLLECTION_DIRECTORY NR Array UNSIGNED32 0 13 STND FINAL_VALUE NRW Record FLOAT_S 0x80;0.0 14 MFG WORKING_SP RW Simple FLOATING_POINT 0 15 MFG FINAL_POSITION_VALUE NR Record FLOAT_S 0x80,0.0 16 MFG CONTROLLER_STATE_STATUS R Simple BIT_STRING 0 17 MFG CONTROLLER_STATE_MASKING NRW Simple BIT_STRING 0 18 MFG POSITIONER_STATUS R Simple BIT_STRING 0 19 MFG POSITIONER_MASKING NRW Simple BIT_STRING 0 20 MFG DEVIATION_VALUE R Simple FLOATING_POINT 0 21 MFG PRESSURE_SUPPLY R Simple FLOATING_POINT 0 22 MFG PRESSURE_PORT_A R Simple FLOATING_POINT 0 23 MFG PRESSURE_PORT_B R Simple FLOATING_POINT 0 24 MFG TEST_MODE RW Simple BIT_STRING 0 25 MFG CALIBRATE RW Simple UNSIGNED8 0 “ Logix 3400MD Digital Positioner LGENIM3405-02 11/13 26 MFG CALIBRATION_STATUS R Simple BIT_STRING 0 27 MFG MAIN_RESERVED_1 NRW Simple FLOATING_POINT 0 28 MFG P_GAIN SRW Simple FLOATING_POINT 2 29 MFG I_GAIN SRW Simple INTEGER16 10 30 MFG D_GAIN SRW Simple UNSIGNED16 2 31 MFG PRESS_CTRL_GAIN SRW Simple FLOATING_POINT 0 32 MFG PRESS_CTRL_WINDOW SRW Simple FLOATING_POINT 0 33 MFG FINAL_VALUE_CUTOFF_HI SRW Simple FLOATING_POINT 100 34 MFG FINAL_VALUE_CUTOFF_LO SRW Simple FLOATING_POINT 0 35 MFG STOP_HI_POS SRW Simple FLOATING_POINT 110 36 MFG STOP_LO_POS SRW Simple FLOATING_POINT 10 37 MFG STROKE_TIME_OPEN_LIM NRW Record FLOAT_S 0x02,0.0 38 MFG STROKE_TIME_CLOSE_LIM NRW Record FLOAT_S 0x02,0.0 39 MFG MAIN_RESERVED_2 NRW Simple FLOATING_POINT 0 40 MFG PRESSURE_SUPPLY_CAL_REF NRW Simple FLOATING_POINT 0 41 MFG CYCLE_CNTR NRW Simple UNSIGNED32 0 42 MFG CYCLE_CNTR_LIM SRW Simple UNSIGNED32 4294967294 43 MFG CYCLE_CNTR_DEADBAND SRW Simple FLOATING_POINT 20 44 MFG TRAVEL_ACCUM NRW Simple UNSIGNED32 0 45 MFG TRAVEL_ACCUM_LIM SRW Simple UNSIGNED32 0 46 MFG TRAVEL_ACCUM_DEADBAND SRW Simple FLOATING_POINT 20 47 MFG STROKE_LENGTH SRW Simple FLOATING_POINT 0 48 MFG POS_ALERT_HI SRW Simple FLOATING_POINT 110 49 MFG POS_ALERT_LO SRW Simple FLOATING_POINT 10 50 MFG POS_DEADBAND SRW Simple FLOATING_POINT 10 51 MFG POS_DEVIATION_TIME SRW Simple FLOATING_POINT 60 52 MFG INTERNAL_TEMP R Simple FLOATING_POINT 0 53 MFG HOURS_SINCE_LAST_POWERUP NRW Simple FLOATING_POINT 0 54 MFG HOURS_SINCE_LAST_RESET NRW Simple FLOATING_POINT 0 55 MFG HOURS_LIFE_TIME NRW Simple FLOATING_POINT 0 56 MFG SIG_START NRW Simple FLOATING_POINT 0 57 MFG SIG_STOP NRW Simple FLOATING_POINT 100 58 MFG SIG_RATE NRW Simple FLOATING_POINT 100 59 MFG SIG_HOLD NRW Simple FLOATING_POINT 10 60 MFG SIG_INDEX NRW Simple UNSIGNED16 0 61 MFG SIG_FLAGS NRW Simple BIT_STRING 0 62 MFG TRAVEL_ACCUM_UNITS SRW Simple UNSIGNED8 57 63 MFG PRESSURE_UNITS SRW Simple UNSIGNED8 0x06 64 MFG INTERNAL_TEMP_UNITS SRW Simple UNSIGNED8 0x21 65 MFG XD_FSTATE_OPT SRW Simple UNSIGNED8 0 66 MFG ELECTRONICS_SN NR Simple VISIBLE_STRING “00000000” 67 MFG SOFTWARE_VER_MAJOR NR Simple UNSIGNED16 0 68 MFG SOFTWARE_VER_MINOR NR Simple UNSIGNED16 0 69 MFG SOFTWARE_DATE_CODE SRW Simple VISIBLE_STRING “ 70 MFG VALVE_MAN_ID NRW Simple UNSIGNED8 99 71 MFG VALVE_MODEL_NUM NRW Simple VISIBLE_STRING “ 72 MFG VALVE_TYPE NRW Simple UNSIGNED8 99 73 MFG VALVE_SIZE NRW Simple UNSIGNED8 99 74 MFG VALVE_CLASS NRW Simple UNSIGNED8 99 75 MFG VALVE_ENDCON NRW Simple UNSIGNED8 99 76 MFG VALVE_BODYMAT NRW Simple UNSIGNED8 99 77 MFG VALVE_PACKTYPE NRW Simple UNSIGNED8 99 “ “ 35 Logix 3400MD Digital Positioner LGENIM3405-02 11/13 78 MFG LEAK_CLASS NRW Simple UNSIGNED8 99 79 MFG VALVE_FLAGS NRW Simple UNSIGNED8 99 80 MFG VALVE_TRIMMAT NRW Simple UNSIGNED8 99 81 MFG VALVE_TRIMCHAR NRW Simple UNSIGNED8 99 82 MFG VALVE_TRIMTYPE NRW Simple UNSIGNED8 99 83 MFG VALVE_TRIMNO NRW Simple UNSIGNED8 99 84 MFG VALVE_SN NRW Simple VISIBLE_STRING “ 85 MFG STEM_DIAM NRW Simple FLOATING_POINT 0 86 MFG RATED_TRAV NRW Simple FLOATING_POINT 0 87 MFG INLET_PRESS NRW Simple FLOATING_POINT 0 88 MFG OUTLET_PRESS NRW Simple FLOATING_POINT 0 89 MFG ACT_MAN_ID NRW Simple UNSIGNED8 0 90 MFG ACT_FAIL_ACTION NRW Simple UNSIGNED8 0 91 MFG ACT_MODEL_NUM NRW Simple VISIBLE_STRING All “ “ 92 MFG ACT_SN NRW Simple VISIBLE_STRING All “ “ 93 MFG ACT_TYPE NRW Simple UNSIGNED8 99 94 MFG ACT_SIZE NRW Simple UNSIGNED8 105 95 MFG ACT_AREA NRW Simple FLOATING_POINT 23.8 96 MFG SPRING_TYPE NRW Simple UNSIGNED8 99 97 MFG PO_DATE NRW Simple VISIBLE_STRING “ “ 98 MFG INSTALL_DATE NRW Simple VISIBLE_STRING “ “ 99 MFG MFG_PHONE NRW Simple VISIBLE_STRING “ “ 100 MFG PUR_ORDER_NUM NRW Simple VISIBLE_STRING “ “ 101 MFG FINAL_VALUE_RANGE SRW Record SCALE 100.0,0.0,0x53e,1 102 MFG XD_CAL_LOC SRW Simple VISIBLE_STRING “ 103 MFG XD_CAL_DATE SRW Simple VISIBLE_STRING “ 104 MFG XD_CAL_WHO SRW Simple VISIBLE_STRING “ 105 MFG MAIN_RESERVED_3 RW Simple FLOATING_POINT 0 106 MFG MAIN_RESERVED_4 RW Simple FLOATING_POINT 0 107 MFG CONTROL_CONFIG NRW Simple BIT_STRING 0 108 MFG MISC_CONFIG NRW Simple BIT_STRING 0 109 MFG MAIN_BLOCK_TEST R Array UNSIGNED8 0,0,0,0,0,0,0,0 110 MFG MAIN_RESERVED_5 RW Simple FLOATING_POINT 0 111 MFG EXEC_DELAY SRW Simple UNSIGNED16 0 112 MFG MAIN_RESERVED_6 RW Simple FLOATING_POINT 0 113 MFG BLINK_CODE R Simple UNSIGNED8 0 “ “ “ “ Access Type NOTE: How the Fieldbus board accesses the respective Control board variable. • Std - Standard Parameters. These values are constantly updated from the Control Board, except during the ‘Signature’ capture. • Info - Device Information Parameters. These values are read only at start-up or when any of them are changed. The number -n is used to group parameters into manageable sizes. • Diag - Advanced Diagnostic • Parameters - These values are active only when the parameter ‘Enable diagnostic Variable Access’ is set in TEST_MODE. Transducer Block Diagram Figure 8.2 is a block diagram showing the basic components of the transducer block. 36 Logix 3400MD Digital Positioner LGENIM3405-02 11/13 Controller Board Figure 8.2 Transducer Block Diagram Transducer Block Valtek Product-defined Parameters Table 8.6 describes the Logix parameters included in the transducer block. Table 8.6 Transducer Block Parameter Descriptions Parameter Default Value Function FINAL_VALUE_CUTOFF_HI 110% This will saturate the actuator in an open position if FINAL_VALUE becomes greater than the cutoff value. FINAL_VALUE_CUTOFF_LO 1% This will saturate the actuator in a close position if FINAL_VALUE becomes less than the cutoff value. This is the same as the Minimum Position Cutoff feature of the Logix1200 digital positioner. The new terminology matches FF terminology. FINAL_POSITION_VALUE Dynamic Actual stem position in percent of stroke FINAL_VALUE_RANGE 110%to-10% The high and low range limit values, the engineering units code and the number of digits to the right of the decimal point to be used to display the final value. TEST_MODE 0 CONTROL_CONFIG 0 Used to configure the positioner. PGAIN 2 Proportional gain. DGAIN 2 Derivative gain. IGAIN 10 Integral gain. SOFTSTOP_HIGH 110% Software upper stroke limit SOFTSTOP_LOW -10% Software lower stroke limit PRESS_UNITS Psi Units pressure sensors reading are expressed in. TEMP_UNITS DegF Units temperature is expressed in. Used to enable certain parameter outputs and diagnostic control. Parameter Definitions The following list summarizes some of the key parameters within the Logix 3400MD digital positioner. For definitions of parameters not listed, use the help window in the DD view. The Logix positioner automatically stores changed parameters in non-volatile memory when a change is made. FINAL_VALUE: This is the set-point or command received by the 3400MD. FINAL_VALUE_CUTOFF_HI : If FINAL_VALUE is greater than FINAL_VALUE_CUTOFF_HI, the positioner will saturate the actuator in an open position. A 1 percent hysteresis is added, so FINAL_ VALUE must be more than 1 percent smaller than FINAL_VALUE_CUTOFF_HI, before the positioner will allow the valve to start closing. This feature is disabled in SOFTSTOP_HIGH is less than or equal to 100 percent. 37 Logix 3400MD Digital Positioner LGENIM3405-02 11/13 FINAL_VALUE_CUTOFF_LO: If FINAL_VALUE is less than FINAL_VALUE_CUTOFF_LO the positioner will saturate the actuator in a closed position. There is a 1 percent hysteresis added, so FINAL_VALUE must be more than 1 percent of FINAL_VALUE_CUTOFF_LO, before the positioner will allow the valve to start opening. This feature is disabled in SOFTSTOP_LOW is less than or equal to 0 percent. FINAL_POSITION_VALUE: This is the valve’s stem position, as sensed by the positioner. This value is always reported in percent of stroke. TEST_MODE: This parameter is used to enable the diagnostic parameters in the Transducer Tech Block for continuous update. Also, this can be used to set the mode to allow write to the DAC directly to test the spool control. CONTROL_CONFIG: These are flags used to set the configuration of the positioner. • Local Panel disable allows the user to disable any button pushes or changes to be made at the device. • Continuous Friction Mode Enable allows the user to enable or disable the continuous friction mode. • Pressure Control Enabled allows the user to enable or disable the pressure control function. • Pressure Sensor Board Present is set by the device indicating that a functioning pressure board has been installed into the device. • Single Action Enabled allows the user to select between single acting and double acting. PGAIN: The Logix 3400MD digital positioner uses a special gain algorithm. The proportional gain increases with a decrease in error. This allows for maximum resolution and speed. GAIN_UPPER is the upper limit to proportional gain. DGAIN: The Logix 3400MD digital positioner uses a special gain algorithm. The proportional gain increases with a decrease in error. This allows for maximum resolution and speed. GAIN_ LOWER is the lower limit to proportional gain. IGAIN: In addition to proportional gain the Logix uses integral as well. This in the integral gain setting. Typically this is set to 10. CALIBRATE: This parameter initiates calibration. Two types of calibration are available Stroke, Pressure Sensors (advanced/pro models only). To learn more about calibration refer to the Calibration section of this document. STOP_HIGH_POS: Software imposed stroke limit. The positioner will not allow the valve to open beyond the value shown in this parameter. STOP_LOW_POS: Software imposed stroke limit. The positioner will not allow the valve to close beyond the value shown in this parameter, normally psi. CYCLE_CNTR This parameter counts the number of cycles that have occurred. CYCLE_DEADBAND In order for a cycle to be counted it must be greater than the value in this field. CYCLE_CNTR_LIM_CNTR If CYCLE_COUNTER exceeds this value, the LED lights will start to blink Green, Red, Green, Green and a warning will be generated in TRAVEL_FLAGS. TRAVEL_ACCUM: Total distance the valve stem has traveled. TRAVEL_ACCUM_DEADBAND: Amount in percent of stroke the valve must move in order for the movement to be added to TRAVEL_ENG. TRAVEL_ALERT:_LIM If TRAVEL_ENG exceeds this value, the LED lights will start to blink Green, Red, Green, Green and a warning will be generated in TRAVEL_FLAGS. STROKE_LENGTH: Stoke length of valve. This value is used to calculate TRAVEL_ENG. TRAVEL_UNITS Units of measure used to calculate TRAVEL_ENG. PRESS_UNITS Units of measure that pressure sensor readings are expressed in. TEMP_UNITS Units of measure that temperature is expressed in. Note: The stroke limiting feature could be used to make a valve very responsive to small steps. By increasing the nominal gain values, and limiting the stroke speed, small steps would be subject to very high gains. When active, the algorithm scales back large step sizes, thus limiting the undesired effects large gains normally demonstrate on large step sizes, such as overshoot. 38 Logix 3400MD Digital Positioner LGENIM3405-02 11/13 Signatures See Section 10.13, Initiating a Valve Signature for more details on using the signature acquisition functions of the Logix 3400MD digital positioner. Custom Characterization See Section 10.11, Stroke Characterization for more details on using the custom characterization features of the Logix 3400MD digital positioner. 8.6 Tech Transducer Block The Tech Transducer block contains the parameters used by a technician to troubleshoot a positioner. Many of these parameters are not updated on a regular basis. In order to cause these parameters to update on a regular basis the TEST_MODE parameter in the Main Transducer block must have the diagnostics enabled. Section 10.16 Lists the parameters that do not update unless TEST_MODE is selected. Table 8.7 Tech Transducer Block Parameters Index Origin Name Store Date Type Default Value 0STND XDTB_TECH SRW Record BLOCK 0 1STND ST_REV SR UNSIGNED16 1 2STND TAG_DESC SRW Simple OCTET_STRING “7 3STND STRATEGY SRW Simple UNSIGNED16 2 4STND ALERT_KEY SRW Simple UNSIGNED8 4 5STND MODE_BLK SRW Record MODE 0x01;0x01;0x11;0x10 6STND BLOCK_ERR R Simple BIT_STRING 0 7STND UPDATE_EVT RW Record ALARM_EVENT 0;0;0,0;0;0;0;0 8STND BLOCK_ALM RW Record ALARM_DISC 0;0;0,0;0;0;0;0;0;0 9STND TRANSDUCER_DIRECTORY NR Array UNSIGNED16 0 10STND TRANSDUCER_TYPE NR Simple UNSIGNED16 106 11STND XD_ERROR R Simple UNSIGNED8 0 12STND COLLECTION_DIRECTORY NR Array UNSIGNED32 0 13MFG ELECTRONIC_STATUS R Simple BIT_STRING 0 14MFG ELECTRONIC_MASKING NRW Simple BIT_STRING 0 15MFG INNERLOOP_STATUS R Simple BIT_STRING 0 16MFG INNERLOOP_MASKING NRW Simple BIT_STRING 0 17MFG OUTERLOOP_STATUS R Simple BIT_STRING 0 18MFG OUTERLOOP_MASKING NRW Simple BIT_STRING 0 19MFG CONFIGURATION_STATUS R Simple BIT_STRING 0 20MFG CONFIGURATION_MASKING NRW Simple BIT_STRING 0 21MFG PRESSURE_STATUS R Simple BIT_STRING 0 22MFG PRESSURE_MASKING NRW Simple BIT_STRING 0 23MFG DEVIATION_EFFORT R Simple FLOATING_POINT 0 24MFG PRESS_CTRL_EFFORT R Simple FLOATING_POINT 0 25MFG INTEGRAL_EFFORT R Simple FLOATING_POINT 0 26MFG SPOOL_OFFSET RW Simple FLOATING_POINT 0 27MFG SPOOL_COMMAND RW Simple FLOATING_POINT 0 28MFG BACKOFF_EFFORT R Simple FLOATING_POINT 0 29MFG SPOOL_POSITION R Simple FLOATING_POINT 0 30MFG SPOOL_EFFORT R Simple FLOATING_POINT 0 31MFG PIEZO_OFFSET R Simple FLOATING_POINT 0 32MFG PIEZO_COMMAND R Simple FLOATING_POINT 0 33MFG USER_INTERFACE_INSTANT R Simple BIT_STRING 0 34MFG USER_INTERFACE_ACTIVE RW Simple BIT_STRING 0 35MFG P_GAIN_EFFECTIVE R Simple FLOATING_POINT 0 36MFG P_GAIN_MULT SRW Simple FLOATING_POINT 0.05 Simple “ 39 Logix 3400MD Digital Positioner LGENIM3405-02 11/13 Index 40 Origin Name Store Date Type Default Value 37MFG D_GAIN_EFFECTIVE R Simple UNSIGNED16 0 38MFG D_GAIN_FILTER SRW Simple UNSIGNED16 0 39MFG PRESS_CTRL_GAIN_EFFECTIVE R Simple FLOATING_POINT 0 40MFG PRESS_CTRL_GAIN_MULT SRW Simple FLOATING_POINT 0.05 41MFG PRESS_CTRL_SP SRW Simple FLOATING_POINT 0 42MFG FINAL_VALUE_CUTTOFF_HYSTERESIS SRW Simple FLOATING_POINT 0 43MFG CURVEX SRW Array FLOATING_POINT All 21 44MFG CURVEY SRW Array FLOATING_POINT All 21 45MFG STROKE_TIME_CAL R Simple FLOATING_POINT 0 46MFG STROKE_TIME_DOWN R Simple FLOATING_POINT 0 47MFG STROKE_TIME_UP R Simple FLOATING_POINT 0 48MFG HALL_DOWN SRW Simple UNSIGNED16 0 49MFG HALL_UP SRW Simple UNSIGNED16 0 50MFG HALL_RANGE SRW Simple UNSIGNED16 0 51MFG HALL_AD_COUNT R Simple UNSIGNED16 0 52MFG HALL_NULL SRW Simple UNSIGNED16 0 53MFG FB_ZERO SRW Simple UNSIGNED16 0 54MFG FB_OPEN SRW Simple UNSIGNED16 23505 55MFG FB_RANGE SRW Simple INTEGER32 0 56MFG FB_AD_COUNT R Simple UNSIGNED16 0 57MFG PORT_A_ZERO SRW Simple UNSIGNED16 0 58MFG PORT_A_FULL SRW Simple UNSIGNED16 1200 59MFG PORT_A_RANGE SRW Simple INTEGER16 1200 60MFG PORT_A_AD_COUNT R Simple UNSIGNED16 0 61MFG PORT_B_ZERO SRW Simple UNSIGNED16 0 62MFG PORT_B_FULL SRW Simple UNSIGNED16 1200 63MFG PORT_B_RANGE SRW Simple INTEGER16 1200 64MFG PORT_B_AD_COUNT R Simple UNSIGNED16 0 65MFG SUPPLY_PRESS_REF_PSI R Simple FLOATING_POINT 0 66MFG PIEZO_COUNTER R Simple UNSIGNED32 0 67MFG PIEZO_INTERVAL NRW Simple UNSIGNED16 0 68MFG HALL_TGT R Simple FLOATING_POINT 0 69MFG FB_VOLTS R Simple FLOATING_POINT 0 70MFG HALL_VOLTS R Simple FLOATING_POINT 0 71MFG PIEZO_VOLTS R Simple FLOATING_POINT 0 72MFG REF_VOLTS R Simple FLOATING_POINT 0 73MFG FB_POSITION_FILTER SRW Simple UNSIGNED16 0 74MFG LOAD_EE_DEFAULTS RW Simple UNSIGNED8 0 75MFG NVRAM_WRITE_CYCLES NR Simple UNSIGNED32 0 76MFG GENERIC_PARAMETER RW Record GENERIC_S 0;0;0 77MFG SPI_TEST_RCV R Array UNSIGNED8 All 0 78MFG SPI_TEST_TX R Array UNSIGNED8 All 0 79MFG TECH_BLOCK_TEST R Array UNSIGNED8 0,0,0,0,0,0,0,0 80MFG EXEC_DELAY SRW Simple UNSIGNED16 0 81MFG LX_SPI_STATUS_FLAGS NR Simple BIT_STRING 0 82MFG SUPPLY_PRESSURE_PCT R Simple FLOATING_POINT 0 83MFG PORT_A_PRESSURE_PCT R Simple FLOATING_POINT 0 84MFG PORT_B_PRESSURE_PCT R Simple FLOATING_POINT 0 85MFG TEMPERATURE_HIST R Array FLOATING_POINT All 0 86MFG ERROR_HIST R Array UNSIGNED8 All 0 87MFG CURVE_SELECT SRW Simple UNSIGNED8 0 Logix 3400MD Digital Positioner LGENIM3405-02 11/13 Index Origin Name Store Date Type Default Value 88MFG SIG_DATA1 R Array INTEGER16 All 0 89MFG SIG_DATA2 R Array INTEGER16 All 0 90MFG SIG_DATA3 R Array INTEGER16 All 0 91MFG SIG_DATA4 R Array INTEGER16 All 0 92MFG SIG_DATA5 R Array INTEGER16 All 0 93MFG SIG_DATA6 R Array INTEGER16 All 0 94MFG SIG_DATA7 R Array INTEGER16 All 0 95MFG SIG_DATA8 R Array INTEGER16 All 0 96MFG SIG_DATA9 R Array INTEGER16 All 0 97MFG SIG_DATA10 R Array INTEGER16 All 0 98MFG SIG_DATA11 R Array INTEGER16 All 0 99MFG SIG_DATA12 R Array INTEGER16 All 0 100MFG SIG_DATA13 R Array INTEGER16 All 0 101MFG SIG_DATA14 R Array INTEGER16 All 0 102MFG SIG_DATA15 R Array INTEGER16 All 0 103MFG SIG_DATA16 R Array INTEGER16 All 0 104MFG SIG_DATA17 R Array INTEGER16 All 0 105MFG SIG_DATA18 R Array INTEGER16 All 0 106MFG SIG_DATA19 R Array INTEGER16 All 0 107MFG SIG_DATA20 R Array INTEGER16 All 0 108MFG SIG_DATA21 R Array INTEGER16 All 0 109MFG SIG_DATA22 R Array INTEGER16 All 0 110MFG SIG_DATA23 R Array INTEGER16 All 0 111MFG SIG_DATA24 R Array INTEGER16 All 0 112MFG SIG_DATA25 R Array INTEGER16 All 0 113MFG SIG_DATA26 R Array INTEGER16 All 0 Parameter Definitions The Tech Transducer Block contains many of the parameters that are used by a technician. Make sure the TEST_MODE parameter in the Main Transducer Block has been set to enable diagnostic parameters when viewing the parameter in this block. P_GAIN_MULT: The Logix 3400MD digital positioner uses a special gain algorithm. The proportional gain increases with a decrease in error. This allows for maximum resolution and speed. GAIN_MULT adjust the transition rate between GAIN_UPPER and GAIN_LOWER. SPOOL_OFFSET: This parameter tells the positioner where the spool valve’s null position is. This value is set during a stroke calibration procedure and requires no further adjustment. USER_INTERFACE_INSTANT: This parameter shows the instant value of the front panel DIP switches, button presses, and gain selector switch. These values are stored into the USER_INTERFACE_ACTIVE parameter during a Quick-Cal. USER_INTERFACE_ACTIVE: This parameter is actually used by the system and allows the user to change the front panel settings without actually changing the setting on the physical device. If these settings match the DIP switches then this parameter should not have to be changed. The settings that are changed through this parameter are as follows: • Air Action ATO Enabled: allows the user to set the device to Air-to-Close or Air-to-Open. • Characterization Linear: allows the user to select what characterization is requested. When this is set to “other” then the CURVE_SELECT parameter must be set. • Autotune Enabled: allows the user to enable or disable the autotune feature. • Low Friction Mode: allows the user to specify the device to operate in low or high friction mode. 41 Logix 3400MD Digital Positioner LGENIM3405-02 11/13 • Calibration Auto: allows the user to specify the auto calibration (default) or to enter into a job calibration mode. LX_SPI_STATUS_FLAGS Should a loss of communications occur between the fieldbus card and positioner card this parameter sets the fail mode of the valve. Nothing selected will cause the positioner to hold the last known command should a loss of communications occurs. STROKE_TIME_UP: Allows the user to limit the stroking speed of the positioner. Input the number of seconds for the desired opening stroke speed. Disable this feature by writing 0 to the variable. STROKE_TIME_DN: Allows the user to limit the stroking speed of the positioner. Input the number of seconds for the desired closing stroke speed. Disable this feature by writing 0 to the variable. CURVE_SELECT: This parameter allows the user to select what type of characterization curves the positioner will use. The selections are Equal Percent, Quick Open, or Custom. If Custom is selected, the parameters CURVEX and CURVEY must be initialized. NVRAM_WRITE_CYCLES: This is a diagnostic parameter that allows the user to monitor the number of times the NVRAM is written to. This can be a useful diagnostic tool for checking if the host system is writing to the Fieldbus board memory too often. This is often a configuration error in the host system setup. Excessive write cycles can cause configuration upsets and possible communications slowdowns and errors. It also will shorten the operational life of a Fieldbus device by exceeding the finite number of write cycles NVRAM chips can be used reliably to. These devices typically have a minimum 10,000,000 write cycle endurance. Even though this is a very high number that would typically never be reached during the operational life of the device, a misbehaving host configuration routing could drive up the number of write cycles very quickly, and should be corrected as all devices in the configuration will be adversely affected by this continuous download. 8.7 MD Transducer Block The MD Transducer block contains the parameters used by the advanced and pro model of the Logix 3400MD. These parameters are used for diagnostics and error detection of the system. Table 8.8 Transducer Block Parameters Index 42 Origin Name Store Date Type 0 STND XDTB_MD SRW Record BLOCK Default Value 0 1 STND ST_REV SR Simple UNSIGNED16 1 2 STND TAG_DESC SRW Simple OCTET_STRING “7 3 STND STRATEGY SRW Simple UNSIGNED16 2 4 STND ALERT_KEY SRW Simple UNSIGNED8 4 5 STND MODE_BLK SRW Record MODE 0x01;0x01;0x11;0x10 6 STND BLOCK_ERR R Simple BIT_STRING 0 7 STND UPDATE_EVT RW Record ALARM_EVENT 0;0;0,0;0;0;0;0 8 STND BLOCK_ALM RW Record ALARM_DISC 0;0;0,0;0;0;0;0;0;0 9 STND TRANSDUCER_DIRECTORY NR Array UNSIGNED16 0 10 STND TRANSDUCER_TYPE NR Simple UNSIGNED16 106 11 STND XD_ERROR R Simple UNSIGNED8 0 12 STND COLLECTION_DIRECTORY NR Array UNSIGNED32 0 13 MFG LD_MD_MODE R Simple UNSIGNED8 0 14 MFG MECHANICAL_STATUS R Simple BIT_STRING 0 15 MFG MECHANICAL_MASKING NRW Simple BIT_STRING 0 16 MFG VALVE_TRAVEL_DISTANCE R Simple FLOATING_POINT 0 17 MFG VALVE_TRAVEL_HIGH_START RW Simple FLOATING_POINT 0 18 MFG VALVE_TRAVEL_HIGH_END RW Simple FLOATING_POINT 0 19 MFG VALVE_TRAVEL_PERCENT_YELLOW NR Simple FLOATING_POINT 0 20 MFG VALVE_CYCLE_COUNT R Simple UNSIGNED32 0 21 MFG VALVE_CYCLE_HIGH_START RW Simple UNSIGNED32 0 22 MFG VALVE_CYCLE_HIGH_END RW Simple UNSIGNED32 0 23 MFG VALVE_CYCLE_PERCENT_YELLOW NR Simple FLOATING_POINT 0 24 MFG PST_TIME_BREAKAWAY NR Simple FLOATING_POINT 0 25 MFG PST_PRESSURE_DIFF R Simple FLOATING_POINT 0 “ Logix 3400MD Digital Positioner LGENIM3405-02 11/13 Index Origin Name Store Date Type 26 MFG PST_TIME_TO_TARGET NR Simple FLOATING_POINT 0 Default Value 27 MFG PST_RESULT R Simple UNSIGNED8 0 28 MFG PST_TIMELIMIT RW Simple FLOATING_POINT 0 29 MFG ACTUATOR_RATIO RW Simple FLOATING_POINT 0 30 MFG ACTUATOR_RATIO_HIGH_START_LIMIT RW Simple FLOATING_POINT 0 31 MFG ACTUATOR_RATIO_HIGH_END_LIMIT RW Simple FLOATING_POINT 0 32 MFG ACTUATOR_RATIO_PERCENT_YELLOW NR Simple FLOATING_POINT 0 33 MFG SPOOL_CYCLE_HIGH_START_LIMIT RW Simple UNSIGNED32 0 34 MFG SPOOL_CYCLE_HIGH_END_LIMIT RW Simple UNSIGNED32 0 35 MFG SPOOL_CYCLES NR Simple UNSIGNED32 0 36 MFG CYCLE_TRAVEL_RESET RW Simple BIT_STRING 0 37 MFG SPOOL_CYCLE_PERCENT_YELLOW NR Simple FLOATING_POINT 0 38 MFG SPOOL_TRAVEL_HIGH_START_LIMIT RW Simple FLOATING_POINT 0 39 MFG SPOOL_TRAVEL_HIGH_END_LIMIT RW Simple FLOATING_POINT 0 40 MFG SPOOL_TRAVEL_PERCENT R Simple FLOATING_POINT 0 41 MFG SPOOL_TRAVEL_PERCENT_YELLOW NR Simple FLOATING_POINT 0 42 MFG TREND_STATE RW Simple UNSIGNED8 1 43 MFG TREND_INDEX RW Simple UNSIGNED8 0 44 MFG TREND_DATESTAMP R Array UNSIGNED8 0,0,0,0,0,0 45 MFG MD_RESERVED_1 RW Simple FLOATING_POINT 0 46 MFG MD_RESERVED_2 RW Simple FLOATING_POINT 0 47 MFG MD_RESERVED_3 RW Simple FLOATING_POINT 0 48 MFG MD_RESERVED_4 RW Simple FLOATING_POINT 0 49 MFG MD_RESERVED_5 RW Simple FLOATING_POINT 0 50 MFG SPOOL_RESPONSE_TIME NR Simple FLOATING_POINT 0 51 MFG SPOOL_START_LIMIT NRW Simple FLOATING_POINT 0 52 MFG SPOOL_END_LIMIT NRW Simple FLOATING_POINT 0 53 MFG SPOOL_PERCENT R Simple FLOATING_POINT 0 54 MFG PNEUMATIC_LEAK NR Simple FLOATING_POINT 0 55 MFG PNEUMATIC_LEAK_START NRW Simple FLOATING_POINT 0 56 MFG PNEUMATIC_LEAK_END NRW Simple FLOATING_POINT 0 57 MFG PNEUMATIC_LEAK_PERCENT_YELLOW NR Simple FLOATING_POINT 0 58 MFG FORCE_PRESSURE R Simple INTEGER16 0 59 MFG FORCE_SPRING R Simple INTEGER16 0 60 MFG FORCE_ACTUATOR R Simple INTEGER16 0 61 MFG DEVIATION_TIMES_EFFECTIVE_GAIN R Simple INTEGER16 0 62 MFG WORST_VALVE_HEALTH R Simple FLOATING_POINT 0 63 MFG WORST_ACTUATOR_HEALTH R Simple FLOATING_POINT 0 64 MFG WORST_POSITIONER_HEALTH R Simple FLOATING_POINT 0 65 MFG WORST_CONTROL_HEALTH R Simple FLOATING_POINT 0 66 MFG SUPPLY_PRESSURE_HIGH_START_LIMIT RW Simple FLOATING_POINT 0 67 MFG SUPPLY_PRESSURE_LOW_START_LIMIT RW Simple FLOATING_POINT 0 68 MFG SUPPLY_PRESSURE_LOW_END_LIMIT RW Simple FLOATING_POINT 0 69 MFG SUPPLY_PRESSURE_HIGH_PERCENT NR Simple FLOATING_POINT 0 70 MFG SUPPLY_PRESSURE_LOW_PERCENT NR Simple FLOATING_POINT 0 71 MFG FRICTION R Simple INTEGER16 0 72 MFG FRICTION_STARTING R Simple UNSIGNED16 0 73 MFG FRICTION_HIGH_START_LIMIT RW Simple UNSIGNED16 0 74 MFG FRICTION_HIGH_END_LIMIT RW Simple UNSIGNED16 0 75 MFG FRICTION_LOW_START_LIMIT RW Simple UNSIGNED16 0 76 MFG FRICTION_LOW_END_LIMIT RW Simple UNSIGNED16 0 77 MFG FRICTION_HIGH_PERCENT_YELLOW NR Simple FLOATING_POINT 0 43 Logix 3400MD Digital Positioner LGENIM3405-02 11/13 Index Origin Name Store Date Type 78 MFG FRICTION_LOW_PERCENT_YELLOW NR Simple FLOATING_POINT 0 Default Value 79 MFG PRESSURE_DIFFERENTIAL R Simple FLOATING_POINT 0 80 MFG MD_BLOCK_TEST R Array UNSIGNED8 0,0,0,0,0,0,0,0 81 MFG EXEC_DELAY SRW Simple UNSIGNED16 0 82 MFG FRICTION_UNITS RW Simple UNSIGNED8 0 83 MFG TREND_DATA_1 R Array INTEGER16 All 0 84 MFG TREND_DATA_2 R Array INTEGER16 All 0 85 MFG TREND_DATA_3 R Array INTEGER16 All 0 86 MFG TREND_DATA_4 R Array INTEGER16 All 0 87 MFG TREND_DATA_5 R Array INTEGER16 All 0 88 MFG TREND_DATA_6 R Array INTEGER16 All 0 89 MFG TREND_DATA_7 R Array INTEGER16 All 0 90 MFG TREND_DATA_8 R Array INTEGER16 All 0 91 MFG TREND_DATA_9 R Array INTEGER16 All 0 8.8 Analog Output Function Block AO Block Description The Analog Output function block serves as the external interface for the transducer function block. The value of SP is used to produce the OUT value which is then sent to the transducer block to specify the valve position. PV reflects the actual valve position reported by the transducer block. The AO function block operates on the output value from a control block [such as PID] and performs the following primary functions (most can be user configured): Set-point source selection limiting • Units conversion • Fault state action • Position read back • Alarming • Mode control • Output calculation The database contains the standard AO block database, as defined in the FF FBAP specifications. Flowserve product extensions are specified in the Logix 3400MD digital positioner parameter dictionary and are described below. The interface to the AO block contains the following: • Execute function block • Database read access • Alarm acknowledgment • Database write access AO Block Connections CAS_IN is the only linkable input parameter and is used with a PID function block for direct cascade connection. RCAS_IN is a contained input parameter used for remote cascade connection. OUT and BKCAL_OUT are linkable output parameters. RCAS_OUT is a contained output parameter for remote cascade connection. 44 Logix 3400MD Digital Positioner LGENIM3405-02 11/13 The OUT parameter of the AO block is used to set the FINAL_POSITION_VALUE in the transducer block, as modified by the FINAL_VALUE_ RANGE. READBACK_OUT tracks the valve position in percent. Fail-safe Handling The fail-safe parameters determine the response of an output block to the following conditions. FSTATE_TIME is the number of seconds without communication or with Initiate Fail Safe at the CAS_IN status, required to put this block into the fail safe state. The FAULT_STATE parameter of the resource block may also put this block into the fail safe state. The Failsafe Type I/O option determines whether the action is simply to hold, or to move to FSTATE_VAL. The Target to Manual if IFS I/O option may be used to latch the fail safe state when IFS appears in the CAS_IN status. This will cause a fail-safe block alarm. After the cause of the IFS status is removed, the target mode may be returned manually to CAS mode when it is safe to do so Section 10.17 described how to setup the fail-safe handling. AO Block Parameter List Table 8.8 lists the block parameters and default values for the AO function block. Table 8.9 AO Function Block Parameter List Index Origin Name Store Date Type Default Value 0 STND ANALOG_OUTPUT_BLOCK SRW Record BLOCK 0 1 STND ST_REV SR Simple UNSIGNED16 0 2 STND TAG_DESC SRW Simple OCTET_STRING “ 3 STND STRATEGY SRW Simple UNSIGNED16 0 4 STND ALERT_KEY SRW Simple UNSIGNED8 0 5 STND MODE_BLK SRW Record MODE 0x01;0x01;0x79;0x10 6 STND BLOCK_ERR R Simple BIT_STRING 0 7 STND PV R Record FLOAT_S 0;0.0 8 STND SP NRW Record FLOAT_S AO_VAL_SP_STATUS;AO_VAL_SP_VALUE 9 STND OUT NRWO Record FLOAT_S 0x80;0.0 10 STND SIMULATE RW Record SIM_FLOAT 0;0.0;0;0.0;1 11 STND PV_SCALE SRW Record SCALE 100.0;0.0;0;0 12 STND XD_SCALE SRW Record SCALE 100.0;0.0;0;0 13 STND GRANT_DENY RW Record ACCESS_PERM 0;0 14 STND IO_OPTS|IO_OPTS_AO SRW Simple BIT_STRING 0 15 STND STATUS_OPTS|STATUS_OPTS_AO SRW Simple BIT_STRING 0 16 STND READBACK R Record FLOAT_S 0x80;0.0 17 STND CAS_IN NRWI Record FLOAT_S 0xC3;0.0 18 STND SP_RATE_DN SRW Simple FLOATING_POINT FLT_MAX 19 STND SP_RATE_UP SRW Simple FLOATING_POINT FLT_MAX 20 STND SP_HI_LIM SRW Simple FLOATING_POINT 100 21 STND SP_LO_LIM SRW Simple FLOATING_POINT 0 22 STND CHANNEL SRW Simple UNSIGNED16 1 23 STND FSTATE_TIME SRW Simple FLOATING_POINT 0 24 STND FSTATE_VAL SRW Simple FLOATING_POINT 0 25 STND BKCAL_OUT RO Record FLOAT_S 0xcc;0.0 26 STND RCAS_IN NRW Record FLOAT_S 0x1C;0.0 27 STND SHED_OPT SRW Simple UNSIGNED8 0 28 STND RCAS_OUT R Record FLOAT_S 0xcc;0.0 29 STND UPDATE_EVT RW Record ALARM_EVENT 0;0;0,0;0;0;9;0 30 STND BLOCK_ALM RW Record ALARM_DISC 0;0;0,0;0;0;0;8;0;0 31 MFG WSP RW Record FLOAT_S 0,0.0 32 MFG READBACK_OUT RO Record FLOAT_S 0x80;0.0 33 MFG AO_BLOCK_TEST R Array UNSIGNED8 0,0,0,0,0,0,0,0 “ 45 Logix 3400MD Digital Positioner LGENIM3405-02 11/13 AO Block Diagram Figure 8.3 is a block diagram showing the key components of the AO function block. AO Block Diagram SP (Read) SP (Write) CAS IN RCAS IN RCAS CAS SHED OPT MAN LO RCAS timeout Setpoint Limiting Setpoint Tracking PV TARGET ACTUAL BKCAL OUT FROM OUT CONVERT AUTO ACTUAL RCAS OUT OUT SHED RCAS Time OUT Timer Status Calculation SP LO LIM SP HI LIM TARGET ACTUAL SP Track Ret. Tgt SP PV Track in Man. USE PV FOR BKCAL SP PV Track LO IMAN SP RATE UP SP RATE DN ACTUAL Rate Limiting RCAS CAS AUTO LO Last SP FSTATE MAN IMAN FaultState to Value WSP OUT Convert ACTUAL fstate: Active FSTATE_VAL FSTATE TIME XD SCALE PV Convert PV SCALE READBACK RS Feature_Sel Out_Readback On Invert TARGET PERMITED SHED OPT PV READBACK_Out TO OUT PARAMETER RCAS timeout MODE Select RCAS timeout FaultState Check VALUE Incr. to Close Targ to MAN on Bad IN SIMULATE: TRANSDUCER SIMULATE ENABLE UPDATE EVT CHANNEL BLOCK ALM STATUS OPTS Transducer Block 1 Transducer Block 2 Transducer Block n Figure 8.3 Figure 8.3 AO Function Block Diagram AO Function Block Diagram Clearing Block Configuration Errors Block configuration errors prevent the block from leaving OOS mode. The parameter BLOCK_ERR will show whether a block configuration error is present. Table 10.7 is a list of parameters that can cause the status of CONFIGURATION ERROR to be set in the AO BLOCK_ERR parameter. NOTE: CONFIGURATION ERROR can only be cleared if the function block is being executed. One way of determining block execution is by performing a series two or three reads of the BLOCK_TEST parameter and confirming that the first byte of the parameter is incrementing. This will work if the execute rate is fast relative to the speed of reading BLOCK_TEST. A very slowly executing block may not appear to execute because block parameters are updated only when the block executes. Mode-restricted Write Operations Table 8.7 lists the AO block parameters which may be write restricted based upon the block’s mode. Listed in the table are the TARGET and/or ACTUAL modes required for the write to be accepted. Other limitations listed in the last column must also be met. SIMULATE, READBACK and PV Determination In the AO Function Block, these three parameters provide the values and status of the actuator position, where SIMULATE (or optionally OUT) generates the READBACK parameter and READBACK is then re-scaled to produce the PV. The following sub-sections describe each of these parameters. SIMULATE Parameter SIMULATE is the interface parameter between the AO and the Transducer Function Blocks. Each time the AO block executes, SIMULATE.TRANSDUCER is updated with the FINAL_POSITION_VALUE from the transducer block. When the SIMULATE.ENABLE is FALSE, SIMULATE.TRANSDUCER is copied into SIMULATE. SIMULATE. When SIMULATE.ENABLE is TRUE, SIMULATE.SIMULATE is not updated with SIMULATE.TRANSDUCER and the user may write a value and status to SIMULATE.SIMULATE. 46 Logix 3400MD Digital Positioner LGENIM3405-02 11/13 NOTE: SIMULATE.ENABLE can only be set TRUE when the Simulate dip switch is in the “On” position when the device is powered up or a processor restart is issued. READBACK Parameter The value and status of READBACK will come from either the OUT parameter or SIMULATE.SIMULATE, determined by the state of the OUT_READBACK feature in the Resource Block. READBACK is in XD units. When RS.FEATURE.OUT_READBACK is set TRUE, SIMULATE.SIMULATE is used for READBACK. When FEATURE.OUT_READBACK is FALSE, OUT will be used for READBACK. NOTE: The default value for RS.FEATURE.OUT_READBACK is FALSE. With the Logix 3400MD, this feature should always be set TRUE to allow the transducer block position value to be the source of READBACK. READBACK_OUT ALLOWS THE USER A LINKABLE PARAMETER FOR VALVE POSITION. PV Parameter The PV value is simply the READBACK value, re-scaled from XD units to PV units. PV status is copied directly from READBACK status. 8.9 Digital Output Function Block DO Block Description Operates according to Section 10.18 Table 8.10 DO Function Block Parameter List Index 0 Origin STND Name DISCRETE_OUTPUT_BLOCK Store SRW Date Type Record BLOCK Default Value 0 1 STND ST_REV SR Simple UNSIGNED16 0 2 STND TAG_DESC SRW Simple OCTET_STRING “ 3 STND STRATEGY SRW Simple UNSIGNED16 0 “ 4 STND ALERT_KEY SRW Simple UNSIGNED8 0 5 STND MODE_BLK SRW Record MODE 0x01;0x01;0x79;0x30 6 STND BLOCK_ERR R Simple BIT_STRING 0 7 STND PV_D R Record DISC_S 0;0 8 STND SP_D NRW Record DISC_S DO_VAL_SP_D_STATUS;DO_VAL_SP_D_VALUE 9 STND OUT_D NRWO Record DISC_S 0x1C;0 10 STND SIMULATE_D RW SIM_DISC 0;0;0;0;1 Record 11 STND PV_STATE SRW Simple UNSIGNED16 0 12 STND XD_STATE SRW Simple UNSIGNED16 0 13 STND GRANT_DENY RW Record ACCESS_PERM 0;0 14 STND IO_OPTS|IO_OPTS_DO SRW Simple BIT_STRING 0 15 STND STATUS_OPTS|STATUS_OPTS_DO SRW Simple BIT_STRING 0 16 STND READBACK_D R Record DISC_S 0;0 17 STND CAS_IN_D RWI Record DISC_S 0x1C;0 18 STND CHANNEL SRW Simple UNSIGNED16 0 19 STND FSTATE_TIME SRW Simple FLOATING_POINT 0 20 STND FSTATE_VAL_D SRW Simple UNSIGNED8 0 21 STND BKCAL_OUT_D RO Record DISC_S 0;0 22 STND RCAS_IN_D RW Record DISC_S 0x1C;0 23 STND SHED_OPT SRW Simple UNSIGNED8 0 24 STND RCAS_OUT_D R Record DISC_S 0;0 25 STND UPDATE_EVT RW Record ALARM_EVENT 0;0;0,0;0;0;9;0 26 STND Block BLOCK_ALM RW Record ALARM_DISC 0;0;0,0;0;0;0;8;0;0 47 Logix 3400MD Digital Positioner LGENIM3405-02 11/13 The functionality of these parameters follows the standard Fieldbus definitions as defined in the Foundation Fieldbus specifications. 8.10 Digital Input Function Block DI Block Description The DI block takes the manufacturer’s input data, selected by channel number, and makes it available to other function blocks at its output. This block operates according to the Foundation Fieldbus specifications. Also found in Section 10.19 Table 8.11 DI Function Block Parameter List Index Origin Name Store Date Type Default Value 0 STND DISCRETE_INPUT_BLOCK SRW Record BLOCK 0 1 STND ST_REV SR Simple UNSIGNED16 0 2 STND TAG_DESC SRW Simple OCTET_STRING “ 3 STND STRATEGY SRW Simple UNSIGNED16 0 4 STND ALERT_KEY SRW Simple UNSIGNED8 0 5 STND MODE_BLK SRW Record MODE 0x01;0x01;0x19;0x10 6 STND BLOCK_ERR R Simple BIT_STRING 0 7 STND PV_D R Record DISC_S 0;0 8 STND OUT_D NRWO Record DISC_S 0;0 9 STND SIMULATE_D RW Record SIM_DISC 0;0;0;0;1 10 STND XD_STATE SRW Simple UNSIGNED16 0 11 STND OUT_STATE SRW Simple UNSIGNED16 0 12 STND GRANT_DENY RW Record ACCESS_PERM 0;0 13 STND IO_OPTS|IO_OPTS_DI SRW Simple BIT_STRING 0 14 STND STATUS_OPTS|STATUS_OPTS_DI SRW Simple BIT_STRING 0 15 STND CHANNEL SRW Simple UNSIGNED16 0 16 STND PV_FTIME SRW Simple FLOATING_POINT 0 17 STND FIELD_VAL_D R Record DISC_S 0;0 18 STND UPDATE_EVT RW Record ALARM_EVENT 0;0;0,0;0;0;9;0 19 STND BLOCK_ALM RW Record ALARM_DISC 0;0;0,0;0;0;0;8;0;0 20 STND ALARM_SUM|ALARM_SUM_DI SRW Record ALARM_SUMMARY 0;0;0;0 21 STND ACK_OPTION|ACK_OPTION_DI SRW Simple BIT_STRING 0 22 STND DISC_PRI SRW Simple UNSIGNED8 0 23 STND DISC_LIM SRW Simple UNSIGNED8 0 24 STND Block DISC_ALM RW Record ALARM_DISC 0;0;0,0;0;0;0;7;0;0 “ The functionality of these parameters follows the standard Fieldbus definitions as defined in the Foundation Fieldbus specifications. 8.11 Input Selector Function Block IS Block Description 48 The signal selector block provides selection of up to four inputs and generates an output based on the configured action. This block normally receives its inputs from AI blocks. The block performs maximum, minimum, middle, average and ‘first good’ signal selection. With a combination of parameter configuration options the block can function as a rotary position switch, or a validated priority selection based on the use of the first good parameter and the disable_n parameter. As a switch the block can receive switching information from either the connected inputs or from an operator input. The block also supports the concept of a middle selection. Although the normal configuration for this feature would be with three signals the block should generate an average of the middle two if four signals are configured or the average of two if three are configured and a bad status is passed to one of the inputs. Logic is provided for handling uncertain and bad signals in conjunction with configured actions. The intended application of this block is to provide control signal selection in the forward path only, therefore, no back calculation support is provided. SELECTED is a second output that indicates which input has been selected by the algorithm. Logix 3400MD Digital Positioner LGENIM3405-02 11/13 Table 8.12 IS Function Block Parameter List Index Origin Name Store Date Type Default Value 0 STND INPUT_SELECTOR SRW Record BLOCK 0 1 STND ST_REV SR Simple UNSIGNED16 0 2 STND TAG_DESC SRW Simple OCTET_STRING “ 3 STND STRATEGY SRW Simple UNSIGNED16 0 4 STND ALERT_KEY SRW Simple UNSIGNED8 0 5 STND MODE_BLK SRW Record MODE 0x01;0x01;0x19;0x10 6 STND BLOCK_ERR R Simple BIT_STRING 0 7 STND OUT NRWO Record FLOAT_S 0x1C;0.0 8 STND OUT_RANGE SRW Record SCALE 100.0;0.0;0;0 9 STND GRANT_DENY RW Record ACCESS_PERM 0;0 10 STND STATUS_OPTS|STATUS_OPTS_IS SRW Simple BIT_STRING 0 11 STND IN_1 RWI Record FLOAT_S 0x08;0.0 12 STND IN_2 RWI Record FLOAT_S 0x08;0.0 13 STND IN_3 RWI Record FLOAT_S 0x08;0.0 14 STND IN_4 RWI Record FLOAT_S 0x08;0.0 15 STND DISABLE_1 RWI Record DISC_S 0x08;0 16 STND DISABLE_2 RWI Record DISC_S 0x08;0 17 STND DISABLE_3 RWI Record DISC_S 0x08;0 18 STND DISABLE_4 RWI Record DISC_S 0x08;0 19 STND SELECT_TYPE SRW Simple UNSIGNED8 0 20 STND MIN_GOOD SRW Simple UNSIGNED8 0 21 STND SELECTED RO Record DISC_S 0x1C;0 22 STND OP_SELECT RWI Record DISC_S 0x08;0 23 STND UPDATE_EVT RW Record ALARM_EVENT 0;0;0,0;0;0;9;0 24 STND BLOCK_ALM RW Record ALARM_DISC 0;0;0,0;0;0;0;8;0;0 “ The functionality of these parameters follows the standard Fieldbus definitions as defined in the Foundation Fieldbus specifications. 8.12 Output Splitter Function Block OS Block Description The output splitter block provides the capability to drive two control outputs from a single input. Each output is a linear function of some portion of the input. Back calculation support is provided using the same linear function in reverse. Cascade initialization is supported by a decision table for combinations of input and output conditions. This block would normally be used in split ranging or sequencing of multiple valve applications. A typical split range application has both valves closed when the splitter input is 50%. One valve opens fully as the input drops to 0%. The other valve opens as the input rises above 50%. A typical sequencing application has both valves closed at 0% input. One valve opens fully as the input rises to 50%, and the other stays shut. The second valve opens as the input rises above 50%, and the first valve may remain open or shut off quickly. Because this block is in the control path, it is able to pass limit and cascade initialization information back to the upstream block. Table 8.13 OS Function Block Parameter List Index Origin Name Store Date Type Default Value 0 STND OUTPUT_SPLITTER SRW Record BLOCK 0 1 STND ST_REV SR Simple UNSIGNED16 0 2 STND TAG_DESC SRW Simple OCTET_STRING “ 3 STND STRATEGY SRW Simple UNSIGNED16 0 4 STND ALERT_KEY SRW Simple UNSIGNED8 0 5 STND MODE_BLK SRW Record MODE 0x01;0x01;0x31;0x10 6 STND BLOCK_ERR R Simple BIT_STRING 0 7 STND SP RW Record FLOAT_S 0;0.0 “ 49 Logix 3400MD Digital Positioner LGENIM3405-02 11/13 Index Origin Name Store Date Type Default Value 8 STND OUT_1 RWO Record FLOAT_S 0x1C;0.0 9 STND OUT_2 RWO Record FLOAT_S 0x1C;0.0 10 STND OUT_1_RANGE SRW Record SCALE 100.0;0.0;0;0 11 STND OUT_2_RANGE SRW Record SCALE 100.0;0.0;0;0 12 STND GRANT_DENY RW Record ACCESS_PERM 0;0 13 STND STATUS_OPTS|STATUS_OPTS_OS SRW Simple BIT_STRING 0 14 STND CAS_IN RWI Record FLOAT_S 0x08;0.0 15 STND BKCAL_OUT RO Record FLOAT_S 0x1C;0.0 16 STND IN_ARRAY SRW Array FLOATING_POINT 0.0,50.0,51.0,100.0 17 STND OUT_ARRAY SRW Array FLOATING_POINT 0.0,50.0,51.0,100.0 18 STND LOCKVAL SRW Simple UNSIGNED8 0 19 STND BKCAL_IN_1 RWI Record FLOAT_S 0x08;0.0 20 STND BKCAL_IN_2 RWI Record FLOAT_S 0x08;0.0 21 STND BAL_TIME SRW Simple FLOATING_POINT 0 22 STND HYSTVAL SRW Simple FLOATING_POINT 0 23 STND UPDATE_EVT RW Record ALARM_EVENT 0;0;0,0;0;0;9;0 24 STND BLOCK_ALM RW Record ALARM_DISC 0;0;0,0;0;0;0;8;0;0 8.13 PID Function Block PID Block Description The PID function block provides a choice of selecting either a standard PID control equation (Ideal) or a robust PID. Table 8.14 lists the block parameters and default values for the PID function block. Table 8.14 PID Control Function Block Parameters 50 Index Origin Name 0 STND PID_BLOCK 1 STND ST_REV 2 STND 3 Size Date Type Default Value 62 Record BLOCK 0 2 Simple UNSIGNED16 0 TAG_DESC 32 Simple OCTET_STRING “ STND STRATEGY 2 Simple UNSIGNED16 0 4 STND ALERT_KEY 1 Simple UNSIGNED8 0 5 STND MODE_BLK 4 Record MODE 0x01;0x01;0xF9;0x10 6 STND BLOCK_ERR 2 Simple BIT_STRING 0 7 STND PV 5 Record FLOAT_S 0x80;0.0 8 STND SP 5 Record FLOAT_S PID_VAL_SP_STATUS;PID_VAL_SP_VALUE 9 STND OUT 5 Record FLOAT_S 0x80;0.0 10 STND PV_SCALE 11 Record SCALE 100.0;0.0;0;0 11 STND OUT_SCALE 11 Record SCALE 100.0;0.0;0;0 12 STND 2 Record ACCESS_PERM 0,0 13 STND 2 Simple BIT_STRING 0 14 STND GRANT_DENY CONTROL_OPTS|CONTROL_OPTS_ PID STATUS_OPTS|STATUS_OPTS_PID 2 Simple BIT_STRING 0 15 STND IN 5 Record FLOAT_S 0x80;0.0 16 STND PV_FTIME 4 Simple FLOATING_POINT 0 17 STND BYPASS 1 Simple UNSIGNED8 0 18 STND CAS_IN 5 Record FLOAT_S 0x1C;0.0 19 STND SP_RATE_DN 4 Simple FLOATING_POINT FLT_MAX 20 STND SP_RATE_UP 4 Simple FLOATING_POINT FLT_MAX 21 STND SP_HI_LIM 4 Simple FLOATING_POINT 100 22 STND SP_LO_LIM 4 Simple FLOATING_POINT 0 “ Logix 3400MD Digital Positioner LGENIM3405-02 11/13 Index Origin Name Size Date Type Default Value 23 STND GAIN 4 Simple FLOATING_POINT 1 24 STND RESET 4 Simple FLOATING_POINT FLT_MAX 25 STND BAL_TIME 4 Simple FLOATING_POINT 0 26 STND RATE 4 Simple FLOATING_POINT 0 27 STND BKCAL_IN 5 Record FLOAT_S 0xCe;0.0 28 STND OUT_HI_LIM 4 Simple FLOATING_POINT 100 29 STND OUT_LO_LIM 4 Simple FLOATING_POINT 0 30 STND BKCAL_HYS 4 Simple FLOATING_POINT 0.5 31 STND BKCAL_OUT 5 Record FLOAT_S 0xcf;0.0 32 STND RCAS_IN 5 Record FLOAT_S 0xce;0.0 33 STND ROUT_IN 5 Record FLOAT_S 0xce;0.0 34 STND SHED_OPT 1 Simple UNSIGNED8 0 35 STND RCAS_OUT 5 Record FLOAT_S 0xcf;0.0 36 STND ROUT_OUT 5 Record FLOAT_S 0xcf;0.0 37 STND TRK_SCALE 11 Record SCALE 100.0;0.0;0;0 38 STND TRK_IN_D 2 Record DISC_S 0x1C;0 39 STND TRK_VAL 5 Record FLOAT_S 0x1C;0.0 40 STND FF_VAL 5 Record FLOAT_S 0x1C;0.0 41 STND FF_SCALE 11 Record SCALE 100.0;0.0;0;0 42 STND FF_GAIN 4 Simple FLOATING_POINT 1 43 STND UPDATE_EVT 16 Record ALARM_EVENT 0;0;0,0;0;0;0;0 44 STND BLOCK_ALM 18 Record STND ALARM_SUM|ALARM_SUM_PID 8 Record 46 STND ACK_OPTION|ACK_OPTION_PID 2 Simple ALARM_DISC ALARM_ SUMMARY BIT_STRING 0;0;0,0;0;0;0;8;0;0 45 47 STND ALARM_HYS 4 Simple FLOATING_POINT 0.5 48 STND HI_HI_PRI 1 Simple UNSIGNED8 0 49 STND HI_HI_LIM 4 Simple FLOATING_POINT FLT_MAX 50 STND HI_PRI 1 Simple UNSIGNED8 0 51 STND HI_LIM 4 Simple FLOATING_POINT FLT_MAX 52 STND LO_PRI 1 Simple UNSIGNED8 0 53 STND LO_LIM 4 Simple FLOATING_POINT FLT_MAX 54 STND LO_LO_PRI 1 Simple UNSIGNED8 0 55 STND LO_LO_LIM 4 Simple FLOATING_POINT FLT_MAX 56 STND DV_HI_PRI 1 Simple UNSIGNED8 0 57 STND DV_HI_LIM 4 Simple FLOATING_POINT FLT_MAX 58 STND DV_LO_PRI 1 Simple UNSIGNED8 0 59 STND DV_LO_LIM 4 Simple FLOATING_POINT FLT_MAX 60 STND HI_HI_ALM 21 Record ALARM_FLOAT 0;0;0,0;0;0.0;0;4;0;0 61 STND HI_ALM 21 Record ALARM_FLOAT 0;0;0,0;0;0.0;0;2;0;0 62 STND LO_ALM 21 Record ALARM_FLOAT 0;0;0,0;0;0.0;0;1;0;0 63 STND LO_LO_ALM 21 Record ALARM_FLOAT 0;0;0,0;0;0.0;0;3;0;0 64 STND DV_HI_ALM 21 Record ALARM_FLOAT 0;0;0,0;0;0.0;0;6;0;0 65 STND DV_LO_ALM 21 Record ALARM_FLOAT 0;0;0,0;0;0.0;0;5;0;0 66 MFG PID_FORM 1 Simple UNSIGNED8 1 67 MFG ALGO_TYPE 1 Simple UNSIGNED8 1 68 MFG OUT_LAG 4 Simple FLOATING_POINT 0 69 MFG GAIN_NLIN 4 Simple FLOATING_POINT 1 70 MFG GAIN_COMP 4 Simple FLOATING_POINT 1 71 MFG ERROR_ABS 4 Simple FLOATING_POINT 0 72 MFG WSP 5 Record FLOAT_S 0xc0,0.0 0;0;0;0 0 51 Logix 3400MD Digital Positioner LGENIM3405-02 11/13 Index Origin Name Size Date Type Default Value 73 MFG FUTURE1 4 Simple FLOATING_POINT 0 74 MFG PID_BLOCK_TEST 8 Array UNSIGNED8 0,0,0,0,0,0,0,0 Table 8.15 Flowserve PID Parameters Parameter Name Description/Parameter Contents PID_FORM Configuration parameter specifies the IDEAL or ROBUST PID equation to be used: IDEAL PID (default). Non-Interactive form of a three mode control equation that provides Proportional, Integral and Derivative (PID) control action. Linear and non-linear gain parameters are available. ROBUST PID. The same as Ideal PID. Additionally, the equation supports a user-configured lag filter applied to calculated output value. (See OUT_LAG parameter.) Linear and non-linear gain parameters are available. ALGO_TYPE Configuration parameter specifies algorithm type which can be A, B, or C: Type A equation where Proportional, Integral and Derivative act on ERROR. Type B equation where Proportional and Integral act on ERROR and Derivative acts on PV. Type C equation where Integral acts on ERROR and Proportional and Derivative act on PV. OUT_LAG Time constant of single exponential LAG filter applied to the OUT parameter (primary output). Units (in seconds). For ideal PID equation the lag filter is fixed at 1/16 and cannot be configured. GAIN_NLIN Dimensionless gain factor. When the gain factor is multiplied by absolute value of the error and added to the linear GAIN, the result is a gain response which is proportional to the deviation. Default is zero, resulting in no response due to non-linear gain action. GAIN_COMP The composite gain quantity including both linear and non-linear gain parameters. (Read-only parameter.) Table 8.16 PID Parameters Parameter Name Description/Parameter Contents ERROR_ABS Absolute value of the difference between PV and working set-point. (Readonly parameter.) WSP Working set-point. This is the set-point value after absolute and rate limits have been applied. Deviation alarms are computed on this value. (Read only parameter.) PID_BLOCK_TEST An internal test parameter. PID Block Diagram Figure 8.4 is a block diagram showing the key components of the PID control function block. FF_VAL BKCAL_IN ROUT_IN Feed Forward FF_SCALE RCAS_IN SP_RATE_DN SP_RATE_UP SP HI LIM SP_LO_LM WSP PV Filter PV Output PID Control OUT_ HI_LIM OUT_LO_ LIM BAL_T IME GAIN RESET BAL_TIME RATE PID_FORM ALGO_TYPE OUT_LAG GAIN_NLIN GAIN_COMP ERROR_ABS SP IN BYPASS FF_GAIN Setpoint CAS_IN Bypass Backward Path Outputs PV_FTIME BKCAL_HYS Target & Permitted Mode Mode Select Alarm Output Track SHED_OPT HI/LO DEV TRK_SCALE Actual & Normal Mode TRK_IN_D TRK_VAL Figure 8.4 PID Control Block 52 OUT ROUT_OUT RCAS_OUT BKCAL_OUT Logix 3400MD Digital Positioner LGENIM3405-02 11/13 PID Block Description PID control function block is an algorithm that produces an output signal in response to the measured variable and the set-point. The PID function block allows the user to choose either a standard PID control equation (Ideal) or a robust PID equation defined by Honeywell. This selection is defined in the PID_FORM parameter. The output has three terms: Proportional, Integral and Derivative. The output is adjusted by tuning constants. Three tuning constants are contained in the ideal PID equation. The robust PID uses four tuning constants. 1. GAIN is the tuning constant of the Proportional term. 2. RESET is the tuning constant of the Integral term. 3. RATE is the tuning constant of the Derivative term. RATE is usually modified by a lag, which is set at some fixed ratio higher than the rate time to create a rate gain. No lag occurs with the rate in this implementation. 4. OUT_LAG is the fourth tuning constant used in the robust PID, it adds roll off to the output response. The action is similar to PID with rate gain. PID Ideal and PID Robust The ideal equation is a parallel or non-interacting implementation of PID control using three tuning constants. It automatically fixes OUT_LAG to 16 times the RATE time constant. This produces response characteristics equivalent to the algorithms used in TPS products. The robust equation is the same parallel implementation of ideal PID control but allows the engineer to set the OUT_LAG and effectively change the rate gain. ALGO_TYPE is a configuration parameter that contains one of three selected algorithm types, A, B, or C. Where: • A RATE, GAIN and RESET all act on the error between set point and measured variable. • B RATE acts on the measured variable only, GAIN and RESET use the error. • C RATE and GAIN act on the measured variable only, and RESET uses the error. PID Tuning Parameters Table 8.10 lists the valid ranges for the tuning parameters for the PID block. Note that OUT_LAG parameter cannot be configured when ideal PID is selected (PID_FORM = 1) and can be configured when robust PID is selected (PID_FORM = 2). The values given for these tuning parameters are valid under the following conditions: • The values assume that the minimum configured PID function block execution period (Ts) is 0.125 seconds. • Algorithm type setting (i.e. A, B, or C) has no effect on the validation of these tuning parameters. • The PID function block will reject all values outside the ranges. Mode-restricted Writes to PID Parameters Writing to certain PID block parameters are restricted by the block’s TARGET and/or ACTUAL mode. The MODE_BLK.TARGET or MODE_BLK. ACTUAL parameter must equal one of the modes in the ‘Write Restrictions Column’ in Table 8.8 before the user can write values to the parameters listed. Note: Do not select anything in CONTROL_OPTS in order to set the PID action to reverse acting. 53 Logix 3400MD Digital Positioner LGENIM3405-02 11/13 8.14 Link Objects The function blocks configured to control a process are linked, or connected by objects within the devices. These links allow the user to transfer process and event data from one block to another. These links are defined through link objects. Link Object Description Link objects define Virtual Communication Relationships (VCRs), which are used to communicate between blocks. Link objects contain information needed to define communication links between function blocks and interface devices and other field devices. This information may be read by an interface device which will access information in field devices. For example, link objects may be used to link the output parameter of one function block to the input of another block, or a trend object, or alert object. Link objects are used for alarms and events, function block linking and trending. In the Logix 3400MD digital positioner links objects are available for: • The PID block (6 input parameters) • The PID and AO blocks (4 output parameters) • Every alert object • Every trend object Link Object for Parameter or Number of Objects Input parameters PID function block: BKCAL_IN CAS_IN FF_VAL IN TRK_IN_D Output parameters TRK_VAL AO function block: OUT PID function block: BKCAL_OUT OUT Alert objects Trend objects TOTAL READBACK_OUT 3 2 16 objects 8.15 View Objects Description View objects support management and control of function blocks by providing user visibility of function block configuration and operation. View objects allow parameter data to be grouped and accessed (for viewing on an operator interface) by the user. This provides for information groups to be communicated efficiently. At least four view objects (View1, View2, View3 and View4.) are defined for each block in a device. Block parameters can be grouped and displayed depending on how the data is to be used. Four standard view objects (groups) are defined for accessing the following types of information: 1. View1 - used to display dynamic operation data 2. View2 - used to display static operation data 3. View3 - used to display all dynamic data 4. View4 - used to display other static data. 54 Logix 3400MD Digital Positioner LGENIM3405-02 11/13 Logix 3400MD Digital Positioner View Objects In the Logix 3400MD digital positioner, four view objects have been defined for each of the blocks. All standard blocks follow the Fieldbus defined views found in the Foundation Fieldbus specification. All nonstandard blocks are shown below in the following order: • Resource block • Transducer blocks • AO block • PID block Note: Many of the transducer block parameters are not defined in the views since they are used only with the DTM, provided for technician access, or used only in advanced or pro mode. Table 8.17 Resource Block View List Index Name View1 View2 View3 View4 1 ST_REV 2 2 2 2 2 TAG_DESC 3 STRATEGY 2 4 ALERT_KEY 1 5 MODE_BLK 4 4 6 BLOCK_ERR 2 2 7 RS_STATE 1 1 8 TEST_RW 9 DD_RESOURCE 10 MANUFAC_ID 4 11 DEV_TYPE 2 12 DEV_REV 1 13 DD_REV 14 GRANT_DENY 15 HARD_TYPES 16 RESTART 17 FEATURES 18 FEATURE_SEL 19 CYCLE_TYPE 20 CYCLE_SEL 1 2 2 2 2 2 2 21 MIN_CYCLE_T 4 22 MEMORY_SIZE 2 23 NV_CYCLE_T 24 FREE_SPACE 25 FREE_TIME 26 SHED_RCAS 27 SHED_ROUT 28 FAULT_STATE 29 SET_FSTATE 30 CLR_FSTATE 4 4 4 4 4 4 1 1 55 Logix 3400MD Digital Positioner LGENIM3405-02 11/13 31 MAX_NOTIFY 1 32 LIM_NOTIFY 1 33 CONFIRM_TIME 4 34 WRITE_LOCK 1 35 UPDATE_EVT 36 BLOCK_ALM 37 ALARM_SUM 38 ACK_OPTION 2 39 WRITE_PRI 1 40 WRITE_ALM 41 DL_CMD1 42 DL_CMD2 43 DL_APPSTATE 2 8 8 Manufacturer Specific Parameters 44 DL_SIZE 4 45 DL_CHECKSUM 2 46 REVISION_ ARRAY 47 BLOCK_TEST 48 ERROR_DETAIL Total 6 8 6 22 30 44 35 Table 8.18 Transducer Block View List Index 0 1 2 3 4 5 6 7 8 9 10 11 12 13 14 15 16 17 18 19 20 21 22 23 24 25 26 27 56 Parameter Name XDTB_MAIN ST_REV TAG_DESC STRATEGY ALERT_KEY MODE_BLK BLOCK_ERR UPDATE_EVT BLOCK_ALM TRANSDUCER_DIRECTORY TRANSDUCER_TYPE XD_ERROR COLLECTION_DIRECTORY FINAL_VALUE WORKING_SP FINAL_POSITION_VALUE CONTROLLER_STATE_STATUS CONTROLLER_STATE_MASKING POSITIONER_STATUS POSITIONER_MASKING DEVIATION_VALUE PRESSURE_SUPPLY PRESSURE_PORT_A PRESSURE_PORT_B TEST_MODE CALIBRATE CALIBRATION_STATUS MAIN_RESERVED_1 Access SRW SR SRW SRW SRW SRW R RW RW NR NR R NR NRW RW NR R NRW R NRW R R R R RW RW R NRW Size 62 2 32 2 1 4 2 16 18 2 2 1 4 5 4 5 1 1 1 1 4 4 4 4 1 1 1 4 V1 2 4 2 5 4 5 1 1 1 1 4 4 4 1 1 V2 2 V 3_1 2 4 2 1 5 4 5 1 1 1 1 4 4 4 4 1 1 1 V 3_2 2 V 4_1 2 2 1 V 4_2 2 V 4_3 2 V 4_4 2 2 2 4 No View 32 16 18 4 Logix 3400MD Digital Positioner LGENIM3405-02 11/13 28 29 30 31 32 33 34 35 36 37 38 39 40 41 42 43 44 45 46 47 48 49 50 51 52 53 54 55 56 57 58 P_GAIN I_GAIN D_GAIN PRESS_CTRL_GAIN PRESS_CTRL_WINDOW FINAL_VALUE_CUTOFF_HI FINAL_VALUE_CUTOFF_LO STOP_HI_POS STOP_LO_POS STROKE_TIME_OPEN_LIM STROKE_TIME_CLOSE_LIM MAIN_RESERVED_2 PRESSURE_SUPPLY_CAL_REF CYCLE_CNTR CYCLE_CNTR_LIM CYCLE_CNTR_DEADBAND TRAVEL_ACCUM TRAVEL_ACCUM_LIM TRAVEL_ACCUM_DEADBAND STROKE_LENGTH POS_ALERT_HI POS_ALERT_LO POS_DEADBAND POS_DEVIATION_TIME INTERNAL_TEMP HOURS_SINCE_LAST_POWERUP HOURS_SINCE_LAST_RESET HOURS_LIFE_TIME SIG_START SIG_STOP SIG_RATE SRW SRW SRW SRW SRW SRW SRW SRW SRW NRW NRW NRW NRW NRW SRW SRW NRW SRW SRW SRW SRW SRW SRW SRW R NRW NRW NRW NRW NRW NRW 4 2 2 4 4 4 4 4 4 5 5 4 4 4 4 4 4 4 4 4 4 4 4 4 4 4 4 4 4 4 4 4 4 4 4 4 2 2 4 4 4 4 4 4 4 4 4 4 4 4 4 4 4 4 4 4 4 4 4 59 60 61 62 63 64 65 66 67 68 69 70 71 72 73 74 75 76 77 78 79 80 81 82 SIG_HOLD SIG_INDEX SIG_FLAGS TRAVEL_ACCUM_UNITS PRESSURE_UNITS INTERNAL_TEMP_UNITS XD_FSTATE_OPT ELECTRONICS_SN SOFTWARE_VER_MAJOR SOFTWARE_VER_MINOR SOFTWARE_DATE_CODE VALVE_MAN_ID VALVE_MODEL_NUM VALVE_TYPE VALVE_SIZE VALVE_CLASS VALVE_ENDCON VALVE_BODYMAT VALVE_PACKTYPE LEAK_CLASS VALVE_FLAGS VALVE_TRIMMAT VALVE_TRIMCHAR VALVE_TRIMTYPE NRW NRW NRW SRW SRW SRW SRW NR NR NR SRW SRW NRW NRW NRW NRW NRW NRW NRW NRW NRW NRW NRW NRW 4 2 1 1 1 1 1 8 2 2 8 1 32 1 1 1 1 1 1 1 1 1 1 1 1 1 1 1 4 2 1 1 1 8 2 2 8 1 1 1 1 1 1 1 1 1 1 5 5 4 4 4 4 32 57 Logix 3400MD Digital Positioner LGENIM3405-02 11/13 83 84 85 86 87 88 89 90 91 92 93 94 95 96 97 98 99 100 101 102 103 104 105 106 107 108 109 110 111 112 113 VALVE_TRIMNO VALVE_SN STEM_DIAM RATED_TRAV INLET_PRESS OUTLET_PRESS ACT_MAN_ID ACT_FAIL_ACTION ACT_MODEL_NUM ACT_SN ACT_TYPE ACT_SIZE ACT_AREA SPRING_TYPE PO_DATE INSTALL_DATE MFG_PHONE PUR_ORDER_NUM FINAL_VALUE_RANGE XD_CAL_LOC XD_CAL_DATE XD_CAL_WHO MAIN_RESERVED_3 MAIN_RESERVED_4 CONTROL_CONFIG MISC_CONFIG MAIN_BLOCK_TEST MAIN_RESERVED_5 EXEC_DELAY MAIN_RESERVED_6 BLINK_CODE NRW NRW NRW NRW NRW NRW NRW NRW NRW NRW NRW NRW NRW NRW NRW NRW NRW NRW SRW SRW SRW SRW RW RW NRW NRW R RW SRW RW R 1 32 4 4 4 4 1 1 32 32 1 1 4 1 8 8 18 18 11 32 8 32 4 4 1 1 8 4 2 4 1 1 11 1 32 1 8 8 8 1 4 4 4 4 1 1 4 1 18 18 Total Bytes 672 57 85 59 21 64 92 R Parameter is Readable W Parameter is Writeable N Parameter is stored in NV-RAM S Parameter is STATIC Table 8.19 AO Block View Table Index 58 Name View1 2 View2 2 View3 ST_REV 2 TAG_DESC 3 STRATEGY 2 4 ALERT_KEY 1 5 MODE_BLK 4 4 6 BLOCK_ERR 2 2 7 PV 5 5 8 SP 5 5 9 OUT 5 5 10 SIMULATE 11 PV_SCALE 11 12 XD_SCALE 11 2 View4 1 2 32 32 1 32 32 4 4 1 8 4 2 4 88 107 1 102 Logix 3400MD Digital Positioner LGENIM3405-02 11/13 13 GRANT_DENY 14 IO_OPTS 2 15 STATUS_OPTS 16 READBACK 5 5 17 CAS_IN 5 5 2 2 18 SP_RATE_DN 4 19 SP_RATE_UP 4 20 SP_HI_LIM 4 4 21 SP_LO_LIM 22 CHANNEL 2 23 FSTATE_TIME 4 24 FSTATE_VAL 25 BKCAL_OUT 5 26 RCAS_IN 5 27 SHED_OPT 28 RCAS_OUT 29 UPDATE_EVT 30 BLOCK_ALM 4 1 5 ManufacturerSpecificParameters 31 WSP 32 BLOCK_TEST 5 Total 5 8 38 34 61 28 Table 8.20 PID Block View Table Index Name 1 ST_REV 2 TAG_DESC View1 2 View2 2 View3 2 View4 2 3 STRATEGY 2 4 ALERT_KEY 1 5 MODE_BLK 4 6 BLOCK_ERR 2 2 7 PV 5 5 8 SP 5 5 9 OUT 5 10 PV_SCALE 11 11 OUT_SCALE 11 12 GRANT_DENY 2 13 CONTROL_ OPTS 2 14 STATUS_OPTS 2 15 IN 16 PV_FTIME 17 BYPASS 4 5 5 4 1 18 CAS_IN 19 SP_RATE_DN 5 5 4 20 SP_RATE_UP 4 59 Logix 3400MD Digital Positioner LGENIM3405-02 11/13 60 21 SP_HI_LIM 4 22 SP_LO_LIM 4 23 GAIN 4 24 RESET 4 25 BAL_TIME 4 26 RATE 27 BKCAL_IN 4 28 OUT_HI_LIM 4 29 OUT_LO_LIM 4 30 BKCAL_HYS 31 BKCAL_OUT 5 4 5 32 RCAS_IN 5 33 ROUT_IN 5 34 SHED_OPT 35 RCAS_OUT 5 1 36 ROUT_OUT 5 37 TRK_SCALE 38 TRK_IN_D 2 2 11 39 TRK_VAL 5 5 40 FF_VAL 41 FF_SCALE 11 4 42 FF_GAIN 43 UPDATE_EVT 44 BLOCK_ALM 5 45 ALARM_SUM 46 ACK_OPTION 8 8 2 47 ALARM_HYS 4 48 HI_HI_PRI 1 49 HI_HI_LIM 4 50 HI_PRI 1 51 HI_LIM 4 52 LO_PRI 1 53 LO_LIM 4 54 LO_LO_PRI 1 55 LO_LO_LIM 4 56 DV_HI_PRI 1 57 DV_HI_LIM 4 58 DV_LO_PRI 1 59 DV_LO_LIM 4 60 HI_HI_ALM 61 HI_ALM 62 LO_ALM Logix 3400MD Digital Positioner LGENIM3405-02 11/13 63 LO_LO_ALM 64 DV_HI_ALM 65 DV_LO_ALM Manufacturer Specific Parameters 66 PID_FORM 1 67 ALGO_TYPE 1 68 OUT_LAG 4 69 GAIN_NLIN 4 70 GAIN_COMP 4 4 71 ERROR_ABS 4 4 72 WSP 5 5 73 FUTURE1 74 BLOCK_TEST Total 8 56 53 104 104 8.16 Alert Objects Alert objects support the reporting of alarms and update events to operator interface devices and other field devices. Alert objects are used to communicate notification messages when alarms or events are detected. These objects are defined in the function block application. Alert objects contain: • The value of the data • Block index (a number) • Alert key (parameter) • Time stamp • Priority Logix 3400MD Digital Positioner Alert Objects Three alert objects are defined in the Logix 3400MD digital positioner for event and alarm reporting. • 1 for events • 1 for discrete alarms • 1 for analog alarms 8.17 Alarm and Event Reporting Fieldbus Alarms, Events and Alert Objects Alarms are generated when a block leaves or returns from a particular state. Events are instantaneous occurrences such as the change of a parameter. Alarms and event messages are communicated to operator interfaces and other devices using alert objects. 61 Logix 3400MD Digital Positioner LGENIM3405-02 11/13 Fieldbus Alarm Messages Alarm messages are usually transparent to the user. A host system typically receives these messages and presents them to the user. Acknowledgment of alarms by the operator may be necessary to satisfy operation requirements. Event Messages • Event messages contain a time stamp • Events also must be confirmed; otherwise the block will continually report the event. • Acknowledgment of events may be necessary to satisfy operation requirements Internal Positioner Alarms NOTE: These are standard fieldbus alarms. The Logix 3400MD digital positioner has several internal alarms which monitor electronics operation, the valve and actuator health and the mechanical linkage. Refer to the following parameters to view positioner alarms: • CONTROLLER_STATE_STATUS • POSITIONER_STATUS • MECHANICAL_STATUS • ELECTRONIC_STATUS • PRESSURE_STATUS • INNERLOOP_STATUS • OUTERLOOP_STATUS • CONFIGURATION_STATUS 3400MDStatusAlarms Table 8.20 Status Alarms Table 62 Logix 3400MD Digital Positioner LGENIM3405-02 11/13 Defined Bits XD_MAIN_ BLOCK_ERR BLINK_ CODE INITIALIZING FACTORY_RESET_STATE JOG_COMMAND_MODE SIGNATURE_IN_PROGRESS CONTINUOUS_FRICTION_MODE 0X01 0X02 0X10 0X20 0X40 NONE MAINT_NOW NONE NONE NONE 0 1 4 5 6 YGGR RGRR YGYY YGYY NONE POSITIONER_STATUS POSITION_DEVIATION_ALARM SOFT_STOP_UPPER_LIMIT SOFT_STOP_LOWER_LIMIT POSITION_UPPER_LIMIT POSITION_LOWER_LIMIT MPC_ACTIVE LOCAL_INTERFACE_DISABLED ERROR_HISTOR_RESET 0X01 0X02 0X04 0X08 0X10 0X20 0X40 0X80 MAINT_NOW NONE NONE NONE NONE NONE NONE NONE 8 9 10 11 12 13 14 15 RRRR GYGY GYGY GYGG GYGG GGGY GGYG NONE MD MECHANICAL_STATUS ACTUATOR_RATIO_WARNING PNEUMATIC_INABILITY_TO_FAI_SAFE FRICTION_HIGH_WARNING FRICTION_LOW_WARNING FRICTION_HIGH_ALARM FRICTION_LOW_WARNING VALVE_CYCLES_WARNING VALVE_TRAVEL_WARNING 0X01 0X02 0X04 0X08 0X10 0X20 0X40 0X80 MAINT_SOON MAINT_SOON MAINT_SOON MAINT_SOON MAINT_SOON MAINT_SOON MAINT_SOON MAINT_SOON 16 17 18 19 20 21 22 23 YYYY YRRR YRYG YRGY RRGR RRGY GRGG GRGG TECH ELECTRONIC_STATUS TEMPERATURE_HIGHT_WARNING TEMPERATURE_LOW_WARNING SHUNT_VOLTAGE_REFERENCE_ERROR PIEZO_VOLTAGE_ERROR WATCH_DOG_TIME_OUT NV_RAM_CHECKSUM_ERROR LOSS_OF_INTER_PCB_COMM ELECTRONIC_INABILITY_TO_FAIL_SAFE 0X01 0X02 0X04 0X08 0X10 0X20 0X40 0X80 MAINT_SOON MAINT_SOON MAINT_SOON MAINT_SOON MAINT_SOON MAINT_SOON MAINT_SOON MAINT_SOON 32 33 34 35 36 37 38 39 YYGG YYGG RRRY RRYG RRRY RRRY RRRG YRRY TECH PRESSURE_STATUS SUPPLY_PRESSURE_LOW_ALARM SUPPLY_PRESSURE_HIGH_WARNING SUPPLY_PRESSURE_LOW_WARNING PORT_1_VALUE_OUT_OF_RANGE PORT_2_VALUE_OUT_OF _RANGE PORT_1_RANGE_TOO_SMALL PORT_2_RANGE_TOO_SMALL PNEUMATIC_LEAK_WARNING 0X01 0X02 0X04 0X08 0X10 0X20 0X40 0X80 MAINT_SOON MAINT_SOON MAINT_SOON MAINT_SOON MAINT_SOON MAINT_SOON MAINT_SOON MAINT_SOON 40 41 42 43 44 45 46 47 RYYG YYGR YYYG YYGY YYGY YYGY YYGY YRGR TECH INTERLOOP_STATUS SPOOL_STICKING_WARNING SPOOL_STICKING_ALARN SPOOL_CYCLES_WARNING SPOOL_TRAVEL_WARNING HALL_SENSOR_UPPER_POSITION HALL_SENSRO_LOWER_POSITION 0X01 0X02 0X04 0X08 0X10 0X20 MAINT_SOON MAINT_SOON MAINT_SOON MAINT_SOON MAINT_SOON MAINT_SOON 48 49 50 51 52 53 YRGG RRGG GRGG GRGG RRYR RRYR TECH OUTER_LOOP_STATUS FEEDBACK_RANGE_TOO_SMALL POSITION_OUT_OF_RANGE_0 POSITION_OUT_OF_RANGE_100 NO_MOTION_TIME_OUT NON_SETTLE_TIME_OUT INNER_LOOP_OFFSET_TIME_OUT JOG_CALIBRATE_SET_100_POSITION 0X01 0X02 0X04 0X08 0X10 0X20 0X40 MAINT_SOON MAINT_SOON MAINT_SOON MAINT_SOON MAINT_SOON MAINT_SOON MAINT_SOON 56 57 58 59 60 61 62 RGGY RGGY RGGY RGYY RGYG RGGR YGYR TECH CONFIGURATION_STATUS PRESSURE_SENSOR_BOARD_PRESENT PRESSURE_CONTROL_LOCKED REVERSED_POT_ROTATION REVERSED_SPRING INSUFFICIENT_SPRING NO_SPRING 0X01 0X04 0X08 0X10 0X20 0X40 NONE NONE NONE NONE NONE NONE 72 74 75 76 77 78 NONE NONE NONE NONE NONE NONE Function Block Parameter MAIN CONTROLLER_STATE_STATUS MAIN 3400 Alert/Alarm Items GREYED OUT are factor default masked off (NOT ACTIVE) LED Blink 63 Logix 3400MD Digital Positioner LGENIM3405-02 11/13 Pressure Alarms Pressure alarms are only available on models with advanced diagnostics (Logix 3400MD digital positioner). Advanced diagnostic models add top and bottom pressure sensors. These sensor readings and alarms are only accessible from the communicator when the configuration has been set to Advanced. Loss of Pressure: The loss of pressure alarm becomes active when the supply pressure is near the minimum positioner operating pressure of 30 psig. The LEDs will blink Red, Yellow, Yellow, Green. This alarm is meant to alert the user to low supply pressure as well as complete loss of pressure. Top Sensor, Bottom Sensor: Each sensor is checked during actuator calibration. If a calibration reading appears to be out of range, the appropriate alarm will become active. The pressure sensors are located on the collector board assembly. Internal Positioner Alerts MPC: (FINAL_VALUE_CUTOFF_HI, FINAL_VALUE_CUTOFF_LO)The MPC or tight shutoff feature of the Logix 3400MD digital positioner allows the user to control the level at which the command signal causes full actuator saturation in the closed (or open) position. This feature can be used to guarantee actuator saturation in the closed (or open) position or prevent throttling around the seat at small command signal levels. To enable, use configuration to apply the desired MPC threshold. Note: The positioner automatically adds a 1 percent hysteresis value to the MPC setting to prevent jumping in and out of saturation when the command is close to the MPC setting. Question: I set the FINAL_VALUE_CUTOFF_LO at 5 percent. How will the positioner operate? Answer: Assume that the present command signal is at 50 percent. If the command signal is decreased, the positioner will follow the command until it reaches 5 percent. At 5 percent, the spool will be driven in order to provide full actuator saturation. The positioner will maintain full saturation below 5 percent command signal. Now, as the command increases, the positioner will remain saturated until the command reaches 6 percent (remember the 1 percent hysteresis value added by the positioner). At this point, the stem position will follow the command signal. Question: I have FINAL_VALUE_CUTOFF_LO set to 3 percent but the valve will not go below 10 percent? Answer: Is a lower soft limit enabled? The lower soft limit must be less than or equal to 0 percent in order for the MPC to become active. If soft stops are active(SOFTSTOP_LOW>30, SOFTSTOP_ HIGH<100) FINAL_VALUE_HI or _LO is disabled. Position Alerts Position alerts notify the user that the valve has traveled past a configured limit. The default settings are –10 percent and 110 percent which are outside normal travel and, therefore, disabled. Position alerts only notify the user that a limit has been exceeded and do not limit stem movement. Position alerts will cause a green LED code to blink. Soft Limits Unlike position alerts, soft limits (SOFTSTOP_LOW, SOFTSTOP_HIGH) prevent the stem position from going below or above the configured limits. If the command signal is trying to drive the position past one of the limits, the green LED code will blink, but the stem position will remain at the set limit. Travel Accumulator The travel accumulator is equivalent to a car odometer and sums the total valve movement. Using the user-defined stroke length and travel dead band, the Logix 3400MD digital positioner keeps a running total of valve movement. When the positioner first powers up, high and low dead band limits are calculated around the present position. When the stem position exceeds the travel dead band, the movement from the center of the dead band region to the new position is calculated and added to the travel accumulator. From this new position, dead band high and low limits are again calculated. Example: The Logix 3400MD digital positioner has a default dead band configuration of 20 percent and the valve has a 4- inch linear stroke. When the valve first powers up, the command signal is 50 percent. The unit will calculate a high-travel threshold of 70 percent (50 percent present position plus 20 percent dead band) and a low-travel threshold of 30 percent (50 percent present position minus 20 percent dead band). As long as the stem position remains greater than 30 percent and less than 70 percent, no additions are made to the travel accumulator. Now, assume the stem position moves to 80 percent, which is outside the present dead band. The Logix 3400MD digital positioner calculates the stem movement and adds this number to the travel accumulator. 64 80percent(presentposition)–50percent(previous)=30percentmovementx4-inchstroke=1.2 inches Logix 3400MD Digital Positioner LGENIM3405-02 11/13 So, 1.2 inches is added to the travel accumulator. New dead band thresholds of 100 percent (80 percent present position plus 20 percent dead band) and 60 percent (80 percent present position minus 20 percent dead band) are calculated. This process continues as the stem position moves throughout its stroke range. Cycle Counter The cycle counter is another means of monitoring valve travel. Unlike the travel accumulator, the stem position must do two things to count as a cycle: exceed the cycle counter dead band and change direction. A cycle counter limit can also be written into the positioner. If this limit is exceeded, the LEDs will blink Green, Red, Green, Green. Position Deviation If the stem position differs fromthe control command by a certain amount for a given length of time, the LED‘s will blink Red, Red, Red, Red to signify excess deviation. The trip point and settling times are set in the transducer block. 8.18 Trend Objects Trend objects support the management and control of function blocks by providing access to history information. Trend objects provide for short-term history data to be collected and stored within a resource. The collected data may be input and output parameters, and status information from selected function blocks. Trend objects are available anytime for reading. A user will not typically view trend objects directly. A host system may receive the data and build displays using the history data. The Logix 3400MD digital positioner has one defined trend object. 8.19 Domain Objects Description Domain objects support download services which are used to download firmware to a device. Standard generic download services (defined by Fieldbus Foundation) are used in the domain object of the Logix 3400MD digital positioner. 8.20 Device Description Device Descriptions and ODs A Device Description (DD) provides a clear and structured text description of a field device. The descriptions found in a DD supplement the object dictionary definitions of device applications. So an OD description used in conjunction with the DD will provide a complete detailed description of the device operation. (See the FF Fieldbus Specifications for more details about the usage of DDs and ODs.) DD Download The DD for the Logix 3400MD digital positioner can be downloaded by going to the Software Download section on the Flowserve website at www.flowserve. com. Device Description Contents A typical DD contains information about the device parameters and operation, such as: • Attributes, like coding, name, engineering unit, write protection, how-to-display, etc. • The menu structure for listing parameters, including names of menus and sub-menus. • The relationship of one parameter to others • Information about help text and help procedures • Maintenance, calibration and other necessary operation information. 65 Logix 3400MD Digital Positioner LGENIM3405-02 11/13 • Methods Wizard to help configure and commission the positioner Standard and Device-specific DD Standard DD descriptions for function blocks and transducer blocks are maintained by the Fieldbus Foundation. These descriptions can be used as part of a field device DD by manufacturers to describe the standard features of their devices. Device-specific descriptions are developed by manufacturers to describe custom features which are unique to that particular device. These two types of DDs (the standard and device-specific) can then be combined to provide a complete DD for the field device. 8.21 Object Dictionary Object Dictionary Description AP objects are described in the Object Dictionary (OD) with each entry describing an individual AP object and its message data. The message data may consist of a number of characteristics defined for that particular object. The OD allows the FBAP of a device to be visible to the fieldbus communications system. Refer to the Fieldbus documentation for more information about OD. 8.22 System Management System Management (SM) operates on special objects in the System Management Information Base (SMIB) which is part of the Management Virtual Field Device (VFD). System Management Key Features The key features of system management operation: • Provide system application clock time synchronization • Provide scheduling of function blocks • Manage automatic device address assignment • Provide tag search service • System Management Information Base (SMIB) The SMIB contains various objects that are associated with system management operation. Table 8.22 shows a listing of the SMIB object dictionary. Groups of objects (along with their starting index number) are included in the SMIB for the Logix 3400MD digital positioner. The numbers in parenthesis indicate the number of objects. Supported Features The features supported by system management include the key features listed above as well as the ones designated in Table 8.23. The object SM_SUPPORT indicates which features are supported by system management in the FBAP. The features are mapped to the bits in the bit string shown below. Table 8.21 System Management Supported Features SM_SUPPORT bit 0 66 Feature Set physical device tag (agent) Supported? yes 1 Set field device address (agent) yes 2 Clear address (agent) yes 3 Identify (agent) yes yes 4 Locating function blocks (agent) 5 Set physical device tag (manager) no 6 Set field device address (manager) no 7 Clear address (manager) no Logix 3400MD Digital Positioner LGENIM3405-02 11/13 8 Identify (manager) no 9 Locating function blocks (manager) no 10 FMS server role yes 11 Application clock synch (timeslave) yes 12 Scheduling function block yes 13 Application clock synch (time publisher) no 14 to31Reservedforfutureuse. no SM_SUPPORT Bits Any bit (of the object SM_SUPPORT) will be set that corresponds to a supported feature listed in Table 8.23. The resulting value in the object SM_SUPPORT is 1C1F (hex). SM Agent Objects Four SM agent objects are contained in the SMIB object dictionary. One object, SM_SUPPORT, was described previously. The three other objects are timers associated with SM operations. Table 8.22 identifies the SM Agent objects with their object directory index and default values. Table 8.22 SM Agent Objects OD Index Default Value Variable that indicates the features supported by SM in this device. See Table 8.22, Logix 3400MD Digital Positioner SMIB Object Dictionary 258 0x1C1F T1 Value of the SMstep timer in 1/32 of a millisecond ticks. 259 96,000* (3 seconds) T2 Value of the SM set address sequence timer in 1/32 of a millisecond ticks. 260 1,920,000* (60 seconds) T3 Value of the SM set address wait timer in 1/32 of a millisecond ticks. 261 480,000 * (15 seconds) Object Description SM_SUPPORT * The default value is specified by the communications profile for the application area System Application Clock Time Synchronization Each link in a fieldbus network contains an application clock time publisher responsible for distributing application time on the link. A clock synchronization message is periodically sent by the time publisher to all fieldus devices. The application clock time is independently maintained in each device based on its own internal crystal clock. Clock synchronization provides the capability for devices to time stamp data (events and alarms when they occur). Sync and Scheduling Objects These objects are used by system management to provide application clock synchronization and macro cycle scheduling for the device. Table 8.23 identifies the sync and scheduling objects with their object directory index and default values. Table 8.23 SM Sync and Scheduling Objects Object Description OD index DefaultValue CURRENT_TIME The current application clock time. 262 Dynamic LOCAL_TIME_DIFF Used to calculate local time from CURRENT_TIME. 263 0 AP_CLOCK_SYNC_INTERVAL The interval in seconds between time messages on the link (bus). 264 Set by SM (mgr.) during address assignment 67 Logix 3400MD Digital Positioner LGENIM3405-02 11/13 TIME_LAST_RCVD The application clock time contained in the last clock message. 265 Dynamic PRIMARY_AP_TIME_ PUBLISHER The node address of the primary time publisher for the local link (bus). 266 Set by SM (mgr.) during address assignment TIME_PUBLISHER_ADDR The node address of the device which sent the last clock message. 267 Dynamic Unused MACROCYCLE_DURATION 268 The length of the macro cycle in 1/32 of a millisecond ticks. 269 Set by SM (mgr.) during address assignment Device ID, Tag Name and Device Address Each fieldbus device on the network is uniquely identified by: • Device ID that is set by the manufacturer to identify the device. • Device Name (Tag) set by the user to identify operation • Device Address - a unique numerical address on the fieldbus segment. Address may be set automatically by system management. Address Assignment Objects Table 8.24 is a description of the address assignment objects with their object directory index and default values. Table 8.24 SM Address Assignment Objects ObjectDescription OD index Default Value DEV_ID The device ID set by the manufacturer. 270 464C530201-VAL-LX1 400-0nnnnnnnn PD_TAG The physical device tag to be set using SET_PD_TAG service. 271 OPERATIONAL_ POWERUP Controls the state of SM of the device upon power-up. 272 All Spaces TRUE (SM goes operational after power up) Virtual Field Device (VFD) List Objects Two objects identify the VFDs in the device: Table 8.25 Virtual Field Device (VFD) List Objects OD Index VFD_REF VFD_TAG 273 1 ‘MIB’ 274 2 ‘Resource’ Function Block Scheduling The SMIB contains a schedule, called the function block schedule, that indicates when that device’s function blocks are to be executed. System Management schedules the start of each function block relative to the macro cycle of the device. The macro cycle represents one complete cycle of the function block schedule in a device. The macro cycles of all devices on the link are synchronized so that function block executions and their corresponding data transfers are synchronized in time. Using the configurator software, the device’s function block schedule can be pre-configured. Function Block Scheduling Objects Four scheduling objects are defined in the Logix 3400MD digital positioner. Table 8.25 lists the function block scheduling objects with their object directory index and default values. 68 Table 8.25 Function Block Scheduling Objects Logix 3400MD Digital Positioner LGENIM3405-02 11/13 Object Description OD Index Default Value VERSION_OF_SCHEDULE The version number of the function block schedule. 275 0 FBScheduleEntry#1 Default setting is the AO block 276 START_TIME_OFFSET -0FB_OBJECT_INDEX-257 VFD_REF-1 FBScheduleEntry#2 Default setting in the PID block 277 START_TIME_OFFSET-16000 FB_OBJECT_INDEX-310 VFD_REF-1 278 0xFFFFFFFF 279 0 FBScheduleEntry#3 FBScheduleEntry#4 Available 8.23 Network Management Network management provides for the management of a device’s communication system by an external network manager application. Network management operates on special objects in the Network Management Information Base (NMIB) which is part of the Management Virtual Field Device (VFD). Network Management Features Network Management provides the following features: Loading a Virtual Communication Relationship (VCR), which may be a list or a single entry. See VCR list objects. • Loading/changing the communication stack configuration • Loading the Link Active Schedule (LAS) • Performance monitoring Network Management Objects CAUTION: Normally most of the network management objects appear transparent to the user. In other words, the parameters and objects used for network management are not normally viewed or changed as part of device configuration. The network management objects in the Logix 3400MD digital positioner FBAP are listed in the following paragraphs, although most, (if not all) of these objects are not directly user-configured. Network Management Information Base (NMIB) The NMIB contains various objects that are associated with network management operation. Table 8.28 lists the NMIB object dictionary. The groups of network management objects (along with their index starting numbers) are included in the NMIB for the Logix 3400MD digital positioner. The numbers in parenthesis indicate the number of objects. Virtual Communications Reference (VCR) Objects The objects listed above contain parameters which define network management operations. These operations include communications between applications in different field devices (or field devices and operator interface). In order for this communication to take place, a communications relationship must be set up using the network management objects and parameters. The parameters for this communication relationship are stored in a Virtual Communications Reference (VCR) object. VCR Attributes The attributes for the VCR types (VCR name) defined in the Logix 3400MD digital positioner device are standard fieldbus attributes. There are 16 available VCR‘s available in the Logix 3400MD. For detailed descriptions of these attributes, see 69 Logix 3400MD Digital Positioner LGENIM3405-02 11/13 Unsupported Services The following is a list of services which are not supported (not used) in the Logix 3400MD digital positioner FBAP: • FB_Action (all function blocks are static) • Put_OD (all ODs are static) • Domain upload • Program invocation • Reception of alert and trend indications • Access protection and check of password • AlertEventConditionMonitoring • Write to variable lists • Create/Modify/Delete variable lists • Read and write access by name • Phys Read, Phys Write • Read With Type, Write With Type • Information Report With Type 8.24 Logix 3400MD Digital Positioner Variable Enumeration The following table defines the Logix 3400MD digital positioner variables enumeration. CALIBRATE: This variable initiates calibration procedures, and reports current state of calibration during the procedure. CONTROL PARAMETERS Table 8.26 Control Parameters Table 70 Parameter Name Bit or Byte Values Description TEST_MODE Bit 0 0x01 Bit 7 0x08 Enagle diagnostic variable access Write to DAC value Calibrate 0 1 2 5 Select Calibration Type Perform a Stroke Calibration Perform a Pressure and Friction Calibration ABORT Calibration Procedure Calibration_Status Bit 0 0x01 Bit 2 0x04 Bit 4 0x08 Bit 5 0x20 Bit 6 0x40 Stroke Calibration in Progress Pressure Calibration in Progress Setting Spool Offset Pressure Calibration Required Stroke Calibration Required SIG_FLAGS Bit 0 0X01 Bit 1 0x02 Bit 2 0x04 Bit 3 0x08 Bit 4 0x10 Bit 5 0x 20 Bit 6 0x40 Bit 7 0x80 RUN/Begin Signature Signature Complete TEST REPEAT Mode Rum Ram Signature Valve INIT End of Singnature Data Encountered TEST DAC Mode Run Partial Stroke Test (PST) Logix 3400MD Digital Positioner LGENIM3405-02 11/13 Parameter Name Bit or Byte Values Description XD_FSTATE_OPT No Bit 0x00 Bit 1 0x01 Bit 2 0x02 Fail to Last Known Set Point Fail Valve Closed Fail Valve Open CONTROL_CONFIG Bit 0 0X01 Bit 1 0x02 Bit 2 0x04 Bit 3 0x08 Bit 4 0x10 Bit 5 0x 20 Bit 6 0x40 Bit 7 0x80 Local Panel Disabled Continuous Friction Mode Enabled For Future Use Pressure Control Enabled Pressure Sensor Board Present Single Action Enabled For Future Use For Future Use MISC_CONFIG Bit 0 0X01 Bit 1 0x02 Bit 2 0x04 Bit 3 0x08 Bit 4 0x10 Bit 5 0x 20 Bit 6 0x40 Bit 7 0x80 For Future Use For Future Use For Future Use For Future Use For Future Use For Future Use For Future Use For Future Use USER_INTERFACE_ACTIVE Bit 0 0X0001 Bit 1 0x0002 Bit 2 0x0004 Bit 3 0x0008 Bit 4 0x0010 Bit 5 0x 0020 Bit 6 0x0040 Bit 7 0x0080 Bit 8 0x0100 Bit 9 0x0200 Bit 10 0x0400 Bit 11 0x0800 Bit 12 0x1000 Bit 13 0x2000 Bit 14 0x 4000 Bit 15 0x8000 Air Action ATO Enabled Characterization Linear Auto Tune Enabled Low Friction Mode Calibration Auto DIP SW 6 Spare Up Button Not Pressed Dn Button Not Pressed Bit 1 of Gain Selector Bit 2 of Gain Selector Bit 3 of Gain Selector For Future Use Qucik Cal Button Not Pressed For Future Use For Future Use For Future Use LOAD_EE_DEFAULTS 0 1 2 Normal Operation Reset Non-Volatile Variables Reset Calibration Variables CURVE_SELECT 0 1 2 Equal Percent Quick Opening Custom (CurveX,CurveY) Unit Parameters Table 8.27 Unit Parameters Table Parameter Name Bit or Byte Values Description TRAVEL_UNITS 57 Percent PRESSURE_UNITS 6 7 10 12 PSI BAR Kg/cm2 Kpa INTERNAL_TMEP_UNITS 32 33 Deg C Deg F FRICTION_UNITS 0 Pounds 71 Logix 3400MD Digital Positioner LGENIM3405-02 11/13 Diagnostic Parameters Table 8.28 Diagnostics Parameters Table Parameter Name Bit or Byte Values Description DIAGNOSTIC_LEVEL 0 2 3 Standard Advanced Pro PST_RESULT 0 1 Fail Pass CYCLE_TRAVEL_RESET Bit 0 0x01 Bit 1 0x02 Bit 2 0x04 Bit 3 0x08 Valve Cycle Reset Valve Travel Reset Spool Cycle Reset Spool Travel Reset TREND_STATE 0 1 3 Unlock Trend Data Lock Trend Data Clear Trend Data Informational Parameters Table 8.29 Informational Parameters Table 72 Parameter Name Bit or Byte Values Description VALVE_MAN_ID 0 1 2 00 Valtek Kammer NAF Other VALVE_TYPE 0 1 2 3 4 5 6 7 8 9 10 11 12 13 14 15 16 17 18 19 20 21 22 23 24 25 26 27 28 29 30 31 99 Mark One Mark One-X Mark 100 Mark two Mark Six Mark Eight Mark Ten ShearStream SB ShearStream HP Maxflo 3 Valdisk BX HpFlow LinedFlow TotalFlow ColdFlow DrainFlow SmallFlow CleanFlow Multi-Z 020000 025000 030000 185000 FlowTop FlowPak FlowPro VariCool Setball Duball Trunnball Torex Unex Other Logix 3400MD Digital Positioner LGENIM3405-02 11/13 Parameter Name Bit or Byte Values Description VALVE_CLASS 0 1 2 3 4 5 6 7 8 9 10 11 12 13 14 15 16 17 18 19 20 21 22 23 99 0.25 inch / DN 6 0.5 inch / DN 15 0.75 inch / DN 20 1.0 inch / DN 25 1.25 inch / DN 32 1.5 inch / DN 40 2.0 inch / DN 50 2.5 inch / DN 65 3.0 inch / DN 80 4.0 inch / DN 100 5.0 inch / DN 125 6.0 inch / DN 150 8.0 inch / DN 200 10.0 inch / DN 250 12.0 inch / DN 300 14.0 inch / DN 350 16.0 inch / DN 400 18.0 inch / DN 450 20.0 inch / DN 500 24.0 inch / DN 600 28.0 inch / DN 700 32.0 inch / DN 800 36.0 inch / DN 900 40.0 inch / DN 1000 Other VALVE_CLASS 1 2 3 4 5 6 7 8 9 10 11 12 13 14 15 16 17 99 CL 150 CL 300 CL 600 CL 900 CL 1500 CL 2500 CL 4500 PN 10 PN 16 PN 25 PN 40 PN 63 PN 100 PN 160 PN 250 PN 400 PN 4000 Other VALVE_ENDCON 0 1 2 3 4 5 99 Sep Flange Intergral Flange Weld End Flangeless/Wafer Clamped Screwed Other VALVE_BODYMAT 0 1 2 3 4 5 6 7 8 9 10 11 99 Alloy 20 Aluminum Bronze Carbon Steel Special Alloy Hastelloy Inconel Monel 400 Nickel Titanium Type 304 Type 316 Other 73 Logix 3400MD Digital Positioner LGENIM3405-02 11/13 74 Parameter Name Bit or Byte Values Description VALVE_PACKTYPE 0 1 2 3 4 99 Single Packing PTFE Single Packing Graphite Double Packing PTFE Double Packing Graphite Spring Loaded Other LEAK_CLASS 1 2 3 4 5 6 99 Class I Class II Class III Class IV Class V Class VI Other VALVE_FLAGS 0 1 2 3 4 99 Flow Over Flow Under Shaft Upstream Shaft Downstream Shaft Center Other VALVE_TRIMMAT 0 1 2 3 4 99 Stainless Steel Sainless Steel Hardened Alloy 6 Soft Seated Special Alloys Other VALVE_TRIMCHAR 0 1 2 3 99 Equal Percent (=%) Linear Quick Open Bi-Linear Other VALVE_TRIMTYPE 0 1 2 3 4 5 6 7 8 9 10 11 12 13 99 Cav Control Channel Stream High Pressure Mega Stream Standard Tiger Tooth Stealth MicroCav CavStream MultiStream SilentPack Kammer Type I-III Z-Trim Multi Stage Other Logix 3400MD Digital Positioner LGENIM3405-02 11/13 Parameter Name Bit or Byte Values Description VALVE_TRIMNO 0 1 2 3 4 5 6 7 8 9 10 11 12 13 14 15 16 17 18 19 20 21 22 23 24 25 26 99 0.10 - 0.12 in (2.5 - 3.0 mm) 0.13 - 0.15 in (3.1 - 3.8 mm) 0.16 - 0.19 in (3.9 - 4.8 mm) 0.20 - 0.24 in (4.9 - 6.1 mm) 0.25 - 0.30 in (6.2 - 7.6 mm) 0.31 - 0.37 in (7.7 - 9.4 mm) 0.38 - 0.45 in (9.5 - 11.4 mm) 0.46 - 0.55 in (11.5 - 14.0 mm) 0.56 - 0.67 in (14.1 - 17.0 mm) 0.68 - 0.81 in (17.1 - 20.6 mm) 0.82 - 0.98 in (20.7 - 24.9 mm) 0.99 - 1.18 in (25.0 - 30.0 mm) 1.19 - 1.42 in (30.1 - 36.1 mm) 1.43 - 1.7 in (36.2 - 43.0 mm) 1.8 - 2.1 in (44 - 54 mm) 2.2 - 2.7 in (55 - 68 mm) 2.8 - 3.3 in (69 - 84 mm) 3.4 - 4.1 in (85 - 103 mm) 4.2 - 4.9 in (104 - 125 mm) 5.0 - 6.0 in (126 - 152 mm) 6.1 - 7.3 in (153 - 184 mm) 7.4 - 8.8 in (185 - 223 mm) 8.9 - 10.5 in (224 - 268 mm) 10.6 - 12.7 in (269 - 322 mm) 12.8 - 15.2 in (323 - 386 mm) 15.3 - 18.2 in (387 - 462 mm) 18.3 - 21.8 in (463 - 552 mm) Other ACT_MAN_ID 0 1 2 3 4 5 6 99 Valtek Piston Kammer Valtek Diaphragm Rotary Automax NAF Valtek Diaphragm Linear Fisher Other ACT_FAIL_ACTION 0 1 2 3 None Mechanical Fail Closed Mechanical Fail Open Mechanical Fail In Place ACT_TYPE 0 1 2 3 4 99 Linear (piston) Linear (diaphragm) Rotary (piston) Rotary (diaphragm) Rotary (Rack & Pinion) Other ACT_SIZE 0 1 2 3 4 5 6 7 8 9 10 12 13 14 15 16 17 18 19 Valtek Piston 25 Valtek Piston 50 Valtek Piston 100 Valtek Piston 100C Valtek Piston 150C Valtek Piston 200 Valtek Piston 200C Valtek Piston 300 Valtek Piston 400 Valtek Piston 500 Valtek Piston 600 Kammer 37 Kammer 38 Kammer 39 Kammer 3D Kammer 47 Kammer 48 Kammer 49 Kammer 4D 75 Logix 3400MD Digital Positioner LGENIM3405-02 11/13 76 Parameter Name Bit or Byte Values Description ACT_SIZE 20 21 22 23 24 25 26 27 29 30 31 32 33 34 35 36 37 38 39 40 41 42 43 44 45 46 47 48 49 50 51 52 53 54 55 56 57 58 59 60 61 63 64 65 66 67 68 69 70 71 72 73 75 76 77 78 79 80 82 83 84 85 Kammer P0 Kammer P1 Kammer P2 Kammer P3 Kammer P4 Kammer P5 Kammer P6 Kammer P7 Valtek Diaphragm Rotary NR1 Valtek Diaphragm Rotary NR2 Valtek Diaphragm Rotary NR3 Automax B050D Automax B063D Automax B085D Automax B100D Automax B115D Automax B125D Automax B150D Automax B175D Automax B200D Automax SNA250 Automax SNA300 Automax R205 Automax R206 Automax R207 Automax R208 Automax R310 Automax R312 Automax R314 Automax R316 Automax R414 Automax R416 Automax R418 Automax R420 Automax R422 Automax R514 Automax R516 Automax R518 Automax R520 Automax R522 Automax R524 NAF 02 NAF 11 NAF12 NAF 21 NAF 22 NAF 31 NAF 32 NAF 41 NAF 42 NAF 51 NAF 52 Valtek Diaphragm Linear 127 Valtek Diaphragm Linear 252 Valtek Diaphragm Linear 502 Valtek Diaphragm Linear 700 Valtek Diaphragm Linear 1502 Valtek Diaphragm Linear 3002 Fisher 657-30 Fisher 657-34 Fisher 657-40 Fisher 657-45 Logix 3400MD Digital Positioner LGENIM3405-02 11/13 Parameter Name Bit or Byte Values Description ACT_SIZE 86 87 88 89 90 91 92 93 94 95 96 97 98 99 100 101 102 103 105 Fisher 657-46 Fisher 657-50 Fisher 657-60 Fisher 657-70 Fisher 657-80 Fisher 657-87 Fisher 657-100 Fisher 667-30 Fisher 667-34 Fisher 667-40 Fisher 667-45 Fisher 667-46 Fisher 667-50 Fisher 667-60 Fisher 667-70 Fisher 667-80 fisher 667-87 Fisher 667-100 Other SPRING_TYPE 0 1 2 3 4 5 99 88 USER_INTERFACE_INSTANT Bit 0 0x0001 Bit 1 0x0002 Bit 2 0x0004 Bit 3 0x0008 Bit 4 0x0010 Bit 5 0x0020 Bit 6 0x0040 Bit 7 0x0080 Bit 8 0x0100 Bit 9 0x0200 Bit 10 0x0400 Bit 11 0x0800 Bit 12 0x1000 Bit 13 0x2000 Bit 14 0x4000 Bit 15 0x8000 Air Action ATO Enabled Characterization Linear Auto Tune Enabled Low Friction Mode Calibration Auto DIP SW 6 Spare Up Button Not Pressed DN Button Not Pressed Bit 1 of Gain Selector Bit 2 of Gain Slelector Bit 3 of Gain Selector For Future Use Quick Cal Button Not Pressed For Future Use For Future Use For Future Use 9Calibration 9.1Introduction This section provides information about calibrating the Logix 3400MD digital positioner’s sensors. 9.2Overview About Calibration When re-calibration is required, the Logix 3400MD digital positioner does not need to be removed from the process and may be calibrated in the field. NOTE: Calibration will cause the valve to fully stroke, so calibration must not be initiated while the valve is on line in the process. 77 Logix 3400MD Digital Positioner LGENIM3405-02 11/13 CAUTION: The configurator application can be used to perform the calibration procedures. The software application is not a calibrated measurement source. It is a digital diagnostic tool that provides verification of device parameter values. Calibration Process In general, calibration procedures follow these processes: 1. Prepare the device. (Note: The transducer function block must be out-of-service in order to perform any calibration.) 2. Write to CALIBRATE. 3. Observe the positioner performance. The calibration parameter values and calibration commands are written to the device using a fieldbus configuration application, (such as the NI-FBUS Configurator). Alternatively, use the Re-Cal button on the Logix 3400MD digital positioner to perform the stroke calibration. Confirm that positioner is configured properly, then proceed. 1. Prepare the device and safe the area for the removal of the main housing cover. 2. Remove the cover. 3. Press and hold the Re-Cal button for at least five seconds to initiate the stroke calibration. (NOTE: The transducer block must be out-of-service before the Re-Cal button will be active.) If Auto Tune is selected, this will also auto tune the positioner response. 4. Replace cover and return to operation. (Refer to Logix 3400MD Digital Positioner IOM for more details.) 9.3Calibration The output position of the Logix 3400MD digital positioner is calibrated using the transducer block CALIBRATE parameter. The positioner performance must be verified by the operator. Calibration Parameters Table 9.1 lists transducer block parameters and their values used in the calibration procedures. Table 9.1 Transducer Block Calibration Parameters Parameter Description Value - Meaning Comments MODE_BLK The operating mode of the transducer block Permitted modes: The transducer block must be in the OOS mode to perform Logix 3400MD digital positioner calibration. Auto — Auto (target mode) OOS — Out of Service CALIBRATE One-byte value which selects the calibration operation to be performed. 0 Normal operation. Valve tracks FINAL_VALUE 1 Initiates stroke calibration. Closes valve. 2 Initiates actuator pressure Calibration and correction commands are executed when the command is written. transducers calibration. 3 Moving valve closed position 4 Moving valve to open position 5 Calibrating Supply 6 Calibrating actuator sensor - closed 7 Calibrating actuator sensor - open 8 Monitoring of Re-Cal button. 9 Error occurred during calibration 10 Inner-loop offset adjustment 78 Messages only Nulls the spool block Logix 3400MD Digital Positioner LGENIM3405-02 11/13 11 Auto Tune Positioner Only active when Re-Cal is done 12 JogCal - Waiting for user to set point Initiates the monitoring of the button for five seconds 13 Range Checking PRESURE_ SUPPLY_ CAL_REF Input referenc or actual supply pressure for calibration 14 Normal Operation (Rev 0x23). Checkjog call setting in MISC_FLAGS Jog Cal must be enabled in MISC_FLAGS before it can be initiated 0 – 150 psig max. Used to calibrate the span of the actuator pressure sensors Two-point Calibration The Logix 3400MD digital positioner has two-point calibration. The stroke position feedback potentiometer and the actuator pressure transducers are calibrated this way. The positioner must be pre-configured to the proper air action and valve type (linear or rotary)before the calibration is done. Procedure: Stroke and pressures are calculated when the user follows the steps below. 1. Using a fieldbus configuration application as the operator interface to device, set the transducer and resource block MODE_BLK parameter to OOS (Out of Service). 2. For stroke, write the value 1 to CALIBRATE. The valve will close and then open automatically. The value will change values as the calibration continues. Once completed, CALIBRATE will return to ‘0.’ (This may take 10 seconds to ~2 minutes depending on the actuator size.) 3. For actuator pressure transducers (if so equipped), input the measured supply pressure (in psig) in PRESSURE_SUPPLY_CAL_REF. Write the value 2 to CALIBRATE. The valve will close and then open automatically. The value will change values as the calibration continues. Once completed, CALIBRATE will return to ‘0’ (This may take 1 minute to ~10 minutes depending on the actuator size.) 4. The positioner will return to tracking FINAL_VALUE. 5. Change MODE_BLK to desired mode 6. When calibration is completed, set transducer and resource block to auto mode to resume normal device operation. Canceling Calibration Write ABORT to CALIBRATE. The previous values are restored and CALIBRATE returns to NONE. Additional Calibration Features Re-Cal button: Re-Cal is a method by which the valve can be stroke-calibrated without using the fieldbus configurator. Important: This feature is provided to allow stroke calibration being initiated at the positioner. However, the Logix 3400MD digital positioner Transducer block must be placed in Out-ofService mode for the button to become active. After completion of the calibration cycle, the block must be returned to normal mode for operation to resume. Re-Cal only affects position calibration. Any previous configuration or stored information is not affected. Re-Cal must be used to Auto Tune the positioner. 79 Logix 3400MD Digital Positioner LGENIM3405-02 11/13 10Troubleshooting 10.1Introduction This section contains information about identifying device faults and suggested actions to correct them. The approach to troubleshooting is determining the cause of the fault through definition of the symptoms (such as a device not visible on network or not able to write values to parameters). The information is organized the following way: • Device troubleshooting tables list some of the more commonly encountered faults and suggestions to check in order to find out where the problem is and correct it. • Positioner status tables define some of the conditions that cause critical or non-critical faults in the transmitter. Critical and non-critical faults are described and suggestions are given on where to find further information. • Device diagnostics briefly explains about some of the background diagnostics that are active in the device during normal operation. Device parameters are described that provide information about hardware and software status within the device. • Block configuration errors summarize conditions within the device which may be caused by configuration errors and suggestions on where to look to correct the errors. • Simulation mode describes how to set up the transmitter to generate a user-defined simulated input. This feature is useful in debugging the system when the process is not running. 10.2Overview Device Status and Failures Logix 3400MD digital positioner is constantly running internal background diagnostics to monitor the functions and status of device operation. When errors and failures are detected, they are reported in the status bits of various parameters in each block object, e.a. BLOCK_ERR or ERROR_DETAIL. Other parameters can be viewed showing a status description and/or a value which may identify a fault. Device status and certain operational faults are identified by viewing the parameter status or values and interpreting their meaning using the tables in this section. CAUTION: Additional diagnostics may be available through supervisory and control applications that monitor and control fieldbus networks. These diagnostics and messages are dependent upon the capabilities of the application and control system used. Troubleshooting with the NI-FBUS Configuration Tool The diagnostic messages generated by the Logix 3400MD digital positioner and block parameters can be accessed and evaluated using the NI-FBUS Configurator. Troubleshooting of some Logix 3400MD digital positioner faults and corrective actions also can be performed using the configurator. Fault Summary Diagnostic messages can be grouped into one of these three categories. 1. Non-critical Failures (Blink Code Starts Y) — Logix 3400MD digital positioner continues to calculate PV output. 2. Critical Failures (Blink Code Starts R)— Logix 3400MD digital positioner drives PV output to fail-safe state. 3. Configuration Errors — Incorrect parameter values may cause the Logix 3400MD digital positioner to generate a fault. A description of each condition in each category is given in the following tables. The condition is described, a probable cause is stated and a recommended corrective action is given for each fault. 80 Logix 3400MD Digital Positioner LGENIM3405-02 11/13 10.3 Device Troubleshooting Device Not Visible on Network If the device is not seen on the fieldbus network, the device may not be powered up or possibly the supervisory or control program is not looking for (or polling) the node address of that device. (See Table 10.1 for possible causes and recommended actions.) Table 10.1 Device Troubleshooting A Symptom • Device not visible on network Possible Cause Items to Check Recommended Action Device may have a node address that is with- Look at the following settings of the host system: in the unpolled range of addresses. • First Unpolled Node • Number of Unpolled Nodes Set number of unpolled nodes to 0. No power to the device. Measure the DC voltage at the device’s SIGNAL terminals. If no voltage or voltage is out of operating limits, Voltage must be within the limits as shown in Table 4.2 determine cause and correct. on page 15. Insufficient current to device Measure DC current to device. It should be between 23 If current is insufficient, determine cause and and 27 mA. correct. More than two or less than two terminators Check to see that only two terminators are present on Correct, if necessary. wired to fieldbus link link. Insufficient signal to device Measure the peak-to-peak signal amplitude; it should be: • Output 0.75 to 1.0 Vp-p. • Input 0.15 to 1.0 Vp-p. If signal amplitude is insufficient, determine the cause and correct. Measure the signal on the + and - SIGNAL terminals and at a frequency of 31.25k Hz. Incorrect or Non-compatible Tools If the user is using non-compatible versions of fieldbus software tools, such as Standard Dictionary or Device Description (DD) files, or if the user is using the incorrect revision level of device firmware, then device objects or some block objects may not be visible or identified by name. (SeeTable10.2 for possible causes and recommended actions.) Table 10.2 Device Troubleshooting B Symptom • Device and/or block objects not identified (UNKnown), or, • Parameters are not visible or identified by name, or • Flowserve-defined parameters are not visible. Possible cause Incorrect standard dictionary, device description (DD) or symbols on host computer Items to check Recommended Action Verify that the standard dictionary, the DD or sym- Install the compatible version of standard dictionary and DD for bols files are correct for the device. the device on the host computer. See Fieldbus Device Version Checking on page xi. Incorrect path-names to descrip- Check that the path name to locations of the stan- Make sure that the path name of the standard dictionary and tions on host computer. dard dictionary, and DD files on the host computer DD are in the correct location for the fieldbus software applicais correct. tion. (C:\. . . \release\) Incorrect revision of Device Resource Block firmware Read the four (4) elements of the REVISION_ARRAY parameters: which are: Perform a code download of the correct device firmware. See Code Download on page 133. • Board Firware Rev • Stack Rev Transducer Board Firmware Major Rev Transducer Board Firmware Minor Rev 81 Logix 3400MD Digital Positioner LGENIM3405-02 11/13 Incorrect revision level of the device Read the three elements of the REVISION_ARRAY Perform a code download of the correct device firmware. See firmware. parameter, which are: Code Download in section 11. • Stack board firmware • Stack board boot code • Transducer board firmware NOTE: The numbers, when viewed as hexadecimal numbers, are in the format MMmm.Where, MM is the major revision number and mm is the minor revision number. Non-functioning Blocks • Device block objects may not be running (executing their function block schedules) or the blocks may be in Out-of-Service (OOS) mode. For example, if the AO function block is in OOS mode, the block will not provide updated output values although the AO block may be running. When troubleshooting nonfunctioning block objects, start with the resource block. For example, if the resource block is in OOS mode all other blocks in the device will also be in OOS mode. (See Table 10.3 for possible causes and recommended actions.) Table 10.3 Device Troubleshooting C Symptom • Device output is not updating. Possible Cause Items to Check Recommended Action Resource block mode is OOS Read MODE_BLOCK. ACTUAL of Resource block. If necessary, set MODE_BLOCK.TARGET to Auto. Resource block is not running. Read the first element of BLOCK_TEST. Number should be increasing indicating that block is running. If block is not running, check the second element of BLOCK_TEST. If second element of BLOCK_TEST is not zero, write all zeroes to element. Check BLOCK_ERR for other errors. See Sub-section 10.7 for details on BLOCK_ERR. If an error is present in BLOCK_ERR, then read ERROR_DETAIL. Set RESTART to processor (or ‘4’) to soft-restart the device. Incorrect revision of resource Read DEV_TYPE , DEV_REV, and DD_REV. block firmware. See Incorrect or non-compatible tools above in Sub-section 10.3. Incorrect revision level of the de- Read REVISION_ARRAY. vice firmware. See Incorrect or non-compatible tools above in Sub-section 10.3. Transducer block mode is OOS Set MODE_BLK.TARGET to auto. NOTE: Transducer block must be in AUTO mode for the sensor signal to be passed to ‘AO block.’ Read MODE_BLK . ACTUAL. Transducer block is not producing 1. Read the first element of BLOCK_TEST. Number should be If second element of BLOCK_TEST is not zero, write valid primary data. increasing indicating that block is running. If block is not run- all zeroes to element. ning, check the second element of BLOCK_TEST. 2. Read BLOCK_ERR. See Sub-section 10.7 for details on BLOCK_ERR. 3. Verify parameter FINAL_VALUE is not valid STATUS = good or uncertain VALUE = active 4. Read FINAL_POSITION VALUE; should contain the posi- Report information to factory. tion. Isolate valve from process and check calibration. 82 Analog Output block mode is OOS Read MODE_BLK.ACTUAL of AO block. Set MODE_BLK .TARGET to auto. AO block is not initialized 1. CHANNEL 1. Set to 1 2. SHED_OPT 2. Set to a value other than Un-initialized PID block is not initialized SHED_OPT Set to a value other than uninitialized. PID block mode is OOS Read MODE_BLK.ACTUAL of PID block. Set MODE_BLK.TARGET to Auto. PID block is not running. Read the first element of BLOCK_TEST. Number should be increasing indicating that block is running. If block is not running, check the second element of BLOCK_TEST. If second element of BLOCK_TEST is not zero, write all zeroes to element. Download valid schedule to device. Logix 3400MD Digital Positioner LGENIM3405-02 11/13 10.4 Device Diagnostics Logix 3400MD Digital Positioner Memory The Logix 3400MD digital positioner contains a number of areas of memory. An EEPROM provides a non-volatile memory area for static and non-volatile parameter values. The positioner also contains areas of RAM and ROM. Background Diagnostics Block objects (resource, transducer and function blocks), the communications stack and other device objects each have a designated area of memory where their database resides. Diagnostic routines are performed in the background during device operation which check the integrity of these individual databases. When a failure is detected, a status bit is set in the BLOCK_ERR parameter in the appropriate block object. Diagnostic checks are performed continuously on the device functional databases of the Logix application shown in Table 10.4. Table 10.4 Areas of Device Memory Where Data is Stored Device Functional Area Location Block object database (DB) RAM and EEPROM Communication stack database (DB) RAM and EEPROM Boot ROM ROM Program ROM ROM Trend and link object databases (DB) RAM and EEPROM BLOCK_ERR Parameter BLOCK_ERR parameter shows diagnostic faults of hardware and software components within the transmitter. Each block object in the transmitter device application contains a BLOCK_ERR parameter. BLOCK_ERR is actually a bit string which provides a means to show multiple status or error conditions. A status message identifying the fault can be viewed by accessing the parameter. Table 10.5 shows the bit mapping of the BLOCK_ERR parameter To verify that block and background diagnostics are executing in a particular block: View the BLOCK_TEST parameter of the block. If the first element of the parameter (BLOCK_TEST = ) is incrementing, the block is executing and the diagnostics are active. CAUTION: If the first element value is not increasing, the block is not executing. Table 10.5 BLOCK_ERR Parameter Bit Mapping BLOCK_ERR Bit Message Name* Description No bit set NO_ERROR If no bits are set there is no error 0 OUT_OF_SERVICE Indicates the block is out of service (OOS) 1 POWER_UP Not used 2 NEEDS_MAINT_NOW This indicates that the device needs maintenance now. Diagnostics has indicated that something has failed causing the positioner to not be able to operate. (Transducer block only). 3 REEDBACK_CHECK_ FAILED Communication failure to serial EEPROM (Resource block only) (Checksum Error) 4 LOST_NV_DATA EEPROM write to block DB failed, EEPROM write to Stack DB failed (Resource block only), EEPROM write to Link or Trend DB failed (Resource block only) 5 LOST_STATIC_DATA Block Non-Volatile (NV) memory failure Stack NV memory failure Link or Trend Object NV memory failure 6 MEMORY_FAILURE Not used 7 OUTPUT_FAILURE Indicates there was an output failure to the transducer block (AOand DO blocks only) 8 INPUT_FAILURE Indicates there was an input failure to the block (AO, DI and DO blocks only) 83 Logix 3400MD Digital Positioner LGENIM3405-02 11/13 9 NEEDS_MAINT_SOON This indicates that the device needs maintenance soon. Diagnostics has indicated something is out of tolerance or is going to fail, causing the positioner to possibly be operating with reduced functionality (Transducer block only) 10 FAULT_STATE_SET Indicates if the fault state has been set (Resource Block only) 11 LOCAL_OVERRIDE Indicates if the block has gone into Local Override mode (LO) 12 SIMULATE_ACTIVE The SIMULATE parameter is being used as the input to the AO block. This occurs if the simulate jumper is set to Y on the electronics board and the ENABLE_DISABLE field of the SIMULATE parameter is set to 2 13 LINK_CONFIG_ERR Set by the system. Indicates if all the links for the block configurations are available 14 BLOCK_CONFIG_ERR Invalid parameter value in block. See Clearing Block configuration Errors 15 OTHER * Depending on the fieldbus interface application, device operating status and parameter values may appear as text messages. The text in the table is typical of values or messages seen when using the NI-FBUS Configurator Table 10.6: Transducer Block BLOCK_ERR diagnostics mapping Diagnostic Flag BLOCK_ERR Alarm Issued POSITION_DEVIATION _ALARM BLK_ERR_DEV_NEEDS_MAIN_NOW FACTORY_RESET_STATE BLK_ERR_DEV_NEEDS_MAIN_NOW STROKE_CAL_REQUIRED BLK_ERR_DEV_NEEDS_MAIN_NOW SUPPLY_PRESS_LOW_ALARM BLK_ERR_DEV_NEEDS_MAIN_NOW LOSS_INTERBOARD_PCB BLK_ERR_DEV_NEEDS_MAIN_NOW MECHANICAL_STATUS not ZERO BLK_ERR_DEV_NEED_MAINT_SOON ELECTRONIC_STATUS not ZERO BLK_ERR_DEV_NEED_MAINT_SOON SUPPLY_PRESS_HIGH_WARNING BLK_ERR_DEV_NEED_MAINT_SOON SUPPLY_PRESS_LOW_WARNING BLK_ERR_DEV_NEED_MAINT_SOON PORT_A_VALUE_OUT_OF _RANGE BLK_ERR_DEV_NEED_MAINT_SOON PORT_B_VALUE_OUT_OF_RANGE BLK_ERR_DEV_NEED_MAINT_SOON PORT_A_RANGE_TOO_SMALL BLK_ERR_DEV_NEED_MAINT_SOON PORT _B_RANGE_TOO_SMALL BLK_ERR_DEV_NEED_MAINT_SOON PNUEMAITC_LEAK_WARN ING BLK_ERR_DEV_NEED_MAINT_SOON SPOOL_STICKING_WARNING BLK_ERR_DEV_NEED_MAINT_SOON SPOOL_STICKING_ALARM BLK_ERR_DEV_NEED_MAINT_SOON SPOOL_CYCLES_WARNING BLK_ERR_DEV_NEED_MAINT_SOON SPOOL_TRAVEL_WARNING BLK_ERR_DEV_NEED_MAINT_SOON HALL_SENSOR_UPPER_POSITION BLK_ERR_DEV_NEED_MAINT_SOON HALL_SENSOR_LOWER_POSITION BLK_ERR_DEV_NEED_MAINT_SOON FEEDBACK_RANGE_TOO_SMALL BLK_ERR_DEV_NEED_MAINT_SOON POSITION_OUT_OF_RANGE_LOW BLK_ERR_DEV_NEED_MAINT_SOON POSITION_OUT_OF_RANGE_HIGH BLK_ERR_DEV_NEED_MAINT_SOON NO_MOTION_TIME_OUT BLK_ERR_DEV_NEED_MAINT_SOON NON_SETTLE_TIME_OUT BLK_ERR_DEV_NEED_MAINT_SOON INNER_LOOP_OFFSET_TIME_OUT BLK_ERR_DEV_NEED_MAINT_SOON JOG_CALIBRATE_SET_100_POS BLK_ERR_DEV_NEED_MAINT_SOON 10.5 Block Configuration Errors Configuration Errors Block configuration errors prevent a device block from leaving OOS mode. The BLOCK_ERR parameter (bit 1) shows whether a block configuration error is present. Table 10.7 summarizes the conditions that may be the result of block configuration errors, which in turn cause a device fault. Follow the recommended actions to correct these errors. 84 Logix 3400MD Digital Positioner LGENIM3405-02 11/13 Table 10.7 Summary of Configuration Errors Problem/Fault Probable Cause Recommended Action Name of parameters are not visible Missing or incorrect version of device description file on host computer. 1. Check path to device description. Unable to write successfully to MODE_BLK of any block. Mode not supported in TARGET and/or PERMITTED modes for the given block. • Verify that the mode being written is supported by the block. 2. Load correct version of DD. • If writing TARGET mode only, then the desired mode must already be set in the PERMITTED field. • If writing the whole MODE_BLK record, then the mode set in TARGET must also be set in the PERMITTED field. Other modes may also be set in the PERMITTED field, but target mode must be set. Unable to write to a parameter Unable to change resource block to auto mode Unable to change analog output block from OOS mode 1. Parameter is read-only. 1. None 2. Sub-index of the parameter is read-only. Some parameters have fields that are not writable individually (such as MODE_BLK. ACTUAL). 2. None 3. Write-locking is active. Resource block parameter WRITE_LOCK value is 2. 3. R emove write protect jumper (see Subsection 6.5) 4. Corresponding block is in the wrong mode. Some parameters can only be written to in OOS mode only, or in OOS or manual modes. 4. W rite valid mode to MODE_BLK parameter of block (OOS or MAN modes). See Mode Restricted Writes to Parameters in Sub-sections 8.6 and 8.7. 5. Data written to the parameter is out of the valid range for that parameter. 5. W rite valid range values to parameter. 1. The second element of BLOCK_TEST is not zero. 1. W rite all zeroes to the second element of the BLOCK_TEST parameter. 2. Resource block is in OOS mode. 2. W rite auto mode to MODE_BLK.TARGET of the resource block. 3. The second element of BLOCK_TEST is non-zero. 3. W rite all zeroes to the second element of the BLOCK_TEST parameter. 4. A configuration error occurred in the block. 4.Find and correct any configurable parameter outside its valid range. See Clearing Block Configuration Errors in Sub-section 10.6. 1. The block has not been configured to execute. It is neither in the function block schedule in the system management information base, nor is it linked to another executing block via the next block to execute field in the block record (relative parameter index). 1. B uild and download an execution schedule for the block including links to and from AO block with other function blocks. 2. Resource block is in OOS mode. 2. W rite auto mode to MODE_BLK of resource block. 3. Block configuration error. 3. a. C heck the parameters SHED_OPT and CHANNEL. All values must be non-zero. b. B LOCK_ERR for bit 1 set. If set, check all configurable parameters for possible invalid values. See Clearing Block Configuration Errors in Subsection 10.6. 4. The second element of BLOCK_TEST is not zero. 4. W rite all zeroes to the second element of the BLOCK_TEST parameter. 85 Logix 3400MD Digital Positioner LGENIM3405-02 11/13 AO block is in the correct mode but does not seem to be operating 1. Simulation active. 1. D isable simulation. See Sub-section 10.8 for procedure. 2. The block has not been configured to execute. It is neither in the function block schedule in the system management information base, nor is it linked to another executing block via the next block to execute field in the block record (relative parameter index 0). 2. B uild and download an execution schedule for the block including links to and from AO block with other function blocks. 3. The second element of BLOCK_TEST is not zero. 3. W rite all zeroes to the second element of the BLOCK_TEST parameter. 10.6 Clearing Block Configuration Errors Clearing Block Configuration Errors Table 10.8 and Table 10.9 list the parameters in the AO and PID blocks which can cause the status bit of block configuration error to be set in their respective BLOCK_ERR parameters. The tables also provide the initial values and the valid range for the parameters. NOTE: Block configuration errors can only be cleared if the function block is being executed (running). One way of determining block execution is by doing a series of two or three reads of the BLOCK_TEST parameter and confirming that the first byte of the parameter is incrementing. This will work if the execute rate is fast relative to the speed of reading BLOCK_TEST. A very slowly executing block may not appear to execute because block parameters are updated only when the block executes. Table 10.8 AO Block Parameters Parameter 86 Initial Value Valid Range Corrective Action ALERT_KEY 0 non-zero Initial value is a configuration error. Set value to non-zero number. SIMULATE 1(disabled) 1-2 (disabled-enabled) Set value in valid range. XD_SCALE 0to100 EU_100 > EU_0, UNITS_INDEX matches output of Set values to valid range(s). transducer block CHANNEL 0 1-2 SP_RATE_DN SP_RATE_UP +INF 0-15 Set value to valid range. SP_HI_LIM, 100 0-100 Set value to valid range. SP_LO_LIM 0 0-100 Set value to valid range. SHED_OPT 0 1-8(seeShedOptionsinthe FFspecs.) Initial value is a configuration error. Set value in valid range. BYPASS 0 1:OFF,2:ON Initial value is a configuration error. Set value in valid range. SHED_OPT 0 1-8(seeShedOptionsinthe FFspecs.) Initial value is a configuration error. Set value in valid range. HI_HI_LIMHI_LIM +INF +INF LO_LIMLO_LO_LIM -INF -INF PV_SCALE,-INF Values must be set in rank order. OUT_HI_LIM OUT_LO_LIM 100 0 OUT_SCALE+/-10% Verify that OUT_HI_LIM > OUT_LO_LIM. SP_HI_LIMSP_LO_LIM 100 0 PV_SCALE+/-10% Verify that SP_HI_LIM > SP_LO_LIM. Initial value is a configuration error. Set value to valid range. PV_SCALE, +INF Values must be set in rank order (e.g.LO_LIM > LO_LO_LIM but < HI_LIM etc.) Logix 3400MD Digital Positioner LGENIM3405-02 11/13 Table 10.9 PID Function Block Parameters Parameter Initial Value Valid Range Corrective Action BYPASS 0 1:OFF,2:ON SHED_OPT 0 1-8(see Shed Options in the FF specs.) Initial value is a configuration error. Set value in valid range. HI_HI_LIM +INF HI_LIM +INF LO_LIM -INF LO_LO_LIM -INF OUT_HI_LIM OUT_LO_LIM SP_HI_LIM SP_LO_LIM Initial value is a configuration error. Set value in valid range. PV_SCALE, +INF Values must be set in rank order (e.g.LO_LIM > LO_LO_LIM but < HI_LIM etc.) PV_SCALE, -INF Values must be set in rank order. 100 0 OUT_SCALE +/-10% Verify that OUT_HI_LIM > OUT_LO_LIM. 100 0 PV_SCALE +/-10% Verify that SP_HI_LIM > SP_LO_LIM. 10.7 Additional Troubleshooting As a general rule, follow the suggestions for corrective action for suspected problems described this document. If a problem is still present, perform step 1 below. If the problem still persists, perform step 2 and so on. 1. In the resource block set the RESTART parameter to ‘Processor’. Then return to ‘run’. 2. Cycle power to the Logix 3400MD digital positioner 3. Re-start fieldbus driver software on the host computer with the Logix 3400MD digital positioner un-powered, then power-up the Logix 3400MD digital positioner. 4. Call Flowserve’s Valtek Control Product Technical Assistance. (See Technical Assistance on page 10.) 10.8 Simulation Mode Simulation Mode Dip Switch A simulation mode is available in the positioner, which is used to aid in system debug if the process is not running. When simulation mode is enabled, the SIMULATE parameter in the AO block provides a user-selected value as the readback input to the AO block. Setting Simulation Dip Switch ATTENTION: A hardware dip switch on the main PCB cover is set to enable or disable the S IMULATE parameter. See Figure 10.1 for dip switch selection. Table 10.10 shows how to set the simulation dip switch on the main PCB cover. DIP Switch Block Off On FF Simulate Dip Switch Figure 10.1 Simulation DIP Switch Location on the PCB Cover 87 Logix 3400MD Digital Positioner LGENIM3405-02 11/13 Table 10.10 Setting the Simulation Dip Switch To Set the Dip Switch to: Enable read and write access to the device’s configuration. (Factory-set Off position on the dip switch. default) Enable read only access to device’s configuration. (Write-protect) On position on the dip switch.* Off On Off On Enabling Simulation Mode The SIMULATE parameter is enabled by setting the hardware simulation jumper to the Y position. Additionally, AO block SIMULATE parameter must be set to the following values: SIMULATE STATUS = Good: :[alarm status]: constant (suggested setting) SIMULATE_VALUE = (supplied by user) used as the readback input to the AO block. ENABLE_DISABLE = Active enabled Simulation Mode Truth Table The truth table in Table 10.11 shows the states of the simulation jumper and SIMULATE parameter to activate the simulation mode. Table 10.11 Simulation Mode Truth Table When the Simulation Dip Switch on main PCB cover is set to: ... and the SIMULATE Enable_Disable is set to: 1 (Disabled) 2 (Active) Off Position Simulation Disabled Simulation Disabled On Position Simulation Disabled Simulation Active Simulation Mode A simulation mode is available in the AO function block to set the value and status of READBACK when it is necessary to override the transducer value or status. The SIMULATE parameter contains the following elements: • SIMULATE_VALUE Contains the value that is copied to the READBACK parameter. • SIMULATE_STATUS Contains the status that is copied to the READBACK parameter. • TRANSDUCER_VALUE Contains the value read from the transducer position source. • TRANSDUCER_STATUS Contains the status read from the transducer position source. • ENABLE_DISABLE Enables simulation of the SIMULATE_VALUE and SIMULATE_STATUS when selected. Enabling Simulation Before the ENABLE_DISABLE in the SIMULATE parameter may be selected, the hardware simulation must be enabled for the device. To enable simulation in the device, set the SIMULATE dip switch to the “On” position, select RESTART_PROCESSOR in the Resource block RESTART parameter. To ensure that simulate is permitted in the device, go to the Resource Block and read the BLOCK_ ERR parameter. It should indicate Simulation Enabled. Simulating the Transducer To simulate the READBACK parameter, set the SIMULATE parameter as follows: 88 Logix 3400MD Digital Positioner LGENIM3405-02 11/13 1. Set ENABLE_DISABLE to ACTIVE and write the parameter. 2. Set SIMULATE_VALUE and SIMULATE_STATUS as desired and write the parameter. 3. Read the READBACK parameter. This should reflect the value and status which was set in the SIMULATE parameter. NOTE: The TRANSDUCER_VALUE and TRANSDUCER_STATUS will continue to be updated by the transducer source as described in the next section. Transducer Position Source Selection The source of the TRANSDUCER_VALUE and TRANSDUCER_STATUS in the SIMULATE param eter is determined by the FEATURE_SEL parameter in the Resource Block. If FEATURE_SEL OUT_READBACK not selected (default) then the transducer source will be the AO OUT parameter. If FEATURE_SEL OUT_READBACK is selected then the transducer source will be the FINAL_ POSITION_ VALUE from the Transducer Block. Because the FINAL_POSITION_VALUE in Logix 3400MD transducer block reflects the actual actuator position, the OUT_READBACK feature should be always be selected during normal operation. AO Block Mode To connect the AO block input to the output, the AO block must be in AUTO mode. 10.9 Logix 3400MD Digital Positioner Troubleshooting Guide Table 10.12 Symptom Chart Failure or Problem Mounting and Installation LED won’t blink Valve moves in wrong direction with no change in input signal Unit does not respond to fieldbus command. Probable Cause(s) Refer to Section(s) 1. Input voltage not correct 1. See Electrical Wiring Summary in tion 5. 2. Termination may be incorrect. 3. Calibration is in process. 1. May be tubed for wrong air action. 2. Spool stuck. 1. Unit is not configured correctly. 2. Error occurred during calibration. Sec- 1. See Air Action in Section 6. 2. See Spool Valve instructions in Logix 3400MD Digital Positioner IOM. 1. See Theory of Operation on page 3. 2. See Calibration in Section 9. Calibration LEDs blink RGGY after a Re-Cal operation. Valve 1. Configured for linear on a rotary mounting. 1. See Re-Cal button Section 9. stays in fully open or closed position. 2. Feedback linkage out of range. 1. Valve didn’t fully stroke during calibration (low 1. See Re-Cal button Section 9. or no air supply). 2. Stuck Spool. 2. See Spool Valve instruction in Logix 3400MD Digital Positioner IOM. On a rotary, valve has a dead band at the fully 1. Mechanical travel is not centered within the 1. See Linear vs. Rotary in Section 6. open or closed position. electrical measurement range (position sensor out of range). Control and Tuning Valve won’t saturate at closed position. 1. May need to enable MPC 1. See MPC in Section 8. 2. Calibration required. Valve won’t go below or above a certain limit. 1. Soft limits are not enabled 1. See Advanced Features in Section 10. 2. MPC is not enabled 89 Logix 3400MD Digital Positioner LGENIM3405-02 11/13 Sticking or hunting operation of the positioner. 1. Contamination of spool valve assembly 2. P+I setting incorrect 3. Excessive Stiction Large initial deviation; only present on initial 1. Inner loop offset not correct. power-up. Stem position movement is not linear with com- 1. Custom characterization is enabled mand. Fieldbus Communication Logix 3400MD digital positioner will not com- 1. Power problem. municate with fieldbus. 2. FB card connection. Configurator displays ‘Unknown’ after it con- 1. DD has not been loaded in the configurator nects. correctly. Erratic communications occur. 1. Maximum cable length or impedance exceeded 2. Card not receiving enough power. (Laptop batteries possibly low) 3. Interference with I.S. barrier Alarms Temperature alarm occurs. 1. Ambient temperature has exceeded electronics ratings Hall sensor alarm occurs. 1. Hall connector may have bad connection 2. Sensor may be damaged 3. Low air supply pressure Modulator current alarm occurs. 1. Modulator minimum pressure may be too low. 2. Clogged orifice 3. Bad cable connection EEPROM checksum alarm occurs. 1. Error when reading non-volatile memory storage Multiple internal flags occur. 1. Bad micro-controller on main PCB assembly. LEDs LED four blink sequence begins with green 1. Any sequence beginning with a green light is a normal operating mode . LED four blink sequence begins with yellow 1. Any sequence starting with a yellow light indicates that the unit is in a special calibration or test mode, or that there was a calibration problem. LED four blink sequence begins with red 1. Any sequence starting with a red light indicates that there is an operational problem with the unit Advanced Features Will not display pressure readings. 1. Is configuration set to advanced? MPC will not function. 1. See Air Supply Requirements on page 15. See Spool Valve in Section 10. 2. See Setting P+I Parameters in Section 10. 3. Enable Hi Friction Feature 1. See Setting P+I Parameters in Section 10. 1. See Custom Characterization in Section 10. 1. See Wiring the Logix 3400MD Digital Positioner to a Fieldbus Network on page 19. 2. Verify FB protocol being used. 1. Reload DD making sure Valtek products are listed. 1. See Wiring the Logix 3400MD Digital Positioner to a Fieldbus Network on page 19. 2. Refer to AGA-181 for Network checkout procedure. 1. See Temperature Alarm in Section 8. 1. See Hall sensor Alarm in Section 8. 3. Check air supply 1. See Modulator current Alarm in Section 8. 1. See EEPROM checksum Alarm in Section 8. 1. Go to Section 7.9 in the Logix 3400MD IOM 1. Go to Section 7.9 in the Logix 3400MD IOM 1. Go to Section 7.9 in the Logix 3400MD IOM 1. See Standard vs. Advanced Diagnostics in Section 10. 1. Is lower soft limit >= 0%. 2. Set-point should 1. See MPC in Section 8. be 1 percent hysteresis around MPC. 10.10 Internal Positioner Issues Positioner Inner loop Control and Tuning Setting P+I Parameters: Using the configurator, the user can set individual tuning parameters. To use the Auto Tune feature of the Logix 3400MD refer to section 7.4 in the Logix 3400MD IOM. A few key points are mentioned below. GAIN_UPPER, GAIN_LOWER and GAIN_MULT: These three parameters are related by the following formula. Proportional gain = maximum gain - | deviation | x gain multiplier If proportional gain < minimum gain, then proportional gain = minimum gain 90 Logix 3400MD Digital Positioner LGENIM3405-02 11/13 Proportional Gain Maximum Gain (GAIN_UPPER) Gain Multiplier (Determines Slope) (GAIN_MULT) Minimum Gain (GAIN_LOWER) Small Steps Large Steps | deviation | Figure 10.2 Gain Effect Diagram This algorithm allows for quicker response to smaller steps yet stable control for large steps. (Refer to Figure 10.2.) Setting the gain multiplier to zero and max gain = min gain results in a typical fixed proportional gain. The higher the gain multiplier, the larger the required deviation before the gain increases. Default values upon initiating a reset to the factory defaults are maximum gain= 2.0, minimum gain = 1.0, and gain multiplier = 0.05. These values will allow stable control on all Valtek control product actuator sizes. Integral Gain (IGAIN): The integral gain is primarily for deviations due to temperature drift within the inner loop spool control. The factory default value is 10. Although higher numbers can speed the time it takes to reach zero deviation, it can add overshoot if too large. It is recommended that maximum and minimum gains be adjusted while leaving Integral Gain fixed at 10. Integration is disabled below a stem position of 3 percent and above a stem position of 97 percent. This is to prevent integration windup from calibration shifts due to lower pressure or a damaged seat which may prevent fully closing the valve. Integration Summer: The integral summer within the Logix 3400MD digital positioner is clamped at +20.00 percent and –20.00 percent. If the integration summer is fixed at +20% or –20%, it usually indicates a control problem. Some reasons for a clamped integration summer are listed below: • Stroke calibration incorrect • Any failure which prevents stem position movement: stuck spool, handwheel override, low pressure. • Incorrect inner loop offset • Loss of air supply on a fail in place actuator Writing a zero to integral gain will clear the integral summer. The integral gain can then be returned to its original value. Inner Loop Offset (IL_OFFSET): Referring to Figure 1.3 in section 1, three control numbers are summed to drive the inner loop spool position control: proportional gain, integral summer, and inner loop offset. Inner loop offset is the parameter that holds the spool in the null or balance position with a control deviation of zero. This value is written by the positioner during stroke calibration and is a function of the mechanical and electrical spool sensing tolerances. However, if replacing the Driver Module Assembly is necessary, or the software reset has been performed, it may be necessary to adjust this value. The method below should be used to adjust inner-loop offset. Or simply perform a new stroke calibration. From the fieldbus configurator, 91 Logix 3400MD Digital Positioner LGENIM3405-02 11/13 • Send a 50 percent command. • Set integral to zero. • Locate the DAC_PERCENT • Write this percentage value to IL_OFFSET. • Write original value to Integral Table 10.13 Logix 3400MD Digital Positioner Factory Tuning Sets Brand Valtek Kammer Automax Tuning Set GAIN_LOWER GAIN_UPPER GAIN_MULT lgain Comparable Actuator VFactory_A 1.00 2.00 0.05 10.0 25 sq. in. VFactory_B 1.00 2.50 0.05 10.0 50 sq. in. VFactory_C 2.00 3.00 0.05 10.0 100 sq. in. VFactory_D 4.00 5.00 0.05 10.0 200 sq. in. VFactory_E 4.00 7.00 0.05 10.0 300 sq. in. Trooper 48 0.40 0.50 0.05 25.0 31 sq. in. Trooper 49 3.00 4.00 0.05 10.0 77.5 sq. in. R1 0.30 0.50 0.05 10.0 3 to 5 sq. in. R2 1.00 1.50 0.05 10.0 9 to 12 sq. in. R3 1.30 2.00 0.05 10.0 16 to 19 sq. in. R4 2.00 2.50 0.05 10.0 27 to 37 sq. in. R5 2.50 3.60 0.05 10.0 48 to 75 sq. in. R6 4.00 5.00 0.05 10.0 109 sq. in. Spool Valve The spool valve is a four-way directional valve with precision features to provide optimal control and low air consumption. To help prevent spool valve malfunction, the positioner supply air must conform to ISA Standard S7.3 (a dew point at least 18 degrees below ambient temperature, particle size below 1 microns, oil content not to exceed 1 part per million). Flowserve’s standard coalescing filter is highly recommended to help meet these requirements. Small particles, oil that has varnished, corrosion, ice, burrs, and extreme wear could cause the spool valve to act abnormally. If the spool valve is suspected of sticking, it can be inspected by performing the following. 1. Make sure the valve is bypassed or in a safe condition. 2. Disconnect the power and air supply to the unit. 3. Remove the spool valve cover by removing the screw and sliding the cover assembly backwards until the tab is clear of the slot. 4. Inspect the coalescing filter element in the spool valve cover for signs of oil, water and debris that may have come from the air supply. A clean filter is white. 5. Remove the two phillips-head screws holding the spool valve to the housing. Inspect the free movement of the spool by carefully sliding the block up and down on the spool about 0.25 inches. The block should slide on the spool with no resistance. Carefully remove the block, ensuring it is removed concentric with the spool. 6. Inspect the block and spool for oil, water, debris and wear. If oil, water and/or debris are found, the spool and block can be cleaned with a non-residue cleaner, lint-free cloth and soft bristle brush. If wear is found, replace the driver module assembly per the IOM manual. 7. Before re-assembly, verify that the three O-rings are in the counter-bores on the machined platform where the spool valve block is to be placed. 92 Logix 3400MD Digital Positioner LGENIM3405-02 11/13 8. Carefully slide the block over the spool, using the machined surface of the housing base as a register. Slide the block toward the driver module until the two retaining holes line up with the threaded holes in the base. If resistance is still encountered, re-clean both parts or replace the driver module assembly. Refer to the IOM manual for spare part kit numbers. Refer to the instructions in the Logix Series 3400MD Digital Positioner IOM under Driver Module Assembly for further instructions. Advanced Features Standard vs. Advanced Diagnostics Answer: The model with advanced diagnostics adds top and bottom sensors. This allows for the collection of data for more diagnostic calculations, such as loss of pressure, friction, advanced signatures, and troubleshooting. Question: Can I upgrade from a standard to an advanced model? Answer: Yes. Advanced pressure board assembly can be purchased (see IOM). Simply install the advanced pressure board. All connectors on the pressure board are keyed and unique for easy cable re-connection. Using FB configurator, perform an actuator pressure calibration. Temperature and Pressure Units: The desired temperature and pressure units can be set during configuration. Once set, all readings will be displayed in the desired units. Parameters TEMP_UNITS and PRESS_UNITS in the transducer block. Stroke Length: Stroke length is used by the travel accumulator (TRAVEL_ENG). When the stroke length and units are set, the length is used to determine the total travel accumulated. The travel accumulator will have the units associated with stroke. Parameters STROKE_ENG and TRAVEL_UNITS in the transducer block. Example: Stroke length is set to 4 inches. If the valve is moved from 0 percent to 100 percent, 4 inches will be added to the travel accumulator. The travel accumulator units will be inches. If stroke length is 90 degrees for a rotary, the travel accumulator will now have units of degree. A 0 percent to 100 percent stroke will add 90 to the travel accumulator. NOTE: Stroke length is for information only. Custom Characterization: Custom characterization can be thought of as a soft cam. The user can choose between an equal percentage, quick opening, or custom user-defined characterization curve using 21-points. The control will linearly interpolate between points. Points do not have to be equally spaced in order to allow more definition at critical curve areas. The Logix 3400MD digital positioner has two modes: linear and characterization. Linear is a straight 1:1 mapping of command to control command. It does not use the 21-point curve definition. When custom characterization is disabled, the positioner is automatically in linear mode. If custom charac terization is enabled, the Logix 3400MD digital positioner uses one of the 21-point user defined curves. Question: Does a default custom characterization curve exist? Answer: Yes. The Logix 3400MD digital positioner comes with a factory-default equal percent (and quick opening) curve in Figure 10.3. NOTE: The quick opening curve is the inverse of the equal percent curve. Table 10.14 Logix 3400MD Digital Positioner Characteristic Curves FINAL_VALUE (%FS) 0 CMD_USED (%FS) Equal Percent Quick Open 0.0 Linear 0.00 0 5 18.8 1.00 5 10 37.6 2.00 10 15 56.4 3.00 15 20 74.0 4.00 20 25 84.3 5.24 25 30 90.0 6.47 30 35 92.0 8.02 35 93 Logix 3400MD Digital Positioner LGENIM3405-02 11/13 40 45 93.4 94.2 9..57 11.86 40 45 50 94.8 14.15 50 55 95.5 17.54 55 60 96.0 20.93 60 65 96.5 25.94 65 70 97.0 30.95 70 75 97.5 38.36 75 80 98.0 45.77 80 85 98.5 55.66 85 90 99.0 67.68 90 82.31 95 95 99.5 100 100.0 100.0 100 NOTE: Custom characterization points can only be entered with the FB configurator. 100 CMD_USED (% FS) 90 80 70 60 50 Quick Open 40 Equal Percent 30 Linear 20 10 0 0 20 40 60 80 100 FINAL_VALUE (% FS) Figure 10.3 Logix 3400MD Digital Positioner Characteristic Curves 10.11 Stroke Characterization In addition to three pre-defined and embedded characterization curves, the Logix 3400MD positioner has a 21-point custom stroke characterization feature. This allows the user to define a unique set of operating parameters customizable to his process conditions. Table 10.15 Transducer Block Characterization Parameters Parameter MODE_BLK CONTROL_FLAGS CURVEX CURVEY 94 Description The operating mode of the transducer block Byte values which select positioner operation features Value — Meaning Permitted Modes: Auto - Auto (target mode) OOS - Out of Service 1 Quick Opening Curve* Comments The transducer block must be out-of-service before the user can edit or change characterization. Loads factory defined QO curve as custom curve. 2 Equal Percent Curve Loads factory defined equal percent curve as custom curve. 4 Positioner Model 5 Actuator Style 6 Custom Characterization Active Activates custom curve. If Off, response is Linear. 8 Air Action Numeric X value array for cus- X-axis value for custom stroke char- Pair each X-value with corresponding Y-value to tom point. (1x21 array points) acterization point. Range -10 to 110 define the desired point. Values must be in ascending (or equal) order. Numeric Y value array for cus- Y-axis value for custom stroke chartom point. (1x21 array points) acterization point. Range -10 to 110 Logix 3400MD Digital Positioner LGENIM3405-02 11/13 * Must not be selected if a custom curve is to be created or edited. 10.12 Characterization Procedure The following procedure outlines the basic way setting up a custom stroke characterization takes place. Steps: 1. Verify the process is in a safe condition and that the valve may be taken out of service. 2. Put the Transducer block MODE_BLKOOS 3. Make sure that “Custom’ is selected in CURVE_SELECT. 4. Enter the values for CURVEX and CURVEY to define the desired response. Care must be taken to assure that each CURVEX value has the correct corresponding CURVEY value. The user may choose any number in the range to define the curve. The 21 CURVEX points do not need to be evenly spaced, if so desired. However, the CURVEX values must be in ascending (or equal) order. The CURVEY points may be any value in the range, ascending or descending. The response is a linear interpolation, or straight-line, response between points. All 21-points must be defined. (i.e. If only 5 point sets were needed to define the desired operation, the remaining 16 points would need to be set to 110.). 5. Write the changes to the Logix 3400MD digital positioner. 6. Verify the proper operation of the stroke response by incrementally writing values to FINAL_ VALUE. (The Resource Block must also be OOS first.) CMD_USED, FINAL_POSITION_VALUE, and the valve response should track the desired curve. 7. Return the valve to service by returning both MODE_BLKs back to Auto. Characterization Retention Once a custom curve has been loaded into the Logix 3400MD digital positioner’s memory it is retained in the EPROM until it is either edited or replaced. Turning ‘Custom Characterization Active’ on or off now selects between a linear response (Off), or the new custom curve (On). If either of the other two factory curves is selected it will overwrite the custom curve in RAM, only. The custom curve will automatically be activated again when the factory curve is deselected. 10.13 Initiating a Valve Signature A feature of the Logix 3400MD positioner is the ability to capture and store a valve diagnostic signature in the positioner’s volatile RAM. A signature is the collected data response of the valve to a pre-defined set of operating conditions. This stored data can later be uploaded to the host system for analysis of potential problems. By comparing a baseline signature, when the valve is new, to subsequent signatures at later times, a rate of change can be tracked which can help predict possible faults in the valve before they happen. This is called ‘predictive maintenance’. It is important to note that the purpose of the positioner is to act as the data acquisition device for the signature. Analysis of the data is not done on the device, but in the supervisory system. System Preparation CAUTION: By definition, the collection of the signature requires the unmanaged operation of the positioner. Therefore, the process must be in a safe operating mode where unexpected movement of the valve will not cause a hazardous condition. Before a valve signature can be run, the Transducer Block must be out of service (OOS). 95 Logix 3400MD Digital Positioner LGENIM3405-02 11/13 Table 10.16 Transducer Block Signature Parameters Parameter Description Value-Meaning Permitted Modes: Auto-Auto (target mode) OOS-Out of Service MODE_BLK The operating mode of the Transducer block SIG_START Beginning position point for signature Value is in percent and should be set in the to start. range of -10% to 110%. SIG_STOP Ending position point for signature. RAMP_RATE Desired time for ramp signature in seconds.. Minimum value is 1 SIG_HOLD Comments The transducer block must be in the OOS mode to perform a Signature Value is in percent and should be set in the range of -10% to 110%. RAMP_RATE is only used in the ramp signature. This is ignored in step signatures. Time in seconds after step or ramp that the the system will log data. 0x01 RUN/BEGIN_SIG 0x02 SIG_COMPLETE Select to initiate the signature Status set when signature is complete 0x04 TEST REPEAT MODE SIG_FLAGS Byte value which select Which signature options Are used 0x08 RUN RAMP 0x10 VALVE_ 0x20 END OF DAT 0x40 TEST DAC MODE 0x80 RUN PST 96 SIG_INDEX Pointer used for data transfer SIG_DATAn Arrays to hold the signature data after transfer from controller board. Write the desired packet value. Select to run a ramp signature otherwise it defaults to a step signiature. Initializes valve for signature capture (read only End of signiature data encountered when uploading. Select for special DAC mode Run Partial Stroke Test (PST) Writing any value to SIG_INDEX will initiate a sig data transfer and will populate the SIG_DATAn parameters in the XDTB_ TECH block. The DIG_DATAn parameters are populated with the latest signature data when a write to the SIG_INDEX parameter is done. Logix 3400MD Digital Positioner LGENIM3405-02 11/13 10.14 Signature Procedure The following steps are an example of how to initiate a ramp signature capture. 1. Make sure the process is in a safe condition and notify the control room that the valve will temporarily be taken off-line. 2. Verify preparedness to proceed. 3. Put the Transducer block MODE_BLK OOS. 4. Set SIG_START to desired value. 5. Set SIG_STOP to desired value. 6. Set SIG_RATE to desired value. 7. Set SIG_HOLD to desired value. 8. In SIG_FLAGS select: RUN/BEGIN, RUN RAMP. 9. Write values to the Logix 3400MD digital positioner. 10. The valve will stroke to the beginning position, as defined by SIG_START ,and will begin ramping to the desired ending position, as defined by SIG_STOP. Notice that SIG_COUNTER will increment while this takes place 11. SIG_FLAGS indicates SIG COMPLETE. 12. Notify control room the valve is back on-line. The stored signature will remain in the Logix 3400MD digital positioner NON volatile RAM until the either the unit is reset, or another signature is taken which overwrites the previous one. 13. Return the MODE_BLK to Auto 97 Logix 3400MD Digital Positioner LGENIM3405-02 11/13 STEP SIGNATURE If a step signature was desired, simply do not select STEP_RAMP in SIG_FLAGS, and then set the STEP_TIME prior to selecting BEGIN_SIG. Collection of Stored Signature The collection of the stored signature is accomplished by the host system. It is not part of the device. See host system programming. A simple utility using National Instruments NIFBUS is available from Flowserve for retrieving a signature file. This file is stored in a text format that can be imported into other programs for plotting and analysis. Contact Flowserve for more details. Retrieve a Signature After a signature has been run the data is stored on the Logix 3400MD device. Because of the amount of data in a signature it has to be retrieved from the device. To retrieve this data it is recommended that you use the valvesight DTM. However you can also retrieve the raw data view it in the parameters XDTB_TECH.SIG_DATA1 – SIG_DATA26. To retrieve this data using the parameters you can simply write a non zero value to the parameter XDTB_MAIN.SIG_INDEX. When you do this you will see this parameter start changing and the signature data can then be viewed in the signature parameters. This procedure may take the device several minutes to complete. The data will be formatted in following order: Command Position Spool Command Hall Position in Percent Port 1 Pressure in Percent Port 2 Pressure in Percent Future Use 10.15 Logix 3400MD Function Block Execution Times 98 XDTB_TECH_BLOCK 20 mS Logix 3400MD Digital Positioner LGENIM3405-02 11/13 XDTB_MAIN_BLOCK 20 mS XDTB_MD_BLOCK 20 mS PID90 mS DI_LO20 ms DI_HI20 mS ANALOG_OUT 30 mS DISCRETE_OUT 30 mS OUTPUT_SPLITTER 50 mS iNPUT _SELECTOR 50 mS 10.16 Logix 3400MD Diagnostic Parameters Enabled with TEST_MODE The following Logix 3400MD parameters are only populated with valid data when the ENABLE_DIAGNOSTIC bit in the parameter TEST_ MODE has been selected: LX_XDTB_TECH_DEVIATION_EFFORT LX_XDTB_TECH_PRESS_CTRL_EFFORT LX_XDTB_TECH_INTEGRAL_EFFORT LX_XDTB_TECH_SPOOL_COMMAND LX_XDTB_TECH_BACKOFF_EFFORT LX_XDTB_TECH_SPOOL_POSITION LX_XDTB_TECH_SPOOL_EFFORT LX_XDTB_TECH_PIEZO_OFFSET LX_XDTB_TECH_PIEZO_COMMAND LX_XDTB_TECH_P_GAIN_EFFECTIVE LX_XDTB_TECH_P_GAIN_MULT LX_XDTB_TECH_D_GAIN_EFFECTIVE LX_XDTB_TECH_D_GAIN_FILTER LX_XDTB_TECH_PRESS_CTRL_GAIN_EFFECTIVE LX_XDTB_TECH_PRESS_CTRL_GAIN_MULT LX_XDTB_TECH_PRESS_CTRL_SP LX_XDTB_TECH_FINAL_VALUE_CUTTOFF_HYSTERESIS LX_XDTB_TECH_STROKE_TIME_CAL LX_XDTB_TECH_STROKE_TIME_DOWN LX_XDTB_TECH_STROKE_TIME_UP LX_XDTB_TECH_HALL_DOWN LX_XDTB_TECH_HALL_UP LX_XDTB_TECH_FB_AD_COUNT LX_XDTB_TECH_HALL_RANGE LX_XDTB_TECH_HALL_AD_COUNT LX_XDTB_TECH_HALL_NULL LX_XDTB_TECH_PIEZO_COUNTER LX_XDTB_TECH_PIEZO_INTERVAL LX_XDTB_TECH_HALL_TGT LX_XDTB_TECH_FB_VOLTS LX_XDTB_TECH_HALL_VOLTS LX_XDTB_TECH_PIEZO_VOLTS LX_XDTB_TECH_REF_VOLTS LX_XDTB_TECH_FB_POSITION_FILTER LX_XDTB_TECH_LOAD_EE_DEFAULTS 99 Logix 3400MD Digital Positioner LGENIM3405-02 11/13 10.17 Logix 3400MD Fault States The following procedure describes hot to setup the fault states in the Logix 3400MD: • In the Resource block verify the Faultstate is checked in the FEATURE_SEL parameter • In the AO block make sure the SHED_OPT parameter is initialized correctly for your system. (NormalShed_NormalReturn is most common) To Fail In Place • In the AO block verify the Fault State to Value is NOT checked in the OP_OPTS parameter. To Fail Closed / Open / or to a designated value • In the AO block verify the Fault State to Value is checked in the OP_OPTS parameter. • In the AO block set the FSTATE_VAL parameter to the position you wish to fail to between 0 and 100. (0 for closed or 100 for open or anything in between) In the AO block set the FSTATE_TIME parameter. This parameter will delay the fault state action by the amount of time indicated. The default for this is 0 (zero) seconds or no delay. Some will recommend this value be set to something other than zero to ac count for momentary faults that recover itself. To Test the fault state is set correct • In the Resource Block set the SET_FSTATE parameter to SET. The device should move to the desired fault state. • When the test is complete in the Resource Block set the CLR_FSTATE parameter to CLEAR. The device should start functioning properly at this point. 10.18 Logix 3400MD Digital Ouput (DO) Operation The DO block is designed to be able to set the position to a predetermined position based on the OUT_d parameter of the DO block. To implement, schedule the DO block to run and set the DO OUT_d parameter to the desired value based on the following table. ! Note: this will only work when the block is in AUTO mode. A value of 16 in the DO OUT_d parameter will disable the DO and revert control back to the AO block. Table 10.17 DO OUT_d Table OUT_D_VALUE 100 Position 00 0% 01 100% 02 50% 03 7.0% 04 14% 05 21% 06 28% 07 35% 08 42% 09 49% 10 56% 11 63% 12 70% 13 77% 14 84$ 15 91% 16 Diables DO Logix 3400MD Digital Positioner LGENIM3405-02 11/13 10.19 Logix 3400MD Digital Input (DI) Operation The DI(LO) is a discrete that is set when the actual position of the actuator is equal or less than the XDTB_MAIN.pos_alert_lo parameter. To implement, schedule the DI(LO) block to run and set the XDTB_MAIN.pos_alert_lo to the value that you want the trigger point to be. DI(HI) is a discrete that is set when the actual position of the actuator is equal or greater than the XDTB_MAIN.pos_alert_hi parameter. To implement, schedule the DI(HI) block and set the XDTB_MAIN.pos_alert_hi to the value that you want the trigger point to be 11 Software Maintenance Appendix A: Sample Configuration Record Sample Device Configuration The following pages provide a printout example of the Function Block Application portion of a Logix 3400MD digital positioner device configuration file. The printout was generated using the NI-FBUS Configurator application and shows function block parameters and values for a typical control loop. The printout is shown at the left side of the page. Comments and notes on the configuration are given on the left-hand side. Glossary A/D: Also called ADC or analog-to-digital converter. An A/D converts an analog signal into an integer count. This integer count is then used by the micro controller to process information such as position, pressure and temperature. D/A: Also called DAC or digital-to-analog converter. A D/A converts an integer count into an analog output signal. The D/A is used to take a number from the micro controller and command an external device such as a pressure modulator. EEPROM: Electrically Erasable Programmable Read Only Memory. A device which retains data even when power is lost. Electrically erasable means that data can be changed. EEPROM have a limited number of times data can be re written. Micro controller: In addition to an integral CPU (microprocessor), the micro controller has built in memory and I/O functions such as A/D and D/A. Microprocessor: Semiconductor device capable of performing calculations, data transfer, and logic decisions. Also referred to as CPU (Central Processing Unit). Protocol: A set of rules governing how communications messages are sent and received. PV: Primary Variable or Process Variable. Resolution: Resolution is a number which indicates the smallest measurement which can be made. You will often see Analog-to-Digital (A/D) converters referred to as a 10-bit A/D or a 12-bit A/D. 10-bit and 12-bit are terms which indicate the total number of integer counts which can be used to measure a sensor or other input. To determine the total integer count, raise 2 to the power of the number of bits. Example: 12-bit A/D Total integer number = 2Number of Bits = 212= 4096 Resolution is the measurement range divided by the maximum integer number. 101 Logix 3400MD Digital Positioner LGENIM3405-02 11/13 List of Figures 102 Figure 1.1 Fieldbus Positioner (Logix 3400MD Digital Positioner) 10 Figure 1.2 Functional Block Diagram of Logix 3400MD Digital Positioner Operating with other Instruments 11 Figure 1.3 Logix 3400MD Digital Positioner Block Diagram 11 Figure 1.4 Fieldbus Connecting Control Room and Field Devices 12 Figure 1.5 Fieldbus Devices Contain Device Applications and Function 13 Figure 2.1 Fieldbus Network Components 14 Figure 3.1 Connecting wiring device. 16 Figure 5.1 Typical Linear Actuator-mounted Installation 19 Figure 5.2 Rotary Transfer Case Mounting 19 Figure 5.3 Rotary Valve with Four-bar Linkage 19 Figure 5.4 Logix 3400MD Digital Positioner Mounted to a Diaphragm Actuator 20 Figure 5.5 Logix 3400MD Digital Positioner Terminal Block 21 Figure 5.6 Logix 3400MD Digital Positioner Terminal Block 22 Figure 6.1 Write-protect DIP Switch Location on Main PCB Cover 26 Figure 8.1 FBAP Block Diagram Example 31 Figure 8.2 Transducer Block Diagram 37 Figure 8.3 AO Function Block Diagram 46 Figure 8.4 PID Control Block 52 Figure 10.1 Simulation DIP Switch Location on the PCB Cover 87 Figure 10.2 Gain Effect Diagram 91 Figure 10.3 Logix 3400MD Digital Positioner Characteristic Curves 94 Logix 3400MD Digital Positioner LGENIM3405-02 11/13 List of Tables Table 2.1 Components Required for Logix 3400MD Digital Positioner Installation 14 Table 2.2 Installation / Operation Task Summary 15 Table 4.1 Operating Temperature Limits 18 Table5.1FOUNDATION fieldbus Profile Types 20 Table 5.2 Logix 3400MD Digital Positioner Wiring Terminals 21 Table 6.2 Write-protect Feature Truth Table 27 Table 6.3 Starting Communications with Logix 3400MD Digital Positioner 27 Table 6.4 Logix 3400MD Digital Positioner Identification 28 Table 6.5 Logix 3400MD Digital Positioner Configuration Task List 28 Table 8.1 Function Block Application Process Elements 31 Table 8.3 Resource Block Parameters 32 Table 8.4 Resource Block Parameter Descriptions 33 Table 8.5 Main Transducer Block Parameters 34 Table 8.6 Transducer Block Parameter Descriptions 37 Table 8.7 Tech Transducer Block Parameters 39 Table 8.8 Transducer Block Parameters 42 Table 8.9 AO Function Block Parameter List 45 Table 8.10 DO Function Block Parameter List 47 Table 8.11 DI Function Block Parameter List 48 Table 8.12 IS Function Block Parameter List 49 Table 8.13 OS Function Block Parameter List 49 Table 8.14 PID Control Function Block Parameters 50 Table 8.15 Flowserve PID Parameters 52 Table 8.17 Resource Block View List 55 Table 8.18 Transducer Block View List 56 Table 8.19 AO Block View Table 58 Table 8.20 PID Block View Table 59 Table 8.20 Status Alarms Table 62 Table 8.21 System Management Supported Features 66 Table 8.22 SM Agent Objects 67 Table 8.23 SM Sync and Scheduling Objects 67 Table 8.24 SM Address Assignment Objects 68 103 Logix 3400MD Digital Positioner LGENIM3405-02 11/13 104 Table 8.25 Virtual Field Device (VFD) List Objects 68 Table 8.26 Control Parameters Table 70 Table 8.27 Unit Parameters Table 71 Table 8.28 Diagnostics Parameters Table 72 Table 9.1 Transducer Block Calibration Parameters 78 Table 10.1 Device Troubleshooting A 81 Table 10.2 Device Troubleshooting B 81 Table 10.3 Device Troubleshooting C 82 Table 10.4 Areas of Device Memory Where Data is Stored 83 Table 10.5 BLOCK_ERR Parameter Bit Mapping 83 Table 10.6: Transducer Block BLOCK_ERR diagnostics mapping 84 Table 10.7 Summary of Configuration Errors 85 Table 10.8 AO Block Parameters 86 Table 10.9 PID Function Block Parameters 87 Table 10.10 Setting the Simulation Dip Switch 88 Table 10.11 Simulation Mode Truth Table 88 Table 10.12 Symptom Chart 89 Table 10.13 Logix 3400MD Digital Positioner Factory Tuning Sets 92 Table 10.14 Logix 3400MD Digital Positioner Characteristic Curves 93 Table 10.15 Transducer Block Characterization Parameters 94 Logix 3400MD Digital Positioner LGENIM3405-02 11/13 105 Flowserve Headquarters 5215 N. O’Connor Blvd. Suite 2300 Irving, TX 75039 Phone: +1 972 443 6500 Flowserve Corporation Flow Control 1350 N. Mt. Springs Parkway Springville, UT 84663 USA Phone: +1 801 489 8611 Flowserve (Austria) GmbH Control Valves - Villach Operation Kasernengasse 6 9500 Villach Austria Phone: +43 (0)4242 41181 0 FCD LGENIM3405-02 11/13 To find your local Flowserve representative please use the Sales Support Locator System found at: www.flowserve.com/contact.htm or call USA +1 801 489-8611 Flowserve Corporation has established industry leadership in the design and manufacture of its products. When properly selected, this Flowserve product is designed to perform its intended function safely during its useful life. However, the purchaser or user of Flowserve products should be aware that Flowserve products might be used in numerous applications under a wide variety of industrial service conditions. Although Flowserve can (and often does) provide general guidelines, it cannot provide specific data and warnings for all possible applications. The purchaser/user must therefore assume the ultimate responsibility for the proper sizing and selection, installation, operation, and maintenance of Flowserve products. The purchaser/user should read and understand the Installation Operation Maintenance (IOM) instructions included with the product, and train its employees and contractors in the safe use of Flowserve products in connection with the specific application. While the information and specifications contained in this literature are believed to be accurate, they are supplied for informative purposes only and should not be considered certified or as a guarantee of satisfactory results by reliance thereon. Nothing contained herein is to be construed as a warranty or guarantee, express or implied, regarding any matter with respect to this product. Because Flowserve is continually improving and upgrading its product design, the specifications, dimensions and information contained herein are subject to change without notice. Should any question arise concerning these provisions, the purchaser/user should contact Flowserve Corporation at any one of its worldwide operations or offices. © 2009 Flowserve Corporation, Irving, Texas, USA. Flowserve is a registered trademark of Flowserve Corporation. Flowserve Australia Pty Ltd. 14 Dalmore Drive Scoresby, Victoria 3179 Australia Phone: +61 7 32686866 China 585, Hanwei Plaza 7 Guanghau Road Beijing, China 100004 Phone: +86 10 6561 1900 Flowserve Essen Gmbh Manderscheidtstr. 19 45141 Essen Germany Phone: +49 (0)201 8919 5 Flowserve S.A.S. 7, Avenue de la Libération - BP 60 63307 Thiers Cedex France Phone: +33 (0)4 73 80 42 66 Flowserve Pte Ltd. 12 Tuas Avenue 20 Singapore 638824 Singapore Phone: +65 6868 4600 NAF AB Gelbgjutaregatan 2 SE-581 87 Linköping Sweden Phone: +46 (0)13 31 61 00 Kämmer Valves INC. 1300 Parkway View Drive Flowserve India Controls Pvt. Ltd Pittsburgh, PA 15205 USA Plot #4 1A, E.P.I.P., Whitefield Phone: +1 412 787 8803 Bangalore Kamataka India 560 066 Phone: +91 80 284 10 289