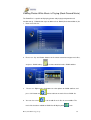
1
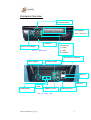
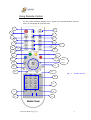
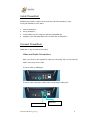
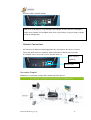
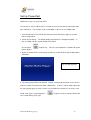
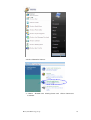
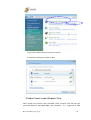
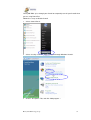
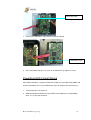
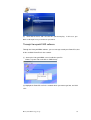
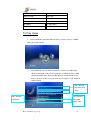
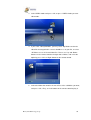
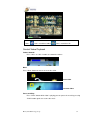
HoneyWld PowerZest HD-301 User Manual HoneyWld Technology Corp. Version v1.00 Version v 2.3 Honeywld Technology Corp 1 CHAPTER 1 BASIC SETUP......................................................................................................... 2 PACKAGE CONTENTS .................................................................................................................... 2 WHAT YOU NEED TO CONNECT TO POWERZEST ........................................................................... 2 HARDWARE OVERVIEW................................................................................................................. 2 USING REMOTE CONTROL ............................................................................................................ 2 INSTALL POWERZEST .................................................................................................................... 2 CONNECT POWERZEST ................................................................................................................. 2 Video and Audio Connections ................................................................................................. 2 Network Connections .............................................................................................................. 2 SET UP POWERZEST ..................................................................................................................... 2 WIRED NETWORK SETUP .............................................................................................................. 2 WIRELESS NETWORK SETUP ......................................................................................................... 2 WIRELESS SETUP FOR POWERZEST .......................................................... 錯誤! 尚未定義書籤。 尚未定義書籤。 When Wireless Network is hidden ........................................................................................... 2 WIRELESS SETUP FOR PC ............................................................................................................. 2 Windows XP Mode .................................................................................................................. 2 Windows Vista Mode ............................................................................................................... 2 AUTO FIRMWARE UPGRADE..................................................................... 錯誤! 尚未定義書籤。 尚未定義書籤。 USING THE HONEYWLD DIGITAL MEDIA SERVER (DMS).............................................................. 2 CONFIGURING YOUR HONEYWLD DMS ........................................................................................ 2 CHAPTER 2 ADVANCED NETWORK SETUP......................................................................... 2 CONNECT POWERZEST TO PC DIRECTLY ....................................................................................... 2 WIRED NETWORK ......................................................................................................................... 2 WIRELESS NETWORK .................................................................................................................... 2 WIRELESS CONFIGURATION UNDER WINDOWS XP....................................................................... 2 Wireless Network Configuration ............................................................................................. 2 Ad-hoc Mode Settings ............................................................................................................. 2 WIRELESS CONFIGURATION UNDER WINDOWS VISTA .................................................................. 2 Wireless Network Configuration ............................................................................................. 2 Disable Firewall under Windows Vista ................................................................................... 2 CHAPTER 3 UPNP MEDIA SERVER......................................................................................... 2 UPNP SERVER .............................................................................................................................. 2 HONEYWLD DIGITAL MEDIA SERVER............................................................................................ 2 MEDIA LIST TAB ........................................................................................................................... 2 SYSTEM TAB ................................................................................................................................. 2 Change the Honeywld Server Name as You Like..................................................................... 2 Honeywld Technology Corp 2 OPTIONS TAB ................................................................................................................................ 2 CHAPTER 4 : NETWORK PROTOCOLS TO PLAY MEDIA................................................. 2 NFS PROTOCOL ............................................................................................................................ 2 Through PowerZest Onscreen Menu....................................................................................... 2 Through Honeywld DMS software .......................................................................................... 2 SAMBA CLIENT PROTOCOL ........................................................................................................... 2 CHAPTER 5 PLAY MULTIMEDIA FILES ................................................................................ 2 MUSIC .......................................................................................................................................... 2 Supported Music Format......................................................................................................... 2 To Play Music.......................................................................................................................... 2 PHOTOS ........................................................................................................................................ 2 Supported Photo Format......................................................................................................... 2 To Play Photos ........................................................................................................................ 2 VIDEO ........................................................................................................................................... 2 Supported Video Format ......................................................................................................... 2 To Play Video.......................................................................................................................... 2 Video Resume Playing............................................................................................................. 2 Play Next Video Automatically ............................................................................................... 2 Search Video ........................................................................................................................... 2 DVD Menu Navigation............................................................................................................ 2 CHAPTER 6 WEB BROWSER .................................................................................................... 2 TO START THE WEB BROWSER ...................................................................................................... 2 USING THE REMOTE CONTROL FOR NAVIGATING .......................................................................... 2 TOOL BAR OF THE BROWSER ......................................................................................................... 2 Go to a web page .................................................................................................................... 2 Tab function............................................................................................................................. 2 Previous, Next and Home Pages ............................................................................................. 2 View of the pages..................................................................................................................... 2 Bookmark function .................................................................................................................. 2 Exit .......................................................................................................................................... 2 CHAPTER 7 INTERNET MEDIA & BIT TORRENT ............................................................... 2 PLAY INTERNET RADIO- LIVE 365™ ............................................................................................ 2 PLAY INTERNET RADIO- MY RADIO .............................................................................................. 2 PLAY INTERNET VIDEO- MY VIDEO .............................................................................................. 2 VIEWING YOUTUBE CONTENT ...................................................................................................... 2 Honeywld Technology Corp 3 ADD/DELETE THE INTERNET RADIO/TV STATION LISTS ............................................................... 2 Through PowerZest Onscreen Menu....................................................................................... 2 Through Honeywld DMS Software.......................................................................................... 2 BITTORRENT DOWNLOADER ........................................................................................................ 2 Enable BitTorrent Feature....................................................................................................... 2 Add New Torrent Seed and Start Downloader......................................................................... 2 BitTorrent Management .......................................................................................................... 2 CHAPTER 8 FIRMWARE UPGRADE AND RESET TO DEFAULT ...................................... 2 UPGRADE BY DIRECT INTERNET ACCESS ...................................................................................... 2 UPGRADE BY USING USB FLASH DISK ......................................................................................... 2 RESET TO DEFAULT ....................................................................................................................... 2 CHAPTER 9 HDD INSTALLATION, CONFIGURATION AND FILE MANAGEMENT .. 誤! 尚未定義書籤。 錯 HARD DISK DRIVE INSTALLATION ................................................................................................ 2 POWERZEST HDD FORMAT WIZARD ............................................................................................ 2 COPY FILES FROM USB STORAGE DEVICE TO POWERZEST (LOCAL HDD) ................................... 2 COPY/DELETE FILES FROM PC TO POWERZEST (LOCAL HARD DISK) ........................................... 2 Through Honeywld Media Server Software ............................................................................ 2 Through Samba Server............................................................................................................ 2 錯誤! 尚未定義書籤。 尚未定義書籤。 CHAPTER 10 MISCELLANEOUS SETTINGS .................................... 錯誤! 尚未定義書籤。 Through FTP Server .......................................................................... SYSTEM SETUP ............................................................................................................................. 2 Language................................................................................................................................. 2 TV Mode Setup ........................................................................................................................ 2 Audio Setup ............................................................................................................................. 2 Video Setup ............................................................................................................................. 2 Other Settings.......................................................................................................................... 2 Hard Disk Share Setup............................................................................................................ 2 LCD Setting............................................................................................................................. 2 BIT TORRENT SETUP ..................................................................................................................... 2 Enable Bit Torrent .................................................................................................................. 2 Max Upload Connection ......................................................................................................... 2 CHAPTER 11 TROUBLE SHOOTINGS................................................ 錯誤! 尚未定義書籤。 NO TELEVISION DISPLAY OR POOR DISPLAY. .................................................................. 2 UNSTABLE DISPLAY WITH 1080P24 FILMS ...................................................................... 2 Honeywld Technology Corp 4 NO AUDIO OUTPUT WITH FILMS WITH DTS ENCODED. ................................................... 2 POWERZEST DOES NOT FIND MY NETWORK. ................................................................... 2 POWERZEST DOES NOT FIND THE HONEYWLD DMS SERVER.......................................... 2 DIGITAL MEDIA SERVER CAN ONLY BE SEEN FOR A SHORT TIME...................................... 2 POWERZEST DOES NOT RECEIVE A VALID IP ADDRESS .................................................... 2 NO SUBTITLE WHEN PLAYING “MPEG2” FILES ................................................................ 2 NO SUBTITLE WHEN PLAYING “MPEG2” FILES AFTER PRESSING “SUBTITLE” BUTTON ..... 2 NO SUBTITLE WHEN PLAYING “MPEG2” FILES ................................................................ 2 FAST FORWARD OR SLOW FORWARD IS NOT WORKING ..................................................... 2 CAN NOT ADD MUSIC FILES TO BGM LIST?..................................................................... 2 CAN NOT FIND FIRMWARE UPGRADE FILE IN THE USB DEVICE ...................................... 2 CHAPTER 11 FAQ.................................................................................... 錯誤! 尚未定義書籤。 Q: PERFORMANCE OF VIDEO PLAYING IS NOT SO GOOD? ............................................................... 2 Q: USB HDD EXTERNAL ENCLOSURE IS NOT SUPPORTED? .......................................................... 2 About This Manual The Honeywld PowerZest User Manual gives you a step-by-step explanation of how to install PowerZest Media Player. Use this information to set up and configure PowerZest. This Manual is provided in PDF format on the Honeywld DMS CD-ROM. Your computer must have the free Adobe Acrobat Reader installed in order to view and print PDF files. Safety Information WARNING: Failure to follow these safety instructions could result in fire, electric shock, or other injury or damage. Read these instructions Keep these instructions Heed all Warnings Follow all instructions Do not use this apparatus near water. Clean only with dry cloth Do not install near any hear sources such as radiators, stoves, or other apparatus (including amplifiers) that produce heart. Unplug this apparatus during lightning storms or when unused for long periods of Honeywld Technology Corp 5 time. WARNING: To reduce the risk of electronic shock, do not remove the cover. WARNING: The device can display static images, which can cause “burn in” of certain displays. Avoid leaving static images (such as photos or paused videos) onscreen for long periods of time. WARNING : This device should be used only indoors in well-ventilated areas. To reduce the risk of fire, electric shock, or interference, do not expose this appliance to rain, liquid, moisture, excessive hear, or naked flame. Technical Support For product updates and Web Support please go to www.honeywld.com.tw Honeywld Technology Corp 6 Chapter 1 Basic Setup Package Contents The product package should contain the following items: PowerZest Player Remote control (2 AA batteries included) Power cable, localized to country of sale Category 5 (CAT5) Ethernet cable Composite (CVBS) Video cable and Audio cable PowerZest Installation CD, including Honeywld PowerZest User Manual in PDF format 4 Screws (for HDD) What You Need to Connect to PowerZest A Windows based computer with - Windows 2000, Windows XP, or Windows Vista system software - 500MHz Processor or better - 512 MB RAM - 20MB available HDD space For “Transcoding” media file, at least 2.0GHz P4 Processor is needed. A TV set with HDMI, or Composite video (CVBS) port and analogue audio or optical digital audio ports A HDMI or Composite cable and analog or optical digital audio cables (Composite cable is shipped with this package). An Ethernet or Wireless network and a broadband Internet connection (DSL/Cable/LAN) Honeywld Technology Corp 7 Hardware Overview Navigation Button LCD Window; 16x2 USB Host Power On/Off Button Characters LED Indicator (1) Power Fig. 1-1 Front View (2) HDD (3) Network Wi-Fi Antenna (Optional) Power Adaptor Video Out/CVBS Ethernet USB Host HDMI SPDIF/ Coaxial SPDIF/Optical Fig. 1-2 Honeywld Technology Corp Rear Audio Out/Stereo View 8 Using Remote Control Use the remote control to navigate menus, and to select and watch videos, listen to music, or view photos on your television. 3 2 1 5 4 6 8 9 7 11 12 10 14 15 13 17 18 16 19 20,21, 22,24 25 26 27 28 29 Fig 1-3 Remote Control 30 31 35 32 33 34 Honeywld Technology Corp 9 Below table below describes the remote control buttons. No. 1 2 3 KEYPAD POWER HOME MUTE 4 OUTPUT 5 6 7 8 9 COPY MENU A-B SLOW ZOOM 10 REPEAT 11 STOP 12 DISPLAY 13 BACK 14 PREV 15 NEXT 16 17 18 19 VIDEO MUSIC PICTURES iMedia 20,21, 22,24 DIRECTIONS 27,28 29 OK/Play Pause REWIND FAST FORWARD SUB & LANG VOLUME+/- 30 BGM 31 NUMBERS 32 33 RECORD :/ 34 SORT 35 SETUP 23 25 26 Honeywld Technology Corp FUNCTION DESCRIPTION Turn On/Off “PowerZest”. Hotkey to return to Main Menu. Mute audio output. Switch the video output type with S-VideoYPbPrHDMI sequence. Copy USB content into local HDD Go to the Menu of DVD films. Set/Cancel A-B repeat mode. Slow forward / backward the media with speed 1/2x, 1/4x,1/8x… Zoom video or photo. 1. Video & Music: Repeat current file or Repeat all files in this folder or cancel repeat function. 2. Photo: Repeat Background music. Stop the media playing. Display media info. Pressing twice will show more info. about video. 1. Press to return to previous folder or setup page. 2. Save/cancel wireless setting in wireless setup page. 1. Skip to the previous page when browsing media files. 2. Skip to the previous file when playing media files. 1. Skip to the next page when browsing media files. 2. Skip to the next file when playing media files. Press to jump to VIDEO mode Press to jump to MUSIC mode Press to jump to PHOTO mode Press to jump to Internet Media mode 1. Press “LEFT” to stop current mode return to former layer; Press “RIGHT” to enter a selected folder or server. 2. Video Mode: Press “UP” or “DOWN” to choose other file 3. Photo Mode: Move picture in “zoom” mode or rotate picture in “rotate” mode 4. Music Mode: Press “UP” to skip to previous music file or press “DOWN” to skip to next music file. 1. Play or pause media files 2. Enter the highlight item. Fast backward the media file with speed 2x, 4x, 8x… Fast forward the media file with speed 2x, 4x, 8x… Select different subtitles and languages when playing video file. Increase/Decrease the volume. 1. Add/Remove a music file as background music. 2. Add/Remove a music station from “My Media” as background music. 1. Input number with the key value. 2. Go to 00%-99% progress of current video or music file. Record stream into HDD Go to the specified time of current file. Sorting all the files in one folder and re-arrange in alphabetical order Hotkey to Setup Menu. “UP” & “DOWN” to move cursor “LEFT” & “RIGHT” to enter or leave page. 10 Install PowerZest Following descriptions explain how to install the PowerZest with basic setup. Install your PowerZest in this order: 1. Connect PowerZest 2. Set Up PowerZest 3. Install software on your computer with Honeywld DMS CD 4. Configure your Honeywld DMS Server to work with the PowerZest Connect PowerZest Follow these steps to connect PowerZest Video and Audio Connections Make sure you have the appropriate cables for connecting. Take care to watch the colors of the plugs on the cable. To connect with an HDMI port To connect with Composite (CVBS) video and analogue audio ports. CVBS-Video Out Honeywld Technology Corp Audio Out 11 To connect with a S/PDIF decoder Note: If the audio output is to go through Coaxial output, check if you have changed the audio setup of Power Zest to Digital mode. Please go to Setup System Setup Audio Setup for configuration. Network Connections You may have an Ethernet cable plugged into the unit and have the wireless antenna connected (Wi-Fi antenna is optional). Neither will interfere with the other, but only one network can be accessed at a time (wired or wireless). Wi-Fi antenna (optional) Ethernet port Connection Diagram Following is a connection example with network and UPnP devices. Honeywld Technology Corp 12 Set Up PowerZest Follow these steps to set up PowerZest Turn on the TV. Set the video sources selector on your TV to match the connection from your PowerZest. For example, if you used HDMI, set the TV to use “HDMI” Input 1. Turn on PowerZest. The LED on the front panel of the PowerZest lights up to show that it is powered on. 2. Check the TV display. The default display of PowerZest is Composite(CVBS). If you use HDMI, aim the remote control at the Power Zest and push “Output” Key. You can cycle through the TV modes to get the correct display. 3. Wait few seconds for the start up page to show up, and it will turns into the Main Menu Afterwards. Fig 1-4 Start Up Page 4. The start up page will last for only few seconds, and then go to a black screen. Please wait few seconds and it will enter into the Main Menu. If there is still no video output after the start up page appears, please make sure the PowerZest and the TV are in the same mode. If not, please cycle through the “Output” key on the remote control, wait few seconds during each cycle. Honeywld Technology Corp 13 Note: When you cycle through the “Output” Key, the Power Zest will tell you which mode you are at. Below is an example of cycling to “HDMI” mode. Please press “OK” if HDMI mode is what you want to select. It will switch to the original mode automatically if idle for 15 seconds. 5. Select Wired or Wireless Network for PowerZest to set up. Wired Network Setup 1) Press “Setup” hotkey on the remote control or select “SETUP” mode from The Main Menu. 2) Select Network Wizard from set up main menu to start setup wizard Honeywld Technology Corp 14 3) Select “Wired” and follow the on screen instructions. Note: If you connect to a network using DHCP, Power Zest automatically detects your network. If you don’t connect using DHCP, go back to set up main menu and select Network Set Up. You may have to enter your IP address, net mask, gateway, and DNS addresses. For more info, make reference to Honeywld DMS Wireless Network Setup If your PowerZest is shipped with Wi-Fi antenna, you can enable network wizard for Wi-Fi function. WARNING: For video streaming, a wired connection between the computer and Power Zest is recommended. A wireless connection can work well if you want to play music or view photos. Honeywld Technology Corp 15 1) Press “Setup” hotkey on the remote control or select “SETUP” mode from the Main Menu. 2) Select “Network Wizard” from set up main menu to start setup wizard 3) Select ‘Wireless” and follow the on screen instructions. 4) PowerZest displays all available networks, navigate on the menu and choose the one you want. 5) PowerZest detects the network type automatically; click “Next” and then “Save” to apply setting. 6) If the network you choose is encrypted, a “Lock” icon displays on the network. 7) Select “Key Value”, and have your password ready to enter. Honeywld Technology Corp 16 8) Input password and choose “Enter” to save. 9) Follow the onscreen instructions to complete the setting. Note: With each network, there are signal strength indicators in 3 colors; red, yellow and green. It is recommended to play high-bit-rate video only when the signal turns into green. When Wireless Network is hidden If you can’t find the ESSID (Network Name) on the “ESSID Device List”, follow these steps to configure wireless network manually. 1. Select Wireless Setup. 2. Select Network type as “Infrastructure” mode. 3. Press “Back” to accept the setting or press “OK” to change the setting. Enter a value of up to 32 characters for the SSID by on-screen keyboard. 4. Input other related information such like “Authentication”, “Key Format”, and proper Honeywld Technology Corp 17 “Key Value” of this hidden wireless network. 5. Press “Back” or “Left” buttons to leave the wireless setup page and save the configurations. Wireless Setup for PC When using wireless network, after PowerZest is set up, you have to ensure your PC is also linked with the same AP. See below to ensure the correct settings. Windows XP Mode 1. Click right button of the mouse on wireless icon, and choose “View Available Wireless Networks” 2. Choose a Wireless Network you want to use and click “Connect”. Honeywld Technology Corp 18 3. Input network key if necessary. 4. Network is successfully connected. Honeywld Technology Corp 19 Windows Vista Mode 1. Select “Control Panel”. 2. Click on “Network and Internet” Honeywld Technology Corp 20 3. Select “Network and Sharing Center” and click on “Connect to a network” 4. Select the right Access Point and click on “Connect”. Honeywld Technology Corp 21 Using the Honeywld Digital Media Server (DMS) To share music, photo and video files from your computer, it is necessary to install the Honeywld Digital Media Sever (DMS) on the PC that contains the files you want to share. The PowerZest can connect to more than one Media Server at a time and scan all the files you want to share in the same local network. Follow these steps to install the software: 1. Insert the Installer CD into the CD drive on the computer. The main CD page opens. 2. Select “Install Honeywld DMS” on the main CD page. 3. Choose language from pop icon. 4. The Install Shield Wizard starts. Follow Install Shield Wizard steps to install the software. 5. After the Install Shield Wizard finish, select Honeywld DMS Serve to begin service. Note: For more information on Honeywld DMS Server Software, please see Chapter 3. Honeywld Technology Corp 22 Configuring your Honeywld DMS 1. For the first time of using Honeywld DMS Server, click “Add” button on the screen to add new folder. Play Add 2. Select folder you want to share and add to the directories 3. After all are done, click “Play “button to begin service. 4. When you are finished, go to your TV. 5. Your PowerZest is ready to use. The Main Menu is displayed. Note: Honeywld will put new version of server on the website (www.honeywldc.com.tw) when it is released, please uninstall the old version of DMS everytime before you install a new one. Honeywld Technology Corp 23 Chapter 2 Advanced Network Setup Connect PowerZest to PC directly This Chapter gives you a description on how to connect the PowerZest directly to your PC instead of getting involved in the local area network. Wired Network 1. Connect the LAN cable to the LAN port of both PowerZest and the PC. 2. Go to PowerZest, press Setup hotkey or select “Setup Main Menu”. 3. Follow on screens instructions to complete Wired Network settings. Note: In this case, use a LAN cross cable type. Wireless Network 1. Press Setup hotkey or select “Setup Main Menu”. 2. Select “Wireless Network Setup”, and set ‘Network Type” as “Ad-hoc” mode. 3. Configure an ESSID with software as you wish. 4. You may choose to configure security settings for this connection or not. 5. Press “BACK” button on remote control to save the settings. 6. Go to your PC to configure your PC to wireless network. 7. Select your PC Windows OS based on XP or Vista according to below descriptions. Honeywld Technology Corp 24 Wireless Configuration Under Windows XP Wireless Network Configuration 1. Click right button of mouse on wireless icon and select “View Available Wireless Networks” 2. Choose the wireless network you want and click “Connect”. Honeywld Technology Corp 25 3. Peer-To- Peer network is successfully connected. Note: Some firewall and anti-Virus tools will forbid “UPnP” protocol. This will affect the connection between “Honeywld DMS” and Power Zest. It is suggested to allow “Honeywld DMS” pass through your firewall or temporarily turn off your firewall when you are using Power Zest. Ad-hoc Mode Settings If it still doesn’t work after above settings are configured, follow these steps to solve the problem. 1. Click right button of mouse on wireless icon and select “Open Network Connections” Honeywld Technology Corp 26 2. Choose your wireless network and click “Properties” 3. Choose the “Wireless Networks” Tab, and click “Advanced” Honeywld Technology Corp 27 4. Select “Computer-to-compute (ad-hoc) mode” networks only and click on “Close” Note: Some firewall and anti-Virus tools will forbid “UPnP” protocol. This will affect the connection between “Honeywld DMS” and Power Zest. It is suggested to allow “Honeywld DMS” pass through your firewall or temporarily turn off your firewall when you are using Power Zest Wireless Configuration Under Windows Vista Wireless Network Configuration 1. Select “Control Panel” Honeywld Technology Corp 28 2. Select “Network & Internet” 3. Choose “Network and Sharing Center” and cilck on “Connect to a network” Honeywld Technology Corp 29 4 Select the network you want and click “Connect” 5 Computer to Computer network is done. Disable Firewall under Windows Vista Some firewall and anti-Virus tools will forbid “UPnP” protocol. That will affect the connection between “Honeywld DMS” and PowerZest. Honeywld Technology Corp It is suggested to allow 30 “Honeywld DMS” pass through your firewall or temporarily turn off your firewall when you are using PowerZest. Follow these steps to disable firewall: 1. Select ‘Control Panel” 2. Select “Security” and click “Allow a program through Windows firewall”. 3. Choose “Exceptions” Tab, and click “Add program…” Honeywld Technology Corp 31 4. Click “Browse…” to browse for Honeywld DMS program Honeywld Technology Corp 32 Note: The default Honeywld DMS program files path is at: :Computer Local Disk ( C) Program Files Honeywld. Follow below steps 5~8 to search for Honeywld program files. 5. Click “Computer”. 6. Click “Program files” Honeywld Technology Corp 33 7. Click Folders “Honeywld” 8. Click “DMS Server vX.XX.XX” Honeywld Technology Corp 34 9. Select “DigitalMediaServer” 10. Hoeywld DMS Server is successfully included to the exceptions. Click “OK” to finish. Honeywld Technology Corp 35 11. Click “Allow” to add this program. Honeywld Technology Corp 36 Chapter 3 UPnP Media Server The PowerZest supports UPnP Server and also comes with its own Digital Media Server software (Honeywld DMS) which users can use on their option. UPnP Server The PowerZest will automatically detect all available UPnP AV compliant content severs on boot-up and list them on “My Media” page. No additional setup is necessary on the PowerZest itself. Honeywld Digital Media Server The PowerZest comes with Digital Media Server software that runs in a computer on your home network. To play media files on PC, PowerZest must be connected to the network, and the Digital Media Server software must be running. Digital Media Server software is easy to install from the Installer CD. After installation, it can be configured to automatically start when Windows system is up. You may use the Digital Media Server to scan for additional media at any time. Following is the detailed introduction for the Honeywld DMS. Media List Tab The Media list tab is where you select the types of files you want to share. Honeywld Technology Corp 37 Importing Media Follow these steps to import media: 1. Press “Add” button to invoke the Explore to choose folder. 2. Select the folder you want to share and press “OK” to start the files scanning. (1) Select folder you want to share (2) Click “OK”. 3. The DMS will ignore those none supported files automatically and you can see which folders had been shared from “Shared Directory” column. 4. Press “Play” button to start the file sharing service, then you can choose this server from Digital Media Player. Honeywld Technology Corp 38 Service Start 5. If you want to add or remove any shared folder, press “Stop Service” first, then repeat step 1-4. 6. If there is any change in the folders that you shared, please also press “Stop Service” button first, and then press “Refresh” button to refresh the file list. Files refreshed 7. When all folders you shared are refreshed, Digital Media Server will restart automatically. Honeywld Technology Corp 39 System Tab The System Tab is where you can change the name of your Honeywld Server Software, delete/add iMedia list or browse/delete/add the local HDD content Change the Honeywld Server Name as You Like Follow below steps to change the desired name. 1. Press “Change” button then change the desired name. 2. Click “OK” to restart service with new server name. 2. Press “OK” 1. Enter new name for your Digital Media Server. Honeywld Technology Corp 40 DMA Setup The DMA Setup has two major functions. One is to help you to add/delete your favorite internet radio/tv lists on iMedia. The other is to browse for each local HDD contents on the network and to copy/delete its files by using the Honeywld DMS Software installed on your PC. Note: For information on how to manage iMedia lists, please see Chapter 5. For information on how to copy/delete files of each local HDD, please see Chapter 7. Options Tab The Options tab is where you can enable the auto-run or trans-code settings Follow below steps to configure your settings. Honeywld Technology Corp 41 1. Click here to enable auto run. 2. Click here to 3. Click here to enable “Transcoding” function. minimized server 5. Select at startup. Language will “Transcoding” appear in the pull quality, down menu 1. Check the “Enable Auto Run” box and this Digital Media Server will auto run once the Window system is up. 2. Check the “Minimized at Startup” box and this Digital Media Server will minimize to system tray when the program is invoked. 3. Check “Enable Transcoding” box and press “APPLY” button to enable the Transcoding function. When you want to watch “MP4” or “MOV” format, enable this function. 4. If service of Digital Media Server is running, please press “CHANGE” button first to check “Enable Transcoding” box. 5. When the “Transcoding” function is enabled, please also select the “Transcoding Quality” at the bottom column. Honeywld Technology Corp 42 Chapter 4 : HDD Installation, Configuration and File Management Hard Disk Drive Installation PowerZest supports 3.5” SATA HDD as internal storage. By installing the HDD inside, you can copy and delete media files via PC to local HDD. WARNING: We recommend you to have a new HDD to install. Power Zest will automatically format the HDD to EXT3 , and erase your existing files. Follow the instructions below to set up HDD. 1. Make sure PowerZest is turned off. 2. Use a screw driver to unscrew the 4 screws at the bottom. 3. Remove the Top cover case and Bottom Tray Honeywld Technology Corp 43 Front View of cover case Bottom View of cover case 1. Insert the HDD into the Cover case as below direction. 5. Put the HDD on the cover and screw up the HDD firmly in the four holes. 6. Connect the SATA data cable with the PowerZest board. Honeywld Technology Corp 44 SATA data cable 1. Connect the HDD Power cable with the PowerZest board. HDD Power cable 2. Close the bottom and top case cover of the PowerZest by original 4 screws. PowerZest HDD Format Wizard After HDD installation is completed, PowerZest will detect your HDD compatibility and perform formatting if necessary. Follow below steps to complete the format process. 1. Turn on PowerZest and your TV. 2. HDD Format Wizard will detect if your HDD is formatted for best compatibility. Click “Yes” if you want to format. Honeywld Technology Corp 45 3. Make sure you want to start format; the HDD will NOT be able to be Used in your PC once you perform the PowerZest Format Wizard. Click “Yes” if you are sure you want to initialize the process. 4. Wait few seconds for the process to be complete. Honeywld Technology Corp 46 5. The Main Menu pops up automatically after format is complete. WARNING: Power Zest supports Samba Server (copying files from PC) with hard disks formatted by Power Zest HDD format wizard. If you skip HDD format wizard, the samba server will be disabled. WARNING: After formatting, the all media files on this HDD will be deleted. Please backup your files before you install the HDD into PowerZest. WARNING: PowerZest will format your HDD as EXT3 format for best performance. This file format can not be recognized by Windows system. Note: By default, Power Zest will check the format of the HDD if the HDD was initialized by Power Zest with EXT3 format. Data in the HDD, which is not with EXT3 file system, may be able to be played by Power Zest. This way, functions like copy via USB and network will NOT be working. There is a setting option to avoid HDD format checking after power-on. Please go to Setup System Setup Hard Disk Share for configuration. Honeywld Technology Corp 47 Copy files from USB Storage Device to PowerZest (Local HDD) Once the PowerZest is installed with a local HDD, you can copy files from USB storage device through USB hosts, or copy and delete files from PC through LAN. Follow below steps to copy files from USB storage device. 1. Go to “My Media” at Set Up Main Page 2. Select the name of your USB Storage device from the server list. USB Flash Stick Honeywld Technology Corp 48 3. Highlight the file you want to copy, and then press “COPY” key on the remote control. 4. The PowerZest will ensure you whether you want to copy, press “Yes” if you want to move on. Note: The Power Zest only support USB hosts copy to local HDD, you are not able to delete files copied to HDD by using this feature. Honeywld Technology Corp 49 Copy/Delete files from PC to PowerZest (Local Hard Disk) PowerZest supports Samba protocol. You can copy/delete files on each PowerZest internal HDD available in your local network by using your PC. The followings are several different methods to do copy/delete files. Through Honeywld Media Server Software To use this feature, you have to install Honeywld Media software to your PC first. Please make reference to Chapter 3 on how to install the Honeywld Media software. After installation is completed, follow below steps to copy/delete files from your PC to local HDD or vice versa. 1. Select “System” Tab of Honeywld DMS Server. The System Tab 2. Double click “DMA Setup” icon. Honeywld Technology Corp 50 Click “DMA Setup” 3. The “DMA List” menu pops up, and shows the all available PowerZest on the local network. Following is the example with 2 PowerZest connected to the Network. 4. Choose the one you want and double click “File Browser” icon 5. A log in icon pops up. Input the user name and password as defaulted “admin” Honeywld Technology Corp 51 6. Browser connects to local HDD successfully. 7. By opening second browser, you can copy/ delete files between your PC and the local HDD via PC mouse. Honeywld Technology Corp 52 8. Repeat step 3~6 if you want to manage the files of other PowerZest local HDD. My Network Place Samba Server PowerZest supports Samba server function which shares your local storage space with client PC over the network. For PC with Windows OS, it’s well known as My Network Places. The following is an example on how to do this through Microsoft Windows XP. 1. Click “My Network Place” icon on your PC. My Network Place Honeywld Technology Corp 53 2. Click “Entire Network” 3. Click “Microsoft Windows Network” “MShome” Honeywld Technology Corp 54 4. The default PowerZest Local HDD location is “MShome”, double click it and you will see the PowerZest (ShareHDD) icon. 5. Double click the PowerZest (ShareHDD) icon, a login menu pops up. Input the default user name and password “admin” 6. Log in is successful. Now you can copy/delete media files between your PC to PowerZest local HDD by using PC mouse. Honeywld Technology Corp 55 Honeywld Technology Corp 56 Chapter 5 : Network Protocols to Play Media The PowerZest can support some network protocols to access media files in the network instead of Using UPnP server or Honeywld DMS. NFS protocol The NFS protocol allows the PowerZest to access media files on NAS (Network Attached Storage) without the using of other UPnP server or Honeywld DMS server. Firstly, have the IP address and the subfolder name of your target source ready (for example, your NAS’ IP and the sub folder of the NAS), below are two options of approaching your target source by NFS protocol. Through PowerZest Onscreen Menu (1) Select and enter “iMedia” from the Main Page. ” (2) Select “My Media” and enter “Add New Entry”. Edit Dialogue will pop up. Honeywld Technology Corp 57 (3) Key in the nickname (for example “nfs”) and the URL of your target source. The url link must be in following arrangement. nfs://ip/export_directory (for example, nfs//192.168.2.112/mnt/hd_a2) The 192.168.2.112 is the IP address of the NAS you want to approach, and the mnt/hd_a2 is the sub folder name of your target source. (4) After the URL is saved, go back to the menu of “My Media”, and you will find the protocol at “My Media” list. Honeywld Technology Corp 58 (5) Enter into the menu, and select the files you want to play. In this case, you don’t need to put in any username or password. Through Honeywld DMS software Through the Honeywld DMS software, you can manage not only one PowerZest, but all the available PowerZest in the network. (1) Start up the Honeywld DMS server installed at your PC. Choose “System Tab” and click on “DMA Setup”. (2) Highlight the PowerZest url in the network which you want to get into, and click “OK”. Honeywld Technology Corp 59 (3) The browser will start after you get into the PowerZest, click on “New Station” (4) Key in the IP address. The URL link will appear, key in the IP address and sub-folder name which you have prepared, and click on “OK” after finish. The url link must be in following arrangement. nfs://ip/export_directory for example, nfs//192.168.2.112/mnt/HD_a2 The 192.168.2.112 is the IP address of the NAS you want to approach, and the mnt/HD_a2 is the sub folder name of your target source. (5) Now you can go back to PowerZest to watch your media files on TV. Honeywld Technology Corp 60 Samba Client Protocol The Samba Client allows the PowerZest to access media files from samba shares on PCs on the network. Go to Setup -> System Setup -> Other Settings -> Network Option -> Samba Client to turn on this option. As long as the network is linked, there is no additional set up to enable this feature. Following steps show how to access media through the Samba Client Protocol. 1. Get into “My Media” in the main menu. 2. All available sources will be shown on the same menu list layer (including local HDD, USB storage, UPnP Server and folders at local area network (those you can find through your Windows PC at the path of “My neighborhood”) Honeywld Technology Corp 61 Local HDD UPnP Samba Total 28 sources client found 3. Gets into the source you want to select. Note: Since sources from UPnP server or Samba client will be found at the same layer, you may have 2 different approaches of same sources at one menu list. You can compare the 2 approaches of Samba client and UPnP server to the same NAS as below. Samba client protocol UPnP Server Honeywld Technology Corp 62 4. When access the NAS through Samba client, if there is request to key in user name and password, the dialogue will pop out. Key in User name and Password to login NAS 5. After input of username and password, you can get into your target source and select the media files you want to play. Remark The performance of high bit rate files (>30 Mbps)will has some lag through Samba Protocol, therefore we don’t suggest to play high bit rate files with this protocol. Honeywld Technology Corp 63 Chapter 6 Play Multimedia Files Music Supported Music Format The following music formats are supported: Format File Extension AAC+ AAC, MP4, M4A AAC-LC AAC, MP4, M4A AC3 / Dolby Digital 5.1 Down mixing AC3 AC3 Pass through AC3 DTS Pass through DTS LPCM WAV, PCM MP3 MP3 MP3Pro MP3 OGG Vorbis OGG WMA WMA, ASF WMA Lossless WMA, ASF WMA Voice WMA, ASF WMA Pro WMA, ASF (ID3 tag supported) To Play Music 1. Select “My Media” from Main Menu to enter server list, or press “Music” hotkey on remote control. . Honeywld Technology Corp 64 2. All available file sources will be listed on the server list, including files stored at Honeywld media server in your PC, at USB flash stick, at USB external Hard disk drive, local hard disk drive or at other UPnP servers. Please select the media server you want to use and press “OK” button on remote control. Files stored at local hard disk drive. Files stored at Honeywld DMS server Files stored at other UPnP server Remark: When you want to play music on other UPnP Servers, please make sure the UPnP function for each device is enabled correctly. 3. Select MUSIC mode and press “OK” to enter music mode. 4. If you select “Honeywld DMS”, the music files will organize by “Album”, “Artist”, or “Genre” automatically for your convenient; or you can select “All Music” to see all music files. You may also select “My Folder” to view the music files that Honeywld Technology Corp 65 organized in several subfolders as on your PC. Please use “Up” and “Down” buttons on the remote control to navigate those folders, and select the option by press “OK” or “Right” button on the remote control. 5. Select the folder that contains the music files or the subfolders you want, and press “OK”, “Play”, or “Left” button on the remote control to play it. Note: icon is stand for a folder; icon is stand for a file. 6. On the screen, you can see related information about ID3 data of the music such as “Artist”, “Album”, “Title”, and “Genre”. If it contain the photo of the Album, it will also be shown like the following screen. Honeywld Technology Corp 66 Controlling Music Playback Use the remote to PLAY, PAUSE, or STOPV music. Controlling the music playback will be as easy as controlling your TV set. Play and Pause Press “PLAY” button while music is playing you can pause the music by pressing “PLAY” button again can resume the music Pause Music Play Music Volume Control: Press “Vol+” or “Vol-” buttons to control the volume Mute: Press “Mute” button to mute or un-mute the music. mute music un-mute music Skip to Next or Previous File: Press “Next” or “Down” buttons to skip to next music file. Press “PREV” or “UP” buttons to skip to previous music file. Honeywld Technology Corp 67 Fast Forward: Press “>>(FF)” button to fast forward the music file. Press several times to switch the speed. Rewind: Press “<<(REW)” button to fast backward the music file. Press several times to switch the speed. Repeat and Repeat All You can turn on the repeat function to continuously play individual music or music within a folder. Repeat Once: Press “Repeat” button once to repeat playing current music file. Repeat All: Press “Repeat” button twice to repeat all music files in current folder. Repeat Off: Press “Repeat” button for three times to disable the repeat mode. Honeywld Technology Corp 68 Viewing Photos While Music is Playing (Back Ground Music) The PowerZest is capable of displaying photos and playing background music simultaneously. . Follow below steps to add music to “BGM” (Back Ground Music) list. 1. Enter music files list 2. Please use “Up” and “Down” buttons on the remote control to navigate music files, and press “BGM” hotkey 3. on remote control to invoke “BGM” tool bar. Please use “Right” and “Left” buttons to select options on “BGM” tool bar, and press “OK” button on “ 4. You can also select “ ” icon to add current music files to “BGM” list. ” icon to add all music files in current folder. The music files that been added to “BGM” list will display with “ Honeywld Technology Corp ” icon. 69 Add music to BGM list Music added successfully 5. To play BGM files, please select “ BGM, please select “ ”button on “BGM” tool bar; to stop playing ” button. 6. To remove music files from BGM list, please select “ want to remove; or select “ ” icon on the file you ” to remove all files from BGM list. 7. To check the “BGM” list, please select “ ” icon to view all music files in the list. BGM music playing Honeywld Technology Corp 70 8. After BGM setting is complete, you can go to “Photo” folder to view photo, and press “BGM” hotkey to evoke the BGM function. Photos Supported Photo Format The following photo formats are supported: Format File Extension BMP BMP EXIF SUPPORT JPEG, JPEG, JPE, TIFF, TIF GIF GIF JPEG JPEG, JPG JPEG2000 JPG, JPEG, JPE PNG PNG TIFF TIFF, TIFF Windows Media Photo WDP, HDP To Play Photos 1. Select “My Media” from Main Menu to enter server list, or press “PHOTO” hotkey on remote control. Honeywld Technology Corp 71 2. All available file sources will be listed on the server list, including files stored at Honeywld media server in your PC, at USB flash stick, at USB external Hard disk drive, local hard disk drive or at other UPnP servers. Please select the media server you want to use and press “OK” button on remote control. Files stored at local hard disk drive. Files stored at Honeywld DMS server Files stored at UPnP NAS device 3. Select “PHOTO” mode and press “OK”, or press “PHOTO” hotkey to enter photo mode. Honeywld Technology Corp 72 4 If you select “Honeywld DMS”, you may select “My Folders” to view the image files that organized in several subfolders as on your PC, or select “All Images” to see all shared image files. Please use “Up” and “Down” buttons on the remote control to navigate those folders, and select the option by press “OK” or “Right” button on the remote control. 5 Select the folder that contains the image files or the subfolders you want, and press “OK”, or “Left” button on the remote control to play it. Honeywld Technology Corp 73 Note: icon is stand for a folder; icon is stand for a file. Playing a Photo Slideshow To start playing a photo slideshow (all photos in one folder), you need to press “PLAY” Button twice on the remote to enable this function. (1) Navigate to the first photo of each folder and press ‘Play” button to view this photo. (2) Press again the “Play” button if you want to enable Photo Slide Show feature. The mark will display when the Photo Slide Show is enabled. Ppress “Stop” to stop the function. The mark will be displayed when the Photo Slide Show is stopped. Controlling Photo Playback Play, Pause and Stop Press “PLAY” button on the image files list to enable slideshow playing. Press “STOP” button to stop it. Honeywld Technology Corp 74 Skip to Next or Previous File: Press “Next” or “Down” buttons to skip to next video file. Press “PREV” or “UP” buttons to skip to previous music file. Viewing Photo Information Press “Info” button to get image information. Photo Viewing Effect Zoom in and Zoom Out Press “ZOOM” button while viewing the photo that you want to manipulate,. 1. Press “Zoom” button and press “Left” button to enlarge the image. 2. When the image screen is larger than TV screen, press “Zoom” again and press “directions” buttons to move the image. Honeywld Technology Corp 75 3. Press “Zoom” button and press “Right” button to shrink the image Rotate: Press “Repeat” button while viewing the photo to enable rotate function. Honeywld Technology Corp 76 View Photo in Thumbnails Mode You can view thumnails of several photos at a time. To enable the thumbnail mode, please do the following: 1. Go to “Setup Main Menu”. 2. Select “Other Settings”. 3. Choose “Thumnail” on “Photo Display Setup” Menu. Honeywld Technology Corp 77 4. After go back to the folder, you will now view several photos displayed at a time. Video Supported Video Format The following movie format are supported Format File Extensions DivX 3 AVI, DivX DivX 4 AVI, DivX DivX 5 HD AVI, DivX DiVX 5 SD AVI, DivX DivX 6 HD AVI, DivX DivX 6 SD AVI, DivX H. 264 AVC MPEG4 part 10 (HD) MPG, MP4, MOV, AVI H. 264 AVC MPEG4 part 10 (SD) MPG, MP4, MOV, AVI MJPEG AVI MPEG-1 MPG, MPEG, DAT MPEG-2 HD MPG, MPEG MPEG-2 SD MPG, MPEG MPEG-2 VOB MPG, MPEG, VOB MPEG-4 part 2 ASP MP4, AVI VC-1 HD 1080i WMV VC-1 HD 720p WMV WMV 9 WMV, ASF Honeywld Technology Corp 78 WMV HD 1080i WMV, ASF WMV HD 720p WMV, ASF WMVPro WMV, ASF XviD AVI, MP4 HD 1080i/p AVI, MP4, MOV DVD ISO, IFO To Play Video 1. Select “My Media” from Main Menu to enter server list, or press “VIDEO” hotkey on remote control. 2. All available file sources will be listed on the server list, including files stored at Honeywld media server in your PC, at USB flash stick, at USB external Hard disk drive, local hard disk drive or at other UPnP servers. Please select the media server you want to use and press “OK” button on remote control. Files stored at local hard disk drive. Files stored at Files stored at UPnP NAS Honeywld DMS server Honeywld Technology Corp 79 3. Select VIDEO mode and press “OK”, or press “VIDEO” hotkey to enter video mode. 4. If you select “Honeywld DMS”, you may select “My Folder” to view the video files that organized in several subfolders as on your PC, or select “All Videos” to see all shared video files. Please use “Up” and “Down” buttons on the remote control to navigate those folders, and select the option by press “OK” or “Right” button on the remote control. 5. Select the folder that contains the music files or the subfolders you want, and press “OK”, “Play”, or “Left” button on the remote control to play it. Honeywld Technology Corp 80 Note: icon is stand for a folder; icon is stand for a file. Control Video Playback Volume Control: Press “Vole+” or “Vole-” buttons to control the volume Mute: Press “Mute” button to mute or un-mute the video. mute video un-mute video Pause and Play: Press “PLAY” button while video is playing you can pause the music by pressing “PLAY” button again can resume the music Honeywld Technology Corp 81 Pause Video Play Video Skip to Next or Previous File Press “Next” or “Down” buttons to skip to next video file. Press “PREV” or “UP” buttons to skip to previous music file. Fast Forward: Press “>>(FF)” button to fast forward the video file. Press several times to switch the speed. Fast Forward Video Rewind: Press “<<(REW)” button to fast backward the video file. Press several times to switch the speed. Rewind Video Slow Forward Press “Slow” button to slow forward the video file. Press several times to switch the speed. Slow Forward Video Slow backward Honeywld Technology Corp 82 Press “Slow” button and press “Left” button to slow backward the video file. Press “Left” button several times to switch the speed. Slow Backward Video Viewing Video Information Press “Info” button to get video information. Video Viewing Effect Zoom in and Zoom Out: While video is playing, press “ZOOM” button to enable zoom in/ zoom out function. 1. Press “Zoom” button and press “Left” button to enlarge the video screen. 2. When the video screen is larger than TV screen, press “Zoom” again and press “directions” buttons to move the video screen. 3. Press “Zoom” button and press “Right” button to shrink the video screen Honeywld Technology Corp 83 Repeat and Repeat All You can turn on the repeat function to continuously play individual video or video within a folder. Repeat Once Press “Repeat” button once to repeat playing current video file. Repeat All Press “Repeat” button twice to repeat all video files in current folder. Repeat Off: Press “Repeat” button for three times to disable the repeat mode. Honeywld Technology Corp 84 Subtitles and Languages If you are playing “VOB” files or “AVI” files, “SUB” button and “LANG” button are available for the subtitle and language switching. Press “LANG” to change different language that recorded in “VOB” files; and press “SUB” button to change different subtitles in both “VOB” and “AVI” files. Note: To use it, make sure that it is in the same folder as your video file and that they are both named exactly the same. Video Resume Playing The PowerZest supports resume video playing to the previous point where the video is interrupted. The device needs to keep powered on to enable this function. The default setting is that it will ask you everytime whether you want to resume the playing when you are back to the interrupted file. If you want to change the setting, please follow below instructions: (1)Go to “System Set Up “ Honeywld Technology Corp 85 (1) Select “Other Setting”, and highlight “Video Resume Playing”. You can disable the setting or make it always on without asking. Play Next Video Automatically The default setting is the all the video files in one folder will be Played continuously until the last file and then return to the main menu. If you want to play only the selected file and then return to the main menu, please go to “Other Settings” ‘Play Next Video” to disable the function. Honeywld Technology Corp 86 Search Video The PowerZest provides two options to seek the video frame. One is to seek by percentage of total file length; and the other is to seek by time. Seek by Percentage While video is playing, you can press the numeric keys on the remote control to Jump to your destination. For example, when you press “7” + “0”, you will jump to 70% of the total file length. Numeric keys on the remote control Start playing from 70% of the file length Honeywld Technology Corp 87 Seek by Time Firstly, press “0” of the numeric keys on the remote control to enter into time seek mode. Then you can input the time frame you want to search. Input the time by numeric key The total time length of the file DVD Menu Navigation The PowerZest support viewing DVD files as you are playing a DVD menu. Follow below steps to enable DVD menu navigation feature. 1. When you select a DVD file, choose the item with 2. The Menu will appear. Use the navigation button and press “Play” on the remote control To select the item you want. Honeywld Technology Corp 88 Chapter 7 Web Browser To start the Web Browser Wherever you stay in the user interface, press ‘Home’ button on the remote control to return to the main menu as shown below. Select the icon which shows ‘Web Browser’ and press ‘ok’. The homepage of the web browser will be displayed, then you can surf the web using the remote control or keyboard and mouse. Using the Remote Control for navigating An USB keyboard and mouse can be plugged to facilitate the web surfing. While using the remote control, the key definition is as follows: No. 13 16 KEYPAD BACK VIDEO 17 MUSIC 19 20,21, 22,24 23 25 iMedia FUNCTION DESCRIPTION Escape from the browser and return to the main menu. Left-click of the mouse Press to enter keyboard mode and press again to be back to mouse mode. Right-click the mouse. DIRECTIONS To move the cursor. Left-click or Enter Fast backward the media file with speed 2x, 4x, 8x… 27,28 OK/Play REWIND FAST FORWARD SUB & LANG 31 NUMBERS 26 Fast forward the media file with speed 2x, 4x, 8x… Select different subtitles and languages when playing video file. Equivalent to the numbers or characters on the keyboard. Honeywld Technology Corp 89 Tool bar of the browser Go to a web page ‘File’ → ’Move page’ → Enter the web address you like to go. Tab function Tabs can be opened and switched when you like to look at different web pages more Honeywld Technology Corp 90 efficiently. ‘File’ → ’Switch tab’ → Select a tab which has been opened. Previous, Next and Home Pages ‘History’ → ’ Back’ or ‘Forward’ or ‘Home’. Honeywld Technology Corp 91