1
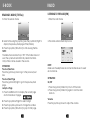
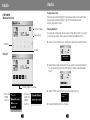
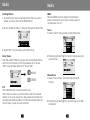
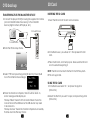
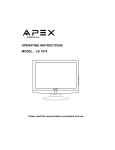
MP-C759
2.5 " TFT M PEG4 MOVIE PLAYER with FM TUNER
Coby Electronics Corp.
56-65 Rust Street
Maspeth, NY 11378
www. cobyusa.com
www.ecoby.com
Please read th is manual b efore operation
Technic al Support Hours
Monda y-Friday 8:30 AM - 8:30 PM EST, 1-80 0-681-2629 or 718-416-3 197
Saturd ay-Sunday 9 :00 AM - 5:30 PM EST, 1-800-727-359 2
Or Sen d E-Mail to: t [email protected]
Contents
Contents
FEATUR ES
PAC K A GE CONTEN TS
SAFETY INSTRUCTIO NS
LOCATION OF CON TROLS
GETTIN G STARTED
Hold Function
Turning Power On or Off
Selecting an Item from the Menu
Menu list
FLASH MOVIE
Playing Flash Movies
Mouse Mo de
Operation
MUSIC
Playing Music
Operation
Playback Menu
Update ID 3 Database
Lyric
VIDEO
Playing Videos
Operation
PHOTO
Vie w ing Picture s
Ope ration
Pho to Menu
BROWS E
Fav orite
Cop y/Paste
Delete
Ren ame
1
3
4
5
7
8
8
8
9
9
11
11
11
12
13
13
15
16
18
20
21
21
22
23
23
24
24
27
29
29
30
31
RECORDING
Voice R ecording
Line-in Recording
FM Rec ording
Operat ion
Record ing Quality
Playing Recorded Files
SETUP
Backlig ht
Langua ge
Power D own
Format
Version
Upgrad e
Speake r
GAME
Block
Box
E-BOOK
Reading E-books
Operat ion
RADIO
Listenin g to the Rad io
Operat ion
Menu
FM Pres et Docume nt
OTG BACKU P
SD CARD
OTHER FUN CTIONS
In stallin g Fonts Libra ry
Setting the Background picture
Setting the Startup Image
TROUBLESH OOTING
2
33
34
35
36
37
38
39
40
40
40
40
40
40
41
41
42
42
42
43
43
43
44
44
44
48
50
51
52
54
54
54
54
55
Features
Package Contents
2.5" TFT-LC D: 16M full- color d isplay
Built in 512 MB Fla sh Memory with Expan sion S lot for
SD C ard(m ax. 2GB)
Built -in Mic rophone a nd Speaker
Vide o Form at: A VI . O ther fi le form ats c an be
converted to AV I format wi th the suppl ied so ftwar e
Aud io Form at: M P3, W MA, W AV
Pictu re Vie wer: JPG, B MP, G IF
Text Viewe r: .TXT file
Flash View er(SWF)
Digital FM Tuner with 2 0 pre set sta tions
Reco rding Source : Microph one, Line-in and FM
Built in games (B lock a nd bo x)
USB OT G (O n-The -Go)
Power: Built-In 3 .7V Re charg eabl e Li-ion Batt ery
Upgradab le Firm ware (You can u pgrad e the
softw are w hen i t beco mes availa ble. P lease chec k
our w ebsit e www .cob yusa. com f or upg rades.)
MP3 Playe r
USB Cable
A/ C Adap ter
Use r's Manu al
Earph ones w/ neck st rap
Audio C able
Host Ca ble
Install ation CD
3
4
Safety Instructions
1.
2.
3.
4.
5.
6.
7.
8.
9.
10.
11.
12.
Read these i nstructions care fully.
Keep these instructio ns for fu ture ref erence.
Heed all warnings.
Follow all instructions.
Do not expo se to water or moisture.
Clea n only w ith a dry cloth.
Keep objects away from ventilatio n openings. Do not
block any ventilation openin gs at any time.
Do not install near any heat sour ces suc h as stoves,
radiators, amplifiers or any apparatus that produce
heat .
Do not force the power plug in the wall outlet. A
polarized plug has t wo blades with one wider than the
other.The wi de blade is pro vided for your safety. I f the
provided plug does not fit into you r outlet, consu lt an
elec trician for replacement of the obsolete outlet.
Place the power cord so that it is protected from being
walk ed on, pinched by objects, torn and exposed to
liquids, especially at plugs, convenience receptacles,
and the point where they ex it from the product.
Only use attachments/accessories specified by the
manufacturer.
Use of attac hments/accessories no t recommended by
the p roduct manufacturer may cau se hazards.
Use only wit h a cart, stand, tripod, brack et, or t able
spec ified b y the manufacturer, or so ld with the
apparatus. When a cart i s used, use caution when
moving the cart/apparatus combination to avoid injury
from tip-over.
5
Safety Instructions
13. Unplug the apparatus during lightning storms or when
unused for long periods of time .
14. Do not use this apparatus nea r water, and no object s
filled wi th liquid s, such as vases, shall be placed on the
appara tus.
15. Do not use headphones/earphones while cycling ,
driving or operating an y motori zed vehicle.
16. Do not use headphone s/earphones at high vol ume.
17. Do not drop or s ubject t he devi ce to impact.
18. Keep the player away from str ong ma gnets. Damage
to your player may result from magnets such as those
found in CRT TV s, monitors and speaker s.
19. Data can be damaged because of physical impact .
Users are respo nsible for crea ting ba ckup data, and
we are not responsible for any damage d data.
20. When y ou upload or downlo ad files using the USB
cable, do not d isconnect the USB cable or tur n off the
device. Data in HDD ca n be da maged .
21. Refer all servicing to au thorized service personnel.
F or recy cling or disposal inform ation a bout th is product,
p lease c ontact your lo cal authorities or the Electronics
I ndustrie s Allianc e: www .eiae.o rg
WARNI NG: H andling the cord on the earphone s will e xpose you t o lead, a chemic al kno wn to the St ate o f
C alifor nia to cause [can cer, a nd] b irth defects or oth er r eproductive harm.
Wash h ands after h andli n g.
6
Location of Controls
Getting Started
HO LD FU NCTION
A-B Repeat Button
POWER/EXIT
Button
Repeat Mode
Button
Power on Indicator
Pop-up Menu Key
Display
Joystick Key
Hold Off : Slide the HOLD swit ch in the op posite direc tion of
the a rrow symbo l to unlock t he player.
Hold On : Slide the HOLD switc h in the dir ection of th e arrow
to dis able all func tions. The h old symbol will display ed in the
uppe r-right corn er of the scr een.
TUR NING POW ER ON OR OFF
Powe r On : Press a nd hold the POWER/EX IT button to turn on
the p ower.
Powe r Off : Press a nd hold the POWER/EX IT button to turn off
the p ower. " Kee p holding to power off" will be displ ayed.
Speaker
SD Card Slot
N OTE:
Neck Strap Hook
Host Jack
Microphone
Line-In Jack
Reset Button
Headphone Jack
USB Port
Hold Button
AC Adapter Jack
If the player does not turn on af ter pressing the button,
please c heck the HOLD switch and/or rech arge the
battery.
If "no dis k" appears during start- up, please restart the
player. I f the message still appe ars, please format the
player w ith your PC . If all the op erations ab ove fail, ple ase
contact technical s upport.
1-800-681-2629 or 718-416-3197
Monday to Friday 8:30 AM - 8:30 PM EST
Saturday and Sunday 9:00 AM - 5:30 PM EST
You can also reach us by e-mail at [email protected]
7
8
Getting Started
Getting Started
SELECTING AN ITEM FROM THE MENU
1. Press the joystic k up/down/left/right to select an
item from the menu list.
2. Press the joystic k (OK button) to enter the selected
mo de.
3. Press the EXIT button to return to the previous menu.
Press and hold the EXIT button to return to the main
me nu.
Photo
Bro wse
Record
Setup
Game
E-book
Battery Sta tus
Title Bar
Me nu Item
Me nu Lis t
Flash
Music
Video
OTG backup
Radio
E-book
9
10
Flash Movie
PLA YING FLASH MOVIES (SWF FILE)
1. Enter the flash m ovie mode.
2. Selec t a file using the joystick.
3. Press the joystick (OK button ) to start pla ying the fla sh file.
N OTE:
The default directory fo r flash files i s "flash". If th e folder
does not ex ist, the syste m will automatically cr eate the fol der.
The player s upports file s that are Macromedia Flash 5 or o lder.
(It does not support Java script). Th e extension of flash file s
is SWF.
MOUSE M ODE
Enter th e mouse mo de
Press th e MENU but ton to ente r the mouse mode while playing
a flash movie.
The mo use icon (^) will appear on the scre en.
11
Playing Flash Movie(SWF file)
Music
Moving the mouse
Press the joystick up /down/left/ right to mo ve the mouse.
P LAYIN G MU SIC (W MA a nd Mp3 files)
1. Enter the music mode.
Clicking the mouse
Move th e mouse to the active a rea or butto n.
Press the joystick (OK button) to click the b utton.
Exit the mouse mod e
Press the MENU butt on to exit th e mouse mo de. The mo use
icon will disappear.
2. Select a file using the jo ystick (press the joystick left/right to
display the previous/next page of files/folders).
OPE RATION
Pause
1. Press t he joystick (OK button ) to pause.
2. Press t he joystick (OK button) again to re sume.
NOTE:
You can not pause t he file by pr essing the O K button w hen
in the mouse mode.
3. Press the joystick (OK button) to sta rt playing t he file.
Volume
Press the joystick up /down to ad just the vol ume.
Previous /Next
Press the joystick lef t/right to pl ay the previ ous/next fla sh file.
NOT E:
The default mu sic directory is "Music". I f the folder does not
exis t, the system will autom atically cre ate the fold er.
If th e selected s ong canno t be played , the next so ng will be
play ed automa tically.
12
13
Music
Music
OPERA TION
M usic File Br owser
P lay/Pause
During playb ack, press t he joystick (OK button) to pause
playback. Press it again to resume playback.
Volume
Press the joy stick up/down to adjust the volume.
P revious/Ne xt
Press the joy stick left/rig ht to play the previous/ next song.
F ast Backwa rd/Forward
Press and ho ld the joystick left/right to fast bac kward/forw ard.
P layba ck Sc reen
Music Se quence
Play status
E qualizers
Press and ho ld the A-B b utton to swi tch the equ alizer settin g:
normal, rock , jazz, classi c, pop.
P lay mode
Press the RPT button to switch play modes.
one : Repeat the current song.
all :Play all music files in the current directory i n order and
repeat .
random :Randomly pla y all music f iles in the cu rrent
directory.
Song n ame
Artist
A lbum
Pro gress bar
Pla ying time
A-B Repeat
1 . Press the A-B button a t the place from which you want to
repeat the audio segment.
"A-" will ap pear at the bottom of t he screen.
EQ Ind icator
Ba ttery level icon
14
15
Music
Music
AD D FAVORITE <On-The-G o Playlist>
1. S elect "Add favorites" fr om the play back menu .
2. P ress the joy stick (OK bu tton) to add the curren t song to
t he favorites .
2. Pre ss the A-B b utton at the place whe re you wan t to end
the repeating audio segm ent.
"A -B" will be d isplayed at the bottom of the scree n, and the
seg ment will p lay repeate dly .
3. Pre ss the A-B b utton to en d the A-B re peat and re sume
no rmal playba ck.
Exit
Pre ss the EXIT b utton to ret urn to the p revious men u.
Pre ss and hold the EXIT button to retur n to the ma in menu.
PL AYBACK ME NU
Pre ss the MENU button in th e playback screen, and the
playback menu will appea r: Add favo rites, Play Sp eed,
Turn on/off lyric s, Save Pow er, EQ, Repe at mode.
See the "Favori tes" section for more in formation.
Pla y Speed
1. S elect "Play Speed" from the playba ck menu.
2. P ress the joy stick (OK bu tton).
3. P ress the joy stick left/rig ht to select the play spe ed
( 70%-130%)
NO TE: 100% is n ormal spee d.
Tur n On/Off Lyrics
1. S elect "Turn o n/off lyrics " from the pl ayback me nu.
2. P ress the joy stick (OK bu tton) to turn on/off lyric s.
See the "Lyrics" section for more inform ation.
Sav e Power
1. S elect "Save Power" from the playba ck menu.
2. P ress the joy stick (OK bu tton) to turn off the LCD .
NO TE:
On ly the joystic k left/right (previous/n ext), joystic k up/down
(vo lume up/do wn) and HOLD buttons can be use d if any
oth er button is pressed, th e LCD will tu rn back on.
16
17
Music
Music
EQ
1. Se lect "EQ" fro m the playb ack menu.
2. Pre ss the joyst ick (OK butt on).
3. Use the joystic k to select t he equalize r setting (no rmal, rock,
jazz, classic, p op).
4. Pre ss the joyst ick (OK butt on).
Press the MENU b utton to di splay the fav orites men u: to top,
to bo ttom, dele te.
to to p: Moves th e selected file to the to p of the fav o rites list.
to bo ttom: Move s the select ed file to th e bottom of the
favor ites list.
dele te: Deletes t he selected file from th e favorites list.
Repe at Mode
1. Se lect "Repea t mode" fro m the playb ack menu.
2. Pre ss the joyst ick (OK butt on).
3. Use the joystic k to select t he repeat m ode (one, all, random ).
4. Pre ss the joyst ick (OK butt on).
Selec t a file and press the jo ystick to be gin playbac k.
FILE BROWSER MENU
Press the MENU b utton in the "Music" fol der (or sub- folders),
and the file brow ser menu w ill appear: favorite, co py, paste,
dele te, rename, new folder .
See t he "Browse " section for more information.
UP DATE ID3 DA TABA SE
1. Press th e MENU bu tton, and "U pdate data base" will a ppear.
2. Press th e joystick ( OK button) to update th e ID3 data base of
the pl ayer.
NOTE:
Updating the databa se sorts all the music in the "Music " folder
using ID3 tag informa tion: Artist, Author, Alb um and Ge nre. If
you dele te, add or m ove music files in the p layer, pleas e
update t he ID3 data base.
All music files/folders can still be found in the "Music" fo lder.
NOTE:
Files in the "Music" fold er (and sub-folders) th at are in the
favorites l ist will have a blue musi c note inste ad of green .
When a fi le is added to the favor ites list, it wil l be added to the
end of the list.
The playe r will autom atically cre ate Mplist.t xt and save it in
the "Sys" f older of disk .
FAVORITES
Press the RPT button in the "Music " folder (or sub-folders) , and
the favo rites list will a ppear.
18
19
Music
VIDEO
LYR IC
PLAYI NG VI DEOS (AVI f iles)
Get L RC files
You c an downlo ad LRC files from the int ernet or cre ate
your own LRC file s with an LR C editor.
1. Enter the video mod e
Save the LRC file s
Copy LRC files to the directo ry where the songs are and make
sure t hey have th e same name.
Ex. so ng.mp3 and song.lrc
2. Select a file using the joystick (p ress the joys tick left/right to
display the previous/next page of files/folde rs.)
3. Press the joystick (OK button) to start playing the file.
NOTE:
The defaul t video direc tory is "Mp4 ". If the fold er does not
exist, the sy stem will au tomatically create the folder. The
extension o f video files is AVI, and they are en coded in XV ID/
MPEG-4. Yo u can use t he included software to convert
other forma ts (WMV, A SF, MPG, et c.)to AVI.
20
21
VIDEO
Photo
OPE RATION
Vie wing Pictures (JP EG, B MP an d GIF files)
Play/Pa use
During playback, p ress the joystick (OK bu tton) to pau se
playba ck. Press it a gain to resu me playba ck.
When a video file is paused, th e time information will b e
displaye d on the b ottom of the screen.
1. En ter the phot o mode.
Press the PLAY button
while playing
00:01 :20/0 1:30 :45
Volume
Press th e joystick up /down to a djust the vo lume.
Previou s/Next
Press th e joystick le ft/right to p lay the prev ious/next vi deo.
Fast Backward/For ward
Press an d hold the j oystick left/ right to fast backward /forward.
Press th e joystick (OK button) to resume no rmal playb ack.
Stop
Pause the video, and press t he EXIT butto n to stop th e video
and r eturn to the file browse r.
You c an also pre ss and hold the EXIT but ton.
FILE BRO WSER MENU
Press th e MENU but ton in the "M p4" folder ( or sub-folde rs), and
the file browser me nu will appe ar: favorite , copy, past e,
delete, rename, ne w folder. Se e the "Brow se" section for more
informa tion.
Press th e A-B button to see the file/folder in formation (name,
size, da te, type). Pr ess the EXIT button to re turn to the f ile
browse r.
22
2. Se lect a file using the joys tick (press t he joystick le ft/right to
display the previous/next page of file s/folders).
3. Pre ss the joyst ick (OK butt on) to view the file.
NOTE: Th e default p hoto direct ory is "Photo s". If the fold er
does no t exist, the system will a utomaticall y create the folder.
The file size must be less than 6M B. JPG and BMP files m ust be
24 bit. A nimated GIF files are su pported.
23
Photo
Photo
OPERATION
Previous/Ne xt
Press the joy stick left/rig ht to displa y the previo us/next ima ge.
Zoom
Press the R PT button t o enter the zoom mode .
Press the R PT button t o zoom in.
Press the A-B button t o zoom out.
Press the j oystick left/ right/up/do wn to move the zoome d
image.
Press the j oystick (OK button) to e xit the zoom mode.
NOTE : GIF fil es cannot b e zoomed.
Slide sho w
Press the joystick ( OK button) to start the slide show.
Press the joystick l eft/right to display the p revious/ne xt image.
Press the joystick ( OK button) to pause/re sume the slide show.
Press the EXIT butt on to return to the file b rowser.
PHOTO M ENU
Press the MENU butt on when a p hoto is disp layed, and the
photo m enu will appear: delete , slideshow , delay, tran sition,
file info.
Delete
1. Select "d elete" from the photo menu.
2. Press the joystick (OK button) to delete the current ima ge.
3. Select "Y ES", and pre ss the joyst ick (OK but ton).
Slide show
1. Select "s lideshow" fr om the pho to menu.
2. Press the joystick (OK button) to turn the slid eshow on/ off.
Delay
1. Select "d elay..." from the photo menu.
2. Press the joystick (OK button).
3. Select th e time (1s, 2s, 3s, 5s, 10 s) that you w ant an ima ge to
be displayed during the slidsho w, and pres s the joystic k
(OK butt on).
Transition
1. Select "t ransition" fr om the phot o menu.
2. Press the joystick (OK button) to turn transi tions on/off .
NOTE : Whe n transition is off, the p revious/nex t image will start
to be disp layed from l eft to right. When transition is on, th e
previous/n ext image w ill start to b e displayed fr om the to p,
bottom, m iddle, etc.
24
25
Photo
Browse
File Info
1. Selec t "file info" fr om the pho to menu.
2. Press the joystick ( OK button) to display t he Exchang eable
Image File Forma t (EXIF) data .
3. Press the joystick ( OK button) to switch th e color of th e text
(white , black).
NOTE:
Most dig ital camera s use the EX IF format. It displays inf ormation
such as: camera ma nufacturer , camera m ode, time, resolution,
etc.
EXIF 2.0 is supported
BMP/GIF files have n o EXIF infor mation.
The EXIF information : Make-Camera Manufacturer
Mode-Camera Model
Datime-Date/Time
Version-EXIF Version
WidxHei -Width x Height
xResolu-X Resolution
yResolu -Y Resolution
FlashUs -Flash Used
FocusLe -Focal Length
CCDWidt - CCD Width
ISO_Equ - Iso Speed
Exposur - Exposure Program
ExpTime-Exposure Time
Apertur-Aperture Value
ExpBias-Exposure Bias
MeterMo-Metering Mode
Encode -JPEG Process
FILE BRO WSER MENU
Press the MENU butt on in the "Photos" folde r (or sub-fol ders),
and the file browser menu will a ppear: favo rite, copy, paste,
delete, rename, new folder. Se e the "Brow se" section f or more
informa tion.
26
BROW SE
You can view all of the fil es/folders in the player through
th e browser.
You can play back music or videos a nd view ima ges or text
fil es directly in the browse r.
You can also copy/paste files/folde rs, delete fil es/folders o r
cr eate new fo lders in the browser.
1. Enter the br owse mode .
2. Select a file using the jo ystick (pres s the joystic k left/right
t o display th e previous/ next page of files/folde rs).
3. Press the joy stick (OK button) to sta rt playing/v iewing the
file.
27
Browse
Browse
BRO WSE FILE
Title
Seque nce
The folder
name
FAVORITE
1. Select the audio file t hat you wa nt to add/re move to/fr o m
the favori tes list, and press the MENU button .
2. Select "fa vorite" from the menu, and press th e joystick (O K
button).
NOTE: Files t hat are in th e favorites list will have a blue music
note instead of green. Only music files can be added to th e
favorites list .
COPY /PAST E
1. Select the file that you want to copy in the bro wser, and
press the MENU button.
Battery status ico n
Pop-up Menu(MENU) :
2. Select "cop y" from the menu, and press the jo ystick (OK
button). The clipboard icon will be displayed a t the top
right corner.
3. Enter the fo lder where you want to copy the fi le to, and
press the MENU button.
Press the MENU bu tton to disp lay this inte rface when you
view t he folders.
28
4. Select "pas te" from the menu, and press the jo ystick
(OK button ).
29
Browse
Browse
RENA ME
DELETE
1. Sel ect the file/ folder that you want to delete, and press
the MENU butt on.
1. Sel ect the file/ folder that you want to , and press the MENU
bu tton.
2. Sel ect "rename" from the m enu, and p ress the joy stick (OK
bu tton). A keyboard will be displayed .
2. Sel ect "delete " from the m enu, and pr ess the joystick
(OK button).
3. Use the keybo ard to enter the new na me.
3. Sel ect YES an d press the joystick (OK button).
Press the A-B butt on to see th e file/folde r informatio n
(na me, size, da te, type).
4. Pre ss and hold the joystick (OK button ) when you are finished .
Pre ss the EXIT b utton to ca ncel
Using the keyboa rd
Press the EXIT but ton to return to the file b rowser.
30
L ayout of the keyboard
Y ou can ent er characte rs or numbe rs using the keyboard.
T here are 12 buttons : 10 alphanumeric buttons , a
mode butto n and a bac kspace but ton.
Backspac e
Mode key
Alp hanumeric
31
Browse
Record
Switching the input mode
1. Use joystick to select MODE .
2. Press th e joystick (OK button) to switch the input mode:
En(capital), en(lowercase) and Nu(number)
Entering letters
1. Switch to EN or en input mode.
2. Use the joystick to select a butto n (for ex ample,
select the 5 button for M, N or O)
3. Press th e joystick (OK button).
4. Press th e joystick left/right to sel ect the character.
5. Press th e joystick (OK button) to enter the character . The
character will appear in the new name box.
6. Press th e EXIT button to cancel t hat character.
Entering numbers
1. Switch to Nu input mode.
2. Use the joystick to select a butto n.
3. Press th e joystick (OK button) to enter the number. The number
will app ear in the new name box.
REC ORDIN G
Record ing file Seq uence
Recor ding
icon
Remain time
Recording
time
L\R sound
track
Recor ding quality
Deleting letters/numbers
1. Select the BACKSPACE button and press the joystick (OK
button)to delete the typed letter /number.
Ending/Canceling the input
1. Press and hold the joystick (OK b utton) t o finish r enaming the
file/folder.
2. Press th e EXIT button to cancel r enaming the file/folder.
32
33
Record
Record
V OICE R ECOR DING
L INE-IN RECORDIN G
1. Ent er the reco rd mode.
1. U sing the sup plied audio cable, con nect the LINE-IN jack o f the
p layer to the LINE-OUT ( or earphon e) jack of an external
d evice.
2. P ress the A-B button to select "line in ".
3. P ress the RPT button to s elect the re cording qua lity (norma l,
g ood, better, best). Best is recomme nded.
2. Pre ss the A-B b utton to sele ct "mic".
3. Pre ss the RPT b utton to sele ct the reco rding quali ty(normal,
go od, better, b est).
4. B egin playback on the e xternal dev ice, and press the joyst ick
( OK button) t o start reco rding. You c an listen w ith earphon es
w hile record ing.
NO TE: Maximum volume o f the external device is
rec ommended .
Audio Device
To the Line-in Jack
4. Pre ss the joystic k (OK butto n) to start r ecording.
34
Player
35
Record
Record
F M RECORDI NG
OPERATION
1. Enter the re cord mode.
STOP RECORDING
2. Press the M ENU button , and select "source sel ect".
3. Press the jo ystick (OK button) and select "fm".
Press and hold the joy stick (OK b utton) to sto p and save the
recording . You can a lso press an d hold the E XIT button t o save
and quit.
PAUS E/RES UME R ECOR DING
During re cording, pre ss the joysti ck (OK butto n) to pause the
recording . Press it ag ain to resum e the recor ding.
CANCEL RE CORD ING
4. Press the jo ystick (OK button) and tune to the radio statio n
that you want to record. Please se e the radio section for
more information.
1. Pause t he recordin g, and pres s the MENU b utton.
2. Select " cancel current" and pr ess the joyst ick (OK butt on) to
cancel the current recording.
NEW RECORDING
5. Press the EXIT button.
1. Pause t he recordin g, and pres s the MENU b utton.
6. Press the R PT button to select the r ecording quality (norm al,
good, bett er, best). Good is recommended.
2. Select " save and new", and pre ss the joyst ick (OK butt on) to
save th e current re cording and start a new one.
7. Press the jo ystick (OK button) to start recordin g.
NOTE:
Only the OK, EXIT, H OLD button s can be use d while
recordin g.
If the me mory is full or power is l ow, the player will stop
recordin g automati cally.
36
37
Record
Record
RE CORD ING Q UALI TY
PLAY ING R ECOR DED F ILES
Mic/ FM:
norm al: Recordi ng duration will be abo ut 36 hours. (32kbps)
1. Select t he recordin g mode (m ic, line-In, fm ), and pres s the
MENU b utton when not record ing.
2. Select " play REC fil e", and pres s the joystic k (OK button ) to
play th e last record ed file in th at mode.
good: Recording duration w ill be abou t 24 hours. (4 8kbps)
bett er: Recordin g duration w ill be abou t 18 hours. ( 64kbps)
best : Recording duration w ill be about 9 hours. (128 kbps)
3. When p laying bac k recorded files, the op eration is sim ilar to
the music mode.
Line-In:
norm al: Recordi ng duration will be abo ut 18 hours. (64kps)
good: Recording duration w ill be abou t 9 hours. (12 8kbps)
bett er: Recordin g duration w ill be abou t 7.25 hours . (160kbps)
best : Recording duration w ill be about 6 hours. (192 kbps)
*bas ed on 512M B storage c apacity
38
NOTE:
The form at for reco rded files is mp3.
The voice files are s aved in the "Recording s\mic" fold er and
are nam ed REC000 1.MP3, REC 0002.MP3, e tc.
The line -in files are saved in the "Recording s\line_in" fo lder
and are named LIN 0001.MP3, LIN0002.MP3 , etc.
The FM files are sav ed in the "Re cordings\fm" folder a nd are
named FM0001.MP 3, FM0002.M P3, etc.
You ca n also use th e browser to play reco rded files.
Record ed files can also be add ed to the favorites list.
39
Setup
Setup
SETTI NGS
UPGR ADE
1. Enter t he setup mo de.
2. Press t he joystick u p/down to select a set ting: Backlig ht,
langua ge, PowerD own, Format, Version, Upgrade, Sp eaker.
3. Press th e joystick le ft/right to a djust a sett ing. Press th e
joystick (OK button ) to perform an action .
1. Copy th e upgrade file to the "S ys" folder. Y ou can dow nload
the file from our we bsite: www. cobyusa.co m
2. Conne ct the AC/D C adapter.
3. Enter th e setup mo de, and sele ct "Upgrad e".
BAC KLIGH T
Set the ti me the bac klight remai ns on (off, 5 sec, 10sec, 20sec,
30sec, 1m in, 5min, on).
4. Press th e joystick (OK button), a nd select " YES".
LANGUAGE
Set the la nguage (En glish, Germ an, Spanish , Portugues e).
POWER DOWN
The playe r will autom atically tur n off after b eing idle for a
certain a mount of tim e. Set the t ime the pla yer automa tically
turns off (never, 1min , 2min, 5min).
5. Press th e joystick (OK button) t o confirm, a nd a windo w
showing the progre ss of the up grade will b e displayed .
6. When th e upgradin g is finished , the playe r will automa tically
turn off. Turn on the player, and the new fir mware will b e
loaded .
FORM AT
Formatting the playe r will erase all of the da ta stored o n the
player. B ackup any files that you want to ke ep before
formattin g.
VERS ION
Display t he version in formation o f the playe r: Firmware Version,
DRAM, ROM, ID).
40
SPE AKER
1. Ente r the setup mode, and press the joy stick up to g o to the
othe r settings pa ge.
2. "Spe aker" will be selected.
3. Press the joystic k left/right to turn the sp eaker on/o ff .
41
Game
To select a ga me
1. Enter the ga me mode.
2. Press the joy stick up/do wn to selec t a game: b lock, box.
3. Press the joy stick (OK button) to sta rt the game .
BLOCK
1. Pre ss the joystic k (OK butto n) to start th e game.
2. Use the joystick left, right, d own to mov e the block s.
3. Pre ss the joystic k up to rota te the blocks.
4. Pre ss the MENU button to se t the difficu lty.
5. Pre ss the EXIT b utton, selec t "EXIT" and press the jo ystick
(OK button) to exit the gam e.
BOX
1. Use the joystick to move the character.
2. Pre ss the MENU button or th e joystick (O K button) t o display
the game menu : restart, ne xt, previous, choice.
3. Pre ss the EXIT b utton, selec t "EXIT" and press the jo ystick (OK
butt on) to exit t he game.
42
E-BOOK
RADIO
REA DING E-BOOKS (TXT file s)
LISTENI NG TO THE RADIO(FM)
1. Enter the e-book mode.
1. Enter the ra dio mode.
2. Selec t a file using the joystick (press the joystick left /right to
displ ay the p r evio us/next pa ge of files/f olders).
3. Press the joystick (OK button ) to start vie wing the file .
NOTE:
The defa ult e-book d irectory is " TXT" . If the fo lder does n ot
exist, the system will automatica lly create th e folder.
Only txt f iles can be v iewed in th e e-book.
2. The radio wi ll automati cally turn on .
OPERAT ION
Previou s/Next Line
Press th e joystick up /down to g o to the pre vious/next
line.
Previou s/Next Page
Press th e joystick le ft/right to g o to the pre vious/next
page.
Jump to a Page
1. Press the MENU b utton to dis play the current page
and t otal numbe r of pages.
NO TE:
Ma ke sure the earphones are connec ted becau se it is used
as an antenna .
2. Press the joystick left/right to select a dig it.
3. Press the joystick up/down to change th e number.
4. Press the joystick (OK button ) to jump to that page.
43
OP ERATION
On /Off
1. P ress the joystick (OK bu tton) to turn off the rad io.
2. P ress the joystick (OK bu tton) again to turn the radio
b ack on.
Vol ume
Pre ss the joystic k up/down to adjust th e volume.
44
Radio
Radio
Tuning Down/Up
Press the joystick left/righ t to tune do wn/up in manual mode.
Press the joystick left/righ t to go to the previous/next
station in preset mode.
F M TUN ER
M anua l sear ch
Mono/stereo
Frequency
S aving Stations
1. In preset or manual mo de, tune to the station that you want
to add as a preset, and p ress and hold the MENU button.
2. Select "save this statio n", and press the joystick (OK button).
P ointer
Scale
P reset
3. Select the preset number that you want to sav e the station
to, and press the joysti ck (OK butto n). There are 20 preset s
(0-19)
Preset station nu mber
Press a nd
hold th e
MENU
button
Pre ss the
MENU
bu tton
45
4. Select "YES", and press the joystick (OK button).
5. Press the EX IT button to cancel.
46
Radio
Radio
Delet ing Stations
MENU
Press the ME NU button to display th e radio men u:
preset, man ual scan, au to scan, to save powe r/ to
normal pow er, turn off.
1. In p reset mode , tune to th e preset sta tion that you want to
delete, and pre ss and hold the MENU button.
2. Sel ect "delete this station" , and press the joystick ( OK button) .
Preset
1. Select "pr eset" and p ress the joys tick (OK but ton).
3. Sel ect "YES", an d press the joystick (OK button).
Mono /Stereo
Press the A-B or R PT button (o r press and hold the OK button)to
switc h to mono/stereo. In mo no there w ill be an "M" above
"MHz" . In stereo t here will be an "S" abov e "MHz".
MO NO
STER EO
Exit
Press the EXIT but ton to exit the radio mo de.
If the radio is on w hen you ex it the radio mode, the r adio will
rema in on. You c an view pho tos, play ga mes, brow se files and
read e-books wh ile the radio is on. The ra dio will aut omatically
turn o ff when you play a mus ic/video file .
47
2. Press the j oystick left/ right to tune to the prev ious/next
preset sta tion.
Manual Sca n
1. Select "m anual scan" and press t he joystick ( OK
button).
2. Press the j oystick left/ right to tune down/up by 0.1MHz
incremen ts.
48
Radio
Radio
Auto Scan
1. Se lect "auto scan" and p ress the joys tick (OK bu tton).
2. Th e radio will scan the en tire FM ban d and save 20 stations
to the presets.
NOT E:
Plea se adjust th e position o f the earph ones and earphone
wire to get the best recept ion.
To S ave Power
1. Se lect "to sav e power" an d press the joystick (OK button).
2. Th e LCD will a utomatica lly turn off a fter a few se conds.
3. Se lect "to no rmal power" and press t he joystick ( OK button) .
4. Th e LCD will r emain on.
NOT E:
Onl y the joystic k left/right ( previous/ne xt), joystick up/down
(vo lume up/do wn) and HOLD buttons can be used . If any
othe r button is pressed, the LCD will tur n back on.
FM PRESE T DOCUMEN T
You c an store the name and the frequen cy of the p reset radio
statio ns in a document.
Crea te a docum ent named fmname.tx t, and add t he
frequ ency, name and prese t number:
[87 500] station 1
[88 700] station 2
...
[10 7300] statio n 20
87500 is 87.5 MHz and station is the name that you w ant to enter .
1 refe rs to preset 0 and 20 re fers to prese t 19. You ca n name up
to 20 stations.
Trans fer the fmna me.txt file t o the "Sys" fo lder, and r estart the
playe r.
NOTE :
If you perform an auto scan t he presets w ill be overw ritten.
When you restart the player t he presets w ill revert
back to those in t he fmname .txt file.
Turn off
1. Se lect "turn o ff" and pres s the joystic k (OK butto n).
2. Th e radio will turn off and exit the rad io mode.
49
50
OTG backup
SD Card
TRANSFERRING FILES FROM ANOTHER DEVICE
INS ERTIN G THE SD CA RD
1. Conne ct the playe r's HOST jac k using the supplied ho st cable
(and a nother USB cable if nec essary) to th e other USB
device (digital ca mera, MP3 p layer, etc. )
1. Inse rt the SD ca rd into the s lot as show n below.
To the HOST Jack
To a UMS device
2. Enter t he OTG bac kup mode.
2. In th e file brows er, you will see "A:". This represents the SD
card .
Player
3. Pre ss the SD ca rd, and it wi ll pop out. M ake sure th e SD card
is no t in use befo re ejecting it.
3. Select "YES" and p ress the joys tick (OK bu tton). The LC D will
turn off and file tra nsfer will be gin.
NOTE: The SD card must be fo rmatted to the FAT file system.
NTFS i s not suppor ted.
USI NG TH E SD C ARD
1. In th e file brows er select "A :", and press the joystick
(OK button).
4. When the transfer is complete , the LCD w ill turn back on,
and a message wi ll be display ed.
"Backu p Failed" m eans that th e transfer fa iled. Check the
conne ction and th e USB devic e. The USB d evice may need
to be turned on.
"Backu p Success" means the t ransfer com pleted succ essfully.
The file s are in the "Backup" fo lder.
51
2. Sele ct the file that you wan t to open, a nd press the joystick
(OK button).
52
Other Functions
SD Card
COPY /PASTE
You c an copy/p aste files to/ from the SD card and the player.
See t he copy/pa ste page in the browse section for more
inform ation.
DELET E/RENAME/ NEW FOLDER
You c an delete/p aste files to /from the S D card. You can
also c reate new folders. See the browse section for more
inform ation.
NOTE :
Make sure the SD card is not in use befor e ejecting it.
INSTALL ING FONTS LIBRA RY
So me fonts ha ve been pr e-installed. If other font s have to be
ins talled, cop y those font s to the "Sys" folder and
re start the pla yer.
NO TE: The syst em is Unico de, so you should set co rresponding
la nguage in th e setup mo de.
SETTING THE BACKGROUN D PICTURE
1. Create a bm p file, and name it bg. bmp. The be st resolutio n
i s 280 x 220 p ixels.
2. Copy the bg .bmp file in to the "Sys" folder.
3. Restart the p layer, and you will see the new ba ckground
i mage.
SETTING THE STARTUP IMAGE
1. Create a gif (or animat ed gif) file, a nd name it logo.gif.
2. Copy the lo go.gif file in to the "Sys" folder.
3. Restart the p layer, and you will see the new sta rtup image .
53
54
Troubleshooting
The pla yer doe s not wo rk
1. Char ge the battery.
2. Chec k the hold switch.
Downlo ad failu re
1. Chec k to see if the d river is installed correct ly on the PC.
2. Chec k the connection.
3. Chec k if the memory is full.
4. Chec k the battery capacity .
Poor so und qua lity or n o sound
1. Chec k if the quality of the music file is poor, and
download it again.
2. Chec k if the volume level is at "0 " , and chec k if the
earphones a re properly con nected.
3. Refor mat the player.
Bad FM recepti on
1. Adjus t the po sition o f the ear phones and player.
2. Turn off nearby elect ric devi ces.
3. Earphones m ust be connect ed because it is used a s
antenna.
The LCD displays nothing
1. Chec k if the power is on.
2. Char ge the battery.
3. Press the reset button.
If you are still having difficulty please contact technical support.
Monday-Friday 8:30 AM 8:30 PM EST 1-800-681-2629 or 718-416-3197
Saturday and Sunday 9:00 AM 5:30 PM EST 1-800-727-3592
You can also reach us by e-mail at [email protected]
55