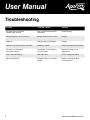
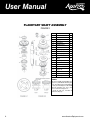
1
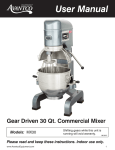
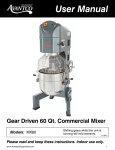
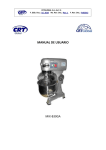
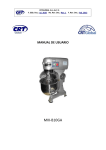
User Manual
Gear Driven 10 Qt. Commercial Mixer
Models: MX10
Shifting gears while this unit is
running will void warranty.
Intertek
9/2014
Please read and keep these instructions. Indoor use only.
www.AvantcoEquipment.com1
User Manual
Index
Parts Overview ............................................................... 3
Standard Accessories..................................................... 4
Operation Instructions ................................................... 4
Mixer Capacity Chart...................................................... 5
Troubleshooting And Specifications.............................. 6
Figure 1 Transmission Case........................................... 7
Figure 2 Planetary Shaft Assembly ............................... 8
Figure 3 Transmission Shaft Assembly ........................ 9
Figure 4 Worm Gear Assembly Shaft .......................... 10
Figure 5 Motor Unit ...................................................... 11
Figure 6 Shift Mechanism............................................. 12
Figure 7 Stand & Bowl Lift Unit ................................... 13
Figure 8 Lifter Unit ....................................................... 14
Figure 8 Planetary Assembly ...................................... 15
Electric Diagram ........................................................... 16
Warranty Information.................................................... 17
2www.AvantcoEquipment.com
User Manual
Parts Overview
ITEM
DESCRIPTION
1
Cover
2
Rear Cover
3
Safety Guard
4
Mixing Device
5
Bowl Lift Wheel
6
Bowl
PARTS CATALOG OVER
ITEM
1
2
3
4
5
6
Notes:
• Do not hose down mixer.
NOTE
• Do no
• Do not operate the mixer with wet
hands.
• Do no
opera
• Unlpug mixer from electrical
supply prior to any maintenance
or repairs.
• Unlpu
suppl
maint
• The reset button is a black button
located on the left side of the
mixer, just above the base.
www.AvantcoEquipment.com3
STANDARD ACCESSORIES
OPERATION INSTR
User Manual
FIGURE 10
Please ensure power supply m
NEMA 5015P
110V
Please ensure power supply m
110V
OFF
OPERATION INSTRUCTION
STANDARD ACCESSORIES
Standard Accessories
FIGURE 10
NEMA 5015P
110V
110V
OFF
ITEM
DESCRIPTION
Item
Description
1
Spatula
1
2
Dough Hook
1
1
Flat Beater
3
Wisk
1
4
Bowl
1
2
3
4
NOTES:
NOTES:
• Any agitator is easily installed by simply raising it onto the mixing axle, and
the rotating it clockwise on the shaft
until into place. To remove, raise the
agitator on the shaft until it clears the
lock and then rotate counter-clockwise
and lower.
3
4
Bowl ensure power
1 supply matches your machine.
Please
1
2
DESCRIPTION
QTY
Spatula
1
A. Be suitable for mix and stir
in speed speed, working time
NOTES:
A
• Any agitator is easily installed by simA. Be suitable for mix and stir
ply raising it onto the mixing axle, and
in speed speed, working time
the rotating it clockwise on the shaft
until into
place.
To remove, raise
theSPEED: Please stop machine firstB. Be suitable for mix and stir
FOR
CHANGING
THE
agitator before
on the shaft
until it clears
changing
speedthein order to avoid
box
work
in middle speed, working
B damage to the gear
lock and then rotate counter-clockwise
and lower.
FOR CHANGING THE SPEED: Please stop machine firstB. Be suitable for mix and stir
work
before changing speed in order to avoid damage to the gear
boin middle speed, working
B
12
C. Middle position is suitable fo
different
C mixing material. is less than 30 minutes. Flour/
Choose the different mixing devicews and speed. C. Middle position is suitable fo
SPANISH:
• Any agitator
is easily
installed by simMIXING:
According
to the different mixing material. is less than 30 minutes. Flour/
ply raising it onto the mixing axle, and
Choose the different mixing devicews and speed.
the rotating it clockwise on the shaft
Qty
Dough Hook
OPERATION
INSTRUCTION
A
Wisk
OPERATION
INSTRUCTION
OPERATION
INSTRUCTION
Bowl
FOR CHANGING THE SPEED:
before changing speed in order t
MIXING: According to the diff
Choose the different mixing d
MIXING: According to the diff
Dough Hook
1
Please
Wisk ensure power
1 supply matches your machine Choose the different mixing d
ITEM
• All of tools are precisely fitted to the
bowl, rounded corners and easily
removable
for cleaning.
MIXING:
According to the
QTY
FOR CHANGING THE SPEED:
before changing speed in order t
1 raise the
until into place. To remove,
Weight
1.5 lbs.
agitator on the shaft until it clears the
A. Be suitable for mix and stir batter, eggs and work with
lock and then rotate counter-clockwise
in speed speed, working time isless than 15 minutes.
and lower.
1
1.5 lbs.
A. Be suitable
stir batter, eggs
andlbs.
work with
1 for mix andtime
2.1
isless than 15 minutes
• All of tools are precisely fitted to the
in speed
speed,
bowl, rounded
corners
andworking
easily
removable for cleaning.
1
5.2 lbs.
B. Be suitable for mix and stir stuffing and raw material, and
work in middle speed, working time is less than 20 mins.
B. Be suitable for mix and stir stuffing and raw material, and
work in middle speed, working time is less than 20 mins.
13
Please ensure power supply matches your machine
• All of tools are precisely fitted to the
bowl, rounded
corners
and easily
Please
ensure
power
supply
matchesyour
yourmachine
machine. C. Middle position is suitable for mixing dough, working time
NEMA
5015P
Please
ensure
supply
removable
for cleaning.
is less
thanrotating
30 minutes.itFlour/
water quantity
40%-50%.
• Any
agitator
is easily
installed
bypower
simply
raisingmatches
it onto the Cmixing
axle, and
the
clockwise
onis the
shaft
110V
Please
ensure
power
supply
matches
your
machine
is suitable
for mixing
dough,counterworking time
C. Middle
position
SPANISH:
until iit locksnto place.
Toensure
remove,
raisesupply
the agitator
on the
shaft
until it clears
the
lock
and then
rotate
Please
power
matches
your
machine.
NEMA 5015P
is less than 30 minutes. Flour/ water quantity is 40%-50%.
• Any agitator is easily installed by sim110V
110V
clockwise
and lower.
Please ensure
power
your machine.
ply raising
it onto thesupply
mixing axle,matches
and
NEMA 5015P
110V
the rotating it clockwise on the shaft
until into place. To remove, raise the
110V
agitator on the
shaft until
clearsbowl,
the
• All of
the accessories
are
precisely
fitted
to itthe
have
corners, and are easily removable for cleaning.
FOR
CHANGING
THE
SPEED:
Please
stoprounded
machine first
lock
and then
rotate counter-clockwise
STANDARD
ACCESSORIES
OPERAT
110V
and lower.
FIGURE 10
OFF
OFF
Operation
Instructions
OFF
before changing speed in order to avoid damage to the gear box
FOR CHANGING
THE
SPEED:
stop machine first
• All of tools
are precisely
fitted toPlease
the
FOR CHANGING
THE
SPEED:
Please
stop machine
first box
bowl, rounded
corners
and to
easily
before
changing
speed
in
order
avoid
damage
to thefirst
gear
FOR CHANGING
THE
SPEED:
Please
stop machine
removable
for cleaning.
before changing
speed
in order to avoid damage to the gear bo
beforeCHANGING
changing speed
order toPlease
avoid stop
damage
to thefirst
gear box
FOR
THE in
SPEED:
machine
12
13
before
changing speed
order toPlease
avoid damage
to thefirst
gear bo
FOR CHANGING
THEinSPEED:
stop machine
MIXING:
According
different
material.
before
changing
speedtointhe
order
to avoidmixing
damage
to the gear bo
Choosethat
the your
different
mixing
devicews
and speed.
Please ensure
power
supply
matches
your machine
NEMA 5015P
MIXING: According to the different mixing material.
!
110V
MIXING:
According
to
the
different
mixing
material.
Choose
differenttomixing
devicews
and material.
speed.
MIXING:the
According
the different
mixing
Choose the different mixing devicews and speed.
Choosethe
the
differentto
mixing
devicews
andmaterial.
speed.
MIXING:
According
the different
mixing
For changing
speed:
Please
stop
machine
first
before changing speed in order to avoid 110V
!
Choose
the
different
mixing
devicews
and
speed.
MIXING:
According
to
the
different
mixing
material.
damage to
box.for mix and stir batter, eggs and work with
A.the
Begear
suitable
Choose the different mixing devicews and speed.
in speed speed, working time isless than 15 minutes.
A. Be suitable for mix and stir batter, eggs and work with
A
A.speed
Be
suitable
for
mix and
and
stirisless
batter,
eggs
and
work with
with
Mixing:
Always use in
the
correct
attachment
for
the
job.
speed,
working
time
than
15and
minutes.
A.
Be
suitable
for
mix
stir
batter,
eggs
work
in
speed
speed,
working
time
isless
than
15
minutes
in speed
speed,
minutes.
A
A.
Be suitable
forworking
mix andtime
stir isless
batter,than
eggs15
and
work with
A.
W
isk:
Suitable
for
mixing
liquids
and
soft
ingredients,
A
in
speed
speed,
working
time
isless
than
15
minutes
A.
Be
suitable
for
mix
and
stir
batter,
eggs
and
work
with
B. Be suitable
stuffing and raw material,
and can work in all speeds. Do not run for
more
than
15 minutes.
in
speed
speed,
working
time
isless
than
15
minutes
work
in
middle
speed,
working
time
is
less
than
20
mins.
B
ITEM
DESCRIPTION
QTY
B. Be suitable for mix and stir stuffing and raw material, and
B. Be suitable for mix and stir stuffing and1 raw material,
and
Spatula
1
work
middle
speed,
working
time
is less
than
20 mins.and
B.
Be
suitable
for
mixSuitable
and
stir for
stuffing
raw
material,
B.inin
Flat
Beater:
mixing
dry
ingredients,
can work in low & medium speeds only.
B
work
middle
speed,
working
time
isand
less
than
20
mins.
Dough
Hook
work
middle
speed,
working
time
is and
less2for
than
20
mins.
Doinsuitable
not
usefor
in
high
speed.
Do
not
run
more
than
15 minutes.1
B.
Be
mix and
stir stuffing
raw
material,
and
B
3
Wisk
1
work
insuitable
middle
speed,
working
time
is less
than
20 mins.
B.
for
mix
and
stirfor
stuffing
and
raw working
material,
and
C. Be
Middle
position
is suitable
mixing
dough,
time
work
in
middle
speed,
working
time
is
less
than
20
mins.
4
Bowl
1 medium speeds only. Do not
is less
30 Hook:
minutes.Suitable
Flour/ water
quantitydough,
is 40%-50%.
C. Dthan
ough
for mixing
can work in low &
C
C. Middle position is suitable for mixing dough, working time
use position
in high speed,
do for
notmixing
run fordough,
more working
than 20 time
minutes. Absorption ratio must be more than
C.less
Middle
suitable
is
thanposition
30 minutes.
Flour/for
water
quantity
is working
40%-50%.
C.
Middle
isissuitable
mixing
dough,
time
NOTES:
C
50%.
Refer
to
mixer
capacity
chart.
lessthan
than30
30minutes.
minutes.Flour/
Flour/ waterquantity
quantityisis40%-50%.
40%-50%.
A
isisless
• Any agitator
is easily
C.
Middle
position
is suitable forwater
mixing dough,
working
time installed by simC
ply
raising
it
onto
the
mixing
axle,
and
is
thanposition
30 minutes.
Flour/for
water
quantity
is working
40%-50%.
C.less
Middle
is suitable
mixing
dough,
time
the rotating it clockwise on the shaft
is less than 30 minutes. Flour/ water quantity
is
40%-50%.
until into place. To remove, raise the
OFF
agitator on the shaft until it clears the
B
lock and then rotate counter-clockwise
4www.AvantcoEquipment.com
and lower.
Plea
Plea
FOR
befor
FOR
befor
MIXI
Choo
MIXI
Choo
A. B
in sp
A. B
in sp
B. B
work
B. B
User Manual
Mixer Capacity Chart
Agitator and Speed
Maximum Bowl
Capacity 10 qt
Bread and Roll Dough -60 % AR
Dough Hook - 1st only
7 lbs.
Heavy Bread Dough -55% AR
Dough Hook - 1st only
6 lbs.
Pizza Dough, Thin -40% AR
Dough Hook - 1st only
4 lbs.
Pizza Dough, Medium -50% AR
Dough Hook - 1st only
5 lbs.
Pizza Dough, Thick -60% AR
Dough Hook - 1st only
5 lbs.
Dough Hook - 1st and 2nd
4 lbs.
Mashed Potatoes
Flat Beater
6 lbs.
Waffle or Hot Cake Batter
Flat Beater
3 qts.
Egg Whites
Wire Whisk
1 pt.
Whipped Cream
Wire Whisk
2 qts.
Cake Batter
Flat Beater
8 lbs.
Product
Raised Donut Dough -65% AR
When mixing dough (pizza, bread or bagels), check your "AR" absorption ratio - water weight divided by flour weight.
Above capacities based on 12% flour moisture at 70°F water temperature. If high gluten flour is used, reduce above
dough batch size by 10%.
Example: If recipe calls for 5 lbs. of water and 10 lbs. of flour, then 5 divided by 10 = 0.50 x 100 = 50 %AR.
• 2nd Speed should never be used on mixtures with less than 50% AR.
• Do not use attachments on hub while mixing.
When calculating the correct size mixer for your application, here are some helpful weights & measures:
• 8.3 lbs. = 1 gallon of water – 2.08 lbs. = 1 Quart.
www.AvantcoEquipment.com5
User Manual
Troubleshooting
Trouble
Possible Causes
Solution
The axles can’t work when
operating the machine
Poor contact of the electrical
equipment
Check the Plug
The mixing bowl is out of position
Moving direction is not correct
Change
Leaks oil
Sealing washer is damaged
Change
Difficult to move the bowl up and down
Slideway is rusted
Clean the slideway and lubricate
The motor is overheated
and speed is down
The voltage is not enough, or
incorrect speed
Check the voltage or use
lower speed
Noise and overheating
Poor lubrication
Add or change lubrication
Mixer touches bowl
The mixing device or bowl deformed
Repair or change the bowl
or mixing device
6www.AvantcoEquipment.com
User Manual
TRANSMISSION CASE, ARM, STAND
FIGURE 1
Item
1
2
4
3
5
4
6
10
11
9
8
13
7
12
20
15
14
Descviption
1
1
2
cover
1
3
plate
1
4
screw M5*12
5
5
bearing 6202
1
6
bearing 6201
1
7
bearing cover
1
8
screw M5*20
4
9
body
1
10
rear cover
1
11
screw M6*55
4
12
breeze window
1
13
screw M5*12
1
14
arm
1
15
stand
1
16
capacitor board
1
17
capacitor
1
18
seat
1
19
safefy covering switch
1
20
fluctuate safety switch
1
21
overload protection switch
1
19
16
17
21
18
Qty
screw M5*35
NOTES:
NOTES
axle
screw
The factory
has provided superior lubricant for
Machine at a factory hour have added to
several years of use. If the mixer is repaired
note
the that
superior
quality
lubricates the
please
ensure
the service
technician
grease,
usually the
replaces
any lubricant
lostcircumstance
or removed. bottom
can use for several years, but machine is
Please
lubricate
bearingsmust
before
refitting
after
maintaining,
replace
the lubribearing
covers.
cation grease.
axle
2
www.AvantcoEquipment.com7
User Manual
PLANETARY SHAFT ASSEMBLY
T
FIGURE 2
ITEM
DESCRIPTION
QTY
1
Baffle
1
2
Roller
4
3
Spring
8
4
Engager
1
5
Gear Ring
1
6
Dividing Ring
1
7
Joint Gear I
1
8
Bearing Ring
1
9
Joint
1
10
Bearing Ring
1
11
Joint Gear I
1
12
Ring
1
13
Bearing 6205
1
14
Oil Seal Pd30*45*10
1
15
Sleeve
1
16
Axle
1
17
Key 6*14
1
18
Key 5*35
2
19
Key 6*30
1
20
Bearing
1
NOTES:
• Be sure to install correct position (see
Figure 2-1) and lubricate all of the pins
in the sleevedrive when reassembling.
• Joint (9) must always be raised and
lowered smoothly. Be sure joint
sleeve as shown in Figure 2-2
• Check oil seal (14), if serious oil
leaks from drip cup.
4
8www.AvantcoEquipment.com
User Manual
BLY
TRANSMISSION SHAFT
FIGURE 3
IPTION
QTY
ITEM
1
1
DESCRIPTION
Bearing
QTY
1
4
2
Transmission Axle
1
8
3
Key 5*11
1
1
4
Key 5*11
1
1
5
Gear
1
Ring
1
6
Stop Ring
1
ar I
1
7
Gear
1
Ring
1
8
Stop Ring
1
1
9
Bearing 6201
1
ng
Ring
1
ar I
1
NOTES:
• At the center in the shaft unit. To the
above gear is the gear shaft and gear
shaft I (see figure 3-1)
1
6205
1
Pd30*45*10
1
• C-type stop ring (6/8) has to be fixed
when reassembling.
1
1
4
1
5
2
0
1
• Be sure that the keys are inserted for
each gear.
1
correct position (see
bricate all of the pins
when reassembling.
ways be raised and
y. Be sure joint
n Figure 2-2
(14), if serious oil
p.
5
www.AvantcoEquipment.com9
User Manual
WORM GEAR SHAFT ASSEMBLY
FIGURE 4
ITEM
DESCRIPTION
QTY
1
Bearing 6201
1
2
Gear Axle
1
3
Key 5*14
1
4
Gear
1
5
Stop Ring
1
6
Bearing 6201
4
NOTES:
• C-Type stop ring (5) has to be fixed
when reassembling.
6
10www.AvantcoEquipment.com
User Manual
MBLY
MOTOR UNIT
FIGURE 5
CRIPTION
QTY
ITEM
1
1
Stop Ring
1
Axle
1
2
Worm Gear
1
*14
1
3
Oil Seal
1
1
g 6201
Ring
g 6201
DESCRIPTION
QTY
1
4
Bearing 6203
1
5
Key 4*22
1
4
6
Axle
1
7
Rotor
1
8
Governor
1
ng (5) has to be fixed
ng.
9
Governor Plate
1
10
Bearing 6203
1
11
Bearing Cover
1
12
Fan
1
NOTES:
• If the motor does not work, first verify
the power source and connection. Next,
check for damaged or faulty wiring or
connections inside the mixer. A faulty
motor may be the result of incorrect
voltage, broken wires, a defective centrifugal governor. Motor damage may
also be cause by bowl over load during
mixing.
• Motor set includes motor axle (6),
rotor (7) and stator.
• Figure 5-1 is component system
diagrams of motor.
7
www.AvantcoEquipment.com11
User Manual
SHIFTING MECHANISM
ST
FIGURE 6
ITEM
DESCRIPTION
QTY
1
Axle
1
2
Nut
1
3
Spring
1
4
Shaft
1
5
Fork
1
6
Pin 3*20
1
7
Eccentricity Knot
1
8
Steel Ball
3
9
Speed Spring
3
10
Speed Block
1
11
Screw M5*10
1
12
Shaft
1
NOTES:
• The speed selector / shifting mechanism is designed for simplicity and reliablity. It features three mixing speeds.
• Apply sealant to the shift selector
assembly when installing.
• Speed selection is made by align
ing the pointer of the shift handle to
the required action.
i.e. Whisk for eggs & cream etc,
Paddle for batter
Hook for dough
Important: Stop the mixer
before changing speed.
8
12www.AvantcoEquipment.com
User Manual
M
RIPTION
STAND & BOWL LIFT UNIT
FIGURE 7
QTY
ITEM
1
1
Bowl Support
1
1
2
Columns
1
DESCRIPTION
QTY
1
3
Slide
1
1
4
Plate
1
1
5
Gear
1
0
1
6
Support Seat
1
icity Knot
1
7
Capacitor Board
1
all
3
8
Capacitor 200uF
1
Spring
3
9
Nut M10
3
Block
1
10
Spring
1
M5*10
1
11
Spiral
1
1
12
Bowl Lift Support
1
13
Handwheel
1
tor / shifting mechaor simplicity and relihree mixing speeds.
14
Nut M10
1
15
Handle
1
16
Handle Screw
1
o the shift selector
nstalling.
17
Machine Seat
1
18
Limit Switch of
Safety Guard
1
19
Fluctuate Safety
Switch
1
20
Overload Protection
Switch
1
21
AC Contact Device
1
22
AC Contact Device
Box
1
n is made by align
the shift handle to
n.
s & cream etc,
ter
gh
top the mixer
ng speed.
9
www.AvantcoEquipment.com13
User Manual
BOWL LIFT UNIT
PL
FIGURE 8
ITEM
DESCRIPTION
QTY
1
Lifting Bar
1
2
Cotton Pin 3*30
1
3
NutM10
3
4
Flat Washer
2
5
Compression Spring
1
6
Little Knot
1
7
Lifting Handle Bracket
1
8
Flat Washer
1
9
Flange Knot
1
10
Screw M6*25
1
11
Key 5*20
1
12
Bowl Lift Handle
1
10
14www.AvantcoEquipment.com
User Manual
PLANETARY ASSEMBLY
FIGURE 9
QTY
ITEM
Bar
1
1
Screw M6*45
6
Pin 3*30
1
2
Turning Plate
1
0
3
3
Ring
1
asher
2
4
Nut M20*1.5
1
ession Spring
1
5
Safety Guard
1
not
1
6
Inner Gear
1
RIPTION
DESCRIPTION
QTY
Handle Bracket
1
7
Screw M8*15
1
asher
1
8
Planetary Gear
1
Knot
1
9
Bearing 6203
1
M6*25
1
10
Bearing 6204
1
20
1
11
Oil SealPd25*50*10
1
ift Handle
1
12
Key 5*18
1
13
Mixing Axle
1
14
Pin
1
11
www.AvantcoEquipment.com15
User Manual
Electrical Diagram
ELECTRIC DIAGRAM /
Parts Cat
Figure 1 T
Figure 2 P
Figure 3 T
Figure 4 W
Figure 5 M
Figure 6 S
Figure 7 S
Figure 8 L
Figure 8 P
SPECIFICATIONS
Type
B20GA
B10GF
Mixer (L)
20
10
Power Supply (V)
230~
110
Input Power (W)
1100
600
Mixing
Speed
Figure 9 S
Operation
Warning a
508
462
Trouble S
317
258
Electric D
(RPM)
197
156
Maxflour Capacity ( KG )
HP
5
2.5
3/4
16www.AvantcoEquipment.com
User Manual
Limited Warranty
All equipment, which is sold under Avantco trademark and used for commercial purpose is warranted against defects
in materials and workmanship. The warranty runs for one year from the date of original installation and is for the benefit
of the original purchaser only. All other Warranties, Expressed or Implied, Statutory or Otherwise, including Without
Limitation any implied Warranty of Merchantability or Fitness for Purposes are excluded. The Seller shall in no event be
liable for direct, indirect or consequential damages in connection with Avantco commercial products.
This warranty is not effective if damage occurs because of accident, carelessness, improper installation, lack of proper
set – up, supervision when required or if the equipment is installed or operated in any manner contrary to the installation and operating instructions. In these cases, repairs will be made at a reasonable cost. Work performed by unauthorized personnel or unauthorized service agencies voids this Warranty.
Items not covered under warranty:
Changing Gears on the Mixers while Unit is Running and Overloading as Determined by an Approved Certified Technician.
This warranty does not apply to, and Avantco is not responsible for, any warranty claims made on products sold or used
outside of the United States.
www.AvantcoEquipment.com17