1
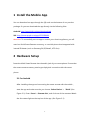
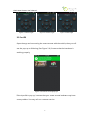
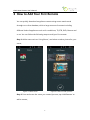
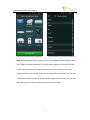
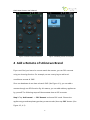
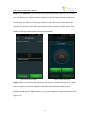
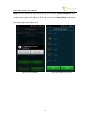
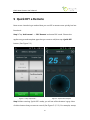
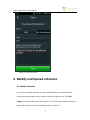
Kiwik Smart Remote
User’s Manual
Guangzhou Kiwik Information Technology Co., Ltd.
Website:www.kiwik.cn
E-Mail:[email protected]
Table of Contents
1 Install the Mobile App .......................................................... 1
2 Hardware Setup.................................................................... 1
2.1 For Android ..................................................................... 1
2.2 For iOS............................................................................. 3
3 How to Add Your First Remote ............................................. 4
4 Add a Remote of Unknown Brand ........................................ 8
5 Quick DIY a Remote ............................................................ 16
6 Modify and Upload a Remote............................................. 21
6.1 Modify a Remote........................................................... 21
6.2 Upload a Remote........................................................... 22
7 Charging the Remote Hardware ......................................... 23
8 Frequently Asked Questions ............................................... 24
1 Install the Mobile App
You can download our app through the QR code on the bottom of our product
package. Or you can download the app directly via the following links:
Android: http://www.kiwik.cn/app/download/apk
iOS: http://itunes.apple.com/app/id705058694
Attention: To successfully use our app to control your electric appliance, you will
need our Kiwik Smart Remote accessory, or a mobile phone that integrated with
internal IR blaster (such as Samsung S4/S5/Note3, HTC One).
2 Hardware Setup
Insert the Kiwik Smart Remote into the audio jack of your smart phone. Ensure that
the smart remote accessory retains good physical connection with the smart
phone.
2.1 For Android
After installing the app and connecting the smart remote with the mobile,
start the app and make sure the you choose “Select Device”->“Kiwik” (See
Figure 2-1). Enter “Scene”->“Remote List”, and click one of the remotes. Watch
the slim status light on the top bar of the app. (See Figure 2-2)
1
Kiwik Smart Remote User’s Manual
Figure 2-1 Device Choice
Figure 2-2 Status Light
There may be three kinds of colors of the status light, which means three
different connection statuses between the remote hardware and your mobile
phone (See Figure 2-2, 2-3, 2-4):
Green: Normal connection, which means the accessory can communicate
normally with your smart phone;
Yellow: which means the smart phone may send signal to the remote but can
receive any data from the remote;
Red: which means the smart phone is unable to communicate with the remote.
It means that your smart remote hardware may have some problem. You may
call our customer service.
2
Kiwik Smart Remote User’s Manual
Figure 2-3 Green Light
Figure 2-4 Yellow Light
Figure 2-5 Red Light
2.2 For iOS
Open the app and connecting the smart remote with the mobile, then you will
see the pop-up as following (See Figure 2-6). It means that the hardware is
working properly.
Figure 2-6 Connect Successfully Tips
If the tips didn’t pop up, it means that your smart remote hardware may have
some problem. You may call our customer service.
3
Kiwik Smart Remote User’s Manual
3 How to Add Your First Remote
You can quickly download a appliance remote using smart match mode
through our online database, which a large amount of remotes including
different kinds of appliances such as Air conditioner, TV, STB, DVD, Camera and
so on. You can follow the following steps to add your first remote.
Step 1: Add a scene such as “Living Room”, and select or take a picture for your
scene;
Figure 3-1 Add a scene
Figure 3-2 Select or take a picture
Step 2: Press and enter the scene you created just now, tap “Add Remote” to
add a remote;
4
Kiwik Smart Remote User’s Manual
Figure 3-3 Enter the scene
Figure 3-4 Add a remote
Step 3: Choose the type of your appliance, for example “TV”. Then you will see a
list of brands, choose the brand of your appliance (e.g. TCL);
5
Kiwik Smart Remote User’s Manual
Figure 3-5 Choose the type of appliance
Figure 3-6 Choose the brand of appliance
Step 4: Smart match the remote from our cloud database. Remember to keep
your data connection available. Point your smart phone (connected with the
smart remote) toward your appliance that you want to control. Press the
buttons to test if the remote works for your appliance. If it works, you can tap
“Download Remote” button to download the right remote. If not, you can tap
the right arrow to switch to the next remote and try again.
6
Kiwik Smart Remote User’s Manual
Figure 3-7 Smart match the remote
Step 5: After successfully download the remote, the app switch to the remote
control panel. You can now enjoy controlling your appliance through a smart
phone. You can enter the remote control panel again through the remote list.
7
Kiwik Smart Remote User’s Manual
Figure 3-8 Smart match the remote
Figure 3-9 Adding remote successfully
4 Add a Remote of Unknown Brand
If you can’t find your brand or cannot match the remote, you can DIY a remote
using our learning function. For example, we are now trying to add an air
conditioner remote of “SKG”.
Since our database do not have a brand “SKG” (See Figure 4-1), you can add a
remote through our DIY function. By this means, you can add arbitrary appliances
by yourself. The following steps will demonstrate how to DIY a remote.
Step 1: Tap “Add remote” -> “DIY Remote” and enter DIY mode. Choose the
appliance type and template type that you want to add, than tap “DIY” button. (See
Figure 4-2, 4-3)
8
Kiwik Smart Remote User’s Manual
Figure 4-1 Brand List
Figure 4-2 Tap “DIY Remote”
Figure 4-3 Select a Template
Figure 4-4 Tap “DIY Remote”
9
Kiwik Smart Remote User’s Manual
Step 2: Tap “Start DIY”, and you will see a pop-up tips (See Figure 4-4, 4-5). Now
you can point your original remote towards our Kiwik Smart Remote and press a
button that you want to record (e.g. button on/off). When you press down the
button, you will see a blue LED light of Kiwik Smart Remote will flash twice. That
means an IR signal have been recorded successfully.
Figure 4-5 Press a button
Figure 4-6 Test the signal
Step 3: After you record an IR signal, we will see the interface like Figure 4-6. Now
you can point your phone together with Kiwik Smart Remote towards your
appliance and tap the “Test” button to see if your appliance response properly (See
Figure 4-7).
10
Kiwik Smart Remote User’s Manual
Step 4: If your appliance response properly, you can tap “Correct Response” and
configure the signal (See Figure 4-8). If not, you can tap “Retry Study” and record
the signal again (See Figure 4-9).
Figure 4-7 Test feedback
Figure 4-8 Configure the signal
11
Kiwik Smart Remote User’s Manual
Figure 4-9 Retry Study
Figure 4-10 Signal configuration Interface
Step 5: You can now enter the signal configuration interface (See Figure 4-10) and
configure the signal you record just now. Choose the Power icon and select the on
status. Now you can continue recording the off status or other buttons such as
temperature, wind speed, and so on (See Figure 4-11, 4-12, 4-13).
12
Kiwik Smart Remote User’s Manual
Figure 4-11 Configure power button
Figure 4-12 Configure power button
Figure 4-13 Configure power button
Figure 4-14 Configure power button
13
Kiwik Smart Remote User’s Manual
Step 6: After recording all the signals, you can now tap “All Complete” to save the
remote. Then tap the brand block (See Figure 4-16) and choose the brand your
remote belongs to. If your brand does not exist in the brand list, you can tap
“Other” and input to create a new brand.
Figure 4-15 Complete configure signals
Figure 4-16 Save the remote
14
Kiwik Smart Remote User’s Manual
Figure 4-17 Enter a new brand
Figure 4-18 Save the remote
15
Kiwik Smart Remote User’s Manual
Figure 4-19 Successfully DIY a remote
5 Quick DIY a Remote
Now we are introducing a method that you can DIY a remote more quickly but less
functional.
Step 1: Tap “Add remote” -> “DIY Remote” and enter DIY mode. Choose the
appliance type and template type that you want to add, than tap “Quick DIY”
button. (See Figure 5-1)
Figure 5-1 Tap “Quick DIY”
Figure 5-2 Quick DIY Interface
Step 2: After entering “Quick DIY” mode, you will see all the buttons is grey. Now
click the button that you want to record (See Figure 5-2, 5-3). For example, we tap
16
Kiwik Smart Remote User’s Manual
the power button, and then a hint will pop up. Now you can point your original
remote toward the Kiwik Smart Remote and press the power button. Remember
that under “Quick DIY” mode, you must follow some order to record the signal. For
instance, you must record the “On” signal first and then the “Off” signal.
Figure 5-3 Record “On” signal
Figure 5-4 Record “Off” signal
Step 3: After recording the “On” and the “Off” signals, please point your phone
towards your appliance that you want to control. Press the “Test” button (See Figure
5-5) and see if your appliance response properly. If your appliance response
properly, you can tap “Correct Response”. If not, you can tap “Retry Study” and
record the signal again. After you configure a button correctly, the button will turn
light.
17
Kiwik Smart Remote User’s Manual
Figure 5-5 Test signals
Figure 5-6 Test Feedback
18
Kiwik Smart Remote User’s Manual
Figure 5-7 Test successfully
Figure 5-8 The Power button
Step 4: After recording all the signals that you want, click the save button on the
right-up corner to save the remote. Your remote is now successfully saved.
19
Kiwik Smart Remote User’s Manual
Figure 5-9 Click the save button
Figure 5-10 Choose a brand
20
Kiwik Smart Remote User’s Manual
Figure 5-11 Save the remote
6 Modify and Upload a Remote
6.1 Modify a Remote
You can also modify a remote you have downloaded or created. Enter the
control panel and tap the menu button on the up-right corner. Tap “Edit
Singals” and enter edit mode. (See Figure 6-1, 6-2) You can modified, delete, or
add some IR signals by yourself. Please refer to Section 4.
21
Kiwik Smart Remote User’s Manual
Figure 6-1 Enter Edit Mode
Figure 6-2 Editing Signals
6.2 Upload a Remote
After you created or modified a remote, you can upload it to our database and
share it with other people. You can long press the remote button, and click
“Upload” on the pop-up menu.
22
Kiwik Smart Remote User’s Manual
Figure 6-3 Long Press the Icon
Figure 6-2 Tap Upload Menu
7 Charging the Remote Hardware
Our Kiwik Smart Remote is built in with rechargeable lithium polymer battery, you
can charge the remote via micro USB port. (See Figure 7-1)
Figure 7-1 Chargring micro USB port
When charging, the red light in the remote will light up (See Figure 7-2). After
approximately 10 minutes, the red light will be off or flash slowing, which means
23
Kiwik Smart Remote User’s Manual
the charging is finished. The remote can stand by for half a year after full cycle
charging.
Figure 7-2 Charge the remote
8 Frequently Asked Questions
Q1: Why the app crashes sometimes and how to deal with that?
A1: You may try to close some app running in the background and release some
memory. Or you can uninstall the app and reinstall it. Or you may try to reboot your
device. Seek some help from our customer service after you have tried the method
above and the problem continues.
Q2: Why the app pops up a hint “Device is not connected”?
A2: For iOS device and Android device without internal IR blaster, remember that
the app should work with our Kiwik Smart Remote hardware. You should purchase
the hardware and insert it into the audio jack of your phone. For Android device
24
Kiwik Smart Remote User’s Manual
built in with internal IR blaster (Now our app support: Samsung S4/S5/Note5, HTC
One), make sure you chose the right option in the “Select Device”. (See Figure 8-1)
Figure 8-1 Choose a device
Q3: Why I cannot find the brand of my appliance when adding a remote?
A3: Because our database doesn’t contain the brand. Please refer to Section 4 and
try to DIY a remote by yourself.
Q4: Why my remote cannot work suddenly or the remote control distance getting
shorter and shorter after a period?
A4: Maybe the remote is running out of power. Please refer to Section 7 and charge
your device.
Q5: Why my smart remote didn’t work?
25
Kiwik Smart Remote User’s Manual
A5: There may be different causes lead to this problem. Please follow the following
steps to locate the cause.
Step 1: The hardware connection problem.
Refer to Section 2 to check is the hardware is connected correctly.
Step 2: Run out of power.
Click arbitrary button of a remote on the app. If the blue LED on the top of Kiwik Smart
Remote flash twice, that means the hardware is OK. If the LED flash more than twice, that
means the remote is running out of power, please refer to Section 7 to charge your
remote.
Figure 8-2 The blue LED light
Step 3: The IR blaster component problem.
If you can see the blue light flash twice when you tap a button on the app, but the
appliance doesn’t response. It may happen that the internal IR blaster component is
broken. You can open the camera of your phone or laptop (iPhone or iPad camera is
unavailable since the camera of iPhone or iPad filters infrared emission), point the
26
Kiwik Smart Remote User’s Manual
Kiwik Smart Remote towards the camera and tap a button to emit IR signals. If the
IR blaster component works normally, you’ll see white lights on the camera (See
Figure 8-3). If you don’t see the white light, that means the hardware may be
broken, please contact our customer service.
Figure 8-3 The White Light
27