1
Centralized Clinical Placement System
USER MANUAL
Version 6
May 2008
ii
TABLE OF CONTENTS
I. INTRODUCTION & OVERVIEW ....................................................................................................... 8
A. HOME PAGE ......................................................................................................................................... 9
WHAT’S NEW? .............................................................................................................................................. 9
NOTICES ...................................................................................................................................................... 10
RELEVANT INFORMATION IN THE COMMUNITY .......................................................................................... 10
ABOUT CCPS .............................................................................................................................................. 10
DOCUMENTS................................................................................................................................................ 10
LINKS .......................................................................................................................................................... 10
CONTACT US................................................................................................................................................ 10
B. “SERVICES” MENU ............................................................................................................................. 11
HOME .......................................................................................................................................................... 11
FAQ ............................................................................................................................................................ 11
CONTACT US................................................................................................................................................ 12
HELP ............................................................................................................................................................ 12
C. “TOP” MENU ...................................................................................................................................... 13
SCHOOL ....................................................................................................................................................... 15
CLINICAL AGENCY ...................................................................................................................................... 15
USER............................................................................................................................................................ 16
REPORTS...................................................................................................................................................... 16
ADMINISTRATION ........................................................................................................................................ 16
II.
LOGIN AND GENERAL INFORMATION .................................................................................. 17
A.
B.
C.
D.
E.
LOGGING IN ....................................................................................................................................... 18
LOGGING OUT.................................................................................................................................... 20
WEB APPLICATION CONVENTIONS .................................................................................................. 21
GENERAL TIPS ................................................................................................................................... 23
CCPS TERMS ..................................................................................................................................... 24
III.
SCHOOL ......................................................................................................................................... 28
A. STEP 1: SCHOOL INFORMATION ....................................................................................................... 30
UPDATING SCHOOL INFORMATION ............................................................................................................. 30
MAINTAINING COURSES.............................................................................................................................. 31
MAINTAINING COHORTS ............................................................................................................................. 35
LIST SCHOOLS ............................................................................................................................................. 36
LIST COURSES & COHORTS ......................................................................................................................... 37
B. STEP 2: COHORT SCHEDULES ........................................................................................................... 38
CREATING STUDENT COHORT SCHEDULES................................................................................................. 39
EDITING COHORT SCHEDULES .................................................................................................................... 41
COPYING COHORT SCHEDULES ................................................................................................................... 42
DELETING COHORT SCHEDULES ................................................................................................................. 44
VIEWING COHORT SCHEDULES ................................................................................................................... 45
RUNNING THE COHORT SCHEDULES REPORT ............................................................................................. 46
C. STEP 3: MATCH SCHEDULES............................................................................................................. 48
iii
REQUESTING PLACEMENTS ........................................................................................................................ 48
Requesting Placements Placements ………………….………………………………………………… 53
VIEWING OR EDITING A PROPOSAL ............................................................................................................. 57
VIEW COMMENTS…………………………………………………………………………………………59
REPROPOSING PLACEMENTS…………………………………………………………………………… .61
VIEWING UNIT AVAILABILITY .................................................................................................................... 62
RUNNING THE SCHOOL PROPOSALS REPORT .............................................................................................. 64
D. PREFERRED PARTNERS ..................................................................................................................... 65
MAINTAINING PREFERRED PARTNERS ........................................................................................................ 66
LIST PREFERRED PARTNERS........................................................................................................................ 67
E. SCHOOL COORDINATOR.................................................................................................................... 67
ADDING A NEW COORDINATOR .................................................................................................................. 68
AUTO EMAIL ON/OFF…………………………………………………………………………………….69
UPDATING COORDINATOR INFORMATION .................................................................................................. 69
REMOVING A COORDINATOR ...................................................................................................................... 70
LIST COORDINATORS .................................................................................................................................. 70
F. INSTRUCTOR ....................................................................................................................................... 71
ADDING A NEW INSTRUCTOR...................................................................................................................... 71
UPDATING INSTRUCTOR INFORMATION ...................................................................................................... 72
REMOVING AN INSTRUCTOR ....................................................................................................................... 73
LIST INSTRUCTORS ...................................................................................................................................... 74
IV.
CLINICAL AGENCY .................................................................................................................... 76
A. STEP 1: AGENCY INFORMATION ....................................................................................................... 76
UPDATING CLINICAL AGENCY DETAILS ..................................................................................................... 78
SELECTING CLINICAL UNITS AVAILABLE FOR PLACEMENT ....................................................................... 81
MAINTAINING UNIT LOCATIONS ................................................................................................................. 83
REMOVING CLINICAL UNITS ....................................................................................................................... 86
LIST CLINICAL AGENCIES ........................................................................................................................... 87
LIST CLINICAL UNITS.................................................................................................................................. 87
B. STEP 2: UNIT AVAILABILITY............................................................................................................. 88
CREATING UNIT AVAILABILITY .................................................................................................................. 88
EDITING UNIT AVAILABILITY ..................................................................................................................... 90
VIEWING UNIT AVAILABILITY .................................................................................................................... 96
RUNNING THE UNIT SCHEDULES REPORT ................................................................................................... 98
C. STEP 3: MATCH SCHEDULES............................................................................................................. 99
REVIEWING PLACEMENT REQUESTS ......................................................................................................... 100
PLACEMENT REQUESTS SUMMARY........................................................................................................... 105
VIEW COMMENTS……………………………………………………………………………………..107
UNIT FLEXIBILITY………………………………………………………………………………………..108
HISTORICAL PLACEMENT REQUESTS…………………………………………………………………….109
REPROPOSAL OPTION………………………………………………………………………….…… 110
112
RUNNING THE PLACEMENT REQUEST STATUS REPORT
RUNNING THE PLACEMENT CALENDAR REPORT ...................................................................................... 113
D. PREFERRED PARTNERS ................................................................................................................... 114
MAINTAINING PREFERRED PARTNERS ...................................................................................................... 115
LIST PREFERRED PARTNERS...................................................................................................................... 115
E. CLINICAL COORDINATOR ............................................................................................................... 116
ADDING A NEW COORDINATOR ................................................................................................................ 116
iv
AUTO EMAIL ON/OFF ………………………………………………………………… …………… 117
UPDATING COORDINATOR INFORMATION ................................................................................................ 118
REMOVING A COORDINATOR .................................................................................................................... 119
LIST COORDINATORS ................................................................................................................................ 119
V.
USER................................................................................................................................................ 121
A.
UPDATE USER PROFILE ........................................................................................................... 122
UPDATING YOUR PROFILE ........................................................................................................................ 122
CHANGING YOUR PASSWORD ................................................................................................................... 123
VI.
REPORTS ...................................................................................................................................... 124
A.
B.
CCPS REPORT DESCRIPTIONS ....................................................................................................... 125
RUNNING A REPORT IN CCPS......................................................................................................... 125
VII.
ADMINISTRATION ................................................................................................................... 128
A. MAINTAINING CLINICAL DEPARTMENTS IN CCPS ...................................................................... 129
ADDING A CLINICAL DEPARTMENT .......................................................................................................... 129
MODIFYING A CLINICAL DEPARTMENT .................................................................................................... 130
REMOVING A CLINICAL DEPARTMENT ..................................................................................................... 131
LIST DEPARTMENTS .................................................................................................................................. 132
B. MAINTAINING CLINICAL UNITS IN CCPS ...................................................................................... 133
ADDING A CLINICAL UNIT ........................................................................................................................ 133
MODIFYING A CLINICAL UNIT .................................................................................................................. 134
REMOVING A CLINICAL UNIT.................................................................................................................... 135
LIST UNITS ................................................................................................................................................ 136
C. MAINTAINING CCPS USERS ........................................................................................................... 137
ADDING A NEW CCPS USER ..................................................................................................................... 138
AUTO EMAIL ON/OFF…………………………………………………………………………………….139
MODIFYING AN EXISTING CCPS USER ..................................................................................................... 139
REMOVING A CCPS USER ......................................................................................................................... 140
LIST CCPS USERS ..................................................................................................................................... 140
GRANTING ACCESS TO A SUSPENDED USER ............................................................................................. 142
REVOKING A USER’S ACCESS ................................................................................................................... 143
D. MAINTAINING CCPS SCHOOLS ...................................................................................................... 144
SELECTING A SCHOOL ............................................................................................................................... 145
ADDING A NEW SCHOOL ........................................................................................................................... 146
REMOVING A SCHOOL ............................................................................................................................... 146
E. MAINTAINING CCPS CLINICAL AGENCIES ................................................................................... 147
SELECTING A CLINICAL AGENCY .............................................................................................................. 147
ADDING A NEW CLINICAL AGENCY .......................................................................................................... 149
REMOVING A CLINICAL AGENCY .............................................................................................................. 150
v
TABLE OF FIGURES
FIGURE 1 – CCPS HOME PAGE ....................................................................................................................................... 9
FIGURE 2 – SERVICES MENU ......................................................................................................................................... 11
FIGURE 3 – FREQUENTLY ASKED QUESTIONS .............................................................................................................. 12
FIGURE 4 – HELP PAGE ................................................................................................................................................. 13
FIGURE 5 – TOP MENU, FROM THE HOME PAGE ............................................................................................................. 14
FIGURE 6 – TOP MENU, FROM SCREENS OTHER THAN THE HOME PAGE ......................................................................... 14
FIGURE 7 – LOGIN LINK ................................................................................................................................................ 18
FIGURE 8 – LOGIN PAGE ............................................................................................................................................... 19
FIGURE 9 – LOGGED IN ................................................................................................................................................. 20
FIGURE 10 – LOGGING OUT .......................................................................................................................................... 21
FIGURE 11 – SCHOOL MENU ......................................................................................................................................... 29
FIGURE 12 – UPDATE SCHOOL LINK ............................................................................................................................. 30
FIGURE 13 – UPDATE SCHOOL SCREEN ......................................................................................................................... 31
FIGURE 14 – ADD COURSE ........................................................................................................................................... 32
FIGURE 15 – EDIT COURSES & COHORTS SECTIONS ..................................................................................................... 33
FIGURE 16 – SELECT COURSE ....................................................................................................................................... 34
FIGURE 17 – LIST SCHOOLS .......................................................................................................................................... 37
FIGURE 18 – LIST COURSES & COHORTS ...................................................................................................................... 38
FIGURE 19 – MANAGE SCHEDULES .............................................................................................................................. 39
FIGURE 20 – CREATE NEW SCHEDULE ......................................................................................................................... 40
FIGURE 21 – MANAGE SCHEDULES SEARCH RESULTS ................................................................................................... 41
FIGURE 22 – EDIT COHORT SCHEDULE .......................................................................................................................... 42
FIGURE 23 – COPY SCHEDULES .................................................................................................................................... 43
FIGURE 24 – COPY SCHEDULES RESULTS...................................................................................................................... 44
FIGURE 25 – COHORT SCHEDULES REPORT PARAMETERS ............................................................................................. 46
FIGURE 26 – COHORT SCHEDULES REPORT................................................................................................................... 47
FIGURE 27 – REQUEST PLACEMENTS, STEP 1 ................................................................................................................ 49
FIGURE 28 – REQUEST PLACEMENTS, STEP 2 ................................................................................................................ 50
FIGURE 29 – REQUEST PLACEMENTS, STEP 3 ................................................................................................................ 51
FIGURE 30 – REQUEST PLACEMENTS, STEP 4 ................................................................................................................ 52
FIGURE 31 – SCHOOL PROPOSAL, COMPLETED ............................................................................................................. 53
FIGURE 32 - SCHOOL PROPOSALS REPORT LINK……………………………………………………………………….54
FIGURE 33 - REQUESTING HISTORICAL PLACEMENTS STEP 2 OF 4……………………………………………… …..55
FIGURE 34 - REQUESTING HISTORICAL PLACEMENTS STEP 3OF 4………………………………………………...…56
FIGURE 35 - SUBMIT HISTORICAL PLACEMENTS STEP 4 OF 3………………………………………………..57
FIGURE 36 – VIEW & EDIT PROPOSALS SEARCH RESULTS ............................................................................................ 58
FIGURE 37 – VIEW COMMENTS..................................................................................................................................... 59
FIGURE 38 – WITHDRAW PROPOSAL............................................................................................................................. 59
FIGURE 39 – EDIT PROPOSAL........................................................................................................................................ 60
FIGURE 40 - VIEW & EDIT RE-PROPOSALS………………………………………………………………… …62
FIGURE 41 – VIEW UNIT AVAILABILITY ....................................................................................................................... 63
FIGURE 42 – VIEW UNIT AVAILABILITY CALENDAR GRAPHIC ...................................................................................... 64
FIGURE 43 – SCHOOL PROPOSALS REPORT ................................................................................................................... 65
FIGURE 44 – MAINTAIN PREFERRED PARTNERS ........................................................................................................... 66
FIGURE 45 – LIST PREFERRED PARTNERS (AGENCIES) ................................................................................................. 67
FIGURE 46 – ADD NEW SCHOOL COORDINATOR .......................................................................................................... 68
FIGURE 47 – UPDATE SCHOOL COORDINATOR ............................................................................................................. 69
FIGURE 48 – REMOVE SCHOOL COORDINATOR ............................................................................................................ 70
FIGURE 49 – LIST SCHOOL COORDINATORS ................................................................................................................. 71
FIGURE 50 – ADD NEW INSTRUCTOR ............................................................................................................................ 72
FIGURE 51 – UPDATE INSTRUCTOR ............................................................................................................................... 73
FIGURE 52 – REMOVE INSTRUCTOR .............................................................................................................................. 74
FIGURE 53 – LIST INSTRUCTORS ................................................................................................................................... 75
vi
FIGURE 54 – UPDATE CLINICAL AGENCY DETAILS ...................................................................................................... 79
FIGURE 55 – UPDATE AGENCY DETAILS, ACCEPT MORE THAN ONE COHORT ................................................................ 80
FIGURE 56 – SPECIFY BY UNIT LOCATION .................................................................................................................... 81
FIGURE 57 – ADD NEW UNITS ...................................................................................................................................... 82
FIGURE 58 – MAINTAIN UNIT LOCATIONS .................................................................................................................... 83
FIGURE 59 – UPDATING UNIT LOCATIONS .................................................................................................................... 84
FIGURE 60 – OVERWRITE “NOT SPECIFIED” AVAILABILITY .......................................................................................... 85
FIGURE 61 – REMOVE UNITS ........................................................................................................................................ 86
FIGURE 62 – LIST CLINICAL AGENCIES ........................................................................................................................ 87
FIGURE 63 – LIST CLINICAL UNITS ............................................................................................................................... 88
FIGURE 64 – CREATE UNIT AVAILABILITY ................................................................................................................... 89
FIGURE 65 – CREATE UNIT AVAILABILITY CONFIRMATION .......................................................................................... 90
FIGURE 66 – EDIT UNIT AVAILABILITY ........................................................................................................................ 91
FIGURE 67 – EDIT UNIT AVAILABILITY, SEARCH RESULTS ........................................................................................... 92
FIGURE 68 – EDIT UNIT AVAILABILITY, GLOBAL EDIT ................................................................................................ 94
FIGURE 69 – EDIT UNIT AVAILABILITY, COPY ROW..................................................................................................... 95
FIGURE 70 – VIEW UNIT AVAILABILITY ....................................................................................................................... 97
FIGURE 71 – VIEW UNIT AVAILABILITY CALENDAR GRAPHIC ...................................................................................... 98
FIGURE 72 – UNIT SCHEDULES REPORT ........................................................................................................................ 99
FIGURE 73 – VIEW PLACEMENT REQUEST FILTERS ..................................................................................................... 100
FIGURE 74 – VIEW PLACEMENT REQUESTS, SELECT UNIT LOCATION ......................................................................... 101
FIGURE 75 – VIEW PLACEMENT REQUESTS, SELECT PROPOSAL .................................................................................. 102
FIGURE 76 – VIEW PLACEMENT REQUESTS, PROPOSAL DETAILS ................................................................................ 103
FIGURE 77 – VIEW PLACEMENT REQUESTS, PROPOSAL DETAILS, CONT. ..................................................................... 104
FIGURE 78 – PLACEMENT REQUESTS SUMMARY FILTERS ........................................................................................... 106
FIGURE 79– PLACEMENT REQUESTS RESULTS............................................................................................................ 107
FIGURE 80 – VIEW COMMENTS................................................................................................................................... 107
FIGURE 81 – CONFIRM CHANGES ............................................................................................................................... 108
FIGURE 82 – UNIT FLEXIBILITY…………………………………………………………………………… ……109
FIGURE 83 – HISTORICAL PLACEMENTS……………………………………………………………………… 109
FIGURE 84 – RE-PROPOSAL OPTION……………………………………………………………………… ……110
…111
FIGURE 85 – STUDENT COUNTS …………………………………………………..…………
FIGURE 86 – PLACEMENT REQUEST STATUS REPORT ................................................................................................... 113
FIGURE 87 – PLACEMENT CALENDAR REPORT............................................................................................................ 114
FIGURE 88 – MAINTAIN PREFERRED PARTNERS (SCHOOLS) ....................................................................................... 115
FIGURE 89 – LIST PREFERRED PARTNERS ................................................................................................................... 116
FIGURE 90 – ADD NEW CLINICAL COORDINATOR ...................................................................................................... 117
FIGURE 91 – UPDATE CLINICAL COORDINATOR ......................................................................................................... 118
FIGURE 92 – REMOVE CLINICAL COORDINATOR ........................................................................................................ 119
FIGURE 93 – LIST CLINICAL COORDINATORS ............................................................................................................. 120
FIGURE 94 – UPDATE PROFILE.................................................................................................................................... 122
FIGURE 95 – CHANGE PASSWORD .............................................................................................................................. 123
FIGURE 96 – REPORT PARAMETERS ............................................................................................................................ 126
FIGURE 97 – REPORT OUTPUT ..................................................................................................................................... 127
FIGURE 98 – ADD DEPARTMENT................................................................................................................................. 129
FIGURE 99– MODIFY DEPARTMENT............................................................................................................................ 130
FIGURE 100 – MODIFY DEPARTMENT CONT. .............................................................................................................. 131
FIGURE 101 – REMOVE DEPARTMENT ........................................................................................................................ 132
FIGURE 102 – LIST DEPARTMENTS ............................................................................................................................. 133
FIGURE 103 – ADD UNIT ............................................................................................................................................ 134
FIGURE 104– MODIFY UNIT ....................................................................................................................................... 135
FIGURE 105 – REMOVE UNIT ...................................................................................................................................... 136
FIGURE 106 – LIST UNITS ........................................................................................................................................... 137
FIGURE 107 – ADD NEW USER ................................................................................................................................... 138
FIGURE 108 – MODIFY USER ...................................................................................................................................... 140
FIGURE 109 – REMOVE USER ..................................................................................................................................... 141
vii
FIGURE 110 – LIST USERS .......................................................................................................................................... 142
FIGURE 111 – GRANT ACCESS .................................................................................................................................... 143
FIGURE 112 – REVOKE ACCESS .................................................................................................................................. 144
FIGURE 113 – SELECT SCHOOL ................................................................................................................................... 145
FIGURE 114 – ADD SCHOOL ....................................................................................................................................... 146
FIGURE 115 – REMOVE SCHOOL ................................................................................................................................. 147
FIGURE 116 – SELECT CLINICAL AGENCY .................................................................................................................. 148
FIGURE 117 – ADD CLINICAL AGENCY....................................................................................................................... 149
FIGURE 118 – REMOVE CLINICAL AGENCY ................................................................................................................ 150
8
I. INTRODUCTION & OVERVIEW
The Centralized Clinical Placement System (CCPS) is an internet-based tool designed to help
address and improve the growing nursing shortage problem. Underutilization of existing clinical
placement sites for nursing students and an inefficient clinical placement system combine to
form one of the barriers to increasing the number of qualified nurses.
This system brings together school and clinical agency information in a centralized, online
format. This enables schools and clinical agencies to achieve a higher level of operating
performance:
(i)
Schools can rapidly match, and may be able to increase, the clinical placement
opportunities for student cohorts (groups of 8-10 students).
(ii)
Clinical agencies can effectively manage a single schedule (for all participating
schools) while increasing the number of students within their agency, which provides
direct observation and potential identification of future employees.
The CCPS, along with another web application called the Centralized Faculty Resource Center
(CFRC) is part of the Nursing Resource Center (NRC). The vision of the NRC is “the creation
of a nursing community with dramatically improved quality of nursing education, leading to
measurable improvements in patient care”.
The CCPS User Manual is organized around the primary users of the system—schools, clinical
agencies, and administrators. Using the CCPS for scheduling clinical placements is essentially a
three-step process, regardless of whether it is being done from the school or clinical agency
perspective. The CCPS and this user manual are designed to walk users through these three
steps. For additional information regarding the use of CCPS, you may also refer to the CCPS
Operating Manual (available on the CCPS home page).
This module introduces the menus available for navigation within the Centralized Clinical
Placement System to lay the framework for the application’s organization.
9
A.
Home Page
The Centralized Clinical Placement System is web-based and accessible using any computer
with a web browser and Internet access. Recommended browsers are Internet Explorer for PCs
and Safari for Macintosh – other browsers are not fully supported for all CCPS features.
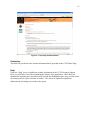
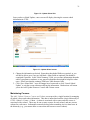
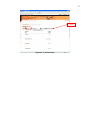
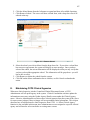
Once you reach CCPS using either a direct link or through a Nursing Resource Center portal
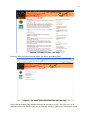
page, you will be at the CCPS home page:
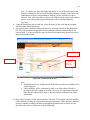
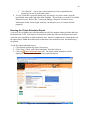
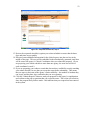
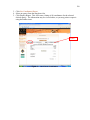
Figure 1 – CCPS Home Page
There are several sections of information available on the home page. It is also helpful to
understand the layout of the CCPS pages since this will be consistent throughout the application.
The black CCPS logo in the top left corner will help you to find the Login link (located directly
below it in the brown shaded area). To the right of the logo at the top of the screen there are two
horizontal menus. The first one, in the black stripe, is the “services” menu and below it is the
“top” menu. We will discuss these menus later in this section.
What’s New?
Directly below the CCPS logo and banner photo is a What’s New? area. This portion of the
home page will be used for important announcements of new users and/or application changes.
This information will often be communicated via email as well, but the What’s New area
provides an online forum for posting it.
10
Notices
Directly below the What’s New? section is a similar area for Notices. This section will be used
to alert users to data entry deadlines, known system issues, planned downtime for system
maintenance and/or documentation changes. The planning cycle “master calendar” with
deadlines for data entry is also displayed in this area.
Relevant Information in the Community
In this section users can read about information in the community that may be affecting clinical
placements
About CCPS
This section provides users with a brief description of the CCPS, its purpose and objectives.
Documents
On the right side of the screen and below the banner photo is more information to assist users.
The first is Documents. This is where you may access up-to-date documentation on CCPS,
including items such as the Operating Manual, this User Manual and other helpful references.
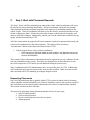
The Operating Manual describes the policies and procedures associated with using the
Centralized Clinical Placement System – all users should be familiar with this document prior to
using CCPS. The User Manual is your “how to” guide for navigating and effectively using the
CCPS.
Please note that, while you are welcome to print these documents for easy reference, printed
copies will not be distributed when updates are made. Therefore, only the electronic version
available on the CCPS home page will be considered the current version. It is the user’s
responsibility to ensure that the most current version is being referenced at all times. Watch for
notices on the home page to alert you that updates have been posted.
Links
The Links section is used to provide users with quick access to related websites or information,
such as a return link to the Nursing Resource Center portal page and lists of the schools and
agencies that use CCPS.
Contact us
For help using the application or for more general information, contact information is provided
on the home page. The email addresses are hyperlinks that will automatically start a new mail
message using your default email application, if possible.
11
The CCPS Customer Support Desk is available to answer your questions regarding online access
and help using the application. There are also several online help options for CCPS users, which
will be detailed in the next section.
B.
“Services” menu
The horizontal black stripe at the top of the page is the “services” menu. The options on this
menu will be available from within any CCPS application screen. Please note that these links
will use the page you are viewing to display information, so be sure to save information if
necessary before accessing them. The Back button on your browser should return you to the
previous page; however, it is always a good practice to save your data first.
Figure 2 – Services menu
Home
The “Home” link will return you to the CCPS Home Page that was discussed in the previous
section. This is a standard feature available on most websites.
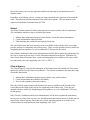
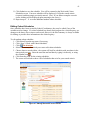
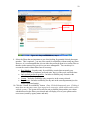
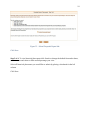
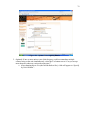
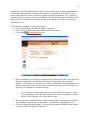
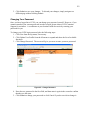
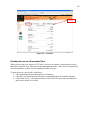
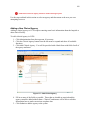
FAQ
The “FAQ” list will take you to a page of frequently asked questions regarding the CCPS
application. This is one of the many ways to access help online, prior to contacting the Customer
Support Desk. This page will be updated often, but if you do not see your question answered
here, please contact CCPS Customer Support. Please also send your feedback about the site.
12
Figure 3 – Frequently Asked Questions
Contact us
This link will provide the same contact information that is provided on the CCPS Home Page.
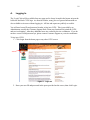
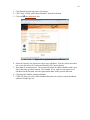
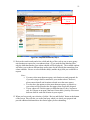
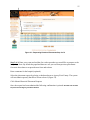
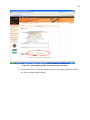
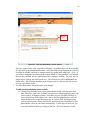
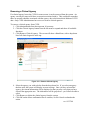
Help
Under the “Help” menu, in addition to contact information for the CCPS Customer Support
Desk, you will find several videos outlining the features of the application. While these are
intended for beginning users and only briefly describe the highlighted topics, they are also useful
for existing users if a quick refresher is needed. The videos are updated as significant
enhancements and changes are made to the system.
13
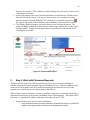
Figure 4 – Help page
To start a video, click the “Launch video” link to the right of the video’s description. The videos
contain audio as well as video, so check the volume on your computer or wear headphones.
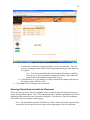
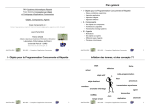
C.
“Top” menu
Also visible from every CCPS screen is a functional menu, which is referred to as the “top”
menu. This menu is located towards the top of the screen, directly below either the services
menu just discussed or the banner photo. The location of the menu depends on the page you are
viewing.
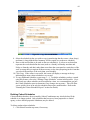
From the CCPS Home Page, the menu will be below the services menu:
14
Figure 5 – Top menu, from the home page
From any other page, the top menu will be just below the banner photo:
Figure 6 – Top menu, from screens other than the home page
Notice that the banner photo changes between the two pages as well – this will serve as an
additional clue about which screen you are currently viewing. Other ways to determine which
15
part of the system you are in are page titles and the title showing in your Internet browser’s
window header.
Regardless of which page you are viewing, the items contained in the top menu will remain the
same. The following section summarizes each of the menu options. The user manual is also
organized around these functional areas of CCPS.
School
The School section contains all of the menu options for screens used by School Coordinators.
The coordinators take three steps to schedule placements:
1. Manage basic information (general school details, course and cohort information)
2. Create and maintain cohort schedules
3. Find matching unit availability and request placements
Once the School menu has been entered, a menu is available on the left side of the screen that
provides options for completing each of these steps. There are also optional screens available for
designating preferred partners, as well as additional CCPS users for the school.
Only School Coordinators and System Administrators will be able to update the information, but
any user or visitor to the site may view the information that has been entered. Within the left
menu for the School functional area, various reporting options are available to all visitors of the
site (indicated by the name beginning with “List” or “RPT:”).
Clinical Agency
The Clinical Agency section is the counterpart of the School menu and contains all of the menu
options for screens used by Clinical Coordinators. The clinical coordinators also take three steps
to schedule placements:
1. Manage basic information (general agency details, units, unit locations)
2. Create and maintain unit schedules/availability
3. Review and respond to placement requests
Once the Clinical Agency menu has been entered, a menu is available on the left side of the
screen that provides links to the screens for completing each of these steps. There are also
optional screens available for designating preferred partners, as well as additional CCPS users
for the agency.
Only Clinical Coordinators and System Administrators will be able to update the information,
but any user or visitor to the site may view the information that has been entered. Within the left
menu for the Clinical Agency functional area, various reporting options are available to all
visitors of the site (indicated by the name beginning with “List”).
16
User
The User section allows all users to update their personal contact information and to change their
password. Anyone with a valid user ID and password will be able to access this menu and
modify the information for the user ID they are currently using. Note: These activities can also
occur within the School and Clinical Agency menus using the “Update Coordinator” screen (see
“Updating Coordinator Information” under either the school or clinical agency section).
Reports
The Reports section is publicly accessible by any visitor to the site and does not require a user ID
and password. These reports are also available from within the School and Clinical Agency
functional areas, within the appropriate step’s menu grouping.
Information about clinical agency unit availability and school cohort schedules may be viewed
here. Site users and visitors may also run reports to see which student cohort schedules have
been proposed to clinical agencies, as well as which schedule matches have been accepted for
clinical placements.
This information is available for all schools and clinical agencies participating in CCPS.
Administration
The Administration section is used solely by System Administrators for overall updates and user
maintenance. This section allows Administrators to update the available clinical departments
and units used in CCPS, add or remove schools and clinical agencies, and maintain users.
Any user may visit this area to view lists of the available clinical departments and units in CCPS.
After clicking on any of the functional menu buttons, the side of the screen will update with
options related to that section (the “left menu”). In the User and Administration areas, these
options are expandable, so it will show the available screens for that option when you click one.
17
II. LOGIN AND GENERAL INFORMATION
This module will show users how to log in and out of the Centralized Clinical Placement System
and provide some general information to assist in using CCPS, such as web application
conventions, general tips, and CCPS terms.
18
A.
Logging In
The “Login” link will be available from any page and is always located in the brown strip on the
left below the black CCPS logo. As discussed earlier, many pieces of general information are
also available to site users without logging in. All lists and reports are publicly accessible.
You will need a user ID and password in order to log in to CCPS. This is provided by an
Administrator, usually the Customer Support Desk, when your location first joined the CCPS
and received training. After that, additional users are created by the site coordinator. If you do
not have a user ID and password yet, please contact Customer Support or your site coordinator.
To log in to CCPS:
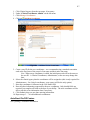
1. Click Login from the home page or any other CCPS screen:
Figure 7 – Login link
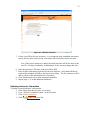
2. Enter your user ID and password in the space provided on the screen, then click Login:
19
Figure 8 – Login page
Note: User ID and password are not case sensitive, so you do not need to worry
about using all upper or lower case letters.
3. Once you are logged in to CCPS, the link will change to read “Logout” and your user
name will appear in the top right corner. (After logging in, you will automatically be
taken to the School section if you are a School Coordinator / Instructor, or to the Clinical
Agency section if you are a Clinical Coordinator.)
20
Figure 9 – Logged in
While you are logged in to the system, all screens accessible by the security level of your user ID
will be available for your use. When a selection is “grayed out,” you do not have permission to
use that functionality. (Note: If an item is grayed out that you believe you should have access
to, check first to see if you have been logged out automatically by the system due to an extended
period of idle time. If you are logged in but still cannot access certain functions, please contact
the CCPS Customer Support Desk.)
CCPS will log you out automatically if you are inactive for a period of time. To re-enter the
system, simply follow the steps above to log back in.
B.
Logging Out
Once you have completed your work in CCPS, you may log out simply by clicking on the
“Logout” link from any CCPS page:
21
Figure 10 – Logging Out
After clicking “Logout,” you will be returned to the CCPS Home Page.
Please note: While you may open CCPS in more than one browser window, we do not
recommend it if you intend to log in on both with the same user ID. However, if you would like
to open a second window just to view public information (reports, FAQ, contacts, help, etc.), that
will not cause any problems.
C.
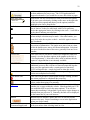
Web Application Conventions
CCPS is a web-based application, so many of the standard Internet browser conventions may be
used with it. The following table provides a quick summary of some of the most common
features.
Feature
Back
Refresh
Description
Use this button to return to a previously visited page. This will
work with CCPS screens, in case you forget to save or clicked to
another screen by mistake.
This button reloads the content currently showing on your screen.
You can also use the F5 key to refresh.
22
Bookmark/Favorites
Drop down lists
Select One...
Radio buttons
Checkboxes
Selection arrows
“Grayed out”
Timeout
Success icon
Error/failure icon
Calendar icon
Hyperlink
Buttons
Control
(Command/Apple) and
All Internet browsers provide an option to save commonly visited
website addresses for easy re-use. The CCPS application will
support bookmarks if you would like to store direct links to pages.
Drop-down lists are selection boxes with pre-defined list options.
You make your selection by clicking on the arrow at the right side
of the box (this expands and shows you the options) and then
highlight your choice from the list.
Radio buttons generally allow you to select just one option from a
list of choices, so they are often used with Yes/No questions.
Select the appropriate choice by clicking in the circle – it will fill in
with a dot to indicate your selection.
Checkboxes are similar to radio buttons but are generally used
when multiple selections may be made. Like radio buttons, you
may click in the box to place a check – and click again to remove
the checkmark.
These arrows are used in CCPS, and other websites, to indicate
movement of information. The single arrow moves one at a time,
while the double arrow moves all current information. Selections
are moved in the direction of the arrow, generally from one list to
another.
This term refers to text that is washed out compared to other text
around it (see the first three options in the graphic to the left, vs.
“List Departments”). Most often, this is used to indicate that the
option is a hyperlink but is not currently available.
Websites that have login functionality, which provides you with
additional access to data, will have a timeout feature that logs the
user out of the application after a certain period of inactivity.
CCPS will also do this – simply log back in when this occurs.
This icon will precede a system update message telling you that the
action was completed successfully.
This icon will precede a system update message warning you that
the action could not be completed due to an error.
You can click the icon to open a calendar that allows you to choose
a date, rather than typing it in manually.
Underlined text on websites often indicates that the text is a link to
another site, or page within the website. Most hyperlinks on CCPS
are underlined (all except for the menu options). You will also
know that something is a hyperlink if your mouse cursor changes to
a hand when you pass over it. Generally, the link will be displayed
in the bottom bar of your web browser.
Buttons such as Submit, Update, and Save are used to provide
actions to the user. Expect something to occur in the application
when you click a button.
The Control (Command) and Shift keys can be used in conjunction
with your mouse when selecting items in a list.
23
Shift keys
Enter key
Print icon
or
Export icon
D.
•
Control (CTRL) or Command (Apple) – select nonadjacent items by holding down the Control/Command key
as you click items
• Shift – select adjacent items by clicking the first item,
holding down the shift key, and clicking the last item
The Enter key is used as a carriage return when typing and as an
action key (like clicking on a button). In CCPS, it can be used to
start a new line within a text box, but it is not recommended to use
it in place of clicking a button since some pages have multiple
options. All procedures in this manual will instruct you to click the
appropriate button.
The printer icon indicates that you have the option to send data on
your screen to a printer. When you click it, you will be provided
with additional printing options.
The lists and reports in CCPS will show this icon to indicate that
you have the option to export the information you are viewing on
the screen. Additional options will be provided once selected.
General Tips
This section is intended to list some general tips for using the CCPS application, aside from the
basic web conventions outlined above. Additional references to these items will be made within
the user manual as step-by-step instructions are provided for completing each activity.
•
•
•
Shaded fields - When a field is shaded in CCPS (light orange on most computer screens),
this indicates that the information is required. The system will not let you save an entry if
shaded fields are left blank.
When you need help or have feedback - The Customer Support Desk will be able to
assist you more quickly if you can provide as much information as possible related to
your issue. Helpful information to submit to the Customer Support Desk is what you
were doing when you received an error and the page you are having trouble using. Also
helpful are the following pieces of information:
• Screenshots – Capture your screen and insert the image into an email. Screenshots
may be taken on a PC by holding down the Ctrl or Alt key while hitting the Print
Screen button on your keyboard (usually located at the end of the function (F1 – F12)
keys) and on a Macintosh by holding down Ctrl+Shift+Command (Apple)+4. This is
like a “copy”, so when you open an email message, you may use the Paste function to
insert the screenshot.
• Browser address – This is another way to capture the screen you are on – simply
highlight, copy and paste the URL that is displayed in the Address line of your
browser into an email.
Screen specific help – In addition to the FAQs, videos on the Help page, and the
Customer Support Desk, there is also instructional text on many CCPS screens specific to
24
the page you are visiting. This text will be displayed for each of the main functional
areas after you click from the 2nd tier menu, as well as most left menu options after you
have expanded the menu.
E.
CCPS Terms
Term
Administrator
Clinical agency
Clinical Coordinator
Cohort
Cohort schedule
Course
Department
Hierarchy
Description
A CCPS user with the highest security access to the system, able
to make any changes and not restricted to a specific school or
clinical agency.
Any clinical location using CCPS that will accept nursing student
cohorts. Clinical agencies may be hospitals, skilled nursing
facilities, etc.
A site coordinator for a clinical agency in CCPS. A clinical
agency should have at least one Clinical Coordinator that will be
responsible for keeping information up to date and reviewing
school requests.
A group of nursing students, typically 8-12, that will complete a
clinical experience together.
Indicates the start and end dates, day(s) of the week and shift
time(s) that a particular cohort would like to receive a clinical
experience. Clinical placement requests are made at the cohort
schedule level.
A course taught as part of the nursing school’s curriculum and for
which there are one or more cohorts of students that need clinical
time to satisfy the course requirements.
The department in CCPS defines the major service areas that are
most common in hospitals and other clinical agencies. They are
intended to represent the clinical education experiences that
students require, rather than an exhaustive list of all possibilities.
The following are the departments available in CCPS:
• Critical Care
• Emergency Dept
• Med/Surg
• OB
• Pediatrics
• Peri-op
• Post Acute
• Psychiatry
• Specialty
• Step down
Data in CCPS exists in hierarchies – where information is grouped
25
and maintained in levels. There are three basic hierarchies:
• Department > Unit
• School > Course > Cohort > Cohort Schedule > Proposal
• Agency > Unit > Location > Unit Availability > Placement
Requests
Each step has a “one to many” relationship – for example, each
school has one or more courses, each course has one or more
cohorts, each cohort has one or more schedules, and each schedule
has one or more proposals against it.
With this structure, it is best to keep the information more and
more general the higher up you get in the hierarchy. This will
decrease the amount of maintenance that is required. For
example, keep all date information at a schedule level, rather than
courses or cohorts.
Instructor
List
Location (or Unit
Location)
Matching
Preferred Partner
Preferred Units
Proposal
Because the data in these hierarchies is interrelated, an item cannot
be deleted if it is still tied to something lower in the structure (e.g.,
a course cannot be deleted if one or more cohorts still exists for it).
One of the faculty members at a nursing school that will have
access to CCPS. An Instructor is set up like a School Coordinator,
but does not have access to change any information.
Publicly available information in CCPS that provides listings of
data entered by School and Clinical Coordinators.
Defines the physical area where a clinical unit is located in the
facility, such as 4West, 3North, and 6Central. This is used to
provide additional information to schools that are used to
identifying the unit by its location.
The term used to describe the process of matching student cohort
schedules with clinical unit availability using filters and program
logic.
The preferred partner for a school or clinical agency using the
CCPS indicates that an agreement exists between the two sites,
previous placements have been scheduled between the partners, or
the facility is in the same geographical area. This classification
can be used as a filter during the matching process.
Each cohort will have preferred units identified that meet the
clinical experience requirements so that placements can be
suggested based on availability at those units. This is set at a
cohort level and will then apply to all schedules for that cohort.
The preferred units for a cohort may be selected from one or more
clinical areas.
During the matching process, schools search for clinical unit
availability that satisfies their cohort schedules and makes
proposals to the clinical agency(ies) to request those time slots.
The school’s requests are only proposals – the agencies must
26
Report
School
School Coordinator
Unit
review and determine whether to accept them before they are
scheduled clinical placements.
Publicly available information in report format regarding the
schedules and matching process.
Any school of nursing that is a CCPS user and has student cohorts
that need clinical experiences in order to meet course
requirements.
A site coordinator for a nursing school in CCPS. A school should
have at least one School Coordinator that will be responsible for
keeping information up to date and requesting clinical placements
at agencies.
Units in CCPS are the actual clinical areas within major service
areas (departments) that will accept nursing student cohorts. They
are organized under departments. All scheduling and availability
is completed at the unit level (and location). The names of units
have been selected to designate a particular clinical experience,
not the actual name of the unit in the individual hospital.
The following units are available in CCPS (listed by department):
Critical Care
• CCU (Cardiac Care Unit, also used as Critical Care Unit)
• CVICU (Cardiovascular Care Unit)
• Medical ICU (Medical Intensive Care Unit)
• Neuro ICU (Neurological Intensive Care Unit)
• Surgical ICU (Surgical Intensive Care Unit)
Emergency Dept
• Emergency Room
• Trauma
Med/Surg
• General Med/Surg
• Geriatrics
• GU/Renal (Gastrointestinal / Renal)
• Gynecology
• Medical
• Neurology
• Oncology
• Orthopaedics
• Respiratory
• Surgical
OB
• Antepartum
• L/D (Labor and Delivery)
• NICU (Neonatal Intensive Care Unit)
• Nursery
• Post Partum
27
Unit schedule / Unit
availability
Pediatrics
• Medical
• Medical/Rehab
• PICU (Pediatric Intensive Care Unit)
• Surgical
Peri-op
• OR (Operating Room)
• PACU (Post Anesthesia Care Unit)
• Short stay
Post Acute
• Acute Rehab
• Home health
• LTC (Long Term Care)
• SNF
• Subacute
Psychiatry
• Adolescent
• Adult
• Alzheimer's
• Detox
Specialty
• AIDS
• Burns
• Cath Lab
• Procedures
• Transplant
Telemetry
• Telemetry
Indicates the days of the week and shift times that a particular
clinical unit/location is available to accept students.
28
III. SCHOOL
This module will discuss all of the functionality contained within the School section of CCPS.
The School section is used by School Coordinators to complete all activities within CCPS:
•
•
•
•
•
•
•
•
Update school details (name, address, phone numbers, etc.)
Modify course and cohort information (add, change or remove)
Manage cohort schedules (create, edit, delete)
Find matching unit availability and request placements
View and edit proposals
View unit availability
Indicate preferred agencies
Maintain additional CCPS users for the school
Reports and simple lists are available within this menu to summarize the information that has
been entered in the CCPS. The reports are also accessible from the Reports menu, which shows
all reports for both school and clinical agency schedule and placement information.
Only School Coordinators and Administrators will have access to manage the information listed
above. When a School Coordinator logs into CCPS, he/she is brought to the School section by
default.
The School menu is organized around the three steps that must be completed to schedule
placements:
Step 1: Work with Courses and Cohorts
The course and cohort information that is entered for each school is the first step in using the
CCPS clinical placements. It is very important, because the preferred units selected at the cohort
level will form the basis for how the system searches through unit availability at clinical agencies
to show potential placements for a cohort. All of the data entry provides information to either
the system or other coordinators so that each has the information it needs to complete the process
of scheduling placements.
Step 2: Work with Cohort Schedules
For each clinical experience that is needed, school coordinators must define the cohort schedule.
This indicates the preferred time period, days of the weeks, and times that the students would
attend clinical rotations. It is not absolute, but rather a starting point for the system (along with
the cohort’s preferred units) to find agency availability. Once created, schedules may be easily
copied for future school terms.
Step 3: Work with Placement Requests
Once the cohorts and schedules have been defined, the system can search for potential matches at
clinical agencies. Several filters are available to narrow, or widen, the search results. Once a
proposal (placement request) has been made in the system, it can be reviewed on a screen and a
report. School Coordinators also have the option to edit the proposals.
29
Optionally, preferred partners may be designated to help with the matching process. All users
may visit this section to views lists of schools and lists of coordinators.
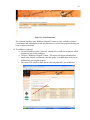
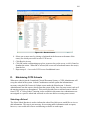
The School menu is the only menu needed by school coordinators to complete their data entry
and scheduling in the CCPS. Every screen and report needed for the process is available within
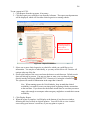
the steps or from the left menu once the School functional menu is selected:
Figure 11 – School menu
30
A.
Step 1: Work with Courses and Cohorts
The Step 1: Work with Courses and Cohorts subsection on the left menu is where users will enter
information about the schools participating in CCPS and the courses/cohorts requiring clinical
placements.
When a school coordinator logs into the system, their school is automatically selected and they
edit information only for their affiliated location. However, school coordinators will be able to
view public information, under lists and reports, for any school using the CCPS.
One screen is used for updating school information, describing courses, and managing cohorts.
Within this step are lists of course/cohort information. The following sections will provide stepby-step instructions on how to use each of these options.
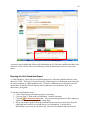
Updating School Information
Information about each school is stored in CCPS – address, phone numbers, website, and a brief
summary. School Coordinators and Administrators may update this information using the
following steps:
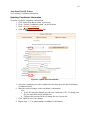
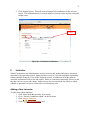
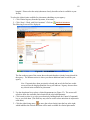
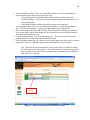
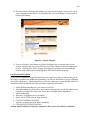
1. Click School from the top menu, if necessary.
2. Click “Step 1: Work with Courses & Cohorts” from the left menu
3. Click “Update” to the right of the school name.
31
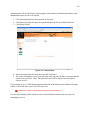
Figure 12 – Update School link
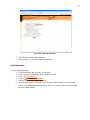
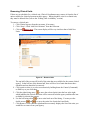
Once you have clicked Update, a new screen will display showing the current school
information in CCPS:
Figure 13 – Update School screen
4. Change the information as desired. Remember that shaded fields are required, so you
will not be able to save if any are left blank. Other fields are optional, but should be
completed if possible. In the “Brief Summary” field, you can enter information about the
school’s programs or students, or any general information that might be helpful to other
users. Please note that the summary field has a 2000 character limit.
5. Click “Save School Info.” once all changes have been made or click “Cancel School
Update” to exit the screen without modifying the information. Both actions will return
you to the Add/ Update/ Remove Courses and Cohorts screen.
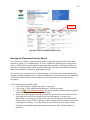
Maintaining Courses
The Add / Update / Remove Courses and Cohorts screen provides a single location for managing
all school, course and cohort information. This data is interrelated and has a logical hierarchy in
CCPS – School > Course > Cohort. A cohort is associated with a course and each course is
associated with a school. There may be one or more courses for each school, and one or more
cohorts for each course. Information cannot be deleted when something ties it to data lower in
the hierarchy (e.g., you cannot delete a course that still has one or more cohorts).
32
Therefore, course and cohort information may be updated concurrently or independently using
the Add / Update / Remove Courses and Cohorts screen under “Step 1: Work with Courses and
Cohorts”. This section will focus on managing your course information, while also describing
how to concurrently manage cohort data:
1. Click School from the top menu, if necessary.
2. Click “Step 1: Work with Courses and Cohorts” from the left menu
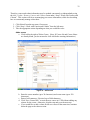
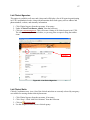
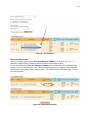
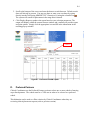
3. Take the appropriate action depending on what you would like to do:
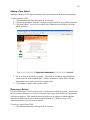
Add a course
a. Click Add to the right of Select Course. (Note: If Course No and Course Name
are already blank, you do not need to click Add before entering information.)
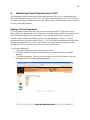
Figure 14 – Add Course
b. Enter the course number (up to 30 characters) and course name (up to 250
characters).
c. Enter a brief summary, if desired, up to 2000 characters.
d. Click “Save Course Info.” to store the new course in CCPS without adding any
cohorts for the course. Otherwise, skip this step and go to the next step.
e. If you would like to add a cohort for the new course at the same time, continue
down the page to the cohort section:
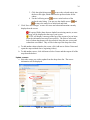
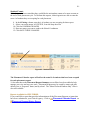
33
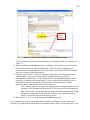
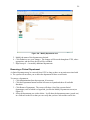
Course
Section
Cohort
Section
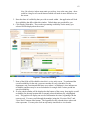
Figure 15 – Edit Courses & Cohorts sections
i. Enter a cohort name/number, which can be any combination of letters and
numbers, up to 20 characters long.
ii. Enter a brief summary of the cohort, if desired (up to 2000 characters).
This information will display on lists and reports.
iii. Enter the number of students in the cohort.
iv. Select the program type for this cohort from the drop-down list.
v. Indicate the level of the students, if desired. Levels may be defined
differently by each school, but could be used to indicate the semester that
the students are in.
vi. Indicate whether the basic preclinical paperwork, such as background
checks, has been completed for this group of students.
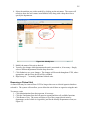
vii. Select the preferred units for the cohort’s clinical placements (this is a
required field and very important information, since it will form the basis
for how the system searches through unit availability at clinical agencies
to show potential placements for your cohort):
1. Use the drop down list to select a clinical department. The screen
will refresh to show the available clinical units for the department.
2. Click a unit to select it, or select several units by holding down the
Control (Command) key as you click them.
34
3. Click the right-facing arrow
to move the selected unit(s) into
the box at the right, which indicates the preferred units for the
cohort.
to move units back out of the
4. Use the left facing arrow
preferred units listing. You may use the double arrows (
and
) to move the entire list of units back and forth.
f. Click “Save All Changes” to store all course and cohort information currently
displayed on the screen.
If required fields (those that are shaded) are missing entries, an error
message will be displayed at the top of your screen.
CCPS will display a message at the top of the screen to let you know
when the information was stored successfully. The Select Course and
Select Cohort drop-downs will also refresh to show the new course and
cohort that were added. They will be in the top of the drop-down lists.
g. To add another cohort related to the course, click Add next to Select Cohort and
repeat the steps outlined above, beginning with (e).
h. To add another course, click Add next to Select Course and then repeat all of the
steps described above.
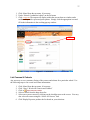
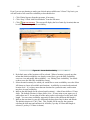
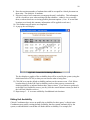
Update a course
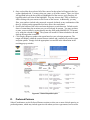
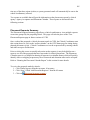
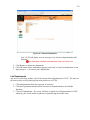
a. Select the course you wish to update from the drop-down list. The course
information will be displayed.
Figure 16 – Select Course
35
b. Update the course details as desired.
c. If you only wish to update the course, click “Save Course Info.” If you would
also like to add, update or remove cohort(s) associated with the selected course,
do not click “Save Course Info.” and continue to the next step.
d. To work with cohort information:
i. Select a cohort from the drop-down list. Only the cohorts associated with
the current course will be available. If you would like to add a new
cohort, click Add next to Select Cohort.
ii. Update the cohort information as desired. Remember, shaded fields
represent required information and must be populated. Or, click Remove
to the right of Select Cohort to delete the selected cohort. Refer to the
previous section for details about the cohort information and how to select
preferred units.
e. When all course and cohort changes have been made, click “Save All Changes” at
the bottom of your screen. (Note: Only one cohort may be updated at a time – if
you select a different cohort without saving, your changes will be lost.)
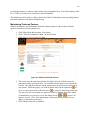
Remove a course
a. Select a course from the drop-down list (see Figure 18).
b. Click Remove. Only courses with no cohorts may be removed. If cohorts exist
for the course you are trying to delete, CCPS will display an error at the top of the
page.
i. To remove the cohort(s) associated with this course, select a cohort and
click Remove. Only cohorts without schedules may be removed. If the
cohort you are trying to delete has schedules, CCPS will display an error
at the top of the page. If schedules exist, you will need to remove those
first. Please refer to the “Deleting Cohort Schedules” section for
instructions on how to do this.
ii. Repeat the previous step until all cohorts for the course have been deleted,
then repeat step b.
c. Once CCPS has successfully removed the course, a message will be displayed at
the top of your screen.
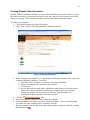
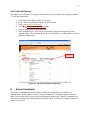
Maintaining Cohorts
To manage cohort information, you must first select a school and a course. Due to this, you may
choose to update cohort information concurrently with course updates as described in the
previous section. This section will provide you with the steps to manage cohort information
independently of courses.
1. Click School from the top menu, if necessary.
2. Click “Edit Courses & Cohorts” from the left menu under “Step 1: School Information”.
3. Take the appropriate action depending on what you would like to do:
36
Add a cohort
a. Select a course from the drop-down list. Only existing courses for your school
will be displayed.
b. Add a cohort by filling in the fields in the cohort section. Only shaded fields are
required, but we recommend that you complete the optional fields as well. Refer
to the “Maintaining Courses, Add a Course” section for additional details
regarding the fields and how to select preferred units.
c. Click “Save All Changes” to store all course and cohort information currently
displayed on the screen. You will need to use this button even if you did not
make any changes to the course information.
If required fields (those that are shaded) are missing entries, an error
message will be displayed at the top of your screen.
CCPS will display a message at the top of the screen to let you know
when the information was stored successfully. The Select Course and
Select Cohort drop-downs will also refresh to show the new cohort that
was added.
d. To add another cohort to the same course, repeat the steps outlined above
beginning with (b). To add a cohort for a different course, repeat all of the steps
described in this section.
Update a cohort
a. Select a course from the drop-down list.
b. Select a cohort from the drop-down list. Only the cohorts associated with the
current course will be available.
c. Update the cohort information as desired. Shaded fields represent required
information and must be populated.
d. When all cohort changes have been made, click “Save All Changes” at the bottom
of your screen. (Note: Only one cohort may be updated at a time – if you select a
different cohort without saving, your changes will be lost.)
Remove a cohort
a. Select a course from the drop-down list.
b. Select a cohort from the drop-down list. Only the cohorts associated with the
current course will be available.
c. Click Remove next to Select Cohort. Only cohorts without schedules may be
removed. If the cohort you are trying to delete has schedules, CCPS will display
an error at the top of the page. If schedules exist, you will need to remove those
first. Please refer to the “Removing Cohort Schedules” section for instructions on
how to do this.
List Schools
This option is available to all users and visitors and does not require any prior actions. List
Schools will display a list of all schools participating in CCPS, in alphabetical order, and will
include information about each school such as address and phone numbers, website, and
summary information.
37
1. Click School from the top menu, if necessary.
2. Under “School Coordinator Admin” on the left menu
3. Click List Schools The output will display within the current browser window and a
toolbar will provide export and print options. Simply click the appropriate icon and
fill in the information in the resulting pop-up window.
Toolbar
Figure 17 – List Schools
List Courses & Cohorts
Any user may access a summary listing of the courses and cohorts for a particular school. Use
the following steps to list course and cohort information:
1.
2.
3.
4.
5.
Click School from the top menu, if necessary.
Click “Step 1: Work with Courses and Cohorts”
Click on List Courses & Cohorts
Select a school from the drop-down list.
Select one or more courses by clicking on the checkbox next to the course. You may
also select all courses using the “Select All Courses” link.
6. Click Display Report to produce the list based on your selections.
38
Toolbar
Figure 18 – List Courses & Cohorts
B.
Step 2: Work with Cohort Schedules
School Coordinators will use this subsection of the School menu in CCPS to manage the
schedules for their student cohorts. Cohort schedules define the dates, time(s), and day(s) of the
week that the school is looking for a clinical placement. These schedules represent the preferred
rotation, but schools will still be able to view other options for placing students during the
matching process.
Only School Coordinators and CCPS Administrators may create and maintain student cohort
schedules.
A single cohort may have more than one schedule, which could be the case if the same cohorts
are used for each school term. However, keep in mind that the cohort details (such as number of
students and preferred units) will be the same for each schedule. This allows for previously used
cohort schedules to be copied over for use in upcoming terms.
The Work with Cohort Schedules screen is used to create, edit, delete and view schedules. It also
provides you a link to direct you to the Copy Schedules screen. This screen is used solely for
copying existing schedules over to new dates.
39
Creating Student Cohort Schedules
Initially, School Coordinators will have to create cohort schedules from scratch. However, once
the typical schedules for each term exist in the system, they may be easily copied for use in later
terms (see Copying Cohort Schedules in this section for instructions on this procedure).
To create a new schedule:
1. Click School from the top menu, if necessary.
2. Click” Step 2: Work with Cohort Schedules” from the left menu
Figure 19 – Manage Schedules
3. Before creating a new schedule, it is a good idea to check what currently exists to prevent
creation of duplicate schedules. To do this:
a. Select the course for which you want to create cohort schedules.
b. Enter a date range for the start date of the schedule.
c. Click Search.
d. Review the results to ensure that a schedule does not already exist for the course,
cohort, dates, day(s), and time(s) needed. (If a schedule does exist, consider
editing it as needed. See the section on “Editing Cohort Schedules” for
instructions on how to do this.) If one does not exist:
Create New Schedule link.
4. Click the
5. Select the course for which you want to create the schedule.
6. Select the cohort(s) for which you want to create the schedule. If you select more than
one cohort, the same schedule will be created for each one.
7. Enter the start date and end date for the placement period by typing it in directly, or using
the calendar icon .
40
Note: It is best to use dates that begin and end the weeks of the term (such as the
Sunday or Monday of the first week and the Saturday or Sunday of the last week),
rather than exact dates corresponding to the day(s) of the week that you have
selected. This will ensure that you reserve all of the necessary dates at the clinical
agency if you end up choosing a different day of the week than originally
expected.
8. Using the checkboxes next to each day, select the day(s) of the week that the students
will attend the clinical placement.
9. For each day that is selected, indicate the times by selecting a shift from the drop-down
list. This will automatically populate the start time and end time with defaults for the
selected shift. You may modify the times as desired by using the drop down lists next to
the hour and minute fields.
2. Select Shift
1. Select day
3. Modify
times, if
necessary
Figure 20 – Create New Schedule
Note:
• Scheduling will occur in shifts based on the shift times that are available at the
clinical agencies.
• Unit availability will be consumed by shift, even if the cohort will not be
present for the entire length of the shift. However, it is important to enter the
times that the cohort will be there so that the clinical coordinators have that
information.
10. Enter a brief summary of the cohort schedule, if desired. For example, this field could be
used to indicate whether the cohort rotates through other units, if there will be a different
group of students switching out halfway through the schedule/term or if there are any
special needs such as a conference room for debriefing.
41
11. Click Submit to save the schedule. You will be returned to the Work with Cohort
Schedules screen. Your new schedule will be displayed, if it fits the search criteria
(course(s) and date range) previously entered. (Note: If you did not complete a search
earlier, nothing will be displayed upon returning to the screen.)
12. Repeat steps 4 – 11 to create additional student cohort schedules.
Editing Cohort Schedules
Once schedules have been created by School Coordinators, they may be edited if any of the
variables need to change. If a cohort schedule has already been proposed to a clinical agency, no
changes to the dates, days or times can be made. However, the brief summary is always available
for editing, to provide more information to the clinical agency.
To edit student cohort schedules:
1. Click School from the top menu, if necessary.
2. Click “Step 2: Work with Cohort Schedules”
3. Click
Edit Schedules
4. Select the course(s) for which you want to edit cohort schedules.
5. Choose dates to search within – the system will look for schedules with start dates in the
time period you enter. Enter the start date and end date by typing it in directly, or using
the calendar icon .
6. Click Search to look for the existing schedules.
7. The screen will refresh to show a list of schedules that exist for your search criteria.
Figure 21 – Manage Schedules search results
42
8. To edit a schedule (only one may be modified at a time), click “Edit” to the left of the
schedule details.
9. You will be redirected to a screen that allows you to edit the variables in the same fashion
used to create the schedule.
Figure 22 – Edit cohort schedule
10. Modify the schedule as needed – start date, end date, days of the week, start time, end
time, and/or brief summary.
* Note: If a schedule is in a proposed or accepted status, only the brief summary
may be modified. The screen will notify you of this and prevent you from
modifying the start/end dates, days, and times.
11. Click Update Schedule to save the schedule changes. You will be returned to the Manage
Schedules screen and your changes will be reflected. (To return to the Work with Cohort
Schedules screen without saving any changes, click on the cancel button.)
12. Repeat steps 7 – 10 to modify additional schedules for the same course(s) and dates, or
steps 3 – 10 to edit schedules for other courses or date ranges.
Copying Cohort Schedules
Once cohort schedules have been created for a particular term, the schedules can be copied. The
existing information (course, cohort, day(s), times and comments) is used to form new schedules,
but the user specifies new start and end dates that represent the coming term.
Note: This functionality does not allow for copying schedules between courses or cohorts, it is
only to copy cohort schedules from one period to another.
To copy student cohort schedules:
43
1. Click School from the top menu, if necessary.
2. Click “Step 2: Work with Cohort Schedules” from the left menu
Copy Schedules link
3. Click on
Figure 23 – Copy Schedules
4. Select the course(s) for which you wish to copy schedules. You may select more than
one, or use the Select All Courses and Deselect All Courses options.
5. Enter dates to search between. The system will return all cohort schedules with a start
date in the range you have entered. For example, if you want to create a new set of
schedules for the fall term, enter the approximate dates of the previous fall term.
6. Click Search to find the existing schedules.
7. CCPS will show you a list of the schedules that meet your criteria (courses and dates)
with one schedule per row.
44
Figure 24 – Copy Schedules results
8. Select the schedule(s) that you wish to copy (remembering that the course, cohort, day(s)
and time(s), along with the brief summary will be copied over to the new schedule).
9. Enter a start and end date to be used on the new schedule(s). It is best to use dates that
represent the weeks that define the term (such as a Sunday or Monday start date and
Friday or Saturday end date) rather than exact dates that correspond to certain days of the
week to ensure that you request all the necessary weeks when proposing (in the event that
you select different days of the week than your schedule).
10. Click Copy. If the action is successful, the screen will display a message at the top
indicating how many cohort schedules were created.
11. To copy additional schedules, repeat steps 3 – 9. To edit the schedules you have created
using this feature, refer to the “Editing Cohort Schedules” section in this module. (Note:
Since only one cohort schedule can be modified at a time, we recommend that you pull
the Cohort Schedules report to determine if any changes are necessary. This will allow
you to quickly focus in on only the schedules that require modifications. Refer to the
“Running the Cohort Schedules Report” section for details.)
Deleting Cohort Schedules
Cohort schedules that have been created by School Coordinators may also be deleted if the
schedule is no longer needed. Only schedules that have never been proposed to a clinical
agency, or have had all proposals withdrawn, may be deleted.
To delete student cohort schedules:
1. Click School from the top menu, if necessary.
45
2. Click “Step 2: Work with Cohort Schedules” from the left menu
3. Select the course(s) for which you want to delete cohort schedules.
4. Choose dates to search within – the system will look for schedules with start dates in the
time period you enter. Enter the start date and end date by typing it in directly, or using
the calendar icon .
5. Click Search to find the existing schedules.
6. The screen will refresh to show a list of schedules that exist for your search criteria (see
Figure 22).
7. Use the checkbox to the left of each schedule to select those you wish to delete. You
may select as many as you like at one time. Schedules that have been proposed and
therefore cannot be deleted will not have a checkbox available.
8. Click Delete at the bottom of the screen to delete the selected schedule(s).
9. Click OK on the confirmation pop-up to continue, or Cancel.
10. Repeat steps 7 – 9 to delete additional student cohort schedules for the same courses and
dates or steps 3 – 9 to delete schedules for a different course or date range.
Viewing Cohort Schedules
Only School Coordinators may view cohort schedules using the Work with Schedules screen.
However, Instructors and Clinical Coordinators may view cohort schedules using the View &
Edit Proposals screen. Refer to the section titled “Viewing or Editing Proposals” for instructions
on how to do that.
To view cohort schedules:
1. Click School from the top menu, if necessary.
2. Click “Step 2: Work with Cohort Schedules” from the left menu
3. Select a school from the drop down list (your school will already be selected).
4. Select the course(s) for which you want to view cohort schedules.
5. Choose dates to search within – the system will look for schedules with start dates in the
time period you enter. Enter the start date and end date by typing it in directly, or using
the calendar icon .
6. Click Search to find the schedules.
7. The screen will refresh to show a list of schedules that exist for your search criteria (see
Figure 22). All information about each schedule will be displayed (course, cohort, start
and end dates, days of the week and times, brief summary, create date and last updated by
user ID). The status of the schedule will also be displayed to the right of each schedule:
a. “Not proposed” – schedule exists, but has not been matched to any agency
availability
b. “Withdrawn” – the schedule was proposed, but all previously requested
placements have been withdrawn (cancelled)
c. “Proposed” – all placement requests associated with this schedule are still waiting
to be accepted or declined by the agency(ies)
d. “Accepted” – all placement requests associated with this schedule have been
accepted by the clinical agency
e. “Declined” – all placement requests associated with this schedule have been
declined by the clinical agency
46
f. “View Details” – one or more unit locations have been requested but the
proposal(s) are not all in the same status
8. To view a schedule’s proposal details (only one may be viewed at a time), click the
hyperlinked status at the right side of the schedule. This will take you to the View & Edit
Proposals screen. Refer to the “Viewing or Editing a Proposal” section for more
information on this screen (begin with step 3 in that process to view and/or edit the
proposal.)
Running the Cohort Schedules Report
A report is also available to provide information on all of the student cohort schedules that have
been entered in CCPS. This may be accessed from within the School or the Report menu and
works the same regardless of which method is used. School Coordinators are encouraged to use
the option that is within the School menu so that time is not wasted on extra, and unnecessary,
navigation.
To run the Cohort Schedules report:
1. Click School from the top menu, if necessary.
2. Click “Step 2: Work with Cohort Schedules” from the left menu
3. Click on Cohort Schedule Report link. The report search parameters will be
displayed, which consists of two list boxes and search dates:
Figure 25 – Cohort Schedules report parameters
47
4. Select one school for which you would like to view information by highlighting it in the
left hand box.
5. Once a school has been selected, all of the courses for that school will appear in the box
on the right hand side. You may select one, some, or all of the courses. There is a Select
All hyperlink below the box which will highlight all of the courses, and a Deselect All
hyperlink which will clear all the highlights. You may also use the CTRL or Shift keys
while clicking with your mouse to select some of the courses.
6. Scroll to the bottom of the screen and enter the dates to search between. Default search
dates of current date plus or minus one year will already be present. You may use these
or enter your own dates by typing directly into the field (using MM/DD/YYYY format)
or by using the calendar icon . The system will search for schedules with start dates in
the range that is entered.
7. Click Display Report to produce the report based on your selection parameters. The
output will display within the current browser window and a toolbar will provide export
and print options. Simply click the appropriate icon and fill in the information in the
resulting pop-up window.
Toolbar
Figure 26 – Cohort Schedules report
48
C.
Step 3: Work with Placement Requests
The Step 3: Work with Placement Requests subsection is where school coordinators will access
the clinical placement matching functionality. School Coordinators will search for potential
clinical placement matches and make proposals to the agencies for availability that meets the
school’s needs. Clinical Coordinators will then review the schools’ proposals and either accept,
decline or Repropose them. Schools may also make changes to the proposals if mistakes were
made or needs have changed. Additionally, schools can view the current unit availability for any
agency and unit location in the CCPS.
All of the actions taken on proposals will cause automatic emails to be generated and sent by the
system to the coordinators for the affected partner. The emails will be sent from a
“ccpsautoemail” address with subject lines that reference CCPS:
•
School proposal alerts, sent to clinical coordinators:
o
o
CCPS request from {SCHOOL NAME} to place students in the {Department-Unit} area
CCPS request from {SCHOOL NAME} to place students in the {Department-Unit} area
has been WITHDRAWN
These emails will provide summary information about the request but are not a substitute for the
real-time information in the system. The emails are intended to be an alert that the user may
have action required in CCPS and to provide additional dialogue between users.
Only Coordinators and CCPS Administrators have access to this piece of CCPS. Additionally,
each coordinator may only take action on the items for their location. Other users may see the
data associated with CCPS matching by using the Reports section.
Requesting Placements
Once all of the underlying data is updated within CCPS (courses & cohorts, units & locations,
cohort schedules and unit availability), the School Coordinators will use the system to search for
unit availability at local clinical agencies that matches the needs of a student cohort schedule.
This section will describe how to do that.
The process for proposing clinical placement matches involves 4 basic steps:
• Select a cohort schedule
• Select search preferences
• Review results and select time slots to request
• Submit proposal
49
To search for availability and request a clinical placement:
1. Click School from the top menu, if necessary.
2. Click Step 3: “Work with Request Placements” from the left menu
Request a Placement link
3. Click on
4. Select a course. Once you have selected the course, the screen will display the cohort(s)
associated with it.
5. Select a cohort from the drop-down list. You may only work with one cohort at a time.
6. Click Show Available Schedules. The screen will refresh to show all cohort schedules
that are available for matching (meaning that they are not in a proposed or accepted
status, and the start and end date have not passed).
7. Select a cohort schedule by placing a check mark in the box next to the schedule you
wish to place. This will be the schedule for which the system will find potential matches.
You may select only one schedule at a time.
Figure 27 – Request Placements, step 1
8. Click Select Search Preferences. This will take you to the next screen and step, which is
to select your search preferences for finding matches:
50
Select filters
(optional)
Figure 28 – Request Placements, step 2
9. Select the filters that are important to you when looking for potential clinical placement
matches. This is optional – you may also search for availability without using any filters.
However, it is recommended that you use either the preferred agencies or county filter so
that the results returned for your review are more manageable. You can always reexecute the search without filters later if necessary.
• Best Matches – Searches only for availability at units that can match your
cohort’s number of students, preferred units, day(s) of the week, and shift times.
• Only include preferred agencies – Includes availability only for units at the
school’s preferred agencies.
• County – Includes availability only at agencies in the county selected.
• Department – Includes availability for any unit in the same department(s) as the
cohort’s preferred unit(s).
10. Click the “Search for availability” button. (Note: Click this button only once. Clicking it
more than one time may cause your request to be sent twice, which could result in errors
with the system.) The system will search for unit availability that matches your cohort
schedule based on the filters you selected and will display a list of your options on the
next screen (sorted by agency name and unit):
51
Shows which step
of the process you
are at
Figure 29 – Request Placements, step 3
11. Review the search results and select a shift and days of the week at one or more agency
unit locations to request for your student cohort. (If you used the Best Matches filter,
only the shift that matches your cohort schedule will be displayed.) The available options
will allow you to choose different days and/or times for the clinical placement than your
cohort schedule. Be sure to select both the shift(s) and the day(s) that you would like to
request.
Notes:
•
•
•
You may select more than one agency unit location to send proposals for
if you are trying to build a rotation for your student cohort. However,
please ensure that all unit locations selected are at the same agency.
You also have the option to select more than one agency to propose to –
your cohort will be placed at the first agency that accepts the proposal.
If your cohort will visit the agency at different times by day, or plans to
stay for 12 hours at an agency that uses 8 hour shifts, you may select more
than one shift for each unit location in your request.
12. When you have made your selection, click the “Review and finalize” button at the bottom
of the screen. This will take you to the final step, which is to check your proposal and
provide additional information to the clinical agency before submitting:
52
Figure 30 – Request Placements, step 4
13. Review the requested schedule(s) against your cohort schedule to ensure that the dates,
days and times are acceptable.
14. If desired, enter additional information for the clinical agency into the text box in the
middle of the page. This text will be embedded in the automatically generated email that
will be sent to the agency’s Clinical Coordinator when you submit the proposal. (If you
are proposing your cohort schedule to more than one agency, the same text will be in
each coordinator’s email.)
15. If you are proposing your cohort to a unit that does not have availability exactly matching
your cohort schedule, be sure that you accept the terms before submitting. This means
that you agree to the terms of the agency’s unit availability – the number of students they
can accept, and the dates, days, and times that you are requesting.
16. Click the “Submit Request” button to send your proposal for the agency’s consideration
and confirm on the pop-up question that you accept the terms. The screen will refresh to
show the proposal that you have made – this indicates that your request has been entered
in the system.
53
Figure 31 – School Proposal, completed
The Clinical Coordinator(s) will receive an email indicating that you have requested a clinical
placement at their facility, prompting them to review it in CCPS and accept or decline your
proposal. You will receive an email when they have taken action on your request.
A report is available to view all of the proposals you have made, the schedule that was requested,
and its status. Refer to the “Running the School Proposals Report” section for information about
this report.
Requesting Historical Placements
Any previously accepted placements are considered “Historical Placements” and can be resubmitted by using the Historical Placement wizard. Historical placements will be proposed to
the same hospital(s), unit(s), days of week and shift(s) as previously accepted. If the new request
needs modification, other than entering new dates, the historical placement feature cannot be
used. Please see “Requesting Placements” on page 47.
Step 3: Work with Historical Placements
Step 1 of 4: School Proposals report link. This report will display what’s already been requested
to avoid adding duplicate entries (optional).
54
Figure 32 – School Proposals Report link
Click Next.
Step 2 of 4: To view historical placements click Search or change the default from and to dates,
select a course and cohort to filter and help manage your view.
Select all historical placements you would like to submit by placing a checkmark in the left
column.
Click Next.
55
Figure 33 – Requesting Historical Placements Step 2 of 4
Step 3 of 4: Enter a new start and end date for each request that you would like to propose to the
hospital(s). Note: By default the populated dates are one year out from previous placements.
Overwrite these dates to request the new from and to dates.
Enter comments for the hospital (optional).
Select the placement request by placing a checkmark next to Agency/Unit/County. The system
will not submit request(s) that haven’t been selected. (Figure 34).
Click Submit Historical Placement Requests
Once the request has been submitted the following confirmation is printed: Selected Unit has been
Proposed and the Agency has Been Notified!
56
Figure 34 – Requesting Historical Placements Step 3 of 4
Step 4 of 4: Click Finish
57
Figure 35 – Submit Historical Placement Request Step 4 of 4
Viewing or Editing a Proposal
In addition to reports, the proposals that have been requested by schools may be viewed using
the “View & Edit Proposals” screen. The details of the request, such as agency/unit/location,
dates, shift(s), and day(s) of the week will be displayed. The date of the request and the status is
also available. Coordinators and Instructors have access to view proposals here.
If an error was made during the proposal process, or the school’s needs have changed, a proposal
may be edited or withdrawn by School Coordinators (Instructors do not have access to the
“Withdraw Proposal” feature). Only proposals that are still pending, and have not been accepted
or declined by a clinical agency, may be withdrawn. This option may also be used to cancel a
portion of a proposal – such as if an extra unit location or agency was selected by mistake.
A cohort schedule will be available for schedule matching again if only declined and withdrawn
proposals exist against it. In order to re-propose to the same agency/unit/location and shift that
was previously requested, the earlier proposal must be withdrawn (not declined).
Since the process required to withdraw a proposal is exactly the same as that of viewing the
request with two additional steps, both are discussed in the following section together.
To view and/or edit proposals:
1. Click School from the top menu, if necessary.
2. Click “Step 3: Work with Placement Requests”
3. Click on
View & Edit Proposals link
58
4. Select the course for which you want to view/edit a cohort schedule proposal. Once you
have selected the course, the screen will display the cohort(s) associated with it.
5. Select the cohort(s) for the schedule that was proposed and needs to be withdrawn. If
you select more than one cohort, the schedules will be displayed for each.
6. Choose dates to search within – the system will look for schedules with start dates in the
date range that you enter. Enter the start date and end date by typing it in directly, or
using the calendar icon . Default search dates are provided.
7. Click Search to find the existing schedules.
8. The screen will refresh to show a list of schedules and the details for each schedule that
exist for your search criteria. Results can be sorted by using the cohort and status filters.
By default the withdrawn proposals don’t show on the screen. To view withdrawn
requests place a checkmark next to “Show Withdrawn Schedules?” and click Search to
refresh the page.
Figure 36 – View & Edit Proposals search results
9. You can click on View in the Comments column to see a history of comments between
the school and clinical agency for that schedule
59
Figure 37 – View Comments
The selection checkbox and “Withdraw Proposal” button are only available to School
Coordinators and Administrators and only when there is at least one proposal that has not
been accepted or declined.
10. To withdraw a proposal:
a. Use the checkboxes in the “Selected” column next to each row to indicate which
proposal(s) you wish to withdraw.
b. Click the “Withdraw Proposal” button. This action will trigger an automated
email to the clinical coordinator(s) for that agency to let them know that you are
withdrawing your original request.
c. The screen will refresh to show that the selected proposal(s) was withdrawn.
60
Figure 38 – Withdraw Proposal
11. You can withdraw multiple proposals from multiple cohorts at one time provided they are
associated with the same course. Repeat step 9 to withdraw additional proposals from
another course.
Note: If you have only declined and/or withdrawn proposals for a cohort schedule
after following this process, you will now be able to request a new schedule
match for it. Refer to “Requesting Placements” for help with this process.
12. To edit a proposal:
a. Click on the Edit link next to the proposal you would like to change.
b. A table will display below the Withdraw Proposal button with the availability for
that agency during the dates specified by your schedule.
Figure 39 – Edit Proposal
c. Select the shift or shifts and days of the week for each unit you would like to repropose to.
d. Click on the Agree to Terms & Submit Request button to complete your edit.
This action will trigger a series of events. First, your original proposal will be
withdrawn and the new proposals will be submitted. Secondly, an automated
email will be sent to the clinical agency notifying them that your original proposal
61
was withdrawn. Thirdly, another automated email will be sent to the clinical
agency notifying them that there is another proposal from your school for them to
consider.
e. Repeat step 11 for each schedule you would like to edit.
Repropose a Placement Request
Clinical Coordinators can place your students onto different units within the same department
you requested. If there is a need to request a different department, shift or make changes to your
cohort schedule such as changing the dates, days of the week, the hospital will use the Repropose
option, asking you via comments to modify and re-submit your placement request.
If a request is in Repropose status school coordinators can edit or withdraw the request to make
changes before they re-submit. Hospital coordinators are not able to accept or decline the request
until it has been re-submitted by the school.
If you are notified that you are being asked to re-propose one of your placement requests
please do one of the following:
1. If you would like to re-submit your request for a different shift or department/unit you
can edit your proposal. see Edit Proposals
2. If you need to make changes to your cohort schedule in order to request different dates,
days of the week etc. you will need to:
•
•
•
Withdraw your request (see Withdraw Proposal)
Edit your cohort schedule (see Editing Cohort Schedules)
Make your new request (see Requesting Placements)
62
Figure 40 – View & Edit Re-Proposal
Viewing Unit Availability
Any logged-in user may choose to view unit availability for any clinical agency. The display is
very similar to what Clinical Coordinators use to modify the unit availability and also includes a
color-coded calendar that will indicate by week where the unit location is still available. The
screen will first list all of the schedules that define total availability – for each unit location, it is
the sum of all schedules that determines overall availability. The graphic will help to depict this,
along with any requests that have been made against the original availability.
Note: It is not necessary to look here for availability prior to the placement request process. The
system will search for availability for you, based on your cohort, cohort schedule and search
parameters, which will be much more efficient than looking at a particular availability.
However, this screen is helpful if you are interested in a specific clinical agency’s unit and
would like to see the current state of availability.
School Coordinators view unit availability from the School Menu:
1. Click “Step 3: Work with Placement Requests,
View Unit Availability
2. Click on
3. Select an agency from the drop down list at the top of the screen. You will only be able
to view availability for one agency at a time.
4. Select which unit(s) you would like to view by placing a checkmark in the box to the left
of the unit location name (it will be displayed in “Department Unit (LOCATION)”
format). You may also use the Select All / Deselect All options at the top right corner of
the list to make your selections.
63
Note: Be selective in how many units you wish to view at the same time – there
could be a long list of records returned which will make it more difficult to use
the screen.
5. Enter the dates of availability that you wish to search within – the application will look
for availability that falls within this window. Default dates are provided for you.
6. Click Display Schedules. The records representing availability for the unit(s) you
selected will be displayed on the screen:
Figure 41 – View Unit Availability
7. None of the fields will be editable since this is a view only screen. To understand the
overall availability for the unit, you must consider all rows (schedules) for the
department, unit, location and shift since rows where # of Students is zero indicates no
availability and there may be several schedules for a single shift if a time period has
special availability.
8. A color-coded calendar will be displayed at the bottom of the screen, showing the overall
availability for the unit location that is currently selected (indicated by a highlighted
row). The graphic will display one week of information at a time, beginning with the
current week. You may scroll through the month(s) using the “Previous Week” and
“Next Week” buttons at the bottom. The legend below the calendar shows what each
color represents. You may also click on any hourly time block to view details:
64
Figure 42 – View Unit Availability calendar graphic
A report is available that will provide information on all of the unit schedules that have been
entered in CCPS. Please refer to the Reports section for information on how to access this data.
However, note that the report only indicates the beginning availability – it will not show where
that availability has already been scheduled and reserved for a particular cohort. To see
scheduled placements at agencies, other reports are available.
Running the School Proposals Report
A “School Proposals” report will provide information on all of the cohort schedules that have
been proposed in CCPS. This may be accessed from the School or the Report menu and works
the same regardless of which method is used. School Coordinators are encouraged to use the
option that is within the School menu so that time is not wasted on extra, and unnecessary,
navigation.
To run the School Proposals report:
1. Click School from the top menu, if necessary.
2. Click on “Step 3: Work with Placement Requests”. Click on School Proposals
Report link. The report search parameters will be displayed, which consists of two list
boxes and search dates.
3. Select one school for which you would like to view information By highlighting it in the
left hand box.
65
4. Once a school has been selected all of the courses for that school will appear in the box
on the right hand side. You may select one, some, or all of the courses. There is a Select
All hyperlink below the box which will highlight all of the courses, and a Deselect All
hyperlink which will clear all the highlights. You may also use the CTRL or Shift keys
while clicking with your mouse to select some of the courses. Additionally, you may
filter your results to include only proposed, accepted, declined, or any combination of the
three by clicking on the appropriate text boxes above the search dates.
5. Scroll to the bottom of the screen and enter the dates to search between. Default search
dates of current date plus or minus one year will already be present. You may use these
or enter your own dates by typing directly into the field (using MM/DD/YYYY format)
or by using the calendar icon . The system will search for cohort schedules with start
dates in the range that is entered.
6. Click Display Report to produce the report based on your selection parameters. The
output will display within the current browser window and a toolbar will provide export
and print options. Simply click the appropriate icon and fill in the information in the
resulting pop-up window.
Toolbar
Figure 43 – School Proposals report
D.
Preferred Partners
School Coordinators use the Preferred Partners section to select one or more clinical agencies as
preferred partners, which may include agencies with whom you have agreements, have used for
66
previous placements, or who are simply in the same geographical area. The clinical agency must
be a CCPS user in order to be selected as a preferred partner.
This distinction can be used as a filter criterion by School Coordinators when requesting clinical
placement matches in the Match Schedules step.
Maintaining Preferred Partners
School Coordinators use the Maintain Preferred Partners option to add or remove clinical
agencies from their preferred partners list.
1. Click School from the top menu, if necessary.
2. Go to “School Coordinator Admin” on the left menu
3. Click Manage Preferred Partners link
Figure 44 – Maintain Preferred Partners
4. This screen uses the same convention as the Edit Courses & Cohorts screen for
selecting a cohort’s preferred units. All available clinical agencies are listed in the
left box. The right box indicates which agencies have been selected as preferred by
to
your school. Select the agency you wish to update and click the right arrow
move it to the preferred list or the left arrow
to remove it from the preferred list.
You may also select more than one agency at a time by holding down the Control
(Command) key as you select, or use the double arrows (
or
) to move all
agencies at once. (Note: The functionality will not provide any benefit if every
agency is indicated as preferred.)
5. Click Submit when you are finished.
67
List Preferred Partners
This public area will produce a listing of the selected school’s preferred clinical agency partners.
To view this information:
1.
2.
3.
4.
5.
6.
Click School from the top menu, if necessary.
Go to “School Coordinator Admin” on the left menu
Click Manage Preferred Partners
Click on Preferred Partners Report link
Select a school from the drop-down list.
Click Display Report. This will create a listing of all preferred agencies for the
selected school. The information may be viewed online, or you may print or export it
using the toolbar icons.
Toolbar
Figure 45 – List Preferred Partners (Agencies)
E.
School Coordinator
The School Coordinator Admin subsection is where an existing School Coordinator or
Administrator can add, update or remove school coordinators. The update function will also
allow for password resets in case a user has forgotten their password. School Coordinators will
have access to manage this information only for their school. All School Coordinators have the
same level of access.
68
Adding a New Coordinator
To add a new School Coordinator:
1. Click School from the top menu, if necessary.
2. Go to “School Coordinator Admin” on the left menu
3. Click “Manage Coordinators”
4. Click the
Add New Coordinator link.
5.
Figure 46 – Add New School Coordinator
6. Create a user ID for the new coordinator – we recommend using a convention such as
the first letter of the person’s first name followed their entire last name.
Note: When a new coordinator is added, the initial password will be the same as
the user ID. A School Coordinator, Administrator, or the user may change this
later.
7. Select the school that the coordinator will be assigned to (this is only required for
Administrators – for school coordinators, your school will be the only option.)
8. Enter the coordinator’s full name in the User Name field.
9. Enter all other information requested for the new coordinator. Only shaded fields are
required, but complete all fields to the best of your ability. The new coordinator will
be able to edit his or her information later if necessary.
10. Click Submit when you are done entering information.
11. Repeat steps 2-7 to add additional coordinators.
69
Auto Email On/Off Feature
See Updating Coordinator Information
Updating Coordinator Information
To update a School Coordinator’s information:
1. Click School from the top menu, if necessary.
2. Go to “School Coordinator Admin” on the left menu
3. Click “Manage Coordinators”
4. Click the
Update Coordinators link.
Figure 47 – Update School Coordinator
5. Select the coordinator you wish to update from the drop-down list and click Display
Coordinator Detail.
6. Make the required changes to the coordinator’s information.
Note:
• A user ID cannot be changed once the user is added to CCPS. To change user
ID, you must delete and re-add the user.
• Typing in the password field will change the user’s password.
7. Click Update to save your changes.
8. Repeat steps 3 – 5 to update another coordinator’s information.
70
Removing a Coordinator
To remove a School Coordinator from CCPS:
1. Click School from the top menu, if necessary.
2. Go to “School Coordinator Admin” on the left menu
3. Click “Manage Coordinators”
4. Click on the Remove a Coordinator link.
5. Select the coordinator you wish to remove from the drop-down list and click Display
Coordinator Detail.
6. Verify that the correct user is selected.
Figure 48 – Remove School Coordinator
7. Click Remove to delete this coordinator.
8. Repeat steps 3 – 5 to remove another coordinator.
List Coordinators
The List Coordinators function is available to all users and visitors in CCPS. This data may be
useful to clinical agencies when reviewing clinical placement requests, other schools in the case
of conflicting requests, or to CCPS Administrators.
To view this information:
1. Click School from the top menu, if necessary.
2. Go to “School Coordinator Admin” on the left menu
3. Click “List Coordinator Report”
4. Select a school from the drop-down list.
71
5. Click Display Report. This will create a listing of all coordinators for the selected
school. The information may be viewed online or you may export or print it using the
toolbar icons.
Toolbar
Figure 49 – List School Coordinators
F.
Instructor
School Coordinators and Administrators use this section to add, update and remove instructors
associated with a particular school. Instructors have access to view unit availability and student
cohort schedules (using the View & Edit Proposals screen), in addition to all of the publicly
accessible information such as lists and reports. However, instructors cannot add, remove or edit
any data, such as courses and cohorts. Instructors are not associated with any cohort or cohort
schedule in particular, except as referenced in a brief summary area.
Adding a New Instructor
To add a new school instructor:
1. Click School from the top menu, if necessary.
2. Go to “School Coordinator Admin” on the left menu
3. Click Manage Instructors
Add New Instructor link.
4. Click on
72
Figure 50 – Add New Instructor
5. Create a user ID for the new instructor – we recommend using a standard convention,
such as the first letter of the person’s first name followed by their entire last name.
Note: When a new instructor is added, the initial password will be the same as the
user ID. A School Coordinator, Administrator, or the user may change this later.
6. Enter the instructor’s full name in the User Name field.
7. Enter all other information requested for the new instructor. Only shaded fields are
required, but complete all fields to the best of your ability. The new instructor will be
able to edit his or her information later if necessary.
8. Click Submit when you are done entering information.
9. Repeat steps 2 – 6 to add additional instructors.
Updating Instructor Information
To update a school instructor’s information:
1. Click School from the top menu, if necessary.
2. Go to “School Coordinator Admin” on the left menu
3. Click Manage Instructors
4. Click on
Update Instructor link.
73
Figure 51 – Update Instructor
5. Select the instructor you wish to update from the drop-down list and click Display
Instructor Detail.
6. Make the required changes to the instructor’s information.
Note:
• User ID cannot be changed once the user is added to CCPS. To change
user ID, you must delete and re-add the user.
• Typing in the password field will change the user’s password.
7. Click Submit to save your changes.
8. Repeat steps 2 – 5 to update another instructor’s information.
Removing an Instructor
To remove a school instructor from CCPS:
1. Click School from the top menu, if necessary.
2. Go to “School Coordinator Admin” on the left menu
3. Click Manage Instructors
4. Click on
Remove Instructor link.
5. Select the instructor you wish to remove from the drop-down list and click Display
Instructor Detail.
6. Verify that the correct user is selected.
74
Figure 52 – Remove Instructor
7. Click Remove to delete this instructor.
8. Repeat steps 2 – 5 to remove another instructor.
List Instructors
To view this information:
1. Click School from the top menu, if necessary.
2. Go to “School Coordinator Admin” on the left menu
3. Click “Manage Instructors”
4. Click on List Instructors Report
5. Select a school from the drop-down list.
6. Click Display Report. This will create a listing of all instructors for the selected
school. The information may be viewed online, or you may print or export it using
the icons on the toolbar.
75
Toolbar
Figure 53 – List Instructors
76
IV. CLINICAL AGENCY
This module will discuss all of the functionality contained within the Clinical Agency section of
CCPS. The Clinical Agency section is used by Clinical Coordinators to complete the following
activities:
•
•
•
•
•
•
•
•
•
Update clinical agency details (name, address, phone numbers, etc.)
Maintain which unit locations, if any, can accept simultaneous cohorts
Modify clinical units available for placements (add or remove)
Specify locations for clinical units
Create default unit availability
Edit and view unit availability
Review and respond to placement requests
Indicate preferred partners
Maintain additional CCPS users for the school
Reports and simple lists are available within this section to summarize the information that has
been entered in the CCPS. Some reports are also accessible from the Reports menu, which
shows all reports for both school and clinical agency schedule and placement information.
Only Clinical Coordinators and Administrators will have access to manage the information listed
above. When a Clinical Coordinator logs into CCPS, he/she is brought to the Clinical Agency
section by default.
The Clinical Agency menu is organized around the three steps that must be completed to
schedule placements:
Step 1: Work with Unit Locations
Entering the unit and location information for each agency is the first step for Clinical Agencies
using the CCPS clinical placement system. The units that are selected will form the basis for
those that will have availability to accept nursing students and define what information the
schools will see when searching for placement matches. While locations are optional, it is
recommended that they are used so that schools have additional information about each of the
units. All of the data entry provides information to either the system or other coordinators so that
each has the information it needs to complete the process of scheduling placements.
Step 2: Work with Unit Schedules
For each unit that was selected in the first step, availability must be created that indicates which
time slots are actually available to accept nursing students (by dates, shifts, and days of the
week). Clinical Agencies also specify the maximum number of students that can be
accommodated on the unit. The system creates 24x7 availability by default, using four
parameters selected by the user. Once the availability is created, coordinators have the option to
customize it for their needs.
77
Step 3: Work with Placement Requests
Once the units and availability for each have been defined, schools will be able to find potential
matches for their cohort schedules and request the time slots. As they make placement requests,
their proposals will show up in the queue for clinical agencies. Using screens and reports,
Clinical Coordinators review each placement request and decide whether to accept or decline it,
then update it appropriately in the system.
Optionally, preferred partners may be designated to help with the matching process. All users
may visit this section to views lists of agencies, units/locations, coordinators, and to see an
agency’s preferred schools.
78
A.
Step 1: Work with Unit Locations
The Step 1: Work with Unit Locations subsection on the left menu is where users will find
information about the locations available for scheduling.
When a clinical coordinator logs into the system, their agency is automatically selected and they
edit information only for their affiliated location. However, clinical coordinators will be able to
view public information, under lists and reports, for any agency using the CCPS.
This section provides screens for updating agency details such as address, phone and website,
selecting units and specifying their locations, removing units, and viewing the agencies and units
that are in the CCPS. The following sections will provide step-by-step instructions on how to
use each of these options.
Updating Clinical Agency Details
Information about each agency is stored in CCPS – address, phone numbers, website, and a brief
summary. Instructors and students may reference this for their scheduled placements. Clinical
Coordinators and Administrators can update this information using the following steps:
1.
2.
3.
4.
Click Clinical Agency from the top menu, if necessary.
Under “Clinical Coordinator Admin” from the left menu
Click on “Update Agency Details” link
Edit the information as desired. Remember that shaded fields are required, so you will
not be able to save if any are left blank. Other fields are optional, but should be
completed if possible. In the “Brief Summary” field, you can enter information about
orientation or any general information that might be helpful to other users. Please note
that the summary field has a 2000 character limit.
79
Figure 54 – Update Clinical Agency Details
5. Optional: If one or more units at your clinical agency could accommodate multiple
cohorts being on the unit simultaneously, select the Yes button next to “Can you accept
more than one cohort on a unit at the same time?”
a. After changing this to Yes (the field defaults to No), a link will appear to “Specify
by Unit Location”:
80
Figure 55 – Update Agency Details, accept more than one cohort
b. Click on this link to see the list of unit locations at your agency and select which
are able to accept multiple cohorts:
81
Figure 56 – Specify by Unit Location
c. Click on the Yes button to change the flag for specific unit locations. This will
prevent overlapping school requests from being automatically declined when one
is accepted.
Note: If you have not defined the clinical units and locations available at
your site yet, it will be premature to update this setting. Select units and
assign locations first and then return to this screen.
d. Click Submit to save your changes or Cancel to discard the changes and return to
the Update Agency Details screen.
6. Click Submit once all changes have been made.
Selecting Clinical Units Available for Placement
This is the first step for a Clinical Coordinator to take to indicate where the clinical agency can
accept nursing student cohorts. The CCPS Administrators have defined a standard list of clinical
departments and units that are most common at hospitals. From this list, Clinical Coordinators
select which units are available at their agency.
Note: The departments and units available in CCPS are meant to describe typical clinical
experiences, not necessarily the exact name of the department or unit for a particular
82
hospital. Please select the unit(s) that most closely describes what is available at your
facility.
To select the clinical units available for placement scheduling at your agency:
1. Click Clinical Agency from the top menu, if necessary.
Add Unit Schedules
2. Click “Step 1: Work with Unit Locations”. Click on
The following screen will be displayed:
Figure 57 – Add New Units
The list on the top part of the screen shows the units that have already been selected for
the agency. The bottom section is where you choose additional units to add for your
agency.
Note: If no units have been previously selected and saved, the first box on this
screen will not be displayed and the screen will indicate “Agency does not have
any clinical units available for placement.”
3. Use the drop down list to select a clinical department (see Figure 53). The screen will
refresh to show the available clinical units for the selected department.
4. Click a unit to select it, or select several units by holding down the Control (Command)
key as you click them. (The Shift key may also be used to select units that are adjacent to
each other.)
to move the selected unit(s) into the box at the right,
5. Click the right-facing arrow
which indicates the clinical units that will be made available for clinical placements.
83
6. Use the left facing arrow
to move units back out of the selected units listing. You
may use the double arrows (
and
) to move the entire list of units back and forth.
7. Repeat steps 3 – 7 to select clinical units from other departments.
8. When you are finished selecting units, click Submit at the bottom of the page. The page
will refresh with a success or failure message and if successful, the display box at the top
of the screen will appear, listing the clinical units you have just selected.
Maintaining Unit Locations
This is an optional feature in CCPS that Clinical Coordinators may use to provide additional
information about their clinical units. Some clinical agencies will need to use it when their site
has multiple locations of a particular clinical unit. If no locations are provided, a default location
of “Not specified” will be assigned by the system.
Note: While locations are optional, it is recommended that they be used to further
describe clinical units. The additional information is often helpful to both clinical
agencies and schools.
To maintain the unit locations for your clinical agency:
1. Click Clinical Agency from the top menu, if necessary.
2. Click “Step 1: Work with Unit Locations” from the left menu.
Edit Unit Locations . The screen will show a list of the clinical units available
3. Click on
at your agency, along with the location(s), if any have already been provided (otherwise,
“Not Specified” will be used):
Figure 58 – Maintain Unit Locations
84
4. To add or update a location, click the hyperlinked department name next to the unit you
wish to edit. Once you have done so, additional options will be displayed for that clinical
unit:
Cannot be unassigned,
schedules exist
Figure 59 – Updating Unit Locations
The clinical department/unit that you have selected will be highlighted. In the space
below the listing of all units and locations, the system will display all of the locations for
your clinical agency. The location(s) currently selected for that unit will be checked.
5. To add (assign) a location for this unit, place a checkmark in the box next to “New
Location” and type in the new location name, or select one of the existing location
names. An error will be generated if the new location name is a duplicate of any existing
locations. If it is, you may simply select it to assign the location to that unit.
a. If you add or select a location for a unit that currently uses the system default (Not
Specified) and for which there are already schedules (unit availability was
created), the system will ask whether you would like to overwrite your existing
schedules with this new location:
85
Figure 60 – Overwrite “Not Specified” availability
6.
7.
8.
9.
If you choose “Yes,” your existing availability (under the Not Specified location
for the selected unit) will be updated to reference the new location you have
indicated. Click No to cancel and return to the Maintain Unit Locations screen.
(Figure 55)
Before clicking Submit, you may also remove locations from a unit by deselecting the
location. However, if availability has already been created for that unit and location, the
checkbox will be grayed out and cannot be unassigned (see Figure 54).
On this screen, you may also modify the name of existing locations and/or delete them
entirely. (Note: Deleting a location removes it from the database completely. If you wish
to simply remove it from a particular unit, refer to the previous step.)
a. To modify an existing location name, simply make your changes in the text field
containing the name and click Submit. An error will be generated if a modified
name duplicates any existing locations.
b. To delete a location name, click on the “Delete Location” link to the right of the
name. You will only be able to delete a location that does not have availability
against it and that is not assigned to any units. If this is not the case, the link will
be grayed out and unavailable.
Click Submit at the bottom of the screen when you are finished modifying the location(s)
for the unit. The screen will refresh to show your changes.
Repeat steps 3 – 7 to add or update the location(s) for additional clinical units.
86
Removing Clinical Units
If there are no schedules for a clinical unit, Clinical Coordinators may remove it from the list of
units available for clinical placement at their agency. When schedules exist for a clinical unit,
they must be deleted first (refer to the “Editing Unit Availability” section).
To remove a clinical unit:
1. Click Clinical Agency from the top menu, if necessary.
2. Click “Step 1: Work with Unit Locations” from the left menu.
3. Click on Remove Units . The screen display will be very similar to that of Add New
Units.
Figure 61 – Remove Units
4.
5.
6.
7.
The top half of the screen will list all of the units that are available for the current clinical
agency. In the left box of the bottom half, there will be a list of units that do not have
schedules and can therefore be removed.
Click a unit to select it, or select several units by holding down the Control (Command)
or Shift key as you click them.
Click the right-facing arrow
to move the selected unit(s) into the box at the right,
which indicates the clinical units that will be removed from the agency and therefore not
available for clinical placements.
Use the left facing arrow
to move units back out of the listing. You may use the
and
) to move the entire list of units back and forth.
double arrows (
Click Remove Units when the right hand box accurately displays the list of the units you
would like to remove from your agency.
87
List Clinical Agencies
This option is available to all users and visitors and will display a list of all agencies participating
in CCPS, in alphabetical order, along with information about each agency such as address and
phone numbers, website, and summary information.
1. Click Clinical Agency from the top menu, if necessary.
2. Under “Clinical Coordinator Admin” from the left menu
3. Click on List Clinical Agencies. This will create a listing of all clinical agencies in CCPS.
The information may be viewed online, or you may print or export it using the toolbar
icons.
Toolbar
Figure 62 – List Clinical Agencies
List Clinical Units
Clinical Coordinators may view a list of the clinical units that are currently selected by an agency
as available for nursing student clinical placements.
1.
2.
3.
4.
Click Clinical Agency from the top menu, if necessary.
Click “Step 1: Work with Unit Locations” from the left menu.
Click on List Clinical Units.
Use the drop-down list to select a clinical agency.
88
5. Click Display Report. The listing of all clinical units for the selected agency will be
displayed. The information may be viewed online, or you may print or export it using the
toolbar icons.
Toolbar
Figure 63 – List Clinical Units
B.
Step 2: Work with Unit Availability
In this step of the process, a clinical agency will create default 24 x 7 availability for each of the
clinical units that have been selected. An agency may then edit the default availability for their
specific needs by editing the dates, shifts and days that are available for accepting nursing
student cohorts.
This section describes how to create, edit and view unit availability.
Creating Unit Availability
Once the units available for clinical placements at the agency have been selected (see “Selecting
Units Available for Clinical Placement” under the previous section), a Clinical Coordinator can
quickly and easily establish default 24 hour/7 day availability for them by providing just three
key pieces of information. The system will automatically create the appropriate unit schedules
that are necessary to represent this availability. Clinical Coordinators will be able to edit them
on a separate screen if necessary.
89
Even if you are not planning to make your clinical units available on a 24 hour/7 day basis, you
will still need to first create the availability as described below.
1. Click Clinical Agency from the top menu, if necessary.
2. Click “Step 2: Work with Unit Schedules” from the left menu.
Add Unit Schedules . The screen will display the list of units (by location) that can
3. Click
be selected for creating default availability:
Figure 64 – Create Unit Availability
4. By default, none of the locations will be selected. When a location is grayed out, that
means that default availability was already created for it (go to the Edit Availability
screen to view and modify that availability – see “Editing Unit Availability” for details
on how to use the Edit Unit Availability screen).
5. Select the unit location(s) for which you would like to create availability or use the Select
All feature to choose all available unit locations. Availability is created at the unit and
location level – if you have more than one location for a particular unit, each location
may have its own availability.
6. Indicate the shift length for the selected unit location(s) – either 8 hour shifts or 12 hour
shifts. The default selection is 8 hour shifts. (Note: If some units at your agency are 8
while others are 12, be sure that all of the units you have selected are on the same shift
length. You can create availability separately for those with a different shift length.)
7. Indicate the start time for your day shift using the drop down lists for hour and minute.
The default selection is 07:00 (7 am). This variable will be used by the system to
calculate the shift start and end times for all shifts (3 per day if 8 hour shift length is
selected, 2 per day if 12 hour is chosen).
90
8. Enter the maximum number of students that could be accepted for clinical placement on
these units. The default is 10 students.
9. If desired, enter a brief comment to accompany the unit’s availability. This information
will be viewable to users when working with the schedules – either to view or modify
them, or when schools are reviewing possible placement options. (Note: If several unit
locations are selected, this summary information will be applied to each one.)
10. Click Submit once all entries are completed.
11. A pop-up box will display:
Figure 65 – Create Unit Availability confirmation
The box displays a graphic of the availability that will be created by the system (using the
default start time of 07:00) so that you can visualize what is being done.
12. Click OK to accept the default availability and stay on the current screen. Click Edit to
be taken directly to the Edit Unit Availability screen so that you may customize the
default availability or indicate blackout days, dates or times. If you choose to go directly
to the Edit Unit Availability screen, you may click the cancel button to return you back to
the Add Unit Schedules screen.)
13. Repeat steps 3 – 11 to create availability for additional unit locations.
Editing Unit Availability
Clinical Coordinators have access to modify the availability for their agency’s clinical units.
Coordinators may modify existing default availability that was created automatically by the
system, or add and delete records that will further define availability. For example, the
91
coordinator may add an additional record for only one month in order to indicate that the unit is
not available during that time. As long as there aren’t any proposals against a shift, an entire
record can be deleted if a shift is no longer available for clinical placements. See “To delete a
schedule” below to learn how to remove availability for a shift that has proposals against it. The
screen provides functionality for copying, deleting, and updating one or more pieces of unit
availability at once.
To edit the unit availability at your clinical agency:
1. Click Clinical Agency from the top menu, if necessary.
2. Click on Step 2: Work with Unit Schedules from the left menu
3. Click on the
Edit Unit Schedules link
Figure 66 – Edit Unit Availability
4. Select which units you would like to edit by placing a checkmark in the box to the left of
the unit location (the screen will display the unit in “Department Unit (Location)”
format). You may also use the Select All / Deselect All options at the top right corner of
the list to make your selections. The screen will refresh each time you select a shift, so it
may take a few moments to complete this step.
Note: Be selective in how many units you wish to edit at the same time – unless
you are planning to make the same changes for all of your availability, it may be
easier to work with only a few select units at a time.
5. Enter the dates of availability that you wish to search within – the application will look
for availability with start dates in this window. Default dates are provided for you.
6. Click the Display Schedules button. The records representing availability for the unit(s)
you selected will be displayed on the screen:
92
Results
grid
Figure 67 – Edit Unit Availability, search results
Each row in the results “grid” represents a schedule. By default, there will be a schedule
for each shift by department/unit/location. All of the fields except Department, Unit and
Location are editable and may be changed simply by typing in the white area. (Note: If
you wish to change the location from the system default of “Not Specified” to a location
that you have defined, see the “Maintaining Unit Locations” section.) You may select a
single row by clicking anywhere on the row. The selected row will be highlighted in a
darker color. The selection checkbox at the left may also be used to select one or more
rows to copy, delete or edit.
7. Use the buttons below the grid to make your changes:
To edit existing schedules (one at a time):
a. Changes may be made in any of the white editable fields. Clicking in the Start
Date, End Date, Start Time, or End Time text boxes will automatically place your
cursor in the # of Students column. From there, use the Tab/Shift Tab keys to
move from field to field within a row. Once a field is highlighted you may use
either the Delete key or the Backspace key to clear the field, and begin typing
your new information. Please note that the system will place the slashes in your
dates and the colons in your times automatically. For the days of the week, you
may check/uncheck them by clicking on the box. The brief summary for the
93
current row (as soon as you click to make a change, the row will be selected) will
be displayed and available to modify.
Note:
•
•
•
•
Dates must be entered in MM/DD/YYYY format and times should be in
military time (24 hour clock, 00:00 – 23:59) format.
You may add additional days to an existing schedule but the additional
days will only be added to schedules going forward. The system cannot
go into the past and add days to a schedule. The additional days entered
will become available as of the day/time you make the new entry.
If you have accepted proposals against a unit schedule, you may not
change the start date. An error message will be generated to alert you that
this field cannot be changed. Instead, you may add a new schedule with
the desired start date.
Days of the week may always be added, but only removed if there is no
proposal against the unit schedule.
b. Click Submit to save your changes. If you change your mind (before clicking
submit) and do not want to save the changes you have made, click Reset. This
will restore all of previous values.
c. If there are any errors with the information you entered, a message will display to
the right of the row. Make your corrections and click Submit again.
To edit existing schedules (multiple schedules at one time):
a. Select the rows you wish to modify using the checkboxes in the “Selected”
column. You may also use the “Select All Schedules / Deselect All Schedules”
options at the top right corner of the results grid (see Figure 59) to select
schedules.
b. Click the Global Edit button. (Note: This button is grayed out until at least one
schedule is selected.)
c. A new section will be displayed at the bottom of the page that provides you with a
place to specify the value(s) you wish to modify for the selected schedules:
94
Global
Edit area
Figure 68 – Edit Unit Availability, Global Edit
d. Enter the value(s) that you want applied to all the selected rows. Only the values
you enter will be changed – the fields that are left blank will remain as is. (The
days of the week can also be modified – the selected days will be applied to all
the rows you are modifying.)
Note: You may add additional days to an existing schedule but the
additional days will only be added to schedules going forward. The system
cannot go into the past and add days to a schedule. The additional days
entered will become available as of the day/time you make the new entry.
Days of the week may always be added to a unit schedule but they can
only be removed if no proposal has been made against it.
e. Click OK to make the changes, or Cancel to abort the action and leave the current
information unchanged.
To add/copy a new schedule:
a. Select a record that is most like the one you wish to add by clicking on the row, or
select multiple records using the checkbox to the left of each row of data.
b. Click Copy. This will add an additional row(s) to the grid, defaulting to the same
values as the row(s) you had selected.
95
The last row is
now a copy of
the 1st, ready for
changes to be
made.
Figure 69 – Edit Unit Availability, Copy Row
c. Make your changes to the new schedule(s) by typing directly in the editable fields
(shown in white). You must enter new dates for the copied schedule. For the days
of the week, you may check and uncheck them by clicking on the box. The brief
summary for the current row (as soon as you click to make a change, the row will
be selected) will be displayed and available to modify.
Note: Dates must be entered in MM/DD/YYYY format and times should
be in military time (24 hour clock, 00:00 – 23:59) format.
d. Click Submit to save your changes. (The copied row will not be saved until you
click Submit.)
Note: The “Global Edit” functionality cannot be used to modify rows that
you created using Copy but have not saved yet. To do this, click Submit
first and then reselect the copied rows to make changes using Global Edit.
e. If there are any errors with the information you entered, a message will display to
the right of the row. Make your corrections and click Submit again.
To delete a schedule (that has no proposals made to it):
a. Select the row you wish to delete by clicking on it or select multiple rows using
the selection checkbox at the left.
b. Click the Delete button.
96
c. A delete confirmation box will appear asking if you are sure you want to delete
the schedule(s).
d. Click OK to continue with the deletion or Cancel to abort the delete.
e. If you clicked OK, the grid will refresh and the deleted schedule(s) will no longer
be displayed. A message at the top will indicate the results of your delete – you
may not be able to delete all the selected schedules; the system will tell you how
many could be removed.
Note: To remove availability from a shift that could not be deleted
because a proposal has been made to it:
1. Select the row you wish to delete by clicking on it or select
multiple rows using the selection checkbox at the left.
2. Change the “# of students” field to “0” and include a comment for
those shifts that you can no longer accept students at that time. In
this way, schools should be clear that you can no longer take
students on this shift.
3. Click OK and the grid will refresh. A message at the top will
indicate if the change was successful.
4. When preparing for the next placement cycle, do not extend
availability for these shifts you would like removed. Once the “end
date” has passed for those shifts, the shift will no longer appear in
the system as available to schools.
Viewing Unit Availability
Any logged-in coordinator may choose to view unit availability for any clinical agency. The
display is very similar to what Clinical Coordinators use to modify the unit availability and also
includes a color-coded calendar that will indicate by week where the unit location is still
available. The screen will first list all of the schedules that comprise total availability – this
generally consists of starting with 24 hour/7 day availability and then additional schedules that
may remove periods of availability. For each unit location, it is the sum of all schedules that
determines overall availability. The graphic will help to depict this, along with any requests that
have been made against the original availability.
Clinical Coordinators view unit availability from the Clinical Agency Menu:
1. Click on “Step 2: Work with Unit Schedules” from the left menu
2. Click
View Unit Schedules
3. Select an agency from the drop down list at the top of the screen (when you are logged in
as a clinical coordinator, your agency will already be selected). You will only be able to
view availability for one agency at a time.
4. Select which unit(s) you would like to view by placing a checkmark in the box to the left
of the unit location name (it will be displayed in “Department Unit (LOCATION)”
format). You may also use the Select All / Deselect All options at the top right corner of
the list to make your selections.
97
Note: Be selective in how many units you wish to view at the same time – there
could be a long list of records returned which will make it more difficult to use
the screen.
5. Enter the dates of availability that you wish to search within – the application will look
for availability that falls within this window. Default dates are provided for you.
6. Click Display Schedules. The records representing availability for the unit(s) you
selected will be displayed on the screen:
Figure 70 – View Unit Availability
9. None of the fields will be editable since this is a view only screen. To understand the
overall availability for the unit, you must consider all rows (schedules) for the
department, unit, location and shift since rows where # of Students is zero indicates no
availability and there may be several schedules for a single shift if a time period has
special availability.
10. A color-coded calendar will be displayed at the bottom of the screen, showing the overall
availability for the unit location that is currently selected (indicated by a highlighted
row). The graphic will display one week of information at a time, beginning with the
current week. You may scroll through the month(s) using the “Previous Week” and
“Next Week” buttons at the bottom. The legend below the calendar shows what each
color represents. You may also click on any hourly time block to view details:
98
Figure 71 – View Unit Availability calendar graphic
A report is also available that will provide information on all of the unit schedules that have been
entered in CCPS. Please refer to the following section for instructions on how to access this
report.
Running the Unit Schedules Report
A “Unit Schedules” report will provide information on all of the unit schedules that have been
entered in CCPS. This may be accessed from the Clinical Agency or the Report menu and works
the same regardless of which method is used. Clinical Coordinators are encouraged to use the
option that is within the Clinical Agency menu so that time is not wasted on extra, and
unnecessary, navigation.
To run the Unit Schedules report:
1. Click Clinical Agency from the top menu, if necessary.
2. Click on “Step 2: Work with Unit Schedules” from the left menu
3. Click on Unit Schedules Report link. The report search parameters will be displayed,
which consists of two list boxes and search dates.
4. Select one or more agencies from the left hand list box and one or more units from the
right hand box for which you would like to view information. You may do so
individually, or you may use the Select All / Deselect All options at the top of the list.
99
You may also use the CTRL or Shift keys while clicking with your mouse to select some
of the agencies and units.
5. Scroll to the bottom of the screen and enter the dates to search between. Default search
dates will already be present. You may use these or enter your own dates by typing
directly into the field (using MM/DD/YYYY format) or by using the calendar icon .
The system will search for unit schedules with availability in the range that is entered.
6. Click Display Report to produce the report based on your selection parameters. The
output will display within the current browser window and a toolbar will provide export
and print options. Simply click the appropriate icon and fill in the information in the
resulting pop-up window.
Toolbar
Figure 72– Unit Schedules report
C.
Step 3: Work with Placement Requests
The third and final step in the clinical placement process is where the actual matching of
schedule information (cohort schedules and unit availability) occurs. Clinical coordinators will
use the screen and reports in the Work with Placement Requests subsection to review and
respond to the clinical placement requests made by the schools.
When a clinical agency responds to a request, regardless of the answer, automatic emails will be
generated and sent by the system to the coordinators for the affected partner. The emails will be
sent from a “ccpsautoemail” address with subject lines that reference CCPS:
•
Proposal status alerts, sent to school coordinators:
o CCPS schedule has been {Accepted, Declined or Proposed (No Action)} by {HOSPITAL
NAME} concerning placement of students in the {Department-Unit} area
100
These emails will provide summary information about the response to the request but are not a
substitute for the real-time information in the system. The emails are intended to be an alert that
the user may have action required in CCPS and to provide additional comments between users.
Only Coordinators and CCPS Administrators have access to this piece of CCPS. Additionally,
each coordinator may only take action on the items for their location. Other users may see the
data associated with CCPS matching by using the Reports section.
Reviewing Placement Requests
Once a school has proposed a clinical placement match in CCPS, the Clinical Coordinator must
take action (however, refer to the “master calendar” on the CCPS home page for timing during
planned placement cycles). Clinical Coordinators review the requests made by nursing schools
and either accept or decline them.
Prior to visiting this screen to actually take action on the requests, it may be helpful to run a
report to see all of the proposals that have been made for clinical placements. The Placement
Calendar report is very helpful in showing all requests in a calendar format, which will quickly
identify where overlapping requests may have been made and determine what can be accepted.
Refer to “Running the Placement Calendar Report” in this section for more details.
To review the proposals made by schools:
1. Click Clinical Agency from the top menu, if necessary.
2. Click “Step 3: Work with Placement Requests” from the left menu
Placement Requests w/ Availability Calendar
3. Click on
Figure 73 – View Placement Request filters
101
4. Select which filter criteria, if any, you would like to filter on to narrow the number of
proposals that will be shown to you (see Figure 68):
o Only include preferred schools (those schools which you have selected as
preferred partners – refer to the section on “Maintaining Preferred Partners” for
more information)
o Only include cohorts with basic preclinical paperwork completed
By using these filters, you can review the proposals made by your preferred partners
first. The filters are optional – simply leave them blank to see all proposals.
5. Enter a date range in the From and To fields. This will result in only the proposals that
occur in the range entered being displayed. By default, the system will show proposals
for current date through one year.
6. Click the button labeled “View Placement Requests”. The next screen will group the
pending requests by clinical department and unit location.
7. Select the unit location that you wish to review from the drop down list next to its clinical
department. The list of schedule requests will refresh based on your selection.
Note: The units may be surrounded by green or red borders if action has already
been taken on one or more requests. Green indicates that at least one request has
been accepted for that unit while red indicates that a schedule has been declined
(and none were accepted).
Select Unit
Location
Figure 74 – View Placement Requests, select unit location
102
8. Select the school proposal you would like to review:
Select
proposal
Figure 75 – View Placement Requests, select proposal
The drop down list will show the school name, followed by the course number and cohort
number. If a proposal has already been accepted or declined, the status will be indicated
at the end.
9. Once you have selected a school proposal to review, the screen will refresh to show you
the details of the student cohort and schedule and gives you the option to accept or
decline it:
103
Figure 76 – View Placement Requests, proposal details
10. Review the request that is being made to determine if you can accept this student cohort
on the unit location requested. At the bottom of the screen there will also be a colorcoded view of your unit’s availability status to help you in your decision making process.
This will provide a quick way to see if more than one school is requesting the same slot:
104
Click on
a box for
details
Figure 77– View Placement Requests, proposal details, cont.
You can click on any of the hourly time blocks to see details for that slot, as shown in
Figure 72.
11. Enter any additional information that you would like to provide about your decision in
the text box below the Accept/Decline buttons. This text will be embedded in the
automatically generated email that will be sent by the system to the School Coordinator
once you accept or decline the proposal.
12. Click Accept or Decline. Clinical Coordinators always have the final approval on a
schedule match – the system merely suggests possible matches, but does not
automatically schedule them. A clinical placement is not scheduled until the school’s
proposal is accepted by the clinical agency. Once accepted, your availability (for the
entire shift on the day(s) requested) will be blocked out for that school’s cohort
placement and no other schools will be able to request it.
Note: When a request is accepted, any proposals that overlapped with it (by even
one day) will be automatically declined by CCPS to prevent over-scheduling the
unit. If you want to accept more than one cohort on a unit simultaneously, a flag
can be set to bypass this auto-decline logic. Refer to the “Updating Agency
Details” section for instructions on how to do this.
13. Repeat steps 6 – 11 to review and respond to additional requests.
Once a proposal has been accepted, the buttons available will change to Decline and Undo.
Likewise, if a proposal has been declined, the available choices will be Accept and Undo. Each
105
time any of the three actions is taken, a system generated email will automatically be sent to the
school coordinator(s) affected.
Two reports are available that will provide information on the placement requests by clinical
agency: Agency Acceptance and Placement Calendar. These reports are discussed in the
following sections.
Placement Requests Summary
The Placement Requests Summary page allows a clinical coordinator to view multiple requests
at one time grouped by the proposing school. This page will take the place of the View
Placement Requests page in future versions of CCPS.
Once a school has proposed a clinical placement match in CCPS, the Clinical Coordinator must
take action (however, refer to the “master calendar” on the CCPS home page for timing during
planned placement cycles). Clinical Coordinators review the requests made by nursing schools
and either accept or decline them.
Prior to visiting this screen to actually take action on the requests, it may be helpful to run a
report to see all of the proposals that have been made for clinical placements. The Placement
Calendar report is very helpful in showing all requests in a calendar format, which will quickly
identify where overlapping requests may have been made and determine what can be accepted.
Refer to “Running the Placement Calendar Report” in this section for more details.
To review the proposals made by schools:
1. Click Clinical Agency from the top menu, if necessary.
2. Click “Step 3: Work with Placement Requests” from the left menu
3. Click on
Placement Requests Summary
106
Figure 78 – Placement Requests Summary filters
4. Enter a date range in the From and To fields. This will result in only the proposals that
occur in the range entered being displayed. By default, the system will show proposals
for current date through one year.
5. Select whether you would like to search only for your preferred partners by checking or
un-checking the Show Preferred Partners Only box.
6. Click the button labeled “Search.” The next screen will group the requests by the
proposing school and unit.
107
Figure 79 – Placement Requests Results
7. You may view “pop-up” comments between the school and clinical agency related to that
proposal by moving your mouse over the Comments column.
Figure 80 – View Comments
8. You may select an action for multiple proposals on the screen simply by selecting your
choice from the drop down list next to each proposal.
9. Once you have made your selections, click on the Confirm Changes button at the bottom
of the screen.
108
10. The next screen will display the changes you selected and include a text box for you to
enter a comment to the school. For proposals that you are declining, you must select a
reason for declining.
Figure 81 – Confirm Changes
11. You can click the Cancel button to go back to the previous screen and none of your
changes will be saved, or you can click the Save These Changes button to complete the
process. Clicking Save These Changes will trigger the system to send an automated
email to each school affected notifying them of the status of their proposal.
Unit Placement Flexibility
If you receive a request for a specific unit and you no longer have space on that unit but you do
have space on another unit within that department, you may use this feature to assign a different
unit to this cohort group. You should always review the comments to ensure that the school has
not indicated they specifically need this unit before employing this feature.
1. Select the Placement Request you want to work with
2. After determining you do not have space on the requested unit, use the drop down arrow
to display a listing of the other units you do have available in that department
3. Select another unit
4. Enter the # of students you are accepting
5. Select ACCEPTED from the drop down list
6. Click on CONFIRM CHANGES
7. Enter any comment for the School Coordinator
8. Click on SAVE THESE CHANGES
An auto email notification with your comments will be sent to the School Coordinator
109
Figure 82 – Unit Flexibility
Historical Placements
When reviewing requests on the Placement Request Summary screen you will see a *(Y)*
indicator in the Historical Column to denote a historical placement request.
**Also note that on the Placement Request Summary screen filters have been added to help
manage your view and sort your work. Placement Requests may be sorted by status code (the
default view is “Proposed” status) and by school. The “Show Preferred Partners Only” filter is
also still available.
Figure 83 – Historical Placements
110
Once a proposal has been accepted, the options available will change to Decline and Undo.
Likewise, if a proposal has been declined, the available choices will be Accept and Undo. Each
time any of the three actions is taken, a system generated email will automatically be sent to the
school coordinator(s) affected.
Two reports are available that will provide information on the placement requests by clinical
agency: Agency Acceptance and Placement Calendar. These reports are discussed in the
following sections.
RE-Proposal Option:
If you receive a request and you need the school to make a slight adjustment to the request or
need them to select a unit from another department, you may use the “Re-propose” option to
communicate this information to them. You will not need to decline the request.
From the Placement Request Summary screen
1. From the drop down list, select “Re-proposed”
2. Click CONFIRM CHANGE
3. Enter a descriptive note that describes what you need the school to do
4. Click SAVE THESE CHANGES
5.
An auto email notification with your comments will be sent to the School Coordinator
Figure 84 – Re-Proposal Option
111
Student Counts
Clinical Agencies have stated that they would like the unit student counts to be more accurate at
the end of each placement cycle. To facilitate this request, clinical agencies are able to enter the
exact # of students they are accepting for each placement.
8. In the # Placing column, enter the # of students you are accepting for that request
9. Select your action status, ACCEPTED, from the drop down list
10. Click on CONFIRM CHANGES
11. Enter any notes you want to send to the School Coordinator
12. Click SAVE THESE CHANGES
Figure 85 – Student Counts
The Placement Calendar report will reflect the actual # of students that have been accepted
for each placement request.
**Also note that on the Placement Request Summary screen filters have been added to help
manage your view and sort your work. Placement Requests may be sorted by status code (the
default view is “Proposed” status) and by school. The “Show Preferred Partners Only” filter is
also still available.
Reports Available for STEP THREE:
If you would like a report that provides information on all the Placement Requests w/status that
Placement Calendar Report or
have been submitted to your Clinical Agency - Click on
Placement Request Status Report.
112
Running the Placement Request Status Report
The “Placement Request Status” report will provide information on all of the school proposals
that have been entered in CCPS, by agency. The report includes the current status of each
(Proposed, Accepted, or Declined), so it is a quick snapshot of everything that is shown on the
View Placement Requests screen. This report may be accessed from the Clinical Agency or the
Report menu and works the same regardless of which method is used. Clinical Coordinators are
encouraged to use the option that is within the Clinical Agency menu so that time is not wasted
on extra, and unnecessary, navigation.
To run the Placement Request Status report:
1. Click Clinical Agency from the top menu, if necessary.
2. Click “Step 3: Work with Placement Requests” from the left menu
3. Click on Placement Request Status Report. The report search parameters will be
displayed, which consists of two list boxes and search dates.
4. Select one or more agencies from the left hand list box and one or more units from the
right hand box for which you would like to view information. You may do so
individually, or you may use the Select All / Deselect All options at the top of the list.
You may also use the CTRL or Shift keys while clicking with your mouse to select some
of the agencies and units. You may filter your search results to show only proposed,
accepted, declined, or any combination of the three by selecting the appropriate
checkboxes.
5. Scroll to the bottom of the screen and enter the dates to search between. Default search
dates will already be present. You may use these or enter your own dates by typing
directly into the field (using MM/DD/YYYY format) or by using the calendar icon .
The system will search for proposals in the range that is entered.
6. Click Display Report to produce the report based on your selection parameters. The
output will display within the current browser window and a toolbar will provide export
and print options. Simply click the appropriate icon and fill in the information in the
resulting pop-up window.
113
Toolbar
Figure 86 – Placement Request Status report
Running the Placement Calendar Report
The “Placement Calendar” report shows all of the accepted and proposed clinical placement
requests by agency, in a calendar format. It is very valuable for showing where overlaps may
exist, as a final check to ensure that all requests have been accepted or declined, and also as a
final report of where students will be arriving on the units. The report also indicates time slots
that are not available to students by shading them in gray.
The report may be accessed from the Clinical Agency or the Report menu and works the same
regardless of which method is used. Clinical Coordinators are encouraged to use the option that
is within the Clinical Agency menu so that time is not wasted on extra, and unnecessary,
navigation.
To run the Placement Calendar report:
1. Click Clinical Agency from the top menu, if necessary.
2. Click “Step 3: Work with Placement Requests” from the left menu
3. Click on Placement Calendar Report . The report search parameters will be displayed,
which consists of two list boxes and search dates.
4. Select one or more agencies from the left hand list box and one or more units from the
right hand box for which you would like to view information. You may do so
individually, or you may use the Select All / Deselect All options at the top of the list.
You may also use the CTRL or Shift keys while clicking with your mouse to select some
of the agencies and units. You may filter your search results to show only preferred
schools by selecting the appropriate response to the Show Only Preferred Partners?
question.
114
5. Scroll to the bottom of the screen and enter the dates to search between. Default search
dates will already be present. You may use these or enter your own dates by typing
directly into the field (using MM/DD/YYYY format) or by using the calendar icon .
The system will search for placements in the range that is entered.
6. Click Display Report to produce the report based on your selection parameters. The
output will display within the current browser window and a toolbar will provide export
and print options. Simply click the appropriate icon and fill in the information in the
resulting pop-up window.
Toolbar
Figure 87 – Placement Calendar report
D.
Preferred Partners
Clinical Coordinators use the Preferred Partners section to select one or more schools of nursing
as preferred partners. The school must be a CCPS user in order to be selected as a preferred
school.
This distinction can be used as a filter criterion by Clinical Coordinators when they are
reviewing clinical placement requests (refer to previous section).
115
Maintaining Preferred Partners
Clinical Coordinators use the Maintain Preferred Partners option to add or remove schools of
nursing from their preferred list.
1. Click Clinical Agency from the top menu, if necessary.
2. Under “Clinical Coordinator Admin” on the left menu
3. Click on Manage Preferred Partners
Figure 88 – Maintain Preferred Partners (Schools)
4. This screen uses a similar convention as the Add New Units screen for selecting available
units. All available schools are listed in the left box. The right box indicates which
schools have been selected as preferred by your agency. Select the school you wish to
update and click the right arrow
to move it to the preferred list or the left arrow
to
remove it from the preferred list. You may also select more than one school at a time by
holding down the Control (Command) or Shift key as you select, or use the double
or
) to move all schools at once. (Note: The functionality will not
arrows (
provide any benefit if every school is indicated as preferred.)
5. Click Submit when you are finished.
List Preferred Partners
This area will produce a listing of the selected agency’s preferred schools of nursing. To view
this information:
116
1.
2.
3.
4.
5.
6.
Click Clinical Agency from the top menu, if necessary.
Under “Clinical Coordinator Admin” on the left menu
Click on Manage Preferred Partners
Click Preferred Partners List
Select a clinical agency from the drop-down list.
Click Display Report. This will create a listing of all preferred schools for the selected
clinical agency. The information may be viewed online, or you may print or export it
using the toolbar icons.
Toolbar
Figure 89 – List Preferred Partners
E.
Clinical Coordinator Admin
Besides managing Updating Agency Details and Managing Preferred Partners (described in
previous sections) the Clinical Coordinator Admin subsection is where a Clinical Coordinator or
Administrator can add or remove coordinators and update the information about a Clinical
Coordinator. The update function will also allow for password resets in case a user has forgotten
his/her password. Clinical Coordinators will have access to manage this information only for
their clinical agency.
Adding a New Coordinator
To add a new Clinical Coordinator:
117
1.
2.
3.
4.
Click Clinical Agency from the top menu, if necessary.
Under “Clinical Coordinator Admin” on the left menu
Click Manage Coordinators
Add New Coordinator
Click on
Figure 90 – Add New Clinical Coordinator
5. Create a user ID for the new coordinator – we recommend using a standard convention
such as the first letter of the person’s first name and their entire last name.
Note: When a new coordinator is added, the initial password will be the same as
the user ID. A Clinical Coordinator, Administrator, or the user may change this
later.
6. Select the clinical agency that the coordinator will be assigned to (this is only required for
Administrators – for clinical coordinators, your agency will be the only option.)
7. Enter the coordinator’s full name in the User Name field.
8. Enter all other information requested for the new coordinator. Only shaded fields are
required, but complete all fields to the best of your ability. The new coordinator will be
able to edit his or her information later if necessary.
9. Click Submit when you are done entering information.
10. Repeat steps 3 – 7 to add additional coordinators.
Auto Email On/Off Feature
See Updating Coordinator Information
118
Updating Coordinator Information
To update a Clinical Coordinator’s information:
1. Click Clinical Agency from the top menu, if necessary.
2. Under “Clinical Coordinator Admin” on the left menu
3. Click Manage Coordinators
4. Click on
Update Coordinators
Figure 91 – Update Clinical Coordinator
5. Select the coordinator you wish to update from the drop-down list and click Display
Coordinator Detail.
6. Make the required changes to the coordinator’s information.
Note:
• User ID cannot be changed once the user is added to CCPS. To change user
ID, you must delete and re-add the user.
• Typing in the password field will change the user’s password.
• Next to Receive Emails?
o Select Yes to receive emails
o Select No to stop receiving emails
7. Click Update to save your changes.
8. Repeat steps 3 – 6 to update another coordinator’s information.
119
Removing a Coordinator
To remove a Clinical Coordinator from CCPS:
1. Click Clinical Agency from the top menu, if necessary.
2. Under “Clinical Coordinator Admin” on the left menu
3. Click on Manage Coordinators
4. Click on
Remove a Coordinator
5. Select the coordinator you wish to remove from the drop-down list and click Display
Coordinator Detail.
6. Verify that the correct user is selected.
Figure 92 – Remove Clinical Coordinator
7. Click Remove to delete this coordinator.
8. Repeat steps 3 – 6 to remove another coordinator.
List Coordinators
The List Coordinators function is available to all users and visitors in CCPS. This data may be
useful to schools to identify the clinical coordinators at agencies where they are requesting
placements, to communicate with an agency regarding agreements, or to CCPS Administrators.
To view this information:
1. Click Clinical Agency from the top menu, if necessary.
2. Under “Clinical Coordinator Admin” on the left menu
120
3. Click List Coordinators Report
4. Select an agency from the drop-down list.
5. Click Display Report. This will create a listing of all coordinators for the selected
clinical agency. The information may be viewed online, or you may print or export it
using the toolbar icons.
Toolbar
Figure 93 – List Clinical Coordinators
121
V. USER
The User section of CCPS provides users with a place to update their profile information
(address, title, phone numbers, etc.) and to change passwords. Only logged-in users have access
to this area, and you will only be able to make changes to your own information, for the user ID
you have used to login to CCPS. Administrators can change any user’s information using a
separate menu under the Administration section.
The following module will describe how a user can update their profile and password using the
User section.
122
Update User Profile
There is only one left menu option under the User section of CCPS, which is Update User
Profile. This expands to show options for updating your user profile (address, title, phone
numbers, etc.) and changing passwords.
Note: If you are a coordinator or administrator, you may use the Update Coordinator screens to
change personal information and passwords.
Updating Your Profile
To update your user profile, take the following steps:
1. Click User from the top menu, if necessary.
2. Click Update User Profile from the left menu to expand and show the list of available
functions.
3. Click Update Profile. The screen will refresh to show you the available fields to update,
defaulting to what is currently stored in CCPS:
Figure 94– Update Profile
4. All fields except user ID can be modified. The shaded fields are required entries – the
system will not let you save changes if they are blank. The email address(es) that you
enter will tell CCPS where to send any automatically generated messages during the
schedule matching process. This also ensures that the Customer Support Desk can
include you on any important CCPS communications.
123
5. Click Submit to save your changes. To discard your changes, simply navigate to a
different page without clicking Submit.
Changing Your Password
Once you have logged in to CCPS, you can change your password yourself. However, if you
cannot remember your current password in order to login, please contact CCPS Customer
Support for assistance. A coordinator at your location could also assist by resetting your
password for you.
To change your CCPS login password, take the following steps:
1. Click User from the top menu, if necessary.
2. Click Update User Profile from the left menu to expand and show the list of available
functions.
3. Click Change Password. The screen will give you areas to enter your new password:
Figure 95 – Change Password
4. Enter the new password in the first field, and then enter it again in the second to confirm
that they are the same.
5. Click Submit to change your password or click Cancel if you do not wish to change it.
124
VI. REPORTS
The Reports section is available to all users and visitors of CCPS. The reports provide access to
general information such as schedules and the schedule matching process, which visitors cannot
access directly from the Schedules menu. The reports are also easily printed and exported.
This section will describe the reports and how to use the search parameters to access data for
each of them. Every report is run against one or more clinical agencies or schools, depending on
the report, and returns data within a certain time period.
125
A.
CCPS Report Descriptions
There are several reports available in the Centralized Clinical Placement System:
Agency Reports include:
Unit Schedules
This report provides a listing, by clinical agency, unit and location, of the schedules that
represent a unit’s availability.
Unit Schedules (Export)
This is the same information as the report above. It provides a listing, by clinical agency, unit
and location, of the schedules that represent a unit’s availability; however, this report exports
into excel.
Placement Calendar
This report shows the proposed and accepted placement requests by clinical agency in a
calendar format, organized by department-unit-location and shift.
Placement Request Status
Lists all of the placement requests made by schools, by clinical agency, and indicates the
status of each proposal. The report will show the information for the cohort and the unit.
School Reports include:
List Clinical Agencies
This report provides a listing of all Clinical Agencies that are participating in CCPS. It
provides pertinent information about these agencies.
Cohort Schedules
This report provides a listing, by nursing school, of the student cohort schedules in CCPS, as
well as the status of the schedule (proposed, accepted, declined or no action).
School Proposals
This report lists all of the cohort schedules, by school, that have been proposed to a clinical
agency, regardless of their status (accepted, declined, or pending).
The next section will describe how to run a report.
B.
Running a Report in CCPS
All of the reports are produced the same way, and the only difference in running each one is
whether you will choose from a list of clinical agencies or nursing schools. Therefore, the
instructions are the same for all reports.
126
To run a report in CCPS:
1. Click Reports from the top menu, if necessary.
2. Click the report you would like to run from the left menu. The report search parameters
will be displayed, which will list either clinical agencies or nursing schools:
All clinical agencies
or nursing schools in
CCPS will be
available in the list
Figure 96 – Report Parameters
3. Select one or more clinical agencies or schools for which you would like to view
information. You may do so individually, or you may use the Select All / Deselect All
options at the top of the list.
4. Scroll to the bottom of the screen and enter the dates to search between. Default search
dates will already be present. You may use these or enter your own dates by typing
directly into the field (using MM/DD/YYYY format) or by using the calendar icon .
The system will search for information in the range that is entered.
Note: When running reports for Unit Schedules, keep in mind that clinical
availability is created for a one year time period, beginning with the current date
as the start date. If you do not use the default search dates be sure that you enter a
range wide enough to encompass when an agency might have created their current
availability.
5. Click Display Report.
6. When the report is complete, it will display at the bottom of your browser window,
following the list of schools or clinical agencies. You will be able to view it on the
screen using your browser’s scroll bar, or you may print or export it:
127
Toolbar
Figure 97 – Report output
128
VII. ADMINISTRATION
The Administration section of CCPS is accessible for data management only by CCPS
Administrators. Within this area, Program Administrators may complete the following activities:
•
•
•
Add and remove schools
Add and remove clinical agencies
Maintain CCPS users
System Administrators have an additional level of access that allows them to:
• Maintain clinical departments
• Maintain clinical units
All users and visitors may visit this section to view lists of the standard clinical departments and
units.
129
A.
Maintaining Clinical Departments in CCPS
The Department subsection provides System Administrators with a way to maintain the list of
clinical departments that are used in CCPS. Like many other maintenance areas of CCPS, there
are options for adding, updating, and removing. There is also a list option that anyone can use to
view the existing departments.
Adding a Clinical Department
A CCPS System Administrator may add a new clinical department to CCPS on this screen.
Before adding any departments, be sure that there is not one already available that could be used.
Also, determine whether the new department is truly needed, based on how common it is,
whether students would need clinical experiences in that department, if there is a similar
department already listed that could be used, etc. The list of clinical departments should be kept
as short and standardized as possible so that schools can quickly locate the department that
describes the clinical experience needed to meet course requirements.
To add a new department:
1. Click Administration from the top menu, if necessary.
2. Click the Department button from the left menu to expand and show all available
functions.
3. Click Add Department. The screen will provide an area to enter the name of the new
department and will list the current departments:
Figure 98 – Add Department
130
4. Enter the new department name in the text box.
5. Click Submit to save the department. The list will refresh to show the department you
have just added, if the action was successful.
6. Repeat steps 4 and 5 to add additional departments.
Modifying a Clinical Department
The names of existing clinical departments can be changed by System Administrators. The new
name will be updated throughout the database, as appropriate.
To change a department name:
1. Click Administration from the top menu, if necessary.
2. Click the Department button from the left menu to expand and show all available
functions.
3. Click Modify Department. The screen will show a list of the current clinical
departments, each of which is a hyperlink.
Figure 99 – Modify Department
4. Select the department that you wish to modify. The screen will refresh to show the
department’s name in an editable field:
131
Figure 100 – Modify Department cont.
5. Modify the name of the department as desired.
6. Click Submit to save your changes. The changes will be made throughout CCPS, where
appropriate, and the list to the left will be refreshed.
7. Repeat steps 4 – 6 to modify additional departments.
Removing a Clinical Department
A clinical department may be removed from CCPS as long as there are no units associated with
it. The system will not allow you to delete the department if there are still units.
To remove a department:
1. Click Administration from the top menu, if necessary.
2. Click the Department button from the left menu to expand and show all available
functions.
3. Click Remove Department. The screen will show a list of the current clinical
departments, each of which is a hyperlink, just like the Modify Department screen (see
Figure 87).
4. Select the department you wish to delete. It will show the department name (grayed out)
in a field next to the list so that you can verify that you have selected the correct one.
132
Figure 101 – Remove Department
Note: CCPS will display an error message if you choose a department that still
has units:
This department cannot be removed because it has one or more units.
5. Click Remove to delete the department.
6. Click OK on the delete confirmation pop-up to proceed, or Cancel to abandon the action.
7. Repeat steps 4 – 6 to remove more departments.
List Departments
Any user or visitor may produce a list of the current clinical departments in CCPS. The steps are
the same as they are for producing lists in any other area of CCPS.
1. Click Administration from the top menu, if necessary.
2. Click the Department button from the left menu to expand and show all available
functions.
3. Click List Departments. The screen will show a simple list of all departments in CCPS,
which may be viewed online or printed or exported using the toolbar icons:
133
Toolbar
Figure 102 – List Departments
B.
Maintaining Clinical Units in CCPS
The Unit subsection provides System Administrators with a way to maintain the list of clinical
units that are associated to the departments covered in the previous section. The units are at the
core of the CCPS functionality – clinical placement scheduling. Each student cohort has
preferred units, indicating the type of clinical experience required, and clinical agencies define
their clinical placement capacity at the unit level. Students and clinical agencies can then be
matched by unit along with other preferences.
Again, like other maintenance functions of CCPS, there are options for adding, updating, and
removing units. There is also a list option that anyone can use to view the existing clinical units,
grouped by department.
Adding a Clinical Unit
A CCPS System Administrator may add a new clinical unit to CCPS on this screen. Before
adding any units, be sure that there is not one already available that could be used. Also,
determine whether the unit is truly necessary, based on how common it is, whether students
would need clinical experiences in that particular unit, if there is a similar unit already listed that
could be selected, etc. The list of clinical units, like departments, should focus on the types of
clinical experiences needed.
To add a new unit:
134
1. Click Administration from the top menu, if necessary.
2. Click the Unit button from the left menu to expand and show all available functions.
3. Click Add Unit. The screen will provide an area to enter the name of the new unit and to
specify the department it belongs to. Below this is a list of the current units (each unit
name is preceded by its department):
Figure 103 – Add Unit
4. Enter the new unit name in the text box.
5. Select the department to associate the unit with by using the drop-down list.
6. Click Submit to save the unit. The list will refresh to show the unit you have just added,
if the action was successful.
7. Repeat steps 4 – 6 to add additional units.
Modifying a Clinical Unit
The names of existing clinical units can be changed by System Administrators. The new name
will be changed throughout the database, where appropriate. This option can also be used to
change the department that a unit is grouped under.
To modify a unit name:
1. Click Administration from the top menu, if necessary.
2. Click the Unit button from the left menu to expand and show all available functions.
3. Click Modify Unit. The screen will show a list of the current clinical units, by
department, each of which is a hyperlink, just like the Modify Department screen (see
Figure 87).
135
4. Select the unit that you wish to modify by clicking on the unit name. The screen will
refresh to show the unit’s name in an editable field, along with a drop-down list to
specify the department:
Figure 104 – Modify Unit
5. Modify the name of the unit as desired.
6. You may also change which department the unit is associated to, if necessary. Simply
select a different department from the drop-down list.
7. Click Submit to save your changes. The changes will be made throughout CCPS, where
appropriate, and the list to the left will be refreshed.
8. Repeat steps 4 – 7 to modify additional clinical units.
Removing a Clinical Unit
A clinical unit may be removed from CCPS as long as there are no clinical agencies that have
selected it. The system will not allow you to delete the unit if there are agencies using the unit.
To remove a unit:
1. Click Administration from the top menu, if necessary.
2. Click the Unit button from the left menu to expand and show all available functions.
3. Click Remove Unit. The screen will show a list of the current clinical units by
department, each of which is a hyperlink, just like the Modify Department screen (see
Figure 87).
136
4. Select the unit you wish to delete by clicking on the hyperlinked unit name. The screen
will refresh to show the unit and department (grayed out) in a field next to the list so that
you can verify that you have selected the correct one.
Figure 105– Remove Unit
Note: CCPS will display an error message if you choose a unit that still has
agencies associated with it (see Figure 93, above).
This unit cannot be deleted because it is assigned to agencies (See list).
When agencies are using the unit, the system will list those agencies.
5. Click Remove to delete the unit. (The Remove button will only be displayed when it is
okay to delete the unit.)
6. Click OK on the delete confirmation pop-up to proceed, or Cancel to abandon the action.
7. Repeat steps 4 – 6 to remove additional units.
List Units
Any user or visitor may produce a list of the current clinical units in CCPS. The steps are the
same as they are for producing lists in any other area of CCPS.
1. Click Administration from the top menu, if necessary.
2. Click the Unit button from the left menu to expand and show all available functions.
137
3. Click List Units. The screen will show a simple list of all units, by department, in CCPS.
It may be viewed online, or you may print or export it using the toolbar icons:
Toolbar
Figure 106 – List Units
C.
Maintaining CCPS Users
The User subsection of the Administration menu provides CCPS Administrators with a place to
manage all of the CCPS users – adding new users, modifying the information for an existing
user, and removing users from the system. There are also options for suspending and reinstating
access. There is also a List Users option, but in this case, the list is only available to logged-in
users (to protect CCPS user information from being publicly available to anyone on the Internet).
Each of the User functions works very similarly to other CCPS maintenance features.
Adding a New CCPS User
If a School Coordinator, Instructor or Clinical Coordinator were being added, this could also be
done from the School or Clinical Agency menus, using the School Coordinator, Instructor or
Clinical Coordinator areas, respectively. However, to add an Administrator to the system, the
User menu under Administration must be used. Only CCPS Administrators have access to this
area, so coordinators must use their respective sections to add additional coordinators or
instructors.
138
There are 5 different security levels in CCPS:
• System Administrator – has access to all areas of CCPS
• Program Administrator – has access to all areas of CCPS except department and unit
maintenance
• Clinical Coordinator – full access to the Clinical Agency menu and the clinical pieces of
the Schedules menu, along with view access for school cohort schedules
• School Coordinator - full access to the School menu and the school pieces of the
Schedules menu, along with view access for unit availability
• Instructor – read-only access (same as a visitor) but with additional read-only access to
view schedules (both unit and cohort)
The levels are generally hierarchical, with System Administrators having the most access and
Instructors having the least. School and Clinical Coordinators are the same, but have access to
different areas.
Be sure to determine the proper level of access before setting up a new user – once you have
added the user, there is no way to change the security level or the location the user is assigned to
(school or clinical agency). Remember, a visitor (someone without a CCPS login) can view
almost all lists of information, as well as the Reports section.
To add a user to CCPS:
1. Click Administration from the top menu, if necessary.
2. Click the User button from the left menu to expand and show all available functions.
3. Click Add New User. You will be provided with a blank form with fields for all of the
user attributes:
Figure 107 – Add New User
139
4. Fill in as many of the fields as possible. Those that are shaded are required and the user
cannot be added without them.
• User ID – The suggested convention is to use first initial, last name. The user’s
password will initially be set to the same value as the user’s ID. Neither user ID
nor password is case sensitive.
• User Type – Choose one of the security types (see descriptions above).
i. If School Coordinator, Clinical Coordinator or Instructor is chosen, an
additional field will appear requesting the school or clinical agency that
the user is associated with – this further controls access.
• User Name – Type the user’s full name (first and last) here.
• Work Email – Not only is this required, it is important because the system will
send auto-generated emails during placement scheduling to this address.
5. Click Submit to add the user to the system.
6. Repeat steps 3 – 5 to add more users.
Auto Email On/Off
see Modifying an Existing CCPS User
Modifying an Existing CCPS User
CCPS Administrators may modify a user’s profile at any time. This is also how an
Administrator could reset a user’s password if he/she had forgotten it and turn on/off auto
generated emails.
To modify a user in CCPS:
1. Click Administration from the top menu, if necessary.
2. Click the User button from the left menu to expand and show all available functions.
3. Click Modify User.
4. Select the user you wish to modify from the drop down list.
5. Click Display User Detail. The screen will show the user’s current attributes:
140
Figure 108– Modify User
6. Update the fields as necessary. Those that are shaded are required and the user cannot be
saved without them. Note that user ID, user type and location (school or clinical agency)
cannot be modified.
Note: To reset a user’s password, type a new password in the password field.
This will overwrite the existing password with the one you have entered.
7. Click Update to save your changes. Any changes you made will overwrite what was
stored in the database previously.
8. Repeat steps 4 – 7 to modify additional users.
Removing a CCPS User
CCPS Administrators may remove a user from the system. Since there is a way to revoke a
user’s access, delete someone only when you must change their user ID, school or agency, or
when they will no longer use the CCPS.
To remove a user from CCPS:
141
1.
2.
3.
4.
5.
Click Administration from the top menu, if necessary.
Click the User button from the left menu to expand and show all available functions.
Click Remove User.
Select the user you wish to remove using the drop-down list.
Click Display User Detail. The screen will show you all of the user’s current attributes
so that you can verify you have selected the appropriate user:
Figure 109 – Remove User
6. Click Remove to delete this user from the system.
7. Click OK on the delete confirmation pop-up to proceed to remove the user, or click
Cancel to abandon the action.
8. Repeat steps 4 – 7 to remove additional users.
List CCPS Users
The List Users option is available only to a logged-in user. It will list all of the current CCPS
users, along with pieces of information from their profiles.
To view a list of all CCPS users:
1. Click Administration from the top menu, if necessary.
2. Click the User button from the left menu to expand and show all available functions.
3. Click List Users. The system will produce a listing of all users entered in CCPS. You
may view it online, or use the toolbar icons to print or export the information.
142
Toolbar
Figure 110 – List Users
Granting Access to a Suspended User
When you are ready to re-instate a CCPS user’s access to the system, you may grant access to
them from within the User subsection of the Administration menu. Once access is granted, the
user will again have system access according to his/her user type.
To grant access to a previously revoked user:
1. Click Administration from the top menu, if necessary.
2. Click the User button from the left menu to expand and show all available functions.
3. Click Grant Access. The screen will show a list of all CCPS users who currently have
their access locked, or revoked:
143
Figure 111– Grant Access
4. Select one or more users by placing a checkmark in the box next to the name of the
user(s) for which you want to reinstate CCPS access.
5. Click Grant Access.
6. Click OK on the confirmation pop-up box to proceed to restore access, or click Cancel to
abandon the action. When OK is selected, the screen will refresh and remove the user(s)
from the list.
7. Repeat steps 4 – 6 to restore CCPS access for additional users.
Revoking a User’s Access
CCPS provides functionality to temporarily suspend privileges to an existing user by revoking
their access. This allows the user and their information to remain in the system, rather than
deleting the user entirely, so that they may be given access again at a later date.
To revoke a user’s access:
1. Click Administration from the top menu, if necessary.
2. Click the User button from the left menu to expand and show all available functions.
3. Click Revoke Access. The screen will show a list of all CCPS users, who currently have
access based on their user type:
144
Figure 112 – Revoke Access
4. Select one or more users by placing a checkmark in the box next to the name of the
user(s) for which you want to revoke CCPS access.
5. Click Revoke Access.
6. Click OK on the confirmation pop-up box to proceed to revoke access, or click Cancel to
abandon the action. When OK is selected, the screen will refresh and remove the user(s)
from the list.
7. Repeat steps 4 – 6 to revoke CCPS access for additional users.
D.
Maintaining CCPS Schools
When new schools join the Centralized Clinical Placement System, a CCPS Administrator will
set up the school in the system. School Coordinators can later update the information as
necessary using the Edit Courses & Cohorts screen under the School menu. Likewise,
Administrators can also remove schools from the system if they leave for some reason, such as if
the nursing program was discontinued. This section describes how to add and remove schools
from CCPS. A “Select School” function is also available in this menu since administrators are
not assigned to a specific school and will need to select one before accessing some screens.
Selecting a School
The Select School function is used to indicate the school for which a user would like to view or
edit information. This step is not necessary for accessing public information such as reports;
however, a user could select first to avoid having to choose on each report.
145
Administrators will use this feature when using the school menu to maintain information, since
administrators have access to all schools.
1. Click Administration from the top menu, if necessary.
2. Click School from the left menu to expand and show the list of available functions.
3. Click Select School.
Figure 113 – Select School
4. Select the school from the drop-down list and click Select.
5. The screen will update to show your selection at the top and will show a message that the
school is now selected. (Note: The selected school will be displayed on subsequent
screens as well.)
If you attempt to use a CCPS data management function in the School menu without selecting a
school as described above you will receive this error:
CCPS does not have a school reference. Please select school first.
Use the steps outlined in this section to select a school and then return to the area you were
attempting to access.
146
Adding a New School
Adding a school to CCPS requires entering some basic information about the nursing school.
To add a school in CCPS:
1. Click Administration from the top menu, if necessary.
2. Click the School button from the left menu to expand and show all available functions.
3. Click Add School. You will be provided with a blank form with fields for all of the
school attributes:
Figure 114 – Add School
4. Fill in as many of the fields as possible. Those that are shaded are required and the
school cannot be added without them. School Coordinators will be able to edit this
information later to make corrections or update data.
5. Click Submit to add the school to the system.
Removing a School
If a school leaves the CCPS for some reason, it can be removed from the system. A school can
only be removed if there are no courses associated with it and it does not have any agreements
with clinical agencies. This would also mean that there are no cohorts or cohort schedules
associated with the school, due to the hierarchical fashion of CCPS data. Only CCPS
Administrators have access to remove schools.
To remove a school from CCPS:
1. Click Administration from the top menu, if necessary.
147
2. Click the School button from the left menu to expand and show all available functions.
3. Click Remove School. The screen will show a blank form, with a drop-down list of all
schools at the top:
Figure 115 – Remove School
4. Select the school you wish to delete from the drop-down list. If you select a school that
has courses or agreements, the system will display an error message. Once you have
selected the school, the current information will be displayed so that you may verify that
you have selected the appropriate school. The information will be grayed out - you will
not be able to edit it.
5. Click Remove to delete the school from the system.
6. Click OK on the delete confirmation box to confirm, or click Cancel to abandon the
action.
E.
Maintaining CCPS Clinical Agencies
When new clinical agencies join the Centralized Clinical Placement System, a CCPS
Administrator will set up the agency in the system. Clinical Coordinators can later update the
information as necessary using the Update Agency Details screen under the Clinical Agency
menu. Likewise, Administrators can also remove clinical agencies from the system if they leave
for some reason, perhaps if they no longer will accept student clinical placements. This section
describes how to add and remove clinical agencies from CCPS. A “Select Clinical Agency”
function is also available in this menu since administrators are not assigned to a specific clinical
agency and will need to select one before accessing some screens.
148
Selecting a Clinical Agency
The Select Clinical Agency function is used to indicate the agency for which a user would like to
view or edit information. This step is not necessary for accessing public information such as
reports; however, a user could select first to avoid having to choose on each report.
Administrators will use this menu when using the clinical agency menu to maintain information,
since administrators have access to all agencies.
1. Click Clinical Agency from the top menu, if necessary.
2. Click Clinical Agency from the left menu to expand and show the list of available
functions.
3. Click Select Clinical Agency.
Figure 116 – Select Clinical Agency
4. Select the clinical agency from the drop-down list and click Select.
5. The screen will update to show your selection at the top and will print a message that the
clinical agency is now selected as the current agency. This selection will be used on
subsequent clinical agency pages that you visit. (Note: The selected clinical agency will
be displayed on subsequent screens as well.)
If you attempt to use a CCPS data management function without selecting a clinical agency as
described above you will receive this error:
149
CCPS does not have an agency reference. Please select agency first.
Use the steps outlined in this section to select an agency and then return to the area you were
attempting to access.
Adding a New Clinical Agency
Adding a clinical agency to CCPS requires entering some basic information about the hospital or
other clinical facility.
To add a clinical agency in CCPS:
1. Click Administration from the top menu, if necessary.
2. Click the Clinical Agency button from the left menu to expand and show all available
functions.
3. Click Add Clinical Agency. You will be provided with a blank form with fields for all of
the agency attributes:
Figure 117 – Add Clinical Agency
4. Fill in as many of the fields as possible. Those that are shaded are required and the
agency cannot be added without them. Clinical Coordinators will be able to edit this
information later to make corrections or update data.
5. Click Submit to add the agency to the system.
150
Removing a Clinical Agency
If a clinical agency leaves the CCPS for some reason, it can be removed from the system. An
agency can only be removed if there are no units associated with it. This would also mean that
there are no unit schedules associated with the agency, due to the hierarchical fashion of CCPS
data. Only CCPS Administrators have access to remove clinical agencies.
To remove a clinical agency from CCPS:
1. Click Administration from the top menu, if necessary.
2. Click the Clinical Agency button from the left menu to expand and show all available
functions.
3. Click Remove Clinical Agency. The screen will show a blank form, with a drop-down
list of all clinical agencies at the top:
Figure 118 – Remove Clinical Agency
4. Select the agency you wish to delete from the drop-down list. If you select an agency
that has units, the system will display an error message. Once you have selected the
agency, the current information will be displayed so that you may verify that you have
selected the appropriate one. The information will be grayed out - you will not be able to
edit it.
5. Click Remove to delete the clinical agency from the system.
6. Click OK on the delete confirmation box to confirm, or click Cancel to abandon the
action.
rev. 05/27/08