1
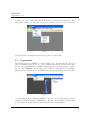
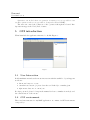
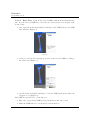
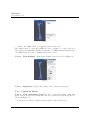
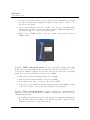
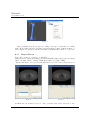
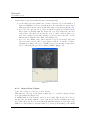
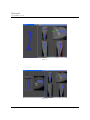
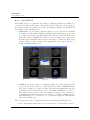
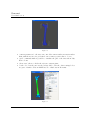
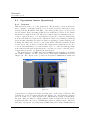
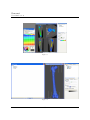
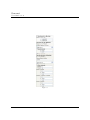
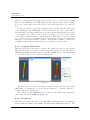
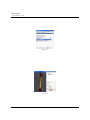
User Guide
v 1.0
Bonemat
User Guide v 1.0
Abstract
This document is aimed to get the User able to use Bonemat software, showing
how to perform all basic operations and parameter setting. To understand what
is under the hood, the User is redirected to the specialized literature describing
philosophy and algorithms related to the Bonemat
2
Bonemat
User Guide v 1.0
Contents
1 Disclaimer
5
2 What is Bonemat?
5
3 System Requirements
5
4 What is MAF?
4.1 VMEs . . . . . . . . . . . . . . . . . . . . . . . . . . . . . . . . . . .
4.2 Views . . . . . . . . . . . . . . . . . . . . . . . . . . . . . . . . . . .
4.3 Operations . . . . . . . . . . . . . . . . . . . . . . . . . . . . . . . .
5
6
6
7
5 GUI introduction
5.1 User Interaction . . . . . . . . . . . . .
5.2 GUI environment . . . . . . . . . . . . .
5.2.1 Menu Bar . . . . . . . . . . . . .
5.2.1.1 File . . . . . . . . . . .
5.2.1.2 Edit . . . . . . . . . . .
5.2.1.3 View . . . . . . . . . .
5.2.1.4 Operations . . . . . . .
5.2.1.5 Tools . . . . . . . . . .
5.2.2 Control Bar . . . . . . . . . . . .
5.2.2.1 Data Tree . . . . . . . .
5.2.2.2 View Settings . . . . .
5.2.2.3 Operation . . . . . . . .
5.2.3 Contextual Menus . . . . . . . .
5.2.3.1 View contextual menu .
5.2.3.2 VME contextual menu
5.2.3.3 Tree contextual menu .
.
.
.
.
.
.
.
.
.
.
.
.
.
.
.
.
.
.
.
.
.
.
.
.
.
.
.
.
.
.
.
.
6 Key Commands
6.1 Data Importers and Exporters (menu File)
6.1.1 Import Dicom . . . . . . . . . . . . .
6.1.2 Import Raw Volume . . . . . . . . .
6.1.3 Import Raw Images . . . . . . . . .
6.1.4 Import VTK . . . . . . . . . . . . .
6.1.5 Import Generic Mesh . . . . . . . .
6.1.6 Import Ansys CDB File . . . . . . .
6.1.7 Import Ansys Input File . . . . . . .
6.1.8 Export Generic Mesh . . . . . . . .
6.1.9 Export Ansys CDB File . . . . . . .
6.1.10 Export Ansys Input File . . . . . . .
6.1.11 Export VTK . . . . . . . . . . . . .
3
.
.
.
.
.
.
.
.
.
.
.
.
.
.
.
.
.
.
.
.
.
.
.
.
.
.
.
.
.
.
.
.
.
.
.
.
.
.
.
.
.
.
.
.
.
.
.
.
.
.
.
.
.
.
.
.
.
.
.
.
.
.
.
.
.
.
.
.
.
.
.
.
.
.
.
.
.
.
.
.
.
.
.
.
.
.
.
.
.
.
.
.
.
.
.
.
.
.
.
.
.
.
.
.
.
.
.
.
.
.
.
.
.
.
.
.
.
.
.
.
.
.
.
.
.
.
.
.
.
.
.
.
.
.
.
.
.
.
.
.
.
.
.
.
.
.
.
.
.
.
.
.
.
.
.
.
.
.
.
.
.
.
.
.
.
.
.
.
.
.
.
.
.
.
.
.
.
.
.
.
.
.
.
.
.
.
.
.
.
.
.
.
.
.
.
.
.
.
.
.
.
.
.
.
.
.
.
.
.
.
.
.
.
.
.
.
.
.
.
.
.
.
.
.
.
.
.
.
.
.
.
.
.
.
.
.
.
.
.
.
.
.
.
.
.
.
.
.
.
.
.
.
.
.
.
.
.
.
.
.
.
.
.
.
.
.
.
.
.
.
.
.
.
.
.
.
.
.
.
.
.
.
.
.
.
.
.
.
.
.
.
.
.
.
.
.
.
.
.
.
.
.
.
.
.
.
.
.
.
.
.
.
.
.
.
.
.
.
.
.
.
.
.
.
.
.
.
.
.
.
.
.
.
.
.
.
.
.
.
.
.
.
.
.
.
.
.
.
.
.
.
.
.
.
.
.
.
.
.
.
.
.
.
.
.
.
.
.
.
.
.
.
.
.
.
.
.
.
.
.
8
8
8
9
9
9
9
9
9
9
10
11
11
11
11
12
12
.
.
.
.
.
.
.
.
.
.
.
.
13
13
14
15
16
18
18
19
20
20
20
20
20
Bonemat
User Guide v 1.0
6.2
6.3
Views (Menu View) . . . . . . . . . . . . . . . .
6.2.1 View Arbitrary . . . . . . . . . . . . . . .
6.2.2 View OrthoSlice . . . . . . . . . . . . . .
6.2.3 View RX-CT . . . . . . . . . . . . . . . .
6.2.4 View Surface . . . . . . . . . . . . . . . .
Operations (menu Operations) . . . . . . . . . .
6.3.1 Bonemat . . . . . . . . . . . . . . . . . .
6.3.1.1 Material modelling parameters .
6.3.1.2 Algorithm parameters . . . . . .
6.3.1.3 Advanced configuration settings
6.3.2 Bonemat batch . . . . . . . . . . . . . . .
6.3.3 Compare Mesh Data . . . . . . . . . . . .
6.3.4 Transform . . . . . . . . . . . . . . . . . .
4
.
.
.
.
.
.
.
.
.
.
.
.
.
.
.
.
.
.
.
.
.
.
.
.
.
.
.
.
.
.
.
.
.
.
.
.
.
.
.
.
.
.
.
.
.
.
.
.
.
.
.
.
.
.
.
.
.
.
.
.
.
.
.
.
.
.
.
.
.
.
.
.
.
.
.
.
.
.
.
.
.
.
.
.
.
.
.
.
.
.
.
.
.
.
.
.
.
.
.
.
.
.
.
.
.
.
.
.
.
.
.
.
.
.
.
.
.
.
.
.
.
.
.
.
.
.
.
.
.
.
.
.
.
.
.
.
.
.
.
.
.
.
.
21
21
24
26
27
29
29
31
33
34
34
36
37
Bonemat
User Guide v 1.0
1
Disclaimer
This is a brief manual of the Bonemat software. It is intended to be a guide to the
user, and we hope it can help rather than confuse you. Please be aware that the
manual is still in a preliminary and rudimentary shape. It may not be complete or
updated, and we cannot ensure all the information in it is 100% correct.
Bonemat is not intended for commercial, nor for clinical use. You use it at
your own risk, and you are responsible for the interpretation of any results. Being
a research tool under continuous development, Bonemat may not work exactly as
documented, and sometimes it may not work at all (loop, crash, etc.)! Please
report to us if you find any bugs ([email protected]), or would like to suggest
improvements ([email protected]).
2
What is Bonemat?
Bonemat is developed by Istituto Ortopedico Rizzoli in Bologna, Italy, as a tool for
mapping on a Finite Element mesh bone elastic properties derived from Computed
Tomography images. Bonemat can import CT images and FE models, interactively
visualise them, fuse them into a coherent representation, and export the updated
FE mesh once bone properties have been mapped. Though developed for computational bone biomechanics, it may be intended as a more general tool for numerical
integration of entities from a regular to an unstructured grid.
Bonemat is developed using the Multimodal Application Framework (MAF for
short), see below for a detailed introduction to MAF.
3
System Requirements
To use Bonemat you just need a PC running Microsoft Windows (we are sorry
but currently other oprative systems are not supported). The minimum system
requirements are:
• Operating System: Windows XP / Windows Vista / Windows 7 / Windows 8
• Processor: 1.0 GHz
• RAM: 1GB (3 GB recommended)
• Graphics Card: Compatible with OpenGL 1.2
• Hard Disk: 30MB
4
What is MAF?
The Open Multimod Application Framework (openMAF) is an open source freely
available framework (www.openmaf.org) for the rapid development of applications
5
Bonemat
User Guide v 1.0
based on the Visualisation Toolkit (www.vtk.org) and other specialised libraries. It
provides high level components that can be easily combined to develop a vertical
application in different areas of scientific visualisation. OpenMAF has been further
extended by an additional software layer, called MafMedical. MafMedical contains
all MAF components that are specific to the biomedical application domain. A
generic MAFMedical application, such as Bonemat, is defined by choosing from
the framework the necessary components, and eventually specialising them. It is
also possible to develop ad hoc components, that are necessary only to the application itself, and to plug in additional 3rd parties libraries. There are four types of
components that form any MAF application:
• Virtual Medical Entities (VMEs), which are the data objects;
• Views, that provide interactive visualisation of the VMEs;
• Operations, that create new VMEs or modify existing ones (special Operations
are the Importers, that let you import and convert into a VME almost any
biomedical dataset, and the Exporters that can convert the VME into files
formatted according to the most common standards);
• Interface Elements, generic GUI components that define the user interface of
the application;
Each session of a MAF application can be saved (and reloaded) as a msf (MAF
Storage Format) file, which is an XML file describing each object properties and
object relationships, including links to a complementary folder in which the datasets
relative to each object are stored in binary format.
4.1
VMEs
VMEs provide the data representation. A VME represents a data entity. There are
many VME types in MAF, that can be used to represent almost any biomedical
image or signal. The VME types Bonemat can directly handle are: VMEVolume,
VMEMesh. Other VME types can be imported through the Import vtk function,
and some of them can be visualised (e.g. VMESurface in the View Surface), but
no interaction through Operations is foreseen for them in Bonemat. VMEs are
organised in a hierarchical tree (VME Tree or data Tree) and they are all composed
by a dataset, a matrix that defines the pose of the VME with respect to its parent
in the VME Tree, and a set of metadata that provides all the textual attributes of
the VME.
4.2
Views
Views allow data examination. There are various views that permit to examine the
VMEs. A View provides an interactive representation of the VME Tree. For each
view the system maintains a display list of the VMEs that are currently rendered
6
Bonemat
User Guide v 1.0
in that view. The Views available in Bonemat are: Arbitrary, Orthoslice, RXCT, Surface (Figure 1). The user can control several properties of the active View
Figure 1
through the View Settings tab in the upper part of Control Bar.
4.3
Operations
Operations create new VMEs or modify existing ones. At any time the user can
select a VME and then choose one of the available Operations. An Operation may
accept only a particular type of VME as primary input, e.g. the Bonemat operation
accepts only VMEMesh. At any time, it is possible to run only those operations
that accept the currently selected VME (Figure 2). Operations that need more than
Figure 2
one input may request additional VMEs to the user, e.g. the Bonemat operation
requires as additional input a VMEVolume. The Operations available in Bonemat
are: Bonemat, Bonemat Batch, Compare Mesh Data, and Transform.
7
Bonemat
User Guide v 1.0
Operations are modal: when an operation is running, it is not possible to run
another operation and it is not possible to change the selected VME.).
The user can control the behaviour of the operation through the Control Bar.
Operations support the Undo/Redo feature.
5
GUI introduction
When launched the application interface looks like Figure 3.
Figure 3
5.1
User Interaction
In all visualisation windows the mouse interaction with the available objects happens
as follows:
• left mouse button to rotate
• central mouse button (or press down the scroll wheel) to translate/pan
• right mouse button to zoom in/out.
If a laptop is used, please look up in the manual for how to simulate from keyboard
the central button of the mouse.
5.2
GUI environment
There is a basic structure for any MAF application: it consists of a GUI environment
composed by:
8
Bonemat
User Guide v 1.0
• Menu Bar
• Main Working Area
• Lateral Control Bar, showing the VME hierarchical structure
• Log Bar, for the system messages.
Contextual menus (upon clicking right mouse button) are also available for Views,
VMEs, and for the VME tree.
5.2.1
Menu Bar
5.2.1.1
File This item contains all the commands related to input/output operations; in the application skeleton the basic features are open/save/new commands
to respectively load, store, or initialise a new msf (MAF Storage Format) session
file. All importers/exporters will be described in detail in the following.
5.2.1.2
Edit This item contains the commands to cut/copy/paste/delete any
VME from the tree. Undo/redo commands are also available. Find VME allows
the user to search a VME by name in the data tree. Each command has a keyboard
shortcut, displayed in the menu.
5.2.1.3
View This item contains the list of the available views. To add a new
view, simply select Add View and select the desired view. It is also possible to select
which of the other bars (Control Bar, Log Bar, Tool Bar and Time Bar) should be
visible in the global application window. All views will be described in detail in the
following.
5.2.1.4
Operations This item contains a list of available operations within
the application; to perform an operation, first select your input VME (if any), then
select the desired Operation in Operations menu (if an operation can not be run with
the selected VME as input, the operation name appears in grey). All operations
will be described in detail in the following.
5.2.1.5
Tools Through the command options, a list of available settings for
any MAF application can be set. It is possible to change the program language, the
measurement unit, and other settings. For example, the user can choose the layout
of windows at program opening and modify the interaction device (e.g. mouse). It
is also possible to customize the user interface preferences. The changes will take
effect when the application restarts.
5.2.2
Control Bar
The Control Bar is formed by three sub-windows:
9
Bonemat
User Guide v 1.0
5.2.2.1
Data Tree It shows the loaded VMEs, with their hierarchical struc-
ture. For the selected VME three other tabs are active (in the bottom part of the
Control bar):
• vme output shows the un-modifiable attributes of the VME related to the VME
data structure (Figure 4).
Figure 4
• visual props shows the rendering properties of the selected VME according to
the active view (Figure 5).
Figure 5
• vme shows the modifiable attributes of selected VME (such as the name, the
encryption, etc) (Figure 6).
Any VME is represented by colour and icon:
• Blue: the correspondent VME is loaded in memory and can be used
• Pink: the VME has not been already loaded in memory
10
Bonemat
User Guide v 1.0
Figure 6
• Grey: the VME could not be displayed in the active view
The display check box near the VME icon can be a square or a circle. If it is a
circle, the view is mutually exclusive for that type of VME, which means that only
one VME of that type can be display in the selected view.
5.2.2.2
View Settings It shows the settings of the selected view (Figure 7).
Figure 7
5.2.2.3
5.2.3
5.2.3.1
Operation It shows the setting of the operation in progress.
Contextual Menus
View contextual menu It can be activated pressing with right
mouse button in any view background and it provides some actions specific for
the views (Figure 8):
• Rename view allows to assign a specific name to the current view;
11
Bonemat
User Guide v 1.0
• Normal size/maximize allows to restore the size view to maximised or normal;
in compound views this command is available for the view as a whole or for
the selected sub panel;
• Save as image allows to save the content of the view in a standard image
format (bmp, jpg, tiff, etc.); in compound views this command is available for
the view as a whole or for the selected sub panel;
• Export Scene (VRML) allows to save the content of the rendered view in
VRML format.
Figure 8
5.2.3.2
VME contextual menu It can be activated pressing with right
mouse button on any VME displayed in any view (provided it is also the one selected in the VME tree) (Figure 9). It adds to the actions of the View contextual
menu, some other actions that are specific for the VMEs:
• Hide removes from the display list the selected VME;
• Delete deletes from the Data Tree the selected VME;
• Move launches the Move operation on the selected VME.
• Visual props opens a GUI exposing the visual properties of the VME according
to the selected View, or (in compound views) the view sub-panel.
5.2.3.3 Tree contextual menu It can be activated by pressing with the
right mouse button on any VME in the VME tree (Figure(10).. It provides some
visualisation shortcuts:
• Save MSF layout saves the layout of the current views with their display list
into the msf; at the next opening of the msf the user will be asked if he/she
wants to load also the corresponding layout;
12
Bonemat
User Guide v 1.0
Figure 9
• Hide/show (present if the VME can be displayed in the active view) hides/shows
the selected VME;
• Show sub-tree (present if a view is opened) displays in the current view all the
VMEs of the sub-tree related to the selected VME;
• Show same type it is present if the selected VME can be displayed in the active
view. It displays in the current view all the VMEs of the same type of the
selected one;
• Hide sub-tree removes from visualisation in the active view all the VMEs of
the sub-tree of the selected VME;
• Hide same type removes from visualisation in the current view all the VMEs
of the same type of the selected one;
• Crypt applies encryption to the selected VME;
• Enable crypt sub-tree applies encryption to all VMEs of a sub-tree.
• Disable crypt sub-tree removes encryption from all VMEs of a sub-tree.
• Sort children nodes allows to sort children nodes in alphabetical order.
• Keep tree nodes sorted allows to keep the alphabetical sorting even when new
VMEs are added to the data tree.
6
6.1
Key Commands
Data Importers and Exporters (menu File)
The Import and Export classes, accessible through the menu File, allows the user
to import/export data to and from the application in different formats. When in
use in the Bonemat application, the files are stored in the internal msf format.
13
Bonemat
User Guide v 1.0
Figure 10
Importers/Exporters are grouped according to the type of data they are dealing
with. In Bonemat, the user can import medical images, finite element meshes, or
previously stored vtk files. Vtk files and finite element meshes can also be exported.
6.1.1
Import Dicom
Path: File → Import → Images → DICOM
This importer loads medical images stored in DICOM format, and creates as output
either a Volume, Mesh, or Image VME (most times, a Volume VME).
The user has first to select from a standard window for folder selection the directory
Figure 12
Figure 11
in which the dicom files are stored. Once performed the folder selection, a new
14
Bonemat
User Guide v 1.0
wizard window appears in which the user can subsequently:
1. see the images preview (with some options to interact: choose the number of
study id if multiple ones were present in the folder and slide across the slices
with appropriate sliders, and perform windowing on the images) (Figure 11).
2. proceed to the optional “Crop” stage, in which cropping is performed in the
slices’ plane by drawing with the mouse the crop area, and in the direction
orthogonal to the slices by moving the “z-crop” slider. The in plane crop
area can be changed by moving each side of the area and controlled over the
different slices with the “slice num” slider (Figure 12).
3. proceed to the “Build” stage, when only the cropped area is kept. The user
can review the selected and cropped images, and choose among “Volume”
(default) and “Image” the type of VME produced by the Import Operation,
before completing the process by clicking “Finish” (Figure 13).
Figure 13
6.1.2
Import Raw Volume
Path: File → Import → Images → Raw Volume
This importer can load a raw binary volume file, i.e. a stack of images already
stored in a single file (Figure 14).
A VMEVolume is created in the data tree as a result. The user needs to choose
the file name (browsing with the “open” button), specify the endianity, the scalar
type (char, short, int, float, double) through which the images are represented, the
number of components for each pixel value (e.g. 1 in a greyscale image, 3 in a RGB
15
Bonemat
User Guide v 1.0
Volume), and to specify if data are signed or not (check-box). The user has also
to enter the dataset dimensions (number of pixels) and the spacing in mm/pixel
in all directions. The import can be limited to a part of the original volume,
defining a volume of interest (VOI) through x, y and z pixel intervals (VOI x, VOI
y, VOI z fields). If the spacing along the z-spacing axis is not uniform the user can
specify a text file from which the Z-coordinates are read (browsing with “z-coord
load” button). The Z coordinates file should be a text file whose format is like the
following (the coordinates should be written in ascending order):
Z coordinates:
-109.1
-107.8
-104.0
...
Moreover, the user can set the header size to be skipped in the import process. A “guess header” function is available throug the “guess” button. Finally, a
VMEVolume is created in the tree upon pressing the ok button.
Figure 14
6.1.3
Import Raw Images
Path: File → Import → Images → Raw Images
This importer can load a stack of raw binary images, automatically creating a
VMEVolume (Figure(15).. The raw images should be stored in a single directory
16
Bonemat
User Guide v 1.0
and should be named with the same prefix and a progressive number (e.g. RawImage 0006.raw, RawImage 0007.raw, etc.). The user needs to specify the name
of single files in the folder through the prefix (e.g. RawImage ), the pattern (e.g.
%s%04d) and the extension of the files (e.g. .raw). The user should also specify if
the data stored in the images are 8bits, 16 bits Little Endian, 16 bits Big Endian,
24 bits RGB, and whether they are signed or not. In case of 24 bits images also the
presence of interleaving should be specified. The user should then set the overall
dimensions of the volume in pixels and the spacing along the axes in mm/pixel.
Ticking on a checkbox, a ROI can optionally be specified on the XY plane, drawing
and adjusting a red box with left mouse button (ROI dimensions are shown underneath). If the spacing of the images is not uniform in the Z direction, the user
can import a text file with the Z coordinates, just like in the Import Raw Volume.
Moreover, the user can set the header size to be skipped in the import. The user
can set an offset for the first slice number (“file offset” field) and a spacing in the
numbering of the images (“file spc” field) if different from unity.
If all the information provided are compatible with the actual files fed in the application, a preview of the images will appear in the window, to be optionally scrolled
through the “slice num” slider. Finally, a VMEVolume is created in the tree upon
pressing the ok button.
Figure 15
17
Bonemat
User Guide v 1.0
6.1.4
Import VTK
Path: File → Import → Other → vtk
The VTK importer loads data stored in vtk format. The type of VME created into
the data tree depends on the information contained into the vtk file.
6.1.5
Import Generic Mesh
Path: File → Import → Finite Element → Generic Mesh
This importer allows the creation of a VMEmesh from two (optionally three) files:
(i) a matrix of nodes IDs and coordinates, (ii) a matrix of element IDs, element
properties and nodal connectivity, and optionally (iii) an array of material properties
(Figure 16).
Figure 16
(i) The file defining the list of nodes should be a matrix, where: the first column
indicates the node number, columns from second to fourth define the x,y,z,
nodal coordinates.
(ii) The file defining the list of elements should be a matrix, where: the first column
indicates the ID of the element; columns from the second to the sixth indicate
element properties that respectively define “material number, element type,
set of constants, reference system, section properties”; the following columns
indicate the nodal connectivity. The mid-columns (2nd to 6th) are present
because Ansys was taken at first instance as a reference program and this
is how Ansys handles the association of properties to elements when listing
elements. At the moment these columns have to be included also when creating
a mesh from scratch and not deriving it from Ansys. However, they represent
a quite straightforward way to group elements in certain subsets. The second
column, in particular, can be very useful since it indicates which “material”
18
Bonemat
User Guide v 1.0
the element is made of. This becomes meaningful if the user specifies also a
“materials file” when importing.
(iii) The optional file defining the list of materials should be formatted as follows:
MATERIAL NUMBER = 1
EX = 20932.
NUXY = 0.30000
DENS = 1.2508
MATERIAL NUMBER = 2
EX = 18456.
NUXY = 0.33000
DENS = 1.1476
.......etc.....
Each element having a “1” in the second column of the file defining the list of
elements will be assigned properties of material number 1, and so on. Note:
additional rows, defining more properties can be added. Once a mesh has been
imported, the number of the “material card” as well as the material properties
of each element can be visualised using the “visual props” panel (or rightclicking on the VME in the compound views), by selecting “enable scalar field
mapping” (Figure 17) and browsing the desired field to be visualised among
those available.
Figure 17
6.1.6
Import Ansys CDB File
Path: File → Import → Finite Element → Ansys CDB File
This importer creates a VMEmesh directly from an Ansys ASCII archive (.cdb
19
Bonemat
User Guide v 1.0
file) which can be written directly by the Ansys program. The importer currently
supports only the following entities: nodes, linear and quadratic solid elements, and
material cards.
6.1.7
Import Ansys Input File
Path: File → Import → Finite Element → Ansys Input File
This importer creates a VMEmesh directly from an Ansys ASCII input file. The
importer currently supports only the following entities: nodes, linear and quadratic
solid elements (2D elements can be created as degenerated solid elements), and
associated material cards.
6.1.8
Export Generic Mesh
Path: File → Export → Finite Element → Generic Mesh
This exported is symmetric to the Import Generic Mesh feature. A VMEmesh is
translated into two (or three if materials are present) files: (i) a matrix of nodes
IDs and coordinates, (ii) a matrix of element IDs, element properties and nodal
connectivity, and optionally (iii) an array of material properties. All fixed rules for
the sintaxis of the files are the same as for the Importer.
6.1.9
Export Ansys CDB File
Path: File → Export → Finite Element → Ansys CDB File
This exporter creates an ASCII file that can be read by Ansys as an Ansys archive
file (.cdb). The exporter can deal with the basic finite element entities supported by
the Bonemat application: nodes, linear and quadratic solid elements, and material
cards usually containing Young’s modulus, density, and Poisson’s ratio values. In
the exported file, elements are grouped into Ansys components according to either
element type and material properties.
6.1.10
Export Ansys Input File
Path: File→ Export → Finite Element → Ansys Input File
This exporter creates an ASCII input file (.inp) that can be directly read by Ansys
program. The exporter can deal with the basic finite element entities supported by
the Bonemat application: nodes, linear and quadratic solid elements, and material
cards usually containing Young’s modulus, density, and Poisson’s ratio values. In
the exported file, elements are grouped into ANSYS components according to either
element type and material properties.
6.1.11
Export VTK
Path: File → Export → Other → VTK
Each VME can be exported as its vtk representation. The user can choose whether
20
Bonemat
User Guide v 1.0
to export the binary or the ASCII file (Figure 18).
Figure 18
6.2
Views (Menu View)
Every VME can be visualised and managed through a combination of views and
operations. Many instances of the same view with different VMEs displayed and/or
different views can be opened at the same time according to the users needs. Views
can be single, or composed by different sub-views (visualisation panels), (Figure 19).
Each visualisation panel views can be (i) perspective, i.e visualising a VME in space
through a camera that can be rototranslated or zoomed, or (ii) slice, i.e. slicing a
VME through a defined plane (Figure 19). Special interaction objects (Gizmos, i.e.
particular handles instantiated by a View or an Operation to allow direct interaction
with the mouse) are present in the slice views to facilitate the definition and the
fine tuning of the view settings (Figure 20).
6.2.1
View Arbitrary
The Arbitrary View is a compound view made of two panels. In the left panel, the
user can change using gizmos the position and the orientation of an arbitrary plane;
in the right panel the corresponding volume section is showed in a 2D parallel view
(Figure 21). The Arbitrary View supports the visualisation of:
• VMEvolume, one at a time. Windowing for the volume scalar is available. It
applies to both view panels.
• VMEmesh, even more than one simultaneously, with a 3D rendering in the
left volumetric view panel, and the sliced contour in the right slice view panel.
• VMEmesh Visual properties (visual prop panel accessible through contextual
menu): the user can define (checkboxes) whether to have a wireframe visualisation, to show or hide element edges, to show or not the visual properties
21
Bonemat
User Guide v 1.0
Figure 19
Figure 20
22
Bonemat
User Guide v 1.0
Figure 21
(colour/opacity etc.), to visualise the scalars associated to the mesh (e.g. elastic modulus) and if so with which LUT, i.e. look-up table, i.e. contour scale
(Figure 22).
Figure 22
The view properties can be changed from the view settings panel (Figure 23):
i) The user can change the position and orientation of the visualised slice through
Gizmo or Text interaction.
“Gizmo Interaction”: it is possible to translate or rotate the slice with three
arrows (for the translation) or three rings (for the rotations). By selecting the
desired gizmo and holding pressed the left button of mouse, the gizmo moves
and the plane is updated accordingly.
“Text Interaction”: The user can write the value in the corresponding text
box, and restore the initial plane position with the “reset” button.
23
Bonemat
User Guide v 1.0
ii) “Reset” button: the user can reset the initial position of the slice
iii) “LUT”: the user can set or define the look-up table to be assigned to the
scalars of the VMEVolume currently visualised.
Figure 23
6.2.2
View OrthoSlice
The OrthoSlice View is a compound view made of four panels and three gizmos. A
perspective panel shows a volume intersected by the three orthogonal planes and
the other three panels show a parallel view of each other slice (Figure 24). The
Orthoslice View supports the visualisation of:
• VMEvolume, one at a time. Windowing for the volume scalar is available. It
applies to all view panels.
VMEvolume visual properties (visual prop panel accessible through contextual
menu): the user can change or define the LUT of the volume scalars, and its
opacity in the visualisation; the z quote can also be changed manually (Figure
25).
• VMEmesh, even more than one simultaneously, with a 3D rendering in the
perspective view panel, and the sliced contour in the orthogonal slice panels.
VMEmesh Visual properties (“visual prop” panel accessible through contextual menu or “visual props” of the control bar, below the VME tree): the user
can define (checkboxes) whether to have a wireframe visualisation, to show or
hide element edges, to show or not the visual properties (colour/opacity etc.),
to visualise the scalars associated to the mesh (e.g. elastic modulus) and if so
with which LUT, i.e. look-up table, i.e. contour scale (quite the same than in
other views, Figure 22).
24
Bonemat
User Guide v 1.0
Figure 24
Figure 25
The view properties can be changed from the view settings panel (Figure 26):
(i) “layout”: the user can change the layout of the panels in the view.
(ii) “LUT”: the user can set or define the look-up table to be assigned to the
scalars of the VMEVolume currently visualised.
(iii) “Snap on grid”: the user can select whether to avoid interpolation between
slices and perform slice cuts only at values of the original grid.
Figure 26
Figure 27
25
Bonemat
User Guide v 1.0
6.2.3
View RX-CT
The RXCT View is a compound view made of eight 2D panels: two planar projections in the XZ and YZ planes, and six slices in the XY plane, whose Z-quotes
are identified in the two planar projections by six gizmos (Figure 27). The RX-CT
View supports the visualisation of:
• VMEvolume (one at a time), displayed in the projection panels as a digitally
reconstructed radiograph, usually resembling anatomical planes projections
(e.g. Anterior/Posterior and Medial/Lateral), and sliced along the Z direction
in the slice panels. VMEvolume visual properties (“visual prop” panel accessible through contextual menu): the user can change or define the LUT of the
volume scalars, and its opacity in the visualisation; the z quote can also be
changed manually (Figure 28).
Figure 28
• VMEmesh (even more than one simultaneously), as a 3D rendering in the
projection panels and as sliced contours in the slice panels. VMEmesh Visual
properties (“visual prop” panel accessible through contextual menu): the user
can define (checkboxes) whether to have a wireframe visualisation, to show or
hide element edges, to show or not the visual properties (colour/opacity etc.),
to visualise the scalars associated to the mesh (e.g. elastic modulus) and if so
with which LUT, i.e. look-up table, i.e. contour scale (quite the same than in
other views, Figure 22).
The view properties can be changed from the view settings panel (Figure 29):
• “side” (Left/right) changes the projection direction of the lateral projection
26
Bonemat
User Guide v 1.0
• “snap on grid”: the user can select whether to avoid interpolation between
slices and perform slice cuts only at values of the original grid. The user can
change the layout of the panels in the view
• “move all”: by checking it, the user moves all gizmos simultaneously
• “reset slices” brings back all slices to their original positions
Figure 29
6.2.4
View Surface
The Surface View is a three-dimensional perspective render window (Figure 30).
The Surface View, originally intended for the visualisation of VMESurface and
VMELandmarkCloud, which are not core component of the Bonemat application,
supports in Bonemat the visualisation of:
• VMEvolumes, displayed only with their bounding box.
• VMEmesh
VMEmesh visual properties (“visual props” panel of the control bar, below
the VME tree, or “visual props” in the contextual menu): quite the same than
in other views (Figure 22), i.e. the user can define (checkboxes) whether to
have a wireframe visualisation, to show or hide element edges, to show or not
the visual properties (colour/opacity etc.), to visualise the scalars associated
to the mesh (e.g. elastic modulus) and if so with which LUT, i.e. look-up
table, i.e. contour scale.
The view properties can be changed from the “view settings” panel (Figure 31):
27
Bonemat
User Guide v 1.0
Figure 30
• “camera parameters”: the user can control the camera with text entries rather
than with the mouse, if a predefined exact camera position has to be set;
• “grid” commands make it possible to visualise the grid or the axes and modify
their colours
• “show axes” shows or hides the reference system gizmo
• “back color” lets the user set the background colour the other settings below
are part of Surface View in MAF but are of little use in Bonemat.
Figure 31
28
Bonemat
User Guide v 1.0
6.3
6.3.1
Operations (menu Operations)
Bonemat
This Operation is the core of the application. The Bonemat operation allows the
user to assign to each finite element of a bone mesh an average material property
derived from the Hounsfield Unit (HU) of the tissue in that region, as reported in
the CT dataset, thus generating an inhomogeneous FE model based on the density
information contained in the CT. The most common (and here implemented) procedure to relate CT data to bone mechanical properties is to extract a density value
from the CT numbers (densitometric calibration achieved by scanning a phantom)
and from this calculating an elastic modulus by applying a density-elasticity relationship. An additional correction to the densitometric calibration parameters may
be introduced, since it has been shown that densitometric phantoms are not free
of errors when mimicking bone characteristics. The core of the Bonemat algorithm
is the numerical integration that maps the voxel-wise properties of the CT grid to
element-wise properties of a (unstructured) mesh grid.
The input data are a VMEvolume and a VMEmesh (the mesh has to fit within
the volume bounding box). The operation is accessible when a VMEmesh is selected
(Figure 32). The output of the operation is an updated VMEmesh in which each
Figure 32
element has been assigned an elastic modulus value on the basis of CT data. The
elements are grouped by their material card (Figure 33). An additional output is
given, in terms of a so called frequency file, which lists how many elements share
the same elastic modulus, for all the sampled elastic moduli in the model. In the
graphical interface, the selected VMEmesh is taken as primary input. Then the
user has to specify the secondary input (VMEvolume). If a unique VMEvolume is
29
Bonemat
User Guide v 1.0
Figure 33
Figure 34
30
Bonemat
User Guide v 1.0
present in the whole MSF file, that VMEvolume is automatically taken as secondary
input, otherwise the user can select a VMEvolume browsing the data tree (Figure
34).
The user has then to define some operation parameters, related either to the
material modelling relationships to be used and to the algorithm. The specified
parameters can be saved (“save configuration file” command) in a XML file which
is by default stored in the parent directory. The configuration file can be reloaded
(“open configuration file” command) or updated (“save configuration file as” command) (Figure 35). Please consider that the application itself is adimensional, so
Figure 35
the user is responsible for setting coherent measurement units to the variables.
6.3.1.1
Material modelling parameters
• CT densitometric calibration (ρQCT = a + bHU ) specifies CT densitometric
calibration parameters (usually obtained through a calibration phantom)
• (optional) Correction of the calibration (ρAsh = a + bρQCT ) applies a linear
correction rule, if available, to the CT densitometric calibration. There is the
possibility of specifying up to three different linear corrections on three different density ranges. See the following reference for details on the opportunity
of using such a correction: Schileo E, Dall’Ara E, Taddei F, Malandrino A,
Schotkamp T, Baleani M, Viceconti M. An accurate estimation of bone density improves the accuracy of subject-specific finite element models.J Biomech.
2008;41(11):2483-91.
• density-elasticity relationship (E = a + bρAsh .c ) specifies the law relating
bone density to bone elastic modulus, usually taken from the many empirical
density-elasticity relationships available in the literature. There is the possibility of specifying up to three different power laws on three different density
ranges, so as to account for discontinuities (e.g. one for cortical and one for
trabecular bone, given a threshold). Density-elasticity relationships have been
extensively reported and discussed in the literature, see e.g. the following references, for a critical review and a FE application respectively:
Helgason B, Perilli E, Schileo E, Taddei F, Brynjlfsson S, Viceconti M. Mathematical relationships between bone density and mechanical properties: a lit-
31
Bonemat
User Guide v 1.0
Figure 36
32
Bonemat
User Guide v 1.0
erature review.Clin Biomech. 2008 Feb;23(2):135-46.
Schileo E, Taddei F, Malandrino A, Cristofolini L, Viceconti M. Subjectspecific finite element models can accurately predict strain levels in long bones.J
Biomech 2007;40(13):2982-9.
The user can set a minimum value for the elastic modulus to be assigned
(optional). All the material modelling parameters are shown in Figure 36.
6.3.1.2
Algorithm parameters
• HU integration vs. E integration: specifies whether performing the integration
on the native HU field on each element and then calculate the E values (called
HU integration), or vice versa (E integration). See the following references to
choose among the averaging strategy:
Taddei F, Schileo E, Helgason B, Cristofolini L, Viceconti M. The material
mapping strategy influences the accuracy of CT-based finite element models
of bones: An evaluation against experimental measurements. Med Eng Phys.
2007 Nov;29(9):973-9.
Taddei F, Pancanti A, Viceconti M. An improved method for the automatic
mapping of computed tomography numbers onto finite element models. Med
Eng Phys. 2004 Jan;26(1):61-9.
Zannoni C, MantovaniR, Viceconti M. Material properties assignment to finite
element models of bone structures: a new method. Med EngPhys. 1998
Dec;20(10):735-40.
• Integration steps:specifies how many integration points the application will set
within each element
• Gap value:specifies the minimum gap between two subsequent material cards
(e.g. given a typical elastic modulus range in the order of 50 to 20000 MPa,
the user may want to avoid defining 19950 different materials but rather group
them each e.g. 500 MPa, resulting in maximum 40 material cards).
All the algorithm parameters are shown in Figure 37.
6.3.1.3
Advanced configuration settings This small sub-menu lets the
user set some minor, yet possibly interesting, parameters:
• Density Output: since a list of bone density values comes as output with the
list of elastic moduli, and different density measurements can be set in the application, the user can decide whether to list the density coming directly from
33
Bonemat
User Guide v 1.0
Figure 37
the densitometric calibration (named “Rho-QCT”, default), or that resulting
from the (optional) correction to the densitometric calibration.
• Grouping Density: by default, elastic moduli bins are assigned by Bonemat
starting from the highest modulus among each element and then grouping to
that value all elements within the specified “gap value”. Then the algorithm
searches again for the highest value among the remaining elements, and the
game goes on until all elements are assigned an elastic modulus, or the minimum value specified above (optional) is reached. This means that the distance
from two consecutive elastic moduli bins is not necessarily the gap value. The
“Grouping Density” options lets the user decide whether to assign to the bin
the highest elastic modulus value contained in it, or the mean one. This option
does not usually imply big or mechanically relevant differences in the output
when e.g. analysing a whole bone ranging from 50 to 20000 MPa in Young’s
modulus, but can be relevant in niche applications where small ranges are
analysed, or if few material bins are used.
• Poisson’s ratio: while waiting for the implementation of a consistent relationship (if any) between density and Poisson’s ratio, a fixed value is set. The
default is 0.3, here the user can specify a different value.
• Output frequency file: specifies the output filename (and folder address, default on the install directory) of the file that lists how many elements share
the same elastic modulus, for all the sampled elastic moduli in the model.
All the advanced configuration settings are shown in Figure 38.
Figure 38
34
Bonemat
User Guide v 1.0
6.3.2
Bonemat batch
The Bonemat batch Operation allows a user to run a series of Bonemat operations
on multiple volumes and multiple meshes using a single text file (.txt format) (Figure 39). The text file has to include, for each Bonemat operation, the following
Figure 39
information:
• path of the VMEmesh (FE model, .cdb or .inp or .vtk file formats)
• path of the VMEvolume (CT volume, .vtk file format)
• path to the calibration file (.conf or .xml file formats)
• path for the output FE model (FE model, .inp or .cdb or .vtk file formats)
Paths can be “absolute”, for example the text file can be formatted as follows:
C:\Windows\mesh\mesh.cdb
C:\Windows\volume\volume.vtk
C:\Windows\calibration_files\calibration.xml
C:\Windows\results\batch.inp
Even “relative” paths can be used, as in the following example:
mesh\mesh.cdb
volume\volume.vtk
calibration_files\calibration.xml
results\batch.inp
35
Bonemat
User Guide v 1.0
with the condition that the text file is in the same directory of the folders in which
there are the VMEmesh, the VMEvolume and the calibration file. In the example
above, the output will be saved in a folder located in the same directory of the text
file.
It is not necessary to specify the paths when the text file is in the same folder
of the VMEmesh, the VMEvolume and the calibration file. The output will be
automatically located in the same directory of the text file, if its path is not specified.
Comments can be added to the text file by adding “#” before them. Please
observe that a calibration file in .xml format is recommended because it contains
the “advanced options”, explained in more detail in the “Advanced configuration
settings” section of the Bonemat operation. It is anytime possibile to update the
configuration file in the Bonemat operation, by saving it in .xml format.
6.3.3
Compare Mesh Data
This Operation allows the user to compare the scalars associated to two meshes
that share the same topology (i.e. connectivity). The Operation can be run when a
VMEmesh (primary input) is activated. Another VMEmesh (secondary input) has
to be chosen by the user for comparison (Figure 40).
Figure 40
The user can choose in the “Comparison mode” menu of the Operation panel
which kind of comparison to perform, among “difference”, “absolute difference”,
“relative difference” (Figure 41).
The output is a new VMEmesh, whose scalars are the result of the comparison
between the two input VMEmesh (Figure 42).
6.3.4
Transform
This Operation allows the user to perform affine transformation (roto-translation
and non-uniform scaling) on the VMEs. The input is any VME in the data tree. The
36
Bonemat
User Guide v 1.0
Figure 41
Figure 42
37
Bonemat
User Guide v 1.0
output is a modified VME, with a matrix pose applied to it (please note the original
dataset, stored in .vtk format, is not changed, just a pose matrix is applied to it
whenever visualising or interacting with it). The user interface (Operation panel
in the data tree) lets the user apply the transformation either by inserting text or
interacting with Gizmos (Figure 43). If interacting with Gizmos, the user has first
Figure 43
to select the transformation mode (translate, rotate, scale) (Figure 44). The user
Figure 44
can activate the “Apply upon mouse release” option (Figure 45) that allows him
to visualize the transformation only after the mouse release and not interactively
following mouse movement. The pose parameters shown in the text are interactively
updated when moving Gizmos. The pose parameters and the Gizmos can be shown
in the following reference systems (Figure 46):
• Absolute, i.e. the global reference system
• VME base ref sys, i.e. the local reference system of the selected VME at the
beginning of the operation, so that the VME base reference system is fixed
38
Bonemat
User Guide v 1.0
Figure 45
Figure 46
and the user can control at each instant the transformation entity on the text
entries.
• VME local centroid, i.e. a reference system centered at the centroid of the
selected VME; the user can modify the coordinates of the reference system
origin to control the transform entity
• Relative, i.e. a reference system specified by the user among the VMEs present
in the data tree
• Relative centroid, i.e. a reference system centered at the centroid of a VME
specified by the user among the ones present in the data tree
• Arbitrary, i.e. an arbitrary reference system that the user can define from the
global reference system, by modifying the coordinates of the reference system
origin.
References
[1] B. Helgason, E. Perilli, E. Schileo, F. Taddei, S. Brynjòlfsson, and Viceconti M.
Mathematical relationships between bone density and mechanical properties: a
literature review. Clinical Biomechanics, (23):135–46, Feb 2008.
[2] E. Schileo, F. Taddei, A. Malandrino, L. Cristofolini, and M. Viceconti. Subjectspecific finite element models can accurately predict strain levels in long bones.
Journal of Biomechanics, (40):2982–9, 2007.
39
Bonemat
User Guide v 1.0
[3] F. Taddei, A. Pancanti, and M. Viceconti. An improved method for the automatic mapping of computed tomography numbers onto finite element models.
Medical Engineering and Physics, (26), Jan 2004.
[4] F. Taddei, E. Schileo, Helgason B., L. Cristofolini, and Viceconti M. The material mapping strategy influences the accuracy of ct-based finite element models of
bones: An evaluation against experimental measurements. Medical Engineering
and Physics, (29):973–9, Nov 2007.
[5] C. Zannoni, R. Mantovani, and M. Viceconti. Material properties assignment to
finite element models of bone structures: a new method. Medical Engineering
and Physics, (20):735–40, Dec 1998.
40