1
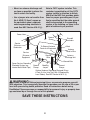
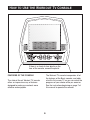
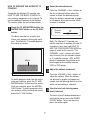
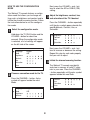
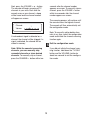
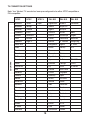
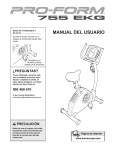
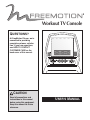
Workout TV Console
QUESTIONS?
At FreeMotion Fitness, we’re
committed to providing
complete customer satisfaction. If you have questions,
see HOW TO CONTACT
CUSTOMER CARE on the
back cover of this manual.
F
S
A
CAUTION
Read all precautions and
instructions in this manual
before using this equipment.
Keep this manual for future
reference.
USER’S MANUAL
Workout TV Console
TABLE OF CONTENTS
Important Precautions . . . . . . . . . . . . . . . . . . . . . . . . . . . . . . . . . . . . . . . . . . . . . . . . . . . . . . .3
How to Connect your Exercise Equipment . . . . . . . . . . . . . . . . . . . . . . . . . . . . . . . . . . . . . . .5
How to Use the Workout TV Console . . . . . . . . . . . . . . . . . . . . . . . . . . . . . . . . . . . . . . . . . . .6
Maintenance and Troubleshooting . . . . . . . . . . . . . . . . . . . . . . . . . . . . . . . . . . . . . . . . . . . . .11
How to Contact Customer Care . . . . . . . . . . . . . . . . . . . . . . . . . . . . . . . . . . . . . . .Back Cover
2
IMPORTANT PRECAUTIONS
WARNING:
To reduce the risk of serious injury, read the following
important precautions and information before operating the Workout TV console.
1. It is the responsibility of the owner
to ensure that all users of the
Workout TV console are adequately
informed of all warnings and precautions.
and requirements for the grounding
electrodes.
7. An outside antenna system should
not be located in the vicinity of overhead power lines or other electric
light or power circuits, or where it
can fall into such power lines or circuits. When installing an outside
antenna system, extreme care
should be taken to keep from touching such power lines or circuits, as
contact with them might be fatal.
2. Use the Workout TV console only as
described in this manual and in the
exercise equipment user’s manual.
3. Keep the Workout TV console away
from moisture and dust. Do not use
the Workout TV console in a garage
or covered patio or near water.
8. To reduce the risk of electric shock,
do not remove the cover or the back
of the Workout TV console. There
are no user serviceable parts inside.
Refer servicing to qualified service
personnel.
4. Keep children under the age of 12
away from the Workout TV console
at all times.
5. Never insert or drop any object into
any opening.
9. Upon completion of any service or
repairs to the Workout TV console,
ask the service technician to perform
safety checks to confirm that the
unit is in proper operating condition.
6. If an outside antenna or cable system is connected, make sure that
the antenna or cable system is
grounded to provide some protection against voltage surges and
built-up static charges. Section 810
of the National Electrical Code,
ANSI/NFPA No. 70-1984, provides
information with respect to proper
grounding of the mast and supporting structure, grounding of the leadin wire to an antenna discharge unit,
size of grounding conductors, location of antenna discharge unit, connection to grounding electrodes,
• Use No. 10 AWG (5.3mm2) copper,
No. 8 AWG (8.4mm2) aluminum,
No. 17 AWG (1.0mm2) copper-clad
steel or bronze wire, or larger as a
ground wire.
• Secure an antenna lead-in and
ground wires to the facility with
stand-off insulators spaced from
4 to 6 feet (1.22 to 1.83 m) apart.
3
• Mount an antenna discharge unit
as close as possible to where the
lead-in enters the facility.
Note to CATV system installer: This
reminder is provided to call the CATV
system installer’s attention to Article
820-40 of the NEC that provides guidelines for proper grounding and, in particular, specifies that the cable ground
shall be connected to the grounding
system of the building, as close to the
point of cable entry as practical.
• Use a jumper wire not smaller than
No. 6 AWG (13.3mm2) copper or
the equivalent when a separate
antenna-grounding electrode is
used. See NEC Section 810-21 (j).
Power Lines
Ground
Clamp
Service
Entrance
Conductors
Standoff
Insulators
Mast
To External Antenna
Terminal of Equipment
Service
Entrance
Equipment
Power Service Grounding
Electrode System (e.g.
Interior Metal Water Pipe)
Antenna
Lead-in Wire
Antenna
Discharge Unit
Ground
Wire
Ground Wire
Ground
Clamps
Bonding
Jumper
Ground
Clamps
Optional Antenna Grounding Electrode Driven
8 Feet (2.44 m) Into The Earth (If Required By
Local Codes). See NEC Section 810–21 (f).
WARNING:
Before beginning this or any exercise program, consult
your physician. This is especially important for persons over the age of 35 or persons with pre-existing health problems. Read all instructions before using.
FreeMotion Fitness assumes no responsibility for personal injury or property damage sustained by or through the use of this product.
SAVE THESE INSTRUCTIONS
4
HOW TO CONNECT YOUR EXERCISE EQUIPMENT
CONNECT THE POWER CORD
A satellite receiver, VCR, or DVD player can
also be connected to your exercise equipment. Connect a CATV cable from the coaxial output on your satellite receiver, VCR, or
DVD player (usually labeled TV OUT or RF
OUT) to the cable jack. Note: Audio/video
equipment without coaxial outputs requires
an RF modulator to operate with your exercise equipment. RF modulators and external
CATV cables are not available from
FreeMotion Fitness, but are available at electronics stores. See the user's manual included with the audio/video equipment you wish
to connect to see whether an RF modulator
is needed.
Before using your exercise equipment with
the Workout TV console, make sure that the
power cord is properly connected as
described in your exercise equipment user’s
manual.
CONNECT A CATV CABLE
A CATV cable must be connected to your
exercise equipment for cable TV stations to
be viewed. Locate the cable jack on your
exercise equipment, and connect a CATV
cable to the cable jack.
5
HOW TO USE THE WORKOUT TV CONSOLE
F
S
A
If there is a sheet of clear plastic on the
face of the console, remove the plastic.
FEATURES OF THE CONSOLE
The Workout TV console incorporates all of
the features of the Basic console, and adds
a built-in flat screen TV so you can watch the
programs of your choice while you exercise.
See the instructions beginning on page 7 of
this manual to operate the console.
The state-of-the-art Workout TV console
offers an impressive array of features
designed to make your workouts more
effective and enjoyable.
6
HOW TO OPERATE THE WORKOUT TV
CONSOLE
2
Press the CHANNEL + and – buttons or
the ten numbered buttons below the
screen to select the desired channel.
When the buttons are pressed, a graphic will appear on-screen to show which
channel is selected.
To operate the Workout TV console, see
HOW TO USE THE BASIC CONSOLE in
your exercise equipment user’s manual. To
use the additional features of the Workout
TV console, follow the instructions below.
1
Select the desired channel.
Press the TV AND MATRIX button, the
MATRIX ONLY button, or the TV ONLY
button.
Channel:
Volume:
The Basic console has a matrix that
shows your progress during your workouts. The Workout TV console displays
the matrix on-screen.
Note: Channel:
The Workout TV console can
identify
and store in memory all valid TV
Volume:
channels in your area (see HOW TO
USE THE CONFIGURATION MODE on
pages 8 and 9 of this manual). The
CHANNEL + and – buttons will select
only channels that are stored in memory. If a satellite receiver, VCR, or DVD
player is connected, the channel must
be changed on the satellite receiver,
VCR, or DVD player.
Matrix
3
Adjust the volume as desired.
Press the VOLUME + and – buttons to
adjust the volume. When the buttons
are pressed, a graphic will appear onscreen (see the drawing above) to show
which volume setting is selected.
To watch programs and view the matrix
while you exercise, press the TV AND
MATRIX button. To view only the matrix
while you exercise, press the MATRIX
ONLY button. To watch programs while
you exercise without viewing the matrix,
press the TV ONLY button.
4
View the heart rate training zones
chart if desired.
To view a chart of recommended heart
rate training zones, press the ZONES
ON/OFF button. To turn off the chart,
press the button again.
7
Language
English
HOW TO USE THE CONFIGURATION
MODE
Next,Mode
press the VOLUME
+ and – butAIR
Language
English
tons to
select the AIR
or CABLE (CBL)
Brightness
Mode
AIR
setting.
Contrast
The Workout TV console features a configuration mode that allows you to change settings such as brightness and contrast and to
initiate the channel-scanning function. Follow
the instructions below to use the configuration mode.
Brightness
Hue
Contrast
Adjust
the brightness, contrast, hue,
Saturation
Hue
and saturation
of the TV if desired.
Scan
Saturation
PressScan
the CHANNEL – button repeatedly
1
3
until the plus symbol appears beside the
word Brightness, Contrast, Hue, or
Language
English
Saturation.
Language
English
Select the configuration mode.
Mode
Mode
Brightness
Brightness
Contrast
Contrast
Hue
Hue
Saturation
Saturation
Scan
Scan
Hold down the TV ONLY button and the
VOLUME + button for about two
seconds. When the configuration mode
is selected, a list of settings will appear
on the left side of the screen.
2
Language
English
Mode
AIR
Brightness
Contrast
Hue
Saturation
Language
English
Scan
Mode
AIR
Brightness
Contrast
Choose
Hue a connection mode for the TV.
Language
English
Saturation
Mode
AIR
PressScan
the CHANNEL
– button. A plus
Brightness
symbol
will appear beside the word
Contrast
Mode.
Hue
Saturation
Language
English
Scan
Mode
AIR
Brightness
Contrast
Language
English
Hue
Mode
TV NTSC AIR
Saturation
Brightness
Scan
Contrast
Hue
Saturation
Language
English
Scan
Mode
TV NTSC AIR
Brightness
Contrast
AIR
TV NTSC AIR
Next, press the VOLUME + and – butLanguage
English the setting.
tons to
increase or decrease
Language
English
Mode
NTSC
AIRproperty
Repeat
this step forTV
each
color
Mode
AIR
Brightness
that you
wish
to
adjust.
Brightness
Contrast
Contrast
4
Hue
Initiate
Huethe channel-scanning function.
Saturation
Saturation
Scan
The Workout
TV console can identify
Scan
and store in memory all valid TV channels in your area. Press the CHANNEL
– button
repeatedlyEnglish
until the plus symbol
Language
appears
beside the AIR
word Scan.
Mode
Brightness
Contrast
Hue
Saturation
Scan
8
Next, press the VOLUME + or – button.
The console will begin scanning all TV
channels in your area. Each time the
console
scans a new channel, a beep
Channel:
will beVolume:
heard and the channel number
will appear on-screen.
seconds after the channel number
appears on-screen. To manually store a
channel, press the VOLUME + button
within two seconds after the channel
number appears on-screen.
The scanning process will continue until
the console scans the highest channel.
The console will then automatically exit
the configuration mode.
Channel:
Volume:
Note: To manually add or delete channels at any time, select the configuration
mode and initiate the channel-scanning
function again.
If no broadcast signal is detected on a
channel, the channel will be skipped; if a
signal is detected, the channel will be
stored in memory.
5
Note: While the console is scanning
channels, you can manually skip
unwanted channels or store desired
channels. To manually skip a channel,
press the CHANNEL + button within two
Exit the configuration mode.
If you did not initiate the channel scanning function, hold down the TV ONLY
button and the VOLUME + button for
about two seconds to exit the configuration mode.
9
TV CONNECTION SETTINGS
COUNTRY
Note: Your Workout TV console has been pre-configured to be either NTSC-compatible or
PAL-compatible.
NTSC
NTSC
NTSC J
PAL B/G
PAL B/G
PAL B/G
Bahamas
Taiwan
Japan
Afghanistan
Madeira
Zimbabwe
Barbados
Tobago
Albania
Majorca Is.
Bermuda
Trinidad
Algeria
Malaysia
Cambodia
U.S.A.
Australia
Malawi
PAL I
Canada
Venezuela
Austria
Mozambique
Angola
Chile
Vietnam
Azores
Netherlands
Botswana
Colombia
Virgin Is.
Bahrain
N. Zealand
Hong Kong
Costa Rica
Bangladesh
Nigeria
S. Africa
Cuba
Brunei
Norway
U.K.
Dominican
Cameroon
Oman
Zanzibar
Ecuador
Canary Is.
Pakistan
El Salvador
Cape Verde
Palestine
Greenland
Cyprus
N. Guinea
PAL D/K
Guam
Denmark
Portugal
China
Guatamala
Fiji
Qatar
N. Korea
Haiti
Finland
Sierra Leone
Honduras
France
Singapore
Jamaica
Germany
Spain
Mexico
Ghana
Sri Lanka
Micronesia
Iceland
Sudan
Myanmar
India
Swaziland
Nicaragua
Indonesia
Sweden
Panama
Israel
Switzerland
Peru
Italy
Thailand
Phillipines
Jordan
Turkey
Puerto Rico
Kenya
Uganda
Samoa
Kuwait
U.A.E.
S. Korea
Laos
Yemen
Suriname
Leichtenstein
Zambia
10
MAINTENANCE AND TROUBLESHOOTING
CLEANING THE WORKOUT TV CONSOLE
TROUBLESHOOTING
To clean the Workout TV console, wipe the
console with a clean 100% cotton cloth. To
remove marks, apply a small amount of mild
multi-purpose cleaner to the cloth and wipe
the console, screen, and external surfaces.
Never spray cleaner directly onto the
console or use ammonia or acid-based
cleaners.
If the Workout TV console does not function,
make sure that the power cord is fully inserted. If the TV picture is fuzzy, make sure that
all cables are properly connected. In addition,
make sure that the correct connection setting
is selected (see HOW TO USE THE CONFIGURATION MODE on pages 8 and 9 of
this manual).
11
HOW TO CONTACT CUSTOMER CARE
If you have questions after reading this manual, or if you require assistance, please contact
Customer Care at the address or phone number listed below. Please mention the name of
the product (FreeMotion Fitness Workout TV Console) when calling.
Customer Care: 1-800-201-2109, Monday–Friday, 7 a.m.–6 p.m. Mountain Time
FreeMotion Fitness, Inc. • 1096 Elkton Drive, Suite 600 • Colorado Springs, CO 80907
FreeMotion Fitness, Inc. • 1096 Elkton Drive, Suite 600 • Colorado Springs, CO 80907
Part No. CC7121 R0707A
Printed in USA © 2007 ICON IP, Inc.