1
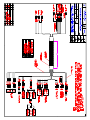
Micro-GASS™
Gas Analysis Sampling System
User Manual
PERMA PURE
8 Executive Drive
Toms River, N.J. 08755
Phone: 800-337-3762
732-244-0010
Fax:
732-244-8140
e-mail: [email protected]
Web Site: www.permapure.com
TABLE OF CONTENTS
1.
Introduction........................................................................................................................................5
2.
Micro-GASS Components..................................................................................................................5
2.1 Heated Filter
2.2 Perma Pure Dryer
2.3 Pump
2.4 Dry Sample as Purge Gas
2.5 Temperature Control
a. System Power
b. Pump Power
c. Temperature Control
d. Flow Control
3.
Installation.........................................................................................................................................7
3.1 Mounting
3.2 Electrical Connections
3.3 Plumbing
a. Sample Connection
b. Purge Connection
c. Sample Exhaust
d. Calibration Gas Connection
4.
Start-Up/Shutdown Procedures..........................................................................................................9
4.1 Start-Up Procedure
4.2 Shutdown Procedure
5.
Maintenance....................................................................................................................................10
5.1 Flow Rate
5.2 Coalescing Filter Element
5.3 Dryer Element Replacement
a. Element Removal
b. Element Installation
APPENDIX A - Specifications......................................................................................................................12
APPENDIX B - Micro-GASS System Spare Parts.......................................................................................13
APPENDIX C - CAL 3300 Temperature Controller Configuration................................................................14
Micro-GASS User Manual
2
WARRANTY AND DISCLAIMERS:
Seller warrants that product supplied hereunder shall, at the time of delivery to Buyer, conform to the
published specifications of Seller and be free from defects in material and workmanship under normal use
and service. Seller’s sole obligation and liability under this warranty is limited to the repair or replacement at
its factory, at Seller’s option, of any such product which proves defective within one year after the date of
original shipment from seller’s factory (or for a normal usable lifetime if the product is a disposable or
expendable item) and is found to be defective in material or workmanship by Seller’s inspection.
Buyer agrees that (1) any technical advice, information, suggestions, or recommendations given to Buyer
by Seller or any representative of Seller with respect to the product or the suitability or desirability of the
product for any particular use or application are based solely on the general knowledge of Seller, are
intended for information guidance only, and do not constitute any representation or warranty by Seller that
the product shall in fact be suitable or desirable for any particular use or application; (2) Buyer takes sole
responsibility for the use and applications to which the product is put and Buyer shall conduct all testing
and analysis necessary to validate the use and application to which Buyer puts the product for which Buyer
may recommend the use or application of the product by others; and (3) the characteristics, specifications,
and/or properties of the product may be affected by the processing, treatment, handling, and/or
manufacturing of the product by Buyer or others and Seller takes no responsibility for the nature or
consequence of such operations or as to the suitability of the product for the purposes intended to be used
by Buyer or others after being subjected to such operations.
SELLER MAKES NO OTHER WARRANTY, EXPRESS OR IMPLIED, OF THE PRODUCT SUPPLIED
HEREUNDER, INCLUDING, WITHOUT LIMITATIONS, IMPLIED WARRANTIES OF MERCHANTABILITY
AND FITNESS FOR PARTICULAR PURPOSE, AND ALL SUCH WARRANTIES ARE HEREBY
EXPRESSLY EXCLUDED. SELLER SHALL HAVE NO LIABILITY FOR LOSS OF PROFITS, OR SPECIAL,
INCIDENTAL, OR CONSEQUENTIAL DAMAGES UNDER ANY CIRCUMSTANCES OR LEGAL THEORY,
WHETHER BASED ON NEGLIGENCE, BREACH OF WARRANTY, STRICT LIABILITY, TORT,
CONTRACT, OR OTHERWISE. SELLER SHALL IN NO EVENT BE LIABLE IN RESPECT OF THIS ORDER AND OR PRODUCT DELIVERED ON ACCOUNT OF THIS ORDER FOR ANY AMOUNT GREATER
THAN THAT PAID TO SELLER ON ACCOUNT OF THIS ORDER.
Micro-GASS User Manual
3
WARNING
Thank you for purchasing sample gas conditioning equipment from Perma Pure LLC. We want your
new sample gas conditioning equipment to operate safely. Anyone who installs or uses this equipment
should read this publication before installing or operating this equipment.
To minimize the risk of potential safety problems, you should follow all applicable local and national
codes that regulate the installation and operation of your equipment. These codes vary from area to
area and usually change with time. It is your responsibility to determine which codes should be followed
and to verify the equipment, installation and operation is in compliance with the latest revision of these
codes.
At a minimum, you should follow all applicable sections of the National Fire Code, National Electrical
Code, and the codes of the National Electrical Manufacturer’s Association (NEMA). There may be local
regulatory or government offices that can also help determine which codes and standards are necessary
for safe installation and operation.
Equipment damage or serious personal injury can result from the failure to follow all applicable codes
and standards. We do not guarantee the products described in this publication are suitable for your
particular application, nor do we assume any responsibility for your system design, installation or operation.
This product should not be operated in any manner that is inconsistent with its intended use.
If you have any questions concerning the installation or operation of this equipment, or you need additional
information, please call us at 1-800-337-3762.
TRADEMARKS
This publication is based on information that was available at the time it was printed. At Perma Pure we
constantly strive to improve our products and services, so we reserve the right to make changes to the
products and/or publications at any time without notice and without any obligation. This publication may
also discuss features that may not be available in certain revisions of the product.
Trademarks
Nafion® and Teflon® are registered trademarks of EI DuPont de Nemours
Copyright 1996-2005, Perma Pure LLC All Rights Reserved
Micro-GASS User Manual
4
1. Introduction
The Perma Pure Micro-GASS is designed to reduce the humidity of gas samples to 20% to 80% RH, the
optimal humidity for Electrochemical Sensors. The Micro-GASS system will remove particulate matter and
water vapor from a gas stream without removing the compounds being monitored. The system consists of
a heated particulate filter, a partially heated Perma Pure Nafion gas dryer, a sample pump, and controls for
temperature and sample flow, assembled in a 12" x 12" x 7" NEMA3R enclosure.
Figure 1
2. Micro-GASS Components
2.1 Heated Filter
The first step in conditioning the sample is filtering out particulate. The filter is a disposable
1micron “encapsulated micro-fiber” filter element housed in a Kynar filter body for corrosion
resistance. Surrounding the filter body is a heated aluminum shell. The filter is
thermostatically controlled at 95°C to prevent aerosols from forming in the sample stream.
Micro-GASS User Manual
5
2.2 Perma Pure Dryer
A Nafion tube is housed inside a dryer shell. As wet compressed air flows through the tube, water
vapor is absorbed through the membrane and carried off by a counter-current purge air flow at a
reduced pressure. The driving force for this process, is the difference in partial vapor pressure of
water between the product and purge gas flows. In this system, a portion of the dried air is
expanded and used as the purge gas.
The sample inlet portion of the dryer is heated to provide rapid removal of the water and to
prevent condensation. Nafion transfers water vapor with a higher efficiency at elevated
temperatures. Yet, not all of the water-of-hydration molecules can be removed, and the
Nafion always retains some water. The amount of water retained is greater at higher
temperatures. Since water is removed only to the extent that the membrane is dry, the dryer
should be kept at the lowest temperature possible without causing the sample to condense.
As the sample dew point constantly drops as it travels through the dryer, a temperature
gradient that is just above the sample dew point is the most desirable. This is achieved by
heating only the sample inlet, where the sample dew point is highest, and cooling the
sample outlet with purge air where the sample dew point is the lowest. Efficiency throughout
the dryer is achieved by using this process.
If liquid water is introduced into the dryer, efficiency will decline and the dryer could fail to
perform altogether. The Nafion tube when wet will elongate approximately 10% over its dry
length. This elongation will cause the element to kink inside the dryer housing, creating a
restriction in the flow.
2.3 Pump
The system pump draws sample from the source through the dryer and analyzer, and
recirculates the sample through the purge side of the dryer under vacuum. Pump has
capacity up to 1 lpm and is made from materials highly resistant to chemical attack.
Pump power is controlled by the temperature controller in order to prevent drawing the wet
sample into the system when the system is cold.
2.4 Dry Sample as Purge Gas
Dry sample is piped to the sensor and back to the Micro-GASS for use as the purge gas. It is
expanded through a needle valve in the flow meter and placed under slight vacuum. The vacuum
increases the difference in partial water vapor pressure between the sample and purge gas and
enhances the drying efficiency of the system. The purge flow enters the dryer at the sample outlet
end of the dryer and performs two functions: First, it provides a medium for the water vapor to be
carried away. Second, the cool gas creates temperature gradient along the length of the dryer. The
purge gas is heated as it traverses the heated section of the dryer, reaching its maximum
temperature at the purge exhaust port. The dryer temperature is monitored and controlled through
the purge exhaust.
Micro-GASS User Manual
6
2.5 Temperature Control
The operating range of the Micro-GASS is from 45OC to 65OC. To maintain the proper operating
temperature the purge gas exhaust is monitored and controlled by the electronic temperature
controller. Dry sample gas returns to the system at ambient conditions, cooling the outlet end of the
dryer. As the purge gas passes through the dryer it is heated to the desired sample inlet
temperature, creating a temperature gradient along the dryer. This gradient allows for both rapid
water removal and decreased final dew point.
a. System Power – The system power switch controls power to the temperature controller,
and the filter, dryer, and heated-line heaters. System power is on a 2 Amp fuse, located
on the front panel.
b. Pump Power – The pump power is wired through the temperature controller. In order
for the pump to engage, the system must be heated to 40°C and the pump power switch
must be in the “ON” position. Sample flow is controlled by the flow meter.
c. Temperature Control - The dryer heaters are controlled by a PID electronic
temperature controller. Set-point adjustment is made by pressing the “ * ” key and either
the up arrow key or the down arrow key simultaneously. When the desired temperature
is displayed, release both keys. The allowed set-point range and the pump cut-off
temperature are preset by Perma Pure, LLC. Refer to APPENDIX C for the temperature
controller configuration or to the manual included with the documentation package.
d. Flow Control – System flow is measured after the analyzer in the dry sample at
atmospheric pressure and temperature. The flow meter should be adjusted to provide a
flow of between 0.5 to 1.0 lpm, depending on the water content of the sample. Lower
flow rates result in dryer samples.
Figure 2
Micro-GASS User Manual
7
3. Installation
3.1 Mounting
The Micro-GASS enclosure is rated NEMA-4, but the system is intended for indoor installation. For
mounting, choose a location to avoid exposure to direct sunlight as it may raise the internal
temperature above the operating limits, nor should the system be subjected to extreme cold
temperatures (< 10°C). Vertical orientation of the system is required for proper operation of the
flow meter. A set of four mounting feet are supplied for mounting the system on 12 ¼” centers.
3.2 Electrical Connections
Standard 110VAC receptacle is provided. For 220-volt systems, a pigtail cord is
provided for connection to the appropriate 220-volt plug (not provided).
For connection to the heated line, two female and one male bullet connectors; for neutral, line, and
ground connections respectively, are provided. An in-line fuse holder is provided for a fuse not to
exceed 10 amps (See wiring diagram on page 16).
3.3 Plumbing
a. Sample Connections
To prevent condensation of the sample gas, a heated
line may be required. The Micro-GASS is supplied
with a heat shrink sealing heated-line fitting sleeve or
“boot”. Connect the boot to the enclosure with the
fitting hub inside the enclosure and the o-ring seal on
the outside, as shown in Figure 3, tighten to secure.
The heated sample line passes through the sleeve
into the enclosure. Remove the insulation from the
heated line and connect the sample line to the ¼”
compression fitting at the inlet to the filter body.
HEATED SAMPLE
LINE
MINI-GASS
ENCLOSURE
FITTING
SLEEVE
O-RING
SEAL
FITTING
HUB
Figure 3
Heat-shrink the boot sleeve to the heated line:
1.
Before heat shrinking the boot connect the sample line to the filter and ensure that it
is in its final and ultimate position. The sleeve is adhesive lined and the heated line
cannot be removed after shrinking.
2.
Provide adequate ventilation. Fumes from burning can cause eye, skin, nose and
throat irritation.
3.
Using a low intensity heat source; such as a hot air heat gun, or infrared heat
source, heat the boot evenly until the sleeve shrinks into place. Allow extra heating
time to ensure that the adhesive melts and flows for proper adhesion.
4.
Keep the heat source 1" away from the heated line. Keep the heat source moving;
do not concentrate the heat in one place. If charring or burning occurs, stop
heating immediately.
Micro-GASS User Manual
8
b. Purge Connections
1/4” Bulkhead compression fittings located on the side of the enclosure are for the purge
connections. Connect the “Dry Sample Outlet” port on the Micro-GASS enclosure to the inlet port
of the sensor. Connect the sensor exhaust/outlet back to the “Dry Sample Return” on the
Micro-GASS. No heated line is required for these connections unless the lines will be exposed to
cool temperatures (<10°C).
c. Sample Exhaust
The sample exhaust can either vent freely, or can be piped away from the Micro-GASS . This gas
is “wet” and condensation in the line is likely.
d. Calibration Gas Connection
1/4” Bulkhead compression fitting is located on the enclosure bottom. The port must be plugged
when not in use. A cap for this purpose is provided.
4. Start-Up/Shutdown Procedures
4.1 Start-Up
Once all sample, purge, and electrical connections have been made, the system is ready for
operation. Start with the sample flowmeter closed and system and pump power switches in the
“OFF” position.
1.
Turn “System Power” switch to the “ON” position. This supplies power to the heated line,
the filter, dryer heaters, and the temperature controller. Allow 10-15 seconds for the
system to start-up. The temperature controller will display the dryer temperature.
2.
Adjust dryer set-point temperature to 35°C, or 10°C above the maximum anticipated
dewpoint temperature, whichever is higher. Refer to section 2.5 and Appendix C for the
temperature controller instructions.
3.
Switch “Pump Power” switch to the “ON” position. To prevent wet sample gas from entering
the unheated dryer, the sample pump is powered via the temperature controller. A relay in
the temperature controller remains open until the system reaches 40°C. The system
requires 10-15 minutes before the operating temperature is reached; and the pump then
becomes energized. There will be a temperature spike associated with the start of sample
flow. This is acceptable provided the temperature stabilizes within a few minutes.
4.
Open the flow meter, adjust the flow to the desired rate (0.5 to 1 lpm). Lower flows result in
dryer gas samples. Samples with a dewpoint of greater than 35°C should be run at no
more than 0.5 lpm.
4.2 Shutdown:
Do not permit wet gases to condense in the Nafion dryer. Follow this
procedure to purge wet sample gas from the system before shutting down:
1.
With system and pump power switches in the “ON” position remove the filter
cap from the bottom of the enclosure (Check condition of the filter element.)
2.
Allow the pump to run for at least two minutes.
3.
Turn the power switches to the “OFF” position and replace the filter cap.
Micro-GASS User Manual
9
5. Maintenance
5.1 Flow Rate
The system should be checked daily for proper flow rate.
5.2 Coalescing Filter Element
The filter element should be checked regularly to ensure that the element is in good
condition. If the filter is dirty or causing a flow restriction replace the filter element.
1.
2.
3.
4.
Remove the filter cap and element.
Inspect the o-ring for damage and replace if necessary.
Fit new filter element to raised portion of the filter cap and replace filter cap.
Tighten until snug, do not overtighten.
5.3 Dryer Element Replacement
Under the operating conditions specified, the Nafion dryer element could last for several
years. If element becomes wet, clogged, or dirty it may require replacement.
a. Element Removal
1.
2.
3.
4.
5.
6.
7.
8.
9.
10.
11.
Disconnect the system power source.
Remove four (4) screws from filter housing flange.
Open cover and lift control panel to gain access to the system components.
Remove two (2) nuts from the sample inlet tee fitting.
Rotate the tee fitting counterclockwise and remove it from the heater sleeve.
While holding the filter heater sleeve from the inside of the enclosure,
remove the Kynar filter housing from the outside by turning counterclockwise
until it can be pulled out.
Remove nut and union from the outlet end of the dryer.
From the outlet end, carefully push the element into the housing until the end
of the element clears the o-ring.
Remove the o-ring and replace with new o-ring.
Grab element from filter end of the dryer and gently pull until element is free
of the housing.
Remove o- ring from housing with the element.
Micro-GASS User Manual
10
b. Element Installation
1.
2.
3.
4.
5.
6.
7.
8.
9.
10.
11.
12.
13.
Always wear gloves when handling the element to prevent skin oils from
contaminating membrane surface.
Remove nut from tee fitting at the outlet end of the dryer.
Remove bend clips from dryer housing tube and straighten tube to allow
element to slip in easily.
Slip two new o-rings onto one end of the new element.
Install other end of the element into the filter side of the dryer housing by
gently pushing element into the housing. Be careful not to kink tubing. Allow
about ¼” to protrude from end of the tee fitting.
Install third o-ring seal around end of the element and gently push it into the
recess of the tee fitting.
Install union and hand tighten, followed by a ¼ turn with a 5/8" wrench.
Install two (2) nuts on tee fitting and tighten by hand.
Replace tube bend clips.
Install filter housing by holding filter heater sleeve from the inside of the
enclosure and lining up the union threads with the element and tee fitting end
of the dryer. Some flexing of the dryer heater sleeve may be necessary to
line up the threads. Do not cross thread the union! When the threads are
lined up properly, virtually no resistance will be felt until union
contacts the o-ring seal. Turn the filter housing until tight and the purge
port is visible through the hole in the heater sleeve.
Apply new Teflon tape to the tee fitting and thread it into the purge port. Do
not cross thread the port!
Install two (2) nuts on the tee fitting and tighten by hand.
Install four(4) screw in the mounting flange.
Micro-GASS User Manual
11
APPENDIX A – Specifications
TEMPERATURE
65°C (150°F) Max.
PRESSURE
30 PSIG Max.-5 in. Hg Min.
SAMPLE FLOW RATE
0.5 to 1.0 LPM
ELECTRICAL REQUIREMENTS
Watts
110VAC, 0.6A, 60 Watts220VAC, 0.3A, 60
GAS INLET/OUTLET FITTINGS
¼” TUBECompression Fittings
OPERATING ENVIRONMENT
10°C to 40°C Ambient0 to 95% R.H.
NAFION TUBE INNER DIAMETER
0.060" +/- 10%
WATER VAPOR CONTENT by SAMPLE DEW POINT
55°C (130°F) Max.
WATER VAPOR CONTENT by PERCENT
15% (by Volume) Max.
SAMPLE GAS RELATIVE HUMIDITY @ 5 lpm
INLET Dew Point
SOLUABLE GAS REMOVAL RATES
OUTLET%R.H. @ 20°C
35°C
27%
40°C
29%
45°C
33%
GAS
% LOSS
NO
0
NO2
0
SO2
0
CO
0
CO2
0
H2S
0
HCl
0
Micro-GASS User Manual
12
APPENDIX B - Micro-GASS System Spare Parts
Part #
Description
MD-070-24E-F Nafion dryer, 0.070" O.D., 24" length, replacement element only
UM-DA-070-24F Dryer assembly (includes dryer, heater, insulation, thermocouple, connectors)
UM-F
UG-FE
UG-FE
UG-FE
UG-1212-PUMP
UG-FM
UG-HL
UG-HL-10
Micro-GASS filter assembly
Micro-GASS filter element (package of 5 elements)
GASS Module with no drain on filter
GASS Module with automatic drain on filter
Vacuum pump for sample and purge, Teflon-coated
Flow meter, sample gas (0-1.5 L/min)
Heated line assembly charge
Heated line
Micro-GASS User Manual
13
APPENDIX C – CAL 3300 Temperature Controller Configuration
1. For all Micro-GASS systems with the CAL3300 Temperature controller, perform the following setup
procedures.
a. Power Up - Apply power to the system and wait for the controller to perform its self test routine.
The display will then be alternately flashing “nonE” and “inPt”.
b. Input sensor type - Press and hold Ø key. Press p key repeatedly to select the “tc J” option for
J type thermocouple. Release both keys.
c. Input unit type - Press the p key once. The display will then be alternately flashing “unit” and
“nonE”. Press and hold the Ø key. Press p key repeatedly to select the “OC” unit. Release both
keys.
d. Input setpoint 1 type - Press the p key once. The display will then be alternately flashing
“SP1.d” and “nonE”. Press and hold the Ø key. Press p key once to select the output device
“SSd”. Release both keys.
e. Input the maximum temperature setpoint - Press and hold the q key until “LEVL” appears.
Press and hold the Ø key. Press the q key to move to level 2. Release the two keys. Press and
hold the p key until “hi.SC” appears. Press and hold the Ø key. Press the q key until “65”
appears. Release the two keys.
f.
Input the minimum temperature setpoint - Press the p key once. “Lo.SC” appears. Press and
hold the Ø key. Press the p key until “45” appears. Release the two keys.
2. Configure the low temperature alarm.
a. Configure SP2 relay as alarm - Press and hold p and q keys simultaneously for 3 seconds to
enter the program mode. Release the two keys. The display will then be alternately flashing
“tunE” and “oFF”. Press the q key once. The display will then be alternately flashing “LEVL” and
“1”. Press and hold the Ø key. Press the p key once to move to level 2. Release the two keys.
Press and hold the p key until “SP2.A” appears. Press and hold the Ø key. Press the p key
until the display reads FS.Lo. Release the two keys. The display will then be alternately flashing
“SP2.A” and “FS.Lo”.
b. Save configuration into memory - Press and hold p and q keys simultaneously for 3 seconds.
The display will then be alternately flashing the process temperature and “PArK” indicating that
no setpoint temperature has been entered.
Micro-GASS User Manual
14
3. Set the control setpoint and auto-tune the controller.
a. Input the control setpoint temperature - Press and hold the Ø key. Hold the p key until the
display goes from 0 to 55.
b. Auto-tune the controller - Press and hold p and q keys simultaneously for 3 seconds to enter
the program mode. Release the two keys. The display will then be alternately flashing “tunE” and
“oFF. Press and hold the Ø key. Press the p key until “At.SP” appears. Release the two keys.
Press and hold p and q keys simultaneously for 3 seconds to exit the program mode. The
display will then be alternately flashing “tunE”, “At.SP” and the actual process temperature. Allow
the controller time to auto-tune. When tuning is complete the display will show only the actual
process temperature. This process may take up to an hour.
4. Enable low temperature alarm.
a. Input the alarm setpoint - Press and hold the q key until “LEVL” appears. Press and hold the Ø
key. Press the q key to move to level 1. Release the two keys. Press and hold the p key until
“Set.2” appears. Press and hold the Ø key. Press the p key until “40” appears. Release the two
keys. This alarm will control the sample pump so that it will automatically turn off at any time that
the temperature is below 40OC.
Micro-GASS User Manual
15