1
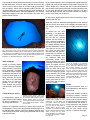
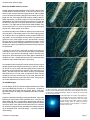
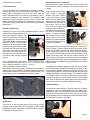
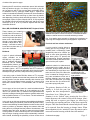
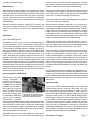
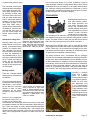
Nikon D7000
and Aquatica AD7000 Review
INTRO
Aquatica phoned me here at ReefNet at the end of December
2010, and asked me if I’d be willing to field test and publicly review a
prototype of their AD7000 housing for the newly-released Nikon
D7000. The review was to be honest, candid, and to include all
positive and negative aspects of the system. It was clear to me
that Aquatica was more interested in honest user feedback and
constructive criticism than an overly positive advertorial.
I accepted their offer and booked a trip to Dominica to put the
system through its paces. Aquatica generously covered my trip
expenses, and I (reluctantly) sent back the prototype upon my
return.
The newest Aquatica housing that I had used before this review
was my father’s AD300 (for the Nikon D300) which was released
in 2008. Since then, I’ve watched from the sidelines at dive
shows across the US, as their line of housings has grown, in
both quantity and quality. Many advances and innovations had
been made by Aquatica since the AD300, which made me all the
more eager to get in the water with the AD7000.
Nikon D7000
When the D7000 box arrived at my house, I put the battery to
charge immediately, and starting paging through the user manual.
The 1200 USD price tag became more and more shocking to me
as I read on, considering the long list of newly-developed and
pro features packed into this consumer-level body. Nikon has set
the bar incredibly high with this new release, which makes you
wonder what the next pro body is going to have under its hood
(D800? D400?).
FEATURES: 16.2MP
APS-C (DX) sensor
The D7000’s new 16
megapixel sensor is
capable of capturing
more details than
any other DX body
from Nikon.
Nikon D7000 in Aquatica AD7000 housing, Tokina
10-17mm lens @ 10mm behind Aquatica’s 9.25”
Megadome, 2 x Ikelite DS160 strobes - 1/60th, f/10,
ISO 100.
The D7000’s new sensor has roughly 30% more pixels than the
12MP D90, D300/s, D700, and D3, and is only topped in resolution
by one body in the Nikon range - the professional D3X, at 24MP.
With those extra 4 million pixels, you can print an image 15%
taller and wider, for a given DPI. This may not seem like much,
and is probably a moot point to many of you, but I certainly
appreciate the extra resolution compared to my D300. This pixel
dense sensor, combined with a 14 bit A/D converter (discussed
below) and a new EXPEED 2 processing engine are capable of
reproducing beautifully rich colors, incredibly sharp details, and
buttery smooth tonal gradients.
Dual SD slots (SDXC compatible)
The D7000’s 14-bit RAW
and JPEG images sometimes tip the scales at over
25MB and 9MB, respectively, and its 1080p HD
videos average around
2MB per second, so storage space can be eaten
up very quickly. Thankfully,
the D7000 has two SD
card slots, so single-card
capacity issues can be
avoided.
I used a pair of SanDisk
16GB Extreme Pro cards,
which was more than enough to let me shoot worryfree for a full day of 3 or 4
dives. I probably could’ve
managed with just a single
16GB (or pair of 8GB), but
the last thing I want to do
is waste time underwater
deleting photos.
Continued on next page-
Several hundred exposures were taken
to achieve this shot. The second card slot
came in handy in this case, since I greatly
exceeded the 16GB capacity of the first memory card. Volcanic gas bubbles at “Champagne”. Nikon D7000 in Aquatica AD7000
housing with tripod, Tokina 10-17mm lens
@ 17mm with Magic Filter behind Aquatica’s
9.25” Megadome, no strobes - 1/6th, f/29,
ISO 100.
Page 1
The second slot can be used as extra storage, or as an automatic
backup destination, on the off chance that data from one of the
cards is lost (I’ve had a couple of no-name cards go completely
belly up before). Videos can be directed to either card slot, but
once that card is full, you need to manually switch destinations
(SHOOTING MENU>Movie settings>Destination). You can also
send RAW images to one card, and JPEGS to the other, but I
find this feature useless.
Now, consider slide film, which is comprised of a plastic substrate
coated with grains of light-sensitive silver-halide. Each grain can
still be thought of as a bucket, but with a small funnel attached
that the water must first travel through. Average quantities of water can pass through the funnel without restriction, but, when
faced with large amounts, the funnel will overflow, only letting a
portion of the water into the bucket.
In other words, digital sensors are much more sensitive to highintensity light than film.
What this means for underwater photographers is that shooting
into the sun will often result in an unsightly stark-white ball in
your images, usually encircled by an equally unattractive cyan
ring.
A self-portrait shot from the inside of a large barrel sponge. The camera was
set to shoot every second using the interval timer shooting mode (SHOOTING
MENU>Interval timer shooting). I let the camera take over 100 shots before manually stopping it – this spilled me over into my second 16GB card. Nikon D7000
in Aquatica AD7000 housing, Tokina 10-17mm @ 10mm behind Aquatica’s 9.25”
Megadome, 2 x Ikelite DS160 strobes - 1/60th, f/14, ISO 200.
100% viewfinder
Usually a pro-body feature,
a 100% coverage viewfinder
allows precise in-camera framing, potentially eliminating
the need for future cropping.
Underwater, this feature is relevant only when using an external viewfinder, like Aquatica’s Aqua View (discussed
below), since it’s nearly impossible to see the entire
frame through any housing
manufacturer’s stock viewfinders.
1/320s flash sync speed
A disappointing aspect of
digital sensors is their inability
to capture highlights in the
same way that film does.
Precisely framing divers in wide angle
shots is much easier with 100% coverage viewfinders. Nikon D7000 in Aquatica
AD7000 housing, Tokina 10-17mm @
10mm behind Aquatica’s 9.25” Megadome, 2 x Ikelite DS160 strobes - 1/200th,
f/13, ISO 200.
Sensors are comprised of an array of pixels, which collect and
record photons. These pixels and photons can be thought of as
buckets and water droplets, respectively. Nothing prevents water
from entering the buckets, so they can get filled as fast as water
is poured into them.
To expose the sun more
pleasingly, a very high shutter speed, small aperture,
and low ISO are typically
required, but this usually results in extreme underexposure of the foreground, which
isn’t always desirable (unless
shooting silhouettes). Ideally,
you’d just turn on your strobes, crank up their power
and illuminate the underexposed area, but DSLRs are
limited by something called
the “maximum flash synchronization speed” which
prevents strobes from being
used past a particular shutter
speed. The higher this limiting shutter speed, the more
these sun balls can be kept
under control, so having a camera with a high sync speed
is very desirable. The D7000
can sync up to 1/320s, which
is the fastest in Nikon’s DSLR
range, other than the lower
grade D70/s and D50 which
sync up to 1/500s.
The Nikon D7000’s high sync speed
(1/320th) helps suppress sun balls.
Furthermore, its 14-bit RAW images provide 4 times more highlight
tones than 12-bit images, so monotone cyan rings can more easily be
avoided. Taken in 20 feet of water,
at 9:30am on a cloudless day. Nikon
D7000 in Aquatica AD7000 housing,
Tokina 10-17mm lens @ 10mm
behind Aquatica’s 9.25” Megadome,
2 x Ikelite DS160 strobes - 1/320th,
f/20, ISO 100.
This is an example of a completely
blown out sun ball surrounded by a ring
of cyan. Taken with a Nikon D90, which
has a slower maximum sync speed
(1/200 vs. 1/320) and shallower bit-depth
(12-bit vs. 14-bit) than the D7000. This
image illustrates the highlight rendering
problems that digital sensors face. Nikon
D90, Tokina 10-17mm lens @ 12mm, 2
x Ikelite DS160 strobes - 1/200th (max
sync speed), f/25, ISO 100.
ASIDE:
For those interested, here is a
brief explanation of why this limitation exists:
Focal plane shutters in DSLRs
consist of 2 “curtains” – front and
rear. The front curtain blocks the
sensor until the shutter release
is triggered, and then moves fully out of the way. The sensor remains exposed for the selected
duration (i.e. the shutter speed),
then the rear curtain quickly
springs- Continued next page
Page 2
Continued from previous pageinto place, ending the exposure. At a high enough shutter speed
the second curtain cannot move quickly enough to provide the
correct exposure. This mechanical limitation of independently
moving curtains is overcome by having the curtains move
together in the form of a slit that pans across the sensor. The
shutter speed is now determined by the slit’s fixed travel time
and its width ---the narrower the slit, the faster the effective shutter speed. This mode of shutter operation presents a problem
for flash photography. If a short strobe burst (typically 1/10001/50000s) occurs while the slit is passing over the sensor, only
that part of the image under the slit will “see” the flash, and the
rest of the frame will be dark. The flash must therefore be
triggered while the shutter curtains are moving independently.
The maximum shutter speed at which this occurs is the
camera’s sync speed. [Note: Some newer cameras extend the
sync speed to higher values by rapid pulsing of the dedicated
flash while the slit is travelling, but this significantly diminishes
the flash power].
In addition to being essential for suppressing sun balls, high sync
speeds are also a key element in creating jet-black backgrounds.
When shooting against bright backgrounds, like sand, sea grass,
or coral, it can be difficult to eliminate all of the ambient light, so
the higher the camera’s sync speed, the better.
2016 pixel RGB sensor for metering
After 14 years of using their 1005 segment RGB meter (first seen
in the F5), Nikon released a newly developed 2016 segment metering system in the D7000. Since the new metering module has
more than twice the number of RGB segments of its predecessor, and because it’s combined with the new (presumably more
powerful) EXPEED 2 processor, it certainly seems like Nikon’s
new metering system is a step forward. I never took the camera
out of manual (M) mode, and used manually controlled Ikelite
DS160 strobes (no TTL), so I didn’t actually test this system underwater.
100-6400 ISO range (expandable to 25600 equivalents)
The first thing I did when I turned on the D7000 was shoot at high
ISOs to compare with my D300. To say that I was shocked is an
understatement – flabbergasted is more like it. Even though the
D7000’s sensor has 25% more pixels than the D300 over the
same area, it exhibits significantly less noise at high ISOs.
Equally surprising is how well
this sensor compares to the
D700’s FX sensor. I don’t
have a D700 to test against,
but if merit is given to the DXO
Mark tests, then the noise levels of the D7000 are only one
stop behind it… with a sensor
having 50% less area AND
25% more pixels!
Eliminating ambient light from a scene is made much easier with cameras
having a high sync speed. Once eliminated, artificial light can be applied (in this
case using a snoot) to illuminate only what you want. Nikon D7000 in Aquatica
AD7000 housing, Nikon 105VR behind Aquatica’s manual focus flat port, 1
hardwired Ikelite DS160 strobe, and 1 Ikelite DS160 mounted on a Gorilla pod
with an Ikelite remote trigger and a ReefNet Fiber Optic Micro Snoot - 1/320th,
f/16, ISO 100.
This is an incredible step forward in sensor technology. It’s
certainly going to be interesting to see the noise levels that the
next generation FX sensors produce using this same technology
– I’m sure we’ll see soon enough!
I arrived in Dominica on schedule, but my bags didn’t make it
with me. All of my strobes were in those bags, but I did have
the D7000 housing, Aquatica’s 9.25” Megadome, and my trusty
Magic Filters, so I was stuck shooting with ambient light day after
day until my bags arrived. This gave me a chance to play with
the camera’s low light capabilities, and I was very pleasantly surprised time and time again. Finally, a Nikon DX camera with a
usable ISO range!
Taken in 40 feet of water on an overcast day. The D7000’s impressive high ISO
performance opens doors that were previously been locked to DX shooters.
100% crop displayed in the corner. Nikon D7000 in Aquatica AD7000 housing,
Tokina 10-17mm lens @ 17mm with Magic Filter behind Aquatica’s 9.25” Megadome, no strobes - 1/30th, f/8, ISO 1600.
Continued next page
Page 3
Continued from previous page
: Noise increases gradually with ISO, but only gets out of hand past the ISO 6400
mark (in my opinion). Keep in mind that this is meant strictly as a noise comparison – pay no attention to the differences in exposure, sharpness, or color, since
many variables were not kept constant (aperture, shutter speed, focus point,
ambient light, the camera’s position, etc.). Nikon D7000 in Aquatica AD7000
housing, Tokina 10-17mm lens @ 17mm behind Aquatica’s 9.25” Megadome,
2 x Ikelite DS160 strobes at various powers – ISO 100: 1/80th, f/10; ISO 400:
1/160th, f/10; ISO 800: 1/320th, f/10; ISO 1600: 1/320th, f/14; ISO 3200: 1/320th,
f/18; ISO 6400: 1/320th, f/22; ISO 12800: 1/320th, f/22. Yes, I accidentally skipped ISO 200.
As you can see from the above comparison, noise increases
incrementally with ISO. The level of noise that one considers
“too much” is a highly subjective matter, depending mainly on
personal preference and an image’s intended use.
I enter a lot of photo contests, and print 12” x 18” images for
friends and family regularly, and I’d feel comfortable doing both
with images shot at up to ISO 3200-6400. If you’re only publishing images online, then the entire range is very usable…
when viewed at screen resolution, the full ISO 100 shot above is
only marginally cleaner than the ISO 12800 shot!
Continued on next page
When viewed at lower resolution, images taken at ISO 12800 are surprisingly
comparable to those taken at ISO 100. 50% crops of both images shown. Nikon
D7000 in Aquatica AD7000 housing, Tokina 10-17mm lens @ 17mm behind
Aquatica’s 9.25” Megadome, 2 x Ikelite DS160 strobes at various powers – ISO
100: 1/80th, f/10; ISO 12800: 1/320th, f/22.
Page 4
Continued from previous page
Multi-cam 4800DX autofocus sensor
Another new feature being debuted in the D7000 is Nikon’s Multi-CAM 4800DX autofocus module. It has 39 focus points (9 of
which are the more accurate cross-type sensors), and is capable
of more accurate 3D tracking than previous models, when combined with the 2016-segment RGB metering module and EXPEED 2 processor. I’ve done a number of very unscientific focus
tests between the D300 and D7000, and it seems to me that the
D7000 wins every time in terms of speed and low contrast performance. The edge that the D300’s Multi-CAM 3500DX autofocus system has is 12 more focus points (6 more cross-type)
spread over a larger portion of the frame.
An autofocus mode on the D300 that I hadn’t given a chance until
now was its AF-C 3D-tracking system. This mode is also present
on the D7000, but is now backed by a more powerful RGB metering system, so is presumably more accurate. The system recognizes the color of the subject of focus, and will track it through
the focus area. This simplifies the composing of images, since it
eliminates the need to manually position the focus point – it just
follows your subject, provided that it’s distinct enough relative to
its background.
I usually only use the AF-S servo with a single focus point placed where I want it, but I now found myself using a combination
of the AF-C servo with this 3D-tracking mode for shooting midrange zoom, and macro/super macro shots. When I wanted to fix
the plane of focus, I simply held down the AF-L button and then
rocked the camera back and forth for fine-tuning.
Less notable is the camera’s AF-A (Auto-autofocus) mode, which
decides, based on the subject’s movement (or lack of it), whether
AF-S or AF-C is to be used, and sticks with that servo mode until
the shutter is fully-depressed or released. This seems good - in
theory - but after using it for less than 5 minutes, I got frustrated
and switched out of it and never re-visited that mode. Equally
useless to me is the “Auto Area AF” focus mode, which lets the
camera decide which focus point should be used. This gives you
no control whatsoever over what is in focus
14-bit RAW images
Like the D300s, D700, D3 and other high-end bodies, the D7000
can record RAW files in either 12- or 14-bit format – file sizes of
the latter being 20% larger than the former. Here’s a little background info that will help you understand what these formats
really mean.
A sensor’s photosites actually record grayscale data, rather than
RGB as you might expect. Each photosite has a color filter that
allows either red, blue, or green light to pass through, and the intensity of this light is converted from an analog signal to a simple
numerical value. Once data from the entire sensor is collected,
the camera’s image processor uses data from adjacent photosites to interpolate a full color RGB image – a process known as
“demosaicing”.
Continued on next page-
The 3D tracking system was able to keep the eye of this trumpet fish in focus as
I re-framed the image. These shots were taken in a 2 second time span. Nikon
D7000 in Aquatica AD7000 housing, Nikon 60mm behind Aquatica’s manual focus flat port, 2 x Ikelite DS160 strobes - 1/80th, f/11, ISO 200. AF-C servo mode
with 3D-tracking activated.
14-bit RAW images can produce more pleasing tonal gradients than their 12-bit predecessors, since
they’re capable of identifying 4 times the number
of light intensity levels. Nikon D7000 in Aquatica
AD7000 housing, Tokina 10-17mm lens @ 17mm
behind Aquatica’s 9.25” Megadome, no strobes 1/320th, f/22, ISO 100.
Page 5
Continued from previous page
The “bit-depth” of a sensor indicates the range of possible values
for the recorded intensity at every photosite. 12-bit sensors have
a range of 4096 values (that’s 2 to the 12th power), and 14-bit
sensors have a range of 16384 values (2 to the 14th power) –
that’s 4 times the range of values. This means that tonal gradients
can be recorded more smoothly, fine details can be recorded
more accurately, and highlight/shadow areas will contain more
information for potent restoration. However, contrary to what
some believe, dynamic range is not affected by bit depth, since
it is related to the light sensitivity of the sensor, rather than how
many levels each pixel is divided into.
Full HD Video capability
This camera can record full HD 1080p videos at 24 fps or 720p
videos at 24 or 30 fps. It compresses them using H.264/MPEG-4
coding – which is the most commonly used format for dealing
with HD videos. Video clips max out at 20 minutes, and in camera
trimming and frame-grabbing can be performed by pausing a
video clip, pressing the WB button, and then selecting the action
you’d like to take (Choose start point/Choose end point/Save selected frame).
ISO and shutter speed (minimum 1/30) can be manually adjusted
while shooting, but, frustratingly, you have to leave live view to
both adjust the aperture and to reset the custom white balance.
There are two focus modes to choose from when in live view
– single-servo (AF-S) and full-time-servo (AF-F). Each of these
modes can be used with any one of the four focus areas (face
priority, wide area, normal area, or subject-tracking).
In AF-S mode, autofocus is activated when the shutter is half
depressed, and stays put when released. When in AF-F mode,
the camera makes focus adjustments continuously to keep the
subject sharp, until the shutter is half-depressed, which
momentarily switches it into AF-S mode. On paper, this sounds
like an ideal setting for shooting video, but in reality, it’s a little
disappointing. The contrast-based autofocus system used in live
view mode is not nearly as quick or accurate as the Multi-CAM
4800DX sensor, and left the camera hunting for focus, and getting confused when switching between a close foreground and a
distant subject. Sometimes the system seemed to give up altogether, requiring a quick tap of the shutter to jolt it back to life.
I always used either the normal focus area, or the subject tracking
function when shooting videos, since the wide focus area covers
too much of the frame, and the face priority function is useless
underwater. The subject tracking function is an interesting feature,
which is similar to the 3D tracking mode in the camera’s primary
autofocus system – simply place the focus box over the subject,
press OK, and watch the little focus square follow the subject
around. However, again, this is much better in concept than in
practice. During my stay in Dominica, I tried to use this feature to
track a number of different subjects, but could only get it to work
reliably on stationary subjects that stood out from their surroundings.
While the autofocus system was rather disappointing, the quality
of the videos was impressive. I didn’t have any video lights, so
chose to shoot with ambient light and a magic filter whenever
possible. Not only are colors rendered vibrantly, the sensor produced usable videos in even the dimmest conditions, because of
its low noise levels at high ISOs.
AESTHETICS
Prior to the release of its Nikon D90 model, Aquatica manufactured its housings primarily by using an aluminum casting process,
followed by 3-axis CNC machining. This imposed a number of
design restrictions, giving the housings a hard-edged and relatively “boxy” look.
Now, however, they use an in-house state-of-the-art 5-axis CNC
machine that can produce very smoothly-contoured surfaces,
overhanging internal features, and can eliminate more excess
material than ever before, creating lighter housings without compromising strength. There are hardly any straight lines on the
D7000 housing, making it look far more sleek and stylish than
my father’s D300 housing.
The CNC machined aluminum bodies are anodized black, and
then all of the critically-dimensioned areas are masked before baking on a hard powder-coating for increased durability,
scratch-resistance, and corrosion prevention.
All of this is great for those interested in aesthetics, but what is (or
should be) more important is the housing’s functionality – in particular its ergonomics. In the following, I discuss all of the D7000
housing controls, pointing out their strengths and weaknesses.
BASICS
The redesigned camera saddle (first seen in the AN-5 for the
Sony NEX 5) slides smoothly along two guide-rods into the housing, and locks firmly in place, providing a consistent camera
position every time it is installed. It screws into the base of the
camera, and can be tightened with most coins. To remove the
camera/saddle assembly from the housing, you need to press
down on a flat lip extending out from under the camera, then pull
on the body, making sure that it is free of obstructions.
Continued on next page-
Page 6
Continued from previous pageThe memory cards are easily accessible with the back plate of
the housing removed, but the battery compartment is blocked by
the bottom of the housing, so the camera needs to be slid out a
few inches (not all the way) to access it.
I never took the tightly-fitting back plate o-ring from its groove –
I just wiped it and it’s mating surface with a t-shirt, and sealed
it back up every day. However, I was a bit more careful with
the port o-rings. Whenever I changed ports, I’d clean the o-ring,
groove, and mating surface before attaching it to the housing
using their standard bayonet mounting system.
CONTROLS
RIGHT HAND SIDE
Right side view of the AD7000, with all major control positions indicated
Shutter release lever
The correct amount of pressure
needed to trigger the shutter
is subjective. Some prefer a
spongy feel, requiring significant
travel to operate, thus making
it easy to differentiate between
half- and fully-depressed states.
Others prefer a hair-trigger, to
minimize the time it takes to click
off a shot. The AD7000 shutterrelease lever is somewhere close to the hair-trigger end of the
spectrum. When in “Ch” mode
(continuous high-speed shoo- A shutter release travel-limiter
ting, 6 FPS), I would occasio- prevents the mechanism from
nally squeeze out an extra cou- damaging the camera or return
ple of exposures accidentally, spring
so I opted to use the “Cl” mode
(continuous low-speed shooting)
set to 3FPS instead, and my problem was eliminated.
Main command and sub-command dial knobs
The shutter speed and aperture controls are two of the most
frequently used camera functions, so the design and position of
the housing’s access knobs are very important.
Their deep ridges, knurled edges, and textured powder-coating
combine to give the AD7000’s
knobs enough grip to be controlled with a single finger. Because
of their large diameters, they
require very little torque to rotate, which in my opinion is a
good thing. However, because
the knobs are so easily spun, it
was sometimes difficult to feel
Both my middle and index fingers
the characteristic “snap” when
could access this vital lever while
changing
these settings on the
solidly gripping the right handle.
camera. It’s a trade-off that I’m
more than happy to make, since one-finger control is far more
important to me.
A toothed pulley connects the
housing’s sub-command dial
knob to a spring-loaded gear
assembly which presses firmly
against the camera. It gripped
the dial very well, and never
missed a beat. This design does
its job very well, but on one occasion the pulley shifted so that The spring-loaded sub and
it was partially hanging off one main command dial gear
assembly
of the gears. This was more of
a head-scratcher than a “problem”, since I couldn’t recreate it, it didn’t affect the knob’s function, and it corrected itself after I rotated the knob a few times.
I pointed this out to Aquatica, and they immediately solved the
problem by adding a stopper on the problematic gear, preventing
slippage from occurring.
The main command dial gear assembly is also spring-loaded
along a track, ensuring that the dial is properly engaged every
time the camera is installed. It uses a more traditional gear/shaft
transmission system to relocate the housing’s knob closer to the
user’s thumb, and to make space for the D-PAD, REC, and Live
View buttons.
With my index finger on the shutter release, my thumb and middle finger had no difficulty reaching and rotating these knobs,
allowing me to quickly adjust exposure settings when shooting
moving subjects.
The AD7000’s large knurled knobs allowed me to very quickly
increase the shutter speed as this turtle swam overhead. Nikon
D7000 in Aquatica AD7000 housing, Tokina 10-17mm lens @ 17mm
with behind Aquatica’s 9.25” Megadome, no strobes – LEFT: 1/60th,
f/20, ISO 100; RIGHT: 1/320th, f/20, ISO 100.
Continued on next page-
Page 7
Continued from prvious page
+/- EV control lever
This spring-loaded lever is positioned just behind the shutterrelease, and can be held down with either the middle or index
finger. While it’s depressed, your thumb can easily rotate the
main command dial knob to set the EV compensation. This information is displayed in the viewfinder, so immediately after
reviewing an image’s exposure, you can return to framing the
subject and make the necessary EV adjustments. I seldom use
this camera function underwater, but it’s good to have it available
nonetheless.
AE-L/AF-L button lever
Located just in front of the main command dial knob, it can be
triggered with your right thumb to lock
focus and exposure settings. The
function of this button can be re-assigned through the menu (CUSTOM
SETTINGS MENU>Controls>Assign
AE-L/AF-L button). I usually kept it
assigned as an AF-ON button (which
simultaneously de-activates the shutter-release’s AF function) for shooting
super macro. It can also be assigned
as an AF-L button only (without locking exposure), or to lock flash exposure when using optically triggered
strobes.
Holding the AE-L/AF-L lever de-
On the prototype that I used, there pressed while keeping a finger
was nothing to prevent this lever from firmly on the shutter release lebeing rotated indefinitely, so there ver was easy.
was no indication of when my thumb
had pressed it far enough. Within a few days of hearing this,
Aquatica sent me 3D renders of a modified internal component,
which restricts rotation to a 30 degree arc (approximately). This
revised design will be incorporated in production models.
Record button and Live View lever
Above the 5-button D-pad and behind the main command dial,
this button/lever combo is located on one of the corners of the
housing.
These housing controls have
been moved a significant
distance from their location
on the camera body, making
them much more easily accessible than if they were directly
transposed from the body to
the housing. The Live View
lever on this prototype was
missing its return-spring, so I
had to manually swing it back
and forth to switch between
modes - production models
will not have this issue. Switching in and out of live view
was easy to do with my thumb
on the lever, without releasing
my grip on the handle.
The record button was a little further away than I would’ve preferred. To reach it, I had to slightly uncurl my grip, which always
added a bit of wobble to the end of video. Pressing this button
to stop recording also added a little shake, since it’s relatively
stiff. I would’ve preferred that this button be controlled by a lever
instead, since they require less force to operate. However, the
inner workings of this corner of the housing are so complicated
and tightly packed already, that implementing a lever would probably have been impossible without re-designing all of the other
buttons as well.
Occasionally, at moderate depths (50-90ft), the record button
wouldn’t spring back up after being depressed. I pointed out this
flaw to Aquatica, and once I returned the housing, they were able
to pinpoint the problem to the walls of the button-hole not being
masked properly before powder-coating. This caused the walls
to be slightly thicker and textured (rather than being smooth),
resulting in the button being held down from the extra frictional
force. They’ve designed new masking plugs for these button holes to prevent this from occurring in production models.
D-Pad/OK buttons
Just below the record button on the back plate are 5 buttons
organized in a circle, corresponding to the UP, DOWN, LEFT,
and RIGHT arrows, and a central OK button on the camera body.
These buttons have been moved as far to the right of the housing as possible using a combination of laser-cut metal linkages
and guide-pins. Continued next page-
On/Off lever
This lever is on the top right surface of the housing. Its twopronged internal mechanism must be properly oriented before
installing the camera. Otherwise, the ON/OFF switch might not
be engaged enough to function.
Page 8
Continued from previous pageThat said, it was a bit of
a stretch for me to reach
the leftmost button without uncurling my fingers from the handle. I
noticed this only when
I needed to move the
focus point around in
the viewfinder, but once
I started using the 3D
tracking mode, I rarely
had to use these buttons
with my eye to the camera anymore. The other
two uses of these buttons (reviewing images
and accessing menu items) are exclusively performed before or
after shooting, so having to take your hand away from the shutter
release and command dials is not an issue.
This prototype had a slight clearance issue with the live view
lever. When at rest, it prevented the UP button from being
depressed, and partially restricted the LEFT button. Aquatica
already had this problem solved, as seen in the computer
rendering above even before this prototype hit the water.
INFO button
Just under the D-pad is the
INFO button. Pressing it once
brings up all relevant shooting information on the LCD
screen, allowing adjustments
to be made without looking
at the top LCD panel (which
there is no window for) or
through the viewfinder. Pressing it a second time brings up a second shooting menu, where
movie quality, noise reduction, color space, picture control, and
active D-lighting can be set. The 3 customizable camera buttons
(AE-L/AF-L, Fn, and Preview) can be quickly assigned through
this screen as well. I used this button very frequently. With your
hand on the grip, it also requires a bit of a stretch to get to, but
this wasn’t an issue since you’d never need to press it while
shooting. The same masking problem caused this button to stick
down occasionally, and Aquatica has implemented the same solution as for the record button.
A pet peeve of mine with the camera, is that this very useful
INFO screen disappears when you touch the shutter release.
So, every time you adjust exposure, and take another shot, you
need to press the INFO button again to re-display the informa-
Diver with yellow tube sponges. Nikon D7000 in Aquatica AD7000
housing, Tokina 10-17mm @ 10mm behind Aquatica’s 9.25”
Megadome, 2 x Ikelite DS160 strobes – 1/200th, f/22, ISO 100.
tion. Alternatively, the ON/OFF switch can be configured to activate the INFO screen as well, and is more accessible than the
INFO button. However, while it may be easier to use the ON/
OFF lever than the INFO button, the INFO screen still annoyingly
disappears when the shutter release is touched.
Metering method button
This is on top of the housing, just behind the ON/OFF button. I
left the camera in matrix metering mode for the whole trip, so I
never had to use this button. A little dexterity is needed for this
one, since the main command dial has to be rotated while the
button is held down. You can either remove your right hand from
the grip to perform both tasks at once, or you can reach over to
press the button with your left hand, while rotating the command
dial with your right. A little awkward, but I wouldn’t have complained if this button wasn’t even included in the housing.
Continued next page-
Page 9
Continued from previous pageUPDATE: This useful piece of information was brought to my
attention by Jean Bruneau (Aquatica’s technical advisor) when
I sent him my list of issues with the housing. Normally, the WB,
ISO, +/- EV, QUAL, AF servo, and metering method buttons must
be held down while adjustments are made with the main or subcommand dials. However, “hidden” in the custom settings menu
is a function that changes how these buttons operate (Custom
Settings Menu>Controls>Release button to use dial). When this
menu item is in its ON state, these buttons no longer need to be
held down to be adjusted. Instead, you can remove your finger
from them once they’ve been pressed, then the command dials
can be used separately. This way, all of these buttons can essentially be operated with one hand (at a time).
LEFT HAND SIDE
Zoom/focus knob
I could easily reach and rotate the
zoom/focus knob with my index
finger alone, but I preferred a twofinger approach, using my thumb
to pinch it. It rotates very smoothly,
and is large and textured enough to
grip it very well when, for example,
taking slow shutter speed zoom
shots.
The zoom/focus knob in its
normal (left) and retracted
(right) positions.
The knob is made of two parts – a
knurled section that is connected
to the internal gear assembly, and
a smooth section that, when rotated, disengages the internal gearing assembly from the lens’ zoom/
focus gear. This is a helpful feature
for safely installing geared lenses,
since it eliminates the possibility of
gear interference.
Mode dial knob and release mode dial knob
The mode dial knob is the
same as the main and subcommand dial knobs – deepridged with a knurled perimeter. There isn’t a viewing
window on the housing to
see which mode you’re in,
but pressing the INFO button
will display this information in
the top-left corner of the rear LCD. I could reach and rotate it with
my left thumb with my hand still on the handle.
The U1 and U2 modes can store and instantly recall user-saved
camera settings. I set U1 as a starting point for macro photography (ISO 100, 1/320, f/11, WB @ 4760K, AF-S, single-point focus), and set U2 as a starting point for shooting video (ISO 400,
1/30, f/8, WB @ PRE, AF-S, subject tracking mode).
The release mode dial knob is slightly smaller than the mode
dial knob, and requires two hands to operate – one is needed
to hold down the lock release, while another is needed to rotate
the knob. There’s no easy way of doing this accurately with one
hand but, fortunately, this is a dial that is rarely used (at least
for me). I primarily shoot in low-speed continuous mode (set at
3 or 4 FPS), which can easily take single exposures as well as
relatively quick sequences. For split shots, I switch over to the
high-speed continuous mode (6 FPS) in order to maximize my
chances of capturing a pleasing waterline
Pop-up flash opener/closer
This is a two-way lever. Pressing it down or up will open
or close the camera’s pop-up
flash, respectively. It is located on the top-left corner of
the housing, well within reach
of your left thumb. Shooting
with electronic sync cords
renders this lever useless,
The two-way lever which controls
but when using fiber optics
the pop-up flash.
to trigger strobes, this can
be very useful. Instead of manually turning off your strobes to
shoot solely with ambient light, the pop-up flash can be closed
instead.
The inner-workings of the two-way flash
lever
M/AF switch lever and AFservo/focus area button
The M/AF switch lever and
concentric AF-servo/focus-area
button are cleverly combined
into a single unit, just below the
zoom knob. Rotating the M/AF
lever is smooth and easy, but it
always took me a few moments
to blindly locate the camera’s
switch with this 2-prong mechanism. Once it was in place, I had
no problems, and could switch
back and forth freely (which I rarely did). This assembly should
be retracted (pulled away from the camera) before removing the
camera from the housing, since it can snag pretty easily on the
lens or lens gear on the way out.
Continued on next page-
Page 10
Continued from previous pagePressing the AF-servo/focus area button was a little awkward.
With my hand on the grip, it is directly in line with my ring finger, but was too stiff for me to press down comfortably with it.
If I wanted to use my (stronger) middle finger, it required me
to bend it somewhat unnaturally, and was still uncomfortable to
use. Instead, I found that removing my hand from the handle,
and depressing it with my thumb was the best option. The focus
area (single, 9-point, 21-point, 39-point, AUTO, or 3D) could then
be adjusted with the sub-command dial knob, and the AF-servo
mode (AF-A, AF-S, or AF-C) could be adjusted with the main
command dial knob.
Menu, WB, ISO/ZOOM IN, QUAL/ZOOM OUT, Playback, Delete
These buttons are located
just left of the LCD screen in a
vertical line, and are all within
reach of my thumb (the delete
button took a little stretching
though). I never had to fiddle
around to adjust WB or ISO
settings - I was able to easily
locate and use them with my
eye to the viewfinder.
Bulkhead
A pair of optical bulkheads
comes standard on the
AD7000, but, if you prefer, a
pair of traditional electronic
bulkheads can be installed
instead (Ikelite, Nikonos, or a
combination of the two). The benefits of optically synced strobes
are hard to ignore – full TTL compatibility with S-TTL strobes, lightweight fiber optic cables as opposed to bulky electrical cords,
modest price tags, and safe, idiot-proof housing connections.
I was using a pair of Ikelite DS160s, without a TTL converter,
and without the optical converter that they showed off at DEMA,
so was forced to use the strobes manually with electrical sync
cords. Their new bulkhead system consists of a central circuit
board with 3 female outlets – 2 for bulkheads, and 1 for the hotshoe.
Flying gurnard wing detail. Nikon D7000 in Aquatica AD7000 housing, Nikon
60mm behind Aquatica’s manual focus flat port, 2 x Ikelite DS160 strobes 1/160th, f/13, ISO 200. AF-C servo mode with 3D-tracking activated.
flux. Just another great example of Aquatica’s commitment to
improving their designs based on photographers’ experiences.
Port lock and lens-release mechanism
If you’ve used a housing without a
locking port for long enough, you’ve
probably had it unknowingly rotate
dangerously close to its “release” position at some point (especially with
large dome ports). To prevent this
from happening, housing manufacturers have come up with various designs to lock the port in place.
Aquatica’s solution is elaborate and
complicated on the inside, but all of
the gears, springs, shafts, and cams
are controlled by a single lever located to the left of the port. When the
lever is rotated far enough, the locking cam mechanism moves out of
the way, allowing a port to be installed. Then, to lock the port, you simply
press the lever like you would a button, and it springs into place.
The port lock lever
close-up shot of the port
lock mechanism in the
unlocked (left) and locked
(right) positions.
The primary function of this assembly is to lock the port, but
lock and lens-release
Aquatica has also incorporated a port
internal mechanism.
lens-release lever. When the mechanism is in its “locked” state, pressing the lever like a
button depresses the camera’s lens-release button, elimiIn the rush to get this test equipment assembled and shipped to nating the need to squeeze your fingers (or Allen keys)
me before leaving for Dominica (it arrived the day before I left!), between the port opening and lens, as has been required in
some excess soldering flux was left behind on the hot-shoe, which the past. This also means that the camera body doesn’t need
made my strobes go bananas. Wiping the contacts clean and to be removed from the housing to change lenses. When
letting them dry overnight fixed the problem. Nonetheless, I told
the mechanism is in its “unlocked” state, the camera can be
Aquatica about this issue, and they’ve assured me that instead
of using solder to connect hot-shoe pins to the bulkhead wires, removed from the housing with the lens still attached.
In one corner of the circuit board is a small switchboard which
governs TTL functionality. When all of the switches are in the
“ON” or “UP” position, the TTL contacts in the right bulkhead are
activated, making automatic flash exposure possible when used
with compatible strobes or TTL converters. The left bulkhead is
strictly for manual strobes.
they’re using a crimping process, which mechanically combines
them instead, eliminating the possibility of short circuits due to
Continued next page.
Page 11
Continued from previous page Moisture alarm
pulate the waters, and a dive site called “Champagne”. The latter
has dozens of streams of volcanic gas bubbles fizzing from the
seafloor, sounding like an open can of carbonated pop.
Solid machined-aluminum housings are great because of their
tight tolerances, strength, durability, and aesthetics, but blindly
trusting your camera to be safely sealed inside their dark cavities
can make the first few minutes of every dive a bit nerve-racking.
However, much of this stress can be alleviated by installing a
moisture alarm in the housing, which Aquatica is including as a
standard feature.
Getting into the water with their resident sperm whales requires
a costly permit from authorities, so that got moved from my to-do
list to my bucket list. However, I was able to dive at Champagne
a few times, so I did some hydrophone testing there.
Basically consisting of a battery, a bright LED, a speaker, and
a few wires, moisture alarms are very simple and effective tools that, in my opinion, are essential to any underwater camera
system.
When the camera’s internal microphone is in a very quiet environment (i.e. an underwater housing), its sensitivity is, by default,
automatically increased to bring out faint noises. Then, when the
relative silence is interrupted by the crashing sounds of exhaled
bubbles, the hiss from inhaling through a regulator, or the whirr
of an autofocus motor, the camera cannot re-adjust the sensitivity rapidly enough to prevent a sharp spike in the volume. This
creates very harsh sounds with a hard-edged feeling.
Hydrophone
First, a little background info:
All materials (air, water, wood, etc.) have an attribute known as
“acoustic impedance”, which is proportional to that material’s
density, and to the frequency of sound trying to travel through
it. When sound is travelling between 2 materials, the more similar their impedances, the more easily sound is transmitted.
Microphones present in DSLRs have acoustic impedance close
to that of air, so they perform at their best when used in it (on
land?). When that same microphone tries to record sound in an
aluminum underwater housing, the results are usually inferior.
Metal has much higher acoustic impedance (because it is much
more dense) than air and water, so only a fraction of incoming
sound pressure reaches the camera’s microphone after traveling
through the walls of the housing. Hydrophones are specificallydesigned microphones with acoustic impedances very close to
that of water, so they’re (theoretically) able to record sound underwater much more accurately.
Now, onto Aquatica’s hydrophone.
Aquatica is the only DSLR
housing manufacturer to
provide a hydrophone as a
housing option – let alone as
a standard feature. Located
just above the zoom knob on
the top-left side of the housing, it is installed through an
extra hole, which can also When the hydrophone is connected
accept their remote triggers to the camera, the back plate o-ring
(or potentially an HDMI bulk- is obstructed, so extra care must be
head for using an external taken when sealing the housing.
video monitor…). The cable
coming from the hydrophone has a stereo microphone jack (despite providing only mono audio recording) and connects to the
camera through an access panel on its left side. Unfortunately,
when the access panel is open, it interferes with the housing’s
main o-ring, so extra care must be taken when closing the housing with the hydrophone connected.
Around Dominica, there are 2 main underwater acoustic attractions that I’m aware of – the communicating cetaceans that po-
Audio captured with and without the hydrophone is very different
– but not in the way that I expected.
I didn’t realize until after the trip that the sensitivity of the microphone can be locked at one of three levels (low, medium, or
high), but I suspect any one of them will not deal adequately with
the range of underwater sounds typically encountered.
On the other hand, when the hydrophone is connected, the sensitivity level remains constant, and a broad range of underwater
sounds is recorded without any abrupt spikes in volume. The
sound of exhaled bubbles is reduced to a faint gurgle, inhalations become a whisper, and the autofocus motor becomes almost inaudible, but the crackling sounds of the reef can still be
heard. It was even sensitive enough to pick up the hiss of my
leaky first-stage. Although sound levels are much more balanced and smooth with the hydrophone, they are also slightly less
intense.
The difference between the microphone and hydrophone is somewhat analogous to a pair of sensors having different dynamic
ranges. At a given ISO (gain), one sensor might be able record
brighter highlights (high frequency sounds) and darker shadows
(low frequency sounds) in a single frame (unit of time) than the
other sensor.
Aqua View Finder
If you’ve never used an external viewfinder on your underwater
camera housing, then you really don’t know what you’re missing. I used standard housing viewfinders for a dozen years before finally getting a taste of the good life in 2008 - and now I
can’t (won’t) go back. Standard viewfinders don’t allow the entire
frame to be seen at once, so it can be difficult getting precisely
framed images. I often had to resort to what I call the “Ray Charles Technique” for framing with standard viewfinders – that is,
moving my head side-to-side to piece together the full image
in my mind. While external viewfinders are often viewed as a
luxury item, they are regarded as a necessity by most serious
underwater photographers. Who wants to spend thousands of
dollars getting to a tropical (or sub-Antarctic) destination, only to
waste time and miss opportunities underwater?
Continued on next page -
Page 12
Continued from previous page The 8-element, black anodized and powder-coated Aqua
View Finder eliminates guesswork when framing an image, providing a bright, clear
view of the entire frame, even
with your mask slightly away
from it. Just like the camera’s
eyepiece, you can fine-tune
the dioptric strength of the
Aqua View Finder using a
special tool provided with the
viewfinder kit. It doesn’t obstruct the rear LCD at all, so
you can review images and
access menus without restriction.
Standard mounting holes
Shooting videos with a rocksteady camera is vital to producing professional-looking
material. So, Aquatica included 3 threaded (1/4”-20) holes in the base of the AD7000
to allow the attachment of
any standard tripod (or TLC’s
new tripod, released at DEMA
2010). Tripods are useful for
videos, but are also helpful
for keeping the camera still
enough to take long exposures underwater.
Last is the preview button (“Pv”), which, by default, is used to
check the depth of field of an image before taking a shot. Tucked
underneath the lens, this button is in an equally awkward location, making a housing control difficult to incorporate. It can be
programmed to operate all of the same function as the Fn button,
so also belongs to the “unmissed” category.
CONCLUSION
Precisely framing this seahorse
would’ve been much more difficult
without the Aqua View Finder. Nikon
D7000 in Aquatica AD7000 housing,
Nikon 105mm VR behind Aquatica’s
manual focus flat port, 2 x Ikelite
DS160 strobes - 1/40th, f/11, ISO 100.
Boasting a new autofocus module, new metering system,
new image processor, and
new sensor (amongst other
things), this consumer-level
camera probably would have
been regarded as a pro-level
camera if it had a full frame
sensor and a pro-style body.
The recording of HD videos isn’t my cup of tea, but it seems like
this capability could be a very productive when placed in skilled
hands. The Nikon D7000 is easily the best DX format camera
that I have ever used (but don’t tell my D300 I said that…).
With regard to the AD7000, there is only so much that 3D modeling programs can simulate and predict, so prototypes are never
perfect. That’s why it is so important to thoroughly test a prototype before production begins, especially for an expensive piece
of equipment like underwater camera housing.
The design problems that I encountered with the prototype
AD7000 were immediately addressed and rectified by Aquatica’s
design team, which demonstrated the kind of dedication to quality that is essential for a company’s survival in this highly competitive industry. Of the few minor inconveniences that I mentioned,
related to button placement, stiffness, and type, they were all
based on my personal preferences, and were rather insignificant. Overall, I was very happy with the AD7000’s performance.
Missing controls
Including a moisture
alarm and a hydrophone as standard
housing features was a
very generous gesture,
which I’m sure users
will appreciate. And
if the multifunctional
port-lock/lens-release
is any indication of the
capability of Aquatica’s
engineering team, they
have a bright and innovative future ahead of
them.
There are 3 camera buttons
that have been excluded from
the AD7000.
First is the bracketing button,
located just under the pop-up
flash button. I can’t remember the last time I used this
function on land, let alone
underwater, so not having
access to it didn’t bother me
at all.
A barrel sponge and moonball, shot
during a night dive at 11pm. Nikon
D7000 in Aquatica AD7000 housing
mounted on a tripod, Tokina 10-17mm
lens @ 10mm behind Aquatica’s 9.25”
Megadome, 1 x DS160 strobe – 4 seconds, f/7.1, ISO 800.
Second is the programmable function button (“Fn”). Its
location on the camera (the
nook between the camera grip and the lens mount) is likely what
prevented this button from being incorporated in the housing design. There are already so many gears/levers/pulleys/springs/
shafts in that corner of the housing, that I can’t imagine how
another would’ve been included. I rarely use any of the functions
that it can be programmed to operate, so I didn’t miss this one
either.
Continued on next page -
Page 13
Dive briefings were consistent and thorough, and either 1 or 2
dive masters would accompany the divers, depending on the size
of the group. Whenever possible (almost every day), dive staff
went out of their way to accommodate my shooting needs – modeling for me, carrying my second camera rig, and letting me go
as slowly as I needed. Doing 2 boat dives a day was enough to
almost fill my memory cards, but if I still had space, or energy, I
took full advantage of Castle Comfort’s great house reef. Tanks for
these shore dives are complimentary.
Continued from previous page ACKNOWLEDGEMENTS
EQUIPMENT:
This review would not have
been possible without Aquatica
loaning me their AD7000 prototype. But they didn’t just box
it up and ship it over to me…
Aquatica’s president, Norma
Alonzo, hand-delivered the
package, and made sure that I
had everything I needed. I communicated by phone and email
with several other members of
Aquatica’s staff, who were very
helpful when troubleshooting
in the field. These members
include Blake Stoughton (coowner), Joe Bendahan (marketing director), Luc Beauregard
(engineer) and Jean Bruneau
(technical advisor, who also
loaned me some of his personal camera gear).
Dominica’s reefs are some of the healthiest I’ve seen in the Caribbean – table-sized barrel sponges, colonies of long yellow tube
sponges, and countless varieties of soft and hard corals blanket
the walls, pinnacles, and slopes of the marine reserve. Fish life
was abundant, currents were uncommon, visibility was great, and
every dive left me wanting more.
Special thanks to Gus, Stinger, Reggie, Thomas, Brad, Odelle,
Kevin, Imran, and especially Daniel Perryman (manager) for helping me with extra effort and patience.
One of Dominica’s many beautiful waterfalls – Emerald pool. Nikon D7000,
Tokina 10-17mm @13mm, tripod – 4
seconds, f/25, ISO 200.
For more information about Aquatica gear, visit: http://aquatica.ca
ACCOMMODATIONS:
Located in a quiet area just
south of Dominica’s capital,
Roseau, and minutes away
from the popular Soufriere
Scott’s Head Marine Reserve,
Castle Comfort Lodge is a
very homey oceanfront facility with only 14 rooms that,
once again, made my stay The sunset view from one of the rooms at
with them a great pleasure Castle Comfort
(this was my 5th stay). Their
comfortable air-conditioned rooms, dipping pool, seaside bar, and
spectacular sunsets made off-gassing relaxing and enjoyable. Dining at their on-site restaurant was delightful, with delicious nightly
specials served by friendly staff. I am grateful for their assistance
with my lost luggage – they tracked and delivered them to me
all the way from St. Lucia – as well as for finding and supplying
me with tools that I required. My thanks go to all staff, especially
Arienne Perryman (manager).
For more information about Castle Comfort and Dive Dominica, visit: For more information, visit: http://www.castlecomfortdivelodge.
com
GENERAL
Another big thanks goes out to two of Dominica’s most well-known
photographers - Simon Walsh and Arun «Izzy» Madisetti. They
generously drove me around the island to photograph some of
Dominica’s waterfalls when I wasn’t able to dive. Check out their
site: www.imagesdominica.com
ABOUT THE AUTHOR:
Although only 26 years old,
Keri has already accumulated
close to 16 years of underwater photography experience.
Educated as a mechanical
engineer, he currently designs and develops products
for ReefNet and is part of DivePhotoGuide.com’s editorial team.
Over the years, his work has appeared in countless magazines,
scientific journals, field guides, books, and museums, and he’s
won over 70 awards in major international underwater photography competitions. For more of Keri’s work, visit www.reefnet.ca,
or www.divephotoguide.com.
DIVING:
Operated from Castle Comfort
Lodge’s dock, Dive Dominica is
a very professional dive facility
capable of efficiently servicing
both small and large groups of
divers. They have 3 dedicated
dive boats ranging in maximum
capacity from 10-24 divers, as
well as 2 boats for whale watching and/or snorkeling trips.
One of Dive Dominica’s 3 dive boats
Page 14