1
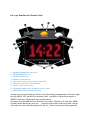
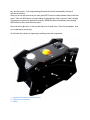
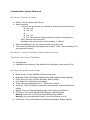
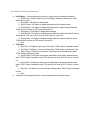
Xronos Clock Manual
For Xronos Clock V2.1
Foreword.
If you are like me, you’ll probably ditch this manual and start messing with cool arcade buttons.
Xronos clock is intuitive and should be easy to figure out. But I see you are still reading, so let’s
get on with it, I promise I’ll try not to make this manual look as boring as your average table saw
instructions.
Quick start
Xronos clock comes with a good quality AC Adapter that will power your clock and won’t waste
too much of power!
Firmly plug in power adapter into wall outlet and DC cable into clock’s right side. Assuming
delivery man didn’t drop your package off the truck (is there anything rattling inside clock case?)
and you have power in your house Xronos should greet you with scrolling welcoming message
and firmware number. If you are real lucky it will even play a startup melody :)
But not to worry, if startup sequence starts to drive you crazy in the future you can turn it off!
Let’s get familiar with Xronos Clock.
1 – MENU/ALARM RESET BUTTON
2 – SET/SNOOZE BUTTON
3 – INCR/TALK BUTTON
4 – AMBIENT LIGHT SENSOR
5 – ACORN NUTS (HOLDS ENCLOSURE TOGETHER )
6 – AM INDICATOR (FOR 12 HOUR MODE)
7 – ALARM 1 AND 2 INDICATORS
8 – IR SENSOR WINDOW (NOT SHOWN ON THIS PICTURE)
9 – RFM12B RECEIVER STATUS INDICATOR
Looking at the top of the clock you will find 3 very sleek looking arcade buttons. From left to right
they are: MENU, SET and INCR (or Increment), and... well that’s it! What did you expect, a
QWERTY keyboard? Each button has several functions.
Go ahead, touch the MENU button! Nice huh? Do it again! AGAIN!!!! :) Ok stop stop. MENU
is primary button that will get you into a … *surprise!* menu system. With every press it will go
to the next menu item and eventually back to the 1st. There’s no exit out of menu system per
say, but don’t panic! If you stop pressing all buttons clock with automatically exit after 5
seconds of inactivity.
After you got into the menu that you want, press SET button to switch between items inside this
menu. Then use INCR button to make change to selected item. And no need to “save” settings.
All changes are saved into permanent memory (EEPROM) either immediately after pressing
INCR button or after clock exits from menu.
Now look at the right side. It’s the one that has a lot of small holes. That’s for the speaker, next
to it is opening for power plug.
On the back side, there’s an opening for resetting clock and temperature.
1 – MAINTENANCE DOOR RELEASE SCREW
2 – TEMPERATURE SENSOR
3 – RESET
Left side of the clock has removable panel (held by 3 screws) for easy access to clock interface
in case you want to re-program/update firmware, access microSD card (that holds all audio
files) or replace clock battery. Yes, clock has internal small coin type battery for keeping time
when external power is not available. It should last few years when in use, and much longer
than not in use.
Setting Time (and surviving apocalypse)
After everything is up and running first thing you’ll might want to do is to set correct time and
date. Out of the box clock is set to 24 hour (a.k.a. military time) mode. If you are more familiar
with 12 hour mode (AM/PM) sorry, you are out of luck. Just kidding :) You can change modes
by pressing MENU button until you see Settings on the screen. Press SET button. First option
will be 12/24 hour mode. Press INCR button to change it if needed.
Hint: When you see something is flashing it means its selected and ready to be changed with INCR button.
Press MENU button again several times until you see Date/Time on the screen. Press SET
button to select Hours/Minutes, etc. and INCR button to change it. Don’t fret if you accidently
went over current year! Once you hit year 2040 it will go back to 2013. Why 2040? What a silly
question! That’s when either world will end or Xronos Clock will become self-aware and will no
longer need you (which is the same thing). So please be nice to it.
That’s it, now you should have a grasp of how menu system works, and at the end of the
manual you will find especially boring fun schematic of all the menu functions and flows, sorry
no pie charts.
Secondary Functions
As I mentioned earlier (were you paying any attention or just mashing arcade buttons?) each
button has secondary function. Heck some have even more than 2! Xronos clock is practically
Swiss army knife of clocks! Well not really a knife, and not Swiss, but it’s still pretty versatile!
Most notable is the INCR button a.k.a. (we have ways of making you) TALK button. When not in
any menu pressing INCR button will make Xronos Clock talk. Sorry it probably won’t be most
engaging storytelling, but it will tell you current time, date, inside temperature and even what
your alarms are set to!
Just briefly press and release this button to hear next item. If you pause for more than 6
seconds between presses it will go back to 1st item (i.e. current time). You can also hold INCR
button for 2 or more seconds and once you release it clock will go into continuous talk mode
meaning it will tell you time, date, temperature and alarm settings without you having to press
button after each item. What you clock says is customizable via User Options menu. There you
can choose what you want Xronos to say or not to say. For example you can set it to tell you
only date and temperature, but not Time and Alarm settings.
When alarm sounds INCR button can also be used to turn on “please just few more minutes”
Snoozing. Actually SET button also turns on Snooze. Either one will let you catch some more
zzz’s. That’s pretty much all this “SAD” SET button does when not in the menu :(
Menu button also has secondary functions. You can use it to interrupt scrolling Info Display, and
Reset Alarm for current day. Resetting alarm only works if Alarm is currently playing or
snoozing.
Alarm Functionality
Your Xronos clock has mighty Dual Alarms.
Each can be set to sound either Daily (Sunday-Monday), Workdays (Monday thru Friday) or on
Custom days of your choosing.
Warning: Never set both alarms to same time on same day! If you do, miniature black hole will
form 5 centimeters above the clock and will probably transfer you and the planet into 37th
dimension. Because time flows in reverse in 37th dimension, clock might not function as
expected.
Each Alarm has LED indicator (dot on the bottom left and right of the LED screen). When light is
green it means no Alarm is set for current day. When it’s orange Alarm is set for this day (keep
in mind light will remain orange thru the day even if alarm already sounded and has been reset).
Alarm light will be Red when Snoozing is activated.
Snoozing will silence alarm for 9 minutes, after which it will start sounding again until either
Snooze or Reset engaged (i.e. via MENU button). Alarm will reset itself after 1 hour has passed
or second Alarm kicked off.
Alarm menu system is slightly different from other menus, and requires master’s degree in
nuclear dentistry to fully comprehend. If you set alarm to Custom mode, it will keep going thru
Days of Week on the screen until you press INCR button when EXIT is shown. At this point
you’ll be able to set alarm time and tone/melody.
There are currently 10 alarm tones/melodies to choose from. First 5 are of escalating type,
meaning they will start at low volumes and get louder with each repeat of the sound (eventually
reaching ultrasound frequencies, shuttering glass windows, and waking up every dog in the
neighborhood *just kidding*). This is best way for a gentle wake up.
Last 5 alarm sounds will always start at full volume, you’ve been warned! :)
Info Display
Periodically you will see a message scrolling across the screen. This is your Info Display. It will
briefly tell you date, temperature, alarm settings, winning lottery numbers and last 4 digits of
your cat’s social security number. Well not really, just 1st three items. You can customize how
frequently you want to see this via User Options menu. You can even turn it off completely.
Info Display scrolling can be interrupted any time by pressing MENU button (what a neat button,
huh?).
System Settings Menu
From here you can control many “under the hood” global functions of the clock such as setting
12/24 hour mode, Brightness (manual or automatic), color, clock font, sound volume, Fahrenheit
or Celsius temperature mode, turn on/off optional RF and Infrared receiver functionality.
User Options Menu.
Very similar to System Settings. In this menu you will be setting misc. options such as what
clock will say when TALK button is pressed, or how frequently Info Display will appear and
temperature offset. See below about this option.
Temperature Offset
What is it and why it’s needed you might ask? Can it reverse effects of the global warming?
Well you see, Xronos Clock components generate some heat. Especially LED matrix. As
efficient as LEDs are they still get warm. Higher brightness you will choose, the warmer clock
will get inside. This is really nothing to be worried about (we are talking about few degrees
above ambient), however because temperature sensor is embedded in the clock case, it will
usually show temperature couple of degrees higher than air in your room. Thus comes
Temperature offset to the rescue! I recommend setting it to about -2 degrees. If you have
another thermometer available use it to calibrate Xronos Clock to a correct temperature using
offset.
Optional Features
In order to keep price of the clock down some extra features are available only as add-ons.
Currently there are two features: Infrared Remote and RFM12b (radio frequency) transceiver.
Infrared Remote
New to Xronos Clock 2.1 is support for Infrared Receiver and ability to control clock functions
with “keychain” remote control.
Remote duplicates functionality of the arcade buttons and additionally gives ability to decrement
items (i.e. when setting time you can increase or decrease hours/minutes).
Here’s what each button do:
- Big Red On/Off button: Same function as MENU button
- Mute (crossed speaker) button: Initiates TALK function (announce Time/Date, etc.).
Additionally this buttons when held for few seconds starts to reprogram remote. More on
this later.
- Up/Down “CH” buttons: Same function as SET button
- Left/Right “VOL” buttons: Decrement (new feature) or Increment (same as INCR) button
functions
- AV/TV button: Initiates Announce All Items (same as holding TALK button for longer
than 2 seconds).
Reprogramming:
Remote uses one CR2032 coin battery that should last you a long time. However if battery is
replaced or accidently remodeled, remote might lose its programming and will stop controlling
Xronos clock. Fortunately you can reprogram it. This requires some patience and a little tricky
but can be done. Here’s procedure:
1. Disable InfoDisplay (Texts scrolling) function by going to User Menu->InfoDisplay and
set frequency to “Never”
2. Make sure that at least one Talk Item is on (i.e. time announcement)
3. Point remote towards face of the Xronos Clock
4. Press and hold “Mute” button on the remote.
5. At this point remote enters programming mode and will cycle between different IR codes
know to it. As soon you hear clock start talking release Mute button immediately.
6. Press On/Off or Mute button again to see if remote found right code. If nothing happens
you skipped the right code and you’ll need to start process again from step 3. Usually on
second try you will find right code almost immediately, but if you skipped too far you’ll
have to hold button for several minutes until it cycles back thru all the IR codes. I know
this part can be frustrating but unfortunately it’s the only way.
RMF12B transceiver
Another optional accessory is RFM12B chip which allows Xronos clock to receive (and possibly)
send data over 915Mhz (or 413Mhz) frequency from/to sensor/device that’s also has RFM12B
chip. As of this writing we do not have any accessories for sale that will work with RFM12B chip,
but you are welcome to make your own. Out of the box Xronos clock supports remote
temperature and humidity data. If you want to build your own sensor use Arduino code provided
on our website (xronosclock.com).
If you are maker possibilities are endless. Here are few ideas:
- You can connect your own RFM12B based transmitter to computer and with right code
you can send RSS feeds, emails, tweets, etc. to the Xronos clock (of course some
coding will be required).
- Make several Xronos clocks talk to each other, or synchronize from external time source
(i.e. GPS reciever).
- Build mailbox sensor and make your Xronos clock display alert when snail mail is
reiceved.
We hope to release outdoor battery powered sensor some time in 1st half of 2014.
Things to keep in mind. You must reset/unplug your clock if you turn RF Setting on or off.
When RF is enabled, RF indicator (in top right corner) will be showing status of received data. If
no data received after clock reset it will be RED. When receiving data it will turn green briefly
and when go off. If no data received for over 30 minutes it will become RED again.
Keep in mind that no radio data can be received when clock is playing audio (i.e. alarm sounds,
time is announced, etc.)
Complete Menu System Reference
Set Alarm 1: Controls 1st alarm
●
●
●
●
On/Off : I’ll let you guess what it does :)
Alarm Frequency:
○ Custom: Let’s user choose any combination of days when alarm will sound
■ Mon: Y/N
■ Tue: Y/N
■ ....
■ Sun: Y/N
■ Exit: This option will exit day selection and goes to following time
○ Daily: Alarm will sound every day
○ Weekdays: Alarm will sound on usual workdays, i.e. Mon-Fri
Alarm Hours/Minutes: Let’s you select time when alarm will sound
Tone: Select Tone/Melody that’s played back as alarm. Tones 1-5 are escalating, 6-10
are played at full volume
Set Alarm 2 : Controls 2nd Alarm (Same options as above)
Time/Date: Sets current Time/Date
●
●
Hours/Minutes
Day/Month/Year (maximum Year allowed 2040, after which it goes back to 2013)
Sys Setup: Sets global clock settings
●
●
●
●
●
●
●
●
●
Mode: Choose 12 hour (AM/PM) or 24 hour clock mode
Brightness: Select LED display brightness from Night (lowest) to Max (brightest)
Color: Sets Clock Color. Choices are Green, Red or Orange
Font: Select Font of Main (big) clock display.
Temp: Chooses temperature units. F = Fahrenheit = Celsius
Sound Vol: Volume of System sounds and announcements. Does not affect alarm
volume.
Startup: Turns on/off startup sequence when clock is reset or powered on
RF Sensor: Turns on/off optional RFM12B sensor. Reboot required.
Warning: Do not turn on if you don’t have RFM12B chip installed!
Warning: You must reboot/reset clocks if you turn this feature on or off.
IR Receiver: Turns on/off optional infrared remote accessory. Reboot required.
User Menu: Sets User preferences
●
●
●
Info Display – Controls what and is shown in scrolling text line and how frequently.
● Show Every: Controls frequency of Info Display, disables it and lets you select
which item to show.
● Displ Date: Y/N Option to display date
● Displ InTemp: Y/N Option to display temperature form internal sensor
● Displ Extemp: Y/N Option to display temperature from optional external sensor.
This item will not show up if RF sensor is turned off.
● Displ Alarm: Y/N Option to display alarm settings
● Displ RFStat: Y/N Option to display last time data from option external RF sensor
was received. This item will not show up if RF sensor is turned off.
● Displ Humid: Y/N Option to display humidity data from optional external sensor.
This item will not show up if RF sensor is turned off.
● Exit
Talk Items
● Say Time: Y/N Option to announce Time when “TALK” button is pressed or held
● Say Date: Y/N Option to announce Date when “TALK” button is pressed or held
● Say InTemp: Y/N Option to announce Temperature from internal sensor when
“TALK” button is pressed or held
● Say ExTemp: Y/N Option to announce temperature from option external sensor
when “TALK” button is pressed or held. This item will not show up if RF sensor is turned
off.
● Say Humid: Y/N Option to announce humidity data from option external sensor
when “TALK” button is pressed or held. This item will not show up if RF sensor is turned
off.
● Say Alrm: Y/N Option to announce Alarm settings when “TALK” button is pressed
or held
● Exit
Temp Offs: Sets negative offset to current temperature from internal sensor.
Maintenance and Hacking
Depending on preference your Xronos Alarm Clock should be wiped from time to time to
remove accumulated dust. Or not. Other than this, you might have to occasionally change
internal clock battery in case you notice clock loses time if there was power interruption. Xronos
takes generic CR2032 coin type 3V battery.
1 – FTDI Pins (for updating Firmware and communicating with clock)
2 – microSD Card (for changing audio data or Alarm tones)
2 – CR2032 Battery
Battery replacing procedure
To replace battery you will need a small Philips head screwdriver to open maintenance door on
the left side of the clock. Here are steps to open maintenance door:
1 Unplug your Xronos Clock.
2 Looking at the front of the clock maintenance door is on the left of the clock (opposite
from speaker side) held by 3 small screws (as shown on the picture above)
3 Gently remove screw that holds door from the back of the clock (1).
4 Unscrew two screws (2,3) on the bottom of the maintenance door. These are a little
shorter than the screw you removed from the back. Try not to mix them.
5 Door should now come off easily, it’s only held by the tab on the bottom.
6
You should see internal battery. Using small flat screwdriver gently push metal retainer
clip outward until it releases battery.
7
Replace with fresh battery. Insert it from plastic end opposite to metal clip first, and then
press down until retainer clip clicks holding it in place.
Upgrading Firmware
Removing maintenance door will also allow you access to the FTDI programming interface. You
will need a 5V USB FTDI adapter board or cable (you can get one on Sparkfun or eBay). Make
sure you unplug external power first. FTDI will provide power to the clock from your computer
via USB. Please take care of plugging FTDI adapter correctly. Usually it means facing up (as
show on the picture). Just look and match writing next to the pins (i.e. DTR on the far left,
Ground on the far right).
There are basically two way to upgrade firmware, a simplified and advanced.
Simplified will require you to download AVRDude program, batch file and a hex file containing
firmware.
For more advanced you will need Arduino IDE environment, required libraries and hardware
files for Sanguino bootloader.
Whichever way you prefer you will still need to get FTDI adapter and install drivers for it!
Firwmare is available at: http://www.xronosclock.com/ (go to Support and then to Technical
Data and Downloads)
Simplified upgrade procedure:
1
2
3
4
Download avr.zip and extract it to your hard drive (i.e. to c:\xronos)
Also download update_xronos.bat file and latest HEX file with firmware. Copy both
somewhere (i.e. c:\xronos)
Plug in USB cable from your computer to FTDI adapter and connect FTDI adapter into
Xronos clock. Provided you installed drivers, your computer will acquire a COM port.
Take a note of the COM Port number by going Device Manger (via Control Panel ->
system or right clicking on “Computer” icon on your desktop). Under Ports you will see
USB Serial Port. Note it’s COM number (i.e. COM3)
5. Edit update_xronos.bat script (i.e. in Notepad)
Find two lines that specify path to AVR that you extracted in step 1:
SET AVRPath="C:\Xronos\avr\bin\avrdude.exe"
SET AVRConfig="C:\Xronos\avr\etc\avrdude.conf"
And change to your actual file location
6. Open command prompt, navigate to the folder where you firmware scripts and run
“start_here.bat”
7. You will be prompted for COM port, so put number you got from step 4.
8. If everything goes fine, you will see update progress and screen will turn green at
successful upload.
Advanced upgrade:
1
2
3
Install latest Arduino IDE
Download Sanguino or Mighty 1284p hardware files and copy to your
projects_home\hardware folder
Download and install libraries:
a Time
b DS1307RTC
c WaveHC (modified to work with Xronos Clock PCB)
4
5
d Dallas Temperature
e OneWire
f IR REmote
Download source code
Open in Arduino IDE, compile and upload to Xronos Clock
Disassembly/Reassembly
If you want to modify hardware or add optional RFM12B chip and/or IR receiver you will need to
open enclosure
Warning: Please be very careful with enclosure, as acrylic tabs can be broken off easily. Never
force your way, go slowly. If someone doesn’t go in, see if you have a wire in a way.
● Put soft cloth on a table so you don’t scratch clock’s face.
● Remove small screw holding maintenance door from the back
● Remove big Acorn shaped nuts from the front of the clock and remove long screws.
While removing them hold back and front of the clock with your hand so it doesn’t
separate.
● Lift off face plate and front panel gently. It’s attached to the mainboard with ribbon cable
and IR receiver cable (if you have one installed).
● Unplug both from main board and put front panel aside. If you need to remove LED
display, simply unscrew 4 screws holding it, but remember which was it was oriented.
● Main board and power supply both attached to the back panel, but power supply also
attached to the side panel via power jack.
● Unscrew 4 screws holding side panels to the bottom panel.
● Nothing is attached to the maintenance door (left) panel so you can just take it out.
● Right panel is attached via speaker cable to main board and via power cable to power
supply.
● You can lift off remaining panels once you unplug all cables (i.e. button cable, light
sensor cable and speaker cable).
● At this point you should be able to access and remove main board easily, just unplug
power cable that’s attached to the power supply and 3 wire temperature sensor cable
that goes under the board to the temperature sensor glued to the back panel.
● Buttons cannot be removed without first disordering/cutting wires. If you need to replace
a button (for example you want different color), carefully unsolder it, press tabs to
remove, insert your own button and solder it back.
Reassembly:
● Attach Main board and power supply to the back panel. Plug in power and temperature
sensor wires.
● Attach right “speaker” panel to the bottom panel with two 1/2” 4-40 screws. Leave
screws slightly loose at this point! Joint will be moving slightly for easier insertion.
● Insert right and bottom panels into bottom panel gently.
● To attach top (button) panel you will need to lift right “speaker” panel slightly to match it’s
tabs and insert all of them into back panel.
● Plug in all the wires (buttons, light sensor and speaker)
● Plug in LED display ribbon cable
● While making sure that no wires get caught gently lower front panel and match all tabs. If
you have faceplate attached, remove it (it’s not screwed to anything) so you can see
where tabs go.
● Check that all parts are fitted nicely, place faceplate on front panel and start threading
long screws from the bottom until they go thru.
● Screw acorn nuts onto them from the front. Do not tighten yet.
● Alight and attach left “maintenance” door and secure it with 3 screws (2 x ½” 4-40 from
side and one 9/16” 4-40 from back)
● Tighten acorn nuts with hand and also tighten 2 half inch 4-40 screws holding speaker
panel. Do not over tighten them! You can break acrylic!
Note on Power Supply
Power supply that comes with clock is designed to work in USA only.
I highly recommend using Power Supply that came with the clock because clock has been
intensely tested with it and I went thru many different kinds until current one was chosen.
If you must use different one (i.e. your country uses different plug) please make sure that:
1. It has correct polarity: Tip is Positive and Outer jacket is negative. This is the most important
thing, as wrong polarity will damage clock!
2. Supplied voltage is at least 6 Volts DC and not more than 24 V
3. DC plug is security stays in the socket! If you touch the wire and clock reboots, it mean that
plug is no good. Bad plug can cause reversible damage to the clock. I’ve seen contents of the
flash being erased due to the bad plug (although on extremely rare occasion). While this won’t
permanently brick your clock, you’ll have to reprogram it if it happens.
Troubleshooting
Symptom
User settings (such as Color, or Mode are
being reset)
Time and/or date is not kept correctly (i.e. it’s
really off by hours or days)
Time/Date lost after power loss or reset
Nothing show on the screen, no signs of life
even when pressing MENU button
Possible Solution
Check if Power Supply is connected security
and nothing pulling the wire
Make sure you are using Power Supply with
output of 6V or more (up to 24)
Replace internal coin battery
Try resetting clock by pressing Reset button.
Unplug Power supply form the clock. Wait 10
seconds and plug it back in.
Open maintenance door and see if any wires
are loose, check that microSD card is fully in.
(Clock won’t work without microSD or if files
are missing)
If you have FTDI adapter/cable see if you can
get any serial output that will tell you anything
meaningful (set baud rate to 115200).
Try uploading latest firmware or sent clock
back to me for repair/reprogramming.
Remember 99% of issues will result from bad or insecurely plugged power supply. Never use
clock if power cable is moving around or stretched. Always plug and unplug it in single quick
motion. Don’t pull on the cable.
Warranty
I will fix or replace fully assembled Xronos clock in the period of ONE YEAR since date of sale if
issue is due to the manufacturing defect. Because this is open source and hackable device, I
cannot be held responsible if you damage it, so warranty will be voided if you modified the clock.
Also warranty doesn’t apply to KIT version of the clock.
Having said that I’m still willing to offer reasonable help and repair on case by case basis.
Disclaimer
I will not be held responsible for any issues resulted by Xronos Alarm Clock or from it’s usage.
Use at your own risk.