1
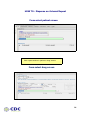
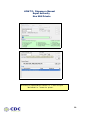
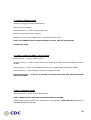
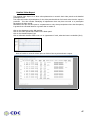
USER MANUAL
Introduction
Thank you for purchasing CDC Forte as your Dispensary Software solution.
The following passages will guide you through how to use Forte to dispense medications in
line with the Australian PBS regulations. Forte represents 3 years of research and
development by CDC systems to design and build from the ground up the best dispensary
system in Australia.
Overview
Forte’s focus as a software solution is to be user friendly, fast and precise in assisting
pharmacists dispense medication to patients. Indeed we expect you to be dispensing with
Forte in less than 15 minutes from your first experience of the software.
Friendly - The windows based interface allows a well known way of interacting with
information in the modern age. Navigation using shortcut keys and arrow buttons allows for
single key and shortcut keyboard based dispensing while also providing for a mouse interface
for those whom so choose. Also it is configurable to suit the dispensing work flow that best
suits you and your pharmacy. Various warnings and detail screens can be turned on or off
depending what are your main dispensary functions.
Fast – Integrated repeat scanning allows you to attach a repeat scanner for internal repeats.
This alleviates the need to search for a customer or type in a repeat number. Simply pass the
internal repeat over the scanner and within a second you are straight into the dispensing
process. Also Forte’s advanced caching techniques allows the system to remember what is
the most commonly used drugs and store them in local memory saving access time from the
server meaning your dispense time is quicker.
Precise –Integrated script checking at the assembly stage ensures you match the right drugs
with right label for the right customer. It can also produce a delivery label for all currently
dispensed medications for a given customer ready for a single scan at the cash register. Fully
integrating the dispensary management system with the Point of Sale System. So you can
always track where your medications are.
CDC Systems Forte is the first community pharmacy dispensing system to have fully
integrated MIMS interaction and allergy information. CDC have worked closely with MIMS to
ensure their medical data is seamlessly integrated in to the Forte dispense process.
Each night Forte automatically checks the CDC Drug Management system to determine if
there are any new updates to the PBS and MIMS medication data if so it downloads and
installs them. Ensuring the every day when you start dispensing you are always up-to date
with Dispensing Best Practice
2
About this Manual
As dispensing is a very diverse and conditional process we have developed this manual
around a set of ‘How To’s as in ‘How to dispense a Script’.
We have adopted this approach as 90% of prescriptions are similar or identical in process
and the remaining 10% are completely different. For the 90% the same, by working through
the first few examples in this manual or online you will cover these dispensing requirements
in no time.
As for the 10% remaining you may need to consult this manual the first time you need to
dispense something in a given way. And when doing so will pose the question How do I?
Also, Take note of the shortcuts available on Pages 8 and 9, as they will undoubtedly speed
up the process of Navigating Forte.
Additionally you can talk to CDC about one of our eTraining Modules where you can either
learn at your own pace or with a live operator assisting and watching over the phone.
3
Table of Contents
Introduction / Overview
2
About this Manual.................................................................................3
Table of Content
4
CDC Systems .......................................................................................6
Medicare Australia
7
Dispensing Screen & Field Shortcuts ......................................................8
How To Dispense an Original Script
10
How To Dispense an Internal Script .....................................................14
How To Dispense an External Repeat
16
How To Dispense an Owing Script.........................................................19
How To Dispense Manual Repat, Private
20
How To Dispense Extemp,Local Extemp & Local Drugs...........................22
How To Dispense using Script Options
23
How To Add a Patient .........................................................................24
How To Add a Family Member
26
How To Join Family Members...............................................................28
How To Remove Family Members
30
How To Merge Patient records ............................................................31
How To Disable Deceased Patient
32
How To Reverse Disabling Deceased Patient.........................................33
How To Alter Script History
34
Forte’s Online PBS Module...................................................................36
Explanation of PBS coloured boxes
37
How To View scripts with NO reason code returned...............................38
How To View scripts WITH a reason code returned
39
How To FIX a script with a reason code returned METHOD 1..................40
How To FIX a script with a reason code returned METHOD 2
41
1.Change a Prescriber number.............................................................41
2.Change a Patients name
42
3.Cancel a script and add to current claim.............................................42
4.New Centrelink cards
42
How To Deal with Communication error/Check Medicare Status...............43
How To Close Current Claim Period
44
Online PBS Statement & Report Access..................................................45
How To View & Print a Statement Report
46
Summary Reconciliation Report...........................................................46
Detailed Claim Report
47
Rejected Scripts Report .....................................................................48
Weekly Payment Report
49
How To Manually Query a Statement.....................................................50
4
How
How
How
How
How
How
How
To
To
To
To
To
To
To
Use Forte Preferences
51
Use Forte Set Up Options.........................................................53
Use Forte Set Up Messages
54
Use Forte Highlighted Drugs.....................................................55
Reprint From Patient History
58
Reprint From Recently Dispensed Scripts.................................. 59
Produce and Print Reports,History,Tax Invoices etc ___________ 60
5
CDC Systems
Contact Information
CDC Software Support and Development
Telephone.............(02) 96033380
FAX:....................(02) 96037554
Software support and development service is available
BH: 8a.m to 6 p.m. Monday to Friday (EST)
EMERGENCY Out of Hours Support Number
Mobile..................0412 060 907
Emergency service only, is available
AH: 6pm to 9pm Monday to Friday (EST)
SATURDAY, SUNDAY and PUBLIC HOLIDAYS (EST 9am to 9pm)
Sales Co-ordination, Marketing and Administration
Telephone...........(02) 9603 3380
FAX:....................(02) 9603 7554
BH: MONDAY to FRIDAY (EST) 9am to 5pm
6
Medicare Australia
Contact Information
Phone 132290
For Concession and Medicare Entitlement Enquiries
Press number 1
For All Claim Payment, Safety Net, Stationeryand General Enquiries
Press number 2
For Technical Support for Online Claiming or
Information about Online Claiming
Press number 3
7
Explanation of
screen & field shortcuts by
pressing <F> keys, shift and control
8
Explanation of
screen & field shortcuts by
pressing <ALT>+<underscored><letter>
Example....
<ALT><A> takes the cursor to Add Patient in the select patient
screen.
<ALT><A> takes the cursor to Script Date in the select drug or
labels screens.
9
HOW TO: Dispense an Original Script
This is to dispense an original script with a patient already on file and with auto display of
patient history turned “OFF” FROM SELECT PATIENT SCREEN:
Enter pharmacist initials
Enter surname and any other details you want to search for patient.
Search also by Medicare Number
Remember to enter your “field separator” between search fields.
Press Enter or key down to corresponding entry then press Enter
Or just press corresponding number or letter next to entry.
Press number 1
10
Medicare, doctor and date
correct?... then enter drug name
Press number 3
Press corresponding number to drug
required or down arrow then enter
11
Check drug
interactions
and allergies,
press enter
Enter directions,
alter repeats
if necessary
12
Charge to account?
Press enter for yes or
key across and
enter for no
Press enter for same patient
or key across and enter
for new or cancel
Paperwork will be printed.
Script is then sent to Medicare
13
HOW TO: Dispense an Internal Repeat
From select patient screen
Enter repeat number in patient or drug screens
From select drug screen
14
Check interactions
and allergies, press enter
All details checked and
correct ……. charge to
account?
Press enter for yes or key
across and enter for no.
Press enter for same patient or key across
and enter for no or cancel.
Finishing script. Paperwork will be printed.
Script is then sent to Medicare
15
HOW TO: Dispense an External Repeat
From select patient screen
From select drug screen
Enter original script number following “?”Non original
script dialog opens. Change script date, enter original
suppliers approval number then press OK
16
Enter and choose correct patient,from select patient screen.
Enter and choose correct Drug (3) from select drug screen
Check interactions and allergies, press enter
17
Enter directions, alter repeats & quantity dispensed as needed, enter last
dispensed date. Check script interval.
Press enter for “outside interval” or key across and enter for inside or cancel. Press
enter for same patient or key across and enter for new patient or cancel.
Finishing script. Paperwork
will be printed. Script is then
sent to Medicare
18
HOW TO: Dispense an Owing Script.
After selecting patient, a screen will open with owing scripts listed
Double left click, enter or key down & enter on owing script to be dispensed
Complete owed scripts details , finalise script
19
HOW TO: Dispense a Manual
Repat Authority
Non NHS Private
In the drug or repeat field type “minusV’ i.e. –V enter for repat
Or “minusP” i.e. –P enter for private .
20
Enter product name & directions in sigs field, continue to repeats &
authority fields if needed
Open options and choose manual recovery or “Y”.
Enter manual recovery price in the dispensed price field
and finalise script. Script is then sent to Medicare
21
HOW TO: Dispense Extemp, Local Extemp
& Local Drugs
From the select drug screen click on the box next to the drug or repeat field
This opens the screen for dispensing extemp , local extemp and local drugs
22
HOW TO: Dispense using Script Options
Script options are accessible in two ways. By adding the option prefix after
choosing drug, following ; or opening the “options box”, by left clicking options
field with mouse or pressing “ALT+O” Choose options required by either left
clicking on option with mouse or entering corresponding prefix.
Note: Options box can be accessed in both drug and label screens
23
HOW TO: Add a Patient
Enter patients’ name.No match?
Press enter to insert new patient.
Or press 'add patient' on select patient screen
Complete patients details in patient tab
24
In family tab add other
pharmacies prf totals to update
patients records.
In miscellaneous tab you can add warnings
and messages in the memo section that
will display on the dispensing screen as
you dispense for this patient
e.g. NO CREDIT, NO GENERICS etc
This section is
for Aged Care
25
HOW TO: Add a Family Member
Type in family name. To add a family member press the
family member button at the bottom of your screen.
Patient details screen opens. Complete details and update
26
Add any other pharmacy PRF totals, memo’s etc
Press update. Proceed with script
HOW TO: Join Family Members
Type patients’ name you wish to add to family, press <F4> to open patient
details screen. Press family button. Select patient screen will open
Enter patients’ family name you wish to connect to. Choose patient
to link this patient to, Press Ok
28
Press update. This will link patient to family.
Double check in the Family Tab
29
HOW TO: Remove Family Members
To remove a patient from a family file, enter patients’ name you
wish to remove, press <F4> to open patient details screen.
Press the reset button then Update. This will remove
the patient from the family and issue him/her with their
own family ID number.
30
HOW TO: Merge Patients
To merge patients, type the patients name of the secondary entry then press the merge
button at the bottom of screen. CDC Forte patient screen will open. Enter the patients
name of the primary entry ...... all scripts will merge TO this patient records). Press OK.
Take care when merging
You can NOT unmerge
31
HOW TO: Disable Deceased Patient
Enter patients’ name you wish to disable then press <F4> to open patient
details screen. Tick the deceased box then update. The patient will then
disappear from dispense, select patient screen. You can still access their
records via the script history screen.
32
HOW TO: Reverse Deceased Patient
To reverse disabling process <shift><F2> to access patient
history screen. Type patients’ name and <F4> to open
patient details screen. Un-tick deceased box then update.
The patient will then re-appear in patient screen as before
33
HOW TO: Alter script history.
From select patient screen, enter patients name then press <shift><F2> takes you to
patients history page, choose script to alter press enter or....
From 'clear' select patient screen press <shift><F2> to go to script history page. Enter
patients name .Choose correct patient, press enter to display patients’ script history. Choose
script to alter , press enter
YOU CAN ALSO SEARCH CLAIM & SERIAL NUMBER FROM A CLEAR HISTORY PAGE
34
After correcting script press update in PBS tab to complete the changes
35
Forte’s Online PBS Module
Introduction to Online PBS
In Australia Forte has been developed to integrate with the Medicare Australia’s online PBS system. This
system purpose is to provide real-time validation of claimable prescriptions with Medicare Australia as
the prescription is being dispensed. The system communicates via a securely encrypted link over the
internet to Medicare Australia’s online PBS System.
Each prescription is validated via the established business rules and passed back to Forte as either
accepted, rejected or with a warning.
Forte displays results of the online claiming process in the online PBS pane. Where a prescription
requires attention a red or yellow mark will appear next to the prescription and a rejection reason will be
populated within the PBS table.
Rejected or warning prescriptions should be reviewed and modified where appropriate by the dispensing
pharmacist.
Medicare Australia Publishes the appropriate action when a prescription requires attention.
This list is an appendix 2 of this document but should be updated by dispensing staff when MA publishes
new versions.
Additionally the online PBS system allows for online claiming and statement receipting electronically.
This means the majority of the process of generating claims and receiving statements is achieved using
Forte’s online PBS module.
Here you can choose
What you would like
shown in main screen
The coloured boxes next to prescription in this screen
relate to the colored boxes at the bottom of the screen
36
Explanation of colouring of PBS boxes
On dispensing screen.
Green PBS means the
script just dispensed on that
PC has been approved
Orange/mustard means
the script just dispensed
from that PC needs to
be checked
If the PBS box turns red it means there is a problem with
the PC talking to the SERVER e.g.Legacy may not be
running on the SERVER
If the PBS box turns magenta/purple it means there was
an exception from MA e.g. MA may be down
37
HOW TO: View scripts with No Reason Code Returned
After finishing a script, paperwork will be printed and a script is sent to PBS on the background and a
result code A is returned. This means that a script is accepted with payment. This result code is updated
in the PBS tab in the script history screen.
38
HOW TO: View scripts with a Reason Code Returned
After finishing a script, paperwork will be printed and a script is sent to PBS on the background and a
result code is returned. This Result Code is updated in the Script History Screen in the PBS tab.
Depending on what you have ticked, some examples are listed below…..
R – The script is rejected without payment. You must adjust and resubmit
H – Script is rejected. Adjust and resubmit or send hard copy prescription
for MEDICARE AUSTRALIA evaluation.
A – Script is accepted with payment. Correct and update only if a Warning
reason code is returned.
Reason code “S” means
Paperwork required
HOW TO: Fix a script with a Reason Code Returned.
39
There are two ways in which you can access this script to make the appropriate modifications.
Method 1: Via the PBS Task bar.
1. Click on the Online Claiming
2. Point the mouse to the appropriate script
3. Double left click to access the script history where changes can be made
4. Press Arrow left and right to move to Details 1 and Details 2
5. Fix up the problem where required.
Double left click on
script
to
access
history for changes
40
HOW TO: Fix a script with a Reason Code Returned
Method 2 Via PBS tab on the bottom of the CDC Forte program.
1.Left click on the PBS. This will bring up a screen with all the scripts with reason code returned.
2.Point the mouse to the messages
3.Right click on the mouse. This will display a screen which explain the reason code
4.Double left click to access the script history where changes can be made
5.Press Arrow left and right to move to Details 1 and Details 2
6.Fix up the problem where required.
Point mouse to messages
Right click for explanation.
Double left click to access script
to make changes
Examples of Reason codes and their correction method.
1. Change a Prescriber number
Press Left Arrow ← to go to Details 2 screen
Press Down Arrow ↓ or click on the Prescriber Code field
Enter the correct Prescriber number
Click on the UPDATE button. This will automatically resubmit the script
41
2. Change a Patient names
Press F4 to bring up the Patient Details Screen
Enter the correct Surname
Press Down Arrow ↓ or click on a Given Name field
Enter the correct Given name if required
Press Enter or Click on the Update button on the Patient Details screen
Click on the UPDATE button on the Script History screen. This will automatically
resubmit the script
3. Cancel a script and Add to Current Claim
Press Left Arrow ← to go to Details 1 screen
Press Down Arrow ↓ or click on to the Remove from Closed Claim field. This will automatically submit to
the PBS
Press Up Arrow ↑ or click on to the PBS tab to check for the update Results returned by the PBS.
Press Left Arrow ← to go to Details 1 screen once changes are made
Press Down Arrow ↓ or click on to the Add to Current Claim field. This will automatically
submit to the PBS.
4. New Centrelink Cards
Press Down Arrow ↓ or Click on the New Card field.
Click on Update button. This will automatically submit to the PBS
A Result Code H will be returned. This means that it is now required to send hard copy prescription for
MEDICARE AUSTRALIA evaluation.
42
HOW TO: Deal with a Communication Error.
Check Medicare Status
Email Support
During a network outage, all scripts that are dispensed will be in a PBS waiting file until Communication
is established. These scripts are automatically set to a processing code 02 and automatically submitted
to the PBS online.
To check Medicare Status or Email CDC Support left click mouse on help in toolbar.
43
HOW TO: Close a Current Claim Period
776
Click on Close Current Claim on the Task Bar
Click on Full or Short or Summary button.
Click on Close Claim to close the Current Claim.
74
Click on
Yes to close a claim.
This will automatically assign a new Claim number. e.g. Claim Number would be 777
This will automatically retrieve a statement for that Close Claim number from PBS and store in a
Statement Screen on the PBS task bar.
Or
No to cancel a process of closing a claim
A print screen will appear. Click Ok to print the claim report or Cancel a report from being printed.
A Save screen will appear. Click Save to save a report on a file or Cancel to cancel a saving.
44
Online PBS Statement and Report Access
Forte will obtain statement details electronically from Medicare Australia that will contain the detailed
prescription information for each weekly payment and each claim period. Forte uses this data to
produce a numbers of reports to assist with reconciling PBS payments.
There are two types of Statements:
Interim Statement (I) – The Interim Statement process is followed for each weekly payment until the
claim period has been closed.
The diagram below details how interim statements are produced for a claim period.
Online Claiming for PBS - Interim Statement Generation Process
Pharmacy
Claim Period
opened in
software
Dispense
prescriptions
and send to MA
for assessment
MA assesses all
prescriptions as
they are
received
Medicare
Australia
Systems
If rejected, prescription
corrected and
resubmitted. If
accepted, payment
process begins
Assessment
results returned
to the pharmacy
Payment
deposited into
pharmacy bank
account
Payment
requests made
to payments
system
Payments made
each Friday
(after payment
lag has expired)
Pharmacy
software sends
request to MA
to retrieve
statement data
Confirmation of
payment
received from
RBA
Statement data
received.
Pharmacy
produces
relevant reports
Interim
statement data
produced by MA
Complete Statement (C) – The Complete Statement is produced once a claim period has been
closed.
The diagram below details how a claim period is processed and how the complete statement is
produced.
Online Claiming for PBS - Complete Statement Generation Process
Pharmacy
Claim Period
closed in
software
Bundle
prescriptions
and send to MA
Claims
assessed and
prescriptions
requiring QAI
identified
Medicare
Australia
Systems
Medicare
Australia
Operator
Pharmacy
software sends
request to MA
to retrieve
statement data
MA receives and
registers claim
package. Claim
period closed in
MA systems
Request made
to payments
system for final
payment
Statement data
received.
Pharmacy
produces
relevant reports
Complete
statement
produced by MA
for the claim
period
MA operator
completes
required
processing
45
HOW TO: View & Print a Statement Reports
Summary Reconciliation Report
The Summary Reconciliation Report is to allow online pharmacies to reconcile their payments at a
summary level for each claim period.
Click on the Statement on the PBS task bar
Click on the Claim period that is listed on the Claim panel.
Click on the Summary Report Type
Click on Preview to view the select report or Click on Print to print and save a report.
46
Detailed Claim Report
The Detailed Claim Report is to allow online pharmacies to reconcile their claim period at the detailed
prescription level.
The report will outline all prescriptions for the claim period and their final result at the time the report is
produced. This also includes identifying all adjustments that may have occurred to a prescription
throughout the claim period.
Pharmacies can also use this report to set parameters to only show prescriptions where the discrepancy
is greater than a financial amount or greater than a certain %.
Click
Click
Click
Click
on
on
on
on
the Statement on the PBS task bar
the Claim period that is listed on the Claim panel.
the Detailed Report Type
Allowable Variance field to set a % or $ parameter if need, otherwise leave it as default (Zero)
Click on Preview to view the select report or Click on Print to print and save a report.
47
Rejected Scripts Report
The Rejected Scripts Report is to allow online pharmacies to identify which prescriptions are still at a
rejected status or have not been successfully submitted to Medicare Australia in a claim period. This
allows the pharmacy to rectify any outstanding issues prior to closing the claim period.
Click on the Statement on the PBS task bar
Click on the Claim period that is listed on the Claim panel.
Click on the Rejected Report Type
Click on Preview to view the select report or Click on Print to print and save a report.
48
Weekly Payment Report
The Weekly Payment Report is to allow online pharmacies to identify which prescriptions they were
debited or credited for in each weekly payment and which claim period the prescriptions relate to.
Click on the Statement on the PBS task bar
Click on the Weekly Report Type
Click on Week Starting field to select the starting date or leave it as default as current date
Click on Preview to view the select report or Click on Print to print and save a report.
49
HOW TO: Manually Query a Statement
Click on the Statement on the PBS task bar
Click on the Claim period that is listed on the Claim panel or Enter a claim period on a Claim Number
field.
Click on Query MA to query the Statement again.
50
HOW TO: Use Forte Preferences/SetUps
Open preferences
Here you may choose different ways of setting your program preferences
e.g. turning patient history screen on or off, having an audible sound when scripts
are rejected, search preferences etc.
51
Set the path to acroread for mims printouts.
Change font , view shortcut programming
52
HOW TO: Use Forte Setup.
Setup Options
Open setup options
Here you may choose global settings such as print PRF card in
reverse order, print price on supply label, confirm delete on
account and more .Check values, fees & details
53
HOW TO: Use Forte Setup.
Setup Messages
54
HOW TO: Use Forte Setup.
Highlighted Drugs
If the drug you wish to
highlight is not listed click
insert field
55
Add drug to be highlighted then press OK
56
Tick highlighted box
Add a message to be printed on repeat when
dispensing. Press ok
57
HOW TO: Reprint labels, repeats,receipts,
PRF, free format etc.
From Patient History
Go to history screen, enter & choose correct
patient , then choose correct script entry
Press <shift><F5> to open print
paperwork options.
Reprint paperwork or create a
free format label by entering
“user defined label”
58
HOW TO: Reprint labels, repeats, receipts
PRF, free format etc.
From last 100 scripts
Open recently dispensed scripts screen from common section,
icon or Shift>F1
Choose script then choose print option
59
HOW TO: Produce and Print Reports
History,Tax Invoices etc.
In the task bar, reports section,
click on appropriate report,
then enter required information
Some report take a while to produce
please be patient
60