1
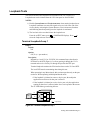
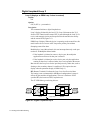
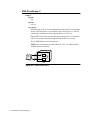
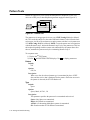
Chapter 8
Testing and Troubleshooting
Overview .......................................................................................................
TEST Main Menu .....................................................................................
Troubleshooting Sequence ............................................................................
Quick Checks ...........................................................................................
Isolating Common Problems ....................................................................
Running Tests ...............................................................................................
From the Front Panel ................................................................................
From the Network Management System (NMS) .....................................
Loopback Tests .............................................................................................
Terminal Loopback/Loop 1 ......................................................................
Digital Loopback/Loop 2 .........................................................................
Remote Loopback/Loop 2.........................................................................
DSU Check/Loop 3 ..................................................................................
Local Loopback/Loop 4 ............................................................................
Service-Provider (Telco)-Initiated Loopback Tests ..................................
CSU Loopback Test .............................................................................
DSU (RT) Non-Latching Loopback Test .............................................
DSU (LLB) Latching Loopback Test ...................................................
Pattern Tests ..................................................................................................
Bit Error Rate (BER) Tests ...........................................................................
Line BER ..................................................................................................
Device BER ..............................................................................................
Initiating a Line or Device BER Test .......................................................
Retrain Test ...................................................................................................
Correcting Port Interference Problems .........................................................
If You Cannot Isolate the Fault .....................................................................
*
8-2
8-3
8-3
8-4
8-5
8-6
8-6
8-6
8-7
8-7
8-8
8-9
8-10
8-11
8-12
8-12
8-12
8-13
8-14
8-15
8-15
8-15
8-16
8-17
8-17
8-18
Testing and Troubleshooting 8-1
Chapter 8
Contents
Overview
This chapter helps you troubleshoot problems in your 3512 DSU/CSU or data
communications network. It provides tests and quick checks to solve problems that
have simple causes. Step-by-step fault isolation procedures help you locate problem
causes by running tests from the 3512 front panel. Table 8-1 provides a guide to
these procedures.
NOTE: Most tests disrupt data flow; warn anyone affected at your site and the
remote site before testing.
Table 8-1.
Troubleshooting and Testing Guide
If...
Do This...
Your data communications system is not See “Troubleshooting Sequence” in this chapter;
transmitting and receiving correctly
refer to Chapter 2 for instructions on running the
Automatic Self-Test.
Your newly installed 3512 passes the
Refer to “Quick Checks,” in this chapter.
Installation Checkout in Chapter 2 but
does not operate correctly
Your newly installed 3512 SDC passes Refer to “Quick Checks,” in this chapter.
the Installation Checkout in Chapter 2
but does not operate correctly
Your 3512 is properly installed and was Refer to “Troubleshooting Sequence” in this
satisfactorily transmitting and receiving chapter.
data before symptoms appeared
Problems persist
In the U. S.: call the Motorola Customer Support
Center.
The Customer Support Center instructs
you to return the 3512 to Motorola
8-2 Testing and Troubleshooting
Outside the U. S.: contact your nearest Motorola
distributor.
Refer to “Return Procedures” at the end of this
manual.
*TEST
*TEST Main Menu
Figure 8-1 shows the
*TEST main menu.
* TEST
LOOPBACKS
PATTERN
TESTS
Pattern
=Off
:On
BER TESTS
Test Type
=Device
:Line
OTHER *
Figure 8-1.
Loop 1
=Off
:Pn
Retrain
=Off
:On
Loop 2
=Off
:Pn
:RT
PRIM Loop 2
=Off
:RT
RM Loop 2
=Off
:Pn
Loop 3
=Off
:On
Loop 4
=Off
:On
Type
=Space
:Mark
:Alt 0/1
:511
BER Address
:000 - 250
BER Length
=10**4
:10**5
:10**6
:10**7
BER
=Off
:On
* The OTHER category appears only if the MP-Mux feature is selected.
*TEST Main Menu
Troubleshooting Sequence
This sequence is organized to help you isolate the problem. By testing sections of
your network in sequence you can eliminate areas and narrow down the problem.
Begin with “Quick Checks.”
Testing and Troubleshooting 8-3
Quick Checks
The following steps may help you solve simple problems:
1) Check all cable connections. Review “Installing the Standalone 3512” in
Chapter 2 to verify that you have installed the cables correctly.
2) Power down the unit and then power it back up. This initiates the self-test,
which is explained in Chapter 2.
If the unit fails the test (the ST LED turns steady red, and an alarm message
displays in place of the default display), check for alarm conditions under the
STATUS menu (Chapter 5). If you cannot resolve the problem, there may a
hardware failure in the local unit. Contact Motorola Customer Support and
provide the information listed under Motorola Customer Information. That
section is located towards the front of this guide, following About This Manual.
*
3) Using the appropriate configuration worksheet (Appendix C) as a guide, go
through the configuration menus to ensure that the 3512 or 3512 SDC is
configured appropriately for the current application.
4) On 3512 SDCs:
a) Set both units to P3=Direct. Determine whether the units communicate.
If:
•They do not, contact Motorola Customer Support, providing information as described in Step 2.
•They do, go on to the next step.
b) Set both units to P3=Compress; set one unit to Compress
Mode=Answer, and the other to Originate. If the units do not
communicate, check the alarm queue display for Link alarms:
•If any are shown, contact Customer Support, providing information as
described in Step 2.
•If there are no Link alarms, go on to the next step.
c) Set both units to P3 Format=NRZI. If the units do not communicate:
•Determine whether the DTEs support the port rate to which the 3512
SDCs are set (Data Rate parameter)
•Determine whether the DTEs support clock stopping, which the 3512
SDCs use.
d) If none of these actions resolve the problem, contact Customer Support,
as described in Step 2.
If these checks do not solve the problem, run the diagnostic tests below.
8-4 Testing and Troubleshooting
Isolating Common Problems
IMPORTANT: Motorola recommends running bit error rate (BER) tests from the
network manager, if one is attached. This is because received network-management
polling data (used when running BER tests from the front panel in a network-managed system) may cause false error readings at 3512 units.
For each pair of devices, run the BER and Loopback tests, in the following
sequence:
NOTE: For instructions on initiating BER and Loopback tests, refer to the next
section, “Running Tests.”
1) If you are running the test from a network-managed 3512’s front panel, set
both the local and remote NC Override parameters to On.
2) Initiate a device BER test for each 3512.
If either unit fails, the problem is in that unit. If both units pass, go to Step 3.
3) Initiate a line BER test.
If the line fails, check that the units are configured for the correct digital
service and speed. If they are, the problem is most likely with the transmission
facility.
If the test is passed, go to Step 4.
4) Run the appropriate loopbacks (refer to “Loopback Tests”) to further isolate
the problem. The problem is probably between the 3512 and the data terminal
equipment (DTE).
Testing and Troubleshooting 8-5
Running Tests
Tests to identify operating problems can be run from the front panel or from a
Network Management System (NMS) to all local and remote 3512s on the circuit.
IMPORTANT: The only test supported in restoral are the service-provider-initiated
local loopback and the Primary Loop 2.
From the Front Panel
To start a test from the front panel, use the front panel keys as described in Table 8-2.
Refer to Figure 8-1 to identify your location in the menu tree. During a test, the ST
LED flashes green.
Table 8-2.
Test Sequence
Press...
Until this Displays:
TEST
LOOPBACKS, PATTERN TESTS, or BER TESTS
TEST SELECTED=Off
TEST SELECTED:On
TEST SELECTED=On
*
NOTE: Configuration changes cannot be made while a test is running.
To stop a test:
1) Display TEST SELECTED=On.
2) Press
to display TEST SELECTED:Off
3) Press
.
From the Network Management System (NMS)
When the 3512 DSU/CSU is operating under network control, tests must be initiated
from the NMS. If you attempt to initiate a test from the front panel, the message
NC ATTACHED
displays.
To disable network control, set NC Override=On at both the local and remote units
( MODIFY main menu, MODIFY NETWORK category). The tests can then be run
from the 3512 front panel. After testing, restore network management control by setting NC Override=Off.
*
8-6 Testing and Troubleshooting
Loopback Tests
This section describes the loopback tests available for the 3512 (Figure 8-1).
Loopback tests can be initiated from the 3512 front panel or from an NMS.
NOTES:
1) Disable System Status and Circuit Assurance when running loopback tests.
Loopback conditions can cause Idle signals to be received at one end of the
circuit, thereby activating the System Status or Circuit Assurance functions
and inhibiting data from passing once the loopback is terminated.
2) The local unit is the one that initiates the loopback test.
so LOOPBACKS displays. Press
From the TEST menu, press
select the loopback tests described next.
*
to
Terminal Loopback/Loop 1
Loop 1
Default:
Off
Options:
Off, Pn (n = port number)
Description:
Initiated by a local 3512 or 3512 SDC, this command loops data from its
DTE back to the DTE (Figure 8-2) without passing it through the 3512’s
transmit and receive circuitry. P1 through P4 specifies the DTE port.
Terminal loopback examines the EIA interface between the 3512 and DTE.
The local DTE must be transmitting data during this test.
When operating in any Muxed mode, this test interrupts data only on the port
under test. When operating in Multipoint Muxed mode:
• If the loopback is initiated on a master device port, the multipoint
application on all slaves for that port is affected.
• If the loopback is initiated on a slave device port, only the application
running on that slave is affected; other slaves can respond to the master.
The ST LED flashes green during this test.
Pn
DTE
Pn
Tx
Rx
Local
= Signal Stops
Figure 8-2. Terminal Loopback/Loop 1
Testing and Troubleshooting 8-7
Digital Loopback/Loop 2
Loop 2 (displays as PRIM Loop 2 when in restoral)
Default:
Off
Options:
Off, Pn, RT (n = port number)
Description:
This command initiates a digital loopback test.
Loop 2 display: Initiated by the local 3512, Loop 2 disconnects the 3512
from its DTE. Data from the remote DTE is passed through the local 3512’s
receive and transmit circuitry and looped back to the transmission facility
and the remote DTE (Figure 8-3).
PRIM Loop 2 display: When the device is operating on the restoral line, this
mode lets the device execute an RT loop on the primary line without
disrupting restoral-line data.
Both displays: in any Muxed mode, this test interrupts data only on the port
under test. In Multipoint Muxed mode:
• If the loopback is initiated on a master device port, the multipoint
application on all slaves for that port is affected.
• If the loopback is initiated on a slave device port, only the application
running on that slave is affected; other slaves can respond to the master.
Pn: Activates the Loop 2 test for the specified port only. Other data, such as
framing or the secondary channel, is unaffected. (This option does not
display when the parameter display is PRIM Loop 2.)
RT (Remote Terminal): Performs the Loop 2 test for all received data.
This setting is not recommended in MP-Muxed configurations, because it
affects all ports and thus all applications. This test is similar to AT&Tspecified RT (also known as DSU) loopback tests.
The ST LED flashes green during this test.
Tx
Rx
Rx
Tx
DTE
DTE
Local
= Signal Stops
Figure 8-3. Digital Loopback/Loop 2
8-8 Testing and Troubleshooting
Remote
Remote Loopback/Loop 2
Rm Loop 2
Default:
Off
Options:
Off, Pn (n = port number)
Description:
This command initiates a remote digital loopback test.
Initiated by the local 3512, this command disconnects the remote unit from
its DTE. During this test, data from the local 3512 is passed to the
transmission facility, through the remote unit’s receive and transmit
circuitry, and looped back to the local unit (Figure 8-4). In this example, Port
4 on the local and remote units is under test.
Pn: This option activates the Loop 2 test for the specified port only.
Other data, such as framing or the secondary channel, is unaffected.
The ST LED flashes green during this test.
NOTES:
1) Remote Loop 2 is not supported in multipoint environments.
In multipoint or multi-tier environments, additional devices may
receive the loopback signaling and go into loopback.
2) Set Timing=Network (MODIFY DSU) before running this test.
3) To run the pattern test in conjunction with the Remote Loop 2 test,
initiate the Remote Loop 2 test before the pattern test. This lets the
signaling that initiates and terminates loopback reach the remote unit
undisturbed by the pattern test data. When finished testing, terminate
the pattern test before terminating Remote Loop 2.
P4
DTE
P4
Tx
Rx
Rx
Tx
P4
DTE
Local
= Signal Stops
P4
Remote
Figure 8-4. Remote Loop 2
Testing and Troubleshooting 8-9
DSU Check/Loop 3
Loop 3
Default:
Off
Options:
Off, On
Description:
Initiated by the local 3512, this command directs the local 3512 to loop data
from its DTE through the 3512 and back to the DTE (Figure 8-5). The line
connection is maintained, but the transmit signal level is set to 0.
During DSU Check, data from the DTE passes through the 3512’s transmit
and receive circuitry and back through the EIA interface to the DTE.
The ST LED flashes green during this test.
NOTE: This test interrupts user data. When the 3512 is in a Muxed mode,
all Muxed ports are affected.
Tx
DTE
Rx
All ports
Local
Figure 8-5. DSU Check/Loop 3
8-10 Testing and Troubleshooting
Local Loopback/Loop 4
Loop 4
Default:
Off
Options:
Off, On
Description:
Initiated by the local 3512, this command disconnects the local 3512 from
its DTE.
During the test, the local 3512 receives data from the remote 3512 and loops
it back without passing it through the local 3512’s transmit and receive
circuitry (Figure 8-6). This process examines the transmission facility, the
remote 3512’s circuitry, and the remote EIA interface.
The Loop 4 test is not supported in Multipoint Muxed, DDS-II SC, or 64k
CC modes. (To run a Loop 4, first put the master and slave in Normal mode.
Since the loop tests the line as well as the device hardware, the results of the
test are valid regardless of the operating mode selected.)
This test is similar to AT&T-specified LL (also known as CSU) loopback
tests.
The ST LED flashes green during this test.
NOTE: Set Timing=Network (MODIFY DSU) before running this test.
Tx
Rx
Rx
Tx
DTE
DTE
All ports
Local
DDS line
All ports
Remote
Figure 8-6. Local Loopback/Loop 4
Testing and Troubleshooting 8-11
Service-Provider (Telco)-Initiated Loopback Tests
Service provider-initiated loopback tests are performed at circuit installation or when
trouble is reported to the provider.
CSU Loopback Test
The provider initiates the CSU (also known as LL) loopback test by reversing the
direction of the local loop sealing current on the 3512 or 3512 SDC.
In Multipoint Muxed modes:
• When the master device is in the LL loop, the LL loopback test interrupts data
on all ports. The slaves lose synchronization, shut down their ports, and
transmit idle characters. When the loopback is removed, the master initiates a
retrain sequence with each slave.
• If the loopback is initiated on a slave, only the data for that slave is interrupted.
The master detects that the slave is not responding, attempts to initiate a retrain,
and if unsuccessful, drops that slave from its active list of slaves.
Communication with other slaves is still possible. When the loopback is
removed, the slave signals the master to retrain it.
NOTE: This loop is supported in restoral. The 3512 transmits on the dial line while
the test is in process. Since this test is non-disruptive, it is preferable to an RT test.
DSU (RT) Non-Latching Loopback Test
The provider initiates the DSU (RT) Loopback test by sending a special alternating
loopback sequence to the 3512 or 3512 SDC. This test is available with DDS-I,
DDS-II SC, and SW 56 services.
In Multipoint Muxed modes:
• On a master device, an RT loopback interrupts data on all ports. Slaves lose
synchronization and transmit idle characters. When the loopback is removed,
the master initiates a retrain sequence with all slave devices.
• On a slave device, only the data for that slave is interrupted. The master detects
that the slave is not responding, attempts to initiate a retrain, and if
unsuccessful, drops the slave from its active list of slaves. Communication with
other slaves, however, is still possible. When the loopback is removed, the slave
signals the master to retrain it.
NOTES:
1) A 3512 running BER, Pattern, or Loop 3 tests does not respond to an RT
request. Terminate tests in progress before you execute loops.
2) An RT loopback test on the restoral line disrupts primary-line data. (An RT on
the primary line does not disrupt restoral-line data.)
8-12 Testing and Troubleshooting
DSU (LLB) Latching Loopback Test
The provider initiates the LLB Loopback test by sending a special loopback
sequence to the 3512 or 3512 SDC. This test is available with 64k CC service.
In Multipoint Muxed modes:
• On a master device, an RT loopback interrupts data on all ports. Slaves lose
synchronization and transmit idle characters. When the loopback is removed,
the master initiates a retrain sequence with all slave devices.
• On a slave device, only the data for that slave is interrupted. The master detects
that the slave is not responding, attempts to initiate a retrain, and if
unsuccessful, drops the slave from its active list of slaves. Communication with
other slaves, however, is still possible. When the loopback is removed, the slave
signals the master to retrain it.
NOTES:
1) The 3512 does not respond to LLBs on the inactive line while it is transmitting
data on the active line. Refer to the RT [or] LTCH DSU parameter description
in Chapter 4 for important details.
2) If a 3512 is running BER, Pattern, or Loop 3 tests, it does not respond to an
LLB request. Terminate tests in progress before you execute loops.
3) Latching loops, which continue looping until explicitly stopped, prevent your
applications from operating on the network. Scrambler is designed to prevent
the inadvertent transmission of data patterns that match loopback-triggering
patterns in 64k CC mode. Refer to the Scrambler parameter description in
Chapter 4 for important details.
Testing and Troubleshooting 8-13
Pattern Tests
Pattern test options let you to specify the data pattern in loopbacks; a DTE, test
device on a DTE port, or internal pattern generator supply the data (Figure 8-7).
Pattern
Tx
DTE
Tx
Rx
Figure 8-7. Pattern Test
The pattern test is an aggregate level test: even if DTE Config=BitSteal or Muxed,
the 3512 sends the pattern over the entire DDS main channel, at the full main channel port rate. An Out of Sync alarm occurs at the remote unit that is not in pattern test
if its DTE Config=BitSteal or Muxed. NOTE: To run the pattern test in conjunction
with the Remote Loop 2, initiate the Remote Loop 2 before the pattern test. This lets
the loopback signaling reach the remote unit undisturbed by the pattern data. after
the test, terminate the pattern test before terminating Remote Loop 2.
To run pattern tests:
1) Display the TEST menu.
2) Press
until PATTERN TESTS displays. Use
*
to display parameters.
Pattern
Default:
Off
Options:
Off, On
Description:
When set to On, the selected pattern type is transmitted in place of DTE
data, and the receive data is monitored for the pattern. Each time an error in
the pattern is detected, the ST LED flashes red.
Type
Default:
Space
Options:
Space, Mark, ALT 0/1, 511
Description:
This parameter specifies the pattern to be transmitted and received.
Space: Only Spaces are transmitted.
Mark: Only Marks are transmitted.
ALT 0/1: An alternating Mark/Space pattern is transmitted.
511: Pseudo-random 511 Bit Pattern is transmitted.
8-14 Testing and Troubleshooting
Bit Error Rate (BER) Tests
There are two BER performance tests available for the 3512 DSU/CSU:
• Line BER tests the line
• Device BER tests the 3512’s internal circuitry
NOTE: BER tests interrupt user data.
Line BER
Line BER is an end-to-end pattern test between local and remote 3512s. The number
of outbound (local to remote) and inbound (remote to local) errors is reported.
NOTES:
1) In Multipoint Muxed mode, initiate this test only at the master device. Slaves
not in test stop transmitting until they receive a retrain signal from the master.
2) Disable System Status and Circuit Assurance ( MODIFY main menu,
MODIFY PORT category) before running line BER tests. These tests can
activate those functions.
*
3) Line BER tests are not supported when Opmode=64k CC and DTE
Con=Normal.
4) When running a Line Bit Error Rate (LBER) test initiated from a network
manager, do not run a 107b LBER if the 3512 is operating at 2.4 kbps.
5) When running LBER tests between a 3512 and 3500 DSU/CSUs with revision
3.2 software:
• Front-panel initiated tests function properly only when initiated from the
3500
• Network-management initiated tests function properly from either device,
but for DDS line rates of 19.2 kbps and below, limit the length to 105b.
IMPORTANT: Motorola recommends running BER tests from the network
manager, if one is attached, because received network-management polling data may
cause false error readings at 3512 units.
Device BER
The device BER test places only the local unit in loopback. It loops a test pattern
through the transmit and receive circuitry of the unit, and checks the pattern for
errors. The line connection is maintained; however, the transmit signal level is set
to 0. NOTE: In MP-Mux mode, a DBER functions as a DSU Check, Loop 3 does.
Testing and Troubleshooting 8-15
Initiating a Line or Device BER Test
To begin a BER test (refer to Figure 8-1):
1) From the
*TEST main menu, press
2) Press
until Test Type displays. Press
until BER TESTS displays.
to select Line or Device.
3) When initiating a device BER test, skip this step. For a line BER test, press
until BER Address displays. Use the numeric-entry procedure (Chapter 3) to
identify the unit's BER Address (on a remote unit, the NC Address). Press .
4) Press
until BER Length=10**4 displays. 10**4 represents 104 (10,000)
bits. Press
to select the number of bits to test. Press . NOTE: The
number of bits selected and the data rate determine the test duration
(Table 8-3).
5) Press
until BER=Off displays. Press
6) Press
to initiate the test.
so that BER:On displays.
Table 8-3.
BER Test Duration
BER Length Parameter Option
Data Rate
(kbps)
10**4
10**5
10**6
10**7
2.4
4 sec
42 sec
6 min 56 sec
69 min 40 sec
4.8
2 sec
21 sec
3 min 28 sec
34 min 43 sec
9.6
1 sec
10 sec
1 min 44 sec
17 min 22 sec
19.2
0.5 sec
5 sec
52 sec
8 min 41 sec
56.0
0.2 sec
2 sec
18 sec
2 min 58 sec
NOTE: For line BER tests, allow an additional 30 seconds for initiation and
termination of the test.
Table 8-4 shows the BER messages that can display.
Table 8-4.
BER Messages
LCD Display
BER PASS
BER FAIL
BER TEST RUNNING
BER SETUP FAIL
In =xxx
Out=xxx
8-16 Testing and Troubleshooting
Definition
Unit passed test
Unit failed test
Test is running
Test failed to run
Test detected xxx inbound errors
Test detected xxx outbound errors
Retrain Test
The OTHER category contains the Retrain parameter (Figure 8-1). OTHER displays
only when DTE Con=MPx Muxed (where x = M [master] or S [slave]).
Retrain
Default:
Off
Options:
On, Off
Description:
This test initiates a retrain sequence. If initiated at the master device, the
master initiates training. If initiated at the slave, the slave signals the master
to initiate training.
Correcting Port Interference Problems
If equipment connected to your 3512 that drives Pins 14 or 23 in EIA 232 operation
causes electrical interference, you can correct the problem by isolating those pins
from one another. You do this by adjusting the 3512’s internal Mux option card Dual
Inline Package (DIP) switches. NOTE: DIP switches are set to On at the factory, and
must be On to support V.35 operation. To change DIP switches:
1) Remove the 3512 enclosure cover, as described in Chapter 2, and set it aside.
Note the DIP switches at the rear of the option card in two groups of four
(Figure 8-8).
Caution
Components used in the 3512 DSU/CSU are sensitive to static
electricity discharge, which can damage the 3512’s internal
components. Use proper handling and grounding precautions
when handling the 3512 card or components.
Testing and Troubleshooting 8-17
O N
1 2 3 4
O N
1 2 3 4
Rear
(Left)
(Right)
Front
Figure 8-8. EIA 232 V.35 DIP Switches
Facing the rear of the 3512, from left to right, the switches are as follows:
Switch No.
Port
Switch ON Connects... Switch OFF Isolates...
4 in left group
None
3 in left group
None
2 in left group*
2
Pin 2 to Pin 14
Pin 2 from Pin 14
1 in left group*
2
Pin 23 to Pin 24
Pin 23 from Pin 24
4 in right group*
3
Pin 2 to Pin 14
Pin 2 from Pin 14
3 in right group*
3
Pin 23 to Pin 24
Pin 23 from Pin 24
2 in right group*
4
Pin 2 to Pin 14
Pin 2 from Pin 14
1 in right group*
4
Pin 23 to Pin 24
Pin 23 from Pin 24
* V.35 operation requires that the port’s DIP switch is set to ON.
2) Set the appropriate switches OFF. For example, to correct interference on
Port 4, set switches 1 and 2 on the right bank OFF.
3) Replace the 3512 enclosure cover.
4) Replace the cables on the rear panel.
If You Cannot Isolate the Fault
If you are unable to resolve the problem and need technical assistance, contact the
Motorola Customer Support Center or distributor. The telephone numbers are listed
under Motorola Customer Information, which follows About This Manual. Also in
that section is the information to provide when calling so the representative can assist
you promptly. If you are advised to return the unit to Motorola , refer to the Return
Procedures section towards the end of this guide.
8-18 Testing and Troubleshooting