1
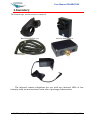
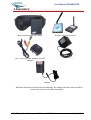
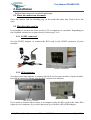
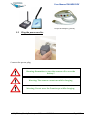
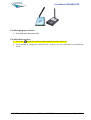
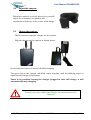
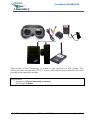
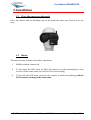
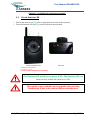
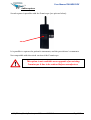
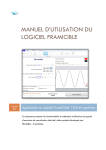
User Manual FRAMISCOPE User Manual FRAMISCOPE® Version 7 SARL FRAMIRAL 107 Avenue Jean Maubert 06130 GRASSE Tel: +33 422.480.107 Fax: +33 9.56.37.24.72 www.framiral.fr [email protected] MU_FS-User_Manual_Framiscope-rev007.docx – 13/05/2015 Page 1/23 User Manual FRAMISCOPE Contents Framiscope Wired ....................................................................................................................................................... 5 1. Inventory........................................................................................................................................................... 6 2. Installation ........................................................................................................................................................ 7 2.1 Place the camera on the mask:............................................................................................................................ 7 2.2 Plug the video cord in: ......................................................................................................................................... 7 2.3 Plug the power cord in: ........................................................................................................................................ 7 2.4 Plug the video cord in the TV/Computer:............................................................................................................. 8 Framiscope Wireless – No LCD .................................................................................................................................... 9 1. Inventory......................................................................................................................................................... 10 2. Installation ...................................................................................................................................................... 11 2.1 Place the camera on the mask:..........................................................................................................................11 2.2 Plug the video cord in: .......................................................................................................................................11 2.2.1 SCART connector: .................................................................................................................................... 11 2.2.2 RCA connector: ........................................................................................................................................ 11 2.3 Plug the power cord in: ......................................................................................................................................12 2.4 Adjust the camera: ............................................................................................................................................14 2.5 Charge the camera: ...........................................................................................................................................14 Framiscope Wireless - LCD ........................................................................................................................................ 15 1. Inventory......................................................................................................................................................... 16 2. Installation ...................................................................................................................................................... 17 2.1 Place the camera on the mask:..........................................................................................................................17 2.2 Modes ................................................................................................................................................................17 Maintenance ............................................................................................................................................................. 19 1. Maintenance ................................................................................................................................................... 20 1.1 Replace the battery:..........................................................................................................................................20 1.2 Cleaning: ............................................................................................................................................................21 1.3 Maintenance:.....................................................................................................................................................21 1.4 Specifications: ....................................................................................................................................................21 1.4.1 Wireless: .................................................................................................................................................. 21 1.4.2 LCD version: ............................................................................................................................................. 21 2. ANNEXE ........................................................................................................................................................... 22 2.1. Visual fixation LED ........................................................................................................................................22 2.2. Audio capture. ..............................................................................................................................................23 MU_FS-User_Manual_Framiscope-rev007.docx – 13/05/2015 Page 2/23 User Manual FRAMISCOPE Overview FRAMISCOPE® is the video-nystagmoscopic mask designed and manufactured by FRAMIRAL. This device allows you to: o visualize (black & white) nystagmus, o operate oculomotor tests, o check the fluidity during slow or fast pursuit exercises and observe the presence of saccades or oscillopsies during fast head movements, o visualize nystagmus post HST, o visualize nystagmus per-rotation and post-rotation (wireless version), and any eye movement while walking or moving the head. Easily adaptable to any visualization system: o computer (VGA/USB adapter device on demand), o surveillance monitor , o TV (Péritel or RCA adapter available) It is possible to record the video via a DVD recorder or via a computer and a Video Recording Device. Framiral also developed a software named « FramVideo » to help you visualize the video on your computer and record them easily in a standard compressed format such as AVI. The light weight rubber mask, along with the adjustable elastic strap fits perfectly and comfortably most faces. It is possible to visualize either the left eye or the right eye by simply swapping the camera and the blanking cap from one eye to the other. The device is supplied with all necessary accessories and cords. The wired version of the FRAMISCOPE® is suited for table manoeuvers, with its 7m long flexible cord. For rotational chair exercises, the wireless version is recommended, as nothing will hamper the rotation. MU_FS-User_Manual_Framiscope-rev007.docx – 13/05/2015 Page 3/23 User Manual FRAMISCOPE This manual describes the following versions: Framiscope – wired, Framiscope – wireless – no LCD, Framiscope – wireless – LCD. MU_FS-User_Manual_Framiscope-rev007.docx – 13/05/2015 Page 4/23 User Manual FRAMISCOPE Framiscope Wired MU_FS-User_Manual_Framiscope-rev007.docx – 13/05/2015 Page 5/23 User Manual FRAMISCOPE 1. Inventory The Framiscope, wired version, is made of: Mask with blanking cap Infrared B&W Camera Cord (1,5 m to 7 m) Video commuting box Alimentation The infrared camera enlightens the eye with two infrared LEDs of low intensity with no inconvenience even after a prolonged observation. MU_FS-User_Manual_Framiscope-rev007.docx – 13/05/2015 Page 6/23 User Manual FRAMISCOPE 2. Installation Follow those steps to use the Framiscope: 2.1 Place the camera on the mask: Align the camera Push it in to the stop The blanking cap can be placed the same way. The elasticity of the camera, the blanking cap, and the mask, offers a flexible and reliable system of placing and removing those items. 2.2 Plug the video cord in: Camera side 2.3 Commutator side Plug the power cord in: The red LED on the side of the commuting box should turn on when correctly powered. MU_FS-User_Manual_Framiscope-rev007.docx – 13/05/2015 Page 7/23 User Manual FRAMISCOPE 2.4 Plug the video cord in the TV/Computer: SCART connector Turn the TV on and switch the video input to SCART (AV1 or AV2…). You should see the image from the Framiscope. When using a monitor or a TV or a computer with a RCA connector available, you can directly plug the RCA cord provided in (yellow connector). MU_FS-User_Manual_Framiscope-rev007.docx – 13/05/2015 Page 8/23 User Manual FRAMISCOPE Framiscope Wireless – No LCD MU_FS-User_Manual_Framiscope-rev007.docx – 13/05/2015 Page 9/23 User Manual FRAMISCOPE 1. Inventory Mask with blanking cap, camera Receiver (several versions) Jack – RCA cord, BNC Adapter, SCART Receiver power plug adapter Charger With this wireless version of the Framiscope, the image from the camera will be sent to the receiver via radio frequency. MU_FS-User_Manual_Framiscope-rev007.docx – 13/05/2015 Page 10/23 User Manual FRAMISCOPE 2. Installation Follow those steps to use the Framiscope: 2.1 Place the camera on the mask: Place the camera and the blanking cap on the mask the same way. Push it in to the stop. 2.2 Plug the video cord in: It is possible to connect the video cord to a TV, a computer, or a monitor. Depending on the available connectors on your device, follow step 1 or 2: 2.2.1 SCART connector: Use the SCART adapter, to connect the RCA cord to the SCART connector of your monitor: Receiver kit SCART connector 2.2.2 RCA connector: You don’t need any adapter to connect the RCA cord to your monitor, if your monitor has a RCA connector. Simply plug the RCA cord in your monitor: RCA connector (Yellow) Receiver connected If you want to connect the receiver to a computer, plug the RCA cord to the video RCA input of your computer. If you don’t have any, you can use a RCA/USB adapter: MU_FS-User_Manual_Framiscope-rev007.docx – 13/05/2015 Page 11/23 User Manual FRAMISCOPE Receiver (jack) 2.3 RCA/USB adapter (yellow) Plug the power cord in: Connect the power plug. Warning: Remember to turn the camera off to save the battery! Warning: The camera cannot run while charging. Warning: Do not wear the Framiscope while charging. MU_FS-User_Manual_Framiscope-rev007.docx – 13/05/2015 Page 12/23 User Manual FRAMISCOPE Receivers For the light grey receiver: 1. It should work automatically. For the black receiver: 1. Press the button for a few seconds, until the receiver turns on, 2. Press quickly to change the chanel (from 1 to 8), to set it as specified on your delivery sheet. MU_FS-User_Manual_Framiscope-rev007.docx – 13/05/2015 Page 13/23 User Manual FRAMISCOPE 2.4 Adjust the camera: When the camera is correctly placed, you can still adjust the orientation, to optimize the visualization of the eye in the center of the image. 2.5 Charge the camera: The kit contains a specific charger for the camera. Plug the charger on the camera as shown below: Be sure that the camera is turned off while charging. The green led on the charger will blink when charging, until the blinking stops, to signal the full charge of the battery. There is no problem leaving the charger plugged in after full charge, it will automatically stop charging. Do not try to use a different charger, this may destroy the battery! MU_FS-User_Manual_Framiscope-rev007.docx – 13/05/2015 Page 14/23 User Manual FRAMISCOPE Framiscope Wireless - LCD MU_FS-User_Manual_Framiscope-rev007.docx – 13/05/2015 Page 15/23 User Manual FRAMISCOPE 1. Inventory Mask, cords and charger Camera with LCD 2.5" and receiver This version of the Framiscope is similar to the wireless no LCD version. The difference is the incorporated LCD 2,5" screen, which allows you to visualize the video directly on the mask, in real time. Specifications: Autonomy: 4 hours non-stop, screen on Full charge: 8 hours MU_FS-User_Manual_Framiscope-rev007.docx – 13/05/2015 Page 16/23 User Manual FRAMISCOPE 2. Installation 2.1 Place the camera on the mask: Place the camera and the blanking cap on the mask the same way. Push it in to the stop. 2.2 Modes The switch located on the camera has 3 positions: 1. Middle position: camera off. 2. To the right: the LED turns on RED, the camera is radio transmitting to any receiver on the same canal, as is the No LCD version doing. 3. To the left: the LED turns on green, the camera is radio transmitting, and the LCD screen is running at the same time. MU_FS-User_Manual_Framiscope-rev007.docx – 13/05/2015 Page 17/23 User Manual FRAMISCOPE The three buttons on the side of the camera (blue, white, red) control the setting of the LCD screen (Brightness, Contrast, Color). We recommend to not change those settings. Warning: The camera cannot run while charging. Do not try to use a different charger, this may destroy the battery! Warning: Do not wear the Framiscope while charging. MU_FS-User_Manual_Framiscope-rev007.docx – 13/05/2015 Page 18/23 User Manual FRAMISCOPE Maintenance MU_FS-User_Manual_Framiscope-rev007.docx – 13/05/2015 Page 19/23 User Manual FRAMISCOPE 1. Maintenance 1.1 Replace the battery: The camera has a battery that gives a 4hrs autonomy. Follow these steps to change the battery: Unscrew the 2 screws on the front Remove the back of the camera Remove the battery Place the new battery in, and close the camera with the 2 screws. It is recommended to give your camera to Framiral to change the battery. If you would like to do it yourself, contact Framiral to get a compatible battery. Information: Camera Specification: Radio frequency: 5.8 GHz Range: 10m Autonomy: 4 hours Full charge: 8 Hours MU_FS-User_Manual_Framiscope-rev007.docx – 13/05/2015 Page 20/23 User Manual FRAMISCOPE 1.2 Cleaning: o It is recommended to clean the mask after use, o A hypoallergic product is recommended, o It is essential to replace the mask if it gets porous. 1.3 o o o o o o o Maintenance: No calibration is needed, You can clean the camera optic with an appropriate cleaning rag and water, If the optic gets some mist, you can clean it with an anti-mist product, Do not put it under water, Avoid shocks, Warranty 2 years except for mask and elastic band, Replace the elastic band when necessary. 1.4 Specifications: 1.4.1 Wireless: Receiver Alimentation: 220V – 50Hz, Receiver power consumption: 180mA, Camera charger: 220V/110V - 50/60Hz –EN60601-1 CE Medical, Camera Alimentation: battery 7,5V Framiral, 1.4.2 LCD version: Autonomy (LCD on): 4 hours, Full charge: 8 hours, LCD screen resolution: 320x240, LCD screen size: 2.5", Luminosity : 250 cd/m². MU_FS-User_Manual_Framiscope-rev007.docx – 13/05/2015 Page 21/23 User Manual FRAMISCOPE 2. ANNEXE Options – available for wireless versions: 2.1. Visual fixation LED o Switch the camera on (2) (refer to appropriate section of the manual) o Turn the fixation LED on (1) (closest switch to the antenna) 1 2 2 3 Camera module view 1 Top view 1 Fixation LED switch 2 Camera switch 3 Camera Status LED (OFF/Green/Red) The Fixation LED switch turns green if ON. The fixation LED can turn on only when the camera is ON. This option is not available as an upgrade of an existing Framiscope. It has to be ordered before manufacture. MU_FS-User_Manual_Framiscope-rev007.docx – 13/05/2015 Page 22/23 User Manual FRAMISCOPE 2.2. Audio capture. Sound capture is possible with the Framiscope (see picture below) Audio It is possible to capture the patient’s statements, and the practitioner’s comments. Not compatible with the wired version of the Framiscope. This option is not available as an upgrade of an existing Framiscope. It has to be ordered before manufacture. MU_FS-User_Manual_Framiscope-rev007.docx – 13/05/2015 Page 23/23