1
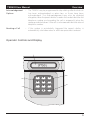
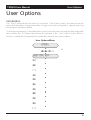
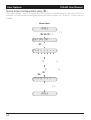
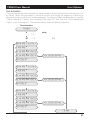
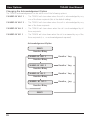
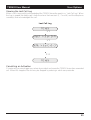
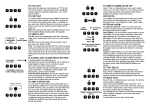
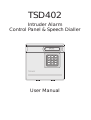
TSD402
Intruder Alarm
Control Panel & Speech Dialler
UNSET
1
2
BELL TEST
WALK TES T
3
4
5
6
USE R CODE 1
CHI ME
USER CODE 2
7
8
9
HOME AREA
DIALLER
E VENT LOG
HOME
0
AWAY
TSD402
User Manual
Contents
Overview
Introduction . . . . . . . . . . . . . . . . . . . . . . . . . . . . . . . . . . . . . . . . . . . . . . . . . . . . . 1
Control Panel Operation . . . . . . . . . . . . . . . . . . . . . . . . . . . . . . . . . . . . . . . . . . . . 1
Speech Dialler Operation . . . . . . . . . . . . . . . . . . . . . . . . . . . . . . . . . . . . . . . . . . . 2
Operator Controls and Display . . . . . . . . . . . . . . . . . . . . . . . . . . . . . . . . . . . . . . . 3
Operating the System
Full Setting the System (AWAY) . . . . . . . . . . . . . . . . . . . . . . . . . . . . . . . . . . . . . . . . 4
Part-Setting the System (HOME) . . . . . . . . . . . . . . . . . . . . . . . . . . . . . . . . . . . . . . . 5
Unsetting the System . . . . . . . . . . . . . . . . . . . . . . . . . . . . . . . . . . . . . . . . . . . . . . . 5
Setting with a Zone Open . . . . . . . . . . . . . . . . . . . . . . . . . . . . . . . . . . . . . . . . . . . 6
Resetting after an Alarm. . . . . . . . . . . . . . . . . . . . . . . . . . . . . . . . . . . . . . . . . . . . . 6
Changing Chime Zones. . . . . . . . . . . . . . . . . . . . . . . . . . . . . . . . . . . . . . . . . . . . . 8
User Options
Introduction . . . . . . . . . . . . . . . . . . . . . . . . . . . . . . . . . . . . . . . . . . . . . . . . . . . . . 9
Bell Test . . . . . . . . . . . . . . . . . . . . . . . . . . . . . . . . . . . . . . . . . . . . . . . . . . . . . . . 10
Walk Test . . . . . . . . . . . . . . . . . . . . . . . . . . . . . . . . . . . . . . . . . . . . . . . . . . . . . . 11
Change Passcode 1 . . . . . . . . . . . . . . . . . . . . . . . . . . . . . . . . . . . . . . . . . . . . . . 12
Change Chime Zones . . . . . . . . . . . . . . . . . . . . . . . . . . . . . . . . . . . . . . . . . . . . . 12
Change Passcode 2 . . . . . . . . . . . . . . . . . . . . . . . . . . . . . . . . . . . . . . . . . . . . . . 13
Home Area Configuration . . . . . . . . . . . . . . . . . . . . . . . . . . . . . . . . . . . . . . . . . . 14
Speech Dialler Programming . . . . . . . . . . . . . . . . . . . . . . . . . . . . . . . . . . . . . . . . 15
View Event Log . . . . . . . . . . . . . . . . . . . . . . . . . . . . . . . . . . . . . . . . . . . . . . . . . . 24
Dialler Reporting Options . . . . . . . . . . . . . . . . . . . . . . . . . . . . . . . . . . . . . . . . . . 25
Remote Keypads
Introduction . . . . . . . . . . . . . . . . . . . . . . . . . . . . . . . . . . . . . . . . . . . . . . . . . . . . 26
Remote Keypad Layout . . . . . . . . . . . . . . . . . . . . . . . . . . . . . . . . . . . . . . . . . . . . 26
Using Remote Keypads . . . . . . . . . . . . . . . . . . . . . . . . . . . . . . . . . . . . . . . . . . . . 26
Troubleshooting
Alarm System troubleshooting . . . . . . . . . . . . . . . . . . . . . . . . . . . . . . . . . . . . . . . 27
Speech Dialler Troubleshooting . . . . . . . . . . . . . . . . . . . . . . . . . . . . . . . . . . . . . . 28
Speech Dialler Details . . . . . . . . . . . . . . . . . . . . . . . . . . . . . . . . . . . . . . . . . . . . . 29
Alarm System Details . . . . . . . . . . . . . . . . . . . . . . . . . . . . . . . . . . . . . . . . . . . . . . 30
TSD402 User Manual
Overview
Overview
Introduction
The TSD402 is a 5 zone (+ Final Exit) control panel with an integral Speech Dialler. It is ideally
suited for domestic and small commercial installations which require additional security through
the communication of audio alarm messages over the telephone line.
Control Panel Operation
Operation and programming is carried out from the tactile rubber keypad on the control panel in
conjunction with the 16 character Liquid Crystal Display (LCD).
The TSD402 incorporates a 3 button set facility which simplifies the setting and part setting of the
system for user. When the user wishes to full set the system, they simply enter the first 2 digits of their
passcode followed by the AWAY key. To part set the system, they simply enter the first 2 digits of
their passcode followed by the HOME key. When unsetting the system the user must enter all 4
digits of the passcode.
There are three passcodes which allow different access levels to the system:
Engineer Passcode
-
This passcode allows the installation engineer access to the engineer
programming menu. It will be used by the installation company to
configure and test your system.
User 1
-
This passcode allows the user to access the` User Options' menu as
well as setting and unsetting the system. The `User Options' menu
allows system testing, passcode defining/changing, part-set
configuration and Speech Dialler programming.
User 2
-
This passcode allows the user to only set/part-set and unset the
system.
1
Overview
TSD402 User Manual
Speech Dialler Operation
The speech dialler may be configured by the engineer to trigger on FIRE, P.A. or ALARM
activations for both the Away set and Home set. In addition to alarm triggers provided internally
from the control panel, there are 3 auxiliary inputs which may be used by other devices to trigger
the speech dialler independently from that of the control panel.
Telephone
Numbers
-
The TSD402 stores up to three different telephone numbers. Each
numbers may be up to 16 digits long and are simply programmed
using the text display and keypad on the unit. The unit is compatible
with most PABX systems that require a pause or wait for secondary dial
tone. Note: The Emergency Service numbers (999 &112) cannot
be programmed into the unit.
Messages
-
The TSD402 has a built-in microphone and speaker so that phrases
can be recorded and replayed directly from the unit. A message is
formed by combining a common phrase (0) and one of the alarm
phrases (F, P or A). When the out-going call is answered the unit plays
the common phrase (0) and one of the three alarm phrases F, P or A.
Phrase 0 states the name and address of the user and phrases F, P and
A relate to the alarm type (FIRE ,PA, ALARM). There is 60 seconds of
recording time available for phrases and each phrase can be any
length as long as the total does not exceed 60 seconds. For example,
the `Common Phrase' may be 12 seconds, `Phrase F' 5 seconds,
`Phrase P' 8 seconds and `Phrase A' 7 seconds.
Reporting Options
-
Each alarm type (F, P or A) may be programmed to report only to
selected telephone numbers. For example the Fire activation may be
programmed to report to all three telephone numbers, whereas the
Alarm activation may be programmed to report only to telephone
numbers 1 and 3 etc.
Call
Acknowledgement
-
When the call is answered, the message is played. At the end of the
message the unit sends an audible `bleep' which must be answered
within 2 seconds using the tone generated by pressing the number [8]
button on a touch-tone telephone. On hearing the [8] tone the unit
immediately sends a second `bleep' which must be answered in the
same way. If successful, a multi-tone confirmation signal is then
heard, if not then the message is repeated with the acknowledgement
`bleeps' again. If the call is not acknowledged at the end of the fifth
play of the message the unit abandon that call and attempts the next
telephone number. This procedure is repeated three times in
sequence for all three telephone numbers. If no acknowledgement
has been received then the speech dialler shuts down.
2
TSD402 User Manual
Overview
Acknowledgement
Options
-
The TSD402 may be programmed to stop dialling after the first call
has been acknowledged or when two, or three have been
acknowledged. The acknowledgement may also be disabled
altogether, when the speech dialler is used in this mode it dials the first
telephone number and providing the call is answered it plays the
message and shuts down. If the call is not answered it dials the second
telephone number.
Aborting a Call
-
If the system is accidentally triggered the speech dialler is
automatically shut down when a valid user passcode is entered.
Operator Controls and Display
16 Character LCD
Display
UNSET
User 1 Functions
Printed Under Each
Key
Part-Set (HOME) key
Tactile Rubber
Keypad
1
2
BELL TEST
WALK TES T
3
4
5
6
USE R CODE 1
CHI ME
USER CODE 2
7
8
9
HOME AREA
DIALLER
E VENT LOG
HOME
0
AWAY
Full Set (AWAY) key
3
Operating the System
TSD402 User Manual
Operating the System
Full Setting the System (AWAY)
Before attempting to fully set the system, the risk of false alarms can be reduced by ensuring that all
detectors are unobstructed and any doors, windows etc. are properly secured.
Full Set (AWAY)
UNSET
Enter first two digits of passcode
then ] (e.g., 5 6 ] )
SECONDS LEFT 030
The exit tone will start and the
display shows the remaining time*
SET
When the exit tone stops, the
system is Full Set
* If the installation company has configured your system to set using the Final Exit zone (normally
the front door). The display will show: ` USE F.E. ROUTE ' and the system will set when the Final
Exit zone is opened then closed.
4
TSD402 User Manual
Operating the System
Part-Setting the System (HOME)
The system may have been programmed to allow you to have part of the system `set' while other
areas are `off'. Before attempting to part-set the system, the risk of false alarms can be reduced by
ensuring that all detectors are unobstructed and any doors, windows etc. are properly secured.
Part-Set (HOME)
UNSET
Enter first two digits of passcode
then [ (e.g., 5 6 [)
SECONDS LEFT 030
The display shows the remaining
time *
SET
When the two-tone sound is heard,
the system is Part-Set
* During the part-set exit the internal sounder is switched off.
Unsetting the System
Unsetting
Enter via the prescribed entry
route. The entry tone will start and
the display shows the remaining
time.
ENTER CODE 025
Enter your passcode
(e.g., 5 6 7 8)
UNSET
System is now Unset.
If the entry time is exceeded an alarm is generated from the internal sounders and the count down
entry timer is re-started. If at the end of the second count down the system has not been unset a full
alarm condition will occur (internal / external sounders and speech dialler activation).
5
Operating the System
TSD402 User Manual
Setting with a Zone Open
If an attempt is made to set or part-set the system with one or more zones open, e.g., a door left
open or detector still active etc. The sounder will give an interrupted tone and the display will
indicate the zone circuits that are in fault.
Setting with Zones Open
UNSET
Enter first two digits of passcode then ]
(e.g., 5 6 ])
CF- 1 2 3 4 5 F
The display shows the zones that
are open and sounder gives an
interupted tone
CF = Circuit Fault
1 = Zone 1 open
2 = Zone 2 open
3 = Zone 3 open
4 = Zone 4 open
5 = Zone 5 open
F = Final Exit open
Enter your passcode *
(e.g., 5 6 7 8)
UNSET
Investigate the cause and
repeat Setting procedure
* If the passcode is not entered before the exit timer expires, the system will initiate an internal
alarm and if fitted the external strobe light will operate.
Resetting after an Alarm
If an alarm has occurred during the set or part-set condition, the display will indicate the first
detection zone that was activated when the user unsets the system. Once the cause of the alarm
has been established the system must be reset. Your system will have been configured by the
installation company to reset by one of the following methods:
User Reset
-
This allows the users to reset the system following an alarm activation.
Engineer Reset
-
This requires an engineer to attend site and reset your system
following an alarm activation.
Remote Reset
-
This feature allows user 1 to reset the system following an alarm
activation. The user is required to contact the installation company
and quote a `Reset Code', this in turn is entered into a code generator
and a unique `Remote Reset Code' is generated. On entering this
code at the control panel, the system resets.
6
TSD402 User Manual
Operating the System
Enter via the prescribed entry route.
The entry tone will start and the
display shows the remaining time.
ENTER CODE 025
Enter your passcode
(e.g., 5 6 7 8)
User Reset
Engineer Reset
Remote Reset
CCT AL. 1
CCT AL. 1
CCT AL. 1
The display shows the zone
that caused the alarm
CALL ENGINEER
CALL ENGINEER
Enter your passcode
(e.g., 5 6 7 8)
The display shows the zone that
caused the alarm and the Call
Engineer message. The internal
sounder `bleeps' every minute
as a reminder that the system
requires an engineer reset
The display shows the zone that
caused the alarm and the Call
Engineer message. The internal
sounder `bleeps' every minute
as a reminder that the system
requires an engineer reset
Enter your passcode
(e.g., 5 6 7 8)
This will silence the `bleeps'.
Enter your passcode
(e.g., 5 6 7 8)
This will silence the `bleeps'.
Contact the alarm company to
attend and reset your system
Enter your passcode again
(e.g., 5 6 7 8)
UNSET
The system is now reset
RESET CODE 6846
Alarm Codes
CCT AL. 1 = Circuit Alarm Zone 1
CCT AL. 2 = Circuit Alarm Zone 2
CCT AL. 3 = Circuit Alarm Zone 3
CCT AL. 4 = Circuit Alarm Zone 4
CCT AL. 5 = Circuit Alarm Zone 5
CCT AL. F = Circuit Alarm Final Exit
PA AL.
= Personal Attack Alarm
FirE AL. = Fire Alarm
ENTRY TO = Entry Timed Out Alarm
Au PL TA = Auxiliary or Panel Lid Tamper
BAT. FLT. = Battery Fault Alarm
CODE TA = Code Tamper Alarm
Write down the 4 digit number.
Telephone the alarm company and
quote the number.
You will be asked to report the
circumstances of the alarm. If an
engineer is not required to attend
site, you will be given a four digit
`Remote Reset' code.
ENTER REPLY ---Enter the `Remote Reset' code
then press [
(e.g., 9 5 4 7 [)
UNSET
The system is now reset
7
Operating the System
TSD402 User Manual
Changing Chime Zones
When a zone is programmed as `Chime' it will generate a two-tone sound from the internal
sounders when activated during the unset or part-set condition. This may be used as a courtesy
warning for a door being opened e.g., front or back door, or shop entrance door etc.
The zones that `Chime' may be selected by user 1 from the `User Options' menu (see User
Options) or by anyone using the `Quick Chime' setting procedure as shown below:
Quick Chime Setting
UNSET
Enter [ [
CHThe display shows the zones that
are programmed as Chime (None
in the above example).
Press 1 -6 to toggle Chime zones
on and off.
(e.g., 1 2 3 456
to program all zones as Chime).
CH- 1 2 3 4 5 F
When the display shows required
setting press [ to accept.
UNSET
System is now Unset with all zones
Programed to Chime.
8
CH = Chime
1 = Zone 1 Chimes
2 = Zone 2 Chimes
3 = Zone 3 Chimes
4 = Zone 4 Chimes
5 = Zone 5 Chimes
F = Final Exit Chimes
TSD402 User Manual
User Options
User Options
Introduction
The `User 1' passcode has the option to access the `User Options' menu, this menu allows the
user to test the system, change passcodes, change Home area configuration, view the event log
and program the speech dialler.
To aid user programming, a brief description of each menu function has been printed underneath
each number key. The figure below shows the structure of the `User Options' menu. When a
function is selected and completed the system will return to the unset condition.
User Options Menu
UNSET
Enter first 3 digits of Passcode then [
(e.g., 5 6 7 [)
USER OPTION -
1 = Bell Test
2 = Walk Test
3 = Remote Reset *
4 = Change Passcode 1 *
5 = Change Chime Zones
6 = Change Passcode 2 *
7 = Home Area Configuration
8 = Dialler Programming *
9 = View Event Log
0 = Dialler Reporting Options *
] = Return to Unset mode
* These options cannot be programmed using the remote keypad.
9
User Options
TSD402 User Manual
Bell Test (key 1 )
This option allows the internal sounders, external sounders and external strobe lights to be tested
by user 1. When selected each device will operate in sequence for 9 seconds, as each device is
switched on the display will count down the remaining on time.
Bell Test
UNSET
Enter first 3 digits of Passcode then [
(e.g., 5 6 7 [)
USER OPTION Press 1 for Bell Test
SnDr BELL STB- 9
Internal Sounders on
Press [ to advance
test or ] to abandon tests.
SnDr BELL STB- 9
Press [ to advance
test or ] to abandon tests.
Press [ to advance
test or ] to abandon tests.
10
External Sounders on
TSD402 User Manual
User Options
Walk Test (key 2 )
The Walk Test option allows user 1 to test the function of all detection zones without causing an
alarm. As each zone is activated the zone number is displayed and the internal sounders generate
a two-tone sound. When the zone is deactivated the sounder will stop, but the display will latch the
activated zone.
Walk Test
UNSET
Enter first 3 digits of Passcode then [
(e.g., 5 6 7 [)
USER OPTION Press 2 for Walk Test
NONE
No Zones Active
Activate each zone in turn.
CF- 1 2 3 4 5 F T
As each zone is activated the
internal sounder generates a
two-tone sound and the display
latches the activated zone
Press ] to abandon test.
All zones activated
CF = Circuit Fault
1 = Zone 1 Activated
2 = Zone 2 Activated
3 = Zone 3 Activated
4 = Zone 4 Activated
5 = Zone 5 Activated
F = Final Exit Activated
T = Tamper Zone Activated
UNSET
11
User Options
TSD402 User Manual
Change Passcode 1 (key 4 )
This option allows `User 1' to change their own passcode, normally when the system is handed
over to you from the alarm company, the `User 1' passcode will be set to 5678.
Change Passcode 1
UNSET
Enter first 3 digits of Passcode then [
(e.g., 5 6 7 [)
USER OPTION Press 4 for Passcode 1
PASSCODE 1 ---Enter new pascode
(e.g., 2 5 8 0 )
PASSCODE 1 2580
Press [ to accept.
UNSET
A two-sound indicates acceptance,
a single low tone indicates that the
passcode is not available.
Repeat again trying a different
four digit number.
Change Chime Zones (key 5 )
This option allows `User 1' to change the zones that `Chime'. Once this option is selected from
`User Option menu' the procedure for changing `Chime' zones is the same as the `Quick Chime'
procedure described on page 8.
12
TSD402 User Manual
User Options
Change Passcode 2 (key 6 )
This option allows `User 1' to change the second user passcode.
Change Passcode 2
UNSET
Enter first 3 digits of Passcode then [
(e.g., 5 6 7 [)
USER OPTION Press 6 for Passcode 2
PASSCODE 2 ---Enter new pascode
(e.g., 7 8 9 0 )
PASSCODE 2 7890
Press [ to accept.
UNSET
A two-sound indicates acceptance,
a single low tone indicates that the
passcode is not available.
Repeat again trying a different
four digit number.
13
User Options
TSD402 User Manual
Home Area Configuration (key 7 )
This option allows `User 1' to select which zones will be omitted when the part-set (HOME) is
selected. Only zones that are programmed by the alarm company as `Night' or `Access' may be
omitted.
Home Area
UNSET
Enter first 3 digits of Passcode then [
(e.g., 5 6 7 [)
USER OPTION Press 7 for Home Area
U7- O A A A A A
Zone - 1
2 3 4
5 F/Exit
The display shows which zones
are Omitted (O) and Armed (A)
for the Home Area Configuration.
Press keys 1 to 6 to toggle zones
between Omitted (O) and Armed (A).
(e.g., press 1 to make zone 1
armed and 2 to make zone 2 omitted).
U7- A O A A A
When the display shows the
required setting, press [ to
accept.
UNSET
14
TSD402 User Manual
User Options
Speech Dialler Programming (key 8 )
This option allows `User 1' to program the speech dialler options. When this option is selected the
system will stay in the `Speech Dialler' programming menu until the `User 1' passcode is entered.
The figure below shows the basic menu structure.
Speech Dialler Menu
UNSET
Enter first 3 digits of Passcode then [
(e.g., 5 6 7 [)
USER OPTION Press 8 for Dialler Programming
READY
Replaying Messages
Press [ for main menu
Press 7 to play Fire message
ENTER 1-3 or 0-9
Press 8 to play PA message
Press 1 for Tel No. 1
Press 2 for Tel No. 2
Press 3 for Tel No. 3
Press 9 to play Alarm message
Sending a Test Call
Select the message Fire (7),
PA (8) or Alarm (9), then the
telephone number. 1, 2 or 3.
PLAYING PHRASE 0
(e.g., press 9 then 3 to
send the Alarm message to
telephone number 3.)
PLAYING PHRASE A
SENDING A To No.3
READY
READY
Press 0 for Common Phrase
Press 7 for Fire Phrase
Press 8 for PA Phrase
Press 9 for Alarm Phrase
Press [ for Last Call Log
Enter Passcode to return to Unset
Note:
If the unit is left un-operated in the READY mode, it will
automatically return to the UNSET condition after 1 minute.
UNSET
15
User Options
TSD402 User Manual
Programming Telephone Numbers
The TSD402 can store up to three telephone numbers with a maximum of 16 digits for each.
Before storing any telephone numbers, the permission of the persons being called must be
obtained. The `Emergency Services' telephone number (999 &112) cannot be stored.
When the TSD402 dials a telephone number it will automatically select the correct dialling format.
Currently in the U.K. there are two formats:
Pulse Dialling
-
This is the older format and is sometimes referred to as Loop
Disconnect (LD).
Tone Dialling
-
This is the modern format and is sometimes referred to as Multiple
Frequency (MF).
Any or all of the telephone numbers can be selected to override the automatic format selection
and be forced into dialling the number in one of the above formats, if required.
If the TSD402 is connected to an internal PABX telephone exchange system, normally the
exchange requires a pre-fixed digit to be dialled before obtaining an outside line (normally 9).
Some exchanges also require a pause after the pre-fixed digit before dialling the telephone
number. When entering telephone numbers it is possible to insert a 3 second pause, if required.
The functionality of the [ key changes when programming telephone numbers, as follows:
Erase number
-
A short press of the [ key when the current number is displayed will
clear the display.
Accept number
-
Press the [ key for 3 seconds to enter the number shown on the
display into the non-volatile memory.
Tone Dialling
-
A short press of the [ key when the display is blank will cause a `T'
to be displayed, indicating `Tone dialling' is selected. Proceed by
entering the digits of the telephone number you require to `Tone Dial'.
Pulse Dialling
-
Two short presses of the [ key when the display is blank will cause a `P'
to be displayed, indicating `Pulse dialling' is selected. Proceed by
entering the digits of the telephone number you require to `Pulse
Dial'.
Inserting a Pause
-
A short press of the [ key after any digit has been entered will cause a P
to be displayed, indicating a pause has been inserted. Proceed by
entering the remaining digits of the telephone number.
16
TSD402 User Manual
User Options
Programming Telephone Numbers (Cont.)
Normal
Selecting Pulse or Tone
Inserting a Pause
for PABX systems
READY
READY
READY
Press [
Press [
Press [
ENTER 1-3 or 7-0
ENTER 1-3 or 7-0
ENTER 1-3 or 7-0
Press 1 for Tel No 1.
Press 1 for Tel No 1.
Press 1 for Tel No 1.
PHONE No. 1
PHONE No. 1
Blank / current number
Blank / current number
Enter pre-fix number
(e.g., 9)
9
0811234567
Press [ (short press)
T
READY
Press [ (short press)
9-
Tone Dialling Selected
- = 3 second pause
Press [ (short press)
Enter new number
(e.g., 0811234567)
P
Note:
Pressing the ] key during
programming will abandon
the operation and the display
will return to READY.
Blank / current number
Press [ (short press)
Enter new number
(e.g., 0811234567)
When display shows required
number, press [ for 3 seconds
to enter
PHONE No. 1
9-0811234567
Pulse Dialling Selected
Enter new number
(e.g., 0811234567)
P0811234567
When display shows required
number, press [ for 3
seconds to enter
READY
When display shows required
number, press [ for 3 seconds
to enter
READY
17
User Options
Recording Messages
The TSD402 has a built-in microphone
speaker so that phrases can be recorded
replayed directly from the unit. Messages
formed by combining a common phrase (0)
one of the alarm phrases (F, P or A).
TSD402 User Manual
and
and
are
and
When the out-going call is answered the unit plays
the common phrase (0) and one of the three alarm
phrases F, P or A. Phrase 0 normally states the
name and address of the user and phrases F, P and
A relate to the alarm type (FIRE ,PA, ALARM).
There is 60 seconds of recording time available for
phrases and each phrase can be any length as long
as the total does not exceed 60 seconds. For
example, the common phrase may be 12 seconds,
`phrase F' 5 seconds, `phrase P' 8 seconds and
`phrase A' 7 seconds.
All phrases must be recorded and they must be
recorded in order (Phrase 0, F, P then A). If however
a phrase is not required it must still be selected and
have a blank message recorded. This is achieved
by selecting the relevant phrase and pressing [ to
start the recording process and then pressing ]
immediately to stop the recording process. If any of
the phrases are re-recorded at any time all
subsequent phrases must be re-recorded (e.g., if
Phrase P is re-recorded, then phrase A must also be
re-recorded).
If the system only requires a single message (e.g.
alarm only) it is permissible to record the whole
message in to the common phrase (0).
Before recording phrases it is advisable to prepare
them first by writing them down.
18
Recording Messages
READY
Press [ for main menu
ENTER 1-3 or 0-9
Press 0 for Common
Phr
Press 7 for Fire Phrase
Press 8 for PA Phrase
Press 9 for Alarm Phrase
TSD402 User Manual
User Options
Replaying Messages
Once the phrases have been recorded it is possible
to play them back through the built-in loudspeaker
within the TSD402.
Replaying Messages
READY
Press 7 for Fire message
Press 8 for PA message
P ress 9 for Alarm message
(e.g., press 9 )
After a short delay
PLAYING PHRASE 0
PLAYING PHRASE A
READY
Call Acknowledgement procedure
When the call is answered, the message is played. At the end of its message the TSD402 sends an
audible `beep' which must be answered within 2 seconds using the tone generated by pressing the
[8] button on a touch-tone telephone. On hearing the [8] tone the TSD402 immediately sends a
second `beep' which must be answered in the same way. If successful, a multi-tone confirmation
signal is then heard, if not then the message is repeated with the acknowledgement `beeps' again.
Points To Note:
1
The TSD402 will not acknowledge signals from Pulse Dialling telephones or those with
short duration tones. Check all recipients phones by calling them and getting them to press
their [8] button. If a series of clicks is heard (or the tone cannot be sustained by holding
down the button) then a Tone Dialling Simulator will be needed to successfully
acknowledge the TSD402 messages (Contact your installation company for details).
2
No harm is done by not acknowledging the message as the unit simply repeats it four times
and then aborts the call. The unit will then dial the next telephone number.
3
The procedure is fairly quick and should be practised by all recipients under test conditions.
The [8] button must be pressed within 2 seconds of each `beep' and should be held down
for between to 1 seconds. If either tone is not `seen' by the TSD402 the message is
repeated again.
19
User Options
TSD402 User Manual
Sending a Test Call
It is possible to test that each message plays to each of the telephone numbers. e.g., you may want
to test that ` Alarm Message' plays to telephone number 1 or the `Fire Message' to telephone
number 3 etc.
Before sending a test call it is very important that the person that is being called is familiar with the
Call Acknowledgement Procedure. This will ensure that the TSD402 is successfully cleared down.
If the TSD402 is not cleared down when it is triggered it will either dial the next telephone number
(if one is programmed) or re-dial the first telephone number a further two times.
Operation
Once a test call is initiated the unit will dial the
telephone number and wait until ringing tone is
detected. When the unit detects the tone, the
display will show `Ringing'. If the ringing tone is not
detected within 5 seconds the unit will start to play
the message. If the ringing tone is detected the unit
will wait until the person picks up the call. If after 1
minute the call has not been answered the display
will show `NO REPLY' then the unit will re-dial the
number.
The unit plays common phrase (Name & Address)
then the selected phrase (Fire, PA or Alarm). At the
end of the selected phrase, the person receiving the
call must carry out the Call Acknowledgement
Procedure.
If the call is successfully acknowledged the display
will show `CALL SUCCESSFUL'. If the person
receiving the call fails to acknowledge it on the first
attempt the unit will repeat the message four times,
giving them the opportunity to acknowledge the call
at the end of each message. However if at the end
of the last attempt they still fail to acknowledge the
call the display will show `NO REPLY'. The unit will
clear down for 6 seconds, then re-dial the
telephone number for a second attempt, in total the
unit will only attempt the telephone number three
times before shutting down completely.
Note:Test calls may be cancelled at any time by
pressing the ] key.
20
Sending a Test Call
READY
Select the message to be
sent then the telephone
number
(e.g., press 7 then 2 to
send the Fire message to
telephone No. 2)
RINGING
PLAYING PHRASE 0
PLAYING PHRASE A
CALL SUCCESSFUL
READY
TSD402 User Manual
User Options
Test Activation
The option allows the unit to simulate an alarm activation from one of the alarm channels (Fire, PA
or Alarm). When this test option is used the unit will go through the sequence of dialling all
telephone numbers until the call is acknowledged. The numbers it dials are dependent on how the
`Dialler Reporting Options' are configured (see page 25) and how the `Acknowledgement
Option' is set (see page 22). The example below shows the default operation.
Test Activation
READY
Select the message to be
sent then press the [ key
(e.g., press 9 then [ to
send the Alarm message
Note:
Test Activations may be
cancelled at any time by
pressing the ] key.
SENDING A To No. 1
RINGING
PLAYING PHRASE 0
PLAYING PHRASE A
NO REPLY
CALL SUCCESSFUL
Call acknowledged
No reply or
acknowledgement
SENDING A To No. 2
RINGING
PLAYING PHRASE 0
PLAYING PHRASE A
NO REPLY
CALL SUCCESSFUL
Call acknowledged
No reply or
acknowledgement
SENDING A To No. 3
RINGING
PLAYING PHRASE 0
PLAYING PHRASE A
NO REPLY
No reply or
acknowledgement
CALL SUCCESSFUL
Call acknowledged
READY
21
User Options
TSD402 User Manual
Changing the Acknowledgement Option
The TSD402 acknowledgement can be set to one of the following options:
CLEARED BY ANY 1 -
The TSD402 will clear-down when the call is acknowledged by any
one of the three recipients (this is the default setting).
CLEARED BY ANY 2 -
The TSD402 will clear-down when the call is acknowledged by any
two of the three recipients.
CLEARED BY ALL 3
-
The TSD402 will clear-down when the call is acknowledged by all
three recipients.
CLEARED BY NO 1
-
The TSD402 will clear-down when the call is answered by any of the
three recipients (i.e., no acknowledgement required).
Acknowledgement Option
READY
Press the 0 key
CLEARED BY ANY 1
Press the [key
Press the 0 key
CLEARED BY ANY 2
Press the [key
Press the 0 key
CLEARED BY ALL 3
Press the [key
Press the 0 key
CLEARED BY NO 1
Press the 0 key
READY
22
Press the [key
TSD402 User Manual
User Options
Viewing the Last Call Log
When a call is successfully acknowledged the TSD402 stores the event in a `Last Call Log'. When
the log is viewed the display will show the alarm that was sent (F, P and A) and the telephone
number(s) that acknowledged the call.
Last Call Log
READY
Press the [ key
ENTER 1-3 or 0-9
Press the [ key
SENT A To [-2-]
The display shows the last
acknowledged call
Press the ] key
READY
Cancelling an Activation
Occasionally you may trigger your alarm by accident and cause the TSD402 to send an unwanted
call. When this happens the unit may be stopped by entering a valid user passcode.
23
User Options
TSD402 User Manual
View Event Log (key 9 )
The TSD402 will store up to 64 events within the memory log. When this option is selected the
most recent event is displayed first. Pressing the [ key takes you backwards through the Log and
pressing the ] key abandons the View Log option. Table 1 shows event log descriptions.
View Log
UNSET
Enter first 3 digits of Passcode then [
(e.g., 5 6 7 [)
USER OPTION Press 9 for View Log
Event Description UNSET
000
Event No.
Press [ for next event
USER 1
001
Press ] to abandon
UNSET
Display
AC OFF
Description
Mains power removed.
AC ON
Mains power restored.
AU PL TA
Auxiliary or panel lid tamper alarm.
BATT FLT
Battery fault.
CCT AL -
Full alarm from zone 1 - 5 ( F =Final Exit when system is part-set).
CODE TA
Code Tamper (4 incorrect passcode entries).
ENTRY TO
Entry timed-out (system not unset after activating F/Exit zone).
FIRE AL
Fire Alarm activated.
SET A
AWAY set (Full).
SET FAIL
System failed to set.
SET H
HOME set (part-set).
USER -
User 1 or 2 passcode entered(User 3 = Keyswitch).
--------
No Event
Table 1 Log Event Codes and Descriptions
24
TSD402 User Manual
User Options
Dialler Reporting Options (key 0 )
Each alarm type (Fire, PA or Alarm) may be programmed to report only to selected telephone
numbers. For example the Fire activation may be programmed to report to all three telephone
numbers, whereas the Alarm activation may be programmed to report only to telephone numbers
1 and 3 etc.
Dialler Reporting Options
UNSET
Enter first 3 digits of Passcode then [
(e.g., 5 6 7 [)
USER OPTION Press 0 for Dailler
Reporting options
F123
P123
A123
Press keys 1 2 3 to
select / de-select the FIRE
reporting options
Press keys 4 5 6 to
select / de-select the PA
reporting options
Press keys 7 8 9 to
select / de-select the
ALARM reporting options
(e.g., press 8 to de-select
the Alarm activation from
being reported to telephone
number 2)
F123
P123
A1 3
When the display shows
the required setting, press
[ to accept.
UNSET
25
Remote Keypads
TSD402 User Manual
Remote Keypads
Introduction
The TSD402 system may have been fitted with one or more remote keypads to allow remote
operation of the system. The remote keypad uses LED indicators to show zone faults and alarms,
and an internal sounder to indicate exit and entry tones.
Remote Keypad Layout
Indicator LEDs
1
2
U NSET
3
4
TAMPER FIN AL EXIT
5
1
2
3
4
5
6
Tactile rubber keypad
7
8
9
HOME
0
AWAY
TS400
Using Remote Keypads
It is advisable that the remote keypad is only used for setting/part-setting and unsetting, although it
can be used for limited programming and testing of the system. However, if a menu option is
selected which is not programmable using the remote keypad (e.g., Dialler Programming) all zone
indicator LEDs will flash. If this occurs press the AWAY key to abandon the option, the system will
return to the unset mode and the green unset LED on the remote Keypad will be illuminated.
26
Troubleshooting
Alarm System troubleshooting
Problem
-
Cause
-
Action
-
Problem
-
Cause
-
Action
-
Problem
-
Cause
-
Action
-
Problem
-
Cause
-
Action
-
Problem
Cause
-
I enter my passcode to set the system but the panel gives me an intermittent
sound and the display shows a zone is in fault.
The tone indicates that a detector is active or a door has been left open. The
display indicates which detector or door is active.
Close doors, wait 10 seconds and try again. If the problem persists contact your
alarm company.
When I came in and entered my passcode the display shows an alarm code and
gave an intermittent beep.
The indication on the display shows the alarm zone that was activated when the
system was set.
Check the building for signs of a break in then refer to the section on Resetting
after an Alarm.
The panel beeps every time I open certain doors or walk in front of movement
detectors.
The TSD402 has a facility called CHIME, which generates a two-tone sound
from the control panel every time certain zones are activated.
To turn this facility on or off, see the section on Changing Chime Zones.
The display indicates Au PL TA and the internal sounder activates during the
unset condition.
This shows that the panel has detected an `Auxiliary' or ` Panel Lid' tamper fault,
i.e. a wiring fault, a cover removed from a detector or control panel, or external
siren.
Enter your passcode to silence the alarm then call your alarm company
immediately.
When the alarm was activated, the external siren pulsed.
The TSD402 has a facility to monitor smoke detectors. If one of these is
activated, the external siren will pulse to show that the alarm was caused by a
Troubleshooting
TSD402 User Manual
Problem
-
The display shows UNSET AC OFF and the internal sounders beeps every
minute.
The mains power to the panel is off or the internal fuse has blown. The system
will operate from the internal battery for about 8 hours.
Enter you passcode to silence the beeps, if the mains power to the building is
on, contact your alarm company.
Cause
-
Action
-
Problem
Cause
Action
-
When setting the system, the outside strobe starts to flash.
This shows that the system has failed to set correctly.
Re-enter the building and enter your passcode to unset the system. Check that
all doors and windows are closed, and try again.
Problem
-
Cause
-
Action
-
Although I follow the correct procedure, the system will not allow me to change
my passcode.
The TSD402 analyses the new code entered and may refuse to accept certain
code combinations for technical reasons.
Try repeating the procedure with a different passcode.
Problem
-
Cause
-
Action
-
The TSD402 `beeps' every 30 seconds and the display shows:
PLEASE RE-RECORD
The mains and battery power for the system has been interrupted, and the
speech dialler messages have been erased.
Re-program all messages as required (contact your installation company for
further advice if the the problem re-occurs).
Speech Dialler Troubleshooting
Problem
Cause
Action
-
The unit will not dial the telephone number that I have programmed.
Number incorrectly dialled
Check the telephone number you are calling has been entered correctly.
Problem
Cause
Action
-
When sending a Test call the display shows: NO REPLY
The call was not answered or acknowledged by the recipient.
Ring the recipient and check they have followed the call acknowledgement
procedure.
Problem
Cause
Action
-
When sending a Test call the the display shows: ENGAGED
The recipient is on another call.
Wait until they have finished the call and try again.
Problem
Cause
-
Action
-
When sending a Test call the display shows: UNOBTAINABLE
The TSD402 has dialled the number and detected something other than a
`ringing' or `engaged' tone (e.g., a B.T. or Cellnet recorded message).
Check the number using a normal telephone or try again.
28
TSD402 User Manual
Problem
-
Cause
Action
Cause
Action
-
Problem
-
Cause
-
Action
-
Troubleshooting
When the unit calls the recipient they can't acknowledge the unit by pressing the
number [8] button.
Incorrect acknowledgement procedure.
Instruct the recipient in the correct procedure (see page 19).
Incompatible telephone.
Call the recipient and ask them to press the number [8] button on their
telephone for 3 seconds. If you hear anything other than a 3 second tone, their
telephone is not capable of acknowledging the TSD402. This may be
overcome by using a tone pad to simulate the modern dialling tones. Contact
your installation company for further details.
The recipient has acknowledged the call but the TSD402 continues to dial the
second or third number.
The `Acknowledgement Option' is set to `CLEARED BY ANY 2' or `CLEARED
BY ALL 3'.
Check the option is set to your required setting (see page 22).
Speech Dialler Details
Tel No. 1:
Tel No. 2:
Tel No. 3:
Common Phrase:
Fire Phrase:
PA Phrase:
Alarm Phrase:
Fire Reports to:
Tel No. 1
Tel No. 2
Tel No. 3
PA Reports to:
Tel No. 1
Tel No. 2
Tel No. 3
Alarm Reports to:
Tel No. 1
Tel No. 2
Tel No. 3
Acknowledgement Option:
1
2
3
None
29
Alarm System Details
Zone
Location
HOME Area
Chime
1
2
3
4
5
Final Exit
Setting Mode:
Final Exit Set
Timed Exit Set
Operation of Final Exit zone in Part-Set:
Final Exit
Instant
System Reset By:
Engineer
Remote Reset
Fire (Away)
PA (Away)
Alarm (Away)
Fire (Home)
PA (Home)
Alarm (Home)
User
Entry Time:
Seconds
Exit Time:
Seconds
Bell Duration:
Minutes
Dialler Reports:
Installation Company
Address:
Telephone No:
For Remote Reset telephone:
B.18985
Drg No. 33:1689:00 Issue 01 Doc 02 July 1995