1
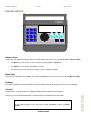
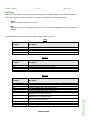
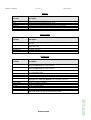
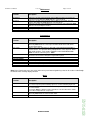
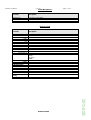
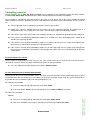
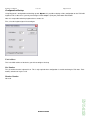
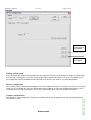
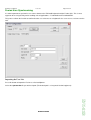
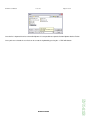
ZVK-22 User Manual Issue 03 Page 1 of 32 ZVK-22D USER MANUAL CCTV Keyboard Issue 03 MEYERTECH LIMITED ZVK-22D ZVK-22D ZVK-22 User Manual Issue 03 Page 2 of 32 Contents CONTENTS ...................................................................................................................................................................................................2 INTRODUCTION ............................................................................................................................................................................................3 ZVK-22D LAYOUT .........................................................................................................................................................................................4 MENUS ..........................................................................................................................................................................................................6 OPERATOR FEEDBACK ..............................................................................................................................................................................7 SOFTKEYS ....................................................................................................................................................................................................8 LOG-ON AND LOG-OFF PROCEDURE ......................................................................................................................................................12 KEYBOARD INFORMATION .......................................................................................................................................................................13 CLASSIC MODE ..........................................................................................................................................................................................14 CONTROLLING CAMERAS ........................................................................................................................................................................16 ALARM MODE.............................................................................................................................................................................................18 CONTROLLING PERIPHERALS .................................................................................................................................................................19 CONFIGURATION .......................................................................................................................................................................................21 FUSION USER SYNCHRONISING ..............................................................................................................................................................26 IMPORTING THE USER LIST......................................................................................................................................................................26 SAFETY PRECAUTIONS ............................................................................................................................................................................28 MAINTENANCE ...........................................................................................................................................................................................29 DISPOSAL ...................................................................................................................................................................................................30 SUPPORT ....................................................................................................................................................................................................31 WARRANTY ................................................................................................................................................................................................32 ZVK-22 User Manual Issue 03 Page 3 of 32 Introduction Thank you for purchasing Meyertech’s ZVK-22D. Please read this user guide prior to using this product. It will help you to achieve the maximum benefit from the product. The manual covers installation, operation and maintenance of a ZVK-22D. What is a ZVK-22D? A ZVK-22D is part of the ZoneVu CCTV Control family. Meyertech’s new ZVK-22D system keyboard is the latest in the range of next generation ZoneVu products. Designed to complement the existing range of ZoneVu Keyboards: ZVK-77D, ZVK-66D and now the ZVK-22D The design of the ZoneVu ZVK-22D System Keyboard uses the latest materials and technology available to bring superior levels of functionality and integration to the CCTV control room. The features described in this manual refer to : Version 1.0.2.0 of the ZVK-22D firmware The information in this manual is believed to be accurate and reliable. However, Meyertech Limited assumes no responsibility or liability for its use, or for any infringement of patents or other rights of third parties, which may result from its use. No license is granted by implication or otherwise under any patent or other rights of Meyertech. All specifications are subject to change without prior notice. MEYERTECH LIMITED are committed to continuous product development and therefore reserve the right to change specifications without notice. 2007 ALL RIGHTS RESERVED. MEYERTECH LIMITED KEY FEATURES • Ergonomic design to minimize RSI • 3-axis proportional joystick camera control • Menu-driven ‘soft-key’ navigation • LCD combining text and graphic information • 16-bit embedded processing power • Multiple user support with independent log-on • Full hierarchal priority camera control • Compatible with the ZoneVu product range ZVK-22 User Manual Issue 03 Page 4 of 32 ZVK-22D LAYOUT . Numeric Keys The numeric keys (light blue left hand side) are used for number entry. These keys are labelled 0 to 9, Clear and Enter. • The Enter key is also used as a select key when a specific option is highlighted. • The Clear key is also used as the Monitor select key. • The numeric keys are also used for text entry (as per a telephone keypad) Menu Keys The menu keys (dark blue centre bottom) are used for navigating the menus. These keys are labelled Menu and Next. Softkeys The softkeys (pale blue centre) will perform the adjacent action shown on the display. These keys are not labelled. Joystick The joystick has 3 axis of movement – left/right, up/down and twist clockwise/anti-clockwise. Note: In this manual softkeys to be pressed are shown highlighted in italics eg Select Preset MEYERTECH LIMITED ZVK-22D It also has a centre mounted button that is used to change the functionality of the twist action. ZVK-22 User Manual Issue 03 Page 5 of 32 Screen layout The screen is split into 3 areas: • Softkeys These are distributed along the bottom right of the display. • Control Pane This takes up the left hand-side of the display and is used for operator information and feedback • Status Bar This is along the top of the display. On the right it displays the name of the current operator and on the left it displays the current camera and monitor selection. ZVK-22D MEYERTECH LIMITED ZVK-22 User Manual Issue 03 Page 6 of 32 Menus The ZVK-22D operation is controlled by which menu is currently selected. The following menus are currently available: • Logged Off The keyboard power up mode before an operator has logged on. • General An operator has logged on and this is the first menu displayed. • Receiver Common receiver and dome functions. • Camera Common camera functions • Relay Control Relay functions • DVR Control DVR and VCR functions • MUX Control Multiplexer functions. This mode should also be used to access certain multiplexer type commands that are supported by DVRs. • Programming Receiver and dome automated features. • Matrix Common matrix (switcher) functions. • Alarm Management Basic alarm handling functions. ZVK-22D MEYERTECH LIMITED ZVK-22 User Manual Issue 03 Page 7 of 32 Operator feedback Messages Status messages are generated by the keyboard to report information to the operator. For example the reporting of the control status of a receiver eg Control Denied. Status messages appear as pop-up windows in the centre of the display. They will disappear automatically after a short period of time. Input The operator is required to enter information in several different ways – depending on circumstance and type. Pop-up messages and Info Boxes Pop-up windows are used in some menus to show messages over the current screen layout. Some will display until any key is pressed, others will automatically clear after 2 seconds if no key is pressed. Some windows require confirmation from the user, normally using the Clear or Enter keys. Numeric and Text entry • Via a pop-up window • Use the numeric keypad and finish with Enter • Cycle through letters as on a telephone pad • Clear key to delete and then again to cancel operation. Automatic menu selection The ZVK-22D incorporates an automatic menu selection feature. Immediately on pressing a number the menu changes to provide a selection of the most common functions. The required function should be selected on completion of the number entry. The Enter key selects the default operation which is camera selection. On completion of the command the menu reverts to it’s previous view. ZVK-22D MEYERTECH LIMITED ZVK-22 User Manual Issue 03 Page 8 of 32 Softkeys Softkeys are keys used by the operator, the function of which can vary with regard to current mode of operation Each menu consists of a series of commands. The menus are navigated using the following keys: • Menu Cycles through the available menu screens. • Next Displays the next set (3) of softkeys for that menu screen. An arrow symbol indicates that more softkeys are available. The following tables detail all the available softkey functions within each menu. Login Function Description <User name #1> <User name #49> Engineer Select operators user name Select operators user name Dedicated engineer logon General Function Description Global Command Home Log off Used to send a command to all local devices Sends the Current camera to it’s home position. Logs off the current operator Receiver Description Wash Wipe Release Control Aux1 Aux2 Aux 3 Select Preset Sends a wash command to the current camera. Toggles the wiper setting on the current camera. Release control of the currently selected and controlled device. Toggles the auxiliary relay 1 on the current camera. Toggles the auxiliary relay 2 on the current camera. Toggles the auxiliary relay 3 on the current camera. Send the current camera to a preset position. The next numeric entry followed by Enter will be the selected preset number. Starts the current camera on a preset patrol. The next numeric entry followed by Enter will be the selected patrol number. Starts the current camera on a mimic patrol. The next numeric entry followed by Enter will be the selected mimic number. Toggles the lamp setting on the current camera. Starts the current camera on a random patrol. Preset Patrol Mimic Patrol Lamp Random Patrol MEYERTECH LIMITED ZVK-22D Function ZVK-22 User Manual Issue 03 Page 9 of 32 Camera Function Description Colour Mono Auto Colour Adj. Manual Iris Auto Focus Sets the current camera into colour mode Sets the current camera into mono (B/W) mode Sets the current camera into auto colour/mono mode Toggles between manual and automatic iris on the current camera. Toggles between manual and automatic focus on the current camera. Relay Control Function Description Relay On Opens a numeric entry box. Typing the relay number followed by enter will energise this relay Opens a numeric entry box. Typing the relay number followed by enter will deenergise this relay Energise all relays. De-energise all relays. Relay Off All Relays On All Relays Off DVR Control Function Description DVR Output 1 Change the currently selected camera on the DVR output 1. The next numeric entry followed by Enter will be the selected camera. Change the currently selected camera on the DVR output 1. The next numeric entry followed by Enter will be the selected camera. Change the currently selected DVR. The next numeric entry followed by Enter will be the selected DVR number. Cycle to the next multi-screen display. Sends a play command.* Sends a command to stop playback only (does note effect the record status). Will request a time/date search. The next numeric entry, in the format ddmmyyhhmmss, followed by Enter will be the requested search time Sends a rewind command.* Sends a fast forward command.* Sends a pause command.* Sends a record command. Sends a stop command.* DVR Output 2 DVR Select Next multi-screen Play Stop Playback Goto Fast Rewind Fast Forward Pause Record Stop * exact operation of DVR on receipt of these commands is dependant on both the DVR model and the current mode of operation of the DVR. ZVK-22D MEYERTECH LIMITED ZVK-22 User Manual Issue 03 Page 10 of 32 MUX Control Function Description MUX Digital Change the currently selected camera on the multiplexer multi-screen output. The next numeric entry followed by Enter will be the selected camera Change the currently selected camera on the multiplexer spot output. The next numeric entry followed by Enter will be the selected camera. Change the currently selected multiplexer. The next numeric entry followed by Enter will be the selected multiplexer number. Cycle to the next multi-screen display. Select picture-in-picture mode. MUX Spot Change MUX Next multi-screen Picture in picture Programming Function Description Store Preset Sends a store preset command to the current camera. The next numeric entry followed by Enter will be the selected preset number that the device will store its current position against. Switches to the Store Patrol Menu. It will send a store patrol command to the Store Patrol current camera. The operator will be prompted for a series of preset, dwell and speed numbers, each number should be entered and followed with Enter. To exit the sub-menu press Clear Record Mimic Store Patrol Menu New Point Delete Point Store Sends a record mimic command to the current camera. The operator will be prompted to move the selected device through the required mimic patrol. Insert a new preset position into the patrol Delete a preset position from the patrol Store the currently defined patrol Note: In the Patrol setup menu, the menu and next keys turn into navigation keys that can be used to scroll through the details of the currently displayed Patrol. Matrix Function Description Seq. Start Starts a camera sequence running. The next numeric entry followed by Enter will be the selected sequence pattern. Starting sequences can be restricted by log in level. Selects the new user monitor. The next numeric entry followed by Enter will change the current monitor. Pressing the Enter key without a number defaults the current monitor to the default user monitor configured in the setup menus. Switches a series of previously selected cameras to monitors. The next numeric entry followed by Enter will be the actioned zonal switch. Select Monitor Zonal Switch ZVK-22D MEYERTECH LIMITED ZVK-22 User Manual Issue 03 Page 11 of 32 Alarm Management Function Description Alarm Cancel Alarm Silence Cancels the current alarm Silences the local alarm warning Engineer Setup Function Network setup Mac Address Line Termination Mode Baud rate Exit Joystick setup Centre stick Speed mode Twist Sensitivity Exit Login account setup Insert new user Edit user Description Edit login name Priority Password (Clear) Delete user (Clear) Eng. Login Setup Edit Zonal Switch New Switch Delete Switch Store Auto Logoff Time Log Off Revert to factory setting ZVK-22D MEYERTECH LIMITED ZVK-22 User Manual Issue 03 Page 12 of 32 Log-on and Log-off Procedure The ZVK-22D supports • 49 users • 1 dedicated engineer logon. • Operator control priority can be set on an individual user basis. The ZVK-22D comes with three default users already configured: User Name Default User Default User 2 Engineer Password 1111 2222 3333 If all password codes with engineering access are lost, users cannot be configured and the keyboard must be reset back to factory settings. Contact our technical support line for advice on this procedure. Log-on Before the keyboard can be used an operator has to log-on by selecting their user name and entering a password code. To log-on follow the procedure below. 1. Use the Next key until your user name is visible 2. Select the softkey adjacent to your user name. 3. Now enter your password code using the numeric keypad and press Enter. 4. You should now be logged onto the keyboard. If the error message Login Incorrect appears, simply repeat steps 1 to 3. Log-off Log off ? Logging-off the ZVK-22D keyboard is achieved by selecting the Log-off option from the General menu or Engineer setup menu. ZVK-22D MEYERTECH LIMITED [Enter] = Confirm [Clear] = Cancel ZVK-22 User Manual Issue 03 Page 13 of 32 Keyboard Information On power-up the ZVK-22D will display it’s firmware version in the status bar eg. 1.2.0.0 If you request technical support you maybe asked for this number Network status The network status shows the current status of communication between the keyboard and the controller. This is displayed at the bottom of the control pane • (Nothing displayed) Communications is good • Not Detected The ZVK-22D is not detecting any communications. This generally means a fault with the network receive (i.e. the keyboard cannot see polls from the controller). • No Response The ZVK-22D is not detecting enough polls to operate correctly. This generally means a fault with the network transmit (i.e. the controller cannot see the poll replies but the keyboard can see the network). ZVK-22D MEYERTECH LIMITED ZVK-22 User Manual Issue 03 Page 14 of 32 Classic Mode The Control pane of the display is used to display information about the currently selected camera. Monitor 1 Camera 8 Lamp o Iris o Wiper o Aux 1 o Aux 3 o The current monitor and camera are displayed on the top. In the centre are indicators for the status of receiver functions: • • • • • Lamp Wiper Iris manual Aux 1 Aux 3 This status information is only displayed once control of the camera has been granted. The top right of the pane is used to indicate PTZF operation. An arrow is drawn showing the approximate direction of pan and tilt. The shape above the arrow indicates zoom (two hollow circles), focus (hollow star) or iris (hollow circle and a filled circle) ZVK-22D MEYERTECH LIMITED ZVK-22 User Manual Issue 03 Page 15 of 32 Selecting cameras and monitors To select a monitor. Method 1 01. Press the softkey directly adjacent to the menu option, Select Monitor. 02. Now enter a monitor in the range 1 – 999 using the numeric keypad followed by Enter. Method 2 01. Type required monitor number 02. Press the softkey directly adjacent to the menu option, Select Monitor. Method 3 01. Press the Clear button when in the keyboards idle state (ie you are not in the process of entering a command) 02. Now enter a monitor in the range 1 – 999 using the numeric keypad followed by Enter. This operation does not have to be done prior to every switch – it is only required when you wish to change which monitor you want to control. To select a camera. Method 1 01. Enter a camera in the range 0 – 9999 using the numeric keypad followed by Enter . In the keyboards idle state (ie you are not in the process of entering a command) all numeric entries on the keyboard followed by an Enter are assumed to be cameras selections. Method 2 01. Enter a camera in the range 0 – 9999 using the numeric keypad 02. Press the softkey directly adjacent to the menu option, Select Camera. ZVK-22D MEYERTECH LIMITED ZVK-22 User Manual Issue 03 Page 16 of 32 Controlling cameras Camera functions such as Pan, Tilt, Zoom and Focus can be controlled via the proportional joystick and other functions including Lamp, Wash, Wipe controlled using the softkeys directly adjacent to each of the menu options. Camera control is automatically requested whenever you select or try to operate any of the camera functions described above. Control of a camera is granted to a user based on Meyertech’s hierarchal camera control priority, the rules of which are: 01. Only one operator can be in control of any particular camera at any one time. 02. Control of a camera is granted based on the priority level of the requesting operator. The priority level is a configuration option. Level settings are in the range 1-9, nine being the highest level of priority available. 03. If the camera requested is not currently under control by any other use, control will be granted to the requesting user. 04. If the camera is currently being controlled by another user, and both users have equal priority levels, control will be denied to the requesting operator. 05. If the camera is currently being controlled by another user, and the requesting user has a lower level of priority than the current user, control will be denied to the requesting operator. 06. If the camera is currently being controlled by another user and the requesting user has a higher level of priority than the current user, control will be granted to the requesting operator and the current user will automatically be forced to submit control. To Release Control of a camera. Camera control is automatically released every time you select a new camera, but on occasion you may want to release control of the camera to another user whilst maintaining the picture on your spot monitor. 01. Press the softkey directly adjacent to the menu option, Release Control. To select Camera Presets or Camera Home position. Camera presets are ‘preset’ camera positions of Pan, Tilt, Zoom and Focus which the camera automatically returns to when requested by either the user or ZoneVu system. Home is a special preset position usually set by the system administrator as the position the camera should be at when not being controlled by a user. To select the Home position: 01. Press the softkey directly adjacent to the menu option, Home. 02. If the menu option, Home is not currently displayed, use the Next and Menu keys to find it. To select a Preset position: Method 1 02. Now enter a PRESET in the range 0 – 999 using the numeric keypad followed by Enter MEYERTECH LIMITED ZVK-22D 01. First press the softkey directly adjacent to the menu option, Select Preset. ZVK-22 User Manual Issue 03 Page 17 of 32 Method 2 01. Type required preset number 02. Press the softkey directly adjacent to the menu option, Select Preset. To store a Camera Preset 01. Press the softkey directly adjacent to the menu option, Store Preset 02. Now enter a PRESET in the range 0 – 999 using the numeric keypad followed by Enter To select a Camera Preset Patrol Placing a camera into a Preset Patrol means the camera will continuously execute a series of Camera Presets over a set period of time. Preset Patrols are generally configured and stored by each particular camera in the system. Various types of camera Preset Patrols exist eg. Random, Ordered and Mimic. The task of the ZVK-22D is to command them to start or stop. Method 1 01. Press the softkey directly adjacent to the menu option, Preset Patrol. 02. Now enter a PATROL in the range 0 – 999 using the numeric keypad followed by Enter Method 2 01. Type required patrol number 02. Press the softkey directly adjacent to the menu option, Select Patrol. To store a Camera Patrol Press the softkey directly adjacent to the menu option, Store Patrol 01 Now enter a PATROL in the range 0 – 999 using the numeric keypad followed by Enter 02 Follow the on-screen menu for entering details of each position within the patrol. Note that the details of the Patrol are not stored on the keyboard and reviewing an existing patrol is not possible. ZVK-22D MEYERTECH LIMITED ZVK-22 User Manual Issue 03 Page 18 of 32 Alarm Mode Alarm mode allows alarms to be advised to the operator using just the ZVK-22D keyboard. On receipt of an alarm from the Site Controller or Series 328 matrix, the buzzer will sound and a pop-up menu will appear asking the user if they want to navigate to the alarm menu. If declined, the buzzer will stay on and the alarm menu will have to be navigated to using the normal menu structure. Two operations are possible on each alarm: • Cancel the alarm • Silence the alarm If the silence button is pressed the alarm will stay active (but silent) until cancel is pressed. If cancel is pressed, the alarm will silence and a cancel command will be sent to the site controller. The alarm details will be shown in the control pane. ZVK-22D MEYERTECH LIMITED ZVK-22 User Manual Issue 03 Page 19 of 32 Controlling Peripherals DVR Control DVR mode allows the user to take control of DVRs connected to the ZoneVu system. Once in the DVR Control Menu you can: Select a DVR camera input to DVR Output 1 • Press the softkey directly adjacent to the menu option, DVR Output 1 • Now enter a DVR in the range 1 – 999 using the numeric keypad followed by Enter. Select a DVR camera input to DVR Output 2 • Press the softkey directly adjacent to the menu option, DVR Output 2 • Now enter a DVR in the range 1 – 999 using the numeric keypad followed by Enter. Select a DVR to control • Press the softkey directly adjacent to the menu option, DVR Select. • Now enter a DVR in the range 1 – 999 using the numeric keypad followed by Enter. Step through the various multiplexer multi-screens • Press the softkey directly adjacent to the menu option, Next multi-screen to select the next MSC. Play a recording. • Press the softkey directly adjacent to the menu option, Play. Stop a device from playing only • Press the softkey directly adjacent to the menu option, Stop Playback Goto the specific time/date of a recording • Press the softkey directly adjacent to the menu option, Goto • Now enter the Time/Date in the Format ddmmyyhhmmss followed by Enter, The Next and Clear key can be used to move the cursor back and forth through the entered time/date so it can be amended before Enter is pressed. If Clear is pressed whilst the cursor is in the first position, the entry will be cleared down Fast Forward from the current play point. • Press the softkey directly adjacent to the menu option, Fast Forward Fast Reverse from the current play point. Press the softkey directly adjacent to the menu option, Fast Rewind MEYERTECH LIMITED ZVK-22D • ZVK-22 User Manual Issue 03 Page 20 of 32 Pause a playback. • Press the softkey directly adjacent to the menu option, Pause. Record. • Press the softkey directly adjacent to the menu option, Record Stop a playback and / or recording. • Press the softkey directly adjacent to the menu option, Stop MUX Control MUX mode allows the user to take control of Multiplexers connected to the ZoneVu system. Once in the Multiplexer Control Menu you can: Select a multiplexer camera input to the multiplexer MSC output, normally referred to as the digital output. • Press the softkey directly adjacent to the menu option, MUX digital • Now enter a CAMERA in the range 1 – 999 using the numeric keypad followed by Enter Select a multiplexer camera input to the multiplexer spot output, normally referred to as the analogue output. • Press the softkey directly adjacent to the menu option, MUX spot • Now enter a CAMERA in the range 1 – 999 using the numeric keypad followed by Enter Select a multiplexer to control • Press the softkey directly adjacent to the menu option, Change Mux. • Now enter a MUX in the range 1 – 999 using the numeric keypad followed by Enter Step through the various multiplexer multi-screens • Press the softkey directly adjacent to the menu option, Next multi-screen to select the next MSC. Show Picture in Picture • Press the softkey directly adjacent to the menu option, Picture in Picture. ZVK-22D MEYERTECH LIMITED ZVK-22 User Manual Issue 03 Page 21 of 32 Configuration Keyboard Backup The ZVK-22D keyboard can be backed up using Meyertech’s Mpower application. Backup is available through a site controller or ZSC-250-xx and all the keyboards on a system can be backed up (one at a time) from a single point. Engineer setup Logging in as the engineer puts the ZVK-22D into the Engineer Setup menu. This menu is used to configure the keyboard settings, usually at the time of commissioning. • Network Setup MAC address Line Term. Mode Description The module access code is the ZoneVu network address of ZVK-22D. Each item of equipment on the network requires a unique address to function correctly. Default 5 Line termination relates to the RS422 network. On a RS422 network system one item of equipment should be terminated into 120R impedance, normally the last item of equipment on the network. Note that only one item of equipment should be terminated Stand-alone, when there is no video matrix or site controller present on the system. This mode gives you the ability to control cameras directly from the ZVK-22D. Off Network Network. In this mode the keyboard should be connected to either a ZoneVu video matrix or a site controller Baud rate • The baud rate for the communications: 9600,19200,38400 9600 Joystick Setup The joystick employed in the ZVK-22D is a fully proportional X,Y,Z joystick providing the operator with independent variable speed control of Pan, Tilt, Zoom, Focus and Iris functions. Centre stick Speed mode Twist Sensitivity Description Calibrate the joystick Basic or Advance – Change this only following advise from Meyertech Technical Support Alter the amount of movement required to start zooming or focusing Set to low if you find the camera zooms / focuses accidentally. Default Advance Standard Note: Joystick Calibration The joystick is a fully proportional type and, as such may require re-calibrating from time to time. To calibrate the joystick. 1. Press the softkey directly adjacent to the menu option, Centre stick. A pop-up window will say ‘Push any key to begin’. Press any key and follow the menu instructions. 2. You will be asked in sequence to move the joystick fully right, left, up, down followed by zoom in and out via the joystick twist grip. MEYERTECH LIMITED ZVK-22D 3. Finally you will be asked to release the joystick to determine it’s centre position. ZVK-22 User Manual Issue 03 Page 22 of 32 Note: Speed mode Since the original ZoneVu system was introduced over 10 years ago development of Meyertech products has continued at a pace, bringing to you the latest technology and ideas. To manage this technology effectively Meyertech have always promoted the concept of backward compatibility, ensuring new products work when installed into older systems. This concept is vital to customers who do not want to entirely replace their system every time they want to take advantage of some new technology. Speed mode is an example of how Meyertech are managing that concept. The Basic speed mode option is to maintain compatibility with older and existing ZoneVu products eg ZVR-510 receiver. The Advance speed mode is an enhanced version of the Basic providing the operator with improved speed control. Select this option only following advice from Meyertech Technical Support • Login Account Setup Operators of the ZVK-22D are required to log-on and log-off the keyboard to operate it. New operators can be easily added through the Login account setup menu. Insert new user Edit user Delete user Clear key Description Enter the operators name using the alphanumeric keypad and press Enter. The menu will automatically take you to the Edit user menu. The Edit user menu is displayed (see below) Delete the currently highlighted user Default Prompts User to exit Login account setup menu Edit user menu Description Edit the new login name. 20 chars. max. The priority level of the new login – 1 to 9 The password for the user. Up to 20 chars, numbers, letters or symbols. Edit login name Priority Password Enter or Clear keys Default 1 9999 Exit to main Login account menu Note: In the Login Account Setup menu , the menu and next keys turn into navigation keys that can be used to scroll through the User Details. • Edit Zonal Switch The Zonal Switches are configured using this menu. There is a maximum of 8 zonal switches available, with 8 single camera switches within each zonal switch Clear key Description Add Monitor and camera number for a Switch Delete Currently displayed camera switch within the selected zonal switch Store the selected zonal switch details Prompts User to exit Zonal switch setup menu MEYERTECH LIMITED Default ZVK-22D New Switch Delete Switch Delete user ZVK-22 User Manual Issue 03 Page 23 of 32 Note: In the Edit Zonal switch menu, the menu and next keys turn into navigation keys that can be used to scroll through the camera switch details of the currently displayed zonal switch. • Auto Logoff Time (minutes) The keyboard logouts out if no commands have been actioned after this configure time has elapsed. Note: If the time is 0, Auto log time is off – The keyboard will only log out if logged out manually. • Eng. Login Setup Edit engineer password • Revert to Factory Settings Use this option to reset all configuration on the keyboard to the factory default values. A dialog box will be displayed asking you to confirm using the Enter key or cancel with the Clear key. ZVK-22D MEYERTECH LIMITED ZVK-22 User Manual Issue 03 Page 24 of 32 Configuration Backup Using Meyertech’s configuration and backing up tool, Mpower, it is possible to backup all the configuration on the ZVK-22D keyboard. This is done on a system by connecting to a ZSC-1000plus (PC2 port), ZSC-250 or ZSC-250-IP. Note: It is not possible to backup keyboards on a remote site. First, select the keyboard you wish to configure Unit Address This is the MAC address of the device you wish to configure / backup Site Number The site number that the keyboard is on. This is only required when configuration is carried out through a ZSC-250 / ZSC250-IP), otherwise 0 may be used. Monitor Number Not used. ZVK-22D MEYERTECH LIMITED ZVK-22 User Manual Issue 03 Page 25 of 32 Backup Restore configuration to the keyboard Backup from the keyboard Backup configuration Press this button to backup the configuration from the keyboard. The blue bar will indicate the progress of the backup. If this bar stops moving please press the backup button and the backup will continue. Press the save button to save the configuration (refer to the Mpower manual on how to select where you want to save your configuration). Restore configuration Press load to load the configuration into Mpower (refer to the Mpower manual to see how to select the files you wish to restore). Press this button to restore the configuration to the keyboard. The blue bar will indicate the progress of the restoration. If this bar stops moving please press the restore button again and the restoration will continue. Compare configuration MEYERTECH LIMITED ZVK-22D After loading in some configuration, clicking on this button uploads the configuration from the keyboard, comparing each ‘block’ as it goes. ZVK-22 User Manual Issue 03 Page 26 of 32 Fusion User Synchronising It is often important to synchronise user names between the ZVK-22D keyboard and the Fusion GUIs. This is most apparent when using the Meyertech auditing suite of applications – FusionAudit and FusionAuditZVK. This process allows the installer to confirm that the user reference on a keyboard is the same user as reference on the GUI. Importing the User List Press this button to import the Fusion user list into Mpower. Select the operator.dat file you wish to import (The default path is c:\meyertech\fusion\equipment). ZVK-22D MEYERTECH LIMITED ZVK-22 User Manual Issue 03 Page 27 of 32 Once the list is imported it can be reviewed in Mpower. It is not possible to export the list from Mpower back to Fusion. Once you have reviewed the user list it can be sent to the keyboard by pressing the “-> ZVK-22D” button. ZVK-22D MEYERTECH LIMITED ZVK-22 User Manual Issue 03 Page 28 of 32 Safety Precautions 1. Carefully read this Product Manual prior to commencing installation and configuration. 2. Before working on this product power it down and remove the power leads. Removing panel’s modules or PCB’s may cause damage to the product and present an electric shock and fire hazard. 3. To reduce the risk of electric shock and fire hazard do not operate this product with panels or covers removed. 4. Do not install or operate the product near water. 5. Do not install or operate this equipment outdoors. 6. If work is carried out on the product with panels and covers removed ensure full electrostatic handling procedures are adhered to. 7. Louvers and openings are provided in the product enclosures for ventilation purposes to protect it from overheating. Under no circumstances block or cover these openings. 8. Ensure the product is operated in a suitably temperature controlled environment within the specification limits. 9. Do not operate the product in humidity greater then 90%. 10. Do not drop objects of any kind through the product louvers and openings. This may cause electric shock and fire hazard and product malfunction. 11. Avoid liquid spillages on the product. This may cause electric shock and fire hazard as well as product malfunction. 12. Never attempt to service this product yourself. This product contains no serviceable parts Refer all servicing requirements to the Meyertech Service Centre or appointed Meyertech Service Agent 13. Do not operate this product if 13.1. Any product power leads are damaged. 13.2. If the product has been exposed to rain. 13.3. If the product has been dropped or the enclosure has been damaged. 13.4. If liquid has been spilt on the product. 13.5. If the appliance has malfunctioned or is not operating to its functional specification. 13.6. If the products cooling fans fail to operate. 14. This product must only be operated with the power supply provided or if supplied without a power supply, by the type of power source indicated in the specification. 15. Follow all warnings and instructions marked on the product and in this manual. 16. To clean the enclosure of the product use a cloth. Do not use liquid solvent-based cleaners. . ZVK-22D MEYERTECH LIMITED ZVK-22 User Manual Issue 03 Page 29 of 32 Maintenance The ZVK-22D requires no Planned Preventive Maintenance periods (PPM’s) as it is mainly solid state in design. The ZVK-22D contains no serviceable parts and should be returned to our Service Centre in Scunthorpe for repair or replacement under warranty. Any repairs, attempted repairs or replaced components not carried out by the Meyertech Service Centre will void all Meyertech warranties and liabilities. If your ZVK-22D has to be returned to our Service Centre please follow the returns procedure below, otherwise delays may be incurred in returning or replacing the ZVK-22D. ZVK-22D MEYERTECH LIMITED ZVK-22 User Manual Issue 03 Page 30 of 32 Disposal There are no additional requirements beyond safe working practice in the decommissioning of the Meyertech ZVK-22D. However the ZVK-22D contains printed circuit boards populated with electronic components. The whole unit must be returned to Meyertech Service Centre for final disposal. Please follow the normal returns procedure. ZVK-22D MEYERTECH LIMITED ZVK-22 User Manual Issue 03 Page 31 of 32 Meyertech Limited is a member of the CCTV User Group. Support At Meyertech our staff understand quality support is important to you, vital in fact, which is why we place such a high precedence on providing it. For all matters relating to support go to our website to find the information your require visit http://www.meyertech.co.uk/support.html ZVK-22D MEYERTECH LIMITED ZVK-22 User Manual Issue 03 Page 32 of 32 Warranty Please refer to Meyertech Limited ‘Terms & Conditions of Sale of Goods & Services’ for interpretation. 1. If the Buyer establishes to the Seller's reasonable satisfaction that there is a defect in the materials or workmanship of the Goods manufactured, then the Seller shall at its option, at its sole discretion and within a reasonable time, a. arrange for the repair or making good such defect or failure in such Goods free of charge to the Buyer (including all costs of transportation of any Goods or materials to and from the Buyer for that purpose), b. replace such Goods with Goods which are in all respects in accordance with the Contract, or subject, in every case, to the remaining provisions of this Condition 1 provided that the liability of the Seller under this Condition 1 shall in no event exceed the purchase price of such Goods and performance of anyone of the above options shall constitute an entire discharge of the Seller's liability under this warranty. 2. Condition 1 shall not apply unless the Buyer: a. b. notifies the Seller in writing of the alleged defect within 12 (twelve) months from delivery or such other period or periods as may be agreed in writing between the Seller and the Buyer, and allows the Seller a reasonable opportunity to inspect the relevant Goods. 3. For the avoidance of doubt, the Seller shall be under no liability under the warranty in Condition 1 above: a. where such defects arise from any drawing, design or specification supplied by the Buyer; or b. where such defects arise from fair wear and tear, wilful damage, or negligence of a party other than the Seller (or its employees or authorised personnel), abnormal working conditions, failure to follow the Seller's instructions (whether oral or in writing), misuse or alteration or repair of the Goods without the Seller's approval; or c. where such defects arise in parts, materials or equipment which have not been manufactured or designed by the Seller but have been purchased at the Buyer's request by the Seller from the Buyer's designer and manufacturer or from some other third party (the “Third Party Supplier”). d. if the total price of the Goods has not been paid by the due date for payment e. in respect of any type of defect, damage or wear specifically excluded by the Seller by notice in writing: or f. if the Buyer makes any further use of the Goods after giving notice in accordance with Clause 1 4. Any repaired or replaced Goods shall be redelivered to the Buyer free of charge to the original point of delivery but otherwise in accordance with and subject to these Conditions. 5. Alternatively to Condition 1 the Seller shall be entitled at its absolute discretion on return of the defective Goods to the Seller (at the Seller's request) to refund the price of the defective Goods in the event that such price shall already have been paid by the Buyer to the Seller, or, if such price has not been paid, to relieve the Buyer of all obligation to pay the sum by the issue of a credit note in favour of the Buyer in the amount of such price. 6. In respect of all Goods supplied to the Seller by a Third Party Supplier the Seller will on request pass on to the Buyer (in so far as reasonably possible) the benefit of any warranty given to the Seller by such Third Party Supplier and will (on request) supply to the Buyer details of the terms and conditions of such warranty and copies of any relevant product information sheets, technical data sheets or product leaflets issued by such Third Party Supplier and the Buyer shall be solely responsible to the entire exclusion of the Seller for complying with the same. 7. For the purposes of Condition 1 references to Goods shall be deemed to exclude software. 8. The Buyer acknowledges that software in general is not error-free and agrees that the existence of such errors in the Software Programs shall not constitute a breach of this Contract. 9. In the event that the Buyer discovers a material error which results in the Programmed Products not performing substantially in accordance with the Functional Specification, or the Licensed Programs not performing substantially in accordance with the relevant Program Documentation and notifies the Seller of the error within 90 days from the date of the Seller making available the respective software to the Buyer (the `warranty period") the Seller shall at its sole option either refund the price which the Buyer has paid to the Seller (or if such price has not been paid, relieve the Buyer of all obligations to pay the sum) in respect of the respective software or use all reasonable endeavours to correct by patch or new release (at its option) that part of the software which does not so comply provided that such non-compliance has not been caused by any modification, variation or addition to the software not performed by the Seller or caused by its incorrect use, abuse or corruption of the software by use of the software with other software or on equipment with which it is incompatible, 10. To the extent permitted by English law, the Seller disclaims all other warranties, with respect to the software which it provides pursuant to the Contract, either express or implied, including but not limited to any implied warranties of satisfactory quality or fitness for any particular purpose. 12. The Seller warrants that it will use reasonable skill and care in providing the Services to the buyer MEYERTECH LIMITED ZVK-22D 11. The Buyer is solely responsible for various scanning the software that it receives from the Seller pursuant to the Contract.


![User`s Manual [(LDSP_LCD_99_2)] Label Data](http://vs1.manualzilla.com/store/data/005846764_1-de86383eb41f3d06a08b51e5958ead91-150x150.png)