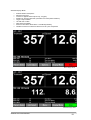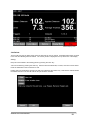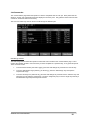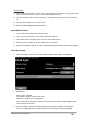
1
Autoline VX10
Roadmarking Controller System
Rev 1.3
Autoline VX10 User Manual
1
Table of Contents
Safety Information
3
Introduction
4
Installation
5
Specifications
7
Hardware Tour
8
Main Operation
10
Operation Description
10
Idle Mode Operation
10
Menu Operation
13
Calibration
19
Output Configuration
25
Marking Mode Operation
32
Notifications
33
LX10 Controller Panel Indicator LEDs
34
Setup Checklist
35
Pattern Editing
36
Sensors
44
Triggers
46
Remote Readout
47
Smartswitch
48
Temperature & Humidity Module
51
Data Logging
57
Over The Air Data
65
Software Update Procedure
70
Product Warranty and Disclaimers
71
Appendices
72
Appendix A: Document Revision History
72
Appendix B: Manufacturer Notes
72
Autoline VX10 User Manual
2
Safety Information
Please read the following safety information. Equipment misuse can cause equipment malfunction
resulting in serious injury.
•
Read and understand all manuals, wiring diagrams, and any other supporting documentation provided in
full before installing or operating the equipment.
•
A suitably qualified technician must carry out installation.
•
This equipment is for professional use only. All operators must be suitably qualified and trained to use
the equipment.
•
Use the equipment only for its intended purpose. Contact the manufacturer or distributor if you are
unsure of any aspects of installation or operation.
•
Do not alter or modify this equipment. Installation and wiring must be strictly in accordance with the
instructions provided within the manuals, wiring diagrams, and any other supporting documentation
provided.
•
The VX10 Vehicle-Mount PC must be mounted in a safe position where it is easily visible and will not
interfere with the operator’s view of the road.
•
Check equipment routinely. Repair or replace worn or damaged parts immediately.
•
Comply with all applicable local, state, and national fire, electrical, and safety regulations.
•
To avoid serious injury or equipment damage the Autoline VX10 Vehicle-Mount PC and LX10 Controller
must be disconnected whenever servicing any part of the roadmarking machine.
•
Operators of equipment must at all times follow occupational health and safety protocols issued by their
organization.
Autoline VX10 User Manual
3
Introduction
The Autoline VX10 roadmarking controller system provides an electronic means of control, measure, and
monitoring of roadmarking operations.
The system is suitable for paint, thermoplastic, and cold-applied plastic applications.
The standard system comprises of the following components:
•
•
•
•
VX10 Vehicle-Mount PC with Autoline software application installed.
LX10 Controller. Interfaces with the VX10, peripheral devices, sensors, and control I/O.
Optional peripheral devices such as Remote Readouts, Smartswitches etc.
Sensor devices to detect vehicle speed, pump activity, temperature and humidity.
Features:
VX10 Vehicle-Mount PC:
•
•
•
•
•
•
•
•
7” touchscreen with adjustable brightness.
5 function keys with LED backlighting.
Intuitive user interface for easy operation and menu navigation.
Single screen for simultaneous display of all information – includes pattern details, metres painted, litres
painted, speed, film thickness.
Ruggedized aluminum enclosure.
Data Logging provides painting records with date/time, GPS, temperature and humidity data.
Add-ons allow the export of work using USB flash drive, email, or upload to cloud using Dropbox.
In the field software upgrades as updates and new features become available.
LX10 Controller:
•
•
•
•
•
•
•
•
•
•
Control up to 8 gun outputs (further output expansion possible).
Four independent pattern generators that can be used simultaneously.
Output offsets help improve beads coverage over paint.
Trigger offsets for look-ahead triggering.
Fast / Slow gun control for two speed operation.
Panel LEDs to indicate input / output activity.
Diagnostics mode to test system operation.
Connectivity with remote readouts.
Simultaneous dual Smartswitch use.
Enclosure and connectors waterproof to IP65.
Notes:
Standard systems are also supplied with interconnecting cables, and the PC based Pattern Editor program.
Autoline VX10 User Manual
4
Installation
VX10 Vehicle-Mount PC Installation:
On the rear of the VX10 Vehicle-Mount PC there are four
screw ports for VESA-75 mounting.
Supplied with the system is a RAM-Mount Kit (P/N: RAM101U-246). Alternative mounting options are available.
See: www.rammount.com
The VX10 Vehicle-Mount PC should be mounted in a location
where the operator can view the screen and touch the keys
with ease.
The screen protection film supplied can be fitted to the screen
to protect against dirt and scratching. Replacement films are
available.
The VX10 Vehicle-Mount PC is rated to IP54 sealing (NEMA3 compliant). This allows the unit to be subjected to
water splashes without any harmful ingress of water.
LX10 Controller Installation:
The LX10 Controller can be mounted with four screws through the rear mounting holes of the enclosure. These
are visible from the rear, and can also be accessed from the front by lifting up the curved bevels on the sides.
The LX10 Controller should be mounted in a location where the panel indicator LEDs can be viewed during setup
and troubleshooting. Typical locations are inside the truck cab between the two seats, or mounted outside at the
rear of the cab.
The LX10 Controller is rated to IP65 sealing (NEMA4 compliant). This allows the unit to be subjected to low
pressure water lets without any harmful ingress of water.
Wiring Installation:
Refer to wiring diagrams for installation wiring.
Peripheral Devices and Sensor Installation:
See specific manual sections for installation details relating to peripheral devices (e.g. remote readouts) and
sensors etc. Other information may be located in wiring diagrams and appendices.
Autoline VX10 User Manual
5
Static Strap:
It is recommended that a static strap be fitted to the vehicle to prevent ESD (electrostatic discharge) damaging
electronic devices.
Welding Warning:
All electronic devices must be completely disconnected before any welding is carried out on the vehicle. Welding
can cause severe damage to sensitive electronic devices.
The power cable must be disconnected from the VX10 Vehicle-Mount PC.
The power and solenoid output connectors must be disconnected from the LX10 Controller.
Excessive Transient Voltage Warning:
All electronic devices must be completely disconnected in the event of any servicing to the equipment that has
the potential to develop excessive transient voltages that can cause severe damage to sensitive electronic
devices. Examples of such events are welding, jump-starting batteries, servicing alternators etc.
Excessive transient voltages and power supply interruptions have the potential to corrupt memory and data.
Ensure all logged work has been recorded/exported prior to any servicing to the equipment.
The power cable must be disconnected from the VX10 Vehicle-Mount PC.
The power and solenoid output connectors must be disconnected from the LX10 Controller.
Autoline VX10 User Manual
6
Specifications
VX10 Vehicle-Mount PC:
Power Supply:
Operating Temperature:
Display Type:
Dimensions (W x H x D):
Enclosure:
Sealing:
9-36VDC (supports ignition cold-crank to 6VDC min)
-30 to 60 deg C
7” TFT LCD, Analog Resistive Touchscreen.
256mm x 161mm x 56mm
Ruggedized aluminum without ventilation holes.
IP54, NEMA3 Compliant
LX10 Controller:
Power Supply:
Operating Temperature:
No. Sensor Inputs:
Sensor Input Polarity:
No. Trigger Inputs:
Trigger Input Polarity:
No. Auxiliary Inputs:
Auxiliary Input Polarity:
No. Outputs:
Output Polarity:
Output Current (max):
Dimensions (W x H x D):
Enclosure:
Sealing:
9-30VDC
-20 to 60 deg C
3 Inputs
Negative switched (NPN)
8 Inputs
Negative switched (NPN)
2 Inputs
Positive switched (PNP)
8 Outputs
Positive switched (PNP)
3.5A
200mm x 150mm x 60mm
ABS
IP65, NEMA4
Notes:
•
•
Refer to the wiring diagrams for further electrical information.
Refer to the Advantech TREK-753 User Manual for further technical information regarding the VX10
Vehicle-Mount PC.
Autoline VX10 User Manual
7
Hardware Tour
VX10 Vehicle-Mount PC:
Power Indicator LED:
Green LED is ON if power is applied to VX10 Vehicle-Mount PC.
Brightness Control Keys:
These keys turn the brightness of the screen UP and DOWN.
During day operation the brightness is best set to a high-brightness.
During night operation the brightness is best set to a low-brightness.
USB Port:
USB memory stick can be connected for software updates and data downloads. There is also another USB port
along the bottom I/O panel.
Touchscreen:
The display is a touchscreen, and provides intuitive menu navigation and operation. Active key areas can be
simply touched.
Function Keys:
There are five illuminated function keys along the bottom (F1:F5). These can be used instead of the
touchscreen. The banner along the bottom of the screen will display the function of each key.
Autoline VX10 User Manual
8
Power Button:
Press power button to turn VX10 ON.
If necessary the VX10 can be shut down by also pressing the power button, this takes a few seconds to occur.
However the recommended method to safely shut down is via the menu command. Menu / Shutdown.
LX10 Controller:
Autoline VX10 User Manual
9
Main Operation
Operation Description:
There are two main modes of operation – Idle Mode and Marking Mode. The modes can be identified by the
STOP / START key on the function banner.
Idle Mode:
Idle Mode is where the functions that are carried out with the vehicle stationary are performed. These include
setup, calibration, clearing counters, selecting jobs, software updates, exporting data etc.
Idle Mode is identified by the display of ‘START’ in the bottom-right corner of the screen.
Marking Mode:
Marking Mode is where the tasks that are associated with marking are performed. These include enabling and
disabling paint and bead power, selecting patterns, and marking patterns etc.
Marking Mode is identified by the display of ‘STOP’ in the bottom-right corner of the screen.
Press START key to enter Marking Mode.
Press STOP key to revert to Idle Mode.
Idle Mode Operation:
Display Modes:
There are three main display modes that can be selected. The display mode can be changed in Idle Mode or
Marking Mode.
Press the ‘Display Mode’ key to change display mode.
Basic Display Mode:
•
•
•
•
•
•
Large-Sized Thickness and Speed Gauges
Selected Pattern Descriptions
Job Title and Location
GPS Status (if enabled)
Status for Paint Guns / Bead Guns / Latch Mode [ON/OFF]
Totaliser Counters for metres and litres across ALL jobs and patterns
Standard Display Mode:
•
•
•
•
•
•
•
Medium-Sized Thickness and Speed Gauges
Selected Pattern Descriptions
Metre/Litre Counters
Job Title and Location
GPS Status (if enabled)
Status for Paint Guns / Bead Guns / Latch Mode [ON/OFF]
Totaliser Counters for metres and litres across ALL jobs and patterns
Autoline VX10 User Manual
10
Detailed Display Mode:
•
•
•
•
•
•
•
•
•
Selected Pattern Descriptions
Metre/Litre Counters
Counter for Applied Distance (lines only, not gaps)
Reading for Average Thickness (calculated over entire pattern distance)
Trigger / Output Details
Job Title and Location
GPS Status (if enabled)
Status for Paint Guns / Bead Guns / Latch Mode [ON/OFF]
Totaliser Counters for metres and litres across ALL jobs and patterns
Basic Display Mode
Standard Display Mode
Autoline VX10 User Manual
11
Detailed Display Mode
Job Select:
This key will enter the Job Select page where the required Job can be opened. All marking data will be recorded
to this Job when Marking Mode is entered. The current job title is displayed in the top-left corner of the display.
Editing:
New jobs can be added to the existing job list by pressing the ‘New’ key.
Jobs can be edited by pressing the ‘Edit’ key. Here the three text fields Title, Location, and notes can be edited.
Press the field label on the touchscreen to edit.
Existing jobs can be deleted by pressing the ‘Edit’ key followed by the ‘Delete’ key. Note that this will also delete
the related counters so ensure all work for this job has been recorded.
Autoline VX10 User Manual
12
Joblist Creator Program:
If the Data Logging Add-on is enabled, it is then possible to compile job lists using the PC based Joblist Creator
program in the office. The VX10 Vehicle-Mount PC can then have this job list imported. Refer to the Data
Logging section for further details on USB importing of Job Lists.
Pattern Select:
•
•
•
•
Press the ‘Prev’ and ‘Next’ keys to scroll through the patterns.
Press the ’Start’ key to select a pattern and automatically progress to Marking Mode.
Press the ‘Select’ key to select a key but to remain in the Idle Mode.
Press the ‘Cancel’ key to exit the Pattern Select page.
Patterns can be viewed in either list format or graphical grid format.
Pattern Select View is set in Menu/General.
List Format
Graphical Grid Format
Menu Operation:
The menu can only be accessed in Idle Mode.
Setup:
This is where most system settings are configured.
General:
Line Adjust Units:
Pattern Select View:
Speed Display Accuracy:
Minimum Speed:
Speed Warning Range:
Thickness Warning Range:
Readout Backlight:
Shutdown Method:
Can be set as either time-based or distance-based (see page 32).
Can be set as either list or graphical grid format.
Sets number of decimal places for speed display.
Sets minimum speed that system will allow marking.
Disabled. Available with an upcoming software update.
Disabled. Available with an upcoming software update.
Sets the backlight level on the remote readouts.
Sets the shutdown behaviour to suit the power input wiring.
Speed Display Accuracy:
Sets the number of decimal places of the speed display. The options are:
•
•
•
[1]:
[0.1]:
[0.01]:
No decimal place (e.g. 8km/hr)
One decimal place (e.g. 8.4km/hr). Reverts to no decimal place over 20km/hr.
Two decimal places (e.g. 8.42km/hr). Reverts to one decimal place over 10km/hr.
Autoline VX10 User Manual
13
Minimum Speed:
This setting determines the minimum speed required to allow marking of pattern outputs. If the speed falls below
this threshold the ‘Painting Stopped” notification will be displayed. The gun outputs can still be tested at zero
speed. This is useful to check gun operation, clear nozzle etc. Default setting is 0.5km/hr.
Shutdown Method:
This setting determines the shutdown behaviour to suit the power input wiring.
Power off manually:
Power off by ignition:
Unit will only shutdown when ‘Shutdown’ is pressed.
Unit will shutdown a short period after the ignition signal is removed.
Refer to the wiring diagrams for further information about the power input wiring.
Sensors / Calibration:
Setup and calibration procedures for speed, pump, temperature and humidity sensors are located in this submenu.
Refer to the Calibration section for further details on speed and pump calibration (page 19).
Refer to the Temperature & Humidity Module section for further details on temperature and humidity sensor setup
and calibration (page 51).
Triggers:
Line Break:
Trigger Offset Value:
Trigger Offset Enable:
Sets the triggers that activate the Line Break function.
Sets the offset between when the trigger is activated and when the output is
activated.
Enables / Disables trigger offset function.
Line Break:
The Line Break function provides a method of disabling the outputs momentarily without deactivating the line
generation. This is useful to prevent applying paint to obstacles on the road (e.g. storm water drain, RRPMs,
road-kill etc).
Trigger Offset:
The Trigger Offset allows for look-ahead triggering, where a distance-based offset between when the trigger is
activated and when the output is activated. This is useful for triggering from a pointer extended either in front of
the guns, or in front of the vehicle and several metres in front of where the guns are positioned. Look-ahead
triggering also allows for painting speeds that require the bead gun to activate before the paint gun.
The Trigger Offset value will be the distance between the operator’s visual triggering point and the position of the
guns.
The Trigger Offset enable allows the offset function to be enabled / disabled without having to clear the offset
value.
Outputs:
Distance Spot Length:
Timed Spot Length:
Fast Output Speed:
Output Profiles:
Bead Alarm:
Sets length for distance-based spots.
Sets duration of time-based spots.
Sets speed threshold for fast/slow paint output operation.
Sets material type and offsets between outputs to match material placement
on the road. Useful for achieving full beads coverage of painted lines.
Setup for the bead alarm sensor.
Refer to the Output Configuration section for further details (page 25).
Autoline VX10 User Manual
14
Smartswitches:
The Smartswitch settings allow the user to edit the pattern assignment for each push button on the Smartswitch.
The new pattern can be selected from the pattern list provided.
Settings are available for both the SX10 (RHS) and SX11 (LHS) models.
Diagnostics:
The Diagnostics mode provides a method of testing sensors, triggers, and outputs etc.
GPS Status:
The GPS Status page displays information about the current GPS reception.
•
•
•
•
•
Current GPS status will indicate whether a receiver is detected, and that the fix is OK.
HDOP (Dilution of Precision) gives indication of the quality of GPS readings being received.
Current position with latitude and longitude co-ordinates.
Current data and time data.
Satellite fixes and strength of reception.
If the Data Logging Add-on has been enabled, the Idle and Marking display modes will also indicate the current
GPS status.
I/O Status:
Check the status of system inputs and outputs.
Trigger Testing:
•
•
Press the ‘Mode’ key to select Trigger Test Mode. No outputs will activate in this mode.
The trigger indicators 1-8 are highlighted when triggers are activated.
Output Testing:
•
•
•
•
Press the ‘Mode’ key to select Output Test Mode.
Press the ‘Output’ key to select output 1-8 to test.
Activate any trigger input to activate selected output.
Both screen indicators and LX10 panel indicator LEDs will show active output.
Sensor Testing:
•
•
Pulse counters are present on sensor inputs.
Sensor pulses can be detected by an increase in counter value.
Autoline VX10 User Manual
15
Job Summaries:
The Job Summaries page allows the operator to view the completed work for each job. Each pattern has the
distance, volume, and average film thickness displayed in summary form. Only patterns where work has been
carried out will be included in the summary.
The ‘Prev’ and ‘Next’ keys can be used to scrolls through the different jobs.
Date Range Feature:
The Date Range feature allows the operator to filter what work is viewed in the Job Summaries page. This is
useful if the operator wanted to view a summary for work completed on a particular day, or any particular period.
There are three modes:
1.
To view all work saved by the Data Logging, press the ‘Date Range’ key and then the ‘View All’ key.
2.
To view a defined date range (dd/mm/yy to dd/mm/yy), press the ‘Date Range’ key and input the
required date range.
3.
To view a summary for a particular day, press the ‘Date Range’ key and then use the ‘Previous Day’ and
‘Next Day’ keys to select the required day. Press the ‘Single Day’ key to revert to single day summary if
a defined date range had previously been entered.
Autoline VX10 User Manual
16
Settings:
There are settings to be configured for the Job Summary page.
Go to Menu / Setup / Data Setup / Storage and Export Options
Default Date Range
This sets the default date range to be used by the Job Summaries page.
Everything:
Today:
This sets the Job Summaries page to display all work logged by default.
This sets the Job Summaries page to display only the current day's work by default.
Job Summary Values
This sets what work is included in the summary.
Logged data:
Pattern counters:
This sets the Job Summaries page to display all work logged. This setting is
recommended for customers using the Data Logging Add-on.
This sets the Job Summaries page to display only the data present in the pattern
counters. This setting is recommended for customers NOT using the Data Logging
Add-on.
Autoline VX10 User Manual
17
Over The Air Data:
Logged data can be exported using upload to cloud (Dropbox) or email.
Refer to the ‘Over The Air Data’ section for further details (page 65).
Custom Patterns:
The operator can configure custom patterns in the field.
Refer to the ‘Pattern Editing’ section for further details (page 42).
About:
Displays software version details and licencing information.
Clear Counters:
Counters for patterns and totalisers can be cleared to zero. Counters include distance and paint used.
There are several options when clearing counters:
•
•
•
•
•
All counters for current pattern.
Counters for individual patterns.
All pattern counters for current job.
Total metres counter.
Total litres counter for each pump.
Select the desired option and then press ‘Clear’.
Standby:
Standby mode is useful when traveling from one job site to another where it is desirable to disable all marking
operation for safety reasons. This saves the operator having to completely shut down the VX10 Vehicle-Mount
PC and then reboot on arrival.
Standby mode turns off the peripheral power that powers the peripheral devices (e.g. Remote Readouts,
Smartswitches, Triggers, Sensors etc). The VX10 Vehicle-Mount PC screen is also turned off.
Enter Standby Mode by pressing Menu / Standby Mode.
Exit Standby Mode by pressing Standby Mode.
Shut down:
This is the recommended method of shutting down the VX10 Vehicle-Mount PC, rather than using the Power
Button.
This ensures that the VX10 application and the Windows OS close and shut down properly.
Autoline VX10 User Manual
18
Calibration:
Calibration procedures for speed and pump sensors are located in this sub-menu:
Menu / Setup
Speed Calibration:
Press the ‘Next’ key to enter the automated calibration process, otherwise press ‘Manual’ to enter the calibration
value manually.
Autoline VX10 User Manual
19
Automated Calibration Process:
Enter the distance that the vehicle will travel during the calibration process. The recommended distance is 100m.
The calibration distance should be located where a straight section of road can be marked off.
Start the calibration process and drive the vehicle over the calibration distance:
1.
2.
3.
At the beginning of the calibration distance either hold down the trigger or press the Start key to begin
pulse capture.
The pulse count on the display increases as motion is detected.
At the end of the calibration distance either release the trigger or press the ‘Next’ key to finish pulse
capture.
Autoline VX10 User Manual
20
The calibration value will be automatically calculated based on the pulses captured over the distance traveled.
Press ‘Finish’ to save the new calibration value.
Manual Calibration Value Entry:
Enter the calibration value using the numeric keypad.
Speed Calibration Verification:
It is recommended that the speed calibration be verified by using a pattern distance counter to measure a known
distance (e.g. the marked calibration distance). If the calibration is correct the distance measured using the
pattern distance counter should equal the known distance (within the tolerance of +/- 1 input pulse).
Regular Calibration Checks:
It is recommended that regular calibration checks take place to ensure that the correct distances are being
measured.
•
A simple on-site check that can be carried out daily to verify that the calibration is correct is to measure
the distances of a broken line pattern. The measured distance between the start of one line and the
start of the following line will equal the programmed distance if the speed calibration is correct.
For example, a 3x9 centreline pattern will measure 12m from start-to-start.
•
Another check that can be carried out at least monthly or when possible is the speed calibration
verification check. This involves using a pattern distance counter to measure a known distance.
For example, the system should measure a 100m distance if the vehicle travels 100m.
Autoline VX10 User Manual
21
Pump Calibration:
Select the paint output and press the Next key to enter the automated calibration process, otherwise press
‘Manual’ to enter the calibration value manually.
Autoline VX10 User Manual
22
Automated Calibration Process:
Start the calibration process:
1.
2.
3.
Output paint to begin pulse capture. If a gun output has been selected as the paint source the gun will
activate automatically when the trigger is enabled.
The pulse count on the display increases as pump strokes are detected.
When the paint volume has filled the bucket to the reference volume mark, release the trigger and press
the ‘Next’ key.
Enter the size of the bucket being used as the reference volume. It is recommended that a minimum reference
volume of 10L be used, but the larger the reference volume the more accurate the calibration results will be.
The calibration value will be automatically calculated based on the pulses captured over the measured volume.
Press Finish to save the new calibration value.
Autoline VX10 User Manual
23
Manual Calibration Value Entry:
Enter the calibration value using the numeric keypad.
Solid Content %:
For an accurate dry film thickness display the correct solid content percentage needs to be entered for the paint
to be used. This percentage is available with the paint specifications. If a wet film thickness display is required
then enter a solid content percentage of 100%.
Enter the Solid Content % using the numerical keypad.
Pump Calibration Verification:
It is recommended that the pump calibration be verified by using a pattern volume counter to measure a known
paint volume (e.g. bucket with 20L marked). If the calibration is correct the paint volume measured using the
pattern volume counter should equal the known paint volume (within the % tolerance of the calibration).
Regular Calibration Checks:
It is recommended that regular calibration checks take place to ensure that the correct paint volumes are being
measured.
•
It is recommended to verify the pump calibration at least bi-monthly by carrying out the pump calibration
verification. This involves checking that the system measures a reference volume correctly.
For example, the system should measure 20L of paint usage if 20L is cycled through the pump.
•
It is also recommended that the Solid Content % value be checked at least bi-monthly to ensure that the
value entered is the same that is specified from the paint manufacturer.
Autoline VX10 User Manual
24
Output Configuration:
Distance Spot Length / Timed Spot Length Setting:
Both these settings set the length of the spot pattern output.
•
•
Distance-based spot patterns use the program script element “LS”. Most patterns use distance-based
spot generation.
Distance-based unit is millimetres (mm).
•
•
Time-based spot patterns use the program script element “S”.
Time-based unit is milliseconds (ms).
It is recommended to edit this setting to adjust the spot length, rather than using the Line Adjust setting. This will
maintain the correct Line Adjust setting for the line outputs.
Also note that the Line Adjust setting still compensates the spot marking output. This will need to be allowed for
when entering the spot length. Typically this will result in a slightly larger spot length needing to be entered to
achieve the desired length on the road.
Refer to the VX10 Pattern Editing section for further pattern program details.
Fast / Slow Paint Operation:
The Fast / Slow Paint function provides a method of activating a second paint gun for higher speed applications.
The two paint guns are positioned one behind the other in tandem. Only one gun is used at lower speeds, while
two guns are used at higher speeds.
The Fast Output Speed setting sets the speed threshold for fast/slow output operation. This is the speed where
the second paint gun is activated at higher speeds.
There is a built-in 1km/hr hysteresis, which means the speed where the second paint gun is deactivated is 1km/hr
less than the Fast Output Speed setting.
The Fast / Slow Paint function can be disabled by setting the Fast Output Speed to zero.
Ensure that the output for the fast gun is set to ‘Fast Only’ in the Output Types sub-menu:
Autoline VX10 User Manual
25
Output Offsetting:
The output offsetting can be configured to automatically maintain full beads coverage over varying
painting speeds.
Go to Menu / Setup / Outputs / Output Profiles to configure output offsetting.
•
Output profiles include mounting offset between paint and bead gun, and delay compensation for each
gun.
•
Calibration wizard for the delay compensation makes configuration very easy. The delay time is
calculated by the VX10 computer – the operator only needs to paint a line at any speed, measure unbeaded section of line, and input measurement into computer. Delays can be configured for multiple
bead gun heights.
•
Overall offset is adjusted dynamically over varying speeds, across all line types.
•
The trigger offset settings allow look-ahead-triggering. This is required at higher painting speeds where
the bead gun needs to come ON before the paint gun.
•
A bead coverage extension setting can dynamically adjust the bead gun ON/OFF point to assure a small
overlap of beads at the ends of the painted line (e.g. 20mm at each end).
•
Existing Line Adjust settings will provide the guns OFF delay compensation.
•
An alarm notifies the operator when the painting speed exceeds the capability of the current
configuration, letting them know when the painted lines will not be fully covered by beads. Resolution
will be to either increase the trigger offset configuration so the bead gun can come ON earlier, or
physically move the bead gun further back.
Autoline VX10 User Manual
26
Mounting Offsets:
The Mounting Offsets settings compensate for the mounting gap between the paint and bead guns.
1.
2.
3.
Identify which outputs are configured for each gun.
Measure the distance between the mounting position of each gun and the reference point. For a
standard installation the paint guns will have a value of 0.0m, and the bead guns will have a value equal
to the distance between the paint gun and bead gun.
Input the offset values and press ‘Back’ when completed.
Delay Compensation:
The Delay Compensation settings compensate for the different times that paint and beads take to reach the road
after the gun is activated.
Single Height or Multiple Heights Modes:
The Delay Compensation settings can be configured for a single bead gun height, or multiple bead gun heights
where the gun height is adjusted for varying line widths.
Multiple Heights mode checks the different line widths used by the pattern list, and allows delay compensation to
be configured for each line width.
•
•
The current mode selected has a highlighted button along the bottom of the screen.
Change the mode by pressing the required button.
Autoline VX10 User Manual
27
Calibration Wizard:
The calibration wizards allows for easy configuration.
1.
2.
3.
4.
Ensure that the Mounting Offsets have been configured correctly, as the wizard calculation relies on
these values being correct.
Select the output to be configured and press ‘Edit’.
Select the reference output - in most cases this will be the corresponding paint gun. Press ‘Next’ to
continue.
Select width if configuring the Multiple Heights mode.
Autoline VX10 User Manual
28
5.
Drive at a constant speed, and when ready activate any trigger to paint a line. The VX10 computer will
record the truck speed when painting was activated. Press ‘Next’ to continue.
6.
Measure the length of line that does not have any beads coverage, and input this into the entry box.
Press ‘Next’ to continue.
Autoline VX10 User Manual
29
7.
The delay time has been calculated. Press ‘Finish’ to save and exit.
Manual Adjustment:
The Delay Compensation settings can also be manually adjusted instead of using the wizard.
1.
2.
Select the output to be configured and press ‘Edit’.
Press ‘Manual’ and adjust the ‘Delay Compensation’ value. Press ‘OK’ to save and exit.
Bead Coverage Extension:
The Bead Coverage Extension assures full bead coverage of painted lines by providing a small overlap of beads
at both ends of the painted line.
1.
2.
Press ‘Edit’ and adjust the ‘Bead Coverage Extension’ value. 50% of this value will extend the start of
the beads, and 50% will extend the end of the beads.
Press ‘OK’ to save and exit.
Trigger Offset:
At higher painting speeds, the bead gun may need to come ON before the paint gun. In this case the trigger
needs to be activated off a reference point ahead of the paint gun. This reference point could be the boom
pointer, or a smaller pointer or chain fitted in front of the paint gun.
Refer to the Trigger Offset section for further details (page 14).
Line Adjust:
The Line Adjust settings can be used to compensate for the mechanical OFF delays of the guns. If the OFF time
of the beads needs to be adjusted further, use the Line Adjust setting.
Refer to the Line Adjust section for further details (page 32).
Autoline VX10 User Manual
30
Bead Alarm:
The bead alarm feature uses a sensor fitted at the bead gun to detect when no beads are exiting the bead gun.
The alarm notifies the operator that no beads are being applied to the painted line. This could be due to a
blockage or the bead tank is empty.
Painting can be stopped automatically if the sensor detects no beads.
Alarm Enabled:
Alarm Stops Painting:
Minimum Input Time:
Enable / Disable the bead alarm feature.
This setting will automatically deactivate the guns when an alarm condition
occurs. Enable this after the sensor installation has been tested.
This is how long the sensor needs to detect NO BEADS before the alarm is
raised. This setting needs to be greater than the ON delay of the bead
solenoid and gun, but less than the ON time for intermittent lines (e.g. 3x9 @
14km/hr has bead gun ON time of 770ms each 3m stripe).
Suitable Sensor:
A suitable sensor is a photoelectric sensor with PNP output.
https://www.ifm.com/products/nz/ds/OGH314.htm
Sensor Wiring:
•
•
•
+VE:
OUT:
-VE:
LX10 output for associated bead gun
LX10 AUX Input 1 (Yellow)
-Ve
Autoline VX10 User Manual
31
Marking Mode Operation:
Pattern Select:
This key will enter the Pattern Select page.
Patterns can be viewed in either graphical format or list format.
Pattern Select View is set in Menu/General.
Line Adjust:
The Line Adjust setting compensates for mechanical delays within the system by increasing / decreasing the line
length output slightly. The mechanical delays are caused by latency in the air system, solenoids, and guns etc.
The outputs used by the selected patterns are listed. Either all outputs can have the line adjust setting edited
globally, or outputs can be selected and adjusted individually. Adjusting the outputs individually is useful when
the bead gun OFF time needs to be different to the paint gun OFF time.
Line Adjust can be set as either a distance-based (mm) or time-based (ms) value. Time-based adjustment gives
an adjustment independent of the vehicle speed and is the recommended setting. Distance-based adjustment is
a legacy option that provides a constant adjustment based on speed pulses.
Options:
PAINT OUTPUTS:
BEAD OUTPUTS:
LATCH MODE:
Enables / Disables outputs for paint.
Enables / Disables outputs for beads.
Enables / Disables the Latch Mode function.
The above options can be enabled / disabled using the touchscreen or function keys to toggle the
ON/OFF settings.
Press the ‘Exit’ key when setting changes are complete.
Latch Mode:
Latch Mode latches ON the line outputs until the completion of the line pattern (if enabled in the pattern
program). This semi-automatic functionality is useful for remark work and multiple line (barrier)
applications.
During remark work the start of the line output can be triggered by momentarily activating the input
switch. The programmed line length will be outputted and stopped automatically at completion.
Multiple line (barrier) applications can be configured so multiple line outputs turn off together when
deactivated. This provides a uniform line finish which is required in some applications.
The Latch Mode function is ignored by patterns containing only solid lines. This is because these
patterns do not have a known end to the line.
Marking Operation:
Basic marking operation as follows:
1.
2.
3.
4.
Select pattern.
Set Paint Outputs / Bead Outputs / Latch Mode [ON/OFF] as required.
Drive vehicle at required application speed.
Activate trigger to start line outputs. Deactivate trigger to stop line outputs.
Press ‘STOP’ key to disable marking immediately, and revert to Idle Mode.
Refer to the Smartswitch section for instructions regarding marking operation with the Smartswitch.
Autoline VX10 User Manual
32
Notifications:
Notifications are where the operator is alerted of an important system event or condition.
A pop-up message will be displayed and an alarm will be sounded.
Release Trigger:
A trigger is currently pressed when the system does not allow trigger activity.
Connection Error:
The VX10 Vehicle-Mount PC is not communicating with the LX10 Controller. Check power to the LX10 Controller
and associated wiring, and cable connections between the VX10 Vehicle-Mount PC and the LX10 Controller.
Painting Stopped:
Painting stopped because loss of speed signal.
MX10 Module Not Found:
The MX10 features are enabled but no MX10 Temperature & Humidity Module is detected. Check cables and
connections to module. Disable MX10 features if no module is fitted.
Speed Too Fast:
Speed is too fast for bead offset correction. Increase the trigger offset configuration so the bead gun can come
ON earlier, or physically move the bead gun further back.
Bead Alarm:
Bead output flow not detected. Check bead output. Check for blockage or empty bead tank.
Autoline VX10 User Manual
33
LX10 Controller Panel Indicator LEDs:
The LX10 Controller has panel indicator LEDs to show I/O activity. These LEDs are useful to view during
setup and troubleshooting.
Power LED:
LED continuous ON when power OK.
LED flashes when VX10 Vehicle-Mount PC not detected.
Expansion Port LED:
LED continuous ON when communication to VX10 Vehicle-Mount OK.
Trigger LEDs:
LED continuous ON when a trigger input is activated.
Sensor LED:
LED flashes momentarily when a sensor pulse is detected.
Output ‘READY’ LEDs:
The green ‘READY’ LEDs indicate which outputs are ready to be activated if triggering occurs.
If the ‘PAINT OUTPUTS’ or ‘BEAD OUTPUTS’ are disabled then the corresponding LEDs will not be turned ON.
The outputs will also not be activated.
Output ‘ACTIVE’ LEDs:
The red ‘ACTIVE’ LEDs indicate which outputs are currently activated. These LEDs are a direct indication of the
present output status.
Autoline VX10 User Manual
34
Setup Checklist:
This checklist helps outline the required steps for a standard setup.
Installation:
•
•
Ensure system components are installed and wired correctly.
Refer to wiring diagrams.
Sensor Calibration:
•
•
Ensure the speed and pump calibration procedures have been completed.
Ensure the calibration values have been verified.
Outputs:
•
Ensure all outputs activate the intended guns.
Marked Pattern Module Length:
•
•
•
Paint at least four modules of a line+gap pattern (e.g. 3m line, 9m gap) in a straight line, at a constant
and typical marking speed.
Measure from the start of the second line to the start of the third line, and the start of the third line to the
start of the fourth line. The first line is not used for checking in case there is a sticking gun.
The distances measured should be equal to the line+gap sum of the pattern. This further validates that
the speed calibration is correct and the system is measuring distance correctly.
Set Line Adjust:
•
•
•
•
•
Measure the length of the second, third, and fourth lines marked.
Compare these lengths with the required pattern length.
Use the Line Adjust setting to increase / decrease the line length. This will compensate for the
mechanical delays within the system.
Paint another set of four modules and measure new line lengths.
Continue process until line length matches required pattern length.
Note:
Check the air system, solenoids and guns if line lengths are inconsistent. Ensure the air hoses going from the air
solenoids to the guns are kept to a minimum length. Ensure installed air hoses installed have a suitable aperture.
Ensure that the air pressure is stable. Check operation and assembly of guns.
Set Spot Length (if applicable):
•
•
•
Paint at least two spots at typical marking speed.
Check spot length of second spot. The first line is not used for checking in case there is a blockage in
the guns etc.
Adjust spot length setting as required.
Set Trigger and Output Offsets (if applicable):
•
•
•
•
Set required offset values.
Paint some test lines.
Check painted lines to ensure offset value set is correct.
Adjust and re-check where necessary.
Autoline VX10 User Manual
35
Pattern Editing
PC Based Pattern Editing Program:
Introduction:
The Autoline VX10 roadmarking controller system uses programmable patterns that generate the line outputs.
The PC based Pattern Editor program can generate, modify, and save pattern files. Patterns can be easily
edited, added, or removed. These files can then be loaded onto a USB flash drive to update the VX10 VehicleMount PC.
Installation:
Compatible PC operating systems are Windows XP or later.
•
•
•
PC Pattern Editor program is distributed via USB flash drive or online download.
Locate the file named vx10patterninstall.exe and double-click to run.
An install wizard will open and follow the on screen prompts.
Element Definitions:
The pattern program consists of a series of elements that define the required pattern generation. Following is a
table outlining the basic pattern programming elements.
Element
Description
Details
L
Line
Line generation. “L” element is followed by line length (e.g. L3).
G
Gap
Gap generation. “G” element is followed by gap length (e.g. G9).
LS
Distance Spot
Distance spot generation. Length is dependent of spot length setting in
VX10 setup menu.
S
Timed Spot
Time spot generation. Length is dependent of spot length setting in VX10
setup menu.
C
Continue
This element is used to define a jump in the pattern generation. Normally
is used on the end of the pattern program to jump back to the start.
Pattern Program Examples:
Following is a series of pattern program examples to show the use of the pattern programming elements:
L
Generates an indefinite line output. Used for solid line generation.
G
Generates an indefinite gap output. Used for measurement patterns that require distance measurement but no
output generation. Also used in counting patterns.
L30
Generates a 30m line, and then STOPS.
L3G9C
Generates a 3m line, a 9m gap, and then continues with a 3m line, a 9m gap, and so on…
Autoline VX10 User Manual
36
LSG12C
Generates a distance-based spot, a 12m gap, and then continues with a spot, a 12m gap, and so on…
L3G4.5LSG4.5C
Generates a 3m line, a 4.5m gap, a distance-based spot, a 4.5m gap, and then continues with a line, a gap, a
spot, a gap, and so on…
Note:
The following example shows how the “C” element can be used to jump to a program location other than the
start. This is done by defining the required element number for the continue point (the first element being number
1).
G9L1G1C2
Generates a 9m gap, a 1m line, a 1m gap, and then jumps back to the 1m line, 1m gap, 1m line, 1m gap, and so
on…
Operation Description:
The VX10 Pattern Editor has the following capabilities:
•
•
•
•
•
•
Generate new or modify existing pattern files.
Create line patterns using the pattern programming elements (e.g. L3G9C).
Configure trigger inputs.
Configure outputs.
Enable latch-mode.
Assign Smartswitch push button operation.
Editor Operation:
Left / Right Lists:
These lists determine the graphical layout on the VX10 ‘Pattern Select’ page.
If patterns are present in both the left and right lists the VX10 ‘Pattern Select’ page will be graphically split into
LHS / RHS. This is useful if a pattern from each list needs to be selected and activated simultaneously.
If split operation is not required, the patterns can be listed in the left side list only. This will result in a single
combined pattern list being displayed on the VX10 ‘Pattern Select’ page. This is the normal configuration.
List Management:
Add Pattern:
Click the ‘Add’ button to add a pattern.
Edit Pattern:
Click on the required pattern to select and then click the ‘Edit’ button. Alternatively double-click on required
pattern to edit.
Delete Pattern:
Click on the required pattern to select and then click the ‘Delete’ button.
Autoline VX10 User Manual
37
Move Up / Move Down:
These functions change the location of the pattern within the list. Click on the required pattern to select and then
click the ‘Move Up’ / ‘Move Down’ buttons.
Pattern Editing and I/O Configuration:
ID:
Each pattern must be given a numerical ID. The application uses this ID number for referencing purposes.
Width:
The width setting is used for film thickness calculations. Enter line width for pattern (e.g. 100mm).
Smartswitch Auto-Start Checkbox:
The ‘Start immediately if selected from smartswitch’ checkbox enables/disables the auto-start feature. If enabled
the line outputs will activate automatically when the pattern button is pressed during latch-mode.
Add Line:
Click on the ‘Add Line’ button to add a new line generator to the pattern. Each pattern can use up to four
separate line generators.
Autoline VX10 User Manual
38
Description:
The description is a text field used to describe the pattern (e.g. Solid, 3x9).
Trigger Action:
Patterns can be configured to count trigger events. These trigger events can be used to log counts of RRPMs,
road-signs, pedestrian crossings, or intersectional markings etc.
Manually inputted distance lengths and area dimensions (LxW) can also be entered. This is useful for logging
markings like chevrons and cross-hatching etc.
Select the required Trigger Action mode:
Normal:
Counter:
Operator Length Entry:
Operator Area Entry:
Used for all patterns except counter events.
Used for standard counter events.
Used for counter events where the distance length needs to be logged.
Used for counter events where the area (LxW) needs to be logged.
Note: Counting patterns always use the pattern program “G”.
Program:
The program field is where the pattern program is entered. The pattern program consists of a script that uses
pattern programming elements (e.g. L3G9C).
Triggers:
The triggers field selects the trigger inputs that will activate the line outputs.
It is possible to trigger line generation from the activation of another line generator in the same pattern:
‘Line X is active (Line or Gap)’:
This is useful in multiple line (barrier) and thermoplastic tactile applications, where one line may be a slave of the
other. The slave line will be activated if the master line is active, this includes when both line or gaps are being
outputted.
‘Line X output is on’:
This is useful in thermoplastic applications, where one line may be a slave of the other. The slave line will only
be activated if the master line has an active output.
Paint Outputs / Bead Outputs:
The outputs fields select the outputs that will be activated during line operation.
Trigger Latching:
The trigger latching checkbox enables the pattern to operate with Latch-Mode.
Latch Mode latches ON the line outputs until the completion of the line pattern (if enabled in the pattern
program). This semi-automatic functionality is useful for remark work and multiple line (barrier)
applications.
Control Station:
Each pattern can be assigned to either the Left or Right Control Station. This configures the pattern for either
Left / Right operation of Trigger Offset, Line Break, and Smartswitch functions.
Autoline VX10 User Manual
39
Mirror:
The Mirror selection allows patterns to have split-operation over two pattern generators. This is useful in cases
where the pattern may be required for both LHS and RHS operation. Mirrored patterns have combined counters.
If the Mirror checkbox is selected a second set of Triggers, Outputs, and Control Station settings will be visible for
configuration.
Autoline VX10 User Manual
40
Smartswitch Assignments:
The SX10 / SX11 Smartswitches can have the push buttons assigned to patterns. Click on the list and select the
required pattern for each button.
Pattern File Upload Procedure:
The VX10 Vehicle-Mount PC can have the pattern file uploaded through the use of a USB flash drive.
1.
Using the PC based Pattern Editor program, save the pattern file on a USB flash drive. The file
extension is .vx10pat.
2.
Turn on the VX10 Vehicle-Mount PC and allow to boot up and the VX10 application to launch.
3.
Record the existing painting records on the VX10 Vehicle-Mount PC. If the data logging add-on is
enabled - save data onto a USB flash drive, or send data via email or cloud upload. Performing a
software update will delete all painting record data on the VX10.
4.
Remove USB flash drive and then re-insert, select 'Import Patterns' from the list (at top).
5.
The VX10 will then display the ‘Load Patterns’ page along with a list of available pattern files detected
on the USB flash drive. Select the required pattern file and follow the prompts displayed on the VX10
screen. If only one pattern file is detected on the USB flash drive, this will be selected automatically.
6.
The VX10 will return to the ‘Idle Mode’ when the pattern upload has been completed. The USB flash
drive can be removed.
Autoline VX10 User Manual
41
Built-in Custom Patterns:
The built-in custom patterns allow the operator to add and edit patterns in the field.
•
•
Multiple custom patterns can be added by using the ‘Add’ key.
Existing custom patterns can be edited by using the ‘Edit’ key.
Description:
The description is a text field used to describe the pattern (e.g. Solid, 3x9).
Pattern Cycle (Program):
The pattern cycle field is where the pattern program is entered. The pattern cycle consists of a script that uses
pattern programming elements (e.g. L3G9C).
Width:
The width setting is used for film thickness calculations. Enter line width for pattern (e.g. 100mm).
Material:
The material setting is the pump source for paint usage.
Triggers:
The triggers field selects the trigger inputs that will activate the line outputs.
Paint Outputs / Bead Outputs:
The outputs fields select the outputs that will be activated during line operation.
Autoline VX10 User Manual
42
The pattern cycle can be constructed by adding or editing element types and the associated values.
Autoline VX10 User Manual
43
Sensors
Speed Sensor:
For accurate line measurement the recommended minimum speed signal resolution is 100ppm (pulses per
metre). This provides a line accuracy of +/- 10mm. For more accurate line requirements a sensor with greater
resolution should be used.
The speed input requires an NPN open-collector signal. Refer to wiring diagrams for installation wiring.
There are various sensor options available to generate accurate vehicle motion pulses. Following are examples
of possible options:
Gearbox Encoder:
This type of sensor is installed into the speedometer cable port of the gearbox.
•
•
•
The speedometer cable or transducer is disconnected from the port and the Gearbox Encoder if fitted
into the gearbox port.
During installation take care not to place force on the shaft of the gearbox encoder. The drive pins must
engage with the drive slot.
The speedometer cable or transducer is then connected to the open end of the Gearbox Encoder.
th
5 Wheel Encoder:
This type of sensor is fitted so it runs along a tyre of the vehicle.
•
•
•
The sensor is mounted to the inside wall of a rear tyre with the use of a suitable spring-loaded bracket or
tensioner.
Care must be taken to align the sensor disc so no damage occurs to the tyre wall.
Further installation details are available. Contact the manufacturer.
Digital Multiplier:
This type of sensor option utilizes the vehicle’s onboard electronic speed signal. Sources include compatible
speedometer transducer outputs, ABS wheel speed sensor outputs, and speed signals at ECU etc.
Direct connection from these sources cannot be made to the LX10 Controller because their low pulse resolution
(typically 5-10ppm) is unsuitable for accurate line measurement.
•
•
•
The Digital Multiplier connects to the onboard electronic speed signal. Installation location can be
anywhere convenient.
The Digital Multiplier then converts this signal by x8, x16, or x32. This results in a higher resolution
signal passed to the LX10 Controller.
Further technical information and installation details are available. Contact the manufacturer.
Geartooth Sensor:
This consists of a sensor such as a hall-effect or proximity sensor mounted to detect movement from a geartoothed disc mounted to the drive shaft or similar.
This can be coupled with a Digital Multiplier if the sensor output resolution needs to be increased.
Further technical information and installation details are available. Contact the manufacturer or
distributor.
Autoline VX10 User Manual
44
Pump Sensor:
A pump sensor is required for paint usage measurement and film thickness monitoring.
The pump input requires an NPN open-collector signal. Refer to wiring diagrams for installation wiring.
The most common sensor installation uses an inductive proximity sensor to detect pump strokes. This sensor
must be mounted in close proximity to the pump shaft so it can detect the step in the shaft.
Example of suitable proximity sensor is Omron P/N: E2E-X5ME1
Autoline VX10 User Manual
45
Triggers
Trigger inputs use mechanical switches to activate marking outputs. These are typically mounted in a convenient
location for the operator to use (e.g. vehicle door below window).
The LX10 Controller has two trigger ports, LHS and RHS. However the flexibility of these ports allows any trigger
use and is not confined to LHS/RHS configured operation.
The LHS port has four trigger inputs [1-4].
The RHS port has four trigger inputs [5-8].
The trigger inputs require an NPN open-collector signal. Refer to wiring diagrams for installation wiring.
Either standard trigger switch assemblies from the manufacturer can use used, or a custom trigger switch
assembly can be made. Following are descriptions of the standard manufacturer assemblies:
TX10/TX11 Standard Trigger:
•
•
•
•
•
•
Suitable for fixed mounting.
Assembled into an IP65 polycarbonate enclosure with a panel-mount connector.
Toggle switch with centre-off selects either [A] Trigger Input 1 or [B] Trigger Input 2.
Push button selects [B] Trigger Input 2.
Push button selects [LINE BREAK] Trigger Input 4.
Screw holes for mounting can be accessed for rear of enclosure, or from the front if the lid is removed.
TX12 Handheld Trigger:
•
•
•
•
•
Suitable for handheld use.
Assembled in an ABS enclosure with 1m cable.
Toggle switch with centre-off selects either [A] Trigger Input 1 or [B] Trigger Input 2.
Push button selects [A] Trigger Input 2.
Push button selects [B] Trigger Input 2.
TX13 Microswitch:
•
•
•
•
Suitable for handheld use.
Assembled in a plastic enclosure with 1m cable.
Typically used with Smartwitch but can be used direct with LX10 Controller.
Microswitch selects [B] Trigger Input 2.
Autoline VX10 User Manual
46
Remote Readout
Introduction:
Remote Readouts display information that can be viewed by the operator throughout different locations on the
vehicle. Either single or dual remote readouts are available.
Current display options available are:
•
•
Speed
Paint Film Thickness
The LED backlighting brightness is adjustable through the VX10 Vehicle-Mount PC.
See menu setting: Menu/General.
Dual RX10 Remote Readout
Installation:
Remote Readouts are connected to the LX10 Controller via any of the Expansion Ports.
These devices can be connected to the same Expansion Port as the VX10 Vehicle-Mount PC and/or Smartswitch
to simplify installation wiring. Y-cables are available for instances of multiple devices connected to the single
Expansion Port. Refer to system layout diagram for further wiring information.
Screw holes for mounting can be accessed for rear of enclosure, or from the front if the lids are removed.
Specifications:
Power Supply:
Operating Temperature:
Display Type:
Dimensions (W x H x D):
Enclosure:
Sealing:
Autoline VX10 User Manual
5-30VDC
0 to 60 deg C
FSTN Monochrome, LED Backlighting
Single: 140mm x 65mm x 40mm / Dual: 262mm x 65mm x 40mm
Polycarbonate
IP65, NEMA4 Compliant
47
Smartswitch
Introduction:
The Smartswitch device provides the following features:
•
•
•
•
•
•
Quick pattern selection.
Ability to change patterns without stopping.
Improves application of multiple line patterns (e.g. Barrier patterns).
Cycle Lock allows for “hands-free” operation by providing full-automatic operation.
Remote control of line adjustment settings.
Both RHS (SX10) / LHS (SX11) models available.
Installation:
Smartswitches are connected to the LX10 Controller via any of the Expansion Ports.
These devices can be connected to the same Expansion Port as the VX10 Vehicle-Mount PC and/or Remote
Readout to simplify installation wiring. Y-cables are available for instances of multiple devices connected to the
single Expansion Port. Refer to system layout diagram for further wiring information.
The handheld microswitch (P/N: TX13) connects to the 6 pin panel connector.
Screw holes for mounting can be accessed for rear of enclosure, or from the front if the lid is removed.
Autoline VX10 User Manual
48
Specifications:
Power Supply:
Operating Temperature:
Dimensions (W x H x D):
Enclosure:
Sealing:
5-30VDC
-20 to 60 deg C
170mm x 90mm x 70mm
Polycarbonate
IP65, NEMA4 Compliant
Operation:
General Mode Operation:
When the Smartswitch is powered up the current Mode is indicated by either the ‘Manual’ or ‘Latch Mode’ LEDs
being illuminated. This indication also acts as a Power ON indicator.
The Mode operation is global and synchronized with the VX10 Mode setting. (i.e. Turning off Latch Mode on
Smartswitch also disables Latch Mode on VX10, and vice-versa).
Manual Mode:
Select patterns by pressing the pattern buttons. The microswitch is then used to start / stop marking.
Pressing the microswitch will start the pattern outputs.
Releasing the microswitch will stop the pattern outputs.
•
•
No outputs will auto-start. No patterns will latch ON.
Pressing the ‘STOP’ button will de-select the pattern and revert the VX10 to Idle Mode (stopped).
Latch Mode:
Latch Mode latches ON the line outputs until the completion of the line pattern (if enabled in the pattern
program). This semi-automatic functionality is useful for remark work and multiple line (barrier)
applications.
The pattern is selected by pressing the required pattern button.
•
•
If the pattern is programmed with the auto-start feature set, then the line outputs will activate
automatically. Otherwise pressing the microswitch activates the line outputs.
Patterns with only solid line outputs (e.g. BB, Solid Edgeline) will be latched ON indefinitely in Latch
Mode. This indefinite latching only occurs when the pattern is activated using the Smartswitch, standard
trigger operation will not cause indefinite latching.
During remark work the start of the line output can be triggered by pressing and releasing the
microswitch. The programmed line length will be outputted and stopped automatically at completion.
Pattern outputs can be deactivated by either pressing the ‘STOP’ button, or pressing the ‘MODE’ button
to revert to Manual Mode.
Pressing the ‘STOP’ button whilst no patterns are active will de-select the pattern and revert the VX10 to
Idle Mode (stopped).
Autoline VX10 User Manual
49
Changing Patterns In Latch Mode:
There are two methods of changing patterns in Latch Mode. One method is an instant pattern change, while the
other is a queued pattern change. Both methods allow for pattern change without stopping.
Instant Pattern Change:
This method of pattern change is most useful during remark work where the pattern transition point can be
unpredictable.
To change pattern press the next pattern button WITHOUT the microswitch held down.
•
•
The current pattern stops immediately and the next pattern is selected and started.
If the pattern is programmed with the auto-start feature set, then the line outputs will activate
automatically. Otherwise pressing the microswitch activates the line outputs.
Queued Pattern Change:
This method of pattern change is most useful during new work where the pattern transition can be predicted.
To change pattern press the next pattern button WITH the microswitch held down.
•
•
The current pattern will complete the last line or gap before changing to the next pattern.
During the transition period the next pattern’s LED will flash to indicate a pending pattern change.
Cycle Lock:
Cycle Lock allows for “hands-free” operation by providing full-automatic operation. This is advantageous during
long distances of continuous pattern application because the operator does not need to hold down the
microswitch throughout operation.
When in Latch Mode and a pattern is active, pressing the ‘MODE’ button while the microswitch is depressed will
result in the Cycle Lock being enabled.
The Cycle Lock can be disabled by either pressing the ‘STOP’ button, or pressing the ‘MODE’ button to revert to
Latch Mode.
The Cycle Lock will remain enabled when patterns are changed.
Enable Cycle Lock:
Disable Cycle Lock:
Hold down microswitch and press ‘MODE’ button.
Press ‘STOP’ button, or press ‘MODE’ button to revert to Latch Mode.
Line Adjustment Keys:
The Line Adjustment keys can be used to adjust the length of the lines remotely without having to change the
settings on the VX10 Vehicle-Mount PC.
The ‘-‘ key decreases the line length, while the ‘+’ key increases the line length.
All line adjustments are global.
Autoline VX10 User Manual
50
Temperature & Humidity Module
Introduction:
The MX10 Temperature & Humidity Module provides humidity and temperature measurements for readout
displays and data logging. The module is capable of outputting readings for surface temperature, air
temperature, relative humidity, and dew point.
Benefits of integrating the MX10 Module with the VX10 Roadmarking Controller:
•
Provides real-time readings to the operator. The operator can monitor the temperature and humidity
and make decisions on whether the conditions are appropriate for the marking application.
•
Provides alerts to the operator when conditions fall outside the configured application window.
Examples being when the relative humidity is too high, or when the surface temperature of the road is
too low.
•
Readings are logged with GPS co-ordinates and date/time. This data is useful when providing QA
reports to clients to prove application within specified conditions, assessing premature line failure, and
providing evidence to paint suppliers that failure occurred when product was applied within specified
conditions.
Installation:
The MX10 Module is mounted onto the vehicle with the following considerations:
•
•
•
The module requires a clear line-of-sight between it and the road.
The module should be mounted where it is typically not subjected to rain, water splashes, excessive
dust, direct sunlight, engine or exhaust heat.
The module should be mounted in a ventilated location with good airflow.
A common installation location is in front of the engine, fitted onto the bull-bar or behind the front bumper.
The MX10 Module can be supplied with both sensors housed in the one module, or sensors housed in separate
modules to provide more flexibility with installation.
The MX10 Module is connected to the LX10 Controller via any of the Expansion Ports. Y-cables are available for
instances of multiple devices connected to the single Expansion Port. Refer to system layout diagram for further
wiring information.
Specifications:
General:
Power Supply:
Operating Temperature:
Dimensions (W x H x D):
Enclosure:
Sealing:
5-30VDC
-20 to +60 deg C
151mm x 65mm x 43mm
Polycarbonate
IP65, NEMA4 Compliant
Sensors:
IR Temperature Sensor:
Humidity & Temperature Probe:
Autoline VX10 User Manual
Hi-Bill P/N: HBIR-0812
Vaisala P/N: HMP60
51
Performance:
Surface Temperature:
Measurement Range:
Accuracy:
Repeatability:
Resolution:
-20 to +300 deg C
+/- 2 deg C
+/- 1 deg C
+/- 0.1 deg C
Air Temperature:
Measurement Range:
Accuracy:
Resolution:
-20 to +60 deg C
+/- 0.6 deg C
+/- 0.1 deg C
Relative Humidity:
Measurement Range:
Typical Accuracy (-20 to 0 deg C):
Typical Accuracy (0 to +40 deg C):
Typical Accuracy (+40 to +60 deg C):
Resolution:
0 to 100 %RH
0 to 90 %RH: +/- 5 %RH
0 to 90 %RH: +/- 3 %RH
0 to 90 %RH: +/- 5 %RH
+/- 0.1 %RH
/
/
/
90 to 100 %RH: +/- 7 %RH
90 to 100 %RH: +/- 5 %RH
90 to 100 %RH: +/- 7 %RH
Module Calibration Checks:
Regular calibration checks should be carried out to ensure reliable sensor readings.
This can be done quickly by spot-checking the readings against a known stable reference device. The difference
in readings should not be any greater than the sum of the specified accuracy ratings.
Examples of a reference device could be a portable infrared thermometer, portable humidity / temperature
instrument. These reference devices will need to be annually calibrated.
Suitable Reference Devices:
Vaisala P/N: HM40
Rotronic P/N: HP22-A
www.vaisala.com/HM40
http://www.rotronic.com/hygropalm22-a-hp22-a.html
If during a routine calibration check the module readings were found to be outside the required accuracy then the
module will need to be re-calibrated. Following is a brief description of the re-calibration procedures:
Road Temperature Sensor:
The sensor is factory calibrated using a blackbody calibration source. This industry standard method of
calibration is very accurate and stable. However if the reading accuracy falls below the specified rating then the
calibration can be adjusted so the readings match the reference device more closely.
Relative Humidity / Air Temperature Sensor:
The calibration can be adjusted so readings match the reference device more closely.
If the reading accuracy no longer seems stable the sensor element and/or filter can be easily replaced. The
sensor elements are factory calibrated using an industry standard calibration procedure and designed not to
require calibration in the field, so calibration adjustment should not be necessary after sensor element
replacement.
Replacement sensor elements and filters are available from either your VX10 distributor, or directly from a local
Vaisala re-seller.
Autoline VX10 User Manual
52
VX10 Setup:
Enable:
Enable the MX10 features by selecting the ‘Enabled’ checkbox.
Display Mode:
•
If the MX10 features are enabled, readings can then be monitored in a display mode when in Idle Mode.
Press the ‘Display Mode’ key to change display mode.
•
A graph shows the history of the readings so the operator can see the trends, and whether temperatures
and humidity are rising or falling.
•
No sensor reading received is indicated by ‘err’ being displayed on the screen.
Autoline VX10 User Manual
53
Alerts:
Alerts can be set up to inform the operator when conditions fall outside the configured application window.
Each parameter can have the alert value edited, and the alert enabled / disabled. Press the ‘Edit’ button to
configure alert.
When an alert event occurs a pop-up message will be displayed on the VX10 screen, and the corresponding
reading will be highlighted in RED.
Autoline VX10 User Manual
54
Calibration Adjustment:
Calibration can be spot-checked against the reference device, and if necessary the calibration for the MX10
sensors can be adjusted.
The calibration page for each sensor gives reading values for both the raw sensor reading and the current
calibrated reading. Current calibration capture entries can also be viewed.
To start a new calibration adjustment:
1.
2.
Press the Reset Calibration key to clear the current calibration adjustment.
Press the Enter Calibration key to begin new calibration adjustment.
Single-Point Calibration Adjustment
Enter only one reading from a reference device to do a single-point calibration adjustment.
This will adjust the calibration offset value only. Press OK to save new calibration adjustment.
Autoline VX10 User Manual
55
Two-Point Calibration Adjustment
Enter two readings from a reference device to do a two-point calibration adjustment.
These readings should be entered with different conditions to obtain two different reading value sets. The greater
the difference between the two readings, the more precise the calibration adjustment will be over the operating
range. For example, the surface temperature should be calibrated using a cold surface temp and a warm surface
temp.
This will adjust both the calibration offset and gain values. Press OK to save new calibration adjustment.
Note:
The MX10 module and the reference device need to be exposed to the same temperature and humidity
conditions for at least 20 minutes before spot-checking or calibration adjustment. This ensures that valid reading
comparisons will be achieved.
Autoline VX10 User Manual
56
Data Logging
Introduction:
The data logging features are enabled when the Data Logging Add-on is purchased. Field upgrades are
available via a software update using a USB flash drive.
Data Logging Features:
•
•
•
•
•
•
•
Export work using USB flash drive, email, or upload to cloud using Dropbox.
Data includes job details, pattern details, distance, litres, average film thickness, environment…
GPS locations logged with roadmarking events.
Ability to upload Job lists onto VX10 Vehicle-Mount PC.
Shows roadmarking data in two levels of detail – Summary Report & Detailed Report.
Data in csv format so it can be viewed and manipulated in spreadsheet programs (e.g. Excel).
Data beneficial for both billing purposes and QA records.
Installation:
PC Based Software:
Following is the procedure for installing the PC based software programs. Both the Data Viewer and
Joblist Creator programs will be installed together.
Compatible PC operating systems are Windows XP or later.
•
•
•
PC Pattern Editor program is distributed via USB flash drive or online download.
Locate the file named vx10dataviewinstall.exe and double-click to run.
An install wizard will open and follow the on screen prompts.
GPS Receiver:
The VX10 Vehicle-Mount PC is compatible with the following GPS receiver model:
Globalsat P/N: BU-353
The driver has already been installed in the VX10 Vehicle-Mount PC so the GPS receiver installation is “plugand-play”.
Go to Menu / Diagnostics / GPS Status to check GPS reception.
Autoline VX10 User Manual
57
VX10 Setup:
There are settings to be configured in Menu / Setup / Data Setup / Storage and Export Options
Truck Name
Enter the truck name or plant identification reference that is used by your organization. Logged data will have the
truck name included in the file name by default, and all data will have a reference field with the truck name
included.
Default Date Range
This sets the default date range to be used by the Job Summaries page.
Everything:
Today:
This sets the Job Summaries page to display all work logged by default.
This sets the Job Summaries page to display only the current day's work by default.
Job Summary Values
This sets what work carried out is included in the summary.
Logged data:
Pattern counters:
This sets the Job Summaries page to display all work logged. This setting is
recommended for customers using the Data Logging Add-on.
This sets the Job Summaries page to display only the data present in the pattern
counters. This setting is recommended for customers NOT using the Data Logging
Add-on.
Export Summary Type
This sets the format for the summary data to be exported.
Standard Summary:
Summary data will be formatted per job.
Daily Totals:
Both:
Summary data will be formatted per job but also separated into daily totals.
Both ‘Standard’ and ‘Daily Totals’ data files will be exported.
Autoline VX10 User Manual
58
There are settings to be configured in Menu / Setup / Data Setup / Configuration
Set Date and Time
Set the correct time, date, and time zone for your location. The time and date here will be used with the logged
data.
Autoline VX10 User Manual
59
VX10 Importing / Exporting:
When a USB flash drive is inserted into the VX10 Vehicle-Mount PC, a list of available actions are displayed. It
can take up to several seconds for the USB flash drive to be detected.
Press the required action on the touchscreen.
Import Patterns
This will be listed if a pattern file is detected on the USB flash drive. Follow the prompts displayed on the VX10
screen.
See the Pattern Editing section for further details (page 36).
Import Job List
This will be listed if a job list file is detected on the USB flash drive. Follow the prompts displayed on the VX10
screen.
An option will be given to either merge or replace the new job list with the existing jobs loaded onto the VX10
Vehicle-Mount PC.
•
•
Use the merge option if the existing jobs need to be retained.
Use the replace option if the existing jobs are no longer required.
Export Painting Records
This action exports the painting records (logged data) onto the USB flash drive. Follow the prompts displayed on
the VX10 screen.
•
•
•
The VX10 exports the painting records in a folder with the Truck-Name.
Inside this folder will be monthly folders for the current month and previous month, and a complete
folder.
The monthly folders contain the outputted csv files in summary and detailed formats.
Autoline VX10 User Manual
60
•
•
If there is a disruption to data logging during a month due to pattern file imports or software updates etc,
the data for the month will be split across multiple csv files. Subsequent files are named using file_1,
file_2, and so on.
The ‘complete’ folder contains ALL data presently stored on the VX10. This includes both the raw ‘readonly’ vx10dat file, and the outputted csv files in summary and detailed format.
Retrieve Painting Records Backup
This action allows export of previous painting records. This can be used if the previously exported data has been
lost.
A backup file is automatically saved when painting records are exported, and when software updates occur.
To export a data backup file follow the prompts displayed on the VX10 screen.
Upgrade Software
This will be listed if a VX10 software update file is detected on the USB flash drive.
Follow the VX10 Software Update Procedure (page 70).
Enable Features
This will be listed if a feature upgrade file is detected on the USB flash drive.
Follow the prompts displayed on the VX10 screen. Reboot the VX10 after completion to fully activate the
upgraded features.
Viewing Data:
Outputted CSV Files:
The csv files can be viewed using spreadsheet programs like Excel. The job summaries file has the data
formatted in summary format relating to jobs, where the distances and paint usage are totalized. The line items
file has the data formatted in a raw detailed format as Start / Stop marking events.
These csv files include ALL data field options with NO date range filtering. Any required configuring and filtering
can be done within the spreadsheet program.
Data Viewer Program:
The Data Viewer program can be used to view the raw ‘read-only’ vx10dat file and backup files. The program
user can then export the data into csv format, where it can be used for billing purposes and generating QA
reports.
Autoline VX10 User Manual
61
View Column Selection
Go to View / Job summary columns to select the data columns that are viewed in the Data Viewer program.
Go to View / Line items columns to select the data columns that are viewed in the Data Viewer program.
Viewing Jobs
Use the ‘Select Job’ tab to browse and select available jobs.
Date Range Feature
The Date Range feature allows the user to filter what work is viewed and exported to csv. This is useful if the
only work completed on a particular day, or a particular period is required.
•
To view a defined date range (dd/mm/yy to dd/mm/yy), input the required date range into the calendar
boxes.
•
To view a summary for a particular day, click the ‘<Day’ and ‘>Day’ buttons.
•
To view all work saved by the Data Logging, click the ‘Show All’ button.
Viewing Line Items
Line Items data can be viewed by either clicking on a pattern summary entry and then clicking View / Line Items,
or alternatively by double-clicking on the pattern summary entry.
CSV Export of Data
•
Go to File / Export xxx to Csv to export data to a csv file. Both the Job Summary and the Line Items
(detailed) formats can be exported to csv files.
Autoline VX10 User Manual
62
•
Select whether you wish to include deleted jobs in the csv file. Deleted jobs will be shown as Job
[deleted] in the spreadsheet.
•
Select the required data fields to be included in the csv file.
•
Press OK to generate the csv file. The files can be opened using spreadsheet programs like Excel.
Autoline VX10 User Manual
63
Creating Joblists:
The Joblist Creator program is used to compile a job list in the office. The job list is then imported into the VX10
Vehicle-Mount PC for the operator to complete the required work.
There are four text fields that can be used for each job:
Job Id
Job Title
Location
Notes
Provides a unique ID reference. Optional.
Main job reference. This is ALWAYS required.
Can be used to give location details, or any other secondary reference. Optional.
Can be used to give any job notes. Optional.
Add / Remove Jobs:
•
Use the ‘+’ and ‘-‘ buttons to add and remove jobs from the list.
Autoline VX10 User Manual
64
Over The Air Data
Introduction:
The over the air data features are enabled when the add-on is purchased. Field upgrades are available via a
software update using a USB flash drive.
Over The Air Data Features:
•
•
•
Send data to the office using an upload to the cloud (Dropbox) or email.
This includes all logged data (see Data Logging section on page 57)
Logged data can be exported onto a USB flash drive for office use.
Some older VX10 computers will require a software upgrade to support the over the air data features. Upgrade
instructions and support is available by contacting Novo Innovation.
VX10 Setup:
Dropbox Account:
1.
Create a Dropbox account to be used to store the roadmarking data. One Dropbox account can be
used for multiple trucks. www.dropbox.com
2.
Download and install the Dropbox utility onto your PC where the data files can be synced locally. This
will make it easy to view the data folders etc without having to download from the cloud.
3.
There is also a smartphone app for Dropbox available for download.
WiFi Setup:
Install Adapter:
1.
Plug the USB – WiFi adapter (TP-Link P/N: TL-WN725N) into the VX10 computer before booting. The
drivers for this adapter have already been installed and no further configuration is required.
Check ‘Wireless Zero Configuration’:
2.
Also plug a USB keyboard and mouse into the VX10 computer to help with configuration of the wireless
network and Dropbox account.
3.
Boot up the VX10 computer and allow the roadmarking application to launch.
4.
Go to Menu / Setup / Data Setup / Configuration / Control Panel. This will open the Windows Control
Panel.
5.
Click on ‘Administrative Tools’ and then ‘Services Shortcut’.
6.
Scroll the services list to find ‘Wireless Zero Configuration’.
7.
Set the ‘Startup Type’ to ‘Automatic’ and then click ‘Start’. Click ‘Apply’ and the “OK’ to exit.
8.
Close the ‘Services’ window.
9.
Click the ‘Back’ arrow to return to the Control Panel.
Autoline VX10 User Manual
65
Network Setup:
10. Click on ‘Network Connections’ and then click on ‘Wireless Network Connection’ to bring up more task
options on the left hand panel. Click on ‘View available wireless networks’.
11. Choose a wireless network and enter network key. A USB keyboard is required to input the network
key.
12. Close the Wireless Network Connection window.
13. Move onto install Mozilla Firefox steps below.
Install Mozilla Firefox:
1.
Type “mozilla” into the address bar and press ‘Enter’.
2.
Click on ‘Firefox Web Browser’ search result and start the download.
3.
Check “Make Firefox my default browser” when the setup wizard appears.
4. When the install is complete, close both Mozilla Firefox and Explorer.
5. Move onto ‘Cloud Sync Setup, or close ‘Configuration’ page and allow reboot to save settings.
Cloud Sync Setup:
1. Press ‘Cloud Sync’ in the menu shown at Menu / Setup / Data Setup / Configuration.
2. Edit settings:
Service Type = Dropbox
User Name = Dropbox account user name
Password = Dropbox account password
Note: If using the touchscreen, use the arrow symbol next to DEL to toggle between lower
case and upper case letters.
3. Press ‘Authorise account’ and follow prompts to connect Novo Cloud to your Dropbox
account. A USB keyboard is required to input the account user name and password.
Autoline VX10 User Manual
66
4. Close Mozilla Firefox when Novo Cloud has been successfully connected to your Dropbox.
5. Follow prompts to complete authorisation.
6. The User name and Password fields will now display unique user access key/secret pairs.
These key/secret pairs can be copied to other VX10 computers without requiring reauthentication. This means the ‘Authorise account’ step can be skipped for subsequent VX10
computers.
7. Move onto ‘Email Setup’, or close ‘Configuration’ page and allow reboot to save settings.
Autoline VX10 User Manual
67
Email Setup:
1. Press ‘Email Upload’ in the menu shown at Menu / Setup / Data Setup / Configuration.
2. Edit settings. Your email provider will be able to advise the best settings to enter.
Note: If using the touchscreen, use the arrow symbol next to DEL to toggle between lower
case and upper case letters.
3. Close ‘Configuration’ page and allow reboot to save settings.
Sending Data:
Network Connection:
A WiFi network needs to be available so the VX10 computer can connect to the Internet.
Network connections can be made using:
•
•
•
Mobile phone with WiFi hotspot turned ON.
A compatible mobile broadband device with WiFi hotspot feature.
WiFi hotspot from depot, motel etc that is within range.
Any new networks will need to be setup before being able to connect. See network setup details on page XX.
Networks that have been previously used will automatically connect.
Sending Data:
Go to Menu / Over The Air Data and select from the following options:
•
•
Send Using Cloud Storage (Dropbox)
Send Using Email
Autoline VX10 User Manual
68
Viewing Data:
Dropbox:
To access the data files, within the Dropbox account go to Apps / Novo Cloud. Here there will be folders for each
truck containing the data.
•
•
•
•
The monthly folders contain the outputted csv files in summary and detailed format.
If there is a disruption to data logging during a month due to pattern file imports or software updates etc,
the data for the month will be split across multiple csv files. Subsequent files are named using file_1,
file_2, and so on.
The ‘complete’ folder contains ALL data presently stored on the VX10. This includes both the raw ‘readonly’ vx10dat file, and the outputted csv files in summary and detailed format.
The ‘backups’ folder contains the backup files in raw ‘read-only’ vx10dat. These files will need to be
opened in the Data Viewer program and then exported into csv format.
Email:
The following exported csv files will be sent as attachments in the email:
•
•
•
Monthly outputted csv files in summary and detailed format for the current month and the previous
month.
Complete outputted csv files in summary and detailed format for ALL data presently stored on the VX10.
A complete raw ‘read-only’ vx10dat file for ALL data presently stored on the VX10.
Autoline VX10 User Manual
69
Software Update Procedure
The VX10 Vehicle-Mount PC can have the software updated through the use of a USB flash drive.
1.
Software updates can be obtained either via email or online download.
2.
Copy the VX10 update file onto a USB flash drive.
3.
Turn on the VX10 Vehicle-Mount PC and allow to boot up and the VX10 application to launch.
4.
Record the existing painting records on the VX10 Vehicle-Mount PC. If the data logging add-on is
enabled - save data onto a USB flash drive, or send data via email or cloud upload. Performing a
software update will delete all painting record data on the VX10.
5.
Remove the USB flash drive and then re-insert, select 'Upgrade Software' from the list (near bottom).
6.
The VX10 will run the update install programs. Accept the LX10 being updated when the prompt
appears by pressing OK.
7.
When the update is complete the operator will be asked to remove the USB flash drive, and the VX10
will reboot.
8.
When the VX10 has rebooted go to Menu / About to check the software version has changed.
Autoline VX10 User Manual
70
Product Warranty & Disclaimers
12 Month Limited Warranty:
Novo Innovation Ltd warrants only to the purchaser of the Product from Novo Innovation Ltd (the “Customer”) that
the product purchased from Novo Innovation (the “Product”) will be free from defects in materials and
workmanship under the normal use and service of which the Product was intended for a period of 12 months
from the date of purchase of the Product by the Customer. The Customer’s exclusive remedy under this Limited
Warranty shall be the repair or replacement, at Novo Innovation Ltd’s sole option, of the Product, or any part of
the Product, determined by Novo Innovation Ltd to be defective.
This Limited Warranty does not extend to any Product damaged by reason of alteration, accident, abuse, neglect
or misuse or improper or inadequate handling; improper or inadequate wiring utilized or installed in connection
with the Product; installation, operation or use of the Product not made in strict accordance with the specifications
and written instructions provided by the manufacturer; use of the Product for any purpose other than those for
which it was intended; ordinary wear and tear; disasters or Acts of God; unauthorized attachments, alterations or
modifications to the Product; the misuse or failure of any item or equipment connected to the Product not
supplied by Novo Innovation Ltd; improper maintenance or repair of the Product; or any other reason or event not
caused by Novo Innovation Ltd.
NOVO INNOVATION LTD HEREBY DISCLAIMS ALL OTHER WARRANTIES, WHETHER WRITTEN OR ORAL,
EXPRESS OR IMPLIED BY LAW OR OTHERWISE, INCLUDING WITHOUT LIMITATION, ANY WARRANTIES
OF MERCHANTABILITY OR FITNESS FOR ANY PARTICULAR PURPOSE. CUSTOMER'S SOLE REMEDY
FOR ANY DEFECTIVE PRODUCT WILL BE AS STATED ABOVE, AND IN NO EVENT WILL NOVO
INNOVATION LTD BE LIABLE FOR INCIDENTAL, CONSEQUENTIAL, SPECIAL OR INDIRECT DAMAGES IN
CONNECTION WITH THE PRODUCT.
This Limited Warranty shall be void if the Customer fails to comply with all of the terms set forth in this Limited
Warranty. This Limited Warranty is the sole warranty offered by Novo Innovation Ltd with respect to the Product.
Novo Innovation Ltd does not assume any other liability in connection with the sale of the Product. No
representative of Novo Innovation Ltd is authorized to extend this Limited Warranty or to change it in any manner
whatsoever. No warranty applies to any party other than the original Customer.
Novo Innovation Ltd and its directors, officers, employees, subsidiaries and affiliates shall not be liable for any
damages arising from any loss of equipment, loss or distortion of data, loss of time, loss or destruction of
software or other property, loss of production or profits, overhead costs, claims of third parties, labour or
materials, penalties or liquidated damages or punitive damages, whatsoever, whether based upon breach of
warranty, breach of contract, negligence, strict liability or any other legal theory, or other losses or expenses
incurred by the Customer or any third party.
Obtaining Warranty Service:
If the Product was purchased from a Distributor, please contact that Distributor to obtain a Returned Material
Authorization (RMA). If the Product was purchased directly from Novo Innovation Ltd, please contact us direct at
[email protected] or +64 9 419 1219.
Customer shall prepay shipping charges for Products returned to Novo Innovation Ltd for warranty service and
Novo Innovation Ltd shall pay for return of Products to Customer. However, Customer shall pay all shipping
charges, duties and taxes for Products returned to Novo Innovation from outside New Zealand.
Autoline VX10 User Manual
71
Appendix A:
Document Revision History
Revision
1.0
1.1
Release Date
01-06-2011
04-08-2012
1.2
07-01-2013
1.3
06-11-2014
Comments
First production release.
Change manufacturer details.
Updated for V.12 software release.
Added content for Job Summary function.
Added further content for calibration.
Added content for Pattern Editing.
Added beta content for Temperature & Humidity Module.
Added content for Data Logging.
Updated for V1.34.0 software release.
Added content for output offset enhancements.
Added content for bead alarm feature.
Added beta content for Custom Pattern Editing.
Added beta content for Over The Air Data features.
Changes to Job Summaries content.
Changes to Data Logging content.
Appendix C:
Manufacturer Notes
Acknowledgements:
Advantech manufactures the TREK-753 Vehicle-Mount PC. This device is then installed with the Autoline VX10
software application. The full Advantech TREK-753 User Manual is available.
This publication is intended for reference purposes only.
All document content and product specifications are subject to change without notice.
No part of this publication may be reproduced in any form or by any means, electronic, photocopying, recording
or otherwise, without prior written permission of the publisher.
All brand and product names are trademarks or registered trademarks of their respective companies.
© Novo Innovation Ltd. 2014
Novo Innovation Ltd
P: +64 9 419 1219
E: [email protected]
www.novoinnovation.co.nz
Autoline VX10 User Manual
72