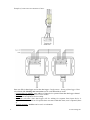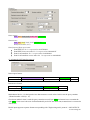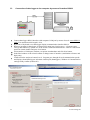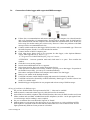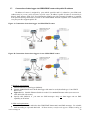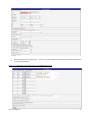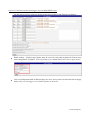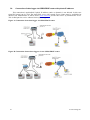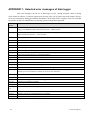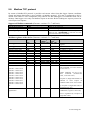
1
MONITORING, DATA LOGGING AND CONTROL SYSTEM MS6 APPENDIXES TO INSTRUCTION MANUAL CONTENT: page APPENDIX 1: Power input of data logger and system back-up ..................................................................... 3 APPENDIX 2: RS485IN Input ....................................................................................................................... 5 APPENDIX 3: Communication of data logger with computer ..................................................................... 12 3.1. Connection of data logger to computer by means of USB interface ............................................. 12 3.2. Connection of data logger to the computer by means of interface RS232 .................................... 14 3.3. Connection of data logger to the computer by means of Ethernet interface ................................. 16 3.4. Connection of data loggers to the computer by means of interface RS485 .................................. 18 3.5. Connection of data logger via modem .......................................................................................... 24 3.6. Connection of data logger with supported SMS messages............................................................ 27 3.7. Connection of data logger via GPRS/EDGE router with public IP address ................................ 29 3.8. Connection of data logger via GPRS/EDGE router with private IP address ............................... 36 APPENDIX 4: Connection of data logger with output relay module and external terminal ......................... 37 4.1. Wiring of interconnection cable MP017 ....................................................................................... 37 4.2. Terminals of output relays module ................................................................................................ 37 4.3. Terminals at data logger side ....................................................................................................... 37 APPENDIX 5: Advanced settings of data logger .......................................................................................... 38 APPENDIX 6: Influence of cable resistance to measurement accuracy with RTD sensors ......................... 39 APPENDIX 7: Selected error messages of data logger ................................................................................. 40 APPENDIX 8: Support of reception and sending of SMS messages ............................................................ 41 APPENDIX 9: Ethernet interface .................................................................................................................. 43 9.1. Introduction ................................................................................................................................... 43 9.2. Creation of www pages ................................................................................................................. 43 9.3. XML files ....................................................................................................................................... 48 9.4. E-mail ............................................................................................................................................ 51 9.5. SOAP protocol .............................................................................................................................. 52 9.6. Protocol Syslog ............................................................................................................................. 54 9.7. Protocol SNMP ............................................................................................................................. 55 9.8. Modbus TCP protocol ................................................................................................................... 56 9.9. Communication ports .................................................................................................................... 57 9.10. Safety ............................................................................................................................................. 57 APPENDIX 10: Security – Users and passwords administration................................................................... 59 Appendix 11: NTC thermistor input ............................................................................................................... 69 Copyright: COMET System, Ltd. It is prohibited to copy and edit this instruction manual and make any changes at all without explicit agreement of COMET System, Ltd. All rights reserved. COMET System, Ltd makes constant development and improvement of all its products. That is why it reserves the right to make any technical changes on the device/product without previous notice. 2 ie-ms2-ms6app-09 APPENDIX 1: Power input of data logger and system back-up 1. Wiring of power connector MS6-Rack has additional circular power connectors on rear pannel. 2. Parameters of power input Power voltage of data logger is 24V±3V DC. Consumption of data logger differs depending on kind of connected peripherals. Approximate values are in the below table. It is necessary to warn negative pole of power connector is galvanically connected to internal GND and input terminals (GND, COM) of data logger. It is suitable to ground all system especially when using pulse power supplies. There is a special terminal for grounding. Approximate maximum current consumption data logger MS6D/R approximately 80 mA Output relay module, all relay closed approximately 200 mA Ethernet interface approximately 25 mA 3. System back-up in case of mains power failure In case data logger function is necessary to back up during power mains failure, first specify the current consumption of the entire system. Then choose suitable back-up supply in accordance with the required time of uninterrupted operation. If there is a need to inform operating staff or distant user on battery operation, then set up one input channel as binary and connect it with the backup supply output signalizing battery operation. When installing power supplies it is necessary to follow valid safety regulations and recommendations specified in instruction manuals of supply manufactures. Leads to battery must be of suitable cross-section size. In back-up design it is necessary to consider allowed temperature supply a battery. Recommended back-up systems: a) Back-up supply AWZ224, manufacturer Pulsar sp.j., Poland To this supply it is necessary to buy two lead accumulators 12V/7Ah in hermetical maintenance-free type of construction, e.g. type ELNIKA 12V/7.2Ah. Supply is designed for mounting to vertical inflammable wall with sufficient air flow. Its protection rate is IP20. It is not designed for mounting to closed switchboard. More details are described in manufacturer instruction manual. ie-ms2-ms6app-09 3 This back-up supply is able to supply data logger with transmitters of current consumption 200mA for approximately 35 hours. Discharged accumulators are recharged to full capacity in approximately 14 hours. Make basic wiring in accordance with instruction manual of the manufacturer. Connect data logger this way: connect terminal –OUT of supply to terminal GND of the power data logger connector, connect terminal +OUT of supply to terminal +Ucc. In case information for data logger on battery operation is required, set up one channel of data logger as binary and connect supply terminal BS to terminal IN of binary channel. In user PC program state „OFF“ corresponds to „Mains operation“ and state „ON“ corresponds to „Battery operation“. User can be informed on switch-over to battery operation by suitable adjustment of conditions and alarms. b) Back-up supply MINI-DC-UPS/24DC/2 with battery MINI-BAT/24DC/1.3AH, manufacturer Phoenix Contact This supply is designed for mounting to 35mm DIN rail in data logger case MP033. It contains two modules - UPS and battery. More details are described in manufacturer instruction manual. This back-up supply is able to supply data logger system with 200 mA consumption at least 3 hours, data logger system with 500 mA consumption at least 2 hours, data logger system with 1A consumption at least one hour. Discharged accumulators are recharged to full capacity in approximately 3 hours. Make basic wiring in accordance with instruction manual of the manufacturer. Connect battery (without fuse) with proper polarity to terminal +/- Battery, connect output of supply –Out to terminal GND of data logger power connector and supply output +Out to data logger terminal +Ucc. In case information for data logger on battery operation is required, set up one channel of data logger as binary and connect terminal Bat.mode to terminal IN of binary input. Attention – connect across terminals IN and GND resistor 2k2 dimensioned at least for 0.3W. In case of delivery of complete system this will be already prepared from manufacturer. In user PC program state „OFF“ corresponds to „Mains operation“ and state „ON“ corresponds to „Battery operation“. User can be informed on switch-over to battery operation by suitable adjustment of conditions and alarms. Example of backed up system: There is a requirement to back up data logger MS6D with 10 x Pt1000 and 6 x (4 to 20) mA inputs. Three T3110 transmitters are connected to current inputs. Data logger is connected to LAN network via Ethernet interface and equipped with SMS module and external GSM modem Wavecom, powered from the same supply as data logger. Total consumption of the system: 80mA (MS6D) + 6x20mA (6x current input) + 40mA (Ethernet interface) + approximately 100mA (GSM modem) = 340 mA. By means of back-up supply AWZ224 we are able to reach up to approximately 20 hours of backed up operation, by means of system MINI-DC-UPS almost 3 hours of backed up operation. It is supposed in described calculation, no short-circuit of current loops at current input appears. In opposite case current approximately 40mA/current input must be calculated. 4 ie-ms2-ms6app-09 APPENDIX 2: RS485IN Input What can be connected to RS485IN input: device, which is equipped with communication link RS485 (link is galvanically isolated at data logger side) device must support communication protocols ModBus RTU or ADVANTECH. Each measured quantity must be accessible by separate command. Not only status when several measured quantities are accessible with one command. 1 to 16 input device can be connected to one module Comet transmitters Tx4xx , Hx4xx or other manufacturer devices are connectable this way to data logger, optionally devices of other manufacturers (single channel models ADAM 4011,4012,4013,4014D, multichannel model 4017 etc.) it is not possible to connect RS485IN input to devices working with different baudrate or different communication protocols Which terminals transmitters connect to Connect transmitters or other input device to terminal for RS485IN input (next to input terminal block). Do not confuse with communication interface RS485 for communication with computer! If input channel is set to RS485IN, measured values are not read from terminals of this channel, but from terminals of RS485IN input. Subsidiary terminals +24V and GND can be used for supplying of connected transmitters of maximum consumption up to 400 mA. How to set data logger together with input devices: Connect each from input devices one after another to the computer and set these parameters: - device address - suitable baudrate, for all device must be the same - transfer protocol (must be the same for all connected devices) and other settings specific for this protocol Some types of input device can require connection of internal jumper Init. Follow the rules in manual for these devices. Connect input device to the RS485 network. Connect link to input terminals RS485IN of data logger and switch on. other way of setting transmitters: connect computer to data logger by cable RS232 or USB connect desired transmitter to input RS485IN run program for setting of transmitters on the PC (e.g. TSensor) press and hold keys „Up“ and „Down“ on data logger (it does not work for external terminal unit) while RS232 is connected and switch on the data logger power. Reading appears on data logger Tunnel RS232<==>RS485IN. While USB cable connected press keys „Menu“ and „Down“). now directly configure connected transmitters by means of user program for transmitters. ie-ms2-ms6app-09 5 Example of connection to transmitter Comet: Run user SW for data logger and set the data logger: Configuration – Setting of data logger. Here at bookmark Ch..Marking and conversions set for each channel these items: - Connected device address: enter address of input device operated from that data logger channel. - Baudrate: set speed, input device is set to before - Parity: must correspond to device setting. - Maximum wait time: time data logger will be waiting for response from input device is adjustable from 30 to 210 ms. If response does not come within this time, error is reported (Error 3). - Transfer protocol: ModBus can be used or Advantech. 6 ie-ms2-ms6app-09 for ModBus protocol: - Data source: specification of Modbus register area - Register address: enter address of register with required measured value for specification of connected device. Address can be entered from 0 to 65535. ATTENTION – this address corresponds to physical address of register. There are different ways of specification of this address. That is why disagreement can appear, if transmitter is adjusted by program from the manufacturer with address, which is physically present in communication. Read carefully description of connected device. Sometimes specified address equals to physical address of register (e.g. in case of RS485IN input). Sometimes shift of 1 is defined (entered address 1 corresponds to physical address 0), sometimes shift of 40 000 or 40 001 is defined (entered address 40 001 corresponds to physical address 0). E.g. in the last case if in documentation is specified data is at the address of 40 005, it is necessary to enter address of register 4. - Data format: must correspond to specification of the device. for Advantech protocol: - Multichannel device: If this input device measures more values, then tick this field. More information – see below protocol description. - Channel: valid for multi-input device. It is a number from 0 to 15 - Check sum enabled– must correspond to setting of the transmitter After this setting RS485IN input works with those inputs identically as with usual analog channels How to set data logger with Comet Tx4xx, Hx4xx devices If RS485IN input works with Comet trasmitters only, following settings are recommended: - Connected device address: enter device address Baudrate: must correspond to device setting (default value: 9600Bd) Parity: set two stop bits without parity (recomended) Maximum wait time: 210 ms Transfer protocol: ModBus Data source: Input register or Holding register Register address: Value Temperature Relative humidity Calculated humidity value Barometric pressure Physical register address 48 49 50 51 - Data format: Signed (-32768..32767) - Recalculation: measured value 0 corresponds to displayed value 0, measured value 10 corresponds to displayed value 1 (transmitters uses integer*10 data format) . Note: Comet transmitters also enable to read with better resolution in format float uC, address of registers are then 8 (temperature),10 (relative humidity), 12 (calculated humidity value) and 14 (barometric pressure). Data format set to “float uC”. Recalculation set up by request. Support of float uC format with these transmitters is not specified and guaranteed in documentation for Comet transmitters. ie-ms2-ms6app-09 7 Detailed specification of communication protocol Read this paragraph carefully for checkig if your device can be connected to RS485IN input. Principle of communication of RS485IN input with connected devices: MS6 datalogger channels – time-division multiplex Ch.1 query for measured value Ch.16 response transfer to/from specific protocol layout query for measure value response IIC bus – communication between MS6 and RS485IN input RS485IN input Physical layout: RS485 Link layout: ModBus RTU Advantech input device(s) A) Communication possibilities (common setting) Connected device address, Baud-rate and Parity options are noted in table above. Maximum wait time (= Time out) ... is adjustable up to 210 ms approximately. After expiration of this duration communication error is reported and module continues with reading of the following channel. 8 ie-ms2-ms6app-09 B) ModBus RTU transfer protocol RTU ModBus message frame: Connected device Function code address 1 byte 1 byte Data CRC n byte 2 byte Supported data request formats: Connected device address 1 byte Function code Starting address No. of registers CRC 0x03 or 0x04 2 byte (0...65535) 2 byte 2 byte Data source: RS485 input supports two function codes: 0x03 ... Read holding registers 0x04 ... Read input registers other functions are not supported Register address (= starting address): absolute address of the first 16-bit reading register (address on the link layout), range: 0...65535 Data format – RS485 input is suitable for reading of continuous quantities. Every read value is converted to 4 byte float (single) format for data logger. Data format item specifies No. of requested registers and their conversion method to data logger float format. Possible options: signed (-32768..32767) ... 2 byte, “integer” format, No. of registers = 1 unsigned (0...65535) ... 2 byte, “word” format, No. of registers = 1 signed (-32768..32767) ... 2 byte, “integer” format, No. of registers = 1 float IEEE754 ...4 bytes, float format (register 0,register 1), No. of registers = 2 float IEEE754 reverse order...4 bytes, float format, (register 1,register 0), No. of registers = 2 float for uControllers ...4 bytes, float format (register 0,register 1), No. of registers = 2 float for uControllers reverse order..4 bytes, float format, (register 1,register 0), No. of registers = 2 Data response format: Connected device Function code Byte count Data CRC address 1 byte 1 byte 1 byte ByteCount byte 2 byte Function code in response is the same as in the request. If the exception occurs function code is 0x83 or 0x84 and data field contains error code. ie-ms2-ms6app-09 9 Example: Data request: 0x01, 0x03, 0x00, 0x30, 0x00, 0x01, 0x84,0x05 Data answer: 0x01, 0x03, 0x02, 0x01, 0x01, 0x78,0x14 data field: 0x0101 (257) Data format of float expressions: float IEEE754 No. 1 is expressed as 0x3F800000 float IEEE754 reverse order No. 1 is expressed as 0x0000803F float for uControllers No. 1 is expressed as 0x80000000 float for uControllers reverse order No. 1 is expressed as 0x00000080 C) Advantech ASCII transfer protocol Data request format: Start of reading # Connected device address 2 ascii byte channel number* 1 ascii byte CRC* 2 ascii byte CRC* 2 ascii byte end char 0x0D end char 0x0D Data answer format: Start reading > *...optionally Measured value n ascii byte Multichannel device: for the input devices that measures several values. In this case the query contains „Channel number“ field (0...15). Check sum enabled: when is used the query contains two ascii byte CRC and answer have to contain the right CRC. Check sum is the sum of all transmitted bytes before the check sum, transmission is converted to ASCII code. RS485 input supports response format corresponding with "Engineering units" protocol ADVANTECH: 10 ie-ms2-ms6app-09 >sxxxx.xxxx(CRC)(cr) where s ... sign („+“ or „-“ or nothing) x ... digits, maximum number of digits left from decimal point is 11, right from decimal point is 6 (cr) ... 0x0D Examples: a) one channel transmitter without CRC the query message: #032(cr) (hexadecimal expression: 0x23,0x30,0x33,0x32,0x0D) the response: >+23.50 (cr) (hexadecimal expression: 0x3C, 0x2B,0x32,0x33,0x2E,0x35,0x30,0x0D) b) multi-channel device with CRC: the query message: #032B8 (cr) (hexadecimal expression: 0x23,0x30,0x33,0x32,0x42,0x38,0x0D) the response: >358B(cr) (hexadecimal expression: 0x23,0x33,0x35,0x38,0x42,0x0D) ie-ms2-ms6app-09 11 APPENDIX 3: Communication of data logger with computer 3.1. Connection of data logger to computer by means of USB interface By standard USB cable A-B of 5m length connect data logger USB interface to the computer. After switching on data logger power or after connection cable computer detects new device If proper drivers are not installed in computer, can be found on installation CD or at website www.cometsystem.cz So-called Virtual COM port is assigned to data logger by operational system (e.g. COM8). It can be found in operation system – Device Administrator, COM and LPT ports – Parameters – Specify. Here modification of port number is enabled. ATTENTION – If data logger will be disconnected from USB often, use always the same USB socket. If using different USB socket virtual COM port can be set to different number. By means of the data logger keyboard set data logger to communication interface USB Run user program for data logger. In menu select menu item Configuration – Communication settings and continue by option New in the section Communication interface. Choose USB, RS232 option in wizard window and press Next button. Select number of COM port, baudrate, set options Autobaudrate and click Next button. If number of Virtual COM port is not known, it can be found in system in Device Administrator. In the final window of the wizard confirm or change name of the interface (combination of letters and digits only) Confirm window and press button Search. Program goes through all used communication speeds and displays found data loggers in bottom window part (Dataloggers). Window of Communication settings finally confirm (button OK). 12 ie-ms2-ms6app-09 Solving of problems with communication via USB: If data logger cannot communicate, check on its display, if really communication interface USB is set. Also check, if operating system creates virtual COM port (with connected USB cable system must add COM port and after its disconnection port must disappear from device administrator). In case it does not work cable can be damaged, incorrect driver, damaged USB computer port or damaged USB port in data logger. If all this works, run user SW for data logger and check in Communication settings, if number of COM port corresponds with number in system. Verify if searching via different communication speeds is allowed (Auto baud rate). If data logger cannot be found, try to change the number of communication port in system (the same must be done in Communication settings) and try again. Also Auto baud rate can be disabled and manually set the same communication speed as in data logger. Another possibility is to try the communication with another computer. ie-ms2-ms6app-09 13 3.2. Connection of data logger to the computer by means of interface RS232 Connect data logger RS232 interface with computer COM port by means of usual crossed RS232 cable. The maximum cable length is 15m. By means of keyboard set on data logger display communication interface RS232. Run user program for data logger. In menu select menu item Configuration – Communication settings and continue by option New in the section Communication interface. Choose USB, RS232 option in wizard window and press Next button. Select number of COM port, baudrate, set options Autobaudrate and click Next button. In the final window of the wizard confirm or change name of interface (combination of letters and digits only) Confirm window and press button Search. Program goes through all used communication speeds and displays found data loggers in bottom window part (Dataloggers). Window of Communication settings finally confirm (button OK). 14 ie-ms2-ms6app-09 Note: 230400 Bd baudrate is unsupported for standard PC COM port Solving problems with communication via RS232: If data logger cannot communicate, check on its display, if communication interface RS232 is really adjusted. Check further, if operating system in Device administrator sees connected COM port. Run user SW for data logger and check in Communication settings, if COM port number corresponds with number from system. Verify, if search via different communication speeds is enabled (Auto baud rate). Also you can disable Auto baud rate and manually set communication speed - same as on data logger. In case data logger still cannot communicate, cable can be damaged, RS232 port in computer or in data logger can be damaged. Another possibility is to try communication with another computer. Wiring diagram of RS232 communication cable (simplified, but fully functional version) ie-ms2-ms6app-09 15 3.3. Connection of data logger to the computer by means of Ethernet interface Connect data logger to computer network by means of UTP cable with RJ-45 connector. Learn from network administrator if your network uses DHCP or use IP address, gate address and network mask assigned from network administrator. By means of keyboard set on data logger display communication interface Ethernet-DHCP (if your network uses DHCP) or Ethernet and enter assigned IP address, gate address and network mask. Run user program for data logger. Select menu item Configuration – Communication settings and continue by option New in the section Communication interface. Choose Ethernet option in wizard window and press Next button. Enter IP address of data logger (if you do not know you can search the network by button Search), number of port (10001) and click Next button. In the final window of the wizard confirm or change name of the interface (combination of letters and digits only) Confirm window and press button Search. Program performs test communication and displays found data loggers at window lower part (Dataloggers). Window of Communication settings finally confirm (button OK). 16 ie-ms2-ms6app-09 Setting of IP address Be careful with setting of IP address and sub-network mask. Incorrect setting can cause data logger is not accessible or cause conflict in network with other devices. If conflict of IP addresses appears disconnect data logger from network and change IP address from data logger’s keyboard. Incorrect setting of IP address can disable other IP address changes from data logger display! Solving problems with communication via Ethernet: If data logger cannot communicate, verify again setting correctness, also if LED diodes next to data logger Ethernet interface light correctly: Left LED – connected to network (detection of carrier frequency). If this LED does not light, problem is with cable or network. Green light indicates 100 MBit network, orange light 10 MBit network. Right LED - blinks when sending or reception of packets is in progress (also if communication cable is disconnected). Similarly as in previous case green light indicates 100 MBit network, orange light 10 MBit network. Both LEDs blink green in regular interval (cca 1 to 2 sec) – corrupted firmware in data logger Ethernet interface. You can also verify, if command ping reacts at data logger IP address. Then you can connect data logger to computer by crossed Ethernet cable, set correctly network card in computer and verify communication functionality. If it is ok, search problem in network setting itself (Firewall, ...). Another strong helper is network packet recorder - suitable rather for service engineers with deeper knowledge of Ethernet networks. ie-ms2-ms6app-09 17 3.4. Connection of data loggers to the computer by means of interface RS485 Interconnect data loggers by means of shielded twisted cable and lead the link to RS485 computer interface or to suitable converter. Maximum length of the entire cabling is 1200m and maximum 32 data loggers can be connected. Do not connect to network of data loggers MS6 RS485 any other device, than data logger MS6, MS5, MS2+, MS3+ or MS4+ Wiring of RS485 terminals at data logger and the way of data loggers connection 18 ie-ms2-ms6app-09 Recommended parameters of connection leads: Twisted two-wire, shielded, intended for RS485 network. In practice generally twisted shielded two-wire is used, e.g. cable SYKFY n x 0.5 . For longer distances use cabling in one line, i.e. no „tree“ or „star“ (for shorter distances different topology can be tolerated). At the beginning and end termination resistor should be (120 In many cases termination resistor can be omitted due low communication speed. Marking of link leads from other manufacturers: „+“ corresponds with marking „A“, „-“ corresponds with marking „B“. Connect cable shielding to each other, do not connect to transmitter, if those are not equipped with shielding terminal galvanically isolated from communication and measuring circuits, including case metal parts. In case shielding of RS485 link is not possible to ground at computer side, ground at data logger nearest to the computer: ie-ms2-ms6app-09 19 Connected RS485 links to the computer by means of converters: a) Wiring diagram of connection to USB/RS485 converter: 20 ie-ms2-ms6app-09 Note: If cable shielding is not connected to ground of some data logger (see figure above), then connect shielding to pin 5 of Sub-D connector. b) Wiring diagram of connection to RS232/RS485 converter: Drawing of topology was presented in the header of this chapter. Used converter type E06D with automatic switching of transfer direction is powered from adapter 6V DC. This converter is possible to plug to serial communication computer port COM. Connect link from data logger to the RS485 side with correct polarity (pins 3 and 4) and connect pins 2 and 7 to each other. It corresponds with setting of time constant of automatic converter switching for speed 115200 Bd. At this setting mostly there are no problems in communication at lower speed). During communication it is necessary to connect DC output of ac/dc adapter 230V/6V DC to the converter and adapter plugged in mains. ie-ms2-ms6app-09 21 c) Drawing of connection by means of converter Ethernet/RS485: Wiring diagram of cable between data logger and RS485/Ethernet converter UDS10/100/1000/1100: Perform following setting with this converter: Connect converter to computer network by means of UTP cable with RJ-45 connector. Learn from network administrator if your network uses DHCP or use IP address, gate address and network mask assigned from network administrator. By means of converter web pages or telnet protocol or special program set converter to interface RS485 and enter assigned addresses. 22 ie-ms2-ms6app-09 Setting of data logger and computer to RS485 communication link By means of keyboard set on display of each data logger communication interface RS485. Communication speed (must be the same for all data loggers) and address data logger (for each data logger address must be unique). Run user program for data logger. Select menu item Configuration – Communication settings and continue by option New in the section Communication interface. Choose Converter RS232/RS485, converter USB/RS485 or Converter Ethernet/RS485 option in wizard window and press Next button. Set particular options of the interface according to selected interface type. For converter RS232/RS485 or converter USB/RS485 select communication port and baudrate. For converter Ethernet/RS485 enter IP address and port number. Then click Next button. In the final window of the wizard confirm or change name of the interface (combination of letters and digits only). Confirm window and press button Search. Program goes through all addresses and displays found data loggers in the bottom window part (Dataloggers). Window of Communication settings finally confirm (button OK). Troubleshooting with RS485 communication: First check cabling, correct connection of link polarity, correction of connection of converter RS232/RS485 and connection of its power. Try communication without terminator. If several data loggers are connected, let only one in the network (disconnect others by unplugging connector) and try communication. If correct, the cause can be address conflict, improper speed of communication or short circuit of the link. Communication could not work with each type of converter RS232/RS485. If user uses other type than recommended, problem can be in its dynamic parameters. Also try other communication port and recommended type of converter. ie-ms2-ms6app-09 23 3.5. Connection of data logger via modem At the data logger side and PC side suitable modem must be used (recommended type: Wavecom M1306B, Supreme, Xtend). Connect interfaces RS232 of data logger and PC with modems by cables, delivered with modems. Used SIM card must enable to transfer data (verify at your operator), SMS messages and must not be protected by PIN code. Used SIM card must be financially credited sufficiently. Data logger is not able to detect low credit! Use suitable tariff. Connect modem at data logger side to RS232 computer port. Click by right mouse button to icon of user program for data logger, select Options-ShortcutTarget, where append text of /master, e.g.: "C:\Program Files\COMET\MS234p\Ms_234p.exe" /master ATTENTION – between quotation mark and slash must be a space. Then confirm the window. Click this icon to run the program. Select item Configuration – Modem initialization (for newer SW specify “data logger side modem”). If this operation is finished successfully, modem is properly set to data logger. If operation is not finished successfully, you can try to set modem manually (see below). Disconnect configured modem from computer and connect it to data logger. By means of the keyboard set on data logger display communication interface RS232-modem, communication speed 9600Bd. Connect second GSM modem to the computer. Newer SW also allows to initialize modem on the PC side. This is done similarly as above. Simply choose “PC side modem”. But this modem should work without presets. In software select menu item Configuration – Communication settings and continue by option New in the section Communication interface. Choose Modem (RS232) option in wizard window and press Next button. Select number of COM port, where modem is connected and communication parameters. Some modem types work only on speed 9600 Bd. Select Tone dialing and enter Modem initialization string to AT&D2. Then click Next button. In the final window of the wizard confirm or change name of the interface (combination of letters and digits only) 24 ie-ms2-ms6app-09 In the part Dataloggers select option New. Select communication interface, enter telephone number of modem at the data logger side and save settings (button OK). Perform communication test (button Test). Remove in desktop shortcut text /master Read data logger configuration, set data logger communication port and activate preset configuration string for GSM modem. ie-ms2-ms6app-09 25 Solving of problems in communication via GSM modems: Check, if SIM card used in GSM modem is set the way, not to require PIN code after modem is switched on. Check, if data transfers are allowed by the operator of this card. Check correct setting on data logger display – ATTENTION, some modems require to use only communication speed 9600Bd Check, if correct communication cable is used (use cables delivered to modem). Watch blinking of LED diodes on modems. If connection is not established, LED diodes blink with cca 10s interval. If connected, LED diodes blink quickly. If error state appears, LED diode lights permanently (SIM card was not detected, it is blocked etc.). Check, if data logger communicates with computer by means of another communication interface. If you were not successful and data logger itself communicates with the computer, test connection between two computers. Connect modem, which was at the data logger side to the first computer and run Hyperterminal. Connect second modem to the second computer and also run Hyperterminal. Here contrary to first computer establish new connection with link telephone number, first modem is connected to. Now read user manual of modem and try to establish bi-directional data connection at suitable communication speed. In case, modem configuration at the data logger side by means of user SW in master mode was not successful, you can do it by means of Hyperterminal: Set Hyperterminal to speed 115200Bd and enter following commands sequence (valid for modems Wavecom M1306B, Supreme, Xtend, cr means pressing of Enter key): a) AT&F cr (factory default) b) AT+IPR=9600 cr (serial interface of modem sets to 9600 Bd) c) now is necessary to change Hyperterminal Baud-rate to 9600Bd d) AT+CICB=0 cr (automatic jump to data mode) e) ATS0=1 cr (automatic call pick-up after first ring) f) AT&D0 cr (DTR is ignored) g) AT&S0 cr (DSR always ON) h) ATE0 cr (ECHO off) i) AT&W cr (writing of configuration to EEPROM memory). If modem does not correspond, try to repeat the procedure at other communication speed. 26 ie-ms2-ms6app-09 3.6. Connection of data logger with supported SMS messages Follow above recommendations and connect data logger with computer via selected interface and verify functionality of communication. If using RS232 interface both for SMS and for data communication with the computer, then first make the communication work. In this case below steps for modem setting are not necessary. However if there are problems with SMS messages follow recommendations below. Connect suitable modem to data logger RS232 interface only (recommended type: Wavecom M1306B, Supreme, Xtend). Use cable included in modem. Connect modem to RS232 computer port. Click right mouse button icon of user program for data logger, select Options-ShortcutTarget, where append text of /master, e.g.: "C:\Program Files\COMET\MS234p\Ms_234p.exe" /master ATTENTION – between quotation mark and slash must be a space. Then confirm the window. Click this icon to run the program. In main menu additional item Service appears. Select item Initialize Wavecom modem from menu Service. If this operation is finished successfully, modem is properly set to data logger. If operation is not finished successfully, you can try to set modem manually. Disconnect configured modem from computer and connect it to data logger. Remove text /master in the desktop shortcut. Used SIM card must enable SMS messaging and must not be blocked by PIN code. Used SIM card must be financially credited sufficiently. Data logger is not able to detect low credit! Use suitable tariff. Read data logger configuration in user program and activate using of SMS messages. Solving of problems with SMS messages: Do you have disabled SIM card requirement for PIN ? - Must not be enabled! Modem must be connected to data logger by cable delivered to the modem! Insert SIM card to mobile telephone and test SMS function, then erase all SMS from the card, insert SIM to modem and send SMS ALARM from mobile telephone (not Info - can be put together from several messages and its sending is more complex) Do you use modem Wavecom M1306B, Supreme or Xtend? Modem starts to work correctly after about 20 to 30 sec after power on. After switching on LED diode lights for a moment on the modem and then must blink in several second intervals. If LED lights permanently SIM card is not present or is blocked. ie-ms2-ms6app-09 27 If using RS232 interface both to the SMS messaging and to communication with data logger, then SMS messaging will be working after data connection is finished! Check setting on shortcut Advanced options – see Appendix No.5. Check how data logger communicates with modem. Enter data logger menu Service and here check, If regular communication with modem works (menu SMS status). Press Enter key to see directly the content of sending and reception buffer (2x16 characters). So direct watching of communication between data logger and modem is enabled. Data logger and modem must work at the same communication speed, 9600 Bd is recommended. Modem can be set to Auto-Bauding (for 2400 to 115200 Bd) or to a specified speed. If particular speed is set, then Auto-Bauding is switched off. Auto-Bauding is enabled by: AT+IPR=0 . You can do it by means of Hyperterminal, after entering command always pressing of Enter key is necessary. 9600 Bd is enabled by: AT+IPR=9600 You do not have enabled in modem local copy-down of characters (Echo)? – it is disabled by ATE0 Connect modem to PC and try to communicate with modem as data logger: write: ATE0+CSMS=0 <enter> expected response: OK: write: AT+CSCS=“GSM“ <enter> expected response: OK write: AT+CMGF=0 <enter> expected response: OK write: AT+CMGL=4 <enter> response: SMS message ending with OK If anything was changed in modem setting, finally store with command AT&W (write to modem eeprom) For detailed description of using SMS messages see Appendix No.8. 28 ie-ms2-ms6app-09 3.7. Connection of data logger via GPRS/EDGE router with public IP address IP address of router is assigned by your mobile provider and it is related to your SIM card. Address may be private, public dynamic or public static. IP addres is public if router is accessed by it directly from internet. Static IP is fixed allocated to SIM by provider. Dynamic IP address is acquired from provider during connection of router to the GPRS/EDGE network. Dynamic IP is variabled. No everyone provider supports public IP! Figure A: Connection of one data logger via GPRS/EDGE router Figure B: Connection of more data loggers via one GPRS/EDGE router a) Hardware requirements Ethernet interface in data logger (MP042). Suitable GPRS/EDGE router at the data logger side must be used (described type: Conel ER75i RS232 set). Figure B only: Suitable Ethernet Switch is needed. Use standard Ethernet cables (not cross-over cable delivered with router). Special cable (MP051) if you want use SMS messages. Only one data logger can use SMS capability at B variant. b) SIM card requirements Used SIM card must be enabled to the GPRS/EDGE data transfer and SMS messages. Use suitable tariff according to expected data bulk. All data memory transfer take approx. 2MByte,reading of ie-ms2-ms6app-09 29 configuration 15kB, Display mode 3kB/refresh. In case is activated online monitoring (Display mode) with 10s reading interval, record downloading four times per month data bulk will be approx. 30Mbyte per month. Due other internet protocols don´t use lower data limit then 100 MByte per month. Contact your mobile provider to activate public static IP address (expensive solution) or public dynamic IP address (cheap solution) on your SIM card. In case using of warning e-mails find out IP address of SMTP server of your provider. New e-mail account at your provider may be demanded (user name + password). No domain name of SMTP server is usabled but it IP address only! c) DDNS server registration Continue with this paragraph if public dynamic IP address is used. If you have a public static IP skip to the step d). Choose suitable and reliable provider of DDNS service. It is recommended cheap server www.dyndns.org. Free providers with non-guaranteed reliability are possible too. After registration you obtain provider name, your DDNS domain name and password. d) GPRS/EDGE router ER75i settings Insert SIM card to the router and connect it to PC by using of delivered cross-over cable. Set up PC to IP address e.g. 192.168.1.100, net mask 255.255.255.0 (Network connection – Local area connection – Properties – Internet protocol TCP/IP – Properties). If your network is addressed as 192.168.1.xxx with free 192.168.1.1. position, you can use alternative method with connection of router to local network by using of standard net cable. Connect antenna and power source to the router and switch on power. Launch internet browser and type IP address 192.168.1.1. The router´s login window will be appeared. Type user name and password both root. The configuration window of router is displayed. Click on menu item Configuration – LAN. If IP address of MS data logger is from 192.168.1.2 to 192.168.1.254 interval (default IP is 192.168.1.211) do no change. Click on menu item Configuration – GPRS. Insert access point name (APN) of your mobile provider. Check documentation from mobile provider if this domain name is intended for public IP. As necessary you insert autentification provider´s data. Tick Get DNS addresses from operator. Click on Apply button. 30 ie-ms2-ms6app-09 Click on menu item Configuration – NAT. Set up port redirection of ingoing connections and save it by using Apply button: Figure A: Connection of one data logger via GPRS/EDGE router ie-ms2-ms6app-09 31 Figure B: Connection of more data loggers via one GPRS/EDGE router All data loggers will be visibled at internet on the same IP address and different port number: DDNS settings – skip this step if public static IP is used. In case public dynamic IP click on menu item Configuration – DynDNS. Insert login data to your DDNS domain and click on Apply button. Click on Configuration-SMS if SMS messages are used. Set up items as bellow and click on Apply button. Only one data logger can use SMS capability at B variant. 32 ie-ms2-ms6app-09 Enter your own password to router (Change password) and save. Use original manual to GPRS/EDGE router in case any problem. e) MS data logger connection and configuration It ts assumed that MS data loggers ´ communication port number has default value (10001). Figure A (one MS data logger): Connect Ethernet interface of data logger with ETH connector of router by using of cross-over cable delivered with router. By means of data logger´s keyboard check IP address, (for example 192.168.1.211), net mask (255.255.255.0) and gateway address – insert IP address of router (192.168.1.1). Figure B (more MS dataloggers): Connect Ethernet interface of each data logger to the Switch. Connect ETH connector of router to the Switch too. Use standard Ethernet cables (not cross-over cable delivered with router). By means of data loggers´ keyborads set up their unique IP addresses (for example 192.168.1.211, next data logger: 192.168.1.212... etc.), net mask (255.255.255.0) and gateway address – insert IP address of router (192.168.1.1). Setting must be corresponded to NAT table of the router. Go to the computer with Internet connection. Run user program for data logger. Select menu item Configuration – Communication settings and continue by option New in the section Communication interface. Choose Ethernet option in wizard window and press Next button. If public dynamic IP address is used: Enter DDNS address of router, number of port (10001 for Figure A, according to NAT table for figure B) and click Next button. If public static IP address is used: Enter IP address of router, number of port (10001 for Figure A, according to NAT table for figure B) and click Next button. In the final window of the wizard confirm or change name of the interface (combination of letters and digits only) Confirm window and press button Search. Program performs test communication and displays found data loggers at window lower part (Dataloggers). Window of Communication settings finally confirm (button OK). ie-ms2-ms6app-09 33 Read data logger´s configuration (Configuration-Datalogger setting). If you were not successfull (for public dynamic IP): o run cmd and try ping to domain name of data logger (DDNS address, e.g. např. ping datalogger.dyndns.info) o If ping is successfull note IP address from response and try communicate by using this IP directly. If no response then problem is between router and data logger probably. o If ping is not successfull however IP address is visibled, open your DDNS server web pages and check assigned IP addres: o if IP address at DDNS web pages is like as IP from ping, either router´s DynDNS setting is wrong or IP address of router is not public. if IP address at DDNS web pages is different from IP from ping, your local DNS server holds old record probably. You can restart computer, local router (GateWay, DNS server) or wait for any time. It is suitabled to insert HUB with next computer between data logger and GPRS/EDGE router. It is possible watch communication at data logger side or mobile side in router setting (menu item Network). After data logger´s configuration reading go to Communication bookmark and set up each protocol of Ethernet interface as is needed. At SMTP protocol (e-mails) insert IP address of SMTP server of your mobile provider and autentififation data if is needed: 34 ie-ms2-ms6app-09 At E-mails(2) bookmark don´t use Sender-Default choice, but insert name of your existing e-mail account. Try send testing e-mail after saving of configuration. If you were not successfull, it is possible that demand was blocked at local network side. Try activate alarm on data logger and check if a-mail was sent. Set up next protocols as is needed. If access from local network can be the problems with connection blocking. Change of firewall or router settings can be necessary. Check functionality of every one used Ethernet protocol. Collaborate with yout network administrator. Connect RS232 interface of data logger with PORT1 of router by delivered cable (MP051) if you want use SMS messages. Only one data logger can use SMS capability at B variant. Set up and check SMS functionality. ie-ms2-ms6app-09 35 3.8. Connection of data logger via GPRS/EDGE router with private IP address This connection is applicabled if public IP address (static or dynamic) is not allowed. In this case OpenVPN tunnel can be used. The OpenVPN server with created access points must be avalilabled at internet side. Manufacturer of ER75i router (www.conel.cz) provide this service by SmatrCluster server. This is third part fee service without Comet system support. Figure A: Connection of one data logger via GPRS/EDGE router Figure B: Connection of more data loggers via one GPRS/EDGE router 36 ie-ms2-ms6app-09 APPENDIX 4: Connection of data logger with output relay module and external terminal 4.1. Wiring of interconnection cable MP017 ATTENTION – cable is crossed. If wired different way than on the figure, connected circuits can be damaged! 4.2. Terminals of output relays module 4.3. Terminals at data logger side ie-ms2-ms6app-09 37 APPENDIX 5: Advanced settings of data logger Follow this appendix If you need: to activate external terminal or output relays module to activate Ethernet interface in data logger to invert behavior of ALARM OUT output to set data logger for SMS messaging activate "latched alarms" function Procedure: Click right mouse button on icon of user program for data logger, select Options-ShortcutTarget, where append text of /master, e.g.: "C:\Program Files\COMET\MS234p\Ms_234p.exe" /master ATTENTION – between quotation mark and slash must be a space. Then confirm the window. Click this icon to run the program. after reading configuration of data logger another folder appears Advanced options do required settings and then click button OK – ATTENTION, all recorded data in data logger will be erased! Remove text /master from text in the desktop shortcut Notes: Activation of external terminal and relay outputs is necessary to make data logger communicate with these devices. If these items are active, then you can set and use them in usual data logger configuration. Activation of Ethernet interface is necessary to switch on this interface on data logger display or in user SW. Inversion behavior of output ALARM OUT is suitable, when you need status without data logger power to consider as alarm. With inverse behavior of this output relay is closed in the state without alarm and there is a voltage present at the output. Advanced setting of SMS messages: You can change communication speed between data logger and modem (it has nothing to do with communication speed for communication with computer, even if one RS232 interface is used for both). It is recommended to set 9600 Bd. You can switch on flow control of RTS/CTS – usually it is not needed. You can disable to link SMS messages into one long message. This function is not supported by operators in some countries, that is why it is necessary to disable to link SMS in particular situation. It concerns response to SMS Info, which can sustain from up to four SMS messages. Other selections concern rather diagnostics in solving problems with messages. Keep default ticked Erase damaged messages from modem and not ticked Stop SMS transaction in progress with error. Automatic modem reset - GSM modem could crash or lose registration with the phone network as result of high level electromagnetical disturbance. The reasons this can happen are that the modem is unavailable form network. To prevent this problem, the datalogger can be programmed to send reset command to the GSM modem at regular 12 hours intervals (AT+CFUN=1). Diagnostic tools in record It is not enabled to set clock frequency of processor in master mode. Latched alarms: If any alarm is appeared, it stays active regardless the measured values. This state persists until to the confirmation of alarm signalization when the alarms are set according to the actual measured values. This feature is available for MS6 data logger with firmware version 6.3.0 and later. Use the latest version of software. 38 ie-ms2-ms6app-09 APPENDIX 6: Influence of cable resistance to measurement accuracy with RTD sensors In case inputs J (Ni1000), K (Pt100) or K1 (Pt1000) are installed and RTD probe is connected, then non zero cable resistance causes additional measurement error, which is added to real temperature. This error depends on cable cross-section, its length and sensor type. If it is known correction is enabled by recalculation of input channels. Added error for copper wire (two wires) at temperature 23°C: Cable cross-section [mm2] 0,22 0,34 0,50 1,00 1,50 2,00 2,50 Added error for Ni1000/6180ppm [°C] Cable length [m] 1 2 5 10 0,02 0,04 0,12 0,24 15 0,36 0,01 0,03 0,07 0,15 0,01 0,02 0,05 0,10 0,00 0,01 0,02 0,05 0,00 0,00 0,01 0,03 0,00 0,00 0,01 0,02 0,00 0,00 0,01 0,02 0,23 0,16 0,08 0,05 0,04 0,03 Added error for Pt100/3850ppm [°C] Cable length [m] 1 2 5 10 0,36 0,73 1,82 3,64 0,24 0,47 1,18 2,36 0,16 0,32 0,80 1,60 0,08 0,16 0,40 0,80 0,05 0,11 0,27 0,53 0,04 0,08 0,20 0,40 0,03 0,06 0,16 0,32 15 5,47 3,54 2,40 1,20 0,80 0,60 0,48 Added error for Pt1000/3850ppm [°C] Cable length [m] 1 2 5 10 0,04 0,07 0,18 0,36 0,02 0,05 0,12 0,24 0,02 0,03 0,08 0,16 0,01 0,02 0,04 0,08 0,01 0,01 0,03 0,05 0,00 0,01 0,02 0,04 0,00 0,01 0,02 0,03 15 0,55 0,35 0,24 0,12 0,08 0,06 0,05 1,50 2,00 2,50 Added error for copper wire (two wires) at temperature 100°C: Cable cross-section [mm2] 0,22 0,50 1,00 Added error for Ni1000/6180ppm [°C] Cable length [m] 1 2 5 10 0,02 0,04 0,10 0,20 15 0,30 0,01 0,02 0,06 0,13 0,01 0,02 0,04 0,09 0,00 0,01 0,02 0,04 0,00 0,00 0,01 0,03 0,00 0,00 0,01 0,02 0,00 0,00 0,01 0,02 0,20 0,13 0,06 0,04 0,03 0,02 Added error for Pt100/3850ppm [°C] Cable length [m] 1 2 5 10 0,37 0,75 1,86 3,73 15 5,60 0,24 0,48 1,21 2,41 0,16 0,33 0,82 1,64 0,08 0,16 0,41 0,82 0,05 0,11 0,27 0,55 0,04 0,08 0,21 0,41 0,03 0,07 0,16 0,33 3,62 2,46 1,23 0,82 0,62 0,49 Added error for Pt1000/3850ppm [°C] Cable length [m] ie-ms2-ms6app-09 0,34 1 2 5 10 0,04 0,07 0,19 0,37 0,02 0,05 0,12 0,24 0,02 0,03 0,08 0,16 0,01 0,02 0,04 0,08 0,01 0,01 0,03 0,05 0,00 0,01 0,02 0,04 0,00 0,01 0,02 0,03 15 0,56 0,36 0,25 0,12 0,08 0,06 0,05 39 APPENDIX 7: Selected error messages of data logger This error messages you can see on data logger’s LCD, among measured values or during some actions in software. If software reports error message, take care on sign of this error number. Positive errors are evaluated by datalogger and their decription is in the table below. Negative errors are evaluated by software. In this case additional text in message specify what problem appeared. Error number 1 MEANING 2 A/D converter is at upper limitation (input quantity – is over upper limit of module range) or for RS485IN input & Advantech protocol: >+9999 response 3 RS485IN input did not receive response from connected device in adjusted time 4 RS485IN input: invalid control check sum 5 RS485IN input: invalid character (Advantech protocol) 6 RS485IN input: too few characters in response (Advantech protocol) 7 RS485IN input: invalid ModBus code 8 RS485IN input: ModBus exception 9 RS485IN input: too many characters in response (Advantech protocol) 11 some source channel has error (recalculated channel) 12 some source channel is switched off (recalculated channel) 13 unknown recalculation formula 14 math error (division by zero etc.) 112-127 error in work with SD card (if data logger uses SD) 128-136 error in communication with internal and external data logger devices 137 impossible to display value (it contains more than 10 digits) – only error of display, this error can be caused by incorrect calibration constants or incorrect user calibration 138 function not enabled (deactivation of alarm or condition) 149 unknown communication protocol of RS485IN input 160, 162 corruption of configuration areas of data logger 161,163 corruption of calibration constants 184 unknown type of input channel 186-188, 190 unauthorized access (non valid password) 191 alarm is not active, required action will not be performed 212,213 unauthorized access (invalid password or user name) 189 error of measurement of thermocouple cold junction 40 A/D converter is at lower limitation (input quantity – is below lower limit of module range) or for RS485IN input & Advantech protocol: >-0000 response ie-ms2-ms6app-09 APPENDIX 8: Support of reception and sending of SMS messages Data logger enables to respond to SMS query and sending SMS alarm messages. GSM modem connected to data logger must support PDU SMS format and its SIM card must have stored SCA number (Service Center Address). SIM card must not be blocked by PIN code and must have sufficient credit. Data logger is not able to indicated state of credit with prepaid cards. Format of received SMS messages: PDU format, support of 7 bit, 8 bit a 16 bit coding without compression, telephone number in international/national format, ISDN/telephone numbering plan, maximum 15 characters of telephone number, maximum length of text message 64 characters, message can contain UDH of 36 character maximum length, TP-PID= 00h (Short Message Type 0). If those parameters are matched, message is accepted and decoded by data logger, i.e. UDH block is removed, text is converted to capital letters and compared with predefined strings: Info, Alarm, Ch1 to Ch16, Set1 to Set16, Clr1 to Clr16. In case valid string was received (no matter if capital/lower-case letters), data logger sends proper response and received message is cleared from modem. If received SMS message is not valid it is cleared from modem without sending any response. Format of sent SMS messages: PDU format, 7 bit coding without compression, telephone number in international format maximum length 15 characters, Validity period: 3 days, with all messages except response to request Info one SMS is sent of maximum 160 characters. In response to request Info sequence of one to four SMS messages is sent (depending on configuration of data logger), maximum length is 152 characters for a message. Messages contain UDH with code for linking to one long SMS on mobile telephones, which support linking of SMS together. For proper function it is necessary to have telephone number SCA (Service Center Address) stored on SIM card of the modem. With messages sent due to creation of alarm or critical state, after SMS is sent all alarm states in data logger are stored. If no change in alarms appears, another message is not sent. If alarm stops to be active and appears again, message is sent. If alarm at another channel appears, message is sent again (if it is allowed by the user). If critical error state for sending SMS appeared (defined delay expired) and before sending of this SMS appeared new critical states, the states are included into the SMS. It is always recommended to set suitable hysteresis and alarm delay. Detailed description of SMS content: 1. Information on data logger is sent if SMS with text Info was received. Then SMS contains: type of data logger (e.g. MS6) name of data logger (see setting of data logger) state of memory occupation for each channel: - channel name - measured value - physical unit - state of alarms Total number of sent SMS messages is 1 to 4 depending on configuration of data logger. Messages contain information intended for linking together at the recipient to one long SMS. 2. State of alarms is sent if SMS with text Alarm was received or If at some channel appeared new alarm and is required its report by SMS. Message contains: type of data logger (e.g. MS6) name of data logger (see setting of data logger) ie-ms2-ms6app-09 41 list of channels, where Alarm 1 appeared list of channels, where Alarm 2 appeared 3. Information on particular channel is sent if SMS with text Chn (where n is channel number 1 to 16). Message contains: type of data logger (e.g. MS6) name of data logger (see setting of data logger) state of memory occupation information on specified channel: - channel name - measured value - physical unit - state of alarms 4. Message of remote condition number 4 setting on selected channel is sent, if SMS was received with text Setn (where n is number of channel 1 to 16) resp. Clrn. Message contains: Type of data logger (MS6). Name of data logger (see setting of data logger). Status of adjusted condition or error message (unaccepted command, if condition is set differently than to Remote or Access denied (if PIN code does not correspond when using safety protection). 5. Message on creation of critical state is sent if critical error state in data logger appeared and SMS report is required. Message contains: text WARNING! type of data logger (e.g. MS6) name of data logger (see setting of data logger) Actual list of critical states in data logger (selftest error, configuration, measurement, overrun of adjusted limit, fulfilling of memory) 6. Scheduled SMS report is sent, if the time for scheduled SMS expires. Message contains: Type of data logger (MS6). Name of data logger (see setting of data logger). “Scheduled report: system operates correctly, ” and state of alarms Some other settings concerning communication between data logger and modem (If linking of SMSs is used, how some error states are solved, etc.) are specified in Advanced options tab and are described in Appendix 5. 42 ie-ms2-ms6app-09 APPENDIX 9: Ethernet interface 9.1. Introduction This document contains information needed for using of all features of MS6 data logger optional Ethernet interface (further only device or data logger). Here all communication protocols are described and several examples follow. This document does not explain basic principles of Ethernet computer networks function. Basic knowledge of work with computer networks and TCP/IP communication protocols is supposed. Also basic knowledge of WWW pages creation by means of HTML including Java script and CSS is supposed. 9.2. Creation of www pages Ethernet interface of data logger MS6 contains embedded WWW server. This server enables to display actually measured values simply by means of web browser. Ethernet interface also enables user to store own WWW pages. For their creation and uploading some SDK files are necessary. Such files are available at manufacturer website. Pages sustain from two types of pages – static and dynamic pages. Static pages are created by HTML code. At places, where values from data loggers should be presented it is necessary to insert special tag <% %>. Description of these tags is specified in the following chapter. Ethernet interface also enables to create dynamic WWW pages by means of Javascript language. It is thus possible to realize dynamically changing pages using AJAX technology. For these purposes values in XML format are provided. In creation of WWW pages some particular limitations exist. Special HTML tags Create HTML pages in any editor. Insert proper mark from below table to the location where you want to place values. General tags: Tag Description <%sn%> Serial number of data logger <%name%> Data logger name (maximum 16 characters) <%type%> Type of data logger <%rfr%> Refresh interval of WWW pages [s] <%time%> Actual time in data logger <%date%> Actual date in data logger <%fw%> Version of Ethernet interface firmware <%fwms%> Version of measuring unit firmware <%ram%> Internal memory occupation [%] <%rec%> Logging mode <%iacs%> Internal audio indication <%oacs%> ALARM OUT output <%slft%> Selftest status <%ucc%> Power voltage value <%neg%> Negative voltage value <%bat%> Back-up battery voltage <%rel%> Flag of installed relay board <%rp%> Optional RS485 input is installed <%ip%> Actual IP address <%mac%> MAC address <%mem%> Internal memory size [MB] <%uptm%> Time of Ethernet interface run <%incd%> Volume of incoming data [kB] <%outd%> Volume of outgoing data [kB] <%sec%> Flag of active autentization <%usr%> Actually logged user ie-ms2-ms6app-09 Example of generated text 10060001 MS in kitchen 6 60 13:43:57 02.01.2010 6-5-0-0.0116 6.0.08 43 cyclic/non-cyclic inactive/active inactive/active passed/Ucc fail/Uneg fail... 24 -10 3.1 0/1 0/1 192.168.1.40 00-20-4A-AF-06-49 2 0 h, 30 min, 27 sec 33 338 0/1 Barack_Obama 43 Tags for channel: Following table contains tags for displaying information from measuring channel. Instead of letter X it is necessary to add proper channel number (1 – 16). Tag <%cXn%> <%cXv%> <%cXu%> <%cXa%> <%cXb%> <%cXr%> <%cXai%> <%cXbi%> <%cXri%> <%cXp%> <%rX%> <%rXi%> Description Channel name Measured value Unit Alarm I (yellow LED) Alarm II (red LED) Record enabled/disabled Alarm I (figure for static web) Alarm II (figure for static web) Record enabled (figure for static web) Process Status of relays on relay board Status of relays on relay board (figure for static web) Example of generated text Ch1 name -9.95 V 0/1 0/1 0/1 <img src="yellow.gif" ...> <img src="red.gif" ...> <img src="record.gif" ...> Proces 1 0/1 <img src="yellow.gif" ...> Example of static www pages Following HTML code contains special tags <% %>. Instead of these tags data logger adds actually measured value. If periodical refresh of actual values is required, it is suitable to use tag <meta httpequiv="refresh" content="<%rfr%>">. <?xml version="1.0" encoding="ISO-8859-1"?> <!DOCTYPE html PUBLIC "-//WAPFORUM//DTD XHTML Mobile 1.0//EN" "http://www.wapforum.org/DTD/xhtml-mobile10.dtd"> <html xmlns="http://www.w3.org/1999/xhtml"> <head> <meta http-equiv="content-type" content="text/html; charset=windows-1250"> <meta http-equiv="refresh" content="<%rfr%>"> <title><%name%></title> </head> <body> <b>Name: <%name%></b> <br /> s/n: <%sn%> <br /> Time: <%date%> <%time%> <br /> <table border="1" cellpadding="2" cellspacing="0"> <tr> <th>Nr</th><th>Channel name</th><th>Value</th><th>I.</th><th>II.</th> </tr> <tr> <td>1</td> <td><%c1n%></td><td><%c1v%><%c1u%></td> <td><%c1ai%></td> <td><%c1bi%></td> </tr> <tr> <td>2</td> <td><%c2n%></td><td><%c2v%><%c2u%></td> <td><%c2ai%></td> <td><%c2bi%></td> </tr> <tr> 44 ie-ms2-ms6app-09 <td>3</td> <td><%c3n%></td><td><%c3v%><%c3u%></td> <td><%c3ai%></td> <td><%c3bi%></td> </tr> <tr> <td>4</td> <td><%c4n%></td><td><%c4v%><%c4u%></td> <td><%c4ai%></td> <td><%c4bi%></td> </tr> <tr> <td>5</td> <td><%c5n%></td><td><%c5v%><%c5u%></td> <td><%c5ai%></td> <td><%c5bi%></td> </tr> </table> </body> </html> Result generated WWW page generated by data logger server has following HTML code: <?xml version="1.0" encoding="ISO-8859-1"?> <!DOCTYPE html PUBLIC "-//WAPFORUM//DTD XHTML Mobile 1.0//EN" "http://www.wapforum.org/DTD/xhtml-mobile10.dtd"> <html xmlns="http://www.w3.org/1999/xhtml"> <head> <meta http-equiv="content-type" content="text/html; charset=windows-1250"> <meta http-equiv="refresh" content="10"> <title>Warehouse 16</title> </head> <body> <b>Name: Warehouse 16</b> <br /> s/n: 10060001 <br /> Time: 22.04.2010 08:41:40 <br /> <table border="1" cellpadding="2" cellspacing="0"> <tr> <th>N</th><th>Channel name</th><th>Value</th><th>I.</th><th>II.</th> </tr> <tr> <td>1</td> <td>Environment</td><td>23.4°C</td> <td><img src="none.gif" alt="" height="16" width="16"/></td> <td><img src="none.gif" alt="" height="16" width="16"/></td> </tr> <tr> <td>2</td> <td>Freezer 1L</td><td>-16.3°C</td> <td><img src="yellow.gif" alt="X" height="16" width="16"/></td> <td><img src="none.gif" alt="" height="16" width="16"/></td> </tr> <tr> <td>3</td> <td>Freezer 1R</td><td>-14.5°C</td> <td><img src="none.gif" alt="" height="16" width="16"/></td> ie-ms2-ms6app-09 45 <td><img src="red.gif" alt="X" height="16" </tr> <tr> <td>4</td> <td></td><td></td> <td><img src="none.gif" alt="" height="16" <td><img src="none.gif" alt="" height="16" </tr> <tr> <td>5</td> <td>Power supply</td><td>ok</td> <td><img src="none.gif" alt="" height="16" <td><img src="none.gif" alt="" height="16" </tr> </table> </body> </html> width="16"/></td> width="16"/></td> width="16"/></td> width = "16"/></td> width = "16"/></td> And page is then displayed in web browser: Creation of dynamic www pages Ethernet interface also enables reading of actual values by means of Javascript language and AJAX technology. To get actual values it is necessary to send GET requirement to WWW server in device. Actual values are provided via file values.xml. Status of remote conditions is in file remote.xml. For more information on structure of these files see chapter 9.3. Compilation and upload of www pages to device For upload of WWW pages to data logger program WebFileCreator is required. Find this program at author website. For WebFileCreator correct funtion tftp.exe program is necessary. Install it for Windows 7 or Windows Vista. Store created pages to one directory and copy this to directory of program WebFileCreator (i.e. create subdirectory containing required HTML files). For proper function of sending data to SOAP server file soap must be available (optionally file soap.conf). If you enter IP address of device without specification of proper pages, automatic redirecting to the page index.html is performed. That is why it is suitable file index.html is always present. Procedures of pages upload: 1. Download program WebFileCreator from author website. 2. Unpack archive to the directory (e.g. C:\WebCreator). 3. Store all created/edited HTML files to one directory (e.g. C:\WebCreator\html) 4. Run program WebFileCreator (C:\WebCreator\WebFileCreator.exe). 46 ie-ms2-ms6app-09 5. Enter t filed From location of web pages (C:\WebCreator\html) 6. Press button Create. Web pages will be compiled to so called COB file. 7. Enter device IP address (item IP, or search device by means of button Find Device). 8. Press button Upload web to upload web pages. This operation takes about 30 s. During this operation do not switch off or disconnect the data logger. Open UDP communication port for TFTP transfer (UDP port 69) is necessary for successful upload. Additional information Names of files: Some file names of web pages have reserved name (i.e. these names cannot be used). Name of file index.html soap soap.conf values.xml remote.xml diag diag.log settings Description Beginning page. If only transmitter IP address is entered this file is displayed. This file should always exist. SOAP file. In sending SOAP message this file is processed. For proper function of SOAP protocol this file is necessary. Configuration fo HTTP header SOAPaction in sending of SOAP message. Actual value in XML file. Status of conditions and control of remote conditions. Diagnostic page Diagnostic file. Reserved file name. Limitation: In creation of user WWW pages some limitations must be considered. These limitations are caused especially by used hardware. - Respect reserved file names - Maximum size of any file is 64kB (HTML, JPG, etc.) - Total size of web pages is limited to 256kB - Special tags <% %> can be located only in files *.htm, *.html a *.xml. Other files are sent without search tags <% %>. - Server throughput in device is limited. The bigger your pages are the lower number of possible accesses at one time will be. Recommended are simple pages without many pictures read in parallel. Using of pages with frame it is not recommended. To format texts use CSS - best directly inserted in HTML file. Safety protection of WWW pages: Data logger enables to protect access to WWW pages by user name and password. For protection autentization HTTP/1.0 is used. If protection is active first display of WWW pages shows dialog for ie-ms2-ms6app-09 47 entering user name and password. After theirs correct entering pages are displayed. Close web browser for logout. If maximum protection is required it is suitable to deactivate pages. 9.3. XML files Ethernet interface provides information on actual values and status of conditions by means of XML files. Such information is possible to use for creation of dynamic WWW pages by means of AJAX technology. File can be also used for data transfer to master system. File also enables to control remote condition status. File values.xml contains all information on actually measured values (channel name, measured value, unit, status of alarms, etc.). In file remote.xml is information on status of conditions and file enables to set remote conditions. These files cannot be modified. Files are located directly in the device firmware. If XML file with different structure is required ti is possible to create it and store to space for WWW pages. In creation of this file using of tags <% %> is enabled. Reading of Actual values Reading of Actual values is possible to realize via file values.xml. Example file: <?xml version="1.0" encoding="ISO-8859-1"?> <device> <dscr>Warehouse 16</dscr> <sn>10060001</sn> <time>22.04.2010 08:41:40</time> <self>1</self> <acc>0</acc> <out>1</out> <mem>83</mem> <err>0</err> <c1> <n>Environment</n> <v>23.4</v> <u>°C</u> <p>Proces_1</p> <r>1</r> <a>0</a> <b>0</b> </c1> <c2> <n>Freezer 1L</n> <v>-16.3</v> <u>°C</u> <p></p> <r>0</r> <a>1</a> <b>0</b> </c2> ... ... <r1>0</r1> <r2>1</r2> ... ... </device> 48 ie-ms2-ms6app-09 Key <dscr> <sn> <time> <self> <acc> <out> <mem> <err> <n> <v> <cX> <u> <p> <r> <a> <b> <rX> Description Name of data logger. Text value maximum 16 characters. Serial number of data logger – 8 digits Actual time and date in format DD.NN.YYYY HH:MM:SS Status of data logger selftest (1 = OK, 0 = selftest error). Status of internal audio indication (0 = not active, 1 = active) Status of output ALARM OUT (0 = not active, 1 = active) Internal memory occupation of data logger in %. Number 0 – 100. Indication of validity of transferred data via file values.xml. If value of key is set to 1 transferred data via XML file are not valid – error status is indicated (e.g. Ethernet interface is not active, etc.). Name channel (maximum 16 characters). Measured value. Contains actual value in text format (e.g. 19.5). If channel is binary, optional text for proper status is transferred. With error status on channel number of error code is specified (e.g. Error 137). Other possible states: +INF, –INF a ???. Unit of channel (maximum 8 characters) Process (maximum 16 characters) Indication of active record for specified channel (0 = not active, 1 = active). Alarm I (0 = not active, 1 = active). Alarm II (0 = not active, 1 = active). Status of relays on connected relay board (0 = not active, 1 = active). If relay board is not installed value 0 is returned. Control of remote conditions Display of actual status of conditions is enabled by reading of file remote.xml. By means of this file it is also enabled to control remote conditions and realize alarm deactivation. This je performed by means of parameters in GET requirement. Example file: <?xml version="1.0" encoding="ISO-8859-1"?> <condition> <time>23.04.2010 07:59:33</time> <acc>0</acc> <out>1</out> <ach>1</ach> <auth>0</auth> <msg></msg> <err>0</err> <c1> <n>Environment</n> <cd>0122</cd> <en>0000</en> </c1> <c2> <n>Freezer 1L</n> <cd>1011</cd> <en>1111</en> </c2> ... ... </condition> Key <time> <acc> <out> ie-ms2-ms6app-09 Description Actual time and date in format DD.NN.YYYY HH:MM:SS Status of internal audio indication (0 = not active, 1 = active). Status of output ALARM OUT (0 = not active, 1 = active). 49 Key <ach> Description Information if it is possible to deactivate remotely alarm (1 = yes, 0 = no). Information if protection is activated (1 = yes, 0 = no). If protection is active with change of remote condition or alarm deactivation PIN code is required. Information message with control of remote conditions and alarm deactivation. Text of message can be as follows: Alarm deactivation is not allowed! No active alarm! Access denied! Wrong PIN code. Unknown error: X! Done. Alarm was deactivated. <auth> <msg> Not a remote condition! Access denied! Wrong PIN code. Unknown error: X! Done. Condition was changed to Inactive. Done. Condition was changed to Active. <err> <n> <cX> <cd> <en> Login fail - locked (X sec)! Indication of validity of transferred data via file remote.xml. If value of key is set to 1 transferred data via XML file are not valid – error status is indicated (e.g. Ethernet interface not active, etc.). Name of channel (maximum 16 characters). Specifies status of all four 4 conditions an channel. 0 = condition not active 1 = condition is active 2 = this condition is not enabled (activated) Specifies information if condition is remotely controllable (1 = yes, 0 = no). If setting of remote conditions from master control system is required, it is necessary to send proper command via GET requirement. In sent XML file is then in key <msg> information if required action was executed. If protection is active it is necessary to send in requirement also PIN code. If 3x incorrect entering of PIN code appears, control is blocked temporarily by means of GET requirements. Blocking period is 1 hour. Control of remote conditions via WWW pages is not blocked. Examples of GET requirements: – deactivation of alarm: http://192.168.1.201/remote.xml?cmd=alarm – deactivation of alarm with PIN code (1234): http://192.168.1.201/remote.xml?cmd=alarm&pin=1234 – change of remote condition status (channel 2, condition 1): http://192.168.1.201/remote.xml?cmd=condition&ch=2&cond=1 – change of remote condition status (channel 5, condition 4) with PIN code (1234): http://192.168.1.201/remote.xml?cmd=condition&pin=1234&ch=5&cond=4 50 ie-ms2-ms6app-09 9.4. E-mail Device enables to send warning e-mails up to three different addresses. These e-mails are sent when alarm is activated or deactivated. Also when error status on data logger appears (measurement error, configuration error, selftest error and exceeding of adjusted memory occupation). Supported autentization protocols For sending e-mails protocol SMTP on TCP port 25 is used. E-mails can be sent both without autentization and also with using SMTP autentization – see: Type of autentization without autentization AUTH LOGIN AUTH PLAIN CRAM-MD5 SSL Description Autentization not used. Suitable if SMTP server is accessible on local network. Basic autentization based on base64 algorithm. Password and user name are sent consequently. Autentization by means of base64. Password and username are sent at the same time. Protected password transfer. Encrypted way of user verifying and message transfer. Support Example of e-mail Testing message. 1: 2: 3: 4: 5: 6: 7: 8: 9: 10: 11: 12: 13: 14: 15: 16: Environment Freezer 1L Freezer 1R 23.7 °C -17.3 °C -18.5 °C alarm 2 active alarm 1,2 active no alarm Power supply A Cooling fluid ok 4.4 m/sec no alarm no alarm Cryogenics lab1 Cryogenics lab2 Bio-Tank 1 Bio-Tank 2 Bio-Tank 3 19.4 °C 18.3 °C -102.4 °C -87.6 °C -119.1 °C no alarm alarm 1 no alarm no alarm no alarm Power supply B ok no alarm For actual info visit http://192.168.1.41 . Have a nice day. ie-ms2-ms6app-09 51 9.5. SOAP protocol SOAP serves for sending of measured data to HTTP server. By means of this protocol measured data is sent as XML document (SOAP message). Advantage of this protocol is, sent data are not binary and hence SOAP message mostly passes free via firewall. Example of sent SOAP message Standard SOAP message sent by data logger has this format. SOAP message can be changed by the user. <?xml version="1.0" encoding="utf-8"?> <soap:Envelope xmlns:soap="http://schemas.xmlsoap.org/soap/envelope/" xmlns:xsi="http://www.w3.org/2001/XMLSchema-instance" xmlns:xsd="http://www.w3.org/2001/XMLSchema"> <soap:Body> <InsertMSxSample xmlns="http://cometsystem.cz/schemas/soapMSx.xsd"> <dscr>Warehouse 16</dscr> <sn>10060001</sn> <type>6</type> <time>22.04.2010 18:11:42</time> <self>1</self> <acc>0</acc> <out>1</out> <mem>83</mem> <timer>10</timer> <c1> <n>Environment</n> <v>25.04</v> <f>1A4CC841</f> <u>°C</u> <a>0</a> <b>0</b> <i>open;closed</i> <c>1;1;12;2;7</c> </c1> <c2> <n>Freezer 1L</n> <v>-49.97</v> <f>C8E147C2</f> <u>°C</u> <a>1</a> <b>0</b> <i>on;off</i> <c>1;1;12;2;7</c> </c2> ... ... <r>34826</r> </InsertMSxSample> </soap:Body> </soap:Envelope> Key <dscr> <sn> 52 Description Name of data logger. Text value maximum 16 characters. Serial number of data logger – 8 digits ie-ms2-ms6app-09 Key <time> <self> <acc> <out> <mem> <timer> <n> <v> <cX> <f> <u> <r> <a> <b> <i> <c> <r> Description Actual time and date in format DD.NN.YYYY HH:MM:SS Selftest status of data logger (1 = OK, 0 = selftest error). Status of internal audio indication (0 = not active, 1 = active) Status of output ALARM OUT (0 = not active, 1 = active) Occupation of data logger internal memory in %. Number 0 – 100. Interval of sending SOAP messages in seconds. Channel name (maximum 16 characters). Measured value. Contains Actual value in text format (e.g. 19.5). If channel is binary status 0 or 1 is transferred. If there is a error status on channel number of error code is specified (e.g. Error 137). Other possible states: +INF, –INF and ???. Value in float format. Contact manufacturer for its detailed description. Unit of channel (maximum 8 characters) Indication of active record for particular channel (0 = not active, 1 = active). Alarm I (0 = not active, 1 = active). Alarm II (0 = not active, 1 = active). Labels for BIN inputs status. Additional channel informations (channel enabled for measuring; recording active; channel type; number of decimal points; filter). Status of relay board (E.g. 34826 => 1000 1000 000 1010, RE1-off, RE2 – on, RE3-off, RE4-on, etc.) Change of SOAP message structure If needed it is possible to change XML document representing SOAP message. Place proper mark to the required location where values would be inserted - see table below. Store file with name soap and add it to the directory with web pages. Tag <%sn%> <%name%> <%time%> <%date%> <%ram%> <%slft%> <%iacs%> <%oacs%> <%tmr%> <%rst%> <%type%> <%cXn%> <%cXv%> Description Serial number of data logger Name of data logger (maximum 16 characters) Actual time in data logger Actual date in data logger Occupation of internal memory [%] Status of selftest Internal audio indication Output ALARM OUT Interval of sending SOAP messages [sec] Status of relay (…10 = active RE2) Device type (6 = MS6, 85 = MS55) Name of channel <%cXf%> <%cXu%> <%cXa%> <%cXb%> <%cXt%> <%cXp%> <%cXi> <%cXc> Float value Unit Alarm I (yellow LED) Alarm II (red LED) Type of channel Number of digits right from decimal points Labels for BIN inputs status. Additional channel informations (channel enabled for measuring; recording active; channel type; number of decimal points; filter) Actual measured value Example of generated text 10060001 MS in kitchen 13:43:57 02.01.2010 43 0/1 0/1 0/1 60 5 6 Ch1 name -9.95 (pro BIN 0/1), Error X 01AC05C3 V 0/1 0/1 4 2 on;off 1;1;12;2;7 Simple example of XML document (only actual value from channel 1): <?xml version="1.0" encoding="utf-8"?> <soap:Envelope xmlns:soap="http://schemas.xmlsoap.org/soap/envelope/" xmlns:xsi="http://www.w3.org/2001/XMLSchema-instance" xmlns:xsd="http://www.w3.org/2001/XMLSchema"> ie-ms2-ms6app-09 53 <soap:Body> <ms6 xmlns="http://example.com/schemas/ms6.xsd"> <channel1><%c1%></channel1> </ms6> </soap:Body> </soap:Envelope> If you want to change value sent in HTTP header of SOAPaction edit file soap.conf. 9.6. Protocol Syslog Data logger informs on alarms and error states by means of Syslog protocol. For transfer of messages UDP protocol is used to port 514. Data logger supports Syslog protocol in accordance with RFC5424 specification. Following messages are sent: system Syslog message Device init OK Testing message Firmware was updated e-mail Email login error Email auth error Email some error SOAP Email sock error SOAP file not found SOAP host error SOAP sock error SOAP delivery error condition error alarms WWW Login from IP: x.x.x.x 54 Alarm CHx, nr:1 Alarm CHx, nr:2 Clearing CHx, nr:1 Clearing CHx, nr:2 Measurement error Configuration error Selftest error Full memory warning Alarm deactivated Cond CHx-c activated Cond CHx-c deactivated Description Information on data logger Ethernet interface restart. Testing SNMP Trap. Report on upload of new firmware version. It was not possible to log in SMTP server. TCP connection with server was established, but server responds incorrectly. Error of autentization on SMTP server. Incorrect user name and password or server does not support used type of autentization. E-mail probably was not sent. Server returns incorrect return code during communication. It was not possible to open TCP connection on SMTP server. In area of www pages soap file was not found. It is not possible to send SOAP message. Incorrect address length of SOAP server. It was not possible to open TCP connection on SOAP server. Unknown error in SOAP message sending. Message probably was not delivered. To www server requirement was sent without specified user name and password. It is necessary to display form for entering name and password. In message client IP address is specified, requirement was sent from. Activation of alarm I on specified data logger channel. Activation of alarm II on data logger channel. Deactivation of alarm I on data logger channel. Deactivation of alarm II on data logger channel. Error on some data logger channel. Error of data logger configuration. Selftest error. Error of data logger memory occupation. Adjusted limit was exceeded. Remote alarm deactivation by means of www pages or XML file was performed. Remote condition activation was performed by means of www or XML file. Deactivation of remote condition from www or XML. ie-ms2-ms6app-09 9.7. Protocol SNMP By means of SNMP protocol it is possible to read of actual values from data logger. For proper assignment of OID (Object identifier) so called MIB table is required. These tables can be found at Ethernet inerface website. Data logger supports protocol SNMP version 1. Data logger also can actively inform on error states and alarm values by means of so called SNMP Trap messages. Trap can be sent up to three independent IP addresses. condition error alarmy WWW SOAP e-mail system Trap 0/0 6/0 6/1 6/2 6/3 6/4 6/5 6/6 6/7 6/8 6/9 6/10 6/11 6/12 6/21 6/22 6/30 6/31 6/32 6/33 6/40 6/41 6/42 Description Information on data logger Ethernet interface restart (OID: 1.3.6.1.2.1.1.1.0 and 1.3.6.1.2.1.1.3.0). Testing SNMP Trap. Report on new firmware version upload. Log in to SMTP server was not possible. TCP connection with server was established, but server responded incorrectly. Error of autentization on SMTP server. Incorrect user name and password or server does not support used type of autentization. E-mail was not probably sent. Server returned incorrect return code during communication. It was not possible to open TCP connection on SMTP server. In area of www pages soap file was not found. It is not possible to send SOAP message. Incorrect length of SOAP server address. It was not possible to open TCP connection on SOAP server. Unknown error in sending of SOAP message. Message probably was not delivered. To www server requirement without specified user name and password was sent. It is necessary to display form for entering of name and password. In message client IP address is specified, requirement was sent from. Activation of alarm I on specified data logger channel. Activation of alarm II on data logger channel. Deactivation of alarm I on data logger channel. Deactivation of alarm II on data logger channel. Error on some data logger channels. Data logger configuration error. Error of selftest. Error of data logger memory occupation. Adjusted limit was exceeded. Remote alarm deactivation by means of www pages or XML file was performed. Remote condition activation was performed by means of www or XML file. Deactivation of remote condition from www or XML. ie-ms2-ms6app-09 55 9.8. Modbus TCP protocol By means of ModbusTCP protocol is possible read current values from data logger. Remote conditions control and alarm deactivation is also available via Modbus protocol. TCP port is configured to 502 by default. Port number is user configurable using software for MS dataloggers. Unit Identifier field can be arbitrary. Data logger serves only one Modbus request at one time. Before sending new request you need to wait for previous response. Supported Modbus commands (firmware version 6-5-1-7 and later): Command/Function Read Holding Registers Read Input Registers Write Single Register Function code [HEX] 0x03 0x04 0x06 Description Reads 16 bit register(s) Reads 16 bit register(s) Write one 16 bit register. When security is used must be user "SCADAUSER" in user list set. This user must have PIN1 set properly. Modbus registers of the device (firmware version 6-5-1-7 and later): Variable Format Mode Data logger serial number BCD Data logger model number Selftest status Internal acoustic state Alarm OUT state Memory occupation [%] Relay board state Channel value INT Channel value INT*100 Alarm I state Alarm II state Channel value FLOAT Conditions state: HEX INT INT INT INT BIT INT INT*100 INT INT FLOAT DEC 1) R Address [HEX] 3) 0x00–0x03 Length [bit] 4x 16b R R R R R R R R R R R R/W 0x04 0x05 0x06 0x07 0x08 0x09 0x10-0x1F 0x20–0x2F 0x30–0x3F 0x40–0x4F 0x50–0x6F 0x70–0xAF 16b 16b 16b 16b 16b 16b 16x 16x 16x 16x 16x 64x 2) channel 1 cond 1=0x70 channel 1 cond 2=0x71 channel 1 cond 3=0x72 channel 1 cond 4=0x73 channel 2 cond 1=0x74 channel 2 cond 2=0x75 channel 2 cond 3=0x76 channel 2 cond 4=0x77 channel 3 cond 1=0x78 channel 3 cond 2=0x79 etc. Confirmation of alarm signalization 16b 16b 16b 16b 32b 16b Notice Serial number has four BCD registers 0x06=MS6, 0x55=MS55 1=OK, 0=error 0= inactive, 1=active 0=inactive, 1=active 0 – 100% memory occupation Every bit means one relay e.g. 185=185°C e.g. 185=1.85°C 0=inactive, 1=active alarm 0=inactive, 1=active alarm current condition state is returned to read command: (0=cond. inactive, 1=cond. active) remote conditions can be set by write command: (0=deactivate cond., 1=activate cond.) exception 2 (illegal data address) is returned to write request of condition which is not set to remote DEC W 0xB0 16b by exception 3 (ilegal data value) is signalised write error write arbitrary values for alarm confirmation, register is write only error is signalised by exception 3 (ilegal data value) 56 ie-ms2-ms6app-09 Notes: 1) Error value has number 0x8000. This number indicates error on channel and also Modbus register overflow. BCD … variable have BCD encoding HEX … variable have hexadecimal representation BIT … 16b variable, every bit have own meaning INT … 16b signed number, range -32760 to 32760 INT*100 … 16b signed number. Value from channel is multiplied by 100. Range from -327.60 to 327.60 FLOAT … values are encoding by 32b float. Float representation is based on IEEE 754. Error codes are represented by the special numbers. For more information please contact device manufacturer. 2) Modbus register mode. According register mode can be used proper Modbus command/function. R ... registr is read only, W ... rgister is write only, R/W ... read/write accesss for redister is available 3) Listed are numbers of the Modbus registers. The register number is always one greater than Modbus addresses. 9.9. Communication ports Following table contains list of all communication ports of data logger: Port Destination TCP/10001 Source client/ server server Service/Protocol Change of port TCP/25 TCP/80 TCP/??1) TCP/??2) client client Communication with MS software Embedded WWW server SMTP SOAP TCP/502 UDP/514 UDP/514 server client ModbusTCP Syslog protocol TCP/80 server Note Protocol for e-mail sending Active sending by means of TCP/HTTP. Active sending by means of UDP/Syslog. UDP/161 UDP/162 TCP/9999 UDP/162 server client server SNMP v1 SNMP – Trap Telnet UDP/50697 UDP/50697 client Diagnostics Diagnostic broadcast message. UDP/30718 server UDP/69 server ICMP/echo server Configuration protocol Upload of new firmware Response on ping Protocol used for sending testing emails, search of data loggers, etc. Upload of new FW by means of TFTP protocol. Ping is not possible to deactivate. Active sending UDP/SNMP – Trap Not documented. Only for service purposes. Notes: 1) For each connection new number of source port is generated. 2) If source port is set to 0, for each connection new number source port is generated. It is suitable to let this setting to 0. In opposite case it can cause problems on SOAP server. 9.10. Safety Never connect data logger directly to the Internet network. Always it is necessary to correctly configure safety element in front of data logger – firewall. Mind the protection of redirected ports. For remote access from Internet it is suitable to use VPN or other safety way. ie-ms2-ms6app-09 57 Do not underestimate protection of your data logger. Possible attack to incorrectly protected data logger can cause loss of data or even damage of data logger! 58 ie-ms2-ms6app-09 APPENDIX 10: Security – Users and passwords administration This appendix describes protection of data logger MS6 against unauthorized access. This issue is applied to the following levels: Communication encryption Users and passwords list Login dialog settings Program security Data logger security Synchronization of users and passwords list (centralized administration of users and passwords) 1. Communication encryption If data logger security is active, system uses communication encryption automaticaly and uses access data of the current logged user (name and password) for it. 2. Users and passwords list Security is commonly implemented by the system of users and passwords list where users have been allocated access rights. The list of authorized users is applied in the level of data logger security (list in the data logger) and in the level of program security (list in the program), it means, in the system can be two or more independent lists of users and passwords (system is computer/computers with connection of one or more data loggers). The list of users and passwords can contain up to 16 users with following properties: User name – unique user name for the access to the account (login). Name and surname – name and surname of the user. Description – description of the user account. Password – user password creation (available through new account creating only). Password confirmation – user password confirmation (available through new account creating only). Change password – password change of the selected user (available through account editing only). Group membership – membership in the group of users User with limited rights – it is possible define access to the HW and SW protected functions except access to the security administration for the member of this group. Administrator – member of this group has unlimited access to the HW and SW protected functions including security administration. SW protected functions – distinguished functions for work with the program. HW protected functions – distinguished functions for work with data logger. Export – save list of users and passwords to the file. Import – load list of users and passwords from the file. List of users and passwords stored in the file can be used for transfer of users between program installations on more computers, for theirs back-up or for import to the data logger. This file should be stored on save place! ie-ms2-ms6app-09 59 3. Login dialog settings Option “Login dialog settings” is designed for settings of behaviour of login dialogs (is related to program security and data logger security also!). At application startup only Login dialog is used only once, at the time of first run. Entered access data is used at the next time automaticaly until access data become invalid. Then it’s required to enter access data again. Data become invalid for example in this cases: program shut down, user log out, access data are invalid. Before every protected functions Login data have to enter every time when access rights verification is required. It’s access verification to some protected functions almost. 4. Program security Program security (SW security) is protection against unauthorized access to the program and restriction of program functions according to settings of users rights. It limits access to the program and program’s “Protected functions” according to users rights defined in the list of users and passwords in the program. By activating of the option “SW security” is set administrator account and it’s required new password for it. It’s required login to the user account after settings is applied and/or program startup otherwise you can’t work with the program. Current user can be logged out by option “User logout...” from the menu File. 60 ie-ms2-ms6app-09 SW protected functions: Program options settings Protection of program options setting (Folders, Display, Autodownload). Communication settigns Protection of communication settings editing (list of communication interfaces and data loggers). Clear display statistics Protection of statistics reset of the current data logger in the Display mode on the corresponding tab. Clear display alarms Protection of alarm records erasing of the current data logger in the Display mode on the corresponding tab. Delete event viewer messages Protection of messages deleting in the event viewer. Other functions of the security: User same security settings and user list for all dataloggers See Synchronization of users and passwords list (centralized administration of users and passwords). User activity logging By activating this option is possible log specific users activity. Logged events are stored and available to show through event viewer. 5. Data logger security Data logger security (HW security) is protection against unauthorized access to the data logger and restriction of data logger configuration possibilities according to settings of users rights. It limits access to the data logger, data logger’s “Protected functions” and configuration possibilities according to users rights defined in the list of users and passwords in the data logger. By activating of the option “Security On/Off” is set administrator account and it’s required new password for it. Then it’s possible to edit users account of the data logger. If data logger security is active, it’s performed verification of users rights during each of access attempt to the data logger (it depends on settings of option “Login dialog settings”, eventually on data logger account synchronization with computer). ie-ms2-ms6app-09 61 HW protected functions: Data logger settings writing User can save performed changes to the data logger. Erase memory, reset counter inputs Alarm confirmation by PIN1 User is authorized to cancel (confirm) alarm signalization base on assigned PIN. Alarm signalization is possible cancel (confirm) by following ways: - By option “Deactivate alarm signalization” from the program menu (menu Configuration) - By button “Enter” on the data logger keyboard - In the menu of data logger keyboard (data loggers with display only) 6. Synchronization of users and passwords (centralized administration of users and passwords) Synchronization means using of same security settings and users list for all dataloggers. It can be set by appropriate option in the program options on the tab “Users and passwords”. If it’s active, it’s used only one, centralized users list in the system. This list is managed in the program options and it’s distributed to the data loggers. If data logger is synchronized, users account editing is unavailable in the data logger. List distribution is performed: Globally After changes of program options is confirmed, request for synchronization is rised. It the request is confirmed, synchronization is performed for all available data loggers (see list of data loggers in the communication settings). Distributively o Through program menu (option “Update users and passwords in datalogger”) Synchronization of selected data logger is performed. o Before access to data logger configuration After dialog of synchronization request is confirmed, synchronization of selected data logger is performed. Synchronization checking is made through each of access attempt to the data logger configuration. If data logger is not synchronized for some reason, user is requested to perform synchronization of date logger. Synchronization process can be made by user with administrator access rights for data logger only (in data logger without security is every approaching user administrator). If security in data logger is not active due to synchronization, it’s switched on. If you switch off synchronization, it remains valid last known configuration in every data logger (configuration, let us say security is without changes in data logger) and security in data logger is administrated distributively for selected data logger. It’s possible switched off security for selected data logger and it means switched off synchronization for this data logger (administrator only). 62 ie-ms2-ms6app-09 Examples of security settings 1. Restriction of the program startup and functionality, data logger has no security User want to secure the system on the computer side only. Characteristics - Security (users and passwords) is set in computer only. If data logger is connected to other computer that has no security, access to the data logger is without protection (unlimited). It’s possible to set restriction of work with program for the user (see SW protected functions). Easy settings Low level of the security Settings Switch on security in program options, option “SW security”, and create new administrator password. Add/remove user to/from the list of users and passwords. Edit user’s properties in the list of users and passwords – button “Properties”. In user account on the tab “Details” can be set restriction for work with program (SW protected functions). Save the settings. After you set the settings, log in to the program. 2. Data logger with active security and with access from more computers User want to secure selected data logger and it don’t make any difference computer security (program security). For example, data logger connected by ethernet and it can be available from more computers. Characteristics - - Security (users and passwords) is set in data logger only. Communication between computer and data logger is encrypted by password. You need to know login data (name and password) for the access to data logger. This data can be stored in the computer. When you are connected to data logger from any other computer, you need to enter login data again. It can be set restriction of work with data logger for the user (see HW protected functions). Higher level of security ie-ms2-ms6app-09 63 Settings Switch on data logger security, option “Security On/Off”, and create new administrator password. It can be edit user’s properties in the section “users list”. In user’s properties (user account) on the tab “Details” can be set restriction for work with data logger (HW protected functions). Save the settings (configuration). 3. Identification of user who canceled (confirmed) alarm signalization It’s possible to record events of alarm signalization revocation in the measured values and identify the user who performed this action (this record is available with co-operation with identification of user only). Identification of user who canceled (confirmed) alarm signalization is available only, if data logger seturity is active. Characteristics - - There is active security (users and passwords) in the data logger. Communication between computer and data logger is encrypted by password. You need to know login data (name and password) for the access to data logger. This data can be stored in the computer. When you are connected to data logger from any other computer, you need to enter login data again. It can be set restriction of work with data logger for the user (see HW protected functions). Higher level of security Alarm signalization revocation is performed by enter PIN1 on the data logger keyboard or in the computer. Settings First follow steps from previous example (ex. 2). Go to the tab “Details” in user account. Select option “Alarm confirmation by PIN1” and create new PIN1 for selected user. You can repeat this step for any number of users in the list. 64 ie-ms2-ms6app-09 Choose option from where can be alarm signalization canceled (confirmed) – main window of data logger settings (configuration), tab “Common”, section “Confirmation of alarm signalization”. Go to the tab “Profile” and enable option “Recording of ALARM OUT state changes” in the section “Alarm signalization”. Save data logger settings (configuration). ie-ms2-ms6app-09 65 4. Security of more data loggers with centralized administration from one computer User works with many data loggers from one place (computer) and this data loggers share security (users and passwords). Characteristics - - There is active security (users and passwords) in all of data loggers. Communication between computer and data loggers is encrypted by password. You need to know login data (name and password) for the access to the system. This data can be stored in the computer. When you are connected to data loggers from any other computer, you need to enter login data again. Program checks changes of the security (users and passwords) settings and update it in the data loggers. It can be set restriction of work with data logger (HW protected functions) and restriction of work with program (SW protected functions) for the user. High level of security Settings First follow steps from example 1. In addition enable option “Use same security settings and user list for all data loggers”. 66 ie-ms2-ms6app-09 After settings confirmation log in to the program as administrator. Then confirm synchronization request (button YES in the dialog). Software set up security for each of available data loggers through synchonization process. Changes of security (users and passwords) in data logger require memory delete, that is why user is inform about it and may download current records from data logger before memory is deleted. If you select “Cancel” option, current data logger is skipped (synchronization is not applied on it) and synchronization process continue with next available data logger from the list. User is inform about synchronization finalization by summary table with synchronization result. ie-ms2-ms6app-09 67 68 ie-ms2-ms6app-09 Appendix 11: NTC thermistor input MS6 data logger can measure temperature by using NTC thermistors. Because of the fact a wide range of thermistors with different parameters is on the market, the user-defined coefficients of thermistor equation are saved in data logger to calculate the temperature from the measured thermistor resistance. Up to 16 NTC thermistors can be connected to data logger but each of them must have the same curve. It is not possible to combine more thermistors with different characteristics together. Important notice: NTC thermistors are supported for MS6 firmware version 6.2.0 or later. To check if the thermistor is suitable for work with data logger, it is necessary to take into consideration: MS6 data logger can measure resistance from 0 ohms to 11,000 ohms. It means that the lowest measured temperature corresponds to the resistance of the thermistor about 11,000 ohms. Thermistor has an exponential curve. Accuracy of data logger for resistance measuring is 0.1% FS (eg ± 10 ohms for input range 10,000 ohms). Check if accuracy for high temperatures is acceptable for you. You will need the table with dependence of thermistor resistance on its temperature from the the thermistor manufacturer or Steinhart-Hart equation coefficients. During the setting of data logger the lowest measured temperature and accuracy are calculated and displayed in the software window. Data logger is factory preset to the thermistor R25 = 2252Ω/ R70 = 394.5 ohms, input range 0 to 10 kΩ. In this setting, the lowest measured temperature is approx. -7°C (accuracy: ±0,02°C). For temperature +25°C is accuracy ±0,1°C and for +70°C is accuracy ±0,75 °C. How to change the thermistor curve? Launch the software for data logger with master parameter (see Appendix 5: Advanced settings of data logger) Read the configuration of data logger. Select Advanced Options bookmark - NTC thermistor section. There you can see the current settings of the thermistor. Click the Definition of parameters button in this section. The window with thermistor curve definition will appear. Insert resistance of thermistor for temperatures of 0 °C, 25 °C and 70 ° C or insert Steinhart-Hart equation coefficients (a, b, c). If you work in the different temperature range, the resistance can be entered for a different temperature than the default values. Select a suitable resistance range of the data logger depending on required temperature range and accuracy. After changing of range you can see the information field with the minimum measurable temperature and accuracies. If you need to measure more accurately for higher temperatures at default settings (2252Ω), change the resistance range to (03000)Ω . Accuracy for the +80 ° C falls to 0.22 °C, however, the lowest measured temperature rises to about 17 ° C. Confirm the window and set required input channels to NTC thermistor. Save configuration to the data logger. Note: Steinhart – Hart equation: 1 T a b * ln( R) c * ln3 ( R) [K, Ω] This equation is used for the conversion of the measured resistance to temperature. The coefficients can be entered either directly or calculated by software from three entered points. ie-ms2-ms6app-09 69