1
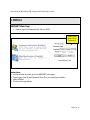
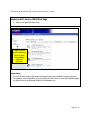
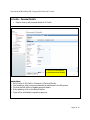
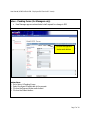
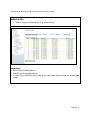
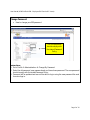
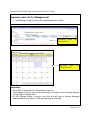
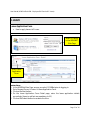
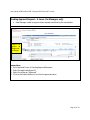
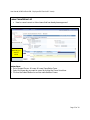
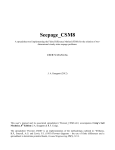
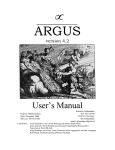
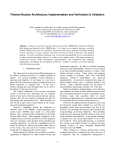
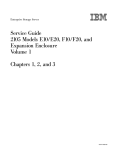
User Manual (HCMS Unified HCM – Employee Self-Service & E-Leave) Table of Contents E-PROFILE 3 HRMSNET Main Page How to log on to Employee Self-Service (ESS) 3 Employee Self-Service (ESS) Main Page How to navigate ESS main page 4 E-Profile – Personal Details How to view or edit personal details in E-Profile 5 E-Profile – My Addresses How to view or edit address details in E-Profile 6 Inbox – Pending Forms (for Managers only) How Manager approve subordinate’s staff request for change in ESS 7 Historical Info How to view your historical info (e.g. Leave History) 8 Change Password How to change your ESS password 9 Supervisor Leave List (for Managers only) How Manager is able to check if their subordinates are on leave 10 E-LEAVE 11 Leave Application Form How to apply leave via E-Leave 11 Pending Approval Request – E-Leave (for Managers only) How Manager is able to approve leave request submitted by the subordinate 12 Leave Cancellation List How to cancel current or future leave that has already been approved 13 Page 2 of 14 User Manual (HCMS Unified HCM – Employee Self-Service & E-Leave) E-PROFILE HRMSNET Main Page How to log on to Employee Self-Service (ESS) Type in your User ID and Password Instructions: 1. On the Internet browser, go to the HRMSNET main page. 2. Type in your User ID and Password. (User ID is your employee number) 3. Select ESSNet. 4. Click on the Login button. Page 3 of 14 User Manual (HCMS Unified HCM – Employee Self-Service & E-Leave) Employee Self-Service (ESS) Main Page How to navigate ESS main page Double-click on any of the listed items to view the available pages for selection Instructions: 1. On the ESS main page, a side menu and top menu bar are available for page selection. 2. For example, you may double-click on Profile and drill-down to view the available pages for selection such as Personal Details, My Addresses, etc. Page 4 of 14 User Manual (HCMS Unified HCM – Employee Self-Service & E-Leave) E-Profile – Personal Details How to view or edit personal details in E-Profile Click on the Edit button to update personal details Instructions: 1. Go to Profile My Profile Personal Personal Details. 2. You are able to view your personal details as maintained in the HR system. 3. Click on the Edit button to update personal details. 4. After updating, click on the Submit button. 5. Form will be escalated to respective approver. Page 5 of 14 User Manual (HCMS Unified HCM – Employee Self-Service & E-Leave) E-Profile – My Addresses How to view or edit address details in E-Profile Instructions: 1. Go to Profile My Profile Personal My Addresses. 2. You are able to view your address information as maintained in the HR system. 3. Click on the Edit button to update address information. 4. After updating, click on the Submit button. 5. Form will be escalated to respective approver. Page 6 of 14 User Manual (HCMS Unified HCM – Employee Self-Service & E-Leave) Inbox – Pending Forms (for Managers only) How Manager approve subordinate’s staff request for change in ESS Click on the Approve status radio button Instructions: 1. Go to Inbox Pending Forms. 2. Select the Agent ID applicable to the request. 3. Click on the Approve status radio button.. 4. Click on the Submit button Page 7 of 14 User Manual (HCMS Unified HCM – Employee Self-Service & E-Leave) Historical Info How to view your historical info (e.g. Leave History) Instructions: 1. Go to Profile Historical Info 2. Select from the available options. 3. If Leave List is selected, user is able to see their leave history based on defined date range. Page 8 of 14 User Manual (HCMS Unified HCM – Employee Self-Service & E-Leave) Change Password How to change your ESS password The new password should comply with the stated Password Policy Instructions: 1. Go to Profile Administration Change My Password. 2. Enter the old password, new password and confirmed new password. The new password should comply with the stated Password Policy. 3. Password will be updated and user will be able to log in using the new password the next time she logs in. Page 9 of 14 User Manual (HCMS Unified HCM – Employee Self-Service & E-Leave) Supervisor Leave List (for Managers only) How Manager is able to check if their subordinates are on leave Supervisor Leave List (Listing View) Supervisor Leave List (Calendar View) Instructions: 1. Go to Staff Supervisor List Supervisor Leave List. 2. The Manager is able to view which subordinate is on leave via the following displays: Listing View or Calendar View. 3. On the Calendar Display, clicking on the blue text will open a window displaying additional details (e.g. name of staff applying leave on that date) Page 10 of 14 User Manual (HCMS Unified HCM – Employee Self-Service & E-Leave) E-LEAVE Leave Application Form How to apply leave via E-Leave Select FLOWNet in the HRMSNET Main Page Select Leave Application Form Instructions: 1. In the HRMSNet Main Page, ensure you select FLOWNet prior to logging in. 2. Go to Request Forms Leave Leave Application Form. 3. Click on the Next button. 4. On the Leave Application Form Detail page, enter the leave application details accordingly (items in red font are mandatory to fill) 5. Click on the Submit button to escalate the form. Page 11 of 14 User Manual (HCMS Unified HCM – Employee Self-Service & E-Leave) Pending Approval Request – E-Leave (for Managers only) How Manager is able to approve leave request submitted by the subordinate Select the status as Approved or Reject Instructions: 1. Go to Approval Forms Pending Approval Requests. 2. Select the applicable Agent ID. 3. Select the status as “Approved”. 4. Click on the Submit button to confirm the approval status. Page 12 of 14 User Manual (HCMS Unified HCM – Employee Self-Service & E-Leave) Leave Cancellation List How to cancel current or future leave that has already been approved Select the leave day you want to cancel Instructions: 1. Go to Request Forms Leave Leave Cancellation Form. 2. Select the leave day you want to cancel by ticking the Cancel checkbox. 3. Click on the Submit button to confirm cancellation of leave. Page 13 of 14 User Manual (HCMS Unified HCM – Employee Self-Service & E-Leave) Notes: Page 14 of 14