1
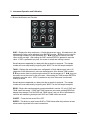
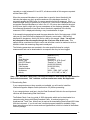
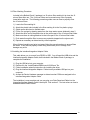
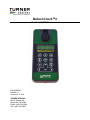
Ballast-CheckTM2 Handheld PAM Fluorometer P/N: 998-8501 Revision: H November 11 2015 TURNER DESIGNS 845 W. Maude Ave. Sunnyvale, CA 94085 Phone: (408) 749-0994 FAX: (408) 749-0998 Table of Contents 1 Introduction 1.1 Description 1.2 PAM Fluorometry 1.3 Quick View Diagrams 1.4 Inspection 1.5 General Information, Precautions & Cleaning 2 4 4 4 5 5 Instrument Operation and Calibration 2.1 Button Identification and Function 2.2 Instrument Power Up 2.3 Calibration Verification 2.4 Filtering Samples 2.5 Measuring a Sample 2.6 Data Displayed 2.7 Downloading Data 2.8 Filter Washing Procedure 2.9 Installing the Interface/Integration Adaptor Cable 6 7 8 8 9 10 11 13 13 3 Sample Analysis Guidelines 14 4 Measurement Parameters 4.1 Abundance 4.2 Activity 4.3 Calculations 15 15 15 Warranty 5.1 Terms 5.2 Warranty Service 5.3 Out of Warranty Service 17 17 17 5 Appendixes A Specifications B Error Readings and Warning Messages Ballast-Check 2 User’s Manual 19 20 2 WASTE ELECTRICAL AND ELECTRONIC EQUIPMENT (WEEE) DIRECTIVE Turner Designs is in the business of designing and selling products that benefit the well-being of our environment. Accordingly, we are concerned with preserving the surroundings wherever our instruments are used and happy to work with customers by complying with the WEEE Directive to reduce the environmental impact resulting from the use of our products. WEEE Return Process: To arrange the return of an end-of-life product, proceed as follows: If you purchased your instrument through a Turner Designs Distributor please contact your local representative. They will instruct you where to return the end-of-life product. If you purchased your instrument directly from Turner Designs please contact Turner Designs Customer Service By Phone: 1-408-212-4041 or Toll Free: (877) 316.8049 By Email: Customer Service at [email protected] Turner Designs will provide a WEEE RMA Number, a Shipping Account Number, and a Ship to Address. Package and ship the product back to Turner Designs. The product will be dealt with per Turner Designs’ end-of-life recycling program in an environmentally friendly way. Ballast-Check 2 User’s Manual 3 1 Introduction 1.1 Description The Ballast-Check 2 provides users with a rapid estimation of relative Abundance and Activity of algae in ballast water samples to help users quickly assess the risk of gross exceedance of the discharge standard for ballast water. Risk of contamination is determined using both Abundance and Activity values. High Risk: Low Risk: High Algal Abundance Low Algal Abundance AND OR High Algal Activity Low Algal Activity 1.2 PAM Fluorometry The Ballast-Check 2 is a Pulse Amplitude Modulated (PAM) Fluorometer. Pulse amplitude modulation is a process that uses varying light intensities delivered in a series of pulses for looking at fluorescence quenching to determine photosynthetic efficiency of algae or plant material. There are two measurement modes, single and multiple turnover. The BallastCheck 2 is a multiple turnover PAM fluorometer in that one saturating pulse of light is delivered to the sample to quickly reach the maximum fluorescence value with the interest of only looking at how efficient algae are at photosynthesizing, essentially determining the activity of the organisms. High degree of activity means a high survival rate and low activity means the algae aren’t capable of efficiently photosynthesizing and have a low survival rate. 1.3 Quick View Diagrams The Ballast-Check 2 uses four standard or rechargeable AAA user-replaceable batteries. Battery panel O-ring Ballast-Check 2 User’s Manual 4 1.4 Inspection Upon receiving your instrument, please inspect everything carefully and make sure all accessories are included. The Ballast-Check 2 package comes in a carrying case that includes: The Ballast-Check 2 inside a storage pouch (batteries included) Instrument-specific Calibration Check Standard (stored in pouch’s compartment) Laminated Quick Start Guide (QSG) Laminated Calibration Certificate 2 - glass 10x10mm cuvettes 60cc plastic syringe 3 - 10µ filter capsules Filter Washing Kit Kim Wipes Wrist Strap Data download cable and serial to USB adapter cable USB Flash Drive with User’s Manual, QSG, and serial to USB cable driver 4 - AAA replacement batteries 1.5 General Information, Precautions and Cleaning The plastic battery tab at the back of the Ballast-Check 2 must be removed before use. Grasp it firmly and pull gently to remove it exposing the battery terminals to enable power to the Ballast-Check 2. Grasp the plastic tab firmly and pull gently to remove. Use caution around solvents, they may degrade the plastic case of the Ballast-Check 2. If a sample is accidentally spilled inside the sample compartment, invert the BallastCheck 2 to drain out the excess liquid. Then wipe the inside area dry with a clean soft towel or tissue followed by a quick wipe using the Kim Wipes provided. If extra cleaning is needed, use a mild detergent to dampen the towel for cleaning. Although the Ballast-Check 2 floats, do not submerge it in water. Do not expose the Ballast-Check 2 to temperatures outside the specified range of 5 to 40 °C or damage may occur to the unit that will not be covered under warranty. Ballast-Check 2 User’s Manual 5 2. Instrument Operation and Calibration 2.1 Button Identification and Function SHIP – Displays the ship number as a 12-digit alphanumeric value. All characters in the alphanumeric value can be adjusted to set the SHIP number. keys can be used to cycle through numbers 0-9 and characters A-Z. keys can be used to move the cursor to the next digit. After setting the SHIP number ENTER is pressed to save the value. If ESC is pressed at any time, the screen is exited and nothing is saved. Saved values are appended to a data point after a sample is analyzed. The sample number will count sequentially, beginning with “#0001” for the first sample analyzed. TANK – Displays the tank number as a configurable 10-digit alphanumeric value. All characters in the alphanumeric value can be adjusted to set a desired TANK number. keys can be used to cycle through numbers 0-9 and characters A-Z. keys can be used to move the cursor to the next value. After setting the TANK number ENTER is pressed to save the value. If ESC is pressed at any time, the screen is exited and nothing is saved. Saved values are appended to a data point after a sample is analyzed. The sample number will count sequentially, beginning with “#0001” for the first sample analyzed. READ – Begins the sample analysis procedure detailed in section 2.5, only if SHIP and TANK values are saved. If SHIP and TANK values are not saved, pressing READ will display the message “First Set SHIP and TANK Values” and you will not be allowed to continue with measuring a sample until SHIP and TANK values are saved. ON/OFF – Turns the instrument ON or OFF. ENTER – This button is used to save SHIP or TANK values after they’ve been set and allows users to proceed to the next screen/menu. Ballast-Check 2 User’s Manual 6 DATA – When the DATA button is pressed users can choose between either sending/clearing data or setting date/time. Use the keys to choose between the two options; a marker will indicate the selection made. If SEND/CLEAR DATA is selected, press ENTER and a submenu will display. Users can choose, using keys, to either send data to a connected computer (see section 2.7) or clear logged data; a marker will indicate the selection made. o o If SEND DATA is selected and ENTER is pressed, the instrument will send all logged data out as an ASCII file (see section 2.7). If CLEAR DATA is selected, the following message will display; “ENTER TO CONFIRM CLEAR DATA”; when ENTER is pressed all logged data will be deleted. If SET DATE/TIME is selected, press ENTER and date and time will display on the screen as (MM/DD/YYYY) and (hh:mm). Use the keys to select either parameter; a marker will indicate selection. o o If MM/DD/YYYY is selected, press ENTER and you will be allowed to adjust the month, date, and year using the keys. Press ENTER to save the set date. If ESC is pressed prior to saving the set date, the screen is exited and nothing is saved. Date is logged per sample. If hh:mm is selected, press ENTER and you will be allowed to adjust the hour and minutes using the keys. Press ENTER to save the set time. If ESC is pressed prior to saving the set time, the screen is exited and nothing is saved. Time is logged per sample. ESC – Exits to the previous or home screen CHK STD – Is used to determine instrument performance. “Cal. Check Passed” or “Cal. Check Failed” will be displayed after measuring the Calibration Check Standard using the CHK STD button indicating whether the Ballast-Check 2 can continue to be used for sample analysis or should be returned to the factory. 2.2 Instrument Power Up Press the ON/OFF button to power on the Ballast-Check 2. After a 5 second warm up, the Ballast-Check 2 is ready for operation. Pressing the ON/OFF button again will turn the unit off or if left idle on the HOME screen for 3 minutes the unit will automatically turn off to save battery power. Note: The Ballast-Check 2 will not automatically turn off if left idle while running a sample. HOME SCREEN The home screen will display the current date, time, Ballast-Check 2 firmware version, and remaining battery power as a percentage. These parameters will be displayed after powering the instrument on and warm up has completed as well as every time the ESC button is pressed to exit to the home screen. Ballast-Check 2 User’s Manual 7 01/06/2015 11:30 FW0.01 Batt: 50% Battery power is checked whenever users turn the instrument on using the ON/OFF button. After the 5 second countdown, - If the battery power is < 20%, the following warning message will display “Battery <20%! Press <ENTER>” You can continue making measurements after pressing ENTER. - If the battery power is < 10%, the following message will display “Battery Low Pwr! Replace Battery!” You will not be able to make any measurements until batteries are replaced. 2.3 Calibration Verification The Ballast-Check 2 is factory calibrated and should remain calibrated for many years. Calibration can be verified using the Calibration Check Standard (CCS) included with the instrument. Calibration Check Standards are paired with specific Ballast-Check 2 instruments. To check instrument calibration: 1 2 3 4 5 Press the ON/OFF button to turn the Ballast-Check 2 on Locate the Calibration Check Standard (CCS) in the side pocket of the pouch. Confirm the serial number on the CCS and Ballast-Check 2 are the same. After warm up has completed, holding the CCS by the tab, insert it with the tab at the back end of the sample compartment and close the sample compartment lid NOTE: The Ballast-Check 2 should be placed on a flat surface prior to reading the Calibration Check Standard (CCS). Press the CHK STD button a. If the calibration is valid, the Ballast-Check 2 will display “Cal. Check Passed” b. If the Ballast-Check 2 displays “Cal. Check Failed”, remove the CCS from the instrument, re-insert the CCS, press the ESC button and press the CHK STD button to run another calibration check. Repeat this procedure 5 times. If the calibration check fails more than 2 out of 5 times, the Ballast-Check 2 is out of calibration and needs to be sent back to the manufacturer. If the calibration check fails less than or equal to 2 out of 5 times, the calibration is valid. NOTE: Temperature change may cause slight variability in the response of the CCS causing the CHK STD to fail. Running the CCS multiple times as described above will account for this variability. Return the CCS to the side pocket of the pouch. For a CCS reading, the date, time, serial number, result type, and “Passed/Failed” will be logged to memory. CCS readings are not counted as actual samples, therefore NA (Not Applicable; see section 2.6 for details) will be displayed in place of a sample number, and all Ballast-Check 2 User’s Manual 8 other parameters included in the data output string for the measurement. See section 2.7 for data downloading instructions. 2.4 Filtering Samples The Ballast-Check 2 comes with 3 filter capsules with 10 micron nylon mesh filters already installed. These filters are used to fractionate samples to more accurately determine abundance and activity of 10-50 micron sized cells. The procedure in section 2.5 outlines how and when to use the filters provided to perform the analysis. 2.5 Measuring a Sample NOTE: See Section 3 for Sample Analysis Guidelines before proceeding. The guidelines will help with minimizing measurement error. The following materials are required for measuring a sample: - Ballast-Check 2 60 cc plastic syringe with male luer lock end Glass Cuvette Kim Wipes for wiping the outside of the glass cuvette 10 micron mesh filter capsule Filter washing kit Deionized or distilled water The following procedure is used to measure a sample: 1. Aspirate a small amount of sample into your 60cc syringe to rinse any residual from your previous sample and purge all the water from the syringe. 2. Aspirate 50cc’s of sample into your syringe. 3. Using the sample in your syringe, rinse a glass cuvette 3 times, then fill the cuvette ¾ full. 4. Dry and clean all faces of the cuvette using Kim Wipes. 5. Insert the cuvette into your Ballast-Check 2 and close the lid. 6. Turn the Ballast-Check 2 on with the ON/OFF button. 7. Set the Ship and Tank values. See SHIP and TANK button functions in Section 2.1 if these values haven’t been set. 8. Press READ. 9. The message “SHIP/TANK OKAY?” will be displayed and you’ll be prompted to select “YES” to proceed with sampling or “NO” to return to the HOME screen and set new SHIP/TANK values. To select “YES” press the ENTER key, to select “NO” use the keys to move the cursor to “NO” then press the ENTER key. 10. If you choose “YES” to proceed with sampling, you will be prompted to press the READ button to continue with the measurement. 11. Press READ and the measurement will begin. Ballast-Check 2 User’s Manual 9 o If LOW risk is displayed, the measurement is complete and you can see values for that sample by pressing the key. o If the sample has a HIGH risk, you will be prompted to insert a 10 micron sample. o Attach a 10 micron filter to your 60cc syringe. 12. Remove the cuvette from your Ballast-Check 2 and discard the sample. 13. Using the remaining sample in your syringe, rinse the glass cuvette 3 times, then fill the cuvette ¾ full with your 10 micron filtered sample. 14. Dry and clean all faces of the cuvette using Kim Wipes. 15. Insert the cuvette into your Ballast-Check 2 and close the lid. 16. Press READ. 17. Results will be displayed as HIGH or LOW risk. The measurement is complete. Associated values can be viewed by pressing the key. 18. Remove the cuvette from the Ballast-Check 2 and discard the sample 19. Remove the 10 micron filter from your 60cc syringe and discard the sample remaining in the syringe. 20. Rinse the syringe 3 times with DI. 21. Using the filter washing kit, back wash the 10 micron filter with a clean water source such as deionized or distilled water to prepare it for reuse or storage. See Filter Washing Procedure in Section 2.8 for more information on filter washing. 22. When finished viewing data, or if ready to run the next sample, press ESC to get to the Home screen and repeat sampling procedure. Note: It is recommended you repeat the above steps 3 times. If you see inconsistent results, please refer to the Sample Analysis Guidelines in Section 3. 2.6 Data Displayed Data can be viewed on the Ballast-Check 2’s display or downloaded to a computer for viewing. To view data on the Ballast-Check 2’s display, from the HOME screen, use the keys to scroll through sample numbers until you’ve reach the sample number you wish to view. Then use the keys to scroll through logged data for that sample number. You can view the date, time, risk, ship/tank values recorded and the Abundance and Activity value saved for that sample. You can also view these parameters using the keys right after a measurement has completed. Values for Abundance and Activity are defined by the set fluorescence thresholds which correlate to the discharge standard of less than 10 viable organisms of the 10-50 micron size class in 1 milliliter of ballast water. The Abundance value represents an enumeration of the algal cells in the sample and addresses the “…less than 10 organisms…” requirement of the discharge standard. The Ballast-Check 2 has a set threshold value of 10 cells per milliliter. This threshold is part of the information used to determine whether samples are at risk for gross exceedance of the discharge standard. Addressing the discharge standard’s “…viable organisms…” is done by measuring the photosynthetic efficiency (Activity) of algae in ballast water samples. The Activity is Ballast-Check 2 User’s Manual 10 reported as a ratio between 0.01 and 0.75; all values outside of this range are reported as Non-Detect (ND). When the measured Abundance is greater than or equal to the set threshold, this indicates that algae may be in gross exceedance of the discharge standard. To accurately assess the RISK factor, the same sample’s Activity is measured. If the measured algal Activity is greater than or equal to 0.3, then HIGH is displayed for RISK as together the algal Abundance of cells in the 10 – 50 micron size class and the algal Activity have shown a high risk of gross exceedance of the discharge standard. When the measured Abundance is less than the set threshold, regardless of the Activity measured, LOW is displayed indicating a very low abundance of algae. If the sample being analyzed exceeds the upper detection limit of the instrument (>2000 cells per ml), then HIGH will be displayed for risk and a count value > 2000 will be displayed for abundance; Activity will not be valid for this sample. Note: You will not be prompted to filter the sample through the 10 micron filter in this case. This sample will be considered too high to count and will either need to be marked as such or diluted to within the measuring range and re-analyzed. The following parameters are recorded in the order specified below for a single measurement and can be downloaded to a computer after they’ve been logged: Date Time Serial Number Result Type CHK STD Result Ship Number Tank Number Sample Number Abundance Activity (MM/DD/YYYY) (hh:mm:ss) (85XXXXX) “Sample” or “STD Check” “Passed” or “Failed” (XXXXXXXXXXXX) (XXXXXXXXXX) (1 - 1000) (00.01 - 2000, “ND”, or “NA”) (0.1 – 0.75, “ND”, or “NA”) Note: “ND” indicates a Non Detect, meaning the sample is well below the lower detection limit of the instrument. “NA” indicates no measurement was made, Not Applicable. 2.7 Downloading Data If your computer does not have a serial port available, you will need to install the Interface/Integration Adaptor Cable (see section 2.9) before proceeding. If your computer has a serial port, plug the Data Download Cable into the serial port and continue with Downloading Data instructions. The Ballast-Check 2 can log a total of 1000 data points which can be downloaded to a computer using the provided Data Download Cable. A terminal program (e.g. Hyperterminal, Terra Term, MotoCross) is required for downloading these stored ASCII data from the instrument. If you do not have a terminal program installed or available, follow these instructions on how to access and use Hyperterminal, which is included in the BallastCheck 2 package: Ballast-Check 2 User’s Manual 11 1) Plug the USB drive into your computer 2) Open the Hyperterminal folder 3) Double click the “Hypertrm.exe” file. Note: You may be asked to make Hyperterminal your default telnet program; click NO to this request. 4) Certain computers may request the area code for your location. If requested, enter the area code for your location in the appropriate box and click OK 5) Name the connection and click OK 6) Access the “Connect using” pull-down menu and select the COM port that will be used to connect to the Ballast-Check 2 and click OK 7) Use the following setting to properly set the connection parameters Baud Rate: Data Bits: Parity: Stop Bits: Flow Control: 57600 8 None 1 None Click OK and connect to the Ballast-Check 2 by plugging the stereo jack from the Data Download cable into the Ballast-Check 2’s data port. 1) Click “Transfer” in the menu bar 2) Click “Capture Text” 3) Click the “Browse” button and navigate to the folder where you want the data to be saved 4) Name the data file and click save 5) Click “Start” 6) Make sure the Ballast-Check 2 is ON 7) Press the Ballast-Check 2’s DATA button 8) Use the keys to select SEND/CLEAR DATA 9) Press ENTER 10) Select SEND DATA 11) Press ENTER 12) Stop text capture in the terminal program by clicking on “Transfer”, then “Capture text”, then “Stop”. Note: .txt files can be viewed using most all programs including Microsoft Excel and can be saved as .csv or other file formats. Confirm data are saved to your computer by navigating to the saved file and opening the file to view data before clearing data from the Ballast-Check 2. Ballast-Check 2 User’s Manual 12 2.8 Filter Washing Procedure Included in the Ballast-Check 2 package is a 10 micron filter washing kit to rinse the 10 micron filters after use. The 10 micron filters can be reused many times if properly rinsed after each use. The following procedure guides users on how to properly rinse the 10 micron filters: 1) 2) 3) 4) 5) 6) 7) 8) Locate the filter washing kit Attach the plastic tube included in the filter washing kit to the 5cc plastic syringe Obtain some deionized or distilled water Fill the 5cc syringe by drawing water from the clean water source obtained in step 3 Attach the other end of the plastic tube to the outflow port of the 10 micron filter holder Make sure there is nothing attached to the inflow port of the 10 micron filter holder Push water through the filter to remove any materials trapped on the nylon mesh Repeat as necessary as determined by visual inspection When finished sampling and prior to storage follow the procedure above to ensure filters are clean. If they are not properly rinsed using clean water prior to storage, filter damage may occur. 2.9 Installing the Interface/Integration Adaptor Cable This cable allows you to convert from RS232 to USB. You will need the USB drive and the Interface/Integration Adaptor Cable, both included in the Ballast-Check 2 package, to complete the installation. 1) 2) 3) 4) Plug the USB drive into your computer Double click the “InstallParallaxUSBDriversv2.08.02.exe” file Follow installation wizard’s instructions for installing the driver Plug the Interface/Integration Adaptor Cable into any available USB port on your computer 5) Access the Device Hardware manager to determine what COM was assigned to the Interface/Integration Adaptor Cable The installation is now complete and you may plug your Data Download Cable into the Integration/Interface Adaptor Cable’s serial port. See section 2.7 for instructions on how to download Ballast-Check 2 data. Ballast-Check 2 User’s Manual 13 3 Sample Analysis Guidelines Take care not to spill samples into the sample chamber. Wipe up any spills promptly. The cuvette MUST BE DRY on the outside when taking readings. Any moisture or condensation on the outside of the cuvette can affect the reading. Fill the cuvette with at least 3.5 mL volume (3/4 full). Significant error in readings may result if the cuvette contains less than this minimum volume. Use the same cuvette for your samples, it is very important that you thoroughly rinse the cuvette between samples. The Ballast-Check 2 is very sensitive, therefore cross contamination between subsequent samples will skew results. Three rinses with the sample intended for measurement will help flush out any residual and decrease the chance for cross contamination. Do not use a cuvette cap as it may cause the cuvette to not seat properly in the sample compartment. When handling the cuvette, hold it near the top. Any bubbles in the sample will affect the readings. Take care not to introduce bubbles into samples. Remove any bubbles by lightly tapping with your finger on the outside cuvette wall or cover the top of the cuvette and tilt the sample to help dissipate bubbles. Wait at least 3 seconds between consecutive measurements to allow the optics to return to normal state. Ballast-Check 2 User’s Manual 14 4 Measurement Parameters 4.1 Abundance The Ballast-Check 2 is configured for detecting chlorophyll fluorescence from live algal cells (i.e. in vivo detection of Chlorophyll). Light from the fluorometer is absorbed by algae and fluorescence emitted by the cells is detected, quantified, and displayed as a digital number estimating the abundance of algae in the sample. Although environmental conditions, presence of interfering compounds, cellular physiology, and light history can influence abundance estimates, the procedure used to analyze samples on Ballast-Check 2 accounts for most of the interferences, providing an accurate estimate of algal abundance for 10 – 50 micron sized cells. 4.2 Activity The Ballast-Check 2 uses two measuring LEDs to estimate photosynthetic efficiency. The first LED (monitoring) is used to excite the sample with very low light intensity so as not to induce a change in chlorophyll reaction centers. While continuously monitoring the sample using the monitoring LED, the second LED (saturating) blasts the sample with a high intensity of light to effectively close chlorophyll reaction centers and bring algae to a maximum fluorescence state (Fm). The difference between the monitoring LED’s measurement of the maximum (Fm) and minimum (Fo) fluorescence states is called variable fluorescence (Fv). The ratio (Fv/Fm) is a good measure of the algal activity, which is measured between 0.01 and 0.75. 4.3 Calculations There are two potential equations for calculating abundance of algae in samples. Equation 1 calculates abundance of whole water as a first step in determining gross exceedance of algae. Abundance = (RFUBraw) x (Calibration Coefficient) (Equation 1) Where, RFUBraw is the blank-corrected fluorescence detected from raw water sample Calibration coefficient is the value used to convert fluorescence to abundance If algae exceed threshold limits, equation 2 is used to correct for less than 10 micron cell fluorescence, which may add to the fluorescence detected giving a false positive. Abundance = [(RFUBraw) – (RFUB10)] x (Calibration Coefficient) (Equation 2) Where, RFUBraw is the blank-corrected fluorescence detected from raw water sample RFUB10 is the blank-corrected fluorescence detected from the 10 micron filtered sample Calibration coefficient is the value used to convert fluorescence to abundance Ballast-Check 2 User’s Manual 15 A third equation is used to calculate algal activity (photosynthetic efficiency of algae). 𝐴𝑐𝑡𝑖𝑣𝑖𝑡𝑦 = {𝐹𝑚− 𝐹𝑜} 𝐹𝑚 (Equation 3) Where, Fm represents the maximum blank-corrected fluorescence detected after a saturation pulse Fo is the blank-corrected fluorescence detected from sample using low light intensity Ballast-Check 2 User’s Manual 16 5 Warranty 5.1 Terms Turner Designs warrants the Ballast-Check 2 PAM Fluorometer and accessories to be free from defects in materials and workmanship under normal use and service for a period of 12 months from the date of shipment from Turner Designs, with the following restrictions: Turner Designs is not responsible for replacing parts damaged by accident or neglect. Damage from corrosion is not covered. Damage caused by customer modification of the instrument is not covered. This warranty covers only Turner Designs products and is not extended to equipment used with our products. We are not responsible for incidental or consequential damages, except in those states where this limitation is not allowed. This warranty gives you specific legal rights and you may have other rights which vary from state to state. Damage incurred in shipping is not covered. 5.2 Warranty Service To obtain service during the warranty period, the owner shall take the following steps: 1 Write, email, or call the Turner Designs Technical Support department and describe as precisely as possible the nature of the problem. Phone: 1 (877) 316-8049 Email: [email protected] 2 Carry out any adjustments or tests as suggested by the Technical Support Department. 3 If proper performance is not obtained you will be issued a Return Authorization number (RMA). Package the unit, write the RMA number on the outside of the shipping carton, and ship the instrument, prepaid, to Turner Designs. If the failure is covered under the warranty terms, the instrument will be repaired and returned free of charge, for all customers in the contiguous continental United States. For customers outside of the contiguous continental United States who purchased equipment from one of our authorized distributors, contact the distributor. If you purchased directly, contact us. We will repair the instrument at no charge. Customer pays for shipping duties and documentation to Turner Designs. Turner Designs pays for return shipment. Custom duties, taxes and fees are the responsibility of the customer. 5.3 Out-of-Warranty Service Follow steps for Warranty Service as listed above. If our Technical Support department can assist you by phone or correspondence, we will be glad to, at no charge. Repair service will be billed on a fixed price basis, plus any applicable duties and/or taxes. Shipment to Turner Designs should be prepaid. Your bill will include return shipment freight charges. Address for Shipment: Turner Designs 845 W. Maude Avenue Sunnyvale, CA 94085 Ballast-Check 2 User’s Manual 17 Ballast-Check 2 User’s Manual 18 Appendix A: Specifications Ballast-Check 2 Sensitivity < 10 cells/ml Warm Up Time 5 seconds Power 4 AAA standard or rechargeable batteries Auto Power Off After 3 minutes of inactivity Light Source LED Detector Photodiode LCD Display 2 x 16 characters Resolution 12 bits Case Meets IP 67 Standard; dustproof and waterproof Temperature 41-104 °F; 5-40 °C Internal Memory 1000 records Data Output Format ASCII Weight 0.87 lbs. (0.4kg) Size 1.75” x 3.5” x 7.25”(4.45cm x 8.9cm x 18.4cm) Ballast-Check 2 User’s Manual 19 Appendix B: Error Readings and Warning Messages Memory Warning Messages The Ballast-Check 2’s memory starts at 100% allowing for a maximum of 1,000 data points to be logged. If the memory is more than 90% full and the READ button is pressed, the following message will display: “Warning: Memory > 90% Full” Indicating that you have reached more than 90% of the total memory allowed. You will be allowed to continue sampling, but it is highly recommended you stop measuring samples at this point, download data to your PC and clear the data log. When memory is full, the instrument will display: “Memory Full” When READ is pressed you will not be allowed to analyze samples until data have been downloaded and cleared from memory. Error Readings When samples are below set blank values, the instrument will result in an Error Reading indicating that there is no fluorescence associated with the sample being read. When this occurs, users should read the sample 2 more times for repeatability. Error readings are logged to memory and will be counted as samples. However, logged values (Risk, Abundance, Activity) for error readings will display NA indicating that the instrument wasn’t able to measure the sample. Ballast-Check 2 User’s Manual 20