1
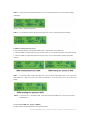
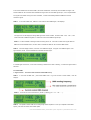
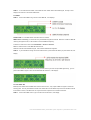
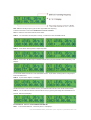
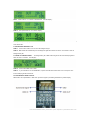
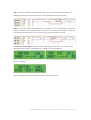
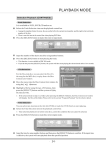
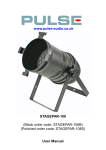
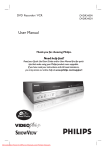
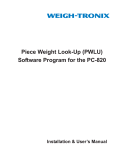
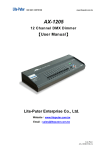
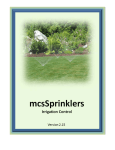
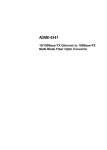
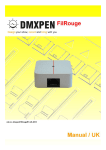
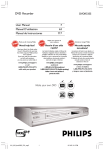
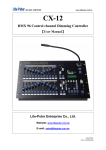
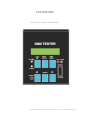
TESTER DMX
MANUAL DE USARIO / USER MANUAL
User manual DMX Tester | Triton Blue | Rev. Sep 2013 | www.triton-‐blue.com
ENGLISH
For your own safety, please read this user manual carefully before you initially start-up.
Every person involved with the installation, operation and maintenance of this device has to:
Be qualified.
Follow the instructions of this manual.
Consider this manual to be part of the total product.
Keep this manual for the entire service life of the product.
Pass this manual on to every further owner or use of the product
Download the last version of the user manual from the internet in www.triton-blue.com
1.1 MAIN FEATURES
-LIGHT & HANDY, PORTABLE.
-AVAILABLE FOR TESTING SYNCHORNIZED SIGNAL DMX IN - DMX OUT
-Built-in battery, it can work for several hours continuously. ( Charge it 5 hours , it can work 3 hours or waiting 100 hours)
-LCD background lighting economizes on power to extend battery life.
-Sleeping deviceStop working in 5 minutes running, it will be in the mode of sleeping to extend battery life.
1.2 TECHNICAL SPECIFICATIONS
Power SupplyDC 12V / 1A
DMX INPUTDMX512
DMX OUTPUT CHANNELS512 CHANNELS
DMX SIGNAL CONNECTORXLR 3PIN ( ! 2 )PHONE JACK RJ11 ( ! 2 )
OUTSIDE DIMENSIONS100 (W) x 50 (H) x 133 (L) mm
WEIGHT750 g
1.3 FACEPLATE MANUAL
User manual DMX Tester | Triton Blue | Rev. Sep 2013 | www.triton-‐blue.com
1
2
3
4
5
LCD
6d
7
LCD display
Baterry chrage indicator
External power indicator
Level revolving button
FUNCTION OPTION
Play contrast button
Hexadecimal
8
/ percent alternate button
DMX signal outputXLR 5 PIN
9
10
DMX signal input / output : XLR 5 PIN
11
Synchronal signal output connector
12
Power supply input DC 12V/1A
DMX signal outputPHONE JACK RJ11
13
LCD background light turn-on button
14
Power switch
2.1 DMX OUT
1.Single channelsuccessive multi-channels DMX OUT set-up
STEP-1 Turn on Power to go to function DMX OUT . Or you can press button
DMX OUT 1 in other function mode to go to DMX OUT , LCD will display :
STEP-2 If you need to change the level of current channel , you can push the revolving button to make adjustment .
(Up goes to level increase , down goes to level decrease)
CH002 will output 10%
STEP-4 If you need to control successive multi-channels in the same time, you choose initial channel you require
then press button " , LCD display :
CH002CH003 will output 10%
User manual DMX Tester | Triton Blue | Rev. Sep 2013 | www.triton-‐blue.com
STEP-5 At the same time you press button #or $, you can choose ending channel .You press button $again ,
LCD display :
CH002CH003CH004 will output 10% .
STEP-6 You can also press button #to reduce ending channel , when you press button #, LCD display :
2. DMX OUT sending frequency set-up
2 kinds of sending frequency are available for DMX Tester , they are 20/S40/S respectively :
120/S is the DMX 512 signal sending 20 times of every second , it is for normal dimmer pack to test data receiving .
240/S is the DMX 512 signal sending 40 times of every second , it is for dimmer pack to test high speed data
receiving .
STEP-1 In the mode of 20/S , press button DMX OUT 1 to go to function AUTO FADE ( refer to 2.2 ) , then press
button DMX OUT 1 again to go back to the function of DMX OUT , but at the same time you will find that LCD
display :
STEP-2 In the same way , in the mode of 40/S , press continuously button DMX OUT 1 twiceto go to function of
20/S DMX OUT .
3. In the mode of DMX OUT , display of DMX IN
The picture below shows the positions of communication outlets :
User manual DMX Tester | Triton Blue | Rev. Sep 2013 | www.triton-‐blue.com
In the mode of DMX OUT and AUTO FADE , the socket of DMX OUT continuously send out DMX 512 signal . The
socket of DMX IN / OUT will also send out DMX OUT signal when no other DMX signal input , once it suspects DMX
512 signal of the socket coming from other controllers , it will be automatically defined as DMX IN to receive
controller’s signal .
STEP-1 In the mod of DMX OUT , DMX IN / OUT socket receives DMX signal , LCD displays :
The upper row of LCD displays receiving DMX signal from CH001~CH004 , the level is 69%95%40% , in the
mean while LED on DMX IN is lighted , it means that now we have DMX IN signal input .
STEP-2It is also available to test signal cable is working well or not . Insert the one side of the signal cable into
DMX OUT socket of DMX Tester , the other side is inserted into DMX IN / OUT socket of DMX Tester
STEP-3 The LCD display as below , the lower row is DMX OUT signal , the upper row is DMX IN signal . If the
signal cable is normal , the level of DMX OUT and DMX IN will be equal .
If no DMX signal is received , or the level of receiving is different from level of sending , it means that signal cable is
abnormal .
2.2 AUTO FADE
1. Signal channel successive multi-channels AUTO FADE set-up
STEP-1 In the mode of DMX OUT , press button DMX OUT 1 to go into function of AUTO FADE , LCD will
displays :
STEP-2 You’ll find the current channel level ( CH001 ) is flowing ( 0% % FL % 0% && ) .
STEP-3 The speed of AUTO FADE can be changed by LEVEL adjustment . Push up to expedite AUTO FADE
speed , push down to reduce AUTO FADE speed .
User manual DMX Tester | Triton Blue | Rev. Sep 2013 | www.triton-‐blue.com
STEP-4 If you wish to amend channel , press button #or $. While you press button $, LCD displays :
CH002 will proceed with AUTO FADE .
STEP-5 If you require successive multi-channels to proceed with AUTO FADE , you choose initial channel first
then press button " , LCD displays :
While AUTO FADE is operating as below : CH002 : 0% % 100% % 0% % CH003 : 0% % 100% % 0% % CH002 :
0% % 100% % 0% &&&&
STEP-6 Press button #or $, you can change ending channel . When you press button $LCD displays :
When you press button $ , the ending channels are increasing .
STEP-7 In the same way , while you press button #to decrease ending channels . When you press button #, LCD
displays :
2. AUTO FADE sending frequency setup
AUTO FADE has 2 kinds of sending frequency , 20/S & 40/S .
Press continuously button DMX OUT 1 , you can switch between (DMX OUT 20/S) - (AUTO FADE 20/S) - ( DMX
OUT 40/S ) and ( AUTO FADE 40/S ) .
3. DMX IN display in the mode of AUTO FADE
STEP-1 In the mode of AUTO FADE , when DMX IN / OUT socket receive other DMX signal , the way of LCD
display is the same as in the mode of DMX OUT :
3. DMX IN display in the mode of AUTO FADE
User manual DMX Tester | Triton Blue | Rev. Sep 2013 | www.triton-‐blue.com
STEP-1 In the mode of AUTO FADE , when DMX IN / OUT socket receive other DMX signal , the way of LCD
display is the same as in the mode of DMX OUT :
2.3 DMX IN
STEP-1 Press button DMX IN to go to the function DMX IN , LCD displays :
START CODE : It is the DMX IN start code level which is received .
DMX IN times of receiving : It shows how many times DMX IN signal are received . When the numbers of DMX IN
receiving are higher than 99 , it will be switch to received DMX IN frequency .
% / H / D : It shows the current unit is Hexadecimal or Percent or Decimal .
C001 : It means that the current DMX IN initial channel .
While the channel receives DMX IN signal , LED of button DMX IN will be lighted .
STEP-2 If you would like to change the current initial channel , press button #or When you press button $, LCD
display :
In the mode of DMX IN , DMX Tester will remain previous status if you move the input DMX signal away , you can
press button DMX IN again to clean the received DMX IN memories , LCD displays :
2.4 OUT LEVEL SET
Basically OUT LEVEL SET and DMX OUT have the same function , they output a DMX 512 signal to control the
dimming pack . The only one difference is that OUT LEVEL SET can set different output level for individual channel
from CH001 to CH512 , but DMX OUT can only set the same output level for successive channels .
STEP-1 Press button DMX OUT 2 to go to function OUT LEVEL SET , LCD display :
User manual DMX Tester | Triton Blue | Rev. Sep 2013 | www.triton-‐blue.com
20/S : DMX OUT sending frequency (this remains original DMX OUT frequency) .
% / H / D: It shows the current unit is Hexadecimal or Percent or Decimal.
C001 : It means the current initial channel of OUT LEVEL .
STEP-2 You will find 00 in the first place is shinning , it means the current controllable channel .
STEP-3 Push LEVEL revolving button to adjust output level .
STEP-4 Press button #or $to adjust controllable channel. When you press button $3 times continuously , LCD
displays :
You’ll find that CH004 becomes the current controllable channel . To put LEVEL revolving button to change output
level of the said channel .
STEP-5To press button $again , LCD displays :
CH005 becomes the current controllable channel ( You’ll find that initial channel of OUT LEVEL becomes C002 )
STEP-6 You can clean the set levels of all channels the set-up by pressing and holding the button DMX OUT 2 2
seconds , after that LCD displays :
2.5 HexadecimalPercentDecimal DISPLAY SETTING UP
TEP-1 In the mode of DMX OUT , it shows as percent , LCD displays :
User manual DMX Tester | Triton Blue | Rev. Sep 2013 | www.triton-‐blue.com
TEP-2Press button H / % to switch to Hexadecimal , LCD will display
STEP-3Then press button H / % to switch f display
The way to set up the display of Decimal and Hexadecimal and Percent is the same in AUTO FADEDMX IN and
OUT LEVEL SET .
2. BACKGOUND LIGHTING 6 LCD
STEP-1 Press button LIGHT to turn on the LCD background light .
STEP-2DMX Tester will automatically turn off background light after it doess not work in 10 seconds in order to
enlarge battery life.
2.7 MODE OF SLEEPING STEP-1 To enlarge battery life , DMX Tester will get into the mode of sleeping after it
does not work in 5 minutes , LCD displays :
STEP-2 Press button DMX OUT to wake
STEP-3 If you would like to turn off SLEEPING , to press and hold button LIGHT Then turn on the power .The
function sleeping will be switched off .
2.8 SYNCHRONAL SIGNAL OUTPUT
DMX Tester can output DMX INDMX OUT synchronal signal to proceeding observation by Wave Display.
User manual DMX Tester | Triton Blue | Rev. Sep 2013 | www.triton-‐blue.com
STEP-1When you would like to observe DMX OUT signal , you can use wave display measure SYNC of TO
SCOPE (synchronal signal measurement connector) and TX ground (please refer to picture below) .
STEP-2For example , DMX Tester sent signal CH001 = 42H DMX IN , you can use wave isplay to measure from
SYNC of TO SCOPE ( synchronal signal connector ) to TX ground , you can see the wave as below , CH-00 in red
circle is the DMX wave of TX ground , CH-01 in red circle is the synchronal signal wave of SYNC .
2.9 Low power indication STEP-1 When the battery of DMX Tester is in low power , the first line of LCD will
switch between normal function and “BATTER LOW” , it displays in the mode of DMX OUT :
STEP-2: Then you can charge DMX Tester , otherwise DMX Tester will be in the mode of low : power sleeping after 1
minute , LCD displays
STEP-3 If you would like to operate DMX Tester low power , you can press button DMX OUT1 to wake it up to be
back to work . DMX Tester will be in the mode of low power sleeping after 1 minute .
User manual DMX Tester | Triton Blue | Rev. Sep 2013 | www.triton-‐blue.com