1
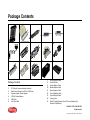
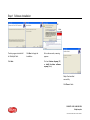
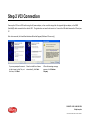
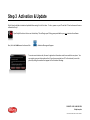
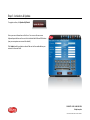
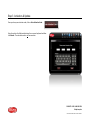
Delphi Scan
Quick Start Guide
Thank you for purchasing the Delphi Scan automotive diagnostic and reprogramming
tool! The following guide is designed to quickly help you unpack and configure the tool
(applicable for SV34000, SV34001, SV34002). Please follow the User Guide for
complete information on the tool and its proper operation.
CONTACT US AT 1.800.545.2220
Delphi.com/am
©2013 DELPHI CORPORATION. ALL RIGHTS RESERVED.
Package Contents
1
2
3
4
5
6
7
8
9
10
11
12
13
14
15
Package Contents
1.
2.
3.
4.
5.
6.
VCI (Vehicle Communications Interface)
Delphi Scan Software (on DVD or USB Drive)
Cigarette Lighter Power Adapter
120V AC Power Adapter
USB Cable
8 ft. Main Cable
7.
8.
9.
10.
11.
12.
13.
14.
15.
OBDII Quicklink Cable
Ford DCL Cable
Honda Adapter Cable
Mazda Adapter Cable
Nissan Adapter Cable
Toyota Wht/Sqr Cable
Toyota Blk/Rnd Cable
Carrying Case
Tablet PC with Windows 7 and AC Power Adapter (Part
Number SV34000 only)
CONTACT US AT 1.800.545.2220
Delphi.com/am
©2013 DELPHI CORPORATION. ALL RIGHTS RESERVED.
Step 1 Software Installation
If your Delphi Scan kit includes the optional tablet PC please skip to Step 3 on Page 11; ‘Activation & Update.’
Please install the Delphi Scan software on the shop computer you have designated for Delphi Scan. System requirements are:
•
Microsoft Windows 32-bit Operating System:
–
Windows XP with Service Pack 3 with at least 500MB of RAM, or
–
Windows Vista with at least 1GB of RAM, or
–
Windows 7 (64 bit also) with at least 1GB of RAM
•
3GB available Hard Disk space (recommended 5GB for future expansion)
•
1 available USB port
•
DVD drive
•
WiFi 802.11 b/g wireless network adapter (for VCI units with optional WiFi)
•
Internet access to allow updates
To begin installation, please close all programs and disable any security software on your PC, then insert the Delphi Scan DVD in the DVD drive.
The installation will begin automatically.
CONTACT US AT 1.800.545.2220
Delphi.com/am
©2013 DELPHI CORPORATION. ALL RIGHTS RESERVED.
Step 1 Software Installation
Follow the on-screen prompts, which guide you to install Delphi Scan, the Delphi Scan Updater, and then Delphi Flash, in that order.
The Delphi Scan application will
install first.
We recommend leaving the
default folder path.
The software installed
successfully.
Click Next at this screen.
Click Next to finalize the
installation.
Click Close to continue.
CONTACT US AT 1.800.545.2220
Delphi.com/am
©2013 DELPHI CORPORATION. ALL RIGHTS RESERVED.
Step 1 Software Installation
The next program to run will be
the Delphi Scan Updater
installation.
We recommend leaving the
default folder path.
The Delphi Scan Updater installed
successfully.
Click Next.
Click Next to finalize the
installation.
Click Close to continue.
CONTACT US AT 1.800.545.2220
Delphi.com/am
©2013 DELPHI CORPORATION. ALL RIGHTS RESERVED.
Step 1 Software Installation
XP
Vista
The last program to install will
be The Delphi Flash.
Click Next .
Click Next to begin the
Installation.
After a few seconds, a warning
appears.
Click on Continue Anyway (XP)
or Install the driver software
anyway (Vista)
Delphi Flash installed
successfully.
Click Close to finish.
CONTACT US AT 1.800.545.2220
Delphi.com/am
©2013 DELPHI CORPORATION. ALL RIGHTS RESERVED.
Step 2 VCI Connection
Power up the VCI from a 120V outlet using the AC power adapter, or from a vehicle using either the cigarette lighter adapter, or the OBDII
Quicklink(R) cable connected to the vehicle’s DLC. The ignition does not need to be turned on. Connect the USB cable between the VCI and your
PC.
After a few seconds, the Found New Hardware Wizard will appear (Windows XP users only);
If you are prompted to connect
to the internet, select ‘No, not
this time,’ click Next .
Select to install the software
automatically, click Next .
When this warning message
appears, click Continue
Anyway.
CONTACT US AT 1.800.545.2220
Delphi.com/am
©2013 DELPHI CORPORATION. ALL RIGHTS RESERVED.
Step 2 VCI Connection
The VCI is connected and
communicating properly.
Click Finish.
When the Hardware Wizard
finishes, label the USB port
that is in use by the VCI and
always connect the VCI to this
port in the future.
CONTACT US AT 1.800.545.2220
Delphi.com/am
©2013 DELPHI CORPORATION. ALL RIGHTS RESERVED.
Step 3 Activation & Update
Delphi Scan should be activated and updated before using it for the first time. To do so, power on your PC and the VCI tool and connect them as
indicated in Step 2.
Open Delphi Scan from the icon on the desktop. This will begin your 30-day grace period before you must activate the software.
Next, click the Vehicle menu button and the
Activation Message will appear.
To receive an activation code, the user’s registration information must be recorded in our system. You
can register your user information online (if you have connected your PC to the internet) or over the
phone by calling the number that appears in the Activation Message.
CONTACT US AT 1.800.545.2220
Delphi.com/am
©2013 DELPHI CORPORATION. ALL RIGHTS RESERVED.
Step 3 Activation & Update
To register online, click Update My Details.
Enter your user information on this form. You can use the on-screen
keyboard provided or use the one that is included with Microsoft Windows
(see your computer user manual for details).
Click Submit and the activation code will be sent to the email address you
entered in the email field.
CONTACT US AT 1.800.545.2220
Delphi.com/am
©2013 DELPHI CORPORATION. ALL RIGHTS RESERVED.
Step 3 Activation & Update
Once you have your activation code, click on Enter Activation Code.
Enter the code in the field provided using the on-screen keyboard and then
click Submit. The activation code is not case sensitive.
CONTACT US AT 1.800.545.2220
Delphi.com/am
©2013 DELPHI CORPORATION. ALL RIGHTS RESERVED.
Step 3 Activation & Update
Activation is now complete. Click OK.
To update, first click on the Set-Up menu button.
Next, click on the Update menu button.
Then click OK after reading the notice.
CONTACT US AT 1.800.545.2220
Delphi.com/am
©2013 DELPHI CORPORATION. ALL RIGHTS RESERVED.
Step 3 Activation & Update
Click on Get Updates
to begin the update process.
The update progress will be displayed and may take a few minutes or several hours,
depending on the speed of your internet connection and the size of the update to be
performed.
Wait for the Update Success window to appear and then click OK.
CONTACT US AT 1.800.545.2220
Delphi.com/am
©2013 DELPHI CORPORATION. ALL RIGHTS RESERVED.
Troubleshooting and Feedback
In some situations, users may find that Delphi Scan does not seem to perform all of the diagnostic functions they expect. The first priority is to
find a solution so that work can continue on the vehicle. The second priority is to report it so that the same issue doesn’t interrupt work in the
future.
Finding a Quick Solution:
Here are some quick tests and workarounds that may permit the feature to operate correctly.
1. To begin, make sure the software version is the latest. Go to the complete User Guide and follow the steps listed in the chapter
“Updating the Delphi Scan Software” to update the tool and then try the diagnostic procedure again.
2. If a function or feature still appears to be missing, attempt that same function on the same car with another scan tool to confirm
whether the issue is with the car or the tool.
3. If Delphi Scan is up to date, try selecting a similar but different make and model vehicle to see if it can be made to perform the function
you need. For example, if troubleshooting a Pontiac Vibe, select a Toyota Matrix of the same year and engine configuration, or simply
choose a 2006 or 2008 Silverado if you are working on a 2007 model that won’t communicate well.
Sending Feedback Reports:
Regardless of whether a workaround was found, please let us know about the problem you experienced so that we can help resolve the
problem. Delphi Scan features a Feedback function for this purpose, allowing users to send the problem report directly to our software
developers for correction.
Click the Feedback button as soon as a problem is experienced. This automatically generates a log of the diagnostic functions the
user tried, and sends that log to engineers over the internet. If you are not connected to the internet, a log file will be saved and
then sent the next time an internet connection is detected.
The log file contains the pertinent vehicle and Delphi Scan data, and only enough user information to allow us to follow up with
CONTACT US AT 1.800.545.2220
Delphi.com/am
©2013 DELPHI CORPORATION. ALL RIGHTS RESERVED.
users who submit a report. In addition, users may choose to enter any comments they feel are relevant to the issue they experienced. Feedback
reports in English, French or Spanish are welcome.
Live Technical Support:
For assistance with the setup and operation of the Delphi Scan or Delphi Flash, our Technical
Support line can be reached at 1-800-545-2220. If possible, have the vehicle and device ready to
operate so that we can quickly identify the source of the problem.
BlueView Interactive Help
When needed, Technical Support may ask for access to your computer using BlueView.
BlueView is a program that allows Customer Service to quickly connect to your computer through
the internet. This allows our support team to view and change settings, or to guide you through a
particular process.
When requested, you can launch the BlueView program from the desktop icon after
ensuring that you are connected to the internet.
Provide the ID number shown on your screen to the Representative over the phone.
This will allow him to see what you see, and it will give him control over your computer.
CONTACT US AT 1.800.545.2220
Delphi.com/am
©2013 DELPHI CORPORATION. ALL RIGHTS RESERVED.
Thank You
Thank you for purchasing the Delphi Scan Tool. The tool is designed to easily integrate into your
shop’s existing platform.
Should you have any questions that this Quick Start Guide, the detailed User Guide, or the
demonstration video on the tool do not answer, please contact our Technical Support hotline at
1-800.545.2220.
CONTACT US AT 1.800.545.2220
Delphi.com/am
©2013 DELPHI CORPORATION. ALL RIGHTS RESERVED.