1
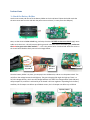
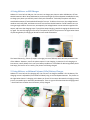
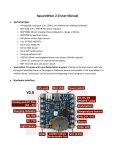
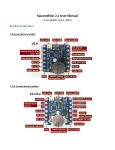
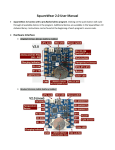
AASaver v2.1 User Manual (Updated June 20, 2014) Contents Introduction .................................................................................................................................................. 2 Hardware Interface ....................................................................................................................................... 2 Instructions ................................................................................................................................................... 3 1. Attach the Battery Holder ..................................................................................................................... 3 2. Solder Flashlight LEDs ........................................................................................................................... 4 3. (Optional) Solder Breadboard Pin Headers........................................................................................... 4 4. Using AASaver as USB Charger .............................................................................................................. 5 5. Using AASaver as Lithium-Polymer (LiPo) Battery Charger .................................................................. 5 6. Using Lithium-Polymer (LiPo) Battery as Power Source ....................................................................... 6 7. Using AASaver to Charge LiPo Battery from USB .................................................................................. 6 8. Creative Uses of AASaver ...................................................................................................................... 7 Specifications ................................................................................................................................................ 7 Terms and Conditions ................................................................................................................................... 7 Open-Source Links ........................................................................................................................................ 7 Schematic ...................................................................................................................................................... 7 FAQ................................................................................................................................................................ 8 Introduction Throwing away dead AA batteries? Don’t! Try them with the AASaver, a versatile voltage booster for AA/AAA batteries! AASaver harvests the remaining energy in dead batteries. You will be surprised how long they can still last to power LEDs and breadboard circuits. But AASaver can do a lot more! With fresh batteries, you can also use it to charge your phone, USB gadgets, or Lithium-Polymer batteries. The AASaver kit includes a partially-assembled and tested circuit board, battery holder, flashlight LEDs, breadboard pin headers, screws and nuts. A small number of soldering and assembly steps are required. The estimated assembly time is 15 minutes. Features and Built-in Components: Power Source: AA/AAA batteries or 3.7V LiPo battery (selectable via an on-board switch). Output Voltage: regulated 5V / 3.3V (selectable via an on-board switch), up to 500mA / 250mA. Built-in Flashlight LEDs: a pair of high-current (30mA) white LEDs, with on/off switch. Built-in USB port: for charging phone, MP3 player, or other USB gadgets, up to 500mA. Built-in Lithium charger: for charging Lithium-Polymer batteries, charging current adjustable from 10mA to 220mA (via an on-board potentiometer). Built-in Breadboard Pin Headers: matches the +/- pins on standard breadboards. Hardware Interface The image below shows a close-up image of the AASaver and marks the built-in components. Instructions 1. Attach the Battery Holder Use the two screws and nuts to fix the battery holder to the circuit board. Orient the holder such that the wires come out from the side with the power source selector (i.e. away from the USB port). Next, cut the wires to 0.8 to 1 inch long, and strip the wires. DO NOT cut them too short! Apply some solder to tin the wires – this will prevent splitting strands. Insert the wires to the battery pins, make sure the Red wire goes to the hole marked ‘+’ – this is the positive wire. Go ahead and solder the wires to the circuit board. Double check yours with the images below. Cut to 0.8”, strip and tin. Solder points Red wires goes to + Once the battery holder is in place, you can pop in two AA batteries, and turn on the power switch. The red LED on the voltage booster should light up. The green charging LED might also light up. There is a 5V/3.3V voltage selector, which sets the voltage between VCC-GND. The voltage booster (and USB port) always outputs 5V; and 3.3V is achieved by an on-board 3.3V linear regulator. Depending on the battery condition, the 5V output can deliver up to 500mA current; the 3.3V output can deliver up to 250mA. 5V/3.3V selector 2. Solder Flashlight LEDs AASaver supports two built-in flashlight LEDs. First insert the LEDs into the LED pin holes. Make sure the longer lead of the LED (this is the positive lead) goes into the hole marked ‘+’. Gently bend the pins to 90 degree. Solder the leads and use a diagonal cutter to cut the extra leads. There is a separate LED on/off switch. The 5V/3.3V voltage selector is also effective: at 5V output voltage, the LEDs are considerably brighter than 3.3V, so this can be used for brightness control. LED switch Breadboard Power Supply 3. (Optional) Solder Breadboard Pin Headers Now solder the breadboard pin headers. This step is optional – it’s only necessary if you plan to use AASaver as a breadboard power supply. First, insert the two pin headers at the end of a breadboard. This will help fixing them in place during soldering. Next, align the VCC/GND holes on the AASaver with the pin headers, and solder the pin headers to the circuit board. The pin header spacing matches the width of a standard breadboard. If your breadboard is wider, use the extra VCC/GND pins on the left, as shown in the picture below. The 5V/3.3V selector is effective to breadboard pin headers, so you can use it as a 5V/3.3V selectable breadboard power supply. Solder points For wider breadboard 4. Using AASaver as USB Charger AASaver 2.1 has a built-in USB port. You can use it to charge your phone or other USB devices, all from two AA batteries! While ‘dead’ AA batteries can be used to light up LEDs and power breadboard circuits, to charge your phone you will likely need a fresh pair of batteries. Technically the phone will draw a considerable amount (a few hundred milliamps) of current. To deliver the current, the voltage booster needs to work really hard, and draw even more current from the AA batteries. ‘Dead’ batteries are not strong enough to deliver that current, consequently the voltage booster cannot maintain regulated 5V output, and hence the charging stops. If your phone stops charging, consider changing the batteries and try again. The actual charging current varies from phone to phone. The picture on the right below shows my Samsung Galaxy S3 charging at 261mA from two used AA batteries. The latest iPhones (e.g. iPhone 5) require a charging current of 500mA, which will likely reach the limit of the AASaver. However, even if the phone reports it’s not charging, in practice it’s still charging at a low current, usually 100mA. So in case your battery condition is not suitable for delivering 500mA, don’t lose hope, just leave it on for a while, your phone is still being charged. 5. Using AASaver as Lithium-Polymer (LiPo) Battery Charger AASaver 2.1 has a built-in LiPo charging chip. You can use it to charge a standard 3.7V LiPo battery. The charging current is adjustable (from 10mA to 220mA) using an on-board potentiometer. The picture on the right below shows it’s charging a LiPo battery at 22mA. To increase or decrease the charging current, just use a screw-driver to rotate the potentiometer. There is a green LED that shows the charging status – the LED will turn off when the LiPo battery is fully charged. Why adjustable current? Well, as mentioned above, the condition of the batteries determines how much current they can deliver. ‘Dead’ batteries can’t deliver a whole lot, so you need to let them drain slowly. As you will see below, you can still harness even ‘dead’ batteries to charge your phone: the trick is to use a LiPo battery to collect the charges slowly from ‘dead’ batteries (analogous to collecting water slowly into a bucket), then the LiPo battery can serve as the power source to charge your phone. 6. Using Lithium-Polymer (LiPo) Battery as Power Source Instead of AA batteries, you can use a 3.7V LiPo battery as source to the voltage booster. This is done via the Source selector switch. Because LiPo battery typically has higher voltage than AA batteries, the voltage booster is capable of delivering even higher current (i.e. beyond 500mA) at 5V output. As the discussion above goes: this allows you to ‘suck’ the remaining energy in ‘dead’ AA batteries for charging your phone, by using a LiPo battery as the intermediate ‘bucket’. Source selector 7. Using AASaver to Charge LiPo Battery from USB Want to use AASaver to charge your LiPo battery from USB? Where there is a will, there is a way! To do so, you will need a USB Male A to Male A cable. This is not a common cable, but you can still find it on Amazon for just a few bucks, or if you are in the mood, take apart two existing USB cables and make one yourself! Plug one end of the cable to AASaver’s USB port, and the other end to your computer’s USB port. Now you can charge a LiPo battery from your computer’s USB port. 8. Creative Uses of AASaver Now that you are familiar with the built-in components of AASaver, you can think of more creative ways to use it for. For example, you can combine it with a 6V solar cell to make a solar charger for LiPo battery. To do so, connect a 6V solar cell to the VCC/GND pins (better with a 1N4148 diode in series to prevent reverse charge). This way you can make use of the LiPo charger on board to charge LiPo battery from the solar cell. Speaking of solar cell, you can add a photoresistor and transistor to make the LEDs light up only when it’s dark. A more advanced modification is to add a 555 timer circuit to provide timing control, for example, let LEDs turn off automatically after 2 hours. Specifications Startup Voltage: Power Source: Output Voltage: Output Current: LiPo Charging: Size: Weight: 0.9V. two AA/AAA (can be modified to work with one AA/AAA), or one 3.7V LiPo. regulated 5V (from boost converter) / 3.3V (from LDO). up to 500mA @ 5V, and up to 250mA @3.3V. adjustable current from 10mA to 220mA. 70mm x 38mm x 30mm. 85g (3oz) w/o battery. Terms and Conditions AASaver is an open-source project. The hardware design and software code are made publicly available under the Creative Commons Attribution-ShareAlike (CC BY--SA) 3.0 license. The product is open-source for educational purpose. The hardware and software are provided as is. We (Rayshobby LLC) are not responsible for any damage or accident that may occur due to either hardware or software error, or during the assembly, use, and modification of AASaver. Open-Source Links AASaver Github Repository AASaver homepage Rayshobby Forum Schematic FAQ Q: How is AASaver different from Joule Thief? AASaver uses a switching boost converter. On a high-level it’s similar to Joule Thief in that both make use of oscillation and inductor to boost the battery voltage. However, boost converter is more efficient and can provide regulated output voltage, while Joule Thief does not regulate the output voltage. Q: How is AASaver different from Adafruit’s MintyBoost? They use different boost converter chips: AASaver uses CE8301 with 0.9V startup voltage, while MintyBoost uses LT1302, with 2V startup voltage. So AASaver can work with batteries that have very low voltage. Also, AASaver is designed to be multi-purpose (with built-in LED flashlight, breadboard pin headers, 5V/3.3V selectable output voltage, USB port, Lithium charging chip), while MintyBoost is primarily used for USB charging. Q: How is AASaver 2.1 different from its prior versions? The very first version AASaver 1.0 used MCP1640 boost converter chip; version 1.1 added separate on/off switch for the LEDs; version 2.0 changed to use NCP1450 boost converter, and added on-board LiPo charging chip, USB port, and source selector; version 2.1 is different from 2.0 in that it switched to use CE8301 boost converter, and added 5V/3.3V selectable output voltage. Q: What made you come up with the idea? I always have a pile of ‘dead’ AA batteries from TV remotes, smoke alarms, and other gadgets. These batteries cannot be used in standard devices, but they actually still have quite a bit of juice in them. One day I was learning the principles of voltage booster, and it came to my mind that I can use it to harvest the remaining energy in ‘dead’ AA batteries for something useful. My goal is to make it versatile, so a single circuit can be used for multiple purposes, such as lighting up LEDs, powering breadboard circuits, charging LiPo batteries, and charging USB devices. It’s so useful that I think everyone should have a couple of these! Q: Do you have an enclosure/case to go with the AASaver? Unfortunately not.