1
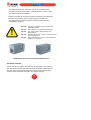
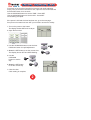
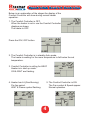
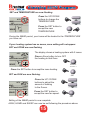
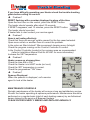
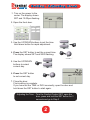
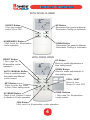
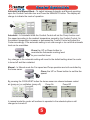
Spectrolink Comfort Controller
Home Owner's Manual
baby,
Heating
2007
cold
outside
it’s
Come home to
E C O S T
R
®
SERVICE: 1300 650 644
For all your Braemar warranty and service needs.
Or
Contact your local Braemar direct dealer.
SALES: 1300 650 141
For all your sales enquiries
Seeley International Pty Ltd has a policy of continuous product development and therefore
reserves the right to make changes to these specifications without notice. Whilst every
care has been taken to assure accuracy of the data compiled in the document,
Seeley International Pty Ltd does not assume any liability for errors and/or omissions.
Braemar is a registered trademark of Braemar Industries Pty Ltd.
Seeley International Pty Ltd ACN 23 054 687 035
Albury Manufacturing
77 North Street Albury, NSW 2640
623528 / e
www.seeley.com.au
Manufacturers and Designers of Technically Advanced Quality Heating and Cooling Products
IMPORTANT
Record Model, Model No. & Serial No. of the heater here.
LA
ABEL
L
Model, Model No. & Serial No.
Date of Installation:_____/______/______
Installer:_______________________
Phone No:_______________________
SERVICE
Before calling for service have you:
1. Checked through the trouble shooting guide. (page 16)
2. Noted the Model,Model No. & Serial No. of the heater
(if they are not recorded above, the numbers are
located on the end of the heater)
3. Spoken to your Braemar Dealer / Installer.
FOR SERVICE CALL: 1 300 650 644
Index
Ind
T opic
Page
General
Setting the Time & Day
Turning the Heater On
The Spectrolink Comfort Controller
Button Functions
Display Functions
Special Features
Stored Auto Program
Changing the Auto Program
Trouble Shooting
1
2
3
4
5
6-9
10 - 11
12
13 - 15
16
Designed and manufactured in Australia to exacting standards.
General
Gene
This Manual details the operation and set-up of the Braemar
Comfort Controller when used to operate Braemar 3 Star, 4 Star
and 5 Star Gas Ducted Heaters.
Detail is provided for Comfort Controller operation of the Breezair,
Braemar and Coolair range of Evaporative Airconditioners.
The Spectrolink Comfort Controller will also operate Add-On
Refrigeration systems.
!
DO NOT
DO NOT
DO NOT
DO NOT
DO NOT
Operate this appliance before reading the
instruction booklet.
Place articles on or against this Appliance.
Use or Store flammable materials near
this Appliance.
Operate with panels, covers or guards removed
from this Appliance.
Spray aerosols in the vicinity of this Appliance
while it is in operation.
TO BE INSTALLED BY AN AUTHORISED PERSON ONLY
DELIVERY CHECKS
The customer or installer, upon delivery of the heater should ensure
that the model number and gas type is as requested. A data label on
the end of the heater details both the model number and gas type.
Please check the heater and report any freight damage.
1
Setting / Adjusting Clock
If the time on the Comfort Controller is incorrect and needs adjusting,
simply Turn the Comfort Controller to OFF, Open the door and Press and
hold the SET button for 3 seconds.
Use the UP/DOWN buttons to set the TIME - Press SET
Use the UP/DOWN buttons to set the DAY - Press SET.
Clock Setting Complete.
If the power is ON and the time has been set, go to the next page.
If the power to the heater has been OFF you will need to set the time and day.
1. Turn on the power to the heater
The display flashes SET and 12:00 pm.
SET
2. Open the front door
AC MODE
WED
COOL/VENT
3. Use the UP/DOWN buttons to set the time.
Hold down button for rapid adjustment.
4. Press the SET button to set the current time
The display shows SET and WED flashing.
SET
5. Use the
UP/DOWN
buttons to set the
day
6. Press the SET button
to set the current day
SET
7. Close the door
Clock setting is complete.
2
WED
OFF
Tur ning ON the Heater
Simply follow the steps below :
1. Ensure the gas and power at the heater is turned on.
2. Check that the Comfort Controller is in HEAT mode.
(Open the door and press the AC MODE button).
HEAT
THU
3. With the Door Closed turn the Comfort Controller ON.
Press the ON / OFF button.
4. The heater will restart in the mode of operation in
which it was last turned off.
MAN
5. Manual Mode - Press UP button until the desired
set temperature is displayed. The HEAT
WED
heater will continue to operate at
HOME
this setting until switched off or
switched to Auto mode.
NOTE - With Door Open - Set Temperature Displayed
With Door Closed - Room Temperature Displayed
6. Automatic Mode - In AUTO the heater will operate
HEAT
according to the programed settings.
HOME
3
AUTO
ON
WED
Spectrolink Comfor t Controller
Below is an explanation of the stages the display of the
Comfort Controller will show during normal heater
operation.
1. The Comfort Controller is OFF.
When the heater is not in use the Comfort Controller
displays as shown.
The heater is OFF.
Press the ON / OFF button.
OFF
WED
AUTO
HEAT
WED
SLEEP
2. The Comfort Controller is in standby Auto mode.
The heater is waiting for the room temperature to fall below the set
temperature.
3. Comfort Controller is calling for HEAT.
Heater is in start up mode.
ON & WAIT are flashing.
AUTO
ON
WAIT
HEAT
WED
WAKE
4. Heater has Lit (Gas Burning).
Pre fan period.
WAIT & Flame symbol flashing.
5. The Comfort Controller is ON.
The Fan symbol & Speed appear.
Normal operation
AUTO
ON
WAIT
HEAT
AUTO
ON
HEAT
WED
WED
WAKE
WAKE
4
ZONE
Button Functions
WITH DOOR CLOSED
Temporarily
Increase
Set
Temperature.
ON / OFF Button.
Turns the Comfort
Controller ON or OF
F.
Home / Away
Button.
Press to switch
between Home
operation and
Away operation.
Temporarily
Decrease
Set
Temperature.
WITH DOOR OPEN
Reset Button
If RESET is shown
on the display
Open the door and
press the RESET
button.
Down Button
Press to make
adjustments in
setting mode.
Auto/ Manual Button
Press to switch
between Automatic
and Manual heater
control.
Set Button
Press to enter the
Clock or Program
setting mode.
AC Mode Button
Press to set Comfort
Controller to control
heater or cooler.
Up Button
Press to make
adjustments in
setting mode.
AC MODE
5
COOL/VENT
Fan Button *
Press to override the
set fan speed.
Cool / Vent Button
Press to turn PUMP
on or off in Evap Cool
mode
Zone Buttons *
Press to turn heating
or refrigerated cooling
to a Zone on or off.
* 4 & 5 Star heaters only
Display Functions
MAN
AUTO
ON
HEATCOOL WAIT
RESETDOOROFF
MONTUEWEDTHUFRISATSUN
HOME
AWAY
WAKE
SLEEP PUMP
ZONE
1 2
3 4
FLAME.
Shows HEAT mode is selected and gas is burning
Full Flame - High Gas
Small Flame - Low Gas
SNOW FLAKE
In EVAPORATIVE COOLING mode the PUMP is on.
In REFRIGERATED COOLING mode COOLING is on.
MAN
MAN
Man displayed when Comfort Controller is in Manual
mode.
AUTO
AUTO
Auto displayed when operating the Automatic program.
TEMPERATURE
Displays the room temperature with door closed.
Displays programmed temperature with the door
open.
6
Display Functions
WAIT
WAIT
In HEAT mode, WAIT and ON are displayed flashing
at the start of a heating cycle.
In COOL mode, WAIT is displayed flashing at the
start of a cooling cycle.
HEAT
HEAT
Heat is displayed when the heater is set for HEAT
mode.
COOL
COOL
Cool is displayed when set for COOL mode.
SET
RESET
MONTUEWEDTHUFRISATSUN
SET
Displayed flashing together with another segment
(ie. time) to indicate other function must be set.
RESET
Is displayed flashing if a fault occurs.
Press the RESET button to restart the heater.
DAYS of WEEK
The current day is displayed.
Day must be set by home owner.
TIME
The current time is displayed.
Time must be set by home owner.
7
Display Functions
AWAY
AWAY
Displayed when the Comfort Controller is in Auto or
Manual Mode.
In Auto, the time is typically between 8.30am and 5.00pm.
In Manual the heater will run at the set temperature.
HOME
HOME
Displayed when the Comfort Controller is in Auto or
Manual Mode.
In Auto, the time is typically between 5.00pm and 10.30pm.
In Manual the heater will run at the set temperature.
SLEEP
SLEEP
Displayed when the Comfort Controller is in Auto Mode.
The time is typically between 10.30pm and 6.00am,
and a temperature of 12 - 16 degrees programmed.
WAKE
WAKE
Displayed when the Comfort Controller is in Auto Mode.
In Auto, the time is typically between 6.00am and 8.30am, and
a temperature of 18 - 22 degrees programmed.
FAN SPEED
In heat mode, fan symbol rotates and fan speed is displayed.
In cool mode, fan symbol rotates.
8
Display Functions
ZONE
1 2
3 4
ZONE
The word ZONE and 1, 2, 3, 4 are displayed in Heat and
Refrigerated Cooling mode when zones are present & set.
A number displayed indicates the ZONE is active.
Zones are not displayed unless set by the installer.
Zones are only available on 4 & 5 Star heaters.
BATTERY
Battery symbol is displayed when the power supply to the
heater is off. Comfort Controller will hold current settings for
up to one hour, and retain program indefinitely
DOOR
DOOR
DOOR is displayed flashing when the door is open for more
than 30 seconds.
Symbol will disappear after any button press.
Heater will not turn off if door is open.
SPANNER
Displayed when heater requires attention from a Braemar
Service technician
ON
OFF
ON is displayed when the Heater is ON
ON will be flashing at heater start.
Steady ON when gas is burning.
Steady ON in cool.
OFF is displayed when the Heater is Off
9
Special Featu
tures
Home / Away Function.
Use the HOME / AWAY button when you have an unscheduled change to
your daily routine. If you arrive home early from work and your heater is not
yet operating, pressing the HOME / AWAY button will bring forward the next
scheduled time period.
Example: HOME period is set to change at 5:00pm, but you arrive home at
4:30pm. Pressing the HOME / AWAY button will bring forward
the Home period settings.
Example: AWAY period is set to change at 9:00am, but you leave home
early at 8:00am. Pressing the HOME / AWAY button will bring
forward the AWAY period settings.
With the Comfort Controller in Manual mode, the heater will operate according
to the Home or Away settings.
Pressing the HOME / AWAY button while the heater is operating shifts the
operation between the Home and Away settings.
The default settings for HOME / AWAY are set during auto programming.
10
Special Featu
tures
Overriding the Sett Temperatures
.
When the Comfort Controller is in Auto mode,
the temperature settings can be temporarily
overridden by pressing the UP/DOWN
buttons. At the next time period the
temperature will revert to the programmed
value.
In Manual mode, when the set temperature
is overridden, the new setting becomes the
default temperature.
Zoning
Braemar 4 & 5 Star heaters can be zoned.
Zoning allows you to heat individual areas of your home to meet your
specific requirements.
If your heating system has been installed
with one zone, the display will show the
word ZONE and "1". If more zones are
installed, numbers corresponding to the
zones will be displayed .
Your heating system can have to 4 zones.
11
AUTO
HEAT
TUE
WAKE
ZONE
1 2
3 4
Stored
Sto
ed Auto
uto P
Program
ams
The table below lists all the default values in the Automatic Default
Program.
When you first power up the Comfort Controller, the default program will
run with the values shown.
Changes can be made to any times, temperatures, zones or fan speeds.
Refer to the set AUTO program function detailed in this manual.
If changes are made to the auto program record them here for future
reference.
Time
Period
WAKE
Time
ON
Temp 0C
Setting
Zone
ON
Fan
ON
Heat
6:00
20
1-2-3-4
10
Cool
6:00
20
1-2-3-4
10
Heat
8:30
14
1-2-3-4
10
Cool
8:30
14
1-2-3-4
10
Heat
5:00
21
1-2-3-4
10
Cool
5:00
21
1-2-3-4
10
Heat
10:30
14
1-2-3-4
10
Cool
10:30
14
1-2-3-4
10
Your
Settings
AWAY
Your
Settings
HOME
SLEEP
Your
Settings
Your
Settings
12
Changing AUTO
O P
Program
The Comfort Controller has a built in program
that can be used to operate the heater Automatically.
The AUTO program will turn the heater ON and OFF a number of times
a day, at different temperatures and allow different zones to be heated.
The AUTO program can be changed to suit your own personal needs.
The default values for the AUTO program are shown on page 12.
To change the AUTO program the Comfort Controller must be in Standby Mode.
Press the AC MODE
button for Heat or Cool
program setting.
AUTO
AC MODE
Press SET to enter
program setting
HEAT
TUE
WAKE
SET
Press the UP / DOWN buttons
to select the individual DAY
or GROUP of DAYS you
want to Program
Press the SET button to accept
the DAYS option you require.
AUTO
HEAT
SET
MON
SET
WAKE
The Comfort Controller is now ready to have the
. default Auto program changed
to suit you requirements. Record your changes in the Table on page 12
You can exit the program changes at any time by simply pressing the
RESET button
Any changes you have made will be saved in memory.
13
.
Changing AUTO
O P
Program
The AUTO program has 4 separate time periods of WAKE, AWAY,
HOME and SLEEP.
Programming follows the sequence below.
WAKE
AWAY
HOME
SLEEP
TIME
TEMPERATURE
ZONES
FAN SPEED
Note: If no Zones are fitted to the heating system,
the zone setting step will not appear.
Setting of the WAKE period is shown in detail below;
AWAY, HOME and SLEEP follow the same routine.
The display shows the default settings for the
WAKE period. ( no Zones )
In the following example, Monday thru Friday
are to be SET.
AUTO
HEAT
SET
MONTUEWEDTHUFRI
WAKE
After the DAYS have been set, the display shows SET and TIME flashing.
Press the UP / DOWN
buttons to change the
TIME.
SET
Press the SET button to
accept the new TIME.
AUTO
HEAT
SET
MONTUEWEDTHUFRI
WAKE
The WAKE period will commence at the TIME you have set.
14
Changing AUTO
O P
Program
SET and TEMPERATURE are now flashing
Press the UP/ DOWN
buttons to change the
TEMPERATURE.
AUTO
HEAT
SET
MONTUEWEDTHUFRI
Press the SET button to
accept the new
TEMPERATURE
WAKE
SET
During the WAKE period, your home will be heated to the TEMPERATURE
you have set.
If your heating system has no zones, zone setting will not appear.
SET and ZONE are now flashing
The display shows a heating system with 2 zones
AUTO
HEAT
SET
MONTUEWEDTHUFRI
ZONE
1 2
WAKE
Press a Zone button to turn OFF
the heating to that Zone
ZONE 2
Press the SET button to accept the zone heating
SET and FAN are now flashing.
Press the UP / DOWN
buttons to adjust the
amount of heating
to the Zones.
AUTO
HEAT
SET
MONTUEWEDTHUFRI
WAKE
SET
SET
ZONE
1 2
Press the SET button to
accept the new fan speed.
SET
Setting of the WAKE period is now complete
AWAY, HOME and SLEEP can now be set following the procedure above
15
Trouble
ouble Shootin
Shooting
If you have difficulty operating your Heater check the trouble shooting
guide before calling for service.
Problem?
RESET flashing with a number displayed in-place of the time.
Open the front door on the control, press the RESET button.
The heater should operate after about 20 seconds.
If RESET reappears, wait 10 minutes, press the RESET button.
The heater should now start.
If heater fails to start contact your service agent.
RESET
MAN / AUTO
Problem?
Home is not heating effectively.
Check that there are enough outlets opened for the fan speed selected.
Open more outlets or another Zone to correct the problem.
Is the return air filter blocked? We recommend cleaning every fortnight.
Check the program running on the Comfort Controller is correct.
Is the Comfort Controller located in the common area as recommended.
(refer to Installation Manual Part No.623467 for more information)
Increase the SET temperature.
Problem?
Heater comes on at wrong time.
Check the time AM or PM.
Check the Heater is in HEAT mode (not cool).
Check the SET temperature is correct.
Check the programmed "ON" times.
Problem?
Spanner Displayed
When the spanner is displayed, call a service
agent to look at the heater
AUTO
ON
HEAT
WED
WAKE
AUTO
ON
HEAT
WED
WAKE
MAINTENANCE SCHEDULE
Periodic maintenance of the heater will ensure a long and satisfactory service
life with the heater operating at optimum performance. Maintenance should be
performed on a regular basis (start of each heating season) by an Authorised
person trained in the service of Braemar Heaters.
CLEAN FILTERS EVERY 2 WEEKS AND REPLACE ANNUALLY
16
Spectrolink Comfort Controller
Home Owner's Manual
Cooling
Come home to
E C O S T
R
®
Index
Topic
General
Setting the Time
Turning On the Cooler
Button Functions
Cooler Operation
Timed Start and Stop
Drain Valve - Bleed System
Maintenance
Troubleshooting
Page
1
2
3
4
5
6
7
8-9
10
Designed and manufactured in Australia to exacting standards.
General
Congratulations on choosing a new Evaporative Cooler
for your home.
Your cooler is built from the highest quality materials and
engineered to provide many years of economical, trouble
free cooling.
Please take a few minutes to read these instructions so you
have a full understanding of how to operate your cooler.
Your installer should demonstrate the features and procedures
set out in these instructions. The installer should also provide
you with a Model and Serial number which can be filled out
below.
EFFECTIVE COOLING
To provide efficient cooling or ventilation the building must
have sufficient exhaust openings to the outdoors in the form
of doors, windows or other vents. To assist air circulation,
open windows or doors that are furthest from the outlet vent
in each room. In every room that has an outlet vent, provide
an exhaust opening 2 to 2.5 times the vent size of the room.
Where the design of the building prevents adequate exhaust,
consideration should be given to the provision of mechanical
extraction such as an exhaust fan.
Model No.
Serial No.
1
Setting / Adjusting Clock
.1. Turn on the power to the
cooler. The display shows
SET and 12:00pm flashing.
SET
WED
2. Open the front door.
AC MODE
COOL/VENT
3. Use the UP/DOWN buttons to set the time.
Hold down button for rapid adjustment.
4. Press the SET button to set the current time.
The display shows SET and WED flashing.
SET
5. Use the UP/DOWN
buttons to select
current day.
6. Press the SET button
to set current day.
SET
WED
OFF
7. Close the door.
Clock setting is complete.
If you have set the TIME or DAY incorrectly, open the door and
hold down the SET button to start again.
Adjusting the Time - Turn the Comfort Control OFF, open the
door, press and hold the SET button for 3
seconds and go to Step 3
2
Tur ning ON the Cooler
Simply follow the steps below: .
1. Ensure the water and power at the cooler is turned on.
2. Check that the Confort Control is in COOL mode.
(Open the door and press the AC MODE button).
COOL
THU
With the Door Closed turn the Comfort Control ON.
Press the ON / OFF.
4. The cooler will restart in the mode of operation in
which it was last turned off.
5. Manual Mode - Press the UP button until the
desired fan speed is displayed.
If the cooler has been off for
more than 10 minutes
,WAIT,
and FAN speed will flash indicating
filter pad pre-wet cycle (2 minutes).
6. Automatic Mode - In AUTO the cooler will operate
according to the ambient temperature sensed by the
Comfort Control. As the ambient temperature varies
up and down the the Comfort Control will adjust the
fan speed to suit.
3
MAN
COOLWAIT
WED
Button Functions
WITH DOOR CLOSED
UP Button
Decreases Fan speed in Manual.
Decreases Cooling in Automatic.
ON/OFF Button
Turns the comfort
control On or OFF.
HOME/AWAY Button
! Not used for Evaporative
cooler operation.
RESET Button
! Not used for
Evaporative cooler
operation.
DOWN Button
Decreases Fan .speed in Manual.
Decreases Cooling in Automatic.
WITH DOOR OPEN
UP Button
Press to make adjustments in
time setting mode.
DOWN Button
Press to make adjustments in
time setting mode.
AUTO / MANUAL Button
Press to switch between
Automatic and Manual
cooler control.
COOL / VENT
Press to turn
Pump On and OFF.
SET Button
Press to enter the Clock
or Auto Timer setting mode.
ZONE Buttons
! Not used for Evaporative
.
cooler control.
AC MODE Button
Press to set Comfort Control
to Heater or Cooler operation.
FAN Button
! Not used for Evaporative cooler operation.
4
Cooler Operation
Automatic and Manual Mode - To switch between Automatic and Manual operation
open the Comfort Controller door and Press the MAN/AUTO button. The display will
change to indicate the mode of operation.
AUTO
MAN
COOL
WED
COOL
WED
AC MODE
COOL/VENT
Automatic - In Automatic mode the Comfort Control will set the Pump function and
Fan speed according to the ambient temperature sensed by the Comfort Control. As
the ambient temperature increases or decreases the Comfort Control will adjust the
Cooler accordingly. If the automatic setting is not cold enough or too cold the automatic
level can be overridden.
Press the UP or Down button to
override the Automatic cooling level
to your comfort level.
Any changes to the automatic setting will revert to the default setting when the cooler
is turned off and then restarted.
Manual - In Manual mode the Fan speed and Pump operation are both controlled by
the home owner.
Press the UP or Down button to set the fan
speed.
By pressing the COOL/VENT button the home owner can choose between cooled
air (pump on) or ventilation (pump off).
Pump On
Pump Off
MAN
AC MODE
MAN
COOL
COOL
WED
WED
COOL/VENT
In manual mode the cooler will continue to operated in the selected options until
changed or turned off.
5
Timed Star t and Stop
A feature of the Comfort Control is the option for the home owner to program
a start and stop time.
1. With the Comfort Control turned
off open the door and press the
SET button.
AC MODE
2. Press the MAN/AUTO button to select
mode of operation. ( The last mode of
operation will be displayed first).
COOL/VENT
COOL/VENT
AC MODE
3. If Auto is selected go to step 4* . For manual
mode press the UP
or DOWN
button
to select Fan speed and the COOL/VENT
button for Cold Air or Ventilation.
AC MODE
COOL/VENT
4. To set the start time press SET and then
the UP
or Down
button to set
the ON time.
5. To set the stop time press SET and then
the UP
or DOWN
button to set
the OFF time.
AC MODE
COOL/VENT
7. The Start and Stop times will remain for
each day until the stop button is pressed.
*If Automatic is selected fan speed and pump operation will be determined by the
ambient temperature sensed by the Comfort Control at time of starting.
6
Automatic Drain - Bleed System
Automatic Drain - If an automatic drain valve system has been
installed into your cooler, the cooler will automatically drain the
water, if water salinity becomes too high or when the pre-set time
period has expired. This ensures the water is always fresh and
helps maintain your cooler in good condition to ensure optimum
cooling performance.
The drain will be activated by 1 of 4 conditions:
1. Water salinity is too high
2. Pre-set time period expires (can be adjusted by your
installer).
3. If the cooler is turned off for a continuous 72 hours.
4. Manually by pressing the UP
and Down
buttons
simultaneously with the Comfort Control off and door
closed. The display will show "dr" to confirm the
operation has activated.
During a drain operation all buttons are in-operable and on
restarting your cooler a delay will be experienced while the
tank refills with fresh water.
Bleed System - During operation the bleed system will drain
a small amount of water from the cooler to ensure fresh water
is continually added.
The amount of bleed will depend on local conditions and will
set by your installer.
7
Maintenance
Draining water from your cooler at the end of the summer season is not
required if your cooler is fitted with an automatic drain valve system. However
it is a requirement to check the cooler, it's operation, the pump, drain valve,
solenoid and fan motor after the first year and then every two (2) years as
routine maintenance.
If the bleed system is fitted then maintenance should be conducted before and
after every summer season as outlined below.
WARNING: Seeley International recommends that is carried out by an
authorised service agent. Climbing onto the roof is hazardous and could
result in personal injury or property damaged. Failure to carry out maintenance
will affect your warranty coverage.
End of Season Maintenance
1. Turn off power to cooler.
2. Turn off water to cooler.
3. Remove the pad frame assemblies - insert a flat screwdriver tip into the slot
(A) and lever until disengagement occurs. Take hold of the pad frame and
pull it towards you (B) until the internal side clips disengage. Pivot the pad
frame outward and lift up (C) . Take care not to damage the pad. Repeat for
all pad frames.
A
B
C
8
Maintenance
4. Turn off power switch inside the cooler A .
5. Check and clean the lid water
channels B .
A
6. If fitted, unclip and remove the bleed
system. Allow water to drain, take care
not to lose the o-ring C .
VE P
AD
-FRAMES
PAD
AD-FRAMES
B
C
7. Thoroughly clean the tank and pump filter, DO NOT replace the bleed system.
8. Refit the pad frames.
Preseason Maintenance
Caution : Do not run the cooler
with the pad frames removed.
1. Turn off power to the cooler.
2. Remove the pad frames.
3. Ensure power switch in cooler is off.
4. Gently wash the pads to remove any dust build up during winter. If pads are poor
condition, replace them.
CAUTION : Do not damage the pads with high pressure water spray.
5. If removed replace bleed system and ensure the o-ring is fitted.
6. Turn on power switch in cooler.
7. Turn on water, power, refit pad frames and run the cooler.
9
Trouble Shooting
If you have difficulty operating your Cooler or consider that the cooler
requires service check the trouble shooting guide before calling the
service agent.
Problem?
Unpleasant Odour.
Odour from new pads - Allow time to condition by running the cooler.
Problem?
Inadequate Cooling.
Dry Pads - Check water flow to pads.
- Ensure water supply is turned on.
Insufficient exhaust openings - Ensure sufficient openings for conditioned air.
Excessive ambient humidity - On days during summer when the ambient
humidity is high, the cooler will not cool as
effectively as on dry days.
Problem?
Wall Control Flashes "
"
An operational fault has been - Ensure the water and power supply
detected.
has been turned on.
Check that the cooler drain pipe is not
blocked.
Turn off wall control and record the number
displayed on the screen.
Call a service agent quote the displayed number and the cooler serial
number shown on page 1.
10