1
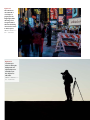
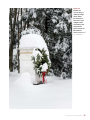
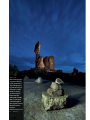
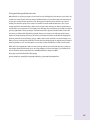
Nikon D750: From Snapshots to Great Shots Rob Sylvan Nikon D750: From Snapshots to Great Shots Rob Sylvan Peachpit Press www.peachpit.com To report errors, please send a note to [email protected] Peachpit Press is a division of Pearson Education. Copyright © 2015 by Peachpit Press All images copyright © 2015 by Rob Sylvan Project Editor: Valerie Witte Production Editor: Becky Winter Copyeditor: Scout Festa Proofreader: Patricia Pane Composition: Danielle Foster Indexer: James Minkin Cover Image: Rob Sylvan Cover Design: Aren Straiger Interior Design: Mimi Heft Notice of Rights All rights reserved. No part of this book may be reproduced or transmitted in any form by any means, electronic, mechanical, photocopying, recording, or otherwise, without the prior written permission of the publisher. For information on getting permission for reprints and excerpts, contact [email protected]. Notice of Liability The information in this book is distributed on an “As Is” basis, without warranty. While every precaution has been taken in the preparation of the book, neither the author nor Peachpit shall have any liability to any person or entity with respect to any loss or damage caused or alleged to be caused directly or indirectly by the instructions contained in this book or by the computer software and hardware products described in it. Trademarks “From Snapshots to Great Shots” is a trademark, in the U.S. and/or other countries, of Pearson Education, Inc. or its affiliates. All Nikon products are trademarks or registered trademarks of Nikon and/or Nikon Corporation. Many of the designations used by manufacturers and sellers to distinguish their products are claimed as trademarks. Where those designations appear in this book, and Peachpit was aware of a trademark claim, the designations appear as requested by the owner of the trademark. All other product names and services identified throughout this book are used in editorial fashion only and for the benefit of such companies with no intention of infringement of the trademark. No such use, or the use of any trade name, is intended to convey endorsement or other affiliation with this book. ISBN-13: 978-0-13-409436-6 ISBN-10:0-13-409436-0 987654321 Printed and bound in the United States of America Dedication For my dear friends Brian Matiash and Nicole S. Young, thank you for being a constant source of inspiration to me, and for all that you have given to the community of photographers around the world. Acknowledgments My deepest thanks go to Jeff Revell, the founding author of the From Snapshots to Great Shots series. Jeff is a tremendous photographer and gifted teacher. Thank you for providing such a sound foundation upon which to build. Any book that has reached the final stage of being published is actually the work of many hands (eyes, brains, and hearts, too) behind the scenes. I owe everyone at Peachpit a great deal of gratitude, but specifically Ted Waitt, Valerie Witte, Scout Festa, Becky Winter, Danielle Foster, Patricia Pane, Owen Wolfson, Aren Straiger, Sara Jane Todd, and Nancy Aldrich-Ruenzel, who were instrumental in getting this book finished, looking so darn fantastic, and out into the world. Thank you all. A special thanks to David Brommer and B&H Photo Video for help in securing the D750 I used to write this book. I am grateful for all that I have learned from my friends at KelbyOne, the Digital Photo Workshops, my peers at Stocksy United, the fantastic instructors at Photoshop World, and countless numbers of fellow photographers. You all have taught and inspired me over the years. I also want to thank my wife, Paloma, for being the love of my life and my number one supporter during this project; my son Quinn, for assisting me on many shoots and being the model in many more; and my family, friends and neighbors—Ea, Avery, Nicole, Brian, Randy, Adrienne, Emma, Julia, Paige, Ella, John, Kris, Gabby, Ed, Jaylin, Alden, Hayden, Charlie, Dan, Raymond, Maggie, Kayla, Justin, Jayda, Nekos—for being a part of the book in large and small ways. The camera used while writing this From Snapshots to Great Shots book was generously provided by B&H Photo. www.bhphotovideo.com Contents IntroductionIx Chapter 1: The D750 Top Ten List 1 Ten Tips to Make Your Shooting More Productive Right Out of the Box Poring Over the Camera Poring Over the Camera 1. Charge Your Battery 2. Set Your JPEG Image Quality 3. Set the Correct White Balance 4. Set Your Color Space 5. Choose Your ISO Setting 6. Set Your Focus Point and Mode 7. Know How to Override Auto Focus 8. Disable the Slot Empty Release Lock 9. Turn On Image Review 10. Review Your Shots Chapter 1 Assignments 2 4 5 6 7 10 12 13 15 15 17 19 25 Chapter 2: First Things First 27 A Few Things to Know and Do Before You Begin Taking Pictures Poring Over the Picture Choosing the Right Memory Card Formatting Your Memory Card Updating the D750’s Firmware Cleaning the Sensor Using the Right Format: Raw vs. JPEG Lenses and Focal Lengths What Is Exposure? Motion and Depth of Field Chapter 2 Assignments 28 30 31 32 34 35 39 44 46 51 Chapter 3: The Auto Modes 53 Get Shooting with the Automatic Camera Modes Poring Over the Picture Auto Mode Flash Off Mode Scene Modes Portrait Mode 54 56 57 59 59 C o n t e n t s v Landscape Mode Child Mode Sports Mode Close Up Mode Night Portrait Mode Other Scene Modes to Explore Effects Modes When You May Never Want to Use the Auto Modes Again Chapter 3 Assignments 61 62 62 65 66 67 70 75 77 Chapter 4: The Professional Modes 79 Taking Your Photography to the Next Level Poring Over the Picture P: Program Mode S: Shutter Priority Mode A: Aperture Priority Mode M: Manual Mode User Settings Mode—Saving Your Favorite Settings to the Mode Dial Customizing My Menu How I Shoot: A Closer Look at the Camera Settings I Use Chapter 4 Assignments 80 82 85 89 95 99 100 102 106 Chapter 5: Moving Target 109 The Tricks to Shooting Sports and More Poring Over the Picture Stop Right There! Using Shutter Priority (S) Mode to Stop Motion Using Aperture Priority (A) Mode to Isolate Your Subject The ISO Sensitivity Auto Control Trick Keep Them in Focus with Continuous-servo Focus and AF Focus Point Selection Stop and Go with 3D-tracking AF Manual Focus for Anticipated Action Keeping Up with the Continuous Shooting Mode A Sense of Motion Tips for Shooting Action Chapter 5 Assignments vi 110 112 115 118 120 122 124 124 126 127 128 132 Chapter 6: Perfect Portraits 135 Settings and Features to Make Great Portraits Poring Over the Picture Automatic Portrait Mode Using Aperture Priority Mode Metering Modes for Portraits Using the AE-L (Auto Exposure Lock) Feature Focusing: The Eyes Have It 136 138 138 142 142 144 N i k o n D 7 5 0 : F r o m S n a p s h o t s t o G r e at S h o t s Classic Black and White Portraits The Portrait Picture Control for Better Skin Tones Detect Faces with Live View Use Fill Flash for Reducing Shadows Portraits on the Move Tips for Shooting Better Portraits Chapter 6 Assignments 147 149 150 151 153 153 163 Chapter 7: Landscape Photography 165 Tips, Tools, and Techniques to Get the Most Out of Your Landscape Photography Poring Over the Picture Sharp and In Focus: Using Tripods Selecting the Proper ISO Selecting a White Balance Using the Landscape Picture Control Turn On Exposure Preview Taming Bright Skies with Exposure Compensation Shooting Beautiful Black and White Landscapes The Golden Light Where to Focus Easier Focusing Making Water Fluid Directing the Viewer: A Word About Composition Chapter 7 Assignments 166 168 170 172 174 176 177 179 181 182 184 185 188 193 Chapter 8: Mood Lighting 195 Shooting When the Lights Get Low Poring Over the Picture Raising the ISO: The Simple Solution Using Very High ISOs Stabilizing the Situation Focusing in Low Light Shooting Long Exposures Using the Built-in Flash Compensating for the Flash Exposure Reducing Red-Eye Rear Curtain Sync Flash and Glass A Few Words About External Flash Chapter 8 Assignments 196 198 201 204 207 210 211 214 216 218 220 221 224 Chapter 9: Advanced Techniques 227 Impress Your Family and Friends Poring Over the Picture Spot Meter for More Exposure Control 228 230 C o n t e n t s vii Manual Mode Avoiding Lens Flare Using the Sun Creatively Bracketing Exposures High Dynamic Range (HDR) Photography Active D-Lighting Shooting Panoramas Shooting with the Interval Timer Macro Photography Chapter 9 Assignments 232 235 236 237 239 243 245 247 250 251 Chapter 10: The Moving Picture 253 Getting the Most Out of the D750’s Video Capabilities It’s All About the Lenses 254 Recording with Live View 254 Video Quality 255 Sound257 Dedicating a Second Card to Video 259 Focusing260 View Modes 261 Accessories for Video 263 Getting a Shallow Depth of Field 265 Giving a Different Look to Your Videos 266 Creating a Time-Lapse Movie 267 Tips for Better Video 269 Watching and Editing Your Video 271 Chapter 10 Assignments 273 Chapter 11: Accessorize 275 Upgrades and Accessories to Expand Your Camera’s Creative Potential Filters276 Tripods282 Remote or Cable Release 283 Macro Photography Accessories 284 Hot-Shoe Flashes 287 Diffusers289 Camera Bags 289 Bits and Pieces 290 A Word About Lenses 292 Conclusion293 viii N i k o n D 7 5 0 : F r o m S n a p s h o t s t o G r e at S h o t s Chapter 12: Creative Compositions 295 Improve Your Pictures with Sound Compositional Elements 295 Poring Over the Picture 296 Depth of Field 298 Angles300 Point of View 300 Patterns300 Color302 Contrast303 Leading Lines 305 Splitting the Frame 305 Frames Within Frames 307 Chapter 12 Assignments 309 Index310 C o n t e n t s ix This page intentionally left blank Introduction The D750 is a wonderful bit of camera technology and a very capable tool for creating photographs and video that you will be proud to show others. The intention of this book is not to be a rehash of the owner’s manual that came with the camera, but rather to be a resource for learning how to improve your photography while specifically using your D750. I am very excited and honored to help you in that process, and to that end I have put together a short Q&A to help you get a better understanding of just what you can expect from this book. I n t r o d u c t i o n xi Q: Is every camera feature going to be covered? A: Nope, just the ones I felt you need to know about in order to start taking great photos. Believe it or not, you already own a great resource that covers every feature of your camera: the owner’s manual. Writing a book that just repeats this information would have been a waste of my time and your money. What I did want to write about was how to harness certain camera features to the benefit of your photography. As you read through the book, you will also see callouts that point you to specific pages in your owner’s manual that are related to the topic being discussed. For example, I discuss the use of Live View, but there is more information available on this feature in the manual. I cover the function that applies to our specific needs but also give you the page numbers in the manual to explore this function even further. Q: So if I already own the manual, why do I need this book? A: The manual does a pretty good job of telling you how to use a feature or turn it on in the menus, but it doesn’t necessarily tell you why and when you should use it. If you really want to improve your photography, you need to know the whys and the whens to put all of those great camera features to use at the right time. To that extent, the manual just isn’t going to cut it. It is, however, a great resource on the camera’s features, and for that reason I treat it like a companion to this book. You already own it, so why not get something of value from it? Q: What can I expect to learn from this book? A: Hopefully, you will learn how to take great photographs. My goal, and the reason the book is laid out the way it is, is to guide you through the basics of photography as they relate to different situations and scenarios. By using the features of your D750 and this book, you will learn about aperture, shutter speed, ISO, lens selection, depth of field, and many other photographic concepts. You will also find plenty of large full-page photos that include captions, shooting data, and callouts so you can see how all of the photography fundamentals come together to make great images. All the while, you will be learning how your camera works and how to apply its functions and features to your photography. Q: What about video? A: The video recording functionality of DSLR cameras continues to improve with each new model, and the D750 is right up there near the top of its class. While the title of this book, From Snapshots to Great Shots, gives a nod to the fact that its main focus is on creating fantastic still photographs, I devote an entire chapter (Chapter 10) to help you get started capturing video with your D750. xii N i k o n D 7 5 0 : F r o m S n a p s h o t s t o G r e at S h o t s Q: What are the assignments all about? A: At the end of most of the chapters, you will find shooting assignments, where I give you some suggestions as to how you can apply the lessons of the chapter to help reinforce everything you just learned. Let’s face it—using the camera is much more fun than reading about it, so the assignments are a way of taking a little break after each chapter and having some fun. Q: Should I read the book straight through or can I skip around from chapter to chapter? A: Here’s the easy answer: yes and no. No, because the first four chapters give you the basic information that you need to know about your camera. These are the building blocks of using the D750. After that, yes, you can move around the book as you see fit, because the following chapters are written to stand on their own as guides to specific types of photography or shooting situations. So you can bounce from portraits to landscapes and then maybe to a little action photography. It’s all about your needs and how you want to address them. Or, you can read the book straight through. The choice is up to you. Q: Is there anything else I should know before getting started? A: In order to keep the book short and focused, I had to be pretty selective about what I included in each chapter. The problem is that there is a little more information that might come in handy after you’ve gone through all the chapters. So as an added value for you, I have written a bonus chapter: Chapter 12, “Creative Compositions.” Chapter 12 will lead you through some photography tips and techniques to make your photographs even better. To access the bonus chapter, just log in or join peachpit.com (it’s free), then enter the book’s ISBN on this page: www.peachpit.com/store/register.aspx. After you register the book, a link to the bonus chapter will be listed on your Account page under Registered Products. Note: If you purchased an electronic version of this book, you’re set—Chapter 12 is already included in it. Q: Is that it? A: One last thought before you dive into the first chapter. My goal in writing this book has been to give you a resource that you can turn to for creating great photographs with your Nikon D750. Take some time to learn the basics and then put them to use. Photography, like most things, takes time to master and requires practice. I have been a photographer for many years and I’m still learning. Always remember that it’s not the camera that makes beautiful photographs—it’s the person using it. Have fun, make mistakes, and then learn from them. In no time, I’m sure you will transition from a person who takes snapshots to a photographer who makes great shots. I n t r o d u c t i o n xiii ISO 100 • 1/2 sec. • f/22 • 29mm lens 4 The Professional Modes Taking Your Photography to the Next Level Most professional photographers use a few select modes that offer the greatest amount of control over their photography. To anyone who has been involved with photography for any period of time, these modes are known as the backbones of photography. They allow you to influence two of the most important factors in taking great photographs— namely, aperture and shutter speed. To access these modes, you simply hold the Mode dial lock release and turn the Mode dial to one of the letter-designated modes and begin shooting. But wouldn’t it be nice to know exactly what those modes control and how to make them do our bidding? Well, if you really want to take that next step in controlling your photography, it is essential that you understand not only how to control these modes, but why you are controlling them. So let’s switch over to the first of our professional modes: Program. 79 Poring Over the Picture I used Shutter Priority mode to ensure that the speed was slow enough to blur the water. I paid a visit to Franconia Notch State Park, in my home state of New Hampshire, the other day. The predominant feature of Franconia Notch is the Flume Gorge, an amazing cascade of water over granite. I brought my tripod, but I absentmindedly forgot to bring the bracket that attaches the D750 to it. That tilting screen on the D750 was about to make itself really useful. I still intended to get that silky water look by using a slow shutter speed, so I made a tripod out of every rock, root, and branch I could find to frame up my shots. Tilting the screen out allowed me to compose when it wasn’t possible to get my eye to the viewfinder. ISO 100 • 1/2 sec. • f/13 • 80mm lens I used the camera’s selftimer feature to trigger the shutter to avoid shaking the camera during the exposure. Despite the small aperture, the depth of field was relatively shallow because I zoomed the lens to 80mm and focused on the nearby leaf. The camera was perched on a mossy root for a firm foundation. 4: The Professional Modes 81 P: Program Mode I think of Program mode as a good place to begin for those graduating from the automatic or scene modes. There is a reason that Program mode is only one click away from the automatic modes: With respect to apertures and shutter speeds, the camera is doing most of the thinking for you. So if that is the case, why even bother with Program mode? First, let me say that I rarely use Program mode because it just doesn’t give as much Manual Callout control over the image-making process as To see available settings for each mode, check out the table on pages 460 and 461 of the electronic user’s manual. the other professional modes. There are occasions, however, when it comes in handy, like when I am shooting in widely changing lighting conditions and I don’t have the time to think through all my options, or when I’m not very concerned with having ultimate control of the scene. Think of a picnic outdoors in a partial shade/sun environment. I want great-looking pictures, but I’m not looking for anything to hang in a museum. If that’s the scenario, why choose Program over one of the scene modes? Because it gives me choices and control that none of the scene modes can deliver. When to use Program (P) mode instead of the automatic scene modes It’s graduation time and you’re ready to move on to a more advanced mode but not quite ready to jump in with both feet. When does Program mode come in handy? • When shooting in a casual environment where quick adjustments are needed • When you want more control over the ISO • If you want to make corrections to the white balance • When you want to change shutter speeds or the aperture to achieve a specific result Let’s go back to our picnic scenario. As I said, the light is moving from deep shadow to bright sunlight, which means that the camera is trying to balance our three photo factors (ISO, aperture, and shutter speed) to make a good exposure. From Chapter 1, we know that Auto ISO is generally not what we want except when shooting in Auto mode, so we have already turned that feature off (you did turn it off, didn’t you?). Well, in Program mode, you can choose which ISO you would like the camera to base its exposure on. The lower the ISO number, the better the quality of photographs, but the less light sensitive 82 N i k o n D 7 5 0 : F r o m S n a p s h o t s t o G r e at S h o t s the camera becomes. It’s a balancing act, with the main goal always being to keep the ISO as low as possible—too low an ISO, and we will get camera shake in our images from a long shutter speed; too high an ISO, and we will have an unacceptable amount of digital noise. For now, let’s go ahead and select ISO 400 so that we provide enough sensitivity for those shadows while allowing the camera to use shutter speeds that are fast enough to stop motion. Starting points for ISO selection Many years ago camera manufacturers were racing to create cameras with more megapixels. Today the digital race is more about higher ISO. Photographers want to be able to shoot in lower light conditions without the risk of digital noise. There is a lot of discussion concerning ISO in this and other chapters, but it might be helpful if you know where your starting points should be for your ISO settings. The first thing you should always try to do is use the lowest possible ISO setting. Your D750 has a good working range of 100–6400. That being said, here are good starting points for your ISO settings: • 100: Bright, sunny day • 200: Hazy or outdoor shade on a sunny day • 400: Indoor lighting at night or cloudy conditions outside • 800: Late night, low-light conditions or sports arenas at night • 1600: Very low light; possibly candlelight or events where no flash is allowed • 3200-6400: Extreme low light (some digital noise will be present; however, less than ever before) These are just suggestions; you’ll have to adjust as necessary. Your ISO selection will depend on a number of factors that will be discussed later in the book. With the ISO selected, we can now make use of the other controls built into Program mode. By rotating the Main Command dial, we now have the ability to shift the program settings. Remember, your camera is using the internal meter to pick what it deems suitable exposure values, but sometimes it doesn’t know what it’s looking at and how you want those values applied (Figures 4.1 and 4.2). With the program shift, you can influence what the shot will look like. Do you need faster shutter speeds in order to stop the action? Just turn the Main Command dial to the right. Do you want a smaller aperture so that you get a greater depth of field? Turn the dial to the left until you get the desired aperture. The camera shifts the shutter speed and aperture accordingly to get a proper exposure, and you will get the benefit of your choice as a result. 4: The Professional Modes 83 Figure 4.1 (left) This is my first shot, using Program mode. ISO 100 • 1/50 sec. • f/4.5 • 85mm len Figure 4.2 (right) I decreased the size of the aperture by rotating the Main Command dial to the left to get a greater depth of field, and the shutter speed slowed down to maintain the same exposure value. ISO 100 • 1/4 sec. • f/20 • 85mm lens You will also notice that a small star will appear above the letter P in the viewfinder and the rear display if you rotate the Main Command dial. This star is an indication that you modified the exposure from the one the camera chose. To go back to the default Program exposure, simply turn the dial until the star goes away or switch to a different mode and then back to Program mode again. Let’s set up the camera for Program mode and see how we can make all of this come together. Setting up and shooting in Program mode 1. Turn your camera on, and then press the Mode dial release lock and turn the Mode dial to align the P with the indicator line. 2. Select your ISO by pressing and holding the ISO button on the back left of the camera while rotating the Main Command dial with your thumb. 3. The ISO will appear on the top display. Choose your desired ISO, and release the ISO button on the left to lock in the change. 4. Point the camera at your subject, and then activate the camera meter by depressing the shutter button halfway. 5. View the exposure information in the bottom of the viewfinder or by looking at the display panel on the back of the camera. 6. While the meter is activated, use your thumb to roll the Main Command dial left and right to see the changed exposure values. 7. Select the exposure that is right for you and start clicking. (Don’t worry if you aren’t sure what the right exposure is yet. We will work on making the right choices for those great shots beginning with the next chapter.) n 84 N i k o n D 7 5 0 : F r o m S n a p s h o t s t o G r e at S h o t s S: Shutter Priority Mode S mode is what photographers commonly refer to as Shutter Priority. Just as the name implies, it is the mode that prioritizes or places major emphasis on the shutter speed above all other camera settings. Just as with Program mode, Shutter Priority gives us more freedom to control certain aspects of our photography. In this case, we are Shutter speeds talking about shutter speed. The selected shutter speed deter- A slow shutter speed refers to leaving the shutter open for a long period of time—like 1/30 of a second or slower. A fast shutter speed means that the shutter is open for a very short period of time— like 1/250 of a second or faster. mines just how long you expose your camera’s sensor to light. The longer it remains open, the more time your sensor has to gather light. The shutter speed also, to a large degree, determines how sharp your photographs are. This is different from the image being sharply in focus. One of the major influences on the sharpness of an image is just how much blurring is occurring based on camera shake and the subject’s movement. Because a slower shutter speed means that light from your subject is hitting the sensor for a longer period of time, any movement by you or your subject will show up in your photos as blur. When to use Shutter Priority mode • When working with fast-moving subjects where you want to freeze the action (Figure 4.3); much more on this in Chapter 5. Figure 4.3 Even the fastest of subjects can be frozen with the right shutter speed. ISO 25600 • 1/1000 sec. • f/5.6 • 400mm lens • When you want to emphasize movement in your subject with motion blur (Figure 4.4). • When you want to use a long exposure to gather light over a long period of time (Figure 4.5); more on this in Chapter 8. • When you want to create that silky-looking water in a waterfall (Figure 4.6). As you can see, the subject of your photo usually determines whether or not you will use Shutter Priority mode. It is important that you can visualize the result of using a particular shutter speed. The great thing about shooting with digital cameras is that you get instant feedback by viewing your shot on the rear LCD monitor. But what if your subject won’t give you a do-over? Such is often the case when shooting sporting events. It’s not like you can ask the quarterback to throw that touchdown pass again because your last shot was blurry from a slow shutter speed. This is why it’s important to know what those speeds represent in terms of their capability to stop the action and deliver a blur-free shot. First, let’s examine just how much control you actually have over the shutter speeds. The D750 has a shutter speed range from 1/4000 of a second all the way down to 30 seconds. With that much latitude, you should have enough control to capture almost any subject. The other thing to think about is that Shutter Priority is considered a “semi-automatic” mode. This means that you are taking control over one aspect of the total exposure while the camera handles the other. In this instance, you are controlling the shutter speed and the camera is controlling the aperture. This is important, because there will be times that you want to use a particular shutter speed but your lens won’t be able to accommodate your request. Figure 4.4 Slowing down the shutter speed and following the motion conveys a sense of movement in the shot. ISO 800 • 1/10 sec. • f/8 • 24mm lens Figure 4.5 With a long enough exposure, moonlight can look like daylight. ISO 400 • 120 sec. • f/8 • 24mm lens For example, you might encounter this problem when shooting in low-light situations. If you are shooting a fast-moving subject that will blur at a shutter speed slower than 1/125 of a second and your lens’s largest aperture is f/3.5, you might find that your aperture display in the viewfinder and the control panel will blink. This is your warning that there won’t be enough light available for the shot—due to the limitations of the lens—so your picture will be underexposed. It does not, however, prevent you from taking the shot, so you need to be aware of the warning and the results. Another case where you might run into this situation is when you are shooting moving water. To get that look of silky, flowing water, it’s usually necessary to use a shutter speed of at least 1/15 of a second. If your waterfall is in full sunlight, you may see the aperture readout blink because the lens you are using only stops down to f/22 at its smallest opening. In this instance, your camera is warning you that you will be overexposing your image. There are workarounds for these problems, which we will discuss later (see Chapter 7 for all the details), but it is important to know that there can be limitations when using the Shutter Priority mode. 4: The Professional Modes 87 Figure 4.6 Increasing the length of the exposure time gives moving water a misty look. ISO 100 • 1/2 sec. • f/13 • 24mm lens 88 N i k o n D 7 5 0 : F r o m S n a p s h o t s t o G r e at S h o t s Setting up and shooting in Shutter Priority mode 1. Turn your camera on. Press the Mode dial release lock and turn the Mode dial to align the S with the indicator line. 2. Set your ISO by pressing the ISO button; select the appropriate setting by looking at the ISO readout on the control panel or by looking at the info display on the rear LCD monitor. 3. Once your ISO is set, point the camera at your subject and then activate the camera meter by depressing the shutter button halfway. 4. View the exposure information in the bottom area of the viewfinder or in the control panel. 5. While the meter is activated, use your thumb to roll the Main Command dial left and right to see the changed exposure values. Roll the dial to the right for faster shutter speeds and to the left for slower speeds. n A: Aperture Priority Mode You wouldn’t know it from its name, but Aperture Priority mode is one of the most useful and popular modes in DSLR photography. Aperture Priority is one of my personal favorite modes, and I believe that it will quickly become one of yours as well. Aperture Priority is also deemed a semi-automatic mode because it allows you to once again control one factor of exposure while the camera adjusts for another. Why, you may ask, is this one of my favorite modes? It’s because the aperture of your lens dictates depth of field. Depth of field, along with composition, is a major element in how you direct attention to what is important in your image. It is the controlling factor when determining how much of your image is sharp. If you want to isolate a subject from the background, such as when shooting a portrait, you can use a large aperture to keep the focus on your subject and make both the foreground and background blurry. If your emphasis is on keeping the entire scene sharply focused, such as with a landscape scene, then using a small aperture will render the greatest depth of field possible. When to use Aperture Priority mode • When shooting portraits or wildlife (Figure 4.7) • When shooting most landscape photography (Figure 4.8) • When shooting macro, or close-up, photography (Figure 4.9) • When shooting architectural photography, which often benefits from a large depth of field (Figure 4.10) 4: The Professional Modes 89 Figure 4.7 A large aperture created a blurry background, so all the emphasis was left on the subjects. ISO 3200 • 1/125 sec. • f/1.4 • 50mm lens Figure 4.8 The smaller aperture setting brings sharpness to near and far objects. ISO 100 • 1/15 sec. • f/11 • 45mm lens Figure 4.9 A small aperture was used to capture the smiling faces of my bees as they emerged from the hive. ISO 4000 • 1/320 sec. • f/8 • 400mm lens 4: The Professional Modes 91 Figure 4.10 I typically like to use smaller apertures for architectural shots to keep everything in focus. ISO 200 • 1/10 sec. • f/11 • 40mm lens So we have established that Aperture Priority (A) mode is highly useful in controlling the depth of field in your image. But it’s also pivotal in determining the limits of available light that you can shoot in. Different lenses have different maximum apertures. The larger the maximum aperture, or f-stop, the less light you need to achieve an acceptably sharp image. You will recall that, when in Shutter Priority mode, there is a limit at which you can handhold your camera without introducing movement or hand shake, which causes blurriness in the final picture. If your lens has a larger aperture, then you can let in more light all at once, which means that you can use faster shutter speeds. This is why lenses with large maximum apertures, such as f/1.4, are called “fast” lenses. On the other hand, bright scenes require the use of a small aperture (such as f/16 or f/22), especially if you want to use a slower shutter speed (Figure 4.11). That small opening reduces the amount of incoming light, and this reduction of light requires that the shutter stay open longer. Figure 4.11 A wide-angle lens combined with a small aperture added to the depth of field. It also created the need for a long shutter speed, which helped add fluidity to the falling water. ISO 100 • 1/20 sec. • f/22 • 24mm lens 4: The Professional Modes 93 F-stops and aperture When referring to the numeric value of your lens aperture, you will find it described as an f-stop. The f-stop is one of those old photography terms that, technically speaking, relates to the focal length of the lens (e.g., 200mm) divided by the effective aperture diameter. These measurements are defined as “stops” and work incrementally with your shutter speed to determine proper exposure. Older camera lenses used one-stop increments to assist in exposure adjustments, such as 1.4, 2, 2.8, 4, 5.6, 8, 11, 16, and 22. Each stop represents about half the amount of light entering the lens iris as the larger stop before it. Today, most lenses don’t have f-stop markings, since all adjustments to this setting are performed via the camera’s electronics. The stops are also now typically divided into 1/3-stop increments to allow much finer adjustments to exposures, as well as to match the incremental values of your camera’s ISO settings, which are adjusted in 1/3-stop increments as well. Setting up and shooting in Aperture Priority mode 1. Turn your camera on. Press the Mode dial release lock, and turn the Mode dial to align the A with the indicator line. 2. Set your ISO by pressing the ISO button; select the appropriate setting by looking at the ISO readout on the control panel or by looking at the info display on the rear LCD monitor. 3. Once your ISO is set, point the camera at your subject and then activate the camera meter by depressing the shutter button halfway. 4. View the exposure information in the bottom area of the viewfinder or in the control panel. 5. While the meter is activated, use your index finger to roll the Sub-command dial left and right to see the changed exposure values. Roll the dial to the right for a smaller aperture (higher f-stop number) and to the left for a larger aperture (smaller f-stop number). n Zoom lenses and maximum apertures Some zoom lenses (like the 24–85mm lens) have a variable maximum aperture. This means that the largest opening will change depending on the zoom setting. In the example of the 24–85mm zoom, the lens has a maximum aperture of f/3.5 at 25mm and only f/4.5 when the lens is zoomed out to 85mm. 94 N i k o n D 7 5 0 : F r o m S n a p s h o t s t o G r e at S h o t s M: Manual Mode Once upon a time, long before digital cameras and program modes, there was manual mode. Only in those days it wasn’t called “manual mode,” because there were no other modes. It was just photography. In fact, many photogra- phers cut their teeth on completely manual cameras. Let’s face it—if you want to learn the effects of aperture and shutter speed on your photography, there is no better way to learn than by setting these adjustments yourself. However, today, with the advancement of camera technology, many new photographers never give this mode a second thought. That’s truly a shame, as it is not only an excellent way to learn your photography basics, it’s also an essential tool to have in your photographic bag of tricks. When you have your camera set to Manual (M) mode, the camera meter will give you a reading of the scene you are photographing, but it’s your job to actually set both the f-stop (aperture) and the shutter speed to achieve a correct exposure. If you need a faster shutter speed, you will have to make the reciprocal change to your f-stop. Using any other mode, such as Shutter or Aperture Priority, would mean that you just have to worry about one of these changes, but Manual mode requires you to do it all yourself. This can be a little challenging at first, but after a while you will have a complete understanding of how each change affects your exposure, which will in turn improve the way that you use the other modes. When to use Manual mode • When learning how each exposure element interacts with the others (Figure 4.12) • When shooting silhouetted subjects, which requires overriding the camera’s meter readings (Figure 4.13) • When your environment is fooling your light meter and you need to maintain a certain exposure setting (Figure 4.14) 4: The Professional Modes 95 Figure 4.12 The camera was set to Manual so I could expose properly for the bright lights while still using a slow enough shutter to enhance the feeling of motion that exists in Times Square. ISO 100 • 0.6 sec. • f/22 • 80mm lens Figure 4.13 I used the spot meter on the bright background and adjusted exposure manually to put the subject into silhouette. ISO 200 • 1/80 sec. • f/8 • 200mm lens Figure 4.14 Beaches and snow are always a challenge for light meters. Add to that the desire to have exact control of depth of field and shutter speed, and you have a perfect scenario for Manual mode. ISO 100 • 2 sec. • f/8 • 40mm lens 4: The Professional Modes 97 Setting up and shooting in Manual mode 1. Turn your camera on. Press the Mode dial release lock, and turn the Mode dial to align the M with the indicator line. 2. Set your ISO by pressing the ISO button; select the appropriate setting by looking at the ISO readout on the control panel or by looking at the info display on the rear LCD monitor. 3. Point the camera at your subject, and then activate the camera meter by depressing the shutter button halfway. 4. View the exposure information in the bottom area of the viewfinder or by pressing the info button on the back of the camera and looking at the info display on the rear LCD monitor. Figure 4.15 Use the over/under scale to find your exposure settings. 5. While the meter is activated, use your index finger to roll the Main Command dial left and right to change your shutter speed value until the exposure mark is lined up with the zero mark. The exposure information is displayed in the viewfinder, and on the rear LCD after pressing the info button (Figure 4.15), by a scale with marks that run from –3 to +3 stops. A proper exposure will line up with the taller mark in the middle. As the indicator moves to the left, it is a sign that you will be underexposing (not enough light on the sensor to provide adequate exposure). Move the indicator to the right and you will be providing more exposure than the camera meter calls for; this is overexposure. 6. To set your exposure using the aperture, depress the shutter release button until the meter is activated. Then rotate the Sub-command dial to change the aperture. Rotate right for a smaller aperture (large f-stop number) and left for a larger aperture (small f-stop number). n 98 N i k o n D 7 5 0 : F r o m S n a p s h o t s t o G r e at S h o t s User Settings Mode—Saving Your Favorite Settings to the Mode Dial The User Settings mode is a great feature if you’re looking to have your favorite settings at the touch of a dial. These are located on the dial as U1 and U2. If you have a favorite group of settings that you find you are using often and want to have them close at hand, then these modes are for you. A B 1. Set the camera to your favorite settings (under any of the semi-automatic modes or Manual mode), adjusting aperture, shutter speed, ISO, flash, focus point, metering, and/or bracketing. C 2. Go to the setup menu, and highlight Save user settings (A). 3. Highlight Save to U1 or Save to U2 (B), then press OK to save your settings (C). 4. When you want to use those settings again, just rotate the top dial to U1 or U2, and the camera will choose your saved settings so that you’re ready to go. n I find it useful to set up one user setting for Aperture Priority mode with bracketing turned on and ISO set to 100 (I find it too easy to forget that I have bracketing enabled), and to configure the other user setting for Shutter Priority mode with Auto ISO sensitivity enabled for times when freezing fast action is more important than ISO setting (and I also find it easy to forget I have Auto ISO sensitivity enabled). This makes it simple for me to jump right to those settings, but also to jump out again. 4: The Professional Modes 99 Customizing My Menu A An awesome characteristic of the D750 is how many aspects can be customized to suit your shooting needs. One of those is the My Menu screen. This is for menu items that you want to make available with fewer clicks. You can add up to 20 items from the Playback, Photo Shooting, Movie Shooting, Custom Settings, Setup, and Retouch menus. In Chapter 2, I mentioned that I add the Clean image sensor function to mine for easy sensor cleaning, but a few others I like to add are Self-timer, Remote Control B mode, Set Picture Control, Image Review, and Battery Info. What works for me may not work for you, but that is the beauty of customization. 1. Press the Menu button, scroll down to the My Menu screen, and highlight Add items (A). 2. Press OK to go to the Add items screen, and highlight the menu section containing the item you want to add to My Menu (B). 3. Press OK to see the available menu choices from that section, and then highlight the one you want to add to My Menu (C). C 4. Press OK to add the item, and use the Multiselector to choose the position for that item in the list (D). Press OK to commit the change. n D 100 N i k o n D 7 5 0 : F r o m S n a p s h o t s t o G r e at S h o t s You can remove and reorder items over time, which is bound to happen as you get more familiar with the camera and your needs change. To make that menu even handier, I assigned the Preview button to display My Menu when pressed. A B 1. Press the Menu button, scroll down to the Custom Settings menu, and highlight f Controls (A). 2. Press OK, then highlight f3 Assign preview button (B). C D 3. Press OK, then with Press highlighted (C), press the Multi-selector to the right to access its options. 4. With My Menu selected, press OK to commit the change (D). n 4: The Professional Modes 101 How I Shoot: A Closer Look at the Camera Settings I Use The great thing about working with a DSLR camera is that I can always feel confident that some things will remain unchanged from camera to camera. For me, these are the Aperture Priority (A), Manual (M), and Shutter Priority (S) shooting modes. Regardless of the subject I am shooting––from landscape to portrait to macro––I am almost always going to be concerned with my depth of field. Whether it’s isolating my subject with a large aperture or trying to maximize the overall sharpness of a sweeping landscape, I always keep an eye on my aperture setting, which makes Aperture Priority my default mode. If I do need to control the action, I use Shutter Priority. If I am trying to create a silky waterfall effect, I can depend on Shutter Priority mode to provide the long shutter speed to get the desired result. Or, perhaps I am shooting a sporting event; I definitely need fast shutter speeds that will freeze the fast-moving action. For times when I need to control all settings, such as when the situation is more complicated than my camera can handle automatically, I put it in Manual (Figure 4.16). While the other camera modes have their place, I think you will find that, like myself and most other working pros, you will use the Aperture Priority and Shutter Priority modes for 90 percent of your shooting. The other concern that I have when I am setting up my camera is just how low I can keep my ISO. This is always a priority for me, because a low ISO will always give the cleanest image. I only raise the ISO as a last resort, because each increase in sensitivity is an opportunity for more digital noise to enter my image. To that end, I always have the High ISO Noise Reduction feature turned on when shooting in JPEG mode (I use Lightroom to deal with high ISO noise in raw format). To make quick changes while I shoot, I often use exposure compensation so that I can make small over- and underexposure changes. This is different than changing the aperture or shutter because it is more like fooling the camera meter into thinking the scene is brighter or darker than it actually is. To get to this function quickly, I simply press the Exposure Compensation button and then dial in the desired amount of compensation. One of the reasons I change my exposure is to make corrections when I see the blinkies in my rear LCD monitor. (“Blinkies” is not the real name for the highlight clipping warning, just the one most photographers use.) Blinkies are the warning signal that part of my image has been overexposed to the point that I no longer have any detail in the highlights. When the Highlights feature is turned on, the display will flash between black and white whenever there is a potential of overexposing in the image. The black and white flashing will only appear in areas of the picture that are in danger of overexposure. To turn on this feature, go to the Playback menu and enable the feature as follows. 102 N i k o n D 7 5 0 : F r o m S n a p s h o t s t o G r e at S h o t s Figure 4.16 At the landscape photography workshops I teach, we end most days with light painting after the sun goes down. My co-leader Randy was shining a powerful light on Balanced Rock in Arches National Park, while I used a small pocket flashlight on the foreground stones. Manual mode was required. ISO 800 • 30 sec. • f/9 • 14mm lens 1. To set up the highlight warning for your camera, press the Menu button and then use the Multi-selector to access the Playback menu. A B 2. Once in the Playback menu, use the Multi-selector to choose Playback display options, and press OK (A). 3. Move the Multi-selector down to the Highlights option, and then press the OK button to add a checkmark (B). 4. Now move back up to the Done heading, and press the OK button again to lock in your change. n Once the highlight warning is turned on, I use it to check my images on the back of the LCD after taking a shot. If I see an area that is blinking (Figure 4.17), I will usually set the exposure compensation feature to an underexposed setting like –1/3 or –2/3 stops and take another photo, checking the result on the screen. I repeat this process until the warning is gone. Figure 4.17 The blinking black and white areas (shown in this image as black) are a warning that part of the image is overexposed at the current camera settings. 104 N i k o n D 7 5 0 : F r o m S n a p s h o t s t o G r e at S h o t s Sometimes, such as when shooting into the sun, the warning will blink no matter how much you adjust the exposure because there is just no detail in the highlights. Use your best judgment to determine if the warning is alerting you to an area where you want to retain highlight detail. To see the highlight, or “blinkie,” warning, you will need to change your display mode. To do this, press the Playback button on the back of the camera and then press up or down on the Multi-selector button until you see “RGB Highlights” at the bottom of the display screen. This will now be your default display mode unless you change it or turn off the highlight warning. If you really want to nerd out, while in the RGB Highlights view, hold the Zoom Out button and press the Multi-selector to the right to view the clipping on a per-channel basis. With each press, you’ll see the letter representing the channel being viewed blink. Keep pressing to the right to return to the full RGB view. As you work your way through the coming chapters, you will see other tips and tricks I use in my daily photography, but the most important tip I can give is to understand the features of your camera so that you can leverage the technology in a knowledgeable way. This will result in better photographs. 4: The Professional Modes 105 Chapter 4 XXAssignments Assignments This will be more of a mental challenge than anything else, but you should put a lot of work into these lesson assignments because the information covered in this chapter will define how you work with your camera from this point on. Granted, there may be times that you just want to grab some quick pictures and will resort to the Program mode, but to get serious with your photography, you will want to learn the professional modes inside and out. Learning to control time with Shutter Priority mode Find some moving subjects and then set your camera to S mode. Have someone ride a bike back and forth, or even just photograph cars as they go by. Start with a slow shutter speed of around 1/30 of a second, and then start shooting with faster and faster shutter speeds. Keep shooting until you can freeze the action. Now find something that isn’t moving, like a flower, and work your way down from a fast shutter speed like 1/500 of a second. Don’t brace the camera on a steady surface. Just try and shoot as slowly as possible, down to about 1/4 of a second. The point is to see how well you can handhold your camera before you start introducing hand-shake into the image, making it appear soft and somewhat unfocused. Controlling depth of field with Aperture Priority mode The name of the game with A mode is depth of field. Set up three items at varying distances from you; I would use chess pieces or something similar. Now focus on the middle item and set your camera to the largest aperture that your lens allows (remember, large aperture means a small number, like f/3.5). Now, while still focusing on the middle subject, start shooting with ever-smaller apertures until you are at the smallest f-stop for your lens. If you have a zoom lens, try doing this exercise with the lens at the widest and then the most telephoto settings. Now move up to subjects that are farther away, like telephone poles, and shoot them in the same way. The idea is to get a feel for how each aperture setting affects your depth of field. 106 N i k o n D 7 5 0 : F r o m S n a p s h o t s t o G r e at S h o t s Giving and taking with Manual mode Manual mode is not going to require a lot of work, but you should pay close attention to your results. Go outside on a sunny day and, using the camera in Manual mode, set your ISO to 100, your shutter speed to 1/125 of a second, and your aperture to f/16. Now press your shutter release button to get a meter reading. You should be pretty close to that zero mark. If not, make small adjustments to one of your settings until it hits that mark. Now is where the fun begins. Start moving your shutter speed slower, to 1/60, and then set your aperture to f/22. Now go the other way. Set your aperture on f/8 and your shutter speed to 1/500. Now review your images. If all went well, all the exposures should look the same. This is because you balanced the light with reciprocal changes to the aperture and shutter speed. Now go back to our original setting of 1/125 at f/16 and try just moving the shutter speed without changing the aperture. Just make 1/3-stop changes (1/125 to 1/100 to 1/80 to 1/60), and then review your images to see what a 1/3 stop of overexposure looks like. Then do the same thing going in the opposite way. It’s hard to know if you want to over- or underexpose a scene until you have actually done it and seen the results. With each of the assignments, make sure that you keep track of your modes and exposures so that you can compare them with the image. If you are using software to review your images, you should also be able to check the camera settings that are embedded within the image’s metadata. Share your results with the book’s Flickr group! Join the group here: www.flickr.com/groups/nikond750_fromsnapshotstogreatshots 4: The Professional Modes 107 Index 3D-tracking AF mode, 124 12- or 14-bit raw images, 36 A about this book, ix–xi accessories, 275–293 camera bags, 289–290 cleaning tools, 290–291 diffusers, 289 filters, 276–282, 285–287 hot-shoe flashes, 287–288 LCD viewing, 264 macro photography, 284–287 remote or cable release, 283–284 tripods, 282–283 video-specific, 263–265 action photography, 109–133 3D-tracking mode for, 124 annotated example of, 110–111 assignments on shooting, 132–133 automatic mode for, 62, 64 composing shots in, 128–131 continuous shooting mode for, 126–127 conveying motion in, 127–128 depth of field in, 118–119 factors to consider for, 112–115 focus modes for, 122–125 freezing motion in, 85, 112 ISO settings and, 115, 117, 120–122 isolating subjects in, 118–119 manual focus for, 124–125 portraits as, 153, 154 shutter speed and, 85, 102, 112–115 techniques for shooting, 127–131 See also motion Active D-Lighting feature, 75, 243–244, 251 Adams, Ansel, 179 310 N i k o n D 7 5 0 : F r o m S n a p s h o t s t o G r e at S h o t s additive color, 11 Adobe RGB color space, 10–11 AE Lock feature, 142, 144, 232 AF-A focus mode, 76 AF-area modes, 14, 123, 260 AF-assist Illuminator, 209 AF-C focus mode, 76, 122–123 AF-F focus mode, 261 AF-mode button, 14 AF-S focus mode, 13, 14, 76, 144, 146 air blowers, 291 Aperture Priority (A) mode, 89–94 assignment on using, 106 close-up photography and, 89, 91, 250 flash sync speeds in, 212 HDR photography and, 239 isolating subjects using, 118–119 landscape photography and, 89, 90, 182, 185 photo examples using, 90, 91, 92, 93 portrait photography and, 89, 90, 138 setting up and shooting in, 94 situations for using, 89–93, 102 aperture settings depth of field and, 48, 49, 89, 93, 102 exposure and, 44, 45–46 f-stops and, 94 landscape photography and, 90, 185 light levels and, 93 Live View feature and, 265–266 portrait photography and, 138–139 prioritizing, 89–94 zoom lenses and, 42, 94 architectural photography, 89, 92 audio recording, 257–259, 270 Auto Cleaning feature, 34, 35 auto exposure bracketing function, 238, 240 Auto Exposure Lock (AE-L) feature, 142, 144, 232 Auto ISO sensitivity control, 120–122 Auto ISO setting, 12, 13 Auto mode, 56–57, 77 Auto white balance setting, 8 autofocus modes. See focus modes automatic modes, 53–77 assignments on using, 77 Auto mode, 56–57 Child mode, 62, 63 Close Up mode, 65 effects modes, 70–74 Flash Off mode, 57–58 Landscape mode, 61 limitations of, 75–76 Night Portrait mode, 66 Portrait mode, 59–60, 138 Program mode vs., 82 scene modes, 59–70 Sports mode, 62, 64 See also professional modes auto-off timers, 17, 18 Autumn Colors scene mode, 70 B backgrounds blurring, 118–119, 138, 139 isolating subjects from, 118–119 portrait, 138, 139, 158, 159 back-of-camera features, 3 backup battery, 5 ball heads for tripods, 282 battery, charging, 5 Beach/Snow scene mode, 67 black and white images landscapes as, 179–180 portraits as, 147–149 blinkies, 102, 104–105, 177, 187 Blossom scene mode, 69 blur background, 118–119, 138, 139 motion, 46, 48, 86, 128, 129, 133 bonus chapter on composition, xi bracketing exposures, 75, 237–238, 240, 244 brightness, 22, 188 buffer, camera, 127 built-in flash. See pop-up flash Bulb setting, 232–234, 251 bull’s-eye composition, 188 burst shooting mode, 126–127 C camera bags, 289–290 camera shake, 58, 168, 204, 224 camera stabilizers, 264 Candlelight mode, 69 catchlight, 151 Center-weighted metering mode, 141, 142, 143 charging the battery, 5 Child mode, 62, 63 child photography, 62, 63, 161 Clean Now feature, 34, 35 cleaning the sensor, 34–35, 51 clipping, 22 Close Up mode, 65, 77 close-up filters, 285–287 close-up photography, 250 accessories for, 284–287 annotated example of, 54–55 Aperture Priority mode for, 89, 91, 250 assignment on shooting, 251 automatic mode for, 65 clouds in photos, 29, 181 Cloudy setting, 8 CMYK colors, 10 color additive vs. subtractive, 11 viewing in photographs, 188 warm vs. cool, 10, 181 Color Sketch effect, 72 color space settings, 10–11 color temperature, 10, 181 color theory, 11 Command dial, 59, 71, 83, 84 commander function, 222–223 composition action photo, 128–131 bonus chapter on, xi creating depth through, 191–192 elements related to, 188, 189 grid overlay for, 191 landscape, 188–192 portrait, 153, 155–162 rule of thirds, 188–190, 193 continuous shooting mode, 126–127, 240 Continuous-servo (AF-C) mode, 122–123 cool colors, 10, 181 Creating DSLR Video: From Snapshots to Great Shots (Harrington), 272 Creative Lighting System (CLS), 222, 223 crop-sensor lenses, 292 Custom Setting menu, 142, 191 customizing menus, 100–101 D Daylight setting, 172 deleting images, 21 depth, creating, 191–192 depth of field action photography and, 118–119 aperture settings and, 48, 49, 89, 93, 102 close-up photography and, 250 landscape photography and, 182–183, 193 lens focal length and, 193 portrait photography and, 138–139, 163 telephoto lenses and, 42 video recording and, 254, 265–266, 273 wide-angle lenses and, 40 diffusers, 289 diopter adjustment, 14 Direct Sunlight setting, 8 direction of travel, 112, 113 display modes, 19–21 display screen. See LCD display distance flash range and, 212 hyper focal, 182–183, 193 subject-to-camera, 114–115 distortion, 139 drive modes, 125 dual image formats, 37–38 Dusk/Dawn scene mode, 68 DX (crop-sensor) lenses, 292 Dynamic-area AF mode, 123, 124 dynamic range, 36, 239 E editing video, 271 effects modes, 70–74 Color Sketch effect, 72 High Key effect, 74 Low Key effect, 74 Miniature effect, 72 Night Vision effect, 71, 202–203 Selective Color effect, 73 Silhouette effect, 73 See also scene modes environmental portraits, 138–140 exposure, 44–46 calculating, 45–46 factors of, 44–45 histograms and, 22–23 long, 86, 87, 171, 210–211, 232–234 previewing, 176–177 reciprocal settings for, 45–46 exposure bracketing, 75, 237–238, 240, 244 exposure compensation feature, 102 automatic modes and, 75 flash adjustments and, 288 highlight warning and, 104, 177 landscape photography and, 177–179, 187 portrait photography and, 142 steps for using, 179 Exposure Delay mode, 206–207 Exposure Preview feature, 176–177 exposure triangle, 44–45 exposure value (EV), 44 extension tubes, 284–285 external flash, 221–223 eyes catchlight in, 151 focusing on, 144, 145, 146 red-eye reduction, 216–217 F Face Priority mode, 150 faces action conveyed in, 131 detecting with Live View, 150 fast lenses, 93 fill flash, 151–152 Ind e x 311 filters, 276–282 close-up, 285–287 graduated ND, 281–282 Monochrome picture control, 148, 179–180 neutral density, 187, 279–280 polarizing, 187, 276–279 skylight, 276 fireworks, 232, 233 firmware updates, 32–33, 51 flash disabling, 57–58, 220 exposure compensation for, 288 external, 221–223 fill, 151–152 hot-shoe, 8, 287–288 manual power mode, 213–214 metering modes for, 213–214 pop-up, 211–214, 223 range/distance, 212 Rear Curtain Sync mode, 218–219 red-eye reduction, 216–217 reflections from, 220, 221 shutter speed and, 212, 213 sync modes for, 218, 220 flash compensation feature, 75, 151, 214–216 Flash Off mode, 57–58 flash synchronization changing modes for, 220 Rear Curtain Sync mode, 218–219 shutter speed and, 212, 213 Flash white balance setting, 8 Flickr group for book, 25 flower photography, 228–229, 250 Fluorescent setting, 8, 172, 173 focal lengths, 39–44 focus modes, 14, 76 3D-tracking, 124 AF-A, 76 AF-C, 76, 122–123 AF-F, 261 AF-S, 13, 14, 76, 144, 146 manual, 15, 124–125, 184–185, 207–208 focus points, 13, 14, 123 312 N i k o n D 7 5 0 : F r o m S n a p s h o t s t o G r e at S h o t s focusing for action photography, 122–125 for landscape photography, 182–185 for low-light photography, 207–209 for portraits, 144–146 for video recording, 260–261, 273 focusing system, 13–14, 207 Food scene mode, 70 formatting memory cards, 31–32, 51 frame rate for video, 256 framing action shots, 129 portraits, 153, 155, 157, 160, 161 Framing Guides mode, 261, 262 freezing motion, 46, 47, 85, 112 Front Curtain Sync mode, 218 front-of-camera features, 2 f-stops, 44, 45–46, 94 See also aperture settings G glass reflections, 220, 221 golden light, 181–182 graduated ND filter, 281–282 grid overlay, 191, 193 H hand portraits, 162 handheld photography, 58, 204, 224 HDMI cable connection, 264–265, 271 headphone jack, 258 Hess, Alan, 223 high-definition video, 255 high dynamic range (HDR) images, 239–243 assignment on shooting, 251 bracketing exposures for, 240 in-camera function for, 241–243 setting up for shooting, 239–240 High ISO Noise Reduction feature, 102, 198, 200, 224 High Key effect, 74 high-key images, 74, 178 Highlight Alert feature, 102, 104–105, 177, 187 highlights overexposure warning for, 102, 104–105, 177, 187 regaining detail in, 179 Highlights display mode, 20, 177 Highlight-weighted metering mode, 141 histograms, 22–23, 177, 261, 262 horizon line, 188, 190, 193 hot-shoe flashes, 8, 287–288 hyper focal distance (HFD), 182–183, 193 I i button, 262–263 image formats dual, 37–38 exploring, 51 JPEG, 6–7, 35–36 raw, 36–37 image-quality settings, 6–7 image resolution, 36 image review features. See reviewing photos Incandescent setting, 8 Information On/Off modes, 261, 262 interval timer, 247–249 Introduction to the Nikon Creative Lighting System, An (Hess), 223 ISO sensitivity auto control, 120–122 ISO settings action photos and, 115, 117, 120–122 Auto option, 12, 13 changing on the fly, 118 expanded settings, 201–202, 224 explanation of, 12 exposure and, 44, 45–46 flash range and, 212 landscape photos and, 170–171 low-light photos and, 198–202 noise and, 13, 64, 170–171, 198, 202 prioritizing, 82–83, 102 sensitivity control feature, 120–122 starting points for, 83 steps for selecting, 12–13 J JPEG file format explained, 6, 35–36 quality settings, 6–7 Raw+JPEG option, 37–38 reasons for using, 35 K Kelvin temperature scale, 10 Kelvin white balance setting, 8 L Landscape mode, 61, 77 landscape photography, 165–193 annotated examples of, 80–81, 166–167 aperture settings and, 90, 182 assignments on shooting, 193 automatic mode for, 61 black and white, 179–180 clouds in, 29, 181 composition in, 188–192 exposure compensation for, 177–179, 187 focusing for, 182–185 golden light in, 181–182 hyper focal distance for, 182–183, 193 ISO settings for, 170–171 manual focus for, 184–185 nighttime, 67 noise reduction for, 171–172 panoramas and, 245–247 picture control for, 174–175 tripods used for, 168–169, 182, 185 waterfall shots in, 185–187 white balance settings for, 172–174 Landscape picture control, 61, 174–175 LCD display accessories for, 264, 291 reviewing photos in, 19–23, 25 reviewing videos in, 271 zooming in on, 116 lens cloth, 290 lens flare, 235 lenses, 39–44 assignment on exploring, 51 compatible with D750, 292 DX (crop-sensor), 292 how they work, 39 normal, 40–41 portrait, 60, 156 rental of, 292 telephoto, 42, 43 Vibration Reduction, 58, 169, 204 video recording and, 254 wide-angle, 39–40 zoom, 42, 94 LensPen, 290–291 light meters, 95, 97, 141 lighting Active D-Lighting feature and, 75, 243–244 red-eye reduction and, 216 See also flash; low-light photography; sunlight lightning storms, 234 Live View feature, 76 aperture settings and, 265–266 Exposure Preview and, 176–177 Face Priority mode, 150 picture controls and, 175 video recording and, 254–255, 261, 262 white balance settings and, 174 Long Exposure Noise Reduction, 171–172, 210, 234 long exposures Bulb setting for, 232–234 low-light photography and, 210–211, 225 noise reduction for, 171–172, 210, 234 Shutter Priority mode for, 86, 87 lossy compression, 6 Low Key effect, 74 low-key images, 74, 178 low-light photography, 195–225 annotated example of, 196–197 assignments on shooting, 224–225 disabling the flash for, 220 eliminating flash reflections in, 220, 221 Exposure Delay mode for, 206–207 external flash for, 221–223 flash compensation for, 214–216 focusing for, 207–209 ISO settings for, 83, 198–202 long exposures for, 210–211, 232–234 manual focus mode for, 207–208 noise reduction for, 198, 200, 210 pop-up flash for, 211–214 Rear Curtain Sync mode for, 218–219 red-eye reduction in, 216–217 self-timer mode for, 205–206 Vibration Reduction lenses for, 204 See also nighttime photography luminance, 22 M macro photography. See close-up photography Manual flash mode, 213–214 manual focus mode anticipated action and, 124–125, 132 low-light photography and, 207–208 recomposing shots using, 184–185 setting the camera to, 15, 25, 125 video recording and, 261, 273 Manual (M) mode, 95–98, 232 assignment on using, 107 Bulb setting in, 232–234 flash sync speeds in, 212 photo examples using, 96, 97 setting up and shooting in, 98 situations for using, 95–97, 102, 103, 131, 232 Matrix metering mode, 75, 141, 142 MC-DC2 remote release cord, 234, 283 megapixels (MP), 36 memory cards, 30–32 choosing, 30 formatting, 31–32, 51 Ind e x 313 memory cards (continued) roles for multiple, 38 safeguard against missing, 15–16 updating firmware from, 33 video recording and, 259–260, 270 menu customization, 100–101 metering modes, 141–142, 163 Center-weighted, 141, 142, 143 Highlight-weighted, 141 Manual flash, 213–214 Matrix, 75, 141, 142 Spot, 141, 230–232 TTL, 213 microphones, 257, 270 Miniature effect, 72 mini-HDMI cable, 264–265 ML-L3 wireless remote, 234, 283 Mode dial, 56, 57, 59, 71, 79, 99 Monochrome picture control, 147–149, 163, 179–180 motion assignments on shooting, 132–133 automatic mode for, 62, 64 blurring, 46, 48, 86, 128, 129, 133 continuous shooting mode for, 126–127 conveying a sense of, 86, 127–128 focus modes for, 122–125 freezing, 46, 47, 85, 112 panning, 127–128, 133 shutter speed and, 46–48, 112–115 techniques for shooting, 127–131 See also action photography Movie Shooting menu, 258 Movie-record button, 254, 255 multiple-image panoramas, 245–247 My Menu screen, 100–101 N natural light, 163 neutral density (ND) filter, 187, 279–280 Night Landscape mode, 67 Night Portrait mode, 66 Night Vision effect, 71, 202–203 314 N i k o n D 7 5 0 : F r o m S n a p s h o t s t o G r e at S h o t s nighttime photography Manual mode for, 232–234 Night Vision effect for, 71, 202–203 scene modes for, 66, 67 See also low-light photography Nikon D750 camera accessories, 275–293 features illustration, 2–4 firmware updates, 32–33 setting up, 5–25 Nikon Speedlights, 221, 222, 287–288 Nikon ViewNX software, 37 Nikon website, 32, 33 noise in images file size related to, 201 ISO setting and, 13, 64, 170–171, 198, 202 long exposures and, 171–172, 210 Noise Reduction features High ISO Noise Reduction, 102, 198, 200, 224 Long Exposure Noise Reduction, 171–172, 210, 234 normal lenses, 40–41 O OK button, 116 online bonus chapter, xi overexposure warning, 102, 104–105, 177, 187 Overview display mode, 19–20 P painting with light, 234 pan heads for tripods, 282 panning, 127–128, 133, 270 panoramas, 245–247 shooting multiple-image, 245, 246, 247 sorting images for, 245 Party/Indoor scene mode, 67 Pet Portrait mode, 69 picture controls auto modes and, 75 Landscape, 61, 174–175 Live View and, 175 Monochrome, 147–149, 163, 179–180 Portrait, 60, 149, 163 raw files and, 176 user manual info on, 174 video recording and, 266–267, 273 pixel resolution, 36 Playback button, 116 Playback display options, 20, 21 Playback menu, 17, 20, 21 polarizing filter, 187, 276–279 pop-up flash, 211–214 assignment on exploring, 225 commander function, 222–223 metering modes, 213–214 sync speeds, 212, 213 See also flash Portrait mode, 59–60, 77, 138 portrait orientation, 157 Portrait picture control, 60, 149, 163 portraits, 135–163 action shots as, 153, 154 AE Lock feature for, 142, 144 annotated example of, 136–137 Aperture Priority mode for, 89, 90, 138 assignments on shooting, 163 automatic mode for, 59–60, 138 backgrounds for, 138, 139, 158, 159 black and white, 147–149 composition of, 153, 155–162 depth of field in, 138–139, 163 environmental, 138–140 Face Priority mode for, 150 fill flash for, 151–152 focusing for, 144–146 framing, 153, 155, 157, 160, 161 lenses used for, 60, 156 metering modes for, 141–142, 143, 163 Night Portrait mode for, 66 Pet Portrait mode for, 69 picture controls for, 147–149, 163 tips for shooting, 153, 155–162 Power Aperture feature, 266 Pre white balance setting, 8 pre-focusing the camera, 124–125 prime lenses, 42 professional modes, 79–107 Aperture Priority mode, 89–94 assignments on using, 106–107 Manual mode, 95–98 Program mode, 82–84 Shutter Priority mode, 85–89 User Settings mode, 99 See also automatic modes Program (P) mode, 82–84 automatic modes vs., 82 flash sync speed in, 212 photo examples using, 84 setting up and shooting in, 84 situations for using, 82–84 progressive video, 256 Q quality settings JPEG format, 6–7 video recording, 255–257 quick-release tripod heads, 283 R raw file format, 36–37 advice on shooting in, 37 HDR images and, 240 picture controls and, 176 Raw+JPEG option, 37–38 reasons for using, 36 Rear Curtain Sync mode, 218–219, 225 reciprocal exposures, 45–46 Red-Eye Reduction feature, 216–217, 225 reflections, flash, 220, 221 remote release cord, 234, 283–284 resolution image, 36 video, 256–257 reviewing photos, 17–23 assignment on, 25 display modes for, 19–21 histograms used for, 22–23 timer settings for, 17, 18 turning on feature for, 17 zooming in for, 116 reviewing recorded videos, 271 RGB colors, 10 RGB Highlights view, 105 RGB histogram display mode, 20, 21 rule of thirds, 188–190, 193 S scene modes, 59–70 Autumn Colors mode, 70 Beach/Snow mode, 67 Blossom mode, 69 Candlelight mode, 69 Child mode, 62, 63 Close Up mode, 65 Dusk/Dawn mode, 68 Food mode, 70 Landscape mode, 61 Night Landscape mode, 67 Night Portrait mode, 66 Party/Indoor mode, 67 Pet Portrait mode, 69 Portrait mode, 59–60 Sports mode, 62, 64 Sunset mode, 68 See also effects modes screen display. See LCD display SD memory cards, 30, 51, 270 SDHC memory cards, 30 Selective Color effect, 73 self-timer mode, 205–206 semiautomatic modes, 86, 89 sensor cleaning, 34–35, 51 Setup menu, 31, 33, 35, 99 Shade setting, 8 sharpening raw images, 36 sharpness of photos, 183, 188 Shooting data display mode, 20, 21 Shooting menu, 38, 121 shooting modes automatic modes, 53–77 effects modes, 70–74 professional modes, 79–107 scene modes, 59–70 Shutter Priority (S) mode, 85–89 action photos and, 85, 102, 115 assignment on using, 106 flash sync speeds in, 212 photo examples using, 85, 86, 87, 88 setting up and shooting in, 89 situations for using, 85–88, 102, 187 shutter speed action photography and, 85, 102, 112–115 exposure and, 44, 45–46 flash synchronization and, 212, 213 handheld photography and, 204, 224 lens limitations and, 86–87 motion and, 46–48, 112–115 prioritizing, 85–89, 115 silky waterfall shots and, 185 slow vs. fast, 85 tripod use and, 168 VR lenses and, 204 Silhouette effect, 73 silhouetted subjects, 95, 96 Single Frame mode, 126 Single-Point AF mode, 123, 124 single-point focusing, 13, 14, 123, 146 skies, exposure compensation for, 177–178 skylight filter, 276 slot empty release lock, 15–16 Slow Sync mode, 218 sound recording, 257–259, 270 speed of subject, 112, 113, 114 Speedlight flashes, 221, 222, 287–288 Sports mode, 62, 64, 77 sports photography. See action photography Spot metering mode, 141, 230–232, 251 setting up and shooting in, 230–231 situations for using, 230 sunrise/sunset photos and, 231–232 sRGB color space, 10, 11 star trail photos, 247, 249 subject-to-camera distance, 114–115 subtractive color, 11 sunlight creative use of, 236 ISO settings and, 83 lens flare from, 235 Ind e x 315 sunlight (continued) portrait photography and, 158, 159, 163 white balance setting for, 8 sunny 16 rule, 45 sunrise/sunset photos, 181, 231–232, 251 Sunset scene mode, 68 TTL metering, 213 TV connections, 264–265, 271 T V tack-sharp images, 183 telephoto lenses, 42, 43 Time mode, 234 time-lapse video, 267–269 timers auto-off, 17, 18 interval timer, 247–249 self-timer, 205–206 tonal range, 22 tonemapping process, 239 top-of-camera features, 4 tripods advice on choosing, 169, 282–283 HDR photography and, 239 landscape photography and, 168–169, 182, 185 macro photography and, 250 multiple-image panoramas and, 245, 247 stability considerations for, 168 video recording and, 255, 263–264 VR lenses and, 169 316 N i k o n D 7 5 0 : F r o m S n a p s h o t s t o G r e at S h o t s U underexposed images, 23, 104 updating the firmware, 32–33, 51 User Settings mode, 99 Vibration Reduction (VR) lenses, 58, 169, 204 video recording, 253–273 accessories for, 263–265 assignments on, 273 book recommendation, 272 depth of field for, 254, 265–266, 273 DSLR lenses for, 254 focusing for, 260–261, 273 Live View mode for, 254–255 memory cards for, 259–260, 270 picture controls for, 266–267, 273 quality settings, 255–257 reviewing/editing videos, 271 sound settings, 257–259, 270 time-lapse feature for, 267–269 tips for improving, 269–270 tripods used for, 255, 263–264 view modes for, 261–263 white balance settings, 267 Virtual Horizon mode, 261, 262 W warm colors, 10, 181 waterfall photography, 86, 87, 88, 185–187 white balance settings, 7–9 assignment on using, 25 automatic modes and, 75 choices available for, 8 color temperature and, 10 landscape photography and, 172–174 Live View feature and, 174 steps for selecting, 9 video recording and, 267 wide-angle lenses, 39–40 depth of field and, 40 distortion caused by, 139 environmental portraits and, 139–140 landscape photography and, 183 situations for using, 40 Wi-Fi feature, 284 wildlife photography, 247 Wireless Mobile Utility (WMU), 284 wireless remote, 234, 283, 284 workshops with author, 293 Z Zoom In/Out buttons, 116 zoom lenses, 42, 94